

Page 1
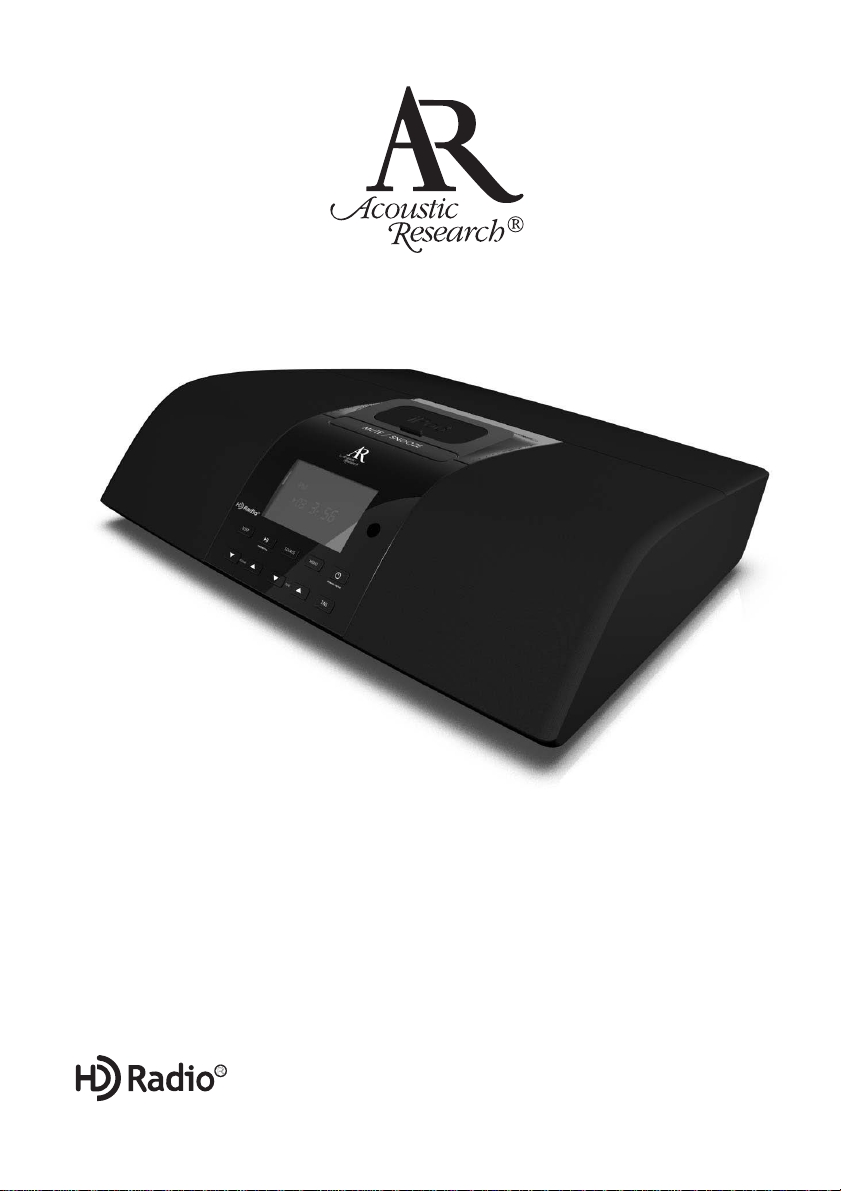
ART7
USER MANUAL
INSTRUCCIONES DEL USUARIO
INSTRUCTIONS D'UTILISATEUR
R
Page 2

Page 3
IMPORTANT SAFETY INSTRUCTIONS
Congratulations on your purchase of the Acoustic Research ART7 Alarm Clock, HD Radio and
iPod docking station. This radio is constructed to provide years of reliable, trouble-free service.
1. Read these instructions.
2. Keep these instructions.
3. Heed all warnings.
4. Follow all instructions.
5. Do not use this apparatus near water.
6. Clean only with a damp cloth.
7. Do not block any of the ventilation openings. Install in accordance with the manufacturer's
instructions.
8. Do not install near any heat sources such as radiators, heat registers, stoves, or other
apparatus including amplifiers that produce heat.
9. Do not defeat the safety purpose of the polarized-type plug. A polarized plug has two blades
with one wider than the other. The wide blade is provided for your safety. When the provided
plug does not fit into your outlet, consult an electrician for replacement of the obsolete outlet.
10. Protect the power cord from being walked on or pinched particularly at plug, convenience
receptacles, and the point where they exit from the apparatus.
11. Only use attachments/accessories specified by the manufacturer.
12. Unplug this apparatus during lighting storms or when unused for long periods of time.
13. Refer all servicing to qualified service personal. Servicing is required when the apparatus has
been damaged in any way, such as when the power-supply cord or plug is damaged, liquid
has been spilled or objects have fallen into the apparatus, the apparatus has been exposed to
rain or moisture, does not operate normally, or has been dropped.
14. Use only with a cart, stand, tripod, bracket, or table specified by the
manufacturer or sold with the apparatus. When a cart is used, use caution
when moving the cart/apparatus combination to avoid injury from tip-over.
15. The apparatus shall not be exposed to dripping or splashing and that no
objects filled with liquids, such as vases, shall be placed on the
apparatus.
16. Do not overload wall outlet. Use only power source as indicated.
1
Page 4

ART7
17. Always leave sufficient space around the product for ventilation. Do not place product in or on
a bed, rug, in a bookcase or cabinet that may prevent air flow through vent openings.
18. Do not place lighted candles, cigarettes, cigars, etc. on the product.
19. Care should be taken so that objects do not fall into the product.
20. The MAINS plug is used as the disconnect device and shall remain readily operable.
21. Where there is more than one connection supplying HAZARDOUS VOLTAGES or
HAZARDOUS ENERGY LEVELS to equipment, a prominent marking, located close to the
entry point provided for a SERVICE PERSON to gain access to the hazardous parts, shall be
provided to indicate which disconnect device or devices isolate the equipment completely and
which disconnect devices can be used to isolate each section of the equipment.
This symbol indicates that this
product incorporates double
insulation between hazardous
mains voltage and user
accessible parts.
WARNING: THE MANUFACTURER IS NOT RESPONSIBLE FOR ANY RADIO OR TV
INTERFERENCE CAUSED BY UNAUTHORIZED MODIFICATIONS TO THIS EQUIPMENT.
SUCH MODIFICATIONS COULD VOID THE USER'S AUTHORITY TO OPERATE THIS
EQUIPMENT.
COMPLIANCE WITH FCC REGULATIONS: This device complies with Part 15 of the FCC Rules.
Operation is subject to the following two conditions:
(1) this device may not cause harmful interference, and (2) this device must accept any
interference received, including interference that may cause undesired operation.
NOTE: This equipment has been tested and found to comply with the limits for a Class B digital
device, pursuant to Part 15 of the FCC Rules. These limits are designed to provide reasonable
protection against harmful interference in a residential installation. This equipment generates, uses
and can radiate radio frequency energy and, if not installed and used in accordance with the
instructions, may cause harmful interference to radio communications. However, there is no
guarantee that interference will not occur in a particular installation. If this equipment does cause
harmful interference to radio or television reception, which can be determined by turning the
equipment off and on, the user is encouraged to try to correct the interference by one or more of
the following measures:
• Reorient or relocate the receiving antenna.
• Increase the separation between the equipment and receiver.
• Connect the equipment into an outlet on a circuit different from that to which the receiver is
connected.
• Consult the dealer or an experienced radio/TV technician for help.
A Class II APPARATUS shall be permanently marked with the words "DOUBLE INSULATION" or
"Double Insulated" and "When servicing use only identical replacement parts."
NOTE: This Class B digital apparatus complies with Canadian ICES-003.
2
Page 5

Important Battery Precautions
• Any battery may present a risk of fire, explosion, or chemical burn if abused. Do not try to
charge a battery that is not intended to be recharged, do not incinerate, and do not puncture.
• Non-rechargeable batteries, such as alkaline batteries, may leak if left in your product for a
long period of time. Remove the batteries from the product if you are not going to use it for a
month or more.
• If your product uses more than one battery, do not mix types and make sure they are inserted
correctly. Mixing types or inserting incorrectly may cause them to leak.
• Discard any leaky or deformed battery immediately. They may cause skin burns or
other personal injury.
• Please help to protect the environment by recycling or disposing of batteries according to
federal, state, and local regulations.
3
Page 6

ART7
PACKAGE CONTENTS
• HD Radio Receiver with iPod Docking Station x 1
• Remote Control x 1
• 3.5mm Stereo Input Cable x 1
• iPod adaptor x 6 (as a pack)
• #3 iPod Mini
• #4 4G iPod & U2 iPod (20 GB)
• #5 4G iPod (40 GB)
• #6 iPod Photo & Color U2 iPod
• #7 iPod Photo, iPod with color display
• #14 iPod Touch
• AM Loop Antenna x 1
• FM Pigtail Antenna x 1
• User Manual x 1
• Product Registration Card x 1
• Music Download Card x 1
4
Page 7

PRODUCT FEATURES
1. HD RadioTM Technology
HD Radio technology is the most technological breakthrough to radio broadcasting since the
introduction of FM radio more than forty-five years ago. HD Radio technology is the standard
for digital FM and AM radio. HD Radio broadcasting offers both FM and AM listeners the
selection, quality and interactive data services consumers expect from other digital technologies, and it's free of charge, all subscription-free.
2. HD Radio Advantages
• CD-quality sound.
• Static/hiss-free, crystal-clear reception.
• HD Radio receivers also gets traditional FM and AM analog broadcasts.
• Multicasting, which broadcasts multiple program streams over a single FM frequency
(103.5-1, 103.5-2, etc.), thereby increasing the amount and diversity of content
selections.
• A variety of "data services" presented in text-based format, such as artist name, song
title, or weather alerts, etc.
To find HD Radio stations in your area, please visit: www.hdradio.com. HD RadioTM Technology Manufactured Under License From iBiquity Digital Corporation. U.S. and Foreign Patents.
The HD and HD Radio logos are proprietary trademarks of iBiquity Digital Corp.
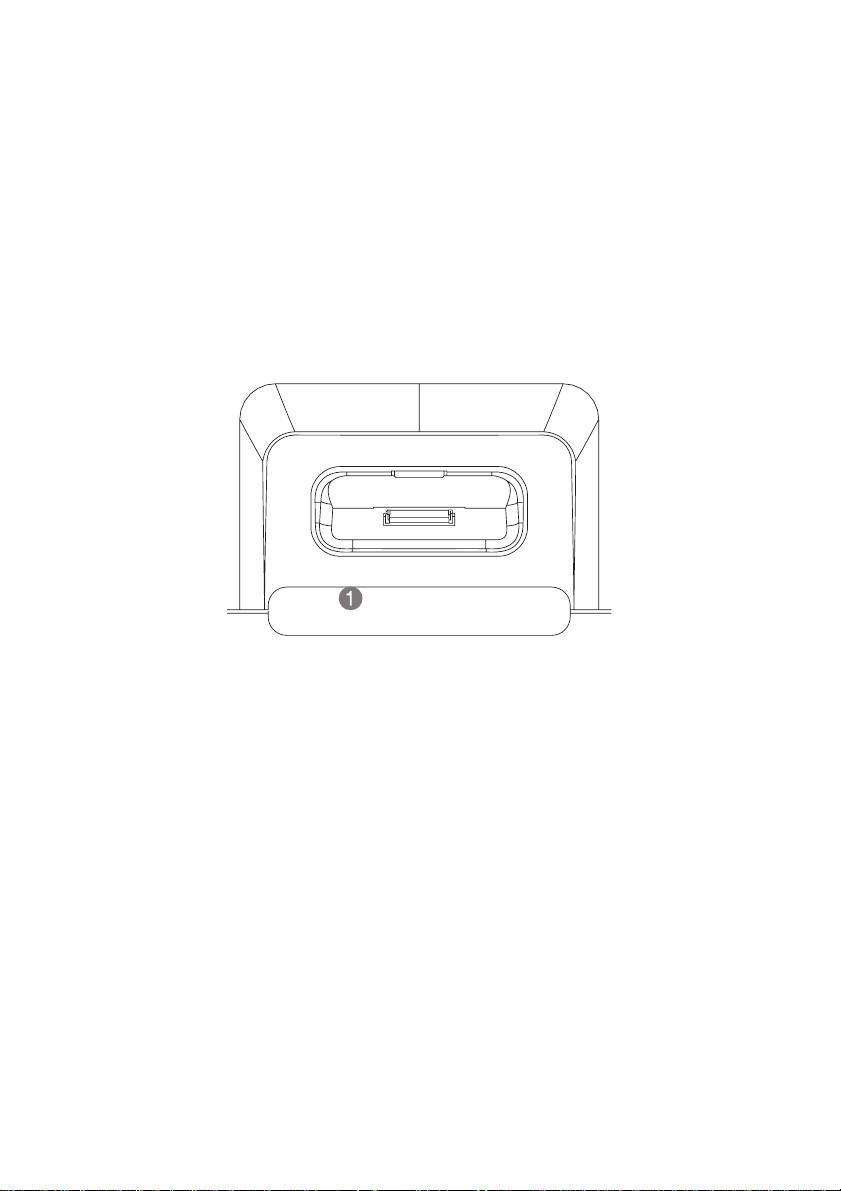
3. iPod Docking
ART7 has a dock for your iPod on the top of the unit and charges your iPod when docked. The
dock provides the latest connectivity, allowing playback for both music and video files. The
dock is directly connected to the Composite output on ART7, so you can link ART7 to a televi-
sion for viewing movies from your iPod. You will see an iPod icon ( ) on the display to show
that an iPod is connected to the ART7.
4. iTunes Tagging
With the simple "tag" button on ART7, you can tag your favorite songs from your local FM HD
Radio station and save them whenever you see the TAG icon ( ) on the display. The
ART7 can tag up to 100 songs, saving the song's info from your HD Radio receiver to your
iPod. The songs will appear in a playlist title "Tagged" in iTunes the next time you sync your
iPod to your computer. You can then choose to purchase and download the tagged songs
from the Apple® iTunes Music Store.
5
Page 8

ART7
COMPATIBILITY CHART
The chart below shows iPod options compatible with the ART7.
Table 1: iPod Compatibility
iPod Audio Playback Video Playback Track Up/Down
Mini* Y N N/A N
4th Gen Video* Y N N/A N
Photo* Y N Y N
Nano Y N N/A N
5th Gen Video Y Y Y Y
2nd Gen Nano Y Y N/A N
3rd Gen Nano
(Video)
Classic Y Y Y Y
Touch Y Y Y N
YYYY
iTunes Tagging
**
*Audio playback on these units works in most cases If you experience problems, please verify that
you have the updated software on your iPod.
**Special Note: iTunes Tagging requires iTunes 7.4 or later. Compatible with 5th Gen Video iPod,
3rd Gen iPod Nano (video) and iPod classic.
© 2007 Apple Inc. All rights reserved. Apple, the Apple logo, iPod, iT unes, and Mac are trademarks
of Apple Inc., registered in the U.S. and other countries. Other product and company names may
be trademarks of their respective companies.
6
Page 9

OVERVIEW OF ART7
Front View
TUNE
MENU
POWER / ENTERFAVORITES
TAG
SLEEP
SOURCE
VOLUME
1. POWER/ENTER:
• Press to turn the power on.
• In the preset menu, press and hold to store the current radio station under the selected
number (1-10). The unit will display "Memory 'Selected No' ".
• In the main menu, press to enter the submenu.
• During menu execution, press to confirm the alarm, preset, clock settings and master
reset.
2. MENU:
Enter the main menu List. The main menu list is as follows:
• ALARM 1 SET
• ALARM 2 SET
• FM PRESETS
• AM PRESETS
• CLOCK SET
• TONE CONTROL
• DISPLAY CONTROL
• SOFTWARE VERSION
• MASTER RESET
From the submenu, press to return to the previous layer.
3. SOURCE:
Select Audio Source (FM/AM/iPod/AUX).
4. Play/Pause/FAVORITES:
• Under iPod mode, press to play/pause a song.
• Under radio mode, press to enter the PRESET submenu and then press again to recall
the highlighted stored station.
5. SLEEP:
Set Timer with 15 minute per tap counting down from 15, 30, 45, or 60.
6. TAG:
When the display shows the “TAG” icon, press to save the current song information into the
ART7 database. You can store up to 100 tags.
7. TUNE /\ (Forward):
• During radio mode, press to increase the radio frequency; press and hold for 2-3
seconds to automatically seek and tune to the next strong radio station. During iPod
mode, press to go to next track; press and hold to fast forward.
• In the main menu and preset list, press to move upward in the list.
• In other submenus, press to increase alarm time, time setting, tone and display control
level.
7
Page 10
ART7
8. TUNE V (Backward):
• During radio mode, press to decrease the radio frequency; press and hold for 2-3
seconds to automatically seek and tune to the previous strong radio station.
• During iPod mode, press to go to previous track; press and hold for fast backward.
• In the main menu and preset list, press to move downward in the list.
• In other submenus, press to decrease alarm time, time setting, tone and display control
9. VOLUME /\ (Up):
10. VOLUME V (Down):
Top View
level.
Increase the volume level and cancel Mute mode.
Decrease the volume level and cancel Mute mode.
MUTE / SNOOZE
1. MUTE / SNOOZE button:
• During Radio/iPod/Aux mode, press to mute audio. Press again to cancel mute.
• When the alarm is sounding, press to snooze the selected alarm source for 7 minutes.
• The 7-minute interval will repeat until the alarm source is turned off by pressing the
POWER button and the unit returns to stand by mode.
• If in standby mode when the alarm sounds, the unit returns to standby; otherwise, the
unit returns to the previous mode.
8
Page 11
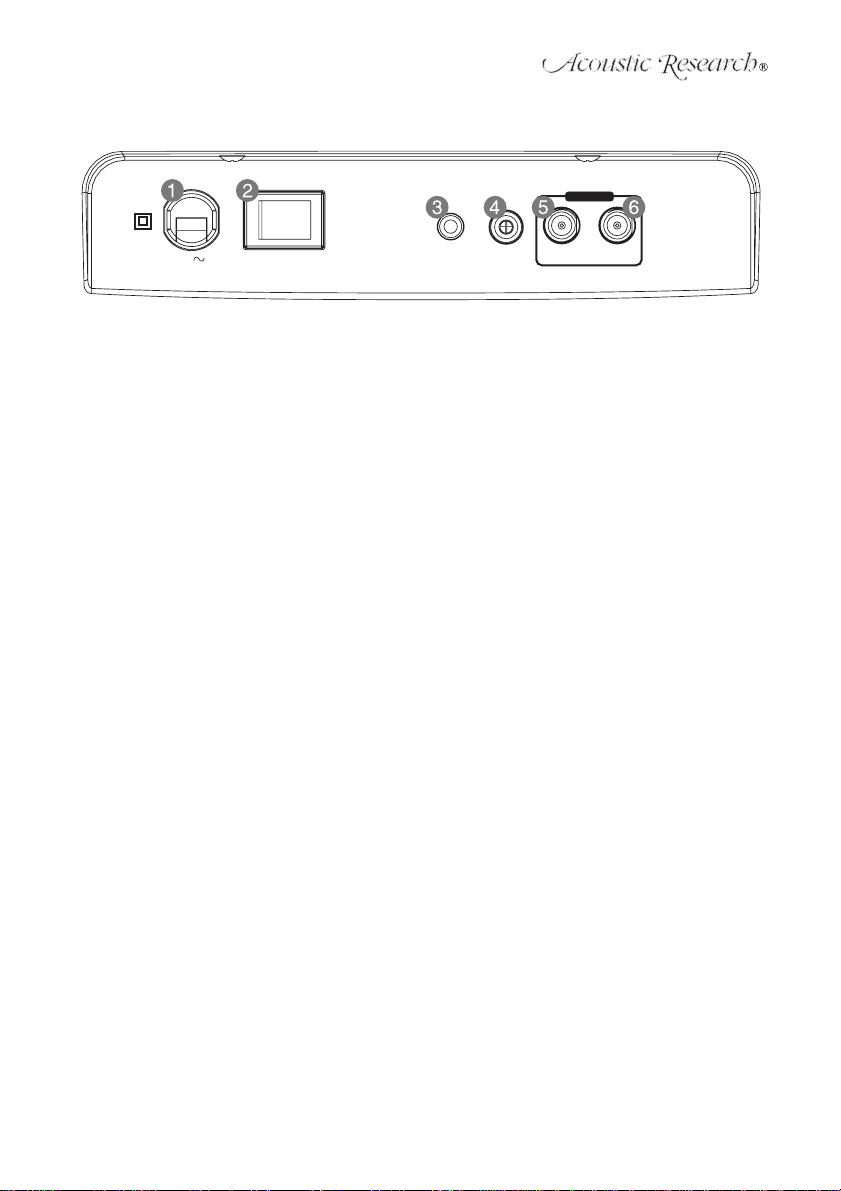
Back View
ANTENNA
120V
60Hz / 25W
POWER
OFF ON
AUX IN VIDEO OUT 75 FM
Ω
AM
1. Power Cable: Connect the power cable to an electric outlet.
2. POWER OFF/ON Mechanical Switch: Press to reboot the system when it fails after improper
operation.
3. AUX IN: Connect with a 3.5mm audio cable to an auxiliary music device.
4. Composite VIDEO OUT: Use to connect iPod to a TV.
5. FM ANTENNA: Connect to FM straight wire pigtail antenna.
6. AM ANTENNA: Connect to AM loop antenna.
9
Page 12
ART7
R
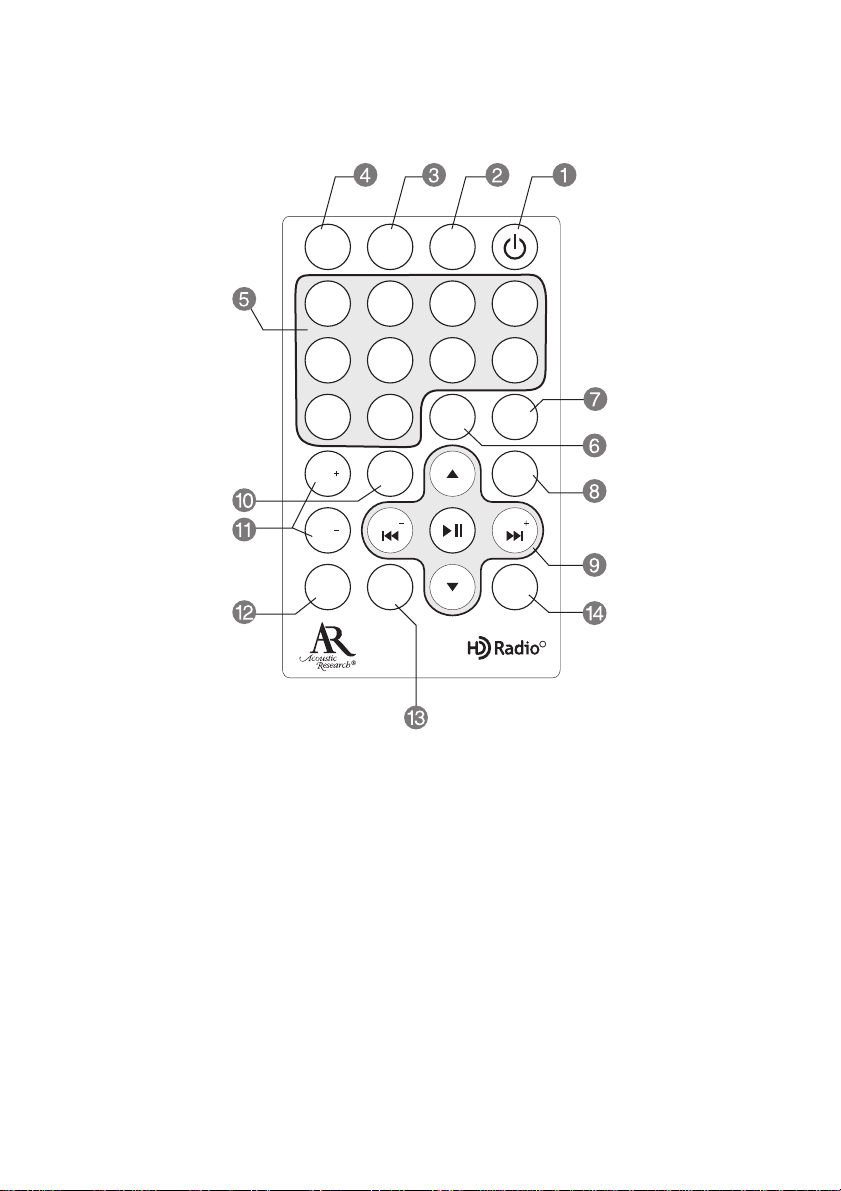
REMOTE CONTROL
Radio Aux iPod
1234
5678
910
VOL
VOL
MUTE
MENU
TUNE
SLEEP
ALARM
iPOD
TAG
iPOD
MENU
TUNE
ENTER
1. Power button: Turn on the power.
2. iPod button: Go to iPod mode.
3. Aux button: Go to Aux mode.
4. Radio button: Toggle between FM and AM mode.
5. Number 1-10 buttons: Press to recall stored preset station; press and hold any number 1-10
button to save the current station to the corresponding preset number. The display will show
"Memory 'Selected No' ".
6. ALARM button: Press for the following commands:
• 1st Press: Alarm 1 on , Alarm 2 off
• 2nd Press: Alarm 1 off, Alarm 2 on
• 3rd Press: Alarm 1 on, Alarm 2 on
• 4th Press: Alarm 1 off, Alarm 2 off
7. iPOD TAG button: When the display shows TAG, press to save the current song information
to the iPod in an iTunes download playlist. You can tag up to 100 songs.
8. iPOD MENU button: Move up a level in the iPod menu.
9. Play/Pause, TUNE + (forward)/TUNE - (backward), and arrow up/down buttons.
• During iPod mode, press the play/pause button to play/pause song playback.
10
Page 13

• Press the TUNE +/- buttons to go to the next/previous track.
• Press and hold the TUNE +/- buttons to fast forward/backward the current track.
• Press the arrow up/down buttons to move up or down in the iPod Menu List.
• During radio mode, press the TUNE +/- buttons to increase/decrease the radio
frequency.
• Press and hold the TUNE +/- buttons for 2-3 seconds to automatically seek the next/
previous strong radio station.
In other modes/settings,
• In the main menu and preset list, press the TUNE +/- buttons to select menu list items.
• In a submenu, press the TUNE +/- buttons to increase/decrease the alarm time, time
setting, tone and display control level.
10. MENU button:
• Enter the Main Menu list.
• When in the submenu, press to go back to the previous layer.
11. VOL +/- Buttons: Increase or decrease volume level.
12. MUTE Button:
• Under Radio/iPod/Aux mode, press to mute the sound during normal operation of any
source. Press again to cancel mute and resume previous audio level.
• When the alarm is set, press to snooze the selected alarm source for 7 minutes. The 7-
minute interval will repeat until the alarm source is turned off by pressing the Power
button and the unit returns to stand by mode.
13. SLEEP button: Set the Sleep Timer in 15 minute intervals per tap, counting from 15, 30, 45, or
60 minutes
14. ENTER button:
• In the Menu, press to enter the submenu.
• In a submenu, press to confirm the alarm, preset, clock settings, and master reset.
11
Page 14
ART7
OPERATION
Place the ART7 on a stable surface such as a table, desk, counter or shelf.
Display
1. Source Display: The selected source, which is "RADIO" in the above image, is always displayed in the top right corner. "FM" is indicated toward the right side of the display. Other indicators include iPod, and AUX.
2. iPod Display: If an iPod is docked, the iPod icon ( ) is appears until you remove the iPod.
3. TAG Display: When listening to an HD Radio station, you can tag a favorite station to store in
a playlist on your iPod for future download through iTunes. If is not displayed, the radio
station has not provided the data necessary to store the song information.
4. Band: The AM or FM radio band indicator is displayed near the top right of the screen when
listing to an AM or FM radio station.
5. HD Logo: The HD indicator is displayed when the station is tuned to an a station broadcasting
an HD Radio signal. HD Radio stations are available for both AM and FM.
6. Signal Strength: The HD Radio signal strength indicator (top right) is displayed when a digital
HD Radio signal is present. If the signal is too weak or the station is not broadcasting in HD
format, the signal strength will not be displayed.
7. Frequency: The station frequency is displayed when receiving an HD Radio broadcast. If
there are additional multicast stations available, the frequency will display a dash followed by
the multicast station number (Example 103.5-1).
8. Station Call Letters or Frequency: The station call letters will be displayed when receiving an
HD Radio broadcast. The station frequency will be displayed if no HD Radio broadcast is
available.
9. Program Data: The ART7 is capable of displaying program associated data, including realtime song titles, artist information and album information, when broadcasted.
10. Time Display: The time is always displayed in the center of the screen.
11. Alarm Display: There are dual alarms settings available. Once the alarm settings are
activated, the alarm information will be displayed in the bottom left corner of the screen.
12
Page 15
USING THE ART7
Table 2: Basic Operation
Item Button Display Setup
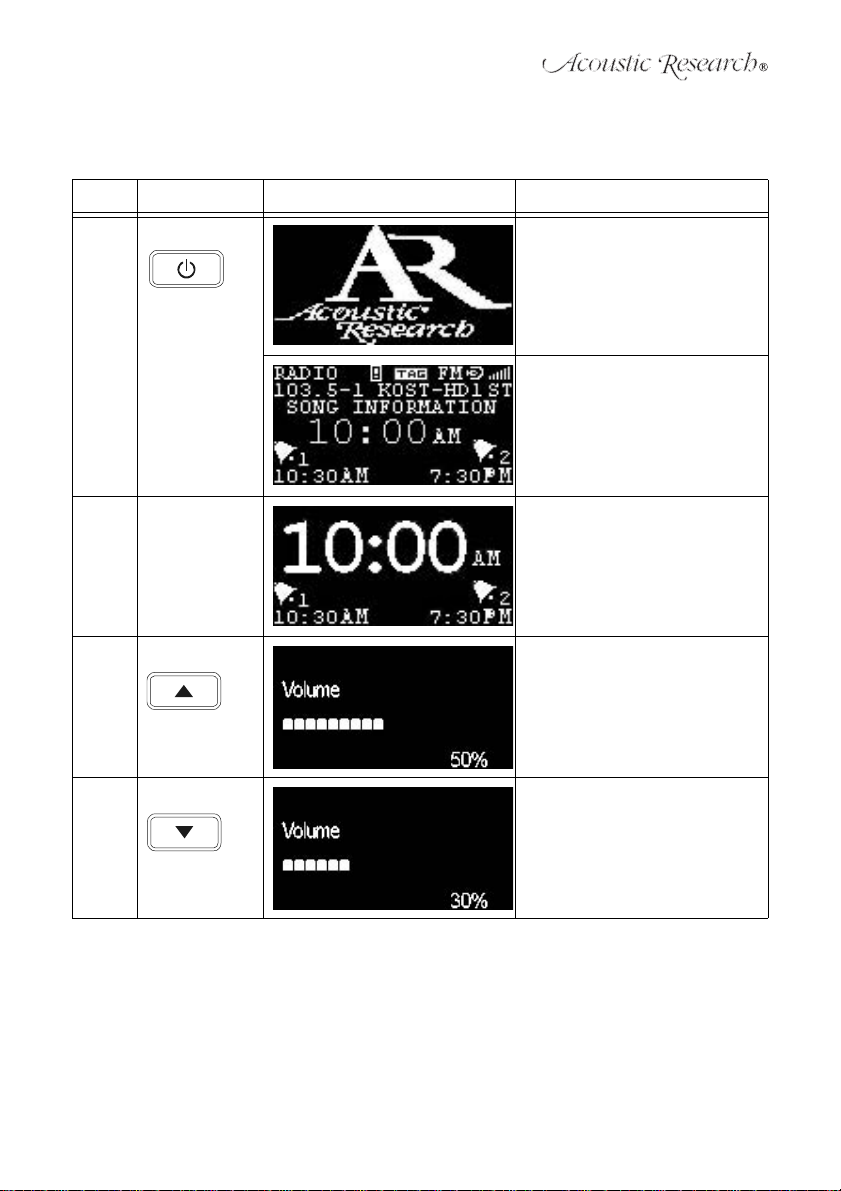
1.1 POWER/ENTER POWER ON:
POWER / ENTER
1. Press POWER/ENTER button to
turn on the ART7.
2. Acoustic Research Logo shown
on the display for 2 seconds.
The ART7 will stay in the last listening
mode (default: FM Mode, 87.5 MHz).
1.2 POWER/ENTER STAND BY MODE:
1.3 VOLUME UP VOLUME UP:
1.4 VOLUME DOWN VOLUME DOWN:
1. The ART7 will show the clock
time on the display.
2. The ART7 alarm function is still
active and the status shows
near the bottom of display.
1. Press the VOLUME /\ button to
adjust the volume between 0%100% (default: 40%).
1. Press the VOLUME V button to
adjust the volume between
100%- 0% (default: 40%).
13
Page 16
ART7
Table 2: Basic Operation
Item Button Display Setup
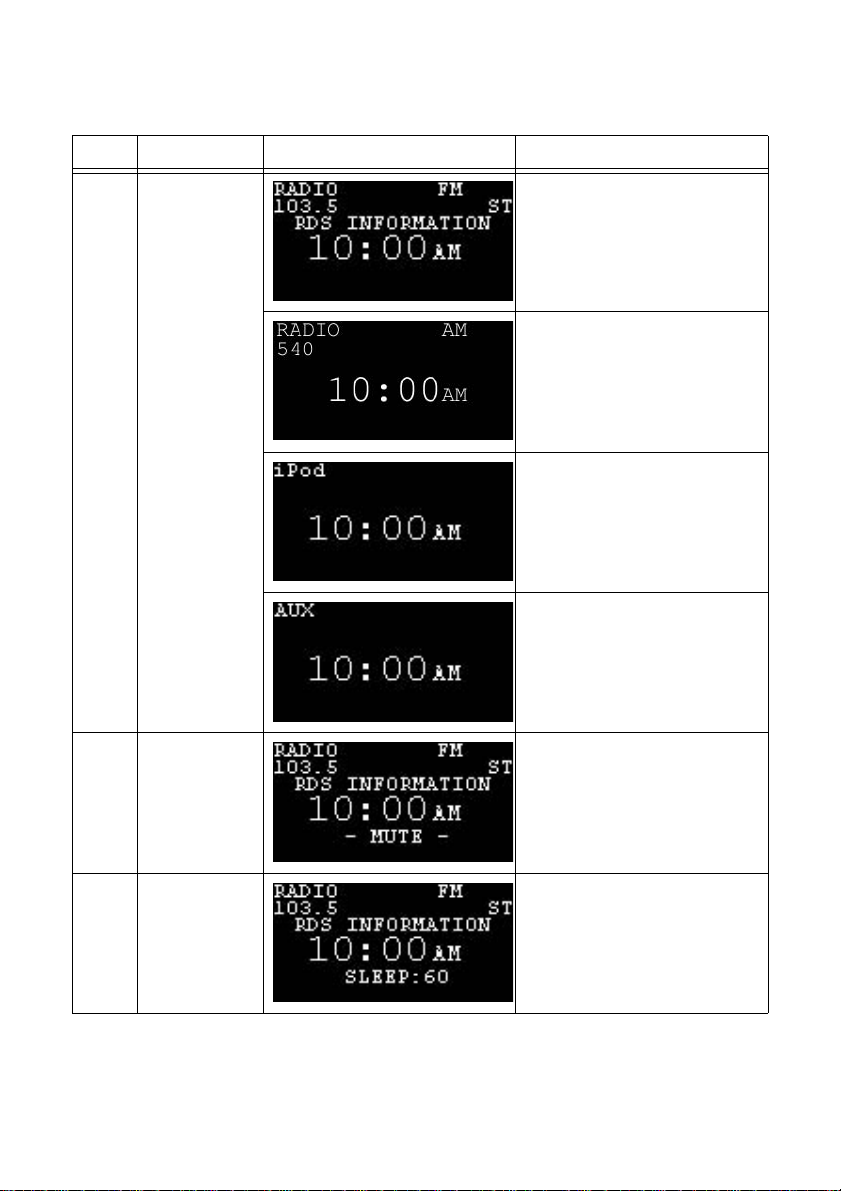
1.5 SOURCE SOURCE SELECTION:
1. Press the SOURCE button to
select Audio Mode.
2. Press SOURCE Button to cycle
through Audio Modes when an
iPod is docked (FM " AM " iPod "
AUX).
3. Press the SOURCE button to
cycle through Audio Modes
when the iPod is not docked
(FM " AM " AUX).
4. Automatically return to FM mode
when iPod is not docked.
1.6 SNOOZE/MUTE SNOOZE:
1.7 SLEEP SLEEP:
1. Press the SNOOZE button to
mute the volume in audio mode
("- MUTE -" blinks on/off).
1. 1. Repeatedly press the SLEEP
button to set the sleep time in 15
minute increments up to 60 minutes (default: 0).
2. The ART7 will enter standby
mode when the sleep timer counts
down to zero.
14
Page 17
Table 3: Audio Mode (Source: FM-AM-iPod-AUX)
Item Button Display Setup
2.1 FM Radio Mode FM RADIO:
(Auto detect HD mode. See “HD
Radio Notes”.)
1. Press the SOURCE button to
choose the FM music source (FM
Frequency: 87.5~108.1 MHz
Step 100KHz).
2. Auto Scanning: Press and hold
the TUNE +/TUNE - button for 2
seconds to automatically seek the
strong station.
3. VOL +/VOL - button: Press to
adjust the volume.
2.2 AM Radio Mode AM RADIO:
2.3 iPod Mode iPod:
2.4 AUX IN Mode AUX:
(Auto detect HD mode. See “HD
Radio Notes”.)
1. Press the SOURCE button to
choose the AM music source (AM
Frequency: 520~1720 KHz Step
10kHz).
2. Auto Scanning: Press and hold
the TUNE +/TUNE - button for 2
seconds to automatically seek the
strong station.
3. VOL +/VOL - button: Press to
adjust the volume.
1. Press the SOURCE button to
choose the iPod music source.
2. PLAY/PAUSE button: Press to
play or pause iPod music.
3. TUNE +/TUNE - button: Press to
access the next/previous iPod
song.
4. TUNE +/TUNE - button: Press and
hold to fast forward/rewind the
song currently playing.
5. VOL +/VOL - button: Press to
adjust the volume.
1. Press the SOURCE button to
choose the AUX source.
2. VOL +/VOL - button: Press to
adjust the volume.
15
Page 18

ART7
HD Radio Station Notes
1. When a radio station is broadcasting an HD Radio signal, the HD icon ( ) will blink to indicate ART7 is acquiring the HD Radio signal. When the signal is acquired, the HD icon will stop
blinking and appear on the display.
Multicasting Note: Multicasting is a feature of HD Radio technology that enables stations to
broadcast multiple streams of data on sub-channels of their main frequency. The multicast
stations may contain other music formats, local traffic, weather and sports. These multicast
stations are found "between" the stations already on the frequency band.
(Note: Multicast Radio Stations are accessed in the same manner as you would any station
frequency using the Tune or Seek functions.)
2. HD Radio Multicast (FM Only): Besides offering static free and clear radio signals, HD Radio
technology also allows FM radio stations to multicast. This allows radio stations to offer more
than one programming channel or station (multicast) at a time using their existing frequency
on the radio dial.
Multicast Example: For example: If the main radio station is 103.5, then that same radio station may have station multicasts of 103.5-1, 103.5-2. The suffix 2, 3, 4, 5, 6, 7 represents the
stations multicast sub-channel. Position -1 is always the main station's program.
3. Not all HD Radio stations will broadcast multicast programs. Those that are multicasting will
typically have 1 to 2 multicast programs at this time, with more being added all the time.
4. Unavailable Digital Signal/Loss of Digital Signal: If the ART7 incurs a loss of digital HD Radio
signal, the radio mode will automatically change to analog radio mode. If a station's multicast
service is interrupted while playing, the ART7 will switch to the main station program. If a
multicast station saved to a preset is chosen when the multicast station is not available or
loses signal, the ART7 will switch to the radio station's main broadcast station.
5. HD Radio Delay: To overcome the delay that digital systems inherently produce, HD Radio
technology first uses a station's analog signal to quickly tune to an AM or FM station. After
approximately five seconds, the audio will then blend from the station's analog to digital HD
Radio signal. Normally, this blending from analog to digital signals is very smooth. When the
changeover is smooth, the radio station has implemented the HD Radio broadcast correctly.
However, if the station has not, you may experience a skip in program content of several
seconds. This is not a problem with your ART7. This is an HD Radio broadcaster's issue. This
will be corrected by the station over time. Today's analog programming is only present on the
main channel. If you select a preset HD channel and tune directly to an HD Radio station's
digital multicast channel, the ART7 will take approximately five seconds to begin playing. This
is normal operation.
16
Page 19
Table 4: MENU Setup
Item Menu Page Display Description
3.1 Menu Page Main MENU List:
1. MENU page will auto stay at the
first setting, which is ALARM1 set.
2. Press the TUNE +/TUNE - button
to move UP/DOWN the list.
3. Press the POWER/ENTER button
for confirmation.
3.2 ALARM 1/
ALARM 2
MODE MODE SETTING:
TIME ALARM TIME SETTING:
SOURCE ALARM SOUND SOURCE:
ALARM SETTING:
1. Choose ALARM 1 or ALARM 2
by pressing TUNE +/TUNE - button. (ALARM 1 will be the first item
to choose from default setting).
2. Press the POWER/ENTER button
for confirmation.
1. Choose ON/OFF to turn on the
ALARM. Press the POWER/
ENTER button to select a field
(ON/OFF, hour/minute, AM/PM,
Buzzer/Music).
2. Press the TUNE +/TUNE - button
to select ON/OFF.
3. Press the MENU button to save
settings and return to the last
menu. (Default: ALARM1 "OFF”,
TIME "12:00 AM”, SOURCE
"BUZZER”, VOLUME "40%”)
1. Press the POWER/ENTER button
to select a field (ON/OFF, hour/
minute, AM/PM, Buzzer/Music).
2. Press the TUNE +/TUNE - button
to increase/decrease the hour/
minute.
3. Press the MENU button to save
and return to the last menu
(Default: ALARM1 "OFF”, TIME
“12:00 AM”, SOURCE "BUZZER,
VOLUME" 40%).
1. Choose Buzzer or AM/FM for the
Alarm sound. (AM/FM requires
selection of a preset station. Unit
defaults to buzzer if the selected
preset is empty.)
2. Press the POWER/ENTER button
to select a field (ON/OFF, hour/
minute, AM/PM, Buzzer/Music).
3. Press the TUNE +/TUNE - button
to select buzzer or music.
4. Press the MENU button to save
and return to the last menu.
17
Page 20

ART7
Table 4: MENU Setup
Item Menu Page Display Description
VOLUME ALARM VOLUME SETTING:
1. Press the TUNE+/TUNE- button
to increase/decrease the alarm
volume.
2. Press the MENU button to save
and return to the last menu.
Slow Wake up Feature: The alarm will
start at volume of 0% and increase
over 20 seconds to the user-defined
volume setting.
DISPLAY after ALARM SETTING:
After ALARM set up, the alarm symbol and time of ALARM 1/ ALARM 2
will show on the bottom of the display
during Stand-by Mode.
DISPLAY after ALARM SETTING:
1. After ALARM set up, the alarm
symbol and time of ALARM 1/
ALARM 2 will show on the bottom
of display during Operating Mode.
18
Page 21
Table 4: MENU Setup
Item Menu Page Display Description
3.3 FM PRESETS FM PRESETS: (Default: Empty)
1. Press the TUNE +/TUNE - button
to select a number.
2. Press the POWER/ENTER button
to recall a preset station.
3. Press and hold the POWER/
ENTER button to store a preset
station.
4. Press the PLAY/PAUSE button to
exit the favorites menu.
5. If you enter the FM presets
through the main menu while the
radio is in AM mode the ART7 will
display an error message (see
left).
3.4 AM PRESETS AM PRESETS: (Default: Empty)
3.5 CLOCK SET CLOCK SETTING:
1. Press the TUNE +/TUNE - button
to select a preset number.
2. Press the POWER/ENTER button
to recall a preset station.
3. Press and hold the POWER/
ENTER button to store a preset
station.
4. Press the PLAY/PAUSE button to
exit the favorites menu.
5. If you enter the AM presets
through the main menu while the
radio is in FM mode the ART7 will
display an error message (see
left).
Press the POWER/ENTER button for
confirmation.
TIME SETTING:
1. Choose the Hour/Mins or AM/PM
for time set up.
2. Press the POWER/ENTER button
to select a field (hour , minute, AM/
PM).
3. Press the TUNE +/TUNE - button
to increase/decrease the hour/
minute or select AM/PM. (Press
and hold to scan hours/minutes).
4. Press the MENU button to save
and return to the previous menu.
19
Page 22

ART7
Table 4: MENU Setup
Item Menu Page Display Description
3.6 TONE CONTROL
ACCESS TONE CONTROL:
1. Select “TONE CONTROL”.
2. Press the POWER/ENTER button
for confirmation.
TONE CONTROL SETTING:
1. Select “TREBLE LEVEL/BASS
LEVEL”.
2. Press the POWER/ENTER button
for confirmation.
TREBLE SET TREBLE LEVEL SETTING:
BASS SET BASS LEVEL SETTING:
1. Press the TUNE +/TUNE - button
to adjust the treble level
(Default: 0 dB).
2. Press the MENU button to confirm
and return to the previous menu.
1. Press the TUNE +/TUNE - button
to adjust the bass level (default: 0
dB).
2. Press the MENU button to confirm
and return to the previous menu.
20
Page 23
Table 4: MENU Setup
Item Menu Page Display Description
3.7 DISPLAY CONTROL
DISPLAY CONTROL SETTING:
1. Select “DISPLAY CONTROL”.
2. Press the POWER/ENTER button
for confirmation.
CONTRAST CONTRAST SETTING:
BRIGHTNESS ACCESS BRIGHTNESS
3.8 SOFTWARE
VERSION
1. Select “CONTRAST”.
2. Press the POWER/ENTER button
for confirmation.
CONTRAST SETTING:
1. Press the TUNE +/TUNE - button to adjust the contrast level
(Default: 33%).
2. Press the MENU button to confirm
and return to the previous menu.
CONTROL:
1. Select “BRIGHTNESS”.
2. Press the POWER/ENTER button
for confirmation.
BRIGHTNESS SETTING:
1. Press the TUNE +/TUNE - button
to adjust the backlight level (1-7)
(Default: 5).
2. Press the MENU button to confirm
and return to the previous menu.
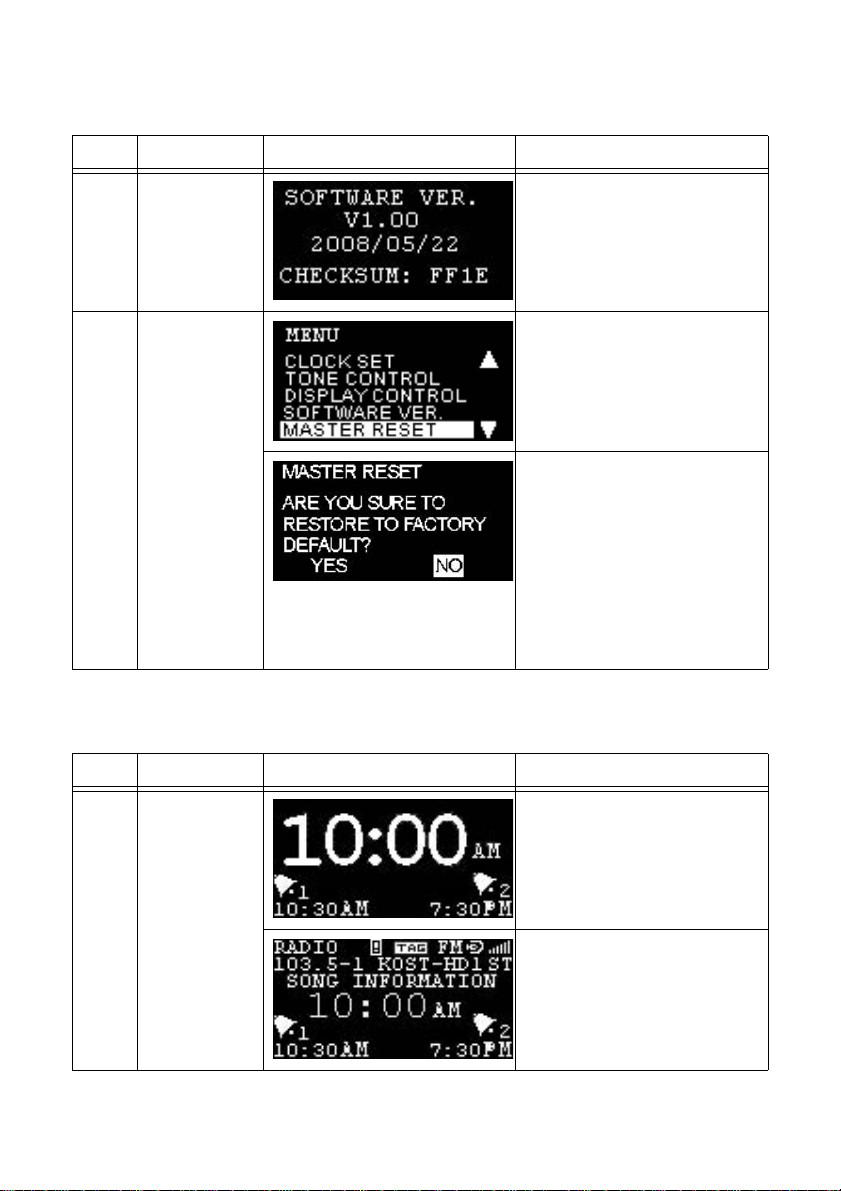
SOFTWARE VERSION DISPLAY:
1. Select “SOFTWARE VER”.
2. Press the POWER/ENTER button
for confirmation.
21
Page 24
ART7
Table 4: MENU Setup
Item Menu Page Display Description
1. View the software version info
(see example to the left).
2. Press the POWER/ENTER button
to return to the previous menu.
3.9 MASTER RESET MASTER RESET:
1. Press the TUNE +/TUNE - button
to choose MASTER RESET.
2. Press the POWER/ENTER button
for confirmation.
MASTER RESET:
1. The ART7 will ask "Are you sure
to restore to the factory default?".
2. Choose “YES” to restore all factory
default settings. Press “NO” to
cancel.
3. Press the TUNE +/TUNE - button
to choose “YES/NO”.
4. Press the POWER/ENTER button
for confirmation.
5. Press MENU to return to the
previous menu without initiating
the Master Reset.
Table 5: Alarm Setup
Item Menu Page Display Description
4.1 ALARM SOUNDING
ALARM SOUNDING, STANDBY:
1. When the ART7 is in standby
mode, if alarm set time equals the
current radio time, it automatically
sounds.
2. Press the POWER/ENTER button
to return to standby mode.
22
ALARM SOUNDING, AUDIO:
1. When the ART7 is in an audio
mode (Buzzer/FM/AM), if alarm
set time equals the current radio
time, it automatically sounds.
2. Press the POWER/ENTER button
to return to audio mode.
Page 25
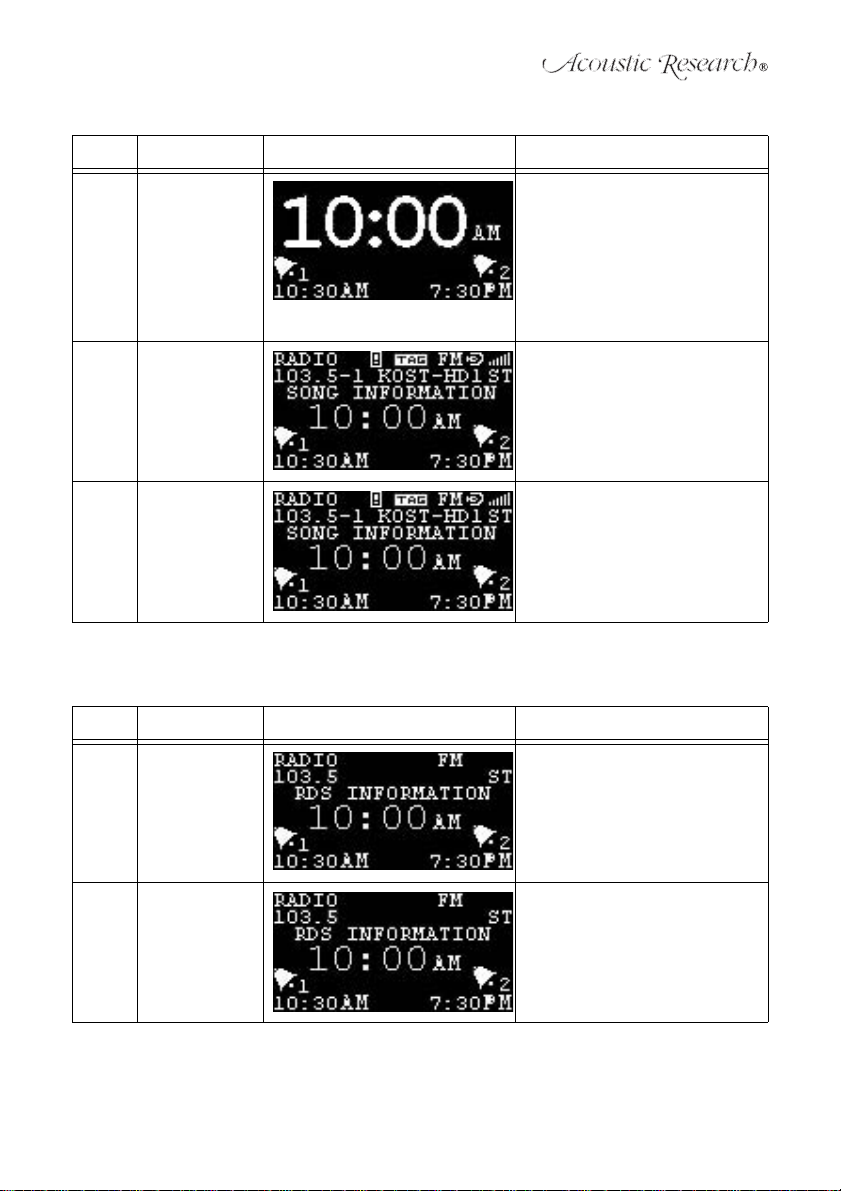
Table 5: Alarm Setup
Item Menu Page Display Description
4.2 ALARM PRIOR-
4.3 SNOOZE SNOOZE:
ITY
ALARM SOUNDING PRIORITY:
1. Alarm priority: Alarm 1, Alarm 2.
The Snooze period is set for every
7 minutes until the user presses
the POWER/ENTER button to
return to standby mode.
2. If either alarm has sounded and is
in SNOOZE mode, the second
alarm will still interrupt the
SNOOZE mode.
1. Press the SNOOZE button to mute
the Alarm.
2. The Snooze time interval is every
7 minutes.
3. Press the POWER/ENTER button
to return to standby mode.
4.4 ALARM
SOURCE
SELECTION &
VOLUME RAMP
UP
Alarm Source Selection: FM/AM
If you set the Alarm 1 and/or 2 sound
as FM/AM, the ART7 will play the last
music source or station to sound the
alarm and the volume will increase
from 0% to the user-set volume level.
Table 6: Preset Station Setup
Item Menu Page Display Description
5.1 PRESET FM /AM PRESETS ON REMOTE
5.2 RECALL RECALL PRESET STATION FROM
CONTROL:
Press and hold 1-10 button to store a
preset. When stored the ART7 will
display "MEMORY (1-10).
REMOTE CONTROL:
Press the 1-10 button on the remote
control to recall a preset station.
23
Page 26

ART7
Table 6: Preset Station Setup
Item Menu Page Display Description
5.3 MY FAVORITE
PRESET/
RECALL
MY FAVORITE PRESET SETTING:
1. Press the PLAY/PAUSE button
during AM or FM mode to enter the
favorites menu.
2. Press the TUNE +/TUNE - button
to select a number.
3. Press the POWER/ENTER button
to recall a preset station.
4. Press and hold the POWER/
ENTER button to store a preset
station.
5. Press the PLAY/PAUSE button to
exit the favorites menu.
24
Page 27
Table 7: iTunes Tagging Setup
Item Menu Page Display Description
6.1 iTunes Tagging STORAGE
SUCCESSFUL STORAGE OF TAGS
TO ART7:
The icon shows on the screen
when iPod connected.
The icon shows on the screen
when the tag function supported.
1. Press the T AG button to initiate the
iTunes Tagging function (you can
tag up to 100 songs).
2. Each tag is cleared after it is sent
to the iPod (when the iPod is
docked on the ART7).
3. "Tag Already Stored" shows on
the when a tag for the selected
song already exists.
6.2 iTunes Tagging -
6.3 iTunes Tagging -
INSUFFICIENT
DATA
TAG S ENT TO
iPod
25
FAILED MESSAGE OF TAGS STORAGE TO ART7:
1. "Not enough information..." shows
on the screen when iTag fails due
to insufficient data retrieved from
the station.
2. "Tag cannot be stored" shows on
the screen when the iTag button is
pressed when not receiving a HD
Radio station.
SUCCESSFUL STORAGE OF TAGS
TO iPOD:
The number of Tags transferred to the
iPod is displayed on the screen.
Page 28
ART7
Table 7: iTunes Tagging Setup
Item Menu Page Display Description
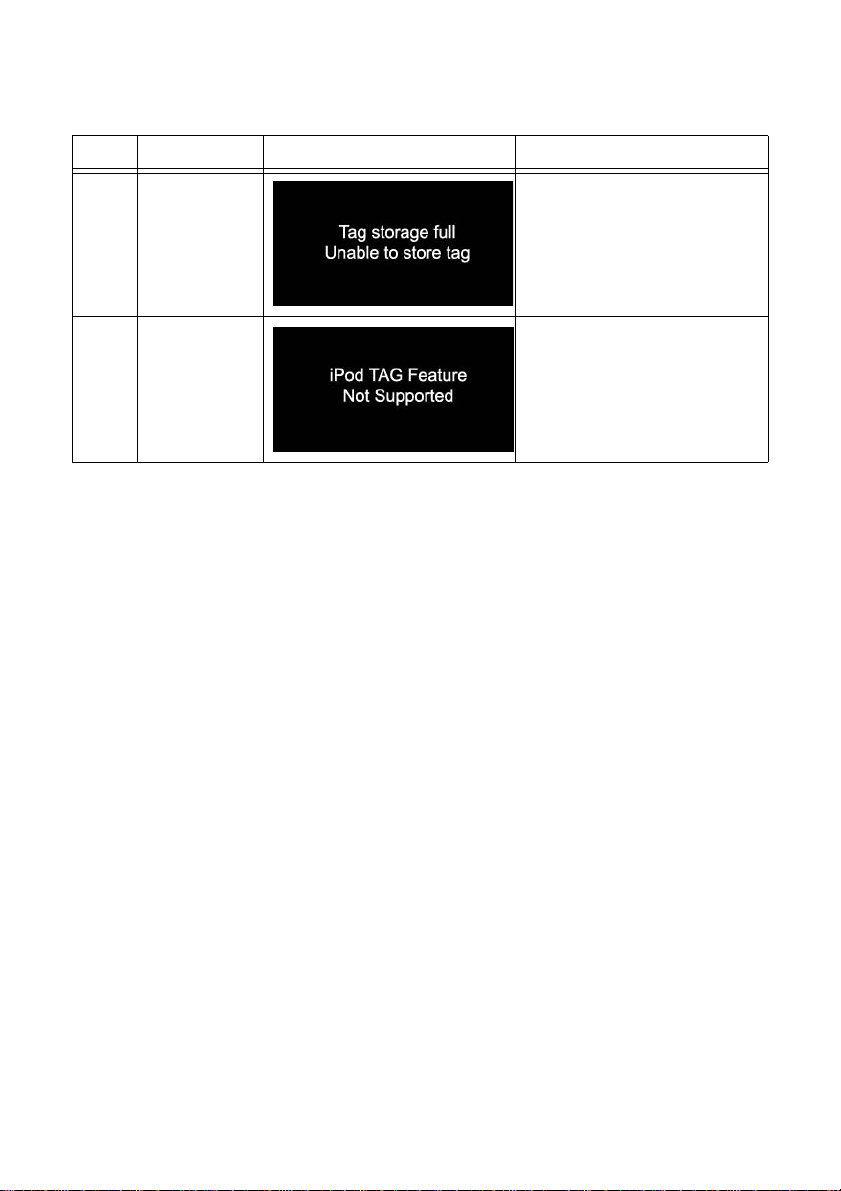
6.4 iTunes Tagging Ta g Full
TAG FULL MESSAGE:
"Unable to store tag" shows on the
screen when tags storage is full.
6.5 iPod Tag Feature
Not Support
iTUNES TAGGING NON-SUPPORTING MESSAGE FOR iPOD:
"Not supported..." shows on the
screen when your iPod does not support the iPod tag feature. (See “Compatibility Chart” on page6).
26
Page 29
TROUBLESHOOTING
If anything is missing or damaged, or if your ART7 fails to operate, notify your dealer immediately.
We recommend keeping your original carton and packing materials in case you need to ship the
unit in the future. Contact the Audiovox Consumer Service Center.
Table 8: iTunes Tagging Setup
Symptom Root Cause What to Do
ART7 Does Not Turn On • AC power cord not properly
No Sound • Audio cables not connected
Remote Control Not Working • Remote used from too far away
iPod Does Not Play iPod not properly docked on the
Poor FM Reception • FM antenna not properly
Poor AM Reception • AM antenna not properly
Unstable HD Radio Reception Poor FM reception to affect the HD
connected
• Power not available at wall
outlet
• Manual switch not turned on
• Power button not turned on
• Volume is turned down; MUTE- is displayed on the
screen
• ART7 not turned on
• Auxiliary unit connected to
AUX input has volume set too
low or off.
• Batteries in remote not properly
installed
• Batteries in remote drained
• Insulator tab in place
ART7
installed
• Environmental factors causing
poor FM reception quality
installed
• Environmental factors causing
poor AM reception quality
Radio reception
• Check AC power cord has
proper connection.
• Check fuse/circuit breaker at
home is turned on.
• Check manual switch on the
rear panel is turned on.
• Press the power button to see
if the display lights up.
• Verify audio cables are
connected properly.
• Press Mute; Turn volume up.
• Press the power button to turn
the unit on.
• Increase volume of auxiliary
unit connected to AUX input
until sound is heard; make sure
external source is "On".
• Move remote closer to the
ART7.
• Make sure the batteries are
installed correctly.
• Change batteries in the remote
control.
• Remove the plastic insulator
tab near battery.
Make sure the correct adaptors are
used for your iPod and check the
connections.
• Verify FM antenna is
connected properly or try
moving antenna to achieve
better reception.
• You may be in an area with
weak FM signals.
• Verify AM antenna is
connected properly or try
moving antenna to achieve
better reception.
• You may be in an area with
weak AM signals.
HD Radio reception requires good
FM reception.
27
Page 30

ART7
Table 8: iTunes Tagging Setup
Symptom Root Cause What to Do
No Songs in the Tag List • Tags have been transferred to
iPod
• No tagging function available
• They may have been
transferred to your iPod when
docked. The list is deleted once
the tags are transferred to an
iPod.
• Check if the Tag icon is
displayed on the screen. HD
Radio reception required to get
TAG information.
28
Page 31

SPECIFICATIONS
• Average Output Power (R.M.S): 10W (5W x 2)
• Driver: 2.5 inch Full Range Driver
• Resistance: 4 ohms
• Frequency Response: 65Hz ~ 20kHz
• Power Supply: AC 120V/60Hz 25W
• Magnetically Shielded: NO
• Dimensions (W x H x D): 377 x 263 x 85 mm
29
Page 32

ART7
1-YEAR LIMITED WARRANTY
AUDIOVOX CORPORATION (the Company) warrants to the original retail purchaser of this
product that should this product or any part thereof, under normal use and conditions, be proven
defective in material or workmanship within 1 year from the date of original purchase, such
defect(s) will be repaired or replaced with new or reconditioned product (at the Company's option)
without charge for parts and repair labor. To obtain repair or replacement within the terms of this
Warranty, please contact Audiovox at the telephone number provided below.
This Warranty does not extend to the elimination of car static or motor noise, to correction of
antenna problems, to costs incurred for installation, removal, or reinstallation of the product, or
damage to tapes, compact discs, accessories or vehicle electrical systems. This Warranty does not
apply to any product or part thereof which, in the opinion of the Company, has suffered or been
damaged through alteration, improper installation, mishandling, misuse, neglect, accident, or by
removal or defacement of the factory serial number/bar code label(s) or markings. THE EXTENT
OF THE COMPANY'S LIABILITY UNDER THIS WARRANTY IS LIMITED TO THE REPAIR OR
REPLACEMENT PROVIDED ABOVE AND, IN NO EVENT, SHALL THE COMPANY'S LIABILITY
EXCEED THE PURCHASE PRICE PAID BY THE PURCHASER FOR THE PRODUCT.
This Warranty is in lieu of all other express warranties or liabilities. ANY IMPLIED WARRANTIES,
INCLUDING ANY IMPLIED WARRANTY OF MERCHANTABILITY, SHALL BE LIMITED TO THE
DURATION OF THIS WRITTEN WARRANTY. ANY ACTION FOR BREACH OF ANY W ARRANTY
HEREUNDER INCLUDING ANY IMPLIED WARRANTY OF MERCHANTABILITY MUST BE
BROUGHT WITHIN A PERIOD OF 1 YEAR FROM DATE OF ORIGINAL PURCHASE. IN NO
CASE SHALL THE COMPANY BE LIABLE FOR ANY CONSEQUENTIAL OR INCIDENTAL
DAMAGES FOR BREACH OF THIS OR ANY OTHER WARRANTY, EXPRESS OR IMPLIED,
WHATSOEVER. No person or represent ative is authorized to assume for the Company any liability
other than expressed herein in connection with the sale of this product.
Some states do not allow limitations on how long an implied warranty lasts or the exclusion or
limitation of incidental or consequential damage so the above limitations or exclusions may not
apply to you. This Warranty gives you specific legal rights and you may also have other rights
which vary from state to state.
U.S.A: 1-800-323-4815
CANADA: Call 1-800-323-4815 for the location of a warranty station serving your area.
30
Page 33

INSTRUCCIONES IMPORTANTES DE
SEGURIDAD
Felicitaciones por su compra del Reloj Alarma, Radio HD y Estación de Puerto iPod Acoustic
Research ART7. Esta radio ha sido fabricada para proveer años de servicio confiable y libre de
problemas.
1. Lea estas instrucciones
2. Guarde estas instrucciones
3. Preste atención a estas advertencias
4. Siga todas las instrucciones
5. No use este aparato cerca del agua.
6. Limpie sólo con un paño húmedo
7. No bloqueé ninguna de las aberturas de ventilación Instale de acuerdo con las instrucciones
del fabricante.
8. No instale cerca de ninguna fuente de calor tales como radiadores, cocinas, u otros aparatos
incluyendo amplificadores que producen calor.
9. No invalide el propósito de seguridad del enchufe de tipo polarizado. Un enchufe polarizado
tiene dos patas una más ancha que la otra. La pata ancha es provista para su seguridad.
Cuando el enchufe provisto no entra en su tomacorriente, consulte a un electricista para
reemplazar el tomacorriente obsoleto.
10. Proteja el cable de alimentación de ser pateado o pinchado particularmente en el enchufe,
receptáculos incorporados, y el punto donde sale del aparato.
11. Sólo use agregados/accesorios especificados por el fabricante.
12. Desenchufe este aparato durante tormentas eléctricas o cuando no se usa por largos
períodos de tiempo.
13. Derive toda reparación a personal de servicio calificado. Se requiere servicio cuando el
aparato se ha dañado de algún modo, tales como cuando el cable de alimentación o el
enchufe está dañado, se ha derramado líquido o han caído objetos sobre el aparato, El
aparato fue expuesto a la lluvia o humedad, no funciona normalmente, o se ha caído.
31
Page 34

ART7
14. Sólo use con un carrito, pedestal, trípode, soporte,o mesa especificada
por el fabricante o vendida con el aparato. Cuando es usado un carrito,
tenga cuidado cuando mueve la combinación carrito/aparato para evitar
daños por caídas.
15. El aparato no debe exponerse a goteos o salpicaduras y no deben
colocarse sobre el aparato objetos llenos con líquidos, tales como vasos.
16. No sobrecargue el tomacorriente de pared. Use sólo la fuente de energía
como se indica.
17. Siempre deje suficiente espacio alrededor de la ventilación del producto. No coloque el
producto sobre una cama, alfombra, en un armario de libros o gabinete que pudiera impedir
el flujo de aire a través de las aberturas de ventilación.
18. No coloque velas encendidas, cigarrillos, cigarros, etc. sobre el producto.
19. Debería tenerse cuidado que no caigan objetos dentro del producto.
20. El enchufe MAINS es usado para desconectar el dispositivo y debe permanecer fácilmente
operable.
21. Donde hay más de una conexión que suministra VOLTAJES PELIGROSOS o NIVELES
PELIGROSOS DE ENERGÍA a equipos, deberá proveerse una indicación destacada,
ubicada cerca del punto de ingreso para el PERSONAL DE SERVICIO que tenga acceso a
partes peligrosos, para indicar que dispositivo o dispositivos desconectar o aislar el equipo
completamente y cuales dispositivos desconectados pueden usarse para aislar cada sección
del equipo.
Este símbolo indica que este
producto incorpora el aislamiento
doble entre las peligrosas voltaje
y las piezas accesibles del usuario.
ADVERTENCIA: EL FABRICANTE NO ES RES PONSABLE POR CUALQUIER INTERFERENCIA
DE RADIO O TV CAUSADOS POR MODIFICACIONES NO AUTORIZADAS A ESTE EQUIPO.
TALES MODIFICACIONES PODRÍAN ANULAR LA AUTO RIDAD DEL USUARIO PARA OPERAR
ESTE EQUIPO.
CUMPLIMIENTO DE LAS REGULACIONES FCC: Este artefacto cumple con la Secc. 15 de las
Normas FCC. El funcionamiento está sujeto a las siguientes dos condiciones:
(1) este dispositivo no debería causar interferencias dañinas, y (2) este dispositivo debe aceptar
cualquier interferencia recibida, incluyendo interferencias que pudieran causar un funcionamiento
no deseado.
NOTA: Este equipo fue probado y se encontró que cumple con los límites para un dispositivo
digital Clase B, de acuerdo con la secc. 15 de las Normas FCC. Estos límites están diseñados
para proveer una protección razonable contra interferencias dañinas en una instalación
residencial. Este equipó genera, usa y puede radiar energía de frecuencia de radio y, si no está
instalado y usado de acuerdo con las instrucciones, podría causar interferencias dañinas a
comunicaciones de radio. Sin embargo, no se garantiza que no se producirán interferencias en
una instalación en particular. Si este equipo causa interferencia dañina a la recepción de radio o
televisión, la cual puede determinarse apagando y prendiendo el equipo, se alienta al usuario a
tratar de corregir la interferencia con una o más de las siguientes medidas:
32
Page 35

• Reoriente o reubique la antena de recepción.
• Aumente la separación entre el equipo y el receptor.
• Conecte el equipo en un tomacorriente o circuito distinto al que está conectado el receptor.
• Consulte al distribuidor o un técnico experimentado en radio/TV para obtener ayuda.
Un APARATO Clase II deberá estar marcado permanentemente con las palabras "DOBLE
AISLACIÓN" o "Doble Aislado" y "Cuando se lo repare use sólo partes de repuesto idénticas."
Precauciones importantes sobre la batería
• Cualquier batería podría presentar un riesgo de incendio, explosión, o quemaduras químicas
si se abusa de ella. No intente cargar una batería que se supone no debe recargarse, no
incinerar, y no pinchar.
• Las baterías no recargables, como las baterías alcalinas, podrían perder su carga si son
dejadas en el producto por un largo período de tiempo. Quite las baterías del producto si no
va a usarlo por un mes o más.
• Si su producto usa más de una batería, no mezcle tipos de baterías distintos y asegúrese que
están insertadas correctamente. Mezclando los tipos o insertándolas incorrectamente podría
causar que pierdan.
• Descarte inmediatamente cualquier batería que pierda o esté deformada. Podrían producir
quemaduras de piel u otras lesiones personales.
• Por favor ayude a proteger el medio ambiente reciclando o desechando las baterías de
acuerdo a las regulaciones federales, estatales, y locales.
33
Page 36

ART7
CONTENIDOS DEL EMPAQUE
• Receptor de Radio HD con Estación de Puerto de iPod x 1
• Control Remoto x 1
• Cable de la entrada estéreo de 3.5mm x 1
• Adaptador de iPod x 6 (como un paquete)
• #3 iPod Mini
• #4 iPod 4G & iPod U2 (20 GB)
• #5 iPod 4G (40 GB)
• #6 iPod Photo & iPod Color U2
• #7 iPod Photo, iPod con pantalla color
• #14 iPod Touch
• Antena Anillo de AM x 1
• Antena Flexible de FM x 1
• Manual de Usuario x 1
• Tarjeta de Registro de Producto x 1
• Tarjeta de Descarga de Música x 1
34
Page 37

CARACTERÍSTICAS DEL PRODUCTO
1. Tecnología de Radio HDTM
La tecnología de Radio HD es el mayor avance tecnológico en transmisión de radio desde la
aparición de la radio de FM hace más de cuarenta y cinco años. La tecnología de Radio HD
es el estándar para radio digital de FM y AM. Las transmisiones de Radio HD ofrecen a los
oyentes de FM y AM la selección, calidad y servicios interactivos de datos que los
consumidores esperan de otras tecnologías digitales, y libres de gastos, todas de libre
suscripción.
2. Ventajas de Radio HD
• Sonido de calidad de CD.
• libre de estática/siseo, recepción clara y cristalina.
• Los receptores de Radio HD también obtienen transmisiones analógicas tradicionales
de FM y AM.
• Multitransmisión, las cuales difunden múltiples programas sobre una sola frecuencia de
FM (103.5-1, 103.5-2, etc.) incrementando así la cantidad y diversidad de selección de
contenidos.
• Una variedad de "servicios de datos" presentado en formato basado en texto, tales
como nombre de artista, título de canción, o alertas de clima, etc.
para encontrar estaciones de Radio HD en su área, por favor visite: www.hdradio.com.
Tecnología HD Radio™ Fabricado bajo licencia de iBiquity Digital Corp. U.S. y Patentes
Extranjeras. Los logos de HD y HD Radio son marcas propietarias de iBiquity Digital Corp.
3. Puerto de Conexión iPod
ART7 tiene un puerto para su iPod en la parte superior de la unidad y carga su iPod cuando
está conectado. El puerto provee la última conectividad, permitiendo la reproducción de
archivos de música y video. El puerto está conectado directamente a la salida compuesta en
el ART7, por lo que puede enlazar el ART7 a un televisor para ver películas desde su iPod.
Verá un icono de iPod ( )en la pantalla para mostrar que un iPod está conectado al ART7.
4. Etiquetado de iTunes
Con el botón único "tag" en el ART7, puede etiquetar sus canciones favoritas de su Estación
local de Radio HD de FM y guardarlo siempre que ve el icono TAG ( ) en la pantalla. El
ART7 puede etiquetar hasta 100 canciones, guardando la información de canciones desde su
receptor de Radio HD a su iPod. Las canciones aparecerán en una lista de reproducción de
títulos "Etiquetados" en iTunes la próxima vez que sincronice su iPod con su computadora.
Luego puede elegir comprar y descargar las canciones etiquetadas de la Tienda de Música
iTunes de Apple
®
.
35
Page 38

ART7
GRÁFICO DE COMPATIBILIDAD
La siguiente tabla muestra las opciones iPod compatibles con el ART7.
Tabla 1: Compatibilidad iPod
iPod
Mini* S N N/A N
Video de 4ta Gen* S N N/A N
Photo* S N S N
Nano S N N/A N
Video de 5ta Gen* S S S S
Nano de 2da Gen S S N/A N
Nano de 3ra Gen
(Video)
Classic S S S S
Touch S S S N
Reproducción
de Audio
SSSS
Reproducción
de Video
Subir/bajar
Pista
Etiquetado de
iTunes**
*La reproducción de audio en estas unidades funciona en la mayoría de los casos. Si experimenta
problemas, por favor verifique que tiene actualizado el software en su iPod.
**Nota Especial: El etiquetado iTunes requiere iTunes 7.4 o superior. Compatible con Video iPod
de 5ta Gen, iPod Nano (video) de 3ra Gen e iPod classic.
© 2007 Apple Inc. Todos los derechos reservados. Apple, el logo Apple, iPod, iTunes, y Mac son
marcas de Apple Inc., registradas en EE.UU. y otros países. Otros productos y nombres de
compañías podrían ser marcas de sus respectivas compañías.
36
Page 39

GENERALIDADES DE ART7
Vista Frontal
TUNE
MENU
POWER / ENTERFAVORITES
TAG
SLEEP
SOURCE
VOLUME
1. POWER/ENTER (ENCENDER/INGRESAR) :
• Presione para encender la unidad.
• En el menú preset, presione y mantenga pulsado para almacenar la estación de radio
actual bajo el número seleccionado (1-10). La unidad mostrará "Memory 'Selected No' "
(Memoria seleccionada Nro).
• En el menú principal, presione para ingresar al submenú.
• Durante la ejecución del menú, presione para confirmar la alarma, predeterminado,
fijación del reloj y restauración maestra.
2. MENÚ:
Ingrese la Lista de Menú principal. La lista de menú principal es como sigue:
• FIJACIÓN DE ALARMA 1
• FIJACIÓN DE ALARMA 2
• MEMORIAS PREDETERMINADAS de FM
• MEMORIAS PREDETERMINADAS de AM
• FIJAR RELOJ
•CONTROL de TONO
• CONTROL de PANTALLA
• VERSIÓN DE SOFTWARE
• RESTAURACIÓN MAESTRA
desde el submenú, presione para volver al nivel anterior.
3. SOURCE:
Seleccione la fuente de Audio (FM/AM/iPod/AUX).
4. Reproducción/Pausa/FAVORITOS:
• Bajo el modo iPod, presione para reproducir/pausar una canción.
• Bajo el modo radio, presione para ingresar al submenú PRESET y luego presione
nuevamente para traer la estación almacenada resaltada.
5. SLEEP(DORMIR):
Fija el temporizador con 15 minutos por pestaña contando desde 15, 30, 45, o 60.
6. TAG (ETIQUETAR):
Cuando la pantalla muestra el icono “TAG”, presione para guardar la información de canción
actual dentro de la base de datos ART7. Puede almacenar hasta 100 etiquetas.
7. TUNE (SINTONIZAR) /\ (hacia adelante):
• Durante el modo radio, presione para aumentar la frecuencia de radio; presione y
mantenga por 2-3 segundos para buscar automáticamente y sintonizar la próxima
estación fuerte de radio. En modo iPod, presionar para ir a la pista siguiente presione y
mantenga para avance rápido.
• En el menú principal y lista de predeterminados, presione para moverse hacia arriba en
la lista.
37
Page 40

ART7
• En otros submenús, presione para aumentar el tiempo de alarma, fijación de hora, tono
y mostrar el nivel de control.
8. TUNE (SINTONIZAR) V (hacia atrás):
• Durante el modo radio, presione para disminuir la frecuencia de radio; presione y
mantenga pulsado por 2-3 segundos para buscar automáticamente y sintonizar la
anterior estación fuerte de radio.
• En modo iPod, presionar para ir a la pista anterior presione y mantenga pulsado para
retroceso rápido.
• En el menú principal y lista de predeterminados, presione para moverse hacia abajo en
la lista.
• En otros submenús, presione para disminuir el tiempo de alarma, fijación de hora, tono y
mostrar el nivel de control.
9. VOLUME (VOLUMEN) /\ (Subir):
Aumenta el nivel de volumen y cancelar el modo Mute (silenciar).
10. VOLUME (VOLUMEN) V (bajar):
Disminuye el nivel de volumen y cancelar el modo Mute (silenciar).
Vista Superior
MUTE / SNOOZE
1. Botón: MUTE / SNOOZE (SILENCIAR/SNOOZE)
• Durante el modo Radio/iPod/Aux, presione para silenciar audio. Presione nuevamente
para cancelar mute (silenciar).
• Cuando la alarma está sonando, presione para dormitar la fuente de alarma
seleccionada por 7 minutos.
• El intervalo de 7 minutos se repetirá hasta que se apague la fuente de alarma
presionando el botón POWER y la unidad vuelve al modo de espera.
• Si está en modo de espera cuando la alarma suena, la unidad retorna a modo de
espera; de otro modo, la unidad retorna al modo previo.
38
Page 41

Vista Posterior
ANTENNA
120V
60Hz / 25W
POWER
OFF ON
AUX IN VIDEO OUT 75 FM
Ω
AM
1. Cable de Alimentación: Conectar el cable de alimentación a un tomacorriente eléctrico.
2. Interruptor Mecánico de ENCENDIDO/APAGADO: Presione para reiniciar el sistema cuando
falla después de una operación indebida.
3. AUX IN: Conecta con un cable de audio de 3.5mm a un dispositivo auxiliar de música.
4. SALIDA DE VIDEO Compuesto: Use para conectar un iPod a una TV.
5. ANTENA FM: Conecta a un cable flexible desnudo de antena de FM.
6. ANTENA DE AM: Conectar una antena de AM en forma de anillo.
39
Page 42

ART7
R
CONTROL REMOTO
Radio Aux iPod
1234
5678
910
VOL
VOL
MUTE
MENU
TUNE
SLEEP
ALARM
iPOD
TAG
iPOD
MENU
TUNE
ENTER
1. Botón de Encendido: Enciende la unidad.
2. Botón iPod: Va a modo iPod.
3. Botón Aux: Va a modo Aux.
4. Botón Radio: Intercambia entre modo FM y AM.
5. Botones de números 1-10: Presione para recuperar la estación predeterminada almacenada;
presione y mantenga cualquier botón de numero del 1-10 para guardar la estación actual al
número predeterminado correspondiente. La pantalla mostrará "Memory 'Selected No' "
(Memoria seleccionada Nro).
6. Botón ALARM: Presione para los siguientes comandos:
• 1er Presionado: Alarma 1 encendida, Alarma 2 apagada
• 2do Presionado: Alarma 1 apagada, Alarma 2 encendida
• 3er Presionado: Alarma 1 encendida, Alarma 2 encendida
• 4to Presionado: Alarma 1 apagado, Alarma 2 apagado
7. Botón iPOD TAG: Cuando la pantalla muestra TAG, presione para guardar la información de
canción actual al iPod en una lista de ejecución de descarga iTunes. Puede marcar hasta 100
canciones.
8. Botón iPOD MENU: Mueve hacia arriba un nivel en el menú iPod.
40
Page 43

9. Botones Reproducir/pausar, TUNE + (hacia adelante)/TUNE - (hacia atrás), y flechas arriba/
abajo.
• Durante el modo iPod, presione el botón reproducir/pausar para reproducir/pausar una
canción.
• Presione los botones TUNE +/- para ir a la pista siguiente/previa.
• Presione y mantenga pulsado los botones TUNE +/- para avance/retroceso rápido de la
pista actual.
• Presione los botones flecha arriba/abajo para mover la Lista de Menú de iPod hacia
arriba o abajo.
• Durante el modo radio, presione los botonesTUNE +/- para aumentar/disminuir la
frecuencia de radio.
• Presione y mantenga pulsado los botones TUNE +/- por 2-3 segundos para buscar
automáticamente la próxima/previa estación de radio con potencia suficiente.
En otros modos/prefijados,
• En el menú principal y lista de predeterminados, presione los botones TUNE +/- para
seleccionar ítems de la lista de menú.
• En un submenú, presione los botones TUNE +/- para aumentar/disminuir el tiempo de
alarma, fijación de hora, nivel de control de tono y pantalla.
10. Botón MENU:
• Ingrese la Lista de Menú principal.
• Cuando está en el submenú, presione para volver al nivel anterior.
11. Botones VOL +/-: Aumentan o disminuyen el nivel de volumen.
12. Botón MUTE:
• Durante el modo Radio/iPod/Aux, presione para silenciar el sonido durante el
funcionamiento de cualquier fuente. Presione nuevamente para cancelar silenciar y
volver al nivel de audio previo.
• Cuando la alarma está fijada, presione para dormitar la fuente de alarma seleccionada
por 7 minutos. El intervalo de 7 minutos se repetirá hasta que se apague la fuente de
alarma presionando el botón encendido y la unidad vuelve al modo de espera.
13. Botón SLEEP(Dormir): Fija el temporizador de dormir en intervalos de 15 minutos por
pestaña contando desde 15, 30, 45, o 60 minutos.
14. Botón ENTER:
• En el Menú, presione para ingresar al submenú.
• En el submenú, presione para confirmar la alarma, alarma predeterminada, fijación de la
hora y restauración maestra.
41
Page 44

ART7
OPERACIÓN
Coloque el ART7 en una superficie estable tal como una mesa, escritorio, mesada o estante.
Mostrar
1. Mostrar Fuente: La fuente seleccionada, la cual es "RADIO" en la imagen de arriba, es
siempre mostrada en la esquina superior derecha. "FM" está indicado hacia el lado derecho
de la pantalla. Otros indicadores incluyen iPod, y AUX.
2. Mostrar iPod: Si un iPod está en el puerto, el icono iPod ( ) aparece hasta que se remueva
el iPod.
3. Mostrar TAG: Cuando escucha una estación de Radio HD, puede etiquetar una estación
favorita para almacenar en una lista de reproducción en su iPod para una descarga futura a
través de iTunes. Si no se muestra, la estación de radio no está provista con los datos
necesarios para almacenar la información de la canción.
4. Banda: En indicador de banda de radio AM o FM es mostrado cerca de la parte superior
derecha de la pantalla cuando escucha una estación de radio de AM o FM.
5. Logo HD: El indicador HD es mostrado cuando la estación está sintonizada en una
transmisión de estación en Radio HD digital. Las estaciones de Radio HD están disponibles
en AM y FM.
6. Fuerza de Señal: El indicador de fuerza de señal de Radio HD (superior derecha) es
mostrado cuando está presente una señal digital de Radio HD. Si la señal es demasiado débil
o la estación no está transmitiendo en formato HD, la fuerza de señal no será mostrada.
7. Frecuencia: La frecuencia de estación se muestra cuando se recibe una transmisión de
Radio HD. Si hay disponibles estaciones de transmisión múltiple adicionales, la frecuencia
mostrará un guión seguido por el número de estación de transmisión múltiple (Ejemplo 103.5-
1).
8. Letras de Identificación de Estación o Frecuencia: Las Letras de Identificación de estación se
muestran cuando se recibe una transmisión de Radio HD. La frecuencia de estación se
mostrará cuando no hay disponible una transmisión de Radio HD.
9. Información de Programa: El ART7 es capaz de mostrar datos asociados al programa,
incluyendo títulos de canciones en tiempo real, información de artista e información de álbum,
cuando se transmiten.
10. Muestra de Hora: La hora siempre es mostrada en el centro de la pantalla.
11. Muestra de Alarma: Hay disponibles fijaciones de alarmas duales. Una vez que las fijaciones
de alarma están activadas, la información de alarma se mostrará en la esquina inferior
izquierda de la pantalla.
42
Page 45

COMO USAR EL ART7
Tabla 2: Operación Básica
Ítem Botón Mostrar Configuración
1.1 POWER/ENTER:
(ENCENDER/
INGRESAR)
POWER / ENTER
Encendido;
1. Presione el botón POWER/
ENTER para encender el ART7.
2. Logo de Acoustic Research
mostrado en la pantalla por 2
segundos.
El ART7 permanecerá en el último
modo de reproducción
(predeterminado: Modo FM, 87.5
MHz).
1.2 POWER/ENTER:
1.3 VOLUME UP
1.4 VOLUME DOWN
(ENCENDER/
INGRESAR)
(SUBIR
VOLUMEN)
(BAJAR
VOLUMEN)
MODO DE ESPERA:
1. El ART7 mostrará la hora del reloj
en la pantalla.
2. La función de alarma del ART7
sigue activa y el estado se
muestra cerca de la parte inferior
de la pantalla.
VOLUME UP (subir volumen):
1. Presione el botón VOLUME /\ para
ajustar el volumen entre 0% y
100% (valor predeterminado:
40%).
VOLUME DOWN (bajar volumen):
1. Presione el botón VOLUME V
para ajustar el volumen entre
100% y 0% (valor predeterminado:
40%).
43
Page 46

ART7
Tabla 2: Operación Básica
Ítem Botón Mostrar Configuración
1.5 SOURCE
(FUENTE)
SELECCIÓN DE FUENTE:
1. Presione el botón SOURCE para
seleccionar un Modo de Audio.
2. Presione el botón SOURCE para
cambiar entre los Modos de Audio
cuando un iPod está en el puerto
(FM " AM " iPod " AUX).
3. Presione el botón SOURCE para
cambiar entre los Modos de Audio
cuando un iPod no está en el
puerto (FM " AM " AUX).
4. Vuelve automáticamente al modo
FM cuando un iPod no está
conectado.
1.6 SNOOZE/MUTE
1.7 SLEEP
(SNOOZE/
SILENCIAR)
(DORMIR)
44
SNOOZE:
1. Presione el botón SNOOZE para
silenciar el volumen en el modo
audio "- MUTE -" parpadea on/off).
SLEEP:
1. Presione repetidamente el botón
SLEEP para fijar un tiempo de
dormir en incrementos de 15
minutos hasta 60 minutos
(predeterminado: 0).
2. El ART7 ingresará al modo espera
cuando el contador de dormir
decrece hasta cero.
Page 47

Tabla 3: Modo de Audio (fuente: FM-AM-iPod-AUX)
Ítem Botón Mostrar Configuración
2.1 Modo de Radio
FM:
RADIO FM:
(detección automática de modo HD.
ver “Notas de Radio HD”.)
1. Presione el botón SOURCE para
seleccionar una fuente de música
FM (Frecuencia de FM:
87.5~108.1 MHz, Paso 100KHz).
2. Búsqueda Automática Presione y
mantenga pulsado los botones
TUNE +/TUNE - por 2 segundos
para buscar automáticamente la
estación fuerte.
3. Botón VOL +/VOL -: Presione
para ajustar el volumen.
2.2 Modo de Radio
2.3 Modo iPod iPod:
AM:
RADIO AM:
(detección automática de modo HD.
ver “Notas de Radio HD”.)
1. Presione el botón SOURCE para
2. Búsqueda Automática Presione y
3. Botón VOL +/VOL -: Presione
1. Presione el botón SOURCE para
2. Botón PLAY/PAUSE: Presione
3. Botón TUNE +/TUNE -: Presione
4. Botón TUNE +/TUNE -: Presione y
5. Botón VOL +/VOL -: Presione
seleccionar una fuente de música
AM (Frecuencia de AM: 520~1720
KHz paso 10kHz).
mantenga pulsado los botones
TUNE +/TUNE - por 2 segundos
para buscar automáticamente la
estación fuerte.
para ajustar el volumen.
seleccionar una fuente de música
iPod.
para reproducir o pausar música
iPod.
para acceder a la próxima/previa
canción iPod.
mantenga pulsado para avance/
retroceso rápido de la canción
actualmente en reproducción.
para ajustar el volumen.
45
Page 48

ART7
Tabla 3: Modo de Audio (fuente: FM-AM-iPod-AUX)
Ítem Botón Mostrar Configuración
2.4 Modo AUX IN AUX:
Notas de Estación Radio HD
1. Cuando una estación de radio está transmitiendo una señal de Radio HD, el icono HD ( )
parpadeará para indicar que el ART7 está adquiriendo la señal de Radio HD. Cuando la señal
es adquirida, el icono HD dejará de parpadear y aparecerá en la pantalla.
Nota de Multitransmisión: La multitransmisión es una característica de la tecnología de
Radio HD que permite a estaciones transmitir múltiples canales de datos en sub-canales de
su frecuencia principal. Las estaciones de transmisión múltiple podrían contener otros
formatos de música, tránsito local, clima y deportes. Estas estaciones de transmisión
múltiples se encuentran "entre" las estaciones que ya están en la banda de frecuencia.
(Nota: Las estaciones de Radio de transmisión múltiple se acceden en la misma forma que lo
haría con cualquier frecuencia de estación usando las funciones de Sintonía o Búsqueda.)
2. Multitransmisión de Radio HD (sólo FM): Además de ofrecer señales de radio limpias y libres
de estática, la tecnología de Radio HD también permite a estaciones de radio FM
transmisiones múltiples. Esto permite a las estaciones de radio ofrecen más de un canal de
programación o estación (multitransmisión) al mismo tiempo usando sus frecuencias
existentes en el dial de radio.
Ejemplo de Multitransmisión: Por Ejemplo: Si la estación de radio principal es 103.5,
entonces la misma estación de radio podría tener estaciones de transmisión múltiple de
103.5-1, 103.5-2. El sufijo 2, 3, 4, 5, 6, 7 representa los subcanales de estaciones
multitransmisión. La posición -1 siempre es el programa de estación principal.
3. No todas las estaciones de Radio HD transmiten programas de multitransmisión. Aquellas
que tienen multitransmisión generalmente tienen 1 o 2 programas de multitransmisión en
este momento, agregándose más todo el tiempo.
4. Señal Digital No Disponible/Pérdida de Señal Digital: Si el ART7 incurre en una pérdida de
señal digital de Radio HD, el modo radio cambiará automáticamente al modo de radio
analógico. Si el servicio de multitransmisión de la estación se interrumpe mientras se está
reproduciendo, el ART7 cambiará al programa principal de radio. Si una estación de
multitransmisión guardada en una memoria predeterminada es elegida cuando la estación
multitransmisión no está disponible o pierde señal, el ART7 cambiará a la estación principal
de transmisión de la estación de radio.
5. Demora de Radio HD: Para superar la demora que los sistemas digitales producen
intrínsecamente, la tecnología de Radio HD primero usa una señal analógica de la estación
para sintonizar rápidamente una estación de AM o FM. Después de aproximadamente cinco
segundos, el audio cambiará la señal analógica de la estación a la señal digital de Radio HD.
Normalmente, el cambio de señales analógicas a señales digitales son muy suaves. Cuando
el cambio es suave, la estación de radio ha implementado correctamente la transmisión de
Radio HD. Sin embargo, si la estación no lo ha hecho, podría experimentar un salto en el
contenido del programa de varios segundos. Esto no es un problema para su ART7. Este es
1. Presione el botón SOURCE para
seleccionar una fuente AUX.
2. Botón VOL +/VOL -: Presione
para ajustar el volumen.
46
Page 49

un problema de la transmisión de Radio HD. Esto será corregido por la estación más
adelante. La programación analógica actual sólo está presente en el canal principal. Si
selecciona un canal HD predeterminado y sintoniza directamente un canal multitransmisión
digital de la estación de Radio HD, el ART7 demorará aproximadamente cinco segundos para
comenzar la reproducción. Esto es funcionamiento normal.
Tabla 4: MENÚ de Configuración
Ítem
3.1 Menú de Página Lista de MENÚ Principal:
3.2 ALARMA 1/
Menú de
Página
ALARMA 2
MODE FIJACIÓN DE MODO:
Mostrar Descripción
1. La página MENÚ se quedará
automáticamente en la primera
fijación, la cual es fijar ALARM1.
2. Presione el botón TUNE +/TUNE -
para mover la lista ARRIBA/
ABAJO.
3. Presione el botón POWER/
ENTER para co n firmar.
FIJACIÓN DE ALARMA
1. Elija ALARM 1 o ALARM 2
presionando el botón TUNE +/
TUNE -. (ALARM 1 será el primer
ítem a elegir de las preferencias
predeterminadas).
2. Presione el botón POWER/
ENTER para confirmar.
1. Elija ON/OFF para encender la
ALARMA. Presione el botón
POWER/ENTER para seleccionar
un campo (ON/OFF, horas/
minutos, AM/PM, Zumbador/
Música).
2. Presione el botón TUNE +/TUNE -
para seleccionar ON/OFF.
3. Presione el botón MENU para
guardar las fijaciones y volver al
último menú. (Predeterminado:
ALARM1 "OFF”, HORA "12:00
AM”, FUENTE "BUZZER”,
VOLUMEN "40%”)
47
Page 50

ART7
Tabla 4: MENÚ de Configuración
Ítem
Menú de
Página
TIME FIJACIÓN DE HORA DE ALARMA
SOURCE
(Fuente)
Mostrar Descripción
1. Presione el botón POWER/
ENTER para seleccionar un
campo (ON/OFF, horas/minutos,
AM/PM, Zumbador/Música).
2. Presione el botón TUNE +/TUNE -
para aumentar/disminuir la Hora/
minutos.
3. Presione el botón MENU para
guardar y volver al último menú.
(Predeterminado: ALARM1 "OFF”,
HORA "12:00 AM”, FUENTE
"ZUMBADOR”, VOLUMEN
"40%”).
FUENTE DE SONIDO DE ALARMA:
1. Elija Zumbador o AM/FM para el
sonido de Alarma. (AM/FM
requiere selección de una estación
preseleccionada. La unidad
selecciona el zumbador si la
estación preseleccionada está
vacía.)
2. Presione el botón POWER/
ENTER para seleccionar un
campo (ON/OFF, horas/minutos,
AM/PM, Zumbador/Música).
3. Presione el botón TUNE +/TUNE -
para seleccionar zumbador o
música.
4. Presione el botón MENU para
guardar y volver al último menú.
48
Page 51

Tabla 4: MENÚ de Configuración
Ítem
3.3 MEMORIAS
Menú de
Página
VOLUMEN FIJACIÓN DE VOLUMEN DE
PREDETERMIN
ADAS de FM
Mostrar Descripción
ALARMA
1. Presione el botón TUNE +/TUNE -
para aumentar/disminuir el
volumen de alarma.
2. Presione el botón MENU para
guardar y volver al último menú.
Dispositivo de Despertar Lento: La
alarma arrancará a un volumen de 0%
y aumenta en 20 segundos a la
fijación de volumen definida por el
usuario.
PANTALLA después de FIJACIÓN DE
ALARMA:
Después de definir la ALARMA, el
símbolo de alarma y la hora de
ALARM 1/ ALARM 2 se mostrará en
la parte inferior de la pantalla durante
el Modo de Espera.
PANTALLA después de FIJACIÓN DE
ALARMA:
1. Después de definir la ALARMA, el
símbolo de alarma y la hora de
ALARM 1/ ALARM 2 se mostrará
en la parte inferior de la pantalla
durante el Modo de
Funcionamiento.
MEMORIAS PREDETERMINADAS
DE FM: (Predeterminado: Vacío)
1. Presione el botón TUNE +/TUNE -
para seleccionar un número.
2. Presione el botón POWER/
ENTER para recuperar una
estación prefijada.
3. Presione el botón POWER/
ENTER para almacenar una
estación prefijada.
4. Presionar el botón PLAY/PAUSE
para salir del menú favoritos.
5. Si ingresa FM predeterminadas a
través del menú principal mientras
la radio está en modo AM el ART7
mostrará un mensaje de error (ver
a la izquierda).
49
Page 52

ART7
Tabla 4: MENÚ de Configuración
Ítem
3.4 MEMORIAS
3.5 FIJAR RELOJ FIJACIÓN DE RELOJ:
Menú de
Página
PREDETERMIN
ADAS de AM
Mostrar Descripción
MEMORIAS PREDETERMINADAS
DE AM: (Predeterminado: Vacío)
1. Presione el botón TUNE +/TUNE -
para seleccionar un número
prefijado.
2. Presione el botón POWER/
ENTER para recuperar una
estación prefijada.
3. Presione el botón POWER/
ENTER para almacenar una
estación prefijada.
4. Presione el botón PLAY/PAUSE
para salir del menú favoritos.
5. Si ingresa AM predeterminadas a
través del menú principal mientras
la radio está en modo FM el ART7
mostrará un mensaje de error (ver
a la izquierda).
Presione el botón POWER/ENTER
para confirmar.
FIJACIÓN DE HORA:
1. Elija las Horas/Minutos o AM/PM
para fijación de la hora.
2. Presione el botón POWER/
ENTER para seleccionar un
campo (hora ,minutos, AM/PM).
3. Presione el botón TUNE +/TUNE -
para aumentar/disminuir la Hora/
minutos o seleccionar AM/PM.
(Presione y mantenga para buscar
horas/minutos)
4. Presione el botón MENU para
guardar y volver al menú anterior.
50
Page 53

Tabla 4: MENÚ de Configuración
Ítem
3.6 CONTROL de
Menú de
Página
TONO
FIJACIÓN DE
AGUDOS
FIJACIÓN DE
GRAVES
Mostrar Descripción
ACCESO al CONTROL de TONO:
1. Seleccione "CONTROL de
TONO".
2. Presione el botón POWER/
ENTER para confirmar.
FIJACIÓN del CONTROL de TONO:
1. Seleccione “TREBLE LEVEL/
BASSLEVEL” (nivel de agudos/
nivel de graves).
2. Presione el botón POWER/
ENTER para confirmar.
FIJACIÓN DE NIVEL DE AGUDOS:
1. Presione el botón TUNE +/TUNE -
para ajustar el nivel de agudos
(Predeterminado: 0 dB).
2. Presione el botón MENU para
confirmar y volver al menú
anterior.
FIJACIÓN DE NIVEL DE GRAV ES:
1. Presione el botón TUNE +/TUNE -
para ajustar el nivel de graves
(Predeterminado: 0 dB).
2. Presione el botón MENU para
confirmar y volver al menú
anterior.
51
Page 54

ART7
Tabla 4: MENÚ de Configuración
Ítem
3.7 CONTROL de
Menú de
Página
PANTALLA
CONTRASTE FIJACIÓN DE CONTRASTE:
BRILLO ACCESO A BRILLO
Mostrar Descripción
FIJACIÓN del CONTROL de
PANTALLA:
1. Seleccione "CONTROL de
PANTALLA".
2. Presione el botón POWER/
ENTER para co n firmar.
1. Seleccione "CONTRAST".
2. Presione el botón POWER/
ENTER para co n firmar.
FIJACIÓN DE CONTRASTE:
1. Presione el botón TUNE +/TUNE -
para ajustar el nivel de contraste
(Valor pre determinado: 33%).
2. Presione el botón MENU para
confirmar y volver al menú
anterior.
CONTROL:
1. Seleccione “BRIGHTNESS”
(brillo).
2. Presione el botón POWER/
ENTER para co n firmar.
3.8 VERSIÓN DE
SOFTWARE
52
FIJACIÓN DE BRILLO:
1. Presione el botón TUNE +/TUNE -
para ajustar el nivel de brillo (1-7)
(Valor predeterminado: 5).
2. Presione el botón MENU para
confirmar y volver al menú
anterior.
MOSTRAR VERSIÓN DE
SOFTWARE:
1. Seleccionar “SOFTWARE VER”
(Versión de Software).
2. Presione el botón POWER/
ENTER para confirmar.
Page 55

Tabla 4: MENÚ de Configuración
Ítem
3.9 RESTAURACIÓ
Menú de
Página
N MAESTRA
Mostrar Descripción
1. Ver la información de versión de
software (ver ejemplo a la
izquierda).
2. Presione el botón POWER/
ENTER para volver al menú
anterior.
RESTAURACIÓN MAESTRA:
1. Presione el botón TUNE +/TUNE -
para seleccionar MASTER RESET
(restauración maestra).
2. Presione el botón POWER/
ENTER para confirmar.
RESTAURACIÓN MAESTRA:
1. El ART7 preguntará "Are you sure
to restore to the factory default?"
(¿está seguro que desea restaurar
los valores predeterminados de
fábrica?).
2. Seleccione "Si” para restaurar
todas las preferencias prefijadas
de fábrica. Presione "NO" para
cancelar.
3. Presione el botón TUNE +/TUNE para elegir “SI/NO”.
4. Presione el botón POWER/
ENTER para confirmar.
5. Presione el botón MENU para
volver al menú anterior sin iniciar
la Restauración Maestra.
53
Page 56

ART7
Tabla 5: Fijación de Alarma
Ítem
4.1 SONORIDAD DE
4.2 ALARMA
4.3 ZUMBADOR: ZUMBADOR:
4.4 SELECCIÓN DE
Menú de
Página
ALARMA
PRIORITARIA
FUENTE DE
ALARMA Y
ELEVACIÓN DE
VOLUMEN
Mostrar Descripción
SONORIDAD DE ALARMA,
ESPERA:
1. Cuando el ART7 está en modo
espera, si la hora de fijación de
alarma es igual a la hora de la
radio actual, sonará
automáticamente.
2. Presione el botón POWER/
ENTER para volver al modo de
espera.
SONORIDAD DE ALARMA, AUDIO:
1. Cuando el ART7 está en modo
audio (Zumbador/FM/AM), si la
hora de fijación de alarma es igual
a la hora de la radio actual, sonará
automáticamente.
2. Presione el botón POWER/
ENTER para volver al modo de
audio.
SONORIDAD DE ALARMA
PRIORITARIA:
1. Alarma prioritaria: Alarma 1,
Alarma 2. el período de zumbador
se activa cada 7 minutos hasta
que el usuario presione el botón
POWER/ENTER para volver al
modo de espera.
2. Si cualquier alarma ha sonado y
está en modo ZUMBADOR, la
segunda alarma seguirá
interrumpiendo el modo
ZUMBADOR.
1. Presione el botón SNOOZE
(zumbador) para silenciar la
Alarma.
2. El intervalo de tiempo de
zumbador es cada 7 minutos.
3. Presione el botón POWER/
ENTER para volver al modo de
espera.
Selección de Fuente de Alarma: FM/
AM
Si fija las Alarmas 1 y/o 2 suena como
FM/AM, el ART7 reproducirá la última
fuente o estación de música para
hacer sonar la alarma y el volumen se
incrementará desde 0% hasta el nivel
de volumen fijado por el usuario.
54
Page 57

Tabla 6: Fijación de Estación Prefijada
Ítem
5.1 PREFIJADA FM /AM PREFIJADAS EN CONTROL
5.2 RECUPERAR RECUPERAR ESTACI ONES
5.3 PREFIJAR/
Menú de
Página
RECUPERAR
MIS FAVO R ITOS
Mostrar Descripción
REMOTO CONTROL:
Presione y mantenga pulsado el
botón 1-10 para almacenar una
prefijada. Cuando está almacenada
el ART7 mostrará MEMORY (1-10).
PREFIJADAS DESDE EL CONTROL
REMOTO:
Presione el botón 1-10 en el control
remoto para recuperar una estación
prefijada.
FIJACIÓN DE MIS FAVORITOS
1. Presione el botón PLAY/PAUSE
durante el modo AM o FM para
ingresar al menú de favoritos.
2. Presione el botón TUNE +/TUNE -
para seleccionar un número.
3. Presione el botón POWER/
ENTER para recuperar una
estación prefijada.
4. Presione el botón POWER/
ENTER para almacenar una
estación prefijada.
5. Presione el botón PLAY/PAUSE
para salir del menú favoritos.
55
Page 58

ART7
Tabla 7: Fijación de Etiquetado iTunes
Ítem
6.1 Etiquetado de
6.2 Etiquetado de
Menú de
Página
iTunesALMACENAMIE
NTO
iTunes- DATOS
INSUFICIENTES
Mostrar Descripción
ALMACENAMIENTO EXITOSO DE
ETIQUETAS AL ART7:
El icono se muestra en pantalla
cuando está conectado en el iPod.
El icono se muestra en pantalla
cuando está soportada la función
etiqueta.
1. Presione el botón TAG (etiquetar)
para iniciar la función de
Etiquetado de iTunes (Puede
etiquetar hasta 100 canciones).
2. Cada etiqueta es eliminada
después de ser enviada al iPod
(cuando el iPod está conectado al
ART7).
3. "Tag Already Stored" (Etiqueta ya
almacenada) se muestra cuando
ya existe una etiqueta para la
canción seleccionada.
MENSAJE DE FALLO DE
ALMACENAMIENTO DE ETIQUET AS
AL ART7:
1. "Not enough information..."
(información insuficiente) se
muestra en la pantalla cuando iTag
falla debido a datos insuficientes
recuperados desde la estación.
2. "Tag cannot be stored" (No puede
almacenarse Etiqueta) se muestra
en pantalla cuando se presiona el
botón iTag cuando no se está
recibiendo una estación de Radio
HD.
6.3 Etiquetado
iTunes ETIQUETA
ENVIADA A iPod
56
ALMACENAMIENTO EXITOSO DE
ETIQUETAS AL iPOD:
El número de Etiquetas transferidas al
iPod es mostrado en la pantalla.
Page 59

Tabla 7: Fijación de Etiquetado iTunes
Ítem
6.4 Etiquetado de
6.5 Función
Menú de
Página
iTunesEtiquetado lleno
Etiquetado iPod
No Soportado
Mostrar Descripción
MENSAJE DE ETIQUETADO LLE NO:
"Unable to store tag" (no se puede
almacenar etiqueta) se muestra en la
pantalla cuando el almacenamiento
de etiquetas está lleno.
ETIQUETADO iTUNES MENSAJE,
DE NO SOPORTADO PARA iPOD:
"Not supported..." (No soportado) se
muestra en pantalla cuando su iPod
no soporta la función de etique tad o
iPod. (Ver “Gráfico de Comp atibilidad”
en la página 36).
57
Page 60

ART7
RESOLUCIÓN DE PROBLEMAS
Si algo está faltando o se encuentra dañado, o si su ART7 falla al funcionar, notifique a su
distribuidor inmediatamente. Recomendamos guardar su caja original y materiales de empaque en
caso que deba enviar la unidad en un futuro. Contacte al Centro de Atención al Cliente de
Audiovox.
Tabla 8: Fijación de Etiquetado iTunes
Síntoma Causa principal Qué hacer
ART7 No enciende • Cable de Alimentación no
Sin Sonido • Cables de Audio no
Control Remoto No Funciona • Control Remoto usado
iPod No Reproduce iPod no adecuadamente
Mala Recepción de FM • Antena de FM no instalada
conectado correctamente
• Tomacorriente de pared sin
energía disponible.
• Interruptor Manual no
encendido
• Botón de Power no encendido
conectados
• El Volumen está bajo; - MUTEse muestra en la pantalla
• ART7 no encendido
• La unidad auxiliar conectada a
la entrada AUX tiene el
volumen fijado demasiado bajo
o apagado.
demasiado lejos
• Baterías en el control remoto
instaladas incorrectamente
• Baterías descargadas en el
remoto
• Etiqueta aislante colocada
conectado al ART7
adecuadamente
• Los factores ambientales
causan mala calidad de
recepción de FM
• Verifique que el Cable de
Alimentación tiene la conexión
adecuada.
• Verifique que el fusible/
disyuntor en casa está
habilitado.
• Verifique que el interruptor
manual en el panel posterior
está encendido.
• Presione el botón de power
para ver si se enciende la
pantalla.
• Verificar que los cables de
audio están adecuadamente
conectados.
• Presione Mute; levante el
volumen.
• Presione el botón de
encendido para encender la
unidad.
• Aumente el volumen de la
unidad auxiliar conectada a la
entrada AUX hasta que se
escuche el sonido; asegúrese
de la fuente externa está en
"On".
• Mover el control remoto más
cerca del ART7.
• Asegúrese que las baterías
están instaladas
correctamente.
• Cambiar las baterías en el
control remoto.
• Quitar la etiqueta aislante
plástica cerca de la batería.
Asegúrese que son usados los
adaptadores correctos para su
iPod y verificar las conexiones.
• Verificar que la antena está
conectada adecuadamente o
trate de mover la antena para
lograr una mejor recepción.
• Podría estar en un área con
señales de FM débiles.
58
Page 61

Tabla 8: Fijación de Etiquetado iTunes
Síntoma Causa principal Qué hacer
Mala Recepción de AM • Antena de AM no instalada
Recepción Inestable de Radio HD. La mala recepción de FM afecta la
Sin canciones en la Lista de
Etiquetas
adecuadamente
• Los factores ambientales
causan mala calidad de
recepción de AM
recepción de Radio HD
• Las etiquetas fueron
transferidas al iPod
• Sin función de etiquetado
disponible
• Verificar que la antena de AM
está conectada
adecuadamente o trate de
mover la antena para lograr
una mejor recepción.
• Podría estar en un área con
señales de AM débiles.
La recepción de Radio HD
requiere buena recepción de FM.
• Podrían haberse transferido a
su iPod cuando se conectó. La
lista es borrada una vez que es
transferida a un iPod.
• Verifique que el icono Tag se
muestra en la pantalla. La
recepción de Radio HD
requiere obtener la información
de la ETIQUETA.
59
Page 62

ART7
ESPECIFICACIONES
• Potencia Promedio de salida (R.M.S.): 10W (5W x 2)
• Controlador: Controlador de Rango Completo de 2.5 pulgadas
• Resistencia: 4 ohms
• Respuesta a Frecuencias: 65Hz ~ 20kHz
• Fuente de Alimentación: CA 120V/60Hz 25W
• Blindado Magnéticamente: NO
• Dimensiones (A x A x L): 377 x 263 x 85 mm
60
Page 63

GARANTÍA LIMITADA DE 1-AÑO
AUDIOVOX CORPORATION (la Compañía) garantiza que el comprador original de tienda de este
producto que si este equipo o cualquier parte del mismo, bajo uso y condiciones normales, se
prueba defectuoso en material o mano de obra dentro del año de la fecha original de compra, tales
defectos serán reparados o reemplazados con un producto nuevo o reacondicionado ( a decisión
de la compañía) sin cargo por partes y mano de obra. Para obtener reparaciones o reemplazos
dentro de los términos de esta Garantía, por favor contacte a Audiovox al número telefónico
provisto abajo.
Esta Garantía no se extiende a la eliminación de estática del automóvil o ruido de motor, a la
corrección de problemas de antena, a costos incurridos por instalación, remoción, o reinstalación
del producto, o daños a cintas, discos compactos, accesorios o sistemas eléctricos del vehículo.
Esta Garantía no se aplica a ningún producto o parte del mismo, el cual a opinión de la Compañía,
ha sufrido o ha sido dañado a través de alteraciones, instalación inadecuada, mal manejo, mal
uso, negligencia, accidente o por remoción o daño de las etiquetas del número de serie / código de
barra o marcación de fábrica. LA EXTENSIÓN DE LA RESPONSABILIDAD DE LA COMPAÑÍA
BAJO ESTA GARANTÍA SE LIMITA A LA REPARACIÓN O REEMPLAZO PREVISTO ARRIBA Y,
EN NINGÚN CASO, LA RESPONSABILIDAD DE LA COMPAÑÍA EXCEDERÁ EL PRECIO DE
COMPRA PAGADO POR EL COMPRADOR POR EL PRODUCTO.
Esta Garantía reemplaza todas las demás garantías y responsabilidades expresas. CUALQUIER
GARANTÍA IMPLÍCITA, INCLUYENDO CUALQUIER GARANTÍA IMPLÍCITA DE
COMERCIALIZACIÓN, SE LIMITARÁ A LA DURACIÓN DE ESTA GARANTÍA ESCRITA.
CUALQUIER ACCIÓN DE VIOLACIÓN DE CUALQUIER GARANTÍA DE LA PRESENTE
INCLUYENDO CUALQUIER GARANTÍA IMPLÍCITA DE COMERCIALIZACIÓN DEBERÁ SER
INFORMADA DENTRO DE UN PERÍODO DE 1 AÑO DESDE LA FECHA ORIGINAL DE
COMPRA. EN NINGÚN CASO LA COMPAÑÍA SERÁ RESPONSABLE DE NINGÚN DAÑO
CONSECUENTE O INCIDENTAL POR VIOLACIÓN DE ESTA O CUALQUIER OTRA GARANTÍA,
EXPRESA O IMPLÍCITA CUALQUIERA. Ninguna persona o representante está autorizado a
asumir por la compañía ninguna responsabilidad distinta a la expresada en este documento en
conexión con la venta de este producto.
Algunos estados no permiten limitaciones en cuanto dura una garantía implícita o la exclusión de
limitaciones de daño consecuente o incidental por lo que las limitaciones o exclusiones de arriba
podrían no serle aplicables. Esta Garantía le brinda derechos legales específicos y podría
también tener otros derechos que variarán de estado a estado.
EE.UU.: 1-800-323-4815
CANADÁ: Llame al 1-800-323-4815 para la ubicación de una estación de garantía que brinde
servicio en su área.
61
Page 64

ART7
62
Page 65

INSTRUCTIONS DE SECURITE IMPORTANTE S
Félicitations d’avoir acheté une stations d’amarrage, une radio HD, un réveil-matin ART 7
d’Acoustic Research. Cette radio est construite pour fournir des années de service fiable sans
problèmes.
1. Lisez ces instructions.
2. Gardez ces instructions.
3. Faites attention à tous les avertissements.
4. Suivez toutes les instructions.
5. N’utilisez pas cet appareil près de l’eau.
6. Nettoyez avec un tissu moite uniquement.
7. Ne bloquez pas d’ouvertures de ventilation. Installez selon les instructions du fabricant.
8. N’installez pas près des sources de chaleur telles que des radiateurs, des registres de
chaleur, des réchauds ou d’autres appareils y compris des amplificateurs qui produisent de la
chaleur.
9. Ne défaites pas le but de sécurité d’une prise de type polarisé. Une prise polarisée a deux
rasoirs, l’un plus grand que l’autre. Le rasoir plus large est fourni pour votre sécurité. Lorsque
la prise fournie ne va pas dans votre sortie, consultez un électricien pour remplacement de la
sortie datée.
10. Protéger l’alimentation d’être marché dessus ou pincé, en particulier à la prise, aux
réceptacles de commodité et au point où ils sortent de l’appareil.
11. N’utilisez que des attaches/accessoires spécifiéspar le fabricant.
12. Débranchez cet appareil pendant des orages à éclairs ou lorsqu’il n’est pas utilisé pendant de
longues périodes.
13. Référez toute la maintenance à du personnel de maintenance qualifié. Le service est exigé
lorsque l’appareil a été endommagé d’une façon quelconque tel l’endommagement de la
corde d’alimentation ou la sortie est endommagé, de la liquide a été versée ou des objets ont
tombés dans l’appareil, ou lorsque l’appareil a été exposé à la pluie ou à l’humidité, n’opère
pas bien ou est tombé.
63
Page 66

ART7
14. N’utilisez qu’avec un chariot; un guéridon, un trépieds; une equerre ou
une table spécifiés par le fabricantou vendu avec l’appareil. Lorsque le
chariot es utilisé soyez prudent lorsque vous vous déplacez avec la
combinaison chariot/appareil pour évitez des blessures d’un
renversement.
15. L’appareil ne doit pas être exposé aux égouttements ou au eclaboussures
et qu’aucun objet rempli de liquides, tels que des vases, ne seront pas
placé sur l’appareil.
16. Ne surchargez pas la sortie murale. N’utilisez que l’alimentation comme indiqué.
17. Laisez toujours assez d’espace autour du produit pour ventilation. Ne placez pas le produit
dans ou sur un lit, un tapis, dans une bibliothèque ou un cabinet qui peuvent empêcher l’air de
circuler à travers les ouvertures de ventilation.
18. Ne placez pas des bougies allumées, des cigarettes, des cigares, etc. sur le produit.
19. Faites attention à ce que des objets ne tombent pas dans le produit.
20. La prise du SECTEUR est utilisée comme un engin de débranchement et doit rester
facilement opérable.
21. Là où il y a plus d’une connexion fournissant des VOLTAGES HASARDEUX ou DES
NIVEAUX D’ENERGIE HASARDEUX à l’équipement, une marque très visible, située près du
point d’entrée fourni pour le personnel de maintenance afin qu’il puisse gagner l’accès aux
pièces hasardeuses, sera fournie pour indiquer quel engin de débranchement isolent
complètement l’équipement et quels engins de débranchement peuvent être utilisés pur isoler
chaque section de l’équipement. .
Ce symbole indique que ce produit
incorpore l'isolation entre la tension
dangereuse et les pièces
accessibles d'utilisateur.
AVERTISSEMENT: LE FABRICANT N’EST PAS RESPONSABLE POUR DES INTERFERENCES
DE RADIO OU DE TELEVISION QUELCONQUE PROVOQUEE PAR DES MODIFICATIONS
NON-AUTORISEES A CET EQUIPEMENT. DE TELLES MODIFICATIONS PEUVENT ANNULER
L’AUTORITE DE L’UTILISATEUR D’OPERER CET EQUIPEMENT.
CONFORMITE AVEC DES REGLEMENTS FCC: Cet engin doit être conformité avec la partie 15
des Règlements FCC. L’opération est soumise aux deux conditions suivantes:
(1) cet engin peut ne pas causer des interférences nuisibles, et 2) cet engin doit accepter tout
interférence reçue, y compris l’interférence qui peut causer une opération indésirable.
A NOTER: Cet équipement a été testé et trouvé être en conformité avec les limites d’un engn
digital de Classe B, suivant la partie 15 des Règlements FCC. Ces limites sont conçue pour fournir
une protection raisonnable contre de l’interférence nuisible dans une installation résidentielle. Cet
équipement engendre et peut irradier une énergie de fréquence radio et; s’il n’est pas installée et
utilisée selon les instructions, peuvent causer des interférences nuisibles aux communications
radio. Cependant, il n’y a aucune garantie que l’interférence n’ait pas lieu dans une installation
particulière. Si cet équipement cause de l’interférence nuisible à la réception radio ou télévisuelle,
ce qui peut être déterminé en allumant et éteignant l’appareil, l’utilisateur est encouragé d’essayer
de corriger l’interférence en prenant l’une des mesures suivantes:
64
Page 67

• Réorientez ou resituez l’antenne de réception.
• Augmentez la séparation entre l’équipement et le récepteur.
• Branchez l’équipement à une sortie sur un circuit différent de celui auquel le récepteur est
branché.
• Consultez le concessionnaire ou un technicien de radio/TV pour aide.
Un APPAREIL Classe II sera marqué à permanence avec les mots « DOUBLE INSULATION » ou
« Double Insulated » et « When servicing use only identical replacement parts ».
A NOTER: Cet appareil numérique de la classe B est conforme à la norme NMB-003 du Canada.
Précautions importantes concernant les piles
• Toute pile peut présenter un risque d’incendie, d’explosion, brûlure chimique si elle est
abusée. N’essayez pas de charger une pile qui n’est pas conçue pour être rechargée,
n’incinerez pas et ne crevez pas.
• Des piles non-rechargeables telles que les piles alkalines, peuvent fuire si elles sont laissées
dans votre produit pendant longtemps. Enlevez les piles du produit si vous n’allez pas l’utiliser
pendant un mois ou plus.
• Si votre produit utilise plus d’une pile, ne mélangez pas les types et assurez-vous qu’elles
soient bien insérées. Mélanger des types ou une insertion incorrecte peut provoquer des
fuites.
• Débarrassez une pile qui fuit ou qui est déformée immédiatement. Cela peut causer des
brûlures de peau ou d’autres blessures personnelles.
• Veuillez aider à protéger l’environnement en recyclant ou débarrassant les piles selon les
règlements fédéraux, provinciaux ou locaux.
65
Page 68

ART7
CONTENU DU PAQUET
• Récepteur radio HD avec station d’amarrage iPod x 1
• Télécommande x 1
• Câble d'entrée de stéréo de 3.5mm x 1
• Adaptateur iPod x 6 (comme un paquet)
• #3 iPod minii
• #4 4G iPod & U2 iPod (20 GB)
• #5 4G iPod (40 GB)
• #6 iPod Photo & Couleur U2 iPod
• #7 iPod Photo, iPod avec affichage en couleur
• #14 iPod Touch
• AM Antenne en boucle x 1
• FM Antenne en queue de porc x 1
• Mode d’emploi x 1
• Carte pour l’enregistrement du produit x 1
• Carte de télédéchargement de musique x 1
66
Page 69

CARACTERISTIQUES DU PRODUIT
1. HD RadioTM Technology
La technologie HD Radio est l’avancée technologique la plus signifiante dans le domaine de
la transmission de radio depuis l’introduction de la radio FM il y a 45 ans. La technologie
Radio HD est un standard pour la radio digitale FM et AM. L’émission de Radio HD offre aux
auditeurs de FM ainsi que d’AM la sélection, la qualité et les services de données interactif
que les consommateurs attendent des autres technologies digitales et c’est gratuit, tout est
d’adhésion gratuite.
2. Des avantages HD Radio
• Qualité de son - CD.
• La réception clair comme de l’eau de roche, libre de parasites/de grésillement.
• La radio HD reçoit aussi des émissions analogue traditionnelles FM et AM.
• Multicasting, qui émet des écoulements de programmes multiples sur une seule
fréquence FM (103.5-1, 103.5-2, etc.), augmentant ainsi la quantité et la diversité des
sélections de contenu.
Pour trouver des stations HD Rado dans votre localité veuillez visiter www.hdradio.com. HD
RadioTM Technology Fabriqué Sous Licence d’iBiquity Digital Corporation. Des brevets EtatsUnis et étrangers. Les logos HD et Radio HD sont les marques déposées propriétaire d’iBiquity Digital Corp.
3. Amarrage d’iPod
ART7 a une station d’amarrage pour votre iPodsur le haut de l’appareil et charge votre iPod
lorsque celui-ci est amarré. L’amarrage fournit la connectivité la plus récente, permettant la
reproduction et des fichiers musiques et des fichiers vidéo. L’amarrage est directement
branché à la sortie Composite sur ART 7, pour que vous puissiez lier le ART 7 à la télévision
pour voir des films depuis votre iPod. Vous verrez une icône iPod ( ) sur l’affichage pour
montrer qu’un iPod est branché à l’ART 7.
4. Balisage des iTunes
Avec un simple bouton « tag » sur l’ART 7 vous pouvez baliser vos chansons favorites depuis
votre station de radio FM HD locale et les sauver lorsque vous voyez l’icône TAG ( ) sur
l’affichage. L’ART7 peut baliser jusqu’à 100 chansons; sauvant l’information sur la chanson
de votre récepteur Radio HD à votre iPod. Les chansons apparaîtront dans une liste d’écoute
titré ‘Tagged’ dans iTunes la prochaine fois que vous synchronisez votre iPod à votre ordinateur. V ous pouvez alors choisir d’acheter et de télédécharger les chansons balisées depuis le
®
iTunes Music Store.
Apple
67
Page 70

ART7
TABLEAU DE COMPATIBILITE
Le tableau ci-dessous montre les options iPod compatibles avec le ART7.
Table 1: Compatibilité
iPod
Mini* Y N N/A N
4th Gen Video* Y N N/A N
Photo* Y N Y N
Nano Y N N/A N
5th Gen Video Y Y Y Y
2nd Gen Nano Y Y N/A N
3rd Gen Nano
(Video)
Classic Y Y Y Y
Touch Y Y Y N
Reproducton
Audio
YYYY
Reproduction
Video
Suivre la trace
vers le haut/
vers le bas
Balisage des
iTunes
*La reproduction audio sur ces appareils fonctionne dans la plupart des cas. Si vous avez des
problèmes, veuillez vérifier si vous avez le logiciel le plus récent sur votre iPod.
**Note Speciale: Le balisage des iTunes exige iTunes 7.4 ou plus récent. Compatible avec iPod
vidéo 5ème génération, iPod Nano 3ème génération (vidéo) et iPod classique.
© 2007 Apple Inc. T ous droits réservés. Apple; le logo Apple, iPod, iT unes et Mac sont les marques
déposées de Apple Inc. enregistrés aux Etats-Unis et d’autres pays. D’autre noms de produit et de
société peuvent êre les marques déposées de leur sociétés respective.
68
Page 71

VUE D’ENSEMBLE D’ART 7
VUE D’AVANT
TUNE
MENU
POWER / ENTERFAVORITES
TAG
SLEEP
SOURCE
VOLUME
1. POWER/ENTER:
• Pressez pour allumer la puissance.
• Dans le menu des préréglés, pressez et maintenez pour mettre la station de radio
actuelle en mémoire sous le numéro sélectionné (1 à 10). L’appareil va afficher «
Memory 'Selected No' ».
• Dans le menu principal, appuyez pour entrer dans le sous-menu.
• Durant l’exécution du menu, pressez pour confirmer le reveil-matin, les préréglés, le
réglages de l’horloge et la réinitialisaion de maître.
2. MENU:
Entrez dans la liste du menu principal. La liste du menu principal est comme suit:
• ALARM 1 SET
• ALARM 2 SET
• FM PRESETS
• AM PRESETS
• CLOCK SET
• TONE CONTROL
• DISPLAY CONTROL
• SOFTWARE VERSION
• MASTER RESET
Depuis le sous-menu, pressez pour revenir à la couche précédente.
3. SOURCE:
Sélectionnez la source audio (FM/AM/iPod/AUX).
4. Jouez/Pause/FAVORITES:
• Sous le mode iPod, pressez pour jouer/faire pause une chanson.
• Sous le mode radio, pressez pour entrer dans le sous-menu PRESET et puis pressez de
nouveau pour rappeler la station mise en mémoire surlignée.
5. SLEEP:
Réglez la minuterie avec 15 minutes par robinet en comptant vers le bas à partir de 15; 30,
45, ou 60.
6. TAG:
Lorsque l’affichage montre l’icône « TAG », pressez pour sauver l’information sur la chanson
actuelle dans le banque de données ART7. Vous pouvez mettre jusqu’à 100 chansons en
mémoire.
7. TUNE /\ (En avant):
• Durant le mode radio, pressez pour augmenter la fréquence de radio, pressez et
maintenez pour 2 à 3 secondes pour automatiquement chercher et syntoniser à la
prochaine station de radio forte. Durant le mode iPod, pressez pour aller à la prochaine
piste. Pressez et maintenez pour faire avance rapide.
69
Page 72

ART7
• Dans le menu principal et la liste des préréglés, pressez pour vous déplacer vers le haut
dans la liste.
• Dans les autres sous-menus, pressez pur augmenter l’heure de reveil, le réglage de
8. TUNE V (En arrière):
9. VOLUME /\ (Monter):
10. VOLUME V (Descendre):
Top View
l’heure, la tonalité et le niveau de contrôle de l’affichage.
• Durant le mode radio, pressez pour diminuer la fréquence de radio, pressez et
maintenez pour 2 à 3 secondes pour automatiquement chercher et syntoniser à la
station de radio forte précédente.
• Durant le mode iPod, pressez pour aller à la piste précédente, pressez et maintenez
pour recul rapide.
• Dans le menu principal et la liste des préréglés, pressez pour descendre dans la liste.
• Dans d’autres sous-menus, pressez pour diminuer l’heure de reveil, le réglage de
l’heure, la tonalité et le niveau de contrôle d’affichage.
Augmenter le niveau de volume et annuler le mode mise en sourdine.
Diminuer le niveau de volume et annuler le mode mise en sourdine.
MUTE / SNOOZE
1. Bouton MUTE / SNOOZE :
• Durant le mode Radio/iPod/Aux, pressez pour mettre l’audio en sourdine. Pressez de
nouveau pour annuler la mise en sourdine.
• Lorsque le réveil se met à sonner, pressez pour ensommeiller la source de réveil
sélectionnée pour 7 minutes.
• L’intervalle à 7 minutes va se répéter jusqu’à ce que source de réveil soit éteinte en
pressant le bouton POWER et l’appareil revient au mode d’attente.
• Si dans le mode d’attente, le réveil-matin sonne, l’appareil revient au mode d’attente,
sinn l’appareil revient au mode précédent.
70
Page 73

Back View
ANTENNA
120V
60Hz / 25W
POWER
OFF ON
AUX IN VIDEO OUT 75 FM
Ω
AM
1. Câble puissance: Branchez le câble puissance à une sortie électrique.
2. POWER OFF/ON Interrupteur mécanique: Pressez pour recharger le système lorsqu’il fait
faillite après une opération abusive.
3. AUX IN: Branchez avec un câble d’audio 3,5 mm.
4. Composite VIDEO OUT: Utilisez-le pour brancher iPod à la télévision.
5. FM ANTENNA: Branchez au fil droit FM antenne à queue de porc.
6. AM ANTENNA: Branchez à l’antenne en boucle AM.
71
Page 74

ART7
R
TELECOMMANDE
Radio Aux iPod
1234
5678
910
VOL
VOL
MUTE
MENU
TUNE
SLEEP
ALARM
iPOD
TAG
iPOD
MENU
TUNE
ENTER
1. Bouton Puissance: Allumez la puissance.
2. Bouton iPod : Allez au mode iPod.
3. Bouton Aux : Allez au mode Aux.
4. Bouton Radio : Basculer entre les modes FM et AM.
5. Bouton numéros 1-10 : Pressez pour rappeler la station de radio préréglée; pressez et
maintenez n’importe quel bouton de numéros 1 à 10 pour sauver la station actuelle au
numéro de préréglé correspondant. L’affichage montrera « Memory 'Selected No' ».
6. Bouton ALARM: Pressez pour les commandes suivantes:
• 1ère Pression : Réveil 1 allumé, Réveil 2 éteint.
• 2ème Pression: Réveil 1 éteint, Réveil 2 allumé.
• 3ème Pression: Réveil 1 allumé, Réveil 2 allumé.
• 4ème Pression: Réveil 1 éteint, Réveil 2 éteint.
7. Bouton iPOD TAG : Lorsque l’affichage affiche TAG, pressez pour sauver l’information de
chanson actuelle à l’iPod dans une liste d’écoute télédéchargée iTunes. Vous pouvez baliser
jusqu’à 100 chansons.
8. Bouton iPOD MENU : Montez d’un niveau dans le menu iPod.
72
Page 75

9. Play/Pause, TUNE + (en avant)/TUNE - (en arrière), et des boutons flèches vers le haut/vers
le bas.
• Durant le mode iPod, pressez le bouton play/pause pour jouer/faire pause pendant la
reproduction d’une chanson.
• Pressez les boutons TUNE +/- pour aller à la piste prochaine/précédente.
• Pressez et maintenez les boutons TUNE +/- pour faire avance/recul rapide dans la piste
actuelle.
• Pressez les boutons de flèches montantes et descendantes pour vous déplacer vers le
haut ou vers le bas dans la liste Menu iPod.
• Durant le mode radio, pressez les boutons TUNE +/- pour augmenter et diminuer la
fréquence radio.
• Pressez et maintenez les boutons TUNE +/- pendant 2 à 3 secondes pour
automatiquement chercher la prochaine/précédente station de radio forte.
Dans d’autres modes/réglages,
• Dans le menu principal et la liste des préréglés, pressez les boutons TUNE +/- pour
sélectionner les articles de la liste menu.
• Dans le sous-menu, pressez les boutons TUNE +/- pour augmenter/diminuer l’heure du
réveil, tonalité et le niveau de contrôle d’affichage.
10. Bouton MENU :
• Entrez dans la liste Menu Principal.
• Lorsque vous êtes dans le sous-menu, pressez pour revenir à la couche précédente.
11. Boutons VOL +/- : Augmenter ou diminuer le volume.
12. Bouton MUTE :
• Sous le mode Radio/iPod/Aux, pressez pour mettre l’audio en sourdine pendant
l’opération normale depuis n’importe quelle source. Pressez de nouveau pour annuler la
mise en sourdine et reprendre le niveau d’audio précédent.
• Lorsque le réveil est réglé, pressez pour faire sommeiller la source de réveil
sélectionnée pendant 7 minutes. L’intervalle à 7minutes va se répéter jusqu’à ce que la
source de réveil soit éteinte en pressant le bouton Puissance et l’appareil revienne au
mode d’attente.
13. Bouton SLEEP : Régler la minuterie sommeil à des intervalles de 15 minutes par taraud, en
comptant à partir de 15, 30, 45, ou 60 minutes.
14. Bouton ENTER :
• Dans le menu, pressez pour entrer dans le sous-menu.
• Dans un sous-menu, pressez pour confirmer le réveil, les préréglés, les réglages de
l’horloge et la réinitialisation de maître.
73
Page 76

ART7
OPERATION
Placez le ART7 sur une surface stable telle qu’une table, un bureau, un comptoir ou un rang.
Affichage
1. Affichage de source : La source sélectionnée qui est « RADIO » dans l’image ci-dessus, est
toujours affiché dans le coin droite en haut. ‘FM’ est indiqué à droite de l’affichage. D’autres
indicateur comprennent iPod et AUX.
2. Affichage iPod Display :Si un iPod est amarré, l’icône iPod ( ) apparaît jusqu’à ce que vous
n’enleviez le iPod.
3. Affichage TAG : Lorsque vous écoutez à une station de radio HD, vous pouvez baliser une
station favorite pour la mettre en mémoire dans une liste d’écoute sur votre iPod pour un
télédéchargement futur à travers iTunes. Si n’est pas affiché, la station de radio n’a pas
fourni les données nécessaires pour mettre l’information sur la chanson en mémoire.
4. Bande : L’indicateur AM ou FM est affiché près du coin droite en haut de l’écran lorsque vous
écoutez à une station de radio AM ou FM.
5. HD Logo: L’indicateur HD est affiché lorsque la station est syntonisée à une station émettant
un signal HD Radio. Des stations HD Radio sont disponibles et pour AM et pour FM.
6. Force du Signal : La force de l’indicateur du signal HD Radio (à droite en haut) est affiché
lorsqu’un signal digital HD Radio est présent. Si le signal est trop faible ou la station ne
transmet pas dans le format HD Radio, la force du signal ne sera pas affichée.
7. Fréquence : La fréquence de station est affichée lorsque l’on reçoit une émission HD Radio.
S’il y a des stations multicasting supplémentaires disponibles, la fréquence va afficher un tiret
suivi par un numéro de station multicast (Exemple 103.5 - 1).
8. Lettres d’émission ou la fréquence d’une station : Les lettres d’émission de la station seront
affichées lorsque l’on reçoit une émission HD Radio. La fréquence de la station sera affichée
si aucune émission HD Radio n’est disponible.
9. Données du programme : Le ART7 est capable d’afficher des données associées au
programme, y compris des titres de chansons en temps réel, l’information sur l’artiste et sur
l’album, lorsque ceux-ci sont émis.
10. Affichage de réveil : Des réglages de réveil en double sont disponibles. Lorsque les réglages
de réveil sont activés, l’information sera affichée au coin gauche en bas de l’écran.
74
Page 77

UTILISER LE ART7
Table 2: Basic Operation
Item Bouton Affichage Configuration
1.1 POWER/ENTER Puissance Allumée:
POWER / ENTER
1. Pressez le bouton POWER/
ENTER pour allumer le ART7.
2. Le logo Acoustic Research est
montré sur l’affichage pendant 2
secondes.
Le ART7 restera dans le mode
d’écoute le plus récent (par defaut:
FM Mode, 87.5 MHz).
1.2 POWER/ENTER MODE D’ATTENTE:
1.3 VOLUME UP Volume vers le haut:
1.4 VOLUME DOWN Volume vers le bas:
1. Le ART7 montrera l’heure de l’horloge sur l’affichage.
2. La fonction de réveil ART7 est
toujours active et le statut se
montre près du bas de l’affichage.
1. Pressez le bouton VOLUME /\
pour ajuster le volume entre 0%100% (par défaut: 40%).
1. Pressez le bouton VOLUME V
pour ajuster le volume entre
100%- 0% (par défaut: 40%).
75
Page 78

ART7
Table 2: Basic Operation
Item Bouton Affichage Configuration
1.5 SOURCE Sélection de Source:
1. Pressez le bouton SOURCE pour
sélectionner Mode Audio.
2. Pressez le bouton SOURCE pour
traverser les modes audio
lorsqu’un iPod est amarré (FM,
AM, iPod, AUX).
3. Pressez le bouton SOURCE pour
traverser les modes audio lorsque
le iPod n’est pas amarré (FM, AM,
AUX).
4. Revient automatiquement au
mode FM lorsque le iPod n’est pas
amarré.
1.6 SNOOZE/MUTE SNOOZE:
1.7 SLEEP SLEEP:
1. Pressez le bouton SNOOZE pour
mettre le volume dans le mode
audio en sourdine (« - MUTE - »
clignote).
1. 1. Pressez le bouton SLEEP plusieurs fois de suite pour régler
l’heure de sommeil par tranches
de 15 minutes jusqu’à 60 minutes
(par défaut: 0).
2. Le ART7 va entrer le mode
d’attente lorsque la minuterie de
sommeil compte en descendant
jusqu’à zéro.
76
Page 79

Table 3: Audio Mode (Source: FM-AM-iPod-AUX)
Articl
e
2.1 FM Radio Mode FM RADIO:
2.2 AM Radio Mode AM RADIO:
Bouton Affichage Configuration
(Détecter automatiquement le mode
HD. Voir « HD Radio Notes ». )
1. Pressez le bouton SOURCE pour
choisir la source de musique FM
(FM Frequency: 87.5~108.1 MHz
Step 100KHz).
2. Scannage automatique: Pressez
et maintenez le bouton TUNE +/
TUNE - pour 2 secondes pour
chercher automatiquement des
stations fortes.
3. Bouton VOL +/VOL -: Pressez
pour ajuster le volume.
(Mode HD détection automatique. V oir
See « HD Radio Notes ».)
1. Pressez le bouton SOURCE pour
choisir la source de musique AM
(AM Frequency: 520~1720 KHz
Step 10kHz).
2. Scannage automatique: Pressez
et maintenez le bouton TUNE +/
TUNE - pour 2secondes pour
chercher automatiquement des
stations fortes.
3. Bouton VOL +/VOL - : Pressez
pour ajuster le volume.
2.3 iPod Mode iPod:
1. Pressez le bouton SOURCE pour
2. Bouton PLAY/PAUSE : Pressez
3. Bouton TUNE +/TUNE - : Pressez
4. Bouton TUNE +/TUNE - : Pressez
5. Bouton VOL +/VOL - : Pressez
77
choisir une source de musique
iPod.
pour jouer ou pauser la musique
iPod.
pour accéder à la chanson iPod
prochaine/précédente.
et maintenez pour faire avance
rapide/rembobinage de la chanson
qui joue actuellement.
pour ajuster le volume.
Page 80

ART7
Table 3: Audio Mode (Source: FM-AM-iPod-AUX)
Articl
e
2.4 AUX IN Mode AUX:
Bouton Affichage Configuration
1. Pressez le bouton SOURCE pour
choisir une source AUX.
2. Bouton VOL +/VOL - : Pressez
pour ajuster le volume.
Notes sur les stations de radio HD
1. Lorsqu’une station de radio émet un signal HD Radio, l’icône HD ( ) clignotera pour
indiquer que le ART7 est en train d’acquérir le signal HD Radio. Lorsque le signal est acquis,
l’icône HD va s’arrêter de clignoter et va apparaître sur l’affichage.
Note sur la multidiffusion: La multidiffusion est une fonction de la technologie HD Radio qui
permet aux stations d’émettre des flux de données multiples sur des sous-chaînes de leur
fréquence principale. Des stations multidiffusion peuvent contenir d’autres formats musicaux,
de la circulation locale; la météo et les sports. Ces stations multidiffusion sont trouvées «
entre » les stations qui sont déjà sur la bande de la fréquence.
(A Noter: Des stations de radio multidiffusion sont accédées de la même manière que vous
utiliseriez pour une fréquence de station en utilisant les fonctions Tune ou Seek.)
2. Multidiffusion HD radio (uniquement FM): Mis à part des signaux de radio clair et libre de
parasites, la technologie HD Radio permet aux stations FM de multidiffuser. Ceci permet aux
stations de radio d’offrir plus d’une chaîne ou station (multidiffusion) de programmes à la fois
en utilisant leur fréquence existante sur le composeur de radio.
Exemple de multidiffusion : Par exemple: Si la station de radio principale est à 103.5, la
même station de radio peut avoir des multidiffusions de station de 103.5-1, 103.5-2. Le suffixe
2, 3, 4, 5, 6, 7 représente les sous-chaînes de stations multidiffusion. La position - 1 est toujours le programme de la station principale.
3. Toutes les stations de radio HD n’émettront pas de programmes multidiffusion. Ceux qui sont
en train de multidiffuser auront typiquement 1 à 2 programmes multidiffusion à ce moment-là,
avec des programmes ajoutés tout le temps.
4. Signal Digital Non-disponible/Perte de signal digital: Si le ART7 encourt une perte de signal
digital HD radio, le mode radio va automatiquement changer au mode de radio analogue. Si le
service multidiffusion d’une station est interrompu lorsqu’il est en train de jouer, le ART7
changera au programme de station principale. Si une station multidiffusion sauvée à un
préréglé est choisie lorsque la station multidiffusion n’est pas disponible, le ART7 va changer
à la station d’émission principale de la station de radio.
5. Retard HD Radio : Pour surmonter le retard que les systèmes digitaux engendre d’habitude,
la technologie HD Radio se sert d’abord du signal analogue de la station pour syntoniser
rapidement à une station AM ou FM. Au bout d’à peu près cinq secondes l’audio va changer
doucement de l’analogue de la station au signal HD Radio digital. Normalement cette
transition des signaux analogues aux digitaux se déroule sans problèmes. Lorsque la
transition se déroule sans problèmes, la station de radio a mis en oeuvre la transmission HD
Radio correctement. Cependant, si la station ne l’a pas fait correctement, vous pouvez avoir
un saut dans le contenu du programme de plusieurs secondes. Ceci n’indique pas un
problème avec votre ART7. C’est un problème à résoudre pour l’émetteur HD Radio. Ceci va
78
Page 81

être corrigé par la station tôt ou tard. Le programme analogue d’aujourd’hui n’est présent que
sur la chaîne principale. Si vous sélectionnez une chaîne HD préréglée et syntonisez
directement à la chaîne de multidiffusion digitale de la station HD Radio, le ART7 va prendra à
peu près cinq secondes pour commencer à jouer: C’est une opération normale.
Table 4: Configuration MENU
Article Page Menu Affichage Description
3.1 Menu Page Liste de MENU principal :
3.2 ALARM 1/
ALARM 2
MODE REGLAGE DE MODE :
TIME Régler l’heure du réveil:
1. La page MENU va s’arrêter
automatiquement au premier
réglage qui est ALARM1.
2. Pressez le bouton Press the TUNE
+/TUNE - pour vous déplacer Vers
le haut/vers le bas de la liste.
3. Pressez le bouton POWER/
ENTER pour confirmation.
Réglage d’alarme :
1. Choisissez soit ALARM 1 ou
ALARM 2 en pressant le bouton
TUNE +/TUNE -. (ALARM 1 sera
le premier article à choisir depuis
le réglage par défaut.
2. Pressez le bouton POWER/
ENTER pour confirmation.
1. Choisir ON/OFF pour allumer
ALARM. Pressez le bouton
POWER/ENTER pour sélectionner
un champ (ON/OFF , heure/minu te,
AM/PM, Buzzer/Music).
2. Pressez le bouton TUNE +/TUNE -
pour sélectionner ON/OFF.
3. Pressez le bouton MENU pour
sauver les réglages et revenir au
dernier menu (Par défaut:
ALARM1 « OFF », TIME « 12:00
AM », SOURCE « BUZZER »,
VOLUME « 40% »)
1. Pressez le bouton POWER/
ENTER pour sélectionner un
champ (ON/OFF, heure/minute,
AM/PM, Buzzer/Music).
2. Pressez le bouton TUNE +/TUNE -
pour augmenter/diminuer les
heures/minutes.
3. Pressez le bouton MENU pour
sauver et revenir au dernier menu
(Par défaut : ALARM1 « OFF »,
TIME « 12:00 AM », SOURCE «
BUZZER », VOLUME « 40% »).
79
Page 82

ART7
Table 4: Configuration MENU
Article Page Menu Affichage Description
SOURCE SOURCE AUDIO DU REVEIL:
1. Choisissez Buzzer ou AM/FM pour
le son du réveil (AM/FM exige la
sélection d’une station préréglée.
L’appareil a recours au réglage de
défaut si le préréglé sélectionné
est vide.)
2. Pressez le bouton POWER/
ENTER pour sélectionner un
champ (ON/OFF, heure/minute,
AM/PM, Buzzer/Music).
3. Pressez le bouton TUNE +/TUNE -
pour sélectionner buzzer ou
musique.
4. Pressez le bouton MENU pur
sauver et revenir au dernier menu.
VOLUME REGLER LE VOLUME DU REVEIL:
1. Pressez le bouton TUNE+/TUNE-
pour augmenter/diminuer le volume du réveil.
2. Pressez le bouton MENU pour
sauver et revenir au dernier menu.
Fonction à réveil ralenti: Le réveil
commencera à un volume de 0% et
augmentera sur une intervalle de 20
secondes au réglage de volume réglé
par l’utilisateur.
Affichage après le réglage du réveil:
Après la configuration du réveil, le
symbole et l’heure d’ALARM 1/
ALARM 2 va se montrer en bas de
l’affichage pendant le mode d’attente.
80
Page 83

Table 4: Configuration MENU
Article Page Menu Affichage Description
Affichage après le réglae du réveil:
1. Après le réglage d’ALARM, le
symbole du réveil-matin et l’heure
de ALARM 1/ALARM 2 se montrera pendant le Mode d’Opération.
3.3 FM PRESETS Préréglés FM : (par défaut : Vide)
3.4 AM PRESETS Préréglés AM : (Par défaut: Vide)
1. Pressez le bouton TUNE +/TUNE -
pour sélectionner un numéro.
2. Pressez le bouton POWER/
ENTER pour rappeler une station
préréglée.
3. Pressez et maintenir le bouton
POWER/ ENTER pour mettre une
station préréglée en mémoire.
4. Pressez le bouton PLAY/PAUSE
pour sortir du menu des favorits.
5. Si vous entrez des préréglés FM à
travers votre menu principal, alors
que la radio est en mode AM, le
ART7 va afficher un message
d’erreur. (voir gauche).
1. Pressez le bouton TUNE +/TUNE -
pour sélectionner un numéro
préréglé.
2. Pressez le bouton POWER/
ENTER pour rappeler une station
préréglée.
3. Pressez et maintenez le bouton
POWER/ENTER pour mettre une
station préréglée en mémoire.
4. Pressez le bouton PLAY/PAUSE
pour sortir du menu des favorits.
5. Si vous entrez les préréglés AM à
travers le menu principal, alors
que la radio est en mode FM, le
ART7 va afficher un message
d’erreur (voir gauche).
81
Page 84

ART7
Table 4: Configuration MENU
Article Page Menu Affichage Description
3.5 CLOCK SET Régler l’horloge :
3.6 TONE CONTROL
Pressez le bouton POWER/ENTER
pour confirmation.
Régler l’Heure :
1. Choisir les heures/minutes ou AM/
PM pour réglage de l’heure.
2. Pressez le bouton POWER/
ENTER pour sélectionner un
champ (heure, minute, AM/PM).
3. Pressez le bouton TUNE +/TUNE -
pour augmenter/ diminuer l’heure/
minute ou sélectionner AM/PM.
(Pressez et maintenez pour
scanner les heures/minutes).
4. Pressez le boutonMENU pour
sauver et revenir au menu
précédent.
CONTROLE DE TONALITE
D’ACCES :
1. Sélectionner « TONE CONTROL
».
2. Pressez le bouton POWER/
ENTER pour confirmation.
REGLAGE DE CONTROLE DE
TONALITE :
1. Sélectionner « TREBLE LEVEL/
BASS LEVEL ».
2. Pressez le bouton POWER/
ENTER pour confirmation.
TREBLE SET REGLAGE DU NIVEAU AIGU :
BASS SET REGLAGE DU NIVEAU DE BASSE :
1. Pressez le bouton TUNE +/TUNE -
pour ajuster le niveau d’aigu
(Défaut: 0dB).
2. Pressez le bouton MENU pour
confirmer et revenir au menu
précédent.
1. Pressez le bouton TUNE +/TUNE -
pour ajuster le niveau de basse
(par défaut: 0dB).
2. Pressez le bouton MENU pour
confirmer et revenir au menu
précédent.
82
Page 85

Table 4: Configuration MENU
Article Page Menu Affichage Description
3.7 DISPLAY CONTROL
REGLAGE DU CONTROLE
D’AFFICHAGE:
1. Sélectionnez « DISPLAY CONTROL ».
2. Pressez le bouton POWER/
ENTER pour confirmation.
CONTRAST REGLAGE DU CONRASTE:
BRIGHTNESS ACCEDER AU CONTROLE DE
3.8 SOFTWARE
VERSION
1. Sélectionnez « CONTRAST ».
2. Pressez le bouton POWER/
ENTER pour confirmation.
REGLAGE DU CONTRASTE:
1. Pressez le bouton TUNE +/TUNE -
pour ajuster le niveau du contraste
(Par défaut: 33%).
2. Pressez le bouton MENU pour
confirmer et revenir au menu
précédent.
LUMINOSITE:
1. Sélectionnez « BRIGHTNESS ».
2. Pressez le bouton POWER/
ENTER pour confirmation.
REGLAGE DE LUMINOSITE:
1. Pressez le bouton TUNE +/TUNE -
pour ajuster le niveau du rétroéclairage (1 à 7) (Par défaut 5).
2. Pressez le bouton MENU pour
confirmer et revenir au menu
précédent.
AFFICHAGE DE LA VERSION DU
LOGICIEL:
1. Sélectionnez « SOFTWARE VER
».
2. Pressez le bouton POWER/
ENTER pour confirmation.
83
Page 86

ART7
Table 4: Configuration MENU
Article Page Menu Affichage Description
1. Visionner l’information sur la version du logiciel (voir l’exemple à
gauche).
2. Pressez le bouton POWER/
ENTER pour revenir au menu
précédent.
3.9 MASTER
RESET
REINITIALISATION DU MAÏTRE:
1. Pressez le bouton TUNE +/TUNE -
pour choisir MASTER RESET.
2. Pressez le bouton POWER/
ENTER pour confirmation.
REINITIALISATION DU MAITRE:
1. Le ART7 demandera, « Etes vous
sûr de vouloir rétablir les réglages
par défaut d’usine? »
2. Choisir « YES » pour rétablir tous
les réglages par défaut d’usine.
Pressez « No » pour annuler.
3. Pressez le bouton TUNE +/TUNE pour choisir « YES/NO ».
4. Pressez le bouton POWER/
ENTER pour confirmation.
5. Pressez MENU pour revenir au
menu précédent sans entamer la
Réinitialisation du Maître.
84
Page 87

Table 5: Configuration du réveil matin
Articl
4.1 ALARM SOUND-
4.2 ALARM PRIOR-
4.3 SNOOZE SNOOZE:
4.4 ALARM
Page Menu Affichage Description
e
ING
ITY
SOURCE
SELECTION &
VOLUME RAMP
UP
SONNERIE DU REVEIL, EN
ATTENTE:
1. Lorsque le ART7 est en mode
d’attente, si le réglage de l’heure
du réveil égale l’heure de la radio
actuelle, il sonne automatiquement.
2. Pressez le bouton POWER/
ENTER pour revenir au mode
d’attente.
SONNERIE DE REVEIL, AUDIO:
1. Lorsque le ART7 est en mode
audio (Buzzer/FM/AM), si le
réglage de l’heure du réveil égale
l’heure de la radio actuelle, il
sonne automatiquement.
2. Pressez le bouton POWER/
ENTER pour revenir au mode
audio.
PRIORITE A LA SONNERIE DU
REVEIL:
1. Priorité du réveil: Réveil 1, Réveil
2. La période Snooze est réglée
en intervalles de 7 minutes jusqu’à
ce que l’utilisateur presse le bouton POWER/ENTER pour revenir
au mode d’attente.
2. Si l’un des réveils a sonné et est
en mode SNOOZE le deuxième
réveil va interrompre toujours la
mode SNOOZE.
1. Pressez le bouton SNOOZE pour
mettre le réveil en sourdine.
2. L’intervalle de l’he ure de Snooze
est toutes les 7 minutes.
3. Pressez le bouton POWER/
ENTER pour revenir au mode
d’attente.
Sélection de source du réveil: FM/AM
Si vous voulez régler en FM/AM, le
ART7 va jouer la dernière source de
musique ou la dernière station pour
sonner le réveil et le volume augmentera de 0% jusqu’au niveau de volume
réglé par l’utilisateur.
85
Page 88

ART7
Table 6: Configuration de stations préréglées
Articl
5.1 PRESET DES PREREGLES FM /AM SUR LA
5.2 RECALL RAPPELER UNE STATION PRERE-
5.3 MY FAVORITE
Page Menu Affichage Description
e
TELECOMMANDE:
Pressez et maintenez un bouton 1 à
10 pour mettre un préréglé en mémoire. Lorsqu’il est mis en mémoire le
ART7 va afficher MEMORY (1-10).
GLEES DEPUIS LA TELECOMMANDE :
Pressez le bouton 1-10 sur la télécommande pour rappeler une station
préréglée.
PRESET/
RECALL
MON REGLAGE DE PREREGLE
FAVORIS:
1. Pressez le bouton PLAY/PAUSE
pendant qu’on est en mode AM ou
FM pour entrer dans le menu des
favoris.
2. Pressez le bouton TUNE +/TUNE -
pour sélectionner un numéro.
3. Pressez le bouton POWER/
ENTER pour rappeler une station
préréglée.
4. Pressez et maintenez le bouton
POWER/ENTER pour mettre une
station préréglée en mémoire.
5. Pressez le bouton PLAY/PAUSE
pour sortir du menu des favoris.
86
Page 89

Table 7: Configuration de balisagte de iTunes
Articl
6.1 iTunes Tagging -
6.2 iTunes Tagging -
Page Menu Affichage Description
e
STORAGE
INSUFFICIENT
DATA
MISE EN MEMOIRE REUSSIE DES
BALISES A ART7:
L’icône se montre sur l’écran lorsque le iPod est branché.
L’icône se montre sur l’écran
lorsque la fonction balise est
soutenue.
1. Pressez le bouton TAG pour initier
la fonction iTunes Tagging (vous
pouvez baliser jusqu’à 100 chansons).
2. Chaque balise est dégagée après
qu’elle soit envoyée à l’iPod
(lorsque le iPod est amarré à
l’ART7).
3. « Tag Already Stored » se montre
dans l’affichage lorsqu’une balise
pour la chanson sélectionnée
existe déjà.
MESSAGE ECHOUE DE LA MISE
EN MEMOIRE DES BALISES A
L’ART7:
1. « Not enough information...» se
montre sur l’écran lorsque le iTag
échoue à cause de l’insuffisance
des données récupérées depuis la
station.
2. « T ag cannot be stored» se montre
sur l’écran lorsque le bouton iTag
est pressé alors qu’on ne reçoit
pas une station de radio HD.
6.3 iTunes Tagging TAG S ENT TO
iPod
87
MISE EN MEMOIRE REUSSIE DES
BALISES A L’IPOD :
Le nombre des Balises transférées à
l’iPod est affiché sur l’écran.
Page 90

ART7
Table 7: Configuration de balisagte de iTunes
Articl
6.4 iTunes Tagging -
6.5 iPod Tag Feature
Page Menu Affichage Description
e
Ta g Full
Not Support
MESSAGE COMPLET DE BALISE:
« Unable to store tag » se montre sur
l’écran lorsque la mémoire des balise
est pleine.
MESSAGE DE NON-SOUTIEN DES
BALISES ITUNES POUR L’iPOD:
« Not supported...» se montre sur
l’écran lorsque votre iPod ne soutien
pas la fonction de balisage de l’iPod
(Voir « TABLEAU DE COMPATIBILITE » à la page 68).
88
Page 91

DEPANNAGE
S’il y a des éléments qui manque ou sont endommagés, ou si ART7 n’opère pas, notifiez
immédiatement votre concessionnaire. Nous recommandons que vous gardiez votre carton et
matériau d’emballage originels au cas où vous auriez besoin d’expédier l’appareil dans l’avenir.
Prenez contact avec Audiovox Consumer Service Center.
Table 8: iTunes Tagging Setup
Symptôme Cause fondamentale Que faire?
ART7 ne s’allume pas • Le câble d’alimentation AC
Pas de Son • Des câbles audio ne sont pas
La télécommande ne fonctionne
pas
iPod ne joue pas iPod n’est pas bien amarré dans
Réception FM de mauvaise qualité • L’antenne FM n’est pas bien
n’est pas bien branché
• La puissance n’est pas
disponible à la sortie murale
• Interrupteur manuel n’est pas
allumé
• Bouton puissance n’est pas
allumé
branchés
• Volume est en baisse; MUTE- est affiché sur l’écran
• ART7 n’est pas allumé
• Appareil auxiliaire branché à
l’entrée AUX a le volume trop
bas ou éteint.
• La télécommande utilisée de
trop loin
• Des piles ne sont pas bien
installées dans la
télécommande.
• Des piles sont épuisées.
• Ongle d’isolement installé
l’ART7
installée
• Des facteurs
environnementaux donnent
une qualité de réception
mauvaise
• Vérifiez que le câble
d’alimentation AC est bien
branché.
• Vérifiez que le fusible/
disjoncteur chez vous est
éteint.
• Vérifiez que l’interrupteur
manuel sur le panneau
d’arrière est allumé.
• Pressez le bouton puissance
pour voir si l’affiche s’illumine.
• Vérifiez que les câbles audio
sont bien branchés.
• Appuyez sur Mute; faites
monter le volume
• Pressez le bouton puissance
pour mettre l’appareil en
marche.
• Augmentez le volume de
l’appareil auxiliaire branché à
l’entrée AUX jusqu’à ce qu’un
son soit entendu; assurez-vous
que la source externe est « On
».
• Approchez la télécommande
vis à vis de l’ART7.
• Assurez-vous que les piles
soient bien installées.
• Changez les piles dans la
télécommande.
• Enlevez l’onglet d’isolement en
plastique près de la pile.
Assurez vous que les adaptateurs
corrects sont utilisés pour votre
iPod et vérifiez les branchements.
• Vérifiez que l’antenne FM est
bien branchée ou bien faites
déplacer l’antenne pour avoir
une meilleure réception.
• Vous pouvez être placé dans
une région avec des signaux
FM faibles.
89
Page 92

ART7
Table 8: iTunes Tagging Setup
Symptôme Cause fondamentale Que faire?
Réception AM de mauvaise qualité • Antenne AM n’est pas bien
Réception de Radio HD instable La qualité faible de la réception FM
Pas de chansons dans la liste des
balises
installée
• Des facteurs
environnementaux peuvent
être la cause d’une réception
AM de mauvaise qualité
affecte la réception HD Radio
aussi.
• Des balises ont été transférées
à l’iPod
• Pas de fonction balisage
disponible
• Vérifiez que l’antenne AM est
bien branchée ou bien essayez
de déplacer l’antenne afin
d’avoir une meilleure réception.
• Vous pouvez être placé dans
une région où les signaux AM
sont faibles.
La réception HD Radio exige une
bonne réception FM.
• Elles peuvent avoir été
transférée à votre iPod lorsque
celui-ci s’est amarré. La liste
est effacée lorsque les balises
sont trasnférées à un iPod.
• Vérifiez l’icône Tag affiché e sur
l’écran. La réception HD Radio
est exigée pour obtenir
l’information TAG.
90
Page 93

SPECIFICATIONS
• Puissance de sortie moyenne (R.M.S): 10W (5W x 2)
• Pilote: 2.5 inch Pilote à gamme pleine
• Résistence: 4 ohms
• Réponse en fréquence: 65Hz ~ 20kHz
• Alimentation: AC 120V/60Hz 25W
• Protégé magnetiquement: NON
• Dimensions (W x H x D): 377 x 263 x 85 mm
91
Page 94

ART7
GARANTIE LIMITEE D’UN AN
AUDIOVOX CORPORATION (la Société) garantit à l’acheteur originel auprès du détaillant de ce
produit que si ce produit ou une partie quelconque de ce produit, dans des conditions d’utilisation
normale, s’avèrent défectueux en matériau ou l’artisanat, dans un an après la date d’achat
d’origine, de tels défauts seront réparés ou remplacés par un produit neuf ou reconditionné (à la
discretion de la Société) sans charge pour les pièces défectueuses ni pour le travail de réparation.
Pour obtenir réparation ou remplacement dans des termes de cette garantie, veuillez prendre
contact avec Audiovox au numéro de téléphone donné ci-dessous. .
Cette Garantie ne s’étend pas à l’elimination des parasites de voiture ou bruit du moteur; à la
correction des problèmes d’antenne, aux coûts d’installation, d’enlèvement ou de réinstallation de
ce produit, ou des endommagements aux bandes, disques compacts, accessoires ou des
systèmes électriques de la voiture. Cette garantie ne s’applique pas à un produit ou une partie
quelconque du produit qui, dans l’avis de la Société, a souffert ou a été endommagé par la
modification, installation incorrecte, mauvaise manipulation, usage abusif, négligence, accident ou
par l’enlèvement ou défiguration du numéro de série d’usine/code à barres ou des marquages. LA
MESURE DE LA RESPONSABILITE DE LA SOCIETE SE LIMITE A LA REPARATION OU
REMPLACEMENT MENTIONNES CI-DESSUS ET, EN AUCUN CAS, LA RESPONSABILITE DE
LA SOCIETE N’EXCEDERA LE PRIS D’ACHAT PAYE PAR L’ACHETEUR POUR CE PRODUIT. .
Cette garantie tient lieu de toutes les garanties ou responsabilités expresses. TOUTE GARANTIE
IMPLIQUEE, Y COMPRISE TOUTE GARANTIE IMPLIQUEE DE MARCHANDABILITE, SERA
LIMITE 0 LA DUREE DE CETTE GARANTIE ECRITE. TOUT ACTION POUR LA RUPTURE DE
TOUTE GARANTIE CI-PRESENT Y COMPRIS TOUTE GARANTIE IMPLIQUEE DE
MARCHANDABILITE DOIT ETRE PORTEE DANS UNE PEIRODE D’UN AN DE LA DATE
D’ACHAT ORIGINELLE. EN AUCUN CAS LA SOCIETE NE SERA RESPONSABLE POUR DES
DOMMAGES ACCESSOIRES OU INDIRECTS POUR LA RUPTURE DE CETTE OU TOUT
AUTRE GARANTIE, EXPRESSE OU IMPLIQUEE, DU TOUT. Personne, y compris un
représentant de la société n’est autorisée à assumer de la part de la Société aucune responsabilité
autre que celle exprimée par la présente par rapport à la vente de ce produit.
Certains états ne permettent pas de limitations sur la durée d’une garantie impliquée ou l’exclusion
ou la limitation des dommages accessoires et indirects, alors les limitations et exclusions ci-dessus
peuvent ne pas s’appliquer à vous. Cette garantie vous donne des droits spécifiques et vous
pouvez avoir d’autres droits qui varieront d’état en état.
U.S.A: 1-800-323-4815
CANADA: Appelezl 1-800-323-4815 pour l’emplacement d’une station de garantie désservant
votre région.
92
Page 95

Page 96

Audiovox Electronics Corporation
150 Marcus Blvd
Hauppauge, New York 11788
© 2009 Audiovox Electronics Corporation
Acoustic Research is a registered trademark of
Audiovox Electronics Corporation.
PRINTED IN CHINA.
www.acoustic-research.com
V1.0
 Loading...