

INTRODUCTION
Check your system carefully
. If it has
been damaged in transit, report the
damage immediately by calling your
Acoustic Research dealer and/or the
trucking firm that delivered it.
Observe all warnings and cautions.
WARNING
To
prevent fire or shock hazard, DO
NOT EXPOSE this subwoofer system
to rain or excessive moisture.
We recommend that you not operate
your speakers or subwoofer with the
bass, treble and loudness controls
set to full boost. This will place
undue strain on the electronics and
speakers and could damage them.
Whenever changing cables, pulling
plugs, etc., ALWAYS TURN OFF ALL
EQUIPMENT including the Subwoofer
.
This prevents transients from entering the speakers and prevents electrical energy from reaching you.
Keep all connections out of the
reach of children.
To
avoid electrical shock,
DO NOT
OPEN THE SUBWOOFER!
There
are no user serviceable parts inside.
CAUTION
RISK OF ELECTRICAL SHOCK
DO NOT OPEN
WARNING: SHOCK HAZARD - DO NOT OPEN
AVIS: RISQUE DE CHOC ELECTRIQUE - NE PAS OUVRIR.
CAUTION: TO REDUCE THE RISK OF ELECTRIC SHOCK, DO
NOT REMOVE THE COVER. NO USER SERVICEABLE PARTS
INSIDE. REFER SERVICING TO QUALIFIED
SERVICE PERSONNEL.
The lightning flash with arrowhead symbol, within an equilateral
triangle, is intended to alert the user to the presence of
uninsulated “dangerous voltage” within the product’s enclosure
that may be of sufficient magnitude to constitute a risk of
electrical shock to persons.
The exclamation point within an equilateral triangle is intended to
alert the user to the presence of important operating and
maintenance (servicing) instructions in the literature accompanying
the product.
IMPORTANT SAFETY PRECAUTIONS
ATTENTION:
Please read these instructions thoroughly before attempting to operate your AR Subwoofer. Be sure to save this
manual for future reference. Also save your bill of sale, as
it may be required for warranty service.
CAUTION:
Please ensure that the correct plug is used on your AC
outlet.
CLEANING - Unplug the AR subwoofer from the wall
outlet before cleaning. Do not use liquid cleaners or
aerosol cleaners. Use a damp cloth for cleaning.
ATTACHMENTS
- Do not place the AR Subwoofer on an
unstable cart, stand, tripod, bracket, or table. The product
may fall, causing serious injury to a child or adult, and
serious damage to the product. The ideal location for your
AR subwoofer is the floor
.
VENTILATION
- Slots and openings in the AR Subwoofer
are provided for ventilation, to ensure reliable operation
and to protect it from overheating, these openings must
not be blocked by placing the product on a bed, sofa rug,
or other similar surface. The AR Subwoofer should not be
placed in a built in installation such as a bookcase or rack
unless proper ventilation is provided or Acoustic
Research’
s instructions have been adhered to.
POWER SOURCES
- The AR Subwoofer should be
operated only from the type of power source indicated on
the marking label. If you are not sure of power supply to
your home, consult your Acoustic Research dealer or local
power company
.
GROUNDING OR POLARIZATION
- The AR Subwoofer
may be equipped with a polarized alternating-current line
plug (a plug having one blade wider than the other). This
plug will fit into the power outlet only one way . This is a
safety feature. If you are unable to insert the plug fully
into the outlet, try reversing the plug. If the plug is still
unable to fit, contact your electrician to replace your
obsolete outlet.
POWER-CORD PROTECTION
- Power-supply cords
should be routed so that they are not likely to be walked
on or pinched by items placed upon or against them,
paying particular attention to cords at plugs, convenience
receptacles, and the point where they exit from the
Subwoofer
.
LIGHTNING
- For added protection for the AR Subwoofer
during a lightning storm, or when left unattended and
unused for long periods of time, unplug it from the wall
outlet and disconnect the antenna or cable system. This
will prevent damage to the AR
Subwoofer due to a light-
ning and power
-line surges.
OVERLOADING
- Do not overload wall outlets, extension
cords, or integral convenience receptacles as this can
result in a risk of fire or electric shock.
OBJECT AND LIQUID ENTRY
- Never push objects of
any kind into this product through openings as they may
touch dangerous voltage points or short-out parts that
could result in a fire or electric shock. Never spill liquid of
any kind on the AR
Subwoofer
.
SERVICING
- Do not attempt to service the AR subwoofer
yourself as opening or removing covers may expose you to
dangerous voltage or other hazards. Refer all servicing to
qualified Acoustic Research service personnel.
DAMAGE REQUIRING SERVICE
- Unplug the AR
sub
woofer from the wall outlet and refer servicing to qualified
service personnel under the following conditions:
A. When the power
-supply cord or plug is damaged.
B.
If liquid has been spilled, or objects have fallen into
the product.
C.
If the product has been exposed to rain or water
.
D.
If the product does not operate normally by following the operating instructions. Adjust only those
controls that are covered by the operating
instructions as an improper adjustment of other
controls may result in damage and will often require
extensive work by a qualified technician to restore
the AR subwoofer to its normal operation.
E.
If the AR subwoofer has been dropped or damaged
in any way
.
F.
When the product exhibits a distinct change in a
performance - this indicates need for service.
REPLACEMENT PARTS
- When replacement parts are
required, be sure the service technician has used replacement parts specified by Acoustic Research or have the
same characteristics as the original part. Unauthorized
substitutions may result in fire, electric shock, or other
hazards.
SAFETY CHECK
- Upon completion of any service or
repairs to this product, ask the service technician to
perform safety checks to determine that the product is in
proper operating condition.
HEAT
- The AR subwoofer should be situated away from
heat sources such as radiators, heat registers, stoves, or
other products (including amplifiers) that produce heat.
Owner’s Manual
098-23593
ARPR808 PERFORMANCE SERIES
Audiovox Electronics Corporation
150 Marcus Blvd
Hauppauge, New York 11788
©2004 Audiovox Electronics Corporation
Your Acoustic Research Subwoofer delivers powerful, deep bass sound
output for a natural, life-like sonic experience. Please follow the directions in this manual to achieve the best performance from your system.
The hook-up and operation of the Subwoofer is the same for a Home
Theater surround sound system or a stereo music system. The
Subwoofer has its own built-in amplifier, so it works with any sound
system. The Subwoofer’s own crossover network sends bass-only
signals to the Subwoofer’ s built-in amplifier. This lets the Subwoofer add
extra bass to the output from your other speakers.
For simplicity, we call your Home Theater system’s or music system’s
main speakers the Front speakers. We call your AV receiver, stereo
receiver, or integrated amplifier the Receiver.
PLACEMENT
Your AR subwoofer should be placed on the floor.You should be aware
that the closer the subwoofer is placed to the wall,the more pronounced
the bass will become,with maximum bass being achieved with the subwoofer being placed in a corner.
To optimize you system's electronic components,try and keep all speaker
wire and cables as short as possible.
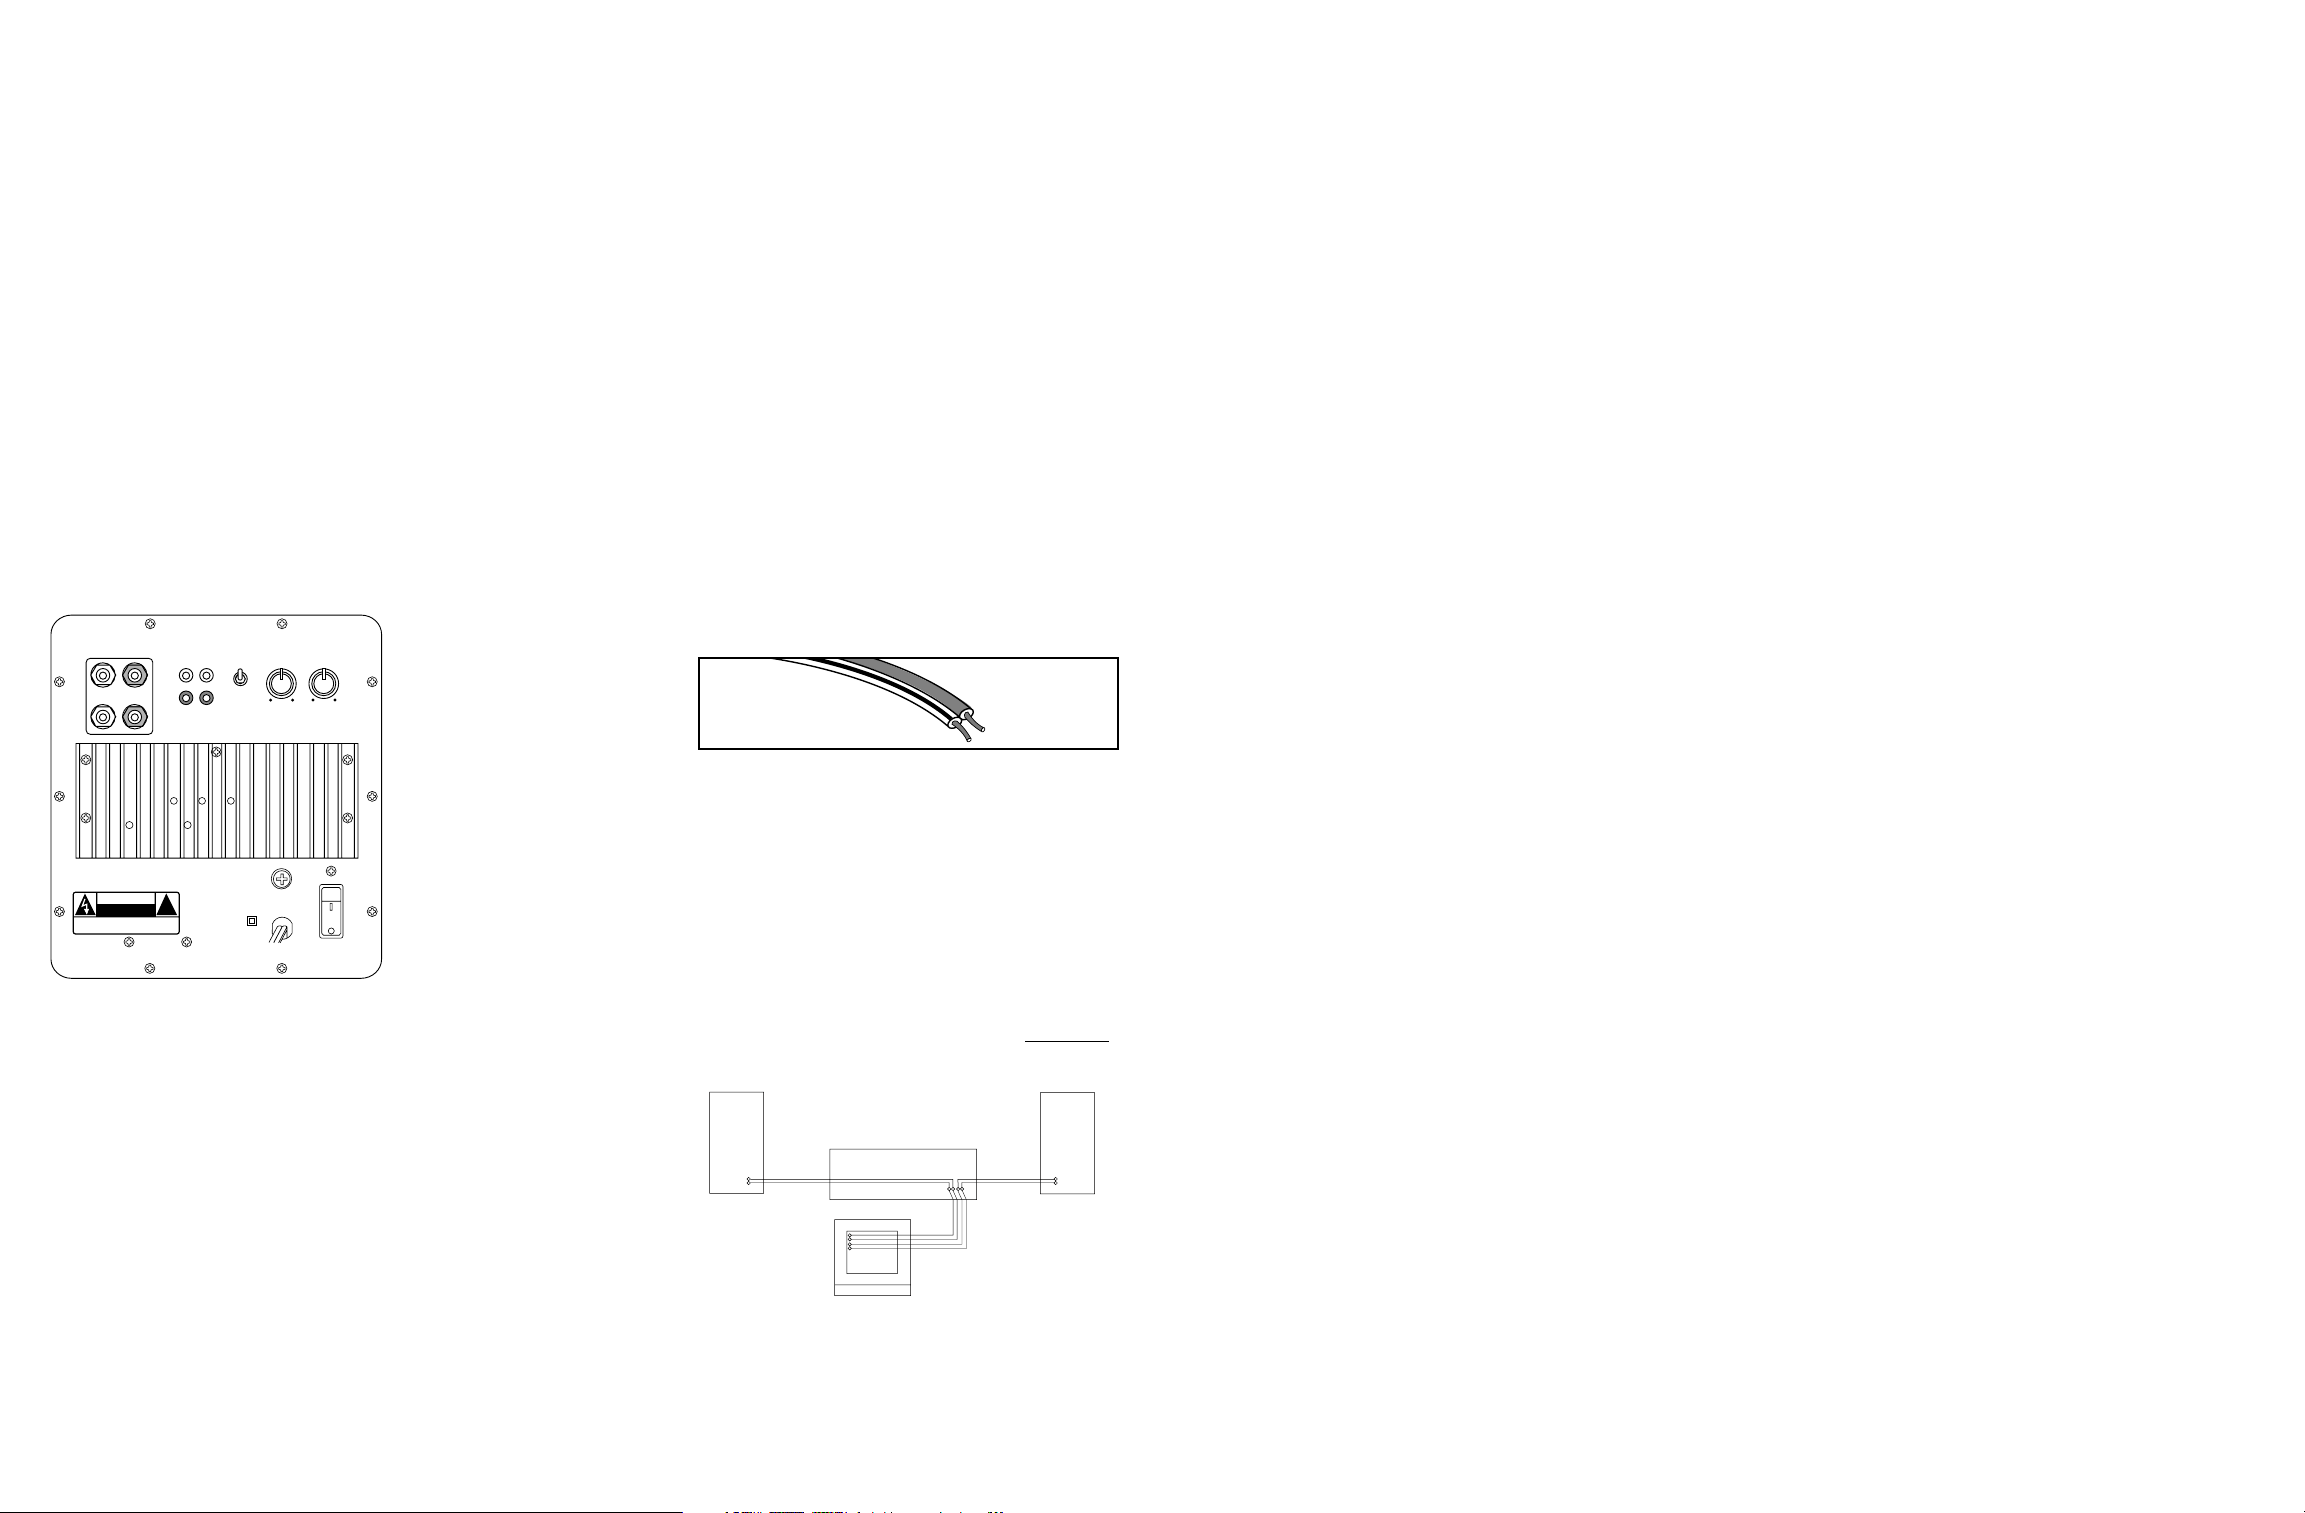
SUBWOOFER CONTROLS & CONNECTIONS
POWER CORD Plug the power cord into an
AC wall outlet or other AC outlet capable of
supplying at least 200 Watts.
POWER SWITCH Turns the AC supply completely OFF or sets the Subwoofer to AUTO ON
operation. In AUTO ON, the Subwoofer is in
standby mode until it detects an audio signal
input, then the Subwoofer turns on automatically. A few minutes after audio input signals
cease, the Subwoofer automatically returns to
standby mode.
POWER INDICATOR LED Your AR Subwoofer
has 2 LED indicators. The Power LED indicator
is located on the amplifier on the rear. This
LED is unlit when the AC power switch is OFF.
It glows red when the Subwoofer is in standby
mode and green when the Subwoofer is on.
The Signal indicator LED is Blue and is located
next to the AR logo on the front of the subwoofer. This LED is lit when there is an audio
signal present.
FUSE 250V 3A This fuse protects against
internal and external faults. If the POWER
switch is ON and the power indicator LED is
unlit, unplug the power cord from the AC outlet and check the fuse by
unscrewing the center piece from the holder. IMPORTANT If the fuse is
blown, replace it only with a fuse of the same type and current rating.
L, R SPEAKER-IN TERMINALS - See Connection Option 1
These terminals are for making connections using speaker wirer. If you
use this option, do not use Option 2.
L,R INPUT JACKS- See Connection Option 2
These jacks are for input connections using audio cables. If your receiver has a mono sub out, you may use either input on your new AR subwoofer. If you use this option, do not use Option 1.
LFE INPUT JACK- Allows direct connection from the
amplifier/processor with an internal low pass filter. This connection
bypasses the subwoofer internal crossover circuitry. Use only with
appropriate Surround Sound processor/amplifier.
LFE Output Jack This connector is connected internally to the LFE input
jack and allows you to loop the LFE input signal out to another LFE input
on an additional AR powered loudspeaker or subwoofer.
LOW PASS FREQUENCY CONTROL Adjusts the upper frequency limit
for audio signals going to the Subwoofer amplifier. This control helps
you adjust the systems tonal balance.
LEVEL CONTROL Balances the loudness of the Subwoofer relative to
the Front speakers and compensates for room effects on the Subwoofer’ s
output.
PHASE SWITCH The Phase Switch controls the phase of the
Subwoofer’s output relative to the front speakers. Listen carefully to the
sound quality while playing a CD with low bass. Select the position of
the switch that produces the fullest deep bass without boominess. You
may need to readjust the Level and Low Pass Frequency controls after
setting the Phase Switch.
CONNECTING YOU SUBWOOFER
IMPORTANT When you make connections. make sure that the power
switches of all components, including the Subwoofer, are OFF.
AUDIO CABLES If you are connecting the Subwoofer into a system
made up of separate components (preamp & power amps), you will need
audio cables long enough to reach the Subwoofer from the preamplifier
and the power amplifier.
SPEAKER WIRE Typical speaker wire has a pair of separate conductors
with insulating jackets that are molded together. We recommend that
you use 16-gauge speaker wire for hooking your Receiver to your Front
speakers. To make connections to the Subwoofer in parallel with the
Front speakers easier, the speaker wire connecting the Receiver to the
Subwoofer can be smaller (higher gauge number), since the Subwoofer
does not draw large amounts of power through these wires.
POLARITY All speakers in a system must be connected with the same
polarity. Speaker wire is marked for polarity so that you can identify
which wire in the pair is which. Polarity is shown by a color strip on the
insulation, by ridged molded into the insulation, or by the colors of the
wires - one copper and one silver.
Strip the insulation from speaker wire ends to reveal the bare conductors
before connecting to Receiver, Subwoofer or Speaker terminals.
IMPORTANT Always connect the red + terminal on the Receiver to the
red + terminal on the Subwoofer, and the black - terminal on the Receiver
to the black - terminal on the Subwoofer. The same is true for hooking
the Receiver outputs to the Front speakers: red + to red +, and black- to
black-.
IMPORTANT USE OPTION 1 OR OPTION 2, NOT BOTH.
OPTION 1 – CONNECTION WITH SPEAKER WIRE
Connect speaker wires from the Receiver’s front left and right speaker outputs to
the subwoofer’s left and right Speaker In terminals, as well as the left and right
front speakers.
SPEAKER LEVEL N
SUBWOOFER ADJUSTMENT & USE
Subwoofer initial control settings
• Set the LOW PASS FREQUENCY Control to its center position.
• Set the LEVEL Control fully counterclockwise to MIN. You’ll reset
this control after you make other adjustments.
Adjusting the Subwoofer controls
• Play a program on your system. For the following adjustments, use
the Dolby ProLogic Normal surround mode and select a movie that
has a Dolby Surround soundtrack with a lot of music, or play a music
CD. Adjust the Receiver’s volume control for a comfortable sound
level from the system speakers.
• Increase the Subwoofer’s LEVEL Control setting clockwise, so that
you hear the deep bass. Adjust the control for a natural, musical
balance that has plenty of deep bass sound when it is actually
present in the music.
• Listen carefully to bass voices and, if needed, adjust the LOW PASS
FREQUENCY Control so that they sound natural. Setting the
frequency too high will make deep voices sound excessively
“chesty” or resonant and will give the upper bass in music a “onenote” quality. Setting the frequency too low will make deep voices
sound “thin” and will give music a lack of “warmth”.
• Make fine adjustments until the program has satisfying and natural
sound quality on both bass voices and music.
Setting the Phase Switch
The PHASE switch controls the phase of the Subwoofers output relative to that of the Front speakers. In many installations, it will be difficult to tell which switch setting is the correct one. Listen carefully
to the sound quality while someone else toggles the switch between
its two positions. The position that produces the fullest deep bass
and the warmest bass and mid-bass sound is the correct one. You
may need to readjust the SUBWOOFER OUT LEVEL and SUBWOOFER
CROSSOVER FREQUENCY controls after setting this switch.
TROUBLESHOOTING
Subwoofer POWER Indicator LED does not light
• Check that the Subwoofer’s POWERSwitch is in the AUTO ON position.
• If the POWER Switch is in the AUTO ON position, check the AC out
let the Subwoofer is plugged into to be sure that it is live. You can
use a tester or plug-in a lamp to check it.
• If the AC outlet is live, either the power cord or Subwoofer has a
problem. Unplug the power cord from the AC outlet and check the
fuse by unscrewing the center piece from the holder. If it is blown,
replace the fuse only with a fuse of the same type and rating. If this
doesn’t help, take the Subwoofer to your dealer for service – THERE
ARE NO USER SERVICEABLE PARTS INSIDE.
No sound from the Front speakers.
• Be sure the Receiver and Subwoofer POWER Switches are in the On
positions.
• Check the Receiver’s Volume Control Setting - if it is all the way
down, there won’t be any sound.
• Check that the Receiver’s Input Selector is set to an active source of
audio signals and that a Tape Monitor Loop is not engaged.
• Be sure that the Receiver’s Speaker Selector switch is turned on to
the terminals [A or B, 1 or 2] that you have your Front speakers
connected to. If the Receiver has a headphone jack, you can use
headphones to check the Receiver for output.
• Check the wires and connections from the Receiver’s Front Speaker
Output terminals to the Subwoofer’s SPEAKER-IN terminals.
• Try removing the Subwoofer from the system, leaving your Front
speakers connected to the Receiver. If there still is no sound, take
the Receiver to your dealer for service.
No sound from the Subwoofer
• First, be sure there is sound from the Front speakers and that the
Receiver is working correctly as outlined above.
• Check the Subwoofer’s LEVEL Control. If it is all the way counter
clockwise, there may be no sound.
• The Subwoofer only reproduces deep bass sound. If the program
has no deep bass, the Subwoofer will not make any sound. Play a
program with plenty of bass, such as jazz or rock music, or an action
movie.
• If everything else checks OK, take the Subwoofer to your dealer for
service - THERE ARE NO USER SERVICEABLE PARTS INSIDE.
SPECIFICATIONS
Driver Complement and Enclosure
8” long throw woofer in a down-firing slot-loaded configuration
with a front firing 8" passive radiator
Frequency Response
28Hz to 150Hz
Amplification
Power output: 150 Watts RMS, LFE In/Out
Total Harmonic Distortion
10% @ 150 Watts output
Signal-to-Noise Ratio
>85 dB
Crossover frequency (-3 dB)
50 Hz @ MIN 150 Hz @ MAX
Special Features:
2 pair of 5-way gold binding posts for high level in
1 pair of RCA inputs for low level input
RCA LFE input and output jacks
Finish: Black ash laminate
Dimensions (HxWxD): 13.5" x 10.25" x 13.5", (34.3cm x 26cm x 34.3cm)
Weight: 26lbs (11.9kgs)
LIMITED WARRANTY
This warranty remains in effect for five years from date of purchase for
speaker components, one year on subwoofer amplifiers and electronic components.
This warranty protects the original owner providing that the product has
been purchased from an authorized Acoustic Research dealer in the United
States. The original bill of sale must be presented whenever warranty service is required. For warranty service outside the United States, contact the
authorized Acoustic Research distributor in the country where the product
was purchased.
Except as specified below, this warranty covers all defects in material and
workmanship. The following are not covered: Damage caused by accident,
misuse, abuse, product modification or neglect, damage occurring during
shipment, damage from failure to follow instructions contained in the owners manual, damage resulting from the performance of repairs by someone
not authorized by Acoustic Research, or any claims based on misrepresentations by the seller. This warranty does not cover incidental or consequential damages. It does not cover the cost of removing or reinstalling the unit.
This warranty is void if the serial number has been removed or defaced.
This warranty gives you specific legal rights. You may also have other rights
which vary from state to state. Some states do not allow the exclusion or
limitation of incidental or consequential damages or limitations on how long
an implied warranty lasts, so the above may not apply to you.
HOW TO OBTAIN SERVICE
Please call us at (800) 225-9847
We will promptly advise you of what action to take. We may direct you to
an authorized Acoustic Research Service Center or ask you to send your
speaker to the factory for repair. You will need to present the original bill of
sale to establish the date of purchase. PLEASE DO NOT SHIP YOUR
ACOUSTIC RESEARCH PRODUCT FOR REPAIR WITHOUT PRIOR
AUTHORIZATION. PLEASE DO NOT RETURN PRODUCT TO THE
ABOVE ADDRESS, IT IS NOT A SERVICE LOCATION. You are respon-
sible for transporting your product for repair and for payment of any initial
shipping charges. However, we will pay the return shipping charges if the
repairs are covered under warranty.
-TO BLACK TERMINAL
(plain or silver)
+TO RED TERMINAL
(color stripe ridges
or cooper)
3/8” (9mm)
BARE WIRE
ARPR8 8
SUBWOOFER
RECEIVER
FRONT LEFT
SPEAKER
FRONT RIGHT
SPEAKER
+–
MODEL: ARPR808
SERIAL NO :
CAUTION
RISK OF ELECTRIC SHOCK
DO NOT OPEN
WARNING SHOCK HAZARD-DO NOT OPEN
AVIS RISQUE DE CHOC ELETRIQUE-NE
PAS OUVRIR
LINE INLPHASE
LFE
ROUT
CAUTION
TO REDUCE THE RISK OF FIRE
REPLACE WITH ONLY THE SAME
TYPE AND RATNG OF FUSE
ATTENTON
UTILISER UN FUSIBLE DE
RECHANGEMEME TYPE
!
DOUBLE INSULATON
when se vicing use only
identical replacement parts
LOW PASS
LEVEL
FREQUENCY
180°
IN
0°
50HZ 150HZ
MIN MAX
FUSE TYPE
T2AL 250V
115W
POWER
60HZ 300W
AUTO
ON
OFF
 Loading...