

Page 1
user manual
guide de l'utilisateur
ARIRC200
ARIRC205
EN
It is important to read this instruction book prior to using your new product for the first time.
Nous vous recommandons de lire ce manuel d’instructions avant d’utiliser votre nouveau produit pour la
première fois.
Page 2

Contents
Safety information
FCC information ..........................................................................3
Technical specification ............................................................. 4
Electrical power source ............................................................ 5
Product registration ..................................................................4
For your records .........................................................................4
Important battery precautions .............................................4
Precautions for the player ....................................................... 4
IMPORTANT SAFETY INSTRUCTIONS ................................... 5
End user license agreement
End user license agreement ................................................... 6
Before you begin
Unpack the unit ..........................................................................8
Setup your AR Infinite Radio accounts ...............................9
Optional: Insert AAA batteries in the base of the
radio ................................................................................................ 9
For ARIRC205 only: Connect the AR Wi-Fi Enabler to
your network................................................................................9
Optional (for ARIRC200 only): For use with a "Wired"
connection .................................................................................... 10
Plug in and turn on the radio ................................................10
Set up the radio ..........................................................................11
Demonstration mode ...............................................................13
Getting the latest firmware and information...................13
Frequently asked questions ...................................................13
General controls of AR Wi-Fi Enabler (for ARIRC205) .... 13
Placement of Wi-Fi Enabler .....................................................14
General controls
Front and top ............................................................................... 15
Rear ..................................................................................................15
Turning on or off .......................................................................16
Volume control ............................................................................16
Source selection .........................................................................16
Weather forecast.........................................................................16
Clock and alarm ..........................................................................16
Using the menus ........................................................................16
Clock and alarm
Accessing the digital clock .....................................................18
Setting the clock ......................................................................... 18
Using the alarm clock ...............................................................18
Sleep mode...................................................................................19
Internet Radio
Accessing Internet Radio ......................................................... 20
Listening to Internet Radio ..................................................... 20
Recording Internet Radio ........................................................ 21
Adding Internet Radio stations ............................................. 21
MP3tunes
MP3tunes Locker setup ...........................................................22
Accessing MP3tunes mode ....................................................22
Listening to music in MP3tunes Locker ............................. 22
FM/AM Tuner
FM/AM antenna .......................................................................... 23
Accessing FM/AM Radio ..........................................................23
Listening to FM/AM Radio ......................................................23
Recording FM/AM Radio ..........................................................23
Internal Memory
Accessing Internal Memory .................................................... 24
Listening to recordings ............................................................ 24
Deleting recordings ...................................................................24
USB Input
Accessing USB Input mode ....................................................25
Listening to music files.............................................................25
Deleting files ................................................................................25
Weather
Weather broadcast.....................................................................26
Settings
Changing radio's settings........................................................27
Account info ................................................................................. 27
Device info .................................................................................... 27
Display ............................................................................................ 27
Network setup ............................................................................. 27
Software updates .......................................................................27
Weather ..........................................................................................27
Advanced settings .....................................................................27
More information
Troubleshooting tips .................................................................28
Further help on Wi-Fi Enabler (for ARIRC205) .................. 29
Web-based utility of Wi-Fi Enabler.......................................31
Copyright warning .....................................................................33
Check for updates ...................................................................... 33
Technical specification ............................................................. 33
Specifications ............................................................................... 33
Warranty information
Limited warranty ........................................................................34
2
Page 3
Safety information
FCC information
This device complies with part 15 of the FCC
rules. Operation is subject to the following two
conditions: (1) This device may not cause harmful
interference, and (2) This device must accept any
interference received including interference
which may cause undesired operation.
This equipment has been tested and found to
comply with the limits for a Class B digital device,
pursuant to Part 15 of the FCC Rules. These limits
are designed to provide reasonable protection
against harmful interference in a residential
installation. This equipment generates, uses and
can radiate radio frequency energy and, if not
installed and used in accordance with the
instructions, may cause harmful interference to
radio communications. However, there is no
guarantee that interference will not occur in a
particular installation.
If this equipment does cause harmful
interference to radio or television reception,
which can be determined by turning the
equipment off and on, the user is encouraged to
try to correct the interference by one or more of
the following measures:
• Reorient or relocate the receiving antenna.
• Increase the separation between the
equipment and receiver.
• Connect the equipment into an outlet on
a circuit different from that to which the
receiver is connected.
• Consult the dealer or an experienced
radio / TV technician for help.
In accordance with FCC requirements, changes or
modifications not expressly approved by
manufacturer could void the user’s authority to
operate this product.
CAUTION
RISK OF ELECTRIC SHOCK
THE LIGHTNING FLASH
AND ARROWHEAD
WITHIN THE TRIANGLE
IS A WARNING SIGN
ALERTING YOU OF
"DANGEROUS
VOLTAGE" INSIDE THE
PRODUCT.
SEE MARKING ON BOTTOM / BACK OF PRODUCT
DO NOT OPEN
CAUTION: TO REDUCE THE
RISK OF ELECTRIC SHOCK,
DO NOT REMOVE COVER (OR
BACK). NO
USER-SERVICEABLE PARTS
INSIDE. REFER SERVICING TO
QUALIFIED SERVICE
PERSONNEL.
THE EXCLAMATION
POINT WITHIN THE
TRIANGLE IS A
WARNING SIGN
ALERTING YOU OF
IMPORTANT
INSTRUCTIONS
ACCOMPANYING
THE PRODUCT.
WARNING: TO PREVENT FIRE OR
ELECTRICAL SHOCK HAZARD, DO NOT EXPOSE
THIS PRODUCT TO RAIN OR MOISTURE.
Manufacturer/Responsible Party
Audiovox Electronics Corp,
150 Marcus Blvd, Hauppauge, NY 11788
1-317-810-4880
(Please note this phone number is for regulatory
matters only. No technical or product support is
available via this number.)
This Class B digital apparatus complies with Canadian
ICES-003.
Cet appareil numérique de la classe B est conforme à la
norme NMB-003 du Canada.
EN
Acoustic Research
ARIRC200
Acoustic Research
ARIRC205
3
Page 4

Safety information
Technical specification
Product: Wi-Fi Internet Radio
Brand: Acoustic Research
Model: ARIRC200, ARIRC205
Electrical power source
External AC adapter for radio
Output: 9.0V DC 1.56A
Input: 100-240V ~ 50/60Hz 0.7A
External AC adapter for enabler (ARIRC205
only)
Output: 5V DC 1A
Input: 100V~240V AC Power
The AC/DC adapter supplied with this product
is inteneded to be correctly oriented in a
vertical or floor mount position.
Product registration
Go to www.acoustic-research.com for online
registration.
For your records
Keep your sales receipt for proof of purchase to
obtain warranty parts and service.
In the event that service should be required, you
may need both the model number and the serial
number. In the space below, record the date and
place of purchase, and the serial number:
Model No.
Date of Purchase
Place of Purchase
Serial No.
Important battery precautions
• Any battery may present a risk of fire,
explosion, or chemical burn if abused. Do not
try to charge a battery that is not intended to
be recharged, do not incinerate, and do not
puncture.
• Non-rechargeable batteries, such as alkaline
batteries, may leak if left in your product for
a long period of time. Remove the batteries
from the product if you are not going to use
it for a month or more.
• If your product uses more than one battery,
do not mix types and make sure they are
inserted correctly. Mixing types or inserting
incorrectly may cause them to leak.
• Discard any leaky or deformed battery
immediately. They may cause skin burns or
other personal injury.
• Please help to protect the environment by
recycling or disposing of batteries according
to federal, state, and local regulations.
Precautions for the player
• Do not use the unit immediately after
transportation from a cold place to a warm
place; condensation problems may result.
• Avoid shock to the unit.
• Do not store the unit near fire, places with
high temperature or in direct sunlight.
Exposure to direct sunlight or extreme heat
(such as inside a parked car) may cause
damage or malfunction.
• Do not expose to rain or moisture.
• Do not operate or store unit in places with
frequent static electricity or electrical noise
(e.g. speaker, TV set).
• Clean the unit with a soft cloth or a damp
chamois leather. Never use solvents.
• The unit must only be opened by qualified
personnel.
4
Page 5
Safety information
IMPORTANT SAFETY INSTRUCTIONS
PLEASE READ AND SAVE FOR FUTURE REFERENCE
Some of the following information may not
apply to your particular product; however, as
with any electronic product, precautions should
be observed during handling and use.
• Read these instructions.
• Keep these instructions.
• Heed all warnings.
• Follow all instructions.
• Do not use this apparatus near water.
• Clean only with dry cloth.
• Do not block any ventilation openings. Install
in accordance with the manufacturer’s
instructions.
• Do not install near any heat sources such as
radiators, heat registers, stoves, or other
apparatus (including amplifiers) that produce
heat.
• Do not defeat the safety purpose of the
polarized or grounding-type plug. A
polarized plug has two blades with one wider
than the other. A grounding type plug has
two blades and a third grounding prong. The
wide blade or the third prong is provided for
your safety. If the provided plug does not fit
into your outlet, consult an electrician for
replacement of the obsolete outlet.
• Protect the power cord from being walked on
or pinched particularly at plugs, convenience
receptacles, and the point where they exit
from the apparatus.
• Only use attachments/accessories specified
by the manufacturer.
• Use only with the cart,
stand, tripod, bracket, or
table specified by the
manufacturer, or sold with
the apparatus. When a
cart is used, use caution
when moving the cart/
apparatus combination to avoid injury from
tip-over.
• Unplug this apparatus during lightning
storms or when unused for long periods of
time.
• Refer all servicing to qualified service
personnel. Servicing is required when the
apparatus has been damaged in any way,
such as power-supply cord or plug is
damaged, liquid has been spilled or objects
]
Portable Cart Warning
EN
have fallen into the apparatus, the apparatus
has been exposed to rain or moisture, does
not operate normally, or has been dropped.
• ADDITIONAL SAFETY INFORMATION
• Apparatus shall not be exposed to dripping
or splashing and no objects filled with
liquids, such as vases, shall be placed on the
apparatus.
• Always leave sufficient space around the
product for ventilation. Do not place product
in or on a bed, rug, in a bookcase or cabinet
that may prevent air flow through vent
openings.
• Do not place lighted candles, cigarettes,
cigars, etc. on the product.
• Connect power cord only to AC power source
as marked on the product.
• Care should be taken so that objects do not
fall into the product.
• Do not attempt to disassemble the cabinet.
This product does not contain customer
serviceable components.
• MAINS plug or an appliance coupler is used
as the disconnect device, the disconnect
device shall remain readily operable.
• IF YOUR PRODUCT OPERATES ON
BATTERIES, adhere to the following
precautions:
A. Any battery may leak electrolyte if mixed
with a different battery type, if inserted
incorrectly, or if all batteries are not replaced
at the same time.
B. Any battery may leak electrolyte or explode if
disposed of in fire or an attempt is made to
charge a battery not intended to be
recharged.
C. Discard leaky batteries immediately. Leaking
batteries can cause skin burns or other
personal injury. When discarding batteries, be
sure to dispose of them in the proper
manner, according to your state/provincial
and local regulations.
D. Batteries (battery pack or batteries installed)
shall not be exposed to excessive heat such
as sunshine, fire or the like.
5
Page 6

End user license agreement
End user license agreement
IMPORTANT: READ CAREFULLY BEFORE DOWNLOADING OR
INSTALLING THIS SOFTWARE!
THIS END USER LICENSE AGREEMENT (THIS “EULA”) IS A LEGAL
AGREEMENT BETWEEN YOU AND AUDIOVOX CORPORATION AND,
AS APPLICABLE, ANY AUDIOVOX SUBSIDIARY, AS DEFINED BELOW
(COLLECTIVELY “AUDIOVOX”), FOR THE ACOUSTIC RESEARCH®
BRAND INTERNET RADIO DEVICE APPLICATION/DRIVER
SOFTWARE PROGRAM WHICH MAY INCLUDE ASSOCIATED
SOFTWARE COMPONENTS, SOFTWARE LICENSED BY AUDIOVOX
FROM THIRD PARTIES (“LICENSORS”) AND ASSOCIATED
DOCUMENTATION, IF ANY (COLLECTIVELY, THE “PROGRAM”). THIS
EULA CONTAINS IMPORTANT LEGAL LIMITATIONS, RESTRICTIONS
AND DISCLAIMERS, AND ALSO SPECIFIES THE DURATION OF
YOUR LICENSE.
BY INSTALLING THE PROGRAM OR CLICKING ON THE
ACCEPTANCE BUTTON OF THE PROGRAM, COPYING OR
OTHERWISE USING THE PROGRAM, YOU ACKNOWLEDGE AND
AGREE THAT YOU HAVE READ THIS EULA, UNDERSTAND IT, AND
AGREE TO BE BOUND BY ITS TERMS AND CONDITIONS. THIS
PROGRAM IS PROTECTED BY COPYRIGHT LAWS AND
INTERNATIONAL COPYRIGHT TREATIES, AS WELL AS OTHER
INTELLECTUAL PROPERTY LAWS AND TREATIES. YOU MAY USE
THE PROGRAM ONLY IN ACCORDANCE WITH THIS EULA, AND ANY
SUCH USE IS HEREBY UNDERSTOOD TO BE CONDITIONAL UPON
YOUR SPECIFIC AGREEMENT TO THE UNMODIFIED TERMS SET
FORTH HEREIN. IF YOU DO NOT AGREE WITH ALL OF THE TERMS
OF THIS EULA, CLICK ON THE REJECTION BUTTON AND/OR DO
NOT INSTALL THE PROGRAM AND/OR DO NOT USE THE
PROGRAM.
1. LICENSE
(a) Under this EULA, you are granted a non-exclusive, non-
sublicenseable, non-assignable and non-transferable (except
as expressly set forth below) license (i) to use and install the
Program on a single workstation, and (ii) to make one (1)
copy of the Program into any machine-readable form for
backup of the Program, provided the copy contains all of the
original Program's proprietary notices.
(b) You may transfer the Program and license to another party
only as a part of the Acoustic Research® brand Internet Radio
Device (the “Device”), and only if the other party agrees to
accept the terms and conditions of this EULA. If you transfer
the Program, you must at the same time either transfer all
copies to the same party or destroy any copies not
transferred.
(c) The terms of this EULA will govern any software upgrades or
updates provided by AUDIOVOX that replace and/or
supplement the original Program, unless such upgrade or
update is accompanied by separate license terms and
conditions in which case the terms of that separate license
will govern. You acknowledge and agree that AUDIOVOX
may automatically download upgrades or updates to the
Program software to your computer in order to update,
enhance, and/or further develop the Program.
2. LICENSE RESTRICTIONS
(a) Except for the licenses expressly granted to you in this EULA,
no other licenses or rights are granted or implied.
(b) You may not (i) make the Program available over a network
where it could be used by multiple computers at the same
time; (ii) modify, translate, reverse engineer, decompile,
disassemble (except to the extent that this restriction is
expressly prohibited by law), or create derivative works
based upon the Program; (iii) copy the Program, except as
expressly permitted herein; (iv) remove or alter any copyright
notices on all copies of the Program; or (v) rent, lease or lend
the Program. You agree that you shall only use the Program
in a manner that complies with all applicable laws in the
6
jurisdictions in which you use the Program, including, but
not limited to, applicable restrictions concerning copyright
and other intellectual property rights.
(c) The Program may contain pre-release code that does not
perform at the level of a final code release. In such case, the
Program may not operate properly. Updated versions of the
Program may be downloaded from www.arinfiniteradio.com.
(d) AUDIOVOX is not obligated to provide support services for
the Program.
(e) The Program is provided with “RESTRIC TED RIGHTS”. Use,
duplication, or disclosure by the U.S. Government is subject
to restrictions as set forth in subparagraph (c)(1)(ii) of DFARS
252.227-7013, or FAR 52.227-19, or in FAR 52.227-14 Alt. III, as
applicable.
3. TERM AND TERMINATION
(a) Your license is effective on the date you accept this EULA
and remains in effect until this EULA is terminated by either
party.
(b) You may terminate this EULA and the associated license,
without any notice or delay, by destroying or permanently
erasing the Program and all copies thereof.
(c) If you fail to comply with any of the terms of this EULA, in
whole or part, your license will automatically terminate
without notice from AUDIOVOX.
(d) Upon termination of this EULA and your associated license,
you shall cease all use of the Program and destroy or
permanently erase the Program and all full or partial copies
thereof.
4. WARRANTY DISCLAIMER
THE PROGRAM IS PROVIDED “AS IS” WITHOUT WARRANTY OF ANY
KIND, EITHER EXPRESSED OR IMPLIED, INCLUDING, BUT NOT
LIMITED TO THE IMPLIED WARRANTIES OF MERCHANTABILIT Y,
FITNESS FOR A PARTICULAR PURPOSE, TITLE OR NONINFRINGEMENT. THE ENTIRE RISK AS TO THE QUALITY AND
PERFORMANCE OF THE PROGRAM IS WITH YOU. SHOULD THE
PROGRAM PROVE DEFECTIVE, YOU (AND NOT AUDIOVOX, ITS
LICENSORS, SUPPLIERS, OR ITS DEALERS) ASSUME THE ENTIRE
COST FOR ALL NECESSARY REPAIR OR CORRECTION.
This exclusion of warranty may not be allowed under some
applicable laws. As a result, the above exclusion may not apply to
you, and you may have other rights depending on the law that
applies to you.
5. OWNERSHIP RIGHTS
All title and intellectual property rights, including but not limited
to copyrights, in and to the Program and any copies thereof are
owned by AUDIOVOX, its Licensors or its suppliers. All title and
intellectual property rights in and to the content which may be
accessed through use of the Program is the property of the
respective content owner and may be protected by applicable
copyright or other intellectual property laws and treaties. This
license grants you no rights to use such content. All rights not
expressly granted are reserved by AUDIOVOX or its Licensors.
6. LIMITATION OF LIABILIT Y
(a) TO THE MAXIMUM EXTENT PERMITTED BY APPLICABLE LAW,
IN NO EVENT SHALL AUDIOVOX, ITS LICENSORS, OR ITS
DEALERS BE LIABLE FOR ANY SPECIAL, INCIDENTAL,
INDIRECT, OR CONSEQUENTIAL DAMAGES WHATSOEVER
(INCLUDING, WITHOUT LIMITATION, DAMAGES FOR LOSS OF
PROFITS, BUSINESS INTERRUPTION, CORRUPTION OF FILES,
LOSS OF BUSINESS INFORMATION, OR ANY OTHER
PECUNIARY LOSS) REGARDLESS OF CAUSE OR FORM OF
ACTION, INCLUDING CONTRACT, TORT, OR NEGLIGENCE,
ARISING OUT OF YOUR USE OF OR INABILITY TO USE THE
PROGRAM, EVEN IF AUDIOVOX HAS BEEN ADVISED OF THE
POSSIBILITY OF SUCH DAMAGES. BECAUSE SOME STATES
AND JURISDICTIONS DO NOT ALLOW THE EXCLUSION OR
Page 7

End user license agreement
LIMITATION OF LIABILIT Y OF CONSEQUENTIAL OR
INCIDENTAL DAMAGES, THE ABOVE LIMITATION MAY NOT
APPLY TO YOU.
(b) YOU ASSUME RESPONSIBILITY FOR THE SELECTION OF THE
APPROPRIATE PROGRAM TO ACHIEVE YOUR INTENDED
RESULTS, AND FOR THE INSTALLATION, USE, AND RESULTS
OBTAINED.
7. WINDOWS MEDIA
This product is protected by certain intellectual property rights
of Microsoft. Use or distribution f such technology outside of
this product is prohibited without a license from Microsoft.
The software embedded within your Device (the “Device
Firmware”) contains software licensed from Microsoft that
enables you to play Windows Media Audio (WMA) files (“WMA
Software”). The WMA Software is licensed to you for use with
your Device under the following conditions. By installing and
using this version of the Device Firmware, you are agreeing to
these conditions. IF YOU DO NOT AGREE TO THE END USER
CONDITIONS OF THIS SECTION 7, DO NOT INSTALL OR USE THIS
VERSION OF THE DEVICE FIRMWARE.
The WMA Software is protected by copyright and other
intellectual property laws. This protection also extends to
documentation for the WMA Software, whether in written or
electronic form.
GRANT OF LICENSE. The WMA Software is only licensed to you
as follows:
You may use this version of the Device Firmware containing the
WMA Software only as such use relates to your Device.
You may not reverse engineer, decompile, or disassemble the
WMA Software, except and only to the extent that such activity
is expressly permitted by applicable law.
You may transfer your right to use the Device Firmware only as
part of a sale or transfer of your Device, on the condition that
the recipient agrees to the conditions set forth herein. If the
version of the Device Firmware that you are transferring is an
upgrade, you must also transfer all prior versions of the Device
Firmware that you have which include the WMA Software.
MICROSOFT IS NOT PROVIDING ANY WARRANTY OF ANY KIND
TO YOU FOR THE WMA SOFTWARE, AND MICROSOFT MAKES NO
REPRESENTATION CONCERNING THE OPERABILITY OF THE WMA
SOFTWARE.
The WMA Software is of U.S. origin. Any export of this version of
the Device Firmware must comply with all applicable
international and national laws, including the U.S. Export
Administration Regulations, that apply to the WMA Software
incorporated in the Device Firmware.
8. RealNetworks, Inc.
Portions of this software are included under license from
RealNetworks, Inc. Copyright 1995-2007, RealNetworks, Inc. All
rights reserved.
The portions of the Program licensed from RealNetworks, Inc.
(“RN”) are provided AS IS WITHOUT WARRANT Y OF ANY KIND. TO
THE MAXIMUM EXTENT PERMITTED BY APPLICABLE LAW, RN
FURTHER DICLAIMS ALL WARRANTIES, EXPRESS AND IMPLIED,
INCLUDING WITHOUT LIMITATION ANY IMPLIED WARRANTIES OF
MERCHANTABILITY, FITNESS FOR A PARTICULAR PURPOSE, AND
NONINFRINGEMENT. TO THE MAXIMUM EXTENT PERMITTED BY
LAW IN NO EVENT SHALL RN BE LIABLE FOR ANY
CONSEQUENTIAL, INCIDENTAL, INDIRECT, SPECIAL, PUNITIVE OR
OTHER DAMAGES (INCLUDING, WITHOUT LIMITATION, DAMAGES
FOR LOSS OF PROFITS). BECAUSE SOME STATES AND
JURISDICTIONS DO NOT ALLOW THE EXCLUSION OR LIMITATION
OF LIABILITY OF CONSEQUENTIAL OR INCIDENTAL DAMAGES,
THE ABOVE LIMITATION MAY NOT APPLY TO YOU.
You may not modify, translate, reverse engineer, decompile,
disassemble (except to the extent that this restriction is expressly
prohibited by applicable law) or use other means to discover the
RN Source Code or otherwise replicate the functionality of the
Real Format Client Code.
9. THIRD PARTY SOFTWARE
ANY THIRD PARTY SOFTWARE THAT MAY BE PROVIDED WITH THE
PROGRAM IS INCLUDED FOR USE AT YOUR OPTION. IF YOU
CHOOSE TO USE SUCH THIRD PARTY SOFT WARE, THEN SUCH USE
SHALL BE GOVERNED BY SUCH THIRD PARTY'S LICENSE
AGREEMENT, AN ELECTRONIC COPY OF WHICH WILL BE
INSTALLED IN THE APPROPRIATE FOLDER ON YOUR COMPUTER
UPON INSTALLATION OF THE SOFTWARE. AUDIOVOX IS NOT
RESPONSIBLE FOR ANY THIRD PARTY’S SOFTWARE AND SHALL
HAVE NO LIABILITY FOR YOUR USE OF THIRD PARTY SOFTWARE.
10. GOVERNING LAW
If you acquired this Device in the United States, this EULA shall
be governed and construed in accordance with the laws of the
State of New York, U.S.A. without regard to its conflict of laws
principles. If you acquired this Device outside the United States
or the European Union, then local law may apply.
11. GENERAL TERMS
This EULA can only be modified by a written agreement signed
by you and AUDIOVOX, and changes from the terms and
conditions of this EULA made in any other manner will be of no
effect. If any portion of this EULA shall be held invalid, illegal, or
unenforceable, the validity, legality, and enforceability of the
remainder of the Agreement shall not in any way be affected or
impaired thereby. This EULA is the complete and exclusive
statement of the agreement between you and AUDIOVOX, which
supersedes all proposals or prior agreements, oral or written, and
all other communications between you and AUDIOVOX, relating
to the subject matter of this hereof. AUDIOVOX’S Licensors shall
be considered third party beneficiaries of this Agreement and
shall have the right to enforce the terms herein.
“AUDIOVOX SUBSIDIARY” shall mean any person, corporation, or
other organization, domestic or foreign, including but not limited
to subsidiaries, that is directly or indirectly controlled by
Audiovox Corporation including, but not limited to, Audiovox
Consumer Electronics, Inc. and Audiovox Electronics Corporation.
For purposes of this definition only, the term “control” means the
possession of the power to direct or cause the direction of the
management and policies of an entity, whether by ownership of
voting stock or partnership interest, by contract, or otherwise,
including direct or indirect ownership of at least fifty percent
(50%) of the voting interest in the entity in question.
EN
7
Page 8
Before you begin
Dear Acoustic Research customer,
Thank you for purchasing the AR Wi-Fi Internet Radio. This product will let you listen to Internet Radio,
MP3tunes, AM/FM tuner, weather forecast and music stored in the internal memory or a USB device.
To start using your Wi-Fi Internet Radio, please follow the setup instructions in the following pages.
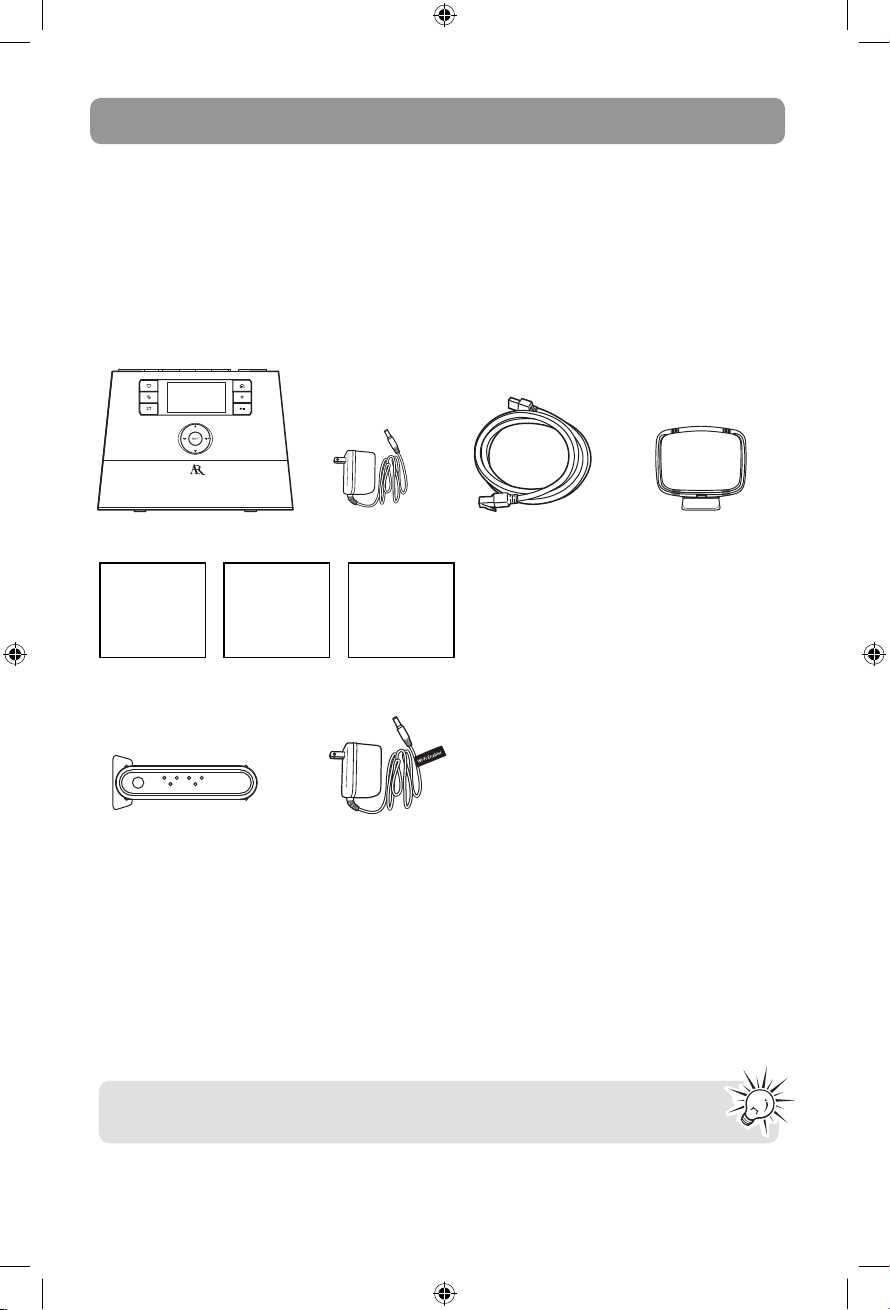
1. Unpack the unit
You should find the following items in the box:
Radio
User Manual
For ARIRC205 only:
Wi-Fi Enabler
Additional requirements
• Broadband Internet service
• Broadband (cable/DSL) modem, usually supplied by your Internet service provider
• An 802.11 b or g (Wi-Fi) wireless home network or Ethernet router/switch/hub with available LAN
port (for ARIRC200 only)
For Wi-Fi connections, you may also need:
• Your wireless network’s SSID
• Your access password (for secure networks)
Exit the DEMO mode after turning on : Press and release preset 1, then SLEEP/SNOOZE,
then preset 6.
Quick Start
Guide
Power adapter
Setup
Information
Card
Power adapter
Ethernet cable
AM loop antenna
8
Page 9
Before you begin
2. Setup your AR Infinite Radio accounts
To simplify setup on the radio please complete these steps:
A. Find the Setup Information Card that contains your radio’s MAC address number (MAC: 00-21-2A-
XX-XX-XX) and activation PIN # (PIN: XXXX). (This number is also found in the Device Info screen
under the Settings menu in your radio.)
B. Using any Internet-connected computer, go to www.arinfiniteradio.com/setup and follow the
online instructions.
• You will need to input your radio’s MAC address and PIN # to associate your radio with your
personal settings.
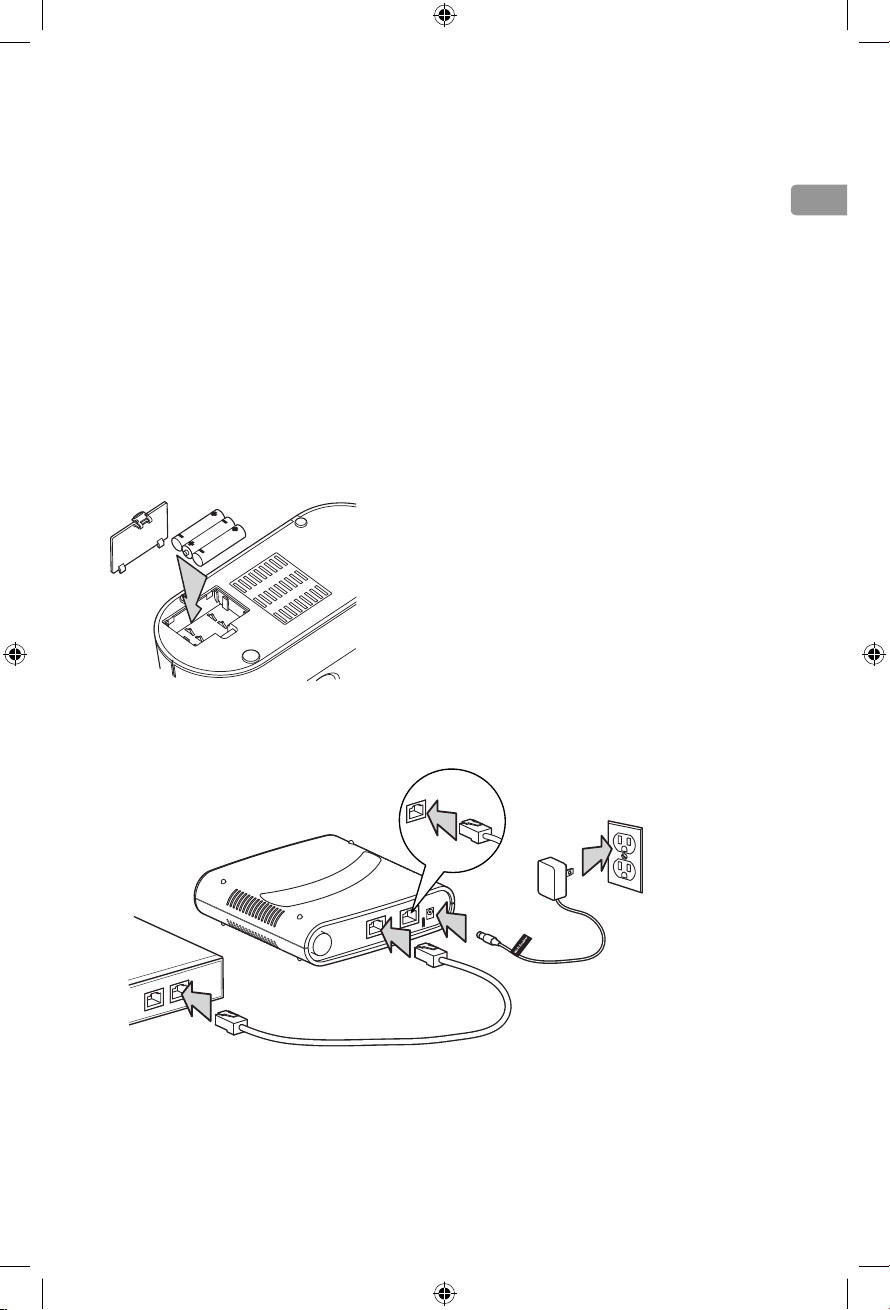
3. Optional: Insert AAA batteries in the base of the radio
Follow the polarity markers in the battery compartment. The batteries power the clock and alarm*
whenever the radio loses electricity. We recommend that you replace the batteries every year (or
more often in case of multiple power outages) to avoid low battery power. Otherwise, clock and
alarm accuracy may be affected when electricity supply is interrupted.
* When the battery backup functions, the clock display will not light. However, the function of alarm still occurs during the power
interruption if remaining battery power is adequate.
EN
4. For ARIRC205 only: Connect the AR Wi-Fi Enabler to your network
If your modem or router/hub/switch has only one LAN
port and is connected to your PC, disconnect the
Ethernet cable from the modem/router/hub/switch and
connect it to the Enabler's LAN port.
N
A
L
LAN
Broadband modem or
Ethernet router/hub/switch
• Make sure the power, WAN, and WIRELESS LEDs are on. The MODE LED state will vary depending
on your network configuration. If the MODE, WPS, and WIRELESS LEDs are blinking simultaneously,
this indicates a possible connection error. Please review your connections and then press and hold
the Enabler’s WPS button for 3 seconds (the MODE LED should start blinking) to rescan your
network configuration. The Enabler may restart multiple times during this process and take up to
two minutes depending on your network configuration. The MODE LED will stop blinking when
this process is completed. Go to www.arinfiniteradio.com for more information.
N
A
L
LAN
wer
N
po
A
L
t
e
res
N
WA
POWER
WAN
Electrical outlet
9
Page 10
Before you begin
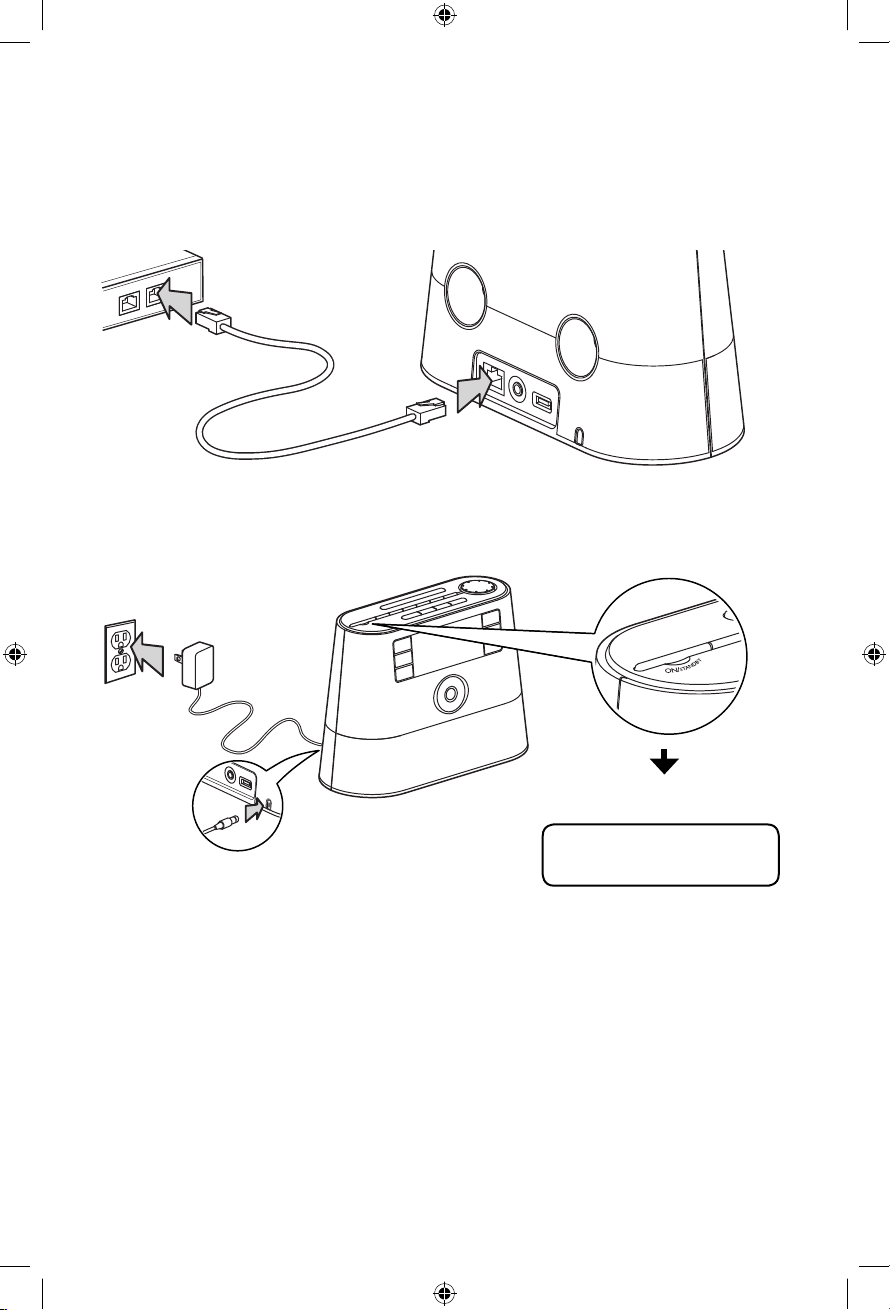
5. Optional (for ARIRC200 only): For use with a "Wired" connection
Use the supplied Ethernet cable if you do not have a wireless (Wi-Fi) access point.
N
A
L
LAN
Broadband modem or
Ethernet router/hub/switch
6. Plug in and turn on the radio
Electrical outlet
LAN
10
Exit the DEMO mode after
turning on
Press and release preset 1, then
SLEEP/SNOOZE, then preset 6.
Page 11
Before you begin
7. Set up the radio
Refer to Using the menus on page
16 for more information on making
choices and inputting information in
menus.
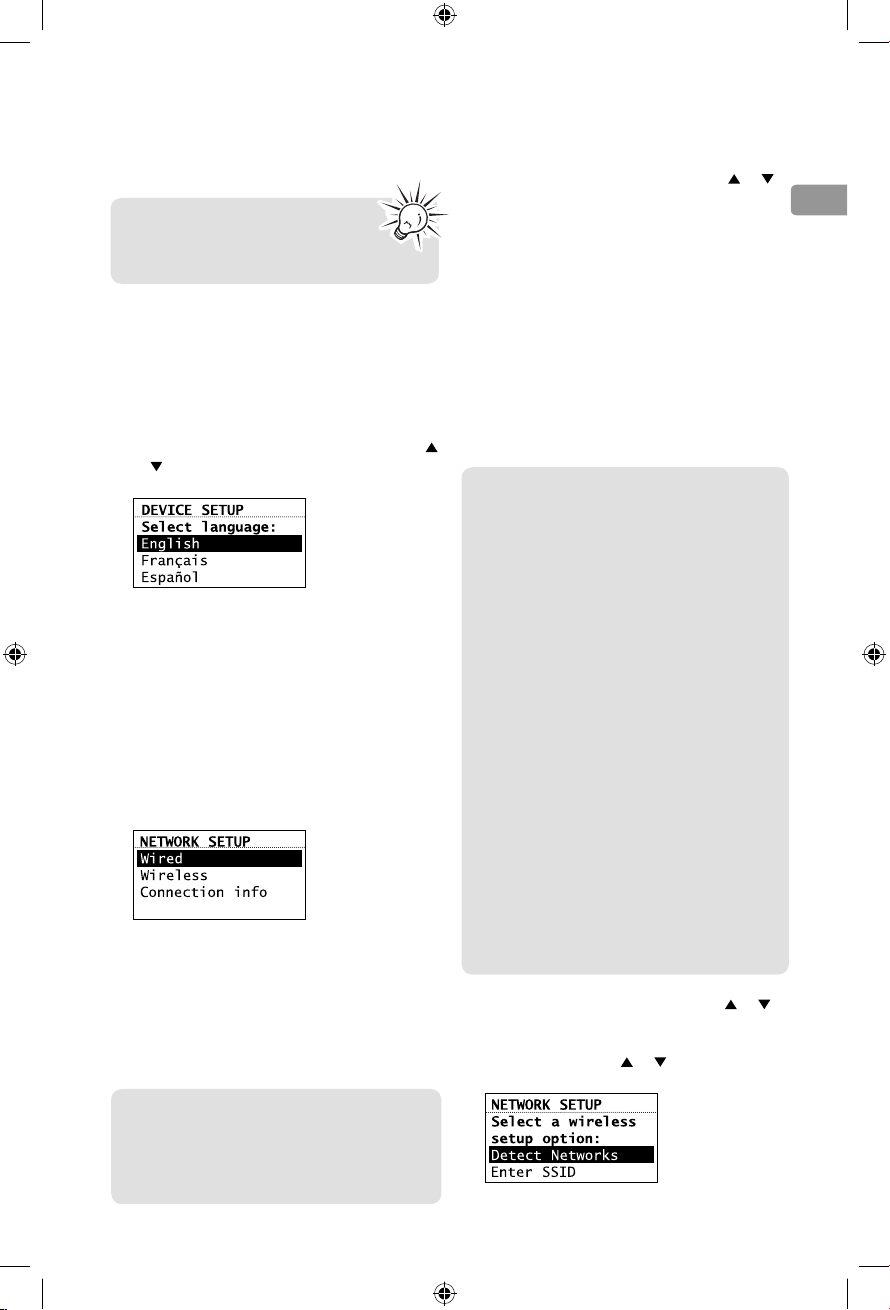
A. NOTE: When you turn on the radio for the
first time, it will be in "DEMO" mode. To exit
this mode, press and release preset 1, then
SLEEP/SNOOZE, then preset 6 on top of the
radio.
B. After exiting the DEMO mode, the radio
displays the Select Language screen. Press
or
to choose your language and then press
SELECT.
• If you are using AR Wi-Fi Enabler
(ARIRC205), setup is done (except you may
need to enter your postal code).
• If you encounter problems to connect the
radio to the Internet via AR Wi-Fi Enabler, refer
step 4 on page 9 or Further help on Wi-Fi
Enabler on page 29.
• If you are using your own wireless access
point or router, please read below.
C. The Network Setup screen displays
connection options:
• At the Network Setup screen, press
select Wired and then press SELECT if your
network does not provide Wi-fi access.
• Before the connection is complete, the radio
may take some time to check for updates and
retrieve account info from the server. Please
wait until you hear a short congratulations
message and "Setup is complete, enjoy the
music" is displayed.
• If the radio requires your IP address, you can
find this information on your broadband
modem, router or access point’s
administration setup page or manual.
E. Wireless
This method uses your existing Wi-Fi access
point, broadband modem or router to connect
the radio to your existing network.
You need to know your Wireless Network’s
name (SSID) and if your wireless network has
security enabled, you will also need to know
your wireless networks password (sometimes
called passphrase or key). You can find this
information on your broadband modem,
router or access point’s administration setup
page or manual. You may also call your
Internet Service Provider (ISP) if you do not
know how to access the administration page
in order to find this information. They usually
have a 1-800 number available. Once you have
the below information you may write it down
for future reference.
or to
EN
• Select Wired to connect using an Ethernet
cable. Go to step D to complete the
connection.
• Select Wireless to connect using an existing
Wi-Fi access point. Go to step E to complete
the connection.
D. Wi red
This method uses an Ethernet cable shown in
step 5 on page 10 to wire the radio directly
up to your broadband modem, router, hub,
or switch. Make sure your Ethernet cable is
properly connected.
• Wireless network name (SSID)
• Security Type (Only needed if your
network has security enabled and your
SSID is hidden, not broadcasted)
• Password/Key (Only needed if your
network has security enabled)
• At the Internet Setup screen, press
select Wireless and then press SELECT. The
Network Setup screen then shows with two
setup options. Press or to choose an
option and then press SELECT.
or to
11
Page 12
Before you begin
• Detect Networks: to automatically scan for
available networks and display a list of
networks to choose from. Go to step F to
complete the connection.
• Enter SSID: to manually enter your networks
information. Select this option if your
Networks SSID is hidden. Go to step G to
complete the connection.
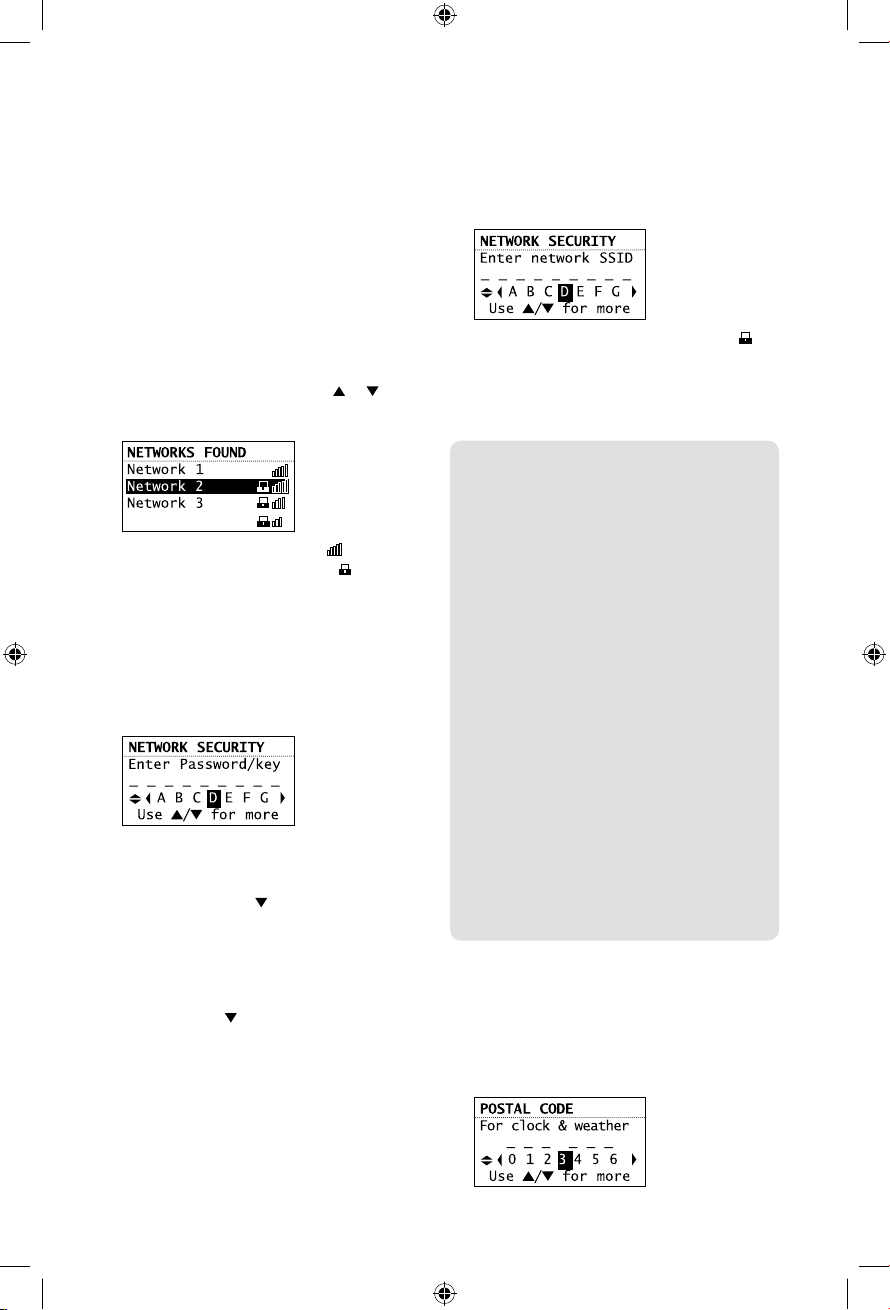
F. If Detect Networks is selected, the SSID
(network name) of those found will be
displayed after searching. Press
select a desired network and then press
SELECT.
• Signal strength is indicated by .
• Secured network is indicated by
(unsecured network has none, as Network 1
in the above example).
• If a secured network is selected, you will be
required to enter your password in the
Network Security screen. The radio should
then connect to the Internet. Please wait until
you hear a short congratulations message
and the clock screen is displayed.
• If the network SSID is hidden (not
• Interference may sometimes block your
broadcasted), you will only see a padlock icon
and signal strength bars like the 4th network
shown above. Press
SSID on the display and then press SELECT.
Then go to step G to complete your
connection.
network from showing up in the list. If this
happens, press
then press SELECT to try again.
to highlight Enter
to show Refresh List and
or to
G. If Enter SSID is selected, the Network
Security screen will be displayed. Enter your
SSID.
• If your network is secured (indicated by ),
enter your password. The radio should then
connect to the Internet. Please wait until you
hear a short congratulations message and the
clock screen is displayed.
About password:
• Do not get your Network Password
confused with your Windows or Mac
system logon password since they can be
di erent.
• Some wireless access point or routers
may call the Wireless Network Password
a passphrase or key. These terms are the
same.
About passphrase:
• This radio supports secured access points
using the Wireless Equivalent Privacy
(WEP) keys or Wi-Fi Protected Access
(WPA and WPA2) standards.
• WEP keys are either 10 or 26 characters
long (characters: 0-9 and A-F) (e.g.
6E78214A52). Note that some Wi-Fi
routers support passphrase generation
for WEP security. However, there is no
industry standard for WEP passphrase
generation and this radio does not support
WEP passphrases.
• If you are using a WEP secured access
point, enter the WEP key (HEX format)
instead of the passphrase.
After connecting to the Internet
• If you did not activate your Infinite Radio
accounts, or if the radio cannot get your
details from the Infinite Radio server, the
radio may ask for your postal code.
• Input your postal code. The radio should then
connect to Internet Radio.
12
Page 13
Before you begin
Demonstration mode
The radio has a pre-installed demonstration. To
exit the demonstration, press and release in
sequence the buttons on top of the radio: preset
1, then SLEEP/SNOOZE, then preset 6.
Getting the latest firmware and
information
The radio will automatically alert you for upgrade
if a new firmware is available. You may also go to
www.arinfiniteradio.com for the latest firmware
and user manual for your radio. Follow the
instructions there to download and install files.
Frequently asked questions
For answers to frequently asked questions
(FAQ's), go to www.arinfiniteradio.com.
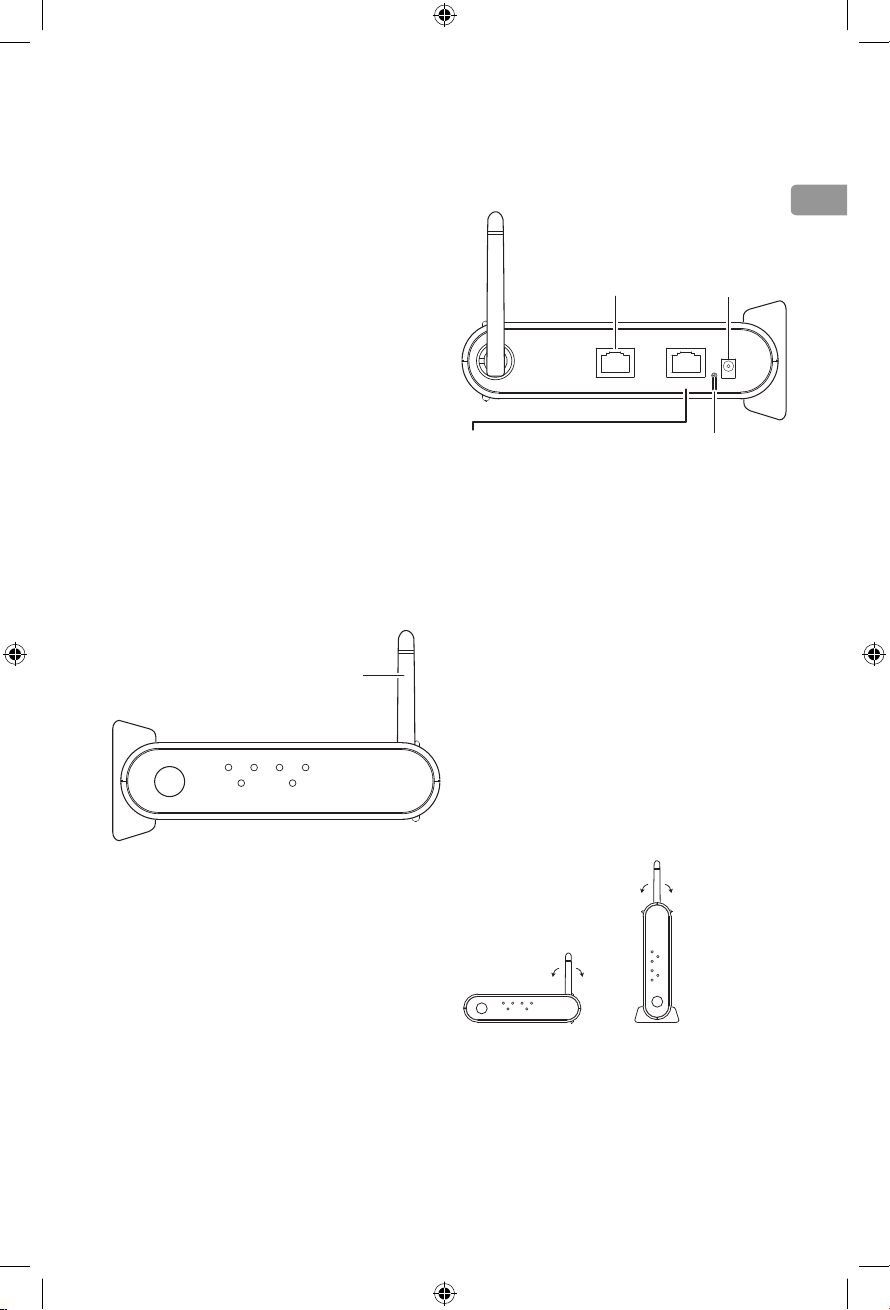
General controls of AR Wi-Fi Enabler
(for ARIRC205)
Front view
Antenna
MODE WPS WIRELESS POWER
WPS
PRESS
WAN LAN
WiFi ENABLER
Back view
WAN port – connect to
your existing access
point, broadband
modem or Ethernet
router/hub/switch
WAN
• LAN port – if your modem or
router/hub/switch has only
Power
adapter jack
RESET
LAN
POWER
Reset push
button
one LAN port and is
connected to your PC,
disconnect the Ethernet cable
from the modem/router/hub/
switch and connect it to the
Enabler's LAN port.
• You can also connect it to your
computer's Ethernet port to
access the Enabler's webadministration page for
troubleshooting purposes.
Refer to page 31 for more
information.
To install the Enabler:
The Enabler can be installed vertically or
horizontally. Remove the standing brackets for
horizontal installation. Rotate the antenna to
improve signal reception.
EN
WiFi ENABLER
WAN LAN
MODE WPS WIRELESS POWER
WPS
PRESS
WAN LAN
WiFi ENABLER
MODE WPS WIRELESS POWER
WPS
PRESS
13
Page 14

Before you begin
To turn on the Wi-Fi Enabler:
The Enabler will turn on automatically when
power is connected.
To check the AR Wi-Fi Enabler's status by
reading the LEDs (Lights):
• Normally the POWER, WAN and WIRELESS
LEDs will be on when the enabler is operating
as a router.
• The LAN LED will be on if there is an Ethernet
cable connected from the LAN port on the
Enabler to a computer.
• The MODE LED will be off when the Enabler is
operating as a Router.
• The MODE LED will be on when the Enabler is
operating as an (AP) Access Point.
To rescan the network configuration:
• Your Wi-Fi Enabler comes preconfigured from
the factory so normally no rescan should be
necessary.
• Press and hold the WPS key for 3 seconds.
The MODE LED then starts blinking. This will
indicate to the user that the unit is scanning
the network to determine the correct mode
for the new environment (i.e. either router or
AP).
• If during a scanning, the unit cannot
determine the mode or needs more
information (i.e. no response from the WAN
connection, PPPOE, fixed IP address
connection, etc) the unit will start flashing the
MODE, WPS and WIRELESS LEDs.
To reset the Enabler:
• If you are unable to connect the radio to the
Wi-Fi enabler, press and hold the RESET for
10 seconds to reset the Wi-Fi enable back to
factory defaults. After resetting the Wi-Fi
enabler, try connecting again.
Placement of Wi-Fi Enabler
The placement of the AR Wi-Fi Enabler and also
interference can affect the radio and Wi-Fi
Enablers operation; therefore choose placement
wisely and try to reduce interference in the
beginning will ensure a pleasant experience.
To choose Wi-Fi Enabler placement:
For best results, place your AR Wi-Fi Enabler:
• Near the center of the area in which your
computer and radio will operate.
• In an elevated location such as a high shelf
where the wirelessly connected radio have
line-of-sight access (even if through walls).
• Avoid obstacles to wireless signals.
• Keep wireless devices at least 2 feet (0.6m)
from large metal fixtures such as file cabinets,
refrigerators, pipes, metal ceilings, reinforced
concrete, and metal partitions.
• Keep wireless devices away from large
amounts of water such as fish tanks and
water coolers.
To reduce interference:
• Avoid windows unless communicating
between buildings.
• Place wireless devices away from various
electromagnetic noise sources, especially
those in the 2400 – 2500 MHZ frequency
band. Common noise-creating sources are:
– 2.4 and 2.5GHz cordless phones, computers,
other wireless routers, access points and fax
machines (no closer than 1 foot (0.3m)).
– Copying machines, elevators, and cell phones
(no closer than 6 feet (1.8m)).
– Microwave ovens (no closer than 10 feet
(3m)).
14
Page 15
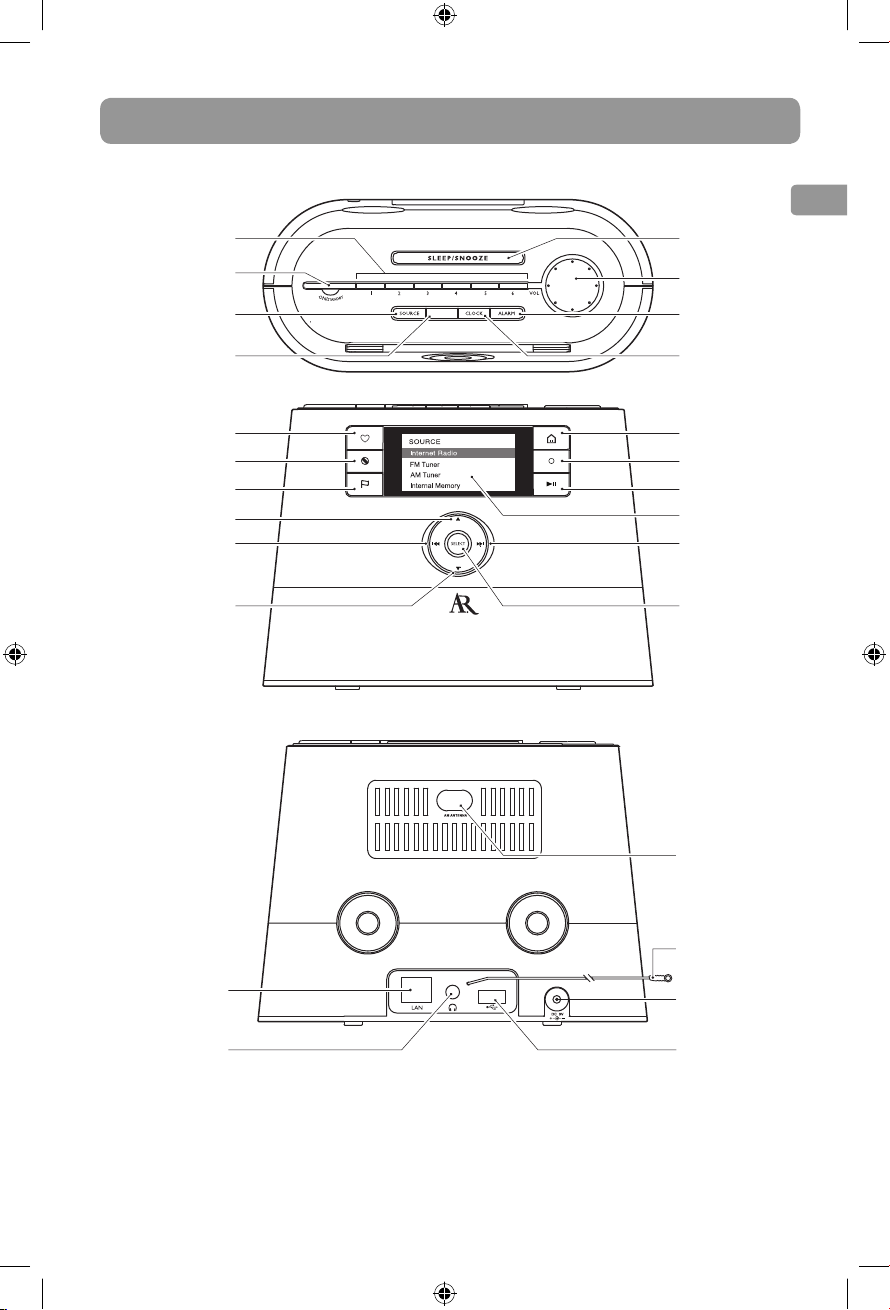
General controls
Front and top
Station presets
On/standby
Audio source
WEATHER
EN
Sleep timer/
snooze
Volume
Alarm set
Weather
information
Menu up
Previous/scan
back/reverse/
menu back
Menu down
Rear
Clock set
Home/Main
Heart
Ban
Tag Play/pause
menu
Record
Display
Next/scan/fast
forward/menu
forward
Menu select
AM loop
antenna socket
(for ARIRC200 only)
LAN port
Headphone/
audio line-out
You can connect USB devices to the USB port:
The radio can play open MP3, WMA and
RealAudio audio files stored on the connected
USB device.
RealAudio is a trademark or a registered trademark of RealNetworks, Inc.
FM antenna
Power adapter
input socket
Full-speed
USB port
15
Page 16
General controls
Turning on or off
Press ON/STANDBY to turn the radio on or off
(standby mode).
Volume control
Rotate the VOL. knob to adjust the volume.
Source selection
Press SOURCE repeatedly to select among the
following audio content sources:
• Internet Radio
• MP3tunes
• FM Tuner
• AM Tuner
• Internal Memory
• USB Input
Weather forecast
Press WEATHER to check current and 3-day
forecast. Refer to page 26 for more information.
Clock and alarm
• Press CLOCK once to show the current time
or press and hold to set the clock time.
• Press ALARM once. Then press or to
choose Turn On, Turn Off, Set Alarm Time,
or Select Sound and then press SELECT.
• Refer to page 18-19 for more information.
Using the menus
The display window shows the playback screen,
browse screen, settings screen, messages etc.
What appears on the window varies depending
on the function you are using.
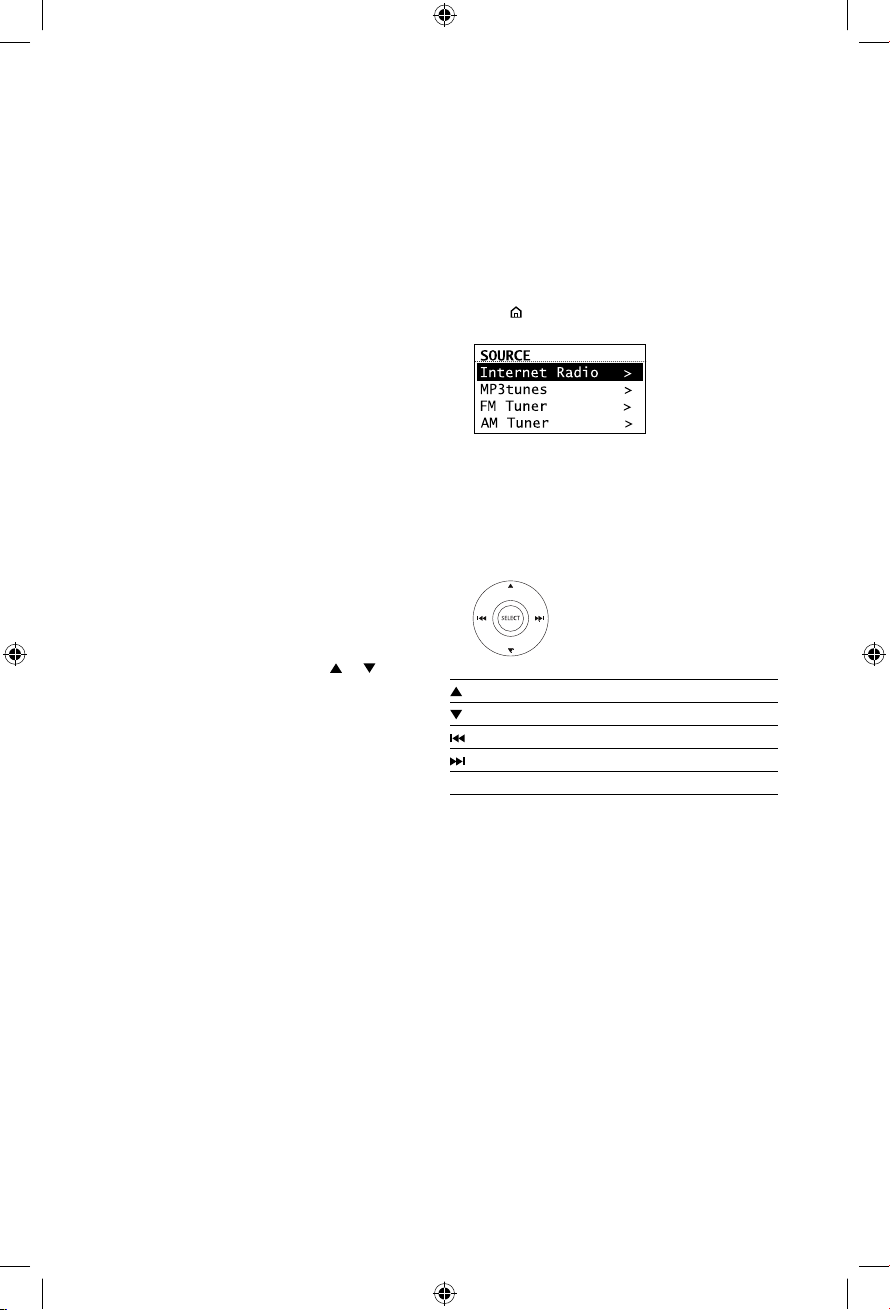
To display the Source menu:
• Press to display the Source menu for
selection of an audio source.
• Now Playing – appears at the top of the
Source menu when a station is playing. Select
this option to return to the play screen.
To navigate in the menus:
• Use the navigation controls to make choices
and input information.
Moves highlight up
Moves highlight down
Moves selection/navigates left
Moves selection/navigates right
SELECT
Con rms selected option or character
16
Page 17
General controls
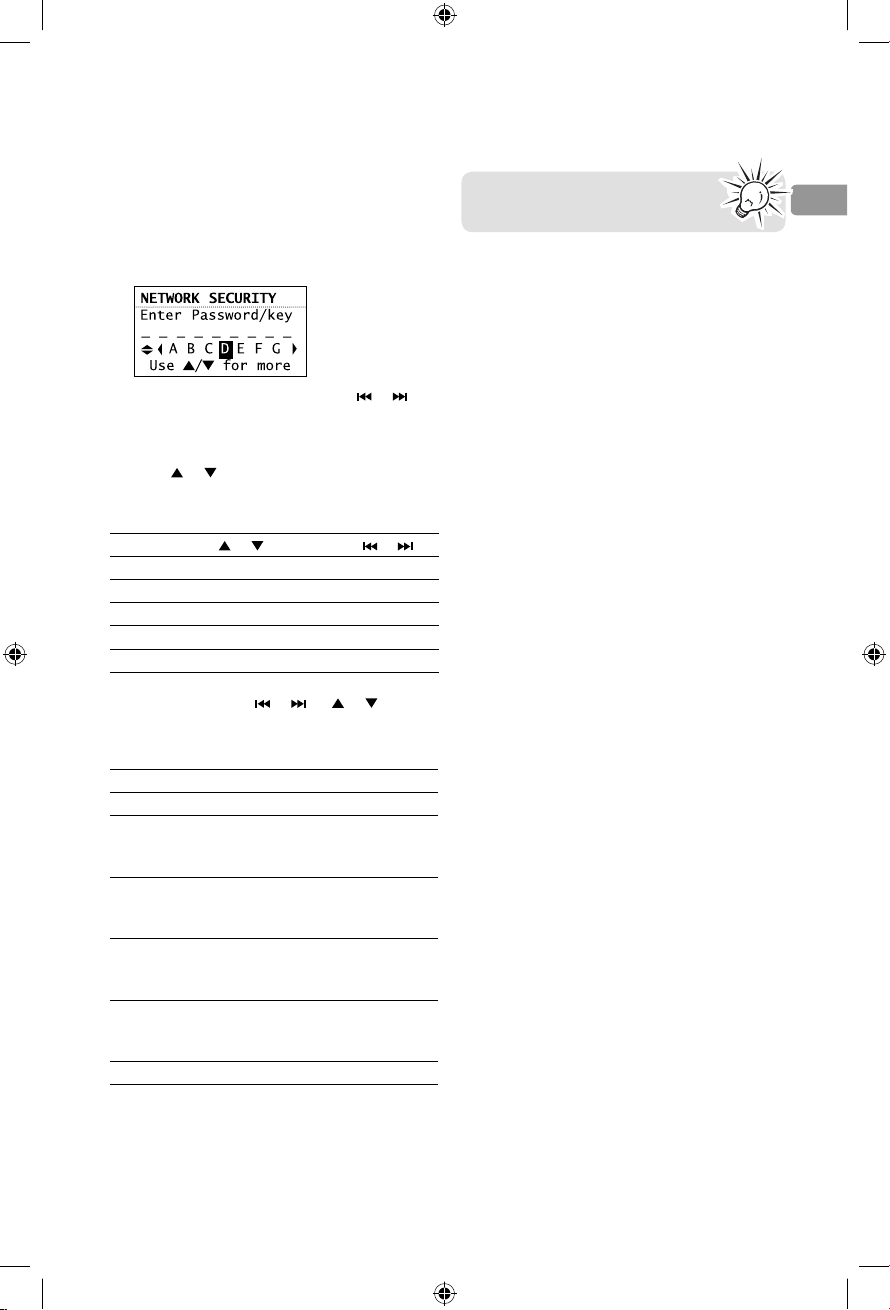
To input characters:
• Some menus require character input (e.g.
password, postal code). Postal code is useful
for clock time setting, weather forecast and
searching local Internet radio stations in your
area.
• When inputting characters, press or to
• Press
Character sets ( or )
Upper case
Lower case
Numeric
Special
Commands
• Commands: press or (or or ) to
select the alpha-numeric characters listed at
the bottom of the screen. Press SELECT to
confirm selections.
or to choose among uppercase,
lowercase, numeric, special characters or
commands.
Options ( or )
A B C D E...X Y Z
a b c d e...x y z
1 2 3 4 5 6 7 8 9 0
_ – ! @ # $ % ^ & *
(read below)
choose the desired command and then press
SELECT.
To exit the input screen without
saving, select the Cancel command.
EN
Commands
DONE
Delete
Space
Back
Next
Cancel
Actions
Ends entry
Deletes highlighted input and
moves the highlight back one
space
Inserts a blank space, characters
to the right will move one location
over
Moves the highlight back within
the entered character without
deleting
Moves the highlight forward
within the entered character
without deleting
Exits input screen without changes
17
Page 18
Clock and alarm
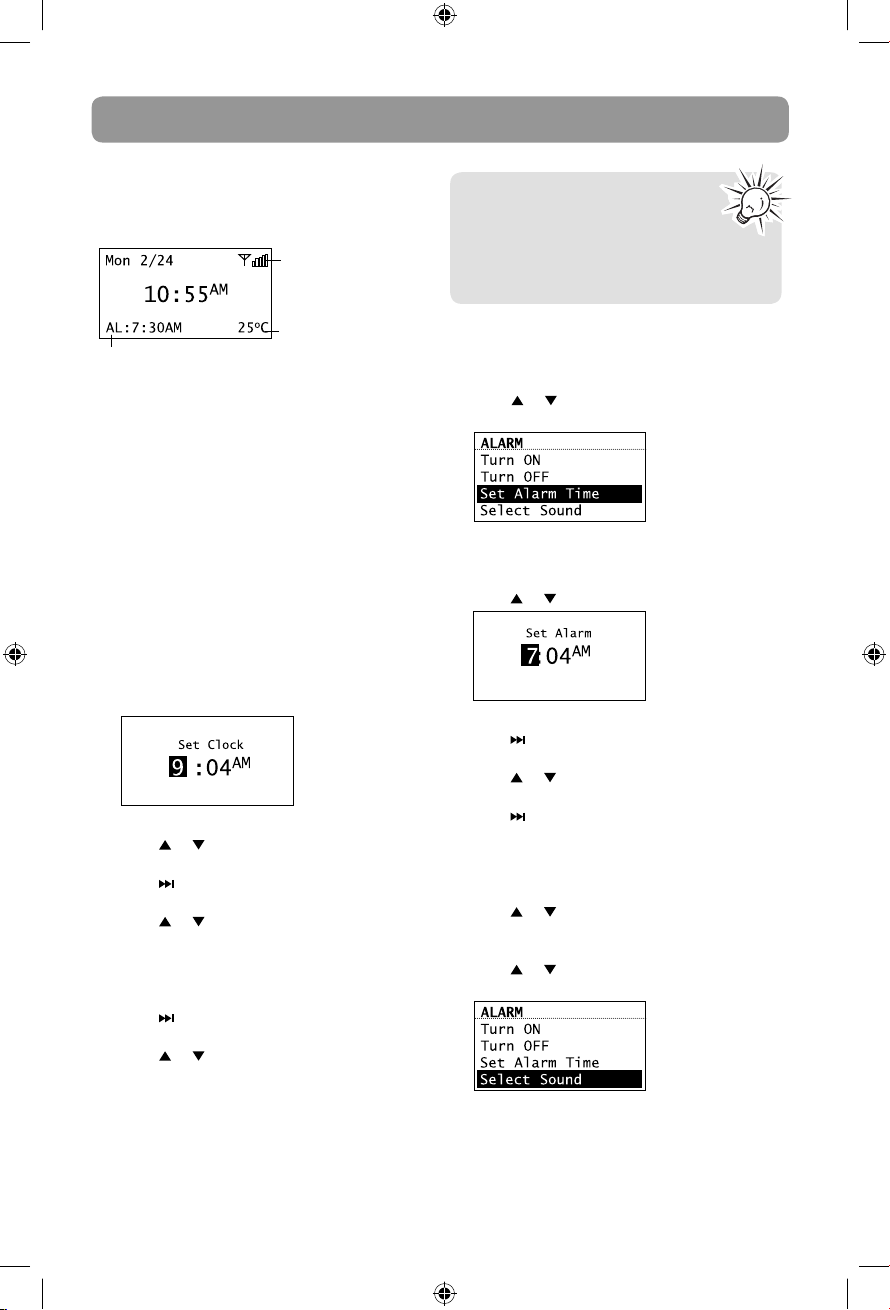
Accessing the digital clock
The Wi-Fi Internet Radio also includes a digital
clock which will be automatically updated when
connected with the Internet.
Wi-Fi connection
strength
Current temperature
Alarm clock status
• Press CLOCK to show the clock without
interrupting audio playback.
• To hide the clock and return the display to
the previous screen, press CLOCK again.
• The clock is also displayed when the radio is
turned off (standby mode).
Setting the clock
With your postal code set, the clock time will be
automatically updated when connected with the
Internet. However, you may still be able to set it
manually. Day, date and month can only be
updated by connecting with an Internet radio
station.
1. Press and hold CLOCK until the hour time is
highlighted (reversed color) on the display.
2. Press or to select the hour time.
3. Press to shift to minute time.
4. Press or to select the minute time.
• If you have set the clock to 24-hour display
mode (refer to page 27), press SELECT after
setting the minute time and skip steps 5-7.
5. Press to shift to AM/PM.
You may also adjust the clock time
manually and turn off the automatic
time update (Auto Sync) when
connected with the Internet. Refer to
Advanced Settings on page 27 for more
information.
Using the alarm clock
To set the wake time and sound:
1. Press ALARM to show the alarm menu. Then
press
or to highlight Set Alarm Time
and then press SELECT.
2. The hour time of the alarm clock is
highlighted (reversed color) on the display.
Press
or to select the wake hour time.
3. Press to shift to minute time.
4. Press
5. Press to shift to AM/PM.
• If you have set the clock to 24-hour display
6. Press or to select between AM and PM
7. Press
or to select the wake minute time.
mode (refer to page 27), press SELECT and
then go to step 7.
and then press SELECT.
or to highlight Select Sound and
then press SELECT.
6. Press or to select between AM and PM.
7. Press SELECT again to confirm the setting.
18
Page 19
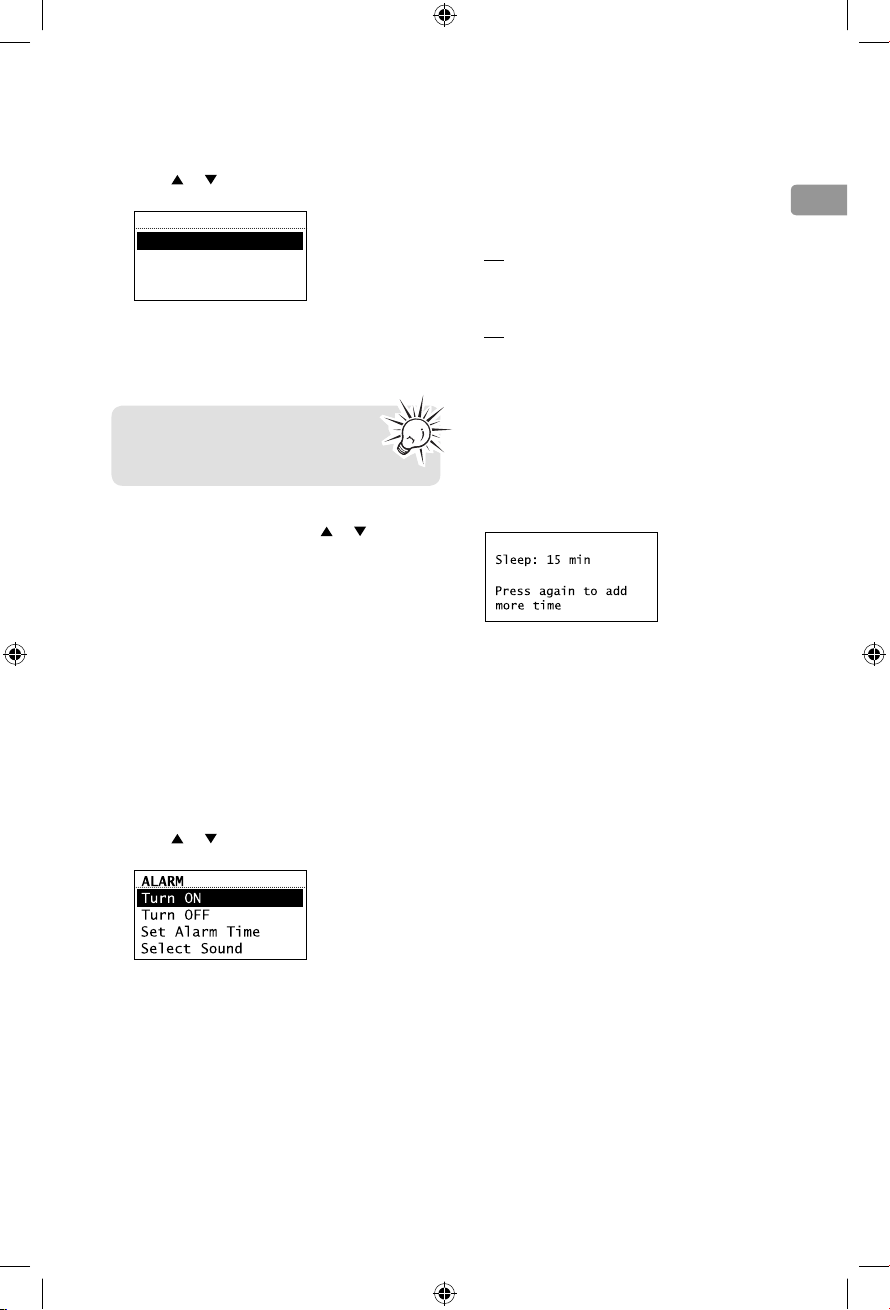
Clock and alarm
8. Press or to highlight one of the sources
of wake sound:
ALARM SOUND:
Buzzer
AM Preset
FM Preset
Internet Preset
• Buzzer
• AM Presets
• FM Presets
• Internet Presets
Read relevant sections (e.g. Internet
Radio) in this user manual to
understand how to preset stations.
9. Press SELECT on the highlighted source of
wake sound and then press or to select
the desired sound or preset item.
10. Press SELECT to confirm the selected item as
the wake sound.
• When the radio loses electricity, the alarm
clock will be powered by the batteries
inserted at the base (refer to page 9). The
wake sound selected will be reverted to the
default buzzer.
• When the selected sound is no longer
available, the default buzzer will sound.
To activate or deactivate the alarm clock:
1. Press ALARM.
2. Press or to highlight Turn On or Turn
Off and then press SELECT.
• When the alarm is turned ON, the set alarm
time (e.g. AL: 7:00AM) will show in the lower
left corner of the clock display.
• When the alarm is turned OFF, "AL: Off" will
show on the clock display.
To turn off the alarm clock when it sounds:
• Press ALARM or ON/STANDBY to turn off
the alarm clock. It will sound again on the
next day if settings have not been changed.
OR
• Press SLEEP/SNOOZE to turn off the alarm
clock temporarily for extra sleep time. The
alarm will sound again after 10 minutes.
OR
• The alarm clock will turn off automatically
after 60 minutes without pressing any
button.
Sleep mode
You can set the radio to play for a set length of
time before turning off automatically.
1. Press SLEEP/SNOOZE to turn on the Sleep
mode while listening to the radio.
• The default time is 15 minutes.
• If the radio is off, press SLEEP/SNOOZE to
turn on the Sleep mode with the last used
channel.
2. If necessary, press SLEEP/SNOOZE again to
add extra sleep time up to 90 minutes. Each
press of the button will add 15 minutes.
• The remaining time before turning off
automatically will show at bottom right of
the clock display, replacing the weather
information.
• Select OFF (press SLEEP/SNOOZE once more
after 90 min) if you decide not to use the
sleep mode. The radio will turn off.
• To cancel the Sleep mode sooner, press ON/
STANDBY.
EN
19
Page 20
Internet Radio
With Internet radio, you can listen to music,
news, sports, weather or talk radio in other
countries or from your home town. It offers the
most music selections from around the world
and most stations are free.
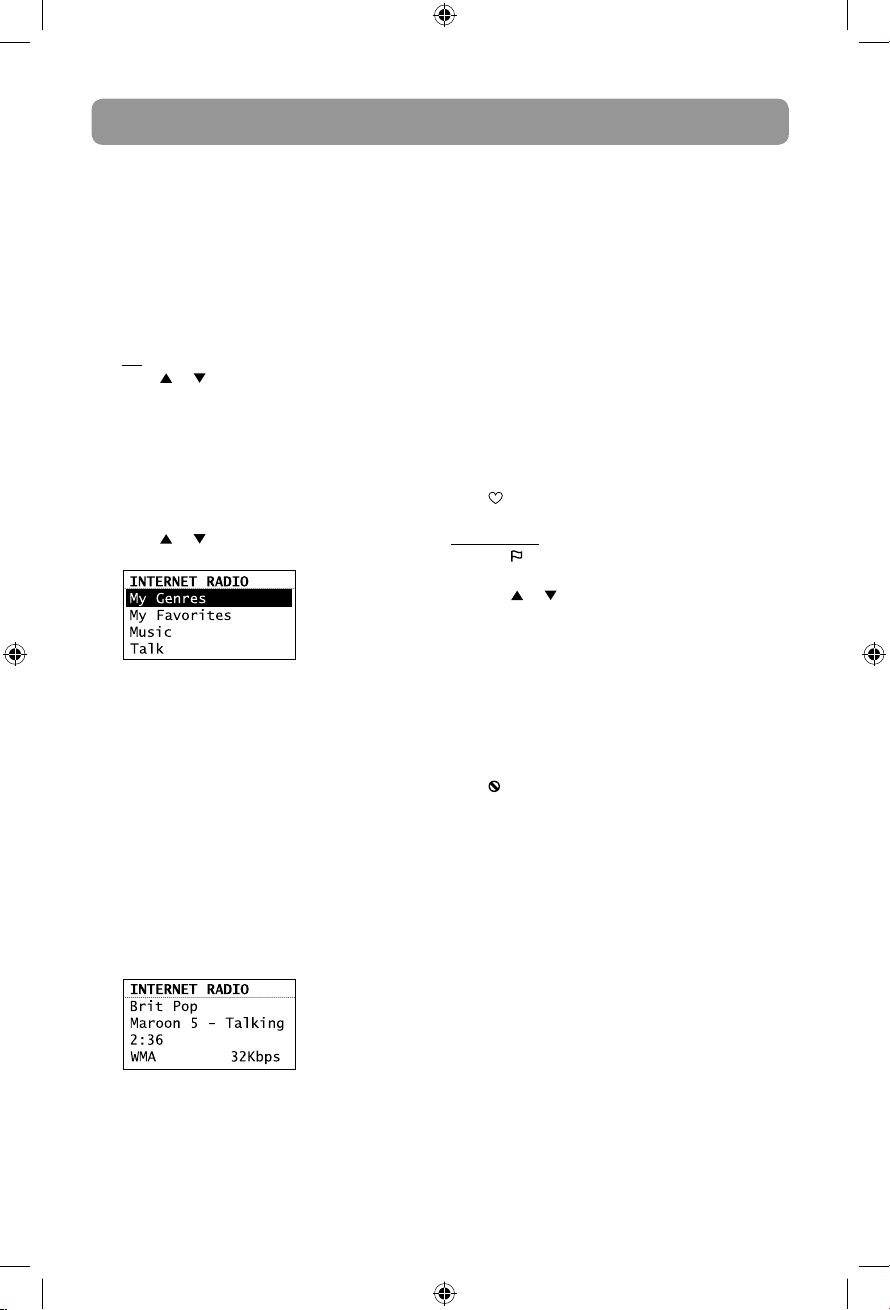
Accessing Internet Radio
• Press SOURCE repeatedly to select Internet
Radio.
OR
• Press or to highlight Internet Radio in
the Source menu and then press SELECT.
Listening to Internet Radio
To select a station:
Internet Radio stations are categorized according
to music genre, talk nature and geographical
location.
1. Press or to highlight a category or subcategory and then press SELECT.
• My Genres – your favorite genres together in
one place for easier navigation
• My Favorites – a list of your favorite Internet
Radio stations
• Music – music stations categorized by genre
and sub-genres (e.g. Blues, Hip Hop)
• Talk – talk-specified stations categorized by
talk natures (e.g. Business news, Religion)
• My Local – a list of local Internet radio
stations selected according to the postal code
provided by the user
• By Region – music stations categorized by
geographical regions
To store the current station as a preset:
1. Select a station.
2. Press and hold 1, 2, 3, 4, 5 or 6 on top of the
radio until a beep sound is heard to store the
current station to that preset button.
• You can store up to 6 stations in each genre.
• To listen to a preset station, press 1-6.
• To edit a preset station, repeat the steps
above to overwrite the previously stored
station.
• You can assign a preset station as the wake
sound of the alarm, refer to page 18 for more
information.
To store the current station as My Favorites:
Press while listening.
Alternatively:
1. Press .
2. Press or to highlight Add to Favorites
and then press SELECT.
To listen to a station in My Favorites:
Select a station from My Favorites in the main
menu of Internet Radio and then press SELECT
to start playback. (Read To select a station for
more information).
To remove a station from My Favorites:
Press while listening to a favorite station.
2. While a station is highlighted, press SELECT.
The selected station will start to play.
20
Page 21
Internet Radio
To assign the current station as the wake
sound of the alarm clock:
1. Press
.
EN
2. Press
or to highlight Send to Alarm and
then press SELECT.
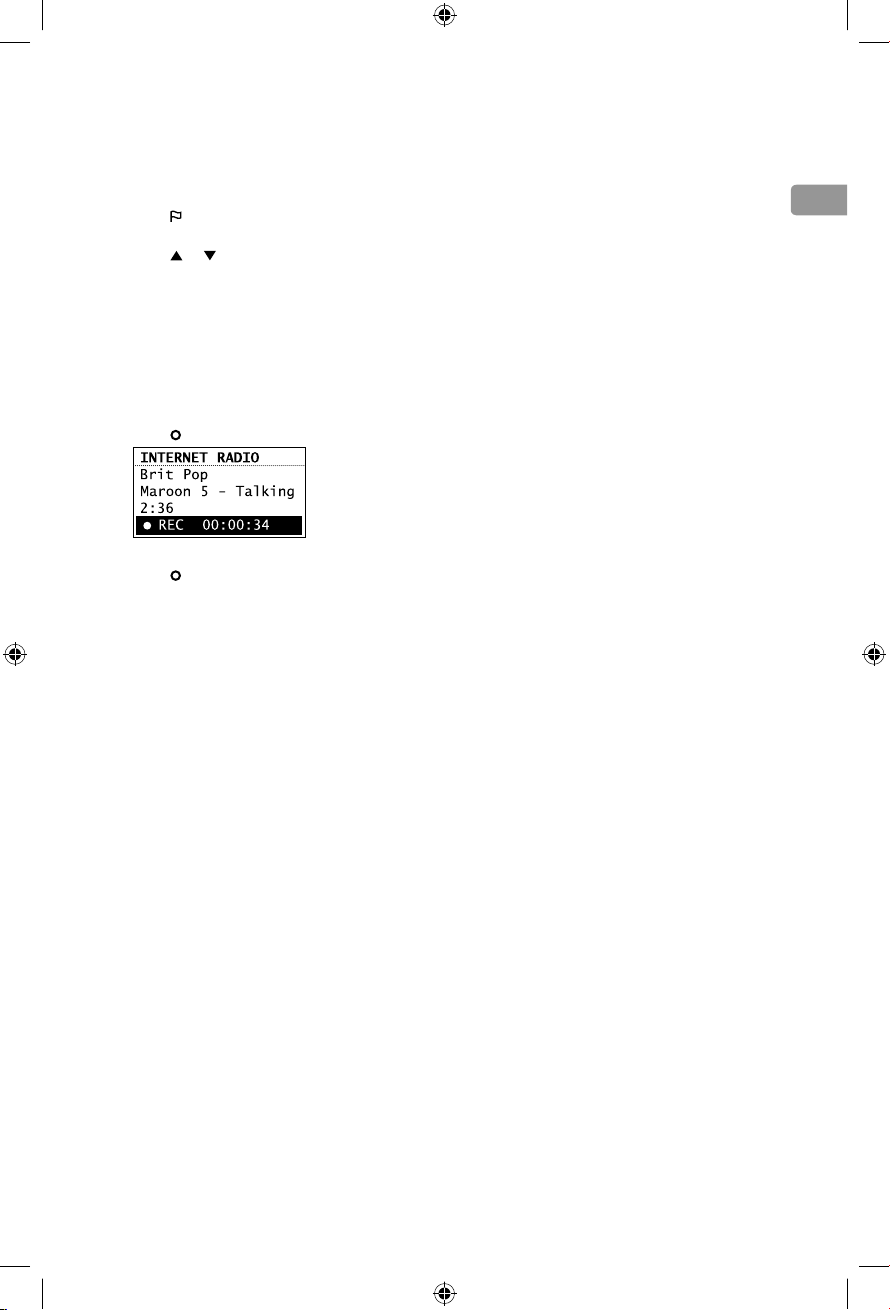
Recording Internet Radio
Warning! Use of the recording feature is for
personal use only. (Files cannot be transferred or
moved from the internal memory.)
To record the current station:
1. Press to start recording.
2. Press to stop recording.
• Recording will be stored in the internal
memory of the radio.
• For playback, please refer to Internal
Memory on page 24.
• The radio names each recording <Station
Name> <Month-Date> <Time Stamp>. For
example: JazzMan 1-21 445.
Adding Internet Radio stations
To add Internet Radio stations:
Please visit www.arinfiniteradio.com/portal
and login to your user account to add new
stations under My Favorites.
21
Page 22

MP3tunes
MP3tunes is a Music Service Provider (MSP) and
the home of MP3tunes Locker, a secure, online
music space to allow unlimited listening.
MP3tunes users can upload their own music
collections to the MP3tunes Locker and listen
through this radio when the computer is turned
off.
The MP3tunes Locker is available in a 3GB
ad-supported free edition, along with the 50GB
MP3tunes Premium Locker which permits larger
music files, full access to album cover art and full
customer support access.
For more information about MP3tunes, please
visit www.mp3tunes.com.
MP3tunes Locker setup
1. Visit www.mp3tunes.com and set up an
MP3tunes account. Both free and paid
subscriptions are available.
2. Upload your music collection to your
MP3tunes Locker.
• MP3tunes offers various methods to upload
your music collection. Please refer to
MP3tunes website for recommendations and
instructions.
3. Make sure your MP3tunes account
information in this radio is the same as your
existing MP3tunes account.
• To check or edit your MP3tunes account
information, please refer to Account Info on
page 27 of this user manual.
Listening to music in MP3tunes
Locker
Your music files are categorized according to
artists, albums and playlists.
1. Press
2. Press SELECT or to play back any music
• To play back a specific music file, press
3. Press to pause or resume playback.
4. Press to skip to the next file.
5. Press within the beginning 3 seconds of
or to highlight a category or sub-
category and then press SELECT.
files from the selected artist, album or
playlist.
SELECT to open the selected artist, album or
playlist. Press or to highlight a specific
file and then press SELECT or .
the current file to skip to the previous file.
Otherwise, you will return to the beginning
of the current file.
Accessing MP3tunes mode
• Press SOURCE repeatedly to select
MP3tunes.
OR
• Press or to highlight MP3tunes in the
Source menu and then press SELECT.
22
Page 23

FM/AM Tuner
FM/AM antenna
• For FM reception, uncoil the FM antenna at
the back of the radio, ensuring it is fully
extended (you may even want to tape it to
the wall behind the radio if possible. The
higher the better.)
• For AM reception, connect the AM antenna
loop to the back of the radio. Rotate the AM
loop antenna for better reception.
Accessing FM/AM Radio
• Press SOURCE repeatedly to select FM Tuner
or AM Tuner.
OR
• Press or to highlight FM Tuner or AM
Tuner in the Source menu and then press
SELECT.
Stereo signal indicator
Listening to FM/AM Radio
To select a station:
1. Press or to adjust the frequency.
2. Press and hold
to start searching through the frequency
range. The radio stops searching when it
detects the next station.
or until the radio beeps
To assign the current station as the wake
sound of the alarm clock:
1. Press
2. Press
.
or to highlight Send to Alarm and
then press SELECT.
Recording FM/AM Radio
Warning! Use of the recording feature is for
personal use only. (Files cannot be transferred or
moved from the internal memory.)
To record the current station:
1. Press to start recording.
92.3
2. Press to stop recording.
• Recording will be stored in the internal
memory of the radio.
• For playback, please refer to Internal
Memory on page 24.
• The radio names each recording
<Source><Station Frequency> <Month-Date>
<Time Stamp>.
For example: FM99.5 1-21 1245.
EN
To store the current station as a preset:
1. Select a station.
2. Press and hold 1, 2, 3, 4, 5 or 6 on top of the
radio until a beep sound is heard to store the
current station to that preset button.
• To listen to a preset station, press 1-6.
• To edit a preset station, repeat the steps
above to overwrite the previously stored
station.
• You can assign a preset station as the wake
sound of the alarm, refer to page 18 for more
information.
23
Page 24

Internal Memory
The radio's internal memory stores up to 10
hours of recordings from Internet Radio and FM/
AM Tuner.
Accessing Internal Memory
• Press SOURCE repeatedly to select Internal
Memory.
OR
• Press
or to highlight Internal Memory
in the Source menu and then press SELECT.
Listening to recordings
1. Press or to highlight a recording and
then press SELECT.
2. Press or to highlight Play and then press
SELECT to start playback.
3. Press
4. Press
5. Press
to pause or resume playback.
to skip to the next recording.
within the beginning 3 seconds of
the current recording to skip to the previous
recording. Otherwise, you will return to the
beginning of the current recording.
Deleting recordings
1. Press or to highlight an unwanted
recording and then press SELECT.
2. Press
3. Press or to highlight Yes in the
To delete all recordings:
1. In the list of recordings, press or to
2. Select Continue in the confirmation screen
• You can also clear the internal memory from
or to highlight Delete and then
press SELECT.
confirmation screen and then press SELECT.
highlight Delete All and then press SELECT.
and then press SELECT.
the Settings menu. Refer to Advanced
Settings on page 27 for more information.
24
Page 25

USB Input
The radio can play back music files (mp3, wma
and RealAudio (RA8 and G2) formats) stored on
an external USB device connected to it. The USB
connection port is located at the back of the
radio.
Accessing USB Input mode
• Press SOURCE repeatedly to select USB
Input.
OR
• Press or to highlight USB Input in the
Source menu and then press SELECT.
Listening to music files
1. Press , , or to browse through the
directory of the USB device and select a
music file by pressing SELECT.
• Press or SELECT to enter a folder.
• Press to exit from a folder.
2. Press or to highlight Play and then press
SELECT to start playback.
3. Press to pause or resume playback.
Deleting files
1. Press or to highlight an unwanted file
and then press SELECT.
2. Press or to highlight Delete and then
press SELECT.
3. Press or to highlight Yes in the
confirmation screen and then press SELECT.
EN
4. Press to skip to the next file.
5. Press within the beginning 3 seconds of
the current file to skip to the previous file.
Otherwise, you will return to the beginning
of the current file.
25
Page 26

Weather
Weather broadcast
Your radio includes a complimentary
4 year weather, on-demand
subscription from WeatherBug®
A digital weather broadcast is available including:
• Text-to-speech reading of weather forecast for
the postal code associated with the radio (can
be turned on or off in the Settings menu).
Audio playback will pause during reading.
• On screen display of conditions including
current temperature, high and low
temperatures of the day, current weather
condition, humidity and wind conditions.
• Graphical display of weather conditions for
3-day forecast:
Unknown
Sunny/clear
Mostly sunny
Partly cloudy
Mostly cloudy
Cloudy
Clear (night)
Mostly clear (night)
Frozen mix
Snow
Heavy snow
Windy
Fog
To check the weather of current day:
Press WEATHER once.
To check the 3-day weather forecast:
Press WEATHER twice to check weather forecast
for current day and the next two days.
To return to the previous audio source or
playback screen:
Press WEATHER a third time.
Partly cloudy (night)
Mostly cloudy (night)
Hazy
Hazy (night)
Rain
Heavy rain
Thunderstorms
Severe thunderstorms
Sleet
26
Page 27

Settings
Changing radio's settings
To change the radio settings:
1. Press to display the Source menu.
2. Press
3. Press
• Repeat this step to browse for more settings
• To change setting, press
• Some menus may require character input,
or to highlight Settings and then
press SELECT.
or to highlight a setting and press
SELECT to enter the sub-menu.
and sub-menus.
or to highlight a
desirable option and then press SELECT to
confirm.
refer to page 16 for tips on inputting
characters.
Account info
• To change the login information (username
and password) sent by the radio when
attempting to login to the MP3tunes service.
• To edit the postal code for time and weather
functions.
If you have changed your account
information through MP3tunes'
website, please also edit the account
information in this setting. The information
here must match your account information
online.
Network setup
To change the network setting of the radio
(wired or wireless). Refer to page 11 for more
information.
Software updates
To check if newer firmware is available. Follow
the instructions on the display for update.
Weather
• To turn on or off the text-to-speech reading
when you press the WEATHER button.
• To select the gender and accent (US/UK) for
the voice used for text-to-speech reading.
Advanced settings
• Clock Mode
– Auto Sync and Manual: to select between
automatic and manual clock time update. If
Auto Sync is selected, the clock time will
update every 5 minutes while checking for
weather update.
– Time Display: to select between 12-hour and
24-hour display modes.
• Format memory: to clear all recordings in the
internal memory.
• Reset to defaults: to reset menus to factory
defaults. The following settings will be reset:
– Username, Password, Display options,
Language selection, Postal code entry,
Network connection setup, Clock, Alarm, Textto-speech voice selections, Demonstration
mode.
– Recordings in Internal Memory will NOT be
erased.
• Set Language: to change the language of the
display.
EN
Device info
To show the firmware version, MAC address and
PIN number of the radio. MAC address and PIN
are necessary to activate your AR Infinite Radio
accounts.
Display
To change brightness and contrast of the display.
27
Page 28

More information
Troubleshooting tips
The radio cannot be turned on.
• Plug the AC power adapter securely into the
radio and a wall outlet.
• Check the power outlet by plugging in
another device.
• Press and hold ON/STANDBY for 10 seconds
to reboot the unit.
No sound.
• Increase the volume setting.
• Make sure the headphones are not plugged
in.
The radio does not respond to key presses.
• The radio may temporarily cease to function if
subjected to electrostatic disturbance. To
resume normal operation, it may be
necessary to reset the radio by unplugging
and reconnecting the power or by removing
and reinstalling the batteries in the base of
the radio.
Cannot connect the radio to Internet.
• Check if your access point is turned on and
correctly connected.
• For users of AR Wi-Fi Enabler: make sure all the
indicators on the Enabler’s front panel are lit.
If the WPS, MODE, or WIRELESS indicators are
off or blinking simultaneously, press and hold
the Enabler’s WPS button for 3 seconds (the
MODE LED should start blinking) to rescan
your network configuration. The Enabler may
restart multiple times during this process and
take up to two minutes depending on your
network configuration. The MODE LED will
stop blinking when this process is completed.
Go to www.arinfiniteradio.com for more
information.
• Make sure a firewall is not blocking any
outgoing ports.
• Make sure the access point does not restrict
connections to specific MAC addresses.
• Make sure you have entered the correct
password. Password is case sensitive.
• Your wireless Internet connection may exceed
the maximum range for reception. Relocate
the Internet Radio closer to the wireless
access point.
• The network settings of the radio may be
incorrect. Check the network settings in
Network Setup in the Settings menu.
• Tilt your router's external antenna to 45
degrees if the radio is on a different floor.
• Move the access point away from or above
obstructions.
• See your router's manual for more tips on
improving range or reception.
Clock time is incorrect.
• Refer to Account Info in the Settings menu
and make sure you have correctly input your
postal code as reference for automatic clock
time update.
Weather information are incorrect.
• Refer to Account Info in the Settings menu
and make sure you have correctly input your
postal code as reference for weather
information.
Weather information is not read out loud.
• Refer to Weather in the Settings menu and
make sure you have turned on the text-tospeech reading feature.
The radio connects to the Internet but is
unable to play a particular station.
• Check if the station is still broadcasting.
• The station may have reached the maximum
number of simultaneous listeners.
• The link to the radio station may be out of
date.
• The Internet connection between the radio
station server and the radio may be too slow.
Intermittent audio.
• The bandwidth of your wireless LAN may be
too low. Move the radio closer to the access
point and make sure that there are no
obstacles between them.
• The actual transmission speed of digital radio
broadcast depends on the service provider
(i.e. the Internet radio station).
Cannot skip to the previous song while
listening to Internet Radio.
• Skipping to the previous song in Internet
Radio is not available.
28
Page 29

More information
Poor FM/AM Tuner reception.
• Check the antenna connection.
• Move antenna.
• Turn off nearby electrical appliances, such as
hair dryer, vacuum cleaner and microwave.
Cannot record radio.
• Record feature is only available for Internet
Radio, AM and FM Tuner.
• The internal memory of the radio may be full.
Remove some of the old recordings.
Cannot play back music files on connected
USB device.
• Make sure USB device is securely connected.
• Digital Right Management (DRM) type music
files will not be played.
• The radio supports FAT12, 16 and 32 file
systems only. Other file systems from Linux,
MAC or NTFS are not supported.
The LED of ON/STANDBY button is flashing.
• The LED is flashing (5-second interval) when
the unit is being powered by the backup
batteries due to electricity supply
interruption. Please check your AC power
supply.
• If the LED is flashing even faster (3-second
interval), this means that the unit is being
powered by weak backup batteries. Please
replace the backup batteries (refer to page
9). We recommend that you replace the
batteries every year (or more often in case of
multiple power outages) to avoid low battery
power. Otherwise, clock and alarm accuracy
may be affected when electricity supply is
interrupted.
Cannot stop the demonstration mode.
• To exit the demonstration, press and release
in sequence the buttons on top of the radio:
preset 1, then SLEEP/SNOOZE, then preset
6.
My question was not answered here.
• Visit www.arinfiniteradio.com for an up-to-
date list of frequently asked questions.
Further help on Wi-Fi Enabler (for
ARIRC205)
• The AR Wi-Fi Enabler adds Wi-Fi capability to
your existing network. Page 9, step 4 shows
you how to connect the AR Wi-Fi Enabler to
your network.
• Your Wi-Fi Enabler comes preconfigured from
the factory so normally no changes should
be necessary. This information is provided for
the more advanced users or for
troubleshooting purposes.
• If you encounter problems connecting the
radio to the Internet via AR Wi-Fi Enabler, the
settings on the radio may not match the
settings on the Enabler. Follow the steps
below to configure the settings again.
To find the configuration information of the
Wi-Fi Enabler:
• Find the Wi-Fi Enabler’s factory configuration
information on the white label on the back of
the AR Infinite Radio. This label includes: 1)
the Wireless Network’s name (SSID), 2) the
Security Type, and 3) the password/key.
To check if the configuration information is
the same in the radio:
1. Press
2. In the Settings menu, press to highlight
3. In the Network Setup screen, press to
4. At the warning screen, press SELECT while
to display the Source menu of the
radio. Press to highlight Settings and then
press SELECT.
Network Setup and then press SELECT.
highlight Wireless and then press SELECT.
Continue is highlighted in the screen below.
EN
29
Page 30

More information
5. In the Network Setup screen, press
to
highlight Enter SSID and then press SELECT.
6. The Network Security screen will be
displayed. Confirm the SSID of the Wi-Fi
Enabler or re-enter if necessary. When
finished, press
to show DONE and then
press SELECT to continue.
The SSID here is an
example only.
7. The Network Security screen will then show.
Press to highlight WPA and then press
SELECT.
8. The Enter Password/key screen will be
displayed. Confirm the password/key of the
Wi-Fi Enabler or re-enter if necessary. When
finished, press
to show DONE and then
press SELECT to continue.
9. The radio should then connect with the Wi-Fi
Enabler and the Internet. If your AR Infinite
Radio accounts have not been activated, the
radio will then display a Server Error
message. Please press SELECT to continue.
You will be asked to enter your postal code
before the radio connects successfully.
• If you are still unable to connect with the
Wi-Fi Enabler, reposition the Enabler and try
connecting again. Refer to the Placement of
Wi-Fi Enabler on page 14 for more
information.
The password/key here
is an example only.
• A connection screen will then show to let you
know the Network name (SSID) that the radio
is connecting to.
30
Page 31

More information
Web-based utility of Wi-Fi Enabler
• This section is provided for advanced users
that would like to verify their Enabler's
configurations via the Enabler’s web-based
utility.
• The utility can be accessed via your web
browser through the use of a computer
connected to LAN port of the Wi-Fi Enabler.
Refer to page 9, step 4 for more information.
• Major pages in the utility and the page’s key
functions will be described below. For a
basic network setup, most users will not have
to use the following screens but this utility
may be useful, for troubleshooting.
To access the web-based utility of the Wi-Fi
Enabler:
1. Connect the supplied Ethernet cable from
the Wi-Fi Enabler LAN port to your
computer's Ethernet port. Refer to page 9,
step 4 for more informaiton.
2. For PC users running Windows XP, click on
Start, Run, and type cmd in the open dialog
box and press Enter.
• For Mac users running OSx click on the
terminal window.
3. For PC users, at the dos prompt, type
ipconfig /all. This will show you the IP
address for your Default gateway (Wi-Fi
Enabler).
• For Mac users, in the terminal window, type
ipconfig getpacket en0.
• A sample of the configuration is shown
below:
4. Launch your Web browser and enter the
Router’s Default Gateway address, (in the
above example: 192.168.36.1 or 192.168.0.1)
in the Address field that was found above
and then press Enter. The address depends
on whether the Enabler is configured as a
Router or as an Access Point (AP) on your
system.
5. When the below screen appears, enter
admin for the User Name and leave the
Password field blank, and then click OK.
6. The web-based utility's home page will be
displayed. You can check the SSID and
Security Type here.
EN
Ethernet adapter Local Area Connection:
Connection-specific DNS Suffix . :
Description . . . . . . . . . . . . . .: Broadcom NetXtreme 57xx
Gigabit Controller #2
Physical Address. . . . . . . . . .: 00-12-3F-14-C2-0D
Dhcp Enabled. . . . . . . . . . . . : Yes
Autoconfiguration Enabled: Yes
IP Address. . . . . . . . . . . . . . : 192.168.36.11
Subnet Mask . . . . . . . . . . . . : 255.255.255.0
Default Gateway. . . . . . . : 192.168.36.1
DHCP Server . . . . . . . . . . . .: 192.168.36.1
DNS Servers . . . . . . . . . . . . : 192.168.36.1
Lease Obtained . . . . . . . . . : Monday, May 12, 2008 7:05:37 PM
Lease Expires . . . . . . . . . . . : Thursday, May 15, 2008 7:05:37 PM
C:\Documents and Settings\Administrator>
7. Click LAN Settings from the left menu to
view more configurations (such as IP address,
Subnet Mask, etc.).
31
Page 32

More information
8. Click Status from the left menu to view the
current connection status.
9. Click Wireless from the left menu to view the
wireless settings. The SSID shows here must
match the SSID of the radio.
• A quick way to check the SSID on the radio:
press , select Settings, select Network
Setup, and then select Connection Info.
• This screen also shows the Wireless channel
that the Enabler is broadcasting on. The
default Channel number is set to Auto. In
some cases, if there are other wireless
networks operating in near proximity on the
same channel, the Auto channel mode may
not work as expected and Auto may need to
be changed to another channel. In the above
example the channel was changed from Auto
to Channel 6.
10. To view the Wireless Security configuration,
click Configure on the Wireless screen.
• In order for the W-Fi Enabler to communicate
with the Radio, 1) SSID, 2) Wireless Security
Type, and 3) Passphrase must match on both
the AR Wi-Fi Enabler and the radio.
• The SSID on the Enabler can be found on the
white label on the side of the Enabler.
• A quick way to check the SSID on the radio:
press , select Settings, select Network
Setup, and then select Connection Info.
• The wireless security type on the Enabler
should be set to WPA-PSK. This security type
must match the security type on the radio
(WPA). Refer to page 29-30 for more
information.
• The Passphrase can be found on the white
label on the side of the Wi-Fi Enabler and it
needs to match the password/key on the
radio. Refer to page 29-30 for more
information.
32
Page 33

More information
Copyright warning
This player is for your personal use only.
Unauthorized recording or duplication of
copyrighted material may infringe upon the
rights of third parties and may be contrary to
copyright laws.
Check for updates
Visit www.arinfiniteradio.com for the latest
news and firmware upgrades for our Wi-Fi
Internet Radio.
Technical specification
Product: Wi-Fi Internet Radio
Brand: Acoustic Research
Model: ARIRC200, ARIRC205
Electrical Consumption: 13W
Specifications
Hardware
• Dimensions: 212 mm H, 94 mm W, 154 mm D
• Unit Weight: 790 g (27.9oz) (without
batteries)
• Standards: IEEE 802.11g and 802.11b
• Channels: 11 Wi-Fi Channels (US, Canada)
• Ethernet Port (ARIRC200 only): 10/100 RJ-45
compatible
• Power: External 9.0V DC 1.56A
• Battery Backup: 3 X AAA Size Batteries
• Display: 2.7" Backlight LCD
• LEDS: On/Standby, two for navigation keys,
Love it.
• Internal memory: 512 MB
• Stereo Headphones jack
• USB Connection Jack
EN
AM Tuner section
• Tuning Range: 520KHz to 1710KHz
FM Tuner section
• Tuning Range: 87.5MHz to 107.9MHz
Amplifier section
• Output Power: 2W x 2
• Distortion @ 1KHz: <10% THD
Speakers
• Number: 2
• Size: 40mm (1.56")
33
Page 34

Warranty information
Limited warranty
12 Month Limited Warranty
Applies to Acoustic Research Audio/Video
Products
AUDIOVOX ELECTRONICS CORP. (the Company)
warrants to the original retail purchaser of this
product that should this product or any part
thereof, under normal use and conditions, be
proven defective in material or workmanship
within 12 months from the date of original
purchase, such defect(s) will be repaired or
replaced with reconditioned product (at the
Company's option) without charge for parts and
repair labor.
To obtain repair or replacement within the terms
of this Warranty, the product is to be delivered
with proof of warranty coverage (e.g. dated bill of
sale), specification of defect(s), transportation
prepaid, to the Company at the address shown
below.
This Warranty does not extend to the elimination
of externally generated static or noise, to
correction of antenna problems, loss/
interruptions of broadcast or internet service, to
costs incurred for installation, removal or
reinstallation of product, to corruptions caused
by computer viruses, spyware or other malware,
to loss of media, files, data or content, or to
damage to tapes, discs, removable memory
devices or cards, speakers, accessories,
computers, computer peripherals, other media
players, home networks or vehicle electrical
systems.
This Warranty does not apply to any product or
part thereof which, in the opinion of the
Company, has suffered or been damaged
through alteration, improper installation,
mishandling, misuse, neglect, accident, or by
removal or defacement of the factory serial
number/bar code label(s). THE EXTENT OF THE
COMPANY'S LIABILITY UNDER THIS WARRANTY IS
LIMITED TO THE REPAIR OR REPLACEMENT
PROVIDED ABOVE AND, IN NO EVENT, SHALL THE
COMPANY'S LIABILITY EXCEED THE PURCHASE
PRICE PAID BY PURCHASER FOR THE PRODUCT.
This Warranty is in lieu of all other express
warranties or liabilities. ANY IMPLIED
WARRANTIES, INCLUDING ANY IMPLIED
WARRANTY OF MERCHANTABILITY, SHALL BE
LIMITED TO THE DURATION OF THIS WRITTEN
WARRANTY. ANY ACTION FOR BREACH OF ANY
WARRANTY HEREUNDER INCLUDING ANY
IMPLIED WARRANTY OF MERCHANTABILITY
MUST BE BROUGHT WITHIN A PERIOD OF 24
MONTHS FROM DATE OF ORIGINAL PURCHASE.
IN NO CASE SHALL THE COMPANY BE LIABLE FOR
ANY CONSEQUENTIAL OR INCIDENTAL DAMAGES
FOR BREACH OF THIS OR ANY OTHER WARRANTY.
No person or representative is authorized to
assume for the Company any liability other than
expressed herein in connection with the sale of
this product.
Some states do not allow limitations on how
long an implied warranty lasts or the exclusion
or limitation of incidental or consequential
damage so the above limitations or exclusions
may not apply to you. This Warranty gives you
specific legal rights and you may also have other
rights which vary from state to state.
How to make a warranty claim:
• If your product is capable of storing content
(such as an mp3 player, digital voice recorder,
etc), it is recommended to make periodic
backup copies of content stored on the
product. If applicable, before shipping a
product, make a back up copy of content or
data stored on the device. Also, it is advisable
to remove any personal content which you
would not want exposed to others. IT IS
LIKELY THAT CONTENTS AND DATA ON THE
DEVICE WILL BE LOST DURING SERVICE AND
REFORMATTING. AUDIOVOX ACCEPTS NO
LIABILITY FOR LOST CONTENT OR DATA, OR
FOR THE SECURITY OF ANY PERSONAL
CONTENT OR DATA ON THE RETURNED
DEVICE. Product will be returned with factory
default settings, and without any pre-loaded
content which may have been installed in the
originally purchased products. Consumer will
be responsible for reloading data and
content. Consumer will be responsible to
restore any personal preference settings.
34
Page 35

Warranty information
• Properly pack your unit. Include any remotes,
memory cards, cables, etc. which were
originally provided with the product.
However DO NOT return any removable
batteries, even if batteries were included with
the original purchase. We recommend using
the original carton and packing materials.
• Include evidence of purchase date such as
the bill of sale. Also print your name and
address and a description of the defect. Send
via standard UPS or its equivalent to:
Audiovox Electronics Corp.
Attn : Service Department.
150 Marcus Blvd.
Hauppauge N.Y. 11788
1-800-331-7599
• Insure your shipment for loss or damage.
Audiovox accepts no liability in case of
damage or loss en route to Audiovox.
• Pay any charges billed to you by the
Exchange Center for service not covered by
the warranty.
• A new or refurbished unit will be shipped to
you freight prepaid.
What we will do:
Provide you with a new, or at our option, a
refurbished unit. The exchange unit is under
warranty for the remainder of the original
product’s warranty period.
EN
For Canada Customers, please ship to:
Audiovox Return Centre
c/o Genco
6685 Kennedy Road,
Unit#3, Door 16,
Mississuaga, Ontario
L5T 3A5
35
Page 36

Illustrations contained within this publication are for representation only and subject to change.
The descriptions and characteristics given in this document are given as a general indication and not
as a guarantee. In order to provide the highest quality product possible, we reserve the right to make
any improvement or modification without prior notice.
Les illustrations de cette publication sont fournies à titre indicatif seulement et sont sujettes à changement.
Les descriptions et les caractéristiques décrites dans ce document représentent une indication générale et
ne constitue pas une garantie. Afin d’offrir la meilleure qualité de produit possible, nous nous réservons le
droit de faire toute amélioration ou modification et ce, sans préavis.
Audiovox Electronics Corp.
150 Marcus Blvd., Hauppauge, NY 11788
© 2009 Audiovox Electronics Corp.
Trademark(s) ® Registered
Marca(s) ® Registrada(s)
Marque(s) ® Deposée(s)
www.audiovox.com
v3.0 (v1.3.3.0)
36
Page 37

Table des matières
Information de sécurité
Information FCC .......................................................................3
Caractéristiques techniques ................................................... 3
Alimentation électrique ........................................................... 3
Enregistrement du produit ..................................................... 4
Pour Votre Référence ................................................................4
Précautions importantes concernant la pile .................... 4
Précautions envers le lecteur .................................................4
IMPORTATNES INSTRUCTIONS DE SECURITE ....................5
Entente de licence de l'utilisateur
Entente de licence de l'utilisateur ........................................ 6
Avant de commencer
Déballage de l’appareil ............................................................8
Configuration de vos comptes AR Infinite Radio ...........9
Installation des piles AAA dans la base de la radio .......9
Pour le modèle ARIRC205 seulement : connexion de
l’outil Wi-Fi AR à votre réseau.................................................9
En option (ARIRC200 seulement) : connexion de la radio
à l’aide d’un câble Ethernet .................................................... 10
Branchement et démarrage de la radio ............................. 10
Configuration de la radio ........................................................11
Après la connexion à Internet ...............................................13
Mode de démonstration..........................................................13
Téléchargement de la plus récente version du
micrologiciel ou plus de renseignements .........................13
Foire aux questions ...................................................................13
Commandes générales de l’outil Wi-Fi AR (Pour le
modèle ARIRC205) .....................................................................13
Positionnement de l’outil Wi-Fi ............................................. 14
Commandes générales
Avant et dessus ........................................................................... 15
Arrière ............................................................................................. 15
Démarrage et fermeture ..........................................................16
Réglage du volume ...................................................................16
Sélection de la source ...............................................................16
Bulletin météo ............................................................................. 16
Horloge et alarme ......................................................................16
Utilisation des menus ...............................................................16
Horloge et alarme
Accès à l’horloge numérique ................................................. 17
Réglage de l’horloge ................................................................. 17
Mode de sommeil ......................................................................18
Fonctionnement de l’alarme .................................................. 18
Radio FM/AM
Antenne FM/AM .........................................................................21
Accès à la radio FM/AM ............................................................21
Écoute de la radio FM/AM ....................................................... 21
Enregistrement de la radio FM/AM .....................................21
Mémoire interne
Accès à la mémoire interne .................................................... 22
Lecture des enregistrements ................................................. 22
Suppression d’enregistrements ............................................22
Entrée USB
Accès au mode d’entrée USB .................................................23
Lecture de fichiers musicaux .................................................23
Suppression de fichiers ............................................................ 23
Météo
Bulletin météo ............................................................................. 24
Réglages
Modification des réglages de la radio ................................25
Code postal...................................................................................25
Info appareil .................................................................................25
Affichage ....................................................................................... 25
Config. réseau .............................................................................. 25
Mises à jour logic. ....................................................................... 25
Météo ..............................................................................................25
Réglages avancés ....................................................................... 25
Plus de renseignements
Conseils de dépannage............................................................26
Aide supplémentaire à propos de l’outil Wi-Fi (pour le
modèle ARIRC205) .....................................................................27
Utilitaire web de l’outil Wi-Fi .................................................. 29
Avertissement à propos du droit d’auteur........................31
Vérification des mises à jour ..................................................31
Caractéristiques techniques ................................................... 31
Caractéristiques techniques ................................................... 31
Information de garantie
Information de garantie...........................................................32
Radio Internet
Accès à la radio Internet ..........................................................19
Écoute de la radio Internet ..................................................... 19
Enregistrement de la radio Internet .................................... 20
Ajout de stations de radio Internet .....................................20
2
Page 38

Information de sécurité
Information FCC
Cet appareil ne contrevient pas aux dispositions
de la section 15 du Règlement sur les
perturbations radioélectriques de la Federal
Communications Commission (FCC) des ÉtatsUnis. Son fonctionnement est assujetti aux deux
conditions suivantes : (1) cet appareil ne cause
pas d’interférence nuisible, et (2) cet appareil
peut capter toute interférence, y compris une
interférence qui pourrait causer un
fonctionnement imprévu.
Cet appareil a été testé et fonctionne à l’intérieur
des limites déterminées pour les appareils
numériques de Classe B, en vertu de la section 15
des règlements de la FCC. Ces normes sont
conçues pour fournir une protection raisonnable
contre l’interférence nuisible dans les
installations domestiques. Cet appareil génère,
utilise et peut émettre de l’énergie sous forme de
fréquences radio et, s’il n’est pas installé
conformément aux instructions, peut causer de
l’interférence nuisible pour les communications
radio. Cependant, il n’est pas assuré que de
l’interférence ne se produira pas dans une
installation spécifique.
Si cet appareil cause de l’interférence nuisible à
la réception de signaux de radio ou de télévision,
ce qui peut être validé en fermant et en allumant
l’appareil, l’utilisateur est invité à corriger cette
interférence par une ou plusieurs des mesures
suivantes :
• Réorienter ou déplacer de l’antenne de
réception.
• Augmenter de la distance entre l’appareil et
le récepteur.
• Brancher de l’appareil dans une prise murale
faisant partie d’un circuit d’alimentation
électrique autre que celui du récepteur.
• Consultez votre revendeur ou un technicien
radio/télévision compétent pour obtenir de
l’aide.
Selon les exigences de la FCC, tout changement
ou modification non expressément approuvé par
le fabricant pourrait annuler l’autorisation
accordée à l’utilisateur d'utiliser cet appareil.
AVERTISSEMENT
Risque de choc électrique
L'éclair et flèche à
l'intérieur d'un
triangle est un
avertissement
contre un "voltage
dangeureux" à
l'intérieur de
l'appareil.
VOIR INDICATIONS SUR LE REVERS/PANNEAU ARRIÈRE DU PRODUIT
Ne pas ouvrir
Avertissement: Pour
diminuer le risque de choc
électrique n'enlevez pas le
couvercle (ou panneau
arrière). Il n'y a aucune
pièce que vous pouvez
réviser à l'intérieur. Pour
révision de l'appareil,
veuillez vous référer à un
agent de service qualifié.
AVERTISSEMENT:
INCENDI OU DANGER DE CHOC ÉLECTRIQUE, N'EXPOSEZ
PAS CE PRODUIT À LA PLUIE OU À L'HUMIDITÉ.
Le point
d'exclamation à
l'intérieur du triangle
est un avertissement
portant votre
attention à des
instructions
importantes qui
accompagnent le
produit.
AFIN DE PRÉVENIR
F
Fabricant/Partie responsable
Audiovox Electronics Corp,
150 Marcus Blvd, Hauppauge, NY 11788
1-317-810-4880
(Sachez que ce numéro de téléphone est utilisé
pour les affaires réglementaires seulement. Ce
numéro n’offre aucun soutien technique ou aide
pour cet appareil.)
This Class B digital apparatus complies with Canadian
ICES-003.
Cet appareil numérique de la classe B est conforme à la
norme NMB-003 du Canada.
Acoustic Research
ARIRC200
Acoustic Research
ARIRC205
3
Page 39

Information de sécurité
Caractéristiques techniques
Appareil : Radio Internet Wi-Fi
Marque : Acoustic Research
Modèle : ARIRC200, ARIRC205
Alimentation électrique
Adaptateur CA externe pour la radio
Sortie : 9,0 V CC 1,56 A
Entrée : 100 à 240 V ~50/60 Hz 0,7 A
Adaptateur CA externe pour l’outil Wi-Fi
(ARIRC205 seulement)
Sortie : 5 V CC 1 A
Entrée : Alimentation de 100 à 240 V CA
Enregistrement du produit
Vous pouvez aussi visiter le site www.acousticresearch.com pour l’enregistrement en ligne.
Pour Votre Référence
Selon certaines lois provinciales, et au cas où
vous aviez besoin de service, il se peut que vous
ayez besoin du numéro de modèle et du numéro
de série. Dans l’espace ci-dessous, enregistrez la
date et l’endroit d’achat, ainsi que le numéro de
série:
No. de modèle:
Date d’achat
Endroit d’achat
No. de série
Précautions importantes
concernant la pile
• Toute pile peut présenter un risque
d’incendie, d’explosion ou de brûlure
chimique si elle n’est pas manipulée avec
soin. N’essayez pas de recharger une pile qui
n’est pas conçue pour être rechargée;
n’essayez pas de l’incinérer ou de la percer.
• Les piles non rechargeables, comme les piles
alcalines, peuvent couler si elles sont laissées
dans votre appareil pendant une longue
période. Retirez les piles de l’appareil si vous
ne l’utilisez pas pendant plus d’un mois.
• Si votre appareil utilise plus d’une pile, ne
mélangez pas les types de pile et assurezvous qu’elles sont installées correctement. Si
différents types de piles sont mélangés ou si
elles sont installées incorrectement, elles
pourraient couler.
• Jetez immédiatement les piles déformées ou
qui coulent. Les piles qui coulent peuvent
causer des brûlures et d’autres blessures.
• Aidez à protéger l’environnement en
recyclant ou en disposant des piles selon les
réglementations fédérales, provinciales et
locales.
Précautions envers le lecteur
• N’utilisez pas l’appareil immédiatement après
le transport d'un endroit froid à un endroit
plus chaud; des problèmes de condensation
pourraient surgir.
• Ne frappez pas l’appareil.
• Ne rangez pas l’appareil près du feu, dans un
endroit très chaud ou au soleil. L’exposition
au soleil ou à une chaleur intense (p. ex. : à
l'intérieur d'une voiture stationnée) peut
causer des dommages ou un mauvais
fonctionnement.
• N’exposez pas votre appareil à la pluie ou à
l’humidité.
• N’utilisez pas et ne rangez pas l’appareil dans
un endroit où l’électricité statique est
fréquente et où les parasites électriques sont
présents (exemples : haut-parleur, téléviseur).
• Nettoyez l’appareil avec un chiffon doux ou
avec un chamois humide. N’utilisez jamais de
solvant.
• L’appareil doit être ouvert seulement par du
personnel compétent.
4
Page 40

Information de sécurité
]
IMPORTATNES INSTRUCTIONS DE SECURITE
BIEN LIRE ET CONSERVER POUR RÉFÉRENCE ULTÉRIEURE
Il est possible que certains des articles ci-dessous
ne s’appliquent pas à votre appareil. Cependant,
il faut prendre certaines précautions quand on
manipule et utilise tout appareil électronique.
• Lisez ces instructions.
• Conservez ces instructions.
• Portez attention à tous les avertissements.
• Observez toutes les instructions.
• N’utilisez pas cet appareil près de l’eau.
• Nettoyez avec un chiffon sec seulement.
• N’obstruez pas les ouvertures de ventilation.
Exécutez l’installation selon les instructions
du fabricant.
• N’installez pas près d’une source de chaleur
tel que radiateur, grille de chauffage, poêle
ou autres appareils (incluant les
amplificateurs) qui produisent de la chaleur.
• Ne déjouez pas le dispositif de sécurité des
fiches polarisées ou avec mise à la terre. Une
fiche polarisée comprend deux lames, l’une
étant plus large. Une fiche avec mise à la
terre comprend deux lames et une broche de
mise à la terre. La lame la plus large ou la
broche de mise à la terre assurent votre
sécurité. Si la fiche fournie ne convient pas à
la prise murale, consultez un technicien pour
remplacer la prise murale.
• Assurez-vous que personne ne marche sur le
cordon d’alimentation ou qu’il n’est pas
coincé près des fiches, des prises et à la sortie
des appareils.
• N’utilisez que les accessoires spécifiés par le
fabricant.
• N’utilisez qu’avec le
chariot, support, trépied,
crochet ou table spécifiée
par le fabricant ou vendue
avec l’appareil. Lorsque
vous utilisez un chariot,
portez attention lorsque
vous déplacer le chariot et l’appareil pour
éviter les blessures dues au renversement.
• Débranchez l’appareil pendant les orages ou
si vous ne l’utilisez pas pendant de longues
périodes.
• Confiez l’entretien à du personnel compétent.
Les réparations sont nécessaires si l’appareil a
été endommagé de quelque façon que ce
soit, comme un cordon d’alimentation ou
une fiche en mauvais état, si un liquide a été
UL60065
Avertissement pour
transport par chariot
renversé sur l’appareil, si des objets sont
tombés sur l’appareil, si l’appareil a été
exposé à l’eau ou à l’humidité, si l’appareil ne
fonctionne pas normalement ou s’il est
tombé.
• INFORMATIONS DE SECURITES
SUPPLEMENTAIRES
• L’appareil ne doit pas être exposé à des
infiltrations ou éclaboussures d’eau et aucun
objet rempli de liquide – tel qu’un vase – ne
doit jamais être placé sur l’appareil.
• Toujours laisser suffisamment d’espace
autour de l’appareil pour assurer la
ventilation. Ne pas placer l’appareil sur un lit,
un tapis ou sur un étagère ou dans un
meuble qui pourrait bioquer les ouvertures
de ventilation.
• Ne pas placer de chandelles, de cigarettes, de
cigares, etc, sur l’appareil.
• Ne brancher le cordon d’alimentation que
dans une prise de courant c.a. comme
indiqué sur l’appareil.
• Prendre garde que des objets ne tombent
pas dans l’appareil.
• Ne pas tenter de démonter l’appareil. Celui-ci
ne contient pas de composants pouvant être
réparés par l’utilisateur.
• Si la fiche électrique ou un coupleur est
utilisé pour débrancher l’appareil, ce
dispositif doit rester en état de
fonctionnement.
• SI L’APPAREIL FONCTIONNE À PILES,
prendre les précautions suivantes:
A. Toute pile peut laisser échapper de
l’électrolyte si on l’utilise avec une pile d’une
autre type, ou si toutes les piles ne sont pas
remplacées en même temps.
B. Toute pile peut laisser échapper de
l’électrolyte ou exposer si on la jette au feu
ou si on tente de charger un pile qui n’est
conçue pour être rechargée.
C. Jeter immédiatement les piles qui fuient.
Cellesci peuvent brûler la peau ou causer
d’autres blessures. Prière de jeter les piles
conformément aux règlements provinciaux
et locaux.
D. Les piles (le bloc-pile ou les piles installées)
ne doivent pas être exposées à des sources
importantes de chaleur, telles qu'au soleil,
près d’un feu, etc.
F
5
Page 41

Entente de licence de l'utilisateur
Entente de licence de l'utilisateur
IMPORTANT : LISEZ ATTENTIVEMENT AVANT DE TÉLÉCHARGER OU
D’INSTALLER CE LOGICIEL
CETTE ENTENTE DE LICENCE D’UTILISATEUR (CETTE « ENTENTE »)
EST UNE ENTENTE LÉGALE ENTRE VOUS ET AUDIOVOX
CORPORATION ET, SI APPLICABLE, TOUTE FILIALE DE AUDIOVOX,
TELLE QUE DÉFINIE CI-DESSOUS (LE TOUT ÉTANT DÉSIGNÉ PAR «
AUDIOVOX »), RELATIVEMENT AU LOGICIEL ET AUX PILOTES DE
L’APPAREIL AUDIOVIDÉO PORTATIF NUMÉRIQUE DE MARQUE RCA,
POUVANT INCLURE DES COMPOSANTS LOGICIELS ASSOCIÉS, DES
LOGICIELS INCLUS PAR AUDIOVOX SOUS LICENCE DE TIERCES
PARTIES (« CONCÉDANT ») ET LES DOCUMENTS ASSOCIÉS, S’IL Y A
LIEU (LE TOUT ÉTANT DÉSIGNÉ PAR « LOGICIEL »). CETTE ENTENTE
CONTIENT DES LIMITES, RESTRICTIONS ET AVIS DE NONRESPONSABILITÉ LÉGAUX ET SPÉCIFIE AUSSI LA DURÉE DE VOTRE
LICENCE.
EN INSTALLANT CE LOGICIEL OU EN CLIQUANT SUR LE BOUTON
D’ACCEPTATION DU LOGICIEL, EN COPIANT OU EN UTILISATION
D’UNE AUTRE MANIÈRE CE LOGICIEL, VOUS RECONNAISSEZ ET
CONVENEZ QUE VOUS AVEZ LU CETTE ENTENTE, QUE VOUS LA
COMPRENEZ ET QUE VOUS CONSENTEZ À ÊTRE LIÉ PAR SES
DISPOSITIONS ET CONDITIONS. CE LOGICIEL EST PROTÉGÉ PAR LES
LOIS SUR LE DROIT D’AUTEUR ET LES TRAITÉS INTERNATIONAUX SUR
LES DROITS D’AUTEUR AINSI QUE LES AUTRES LOIS ET TRAITÉS SUR
LA PROPRIÉTÉ INTELLECTUELLE.
VOUS NE POUVEZ UTILISER CE LOGICIEL QU’EN ACCORD AVEC
CETTE ENTENTE ET CET TE UTILISATION EST, PAR LES PRÉSENTES,
ASSUJETTIE À VOTRE CONSENTEMENT EXPLICITE AUX DISPOSITIONS
NON MODIFIÉES DES PRÉSENTES. SI VOUS N’ACCEPTEZ PAS TOUTES
LES DISPOSITIONS ET CONDITIONS DE CETTE ENTENTE, CLIQUEZ
SUR LE BOUTON DE REJET ET (OU) N’INSTALLEZ PAS LE LOGICIEL ET
(OU) N’UTILISEZ PAS CE LOGICIEL.
1. LICENCE
(a) En vertu de cette entente, vous obtenez une licence non
exclusive, non sous-licenciable, non assignable et non
transférable (sauf dans les conditions spécifiées ci-dessous) (i)
pour utiliser et installer le logiciel sur un seul ordinateur, et (ii)
pour faire une (1) copie de sauvegarde du Logiciel sous un
format permettant sa lecture pourvu que cette copie contienne
tous les avis originaux à propos de la propriété du Logiciel.
(b) Vous pouvez transférer le logiciel et la licence à une autre
personne seulement dans le cadre du transfert de l’appareil de
radio Internet de marque Acoustic Research
seulement si cette personne accepte les modalités et
conditions de ce CLUF. Si vous transférez le Logiciel, vous devez
transférer en même temps toutes les copies à l’acquéreur ou
détruire les copies non transférées.
(c) Les dispositions de cette Entente s'appliquent à toutes les
mises à jour et mises à niveau fournies par AUDIOVOX qui
remplace ou s’ajoute au Logiciel de départ à moins que cette
mise à jour ou mise à niveau ne soit accompagnée de
dispositions et conditions distinctes de licence, auquel cas, les
dispositions et conditions de cette licence distincte
s’appliquent. Vous reconnaissez et acceptez que AUDIOVOX
puisse automatiquement télécharger des mises à jour ou des
mises à niveau au Logiciel sur un ordinateur afin de mettre à
jour, améliorer ou ajouter des mises au point éventuelles au
Logiciel.
2. RESTRICTIONS À LA LICENCE
(a) Sauf pour les licences accordées expressément par cette
Entente, aucune autre licence et aucun autre droit ne sont
octroyés ou mis en cause.
(b) Vous ne pouvez pas (i) offrir le Logiciel sur un réseau où il
pourrait être utilisé par plusieurs ordinateurs simultanément;
(ii) modifier, traduire, désosser, décompiler, désassembler (à
moins que cette restriction soit expressément interdite par la
loi) ou créer des ouvrages dérivés basés sur le Logiciel ou (iii)
copier le Logiciel, sauf si cela est expressément permis par les
présentes ou (iv) retirer ou modifier tout avertissement
MD
(l' « appareil ») et
6
concernant le droit d’auteur sur toutes les copies du Logiciel;
ou (v) louer ou prêter le Logiciel. Vous convenez d’utiliser le
Logiciel seulement d’une manière qui respecte toutes les lois
en vigueur dans les juridictions où vous utilisez le logiciel,
incluant, mais sans limitation, les restrictions en vigueur
relativement au droit d’auteur et aux autres droits relatifs à la
propriété intellectuelle.
(c) Le Logiciel peut contenir du code avant publication qui n’offre
pas le rendement propre à du code final. Dans ce cas, le
Logiciel pourrait ne pas fonctionner correctement. Des
versions à jour du Logiciel peuvent être téléchargées du site
www.arinfiniteradio.com.
(d) AUDIOVOX n’a aucune obligation d’offrir un soutien au
Logiciel.
(e) Le Logiciel est fourni avec des « DROITS RESTREINTS ».
L’utilisation, la reproduction ou la divulgation par le
gouvernement des États-Unis sont soumises aux restrictions
mentionnées au sous-paragraphe (c)(1)(ii) de DFARS 252. 2277013 ou FAR 52. 227-19 ou FAR 52. 227-14 Alt. III, s'il y a lieu.
3. TERME ET RÉSILIATION
(a) La licence entre en vigueur à la date à laquelle vous acceptez
cette Entente et demeure valide tant que cette Entente n’est
pas résiliée par l’une ou l’autre des parties.
(b) Vous pouvez résilier cette Entente et la licence qui
l’accompagne sans avis ou délai en détruisant ou en
supprimant de manière permanente le Logiciel et toutes ses
copies.
(c) Si vous contrevenez, en tout ou en partie, à l’une des
dispositions de cette Entente, la licence est automatiquement
résiliée sans avis de AUDIOVOX.
(d) Au moment de la résiliation de cette Entente et de la licence
qui l’accompagne, vous devez cesser d’utiliser le Logiciel et
détruire ou supprimer de manière permanente le Logiciel et
toutes ses copies, partielles ou entières.
4. EXONÉRATIONS DE GARANTIE
CE LOGICIEL EST FOURNI « TEL QUEL » SANS AUCUNE GARANTIE DE
QUELQUE NATURE, EXPRESSE OU IMPLICITE, INCLUANT, SANS
LIMITATION, LES GARANTIES IMPLICITES DE QUALITÉ MARCHANDE,
D’APTITUDE À UN USAGE PARTICULIER, DE TITRE OU D’ABSENCE DE
CONTREFAÇON. VOUS PRENEZ TOUS LES RISQUES QUANT À LA
QUALITÉ ET À LA PERFORMANCE DU LOGICIEL.
SI LE LOGICIEL S'AVÉRAIT DÉFECTUEUX, VOUS (ET NON PAS
AUDIOVOX, SES FOURNISSEURS OU SES REVENDEURS) ÊTES
RESPONSABLE DE TOUS LES FRAIS REQUIS PAR TOUTE RÉPARATION
OU CORRECTION NÉCESSAIRE.
Cette exclusion de la garantie peut ne pas être permise par les lois
en vigueur. Dans ce cas, cette exclusion pourrait ne pas s’appliquer
à vous et vous avez d’autres droits selon la législation à laquelle
vous êtes assujetti.
5. DROITS RELATIFS À LA PROPRIÉTÉ
Tous les titres et droits de propriété intellectuelle, incluant, mais
sans être limités à, les droits d’auteur, relatifs au Logiciel et à ses
copies appartiennent à AUDIOVOX, à ses Concédants ou à ses
fournisseurs. Tous les droits en titre et de propriété intellectuelle
relatifs aux contenus accessibles en utilisant le Logiciel
appartiennent à leurs propriétaires respectifs et peuvent faire
l’objet de droit d’auteur ou d’autres lois ou traités sur la propriété
intellectuelle. Cette licence ne vous donne aucun droit d’utiliser ces
contenus. Tous les droits non expressément accordés sont réservés
à AUDIOVOX ou à ses Concédants.
6. LIMITES DE RESPONSABILITÉ.
(a) DANS TOUTE LA MESURE PERMISE PAR LES LOIS EN VIGUEUR,
EN AUCUN CAS AUDIOVOX OU SES REVENDEURS NE SONT
RESPONSABLES POUR TOUT DOMMAGE PARTICULIER,
INCIDENT, INDIRECT OU CONSÉCUTIF DE QUELQUE NATURE
QUE CE SOIT (INCLUANT, SANS S’Y LIMITER, LES DOMMAGES
RELATIFS AUX PERTES DE PROFITS, D’INTERRUPTION DES
AFFAIRES, DE CORRUPTION DE FICHIERS, DE PERTE DE
RENSEIGNEMENTS COMMERCIAUX OU DE TOUTE AUTRE PERTE
Page 42

Entente de licence de l'utilisateur
FINANCIÈRE) SANS ÉGARD À LA CAUSE OU GENRE D’ACTION
INCLUANT LES CONTRATS, LES TORTS OU LES NÉGLIGENCES
PROVENANT DE VOTRE UTILISATION OU INCAPACITÉ D’UTILISER
LE LOGICIEL MÊME SI AUDIOVOX A ÉTÉ PRÉVENUE DE LA
POSSIBILITÉ DE TELS DOMMAGES. COMME CERTAINS ÉTATS OU
CERTAINES JURIDICTIONS NE PERMETTENT PAS L’EXCLUSION
OU LA LIMITATION DE LA RESPONSABILITÉ POUR DES
DOMMAGES INCIDENTS OU CONSÉCUTIFS, LA LIMITE
CI-DESSUS PEUT NE PAS S’APPLIQUER DANS VOTRE CAS.
(b) VOUS ÊTES RESPONSABLE DE LA SÉLEC TION DU LOGICIEL
APPROPRIÉ POUR ATTEINDRE LES RÉSULTATS QUE VOUS
RECHERCHEZ AINSI QUE POUR L’INSTALLATION, L’UTILISATION
ET LES RÉSULTATS OBTENUS.
7. WINDOWS MEDIA
Cet appareil est protégé par certains droits de propriété
intellectuelle détenus par Microsoft. L’utilisation ou la distribution
de cette technologie à des fins autres que cet appareil est interdite
sans l’obtention d’une licence de Microsoft.
Le logiciel intégré au Dispositif AV (le « Micrologiciel ») contient un
logiciel licencié par Microsoft qui permet de jouer des fichiers
Windows Media Audio (WMA), (nommé le « Logiciel WMA). La
licence du Logiciel WMA vous est octroyée pour utilisation avec le
Dispositif AV aux conditions suivantes. En installant et en utilisant
cette version du Micrologiciel, vous acceptez ces conditions. SI
VOUS N’ÊTES PAS D’ACCORD AVEC LES CONDITIONS IMPOSÉES À
L’UTILISATEUR FINAL DE CET TE SECTION 7, N’INSTALLEZ PAS OU
N’UTILISEZ PAS CETTE VERSION DU MICROLOGICIEL.
Le Logiciel WMA est protégé par le droit d’auteur et par d’autres lois
sur la propriété intellectuelle. Cette protection comprend aussi la
documentation du Logiciel WMA, qu’elle soit élec tronique ou
imprimée.
OCTROI DE LICENCE. Le Logiciel WMA vous est licencié seulement
aux conditions suivantes :
Vous pouvez utiliser cette version du Micrologiciel contenant le
Logiciel WMA seulement en rapport avec le Dispositif AV.
Vous n’avez pas le droit de désosser, décompiler ou désassembler le
Logiciel WMA, sauf et seulement dans la mesure où cela est
expressément permis par les lois en vigueur.
Vous pouvez transférer votre droit d’utilisation de cette version du
Micrologiciel seulement comme faisant partie de la vente ou du
transfert du Dispositif AV, à la condition que l’acquéreur accepte les
conditions des présentes. Si la version du Micrologiciel que vous
transférez est une mise à jour, vous devez aussi transférer toutes les
versions antérieures du Micrologiciel que vous possédez, ce qui
comprend le Logiciel WMA.
MICROSOFT NE VOUS DONNE AUCUNE GARANTIE DE QUELQUE
NATURE QUE CE SOIT POUR LE LOGICIEL WMA ET MICROSOFT NE
FAIT AUCUNE REPRÉSENTATION RELATIVE AU FONCTIONNEMENT
DU LOGICIEL WMA.
Le Logiciel WMA provient des États-Unis. Toute exportation de cette
version du Micrologiciel doit respecter toutes les lois nationales et
internationales en vigueur, y compris les règlements de la U.S.
Export Administration relatifs au Logiciel WMA intégré au
Micrologiciel.
8. RealNetworks, Inc.
Certaines parties de ce logiciel sont sous licence de RealNetworks,
Inc. Copyright 1995-2007, RealNetworks, Inc. Tous droits réservés.
Les parties du logiciel sous licence de RealNetworks, Inc. (« RN »)
sont fournis TELLES QUELLES ET SANS GARANTIE. DANS LA PLUS
LARGE MESURE AUTORISÉE PAR LES LOIS APPLICABLES, RN NIE
AUSSI TOUTES LES GARANTIES, EXPLICITES OU IMPLICITES,
INCLUANT MAIS SANS ÊTRE LIMITÉES AUX GARANTIES IMPLICITES
DE MARCHANDABILITÉ, D'APTITUDE À UNE FONCTION
PARTICULIÈRE ET DE NON-VIOLATION DES DROITS D'AUTEUR. DANS
LA PLUS LARGE MESURE AUTORISÉE PAR LA LOI, RN NE DOIT EN
AUCUN CAS ÊTRE TENUE RESPONSABLE POUR LES DOMMAGES
INDIRECTS, ACCESSOIRES, SPÉCIAUX, PUNITIFS OU TOUT AUTRE
DOMMAGE (INCLUANT MAIS SANS ÊTRE LIMITÉS AUX DOMMAGES
LIÉS AUX PERTES OU AUX PROFITS). ÉTANT DONNÉ QUE CERTAINES
PROVINCES ET CERTAINES JURIDICTIONS NE PERMETTENT PAS
L’EXCLUSION OU LA LIMITATION DES DOMMAGES INDIRECTS OU
ACCESSOIRES, LA LIMITATION CI-DESSUS NE S’APPLIQUE PEUT-ÊTRE
PAS À VOUS.
Vous ne pouvez pas modifier, traduire, décompiler, désassembler
(excepté dans la mesure où cette restriction est explicitement
interdite par la loi applicable) ou utiliser d’autres méthodes pour
découvrir le code source RN ou copier de quelque manière que ce
soit le fonctionnement du code client Real Format.
9. LOGICIEL DE TIERCE PARTIE
TOUT LOGICIEL DE TIERCE PARTIE QUI POURRAIT ÊTRE FOURNI AVEC
CE LOGICIEL EST INCLUS POUR UNE UTILISATION OPTIONNELLE. SI
VOUS CHOISISSEZ D’UTILISER UN TEL LOGICIEL DE TIERCE PARTIE,
CETTE UTILISATION EST ASSUJETTIE À L’ENTENTE DE LICENCE
DE CETTE TIERCE PARTIE DONT UN EXEMPLAIRE
ÉLECTRONIQUE SERA INSTALLÉ DANS LE RÉPERTOIRE PERTINENT DE
L’ORDINATEUR LORS DE L’INSTALLATION DU LOGICIEL. AUDIOVOX
N’A AUCUNE RESPONSABILITÉ ENVERS TOUT LOGICIEL DE TIERCE
PARTIE ET NE POURRA ÊTRE TENUE RESPONSABLE RELATIVEMENT À
L’UTILISATION DE LOGICIEL DE TIERCE PARTIE.
10. LOI APPLICABLE
Si vous avez acheté cet appareil aux États-Unis, ce CLUF est assujetti
aux et doit être interprété en accord avec les lois de l'État de New
York, États-Unis, sans égard aux conflits avec les principes de loi. Si
vous avez acheté cet appareil à l’extérieur des États-Unis ou de
l’Union européenne, les lois locales peuvent s’appliquer.
11. DISPOSITIONS GÉNÉRALES
Cette Entente ne peut être modifiée que par une entente écrite
signée par vous et par AUDIOVOX et toute modification aux
dispositions et conditions de cette Entente faite d’une autre
manière sera nulle et sans effet. Dans le cas où une partie de cette
Entente était non valide, contraire à la loi ou impossible à appliquer,
la validité, la légalité et l’application du reste de l'Entente n'en
seront ni affectées, ni diminuées. Cette Entente est l’énoncé complet
et exclusif de l’entente entre vous et AUDIOVOX et elle remplace
toute proposition ou entente antérieure, verbale ou écrite, et toute
autre communication entre vous et AUDIOVOX relativement à
l’objet de cette Entente. Les Concédants de AUDIOVOX seront
considérés comme des tiers bénéficiaires de cette Entente et auront
le droit d’exercer les clauses ci-incluses.
« FILIALE DE AUDIOVOX » devra signifier toute personne, entreprise
ou autre organisation, nationale ou internationale, incluant, mais
sans être limitée à, les filiales, qu’elles soient contrôlées directement
ou indirectement par Audiovox Corporation, incluant, mais sans être
limitées à, Audiovox Consumer Electronics, Inc. et Audiovox
Electronics Corporation. Aux fins de cette définition seulement,
l'expression « contrôle » signifie le pouvoir de diriger ou d’influencer
la haute direction et les politiques d'une entité, soit par la
possession d’actions votantes, d’intérêts en partenariat, de contrat
ou autrement, incluant la propriété directe ou indirecte d’au moins
cinquante pour cent (50 %) des droits de vote de l’entité en
question.
F
7
Page 43

Avant de commencer
Cher client d’Acoustic Research,
merci d’avoir acheté la radio Internet Wi-Fi AR. Cet appareil vous permet d'écouter la radio Internet,
MP3tunes, la radio AM/FM, les prévisions météorologiques et la musique enregistrée dans la mémoire
interne ou sur un dispositif USB.
Pour commencer à utiliser votre Radio Internet Wi-Fi, veuillez suivre les instructions de configuration
dans les pages ci-dessous.
1. Déballage de l’appareil
Vous devriez trouver les articles suivants dans la boîte :
Radio
Guide de
l’utilisateur
Pour le modèle ARIRC205 seulement :
Outil Wi-Fi
Exigences supplémentaires
• Accès Internet à haute vitesse
• Modem haute-vitesse (câble/DSL), habituellement fourni par votre fournisseur de service Internet
• Un réseau résidentiel sans fil 802.11 b ou g (Wi-Fi) ou un routeur/commutateur/concentrateur
(hub) Ethernet avec un port LAN disponible
Pour les connexions Wi-Fi, vous pourriez avoir besoin de :
• Le SSID de votre réseau sans fil
• Votre mot de passe (pour les réseaux sécurisés)
Guide de
démarrage
rapide
Adaptateur
d’alimentation
Carte
d’information
de
configuration
Adaptateur
d’alimentation
Câble Ethernet
Antenne cadre AM
Désactivation du mode DÉMO après le démarrage : Appuyez et relâchez préréglage 1,
puis SLEEP/SNOOZE et enfin préréglage 6.
8
Page 44

Avant de commencer
2. Configuration de vos comptes AR Infinite Radio
Pour simplifier la configuration de la radio, veuillez suivre les étapes suivantes :
A. Trouvez la carte d’information de configuration qui indique le numéro d’adresse MAC (MAC :
00-21-2A-XX-XX-XX) et le NIP (PIN : XXXX) de votre radio. (Ce numéro est aussi affiché sous l'option
Device Info dans le menu Settings de votre radio.)
B. À l’aide d’un ordinateur connecté à Internet, allez sur le site www.arinfiniteradio.com/setup et
suivez les instructions en ligne.
• Vous devrez entrer l’adresse MAC et le NIP de votre radio pour l’associer à vos réglages
personnalisés.
3. Installation des piles AAA dans la base de la radio
Respectez les indicateurs de polarité du compartiment des piles. Les piles alimentent l’horloge et
l’alarme* lorsque l’alimentation de la radio est interrompue. Nous vous recommandons de remplacer
les piles chaque année (ou plus souvent lorsque les pannes de courant sont plus fréquentes) pour
éviter que les piles soient trop faibles. Sinon, l'exactitude de l’horloge et de l’alarme pourrait être
affectée lorsque l’alimentation électrique est interrompue.
* Lorsque l'alimentation est fournie par la pile de secours, l'affichage de l'horloge ne
s'allume pas. Par contre, la fonction de l’alarme reste activée pendant la panne de
courant si la puissance de la pile est suffisante.
4. Pour le modèle ARIRC205 seulement : connexion de l’outil Wi-Fi AR à
votre réseau
Si votre modem ou routeur/concentrateur/commutateur
n’a qu’un seul port LAN et qu'il est branché à votre
ordinateur, débranchez le câble Ethernet du modem/
routeur/concentrateur/commutateur et branchez-le au
port LAN de l’outil Wi-Fi.
N
A
L
LAN
F
wer
N
po
A
L
t
e
res
N
WA
N
A
L
LAN
Modem haute-vitesse ou
routeur/concentrateur/
POWER
WAN
Prise électrique
commutateur Ethernet
• Assurez-vous que les témoins DEL Power, WAN et WIRELESS sont allumés. L’état du témoin DEL
Mode dépendra de la configuration de votre réseau. Si les témoins DEL MODE, WPS et WIRELESS
clignotent simultanément, cela indique qu’il y a peut-être un problème de connexion. Veuillez
vérifier vos branchements puis appuyez et gardez enfoncé pendant trois secondes le bouton WPS
de l’outil Wi-Fi (le témoin DEL MODE devrait clignoter) pour détecter à nouveau la configuration
de votre réseau. L’outil Wi-Fi peut se réinitialiser à plusieurs reprises pendant ce processus, qui
peut durer jusqu'à deux minutes selon la configuration de votre réseau. Le témoin DEL MODE
cesse de clignoter lorsque le processus est complété. Visitez www.arinfiniteradio.com pour plus
de renseignements.
9
Page 45

Avant de commencer
5. En option (ARIRC200 seulement) : Pour une connexion « avec fil »
Utilisez le câble Ethernet fourni si vous n’avez pas de point d’accès sans fil (Wi-Fi).
Modem haute-vitesse ou
routeur/concentrateur/
N
A
L
6. Branchement et démarrage de la radio
Prise électrique
commutateur Ethernet
LAN
LAN
10
Désactivation du mode DÉMO
après le démarrage
Appuyez et relâchez préréglage
1, puis SLEEP/SNOOZE et enfin
préréglage 6.
Page 46

Avant de commencer
7. Configuration de la radio
Consultez la rubrique Utilisation des
menus à la page 16 pour plus de
renseignements sur la sélection et
l’entrée d’informations dans les menus.
A. REMARQUE : La première fois que vous
démarrez la radio, elle est en mode «DÉMO».
Pour quitter ce mode, appuyez et relâchez
préréglage 1, puis SLEEP/SNOOZE et enfin
préréglage 6 situés sur le dessus de la radio.
B. Après avoir quitté le mode «DÉMO», l'écran
Select Language s'affiche. Appuyez sur
pour sélectionner la langue puis appuyez
sur SELECT.
• Si vous utilisez l’outil Wi-Fi AR (ARIRC205),
la configuration est terminée (vous devrez
peut-être entrer votre code postal).
• Si vous avez des problèmes lors de la
connexion de la radio à Internet par l’outil
Wi-Fi AR, consultez l’étape 4 à la page 9 ou la
rubrique Aide supplémentaire à propos de
l’outil Wi-Fi à la page 27.
• Si vous utilisez votre propre point d’accès
sans fil ou routeur, lisez les instructions
ci-dessous.
C. L’écran Config. réseau s’affiche :
• Sélectionnez Commuté pour vous connecter
à l’aide d’un câble Ethernet. Passez à l’étape
D pour compléter la connexion.
• Sélectionnez Sans fils pour vous connecter à
un point d'accès Wi-Fi disponible. Passez à
l’étape E pour compléter la connexion.
ou
D. Commuté
Cette méthode utilise un câble Ethernet,
comme indiqué à l’étape 5 à la page 10, pour
brancher la radio directement à un modem
haute vitesse, un routeur, un concentrateur
ou un commutateur. Assurez-vous que votre
câble Ethernet est branché correctement.
• À l’écran Config. réseau, appuyez sur
pour sélectionner Commuté puis appuyez sur
SELECT si votre réseau n’offre pas un accès
Wi-Fi.
• Avant de compléter la connexion, la radio
peut prendre quelque temps pour chercher
des mises à jour et télécharger les
renseignements du compte sur le serveur.
Veuillez patienter jusqu’à ce que vous
entendiez un message de félicitations et que
« Setup is complete, enjoy the music » soit
affiché.
• Si la radio a besoin de votre adresse IP, vous
pouvez trouver cette information sur la page
de configuration ou dans le guide de votre
modem haute vitesse, routeur ou point
d'accès.
E. Sans fils
Cette méthode utilise votre point d’accès
Wi-Fi, modem haute vitesse ou routeur pour
permettre à la radio de se brancher à votre
réseau. Vous devez connaître le nom de votre
réseau sans fil (SSID) et, si votre réseau sans fil
est sécurisé, le mot de passe de votre réseau
sans fil (aussi appelée phrase secrète ou clé).
Vous pouvez trouver cette information sur la
page de configuration ou dans le guide de
votre modem haute vitesse, routeur ou point
d'accès. Vous pouvez aussi appeler votre
fournisseur de service Internet si vous ne
savez pas comment accéder à la page de
configuration afin de trouver cette
information. Ces derniers offrent
habituellement un numéro 1-800. Lorsque
vous avez trouvé les informations ci-dessous,
vous pouvez les noter pour référence future.
• Nom du réseau sans fil (SSID)
• Type de sécurité (nécessaire seulement si
votre réseau est sécurisé et que votre SSID
est caché, non diffusé)
• Mot de passe/clé (nécessaire seulement
si votre réseau est sécurisé)
ou
F
11
Page 47

Avant de commencer
• À l’écran Config. réseau, appuyez sur ou
pour sélectionner San fils puis appuyez sur
SELECT. L’écran Config Réseau s’affiche et
offre deux options de configuration. Appuyez
ou pour sélectionner une option puis
sur
appuyez sur SELECT.
• Détecter réseaux : pour détecter
automatiquement les réseaux disponibles et
afficher une liste des réseaux pouvant être
sélectionnés. Passez à l’étape F pour
compléter la connexion.
• Entrez le SSID : pour entrer manuellement
l’information de votre réseau. Sélectionnez
cette option si le SSID de votre réseau est
masqué. Passez à l’étape G pour compléter
la connexion.
F. Si vous sélectionnez Détecter réseaux, le
SSID (nom du réseau) des réseaux détectés
sera affiché après la détection. Appuyez sur
ou pour sélectionner le réseau désiré puis
appuyez sur SELECT.
• La force du signal est indiqué par le symbole
.
• Un réseau sécurité est indiqué par le symbole
(Un réseau non sécurisé n’affiche rien,
comme le Réseau 1 dans l’exemple ci-dessus).
• Si vous sélectionnez un réseau sécurisé, vous
devrez entrer votre mot de passe à l’écran
Sécurité Réseau. La radio devrait maintenant
se connecter à Internet. Veuillez patienter
jusqu’à ce que vous entendiez un court
message de félicitations et que l’horloge
s’affiche.
• Si le SSID du réseau est masqué (non diffusé),
vous ne verrez que l’icône d’un cadenas et les
barres indiquant la force du signal, comme
dans le 4e réseau ci-dessus. Appuyez sur
pour mettre en surbrillance Entrez le SSID
sur l’affichage puis appuyez sur SELECT.
Puis, passez à l’étape 7 pour compléter la
connexion.
• L’interférence peut quelquefois empêcher
votre réseau d’apparaître dans la liste. Si c'est
le cas, appuyez sur pour afficher Refraîcher
liste puis appuyez sur SELECT pour essayer à
nouveau.
G. Si vous sélectionnez Entrez le SSID, l’écran
Sécurité Réseau s’affiche. Entrez votre SSID.
• Si votre réseau est sécurisé (indiqué par le
symbole ), entrez votre mot de passe. La
radio devrait maintenant se connecter à
Internet. Veuillez patienter jusqu’à ce que
vous entendiez un court message de
félicitations et que l’horloge s’affiche.
À propos du mot de passe :
• Ne confondez pas le mot de passe de
votre réseau avec votre mot de passe
pour Windows ou Mac, parce qu'ils
peuvent être différents.
• Certains points d’accès ou routeurs sans
fil utilisent les termes « phrase secrète »
ou « clé » plutôt que « mot de passe ». Ces
termes veulent dire la même chose.
À propos de la phrase secrète :
• Cette radio est compatible avec les points
d’accès utilisant les clés Wireless
Equivalent Privacy (WEP) ou les normes
Wi-Fi Protected Access (WPA et WPA2).
• Les clés WEP sont d’une longueur de 10
ou de 26 caractères (caractères : 0 à 9 et A
à F) (e.x. 6E78214A52). Sachez que
certains routeurs Wi-Fi supporte la
création de phrases secrètes pour la
sécurité WEP. Par contre, il n’existe aucune
norme dans l’industrie quant à la création
de phrases secrètes WEP et cette radio n’est
pas compatible avec les phrases secrètes
WEP.
• Si vous utilisez un point d'accès WEP
sécurisé, entrez la clé WEP (en format HEX)
plutôt que le mot de passe.
12
Page 48

Avant de commencer
Après la connexion à Internet
• Si vous n’avez pas activé vos comptes Infinite
Radio, ou si la radio ne parvient pas à
télécharger vos renseignements du serveur
Infinite Radio, la radio pourrait vous
demander votre code postal.
• Entrez votre code postal. La radio devrait
maintenant se connecter à Internet.
Mode de démonstration
La radio possède un mode de démonstration
préinstallé. Pour quitter le mode de
démonstration, appuyez et relâchez une à la
suite de l’autres les touches préréglage 1, puis
SLEEP/SNOOZE et enfin préréglage 6, situées
sur le dessus de l’appareil
Téléchargement de la plus récente
version du micrologiciel ou plus de
renseignements
La radio vous avertira automatiquement
lorsqu’une nouvelle version du micrologiciel est
disponible. Vous pouvez aussi aller sur www.
arinfiniteradio.com pour obtenir la plus récente
version du micrologiciel ainsi que le guide de
l’utilisateur de votre radio. Suivez les instructions
sur le site pour télécharger et installer les fichiers.
Foire aux questions
Pour des réponses aux questions les plus
fréquentes (FAQ), visitez www.arinfiniteradio.
com.
Commandes générales de l’outil
Wi-Fi AR (Pour le modèle ARIRC205)
Vue de l’avant
Antenne
WPS
PRESS
Vue de l’arrière
Port WAN – branchez-y votre
point d’accès, votre modem
haute vitesse ou votre
routeur/concentrateur/
commutateur Ethernet
• Port LAN - si votre modem ou
routeur/concentrateur/
commutateur n’a qu’un seul
port LAN et qu'il est branché à
votre ordinateur, débranchez
le câble Ethernet du modem/
routeur/concentrateur/
commutateur et branchez-le
au port LAN de l’outil Wi-Fi.
• Vous pouvez aussi le brancher
au port Ethernet de votre
ordinateur pour accéder à la
page web d’administration de
l’outil Wi-Fi pour le dépanner.
Consultez la page 29 pour
plus de renseignements.
MODE WPS WIRELESS POWER
WAN LAN
WAN
WiFi ENABLER
Prise pour
l’adaptateur
d’alimentation
RESET
LAN
POWER
Bouton de
réinitialisation
F
13
Page 49

Avant de commencer
Pour installer l’outil Wi-Fi :
L’outil Wi-Fi peut être installé à la verticale ou à
l’horizontale. Retirez les supports si vous
l’installez à l’horizontale. Tournez l’antenne pour
améliorer la réception du signal.
WiFi ENABLER
WAN LAN
MODE WPS WIRELESS POWER
WPS
PRESS
WAN LAN
WiFi ENABLER
MODE WPS WIRELESS POWER
WPS
PRESS
Pour démarrer l’outil Wi-Fi :
L’outil Wi-Fi démarre automatiquement lorsque
l’alimentation est branchée.
Pour connaître l’état de l’outil Wi-Fi AR à l’aide
des témoins DEL :
• En temps normal, les témoins DEL POWER,
WAN et WIRELESS sont allumés lorsque l’outil
fonctionne comme un routeur.
• Le témoin DEL LAN s’allume lorsque le port
LAN de l'outil Wi-Fi est branché à un
ordinateur à l’aide d’un câble Ethernet.
• Le témoin DEL MODE est éteint lorsque l’outil
Wi-Fi fonctionne comme un routeur.
• Le témoin DEL MODE est allumé lorsque
l’outil Wi-Fi fonctionne comme un point
d’accès (PA).
Pour détecter à nouveau la configuration du
réseau :
• Votre outil Wi-Fi est préconfiguré; en temps
normal, il n'est pas nécessaire d'effectuer une
nouvelle détection.
• Appuyez et gardez enfoncée la touche WPS
pendant trois secondes. Le témoin DEL MODE
commence à clignoter. Cela indique à
l’utilisateur que l’appareil détecte le réseau et
tente de déterminer le mode approprié au
nouvel environnement (c.-à-d., un routeur ou
un PA).
• Si, pendant la détection, l’appareil ne parvient
pas à déterminer le mode ou a besoin de plus
d'informations (p. ex., aucune réponse par la
connexion WAN, PPPOE, une connexion sur
une adresse IP fixe, etc.), les témoins DEL
MODE, WPS et WIRELESS de l'appareil
commencent à clignoter.
Pour réinitialiser l’outil Wi-Fi :
• Si vous ne parvenez pas à connecter la radio à
l’outil Wi-Fi, appuyez et gardez enfoncé
RESET pendant dix secondes pour réinitialiser
l’outil Wi-Fi avec les réglages par défaut. Après
avoir réinitialisé l’outil Wi-Fi, essayez à
nouveau de vous connecter.
Positionnement de l’outil Wi-Fi
Le positionnement de l’outil Wi-Fi AR et
l’interférence peuvent nuire au fonctionnement
de la radio et de l’outil Wi-Fi; en conséquence,
choisissez soigneusement son emplacement et
essayez de réduire l’interférence de manière à
pouvoir en profiter pleinement dès le début.
Pour choisir où placer l’outil Wi-Fi :
Pour un fonctionnement optimal, placez votre
outil Wi-Fi AR :
• Près du centre de la zone où vous utiliserez
votre ordinateur et votre radio.
• À un endroit élevé, tel que sur une tablette
élevée, de manière à ce que la radio sans fil
ait un accès à visibilité directe (même à
travers les murs).
• Évitez les obstacles aux signaux sans fil.
• Maintenez les appareils sans fil à au moins 60
cm (2 pieds) des objets en métal de grande
dimension, tels que les classeurs, les
réfrigérateurs, les tuyaux, les plafonds en
métal, le béton armé et les cloisons en métal.
• Maintenez les appareils sans fil loin des
quantités d’eau importantes, telles que les
aquariums et les refroidisseurs d’eau.
Pour réduire l’interférence :
• Évitez les fenêtres, sauf si vous devez
communiquer avec d’autres immeubles.
• Placez les appareils sans fil loin des sources
de bruit électromagnétique, surtout celles
qui peuvent affecter la plage de fréquence de
2400 à 2500 MHz. Les sources les plus
fréquentes de bruit sont :
– Les téléphones sans fil de 2,4 et 2,5 GHz, les
ordinateurs, les routeurs et les points d'accès
sans fil ainsi que les télécopieurs (maintenez
une distance d'au moins 30 cm (1 pied)).
– Les photocopieurs, les ascenseurs et les
téléphones cellulaires (maintenez une
distance d’au moins 1,8 m (6 pieds)).
– Les fours à micro-ondes (maintenez une
distance d’au moins 3 m (10 pieds)).
14
Page 50

Commandes générales
Avant et dessus
Stations préréglées
Démarrage/en attente
Source audio
Informations
météorologiques
Adore
Bannir
Déplacement vers le haut
Précédent/balayage/
recherche vers l’arrière/
retour dans le menu
Déplacement vers
le bas dans le menu
Tag
dans le menu
Arrière
WEATHER
Minuterie de
sommeil/rappel
Volume
Réglage de l’alarme
Réglage de l’horloge
Menu principal
Enregistrement
Lecture/pause
Affichage
Suivant/balayage/
recherche vers
l’avant/avancer
dans le menu
Sélection de
l’élément du menu
F
(ARIRC200 seulement )
sortie de ligne audio
RealAudio est une marque de commerce ou une marque déposée de RealNetworks, Inc.
Port LAN
Casque d’écoute/
Vous pouvez brancher des dispositifs USB dans le port USB : La
radio peut lire les fichiers audio mp3, WMA et RealAudio
enregistrés sur les dispositifs USB connectés.
Prise pour l’antenne
cadre AM
Antenne FM
Prise pour
l’adaptateur
d’alimentation
Port USB pleine
vitesse
15
Page 51

Commandes générales
Démarrage et fermeture
Appuyez sur ON/STANDBY pour démarrer ou
fermer la radio (mode d'attente).
Réglage du volume
Tournez le bouton VOL. pour régler le volume.
Sélection de la source
Appuyez à plusieurs reprises sur SOURCE pour
sélectionner l’une des sources audio suivantes :
• Radio Internet
• MP3tunes
• Tuner FM
• Tuner AM
• Mémoire interne
• Entrée USB
Bulletin météo
Appuyez sur WEATHER pour connaître le
bulletin météo de la journée ou des trois
prochains jours. Consultez la page 24 pour plus
de renseignements.
Horloge et alarme
• Appuyez une fois sur CLOCK pour afficher
l’heure courante ou appuyez et gardez
enfoncé CLOCK pour régler l’horloge.
• Appuyez une fois sur ALARM. Puis, appuyez
sur ou pour sélectionner Activation,
Désactivation, Réglage de l'heure ou
Sélection du son puis appuyez sur SELECT.
• Consultez les pages 18 et 19 pour plus de
renseignements.
Utilisation des menus
L’affichage montre l’écran de lecture, de
navigation, des réglages, des messages, etc.
Ce qui est affiché dépend de la fonction que
vous utilisez.
Pour afficher le menu Source :
• Appuyez sur pour afficher le menu Source
de manière à sélectionner une source audio.
• Lecture en cours – s’affiche au haut du menu
Source lorsqu’une station est sélectionnée.
Sélectionnez cette option pour retourner à
l’écran de lecture.
Pour naviguer dans les menus :
• Utilisez les commandes de navigation pour
faire vos sélections et entrer des informations
:
Déplacer la surbrillance vers le haut
Déplacer la surbrillance vers le bas
Déplacer la sélection/naviguer vers la
gauche
Déplacer la sélection/naviguer vers la
droite
SELECT
Con rmer l’option ou le caractère
sélectionné
16
Page 52

Commandes générales
Pour entrer des caractères :
• Certains menus peuvent nécessiter l’entrée
de caractères (p. ex., un mot de passe ou un
code postal). Le code postal est utile pour le
réglage de l'horloge, les prévisions
météorologiques et la recherche de stations
de radio Internet locales dans votre région.
• Lorsque vous entrez des caractères, appuyez
• Appuyez sur ou pour choisir parmi les
Jeux de caractères ( ou )
Majuscules
Minuscules
Numériques
Spéciaux
Commandes
• Commandes : appuyez sur ou (ou ou
ou pour choisir parmi les caractères
sur
alphanumériques affichés au bas de l’écran.
Appuyez sur SELECT pour confirmer votre
sélection.
options de majuscule, minuscule, numérique,
caractères spéciaux ou les commandes.
Options ( or )
A B C D E...X Y Z
a b c d e...x y z
1 2 3 4 5 6 7 8 9 0
_ – ! @ # $ % ^ & *
(voir ci-dessous)
) pour sélectionner la commande désirée
puis appuyez sur SELECT.
Pour quitter le mode d’entrée sans
sauvegarder, sélectionnez la
commande Annuler.
F
Commandes
TERMINÉ
Supprimer
Espace
Précédent
Suivant
Annuler
Actions
Quitte le mode d’entrée
E ace l’entrée en surbrillance et
déplace la surbrillance d'un espace
vers l’arrière
Insère un espace; les caractères à
droite seront déplacés d’un espace
Déplace la surbrillance vers le caractère précédent sans l’e acer
Déplace la surbrillance vers le
caractère suivant sans l’e acer
Quitte le mode d’entrée sans faire
de modi cation
17
Page 53

Horloge et alarme
Accès à l’horloge numérique
La radio Internet Wi-Fi possède aussi une horloge
numérique qui est mise à jour lors de la
connexion à Internet.
Force du signal Wi-Fi
État de l’alarme
• Appuyez sur CLOCK pour afficher l’horloge
sans interrompre la lecture audio.
• Pour masquer l’horloge et retourner à l’écran
précédent, appuyez à nouveau sur CLOCK.
• L’horloge est aussi affichée lorsque la radio
est fermée (en mode d’attente).
Température actuelle
Réglage de l’horloge
Si votre code postal est réglé, l’horloge est réglée
automatiquement lorsque vous vous connectez
à Internet. Malgré tout, vous pouvez quand
même la régler manuellement. Le jour, la date et
le mois ne peuvent être réglés qu’en vous
connectant à une station de radio Internet.
1. Appuyez et gardez enfoncé CLOCK jusqu’à ce
que les heures soient sélectionnées sur
l’affichage (couleurs inversées).
Vous pouvez aussi régler l’horloge
vous-même et désactiver le réglage
automatique de l’horloge (« Sync auto
») lorsque vous vous connectez à Internet.
Consultez la rubrique Réglages avancés à la
page 27 pour plus de renseignements.
Fonctionnement de l’alarme
Pour régler l’heure de réveil et le son :
1. Appuyez sur ALARM pour afficher le menu de
l’alarme. Puis, appuyez sur ou pour
mettre en surbrillance Set Alarm Time puis
appuyez sur SELECT.
2. Les heures de l’alarme soient sélectionnées
sur l’affichage (couleurs inversées). Appuyez
sur
ou pour régler les heures de l’heure
de réveil.
2. Appuyez sur ou pour régler les heures.
3. Appuyez sur pour passer au champ des
minutes.
4. Appuyez sur ou pour régler les minutes.
• Si vous avez réglé l’horloge au mode
d’affichage 24 heures (consultez la page 27),
appuyez sur SELECT après avoir réglé les
minutes et sautez les étapes 5 à 7.
5. Appuyez sur
6. Appuyez sur
PM.
7. Appuyez à nouveau sur SELECT pour
confirmer le réglage.
18
pour passer à AM/PM.
ou pour sélectionner AM ou
3. Appuyez sur pour passer au champ des
minutes.
4. Appuyez sur ou pour régler les minutes
de l’heure de réveil.
5. Appuyez sur pour passer à AM/PM.
• Si vous avez réglé l’horloge au mode
d’affichage 24 heures (consultez la page 27),
appuyez sur SELECT et sautez l' étapes 6.
6. Appuyez sur
PM.
7. Appuyez sur ou pour sélectionner
Sélectionnez Son puis appuyez sur SELECT.
ou pour sélectionner AM ou
Page 54

Horloge et alarme
8. Appuyez sur
surbrillance l’une des sources pour le son du
réveil :
• Bruiteur
• Préréglages AM
• Préréglages FM
• Préréglages Internet
Consultez les rubriques
correspondantes (p. ex., Radio
Internet) de ce guide de l’utilisateur
pour savoir comment prérégler des
stations.
9. Lorsque la source désirée est en surbrillance,
appuyez sur SELECT puis sur ou pour
sélectionner le son ou l’élément préréglé
désiré.
10. Appuyez sur SELECT pour confirmer
l’élément sélectionné comme son de réveil.
• Lorsque l’alimentation de la radio est
interrompue, l’alarme sera alimentée par les
piles installées dans la base (consultez la
page 9). Le son de réveil sélectionné
reviendra au réglage par défaut du bruiteur.
• Lorsque la source sélectionnée n’est pas
disponible, le réglage par défaut du bruiteur
est utilisé.
Pour activer ou désactiver l’alarme :
1. Appuyez sur ALARM.
2. Appuyez sur
On (activée) ou Turn Off (désactivée) puis
appuyez sur SELECT.
• Lorsque l’alarme est activée (ON), l'heure de
l'alarme réglée (p. ex., AL: 7:00 AM) s'affiche
dans le coin inférieur gauche de l'affichage.
• Lorsque l’alarme est désactivée (OFF), « AL:
Off » s’affiche.
ou pour mettre en
ou pour sélectionner Turn
Pour désactiver l’alarme lorsqu’elle sonne :
• Appuyez sur ALARM ou ON/STANDBY pour
désactiver l’alarme. Elle sonnera à nouveau le
lendemain si les réglages ne sont pas
modifiés.
OU
• Appuyez sur SLEEP/SNOOZE pour désactiver
temporairement l’alarme et dormir un peu
plus longtemps. L’alarme sonne à nouveau
après dix minutes.
OU
• L’alarme est désactivée automatiquement
après 60 minutes si vous n'appuyez sur
aucune touche.
Mode de sommeil
Vous pouvez régler la radio pour qu’elle joue
pendant un certain temps avant de se fermer
automatiquement.
1. Pendant l’écoute de la radio, appuyez sur
SLEEP/SNOOZE pour activer le mode de
sommeil.
• La durée par défaut est de 15 minutes.
• Si la radio est fermée, appuyez sur SLEEP/
SNOOZE pour activer le mode de sommeil et
écouter la dernière station syntonisée.
2. Si nécessaire, appuyez à nouveau sur SLEEP/
SNOOZE pour allonger la durée, jusqu’à un
maximum de 90 minutes. Chaque pression de
la touche ajoute 15 minutes.
• Le temps restant avant la fermeture
automatique est affiché en bas à droite de
l’horloge, et remplace les informations
météorologiques.
• Sélectionnez OFF (appuyez à nouveau sur
SLEEP/SNOOZE lorsque la durée atteint 90
minutes) si vous décidez de ne pas utiliser le
mode de sommeil. La radio se ferme.
• Pour désactiver le mode de sommeil plus
rapidement, appuyez sur ON/STANDBY.
19
F
Page 55

Radio Internet
La radio Internet vous permet d’écouter de la
musique, des nouvelles, des sports, la météo ou
la radio parlée dans d’autres pays ou dans votre
région. Elle offre la plus grande diversité de
musique provenant de tous les coins du monde
et la plupart des stations sont gratuites.
Accès à la radio Internet
• Appuyez à plusieurs reprises sur SOURCE
pour sélectionner Radio Internet.
OU
• Dans le menu Source, appuyez sur ou
pour mettre en surbrillance Radio Internet
puis appuyez sur SELECT.
Écoute de la radio Internet
Pour sélectionner une station :
Les stations de radio Internet sont classées en
catégorie selon leur genre de musique, leurs
sujets de discussion ou leur emplacement
géographique.
1. Appuyez sur ou pour mettre en
surbrillance une catégorie ou une souscatégorie puis appuyez sur SELECT.
• My Genres – vos genres favoris regroupés
• My Favorites – une liste de vos stations de
• Music – les stations musicales classées selon
• Talk – les stations de radio parlée classées
ensemble pour faciliter la navigation
radio Internet favorites
les genres et les sous-genres (p. ex., blues ou
hip hop)
selon les sujets de discussion (p. ex.,
nouvelles économiques ou religion)
• My Local – une liste des stations de radio
Internet locales, selon le code postal fourni
par l'utilisateur
• By Region – les stations musicales classées
selon les régions géographiques
2. Lorsque qu’une station est en surbrillance,
appuyez sur SELECT. La station sélectionnée
est jouée.
Pour enregistrer la station courante comme
préréglage :
1. Sélectionnez une station.
2. Pour enregistrer la station courante sous une
touche de préréglage, appuyez et gardez
enfoncé la touche 1, 2, 3, 4, 5 ou 6 située sur
le dessus de la radio jusqu’à ce que vous
entendiez une tonalité.
• Vous pouvez enregistrer jusqu’à six stations
pour chaque genre.
• Pour écouter une station préréglée, appuyez
sur une touche de 1 à 6.
• Pour modifier une station préréglée, reprenez
les étapes ci-dessus pour enregistrer une
nouvelle station par-dessus l’ancienne
station.
• Vous pouvez sélectionner une station
préréglée pour le son du réveil; consultez la
page 18 pour plus de renseignements.
20
Page 56

Radio Internet
Pour enregistrer la station courante dans My
Favorites :
Appuyez sur pendant l’écoute.
Aussi :
1. Appuyez sur .
2. Appuyez sur ou pour mettre en
surbrillance Ajout station fav. puis appuyez
sur SELECT.
Pour écouter une station dans My Favorites :
Sélectionnez une station dans My Favorites
dans le menu principal de la radio Internet puis
appuyez sur SELECT pour démarrer l’écoute.
(Consultez la rubrique Pour sélectionner une
station pour plus de renseignements).
Pour supprimer une station de My Favorites :
Appuyez sur lorsque vous écoutez la station
que vous désirez supprimer.
Pour sélectionner la station courante comme
son du réveil :
1. Appuyez sur
2. Appuyez sur ou pour mettre en
surbrillance Désigner pr alarme puis
appuyez sur SELECT.
.
Enregistrement de la radio Internet
Avertissement! La fonction d'enregistrement est
conçue pour un usage personnel exclusivement.
(Les fichiers ne peuvent pas être transférés ou
déplacés à partir de la mémoire interne.)
Pour enregistrer la station courante :
1. Appuyez sur
l’enregistrement.
2. Appuyez sur pour arrêter l’enregistrement.
• L’enregistrement est sauvegardé dans la
mémoire interne de la radio.
• Pour la lecture, consultez la rubrique
Mémoire interne à la page 22.
• La radio nomme chaque enregistrement
selon le format suivant : <Nom de la station>
<Mois -Jour> <Heure>.
Par exemple : JazzMan 1-21 445.
pour démarrer
Ajout de stations de radio Internet
Pour ajouter des stations de radio Internet :
Veuillez visiter www.arinfiniteradio.com/portal
et connectez-vous à votre compte d’utiliser pour
ajouter de nouvelles stations dans My Favorites.
F
21
Page 57

MP3tunes
MP3tunes est un fournisseur de services
musicaux (MSP) et l'hôte de MP3tunes Locker, un
espace en ligne sécuritaire de musique offrant
une écoute continue.
Les utilisateurs de MP3tunes peuvent téléverser
leur propre collection de musique sur MP3tunes
Locker et l'écouter avec cette radio lorsque leur
ordinateur est fermé.
Le MP3tunes Locker est disponible en version
gratuite (3 Go) comme publiciel (« ad-supported
»), ainsi qu'en version payante MP3tunes
Premium Locker (50Go), qui permet des fichiers
musicaux de plus grande taille, un accès complet
aux couvertures d'album et un accès complet au
soutien à la clientèle.
Pour plus de renseignements sur MP3tunes,
veuillez visiter www.mp3tunes.com.
Configuration de MP3tunes Locker
1. Visitez www.mp3tunes.com et créez un
compte MP3tunes. Le service est offert en
version gratuite ou payante.
2. Téléversez votre collection de musique dans
votre MP3Tunes Locker.
• MP3tunes offre plusieurs méthodes pour
téléverser votre collection de musique.
Veuillez consulter le site web de MP3tunes
pour des recommandations et des
instructions.
3. Assurez-vous que vos informations de
compte MP3tunes sur cette radio sont les
mêmes que celles de votre compte MP3tunes
existant.
• Pour vérifier ou éditer vos informations de
compte MP3tunes, veuillez consulter la
rubrique « Informations de votre compte » à
la page 27 de ce guide de l'utilisateur.
Lecture de la musique sur
MP3tunes Locker
Vos fichiers musicaux sont classés par artistes,
albums et listes de lecture.
1. Appuyez sur ou pour mettre en
surbrillance une catégorie ou une souscatégorie puis appuyez sur SELECT.
2. Appuyez sur SELECT ou pour lire l'un des
fichiers musicaux de l'artiste, de l'album ou
de la liste de lecture sélectionné.
MP3TUNES
Sea of No Fears
Great Big Hits
2:12/3:48
MP3 128Kbps
• Pour lire un fichier musical en particulier,
appuyez sur SELECT pour ouvrir l'artiste,
l'album ou la liste de lecture sélectionné.
Appuyez sur
surbrillance un fichier en particulier puis
appuyez sur SELECT ou
3. Appuyez sur
la lecture.
4. Appuyez sur
5. Appuyez sur
le début du fichier courant pour sauter au
fichier précédent. Sinon, vous reviendrez au
début du fichier courant.
ou pour mettre en
.
pour suspendre ou reprendre
pour sauter au fichier suivant.
moins de trois secondes après
Accès au mode MP3tunes
• Appuyez à plusieurs reprises sur SOURCE
pour sélectionner MP3tunes.
OU
• Dans le menu Source, appuyez sur
pour mettre en surbrillance MP3tunes puis
appuyez sur SELECT.
22
ou
Page 58

Radio FM/AM
Antenne FM/AM
• Pour capter la bande FM, dépliez l'antenne
FM située à l'arrière de la radio et assurezvous qu'elle est entièrement dépliée (vous
devriez même la coller au mur derrière la
radio si possible. Plus elle est élevée,
meilleure sera la réception.)
• Pour capter la bande AM, branchez l’antenne
cadre AM à l’arrière de la radio. Tournez
l’antenne cadre AM pour obtenir une
meilleure réception.
Accès à la radio FM/AM
• Appuyez à plusieurs reprises sur SOURCE
pour sélectionner Tuner FM ou Tuner AM.
OU
• Dans le menu Source, appuyez sur
pour mettre en surbrillance Tuner FM ou
Tuner AM puis appuyez sur SELECT.
ou
Témoin du signal stéréo
Écoute de la radio FM/AM
Pour sélectionner une station :
1. Appuyez sur ou pour syntoniser une
fréquence.
2. Pour balayer la plage de fréquences, appuyez
et gardez enfoncé ou jusqu’à ce que la
radio émette une tonalité. La radio cesse de
balayer lorsqu’elle détecte la station suivante.
Pour sélectionner la station courante comme
son du réveil :
1. Appuyez sur
2. Appuyez sur
surbrillance Désigner pr alarme puis
appuyez sur SELECT.
.
ou pour mettre en
Enregistrement de la radio FM/AM
Avertissement! La fonction d'enregistrement
est conçue pour un usage personnel
exclusivement. (Les fichiers ne peuvent pas être
transférés ou déplacés à partir de la mémoire
interne.)
Pour enregistrer la station courante :
1. Appuyez sur
l’enregistrement.
2. Appuyez sur pour arrêter l’enregistrement.
• L’enregistrement est sauvegardé dans la
mémoire interne de la radio.
• Pour la lecture, consultez la rubrique
Mémoire interne à la page 24.
• La radio nomme chaque enregistrement
selon le format : <Source><Fréquence de la
station> <Mois-Jour> <Heure>. Par exemple :
FM99.5 1-21 1245.
pour démarrer
F
Pour enregistrer la station courante comme
préréglage :
1. Sélectionnez une station.
2. Pour enregistrer la station courante sous une
touche de préréglage, appuyez et gardez
enfoncée la touche 1, 2, 3, 4, 5 ou 6 située
sur le dessus de la radio jusqu’à ce que vous
entendiez une tonalité.
• Pour écouter une station préréglée, appuyez
sur la touche 1 à 6.
• Pour modifier une station préréglée, reprenez
les étapes ci-dessus pour enregistrer une
nouvelle station par-dessus l’ancienne
station.
• Vous pouvez sélectionner une station
préréglée pour le son du réveil; consultez la
page 18 pour plus de renseignements.
23
Page 59

Mémoire interne
La mémoire interne de la radio permet de
sauvegarder jusqu’à dix heures
d’enregistrements de la radio Internet et FM/AM.
Accès à la mémoire interne
• Appuyez à plusieurs reprises sur SOURCE
pour sélectionner Mémoire Interne.
OU
• Dans le menu Source, appuyez sur ou
pour mettre en surbrillance Mémoire
Interne puis appuyez sur SELECT.
Lecture des enregistrements
1. Appuyez sur ou pour mettre en
surbrillance un enregistrement puis appuyez
sur SELECT.
2. Appuyez sur ou pour mettre en
surbrillance Lecture puis appuyez sur
SELECT pour démarrer la lecture.
3. Appuyez sur pour suspendre ou reprendre
la lecture.
4. Appuyez sur
l’enregistrement suivant.
5. Appuyez sur
après le début de l’enregistrement courant
pour passer à l’enregistrement précédent.
Sinon, vous reviendrez au début de
l’enregistrement courant.
pour passer à
moins de quatre secondes
Suppression d’enregistrements
1. Appuyez sur ou pour mettre en
surbrillance un enregistrement non désiré
puis appuyez sur SELECT.
2. Appuyez sur
surbrillance Suppression puis appuyez sur
SELECT.
3. À l’écran de confirmation, appuyez sur ou
pour mettre en surbrillance Yes puis
appuyez sur SELECT.
Pour supprimer tous les enregistrements :
1. Dans la liste des enregistrements, appuyez
ou pour mettre en surbrillance
sur
Supprimer tous puis appuyez sur SELECT.
2. À l’écran de confirmation, sélectionnez
Continuer puis appuyez sur SELECT.
• Vous pouvez aussi effacer la mémoire interne
à partir du menu Réglages. Consultez la
rubrique Réglages avancés à la page 27
pour plus de renseignements.
ou pour mettre en
24
Page 60

Entrée USB
La radio peut lire les fichiers musicaux (en format
mp3, WMA et RealAudio (RA8 et G2)) qui sont
enregistrés sur un dispositif USB connecté. Le
port de connexion USB est situé à l’arrière de la
radio.
Accès au mode d’entrée USB
• Appuyez à plusieurs reprises SOURCE pour
sélectionner Entrée USB.
OU
• Dans le menu Source, appuyez sur ou
pour mettre en surbrillance Entrée USB puis
appuyez sur SELECT.
Lecture de fichiers musicaux
1. Appuyez sur , , ou pour naviguer
dans les répertoires du dispositif USB et
sélectionnez un fichier audio en appuyant sur
SELECT.
• Appuyez sur ou SELECT pour ouvrir un
répertoire.
• Appuyez sur
2. Appuyez sur
surbrillance Lecture puis appuyez sur
SELECT pour démarrer la lecture.
pour quitter un répertoire.
ou pour mettre en
Suppression de fichiers
1. Appuyez sur ou pour mettre en
surbrillance un fichier non désiré puis
appuyez sur SELECT.
2. Appuyez sur ou pour mettre en
surbrillance Suppression puis appuyez sur
SELECT.
3. À l’écran de confirmation, appuyez sur ou
pour mettre en surbrillance Oui puis
appuyez sur SELECT.
F
3. Appuyez sur pour suspendre ou reprendre
la lecture.
4. Appuyez sur
5. Appuyez sur
après le début du fichier courant pour passer
au fichier précédent. Sinon, vous reviendrez
au début du fichier courant.
pour passer au fichier suivant.
moins de quatre secondes
25
Page 61

Météo
Bulletin météo
Votre radio comprend un
abonnement de faveur de quatre ans
au service d'informations
météorologiques sur demande WeatherBug
Orages
Orages violents
MD
.
Grésil
Un bulletin météo est disponible et offre :
• Une lecture texte-vers-parole des prévisions
météo pour le code postal associé à la radio
(cette fonction peut être activée et désactivée
dans le menu Réglages). La lecture musicale
sera suspendue pendant la lecture du bulletin
météo.
• L’affichage textuel des prévisions météo pour
la journée, incluant la température actuelle, les
températures maximale et minimale prévues,
les conditions météo actuelles, l’humidité et
les vents.
• Un affichage graphique des conditions météo
pour les prévisions des trois prochains jours :
Inconnu
Ensoleillé/dégagé
Généralement ensoleillé
Partiellement nuageux
Généralement nuageux
Nuageux
Dégagé (nuit)
Pluie verglaçante
Neige
Neige importante
Vent
Brouillard
Pour connaître la météo de la journée :
Appuyez une fois sur WEATHER.
Pour connaître les prévisions météo des trois
prochains jours :
Appuyez deux fois sur WEATHER pour connaître
les prévisions météo de la journée et des deux
jours suivants.
Brumeux
Brumeux (nuit)
Pluie
Forte pluie
26
Généralement dégagé (nuit)
Partiellement nuageux (nuit)
Généralement nuageux (nuit)
Pour revenir à la source audio ou à l'écran de
lecture précédent :
Appuyez une troisième fois sur WEATHER.
Page 62

Réglages
Modification des réglages de la
radio
Pour modifier les réglages de la radio :
1. Appuyez sur
2. Appuyez sur ou pour mettre en
surbrillance Réglages puis appuyez sur
SELECT.
3. Appuyez sur
surbrillance un réglage puis appuyez sur
SELECT pour ouvrir un sous-menu.
• Reprenez cette étape pour naviguer à
d’autres réglages et sous-menus.
• Pour modifier un réglage, appuyez sur
pour mettre en surbrillance l’option désirée
puis appuyez sur SELECT pour confirmer.
• Certains menus peuvent nécessiter l’entrée
de caractères; consultez la page 16 pour des
conseils sur l’entrée de caractères.
pour afficher le menu Source.
ou pour mettre en
ou
Infos compte
• Pour modifier les informations de connexion
(nom d’utilisateur et mot de passe) utilisées
par la radio lorsqu’elle tente de se connecter
au service MP3tunes.
• Pour modifier le code postal servant aux
fonctions de l’horloge et de la météo.
Si vous avez modifié les informations
de votre compte sur le site web de
MP3tunes, vous devez aussi modifier
les informations de votre compte
dans ce réglage. Les informations de ce
réglage doivent être les mêmes que vos
informations en ligne.
Info appareil
Pour afficher la version du micrologiciel, l’adresse
MAC et le NIP de la radio. L’adresse MAC et le NIP
sont nécessaires pour activer vos comptes AR
Infinite Radio.
Config. réseau
Pour modifier le réglage du type de réseau de la
radio (avec ou sans fil). Consultez la page 11
pour plus de renseignements.
Mises à jour logic.
Pour vérifier si une nouvelle version du
micrologiciel est disponible. Suivez les
instructions à l’écran pour faire la mise à jour.
Météo
• Pour activer ou désactiver la lecture textevers-parole lorsque vous appuyez sur la
touche WEATHER.
• Pour sélectionner le sexe et l’accent (ÉtatsUnis/Angleterre) de la voix utilisée pour la
lecture texte-vers-parole.
Réglages avancés
• Mode de l'horlage :
– Sync Auto et Manuelle : pour sélectionner
entre le réglage automatique et manuel de
l'horloge. Si vous sélectionnez Sync Auto,
l’horloge sera réglée toutes les cinq minutes
lors de la mise à jour des prévisions météo en
ligne.
– Affichage de l’heure : pour sélectionner
entre les modes d’affichage 12 heures et 24
heures.
• Supprimer fichiers : pour supprimer tous les
enregistrements de la mémoire interne.
• Régl. par défaut : pour rétablir les menus à
leur valeur par défaut. Les réglages suivants
seront rétablis à leur valeur par défaut :
– Nom d’utilisateur et Mot de passe
(MP3tunes), Options de l’affichage, Sélection
de la langue, Entrée du code postal,
Configuration de la connexion réseau,
Horloge, Alarme, Option texte-vers-parole,
Mode de démonstration
– Les enregistrements dans la mémoire interne
NE sont PAS supprimés
• Réglage de la langue : pour modifier la
langue de l'affichage.
F
Affichage
Pour modifier la luminosité et le contraste de
l’affichage.
27
Page 63

Plus de renseignements
Conseils de dépannage
Impossible de démarrer la radio.
• Branchez fermement l’adaptateur
d’alimentation CA dans la radio et la prise
murale.
• Vérifiez la prise murale en y branchant un
autre appareil.
• Appuyez et gardez enfoncé ON/STANDBY
pendant dix secondes pour redémarrer
l’appareil.
Pas de son.
• Augmenter le volume.
• Assurez-vous que le casque d’écoute n’est pas
branché.
La radio ne répond pas lorsque vous appuyez
sur les touches.
• La radio peut cesser de fonctionner
temporairement si elle subit une décharge
électrostatique. Pour rétablir son
fonctionnement normal, il peut être
nécessaire de réinitialiser la radio en
débranchant puis en rebranchant
l’alimentation ou en retirant puis en
réinstallant les piles dans la base de la radio.
La radio ne parvient pas à se connecter à
Internet.
• Vérifiez que votre point d’accès est en
fonction et est branché correctement.
• Pour les utilisateurs de l’outil Wi-Fi AR :
assurez-vous que tous les témoins sur le
panneau frontal de l’outil Wi-Fi sont allumés.
Si les témoins WPS, MODE ou WIRELESS sont
éteints ou clignotent simultanément,
appuyez et gardez enfoncé pendant trois
secondes le bouton WPS de l’outil Wi-Fi (le
témoin DEL MODE devrait clignoter) pour
détecter à nouveau la configuration de votre
réseau. L’outil Wi-Fi peut se réinitialiser à
plusieurs reprises pendant ce processus, qui
peut durer jusqu'à deux minutes selon la
configuration de votre réseau. Le témoin DEL
MODE cesse de clignoter lorsque le processus
est complété. Visitez www.arinfiniteradio.
com pour plus de renseignements.
• Assurez-vous qu’un pare-feu ne bloque pas
les ports sortants.
• Assurez-vous que le point d’accès ne limite
pas les connexions à des adresses MAC
spécifiques.
• Assurez-vous que vous avez entré le mot de
passe correct. Le mot de passe est sensible à
la casse.
• Votre connexion sans fil Internet dépasse
peut-être la portée maximale de réception.
Rapprochez la radio Internet du point d’accès
sans fil.
• Les réglages de réseau de la radio sont peutêtre incorrects. Vérifiez les réglages de réseau
dans Network Setup dans le menu Settings.
• Inclinez l’antenne externe de votre routeur de
45 degrés si la radio est à un autre étage.
• Déplacez le point d’accès loin ou au-dessus
des obstacles.
• Consultez le guide de votre routeur pour plus
de conseils pour améliorer la portée ou le
signal.
L’horloge n’a pas la bonne heure.
• Allez à Account Info dans le menu Settings et
assurez-vous que vous avez entré le bon code
postal; ce dernier sert de référence pour le
réglage automatique de l'horloge.
Les informations météo sont incorrectes.
• Allez à Account Info dans le menu Settings et
assurez-vous que vous avez entré le bon code
postal; ce dernier sert de référence pour les
informations météo.
Les informations météorologiques ne sont pas
lues à haute voix.
• Allez à Weather dans le menu Settings et
assurez-vous que vous avez activé la fonction
de lecture texte-vers-parole.
La radio se connecte à Internet mais ne
parvient pas à jouer une station en particulier.
• Vérifiez que la station est toujours en activité.
• La station a peut-être atteint la limite
maximale du nombre d’utilisateurs
simultanés.
• Le lien vers la station de radio est peut-être
désuet.
• La connexion Internet entre le serveur de la
station de radio et la radio est peut-être trop
lente.
Son intermittent.
• La bande passante de votre réseau sans fil est
peut-être trop faible. Rapprochez la radio du
point d’accès et assurez-vous qu’il n’y a pas
d’obstacle entre eux.
28
Page 64

Plus de renseignements
• La vitesse de transmission réelle d'une
transmission numérique radio dépend du
fournisseur de service (c.-à-d., la station de
radio Internet).
Impossible de revenir à la chanson
précédente lors de l’écoute de la radio
Internet.
• Le saut à la chanson précédente n'est pas
disponible avec la radio Internet.
Mauvaise réception sur la radio FM/AM.
• Vérifiez le branchement de l’antenne.
• Déplacez l’antenne.
• Fermez les appareils électriques à proximité,
tels que les séchoirs, les aspirateurs et les
fours à micro-ondes.
Impossible d’enregistrer la radio.
• La fonction d’enregistrement n’est disponible
que pour la radio Internet et la radio FM/AM.
• La mémoire interne de la radio est peut-être
pleine. Supprimez quelques enregistrements.
Impossible de lire les fichiers musicaux sur un
dispositif USB connecté.
• Assurez-vous que le dispositif USB est
correctement branché.
• Les fichiers musicaux de type Gestion des
droits numériques (DRM) ne peuvent pas être
lus.
• La radio est compatible avec les systèmes de
fichiers FAT12, 16 et 32 seulement. Elle n’est
pas compatible avec les autres systèmes de
fichiers, tels que Linux, MAC ou NTFS.
Le témoin DEL de la touche ON/STANDBY
clignote.
• Le témoin DEL clignote (toutes les cinq
secondes) lorsque l’appareil est alimenté par
les piles de secours lors d’une panne de
courant. Veuillez vérifier votre alimentation
électrique CA.
• Si le témoin DEL clignote plus rapidement
(toutes les trois secondes), cela indique que
l’appareil est alimenté par les piles de secours
et que celles-ci sont faibles. Veuillez
remplacer les piles de secours (consultez la
page 9). Nous vous recommandons de
remplacer les piles chaque année (ou plus
souvent lorsque les pannes de courant sont
plus fréquentes) pour éviter que les piles
soient trop faibles. Sinon, l'exactitude de
l’horloge et de l’alarme pourrait être affectée
lorsque l’alimentation électrique est
interrompue.
F
Impossible d’arrêter le mode de
démonstration.
• Pour quitter le mode de démonstration,
appuyez et relâchez une à la suite de l’autres
les touches situées sur le dessus de la radio,
soit : préréglage 1, puis SLEEP/SNOOZE et
enfin préréglage 6.
Je n'ai pas trouvé la réponse à ma question.
• Visitez www.arinfiniteradio.com pour
trouver une liste récente de toutes les
questions les plus fréquentes (FAQ).
Aide supplémentaire à propos de
l’outil Wi-Fi (pour le modèle
ARIRC205)
• L’outil Wi-Fi AR ajoute une capacité sans fil à
votre réseau existant. L’étape 4 à la page 9
vous indique comment brancher l’outil Wi-Fi
AR à votre réseau.
• Votre outil Wi-Fi est préconfiguré; en temps
normal, il n'est pas nécessaire de faire des
modifications. Les renseignements suivants
sont fournis pour les utilisateurs
expérimentés ou pour le dépannage.
• Si vous avez des problèmes lors de la
connexion de la radio à Internet via l’outil
Wi-Fi AR, ceux-ci pourraient être dus au fait
que les réglages de la radio ne correspondent
pas à ceux de l’outil Wi-Fi. Suivez les étapes
ci-dessous pour configurer ces réglages à
nouveau.
Pour trouver les informations de
configuration de l’outil Wi-Fi :
• Vous trouverez les informations de
configuration par défaut de l’outil Wi-Fi sur
l’étiquette blanche située à l’arrière de
l'appareil AR Infinite Radio. Cette étiquette
comprend : 1) le nom du réseau sans fil
(SSID), 2) le type de sécurité et 3) le mot de
passe/la clé.
29
Page 65

Plus de renseignements
Pour vérifier si les informations de
configuration sont les mêmes que celles de la
radio :
1. Appuyez sur
de la radio. Appuyez sur
pour afficher le menu Source
pour mettre en
surbrillance Réglages puis appuyez sur
SELECT.
2. Dans le menu Réglages, appuyez sur pour
mettre en surbrillance Config réseau puis
appuyez sur SELECT.
3. À l’écran Config réseau, appuyez sur pour
mettre en surbrillance Sans fils puis appuyez
sur SELECT.
4. À l’écran d’attente, appuyez sur SELECT
lorsque Continuer est en surbrillance dans
l’écran du dessous.
5. À l’écran Config. réseau, appuyez sur pour
mettre en surbrillance Entrez le SSID puis
appuyez sur SELECT.
7. L’écran Sécurité réseau s’affiche. Appuyez sur
pour mettre en surbrillance WPA puis
appuyez sur SELECT.
8. Le mot de passe/clé s’affiche. Vérifiez s'il est le
même que le mot de passe/clé de l’outil Wi-Fi.
Sinon, utilisez les touches fléchées et SELECT
pour entrer le mot de passe/clé
correspondant. Appuyez sur
pour afficher
DONE puis appuyez sur SELECT pour
poursuivre.
Le mot de passe/clé
utilisé ici n’est qu’un
exemple.
• Un écran de connexion s’affiche pour vous
indiquer le nom du réseau (SSID) auquel la
radio tente de se connecter.
9. La radio devrait maintenant se connecter à
l'outil Wi-Fi et à Internet. Si vos comptes AR
Infinite Radio ne sont pas activés, la radio
affiche le message Server Error. Veuillez
appuyez sur SELECT pour poursuivre. On
vous demandera d’entrer votre code postal
avant que votre radio puisse se connecter.
6. L’écran Sécurité réseau s’affiche. Vérifiez s'il
est le même que le SSID de l’outil Wi-Fi. Sinon,
utilisez les touches fléchées et SELECT pour
entrer le SSID correspondant. Appuyez sur
pour afficher DONE puis appuyez sur SELECT
pour poursuivre.
Le SSID utilisé ici n’est
qu’un exemple.
30
• Si vous ne parvenez toujours pas à vous
connecter à l’outil Wi-Fi, déplacez l'outil Wi-Fi
puis essayez à nouveau de vous connecter.
Consultez la rubrique Positionnement de
l’outil Wi-Fi à la page 14 pour plus de
renseignements.
Page 66

Plus de renseignements
Utilitaire web de l’outil Wi-Fi
• Cette rubrique est destinée aux utilisateurs
expérimentés qui voudraient vérifier la
configuration de leur outil Wi-Fi à l’aide de
l’utilitaire web de l’outil Wi-Fi.
• Vous pouvez accéder à cet utilitaire à l'aide
de votre navigateur web en utilisant un
ordinateur connecté au port LAN de l'outil
Wi-Fi. Consultez l’étape 4 à la page 9 pour
plus de renseignements.
• Les pages et les fonctions les plus
importantes de l'utilitaire sont présentées
ci-dessous. Pour une configuration réseau de
base, la plupart des utilisateurs n’auront pas
à utiliser les écrans suivants; malgré tout, cet
utilitaire peut être utile pour le dépannage.
Pour accéder à l’utilitaire web de l’outil Wi-Fi :
1. Branchez le port LAN de l'outil Wi-Fi au port
Ethernet de votre ordinateur à l’aide d’un
câble Ethernet. Consultez l’étape 4 à la page
9 pour plus de renseignements.
2. Pour les utilisateurs de PC fonctionnant sous
Windows XP, cliquez sur Démarrer, Exécuter
puis entrez cmd dans le champ et appuyez
sur Entrée.
• Pour les utilisateurs de MAC fonctionnant
sous OSX, cliquez sur la fenêtre du terminal.
3. Pour les utilisateurs de PC, à l’invite de
commandes DOS, entrez ipconfig /all. Cette
commande affiche l'adresse IP de votre
passerelle par défaut (« Default Gateway »)
(l’outil Wi-Fi).
• Pour les utilisateurs de MAC, dans la fenêtre
du terminal, entrez ipconfig getpacket en0.
• Un exemple de configuration est présenté
ci-dessous :
Ethernet adapter Local Area Connexion:
Connection-specific DNS Suffix . :
Description . . . . . . . . . . . . . .: Broadcom NetXtreme 57xx
Gigabit Controller #2
Physical Address. . . . . . . . . .: 00-12-3F-14-C2-0D
Dhcp Enabled. . . . . . . . . . . . : Yes
Autoconfiguration Enabled: Yes
IP Address. . . . . . . . . . . . . . : 192.168.36.11
Subnet Mask . . . . . . . . . . . . : 255.255.255.0
Default Gateway. . . . . . . : 192.168.36.1
DHCP Server . . . . . . . . . . . .: 192.168.36.1
DNS Servers . . . . . . . . . . . . : 192.168.36.1
Lease Obtained . . . . . . . . . : Monday, May 12, 2008 7:05:37 PM
Lease Expires . . . . . . . . . . . : Thursday, May 15, 2008 7:05:37 PM
C:\Documents and Settings\Administrator>
4. Démarrez votre navigateur web et entrez
l’adresse Default Gateway de votre routeur
(dans l’exemple ci-dessus, 192.168.36.1 ou
192.168.0.1) dans le champ Adresse de votre
navigateur puis appuyez sur Entrée. L’adresse
varie selon que l’outil Wi-Fi est configuré
comme un routeur ou un point d’accès (PA)
sur votre système.
5. Lorsque l’écran ci-dessous s’affiche, entrez
admin dans le champ Nom d’utilisateur et
laissez le champ Mot de passe vide; appuyez
sur OK.
6. La page principale de l’utilitaire web s’affiche.
Vous pouvez vérifier le SSID et le type de
sécurité sur cette page.
7. Cliquez sur LAN Settings dans le menu de
gauche pour voir plus de réglages (tels que
l’adresse IP, le masque de sous-réseau, etc.).
31
F
Page 67

Plus de renseignements
8. Cliquez sur Status dans le menu de gauche
pour afficher l’état de la connexion courante.
9. Cliquez sur Wireless dans le menu de gauche
pour afficher les réglages sans fil. Le SSID qui
apparaît sur cette page doit être le même
que le SSID de la radio.
• Pour vérifier rapidement le SSID de la radio,
appuyez sur
sélectionnez Network Setup puis
sélectionnez Connection Info.
• Cet écran indique aussi le canal sans fil utilisé
par l’outil Wi-Fi. Le numéro de canal par
défaut est réglé à Auto. Dans certains cas, si
d’autres réseaux sans fil sont actifs à
proximité et utilisent le même canal, le mode
automatique de sélection du canal ne
fonctionnera pas correctement et un autre
canal devra être sélectionné. Dans l’exemple
ci-dessus, le canal a été modifié d’Auto à
Channel 6.
, sélectionnez Settings,
10. Pour afficher la configuration de la sécurité
sans fil, cliquez sur Configure dans l’écran
Wireless.
• Pour permettre à l’outil Wi-Fi de
communiquer avec la radio, 1) le SSID, 2) le
type de sécurité et 3) la phrase secrète
doivent être les mêmes sur l'outil Wi-Fi AR et
sur la radio.
• Vous pouvez trouver le SSID de l’outil sur
l’étiquette blanche située sur le côté de l’outil
Wi-Fi.
• Pour vérifier rapidement le SSID de la radio,
appuyez sur , sélectionnez Settings,
sélectionnez Network Setup puis
sélectionnez Connection Info.
• Le type de sécurité sans fil de l’outil Wi-Fi
devrait être réglé à WPA-PSK. Le type de
sécurité doit être le même que celui de la
radio (WPA). Consultez les pages 27 et 28
pour plus de renseignements.
• Vous pouvez trouver la phrase secrète sur
l'étiquette blanche située sur le côté de l'outil
Wi-Fi; elle doit être la même que le mot de
passe/clé de la radio. Consultez les pages 27
et 28 pour plus de renseignements.
32
Page 68

Plus de renseignements
Avertissement à propos du droit
d’auteur
Ce lecteur est destiné à une utilisation
personnelle seulement. La reproduction ou
l'enregistrement non autorisé de contenus
protégés par le droit d'auteur peut contrevenir
aux droits de tierces parties et aux lois sur le
droit d'auteur.
Vérification des mises à jour
Visitez www.arinfiniteradio.com pour obtenir les
dernières nouvelles et les mises à jour du
micrologiciel de notre radio Internet Wi-Fi.
Caractéristiques techniques
Appareil : Radio Internet Wi-Fi
Marque : Acoustic Research
Modèle : ARIRC200, ARIRC205
Consommation : 13 W
Caractéristiques techniques
Appareil
• Dimensions : 212 mm H, 94 mm L, 154 mm P
• Poids de l'appareil : 790 g (27,9 oz) (sans les
piles)
• Normes : IEEE 802.11g et 802.11b
• Canaux : 11 canaux Wi-Fi (États-Unis et
Canada)
• Port Ethernet (ARIRC200 seulement) :
compatible avec la norme 10/100 RJ-45
• Alimentation : Externe; 9,0 V CC 1,56 A
• Piles de secours : 3 piles AAA
• Affichage : ACL de 6,9 cm (2,7 po) avec
rétroéclairage
• Témoins DEL : On/Standby, deux pour les
touches de navigation, J’adore.
• Mémoire interne : 512 Mo
• Prise pour casque d’écoute stéréo
• Port pour connexion USB
Amplificateur
• Puissance de sortie : 2 x 2 W
• Distorsion @ 1 kHz : < 10 % THD
F
Enceintes
• Quantité : 2
• Dimension : 40 mm (1,56 po)
Tuner AM
• Plage de fréquences : 520 kHz à 1710 kHz
Tuner FM
• Plage de fréquences : 87,5 MHz à 107,9 MHz
33
Page 69

Information de garantie
Information de garantie
Garantie limitée de 12 mois
S’applique aux appareils RCA audiovideo
AUDIOVOX ELECTRONICS CORP. (la Compagnie)
garantit au premier acheteur au détail de cet
appareil que cet appareil ou toute partie de ce
dernier, dans des conditions d’utilisation
normales, ne possède aucune défectuosité
matérielle ou de main d'œuvre pendant les
douze (12) mois suivant la date du premier achat;
une telle défectuosité sera réparée ou remplacée
par un appareil remis en état (à la discrétion de la
Compagnie) sans frais pour les pièces et la main
d’œuvre.
Pour obtenir une réparation ou un remplacement
selon les conditions de cette Garantie, l’appareil
doit être envoyé avec une preuve de garantie (p.
ex., une facture datée de l’achat), une description
de la(des) défectuosité(s) et le port payé à la
Compagnie à l’adresse indiquée ci-dessous.
Cette Garantie ne couvre pas l’élimination des
bruits ou parasites externes, la solution de
problèmes d'antenne, la perte/l’interruption de
transmissions ou de l’accès à Internet, les coûts
de l’installation, de la désinstallation ou de la
réinstallation de l’appareil, les altérations causées
par un virus informatique, un logiciel espion ou
tout autre programme malveillant, la perte de
média, de fichiers, de données ou de contenus,
les dommages causés à des cassettes, des
disques, des dispositifs ou des cartes de mémoire
amovibles, des haut-parleurs, des accessoires, des
ordinateurs, des périphériques d'ordinateurs,
d'autres lecteurs multimédia, des réseaux
résidentiels ou des systèmes électriques de
véhicule.
Cette Garantie ne s’applique pas à l’appareil ou à
toute partie de ce dernier qui, selon la
Compagnie, a été endommagée par ou a souffert
d'une modification, d’une mauvaise installation,
d'une manutention incorrecte, d’abus, de
négligence, d'un accident ou dont l’étiquette
portant le numéro de série/le code à barres usiné
a été retirée ou dégradée. L’ÉTENDUE DE
L’OBLIGATION DE LA COMPAGNIE SOUS CETTE
GARANTIE SE LIMITE À LA RÉPARATION OU AU
REMPLACEMENT INDIQUÉ CI-DESSOUS;
L'OBLIGATION DE LA COMPAGNIE NE DOIT EN
AUCUN CAS DÉPASSER LE PRIX D’ACHAT PAYÉ
PAR L’ACHETEUR POUR CET APPAREIL.
Cette Garantie remplace toutes les autres
garanties ou obligations explicites. TOUTE
GARANTIE IMPLICITE, INCLUANT LA GARANTIE
IMPLICITE DE QUALITÉ MARCHANDE, DOIT ÊTRE
LIMITÉE À LA DURÉE DE LA PRÉSENTE GARANTIE
ÉCRITE. TOUT ACTE CONTREVENANT AUX
TERMES DE LA PRÉSENTE GARANTIE, INCLUANT
LA GARANTIE IMPLICITE DE QUALITÉ
MARCHANDE, DOIT ÊTRE RAPPORTÉ DANS UNE
PÉRIODE DE VINGT-QUATRE (24) MOIS À PARTIR
DE LA DATE ORIGINALE DE L’ACHAT. LA
COMPAGNIE NE DEVRA EN AUCUN CAS ÊTRE
TENUE RESPONSABLE DES DOMMAGES
INDIRECTS OU ACCESSOIRES SUITE À LA
VIOLATION DE CETTE OU DE TOUTE AUTRE
GARANTIE. Aucune personne et aucun
représentant n’est autorisé à assumer au nom de
la Compagnie toute obligation autre que celles
indiquées dans cette Garantie en lien avec la
vente de cet appareil.
Certaines provinces ne permettent pas les limites
à la durée des garanties implicites ou l’exclusion
des dommages indirects ou accessoires, alors
certaines limites ou exclusions pourraient ne pas
s’appliquer à vous. Cette Garantie vous donne
certains droits spécifiques et vous pourriez avoir
d’autres droits, qui varient selon la province.
Comment faire une réclamation de garantie :
• Si votre appareil est en mesure d’enregistrer
des contenus (comme un lecteur mp3, un
enregistreur numérique de la voix, etc.), nous
vous recommandons de faire des copies de
sauvegarde des contenus enregistrés sur
l’appareil régulièrement. Si possible, avant
d’envoyer l’appareil, faites une copie de
sauvegarde des contenus ou des données
enregistrés sur l’appareil. De plus, il est
recommandé de supprimer tout contenu
personnel que vous ne voudriez pas rendre
accessibles à d’autres. IL EST PROBABLE QUE
LES CONTENUS ET DONNÉES ENREGISTRÉS
SUR L’APPAREIL SERONT PERDUS LORS DE LA
RÉPARATION ET DU REFORMATAGE.
AUDIOVOX REFUSE TOUTE RESPONSABILITÉ
POUR LES CONTENUS OU DONNÉES PERDUS
OU POUR LA SÉCURITÉ DES CONTENUS OU
DONNÉES PERSONNELS ENREGISTRÉS SUR
34
Page 70

Information de garantie
L’APPAREIL RETOURNÉ. L’appareil sera
retourné avec les réglages par défaut et sans
contenus préenregistrés qui auraient pu être
déjà installés lors de l'achat original. Le
consommateur sera responsable de
télécharger à nouveau les données et les
contenus. Le consommateur sera responsable
du rétablissement des réglages personnalisés.
• Emballez correctement votre appareil. Incluez
toute télécommande, carte de mémoire,
câble, etc. qui étaient fournis avec l’appareil.
Par contre, NE retournez PAS les piles, même
si les piles étaient fournies lors de l’achat
original. Nous vous recommandons d’utiliser
la boîte et le matériel d’emballage originaux.
• Incluez une preuve de la date de l’achat telle
qu’une facture. Inscrivez aussi vos nom et
adresse et une description de la défectuosité.
Envoyez l’appareil par UPS standard ou un
équivalent à :
Audiovox Electronics Corp.
Attn : Service Department.
150 Marcus Blvd.
Hauppauge N.Y. 11788
1-800-331-7599
• Assurez-vous votre envoi contre la perte ou
les dommages. Audiovox refuse toute
responsabilité en cas de dommages ou de
perte lors du transport vers Audiovox.
• Payez les frais qui vous sont facturés par le
Centre d’échange pour les réparations qui ne
sont pas couvertes par la garantie.
• Un nouvel appareil ou un appareil remis à
neuf vous sera envoyé avec le port prépayé.
F
Ce que nous ferons :
Nous vous fournirons un nouvel appareil ou, à
notre discrétion, un appareil remis à neuf.
L’appareil échangé est sous garantie pour la
durée restante de la période de garantie de
l’appareil original.
Pour les consommateurs canadiens, veuillez
envoyer votre appareil à :
Audiovox Return Centre
c/o Genco
6685 Kennedy Road,
Unit#3, Door 16,
Mississauga, Ontario
L5T 3A5
35
 Loading...