

Page 1
user manual
manual de usuario
ARIR200
EN
It is important to read this user manual prior to using your new product for the first time.
Es importante leer este manual antes de usar por vez primera su equipo.
Page 2

Contents
Safety information
FCC information ..........................................................................3
Technical specification ............................................................. 4
Electrical power source ............................................................ 4
Product registration ..................................................................4
For your records .........................................................................4
Important battery precautions .............................................4
Precautions for the player ....................................................... 4
IMPORTANT SAFETY INSTRUCTIONS ................................... 5
End user license agreement
End user license agreement ................................................... 6
Before you begin
1. Unpack the unit ......................................................................8
2. Setup your AR Infinite Radio accounts .......................... 9
3. Optional: Insert AAA batteries in the base of the
radio ................................................................................................ 9
4. Optional: For use with a "Wired" connection .............. 10
5. Plug in and turn on the radio ............................................ 10
6. Set up the radio ...................................................................... 11
Demonstration mode ...............................................................13
Getting the latest firmware and information...................13
Frequently asked questions ...................................................13
General controls
Front and top ............................................................................... 14
Rear ..................................................................................................14
Turning on or off .......................................................................15
Volume control ............................................................................15
Source selection .........................................................................15
Weather forecast.........................................................................15
Clock and alarm ..........................................................................15
Using the menus ........................................................................15
Clock and alarm
Accessing the digital clock .....................................................17
Setting the clock ......................................................................... 17
Using the alarm clock ...............................................................17
Sleep mode...................................................................................18
Slacker Radio
Accessing Slacker Radio ...........................................................19
Listening to Slacker Radio ....................................................... 19
Tag Options .................................................................................. 20
MP3tunes
MP3tunes Locker setup ...........................................................23
Accessing MP3tunes mode ....................................................23
Listening to music in MP3tunes Locker ............................. 23
FM/AM Tuner
FM/AM antenna .......................................................................... 24
Accessing FM/AM Radio ..........................................................24
Listening to FM/AM Radio ......................................................24
Recording FM/AM Radio ..........................................................24
Internal Memory
Accessing Internal Memory .................................................... 25
Listening to recordings ............................................................ 25
Deleting recordings ...................................................................25
USB Input
Accessing USB Input mode ....................................................26
Listening to music files.............................................................26
Deleting files ................................................................................26
Weather
Weather broadcast.....................................................................27
Emergency Broadcast System alert ..................................... 27
Settings
Changing radio's settings........................................................28
Account info ................................................................................. 28
Device info .................................................................................... 28
Display ............................................................................................ 28
Network setup ............................................................................. 28
Software updates .......................................................................28
Weather ..........................................................................................28
Advanced settings .....................................................................28
More information
Troubleshooting tips .................................................................29
Copyright warning .....................................................................30
Check for updates ...................................................................... 30
Technical specification ............................................................. 30
Specifications ............................................................................... 30
Warranty information
Limited warranty ........................................................................31
Internet Radio
Accessing Internet Radio ......................................................... 21
Listening to Internet Radio ..................................................... 21
Recording Internet Radio ........................................................ 22
Adding Internet Radio stations ............................................. 22
2
Page 3
Safety information
FCC information
This device complies with part 15 of the FCC
rules. Operation is subject to the following two
conditions: (1) This device may not cause harmful
interference, and (2) This device must accept any
interference received including interference
which may cause undesired operation.
This equipment has been tested and found to
comply with the limits for a Class B digital device,
pursuant to Part 15 of the FCC Rules. These limits
are designed to provide reasonable protection
against harmful interference in a residential
installation. This equipment generates, uses and
can radiate radio frequency energy and, if not
installed and used in accordance with the
instructions, may cause harmful interference to
radio communications. However, there is no
guarantee that interference will not occur in a
particular installation.
If this equipment does cause harmful
interference to radio or television reception,
which can be determined by turning the
equipment off and on, the user is encouraged to
try to correct the interference by one or more of
the following measures:
• Reorient or relocate the receiving antenna.
• Increase the separation between the
equipment and receiver.
• Connect the equipment into an outlet on
a circuit different from that to which the
receiver is connected.
• Consult the dealer or an experienced
radio / TV technician for help.
In accordance with FCC requirements, changes or
modifications not expressly approved by
manufacturer could void the user’s authority to
operate this product.
CAUTION
RISK OF ELECTRIC SHOCK
THE LIGHTNING FLASH
AND ARROWHEAD
WITHIN THE TRIANGLE
IS A WARNING SIGN
ALERTING YOU OF
"DANGEROUS
VOLTAGE" INSIDE THE
PRODUCT.
SEE MARKING ON BOTTOM / BACK OF PRODUCT
DO NOT OPEN
CAUTION: TO REDUCE THE
RISK OF ELECTRIC SHOCK,
DO NOT REMOVE COVER (OR
BACK). NO
USER-SERVICEABLE PARTS
INSIDE. REFER SERVICING TO
QUALIFIED SERVICE
PERSONNEL.
THE EXCLAMATION
POINT WITHIN THE
TRIANGLE IS A
WARNING SIGN
ALERTING YOU OF
IMPORTANT
INSTRUCTIONS
ACCOMPANYING
THE PRODUCT.
WARNING: TO PREVENT FIRE OR
ELECTRICAL SHOCK HAZARD, DO NOT EXPOSE
THIS PRODUCT TO RAIN OR MOISTURE.
Manufacturer/Responsible Party
Audiovox Electronics Corp.,
150 Marcus Blvd., Hauppauge, NY 11788
1-317-810-4880
Please note this phone number is for regulatory
matters only. No technical or product support is
available via this number.
This Class B digital apparatus complies with Canadian
ICES-003.
Cet appareil numérique de la classe B est conforme à la
norme NMB-003 du Canada.
EN
Acoustic Research
ARIR200
3
Page 4

Safety information
Technical specification
Product: Wi-Fi Internet Radio
Brand: Acoustic Research
Model: ARIR200
Electrical power source
External AC adapter for radio
Output: 9.0V DC 1.56A
Input: 100-240V ~ 50/60Hz 0.7A
The AC/DC adapter supplied with this product
is inteneded to be correctly oriented in a
vertical or floor mount position.
Product registration
Go to www.acoustic-research.com for online
registration.
For your records
Keep your sales receipt for proof of purchase to
obtain warranty parts and service.
In the event that service should be required, you
may need both the model number and the serial
number. In the space below, record the date and
place of purchase, and the serial number:
Model No.
Date of Purchase
Place of Purchase
Serial No.
Important battery precautions
• Any battery may present a risk of fire,
explosion, or chemical burn if abused. Do not
try to charge a battery that is not intended to
be recharged, do not incinerate, and do not
puncture.
• Non-rechargeable batteries, such as alkaline
batteries, may leak if left in your product for
a long period of time. Remove the batteries
from the product if you are not going to use
it for a month or more.
• If your product uses more than one battery,
do not mix types and make sure they are
inserted correctly. Mixing types or inserting
incorrectly may cause them to leak.
• Discard any leaky or deformed battery
immediately. They may cause skin burns or
other personal injury.
• Please help to protect the environment by
recycling or disposing of batteries according
to federal, state, and local regulations.
Precautions for the player
• Do not use the unit immediately after
transportation from a cold place to a warm
place; condensation problems may result.
• Avoid shock to the unit.
• Do not store the unit near fire, places with
high temperature or in direct sunlight.
Exposure to direct sunlight or extreme heat
(such as inside a parked car) may cause
damage or malfunction.
• Do not expose to rain or moisture.
• Do not operate or store unit in places with
frequent static electricity or electrical noise
(e.g. speaker, TV set).
• Clean the unit with a soft cloth or a damp
chamois leather. Never use solvents.
• The unit must only be opened by qualified
personnel.
4
Page 5
Safety information
IMPORTANT SAFETY INSTRUCTIONS
PLEASE READ AND SAVE FOR FUTURE REFERENCE
Some of the following information may not
apply to your particular product; however, as
with any electronic product, precautions should
be observed during handling and use.
• Read these instructions.
• Keep these instructions.
• Heed all warnings.
• Follow all instructions.
• Do not use this apparatus near water.
• Clean only with dry cloth.
• Do not block any ventilation openings. Install
in accordance with the manufacturer’s
instructions.
• Do not install near any heat sources such as
radiators, heat registers, stoves, or other
apparatus (including amplifiers) that produce
heat.
• Do not defeat the safety purpose of the
polarized or grounding-type plug. A
polarized plug has two blades with one wider
than the other. A grounding type plug has
two blades and a third grounding prong. The
wide blade or the third prong is provided for
your safety. If the provided plug does not fit
into your outlet, consult an electrician for
replacement of the obsolete outlet.
• Protect the power cord from being walked on
or pinched particularly at plugs, convenience
receptacles, and the point where they exit
from the apparatus.
• Only use attachments/accessories specified
by the manufacturer.
• Use only with the cart,
stand, tripod, bracket, or
table specified by the
manufacturer, or sold with
the apparatus. When a
cart is used, use caution
when moving the cart/
apparatus combination to avoid injury from
tip-over.
• Unplug this apparatus during lightning
storms or when unused for long periods of
time.
• Refer all servicing to qualified service
personnel. Servicing is required when the
apparatus has been damaged in any way,
such as power-supply cord or plug is
damaged, liquid has been spilled or objects
]
Portable Cart Warning
EN
have fallen into the apparatus, the apparatus
has been exposed to rain or moisture, does
not operate normally, or has been dropped.
• ADDITIONAL SAFETY INFORMATION
• Apparatus shall not be exposed to dripping
or splashing and no objects filled with
liquids, such as vases, shall be placed on the
apparatus.
• Always leave sufficient space around the
product for ventilation. Do not place product
in or on a bed, rug, in a bookcase or cabinet
that may prevent air flow through vent
openings.
• Do not place lighted candles, cigarettes,
cigars, etc. on the product.
• Connect power cord only to AC power source
as marked on the product.
• Care should be taken so that objects do not
fall into the product.
• Do not attempt to disassemble the cabinet.
This product does not contain customer
serviceable components.
• MAINS plug or an appliance coupler is used
as the disconnect device, the disconnect
device shall remain readily operable.
• IF YOUR PRODUCT OPERATES ON
BATTERIES, adhere to the following
precautions:
A. Any battery may leak electrolyte if mixed
with a different battery type, if inserted
incorrectly, or if all batteries are not replaced
at the same time.
B. Any battery may leak electrolyte or explode if
disposed of in fire or an attempt is made to
charge a battery not intended to be
recharged.
C. Discard leaky batteries immediately. Leaking
batteries can cause skin burns or other
personal injury. When discarding batteries, be
sure to dispose of them in the proper
manner, according to your state/provincial
and local regulations.
D. Batteries (battery pack or batteries installed)
shall not be exposed to excessive heat such
as sunshine, fire or the like.
UL60065
5
Page 6

End user license agreement
End user license agreement
IMPORTANT: READ CAREFULLY BEFORE DOWNLOADING OR
INSTALLING THIS SOFTWARE!
THIS END USER LICENSE AGREEMENT (THIS “EULA”) IS A LEGAL
AGREEMENT BETWEEN YOU AND AUDIOVOX CORPORATION AND,
AS APPLICABLE, ANY AUDIOVOX SUBSIDIARY, AS DEFINED BELOW
(COLLECTIVELY “AUDIOVOX”), FOR THE ACOUSTIC RESEARCH®
BRAND INTERNET RADIO DEVICE APPLICATION/DRIVER
SOFTWARE PROGRAM WHICH MAY INCLUDE ASSOCIATED
SOFTWARE COMPONENTS, SOFTWARE LICENSED BY AUDIOVOX
FROM THIRD PARTIES (“LICENSORS”) AND ASSOCIATED
DOCUMENTATION, IF ANY (COLLECTIVELY, THE “PROGRAM”). THIS
EULA CONTAINS IMPORTANT LEGAL LIMITATIONS, RESTRICTIONS
AND DISCLAIMERS, AND ALSO SPECIFIES THE DURATION OF
YOUR LICENSE.
BY INSTALLING THE PROGRAM OR CLICKING ON THE
ACCEPTANCE BUTTON OF THE PROGRAM, COPYING OR
OTHERWISE USING THE PROGRAM, YOU ACKNOWLEDGE AND
AGREE THAT YOU HAVE READ THIS EULA, UNDERSTAND IT, AND
AGREE TO BE BOUND BY ITS TERMS AND CONDITIONS. THIS
PROGRAM IS PROTECTED BY COPYRIGHT LAWS AND
INTERNATIONAL COPYRIGHT TREATIES, AS WELL AS OTHER
INTELLECTUAL PROPERTY LAWS AND TREATIES. YOU MAY USE
THE PROGRAM ONLY IN ACCORDANCE WITH THIS EULA, AND ANY
SUCH USE IS HEREBY UNDERSTOOD TO BE CONDITIONAL UPON
YOUR SPECIFIC AGREEMENT TO THE UNMODIFIED TERMS SET
FORTH HEREIN. IF YOU DO NOT AGREE WITH ALL OF THE TERMS
OF THIS EULA, CLICK ON THE REJECTION BUTTON AND/OR DO
NOT INSTALL THE PROGRAM AND/OR DO NOT USE THE
PROGRAM.
1. LICENSE
(a) Under this EULA, you are granted a non-exclusive, non-
sublicenseable, non-assignable and non-transferable (except
as expressly set forth below) license (i) to use and install the
Program on a single workstation, and (ii) to make one (1)
copy of the Program into any machine-readable form for
backup of the Program, provided the copy contains all of the
original Program's proprietary notices.
(b) You may transfer the Program and license to another party
only as a part of the Acoustic Research® brand Internet Radio
Device (the “Device”), and only if the other party agrees to
accept the terms and conditions of this EULA. If you transfer
the Program, you must at the same time either transfer all
copies to the same party or destroy any copies not
transferred.
(c) The terms of this EULA will govern any software upgrades or
updates provided by AUDIOVOX that replace and/or
supplement the original Program, unless such upgrade or
update is accompanied by separate license terms and
conditions in which case the terms of that separate license
will govern. You acknowledge and agree that AUDIOVOX
may automatically download upgrades or updates to the
Program software to your computer in order to update,
enhance, and/or further develop the Program.
2. LICENSE RESTRICTIONS
(a) Except for the licenses expressly granted to you in this EULA,
no other licenses or rights are granted or implied.
(b) You may not (i) make the Program available over a network
where it could be used by multiple computers at the same
time; (ii) modify, translate, reverse engineer, decompile,
disassemble (except to the extent that this restriction is
expressly prohibited by law), or create derivative works
based upon the Program; (iii) copy the Program, except as
expressly permitted herein; (iv) remove or alter any copyright
notices on all copies of the Program; or (v) rent, lease or lend
the Program. You agree that you shall only use the Program
in a manner that complies with all applicable laws in the
6
jurisdictions in which you use the Program, including, but
not limited to, applicable restrictions concerning copyright
and other intellectual property rights.
(c) The Program may contain pre-release code that does not
perform at the level of a final code release. In such case, the
Program may not operate properly. Updated versions of the
Program may be downloaded from www.arinfiniteradio.com.
(d) AUDIOVOX is not obligated to provide support services for
the Program.
(e) The Program is provided with “RESTRIC TED RIGHTS”. Use,
duplication, or disclosure by the U.S. Government is subject
to restrictions as set forth in subparagraph (c)(1)(ii) of DFARS
252.227-7013, or FAR 52.227-19, or in FAR 52.227-14 Alt. III, as
applicable.
3. TERM AND TERMINATION
(a) Your license is effective on the date you accept this EULA
and remains in effect until this EULA is terminated by either
party.
(b) You may terminate this EULA and the associated license,
without any notice or delay, by destroying or permanently
erasing the Program and all copies thereof.
(c) If you fail to comply with any of the terms of this EULA, in
whole or part, your license will automatically terminate
without notice from AUDIOVOX.
(d) Upon termination of this EULA and your associated license,
you shall cease all use of the Program and destroy or
permanently erase the Program and all full or partial copies
thereof.
4. WARRANTY DISCLAIMER
THE PROGRAM IS PROVIDED “AS IS” WITHOUT WARRANTY OF ANY
KIND, EITHER EXPRESSED OR IMPLIED, INCLUDING, BUT NOT
LIMITED TO THE IMPLIED WARRANTIES OF MERCHANTABILIT Y,
FITNESS FOR A PARTICULAR PURPOSE, TITLE OR NONINFRINGEMENT. THE ENTIRE RISK AS TO THE QUALITY AND
PERFORMANCE OF THE PROGRAM IS WITH YOU. SHOULD THE
PROGRAM PROVE DEFECTIVE, YOU (AND NOT AUDIOVOX, ITS
LICENSORS, SUPPLIERS, OR ITS DEALERS) ASSUME THE ENTIRE
COST FOR ALL NECESSARY REPAIR OR CORRECTION.
This exclusion of warranty may not be allowed under some
applicable laws. As a result, the above exclusion may not apply to
you, and you may have other rights depending on the law that
applies to you.
5. OWNERSHIP RIGHTS
All title and intellectual property rights, including but not limited
to copyrights, in and to the Program and any copies thereof are
owned by AUDIOVOX, its Licensors or its suppliers. All title and
intellectual property rights in and to the content which may be
accessed through use of the Program is the property of the
respective content owner and may be protected by applicable
copyright or other intellectual property laws and treaties. This
license grants you no rights to use such content. All rights not
expressly granted are reserved by AUDIOVOX or its Licensors.
6. LIMITATION OF LIABILIT Y
(a) TO THE MAXIMUM EXTENT PERMITTED BY APPLICABLE LAW,
IN NO EVENT SHALL AUDIOVOX, ITS LICENSORS, OR ITS
DEALERS BE LIABLE FOR ANY SPECIAL, INCIDENTAL,
INDIRECT, OR CONSEQUENTIAL DAMAGES WHATSOEVER
(INCLUDING, WITHOUT LIMITATION, DAMAGES FOR LOSS OF
PROFITS, BUSINESS INTERRUPTION, CORRUPTION OF FILES,
LOSS OF BUSINESS INFORMATION, OR ANY OTHER
PECUNIARY LOSS) REGARDLESS OF CAUSE OR FORM OF
ACTION, INCLUDING CONTRACT, TORT, OR NEGLIGENCE,
ARISING OUT OF YOUR USE OF OR INABILITY TO USE THE
PROGRAM, EVEN IF AUDIOVOX HAS BEEN ADVISED OF THE
POSSIBILITY OF SUCH DAMAGES. BECAUSE SOME STATES
AND JURISDICTIONS DO NOT ALLOW THE EXCLUSION OR
Page 7

End user license agreement
LIMITATION OF LIABILIT Y OF CONSEQUENTIAL OR
INCIDENTAL DAMAGES, THE ABOVE LIMITATION MAY NOT
APPLY TO YOU.
(b) YOU ASSUME RESPONSIBILITY FOR THE SELECTION OF THE
APPROPRIATE PROGRAM TO ACHIEVE YOUR INTENDED
RESULTS, AND FOR THE INSTALLATION, USE, AND RESULTS
OBTAINED.
7. WINDOWS MEDIA
This product is protected by certain intellectual property rights
of Microsoft. Use or distribution f such technology outside of
this product is prohibited without a license from Microsoft.
The software embedded within your Device (the “Device
Firmware”) contains software licensed from Microsoft that
enables you to play Windows Media Audio (WMA) files (“WMA
Software”). The WMA Software is licensed to you for use with
your Device under the following conditions. By installing and
using this version of the Device Firmware, you are agreeing to
these conditions. IF YOU DO NOT AGREE TO THE END USER
CONDITIONS OF THIS SECTION 7, DO NOT INSTALL OR USE THIS
VERSION OF THE DEVICE FIRMWARE.
The WMA Software is protected by copyright and other
intellectual property laws. This protection also extends to
documentation for the WMA Software, whether in written or
electronic form.
GRANT OF LICENSE. The WMA Software is only licensed to you
as follows:
You may use this version of the Device Firmware containing the
WMA Software only as such use relates to your Device.
You may not reverse engineer, decompile, or disassemble the
WMA Software, except and only to the extent that such activity
is expressly permitted by applicable law.
You may transfer your right to use the Device Firmware only as
part of a sale or transfer of your Device, on the condition that
the recipient agrees to the conditions set forth herein. If the
version of the Device Firmware that you are transferring is an
upgrade, you must also transfer all prior versions of the Device
Firmware that you have which include the WMA Software.
MICROSOFT IS NOT PROVIDING ANY WARRANTY OF ANY KIND
TO YOU FOR THE WMA SOFTWARE, AND MICROSOFT MAKES NO
REPRESENTATION CONCERNING THE OPERABILITY OF THE WMA
SOFTWARE.
The WMA Software is of U.S. origin. Any export of this version of
the Device Firmware must comply with all applicable
international and national laws, including the U.S. Export
Administration Regulations, that apply to the WMA Software
incorporated in the Device Firmware.
8. RealNetworks, Inc.
Portions of this software are included under license from
RealNetworks, Inc. Copyright 1995-2007, RealNetworks, Inc. All
rights reserved.
The portions of the Program licensed from RealNetworks, Inc.
(“RN”) are provided AS IS WITHOUT WARRANT Y OF ANY KIND. TO
THE MAXIMUM EXTENT PERMITTED BY APPLICABLE LAW, RN
FURTHER DICLAIMS ALL WARRANTIES, EXPRESS AND IMPLIED,
INCLUDING WITHOUT LIMITATION ANY IMPLIED WARRANTIES OF
MERCHANTABILITY, FITNESS FOR A PARTICULAR PURPOSE, AND
NONINFRINGEMENT. TO THE MAXIMUM EXTENT PERMITTED BY
LAW IN NO EVENT SHALL RN BE LIABLE FOR ANY
CONSEQUENTIAL, INCIDENTAL, INDIRECT, SPECIAL, PUNITIVE OR
OTHER DAMAGES (INCLUDING, WITHOUT LIMITATION, DAMAGES
FOR LOSS OF PROFITS). BECAUSE SOME STATES AND
JURISDICTIONS DO NOT ALLOW THE EXCLUSION OR LIMITATION
OF LIABILITY OF CONSEQUENTIAL OR INCIDENTAL DAMAGES,
THE ABOVE LIMITATION MAY NOT APPLY TO YOU.
You may not modify, translate, reverse engineer, decompile,
disassemble (except to the extent that this restriction is expressly
prohibited by applicable law) or use other means to discover the
RN Source Code or otherwise replicate the functionality of the
Real Format Client Code.
9. THIRD PARTY SOFTWARE
ANY THIRD PARTY SOFTWARE THAT MAY BE PROVIDED WITH THE
PROGRAM IS INCLUDED FOR USE AT YOUR OPTION. IF YOU
CHOOSE TO USE SUCH THIRD PARTY SOFT WARE, THEN SUCH USE
SHALL BE GOVERNED BY SUCH THIRD PARTY'S LICENSE
AGREEMENT, AN ELECTRONIC COPY OF WHICH WILL BE
INSTALLED IN THE APPROPRIATE FOLDER ON YOUR COMPUTER
UPON INSTALLATION OF THE SOFTWARE. AUDIOVOX IS NOT
RESPONSIBLE FOR ANY THIRD PARTY’S SOFTWARE AND SHALL
HAVE NO LIABILITY FOR YOUR USE OF THIRD PARTY SOFTWARE.
10. GOVERNING LAW
If you acquired this Device in the United States, this EULA shall
be governed and construed in accordance with the laws of the
State of New York, U.S.A. without regard to its conflict of laws
principles. If you acquired this Device outside the United States
or the European Union, then local law may apply.
11. GENERAL TERMS
This EULA can only be modified by a written agreement signed
by you and AUDIOVOX, and changes from the terms and
conditions of this EULA made in any other manner will be of no
effect. If any portion of this EULA shall be held invalid, illegal, or
unenforceable, the validity, legality, and enforceability of the
remainder of the Agreement shall not in any way be affected or
impaired thereby. This EULA is the complete and exclusive
statement of the agreement between you and AUDIOVOX, which
supersedes all proposals or prior agreements, oral or written, and
all other communications between you and AUDIOVOX, relating
to the subject matter of this hereof. AUDIOVOX’S Licensors shall
be considered third party beneficiaries of this Agreement and
shall have the right to enforce the terms herein.
“AUDIOVOX SUBSIDIARY” shall mean any person, corporation, or
other organization, domestic or foreign, including but not limited
to subsidiaries, that is directly or indirectly controlled by
Audiovox Corporation including, but not limited to, Audiovox
Consumer Electronics, Inc. and Audiovox Electronics Corporation.
For purposes of this definition only, the term “control” means the
possession of the power to direct or cause the direction of the
management and policies of an entity, whether by ownership of
voting stock or partnership interest, by contract, or otherwise,
including direct or indirect ownership of at least fifty percent
(50%) of the voting interest in the entity in question.
EN
7
Page 8
Before you begin
Dear Acoustic Research customer,
Thank you for purchasing the AR Wi-Fi Internet Radio. This product will let you listen to Slacker™
Radio, Internet Radio, MP3tunes, AM/FM tuner, weather forecast and music stored in the internal
memory or a USB device.
To start using your Wi-Fi Internet Radio, please follow the setup instructions in the following pages.
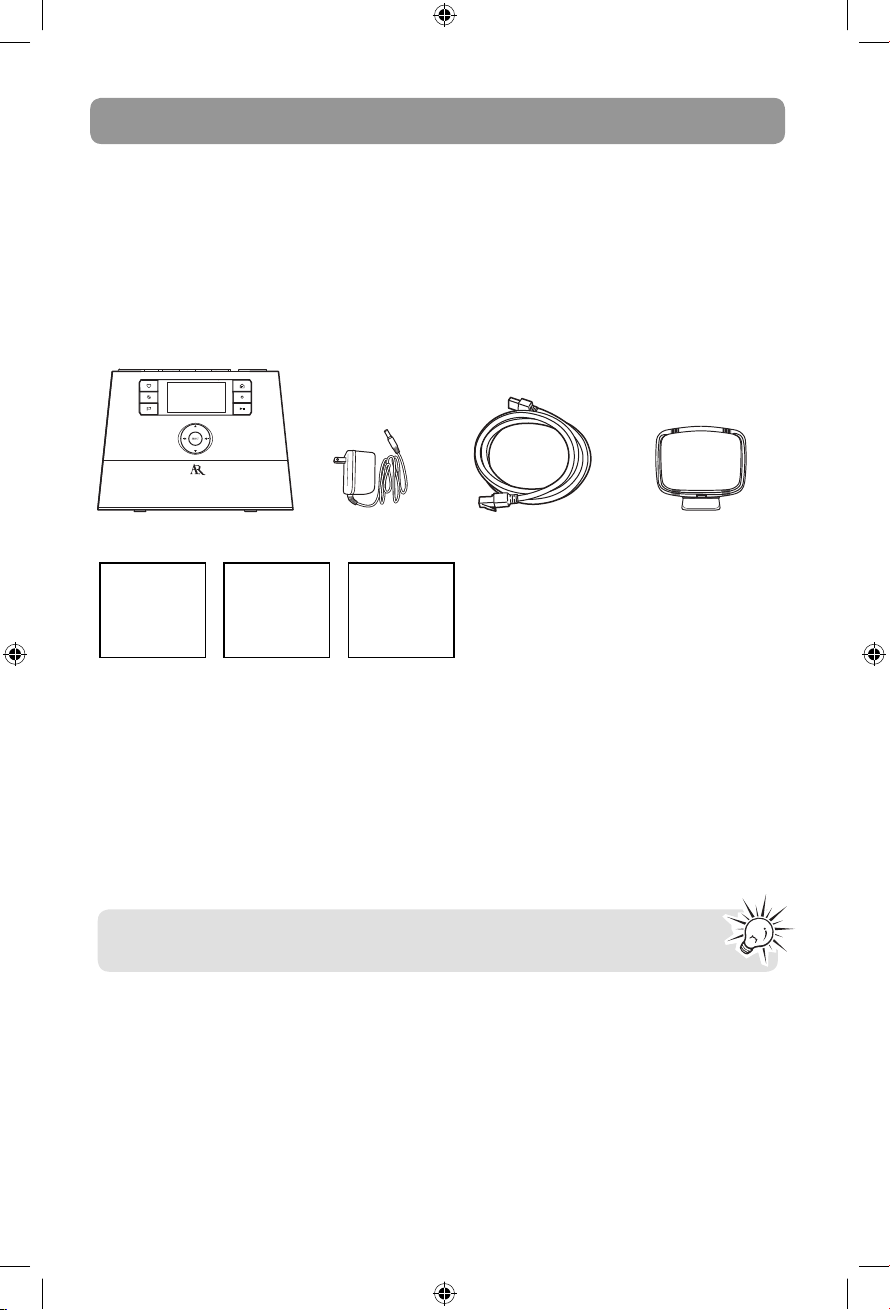
1. Unpack the unit
You should find the following items in the box:
Radio
User Manual
Additional requirements
• Broadband Internet service
• Broadband (cable/DSL) modem, usually supplied by your Internet service provider
• An 802.11 b or g (Wi-Fi) wireless home network or Ethernet router/switch/hub with available LAN
port
For Wi-Fi connections, you may also need:
• Your wireless network’s SSID
• Your access password (for secure networks)
Exit the DEMO mode after turning on : Press and release preset 1, then SLEEP/SNOOZE,
then preset 6.
Quick Start
Guide
Power adapter
Setup
Information
Card
Ethernet cable
AM loop antenna
Slacker is a trademark of Slacker, Inc. in the United States and other countries.
8
Page 9
Before you begin
2. Setup your AR Infinite Radio accounts
To simplify setup on the radio please complete these steps:
A. Find the Setup Information Card that contains your radio’s MAC address number (MAC: 00-21-2A-
XX-XX-XX) and activation PIN # (PIN: XXXX). (This number is also found in the Device Info screen
under the Settings menu in your radio.)
B. Using any Internet-connected computer, go to www.arinfiniteradio.com/setup and follow the
online instructions.
• You will need to input your radio’s MAC address and PIN # to associate your radio with your
personal settings.
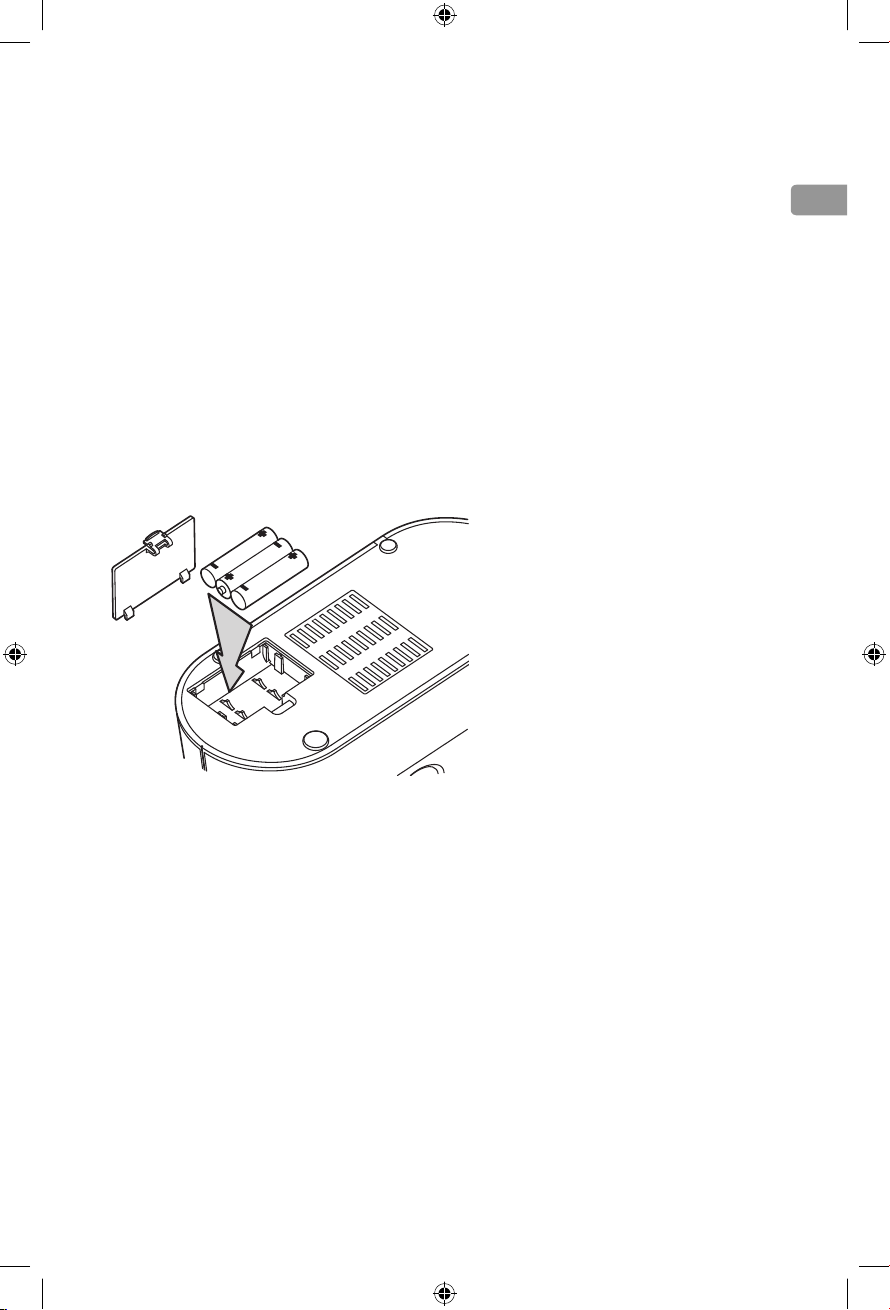
3. Optional: Insert AAA batteries in the base of the radio
Follow the polarity markers in the battery compartment. The batteries power the clock and alarm*
whenever the radio loses electricity. We recommend that you replace the batteries every year (or
more often in case of multiple power outages) to avoid low battery power. Otherwise, clock and
alarm accuracy may be affected when electricity supply is interrupted.
EN
* When the battery backup functions, the clock display will not light. However, the function of alarm still occurs during the power
interruption if remaining battery power is adequate.
9
Page 10
Before you begin
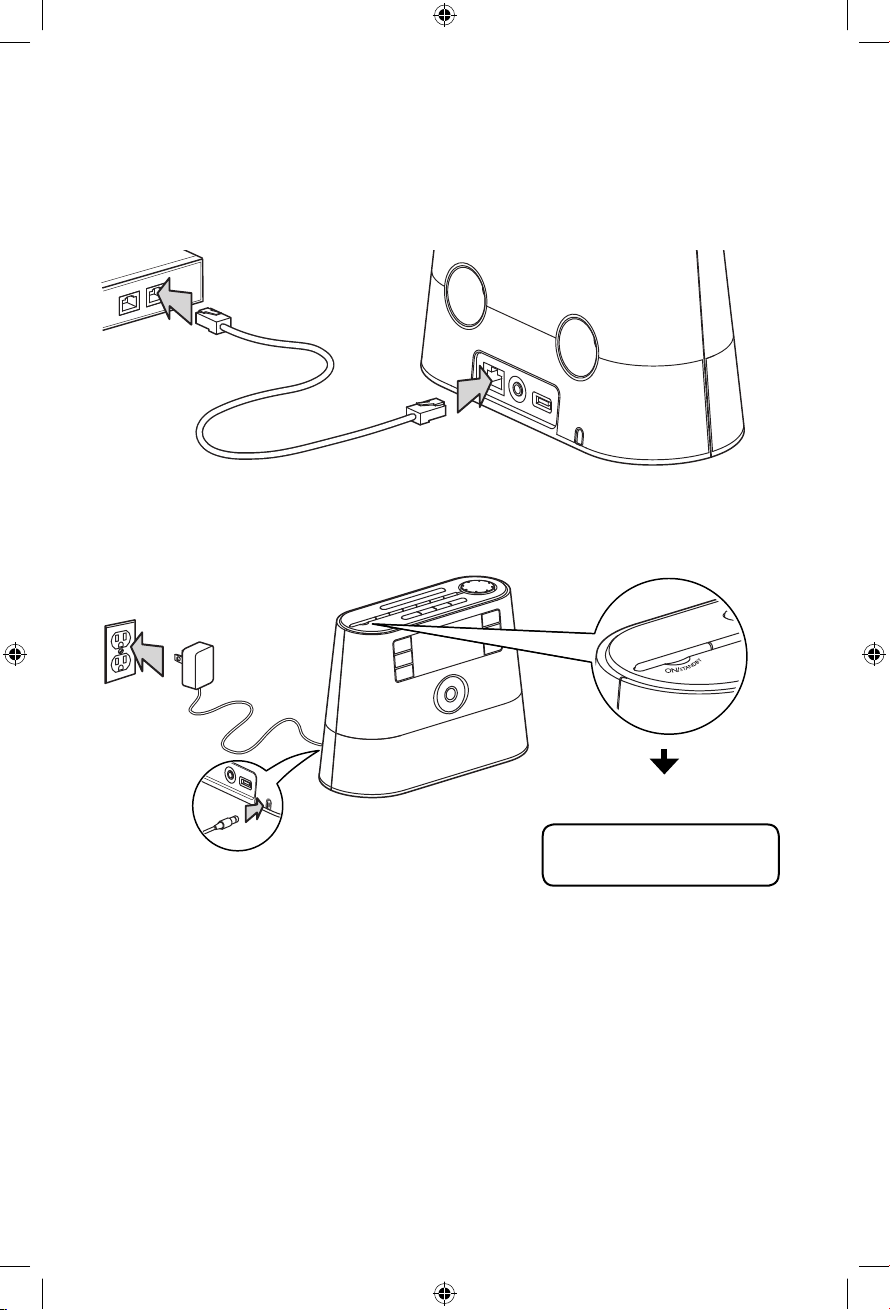
4. Optional: For use with a "Wired" connection
Use the supplied Ethernet cable if you do not have a wireless (Wi-Fi) access point.
N
A
L
LAN
Broadband modem or
Ethernet router/hub/switch
5. Plug in and turn on the radio
Electrical outlet
LAN
10
Exit the DEMO mode after
turning on
Press and release preset 1, then
SLEEP/SNOOZE, then preset 6.
Page 11
Before you begin
6. Set up the radio
Refer to Using the menus on page
15-16 for more information on
making choices and inputting
information in menus.
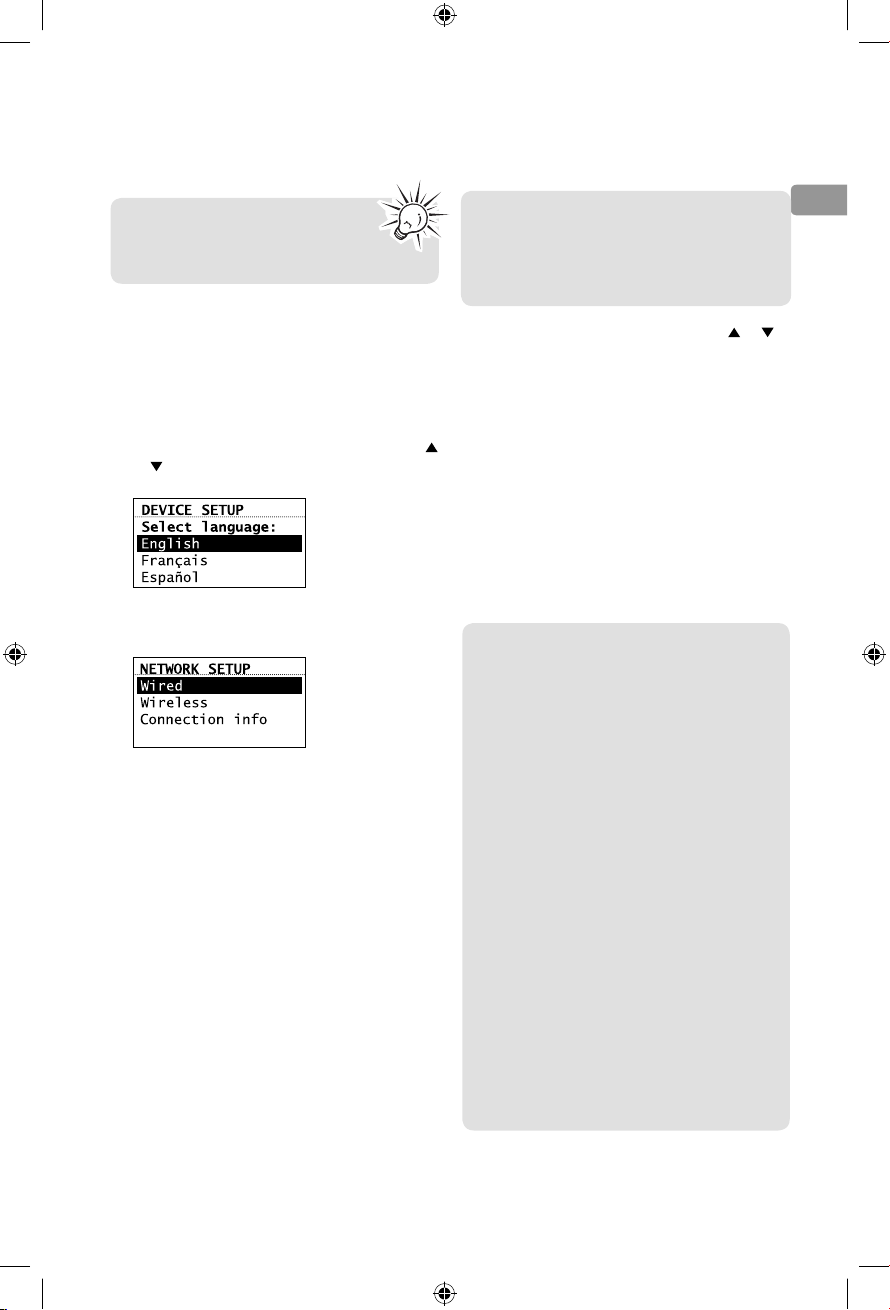
A. NOTE: When you turn on the radio for the
first time, it will be in "DEMO" mode. To exit
this mode, press and release preset 1, then
SLEEP/SNOOZE, then preset 6 on top of the
radio.
B. After exiting the DEMO mode, the radio
displays the Select Language screen. Press
or
to choose your language and then press
SELECT.
C. The Network Setup screen displays
connection options:
• Select Wired to connect using an Ethernet
cable. Go to step D to complete the
connection.
• Select Wireless to connect using an existing
Wi-Fi access point. Go to step E to complete
the connection.
D. Wi red
This method uses an Ethernet cable shown in
step 4 on page 10 to wire the radio directly
up to your broadband modem, router, hub,
or switch. Make sure your Ethernet cable is
properly connected.
• At the Network Setup screen, press
select Wired and then press SELECT if your
network does not provide Wi-fi access.
• Before the connection is complete, the radio
may take some time to check for updates and
retrieve account info from the server. Please
wait until you hear a short congratulations
message and "Setup is complete, enjoy the
music" is displayed.
• If the radio requires your IP address, you can
find this information on your broadband
modem, router or access point’s
administration setup page or manual.
E. Wireless
This method uses your existing Wi-Fi access
point, broadband modem or router to connect
the radio to your existing network.
You need to know your Wireless Network’s
name (SSID) and if your wireless network has
security enabled, you will also need to know
your wireless networks password (sometimes
called passphrase or key). You can find this
information on your broadband modem,
router or access point’s administration setup
page or manual. You may also call your
Internet Service Provider (ISP) if you do not
know how to access the administration page
in order to find this information. They usually
have a 1-800 number available. Once you have
the below information you may write it down
for future reference.
EN
or to
• Wireless network name (SSID)
• Security Type (Only needed if your
network has security enabled and your
SSID is hidden, not broadcasted)
• Password/Key (Only needed if your
network has security enabled)
11
Page 12
Before you begin
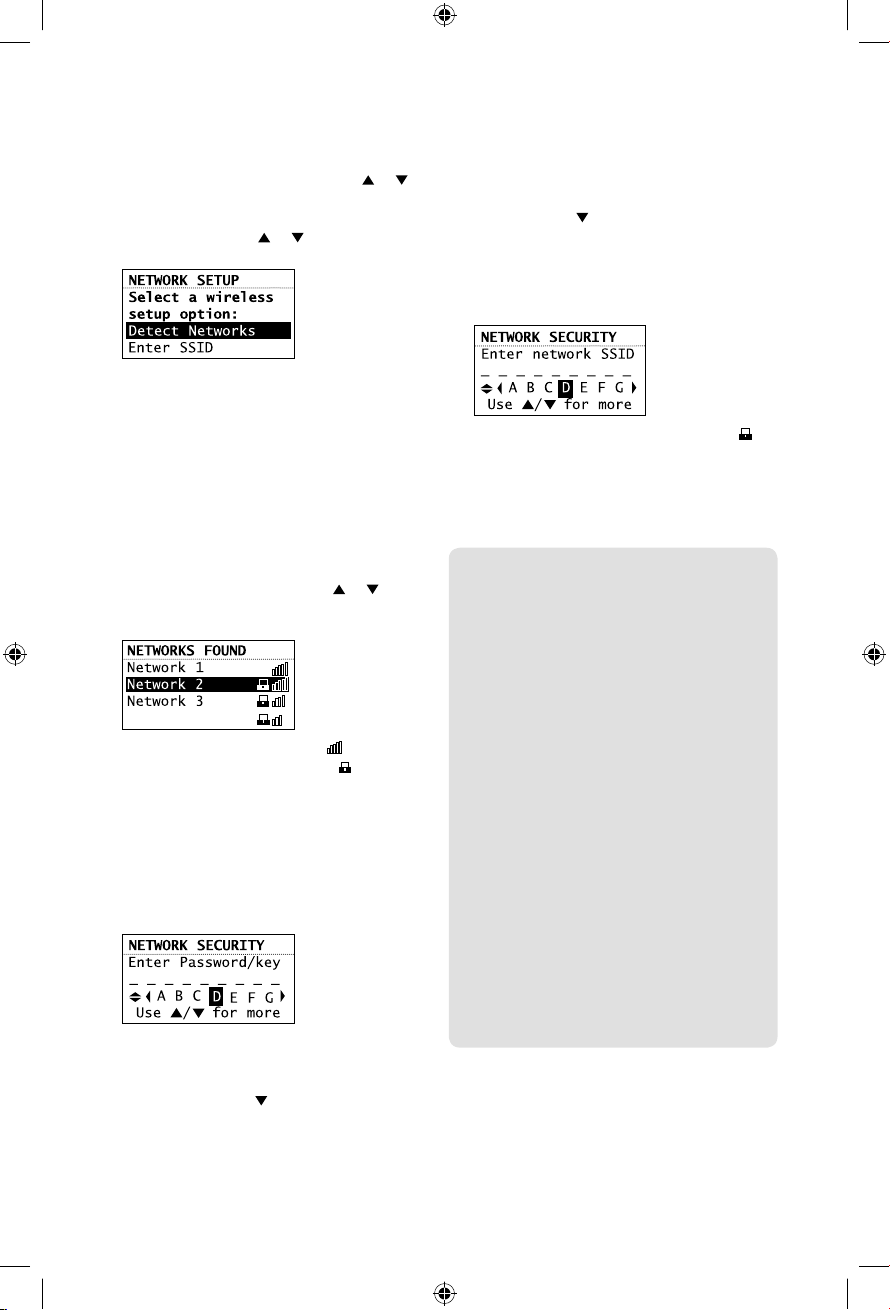
• At the Internet Setup screen, press or to
select Wireless and then press SELECT. The
Network Setup screen then shows with two
setup options. Press
option and then press SELECT.
• Detect Networks: to automatically scan for
available networks and display a list of
networks to choose from. Go to step F to
complete the connection.
• Enter SSID: to manually enter your networks
information. Select this option if your
Networks SSID is hidden. Go to step G to
complete the connection.
F. If Detect Networks is selected, the SSID
(network name) of those found will be
displayed after searching. Press
select a desired network and then press
SELECT.
• Signal strength is indicated by .
• Secured network is indicated by
(unsecured network has none, as Network 1
in the above example).
• If a secured network is selected, you will be
required to enter your password in the
Network Security screen. The radio should
then connect to the Internet. Please wait until
you hear a short congratulations message
and the clock screen is displayed.
• If the network SSID is hidden (not
broadcasted), you will only see a padlock icon
and signal strength bars like the 4th network
shown above. Press to highlight Enter
SSID on the display and then press SELECT.
Then go to step G to complete your
connection.
or to choose an
or to
• Interference may sometimes block your
network from showing up in the list. If this
happens, press to show Refresh List and
then press SELECT to try again.
G. If Enter SSID is selected, the Network
Security screen will be displayed. Enter your
SSID.
• If your network is secured (indicated by ),
enter your password. The radio should then
connect to the Internet. Please wait until you
hear a short congratulations message and the
clock screen is displayed.
About password:
• Do not get your Network Password
confused with your Windows or Mac
system logon password since they can be
di erent.
• Some wireless access point or routers
may call the Wireless Network Password
a passphrase or key. These terms are the
same.
About passphrase:
• This radio supports secured access points
using the Wireless Equivalent Privacy
(WEP) keys or Wi-Fi Protected Access
(WPA and WPA2) standards.
• WEP keys are either 10 or 26 characters
long (characters: 0-9 and A-F) (e.g.
6E78214A52). Note that some Wi-Fi
routers support passphrase generation
for WEP security. However, there is no
industry standard for WEP passphrase
generation and this radio does not
support WEP passphrases.
• If you are using a WEP secured access
point, enter the WEP key (HEX format)
instead of the passphrase.
12
Page 13
Before you begin
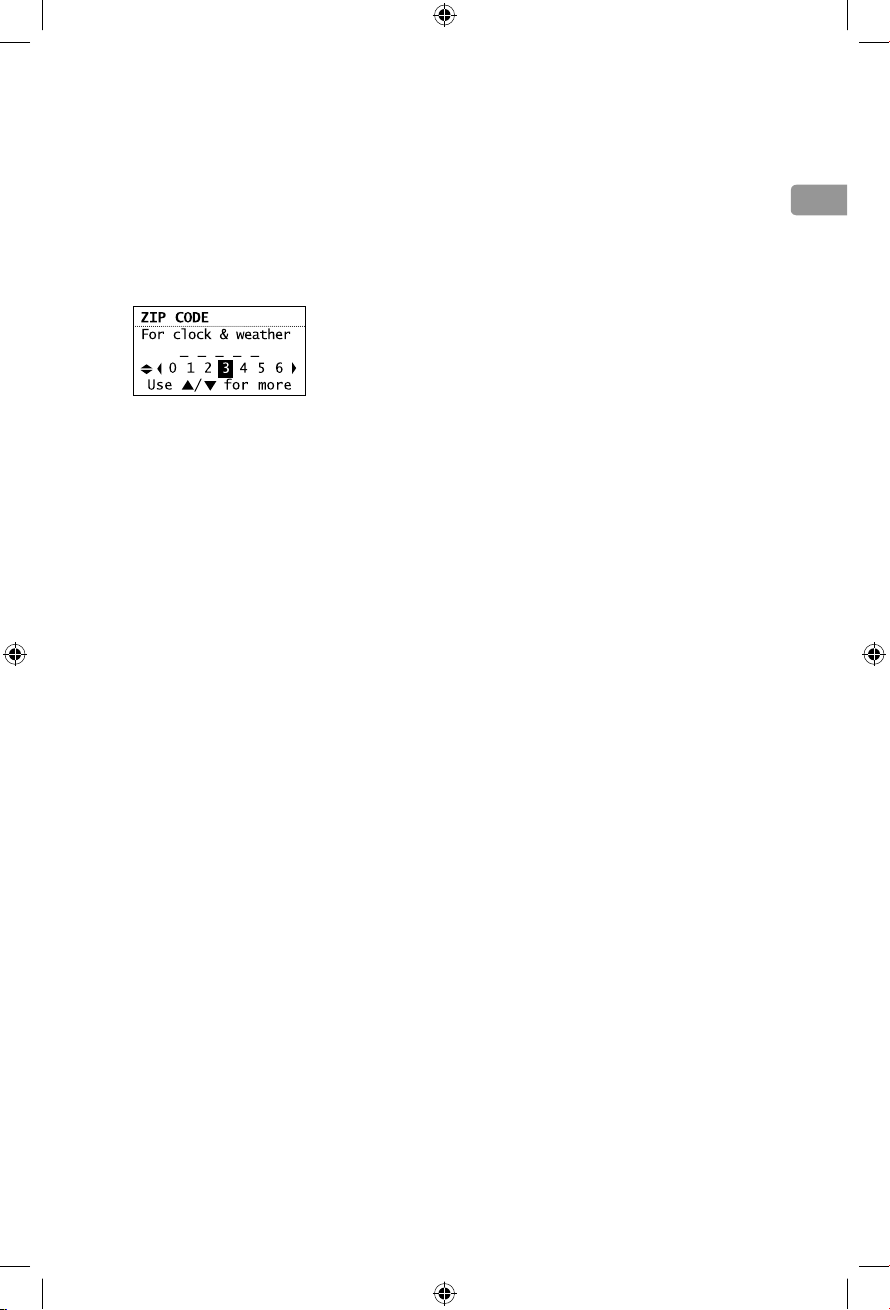
After connecting to the Internet
• If you did not activate your Infinite Radio
accounts, or if the radio cannot get your
details from the Infinite Radio server, the
radio may ask for your ZIP code.
• Input your ZIP code. The radio should then
connect to Internet Radio.
• If your radio has successfully connected to
the Internet you will hear a welcome message
streaming from the Internet.
Demonstration mode
The radio has a pre-installed demonstration. To
exit the demonstration, press and release in
sequence the buttons on top of the radio: preset
1, then SLEEP/SNOOZE, then preset 6.
Getting the latest firmware and
information
The radio will automatically alert you for upgrade
if a new firmware is available. You may also go to
www.arinfiniteradio.com for the latest firmware
and user manual for your radio. Follow the
instructions there to download and install files.
EN
Frequently asked questions
For answers to frequently asked questions
(FAQ's), go to www.arinfiniteradio.com.
13
Page 14
General controls
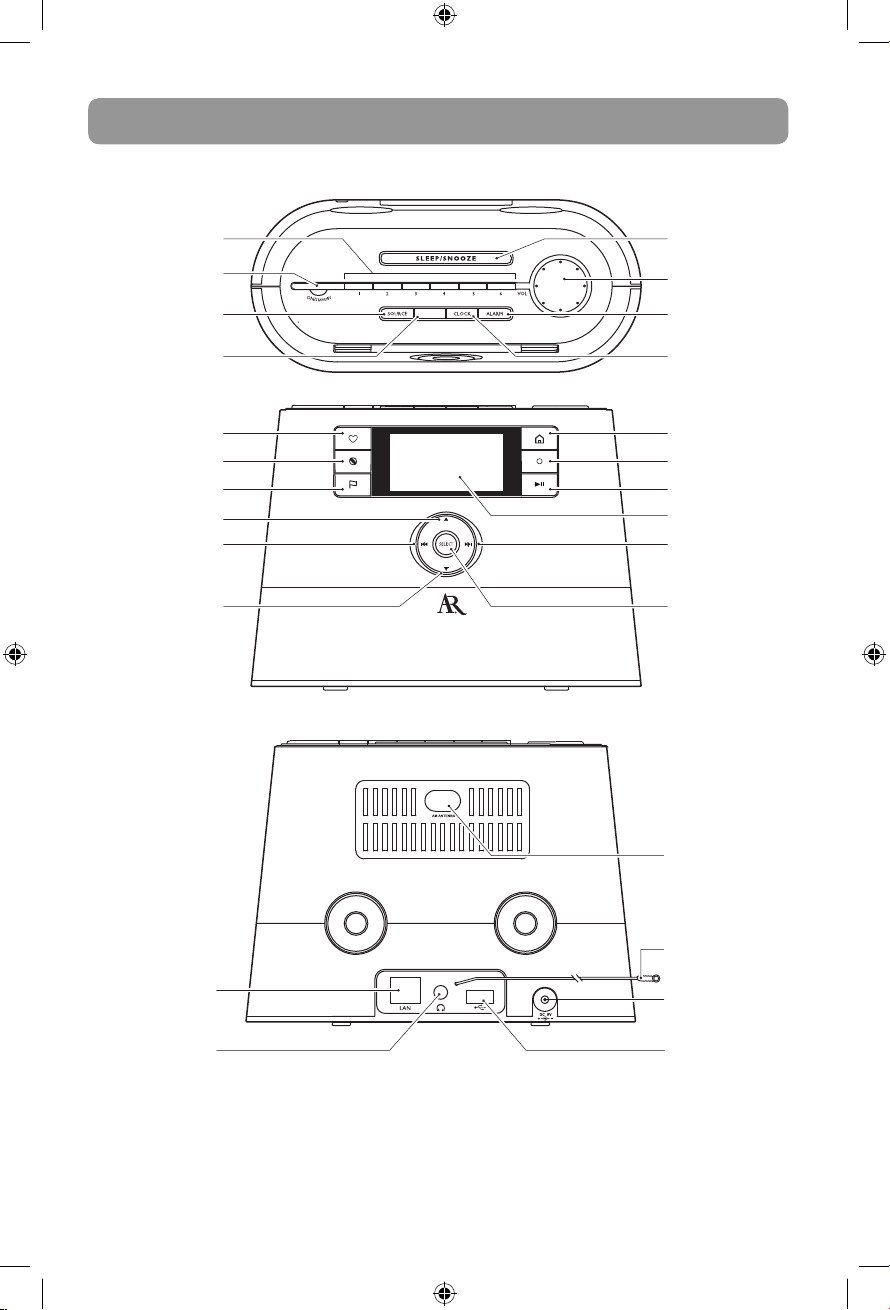
Front and top
Station presets
On/standby
Audio source
Weather
information
Menu up
Previous/scan
back/reverse/
menu back
Menu down
Rear
Sleep timer/
snooze
Volume
WEATHER
Heart
Ban
Tag Play/pause
Alarm set
Clock set
Home/Main
menu
Record
Display
Next/scan/fast
forward/menu
forward
Menu select
LAN port
(for ARIR200 only)
Headphone/
audio line-out
You can connect USB devices to the USB port:
The radio can play open MP3, WMA and
RealAudio audio files stored on the connected
USB device.
RealAudio is a trademark or a registered trademark of RealNetworks, Inc.
14
AM loop
antenna socket
FM antenna
Power adapter
input socket
Full-speed
USB port
Page 15
General controls
Turning on or off
Press ON/STANDBY to turn the radio on or off
(standby mode).
Volume control
Rotate the VOL. knob to adjust the volume.
Source selection
Press SOURCE repeatedly to select among the
following audio content sources:
• Slacker Radio
• Internet Radio
• MP3tunes
• FM Tuner
• AM Tuner
• Internal Memory
• USB Input
Weather forecast
Press WEATHER to check current and 3-day
forecast. Refer to page 27 for more information.
Clock and alarm
• Press CLOCK once to show the current time
or press and hold to set the clock time.
• Press ALARM once. Then press or to
select activate, deactivate, set the alarm time
or set the alarm sound and then press
SELECT.
• Refer to page 17-18 for more information.
Using the menus
The display window shows the playback screen,
browse screen, settings screen, messages etc.
What appears on the window varies depending
on the function you are using.
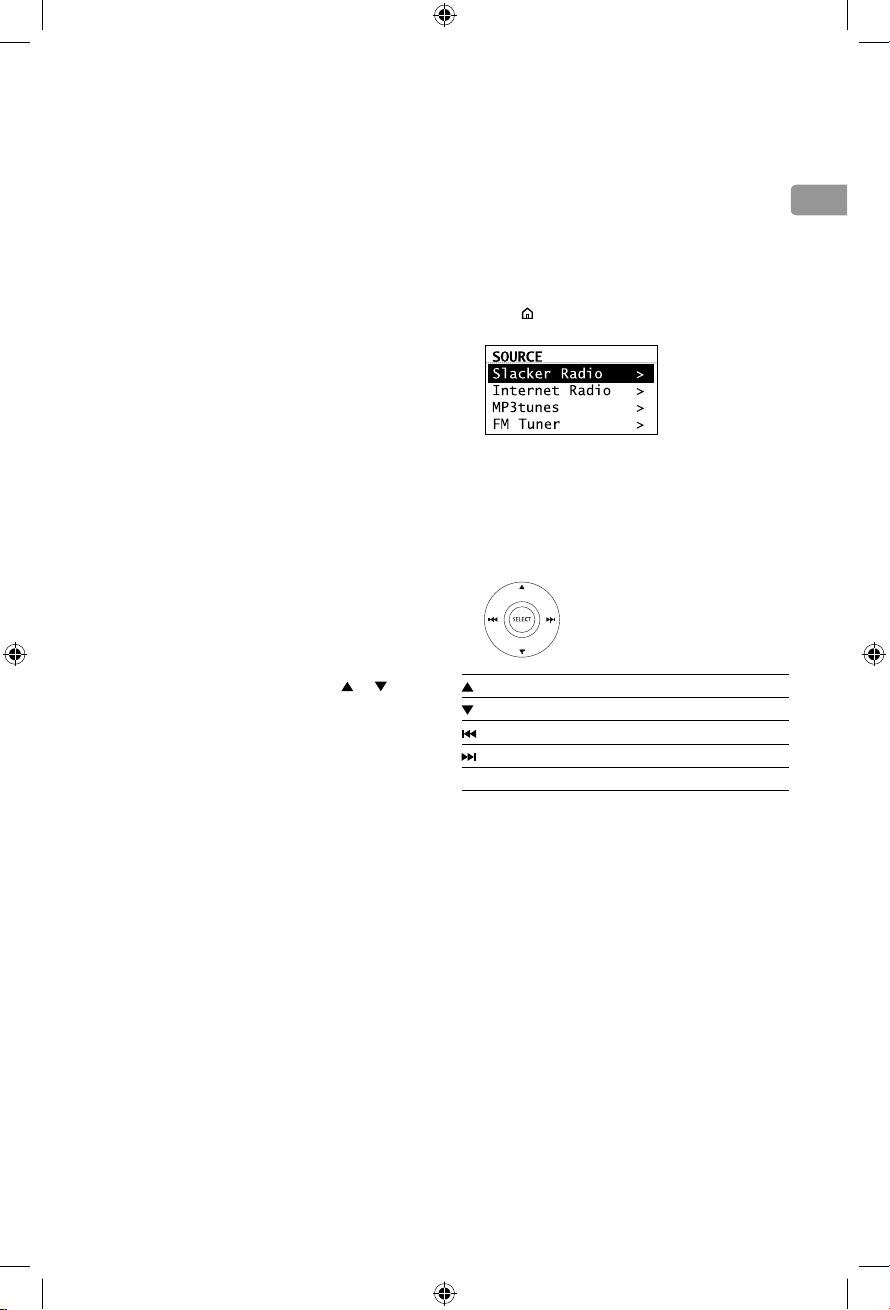
To display the Source menu:
• Press
• Now Playing – appears at the top of the
To navigate in the menus:
• Use the navigation controls to make choices
SELECT
to display the Source menu for
selection of an audio source.
Source menu when a station is playing. Select
this option to return to the play screen.
and input information.
Moves highlight up
Moves highlight down
Moves selection/navigates left
Moves selection/navigates right
Con rms selected option or character
EN
15
Page 16
General controls
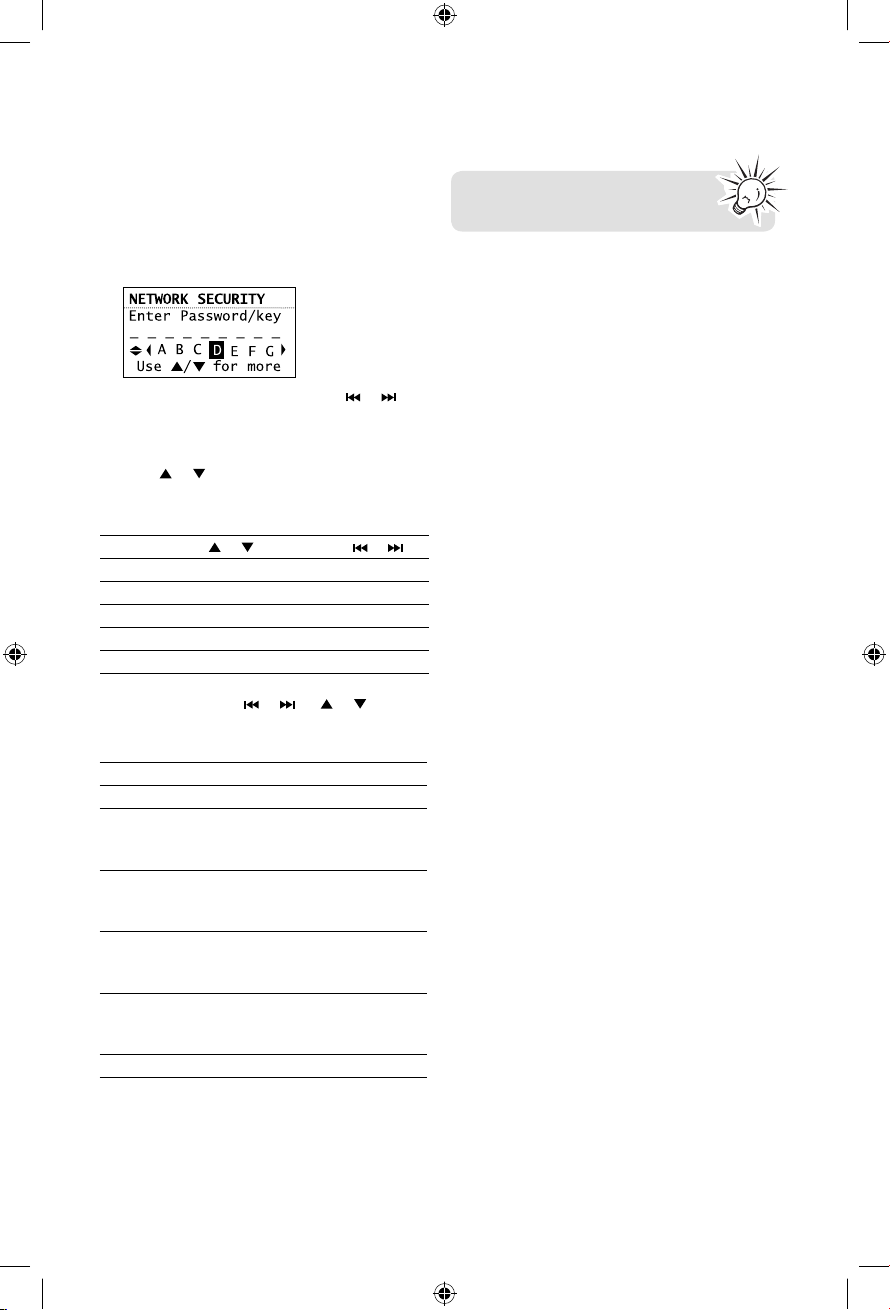
To input characters:
• Some menus require character input (e.g.
password, ZIP code). ZIP code is useful for
clock time setting, weather forecast and
searching local Internet radio stations in your
area.
• When inputting characters, press or to
select the alpha-numeric characters listed at
the bottom of the screen. Press SELECT to
confirm selections.
• Press or to choose among uppercase,
lowercase, numeric, special characters or
commands.
Character sets ( or )
Upper case
Lower case
Numeric
Special
Commands
• Commands: press
choose the desired command and then press
SELECT.
Commands
DONE
Delete
Space
Back
Next
Cancel
Actions
Ends entry
Deletes highlighted input and
moves the highlight back one
space
Inserts a blank space, characters
to the right will move one location
over
Moves the highlight back within
the entered character without
deleting
Moves the highlight forward
within the entered character
without deleting
Exits input screen without changes
Options ( or )
A B C D E...X Y Z
a b c d e...x y z
1 2 3 4 5 6 7 8 9 0
_ – ! @ # $ % ^ & *
(read below)
or (or or ) to
To exit the input screen without
saving, select the Cancel command.
16
Page 17
Clock and alarm
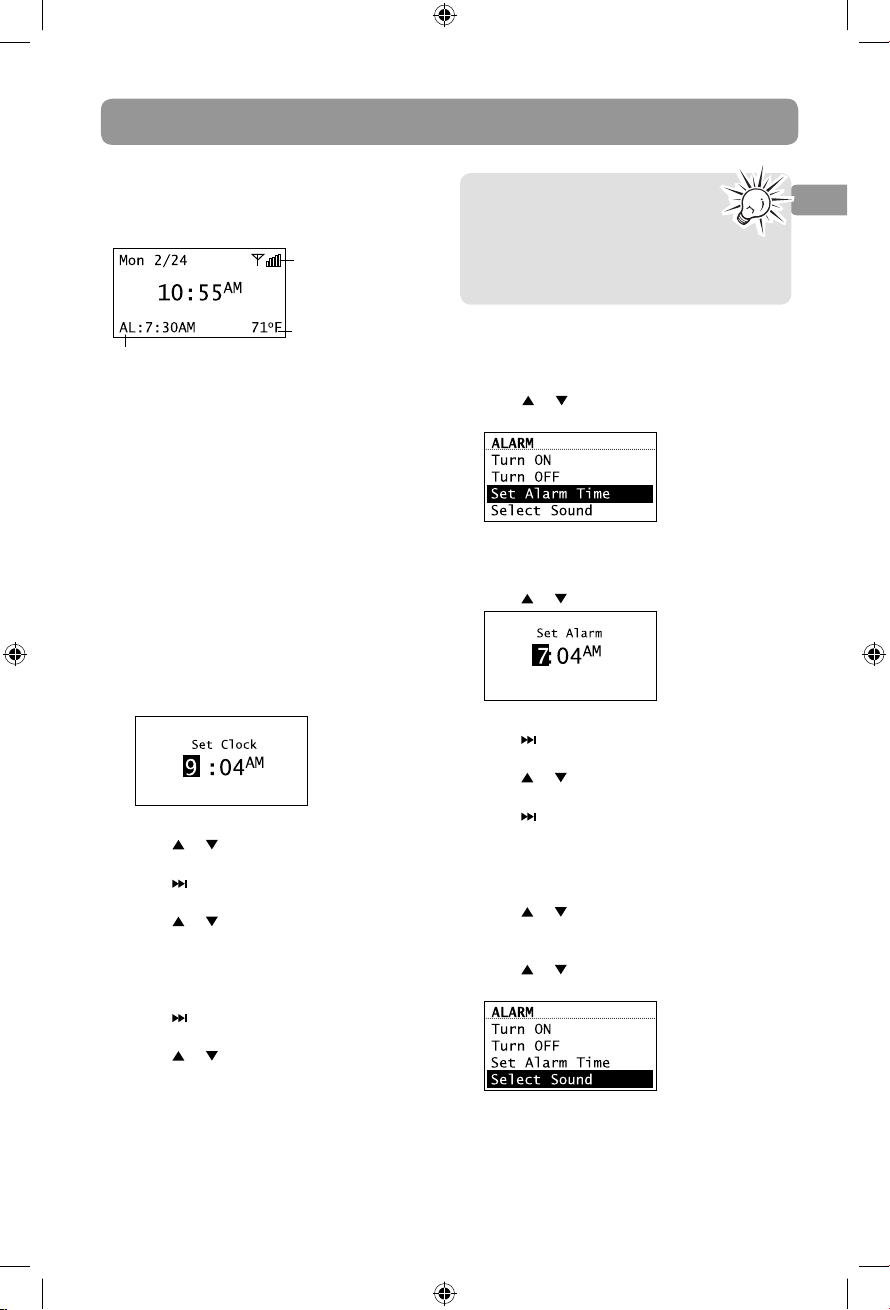
Accessing the digital clock
The Wi-Fi Internet Radio also includes a digital
clock which will be automatically updated when
connected with the Internet.
Wi-Fi connection
strength
Current temperature
Alarm clock status
• Press CLOCK to show the clock without
interrupting audio playback.
• To hide the clock and return the display to
the previous screen, press CLOCK again.
• The clock is also displayed when the radio is
turned off (standby mode).
Setting the clock
With your ZIP code set, the clock time will be
automatically updated when connected with the
Internet. However, you may still be able to set it
manually. Day, date and month can only be
updated by connecting with an Internet radio
station.
1. Press and hold CLOCK until the hour time is
highlighted (reversed color) on the display.
2. Press or to select the hour time.
3. Press
4. Press
• If you have set the clock to 24-hour display
5. Press to shift to AM/PM.
to shift to minute time.
or to select the minute time.
mode (refer to page 28), press SELECT after
setting the minute time and skip steps 5-7.
You may also adjust the clock time
manually and turn off the automatic
time update (Auto Sync) when
connected with the Internet. Refer to
Advanced Settings on page 28 for more
information.
Using the alarm clock
To set the wake time and sound:
1. Press ALARM to show the alarm menu. Then
press
or to highlight Set Alarm Time
and then press SELECT.
2. The hour time of the alarm clock is
highlighted (reversed color) on the display.
Press
or to select the wake hour time.
3. Press to shift to minute time.
4. Press
5. Press to shift to AM/PM.
• If you have set the clock to 24-hour display
6. Press or to select between AM and PM
7. Press
or to select the wake minute time.
mode (refer to page 28), press SELECT and
then go to step 7.
and then press SELECT.
or to highlight Select Sound and
then press SELECT.
EN
6. Press
7. Press SELECT again to confirm the setting.
or to select between AM and PM.
17
Page 18

Clock and alarm
8. Press or to highlight one of the sources
of wake sound:
• Buzzer
• AM Presets
• FM Presets
• Slacker Presets
• Slacker Library (premium account required)
• Internet Presets
Read relevant sections (e.g. Internet
Radio) in this user manual to
understand how to preset stations.
9. Press SELECT on the highlighted source of
wake sound and then press or to select
the desired sound or preset item.
10. Press SELECT to confirm the selected item as
the wake sound.
• When the radio loses electricity, the alarm
clock will be powered by the batteries
inserted at the base (refer to page 9). The
wake sound selected will be reverted to the
default buzzer.
• When the selected sound is no longer
available, the default buzzer will sound.
To activate or deactivate the alarm clock:
1. Press ALARM.
2. Press
or to highlight Turn On or Turn
Off and then press SELECT.
To turn off the alarm clock when it sounds:
• Press ALARM or ON/STANDBY to turn off the
alarm clock. It will sound again on the next
day if settings have not been changed.
OR
• Press SLEEP/SNOOZE to turn off the alarm
clock temporarily for extra sleep time. The
alarm will sound again after 10 minutes.
OR
• The alarm clock will turn off automatically
after 60 minutes without pressing any button.
Sleep mode
You can set the radio to play for a set length of
time before turning off automatically.
1. Press SLEEP/SNOOZE to turn on the Sleep
mode while listening to the radio.
• The default time is 15 minutes.
• If the radio is off, press SLEEP/SNOOZE to
turn on the Sleep mode with the last used
channel.
2. If necessary, press SLEEP/SNOOZE again to
add extra sleep time up to 90 minutes. Each
press of the button will add 15 minutes.
• The remaining time before turning off
automatically will show at bottom right of
the clock display, replacing the weather
information.
• Select OFF (press SLEEP/SNOOZE once more
after 90 min) if you decide not to use the
sleep mode. The radio will turn off.
• To cancel the Sleep mode sooner, press ON/
STANDBY.
• When the alarm is turned ON, the set alarm
time (e.g. AL: 7:00AM) will show in the lower
left corner of the clock display.
• When the alarm is turned OFF, "AL: Off" will
show on the clock display.
18
Page 19
Slacker Radio
Slacker Radio is a premium, streaming content
provider partner which offers "personalization"
through the use of selectable "Heart" and "Ban"
buttons. It also uses artist recommendation and
related artists to further assist discovery of music
and enjoyment of stations.
You can listen to Slacker Radio with an
anonymous account for a limited time only with
some limited functionality. Register for a FREE
account in order to take full advantage of the
custom station creation and intelligent song
rating system. A premium subscription is also
available, but not required. For more information
regarding Slacker Radio accounts, please visit
www.slacker.com/partners/audiovox.
To use your Slacker account, the
account information in the radio
(refer to Account Info on page 28)
must match your Slacker account
information online.
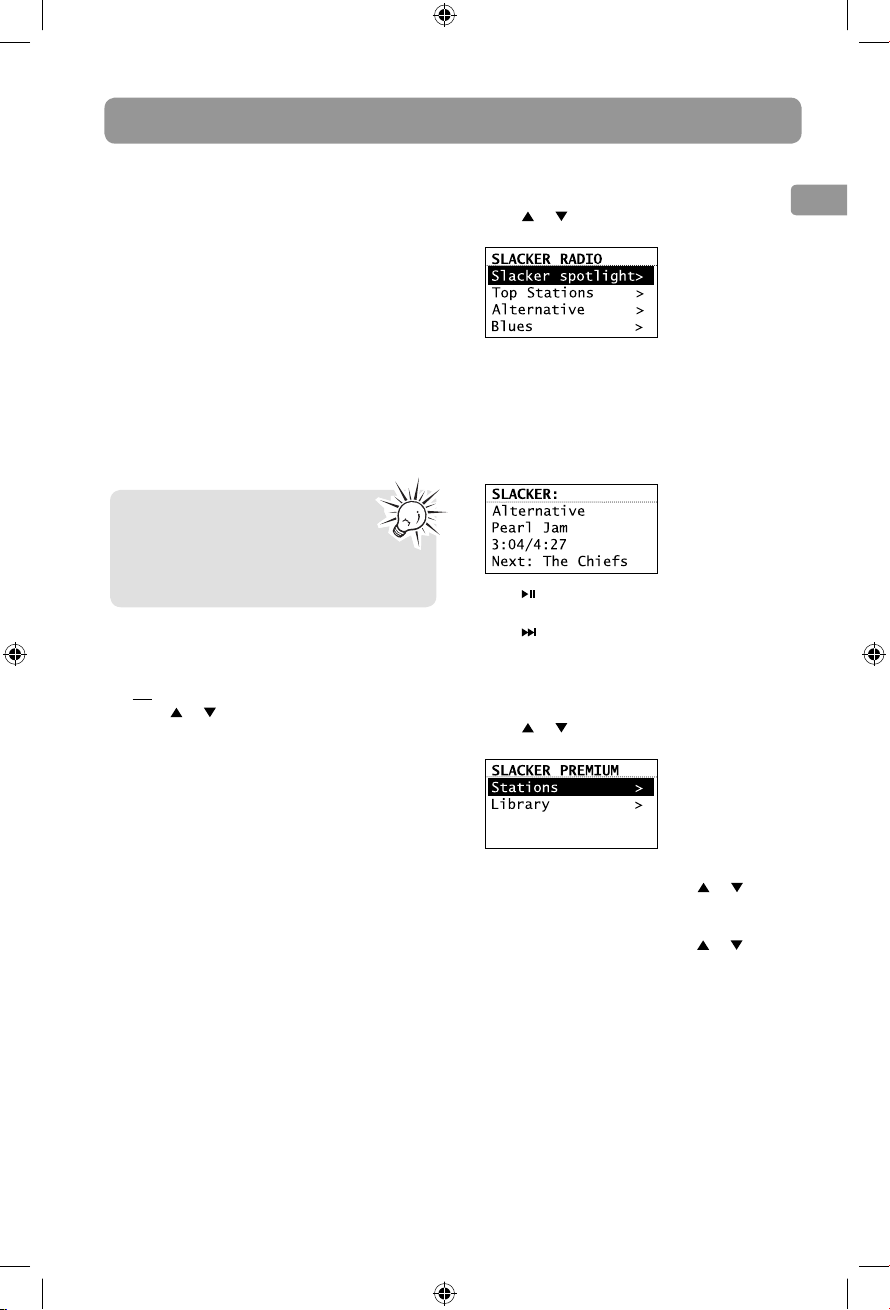
Accessing Slacker Radio
• Press SOURCE repeatedly to select Slacker
Radio.
OR
• Press
or to highlight Slacker Radio in
the Source menu and then press SELECT.
Listening to Slacker Radio
To select a station (free account users):
1. Press or to highlight a station genre and
then press SELECT.
• Some genres may contain sub-genres for
selection.
• Custom stations can only be created through
the Slacker website.
2. While a station is highlighted, press SELECT.
The selected station will start to play.
• Press to pause or resume playback.
3. Press to skip to the next song.
• Free account limits to 6 skips per hour per
station.
To select a station (Premium account users):
1. Press or to highlight Station or Library
and then press SELECT.
EN
2. When Station is selected, press or to
highlight a station genre and then press
SELECT.
• When Library is selected, press
highlight an artist and then press SELECT to
further select a song from the selected artist.
or to
19
Page 20
Slacker Radio
To store the current station as a preset:
1. Select a station.
2. Press and hold 1, 2, 3, 4, 5 or 6 on top of the
radio until a beep sound is heard to store the
current station to that preset button.
• To listen to a preset station, press 1-6.
• To edit a preset station, repeat the steps
above to overwrite the previously stored
station.
• You can assign a preset station as the wake
sound of the alarm, refer to page 18 for more
information.
To mark a song as favorite:
Press
while listening. The current song will be
marked as favorite.
• The button will illuminate if the same song
is heard next time.
• Songs marked as favorites will appear in the
playlist more often.
• To unmark the song as favorite, press
the same song is playing.
To create an artist station based on the
current artist:
Press and hold while listening. A new artist
station will be created using the currently
playing artist.
• The new station will be named using the
artist's name and the term Radio.
• The newly created artist station will begin
playback.
• It is also possible to create an artist station by
pressing and selecting from the tag menu.
while
To further manage your artist stations,
unmark the banned songs or banned
artists, please login your Slacker
account (www.slacker.com) from your PC for
advanced station management.
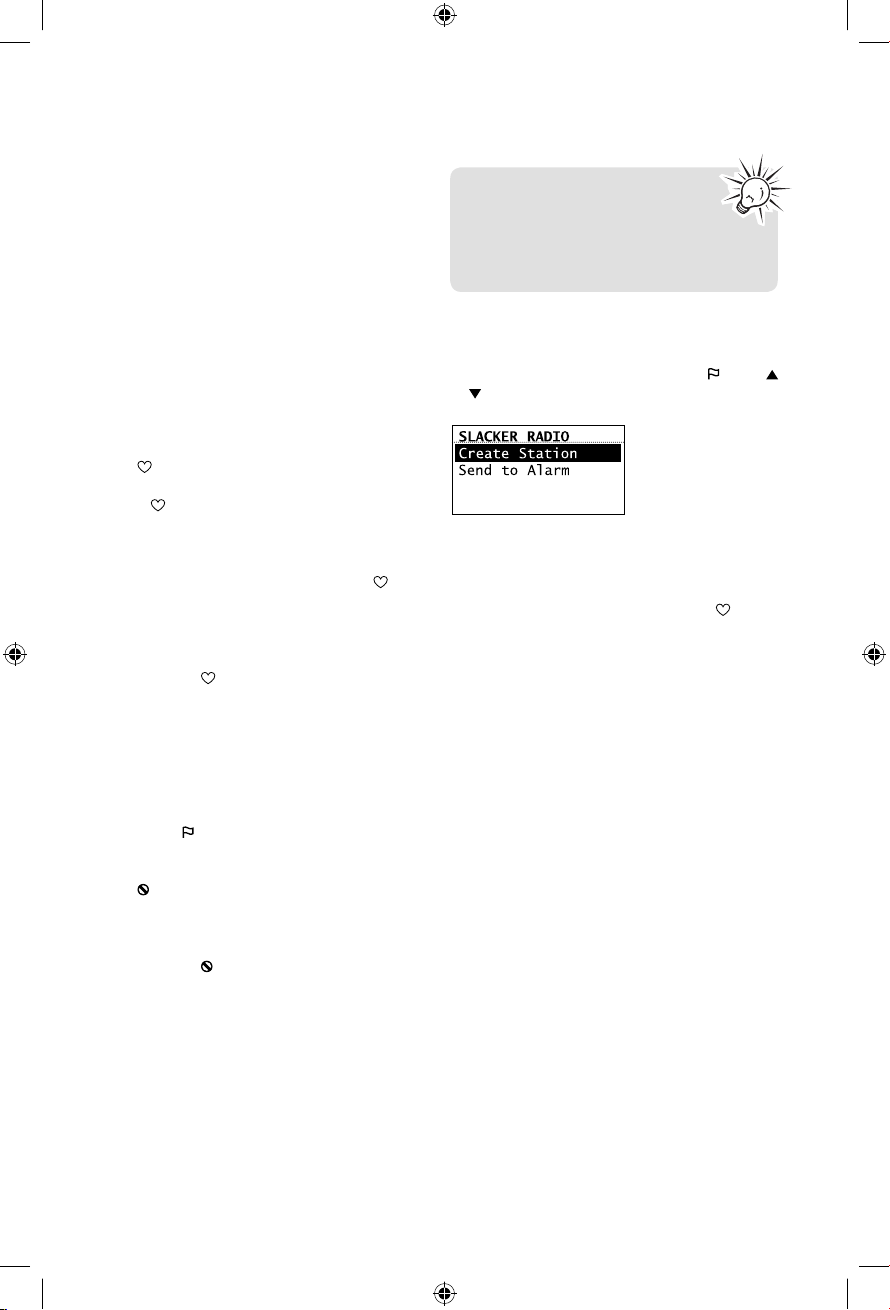
Tag Options
Two options are available while you are listening
to a Slacker Radio station as you press
or to highlight an option in the Tag Options
menu and then press SELECT to proceed.
• Create Station
To create a new station using the currently
playing artist as the seed song (this function
is the same as pressing and holding
listening).
• Send to Alarm
To assign the station in general to be used as
the alarm clock wake sound.
. Press
while
To ban a song in the current station:
Press while listening. The current song will be
marked as banned.
To ban an artist in the current station:
Press and hold while listening. The current
artist will be marked as banned.
20
Page 21

Internet Radio
With Internet radio, you can listen to music,
news, sports, weather or talk radio in other
countries or from your home town. It offers the
most music selections from around the world
and most stations are free.
Accessing Internet Radio
• Press SOURCE repeatedly to select Internet
Radio.
OR
• Press or to highlight Internet Radio in
the Source menu and then press SELECT.
Listening to Internet Radio
To select a station:
Internet Radio stations are categorized according
to music genre, talk nature and geographical
location.
1. Press or to highlight a category or subcategory and then press SELECT.
• My Genres – your favorite genres together in
one place for easier navigation
• My Favorites – a list of your favorite Internet
Radio stations
• Music – music stations categorized by genre
and sub-genres (e.g. Blues, Hip Hop)
• Talk – talk-specified stations categorized by
talk natures (e.g. Business news, Religion)
• My Local – a list of local Internet radio
stations selected according to the ZIP code
provided by the user
• By Region – music stations categorized by
geographical regions
To store the current station as a preset:
1. Select a station.
2. Press and hold 1, 2, 3, 4, 5 or 6 on top of the
radio until a beep sound is heard to store the
current station to that preset button.
• You can store up to 6 stations in each genre.
• To listen to a preset station, press 1-6.
• To edit a preset station, repeat the steps
above to overwrite the previously stored
station.
• You can assign a preset station as the wake
sound of the alarm, refer to page 18 for more
information.
To store the current station as My Favorites:
Press while listening.
Alternatively:
1. Press .
2. Press or to highlight Add to Favorites
and then press SELECT.
To listen to a station in My Favorites:
Select a station from My Favorites in the main
menu of Internet Radio and then press SELECT
to start playback. (Read To select a station for
more information).
To remove a station from My Favorites:
Press while listening to a favorite station.
EN
2. While a station is highlighted, press SELECT.
The selected station will start to play.
21
Page 22

Internet Radio
To assign the current station as the wake
sound of the alarm clock:
1. Press
.
2. Press
or to highlight Send to Alarm and
then press SELECT.
Recording Internet Radio
Warning! Use of the recording feature is for
personal use only. (Files cannot be transferred or
moved from the internal memory.)
To record the current station:
1. Press to start recording.
2. Press to stop recording.
• Recording will be stored in the internal
memory of the radio.
• For playback, please refer to Internal
Memory on page 25.
• The radio names each recording <Station
Name> <Month-Date> <Time Stamp>. For
example: JazzMan 1-21 445.
Adding Internet Radio stations
To add Internet Radio stations:
Please visit www.arinfiniteradio.com/portal
and login to your user account to manually add
new stations under My Favorites.
22
Page 23

MP3tunes
MP3tunes is a Music Service Provider (MSP) and
the home of MP3tunes Locker, a secure, online
music space to allow unlimited listening.
MP3tunes users can upload their own music
collections to the MP3tunes Locker and listen
through this radio when the computer is turned
off.
The MP3tunes Locker is available in an
ad-supported Free edition, along with the
MP3tunes Premium Locker which permits larger
music files, full access to album cover art and full
customer support access.
For more information about MP3tunes, please
visit www.mp3tunes.com.
MP3tunes Locker setup
1. Visit www.mp3tunes.com and set up an
MP3tunes account. Both free and paid
subscriptions are available.
2. Upload your music collection to your
MP3tunes Locker.
• MP3tunes offers various methods to upload
your music collection. Please refer to
MP3tunes website for recommendations and
instructions.
3. Make sure your MP3tunes account
information in this radio is the same as your
existing MP3tunes account.
• To check or edit your MP3tunes account
information, please refer to Account Info on
page 28 of this user manual.
Listening to music in MP3tunes
Locker
Your music files are categorized according to
artists, albums and playlists.
1. Press
2. Press SELECT or to play back any music
• To play back a specific music file, press
3. Press to pause or resume playback.
4. Press or to skip to the next file.
5. Press or within the beginning 3 seconds
or to highlight a category or sub-
category and then press SELECT.
files from the selected artist, album or
playlist.
SELECT to open the selected artist, album or
playlist. Press or to highlight a specific
file and then press SELECT or .
of the current file to skip to the previous file.
Otherwise, you will return to the beginning
of the current file.
EN
Accessing MP3tunes mode
• Press SOURCE repeatedly to select
MP3tunes.
OR
• Press or to highlight MP3tunes in the
Source menu and then press SELECT.
23
Page 24

FM/AM Tuner
FM/AM antenna
• For FM reception, uncoil the FM antenna at
the back of the radio, ensuring it is fully
extended (you may even want to tape it to
the wall behind the radio if possible. The
higher the better.)
• For AM reception, connect the AM antenna
loop to the back of the radio. Rotate the AM
loop antenna for better reception.
Accessing FM/AM Radio
• Press SOURCE repeatedly to select FM Tuner
or AM Tuner.
OR
• Press or to highlight FM Tuner or AM
Tuner in the Source menu and then press
SELECT.
Stereo signal indicator
Listening to FM/AM Radio
To select a station:
1. Press
2. Press and hold
or to adjust the frequency.
or until the radio beeps
to start searching through the frequency
range. The radio stops searching when it
detects the next station.
To assign the current station as the wake
sound of the alarm clock:
1. Press
2. Press
.
or to highlight Send to Alarm and
then press SELECT.
Recording FM/AM Radio
Warning! Use of the recording feature is for
personal use only. (Files cannot be transferred or
moved from the internal memory.)
To record the current station:
1. Press to start recording.
92.3
2. Press to stop recording.
• Recording will be stored in the internal
memory of the radio.
• For playback, please refer to Internal
Memory on page 25.
• The radio names each recording
<Source><Station Frequency> <Month-Date>
<Time Stamp>.
For example: FM99.5 1-21 1245.
To store the current station as a preset:
1. Select a station.
2. Press and hold 1, 2, 3, 4, 5 or 6 on top of the
radio until a beep sound is heard to store the
current station to that preset button.
• To listen to a preset station, press 1-6.
• To edit a preset station, repeat the steps
above to overwrite the previously stored
station.
• You can assign a preset station as the wake
sound of the alarm, refer to page 18 for more
information.
24
Page 25

Internal Memory
The radio's internal memory stores up to 10
hours of recordings from Internet Radio and FM/
AM Tuner.
Accessing Internal Memory
• Press SOURCE repeatedly to select Internal
Memory.
OR
• Press
or to highlight Internal Memory
in the Source menu and then press SELECT.
Listening to recordings
1. Press or to highlight a recording and
then press SELECT.
2. Press or to highlight Play and then press
SELECT to start playback.
3. Press
4. Press
5. Press
to pause or resume playback.
to skip to the next recording.
within the beginning 3 seconds of
the current recording to skip to the previous
recording. Otherwise, you will return to the
beginning of the current recording.
Deleting recordings
1. Press or to highlight an unwanted
recording and then press SELECT.
2. Press
3. Press or to highlight Yes in the
To delete all recordings:
1. In the list of recordings, press or to
2. Select Continue in the confirmation screen
• You can also clear the internal memory from
or to highlight Delete and then
press SELECT.
confirmation screen and then press SELECT.
highlight Delete All and then press SELECT.
and then press SELECT.
the Settings menu. Refer to Advanced
Settings on page 28 for more information.
EN
25
Page 26

USB Input
The radio can play back music files (mp3, wma
and RealAudio (RA8 and G2) formats) stored on
an external USB device connected to it. The USB
connection port is located at the back of the
radio.
Accessing USB Input mode
• Press SOURCE repeatedly to select USB
Input.
OR
• Press or to highlight USB Input in the
Source menu and then press SELECT.
Listening to music files
1. Press , , or to browse through the
directory of the USB device and select a
music file by pressing SELECT.
• Press or SELECT to enter a folder.
• Press
2. Press or to highlight Play and then press
3. Press to pause or resume playback.
to exit from a folder.
SELECT to start playback.
Deleting files
1. Press or to highlight an unwanted file
and then press SELECT.
2. Press
3. Press or to highlight Yes in the
or to highlight Delete and then
press SELECT.
confirmation screen and then press SELECT.
4. Press to skip to the next file.
5. Press within the beginning 3 seconds of
the current file to skip to the previous file.
Otherwise, you will return to the beginning
of the current file.
26
Page 27

Weather
Weather broadcast
Your radio includes a complimentary
4 year weather,
subscription from WeatherBug®
A digital weather broadcast is available including:
• Text-to-speech reading of weather forecast for
the ZIP code associated with the radio (can be
turned on or off in the Settings menu). Audio
playback will pause during reading.
• On screen display of conditions including
current temperature, high and low
temperatures of the day, current weather
condition, humidity and wind conditions.
• Graphical display of weather conditions for
3-day forecast:
Unknown
Sunny/clear
Mostly sunny
Partly cloudy
Mostly cloudy
Cloudy
Clear (night)
Mostly clear (night)
Partly cloudy (night)
Mostly cloudy (night)
Hazy
Hazy (night)
Rain
Heavy rain
Thunderstorms
on-demand
Frozen mix
Snow
Heavy snow
Windy
Fog
To check the weather of current day:
Press WEATHER once.
To check the 3-day weather forecast:
Press WEATHER twice to check weather forecast
for current day and the next two days.
To return to the previous audio source or
playback screen:
Press WEATHER a third time.
Emergency Broadcast System alert
When an Emergency Broadcast System alert is
received, the radio will:
• pause current audio playback,
• sound the alert chirp,
• display the emergency warning text on the
display,
• use text-to-speech to read the alert
You can select the minimum level of emergency
alerts to be notified of by the alert chirp or the
text-to-speech reading in the Settings menu.
EN
Severe thunderstorms
Sleet
27
Page 28

Settings
Changing radio's settings
To change the radio settings:
1. Press to display the Source menu.
2. Press
3. Press
• Repeat this step to browse for more settings
4. To change voice setting, press or to
or to highlight Settings and then
press SELECT.
or to highlight a setting and press
SELECT to enter the sub-menu.
and sub-menus.
highlight a desirable option and then press
SELECT to confirm.
Account info
• To change the login information (username
and password) sent by the radio when
attempting to login to the Slacker and
MP3tunes services.
• To edit the ZIP code for time and weather
functions.
If you have changed your account
information through Slacker or
MP3tunes' website, please also edit
the account information in this setting. The
information here must match your account
information online.
Device info
To show the firmware version, MAC address and
PIN number of the radio. MAC address and PIN
are necessary to activate your AR Infinite Radio
accounts.
Network setup
To change the network setting of the radio
(wired or wireless). Refer to page 11 for more
information.
Software updates
To check if newer firmware is available. Follow
the instructions on the display for update.
Weather
• To turn on or off the text-to-speech reading
when you press the WEATHER button.
• To select the gender and accent (US/UK) for
the voice used for text-to-speech reading.
• To select the minimum level of emergency
alerts to be notified of by the alert chirp.
• To select the minimum level of emergency
alerts to be notified of by the text-to-speech
reading.
Advanced settings
• Clock Mode
– Auto Sync and Manual: to select between
automatic and manual clock time update. If
Auto Sync is selected, the clock time will
update every 5 minutes while checking online
for weather update.
– Time Display: to select between 12-hour and
24-hour display modes.
• Format memory: to clear all recordings in the
internal memory.
• Reset to defaults: to reset menus to factory
defaults. The following settings will be reset:
– Slacker username, Slacker password, Display
options, Language selection, Zip code entry,
Network connection setup, Clock, Alarm,
Weather alert level, Text-to-speech voice
selections, Demonstration mode.
– Recordings in Internal Memory will NOT be
erased.
• Set Language: to change the language of the
display.
Some menus may require character
input, refer to page 15-16 for tips on
inputting characters.
Display
To change brightness and contrast of the display.
28
Page 29

More information
Troubleshooting tips
The radio cannot be turned on.
• Plug the AC power adapter securely into the
radio and a wall outlet.
• Check the power outlet by plugging in
another device.
• Press and hold ON/STANDBY for 10 seconds
to reboot the unit.
No sound.
• Increase the volume setting.
• Make sure the headphones are not plugged
in.
The radio does not respond to key presses.
• The radio may temporarily cease to function if
subjected to electrostatic disturbance. To
resume normal operation, it may be
necessary to reset the radio by unplugging
and reconnecting the power or by removing
and reinstalling the batteries in the base of
the radio.
Cannot connect the radio to Internet.
• Check if your access point is turned on.
• Check if the wireless enabler is securely and
correctly connected.
• Make sure a firewall is not blocking any
outgoing ports.
• Make sure the access point does not restrict
connections to specific MAC addresses.
• Make sure you have entered the correct
password. Password is case sensitive.
• Your wireless Internet connection may exceed
the maximum range for reception. Relocate
the Internet Radio closer to the wireless
access point.
• The network settings of the radio may be
incorrect. Check the network settings in
Network Setup in the Settings menu.
Clock time is incorrect.
• Refer to Account Info in the Settings menu
and make sure you have correctly input your
ZIP code as reference for automatic clock time
update.
Weather information are incorrect.
• Refer to Account Info in the Settings menu
and make sure you have correctly input your
ZIP code as reference for weather
information.
Weather information and Emergency
Broadcast System alert are not read out loud.
• Refer to Weather in the Settings menu and
make sure you have turned on the text-tospeech reading feature.
The radio connects to the Internet but is
unable to play a particular station.
• Check if the station is still broadcasting.
• The station may have reached the maximum
number of simultaneous listeners.
• The link to the radio station may be out of
date.
• The Internet connection between the radio
station server and the radio may be too slow.
Intermittent audio.
• The bandwidth of your wireless LAN may be
too low. Move the radio closer to the access
point and make sure that there are no
obstacles between them.
• The actual transmission speed of digital radio
broadcast depends on the service provider
(i.e. the Internet radio station).
Cannot skip to the next song while listening
to Internet Radio.
• Skipping to the next song in Internet Radio is
not available. (Slacker Radio only)
Poor FM/AM Tuner reception.
• Check the antenna connection.
• Move antenna.
• Turn off nearby electrical appliances, such as
hair dryer, vacuum cleaner and microwave.
Cannot record radio.
• Record feature is only available for Internet
Radio, AM and FM Tuner.
• The internal memory of the radio may be full.
Remove some of the old recordings.
EN
29
Page 30

More information
Cannot play back music files on connected
USB device.
• Make sure USB device is securely connected.
• Digital Right Management (DRM) type music
files will not be played.
• The radio supports FAT12, 16 and 32 file
systems only. Other file systems from Linux,
MAC or NTFS are not supported.
The LED of ON/STANDBY button is flashing.
• The LED is flashing (5-second interval) when
the unit is being powered by the backup
batteries due to electricity supply
interruption. Please check your AC power
supply.
• If the LED is flashing even faster (3-second
interval), this means that the unit is being
powered by weak backup batteries. Please
replace the backup batteries (refer to page
9). We recommend that you replace the
batteries every year (or more often in case of
multiple power outages) to avoid low battery
power. Otherwise, clock and alarm accuracy
may be affected when electricity supply is
interrupted.
Cannot stop the demonstration mode.
• To exit the demonstration, press and release
in sequence the buttons on top of the radio:
preset 1, then SLEEP/SNOOZE, then preset
6.
My question was not answered here.
• Visit www.arinfiniteradio.com for an up-to-
date list of frequently asked questions.
Copyright warning
This player is for your personal use only.
Unauthorized recording or duplication of
copyrighted material may infringe upon the
rights of third parties and may be contrary to
copyright laws.
Check for updates
Visit www.arinfiniteradio.com for the latest
news and firmware upgrades for our Wi-Fi
Internet Radio.
Technical specification
Product: Wi-Fi Internet Radio
Brand: Acoustic Research
Model: ARIR200
Electrical Consumption: 13W
Specifications
Hardware
• Dimensions: 212 mm H, 94 mm W, 154 mm D
• Unit Weight: 790 g (27.9oz) (without
batteries)
• Standards: IEEE 802.11g and 802.11b
• Channels: 11 Wi-Fi Channels (US, Canada)
• Ethernet Port : 10/100 RJ-45 compatible
• Power: External 9.0V DC 1.56A
• Battery Backup: 3 X AAA Size Batteries
• Display: 2.7" Backlight LCD
• LEDS: On/Standby, two for navigation keys,
Love it.
• Internal memory: 512 MB
• Stereo Headphones jack
• USB Connection Jack
30
AM Tuner section
• Tuning Range: 520KHz to 1710KHz
FM Tuner section
• Tuning Range: 87.5MHz to 107.9MHz
Amplifier section
• Output Power: 2W x 2
• Distortion @ 1KHz: <10% THD
Speakers
• Number: 2
• Size: 40mm (1.56")
Page 31

Warranty information
Limited warranty
12 Month Limited Warranty
Applies to Acoustic Research Audio/Video
Products
AUDIOVOX ELECTRONICS CORP. (the Company)
warrants to the original retail purchaser of this
product that should this product or any part
thereof, under normal use and conditions, be
proven defective in material or workmanship
within 12 months from the date of original
purchase, such defect(s) will be repaired or
replaced with reconditioned product (at the
Company's option) without charge for parts and
repair labor.
To obtain repair or replacement within the terms
of this Warranty, the product is to be delivered
with proof of warranty coverage (e.g. dated bill of
sale), specification of defect(s), transportation
prepaid, to the Company at the address shown
below.
This Warranty does not extend to the elimination
of externally generated static or noise, to
correction of antenna problems, loss/
interruptions of broadcast or internet service, to
costs incurred for installation, removal or
reinstallation of product, to corruptions caused
by computer viruses, spyware or other malware,
to loss of media, files, data or content, or to
damage to tapes, discs, removable memory
devices or cards, speakers, accessories,
computers, computer peripherals, other media
players, home networks or vehicle electrical
systems.
This Warranty does not apply to any product or
part thereof which, in the opinion of the
Company, has suffered or been damaged
through alteration, improper installation,
mishandling, misuse, neglect, accident, or by
removal or defacement of the factory serial
number/bar code label(s). THE EXTENT OF THE
COMPANY'S LIABILITY UNDER THIS WARRANTY IS
LIMITED TO THE REPAIR OR REPLACEMENT
PROVIDED ABOVE AND, IN NO EVENT, SHALL THE
COMPANY'S LIABILITY EXCEED THE PURCHASE
PRICE PAID BY PURCHASER FOR THE PRODUCT.
This Warranty is in lieu of all other express
warranties or liabilities. ANY IMPLIED
WARRANTIES, INCLUDING ANY IMPLIED
WARRANTY OF MERCHANTABILITY, SHALL BE
LIMITED TO THE DURATION OF THIS WRITTEN
WARRANTY. ANY ACTION FOR BREACH OF ANY
WARRANTY HEREUNDER INCLUDING ANY
IMPLIED WARRANTY OF MERCHANTABILITY
MUST BE BROUGHT WITHIN A PERIOD OF 24
MONTHS FROM DATE OF ORIGINAL PURCHASE.
IN NO CASE SHALL THE COMPANY BE LIABLE FOR
ANY CONSEQUENTIAL OR INCIDENTAL DAMAGES
FOR BREACH OF THIS OR ANY OTHER WARRANTY.
No person or representative is authorized to
assume for the Company any liability other than
expressed herein in connection with the sale of
this product.
Some states do not allow limitations on how
long an implied warranty lasts or the exclusion
or limitation of incidental or consequential
damage so the above limitations or exclusions
may not apply to you. This Warranty gives you
specific legal rights and you may also have other
rights which vary from state to state.
How to make a warranty claim:
• If your product is capable of storing content
(such as an mp3 player, digital voice recorder,
etc), it is recommended to make periodic
backup copies of content stored on the
product. If applicable, before shipping a
product, make a back up copy of content or
data stored on the device. Also, it is advisable
to remove any personal content which you
would not want exposed to others. IT IS
LIKELY THAT CONTENTS AND DATA ON THE
DEVICE WILL BE LOST DURING SERVICE AND
REFORMATTING. AUDIOVOX ACCEPTS NO
LIABILITY FOR LOST CONTENT OR DATA, OR
FOR THE SECURITY OF ANY PERSONAL
CONTENT OR DATA ON THE RETURNED
DEVICE. Product will be returned with factory
default settings, and without any pre-loaded
content which may have been installed in the
originally purchased products. Consumer will
be responsible for reloading data and
content. Consumer will be responsible to
restore any personal preference settings.
EN
31
Page 32

Warranty information
• Properly pack your unit. Include any remotes,
memory cards, cables, etc. which were
originally provided with the product.
However DO NOT return any removable
batteries, even if batteries were included with
the original purchase. We recommend using
the original carton and packing materials.
• Include evidence of purchase date such as
the bill of sale. Also print your name and
address and a description of the defect. Send
via standard UPS or its equivalent to:
Audiovox Electronics Corp.
Attn : Service Department.
150 Marcus Blvd.
Hauppauge N.Y. 11788
1-800-331-7599
• Insure your shipment for loss or damage.
Audiovox accepts no liability in case of
damage or loss en route to Audiovox.
• Pay any charges billed to you by the
Exchange Center for service not covered by
the warranty.
• A new or refurbished unit will be shipped to
you freight prepaid.
What we will do:
Provide you with a new, or at our option, a
refurbished unit. The exchange unit is under
warranty for the remainder of the original
product’s warranty period.
For Canada Customers, please ship to:
Audiovox Return Centre
c/o Genco
6685 Kennedy Road,
Unit#3, Door 16,
Mississuaga, Ontario
L5T 3A5
32
Page 33

Contenido
Información de seguridad
Información FCC ........................................................................ 3
Especificaciones técnicas ........................................................4
Consumo de corriente eléctrica: ..........................................4
Registro de producto ................................................................ 4
Para su información ..................................................................4
Precauciones importantes para la batería ........................4
Precauciones para el reproductor ........................................4
IMPORTANTE INSTRUCCIONES DE SEGRUIDAD ..............5
Contrato de licencia de usuario final
Contrato de licencia de usuario final .................................. 6
Antes de comenzar
1. Desempaque de la unidad ................................................. 8
2. Configure sus Cuentas de radio AR Infinite ................. 9
3. Opcional: Inserte las baterías AAA en la base del
radio ................................................................................................ 9
4. Opcional: para usarse con una conexión
“Alámbrica” ....................................................................................10
5. Conecte y encienda el radio .............................................. 10
6. Configuración del radio.......................................................11
Después de conectar a Internet ...........................................13
Modo demostración .................................................................. 13
Para obtener el firmware y la información más
reciente .......................................................................................... 13
Preguntas frecuentes ................................................................ 13
Controles generales
Al frente y en la parte superior .............................................14
Parte trasera .................................................................................14
Encender o apagar .....................................................................15
Control de volumen ..................................................................15
Selección de la fuente ..............................................................15
Pronóstico del tiempo .............................................................. 15
Reloj y alarma ..............................................................................15
Uso de los menús ....................................................................... 15
Reloj y alarma
Para accesar el reloj digital .....................................................17
Ajuste del reloj ............................................................................17
Uso del reloj de alarma ............................................................17
Modo dormir ................................................................................ 18
Radio Slacker
Acceso a Radio Slacker ............................................................. 19
Para escuchar Radio Slacker ................................................... 19
Opciones de etiqueta ...............................................................20
MP3tunes
Configuración del MP3tunes Locker ................................... 23
Para accesar el modo MP3tunes ...........................................23
Para escuchar música en MP3tunes Locker......................23
Sintonizador FM/AM
Antena FM/AM ............................................................................24
Para accesar radio FM/AM ......................................................24
Para escuchar el radio FM/AM ..............................................24
Grabación de radio FM/AM ...................................................24
Memoria interna
Para accesar la memoria interna...........................................25
Para escuchar grabaciones ..................................................... 25
Para eliminar grabaciones ....................................................... 25
Entrada USB
Para accesar el modo de entrada USB ................................26
Para escuchar archivos de música .......................................26
Para eliminar archivos...............................................................26
El Tiempo
Transmisión del Tiempo ........................................................... 27
Alerta del Sistema de Transmisión de Emergencia........27
Configuraciones
Para cambiar las configuraciones del radio ......................28
Información de cuenta ............................................................. 28
Información de dispositivo ..................................................... 28
Pantalla .........................................................................................28
Configuración de red ................................................................ 28
Actualizaciones de software ..................................................28
Tiempo ........................................................................................... 28
Configuraciones avanzadas ....................................................28
Más información
Tips para solución de problemas .........................................29
Advertencia sobre derechos de autor ................................ 30
Para checar actualizaciones....................................................30
Especificación técnica...............................................................30
Especificaciones .......................................................................... 30
Garantía limitada
Garantía limitada ........................................................................ 31
Radio en Internet
Para accesar radio en Internet ............................................... 21
Para escuchar Radio en Internet ........................................... 21
Para grabar radio en Internet.................................................22
Para agregar estaciones de radio en Internet .................. 22
2
Page 34

Información de seguridad
Información FCC
Este aparato cumple con la Parte 15 de las
Normas FCC. El funcionamiento de la unidad está
sujeto a las dos condiciones siguientes: (1) Este
aparato no puede provocar interferencias
perjudiciales y (2) este aparato debe aceptar toda
interferencia que reciba incluso aquellas que
provoquen un funcionamiento incorrecto.
Este equipo ha sido aprobado y se encontró que
cumple con los límites para un dispositivo digital
Clase B, de conformidad con la Parte 15 de los
Reglamentos de la FCC. Estos límites están
diseñados para suministrar protección razonable
contra interferencia dañina en una instalación
residencial. Este equipo genera, usa y puede
emitir energía de frecuencia de radio y, si no se
instala y usa de acuerdo con las instrucciones,
puede causar interferencia dañina a las
comunicaciones radiales. Sin embargo, no hay
garantía de que no ocurrirá interferencia en una
instalación en particular.
Si este equipo causa interferencia dañina para la
recepción de radio o televisión, lo cual puede ser
determinado encendiendo y apagando el
equipo, se sugiere al usuario tratar de corregir la
interferencia mediante una o más de las medidas
siguientes:
• Reorientar o reubicar la antena receptora.
• Aumentar la separación entre el equipo y el
receptor.
• Conectar el equipo a una toma de corriente
en un circuito diferente de aquel al cual está
conectado el receptor.
• Consultar con el distribuidor o un técnico de
radio/TV experimentado.
De conformidad con los requerimientos FCC,
cambios o modificaciones no aprobados
expresamente por el fabricante podrían invalidar
la autoridad del usuario para operar este
producto.
PRECAUCION
RIESGO D E ELECTRO CUCION
NO ABRIR
EL SIGNO DEL RAYO
Y LA FLECHA
DENTRO DEL
TRIANGULO ES UN
SIGNO DE
ADVERTENCIA
ALERTANDOLO DEL
"PELIGROSO
VOLTAJE" DENTRO
DEL PRODUCTO.
VER SEÑALIZACION EN EL FONDO/ REVES DEL PRODUCTO
ADVERTENCIA: PARA PREVENIR
FUEGO O SHOCK ELÉCTRICO, NO EXPONGA EL
PRODUCTO A LLUVIA O HUMEDAD.
PRECAUCION: NO
REMUEVA LA CUBIERTA
(O REVERSO) PARA
REDUCIR EL RIESGO DE
ELECTROCUCION. NO HAY
PARTES INTERNAS,
REUSABLES POR EL
USUARIO. PARA SERVICIO
REFERIRSE A TECNICOS
ESPECIALIZADOS.
EL SIGNO DE
EXCLAMACION
DENTRO DEL
TRIANGOULO DE
PRECAUCION ES
UNA SEÑAL DE
ADVERTENCIA E
INSTRUCCIONES
IMPORTANTES
QUE VIENEN CON
EL PRODUCTO.
Fabricante / Parte responsable
Audiovox Electronics Corp.,
150 Marcus Blvd., Hauppauge, NY 11788
1-317-810-4880
(Por favor tome nota que este número de
teléfono es sólo para asuntos regulatorios. En
este número no hay disponibilidad de soporte
de producto o técnico.)
This Class B digital apparatus complies with Canadian
ICES-003.
Cet appareil numérique de la classe B est conforme à la
norme NMB-003 du Canada.
E
Acoustic Research
ARIR200
3
Page 35

Información de seguridad
Especificaciones técnicas
Product: Radio para Internet Wi-Fi
Marca: Acoustic Research
Modelo: ARIR200
Consumo de corriente eléctrica:
Adaptador externo de CA/CC
Salida: 9.0V DC 1.56A
Entrada: 100-240V ~ 50/60Hz 0.7A
El adaptador CA/CC suministrado con este
producto está diseñado para estar orientado
correctamente en una posición vertical o
montado en el piso.
Registro de producto
Usted puede también visitar www.rcaaudiovideo.
com para registro en línea.
Para su información
Guarde su factura como prueba de compra para
obtener la garantía en partes y servicio y anéxela
aquí.
En caso de que algún servicio de asistencia fuera
necesario usted necesitaría el número del
modelo y el número de serie. En el espacio
inferior, apunte la fecha y el lugar de compra, y el
número de serie:
Modelo No.
Fecha de Compra
Lugar de Compra
No. de Serie
Precauciones importantes para la
batería
• Cualquier batería puede presentar un riesgo
de fuego, explosión o quemadura química si
es mal tratada. No trate de cargar una batería
que no esté diseñada para ser recargada, no
incinere y no perfore.
• Baterías no recargables, tales como las
baterías alcalinas, pueden tener fugas si son
dejadas en su producto por un largo periodo
de tiempo. Retire las baterías del producto si
usted no lo va a usar por un mes o más.
• Si su producto usa más de una batería, no
mezcle tipos y asegúrese de que estén
insertadas correctamente. Mezclar tipos de
baterías o insertarlas incorrectamente puede
causar que tengan fugas.
• Deseche inmediatamente cualquier batería
con fugas o deformada. Ellas pueden causar
quemaduras de la piel u otra lesión personal.
• Por favor ayude a proteger el ambiente
reciclando o eliminando las baterías de
conformidad con las regulaciones federales,
estatales y locales.
Precauciones para el reproductor
• No use la unidad inmediatamente después
de la transportación desde un sitio frío a un
lugar cálido; podría resultar en problemas de
condensación.
• Evite golpear la unidad.
• No almacene la unidad cerca del fuego,
lugares con alta temperatura o a la luz
directa del sol. La exposición a la luz directa
del sol o a calor extremo (tal como dentro de
un automóvil estacionado) puede causar
daños o malfuncionamiento.
• No lo exponga a la lluvia o a la humedad.
• No opere o guarde la unidad en sitios con
electricidad estática frecuente o interferencia
eléctrica (por ejemplo, bocinas, receptor de
TV).
• Limpie la unidad con un paño suave o una
gamuza húmeda. Nunca use solventes.
• La unidad debe ser abierta solamente por
personal calificado.
4
Page 36

Información de seguridad
]
IMPORTANTE INSTRUCCIONES DE SEGRUIDAD
FAVOR DE GUARDAR ESTO PARA UNA REFERENCIA FUTURA
Alguna de la siguiente información quizá no se
aplique a su producto en particular. Sin embargo,
como con cualquier producto electrónico, se deben
tomar precauciones durante su manejo y uso.
• Lea estas instrucciones.
• Conserve estas instrucciones.
• Tome en cuenta todas las advertencias.
• Siga todas las instrucciones.
• No use este aparato cerca del agua.
• Limpie solamente con un paño seco.
• No bloquee ninguna de las aperturas de
ventilación. Instale de acuerdo con las
instrucciones del fabricante.
• No instale cerca de fuentes de calor tales como
radiadores, registros de calor, estufas, u otros
aparatos (incluyendo amplificadores) que
produzcan calor.
• No elimine el propósito de seguridad de la
clavija polarizada o del tipo a tierra. Una clavija
polarizada tiene dos cuchillas, una más ancha
que la otra. Una clavija del tipo a tierra tiene dos
cuchillas y una tercera punta para conexión a
tierra. La cuchilla ancha o la tercera punta son
suministradas para su seguridad. Si la clavija
suministrada no se adapta dentro de su toma de
corriente, consulte a un electricista para que
reemplace la toma de corriente obsoleta.
• Proteja el cable de corriente de pisotones o
machucones particularmente en las clavijas,
receptáculos de conveniencia, y en punto donde
salen del aparato.
• Use solamente accesorios/aditamentos
especificados por el fabricante.
• Use solamente con el
carro, soporte,
trípode, consola, o
mesa especificados
por el fabricante, o
vendidos con el
aparato. Cuando se
utiliza un carro, tenga
precaución al mover la combinación de carro/
aparato para evitar lesión ocasionada por
volcadura.
• Desconecte este aparato durante tormentas
eléctricas o cuando no sea utilizado por largos
períodos de tiempo.
• Refiera todo el servicio a personal de servicio
calificado. El servicio es requerido cuando el
aparato ha sido dañado de alguna forma, tal
como daño a la clavija o al cable de corriente,
cuando se ha derramado líquido o han caído
Advertencia sobre el Carro Portátil
objetos dentro del aparato, el aparato ha sido
expuesto a lluvia o humedad, no funciona
normalmente, o ha sido tirado.
• INFORMACION ADICIONAL DE SEGURIDAD
• El aparato no debe quedar expuesto a goteos o
salpicaduras de líquidos, y, por lo tanto, no se
deben colocar sobre el aparato objetos que
contengan líquidos, como por ejemplo vasos.
• Siempre deje suficiente espacio para ventilación
alreadedor del producto. 0No ponga el producto
en la cama, alfombra, librero o gabinete que
pueda obstruir la corriente de aire a través de
apeturas de ventilación.
• No pongan velas, cigarillos o cigarros
encendidos encima de producto.
• Conecte sólo en receptáculos de corriente
alterna como esta indicado en el producto.
• Tome precauciones para evitar que caigan
objetos dentro del producto.
• Carros y Estantes–El artefacto deberá ser usado
sólo con carros y estantes que hayan sido
recomendados por el fabricante.
• La clavija de corriente eléctrica o un acoplador
del aparato son usados como el dispositivo de
desconexión, el dispositivo de desconexión
deberá permanecer disponible para la
operación.
• SI SU PRODUCTO FUNCIONA CON PILAS, haga
caso a las precauciones siguientes:
A. Electrólito puede gotear de cualquier pila si está
si está mezclada con una pila de un tipo
diferente, si ha sido insertada incorrectamente, o
si no se reemplazan todas las pilas al mismo
tiempo.
B. Cualquier pila puede explotar o gotear
electrólito si se echa en un fuego o si trata de
cargar una pila no recargable.
C. Deseche inmediatemente pilas con fuga. Estas
pueden causar quemaduras a la piel otra herida
personal. Cuando deseche las baterías asegúrese
de deshacerse de ellas en una manera
apropiada, de acuerdo con las regulaciones
locales o del estado.
D. Las baterías (paquete de baterías o baterías
instaladas) no deberán ser expuestas al calor
excesivo tal como luz solar, fuego o similar.
E
UL60065
5
Page 37

Contrato de licencia de usuario final
Contrato de licencia de usuario final
IMPORTANTE: LEA DETENIDAMENTE ANTES DE DESCARGAR O
INSTALAR ESTE PROGRAMA!
ESTE ACUERDO DE LICENCIA DE USUARIO FINAL (ACUERDO) ES UN
ACUERDO LEGAL ENTRE USTED Y AUDIOVOX CORPORATION Y,
SEGÚN SEA APLICABLE, CUALQUIER SUBSIDIARIA DE AUDIOVOX,
CONFORME SE DEFINE A CONTINUACIÓN (COLECTIVAMENTE
"AUDIOVOX"), PARA EL PROGRAMA DE SOFTWARE DE
APLICACIÓN/CONTROLADOR DEL DISPOSITIVO DE AUDIO/VÍDEO
DIGITAL PORTÁTIL DE LA MARCA RCA EL CUAL PUEDE INCLUIR
COMPONENTES DE SOFTWARE ASOCIADO, SOFTWARE CON
LICENCIA DE AUDIOVOX DE TERCERAS PARTES ("LICENCIANTES") Y
DOCUMENTACIÓN ASOCIADA, SI LA HAY (COLECTIVAMENTE, EL
"PROGRAMA"). ESTE ACUERDO CONTIENE IMPORTANTES
LIMITACIONES, RESTRICCIONES Y RENUNCIAS LEGALES, Y TAMBIÉN
ESPECIFICA LA DURACIÓN DE SU LICENCIA.
POR EL HECHO DE INSTALAR EL PROGRAMA O DE HACER CLIC EN
EL BOTÓN DE ACEPTACIÓN DEL PROGRAMA, COPIAR O UTILIZAR
DE CUALQUIER OTRA MANERA EL PROGRAMA, VD. RECONOCE Y
ACEPTA QUE HA LEÍDO ESTE ACUERDO, QUE LO HA ENTENDIDO, Y
QUE CONSIENTE EN SOMETERSE A SUS TÉRMINOS Y CONDICIONES.
ESTE PROGRAMA ESTÁ PROTEGIDO POR LEYES DE DERECHOS DE
AUTOR Y TRATADOS DE DERECHOS DE AUTOR INTERNACIONALES,
ASÍ COMO POR OTRAS LEYES Y TRATADOS DE PROPIEDAD
INTELECTUAL. SÓLO PODRÁ HACER USO DEL PROGRAMA SEGÚN
ESTE ACUERDO, Y CUALQUIER USO SERÁ ENTENDIDO POR LA
PRESENTE COMO CONDICIONAL SEGÚN EL ACUERDO ESPECÍFICO
CON LOS TÉRMINOS SIN MODIFICACIÓN QUE SE PRESENTAN A
CONTINUACIÓN. SI NO ESTÁ DE ACUERDO CON TODOS LOS
TÉRMINOS DE ESTE ACUERDO, HAGA CLIC EN EL BOTÓN DE
RECHAZO Y/O NO INSTALE EL PROGRAMA Y/O NO UTILICE EL
PROGRAMA.
1. LICENCIA
(a) Bajo este Acuerdo, a usted se le otorga una licencia no
exclusiva, no sub-licensiable, no asignable, y no transferible,
(excepto según sea expresamente establecido a continuación)
(i) para instalar y usar el programa en una sola terminal, y (ii)
para realizar una (1) copia del Programa en cualquier formato
legible por máquina con el fin de disponer de una copia de
seguridad del Programa, siempre que la copia contenga todos
los avisos de derecho de propiedad originales del Programa.
(b) Puede transferir el programa y su licencia a cualquier otra
ubicación siempre como parte del Dispositivo de Audio/Vídeo
Digital Portátil de la marca RCA ("Dispositivo A/V"), y
únicamente si la otra parte acuerda aceptar los términos y
condiciones del Acuerdo. Si transfiere el programa deberá al
mismo tiempo transferir todas las copias a la misma parte o
destruir cualquier copia no transferida.
(c) Los términos de este Acuerdo gobernarán cualquier
actualización del programa suministrada por AUDIOVOX que
reemplacen y/o suplementen el Programa original, a menos
que dicha actualización sea acompañada por términos y
condiciones de licencia independientes, en cuyo caso,
gobernarán los términos de dicha licencia. Usted acepta y
acuerda que AUDIOVOX puede descargar automáticamente
actualizaciones al Programa en su equipo en caso de que se
desarrollen actualizaciones, mejoras y/o otros cambios en el
Programa.
2. RESTRICCIONES DE LICENCIA
(a) Excepto por las licencias que le han sido otorgadas
expresamente en este Acuerdo, no se otorga ninguna otra
licencia o derecho implícito.
(b) Usted no deberá (i) poner el Programa en servicio a través de
una red en la que pudiera ser utilizado por varios ordenadores
al mismo tiempo; (ii) modificar, traducir, practicar ingeniería
inversa, descompilar, desensamblar (excepto en el caso de
que esta restricción haya sido expresamente prohibida por la
ley), o crear trabajos derivados basados en el Programa, o (iii)
6
copiar el Programa excepto los casos permitidos
expresamente aquí, o (iv) remover o alterar los avisos de
derechos de autor en todas las copias del Programa; o (v)
prestar el Programa. Usted acuerda que sólo utilizará el
Programa de tal forma que cumpla con todas las leyes
aplicables en las jurisdicciones en las que utilice el Programa,
incluyendo, sin limitación, las restricciones aplicables
relacionadas con los derechos de copia u otros derechos de
propiedad intelectual.
(c) El programa puede contener código prelanzamiento que no
se comporte al nivel de la versión final del código. En tal caso,
el Programa podría no funcionar correctamente. Las versiones
actualizadas del Programa deben descargarse desde www.
rcaaudiovideo.com/downloads.
(d) AUDIOVOX no está obligada a ofrecer servicios de soporte
para el Programa.
(e) El programa se entrega con "DERECHOS RESTRINGIDOS". El
uso, duplicación o publicación por el Gobierno de los EE.UU.
se encuentra sometido a ciertas restricciones según lo
establecido en el subpárrafo (c)(1)(ii) de DFARS 252.227-7013,
o FAR 52.227-19, o en FAR 52.227-14 Alt. III, según lo aplicable.
3. TÉRMINOS Y FINALIZACIÓN
(a) Si licencia es efectiva a la fecha de aceptación de este
Acuerdo y permanecerá siendo efectiva hasta que este
Acuerdo sea finalizado por cualquiera de las partes.
(b) Puede finalizar este Acuerdo y la licencia asociada, sin aviso o
retardo, destruyendo o borrando permanentemente el
Programa y todas las copias derivadas.
(c) Si no cumple con alguno de los términos de este Acuerdo,
total o parcialmente, su licencia será revocada
automáticamente sin aviso previo por parte de AUDIOVOX.
(d) Tras la finalización de este Acuerdo y su licencia asociada,
deberá cesar cualquier uso del Programa y destruir o borrar
permanentemente el Programa y todas las copias derivadas
del mismo.
4. DENEGACIÓN DE GARANTÍA
EL PROGRAMA SE ENTREGA "TAL CUAL", SIN GARANTÍA DE
NINGÚN TIPO, EXPLÍCITAS O IMPLÍCITAS, INCLUYENDO SIN
LIMITACIÓN LAS GARANTÍAS IMPLÍCITAS DE COMERCIABILIDAD,
AJUSTE A UN PROPÓSITO PARTICULAR, TÍTULO O NO INFRACCIÓN.
EL RIESGO ABSOLUTO REFERENTE A LA CALIDAD Y
COMPORTAMIENTO DEL PROGRAMA ES ÚNICAMENTE SUYO.
SI EL PROGRAMA RESULTA DEFECTUOSO, USTED (Y NO
AUDIOVOX, SUS PROVEEDORES O DISTRIBUIDORES) ASUMIRÁ
TODO EL COSTE DE LA REPARACIÓN O CORRECCIÓN NECESARIA.
Esta exclusión de garantía podría no haber sido permitida según
algunas leyes aplicables. Como resultado, la exclusión anterior
podría no ser aplicable a usted, y es posible que tenga otros
derechos, dependiendo de la ley que le sea de aplicación.
5. DERECHOS DE PROPIEDAD
Todos los títulos y los derechos de propiedad intelectual,
incluyendo pero sin limitación los derechos de autor, en y al
Programa y cualquier copia del mismo son propiedad de
AUDIOVOX, sus Licenciatarios o sus proveedores. Todos los
derechos de propiedad intelectual del contenido al que puede
accederse por medio del uso del Programa son propiedad de sus
respectivos propietarios y podrían estar protegidos por los
derechos de copia aplicables u otras leyes o tratados de propiedad
intelectual. Esta licencia no le otorga ningún derecho para utilizar
dicho contenido. Todos los derechos no otorgados expresamente
son reservados por AUDIOVOX o sus Licenciatarios.
6. LIMITACIÓN DE RESPONSABILIDAD
(a) HASTA DONDE LO PERMITAN LAS LEYES VIGENTES, NI
AUDIOVOX, NI SUS DISTRIBUIDORES SERÁN RESPONSABLES
EN NINGÚN CASO POR NINGÚN DAÑO ESPECIAL, FORTUITO,
INDIRECTO O CONSECUENTE DE NINGÚN TIPO (INCLUYENDO,
Page 38

Contrato de licencia de usuario final
SIN LIMITACIONES, LOS DAÑOS POR PÉRDIDA DE BENEFICIOS,
INTERRUPCIÓN DEL NEGOCIO, CORRUPCIÓN DE ARCHIVOS,
PÉRDIDA DE INFORMACIÓN COMERCIAL O CUALQUIER OTRA
PÉRDIDA PECUNIARIA), SEA CUAL SEA LA CAUSA O FORMA,
INCLUYENDO EL CONTRATO, EL DELITO O LA NEGLIGENCIA,
QUE RESULTE DEL USO O DE LA IMPOSIBILIDAD DE USAR EL
PROGRAMA, NI TAN SIQUIERA EN EL CASO QUE AUDIOVOX
HAYA SIDO ADVERTIDA DE LA POSIBILIDAD DE TALES DAÑOS.
PUESTO QUE ALGUNOS ESTADOS Y JURISDICCIONES NO
PERMITEN LA EXCLUSIÓN O LIMITACIÓN DE
RESPONSABILIDAD POR DAÑOS CONSECUENCIALES O
FORTUITOS, LA ANTERIOR LIMITACIÓN PUEDE NO SERLE
APLICABLE.
(b) VD. ASUME LA RESPONSABILIDAD DE LA SELECCIÓN DEL
PROGRAMA APROPIADO PARA CONSEGUIR LOS RESULTADOS
DESEADOS, DE LA INSTALACIÓN Y USO, Y DE LOS
RESULTADOS OBTENIDOS.
7. WINDOWS MEDIA
El programa integrado en su Dispositivo A/V "el "Firmware de
Dispositivo") contiene un programa con licencia de Microsoft que
le permite reproducir Archivos de Sonido Windows Media (WMA)
("Programa WMA"). El programa WMA tiene una licencia que le
permite utilizarlo en su dispositivo A/V bajo las siguientes
condiciones. Al instalar y utilizar esta versión del Firmware de
Dispositivo, acepta estas condiciones. SI NO ESTÁ DE ACUERDO
CON LAS CONDICIONES DE USUARIO FINAL DE ESTA SECCIÓN 7,
NO INSTALE O UTILICE ESTA VERSIÓN DE FIRMWARE DE
DISPOSITIVO.
El Programa WMA está protegido por las leyes de derechos de
copia y otras leyes de propiedad intelectual. Esta protección se
extiende también a la documentación del Programa WMA, en
formato escrito o electrónico.
CONCESIÓN DE LICENCIA. El Software WMA se le entrega bajo
licencia en las siguientes condiciones:
Puede utilizar esta versión del Reproductor con el Software WMA
sólo con el Dispositivo A/V.
No puede investigar los secretos, descompilar ni decodificar el
Programa WMA, excepto y solo hasta el punto en que tal actividad
esté permitida de manera expresa por las leyes vigentes a pesar
de esta limitación.
Puede transferir su derecho a utilizar el Firmware de Dispositivo
sólo como parte de una venta o transferencia del Dispositivo A/V,
en condiciones en las que el destinatario acuerde las condiciones
anteriormente establecidas. Si la versión del Firmware de
Dispositivo que está transfiriendo es una actualización, también
deberá transferir todas las versiones anteriores del Firmware de
Dispositivo que posea, incluyendo el Programa WMA.
MICROSOFT NO LE OFRECE NINGUNA GARANTÍA DE NINGÚN TIPO
CON RELACIÓN AL SOFTWARE WMA, Y MICROSOFT NO PRESENTA
NINGUNA OBSERVACIÓN RELATIVA AL FUNCIONAMIENTO DEL
PROGRAMA WMA.
El Software WMA procede de los EE.UU. Cualquier exportación de
esta versión del Firmware de Dispositivo debe ser conforme a
todas las leyes nacionales e internacionales vigentes, incluyendo
las Disposiciones de la Administración para Exportaciones de los
EE.UU., que se apliquen al Programa WMA incorporado en el
Firmware de Dispositivo.
8. RealNetworks, Inc.
Partes de este software se incluyen bajo licencia de RealNetworks,
Inc. Copyright 1995-2007, RealNetworks, Inc. Todos los derechos
reservados.
Las partes de este Programa bajo licencia de RealNetworks, Inc.
(“RN”) son provistas
COMO SON SIN GARANTÍA DE CLASE ALGUNA. EN EL MÁXIMO
GRADO PERMITIDO POR LA LEY APLICABLE, Y ADEMÁS CON
RENUNCIA DE TODAS LAS GARANTÍAS, EXPRESAS E IMPLÍCITAS,
INCLUYENDO, SIN LIMITACIÓN CUALQUIER GARANTÍA IMPLÍCITA
DE APTITUD COMERCIAL, ADECUACIÓN PARA UN PROPÓSITO
PARTICULAR, Y NO TRASGRESIÓN DE DERECHOS. EN EL MÁXIMO
GRADO PERMITIDO POR LA LEY EN NINGÚN CASO SERÁ
RESPONSABLE POR ALGÚN DAÑO CONSECUENCIAL, INCIDENTAL,
E INDIRECTO, ESPECIAL, PUNITIVO O DE OTRA CLASE
(INCLUYENDO, SIN LIMITACIÓN, DAÑOS POR PÉRDIDA DE
UTILIDADES). DEBIDO A QUE ALGUNOS ESTADOS Y
JURISDICCIONES NO PERMITEN LA EXCLUSIÓN O LIMITACIÓN DE
RESPONSABILIDAD DE DAÑOS CONSECUENCIALES O
INCIDENTALES, LA LIMITACIÓN ANTERIOR PUEDE NO APLICARSE A
USTED.
Usted no puede modificar, traducir, efectuar ingeniería en reversa,
decompilar, desensamblar (excepto en el grado en que esta
restricción esté específicamente prohibida por la ley aplicable) o
usar otros medios para descubrir el Código Fuente RN o de otra
forma replicar la funcionalidad del Código de Cliente Real Format.
9. PROGRAMAS DE OTROS FABRICANTES
CUALQUIER PROGRAMA DE OTRO FABRICANTE QUE HAYA SIDO
SUMINISTRADO CON EL PROGRAMA SE INCLUYE PARA SU USO A
SU ELECCIÓN. SI DECIDE UTILIZAR DICHO PROGRAMA DE OTRO
FABRICANTE, SU USO SERÁ GOBERNADO POR EL ACUERDO DE
LICENCIA DE DICHO FABRICANTE, COPIA ELECTRÓNICA DEL CUAL
SE INSTALARÁ EN LA CARPETA ADECUADA DE SU ORDENADOR
DESPUÉS DE LA INSTALACIÓN DEL PROGRAMA.
AUDIOVOX NO SE HACE RESPONSABLE DE NINGÚN PROGRAMA
DE OTRO FABRICANTE Y NO SERÁ RESPONSABLE DEL USO QUE
HAGA DEL MISMO.
10. LEY EN VIGOR
Si ha adquirido este Dispositivo A/V en los Estados Unidos, este
CLUF será gobernado y construido según las leyes del Estado de
Indiana, EE.UU. independientemente de los posibles conflictos con
los principios legales. Si ha adquirido este Dispositivo A/V fuera de
Estados Unidos o la Unión Europea, serán de aplicación las leyes
locales.
11. TÉRMINOS GENERALES
Este CLUF sólo podrá ser modificado por medio de un acuerdo
escrito firmado por usted y AUDIOVOX, y cualquier cambio en los
términos y condiciones de este CLUF realizado de otra forma no
tendrá efecto. Si cualquier parte de este CLUF se considera inválida
o impracticable, la validez, legalidad y practicabilidad del resto del
Acuerdo no deberá verse afectada o modificada en consecuencia.
Este CLUF es la declaración completa y exclusiva del acuerdo entre
usted y AUDIOVOX, que reemplaza todas las propuestas o
acuerdos previos, orales o escritos, y cualquier otra comunicación
entre usted y AUDIOVOX, relacionada con el asunto de que es
objeto este acuerdo. Los Licenciatarios de AUDIOVOX serán
considerados terceras partes beneficiarias de este Acuerdo y
tendrán el derecho para aplicar los términos aquí establecidos.
"SUBSIDIARIA DE AUDIOVOX" significará cualquier persona,
corporación, u otra organización, doméstica o extranjera,
incluyendo pero sin limitación subsidiarias, que estén directa o
directamente controladas por Audiovox Corporation, incluyendo,
pero sin limitarse a Audiovox Consumer Electronics, Inc. Para
propósitos de esta definición solamente, el término "control"
significa la posesión del poder para dirigir o causar la dirección de
la gestión y políticas de una entidad, sea mediante la propiedad
de acciones con derecho a voto o participación en la sociedad,
mediante contrato, o de otra forma, incluyendo la propiedad
directa o indirecta de al menos cincuenta por ciento (50%) de la
participación con derecho a voto en la entidad en cuestión.
7
E
Page 39

Antes de comenzar
Dear Acoustic Research customer,
Gracias por comprar el Radio para Internet Wi-Fi AR. Este producto le permitirá escuchar Radio
Slacker™, Radio en Internet, MP3tunes, el sintonizador AM/FM, pronóstico del tiempo y música
almacenada en la memoria interna o en un dispositivo USB.
Para comenzar a usar su Radio para Internet Wi-Fi, siga las instrucciones de configuración en las
páginas siguientes.
1. Desempaque de la unidad
Usted deberá encontrar los siguientes elementos en la caja:
Radio
Manual del
usuario
Requerimientos adicionales
• Servicio de Internet de banda ancha
• Módem (cable/DSL) de banda ancha, usualmente suministrado por su proveedor de servicio de
Internet
• Una red inalámbrica para el hogar 802.11 b o g (Wi-Fi) o el ruteador/conmutador/bahía Ethernet
con puerto LAN disponible
Para conexiones Wi-Fi, puede ser que Ud. también necesite:
• Su SSID de red inalámbrica
• Su clave de acceso (para redes seguras)
Salga del modo DEMO después de encender: Presione y libere preselección 1, luego
SLEEP/SNOOZE, luego preselección 6.
Guía de inicio
rápido
Adaptador de
corriente
Tarjeta de
información de
configuración
Cable Ethernet
Antena de bucle
AM
Slacker es una marca comercial de Slacker, Inc. en los Estados Unidos y otros países.
8
Page 40

Antes de comenzar
2. Configure sus Cuentas de radio AR Infinite
Para simplificar la configuración en el radio complete los pasos siguientes:
A. Encuentre la Tarjeta de Información de Configuración que contiene el número de dirección MAC
de su radio (MAC: 00-21-2A-XX-XX-XX) y el # de PIN de activación (PIN: XXXX). (Este número se
encuentra también en la pantalla de Información de Dispositivo bajo el menú Configuraciones en
su radio.)
B. Usando cualquier computadora conectada a Internet, vaya al sitio www.arinfiniteradio.com/
setup y siga las instrucciones en línea.
• Usted necesitará ingresar la dirección MAC de su radio y el número de PIN para asociar su radio
con sus selecciones personales.
3. Opcional: Inserte las baterías AAA en la base del radio
Siga los indicadores de polaridad en el compartimiento de las baterías. Las baterías proporcionan
energía cuando el radio pierde el suministro de corriente eléctrica. Recomendamos reemplazar las
baterías cada año o más frecuentemente en el caso de múltiples cortes de energía (para evitar
baterías con baja carga). De lo contrario, la precisión del reloj y de la alarma puede ser afectada
cuando el suministro de electricidad sea interrumpido.
E
* Cuando el respaldo de la batería está funcionando, la pantalla del reloj no se iluminará. Sin embargo, la función de alarma aún ocurre
durante la interrupción de energía si la energía remanente de la batería es suficiente.
9
Page 41

Antes de comenzar
4. Opcional: para usarse con una conexión “Alámbrica”
Use el cable Ethernet suministrado si usted no tiene un punto de acceso inalámbrico (Wi-Fi).
N
A
L
LAN
Módem de banda ancha o
ruteador/conmutador/bahía
Ethernet
5. Conecte y encienda el radio
Toma eléctrica
LAN
10
Salga del modo DEMO
después de encender
Presione y libere preselección 1,
luego SLEEP/SNOOZE, luego
preselección 6.
Page 42

Antes de comenzar
6. Configuración del radio
Para más información sobre
selecciones e ingreso de información
en los menús consulte Uso de los
menús en la página 15-16.
A. NOTA: Cuando usted encienda el radio por
primera vez, este estará en el modo “DEMO”.
Para salir de este modo, presione y suelte
preselección 1, luego SLEEP/SNOOZE, luego
preselección 6 en la parte superior del radio.
B. Después de salir del modo DEMO, el radio
muestra la pantalla Select Language.
Presione ó para elegir su idioma y luego
presione SELECT.
C. La pantalla Network Setup muestra las
opciones de conexión:
• Seleccione Wired para conectar usando un
cable Ethernet. Vaya al paso D para
completar la conexión.
• Seleccione Wireless para conectar usando un
punto de acceso Wi-Fi. Vaya al paso E para
completar la colección.
D. Alámbrico (Wired)
Este método usa un cable Ethernet como se
muestra en el paso cuatro en la página 10
para cablear el radio directamente a su
módem de banda ancha, ruteador, bahía o
conmutador. Asegúrese de que su cable
Ethernet esté adecuadamente conectado.
• Antes de que la conexión esté terminada, el
radio puede tomarse algunos momentos para
verificar actualizaciones y obtener
información de cuenta del servidor. Por favor
espere hasta escuchar un breve mensaje de
felicitaciones y que “Configuración completa,
disfrute la música” se visualice.
• Si el radio requiere su dirección IP, usted
puede encontrar esta información en el
manual o página de configuración de
administración de su módem de banda
ancha, ruteador o punto de acceso.
E. Inalámbrico (Wireless)
Este método usa su punto de acceso Wi-Fi
existente, módem de banda ancha o ruteador
para conectar el radio a su red existente.
Usted necesita conocer su nombre de Red
Inalámbrica (SSID) y si su red inalámbrica tiene
activada la opción de seguridad, usted
necesitará también saber su clave de acceso a
redes inalámbricas (algunas veces llamada
frase de acceso o clave). Puede encontrar esta
información en el manual o página de
configuración de administración de su módem
de banda ancha, ruteador o punto de acceso.
Puede también llamar a su Proveedor de
Servicio de Internet (ISP) si no conoce cómo
accesar la página de administración con
objeto de encontrar esa información. Ellos
usualmente tienen disponible un número
1-800. Una vez que usted tenga la información
siguiente usted puede anotarla para referencia
futura.
• Nombre de la red inalámbrica (SSID)
• Tipo de seguridad (se necesita solamente
si su red tiene la seguridad activada y su
SSID está oculto, no es transmitido)
• Clave de acceso/clave (se necesita
solamente si su red tiene la seguridad
activada)
E
• En la pantalla Network Setup, presione ó
para seleccionar Wired y luego presione
SELECT si su red no suministra acceso Wi-fi.
11
Page 43

Antes de comenzar
• En la pantalla Internet Setup; presione ó
para seleccionar Wireless y luego presione
SELECT. La pantalla Network Setup
entonces muestra dos opciones de
configuración; Presione ó para elegir una
opción y luego presione SELECT.
• Detect Networks: para explorar
automáticamente redes disponibles y
visualizar una lista de las redes de las cuales
poder escoger. Vaya al paso F para
completar la conexión.
• Enter SSID: para ingresar manualmente la
información de sus redes. Seleccione esta
opción si el SSID de sus redes está oculto.
Vaya al paso G para completar la conexión.
F. Si Detect Networks está seleccionado, el
SSID (nombre de la red) de aquellas que se
encontraron se visualizará después de la
búsqueda. Presione
una red de su preferencia y luego presione
SELECT.
• La potencia de la señal es indicada por .
• La red segura es indicada por
segura no tiene una, como en la Red 1 en el
ejemplo anterior).
• Si se selecciona una red segura, a usted se le
pedirá ingresar su clave de acceso en la
pantalla Network Security. El radio debería
entonces lograr la conexión a Internet. Por
favor espere hasta escuchar un breve
mensaje de felicitaciones y a que la pantalla
de reloj se visualice.
• Si el SSID de la red es oculto (no transmitido),
usted solamente verá un icono de candado y
las barras de la potencia de señal como la 4ª.
red que se muestra antes. Presione para
resaltar Enter SSID en la pantalla y luego
12
ó para seleccionar
(una red no
presione SELECT. Luego vaya al paso G para
completar su conexión.
• En ocasiones la interferencia puede bloquear
la visualización de su red en la lista. Si esto
ocurre, presione
y luego presione SELECT para volver a
intentar.
G. Si Enter SSID es seleccionado, la pantalla
Network Security se visualizará. Ingrese su
SSID.
• Si su red es segura (indicado por ), ingrese
su clave de acceso. El radio debería luego
conectarse a Internet. Por favor espere hasta
escuchar un breve mensaje de felicitaciones y
a que la pantalla de reloj se visualice.
Acerca de la clave de acceso:
• No confunda su Clave de Acceso de Red
con su clave de inicio de sesión del
sistema Windows o Mac ya que pueden
ser diferentes.
• Algunos ruteadores o puntos de acceso
inalámbricos pueden pedir la Clave de
Acceso de Red Inalámbrica consistente en
una clave o en una frase de contraseña.
Esos términos son los mismos.
Acerca de la frase de acceso:
• Este radio soporta puntos de acceso
seguro usando las normas de claves de
Privacía Equivalente Inalámbrico (Wireless
Equivalent Privacy) (WEP) o Acceso
Protegido Wi-Fi (Wi-Fi Protected Access)
(WPA y WPA2).
• Las claves WEP pueden tener una
longitud de 10 o 26 caracteres
(caracteres: 0-9 y A-F (ejemplo,.
6E78214A52). Note que algunos
ruteadores Wi-Fi soportan generación de
frases de acceso para seguridad WEP. Sin
embargo, no hay norma de la industria
para la generación de frase de acceso
WEP y este radio no soporta frases de
acceso WEP.
• Si usted está usando un punto de
acceso seguro WEP, ingrese la clave WEP
(formato HEX) en lugar de la frase de
acceso.
para mostrar Refresh List
Page 44

Antes de comenzar
Después de conectar a Internet
• Si usted no activó sus cuentas de Infinite
Radio, o si el radio no puede obtener sus
detalles del servidor Infinite Radio, el radio
puede pedir su código postal.
• Ingrese su código postal. El radio debería
conectarse a Radio por Internet.
• Si su radio logró conectarse a Internet usted
escuchará un mensaje de bienvenida
transmitido desde Internet.
Modo demostración
El radio tiene preinstalada una demostración.
Para salir de la demostración presione y libere los
botones en secuencia en la parte superior del
radio: preselección 1, luego SLEEP/SNOOZE,
luego preselección 6.
Para obtener el firmware y la
información más reciente
El radio le alertará automáticamente para
actualizar si existe disponible un nuevo firmware.
Puede ir también al sitio www.arinfiniteradio.
com para obtener las actualizaciones de
firmware más recientes y el manual del usuario
para su radio. Siga las instrucciones ahí para
descargar e instalar los archivos.
E
Preguntas frecuentes
Para respuestas a preguntas frecuente (FAQ's),
vaya a www.arinfiniteradio.com.
13
Page 45

Controles generales
Al frente y en la parte superior
Preselecciones
de estación
On/standby
Fuente de audio
Información
del tiempo
“Me encanta”
“Prohibirlo”
“Etiquetarlo” Reproducir/pausa
Menú arriba
Previo/explorar
Atrás/reversa
Menú atrás
Menú abajo
WEATHER
Temporizador para
dormir/dormitar
Volumen
Ajuste de alarma
Ajuste del reloj
Inicio/Menú
principal
Grabar
Visualizar
Siguiente/explorar/
avance rápido/
menú adelante
Menú seleccionar
Parte trasera
Puerto LAN (para
ARIR200 solamente)
Audífono/salida de
línea de audio
Usted puede conectar dispositivos USB al puerto
USB: El radio puede reproducir archivos de audio
MP3, WMA y RealAudio almacenados en el
dispositivo USB conectado.
RealAudio es una marca comercial o una marca comercial registrada de RealNetworks, Inc.
14
Conexión para
antena de bucle AM
Antena FM
Conexión de entrada
para adaptador de
corriente
Puerto USB de
alta velocidad
Page 46

Controles Generales
Encender o apagar
Presione ON/STANDBY para encender el radio o
apagarlo (modo standby).
Control de volumen
Gire la perilla VOL. para ajustar el volumen.
Selección de la fuente
Presione SOURCE repetidamente para
seleccionar entre las siguientes fuentes de
contenido de audio:
• Radio Slacker
• Radio por Internet
• MP3tunes
• Sintonizador FM
• Sintonizador AM
• Memoria interna
• Entrada de USB
Pronóstico del tiempo
Presione WEATHER para checar el pronóstico
actual y a 3 días. Para más información consulte
la página 27.
Reloj y alarma
• Presione CLOCK una vez para mostrar la hora
actual o presione y sostenga para ajustar la
hora del reloj.
• Presione ALARM una vez. Luego presione
ó para seleccionar activar, desactivar,
establecer la hora de alarma o seleccionar el
sonido de alarma y luego presione SELECT.
• Para más información consulte la página
17-18.
Uso de los menús
La ventana de visualización muestra la pantalla
de reproducción, la pantalla de navegación, la
pantalla de configuraciones, mensajes, etc.
Lo que aparece en la ventana varía dependiendo
de la función que usted esté usando.
Para visualizar el menú Fuente:
• Presione
para selección de una fuente de audio.
• Now Playing – aparece en la parte superior
del menú Fuente cuando una estación está
en reproducción. Seleccione la opción para
regresar a la pantalla de reproducción.
Para navegar en los menús:
• Use los controles de navegación para hacer
selecciones e ingresar información.
SELECT
para visualizar el menú Fuente
Mueve resaltado
Mueve resaltado abajo
Mueve la selección/navega a la
izquierda
Mueve la selección/navega a la
derecha
Con rma la opción o caracter selec-
cionado
E
15
Page 47

Controles generales
Para ingresar caracteres:
• Algunos menús requieren la entrada de
caracteres (por ejemplo, clave de acceso,
código postal). El código postal es útil para
ajuste de la hora del reloj, pronóstico del
tiempo y para búsqueda de estaciones de
radio en Internet local en su área.
• Al ingresar caracteres, presione ó para
seleccionar los caracteres alfanuméricos
listados en la parte inferior de la pantalla.
Presione SELECT para confirmar las
selecciones.
• Presione ó para elegir entre usar
mayúsculas, minúsculas, caracteres numéricos,
especiales o comandos.
Juego de caracteres
( ó )
Mayúscula
Minúscula
Numérico
Especial
Comandos
Opciones ( ó )
A B C D E...X Y Z
a b c d e...x y z
1 2 3 4 5 6 7 8 9 0
_ – ! @ # $ % ^ & *
(lea a continuación)
Para salir de la pantalla de entrada de
datos sin guardar, seleccione el
comando Cancelar.
• Comandos: presione
elegir el comando deseado y luego presione
SELECT.
Comandos
DONE (HECHO)
Delete
(Eliminar)
Space
(Espacio)
Back (Atrás)
Next
(Siguiente)
Cancel
(Cancelar)
16
Acciones
Termina la entrada
Elimina el dato ingresado y resal-
tado y mueve el resaltado atrás
un espacio.
Inserta un espacio en blanco, los
caracteres a la derecha se moverán sobre una ubicación
Mueve el resaltado atrás dentro
del caracter ingresado sin
eliminar
Mueve el caracter resaltado
adelante dentro del caracter
ingresado sin eliminar
Sale de la pantalla de entrada de
datos sin cambios
ó (ò ó ) para
Page 48

Reloj y alarma
Para accesar el reloj digital
El Radio Wi-Fi para Internet incluye también un
reloj digital el cual será actualizado
automáticamente cuando se conecte a Internet.
potencia de la
conexión Wi-Fi
temperatura actual
estatus de reloj de alarma
• Presione CLOCK para mostrar el reloj sin
interrumpir la reproducción de audio.
• Para ocultar el reloj y regresar la visualización
a la pantalla anterior, presione CLOCK otra
vez.
• El reloj se visualiza también cuando se apaga
el radio (modo standby).
Ajuste del reloj
Con su código postal establecido, el tiempo del
reloj la hora del reloj será automáticamente
actualizado cuando se conecte a Internet. Sin
embargo, usted todavía puede ajustarlo
manualmente. El día, fecha y hora pueden ser
actualizados solamente conectando a una
estación de radio de Internet.
1. Presione y sostenga CLOCK hasta que el
tiempo de la hora sea resaltado (en color
revertido) en la pantalla.
6. Presione
PM.
7. Presione SELECT otra vez para confirmar la
configuración.
Usted puede también ajustar la hora
del reloj manualmente y desactivar
la actualización de tiempo automática
(Auto Sync) cuando se conecte a Internet.
Refiérase a Configuraciones avanzadas
en la página 28 para más información.
ó para seleccionar entre AM y
Uso del reloj de alarma
Para establecer la hora y el sonido para
despertar:
1. Presione ALARM para mostrar el menú
alarma. Luego presione
Set Alarm Time y luego presione SELECT.
2. El tiempo en horas del reloj de alarma es
resaltado (en color revertido) en la pantalla.
Presione ó para seleccionar el tiempo en
horas para despertar.
ó para resaltar
E
2. Presione ó para seleccionar el tiempo en
horas.
3. Presione
minutos.
4. Presione
minutos.
• Si usted ha establecido el modo de
visualización de reloj en 24 horas (refiérase a
la página 28), presione SELECT después de
ajustar el tiempo de minutos y salte los pasos
5-7.
5. Presione para moverse a AM/PM.
para moverse al tiempo de
ó para seleccionar el tiempo en
3. Presione para moverse al tiempo de
minutos.
4. Presione
minutos para despertar.
5. Presione
• Si usted ha configurado el reloj para el modo
de visualización de 24 horas (consulte la
página 28), seleccione SELECT y luego vaya
al paso 7.
6. Presione ó para seleccionar entre AM y
PM y luego presione SELECT.
ó para seleccionar el tiempo en
para moverse a AM/PM.
17
Page 49

Reloj y alarma
7. Presione ó para resaltar Select Sound y
luego presione SELECT.
8. Presione ó para resaltar una de las
fuentes de sonido para despertar:
• Timbre
• Preselecciones AM
• Preselecciones FM
• Preselecciones Slacker
• Slacker Library (se requiere cuenta Premium)
• Preselecciones Internet
Leas las secciones relevantes (por
ejemplo radio en Internet) en este
manual del usuario para entender
cómo preseleccionar estaciones.
9. Presione SELECT en la fuente resaltada de
sonido para despertar y luego presione ó
para seleccionar el sonido deseado o el
elemento de preselección.
• Cuando la alarma se active, la hora de alarma
establecida (por ejemplo, AL: 7:00AM) se
mostrará en la esquina inferior izquierda de la
pantalla del reloj.
• Cuando la alarma se apague, "AL: Off" se
mostrará en la pantalla del reloj.
Para desactivar el reloj de alarma cuando
suene:
• Presione ALARM o ON/STANDBY para
apagar el reloj de alarma. Sonará otra vez al
siguiente día si las configuraciones no han
sido cambiadas.
O
• Presione SLEEP/SNOOZE para apagar
temporalmente el reloj de alarma para un
tiempo adicional para dormir. La alarma
sonará otra vez después de 10 minutos.
O
• El reloj de alarma se apagará
automáticamente después de 60 minutos sin
presionar botón alguno.
Modo dormir
Usted puede establecer el radio para que
reproduzca durante un tiempo establecido antes
de que se apague automáticamente.
1. Presione SLEEP/SNOOZE para activar el
modo Dormir mientras escucha el radio.
10. Presione SELECT para confirmar el elemento
seleccionado como el sonido para despertar.
• Cuando el radio pierda el suministro de
electricidad, el reloj de la alarma recibirá
energía de las baterías colocadas en la base
(consulte la página 9). El sonido para
despertar seleccionado se revertirá al timbre
predeterminado.
• Cuando el sonido seleccionado ya no esté
disponible, sonará el timbre predeterminado.
Para activar o desactivar el reloj de alarma:
1. Presione ALARM.
2. Presione ó para resaltar Turn On o Turn
Off y luego presione SELECT.
18
• El tiempo predeterminado es de 15 minutos.
• Si el radio está pagado, presione SLEEP/
SNOOZE para activar el modo Dormir con el
último canal que se usó.
2. Si es necesario, presione SLEEP/SNOOZE otra
vez para añadir tiempo extra para dormir
hasta 90 minutos. Cada presión del botón
agregará 15 minutos.
• El tiempo remanente antes de apagar
automáticamente se mostrará en la parte
inferior derecha de la pantalla del reloj,
reemplazando la información del tiempo.
• Seleccione OFF (presione SLEEP/SNOOZE
una vez más después de 90 minutos) si usted
decide no usar el modo dormir. El radio se
apagará.
• Para cancelar más pronto el modo Dormir,
presione ON/STANDBY.
Page 50

Radio Slacker
Radio Slacker es un socio proveedor de
contenido streaming premium el cual ofrece
“personalización” a través del uso de los botones
"Me encanta" y "Prohibido" seleccionables. Usa
también recomendación de artistas y artistas
relacionados para ayudar adicionalmente al
descubrimiento de la música y al disfrute de las
estaciones.
Usted puede escuchar Radio Slacker con una
cuenta anónima por un tiempo limitado, aunque
solamente con alguna funcionalidad limitada.
Regístrese para una cuenta GRATUITA con objeto
de aprovechar las ventajas del sistema de
creación de estaciones personalizadas y de
calificación de canciones inteligente. También
está disponible una suscripción premium, pero
no se requiere. Para más información respecto de
las cuentas de Radio Slacker, visite www.slacker.
com/partners/audiovox.
Para usar su cuenta Slacker, la
información de cuenta en el radio
(consulte Información de cuenta
en la página 28) debe coincidir con la
información en línea de su cuenta Slacker.
Acceso a Radio Slacker
• Presione SOURCE repetidamente para
seleccionar Slacker Radio.
O
• Presione
en el menú Fuente y luego presione SELECT.
ó para resaltar Slacker Radio
Para escuchar Radio Slacker
Para seleccionar una estación (usuarios de
cuenta gratuita):
1. Presione ó para resaltar un género de
estación y luego presione SELECT.
• Algunos géneros pueden contener
subgéneros para selección.
• Las estaciones personalizadas pueden ser
creadas solamente a través del sitio web de
Slacker.
2. Mientras una estación esté resaltada,
presione SELECT. La estación seleccionada
comenzará a reproducir.
• Presione para pausar o reanudar la
reproducción.
3. Presione para saltar a la siguiente canción.
• La cuenta gratuita limita a 6 skips por hora
por estación.
Para seleccionar una estación (usuarios con
cuenta Premium):
1. Presione
Library y luego presione SELECT.
ó para resaltar) Station o
E
2. Cuando Station esté seleccionado, presione
ó para resaltar un género de estación y
luego presione SELECT.
• Cuando Library esté seleccionado, presione
ó para resaltar un artista y luego
presione SELECT para además seleccionar
una canción del artista elegido.
19
Page 51

Radio Slacker
Para guardar la estación actual como una
preselección:
1. Seleccione una estación.
2. Presione y sostenga 1, 2, 3, 4, 5 o 6 en la
parte superior del radio hasta que se escuche
un sonido de bip para guardar la estación
actual en este botón de preselección.
• Para escuchar una estación de preselección,
presione 1-6.
• Para editar una estación de preselección,
repita los pasos anteriores para sobrescribir la
estación guardada previamente.
• Usted puede asignar una estación de
preselección como el sonido de despertador
de la alarma, para más información consulte
la página 18.
Para marcar una canción como favorita:
Presione mientras escucha. La canción actual
será marcada como una favorita.
• El botón
se escucha la siguiente vez.
• Las canciones marcadas como favoritas
aparecerán en la lista de reproducción más
frecuentemente.
• Para quitar el marcador a la canción como
favorita, presione mientras la misma
canción está en reproducción.
Para crear una estación de artista en base al
artista actual:
Presione y sostenga mientras escucha. Una
nueva estación de artista será creada usando el
artista actualmente en reproducción.
• La nueva estación será nombrada usando el
nombre del artista y el término Radio.
• La estación de artista recién creada
comenzará la reproducción.
• Es posible también crear una estación de
artista presionando y seleccionando desde el
menú etiqueta.
se iluminará si la misma canción
Para además administrar sus
estaciones de artista, quitar la marca
de canciones prohibidas o artistas
prohibidos, por favor inicie sección en su
cuenta Slacker (www.slacker.com) desde su
PC para administración de estación
avanzada.
Opciones de etiqueta
Hay dos opciones disponibles mientras usted
está escuchando una estación de Radio. Presione
ó para resaltar una opción en el menú
Opciones de Etiqueta y luego presione SELECT
para proceder.
• Para crear una estación
Para crear una nueva estación usando el
artista en reproducción actualmente como la
canción de origen (esta función es la misma
que presionar y sostener
escucha).
• Enviar a alarma
Para asignar la estación en general para ser
usada como el sonido de despertador del
reloj de alarma.
mientras
Para prohibir una canción en la estación
actual:
Presione mientras escucha. La canción actual
será marcada como prohibida.
Para prohibir un artista en la estación actual:
Presione y sostenga mientras escucha. El
artista actual será marcado como prohibido.
20
Page 52

Radio en Internet
Con la radio en Internet usted puede escuchar
música, noticias, deportes, avisos del tiempo o
programas de debates en otros países o en su
propia ciudad. Ofrece la mayor parte de las
selecciones musicales de todo el mundo, y la
mayoría de las estaciones son gratis.
Para accesar radio en Internet
• Presione SOURCE repetidamente para
seleccionar Internet Radio.
O
• Presione
en el menú Fuente y luego presione SELECT.
ó para resaltar Internet Radio
Para escuchar Radio en Internet
Para seleccionar una estación:
Las estaciones de radio en Internet están
clasificadas de acuerdo al género musical, a la
naturaleza de la conversación y a la ubicación
geográfica.
1. Presione ó para resaltar una categoría o
subcategoría y luego presione SELECT.
• My Genres – sus géneros favoritos juntos en
• My Favorites – una lista de sus estaciones de
• Music – estaciones musicales clasificadas por
• Talk – estaciones de conversación y debate
• My Local – una lista de estaciones de radio
• By Region – estaciones musicales clasificadas
un lugar para más fácil navegación
radio en Internet favoritas
género y subgéneros (por ejemplo, Blues, Hip
Hop)
clasificadas por la naturaleza de la
conversación (por ejemplo, noticias de
negocios, religión)
en Internet clasificadas de acuerdo al código
postal suministrado por el usuario
por regiones geográficas
Para guardar la estación actual como una
preselección:
1. Seleccione una estación.
2. Presione y sostenga 1, 2, 3, 4, 5 o 6 en la
parte superior del radio hasta que un sonido
de bip se escuche para guardar la estación
actual en ese botón de preselección.
• Usted puede guardar hasta 6 estaciones en
cada género.
• Para escuchar una estación de preselección,
presione 1-6.
• Para editar una estación de preselección,
repita los repita los pasos anteriores para
sobrescribir la estación previamente
guardada.
• Usted puede asignar una estación de
preselección como el sonido para despertar
de la alarma, para más información consulte
la página 18.
Para guardar la estación actual como Mis
Favoritos:
Presione
Alternativamente:
1. Presione .
2. Presione
Para escuchar una estación en Mis Favoritos:
Seleccione una estación de My Favorites en el
menú principal de Radio en Internet y luego
presione SELECT para iniciar la reproducción.
(Lea Para seleccionar una estación para más
información).
Para remover una estación de Mis Favoritos:
Presione
favorita.
mientras escucha.
ó para resaltar Add to
Favorites y luego presione SELECT.
mientras escucha una estación
E
2. Mientras una estación esté resaltada,
presione SELECT. La estación seleccionada
comenzará la reproducción.
21
Page 53

Radio en Internet
Para asignar la estación actual como el sonido
para despertar del reloj de alarma:
1. Presione
2. Presione ó para resaltar Send to Alarm y
luego presione SELECT.
Para grabar radio en Internet
¡Advertencia! El uso de la característica de
grabación es solamente para utilización personal.
(Los archivos no pueden ser transferidos o
movidos desde la memoria interna).
Para grabar la estación actual:
1. Presione para iniciar la grabación.
2. Presione para detener la grabación.
• La grabación será almacenada en la memoria
interna del radio.
• Para reproducción, por favor consulte
Internal Memory en la página 25.
• El radio nombra cada grabación <Nombre de
estación> <Mes-Fecha> <Registro de fecha y
hora>. Por ejemplo: JazzMan 1-21 445.
.
Para agregar estaciones de radio en
Internet
Para agregar estaciones de radio en Internet:
Por favor visite www.arinfiniteradio.com/
portal e inicie sesión en su cuenta de usuarios
para manualmente agregar nuevas estaciones
bajo Mis Favoritos.
22
Page 54

MP3tunes
MP3tunes es un Proveedor de Servicio de Música
(MSP) y la sede de MP3tunes Locker, un espacio
musical en línea, seguro, que permite escuchar
en forma ilimitada. Los usuarios de MP3tunes
pueden subir sus propias colecciones de música
al Locker MP3tunes y escuchar a través de este
radio cuando la computadora esté apagada.
El MP3tunes Locker está disponible en una
edición libre de anuncios, junto con el MP3tunes
Premium Locker que permite archivos de música
más grandes, acceso completo al arte gráfico de
las portadas de álbumes y acceso total a soporte
al cliente.
Para más información sobre MP3tunes, visite
www.mp3tunes.com.
Configuración del MP3tunes Locker
1. Visite www.mp3tunes.com y configure una
cuenta MP3tunes. Hay opciones de
suscripciones pagadas y gratuitas.
• Usted puede también configurar una cuenta
MP3tunes durante la activación en línea de
este radio.
2. Suba su colección musical a su MP3tunes
Locker.
• MP3tunes ofrece varios métodos para subir
su colección musical. Por favor consulte el
sitio web de MP3tunes para recomendaciones
e instrucciones.
3. Asegúrese de que la información de su
cuenta MP3tunes en este radio sea la misma
que en su cuenta MP3tunes existente.
• Para checar o editar la información de su
cuenta MP3tunes, por favor consulte
Información de Cuenta en la página 28 de
este manual del usuario.
Para accesar el modo MP3tunes
• Presione SOURCE repetidamente para
seleccionar MP3tunes.
O
• Presione
menú Fuente y luego presione SELECT.
ó para resaltar MP3tunes en el
Para escuchar música en MP3tunes
Locker
Sus archivos de música están clasificados de
acuerdo a artistas, álbumes y listas de
reproducción.
1. Presione ó para resaltar una categoría o
subcategoría y luego presione SELECT.
2. Presione SELECT ó para reproducir
cualquier archivo musical del artista, álbum o
lista de reproducción seleccionado.
• Para reproducir un archivo de música
específico, presione SELECT para abrir el
artista, álbum o lista de reproducción
seleccionado. Presione ó para resaltar un
archivo específico y luego presione SELECT ó
.
3. Presione
reproducción.
4. Presione
para pausar o reanudar la
para saltar al siguiente archivo.
E
5. Presione
segundos del archivo actual para saltar al
archivo anterior. De lo contrario, usted
regresará al inicio del archivo actual.
dentro de los primeros 3
23
Page 55

Sintonizador FM/AM
Antena FM/AM
• Para recepción FM, desenrolle la antena FM
en la parte posterior del radio, asegurándose
de que esté completamente extendida (usted
puede si lo desea pegarla con cinta adhesiva
a la pared detrás del radio. Entre más alto
mejor.)
• Para recepción AM, conecte la antena AM de
bucle a la parte posterior del radio. Gire la
antena AM para mejor recepción.
Para accesar radio FM/AM
• Presione SOURCE repetidamente para
seleccionar FM Tuner o AM Tuner.
O
• Presione ó para resaltar FM Tuner o AM
Tuner en el menú Fuente y luego presione
SELECT.
indicador de señal
estéreo
Para escuchar el radio FM/AM
Para seleccionar una estación:
1. Presione ó para ajustar la frecuencia.
2. Presione y sostenga
emita un sonido de bip para comenzar la
búsqueda a través del rango de frecuencias.
El radio deja de buscar cuando detecta la
siguiente estación.
ó hasta que el radio
Para asignar la estación actual como el sonido
para despertar del reloj de alarma:
1. Presione
2. Presione
luego presione SELECT.
.
ó para resaltar Send to Alarm y
Grabación de radio FM/AM
¡Advertencia! El uso de la característica de
grabación es solamente para utilización
personal. (Los archivos no pueden ser
transferidos o movidos desde la memoria
interna).
Para grabar la estación actual:
1. Presione para iniciar la grabación.
92.3
2. Presione para detener la grabación.
• La grabación será guardada en la memoria
interna del radio.
• Para la reproducción, refiérase a Internal
Memory en la página 25.
• El radio nombra cada grabación <Fuente>
<Frecuencia de estación> <Registro de fecha y
hora>. Por ejemplo: JazzMan 1-21 445.
Por ejemplo: FM99.5 1-21 1245.
Para guardar la estación actual como una
preselección:
1. Seleccione una estación.
2. Presione y sostenga 1, 2, 3, 4, 5 o 6 en la
parte superior de radio hasta que un sonido
de bip se escuche para guardar la estación
actual con ese botón de preselección.
• Para escuchar una estación de preselección,
presione 1-6.
• Para editar una estación de preselección
repita los pasos anteriores para sobrescribir la
estación previamente guardada.
• Usted puede asignar una estación de
preselección como el sonido para despertar
de la alarma, para más información consulte
la página 18.
24
Page 56

Memoria interna
La memoria interna del radio almacena hasta 10
horas de grabaciones de radio en Internet y del
sintonizador FM/AM.
Para accesar la memoria interna
• Presione SOURCE repetidamente para
seleccionar Internal Memory.
O
• Presione
Memory en el menú Fuente y luego presione
SELECT.
ó para resaltar Internal
Para escuchar grabaciones
1. Presione ó para resaltar una grabación y
luego presione SELECT.
2. Presione ó para resaltar Play y luego
presione SELECT para iniciar la reproducción.
3. Presione
reproducción.
4. Presione
grabación.
5. Presione
4 segundos de la grabación actual para saltar
a la grabación anterior. De lo contrario usted
regresará al inicio de la grabación actual.
para pausar o reanudar la
para saltar a la siguiente
para saltar dentro de los primeros
Para eliminar grabaciones
1. Presione ó para resaltar una grabación
no deseada y luego presione SELECT.
2. Presione
presione SELECT.
3. Presione ó para resaltar Ye s en la
pantalla de confirmación y luego presione
SELECT.
Para eliminar todas las grabaciones:
1. En la lista de grabaciones, presione
para resaltar Delete All y luego presione
SELECT.
2. Seleccione Continue en la pantalla de
confirmación y luego presione
SELECT.
• Usted puede también borrar la memoria
interna desde el menú Configuraciones.
Refiérase a Configuraciones avanzadas en
la página 28 para más información.
ó para resaltar Delete y luego
ó
E
25
Page 57

Entrada USB
El radio puede reproducir archivos de música
(formatos mp3, wma y RealAudio (RA8 y G2))
almacenados en un dispositivo USB externo
conectado al mismo. El puerto de conexión USB
está ubicado en la parte posterior del radio.
Para accesar el modo de entrada
USB
• Presione SOURCE repetidamente para
seleccionar USB Input.
O
• Presione ó para resaltar USB Input en el
menú Fuente y luego presione SELECT.
Para escuchar archivos de música
1. Presione , , ó para navegar a través
del directorio del dispositivo USB y seleccione
un archivo de música presionando SELECT.
• Presione ó SELECT para entrar a una
carpeta.
• Presione
2. Presione
presione SELECT para iniciar la reproducción.
para salir de una carpeta.
ó para resaltar Play y luego
Para eliminar archivos
1. Presione ó para resaltar un archivo no
deseado y luego presione SELECT.
2. Presione
presione SELECT.
3. Presione ó para resaltar Ye s en la
pantalla de confirmación y luego presione
SELECT.
ó para resaltar Delete y luego
3. Presione para pausar o reanudar la
reproducción.
4. Presione para saltar a la siguiente
grabación.
5. Presione
4 segundos de la grabación actual para saltar
a la grabación anterior. De lo contrario usted
regresará al inicio de la grabación actual.
26
para saltar dentro de los primeros
Page 58

El Tiempo
Transmisión del Tiempo
Su radio incluye una suscripción de
cortesía bajo demanda para el
estado del tiempo por cuatro años
de WeatherBug®.
Está disponible una transmisión digital del
tiempo que incluye:
• Lectura texto-a-voz del pronóstico del tiempo
para el código postal asociado con el radio
(puede ser activada o desactivada en el menú
Configuraciones). La reproducción del audio
pausará durante la lectura.
• Visualización en pantalla de las condiciones
incluyendo temperatura actual, temperatura
alta y baja del día, condición del tiempo
actual, condiciones de viento y humedad.
• Visualización gráfica de las condiciones del
tiempo para pronóstico de 3 días:
Desconocido
Soleado/despejado
Mayormente soleado
Parcialmente nublado
Mayormente nublado
Tormentas severas
Agua nieve
Mezcla congelada
Nieve
Fuerte nevada
Ventoso
Niebla
Para checar el tiempo del día actual:
Presione WEATHER una vez.
Para checar el pronóstico del tiempo a 3 días:
Presione WEATHER dos veces para checar el
pronóstico del tiempo para el día actual y los dos
siguientes días.
E
Nublado
Despejado (por la noche)
Mayormente despejado
(por la noche)
Parcialmente nublado (por
la noche)
Mayormente nublado (por
la noche)
Brumoso
Brumoso (por anoche)
Lluvia
Aguacero
Tormentas
Para regresar a la fuente de audio anterior o a
la pantalla de reproducción:
Presione WEATHER una tercera vez.
Alerta del Sistema de Transmisión
de Emergencia
Cuando se reciba una alarma del sistema de
transmisión de emergencia, el radio:
• pausará la reproducción de audio actual,
• sonará el chirrido de alerta,
• visualizará el texto de advertencia de
emergencia en la pantalla,
• usará texto-a-voz para leer la alerta
Usted puede seleccionar el nivel mínimo de
alertas de emergencia para ser notificado por el
chirrido de alerta o la lectura de texto-a-voz en el
menú Configuraciones.
27
Page 59

Configuraciones
Para cambiar las configuraciones
del radio
Para cambiar las configuraciones del radio:
1. Presione
2. Presione ó para resaltar Settings y luego
presione SELECT.
3. Presione ó para resaltar una
configuración y presione SELECT para entrar
al submenú.
• Repita este paso para navegar a más
configuraciones y submenús.
4. Para cambiar la configuración de voz presione
ó para resaltar una opción preferible y
luego presione SELECT para confirmar.
para visualizar el menú Fuente.
Información de cuenta
• Para cambiar la información de inicio de
sesión (nombre de usuario y clave de acceso)
enviada por el radio cuando se intenta iniciar
sesión en los servicios Slacker y MP3tunes.
• Para editar el código postal para funciones de
hora y tiempo.
Si usted ha cambiado la información de su
cuenta Slacker o del sitio web de
MP3tunes, por favor edite bien la
información de cuenta en esta
configuración. La información aquí debe coincidir
con la información de su cuenta en línea.
Información de dispositivo
Para mostrar la versión firmware, la dirección
MAC y el número de PIN del radio. La dirección
MAC y el PIN son necesarios para activar sus
cuentas de AR Infinite Radio.
Pantalla
Para cambiar el brillo y contraste de la pantalla.
28
Configuración de red
Para cambiar la configuración de red del radio
(alámbrica o inalámbrica). Para más información
consulte la página 11.
Actualizaciones de software
Para checar si está disponible una versión de
firmware más nueva. Siga las instrucciones en la
pantalla para actualización.
Tiempo
• Para activar o desactivar la lectura texto-a-voz
cuando usted presione el botón WEATHER.
• Para seleccionar el género y acento (Estados
Unidos/Reino Unido) para la voz usada para la
lectura texto-a-voz.
• Para seleccionar el nivel mínimo de alertas de
emergencia a ser notificadas o por el chirrido
de alerta.
• Para seleccionar el nivel mínimo de alertas de
emergencia a ser notificadas o por la lectura
texto-a-voz.
Configuraciones avanzadas
• Modo Reloj
– Auto Sync y Manual: para seleccionar entre
actualización de la hora del reloj manual y
automática. Si Auto Sync está seleccionado,
la hora del reloj se actualizará cada 5 minutos
mientras verifica en línea la actualización del
tiempo.
– Time Display: para seleccionar entre los
modos de visualización de 12 horas y 24
horas.
• Format memory: para borrar todas las
grabaciones en la memoria interna.
• Reset to defaults: para restaurar los menús a
los valores predeterminados de fábrica. Las
configuraciones siguientes serán restauradas:
– Nombre de usuario Slacker, clave de acceso
Slacker, opciones de visualización, selección
de idioma, entrada de código postal,
configuración de conexión de red, reloj,
alarma, nivel de alerta de tiempo, selecciones
de Texto-a-voz , modo demostración.
– Las grabaciones en memoria interna NO serán
borradas.
• Set Language: para cambiar el idioma en
pantalla.
Algunos menús pueden requerir
entrada de caracter, consulte la
página 15-16 para tips sobre las
entradas de caracteres.
Page 60

Más información
Tips para solución de problemas
El radio no puede encender.
• Conecte el adaptador de corriente CA en el
radio y en una toma de corriente en la pared.
• Cheque la toma de corriente conectando otro
dispositivo.
• Presione y sostenga ON/STANDBY por 10
segundos para reiniciar la unidad.
No hay sonido.
• Incremente el nivel de volumen.
• Asegúrese de que los audífonos no estén
conectados.
El radio no responde a las presiones de tecla.
• El radio puede dejar de funcionar
temporalmente si es sometido a interferencia
electrostática. Para reanudar la operación
normal, puede ser necesario reiniciar el radio
desconectando y volviendo a conectar la
corriente o removiendo y reinstalando las
baterías en la base del radio.
El radio no se puede conectar a Internet.
• Cheque si su punto de acceso está activado.
• Cheque si el activador inalámbrico está
conectado en forma segura y correcta.
• Asegúrese de que un cortafuegos no esté
bloqueando alguno de los puertos de salida.
• Asegúrese de que el punto de acceso no
restrinja conexiones a direcciones MAC
específicas.
• Asegúrese de que haber ingresado la clave de
acceso correcta. La clave de acceso es
sensible al uso de mayúsculas y minúsculas.
• Su conexión inalámbrica a Internet puede
exceder el rango máximo para recepción.
Reubique el radio para Internet más cerca del
punto de acceso inalámbrico.
• Las configuraciones de red del radio pueden
ser incorrectas. Verifique las configuraciones
de red en Configuración de Red en el Menú
Configuraciones.
La hora del reloj es incorrecta.
• Refiérase a Información de Cuenta en el menú
Configuraciones y asegúrese de haber
ingresado correctamente su código de acceso
como referencia para actualización
automática de la hora del reloj.
La información del tiempo es incorrecta.
• Refiérase a Información de Cuenta en el
Menú Configuraciones y asegúrese de haber
ingresado correctamente su código de acceso
como referencia para información del tiempo.
Las alertas del Sistema de Transmisión de
Emergencia y de Información del Tiempo no
son leídos en alto volumen.
• Refiérase a Tiempo en el menú
Configuraciones y asegúrese de haber
activado la característica de lectura de textoa-voz.
La radio conecta a Internet pero no puede
reproducir una estación en particular.
• Cheque si la estación está transmitiendo
todavía.
• Puede ser que la estación haya alcanzado el
número máximo de escuchas simultáneos.
• El enlace a la estación de radio puede ser
obsoleto.
• La conexión a Internet entre el servidor de la
estación de radio y el radio puede ser
demasiado lenta.
Audio intermitente.
• La banda ancha de su LAN inalámbrica puede
ser demasiado lenta. Acerque el radio al
punto de acceso y asegúrese de que no haya
obstáculos entre ellos.
• La velocidad de transmisión real de la
transmisión de radio digital depende del
proveedor de servicio (por ejemplo, la
estación de radio en Internet).
No puede saltar a la siguiente canción
mientras está escuchando el Radio en
Internet.
• Saltar a la siguiente canción en Radio en
Internet no está disponible. (Solamente
Slacker Radio)
Mala recepción del sintonizador FM/AM.
• Cheque la conexión de la antena.
• Mueva la antena.
• Apague los equipos eléctricos cercanos, tales
como secador de pelo, aspiradora y horno de
microondas.
E
29
Page 61

Más información
No se puede grabar el radio.
• La característica de grabación está disponible
solamente para radio en Internet y
sintonizador AM/FM.
• La memoria interna del radio puede estar
llena.
• Renueva algunas de las grabaciones viejas.
No se puede reproducir archivos de música en
un dispositivo USB conectado.
• Asegúrese de que el dispositivo USB esté bien
conectado.
• Los archivos de música del tipo Digital Right
Management (DRM) no serán reproducidos.
• El radio soporta solamente sistemas de
archivo FAT12, 16 y 32. Otros sistemas de
archivo de Linux, MAC o NTFS no son
soportados.
El botón LED de ON/STANDBY está
parpadeando.
• El LED está parpadeando (intervalo de 5
segundos) cuando la unidad está recibiendo
energía de las baterías de respaldo debido a
interrupción del suministro eléctrico. Por
favor verifique su suministro de corriente CA.
• Si el LED está parpadeando aún más rápido
(intervalo de 3 segundos), esto significa que
la unidad está recibiendo energía de baterías
de respaldo débiles. Por favor reemplace las
baterías de respaldo (refiérase a la página 9).
Recomendamos que remplace las baterías
cada año (o con más frecuencia en caso de
múltiples cortes de energía) para evitar
energía de baterías descargadas. De lo
contrario, la precisión del reloj y de la alarma
puede ser afectada cuando el suministro de
electricidad sea interrumpido.
No se puede detener el modo demostración.
• Para salir de la demostración, presione y
libere en secuencia los botones en la parte
superior del radio: preselección 1, luego
SLEEP/SNOOZE, luego preselección 6.
Mi pregunta no fue respondida aquí.
• Visite www.arinfiniteradio.com para una lista
actualizada de las preguntas frecuentes.
Advertencia sobre derechos de
autor
Este reproductor es para su uso personal
solamente. La grabación o duplicación no
autorizada de material con derechos de autor
puede violar los derechos de terceras partes y
puede ser contraria a las leyes de derechos de
autor.
Para checar actualizaciones
Visite www.arinfiniteradio.com para las más
recientes noticias y actualizaciones de firmware
para nuestro radio para Internet Wi-Fi.
Especificación técnica
Producto: Radio para Internet Wi-Fi
Marca: Acoustic Research
Modelo: ARIR200
Consumo de electricidad: 13W
Especificaciones
Hardware
• Dimensiones: 212 mm A, 94 mm A, 154 mm L
• Peso unitario: 790 g (27.9 oz.) (sin baterías)
• Normas: IEEE 802.11g y 802.11b
• Canales: 11 canales Wi-Fi (Estados Unidos,
Canadá)
• Puerto Ethernet: 10/100 RJ-45 compatible
• Potencia: Externa 9.0V CD 1.56A
• Respaldo de baterías: 3 baterías tamaño AAA
• Pantalla: 2.7" LCD con iluminación de fondo
• LEDS: On/Standby, dos para teclas de
navegación, Me encanta.
• Memoria interna: 512 MB
• Receptáculo de audífonos estéreo
• Receptáculo de conexión USB
Sección de sintonizador AM
• Rango de sintonización: 520KHz a 1710KHz
Sección de sintonizador FM
• Rango de sintonización: 87.5MHz a 107.9MHz
Sección de amplificador
• Potencia de salida: 2W x 2
• Distorsión @ 1KHz: <10% THD
Bocinas
• Cantidad: 2
• Tamaño: 40 mm (1.56")
30
Page 62

Garantía limitada
Garantía limitada
12 meses de garantía limitada
Aplica a productos de audio/video RCA
AUDIOVOX ELECTRONICS CORP. (la Compañía)
garantiza al comprador original a través de
minorista de este producto, que en el caso de
que este producto o alguna parte del mismo,
sometido a uso y condiciones normales, y
probando que tenga defectos en material o
mano de obra, en un plazo de 12 meses desde la
fecha de la compra original, tal(es) defecto(s)
será(n) reparado(s) o reemplazado(s) con
producto reacondicionado (a opción de la
Compañía) sin cargo por las partes y labor en la
reparación.
Para obtener reparación o reemplazo dentro de
los términos de esta Garantía, el producto debe
ser entregado con prueba de cobertura de la
garantía (por ejemplo, nota de venta con fecha),
especificación de defecto(s), transporte
prepagado, a la Compañía a la dirección que se
indica a continuación
Esta garantía no se extiende a la eliminación de
ruido o estática generados externamente, a la
corrección de problemas de antena, a la pérdida/
interrupciones de transmisión o servicio de
Internet, a costos incurridos por instalación,
remoción o reinstalación del producto, a
corrupciones causadas por virus de
computadora, software espía u otro tipo de
software malicioso, a la pérdida de medios,
archivos, datos o contenido, o al daño a cintas,
discos, dispositivos o tarjetas de memoria
removible, bocinas, accesorios, computadoras,
periféricos de computadoras, otros reproductores
de medios, redes caseras o sistemas eléctricos de
vehículo.
Esta Garantía no aplica a algún producto o parte
del mismo que, en la opinión de la Compañía,
haya sufrido o haya sido dañado mediante la
alteración, instalación inapropiada, mal manejo,
mal uso, negligencia, accidente o mediante la
remoción o borrado del número de serie de
fábrica/etiqueta(s) de código de barras. EL
GRADO DE LA RESPONSABILIDAD DE LA
COMPAÑÍA BAJO ESTA GARANTÍA ESTÁ LIMITADO
A LA REPARACIÓN O REEMPLAZO QUE SE INDICA
ANTERIORMENTE, Y, EN NINGÚN CASO, LA
RESPONSABILIDAD DE LA COMPAÑÍA EXCEDERÁ
EL PRECIO DE COMPRA PAGADO POR EL
COMPRADOR POR EL PRODUCTO.
Esta Garantía reemplaza todas las otras garantías
o responsabilidades expresas. CUALQUIER
GARANTÍA IMPLÍCITA, INCLUYENDO CUALQUIER
GARANTÍA IMPLÍCITA DE COMERCIABILIDAD,
ESTARÁ LIMITADA A LA DURACIÓN DE ESTA
GARANTÍA ESCRITA. CUALQUIER ACCIÓN POR
VIOLACIÓN DE ALGUNA GARANTÍA BAJO LA
PRESENTE INCLUYENDO ALGUNA GARANTÍA
IMPLÍCITA DE COMERCIABILIDAD DEBE SER
PRESENTADA EN UN PERIODO DE 24 MESES
DESDE LA FECHA DE LA COMPRA ORIGINAL. EN
NINGÚN CASO LA COMPAÑÍA SERÁ
RESPONSABLE POR DAÑO ALGUNO INCIDENTAL
O CONSECUENCIAL POR LA VIOLACIÓN DE ESTA
O DE CUALQUIER OTRA GARANTÍA. Ninguna
persona o representante está autorizado a
asumir por la Compañía responsabilidad alguna
distinta que la expresada en el presente
documento en relación con la venta de este
producto.
Algunos estados no permiten limitaciones en
cuanto a la duración de una garantía implícita o
la exclusión o limitación de daño incidental o
consecuencial, por lo tanto las limitaciones o
exclusiones anteriores pueden no aplicar a usted.
Esta Garantía le da derechos legales específicos y
puede ser que usted tenga también otros
derechos que pueden variar de estado a estado.
Cómo efectuar una reclamación en garantía:
• Si su producto tiene la capacidad de
almacenar contenido (tal como un
reproductor MP3, una grabadora de voz
digital, etc.), se recomienda que efectúe
respaldos periódicos de copias del contenido
almacenado en el producto. Si es aplicable,
antes de enviar un producto, haga una copia
de respaldo del contenido o de los datos
almacenados en el dispositivo. También, es
aconsejable remover cualquier contenido
personal que usted no querría exponer a
otros. ES PROBABLE QUE LOS CONTENIDOS Y
DATOS EN EL DISPOSITIVO SE PIERDAN
DURANTE EL SERVICIO Y REFORMATEO.
AUDIOBOX NO ACEPTA RESPONSABILIDAD
POR LA PÉRDIDA DE CONTENIDO O DATOS, O
POR LA SEGURIDAD DE ALGÚN CONTENIDO
O DATO PERSONAL EN EL DISPOSITIVO QUE
SEA RETORNADO. El producto será devuelto
E
31
Page 63

Garantía limitada
con las configuraciones predeterminadas de
fábrica, y sin contenido alguno precargado
que pudiera haber sido instalado en los
productos comprados originalmente. El
consumidor será responsable por recargar los
datos y el contenido. El consumidor será
responsable de restaurar cualquier
configuración de su preferencia personal.
• Empaque apropiadamente su unidad. Incluya
cualquier control remoto, tarjetas de
memoria, cables, etc. que fueron
suministrados originalmente con el producto.
Sin embargo, NO regrese batería removible
alguna, aún si las baterías estaban incluidas
con la compra original. Recomendamos usar
el empaque y materiales de empaque
originales.
• Incluya a evidencia de la fecha de compra tal
como la nota de venta. También escriba su
nombre y dirección, y la descripción del
defecto. Envíe mediante UPS estándar o su
equivalente a:
Audiovox Electronics Corp.
At'n: Departamento de Servicio.
150 Marcus Blvd.
Hauppauge N.Y. 11788
1-800-331-7599
• Asegure su embarque por pérdida o daño.
Audiovox no acepta responsabilidad en caso
de daño o pérdida en ruta a Audiovox.
• Pague todos los cargos que le sean
facturados por el Centro de Intercambio por
servicio que no esté cubierto por la garantía.
• Una unidad nueva o reconstruida le será
enviada con flete prepagado.
Lo que nosotros haremos:
Suministrarle una unidad nueva, o a opción
nuestra, una reconstruida. La unidad de
intercambio está bajo garantía por el remanente
del período de garantía del producto original.
Para clientes en Canadá, favor de enviar a:
Audiovox Return Centre
c/o Genco
6685 Kennedy Road,
Unit#3, Door 16,
Mississuaga, Ontario
L5T 3A5
32
Page 64

Illustrations contained within this publication are for representation only and subject to change.
The descriptions and characteristics given in this document are given as a general indication and not
as a guarantee. In order to provide the highest quality product possible, we reserve the right to make
any improvement or modification without prior notice. The English version serves as the final
reference on all products and operational details should any discrepancies arise in other languages.
Las ilustraciones contenidas dentro de esta publicación son para propósitos de ilustración solamente y
están sujetas a cambio.
Las descripciones y las características presentadas en este documento son dadas a modo de indicación
general y no de garantía. Con el fin de proporcionarle la más alta calidad de producto posible, nos
reservamos el derecho a hacer mejoras o modificaciones sin previo aviso. La versión en inglés servirá de
referencia para todos los detalles del producto y del funcionamiento si surgieran discrepancias en otras
lenguas.
EN
Audiovox Electronics Corp.
150 Marcus Blvd., Hauppauge, NY 11788
© 2009 Audiovox Electronics Corp.
Trademark(s) ® Registered
Marca(s) ® Registrada(s)
Marque(s) ® Deposée(s)
www.audiovox.com
Printed in China/Impreso en China
v2.0 (v1.3.2.0)
33
 Loading...