


Ten2
Coda
Corus
Clarus
IMPORTANT SAFETY INSTRUCTIONS
1)Read these instructions.
2)Keep these instructions.
3)Heed all warnings.
4)Follow all instructions.
5)Do not use this apparatus near water.
6)Clean only with a dry cloth.
7)Do not block any ventilation openings. Install in accordance with manufacturer’s instructions.
8)Do not install near any heat sources such as radiators, heat registers, stoves or other apparatus (including amplifiers) that produce heat.
9)Do not defeat the safety purpose of the polarized or grounding-type plug. A polarized plug has two blades with one wider than the other. A grounding type plug has two blades and a third grounding prong. The wide blade or the third prong are provided for your safety. If the provided plug does not fit into your outlet, consult an electrician for replacement of the obsolete outlet.
10)Protect the power cord from being walked on pinched particularly at plugs, convenience receptacles, and the point where they exit from the apparatus.
11)Use only attachments/accessories specified by the manufacturer.
12)Use only with the cart, stand, tripod, bracket, or table specified by the manufacturer, or sold with the apparatus.
13)Unplug this apparatus during lightning storms or when unused for long periods of time.
14)Refer all servicing to qualified service personnel. Servicing is required when the apparatus has been damaged in any way, such as power-supply cord or plug is damaged, liquid has been spilled or objects have fallen into the apparatus, the apparatus has been exposed to rain or moisture, does not operate normally or has been dropped.
FCC COMPLIANCE NOTICE
This device complies with part 15 of the FCC rules. Operation is subject to the following two conditions: (1) This device may not cause harmful interference, and (2) this device must accept any interference received, including interference that may cause undesired operation.
CAUTION: Changes or modifications not expressly approved by the party responsible for compliance could void the user’s authority to operate the equipment.
NOTE: This equipment has been tested and found to comply with the limits for a Class B digital device, pursuant to part 15 of the FCC rules. These limits are designed to provide reasonable protection against harmful interference in a residential installation. This equipment generates, uses and can radiate radio frequency energy and, if not installed and used in accordance with the instruction manual, may cause harmful interference to radio communications. However, there is no guarantee that interference will not occur in a particular installation. If this equipment does cause harmful interference to radio or television reception, which can be determined by turning the equipment off and on, the user is encouraged to try to correct the interference by one or more of the following measures:
--Reorient or relocate the receiving antenna. --Increase the separation between the equipment and
receiver.
--Connect the equipment into an outlet on a circuit different from that to which the receiver is connected.
--Consult the dealer or an experienced radio/TV technician for help.

Contents
Welcome |
|
The Basics |
1 |
Operation--Electronics |
3 |
Power |
3 |
Preamp |
3 |
Inputs |
3 |
Controls |
4 |
Low Cut Filter/Phase Reverse |
5 |
Effects Loop |
5 |
Direct Out |
6 |
Mute Switch |
6 |
Stereo Operation |
6 |
Control Panel Drawings |
7 |
Signal Flow Diagram |
7 |
Effects |
9 |
Headphone Output |
9 |
Limiter Switch |
9 |
Power Amp |
10 |
Connecting a Speaker |
10 |
Operation with No Speaker |
10 |
Operation--Speaker Cabinets |
11 |
Docking System |
11 |
Speaker Placement |
11 |
Tilt Mechanism |
11 |
Connection an Extension Speaker |
12 |
Presence Switch |
12 |
Description of the Corus Combo |
12 |
Tweeter Level Control |
13 |
Room Coupling Control |
13 |
Description of the Ten2 EX |
13 |
Specifications |
14 |
Shoulder Strap |
15 |
Care |
16 |
Warranty And Repair |
16 |
|
|
The information in this manual is subject to change without notice. No part of this manual may be reproduced by mechanical, electronic or other means in any form without prior written permission from Acoustic Image.
Welcome to Acoustic Image!
You have purchased a state-of-the-art musical instrument amplifier system, combining purity, power and portability in a package that sets a new standard in high fidelity amplification.
Each of our designs is engineered to accurately reproduce the sound of acoustic and electric instruments, delivering flat frequency response across the entire musical spectrum; extended, tight, wellcontrolled bass; and complete clarity of sound reproduction.
This manual provides operating information for your Acoustic Image Clarus head; Coda, Corus and Ten2 combo; and Coda EX, Corus EX and Ten2 EX extension cabinet.
The Basics
Our Series 4 product line consists of two amp heads, and three speaker cabinets. The heads mount in the cabinets using our exclusive Cabrio Docking System to form six different combo amps. The amp heads use the same superb class-D power amplifier with a switch mode power supply and a sophisticated, sensitive preamplifier with one or two channels. The speaker cabinets have a 1x10 or 2x10 speaker configuration. The features of the preamp and the speaker configuration define the specific head or combo model. The Clarus amp head combines the power amp with either a one channel or two channel preamp. The Coda combo has a 1x10 speaker configuration with a poly cone woofer. The Corus combo has a 1x10 speaker configuration with a paper cone woofer. Both have a 5 inch extended range driver with presence control in addition to the woofer and both are available with a one or two channel head. The Ten2 combo uses a 2x10 speaker configuration (one downfiring, one front firing) with poly cone woofers in conjunction with a 2.5 inch tweeter. The Ten2 is available with a one or two channel head. Each cabinet type is also available as an extension speaker in either a “Cabrio-ready” configuration or as a fixed extension cabinet (Coda EX, Corus EX or Ten2 EX).
The Clarus integrated amplifier uses our 600W power amp and a one or two channel preamp. The power amp is a high efficiency design that requires no external heat sinks or cooling fans and is capable of driving loads as low as 2 ohms. The rated output is 600W at 4 ohms. AC power and output speaker jacks are located on the rear of the chassis. A standard, three-prong detachable AC power cord is used to provide power to the unit, while an AC voltage selection switch allows the unit to operate at 100 to 120V (50 or 60 Hz) or 220 to 240V (50 Hz). The input channels of both preamp types incorporate combo jack interfaces that allow either a high impedance instrument input (to optimize the sound of piezo-type pickups) or a mic input with a switchable 10 dB pad, a three-band EQ, an effects loop with return level control, a selectable low cut filter and phase reverse switch for feedback control and reduction of low frequency boominess, a sixprogram effects unit with wet/dry mix control, a direct out capability with ground lift and pre/post EQ switch, a master level control and a
1
The Acoustic Image logo is a registered trademark of Acoustic Image LLC. Coda, Corus, Coda EX , Corus EX, Ten 2, Ten2 EX, Clarus and Cabrio Docking System are trademarks of Acoustic Image LLC.
mute switch. The two-channel preamp has a switch that allows the second channel to be disconnected from the main amp and connected to a satellite power amp to create a stereo system.
The Coda, Corus and Ten2 combo amps use either the one channel or two channel Clarus head mounted in a speaker cabinet via the docking system. The Coda and Corus use the same cabinet and speaker configuration: a 10 inch downfiring woofer and a 5 inch front firing extended range driver with a presence control. The difference between the two is the woofer. The Coda uses a poly cone woofer, the Corus uses a paper cone woofer. This gives the Corus a somewhat different sound, one more suited for guitar. The Ten2 has the same amp options but uses a slightly larger cabinet than the Coda/Corus. It has a downfiring 10 and a front firing 10 with a 2.5 inch tweeter for high frequencies A built-in, spring-loaded tilt mechanism allows each cabinet type to be tilted back to better direct sound to your listening position. The cabinets are made of an acoustically inert, high durability, injection molded polymer material which dramatically reduces the weight of the unit. Each unit (combo or extension cab) comes with a fitted slip cover and shoulder strap. A padded case is also available.
While our combos and speakers are designed to play loudly--and clearly--enough so that you can be heard in most gigging situations, they are not suited to playing at extreme volumes. Generating high SPLs may require an extension cabinet like the Coda EX, Corus EX, Ten2 EX or augmentation by a larger house system.
The instructions that follow apply to all of the products due to the many common elements in the different units. Where there are specific differences that are unique to one or more units, those differences are described as necessary. The one and two channel amp heads are described first followed by the common elements of the combo amps (docking system, tilt mechanism, cabinet placement, etc). The specifics of each cabinet type are then described followed by detailed specifications of all of the models.
Operation--Electronics
Power
Power Switch Fuse |
AC Input |
Limiter |
Speaker Output 2 min |
Voltage Switch |
115/230 V~ |
|
|
115/230V |
50/60 Hz |
|
|
|
|
|
|
|
400 Watts |
On |
|
|
|
CAUTION: TO REDUCE THE |
|
|
CAUTION: TO REDUCE THE |
RISK OF ELECTRIC SHOCK, |
|
|
RISK OF FIRE, REPLACE FUSE |
DO NOT REMOVE COVER. |
|
|
WITH THE SAME TYPE 6.3A FAST |
NO USER SERVICEABLE PARTS |
|
|
BLOW FUSE (F 6.3A H 250V) |
INSIDE. REFER |
SERVICING |
|
|
TO QUALIFIED |
PERSONNEL. |
Headphone
Output
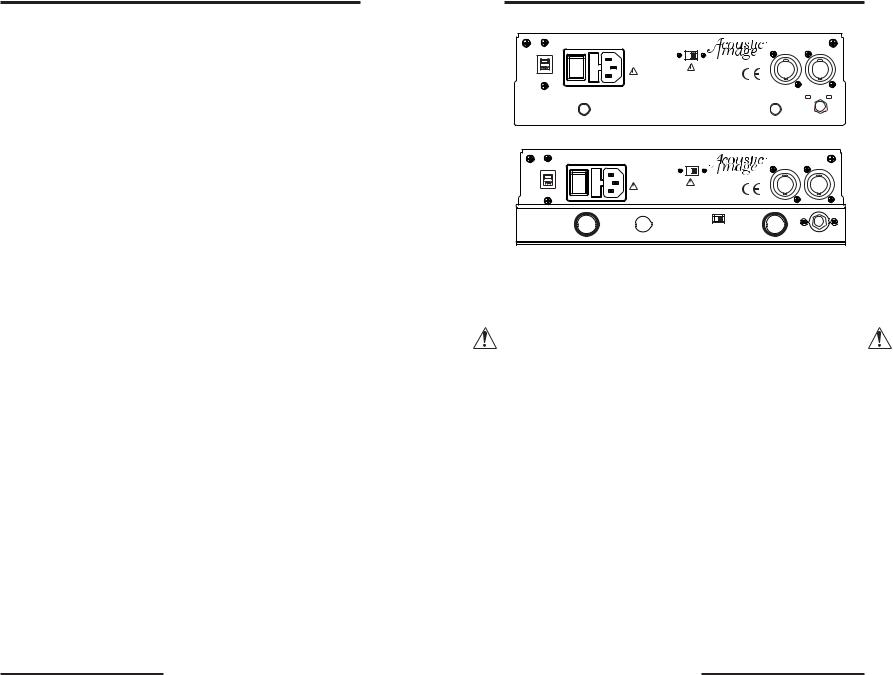
Clarus Rear Panel
Fuse |
AC Input |
|
|
115/230 V~ |
|
Speaker Output 2 min |
|
Power Switch |
50/60 Hz |
Limiter |
|
Voltage Switch |
|
|
|
115/230V |
400 Watts |
|
|
|
|
|
|
|
|
On |
|
|
|
CAUTION: TO REDUCE THE |
|
|
CAUTION: TO REDUCE THE |
RISK OF ELECTRIC SHOCK, |
|
|
RISK OF FIRE, REPLACE FUSE |
DO NOT REMOVE COVER. |
|
|
WITH THE SAME TYPE 6.3A FAST |
NO USER SERVICEABLE PARTS |
|
|
BLOW FUSE (F 6.3A H 250V) |
INSIDE. REFER |
SERVICING |
|
|
TO QUALIFIED |
PERSONNEL. |
Speaker Input
8 300W |
Presence |
Headphone |
|
Output
Coda, Corus and Ten2 Rear Panel (shown in the docked position)
Plug the detachable AC power cord into the receptacle on the back of the amp and into a wall receptacle. A power switch next to the AC input turns on power to the preand power amps, illuminating a “power on” indicator on the front panel of the amp. A 6.3-amp fast blow fuse is mounted in the drawer marked with the fuse symbol that is part of the AC receptacle. To replace the fuse, turn off the amp, remove the AC cord and use a small screwdriver to pry the drawer out of the receptacle. Remove and replace the fuse. Note that a spare fuse is mounted inside the drawer.
All combos will work with either 100 to 120 volt, 50/60 Hz or 220 to 240 volt, 50 Hz AC power. A switch located on the rear panel selects the appropriate voltage. Use the 115V setting for 100 to 120V operation, use the 230V setting for 220 to 240V operation. Note that the correct AC power cord must be used for connection to the appropriate wall plug. If you do not have the right cord, you can buy one from an electronics or computer store. Be sure the switch is in the correct position for the intended application. Operation at 230 volts with the switch in the 115 volt position will damage the unit.
Preamp
Refer to the signal flow diagram and the control panel drawings (page 6).
Inputs
Combo jacks are used for the input to each channel of their preamp. Either an XLR or 1/4 inch connector can be plugged into this type of jack. The 1/4 inch input has a 1 megohm input impedance that is
2 |
|
|
|
3 |
|
|
 Loading...