

Page 1

Installation Guide
RMC7185:1U Rackmount System
RMC 7185
1U Rackmount System
661 Brea Canyon Rd., Suite 3
Walnut, CA 91789
tel: 909.598.7388, fax: 909.598.0218
© Copyright 2009 Acnodes, Inc.
All rights reserved. Product description and product specifications
are subject to change without notice. For latest product information,
please visit Acnodes’ web site at www.acnodes.com.
Page 2
RMC 7185
1U Rackmount System
Installing the System into a Rack
This section provides information on installing the Acnodes RMC7185 into a rack. If the system has
already been mounted into a rack, you can skip ahead to Sections 2-5 and 2-6. Note: This rail will fit a
rack between 26" and 33.5" deep.
There are a variety of rack units on the market, which may mean the assembly procedure will differ
slightly . The following is a guideline for installing the RMC7185 into a rack with the rack rails provided.
Y ou should also refer to the installation instructions that came with the rack unit you are using.
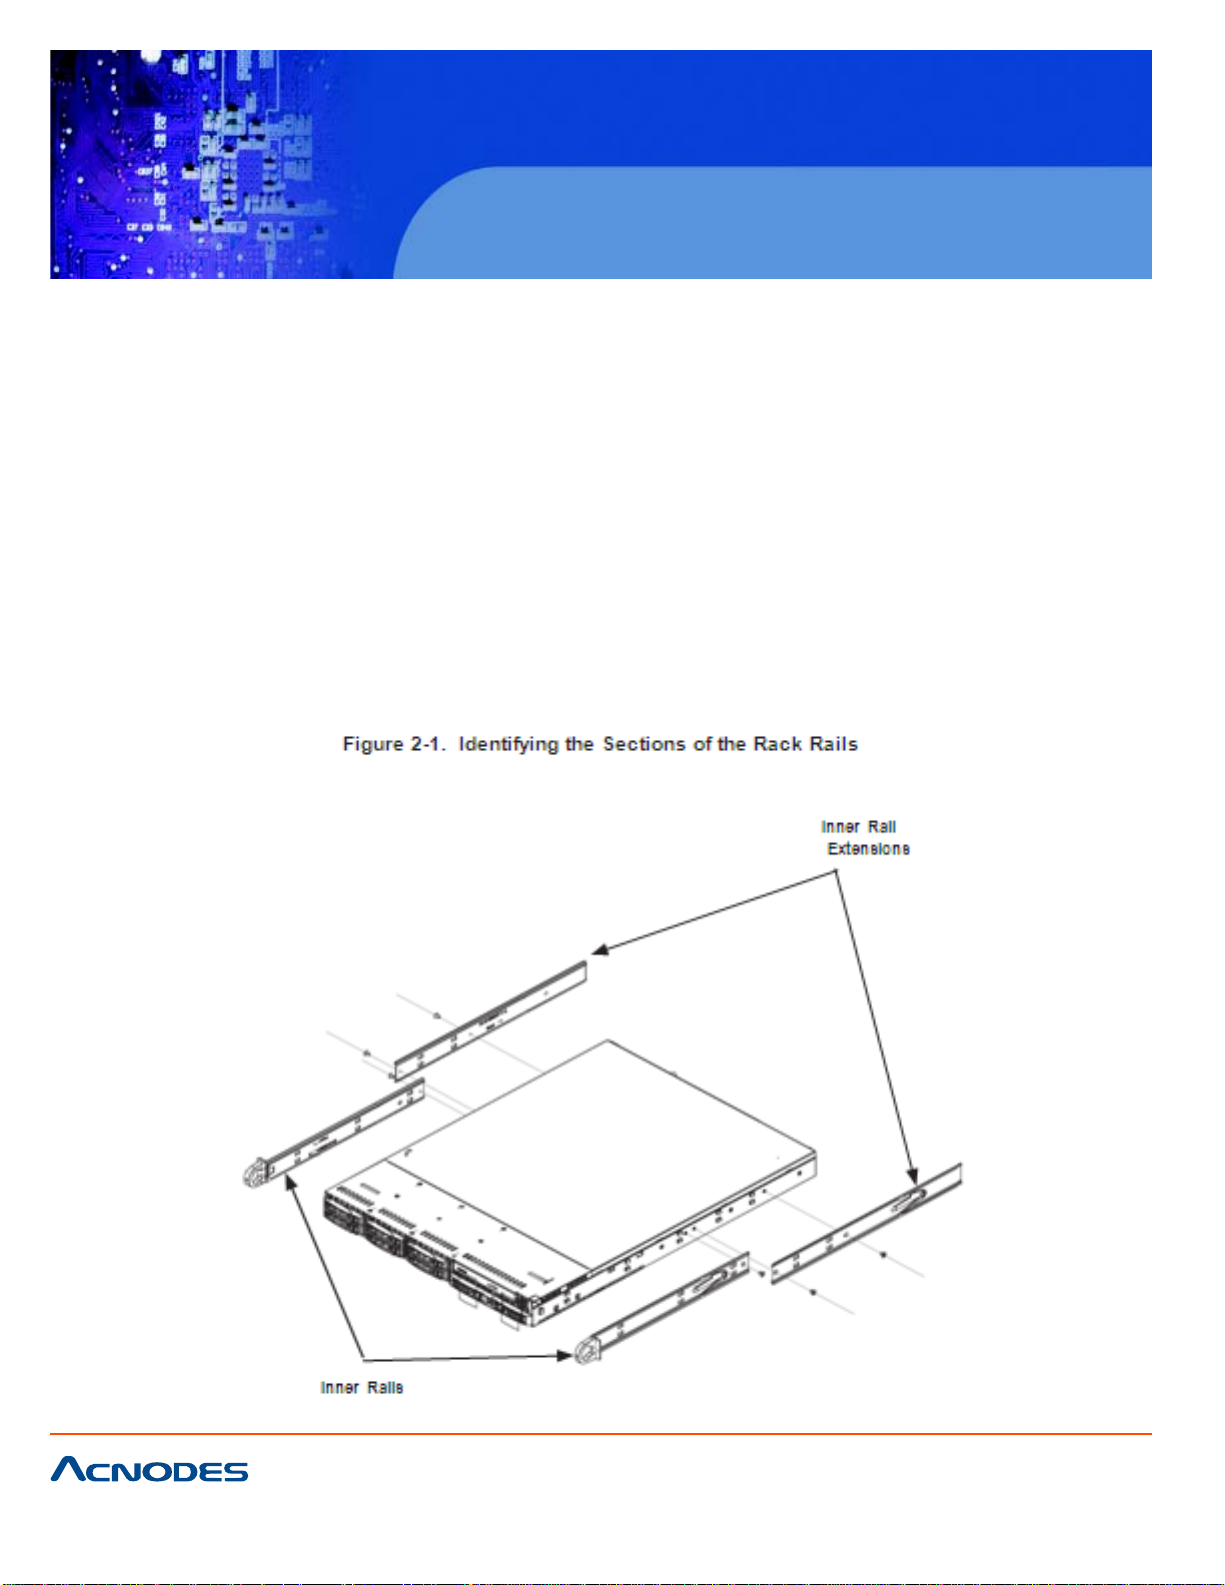
Identifying the Sections of the Rack Rails
Each assembly consists of two sections: an inner fixed chassis rail that secures directly to the server
chassis and an outer fixed rack rail that secures directly to the rack itself.
661 Brea Canyon Rd., Suite 3
Walnut, CA 91789
tel: 909.598.7388, fax: 909.598.0218
© Copyright 2005 Acnodes, Inc.
All rights reserved. Product description and product specifications
are subject to change without notice. For latest product information,
please visit Acnodes’ web site at www.acnodes.com.
Page 3
RMC 7185
1U Rackmount System
Inner Rails
The motherboard chassis includes a set of inner rails in two sections: inner rails and inner rail extensions.
The inner rails are pre-attached and do not interfere with normal use of the chassis if you decide not to
use a server rack. Att ach the inner rail extension to stabilize the chassis within the rack.
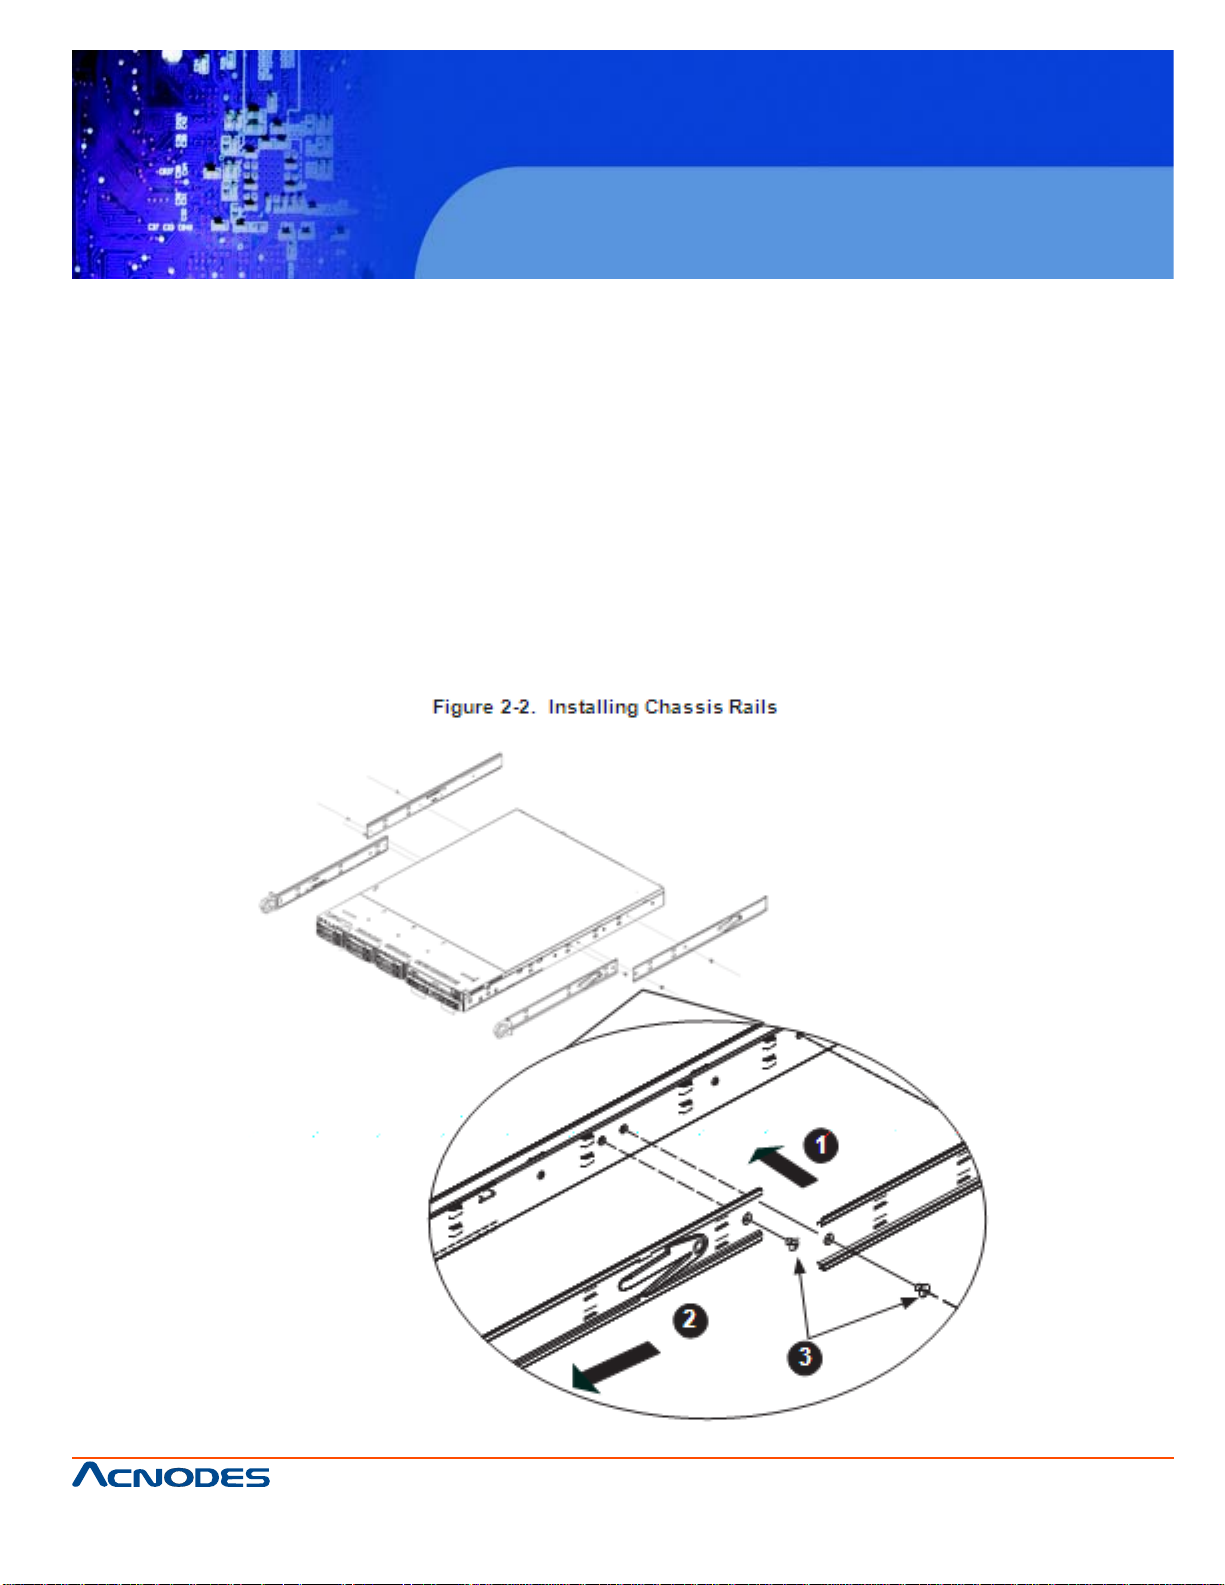
Installing the Rack Rails
1. Place the inner rack extensions on the side of the chassis aligning the hooks of the chassis with the
rail extension holes. Make sure the extension faces "outward" just like the pre-attached inner rail.
2. Slide the extension toward the front of the chassis.
3. Secure the chassis with two screws as illustrated.
4. Repeat steps 1-3 for the other inner rail extension.
661 Brea Canyon Rd., Suite 3
Walnut, CA 91789
tel: 909.598.7388, fax: 909.598.0218
© Copyright 2009 Acnodes, Inc.
All rights reserved. Product description and product specifications
are subject to change without notice. For latest product information,
please visit Acnodes’ web site at www.acnodes.com.
Page 4

RMC 7185
1U Rackmount System
Outer Rails
Installing the Outer Rails to the Rack
1. Attach the short bracket to the outside of the long bracket. Y ou must align the pins with the slides.
Also, both bracket ends must face the same direction.
2. Adjust both the short and long brackets to the proper distance so that the rail fits snugly into the rack.
3. Secure the long bracket to the front side of the outer rail with two M5 screws and the short bracket to
the rear side of the outer rail with three M5 screws.
4. Repeat steps 1-4 for the left outer rail.
661 Brea Canyon Rd., Suite 3
Walnut, CA 91789
tel: 909.598.7388, fax: 909.598.0218
© Copyright 2005 Acnodes, Inc.
All rights reserved. Product description and product specifications
are subject to change without notice. For latest product information,
please visit Acnodes’ web site at www.acnodes.com.
Page 5

RMC 7185
1U Rackmount System
661 Brea Canyon Rd., Suite 3
Walnut, CA 91789
tel: 909.598.7388, fax: 909.598.0218
© Copyright 2009 Acnodes, Inc.
All rights reserved. Product description and product specifications
are subject to change without notice. For latest product information,
please visit Acnodes’ web site at www.acnodes.com.
Page 6

RMC 7185
1U Rackmount System
Installing the Chassis into a Rack
1. Confirm that chassis includes the inner rails and rail extensions . Also, confirm that the outer rails are
installed on the rack.
2. Line chassis rails with the front of the rack rails.
3. Slide the chassis rails into the rack rails, keeping the pressure even on both sides (you may have to
depress the locking tabs when inserting). When the server has been pushed completely into the rack, you
should hear the locking tabs "click".
4. (Optional) Insert and tightening the thumbscrews that hold the front of the server to the rack.
661 Brea Canyon Rd., Suite 3
Walnut, CA 91789
tel: 909.598.7388, fax: 909.598.0218
© Copyright 2005 Acnodes, Inc.
All rights reserved. Product description and product specifications
are subject to change without notice. For latest product information,
please visit Acnodes’ web site at www.acnodes.com.
Page 7

RMC 7185
1U Rackmount System
Installing the Server into a Telco Rack
T o inst all the Acnodes RMC7185 into a T elco type rack, use two L-shaped brackets on either side of the
chassis (four total). First, determine how far follow the server will extend out the front of the rack. Larger
chassis should be positioned to balance the weight between front and back. If a bezel is included on your
server , remove it. Then attach the two front brackets to each side of the chassis, then the two rear brackets positioned with just enough space to accommodate the width of the telco rack. Finish by sliding the
chassis into the rack and tightening the brackets to the rack.
661 Brea Canyon Rd., Suite 3
Walnut, CA 91789
tel: 909.598.7388, fax: 909.598.0218
© Copyright 2009 Acnodes, Inc.
All rights reserved. Product description and product specifications
are subject to change without notice. For latest product information,
please visit Acnodes’ web site at www.acnodes.com.
 Loading...