

Page 1

PC 8172
17” TFT Expandable Intel
®
Core 2 Duo
™
Industrial Panel PC with 2 PCI
User’s Manual
Page 2

Page 3

Disclaimers
This manual has been carefully checked and believed to contain
accurate information. Acnodes Corp. assumes no responsibility for any
infringements of patents or any third party’s rights, and any liability
arising from such use.
ACNODES does not warrant or assume any legal liability or
responsibility for the accuracy, completeness or usefulness of any
information in this document. ACNODES does not make any
commitment to update the information in this manual.
ACNODES reserves the right to change or revise this document
and/or product at any time without notice.
No part of this document may be reproduced, stored in a retrieval
system, or transmitted, in any form or by any means, electronic,
mechanical, photocopying, recording, or otherwise, without the prior
written permission of Acnodes Corp.
♥
Copyright 2008 Acnodes Corp. All
Rights Reserved
August 2008, Version A1
1
Page 4

Safety Approvals
格式化: 項目符號及編號
m
CE Marking
m
FCC Class A
m
FCC Compliance
This equipment has been tested in compliance with the limits for a
Class A digital device, pursuant to Part 15 of the FCC Rules. These
limits are meant to provide reasonable protection against harmful
interference in a residential installation. If not installed and used in
accordance with proper instructions, this equipment might generate or
radiate radio frequency energy and cause harmful interference to
radio communications. However, there is no guarantee that
interference will not occur in a particular installation. If this equipment
does cause harmful interference to radio or television reception, which
can be determined by turning the equipment off and on, the user is
encouraged to try to correct the interference by one or more of the
following methods:
1. Reorient or relocate the receiving antenna.
2. Increase the separation between the equipment and receiver.
3. Connect the equipment to another outlet of a circuit that
doesn’t connect with the receiver.
4. Consult the dealer or an experienced radio/TV technician for
help.
Shielded interface cables must be used in order to comply with the
emission limits.
Page 5

Safety Precautions
Before getting started, please read the following important safety
precautions.
1. The PC 8172 Series does not come equipped with an
operating system. An operating system must be loaded firs t
before installing any software into the computer.
2. Be sure to ground yourself to prevent static charge when
installing the internal components. Use a grounding wrist
strap and place all electronic components in any staticshielded devices. Most electronic components are sensitive
to static electrical charge.
3. Disconnect the power cord from the PC 8172 Series before
any installation. Be sure both the system and external
devices are turned OFF. A sudden surge of power could ruin
sensitive components that the PC 8172 Series must be
properly grounded.
4. The brightness o f the flat panel display will be getting weaker
as a result of frequent usage. However, the operating period
varies depending on the application environment.
5. Turn OFF the system power before cleaning. Clean the
system using a cloth only. Do not spray any liquid cleaner
directly onto the screen. The PC 8172 Series may
come with or w/o a touch screen. Although the touch screen is
chemical resistant, it is recommended that you spray the
liquid cleaner on a cloth first before wiping the screen. In
case your system comes without the touch screen, you must
follow the same procedure and not spray any cleaner on the
flat panel directly.
6. Avoid using sharp objects to operate the touch screen.
Scratches on the touch screen may cause malfunction or
internal failure to the touch screen.
7. The flat panel display is not susceptible to shock or vibration.
When assembling the PC 8172 Series, make sure it is
securely installed.
8. Do not open the system’s back cover. If opening the cover
for maintenance is a must, only a trained technician is
allowed to do so. Integrated circuits on computer boards are
sensitive to static electricity. To avoid damaging chips from
electrostatic discharge, observe the following precautions:
3
Page 6

a
Before handling a board or integrated circuit, touch an
unpainted portion of the system unit chassis for a few
seconds. This will help to discharge any static
electricity on your body.
a
When handling boards and components, wear a wrist-
grounding strap, available from most electronic
component stores.
Trademarks Acknowledgments
ACNODES is a trademark of Acnodes Corp.
IBM, PC/AT, PS/2, VGA are trademarks of International
Business Machines Corporation.
®
Intel
and Pentium are registered trademarks of Intel Corporation.
MS-DOS, Microsoft C and QuickBASIC are trademarks of Microsoft
Corporation.
VIA is a trademark of VIA Technologies, Inc.
SST is a trademark of Silicon Storage Technology, Inc.
UMC is a trademark of United Microelectronics Corporation.
Other brand names and trademarks are the properties and registered
brands of their respective owners.
®
Page 7

Table of Contents
D
isclai
mers
........................................................................................................... ii
S
afety A
pprovals ................................................................................................. iii
S
afety Pre
cautions ...............................................................................................iv
C h a t e r 1 ................................................................................... 1p
1
.
1
1
.
2
1
1
1
1
.
3 Dimensions
1
.
4
1
1
1
.
5
Gene
ral Desc
ription..........................................................................
Syst
em
Specificati
.2.1
Main
.2.2 I/O System.......................................................................................
.2.3 Syst
.4.1 Front Vi
.4.2 I/O Outlets .......................................................................................
CPU B
em Specific
Front Vie
P
ackage Li
w and
ew
ons
......................................................................
oard
..............................................................................
ati
on
.......................................................................
.......................................................................................
I/O Outlets ...............................................................
.......................................................................................
st.....................................................................................
2
3
3
3
4
6
7
7
8
9
C h a p t e r 2 ................................................................................. 11
2.1
2.2
2.3
2.4
2.5
2.6
2.7
2.8 M
2
2
Instal
ling the CPU and
Instal
ling the the Hard Disk Drive
CD-ROM Inst
A
dd-on Card
S
erial Port
DVI-I ...............................................................................................
Ethernet ..........................................................................................
ounti
.8.1 P
.8.2
anel Mo
Rack Mo
allation
Installat
Interface........................................................................
ngs Way – Panel/ Rack
unti
ng
unti
ng
DRAM ........................................................
...................................................
......................................................................
ion
.................................................................
.......................................................
.............................................................................
..............................................................................
11
14
21
22
24
24
26
27
27
28
C h a t e r 3 ................................................................................. 29 p
3
.
1
3
.
2 Co
3
.
3
.
4
3
3
.
5
3
.
6
3
.
7
3
.
8
3
.
9
3
.
10
3
.
11
3
.
12
3
.
13 Load
3
.
14
3
.
15
3
.
16
vi
Entering Setup.................................................... ............................
ntrol K
eys
...................................................................................
Getti
ng Help
...................................................................................
The
Main Menu
St
andard
A
dvanced
A
dvanced Chipset
Integrated Pe
P
ower Management
PnP/PCI
P
C Health
Frequ
ency/Voltage
Opti
Set S
uperviso
S
ave & Exit Se
Exit Without S
..............................................................................
CMOS Setu
BIOS Feat
Co
nfigurati
Status............................................................................
mized
p Menu
.........................................................
ures
...............................................................
Feat
ures
...........................................................
ripherals
....................................................................
Set
up
.............................................................
on Se
tup..................... ....................................
Control.............................................................
Defaults ................................................................
r/Us
er
Pas
sword
......................................................
tup ..........................................................................
aving
........................................................................
29
30
30
31
32
34
40
42
47
52
54
55
56
57
58
59
Page 8

C h a p t e r 4 ................................................................................. 61
4.1
4.2
4
4
4
A p p e n d i x Power Supply Specification ................................ 69
.2.1 S
.2.2
Driver
.2.3
Driver
Syst
em
...........................................................................................
Tou
ch Screen
pec
ificat
Inst
Inst
.................................................................................
ion
...................................................................................
alla
tion
alla
tion
– Windows 200
-
DOS ...................................................................
0/XP/Vista................................. ...
61
62
62
63
66
vii
Page 9

MEMO
viii
Page 10

Page 11
2
PC 817
User’s Manual
C h a p t e r 1
Introduction
This chapter contains general information and detailed specifications
of the PC 8172. Chapter 1 includes the following sections:
f
General Description
f
System Specification
f
Dimensions
f
Front View & I/O Outlets
f
Package List
Introduction
1
Page 12

2
PC 817
User’s Manual
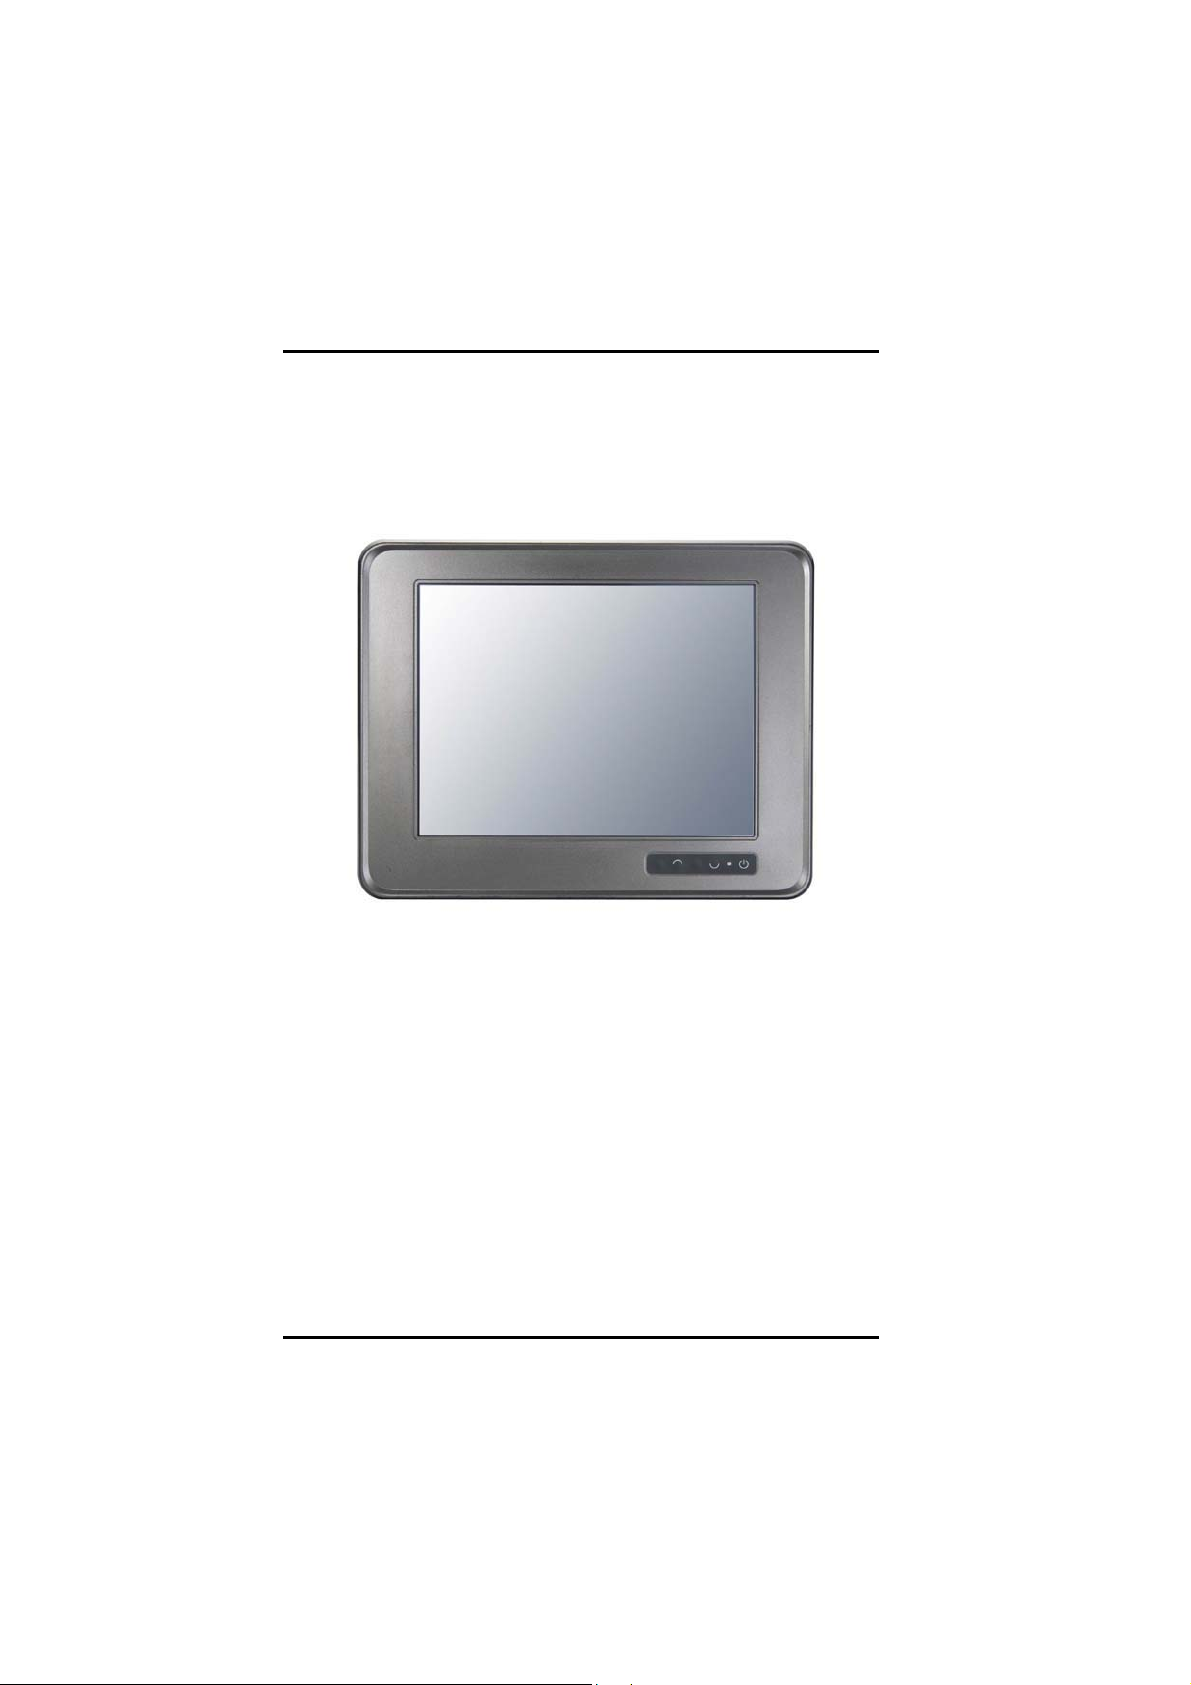
1.1 General Description
The PC 8172 is a 17 ” Industrial panel PC which features Intel
Core™ 2 Duo processor and Intel
powerful computing performance. This panel PC also offers the
expansion ability with two PCI slots. It adopts built-in speaker and
WLAN module for wireless connectivity. Further, the PC 8172 fits in with
Aluminum IP65/NEMA4 compliant front bezel.
Powerful computing: Intel® Core™2 Duo processor
®
The PC 8172 features Intel
®
MHz and Intel
Q965+ICH8 chipset. It features two 1394a ports, two
gigabit Ethernet ports and up to 4GB of dual-channel DDR2 system
memory which deliver high computing capability for high performancedemanding applications.
Expandable for 2 PCI slots
The PC 8172 has two PCI slots for expansion purpose. User can
easily plug in standard half-size PCI cards such as motion card,
communication card and so on.
Speaker & WLAN antenna supported
The PC 8172 features built-in speaker, optional WLAN
module and antenna for wireless network connectivity.
This ideal industrial-grade panel computer PC 8172 can be applied to
the several of industrial or commercial projects, such as transportation,
factory automation, HMI machine controller, Point Of Sales, KIOSK
and more. Moreover, PC 8172 provides highly reliable and highly
flexible industrial-grade products in all-in-one solutions.
Core™ 2 Duo with a maximum of FSB 1066
®
Q965 chipset to provide
®
2
Introduction
Page 13

2
PC 817
User’s Manual
1.2 System Specifications
1.2.1
a
Main CPU Board
CPU
f
Socket LGA775 for Intel
Processor with FSB 533/800/1066 MHz , max up to
®
Core
TM
2 Duo/Core
TM
Solo
E6400.
NOTE It doesn’t support the processor with FSB 1333 MHz,
and it is not recommended to use Quad-Core CPU.
a
System Chipset
f
®
Q965 + ICH8
Intel
a
BIOS
f
Phoenix-Award BIOS, 16Mbit with RPL/PXE LAN Boot ROM,
SmartView and Customer CMOS Backup
a
System Memory
f
Two 240-pin DDR2 DIMM maximum up to 4GB
a
L2 Cache
f
Integrated in CPU
a
Bus Clock
f
533/800/1066 MHz
a
Watchdog Timer
f
Up to 255 levels as Reset feature
1.2.2 I/O System
a
Standard I/O
f
Three serial ports with power, two RS-232 and one RS-
232/422/485
f
One PS/2 for Keyboard and Mouse Interface
f
Four USB Ports 2.0 compliant
f
Two IEEE1394a Ports
Introduction
3
Page 14

2
PC 817
User’s Manual
f
a
Ethernet
One DVI-I Output
f
First port with i82566DM Gigabit Ethernet PHY, Second port
with RTL8111B for Gigabit/Fast Ethernet
a
Audio
f
HD Audio for two channels output
f
a
Storage
a
Box-Header
a
Expansion Slot
MIC-In, Line-Out
f
Four SATA-300 interface
f
One 26-pin for shared LPT/FDD(optional)
f
Two 32-bit PCI Master slots
1.2.3 System Specification
a
17” TFT LCD
a
Disk Drive Housing
f
One built-in slim type CD-ROM dive,
f
One internal 3.5” drive (Optional 2 X 3.5” or 2 X 2.5” HDD)
a
AC Power Supply (100V ~ 240V)
4
Introduction
Page 15

2
PC 817
User’s Manual
a
Heat Dispensing Design
a
Two slots for PCI expansion
a
Net Weight
f
15 Kgs
a
Dimension (Main Body Size)
f
450mm (17.71”)(W) x 150mm (5.90”)(D) x 370mm
(14.56”)(H)
a
Operation Temperature
f
0℃to 40℃; Relative Humidity 50%
a
Relative Humidity
f
10% to 85% @ 40℃, Non-Condensing
a
Altitude
f
10,000 ft. (3,000 meters)
a
Vibration (Operating)
f
5 to 500 Hz, 1 G random
a
Shock (Operating)
f
10 G peak acceleration (11 msec. duration)
NOTE All specifications and images are subject to change
without notic e.
Introduction
5
Page 16
2
PC 817
User’s Manual
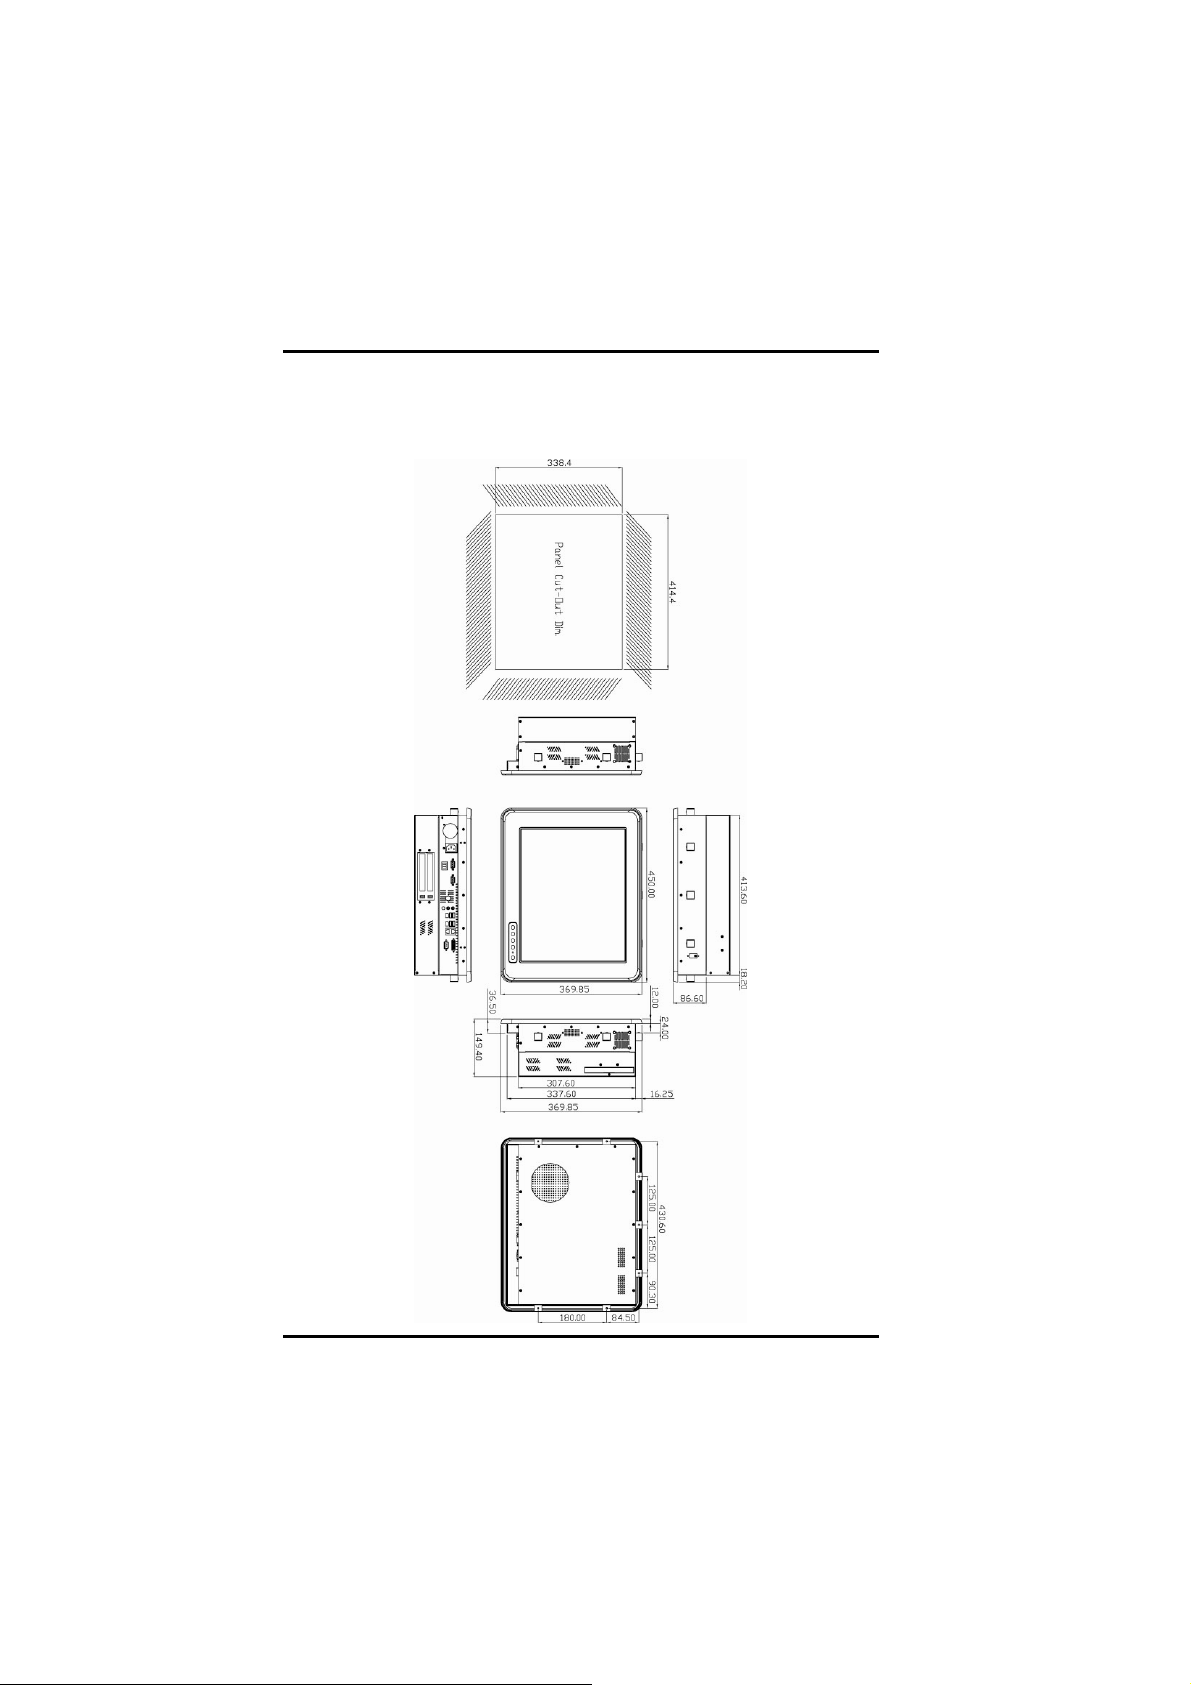
1.3 Dimensions
This diagram shows you dimensions and outlines of the PC 8172.
6
Introduction
Page 17
2
PC 817
User’s Manual
1.4 Front View and I/O Outlets
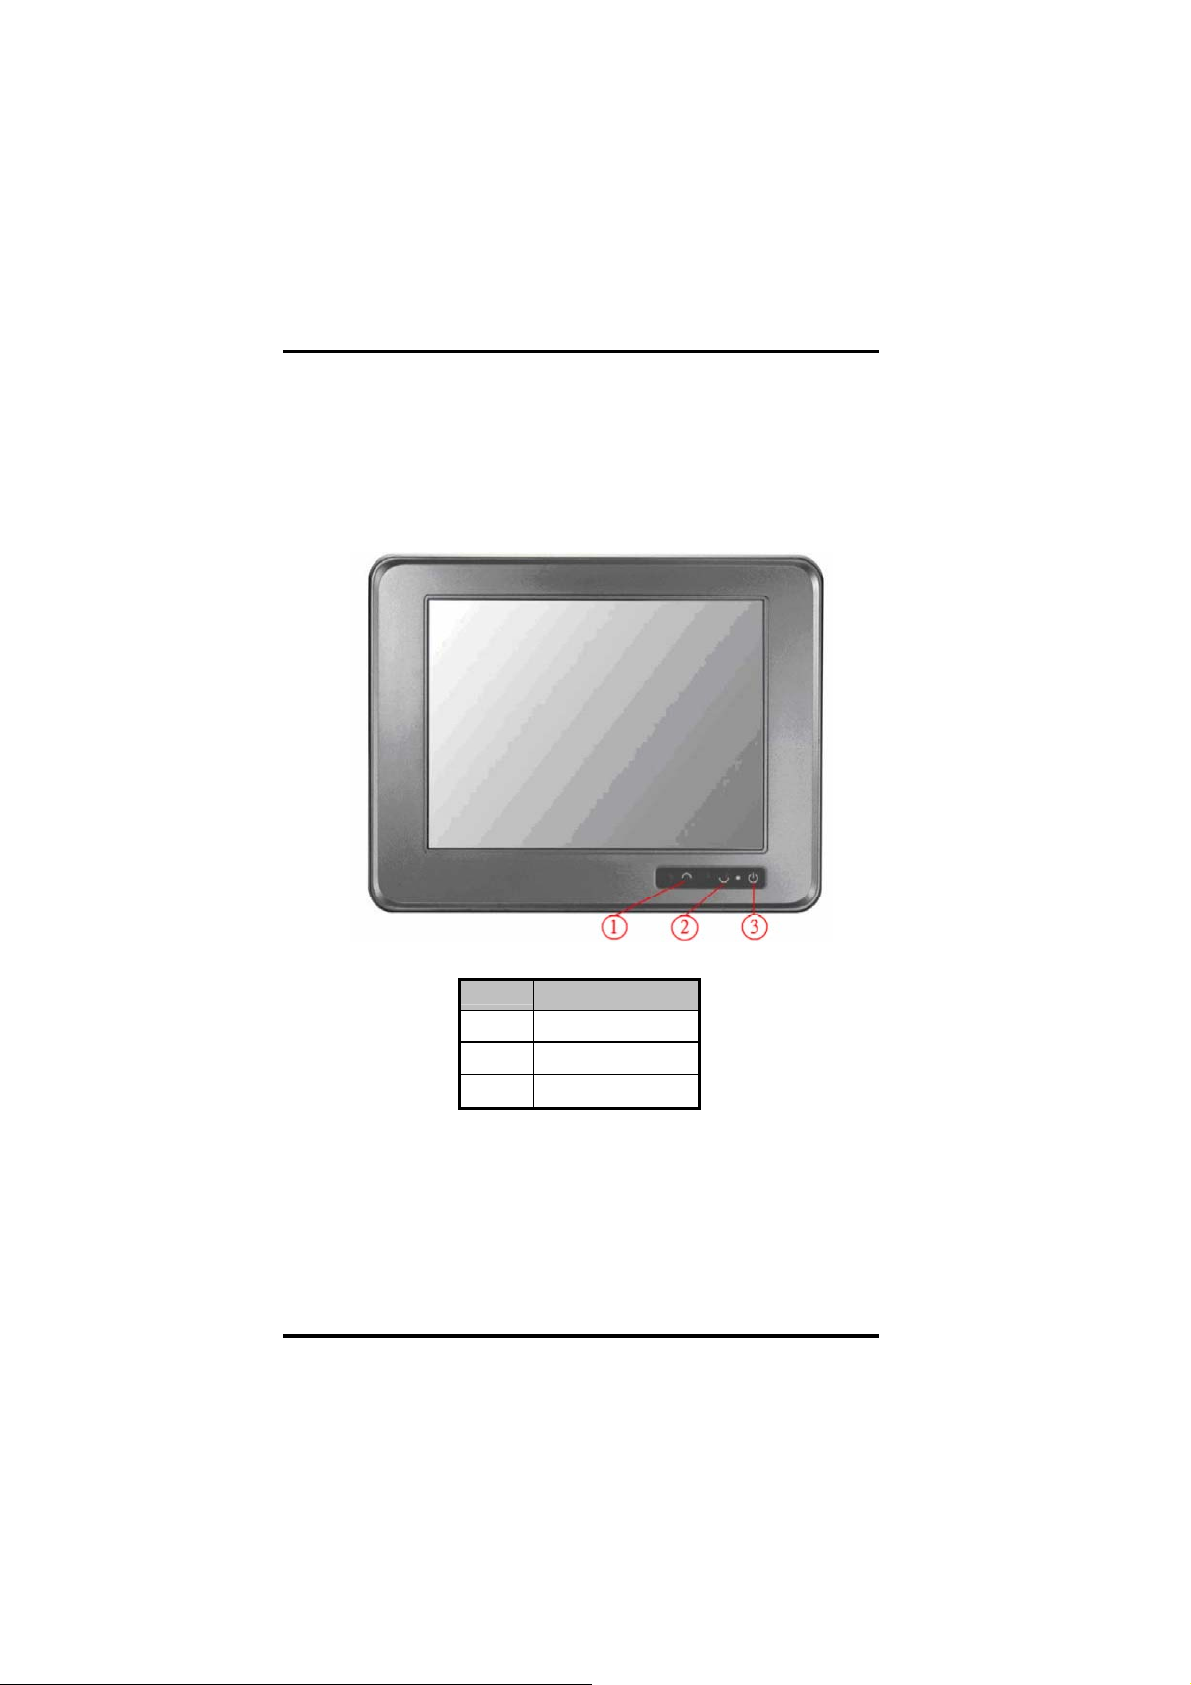
1.4.1 Front View
Please refer to the following illustration for features and controls of the
PC 8172 front bezel.
No Function
1
SEL+
2
SEL-
3
Backlight ON/OFF
Introduction
7
Page 18
2
PC 817
User’s Manual
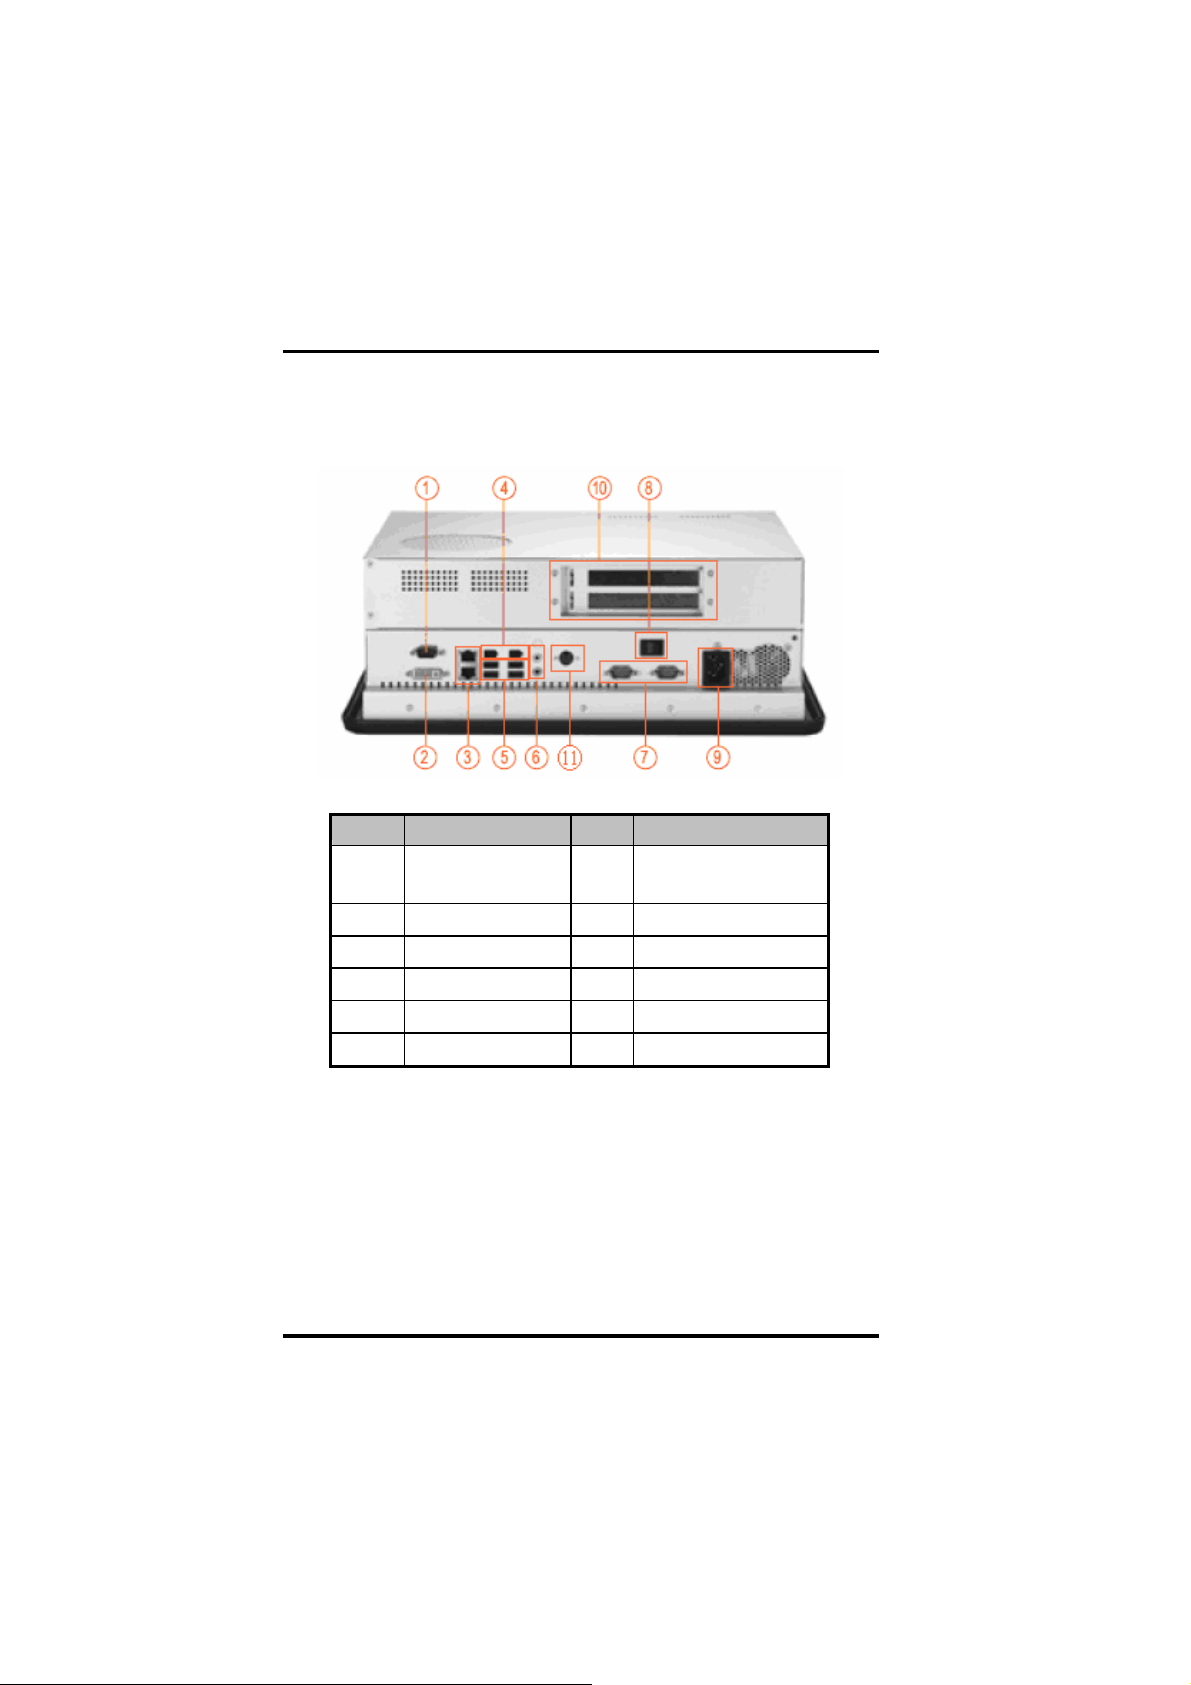
1.4.2 I/O Outlets
The following figure shows the I/O locations of the PC 8172.
No Connector No Connector
8
COM1
1
(RS-232/422/485)
2
DVI-I
3
Giga LAN x 2
4
IEEE 1394a x 2
5
USB v2.0 x 4
6
Mic-in, Line-Out
7
8
9
10
11
COM 2 & COM 3
(RS-232)
Power Switch
AC power
PCI slots x 2
P/S2
Introduction
Page 19

2
PC 817
User’s Manual
1.5 Package List
The package bundled with your PC 8172 should contain the following
items:
a
PC 8172 x 1
a
AC power cord x 1
a
Panel mount kit x 7
a
Driver CD x1
a
LGA 775 CPU Cooler x 1
a
DVI TO VGA Adaptor x 1
PS/2 Splitter – Y Cable x 1
a
SATA Cable x 1
a
Dual 3.5” HDD bracket kit with fan x 1 (Optional)
a
Small HDD Kit for 2.5” HDD (Optional)
a
VIA WLAN Kit (Optional)
a
Rack Mount Bracket Kit x 1 (Optional)
If you can not find this package or any items are missing, please
contact ACNODES distributors immediately.
a
Introduction
9
Page 20

2
PC 817
User’s Manual
MEMO
10
Introduction
Page 21

Page 22

PC 8172User’s Manual
C h a p t e r 2
Hardware Installation
The PC 8172 is convenient for your various hardware configurations
in flexible ways, such as CPU (Central Processing Unit), HDD (Hard
Disk Drive), Memory Module (DRAM), CD-ROM, Add-On card, and
more. The chapter 2 will show you how to install the hardware. It
includes:
f
CPU
f
DRAM
f
Hard Disk
f
CD-ROM
f
Add-On Card
f
Serial Port
f
VGA
f
Ethernet
f
Mounting Ways
2.1 Installing the CPU and DRAM
The standard PC8172 system is designed for Intel Core
2 Duo processors. The built-in CPU board provides two 240-pin
DDR2 DIMM sockets that support system memory up to 4GB.
Please refer to the instructions below, illustrated with concise images,
to upgrade the CPU, DRAM, PCI step by step:
12
Hardware Installation
Page 23
PC 8172User’s Manual
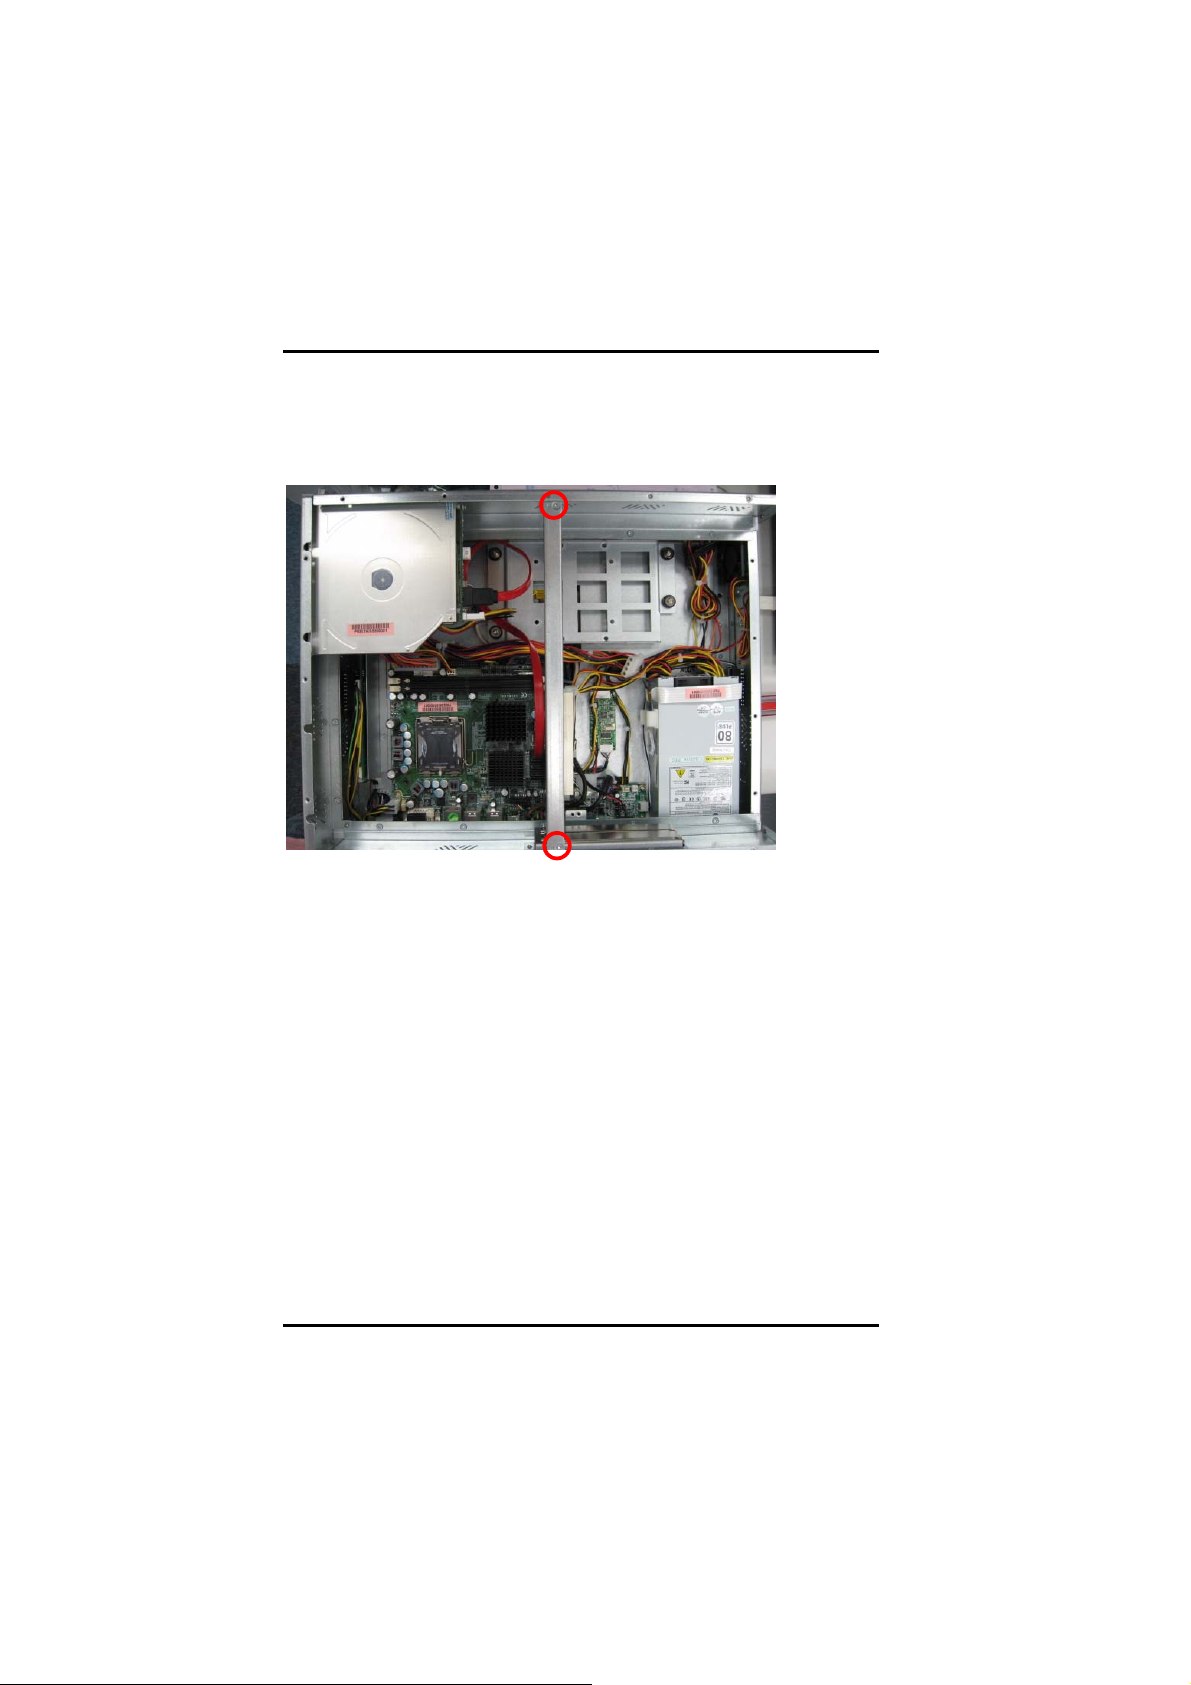
Step 1 Unscrew screws to remove the rear chassis.
Step 2 Remove the riser card fix kit.
Hardware Installation
13
Page 24

PC 8172User’s Manual
Step 3 Install the CPU and DDR DRAM in the PC 8172.
DRAM
CPU
14
Hardware Installation
Page 25
PC 8172User’s Manual
2.2 Installing the Hard Disk Drive
The PC 8172 offers a convenient drive bay module for users
to install HDD. The system offers users one 3.5” Hard Disk Drives for
installation. If you want to install dual 3.5” HDD, or 2.5” HDD, the PC
8172 also provides the dual 3.5” and dual 2.5” drive
holder to meet your requirement. Please follow the steps:
Note The hardware limitation is that the 2.5” HDD and 3.5”
HDD CAN NOT exist simultaneously.
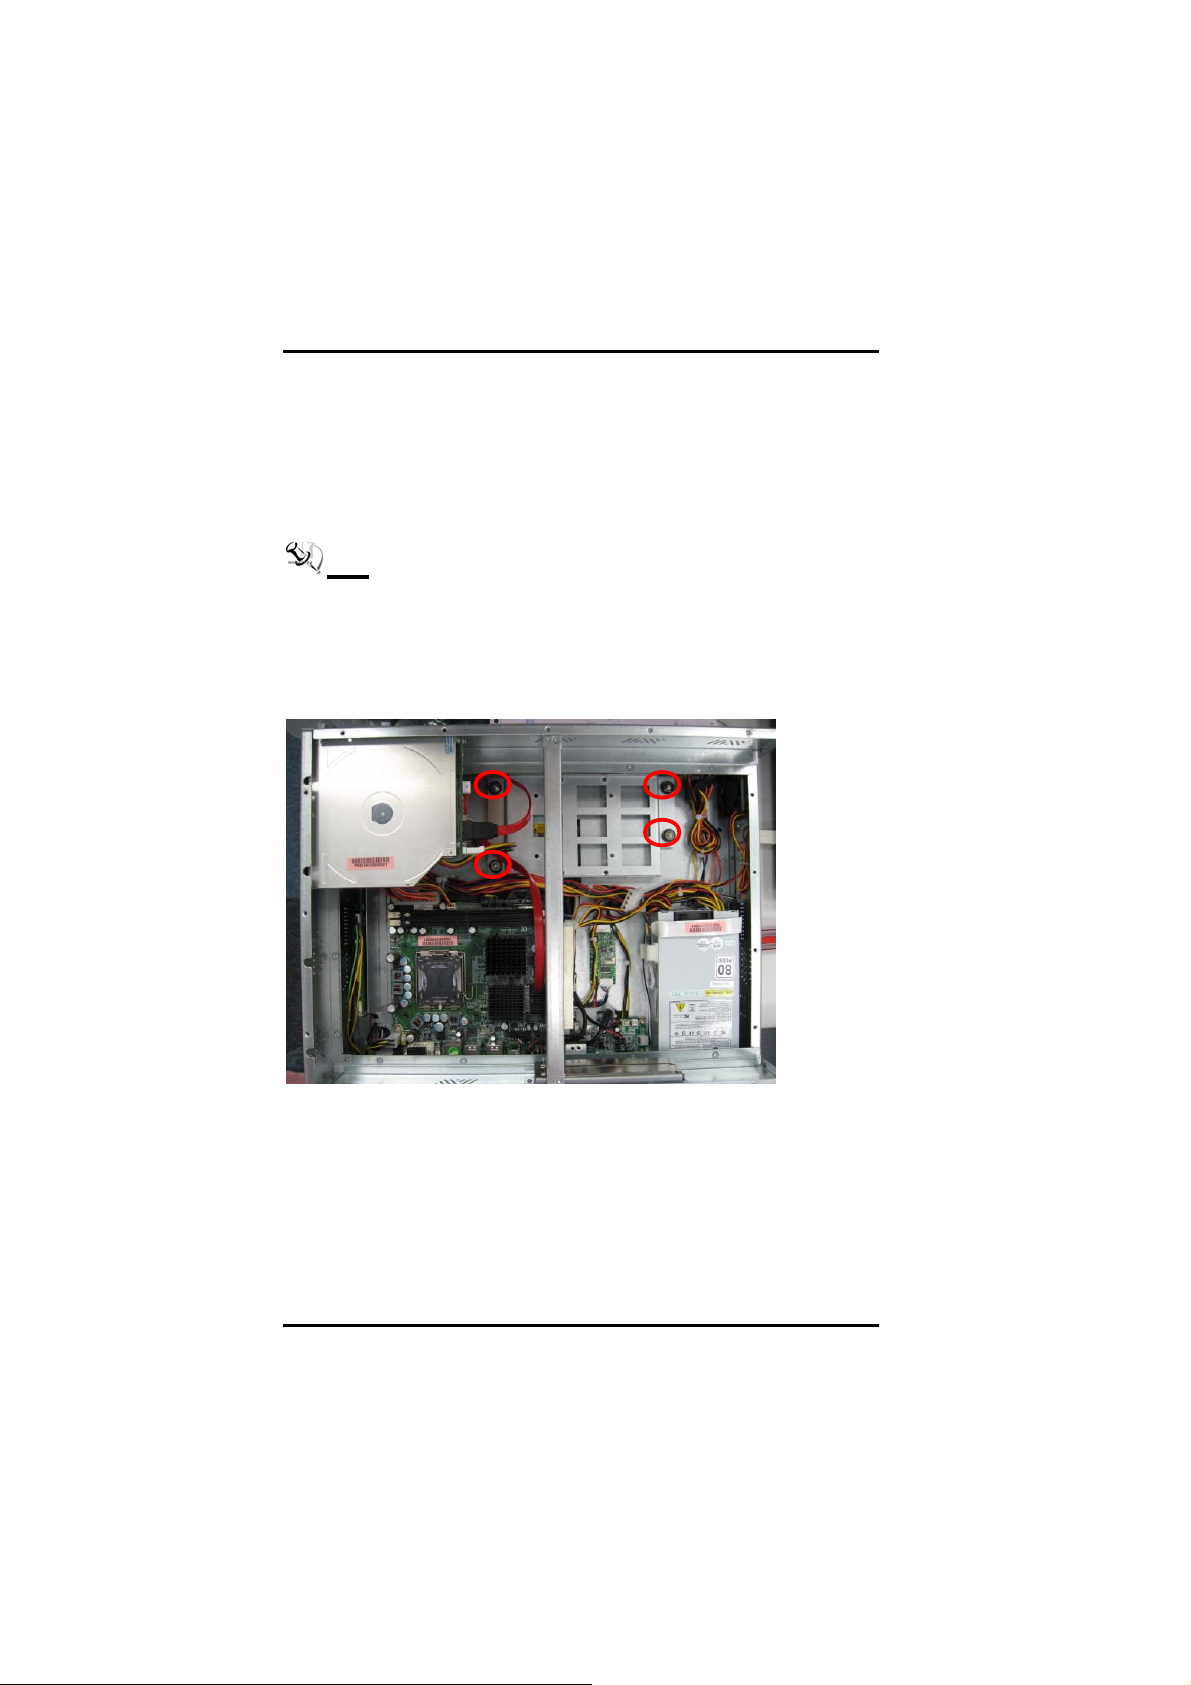
Step 1 Unscrew screws to remove the rear chassis.
Step 2 Remove the riser card fix kit.
Step 3 Unscrew 4 screws from the HDD drive bracket, and take out
HDD bracket kit to install 3.5” HDD.
Hardware Installation
15
Page 26

PC 8172User’s Manual
Step 4 Fix the Hard Disk to the HDD bracket and connect the cable
to complete the installation.
(4-1)
(4-2)
¤
Installing Dual 3.5” HDD
If installing the dual 3.5” HDD, please follow the steps:
Step 1 Change HDD bracket from 3.5” to dual 3.5”.
16
Hardware Installation
Page 27

PC 8172User’s Manual
Step 2 Fix the Hard Disk to the HDD bracket to complete the
installation.
Hardware Installation
17
Page 28

PC 8172User’s Manual
Note When installing Dual 3.5” HDD, users must install a fan to
decrease system heat. Installation step as following:
¤
Installing fan when using dual 3.5” HDD
Step 1 Screw the fan to the right side of cover.
(1-1)
18
Hardware Installation
Page 29

PC 8172User’s Manual
(1-2)
(1-3)
Step 2 Connect power cable of fan to 3 pin fan connector (CN3) in
motherboard.
Hardware Installation
19
Page 30

PC 8172User’s Manual
(2-1)
.
(2-2)
¤
Installing 2.5” HDD
If installing the 2.5” HDD, please follow the steps:
Step 1 Change HDD rubber of HDD bracket from 3.5” to 2.5”.
20
Hardware Installation
Page 31

PC 8172User’s Manual
Step 2 Fix the Hard Disk to the HDD bracket to complete the
installation.
Hardware Installation
21
Page 32

PC 8172User’s Manual
2.3 CD-ROM Installation
The PC 8172 offers a convenient drive bay module for users
to install CD-ROM. When installing the CD-ROM, refer to the following
instructions and illustration:
Step 1 Unscrew screws to remove the rear chassis.
Step 2 Remove the riser card fix kit.
Step 3 Unscrew 4 screws which are around the chassis.
Step 4 The CD-ROM can be taken out.
22
Hardware Installation
Page 33

PC 8172User’s Manual
2.4 Add-on Card Installation
The PC 8172 provides a riser card for PCI slots expansion. The riser
card assembly can accommodate both half-size expansion cards. To
install the riser card, refer to the following figure and instructions
below:
Step 1 Remove the rear chassis.
Setp 2 Remove the riser card fix kit.
Step 3 Remove plates.
Hardware Installation
23
Page 34

PC 8172User’s Manual
Step 4 Insert the add-on card in the socket firmly until it is
completely seated.
24
Hardware Installation
Page 35

PC 8172User’s Manual
2.5 Serial Port Interface
The PC 8172 has four onboard serial ports, COM1, COM2, COM3,
COM4 are RS-232 Port Connector.
The connector, COM1, COM2, COM3 are DB-9 connector, and the
following table shows the pin assignments of this connector.
Pin Signal Pin Signal
DCD, Data
1
Carrier Detect
RXD, Receive
2
3
4 9
5
Data
TXD, Transmit
Data
DTR, Data RI/+5V/+12V Ring
Terminal Ready
GND, Ground
6 DSR, Data Set Ready
RTS, Request To
7
Send
8 CTS, Clear To Send
Indicator
2.6 DVI-I
The PC 8172 has a DVI-I interface connector. It is able to
connect to an expansion CRT monitor, and the system can display on
both the flat panel and the CRT simultaneously.
Pin Signal Pin Signal
1
3
5 6
7 8
9 10
11 12
13 14
15 16
17 18
19 20
TX2Ground
CRT_SPD DATA DVI_SPD_CLK
DVI_SPD DATA CRT-VSYNC
TX1- TX1+
Ground NC
NC VGAVCC
Ground FPDETECT
TX0- TX0+
Ground NC
2
TX2+
4
CRT_SPD_CLK
Hardware Installation
25
Page 36

PC 8172User’s Manual
Pin Signal Pin Signal
21 22
NC Ground
23 24
TXC+ TXC-
C1 C2
CRT-RED CRT-GREEN
C3 C4
CRT-BLUE CRT-HSYNC
C5
VGAGND
NOTE It doesn’t support display in LCD and DVI-D
simultaneously. DVI-D is only available after booting up
in Windows XP.
26
Hardware Installation
Page 37

PC 8172User’s Manual
2.7 Ethernet
The PC 8172 provides a NE2000 compatible Ethernet (RJ-45)
interfaces. For network connection, just plug in one cable end of the
system’s 10/100/1000-Base-T Hub into a standard RJ-45 connector.
Please refer to detailed pin assignment list below:
Pin Signal
1 TX+ (Data transmission positive
TX- (Data transmission
2
negative)
3 Rx+(Data reception positive)
4 RJ45 termination
5 RJ45 termination
6 Rx- (Data reception negative)
7 RJ45 termination
8 RJ45 termination
1 2 3 4 5 6 7
RJ-45
8
Hardware Installation
27
Page 38

PC 8172User’s Manual
2.8 Mountings Way – Panel/ Rack
There are two mounting ways available for the PC 8172
system: Panel and Rack mounting.
2.8.1 Panel Mounting
The PC 8172 is designed for panel mount application. To mount
the PC 8172, the standard set of mounting kit (included in the
system packaging) is needed.
28
Hardware Installation
Page 39

PC 8172User’s Manual
2.8.2 Rack Mounting
The PC 8172 also support rack mounting. The rack mounting kit is
optional. Please refer to the following procedure.
1. Fix five screws each side.
2. Complete the rack mounting.
Hardware Installation
29
Page 40

x
-
y
’
s
PC 8172User
Manual
Phoenix-Award BIOS Utility
C h a p t e r 3
The Phoenix-Award BIOS provides users with a built-in Setup program
to
modify basic system configuration. All configured parameters are
in a
stored
information
battery-backed-up RAM (CMOS RAM) to save the Setup
whenever the power is turned o
ff.
3.1 Entering Setup
There are two ways to enter the Setup program. You may either turn
ON
the computer and press <Del> immediately, or press the <Del>
and/or
<Ctrl>, <Alt>, and <Esc> keys simultaneously when the
f
ollowing message appears at the bottom of the screen during POST
(Power
on
Self Test).
If the
message disappears before you respond and you still want to
enter
Setup, please restart the system to try it again. Turning the
sys
tem
power OFF and ON
system case or simultaneously pressing <Ctrl>, <Alt>, and <Del> keys
can
restart the system.
the system doesn’t boot, an error message will pop out to prompt you
the
following information:
PRESS <F1> TO CONTINUE, <CTRL-ALT-ESC> OR <DEL> TO ENTER SETUP
TO ENTER SETUP PRESS DEL KEY
If
,
pressing the “RESET” button on the
you do not press keys at the right time and
30
Phoeni
Award BIOS Utilit
Page 41

y
2
s
l
r
r
y
PC817 User
’
Manua
3.2 Control Keys
Up arrow
Down arrow
Left a
row
Right a
Esc key
PgUp/“+” ke
PgDn/“−“ key
F1 key
(Shift) F2 key
F3 key
F4 key
F5 key
F6 key
F7 key
F8 key
F9 key
F10 key
3.3 Getting Help
a
a
row
Main Menu
The online description of the highlighted setup function is displayed at
the bottom of the screen.
Status Page Setup Menu/Option Page Setup Menu
Press <F1> to pop out a small Help window that provides the
description
highlighted
of
using appropriate keys and possible selections for
items. Press <F1> or <Esc> to exit the Help Window.
Move cursor to the previous item
Move cursor to the next item
Move cursor to the item on the left hand
Move to the item in the right hand
Main Menu -- Quit and delete changes into CMOS
Status Page Setup Menu and Option Page Setup
Menu -- Exit current page and return to Main Menu
Increase the numeric value or make changes
Decrease the numeric value or make changes
General help, only for Sta us Page Setup Menu and t
Option Page Setup Menu
Change color from total 16 colors. F2 to se ct color le
forward, (Shift) F2 to select color backward
Reserved
Reserved
Restore the previous CMOS alue from CMOS, only v
for Option Page Setup Menu
Load the default CMOS value from BIOS default table,
only for Option Page Se tup Menu
Load the Setup default, only for Option Page Setup
Menu
Reserved
Reserved
Save all the CMOS changes, only for Main Menu
Phoenix-Award BIOS Utilit
31
Page 42

x
-
y
’
s
PC 8172User
Manual
3.4 The Main Menu
Once you enter the Award BIOS CMOS Setup Utility, the Main Menu
appears
f
unctions and a couple of Exit options for your selection. Use arrow
keys
<Enter> to accept or enter its sub-menu.
on
the screen. In the Main Menu, there are several Setup
to
select the Setup Page you intend to configure then press
NOTE
If
your computer can not boot after making and saving
system
changes with Setup, the Award BIOS will reset
your
system to the CMOS default settings via its built-in
It is
strongly recommended that you should avoid changing the
chipset’s
carefully
reliability.
32
override
defaults. Both Award and your system manufacturer have
set up these defaults that provide the best performance and
feature.
Phoeni
Award BIOS Utilit
Page 43

y
2
s
l
PC817 User
’
Manua
3.5 Standard CMOS Setup Menu
The Standard CMOS Setup Menu displays basic information about
your system. Use arrow keys to highlight each item, and use <PgUp>
or <PgDn> key to select the value you want in each item.
a
Date
The date format is <day>, <date> <month> <year>. Press <F3> to
show
a
day
date
month
year
Time
the calendar.
It is determined by the BIOS and re ad only, from Sunday
to Saturday.
It can be keyed with the numerical/ function key, from 1
to 31.
It is from January to December.
It shows the current year of BIOS.
This item shows current time of your system with the format <hour>
<minute> <second>. The time is calculated based on the 24-hour
military-time
Phoenix-Award BIOS Utilit
clock. For example, 1 p.m. is 13:00:00.
33
Page 44

x
-
y
’
s
PC 8172User
Manual
a
IDE Primary Master/Primary Slave
These items identify the types of each IDE channel installed in the
computer.
2 user’s definable types (Type User) for Enhanced IDE BIOS.
There are 45 predefined types (Type 1 to Type 45) and
Press <PgUp>/<+> or <PgDn>/<−> to select a numbered hard disk
type,
or
directly type the number and press <Enter>. Please be
noted your drive’s specifications must match the drive table. The
hard
disk will not work properly if you enter improper information.
your hard disk drive type does not match or is not listed, you can
use Type User to manually define your own drive type
If
selecting Type User, you will be asked to enter related
in the
information
and
press <Enter>. This information should be provided in the
documentation
manufacturer.
If t
he HDD interface controller supports ESDI, select “Type 1”.
he HDD interface controller supports SCSI, select “None”.
If t
he HDD interface controller supports CD-ROM, select “None”.
If t
CYLS. LANDZONE
HEADS SECTORS
PRECOMP MODE
If t
here is no hard disk drive installed, select NONE and press
a
<Enter>.
Video
following items. Directly key in the information
from your hard disk vendor or the system
number of cylinders landing zone
number of heads
write precom
number of sectors
HDD access mode
Select the display adapter type for your system.
a
Halt On
.
This item determines whether the system will halt or not, if an error is
detected while powering up.
No errors
All errors
All, But
Keyboard
All, But
Diskette
All, But
Disk/Key
The system booting will halt on any errors detected.
(default)
Whenever BIOS detects a non-fatal error, the
system will stop and you will be prompted.
The system booting will not stop for a keyboard
error; it will stop for other errors.
The system booting will not stop for a disk error; it
will stop for other errors.
The system booting will not stop for a keyboard or
disk error; it will stop for other errors.
If
34
Phoeni
Award BIOS Utilit
Page 45

y
2
s
l
PC817 User
’
Manua
Press <Esc> to return to the Main Menu page.
3.6 Advanced BIOS Features
This section allows you to configure and improve your system, to se
up some system features according to your preference
t
.
Phoenix-Award BIOS Utilit
35
Page 46

x
-
y
’
s
PC 8172User
Manual
a
CPU Feature
Scroll to this item and press <Enter> to view the CPU Feature sub
menu.
a
Hard Disk Boot Priority
Scroll to
decide
t
his item and press <Enter>
the
disk boot priority
to
view the sub menu to
.
36
Phoeni
Award BIOS Utilit
Page 47

User
2
s
l
y
PC817
’
Manua
a
Virus Warning
This option flashes on the screen. During and after the system boot
up,
any attempt to write to the boot sector or partition table of the hard
disk drive will halt the system with the following message. You can
run an anti-virus program to locate the problem. The default setting is
“Disabled”.
Enabled
Disabled
NOTE This function is only available with DOS and other
operating systems that do not trap INT13.
a
CPU L1 & L2 Cache
These two options speed up memory access. However, it depends
on
the
CPU/chipset design. The default setting is “Enabled”. CPUs
with
no
a
Cache”
item on the menu.
Quick Power On Self Test
This option speeds up Power on Self Test (POST) after you turn on
the
system power.
check
items during POST. The default setting is “Enabled”.
! WARNING !
Disk boot sector is to be modified
Type “Y” to accept write or “N” to abort write
Award Software, Inc.
It automatically activates while the system
boots up and a warning message app ears
for an attempt to access the boot sect or or
hard disk partition table.
No warning message will appear for
attempts to access the boot sector or hard
disk partition table.
built-in internal cache will not provide the “CPU Internal
Enabled
Disabled
Enable cache
Disable cache
If
set as Enabled, BIOS will shorten or skip some
Enabled
Disabled
Enable Quick POST
Normal POST
Phoenix-Award BIOS Utilit
37
Page 48

’
s
l
x
-
y
PC 8172User
Manua
a
First/Second/Third Boot Device
These items let you select the 1st, 2nd, and 3rd devices that the
system
will search for during its boot-up sequence. The wide range of
selection includes Floppy, LS120, ZIP100, HDD0~3, SCS
CDROM.
a
Boot Other Device
I,
and
This item allows the user to enable/disable the boot device not
ted on the
lis
default
a
Boot Up Floppy Seek
During POST, BIOS will determine the floppy disk drive type, 40 or
80 tracks. 360Kb type is 40 tracks while 720Kb, 1.2MB and
1.44MB are all 80 tracks. The default value is “Enabled”.
Enabled
Disabled
a
Boot Up NumLock Status
First/Second/Third boot devices option above. The
sett
ing is “Enabled”
.
BIOS searches for floppy disk drive to determine if it is
40 or 80 tracks. Note that BIOS can not tell from 720K,
1.2M or 1.44M drive type as they are all 80 tracks.
BIOS will not search for the type of floppy disk drive by
track number. There will be no warning message
displayed if the drive installed is 360K.
Set the the Num Lock status when the system is powered on.
The
default value is “On”
a
Gate A20 Option
The default value is “Fast”
Normal
Fast
a
Typematic Rate Setting
The A20 signal is controlled by keyboard controller
or chipset hardware.
Default: Fast. The A20 signal is controlled by Port
92 or chipset specific method.
.
.
This item determines the typematic rate of the keyboard. The
default
value is “Disabled”
Enabled
Disabled
Enable typematic rate and typematic delay
programming.
Disable typematic rate and typematic delay
programming. The system BIOS will use de fault value
of these 2 items, controlled by keyboard.
.
38
Phoeni
Award BIOS Utilit
Page 49

User
2
s
l
y
PC817
’
Manua
a
Typematic Rate (Chars/Sec)
This option refers to character numbers typed per second by the
keyboard.
a
Typematic Delay (Msec)
The default value is “6”
6 characters per second
6
8 characters per second
8
10
12
15
20
24
30
10 characters per second
12 characters per second
15 characters per second
20 characters per second
24 characters per second
30 characters per second
.
This option defines how many milliseconds must elapse before a
held-down
value
a
Security Option
key begins generating repeat characters. The default
is
“250”
.
250
500
750
1000
250 msec
500 msec
750 msec
1000 msec
This item allows you to limit access to the system and Setup, or
just
to
Setup. The default value is “Setup”
System
Setup
If a wrong password is entered at the prompt, the system
will not boot, the access to Setup will be denied, either.
If a wrong password is entered at the prompt, the system
will boot, but the access to Setup will be denied.
.
NOTE To disable the security, select PASSWORD
SETTING at Main Menu and then you will be
to
asked
just
enter a password. Do not type anything,
press <Enter> and it will disable the security.
Once the security is disabled, the system will boot
and
you can enter Setup freely.
a
APIC Mode
Phoenix-Award BIOS Utilit
39
Page 50

x
-
y
’
s
PC 8172User
Manual
Use this item to enable or disable APIC (Advanced Programmable
Interrupt Controller) mode that provides symmetric multiprocessing
a
MPS Version Control For OS
(SMP) for systems
.
This item specifies the version of the Multiprocessor Specification
(MPS).
Version 1.4 has extended configuration tables to improve
support
expandability.
a
Small Logo (EPA) Show
If
disabled,
for multiple PCI bus configurations and provide future
enabled, the EPA logo will appear during system booting up; if
the
EPA logo will not appear.
Press <Esc> to return to the Main Menu page.
40
Phoeni
Award BIOS Utilit
Page 51

y
2
s
l
PC817 User
’
Manua
3.7 Advanced Chipset Features
This section contains completely optimized chipset’s features on the
board
t
hat you are strongly recommended to leave all items on this
page
at
their default values unless you are very familiar with the
t
echnical specifications of your system hardware
.
a
System BIOS Cacheable
Selecting Enabled allows caching of the system BIOS ROM at
F0000h-FFFFFh, resulting in better system performance. However,
if any program writes
The default value is “Disabled”
result.
a
Memory Hole At 15M-16M
to t
his memory area, a system error may
.
You can reserve this area of system memory for ISA adapter ROM.
When
t
his area is reserved, it cannot be cached. The user information
of peripherals that need to use this area of system memory usually
discusses their memory requirements
Phoenix-Award BIOS Utilit
.
41
Page 52

x
-
y
’
s
PC 8172User
Manual
a
PCI Express Root Port Func
Scroll to this item and press <Enter> to view the sub menu to
decide
the
PCI Express Port.
Press <Esc> to return to the Advanced Chipset Featurs page.
*** VGA Setting ***
a
PEG/Onchip VGA Contro
Use this item to choose the primary display card.
a
On-Chip Frame Buffer Size
Use this item to se
a
DVMT Mode
l
t the
VGA frame buffer size.
DVMT (Dynamic Video Memory Technology) helps you select the
video
mode.
a
DVMT/Fixed Memory Size
DVMT (Dynamic Video Memory Technology) allows you to select a
maximum
system
application.
size of dynamic amount usage of the video memory. The
would configure the video memory dependent on your
42
Phoeni
Award BIOS Utilit
Page 53

y
2
s
l
PC817 User
’
Manua
a
Boot Display
This item is for Intel define ADD card only
.
Press <Esc> to return to the Main Menu page.
3.8 Integrated Peripherals
This section allows you to configure your SuperIO Device, IDE
Function
and Onboard Device
.
Phoenix-Award BIOS Utilit
43
Page 54

x
-
y
’
s
PC 8172User
Manual
a
OnChip IDE Device
Scroll to this item and press <Enter> to view the sub menu OnChip
IDE Device.
¤
I
DE HDD Block Mode
Block mode is also called block transfer, multiple commands,
or
multiple sector read/write
block
mode (most new drives do), select Enabled for
. If
your IDE hard drive supports
automatic detection of the optimal number of block
read/writes
¤
I
DE DMA transfer access
Automatic data transfer between system memory and IDE
per sector the drive can support
.
device with minimum CPU intervention. This improves data
throughput
¤
On-Chip Primary/Secondary PCI IDE
and frees CPU to perform other tasks
The integrated peripheral controller contains an IDE
interface with support for two IDE channels. Select Enabled to
.
activate each channel separately. The default value is
“Enabled”
44
.
NOTE Choosing Disabled for these options
willautomatically remove the IDE
rimaryMaster/Slave PIO and/or IDE Secondary
Phoeni
Award BIOS Utilit
Page 55

y
2
s
l
PC817 User
’
Manua
Master/Slave PIO items on the menu.
¤
I
DE Master/Slave PIO
The four IDE PIO (Programmed Input/Output) fields let you
t a
PIO mode (0-4) for each of the four IDE devices that
se
the onboard IDE interface supports. Modes 0 to 4 provide
successively increased performance. In Auto mode, the
automatically determines the best mode for each
DE Master/Slave UDMA
¤
system
device.
I
Select the mode of operation for the IDE drive. Ultra DMA33/66/100/133 implementation is possible only if your IDE
drive supports it and the operating environment
hard
a
includes
DMA driver
. If
your hard drive and your system
software both support Ultra DMA-33/66/100/133, select Auto
¤
enable UDMA mode by BIOS.
to
SATA Mode
There are these options for you to set up SATA mode: IDE,
ID or
AHCI
RA
NOTE ICH8DO supports AHCI under Microsof
.
Windows VISTA and Microsoft Windows XP.
I
CH8 only supports AHCI under Microso
Windows VISTA.
¤
LEGACY Mode Support
Legacy mode support allows devices to function in an
operating
environment that is not USB-aware.
Press <Esc> to return to the Integrated Peripherals page.
t
ft
Phoenix-Award BIOS Utilit
45
Page 56

x
-
y
’
s
PC 8172User
Manual
a
Super IO Device
Scroll to this item and press <Enter> to view the sub menu Super
IO Device.
¤
Onboard FDC Controller
Select Enabled if your system has a floppy disk controller
(FDC) installed on the system board and you wish to use it
If
you install and-in FDC or the system has no floppy drive,
t
Disabled in this field. The options available are
selec
Enabled,
¤
Onboard Serial Port 1/2/3/4
Disabled.
.
Select an address and corresponding interrupt for the serial
port
.
Options: 3F8/IRQ4, 2E8/IRQ3, 3E8/IRQ4, 2F8/IRQ3,
Disabled
¤
Serial Port 1/2/3/4 Use IRQ
These items assign which
serial
¤
Onboard Paralellel Port
,
Auto.
port 1/2/3/4.
I/O
address to access onboard
This item allows you to determine access onboard parallel
port
controller with which
are
378H/IRQ7, 278H/IRQ5, 3BC/IRQ7, Disabled. The 3BC
option
does not support any EPP modes.
I/O
address. The options available
46
Phoeni
Award BIOS Utilit
Page 57

y
2
s
l
PC817 User
’
Manua
¤
Parallel Port Mode
Select an operating mode for the onboard parallel (printer)
port
.
Select Normal unless your hardware and software
require
one of the other modes offered in this field. The
¤
options
EPP1.7.
available are EPP1.9, ECP, SPP, ECPEPP1.7,
ECP Mode Use DMA
Select a DMA channel for the parallel port for use during
ECP mode.
¤
PWRON After PWR-Fail
This item enables your computer to automatically restart or
return
to
its operating status.
Press <Esc> to return to the Integrated Peripherals page.
a
Onboard Lan1/Lan2 Boot ROM
Use this item to enable or disable the Boot ROM function of the
onboard
a
USB Device Setting
LAN1/LAN2 chips when the system boots up.
Scroll to this item and press <Enter> to view the sub menu USB
Device
Sett
ing. USB (CN16) is not working when USB2.0 Controller
is disabled.
Press <Esc> twice to return to the Main Menu page.
Phoenix-Award BIOS Utilit
47
Page 58

x
-
y
’
s
PC 8172User
Manual
3.9 Power Management Setup
The Power Management Setup allows you to save energy of your
sys
tem
display
effectively
after a period of inactivity
. It
will shut down the hard disk and turn OFF video
.
48
Phoeni
Award BIOS Utilit
Page 59

User
2
s
l
y
PC817
’
Manua
a
ACPI Function
This item allows you to enable/disable the Advanced Configuration
and
Power Management (ACPI). The function is always “Enabled”.
a
ACPI Suspend Type
This item specifies
your operating system supports ACPI
Windows
Standby
of
this field. Options are:
[S1(POS)] The S1 sleep mode is a low power state. In
state,
hardware
[S3(STR)] The S3 sleep mode is a lower power state where
the
applications/files
powered
save
Phoenix-Award BIOS Utilit
the
power saving modes for ACPI function.
,
such as Windows 98SE,
ME
and Windows 2000, you can choose
mode in S1 (POS) or S3 (STR) fashion through the setting
to
enter the
t
no
system
maintains all system contex
information of system configuration and open
while most other hardware components turn off to
energy. The information stored in memory will be used
contex
t is
lost
(CPU
or
t.
is
saved to main memory that remains
chipset)
and
49
If
his
Page 60

’
s
l
x
-
y
PC 8172User
Manua
a
to restore the system when a “wake up” event occurs
Run VGABIOS if S3 Resume
.
When this item is set Auto, the system will run VGA BIOS if it is
reaumed
a
Power Management
This option allows you to selec
saving
describes
Max Saving
User Define
Min Saving
Disabled
a
Video Off Method
This setting determines the manner in which the monitor is blanked.
V/H
SYNC+Blank
DPMS
Blank Screen
a
Video Off In Suspend
from the S3 state.
t the
type (or degree) of power
for Doze, Standby, and Suspend modes. The table below
each power management mode:
It is maximum power savings, only available for SL
CPUs. The inactivity period is 1 minute in each mode.
It sets each mode. Select time-out periods in the PM
Timers section.
It is minimum power savings. The inactivity period is 1
hour in each mode (except the hard drive).
Default value
Turns OFF vertical and horizontal
synchronization ports and writes blanks to the
video buffer
Select this option if your monitor supports the
Display Power Management Signaling (DPMS)
standard of the Video Electronics Stand ards
Association (VESA). Use the software supplie d
for your video subsystem to select video power
management values.
System only writes blanks to the video buffer.
This item defines if the video is powered down when the system is
put
a
a
into suspend mode.
Suspend Type
this item is set to the default Stop Grant, the CPU will go into Idle
If
Mode during power saving mode.
Moden Use IRQ
you want an incoming call on a modem to automatically resume
If
the
system from a powersaving mode, use this item to specify the
interrupt
request line (IRQ) used by the modem. You might have to
50
Phoeni
Award BIOS Utilit
Page 61

User
2
s
l
y
PC817
’
Manua
connect the fax/modem to the board Wake On Modem connector
for working this feature.
a
Suspend Mode
After the selected period of system inactivity (1 minute to 1 hour),
all devices except the CPU shut of
Disabled
1/2/4/6/8/10/2
0/30/40
Min/1 Hr
System will never enter SUSPEND mode
Defines the continuous idle time before the system
entering SUSPEND mode.
If any item defined in (J) is enabled & active,
SUSPEND timer will be reloaded
f.
The default value is “Disabled”
a
HDD Power Down
If
HDD activity is not detected for the length of time specified in this
field,
the hard disk drive will be powered down while all other
devices
a
Soft-Off by PWR-BTTN
remain active
This option only works with systems using an ATX power supply.
also allows the user to define which type of so
sequence
the
Instant-Off
Delay 4 Sec.
.
ft
power OFF
system will follow. The default value is “Instant-Off”.
This option follows the conventional manner systems
perform when power is turned OFF. Instant-Off is a soft
power OFF sequence requiring only the switching of the
power supply button to OFF
Upon turning OFF system from the power switch, this
option will delay the complete system power OFF
sequence by approximately 4 seconds. Within this delay
period, system will temporarily enter into Suspend Mode
enabling you to restart the system at once.
It
.
a
Wake-Up by PCI card
If
enable this item, the system can automatically resume when the
PCI Modem or PCI LAN card receives an incoming call.
a
Power On by Ring
This option allows the system to resume or wake up upon detecting
any
ring signals coming from an installed modem. The default value
is “Enabled”
a
Resume by Alarm
enable this item, the system can automatically resume after a
If
fixed
.
time in accordance with the system’s RTC (realtime clock).
Phoenix-Award BIOS Utilit
51
Page 62

x
-
y
’
s
PC 8172User
Manual
** Reload Global Timer Events **
Global Timer (power management) events can prevent the system
f
rom entering a power saving mode or can awaken the system from
such
a
mode.
a
Primary/Secondary IDE 0/1
Use this item to configure the IDE devices monitored by the system.
a
FDD, COM, LPT Port
Use this item to configure the FDD, COM and LPT ports monitored
by
the
a
system.
PCI PIRQ[A-D]#
This item can be used to detect PCI device activities; if no activity
the system will enter the sleep mode.
,
Press <Esc> to return to the Main Menu page.
52
Phoeni
Award BIOS Utilit
Page 63

y
2
s
l
PC817 User
’
Manua
3.10 PnP/PCI Configuration Setup
This section describes configuring the PCI bus system. PCI, or
Personal Computer Interconnec
t, is a
system which allows
operate at speeds nearing the speed the CPU itself uses when
communicating
some
very technical items and it is strongly recommended that only
experienced
with its own special components. This section covers
users should make any changes to the default settings.
I/O
devices to
a
Reset Configuration Data
Normally, you leave this item Disabled. Select Enabled to reset
Extended
if installing a new add-on cause the system reconfiguration a serious
conflict that the operating system can not boot. Options: Enabled,
Disabled.
a
Resources Controlled By
The Award Plug and Play BIOS can automatically configure all
boot and Plug and Play-compatible devices.
interrupt
disappear,
value
a
IRQ Resources
When resources are controlled manually, assign each system
Phoenix-Award BIOS Utilit
System Configuration Data (ESCD) when you exit Setup or
If
you select Auto, all
request (IRQ), DMA assignment, and Used DMA fields
as
the BIOS automatically assigns them. The default
is
“Manual”
.
53
Page 64

x
-
y
’
s
PC 8172User
Manual
interrupt to one of the following types in accordance with the type
of devices using the interrupt:
1. Legacy ISA Devices compliant with the original PC AT bus
specification, requiring a specific interrupt (such as IRQ4 for serial port
1).
2.
PCI/ISA PnP Devices compliant wi th the Plug and Play standard,
whether designed for PCI or ISA bus architecture.
The default value is “PCI/ISA PnP”
.
a
PCI/VGA Palette Snoop
Some non-standard VGA display cards may not show colors
properly
VGA
PCI/VGA
disabled,
.
This item allows you to set whether MPEG ISA/VESA
Cards can work with PCI/VGA or no
can work with a MPEG ISA/VESA VGA card; when
a
PCI/VGA cannot work with a MPEG ISA/VESA Card.
t.
When enabled, a
** PCI Express relative items **
a
Maximum Payload Size
When using DDR SDRAM and Buffer size selection, another
in
consideration
buffer
for data storage. Maximum Payload Size defines the
maximum
the
device.
designing a payload memory is the size of the
TLP (Transaction Layer Packet) data payload size for
Press <Esc> to return to the Main Menu page.
54
Phoeni
Award BIOS Utilit
Page 65

y
2
s
l
PC817 User
’
Manua
3.11 PC Health Status
This section supports hardware monitering that lets you monitor those
parameters
board.
for
critical voltages, temperatures and fan speed of the
a
Shutdown Temperature
It
helps you set the maximum temperature they system can reach
powering down.
before
a
Current SYSTEM Temperature
Show you the current system temperature.
a
Current CPU Temperature
These read-only fields show the functions of the hardware thermal
by
sensor
ensure
a
Vcore +3.3V/+5V/+12V/VBAT(V)/5VSB
CPU thermal diode that monitors
a
stable system
.
Show you the voltage of +3.3V/+5V/+12V.
the
chip blocks to
Press <Esc> to return to the Main Menu page.
Phoenix-Award BIOS Utilit
55
Page 66

x
-
y
’
s
PC 8172User
Manual
3.12 Frequency/Voltage Control
This section is to control the CPU frequency and Supply Voltage,
DIMM
OverVoltage and AGP voltage.
a
CPU Clock Ratio
Use this item to select the CPU’s frequency.
a
Auto Detect PCI Clk
The enabled item can automatically disable the clock source for a
PCI
slot without a module, to reduce EMI (ElectroMagnetic
Interference).
a
Spread Spectrum
spread spectrum is enabled, EMI (ElectroMagnetic Interference)
If
generated by the system can be significantly reduced.
Press <Esc> to return to the Main Menu page.
56
Phoeni
Award BIOS Utilit
Page 67

y
2
s
l
PC817 User
’
Manua
3.13 Load Optimized Defaults
This option allows you to load the default values to your system
configuration.
performance
These default settings are optimal and enable all high
features.
To load SETUP defaults value to CMOS SRAM, enter “Y”.
“N”.
Phoenix-Award BIOS Utilit
If
not, enter
57
Page 68

x
-
y
’
s
PC 8172User
Manual
3.14 Set Supervisor/User Password
You can set either supervisor or user password, or both of then. The
di
ff
erences between are
1.
Supervisor password: can enter and change the options of the
setup
menus.
2.
User password: just can enter but do not have the right to change
options of the setup menus
the
:
.
When you select this function, the following message will appear at the
of
center
the screen to assist you in creating a password.
ENTER PASSWORD:
Type the password with eight characters at most, and press <Enter>.
The
password typed will now clear any previously entered password from
CMOS memory. You will be asked to confirm the password. Type the
password again and press <Enter>. You may also press <Esc> to abort
the selection and not enter a password.
To disable password, just press <Enter> when you are prompted to
enter
password. A message will confirm the password being disabled.
Once the password is disabled, the system will boot and you can enter
Setup freely.
PASSWORD DISABLED.
When a password is enabled, you have to type it every time you enter
Setup.
This prevents any unauthorized person from changing your
tem
sys
configuration.
Additionally when a password is enabled, you can also require the
BIOS to request a password every time the system reboots. This would
preven
t
unauthorized use of your computer
.
You determine when the password is required within the BIOS
Features
set to “System”, the password is required during boot up and entry into
Setup.
Setup.
Setup Menu and its Security option
If
set as “Setup”, prompting will only occur prior to entering
. If the
Security option is
58
Phoeni
Award BIOS Utilit
Page 69

y
2
s
l
PC817 User
’
Manua
3.15 Save & Exit Setup
This allows you to determine whether or not to accept the modifications.
Typing
“Y” quits the setup utility and saves all changes into the CMOS
memory
.
Typing “N” brigs you back to Setup utility.
Phoenix-Award BIOS Utilit
59
Page 70

x
-
y
’
s
PC 8172User
Manual
3.16 Exit Without Saving
Selec
t t
his option to exit the Setup utility without saving the changes
you
have made in this session. Typing “Y” will quit the Setup utility
without
saving the modifications. Typing “N” will return you to Setup
utility.
60
Phoeni
Award BIOS Utilit
Page 71

y
2
s
l
PC817 User
’
Manua
MEMO
Phoenix-Award BIOS Utilit
61
Page 72

’
s
PC 8172User
Manual
4.1 System
PC 8172 supports Windows 2000/XP/Vista. To facilitate the installation of
t
he system driver, please carefully read the instructions in this chapter
before start installing.
C h a p t e r 4
Driver
Installation
1. Here is the path for the system driver:
Panel
series\PC 8172\Driver
2. Select all files, follow the installing procedure, and finally press OK.
62
Driver Installation
Page 73

User
2
s
l
l
l
PC817
’
Manua
4.2 Touch Screen
4.2.1
Specification
Touch Screen
Touch Screen Controller
Communications
Baud Rate
Resolution
Mode Selection
Power Input
Power Consumption
Mechanical Size
Portrait
Others
5-wire Analog Resistive typ e
DMC9000 (10-bit A/D converter inside)
RS-232
19200 and 9600 baud selection
2048 x 2048
PnP or non-PnP
5V DC
12V: 23mA+ i where (i = v/touch screen sheet
R)
5V 20mA+ i where (i = v/touch screen sheet :
R)
60(L) x 26(W) x 8.3(H)mm
Support 90o to 270o screen rotation
Touch activate indi cation LED on board
Driver Insta
ation
63
Page 74

’
s
PC 8172User
Manual
4.2.2 Driver Installation – Windows 2000/XP/Vista
The PC 8172 provides a driver of the touch screen that users can install
it under operating system Windows 2000/XP/Vista. To facilitate this
ouch screen driver installation, users should read the instructions in this
t
chapter carefully before start the installation
.
1
. I
nsert Driver CD and follow the path to select the “Panel
\
series\PC 8172\Driver
2000_XP_Vista Universal Driver\Setup.exe”
2. Follow the installing procedure and press OK.
Step5 - Touch\Driver\Windows
.
3. Click Start menu and select “PenMount Utilities”, and then a
“PenMount Control Panel” pops out
.
Note
Please choose COM4 for touch screen installation.
64
Driver Installation
Page 75

User
2
s
l
l
l
PC817
’
Manua
4. Selec
t the
“Standard Calibrate” tab.
Driver Insta
ation
65
Page 76

’
s
PC 8172User
Manual
5. Calibration:
To adjust the display with touch panel, click “Calibration” and follow the
calibrate
calibration.
point to do calibration; there are five points on screen for
6. Press OK.
66
Driver Installation
Page 77

User
2
s
l
l
l
PC817
’
Manua
4.2.3 Driver Installation - DOS
¤
Using “INSTALL.EXE” Utility to Install PenMount Software
Driver
1. Insert Driver CD and select the Panel series\P1173-
841\Driver\Step5 - Touch\Driver\DOS\Install.exe
2. Press ENTER key to install the drivers to drive C or use keyboard to
key-in the hard disc drive that you plan to install the driver.
3. The driver will ask “Do you want to modify your Autoexec.bat to
initialize
generating
Then
PenMount?
the
f
ollow up the instructions to complete the installation.
(Y/N)”
initialization instructions in AUTOEXEC.BAT files.
¤
Identify the Communication Port and IRQ Number
1
.
For the first time installation, or changing PenMount Touch
Screen’s
C:\PENMOUNT\PMDETECT)
number.
file
2
.
The driver detects your communication COM port and IRQ number
f
rom COM1 IRQ4, COM2 IRQ3, COM3…. to COM4 IRQ15.
PenMount
automatically.
PenMount is initialized successfully!!!
Create
PenMount
COM port, use PMDETECT (e.g.
PMDETECT will save the correct data to PMOUSE.CFG
for f
urther use.
driver can find the COM port and IRQ number
file “pmouse.cfg”. Success.
i
The screen will then show
nternal settings:
Suggest
to
check the COM port and IRQ
you
choose
:
“YES”
for
Comm. Port: COM<n> IRQ<n>
..........
3
.
PMDETECT program is able to skip the IRQ number detecting if the
Touch screen
specified
Driver Installation 13 does not need to detec
IRQ number. For example, you do not need to detect
t t
he
IRQ5, and the command is:
-N5
C:\PENMOUNT\PMDETECT
4
. If
you do not need to detect IRQ5 and IRQ9, the command is:
Driver Insta
ation
67
Page 78

’
s
PC 8172User
Manual
C:\PENMOUNT\PMDETECT -N5 -N9
¤
Do Calibration
1
. To
adjus
t the
touch screen mapping properly to display screen, use
PM.BAT
CALIBRATION
2
.
The message pops out to ask if you select the video mode number.
(C:\PENMOUNT\PM) to do calibration. Choose “1” DO
(adjust screen mapping).
Use keyboard to select starting the calibration, touch the uppercenter
point
, t
hen right-center point, bottom-center point and leftcenter
point in sequence. After the calibration is done, the data will
be
shown on the screen, then press any key to continue the
progress.
3
.
After the calibration, you are suggested to tes
and display mapped results by choosing “3” DRAWING TEST under
PM.BAT
t the
touch screen
¤
I
nitializing the PenMount Driver
If
you don’t have the initialization commands in AUTOEXEC.BAT,
initialize
use
initialization
PenMount C:\PENMOUNT\PMINIT) controller before you
the
PenMount Touch Screen. The display will show the
message:
PenMount V7.06 Copyright(c) SALT International Corp
Test:COM<n> IRQ<n> (<n> is the number after PMDETECT
done)
PenMount communication settings: COM<N> IRQ<n> Baud
Rate: <xxxx>
.
... ... ... ... ... ... ... ... ... ...
¤
Demonstration
To demonstrate or test touch screen operation, please select “3”
DRAWING
be shown on the screen.The demonstration program
“ICECREAM.EXE”
too.
68
TEST in PM.BAT file of the Utility Directory. Drawing will
in the
“PENMOUNT” directory can be applied,
Driver Installation
Page 79

User
2
s
l
l
l
PC817
’
Manua
MEMO
Driver Insta
ation
69
Page 80

’
s
i
f
PC 8172User
Manual
A p p e n d i x
Power Supply Specification
Power Supply FSP250-50GUB (250W,
AC100~240V
1.
OUTPUT ELECTRICAL REQUIREMENTS
The subject power supply will meet all electrical specifications below,
over
OUTPUT RATING
Output Nominal Regulation Ripple/Noise Min Max
Electrical Requirements
the full operation temperature range and dynamic load regulation.
1
2
3
4
5
Note
Input)
+3.3V ±5% 50mV 0.3A 16.8A
+5V ±5% 50mV 0.3A 12.0 A
+12V ±5% 120mV 1.5A 10.0 A
-12V ±10% 120mV 0.0 A 0.8A
+5VSB ±5% 50mV 0.0 A 2.0A
–12V,+3.3V, +5V,+12V will have the regulation to ±10%
when all load take off
.
The +3.3V and +5V total output shall not exceed 105 watts. The +3.3.V
+5V, and +12V total output shall not exceed 230 watts and the total
output
for
this subject power supply is 250 watts
.
,
70
Power SupplySpec
ication
Page 81

2
s
l
LOAD CAPACITY SPECIFICATIONS
The cross regulation defined as follows
DC include DC Output ripple & noise
LOAD +3.3V +5V +12V -12V +5VSB
Condition_1 X X X X 2A
Condition_2 0.5A 0.3A 1A 0A 0.1A
Condition_3 0.5A 2A 2A 0.8A 0.1A
Condition_4 1A 2A 17A 0.1A 0.1A
Condition_5 1A 10A 4A 0.1A 0.1A
Condition_6 4.5A 18A 12A 0.1A 0.1A
Condition_7 12A 2A 2A 0A 0.1A
Condition_8 17A 9.7A 10.5A 0.8A 2A
HOLD-UP TIME (@FULL LOAD)
115V
/
60Hz
: 17
mSec. Minimum.
230V
/
50Hz
: 17
mSec. Minimum.
OUTPUT RISE TIME
(10% TO 95% OF FINAL OUTPUT VALUE, @FULL LOAD)
115V-rms or 230V-rms
OVER VOLTAGE PROTECTION
Voltage Source Protection Point
User
PC817
’
Manua
, the
voltage regulation limits
.
+3.3Vdc 20ms Maximum
+ 5Vdc
+ 12Vdc 20ms Maximum
+ 5Vsb
- 12Vdc
20ms Maximum
20ms Maximum
20ms Maximum
+3.3V 3.76V – 4.8V
+5V 5.6V – 7.0V
+12V 13.0V – 16.5V
Power Supply
Specification
71
Page 82

’
s
i
f
PC 8172User
Manual
SHORT CIRCUIT PROTECTION
Output short circuit is defined to be a short circuit load of less than 0.1
ohm
.
In
the event of an output short circuit condition on +3.3V, +5V or +12V
output
, the
power supply will shutdown and latch of
shall
return to normal operation after the short circuit has been
removed and the power switch has been turned off for no more than 2
seconds.
OVERLOAD PROTECTION
Overload currents defined as a 10 amp/sec fault current ramp starting
f
rom full load, applied to the +3.3V, +5V output, shall not cause that
output
to
exceed 32 amps before the output voltage drops below 0.5
volts
and is latched of
t
he same ramp conditions starting at full load before it is latched of
POWER SIGNAL
f.
The +12V output shall not exceed 20 amps under
f.
The power supply
f.
POWER GOOD @ 115/230V,FULL LOAD
POWER FAIL @115/230V, FULL LOAD
100 –500mSec.
1 mSec. minimum
2.
Loading Voltage Full load Light load
Required Minimum
Efficiency
Required Minimum
Efficiency
3.
Efficiency
Environmental Requirements
f
Operating temperature range: 10°C to 50°C
f
Storage temperature range: -20°C to +80°C
f
Humidity, non-condensing: 5% ~ 95%RH, Non-
Condensing
Typical
load
115V 80% 81% 80%
230V 81% 82% 80%
72
Power SupplySpec
ication
Page 83

User
2
s
l
PC817
’
Manua
f
Vibration: 0.25G, 10~250Hz
f
Shock: -40G, 11mSec for Storage, -10G, 11mSec for
4.
operating
Reliability
The power supply reliability, when calculated by MILHDBK;lates
output at maximum load and an ambient temperature of 25℃.
t
revision, are exceed 100,000 hours with all
5.
Safety
NEMKO EN 60950
TUV EN60950 OR VDE EN60950
UL 60950
CSA 22.2 NO. 60950
IEC 60950
CE
Power Supply
Specification
73
 Loading...