

Acer X1213, X1110, X1210K, X1110A, X1210 User Manual [sv]
1
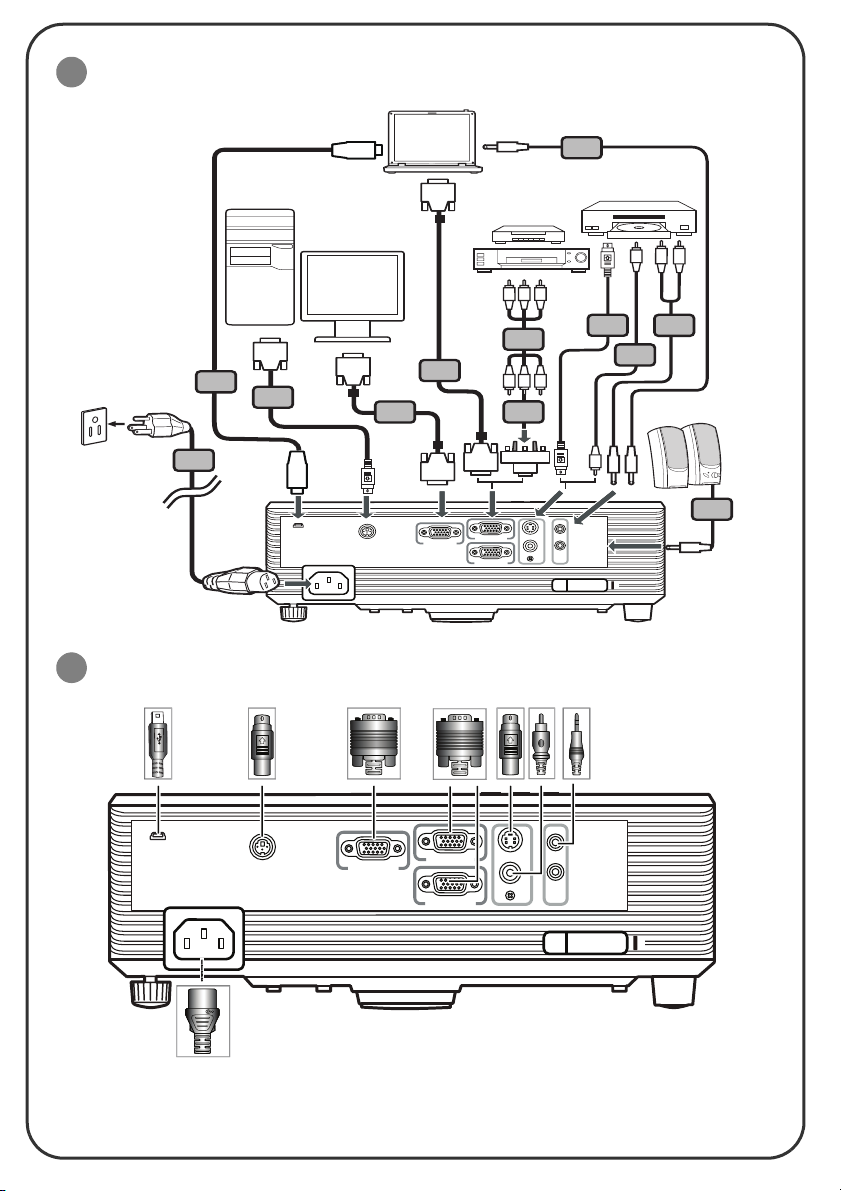
INSTALLATION
INSTALLATION
INSTALLATIONINSTALLATION
RS232
8
7
1
USB
USB B
2
GRÄNSSNITTSKONTAKT
GRÄNSSNITTSKONTAKT
GRÄNSSNITTSKONTAKTGRÄNSSNITTSKONTAKT
USB
D-Sub
RS232
5
D-Sub
R
W
Y
RBG
9
2
2
D-Sub
D-Sub
RBG
3
HDTV adapter
6
Y
5
4
5
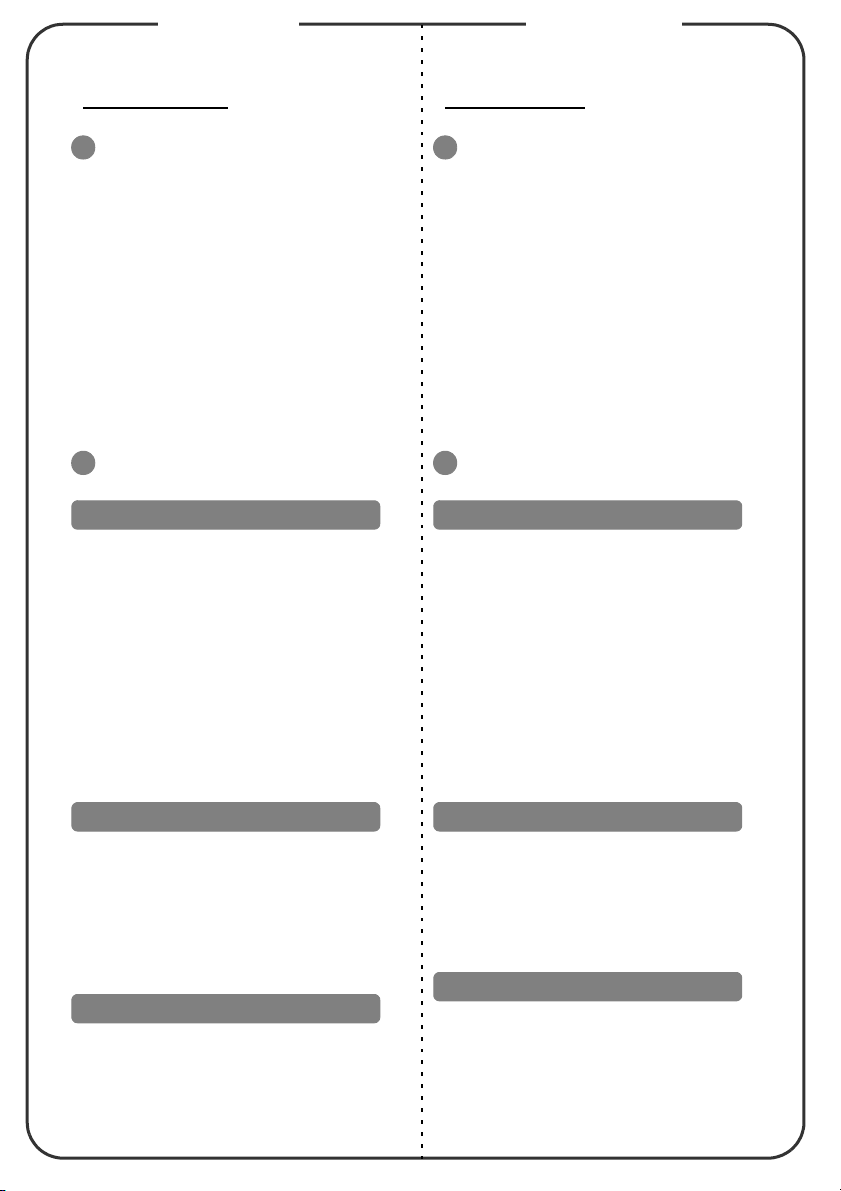
AUDIO IN
S-VIDEO
VGA IN 1
VGA OUT
VGA IN 2
VIDEO
AUDIO OUT
USB B
AUDIO IN
RS232
E62405SP
R
Anm: Kontaktgränssnitt beror på modellspecifikationerna
VGA OUT
VGA IN 1
VGA IN 2
S-VIDEO
VIDEO
AUDIO OUT
English Svenska
Quick Start
Quick Start
Quick StartQuick Start
Snabbstart
Snabbstart
SnabbstartSnabbstart
1
INSTALLATION
INSTALLATION
INSTALLATIONINSTALLATION
1. Power cord
2. VGA cable
3. VGA to component video/HDTV
adapter
4. Composite video cable
5. Audio cable
6. S-Video cable
7. RS232 cable
8. USB cable
9. 3 RCA component cable
Note: Connector interface is subject to model's specifications
2
INTERFACE CONNECTOR
INTERFACE CONNECTOR
INTERFACE CONNECTORINTERFACE CONNECTOR
Connecting to a Computer
1. Ensure the projector and your
computer are turned off.
2. Connect one end of the VGA cable
to the "VGA IN" connector on the
projector; connect the other end to
the VGA connector on the computer
and tighten the screws.
3. Connect one end of the power cord
into the AC power socket on the
projector; connect the other end to
an electrical outlet.
1
INSTALLATION
INSTALLATION
INSTALLATIONINSTALLATION
1. Strömsladd
2. VGA-sladd
3. VGA-till-komponentvideo/HDTVadapter
4. Kompositvideosladd
5. Ljudkabel
6. S-videosladd
7. RS232-sladd
8. USB-sladd
9. 3 RCA-komponent-sladd
Anm: Kontaktgränssnitt beror på modellspecifikationerna
2
GRÄNSSNITTSKONTAKT
GRÄNSSNITTSKONTAKT
GRÄNSSNITTSKONTAKTGRÄNSSNITTSKONTAKT
Anslutning till en dator
1. Se till att projektorn och datorn är
avstängda.
2. Anslut ena änden av VGA-kabeln till
"VGA IN" kontakten på projektorn,
anslut den andra änden till VGAkontakten på datorn och dra åt
skruvarna.
3. Anslut ena änden av strömsladden
till strömuttaget på projektorn och
anslut den andra änden till ett
elektriskt uttag.
Powering On the Projector
1. Remove the lens cap.
2. Turn on the projector first and then
the computer.
3. Adjust the position, focus and
zoom.
4. Run your presentation.
Powering Off the Projector
1. Press the power button twice.
2. Do not remove AC power cord from
outlet until the projector fans shut
down.
Slå på projektorn
1. Ta bort linslocket.
2. Sätt först på projektorn och sedan
datorn.
3. Justera positionen, fokus och zoom.
4. Kör din presentation.
Slå av projektorn
1. Tryck på strömknappen två gånger.
2. Ta inte bort strömsladden från
uttaget innan projektorns fläkt
stängts av.
 Loading...