

Page 1
1
ASENNUS
ASENNUS
ASENNUSASENNUS
RS232
8
7
1
USB
USB B
2
KÄYTTÖLIITTYMÄLIITIN
KÄYTTÖLIITTYMÄLIITIN
KÄYTTÖLIITTYMÄLIITINKÄYTTÖLIITTYMÄLIITIN
USB
D-Sub
RS232
5
D-Sub
R
W
Y
RBG
9
2
2
D-Sub
D-Sub
RBG
3
HDTV adapter
6
Y
5
4
5
AUDIO IN
S-VIDEO
VGA IN 1
VGA OUT
VGA IN 2
VIDEO
AUDIO OUT
USB B
AUDIO IN
RS232
E62405SP
R
Huomautus: Liitäntätyyppi on mallin teknisten tietojen mukainen
VGA OUT
VGA IN 1
VGA IN 2
S-VIDEO
VIDEO
AUDIO OUT
Page 2
English Suomi
Quick Start
Quick Start
Quick StartQuick Start
Pika-aloitus
Pika-aloitus
Pika-aloitusPika-aloitus
1
INSTALLATION
INSTALLATION
INSTALLATIONINSTALLATION
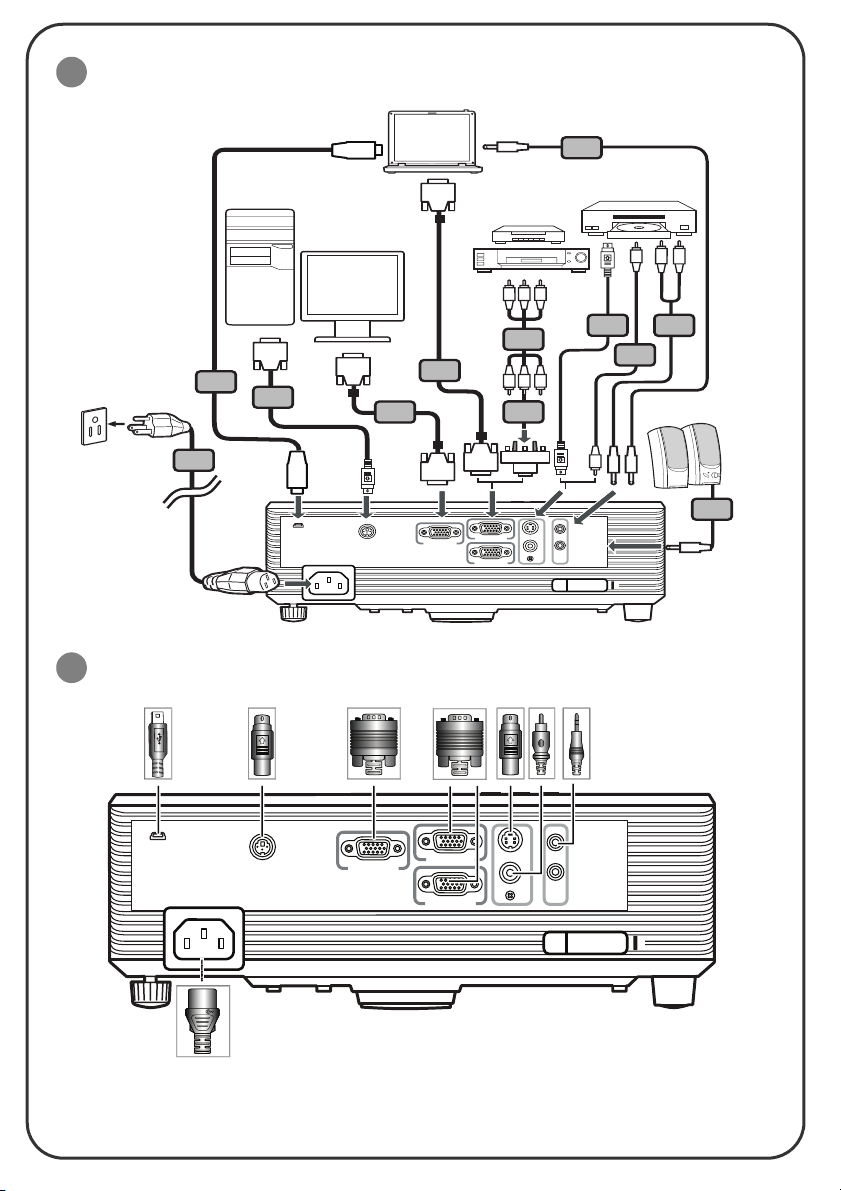
1. Power cord
2. VGA cable
3. VGA to component video/HDTV
adapter
4. Composite video cable
5. Audio cable
6. S-Video cable
7. RS232 cable
8. USB cable
9. 3 RCA component cable
Note: Connector interface is subject to model's specifications
2
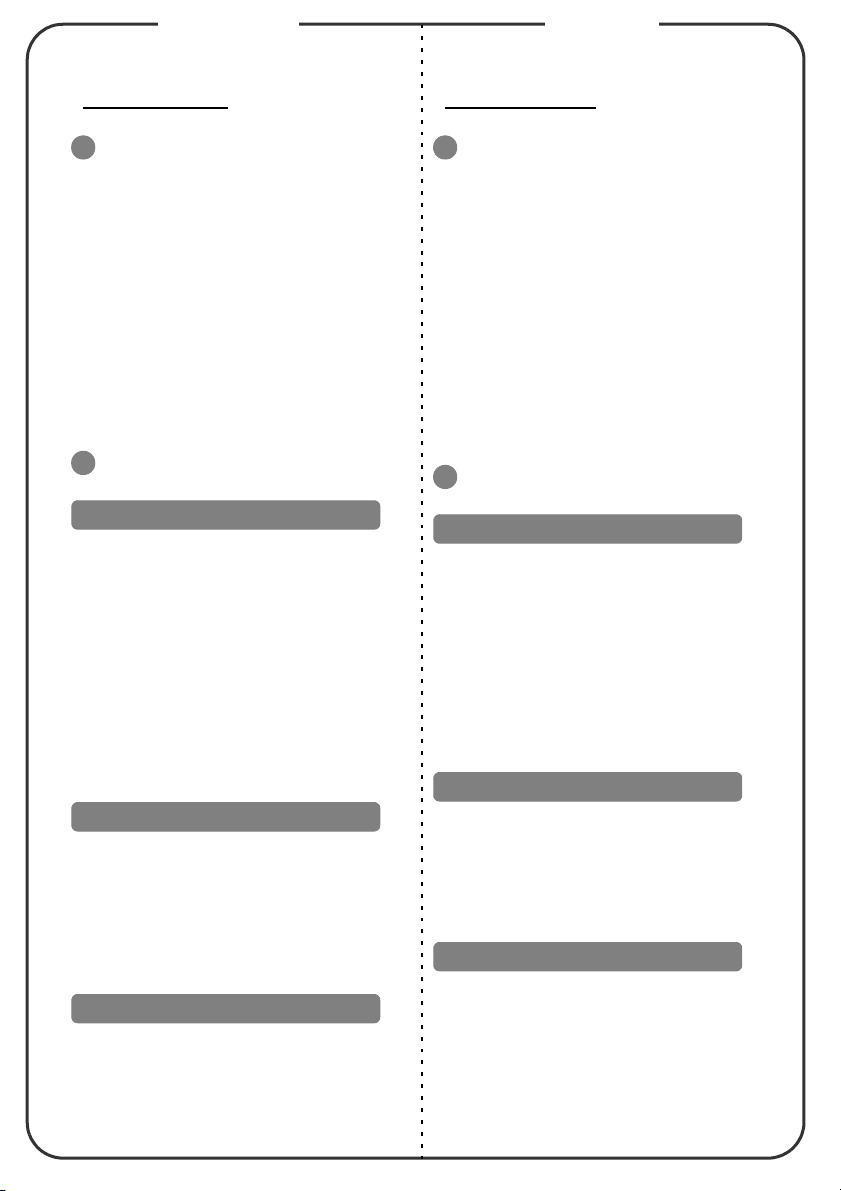
INTERFACE CONNECTOR
INTERFACE CONNECTOR
INTERFACE CONNECTORINTERFACE CONNECTOR
Connecting to a Computer
1. Ensure the projector and your
computer are turned off.
2. Connect one end of the VGA cable
to the "VGA IN" connector on the
projector; connect the other end to
the VGA connector on the computer
and tighten the screws.
3. Connect one end of the power cord
into the AC power socket on the
projector; connect the other end to
an electrical outlet.
Powering On the Projector
1. Remove the lens cap.
2. Turn on the projector first and then
the computer.
3. Adjust the position, focus and
zoom.
4. Run your presentation.
Powering Off the Projector
1. Press the power button twice.
2. Do not remove AC power cord from
outlet until the projector fans shut
down.
1
ASENNUS
ASENNUS
ASENNUSASENNUS
1. Virtajohto
2. VGA-kaapeli
3. VGA-komponenttivideo/HDTVsovitin
4. Komposiittivideokaapeli
5. Audiokaapeli
6. S-videokaapeli
7. RS232-kaapeli
8. USB-kaapeli
9. 3 RCA-komponenttikaapelia
Huomautus: Liitäntätyyppi on mallin teknisten tietojen
mukainen
2
KÄYTTÖLIITTYMÄLIITIN
KÄYTTÖLIITTYMÄLIITIN
KÄYTTÖLIITTYMÄLIITINKÄYTTÖLIITTYMÄLIITIN
Liittäminen tietokoneeseen
1. Varmista, että projektori ja
tietokone on kytketty päälle.
2. Liitä VGA-kaapelin toinen pää
projektorin VGA IN (VGA-tulo) liitäntään ja toinen pää tietokoneen
VGA-liitäntään ja kiristä ruuvit.
3. Liitä virtajohdon toinen pää
projektorin virtapistorasiaan ja
toinen pää seinäpistorasiaan.
Projektorin käynnistäminen
1. Poista linssinsuojus.
2. Käynnistä ensin projektori ja vasta
sitten tietokone.
3. Säädä sijainti, tarkennus ja zoomi.
4. Näytä esityksesi.
Projektorin sammuttaminen
1. Paina virtapainiketta kahdesti
2. Älä irrota virtajohtoa
seinäpistorasiasta ennen kuin
projektorin tuulettimet ovat
sammuneet.
 Loading...