

Acer Veriton 5500 series User's Guide

Veriton 5500 series
(Veriton 5500/Veriton 5500G)
User’s guide

Copyright © 2002 Acer Incorporated
All Rights Reserved.
Veriton 5500 series
(Veriton 5500/Veriton 5500G)
User’s guide
Changes may be made periodically to the information in this publication without obligation
to notify any person of such revision or changes. Such changes will be incorporated in new
editions of this manual or supplementary documents and publications. This company makes
no representations or warranties, either expressed or implied, with respect to the contents
hereof and specifically disclaims the implied warranties of merchantability or fitness for a
particular purpose.
Record the model number, serial number, purchase date, and place of purchase information in
the space provided below. The serial number and model number are recorded on the label
affixed to your computer. All correspondence concerning your unit should include the serial
number, model number, and purchase information.
No part of this publication may be reproduced, stored in a retrieval system, or transmitted, in
any form or by any means, electronic, mechanical, photocopy, recording, or otherwise,
without the prior written permission of Acer Incorporated.
Model Number : _________________________________
Serial Number: ___________________________________
Purchase Date: ___________________________________
Place of Purchase: ________________________________
Acer and the Acer Logo are registered trademarks of Acer Inc. Other company’s product
names or trademarks are used herein for identification purposes only and belong to their
respective companies.

Notices
FCC notice
This device has been tested and found to comply with the limits for a Class B
digital device pursuant to Part 15 of the FCC Rules. These limits are designed to
provide reasonable protection against harmful interference in a residential
installation. This device generates, uses, and can radiate radio frequency
energy, and if not installed and used in accordance with the instructions, may
cause harmful interference to radio communications.
However, there is no guarantee that interference will not occur in a particular
installation. If this device does cause harmful interference to radio or television
reception, which can be determined by turning the device off and on, the user
is encouraged to try to correct the interference by one or more of the following
measures:
• Reorient or relocate the receiving antenna
• Increase the separation between the device and receiver
• Connect the device into an outlet on a circuit different from that to which
the receiver is connected
• Consult the dealer or an experienced radio/television technician for help
Notice: Shield cables
All connections to other computing devices must be made using shielded cables
to maintain compliance with FCC regulations.
iii
Notice: Peripheral devices
Only peripherals (input/output devices, terminals, printers, etc.) certified to
comply with the Class B limits may be attached to this equipment. Operation
with noncertified peripherals is likely to result in interference to radio and TV
reception.
Caution! Changes or modifications not expressly approved by the
manufacturer could void the user’s authority, which is granted by
the Federal Communications Commission, to operate this
computer.
Use conditions
This part complies with Part 15 of the FCC Rules. Operation is subject to the
following two conditions: (1) this device may not cause harmful interference,
and (2) this device must accept any interference received, including interference
that may cause undesired operation.

iv
Notice: Canadian users
This Class B digital apparatus meets all requirements of the Canadian
Interference-Causing Equipment Regulations.
Important safety instructions
Read these instructions carefully. Save these instructions for future reference.
1 Follow all warnings and instructions marked on the product.
2 Unplug this product from the wall outlet before cleaning. Do not use
liquid cleaners or aerosol cleaners. Use a damp cloth for cleaning.
3 Do not use this product near water.
4 Do not place this product on an unstable cart, stand, or table. The product
may fall, causing serious damage to the product.
5 Slots and openings in the housing and the back or bottom are provided for
ventilation; to ensure reliable operation of the product and to protect it
from overheating, these openings must not be blocked or covere. The
openings should never be blocked by placing the product on a bed, sofa,
rug, or other similar surface. This product should never be placed near or
over a radiator or heat register, or in a built-in installation unless proper
ventilation is provided.
6 This product should be operated from the type of power indicated on the
marking label. If you are not sure of the type of power available, consult
your dealer or local power company.
7 Do not allow anything to rest on the power cord. Do not locate this
product where persons will walk on the cord.
8 If an extension cord is used with this product, make sure that the total
ampere rating of the equipment plugged into the extension cord does not
exceed the extension cord ampere rating. Also, make sure that the total
rating of all products plugged into the wall outlet does not exceed the fuse
rating.
9 Never push objects of any kind into this product through cabinet slots as
they may touch dangerous voltage points or short out parts that could
result in a fire or electric shock. Never spill liquid of any kind on the
product.
10 Do not attempt to service this product yourself, as opening or removing
covers may expose you to dangerous voltage points or other risks. Refer all
servicing to qualified service personnel.
11 Unplug this product from the wall outlet and refer servicing to qualified
service personnel under the following conditions:
a When the power cord or plug is damaged or frayed
b If liquid has been spilled into the product

c If the product has been exposed to rain or water
d If the product does not operate normally when the operating
instructions are followed. Adjust only those controls that are covered
by the operating instructions since improper adjustment of other
controls may result in damage and will often require extensive work
by a qualified technician to restore the product to normal condition.
e If the product has been dropped or the cabinet has been damaged
f If the product exhibits a distinct change in performance, indicating a
need for service.
12 Replace the battery with the same type as the product's battery we
recommend. Use of another battery may present a risk of fire or explosion.
Refer battery replacement to a qualified serviceman.
13 Warning! Batteries may explode if not handled properly. Do not
disassemble or dispose of them in fire. Keep them away from children and
dispose of used batteries promptly.
14 Use only the proper type of power supply cord set (provided in your
accessories box) for this unit. It should be a detachable type: UL listed/CSA
certified, type SVT, rated 7A 125V minimum, VDE approved or its
equivalent. Maximum length is 15 feet (4.6 meters).
Laser compliance statement
The CD-ROM/DVD-ROM/CD-RW drive in this computer is a laser product. The
CD-ROM/DVD-ROM/CD-RW drive’s classification label (shown below) is located
on the drive.
CLASS 1 LASER PRODUCT
CAUTION: INVISIBLE LASER RADIATION WHEN OPEN. AVOID EXPOSURE TO
BEAM.
v
Lithium battery statement
CAUTION
Danger of explosion if battery is incorrectly replaced. Replace only with the
same or equivalent type recommended by the manufacturer. Discard used
batteries according to the manufacturer’s instructions.

vi
Macrovision® statement
This product incorporates copyright protection technology that is protected by
method claims of certain U.S. patents and other intellectual property rights
owned by Macrovision Corporation and other rights owners. Use of this
copyright protection technology must be authorized by Macrovision
Corporation, and is intended for home and other limited viewing uses only
unless otherwise authorized by Macrovision Corporation. Reverse engineering
or disassembly is prohibited.
Year 2000 compliance statement
The Veriton 5500 series computer carries the "Hardware NSTL Tested Year 2000
Compliant" logo, which certifies that this model has been tested by NSTL using
the YMark2000 test, and has been found to meet NSTL's standards for Year
2000 hardware compliance.
For more details, check the Acer Year 2000 Resource Center at http://
global.acer.com/service/pcy2000.html

Notices iii
FCC notice iii
Important safety instructions iv
Laser compliance statement v
Lithium battery statement v
Macrovision® statement vi
Year 2000 compliance statement vi
1 First things first 1
Package contents 3
Taking care of your computer 4
Important tips 4
Cleaning and servicing 4
Asking for technical assistance 5
Accessing the user’s guide 6
2 System tour 7
Features 9
Performance 9
Multimedia 9
Connectivity 9
Front panel 11
Rear panel 13
Keyboard 15
Function keys 16
Lock keys 16
Windows keys 17
Cursor keys 17
Palm rest 17
Volume control/Mute knob 18
Multimedia keys 18
Internet/Suspend keys 19
Programmable keys 19
Mouse 20
Disk drives 21
3.5-inch floppy drive 21
CD-ROM/DVD-ROM/CD-RW drive 22
Hard disk 24
Contents
3 Setting up your computer 25
Arranging a comfortable work area 27

viii
Adjusting your chair 27
Positioning your computer 27
Positioning your monitor 28
Positioning your keyboard 28
Positioning your mouse 28
Connecting peripherals 29
Connecting your mouse 29
Connecting your keyboard 32
Connecting a monitor 34
Connecting the power cable 35
Turning on your computer 36
Turning off your computer 37
Connecting options 38
Connecting your printer 38
Connecting the modem 39
Connecting to the network 40
Connecting multimedia devices 41
Connecting USB devices 44
4 Upgrading your computer 47
Installation precautions 49
ESD precautions 49
Preinstallation instructions 49
Post-installation instructions 50
Opening your computer 51
To remove the computer cover 51
To replace the computer cover 52
Internal components 53
System boards 54
Mainboard layout 54
Audio board 59
Upgrading your computer 60
Installing additional memory 60
Replacing the hard disk 62
Installing an expansion card 65
5 System utilities 69
Acrobat Reader 72
LDCM 73
Norton AntiVirus 74
NTI CD-Maker 75
PowerDVD 76
BIOS utility 77

Reinstalling programs 78
Recovering your system 78
6 Frequently asked questions 79
FAQs 81
Index 85
ix

x

1 First things first

This chapter describes the contents of your
computer package and also provides
important tips on how to take care of your
computer.

Package contents
Before you unpack your computer, make sure that you have enough
space to set up your computer.
Carefully unpack the carton and remove the contents. If any of the
following items are missing or damaged, contact your dealer
immediately:
• Veriton 5500 series computer
• Items contained in the accessory box
• PS/2 or USB keyboard
• PS/2 or USB mouse
• User’s guide and installation poster
• Other user documentation and third-party software
3

4
1 First things first
Taking care of your computer
Please read the safety instructions listed in this section. Following
these instructions on the care and use of your new computer will help
you maximize its durability.
Important tips
• Do not expose the computer to direct sunlight. Do not place it
near sources of heat, such as a radiator.
• Do not subject the computer to magnetic fields.
• Do not expose the computer to rain or moisture.
• Do not spill water on the computer.
• Do not subject the computer to heavy shock or vibration.
• Do not expose the computer to dust and dirt.
• Never place the system on uneven surfaces.
• Do not step on the power cord or place heavy objects on top of it.
Carefully route the power cord and any cables away from personal
traffic.
• When unplugging the power cord, do not pull on the cord itself
but pull on the plug.
• The total ampere rating of the equipment plugged in should not
exceed the ampere rating of the cord if you are using an extension
cord. Also, the total current rating of all equipment plugged into
a single wall outlet should not exceed the fuse rating.
• Check the documentation that came with your software programs
to see if you can select other combinations of resolution and color.
These adjustments could make viewing the screen more
comfortable.
Cleaning and servicing
To clean your computer and keyboard
1 Turn off the computer and unplug the power cable.
2 Use a soft cloth moistened with water and gently wipe the exterior
of the computer and the keyboard. Do not use liquid or aerosol
cleaners.

To clean your pointing device
To clean a regular mouse (with rubber ball):
1. Open the circular cover underneath the mouse.
2. Take out the rubber ball and wipe it with a soft, damp cloth.
3. Put the ball back and close the cover.
To clean your optical mouse:
For optical mouse users, refer to the documentation that came with
your mouse for maintenance instructions.
To clean your monitor
Make sure that you keep your screen clean. For cleaning instructions,
refer to the documentation that came with your monitor.
When to contact a service technician
• If you dropped and damaged the computer
• If liquid has been spilled into the computer
• If the computer is not operating normally
• If a computer problem persists even after you have checked and
done the troubleshooting tips discussed in the “Frequently-asked
questions” section on page 81
• If your problem is not listed in the “Frequently-asked questions”
section on page 81
• If you want to replace or upgrade any of your computer's internal
components
5
Asking for technical assistance
For technical assistance, contact your local dealer or distributor. You
may also access the Acer Web site at (www.acer.com
on how and where to contact the service centers available in your area.
) for information

6
1 First things first
Accessing the user’s guide
This user’s guide is also available on your computer as an Adobe
Acrobat PDF file.
To access the user’s guide (for Windows XP)
1 On the Windows XP taskbar, click on the Start button then select
Help and Support Center.
2 On the Help and Support Center home page, double-click the
Veriton 5500 series Online icon.
To access the user’s guide (for Windows 2000)
1 Double-click on the Veriton 5500 series Online icon on your
Windows desktop.

2 System tour

This chapter discusses the features and
components of your computer.

Features
Here are just a few of your computer’s many features:
Performance
• Intel Pentium® 4 processor
• System memory expandable to a maximum of 2GB using DDR
(Double Data Rate) SDRAM DIMM modules
Note: To capitalize on the system memory capacity mentioned
above, you must use 1-GB memory modules which are not yet
available in the market. The biggest capacity currently available is
512-MB which allows a maximum of 1GB.
• Power management function
• 3.5-inch floppy drive
• CD-ROM, DVD-ROM or CD-RW drive
• High-capacity, Enhanced-IDE hard disk
• Supports USB 2.0 high-performance peripherals
9
Multimedia
• 128-bit graphics accelerator installed in the AGP Pro card slot
• 3-D quality audio system via onboard audio controller
• Audio-in/Line-in, Audio-out/Line-out, Headphone-out, and
Microphone-in interfaces
Note: The system has two microphone-in jacks (front and rear).
However, you can not use both of them at the same time. By
default, your system enables the microphone-in jack in front and
disables the one at the back.
Connectivity
• Two PS/2 interfaces for mouse and keyboard
• One serial port

10
2 System tour
• One parallel port
• One VGA port
• Six Universal Serial Bus (USB) ports (two on the front and four on
the rear panel)
• High-speed fax/data PCI modem (optional)
• 10Base-T/100Base-TX network support with remote wake-up
function
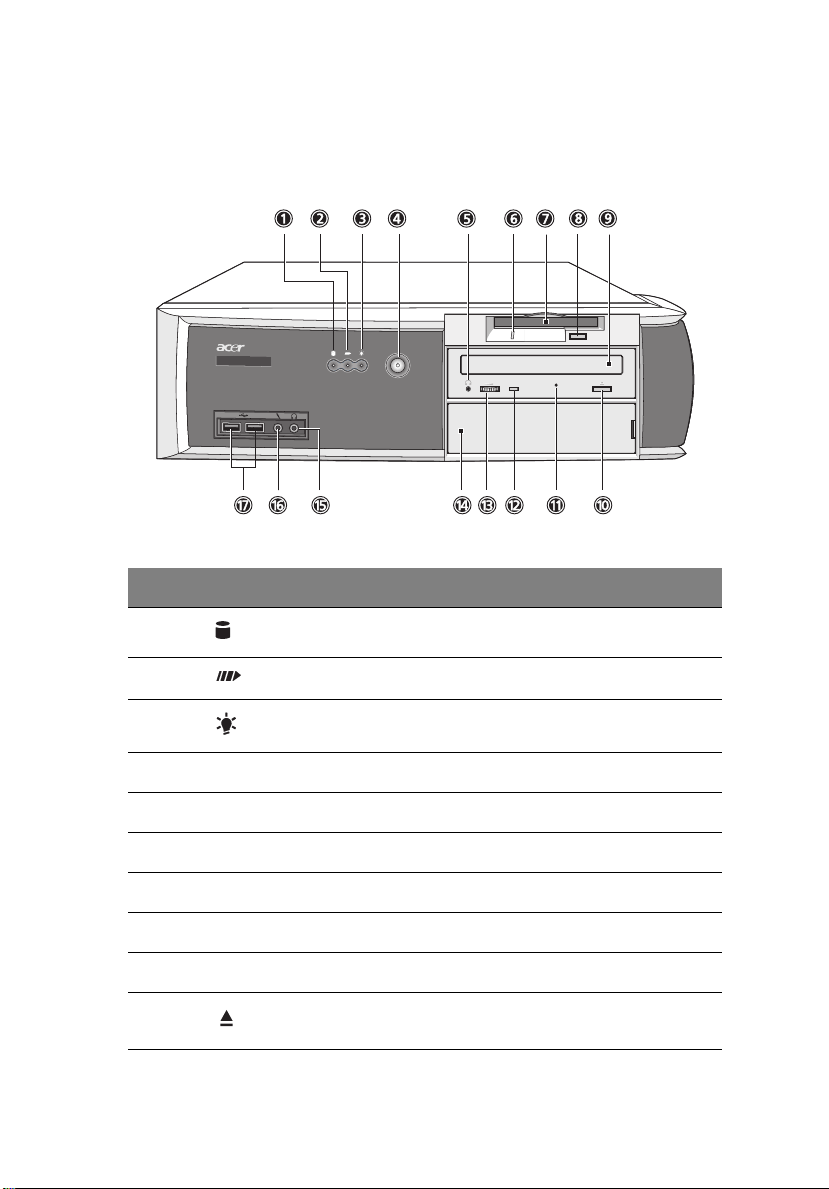
Front panel
Your computer’s front panel consists of the following:
Label Icon Description
1 Hard disk activity light-emitting diode (LED)
11
2 System activity indicator
3 Power indicator
4 Power button
5 CD-ROM/DVD-ROM/CD-RW Headphone/Earphone port
6 Floppy drive LED
7 3.5-inch floppy drive
8 Floppy drive eject button
9 CD-ROM/DVD-ROM/CD-RW tray
10 Stop/Eject button
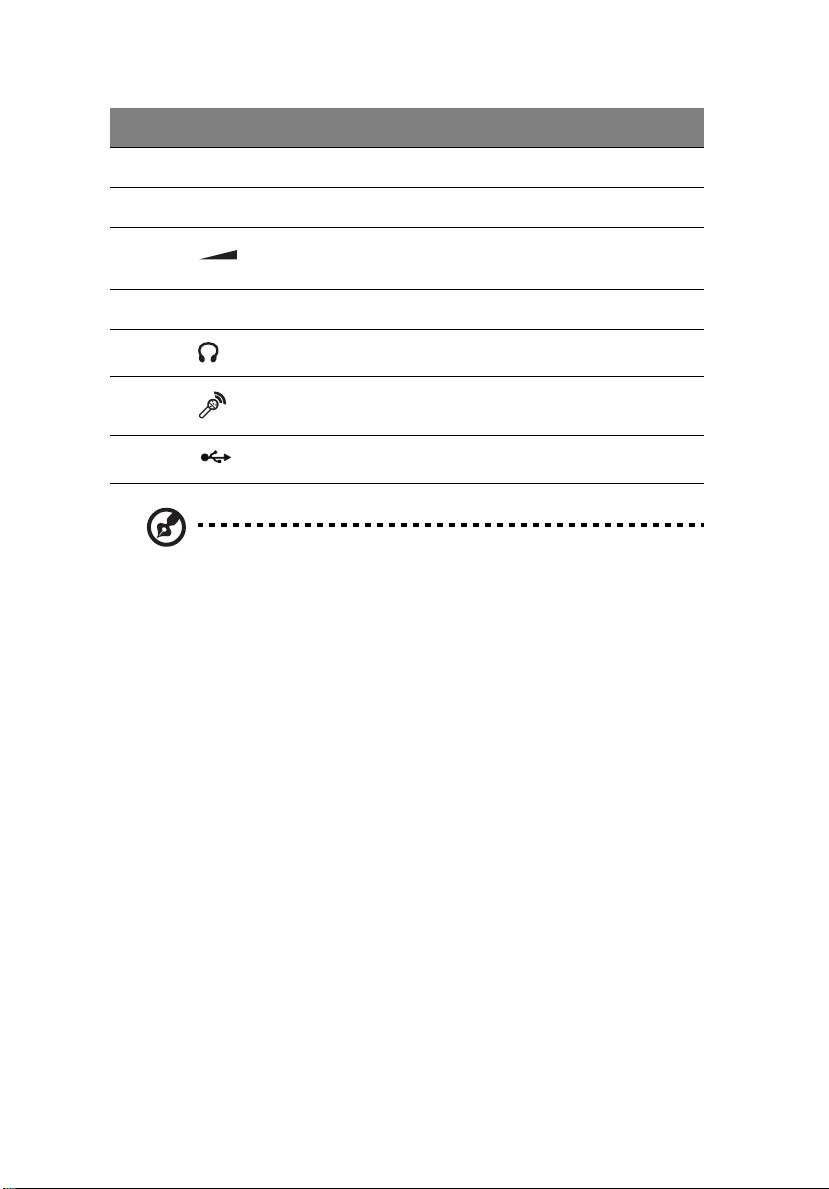
12
Label Icon Description
11 CD-ROM/DVD-ROM/CD-RW emergency eject hole
12 CD-ROM/DVD-ROM/CD-RW LED
13 Volume control
14 5.25-inch drive bay
15 Headphone/Earphone port
16 Front microphone-in port (see Note)
17 USB ports
Note: The system has two microphone-in jacks (front and rear).
However, you can not use both of them at the same time. By
default, your system enables the microphone-in jack in front and
disables the one at the back.
2 System tour
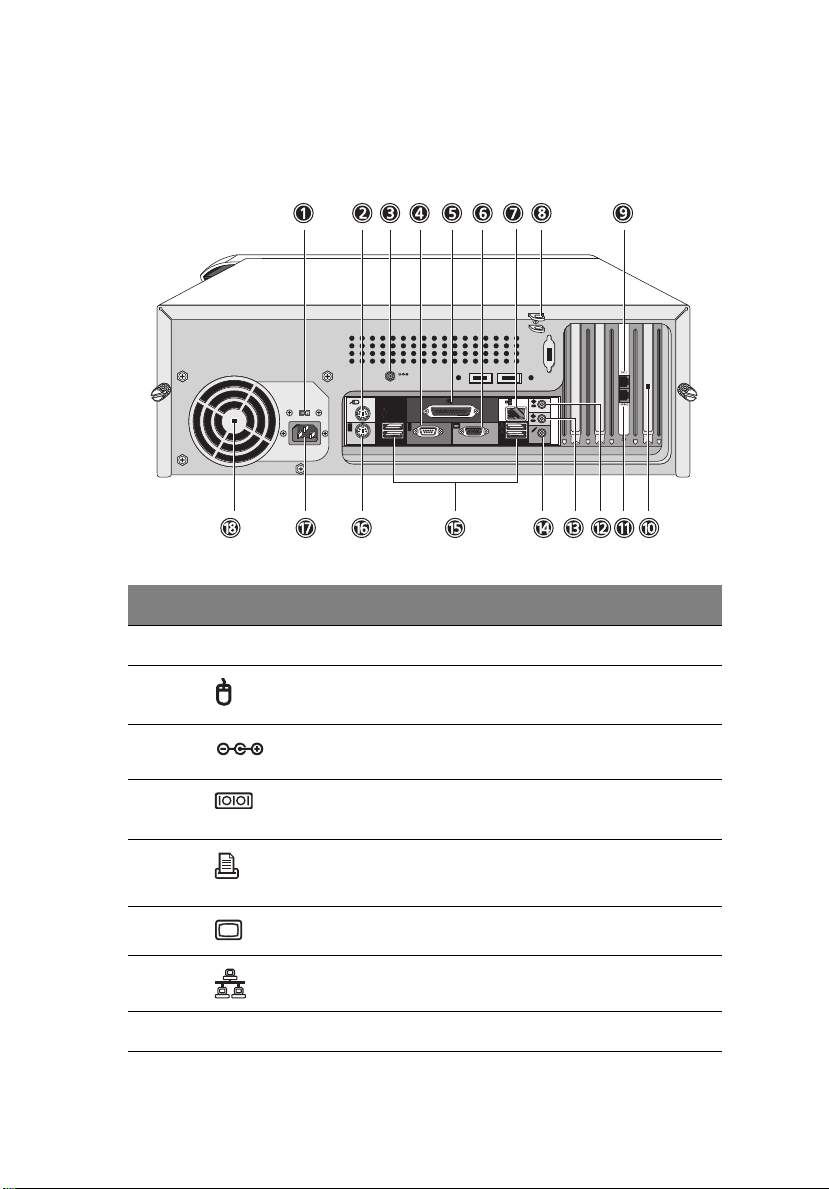
Rear panel
Your computer’s rear panel consists of the following:
Label Icon Color Description
13
1 Voltage selector switch
2 Green PS/2 mouse port
3 Power jack (for external speakers)
4 Teal or
Tur quoi se
5 Burgundy Parallel/Printer port
6 Blue Monitor port
7 White Network port
8Keyhole
Serial port
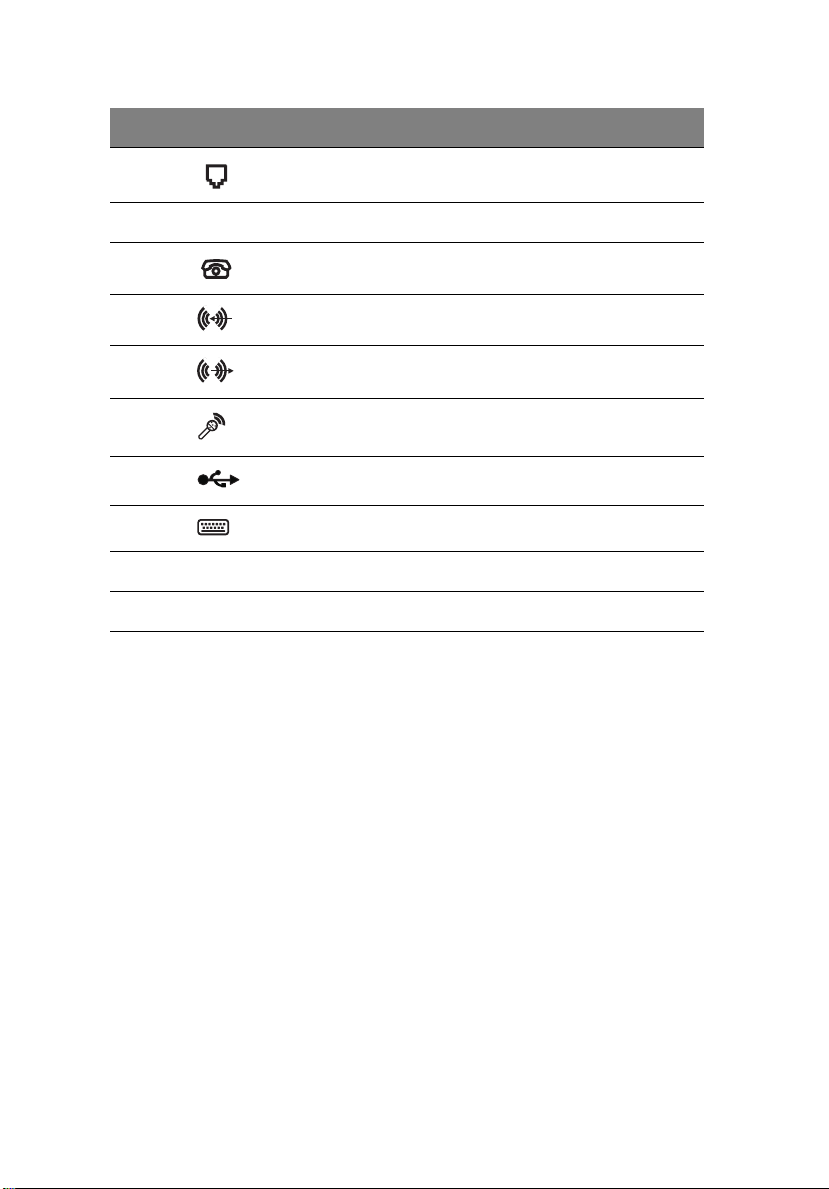
14
Label Icon Color Description
9 Modem line port
10 Expansion slots
11 Telephone port
12 Light blue Audio-in/Line-in jack
13 Lime Audio-out/Line-out jack
14 Pink Microphone-in jack
15 Black USB ports
16 Purple PS/2 keyboard port
17 Power cable socket
18 Power supply
2 System tour
For information on how to connect the peripherals, see “Connecting
peripherals” on page 29 and “Connecting options” on page 38.
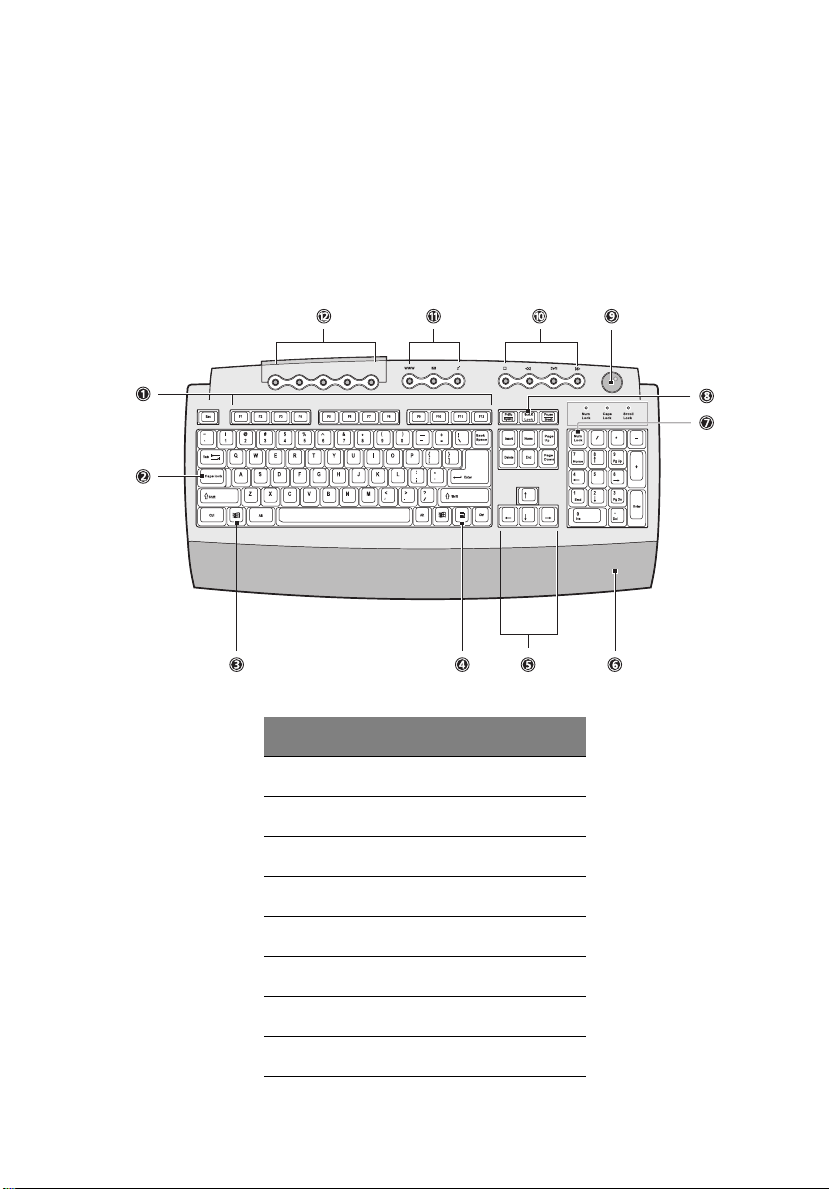
Keyboard
Your computer comes with a USB keyboard. The keyboard has fullsized keys that include separate cursor keys, two Windows keys, and
twelve function keys.
For information on how to connect your USB keyboard, please see
“Connecting peripherals” on page 29
.
15
No. Description
1 Function keys
2Caps lock
3 Windows logo key
4 Application key
5 Cursor keys
6 Palm rest
7 Num lock key
8 Scroll lock key

16
No. Description
9 Volume control/Mute knob
10 Multimedia keys
11 Internet/Suspend keys
12 Programmable keys
2 System tour
Function keys
The function keys, F1 - F12, let you perform specific functions,
depending on the application that uses them.
Lock keys
The keyboard has three lock keys which you can toggle on and off to
switch between two functions.
Lock key Description
Caps Lock When activated, all alphabetic characters typed
appear in uppercase (same function as pressing
Shift + <letter>).
Num Lock When activated, the keypad is set to numeric
mode; i.e., the keys function as a calculator
(complete with arithmetic operators such as +, -,
* and /).
Scroll Lock When activated, the screen moves one line up
or down when you press the up arrow or down
arrow respectively. Take note that Scroll Lock
may not work with some applications.
Windows keys
The keyboard has two keys that perform Windows-specific functions.
Key Description
Windows logo key Start button. Combinations with this key
perform special functions, such as:
• Windows + Tab: Activate the next
Taskbar button
• Windows + E: Explore My Computer
• Windows + F: Find Document
• Windows + M: Minimize All
• Shift + Windows + M: Undo Minimize
All
• Windows + R: Display the Run dialog box
Application key Opens the applications context menu (same
function as clicking the right button of the
mouse).
17
Cursor keys
The cursor keys, also called the arrow keys, let you move the cursor
around the screen. They serve the same function as the arrow keys on
the numeric keypad when the Num Lock is toggled off.
Palm rest
The detachable palm rest provides you a comfortable place to rest your
hands while typing.
18
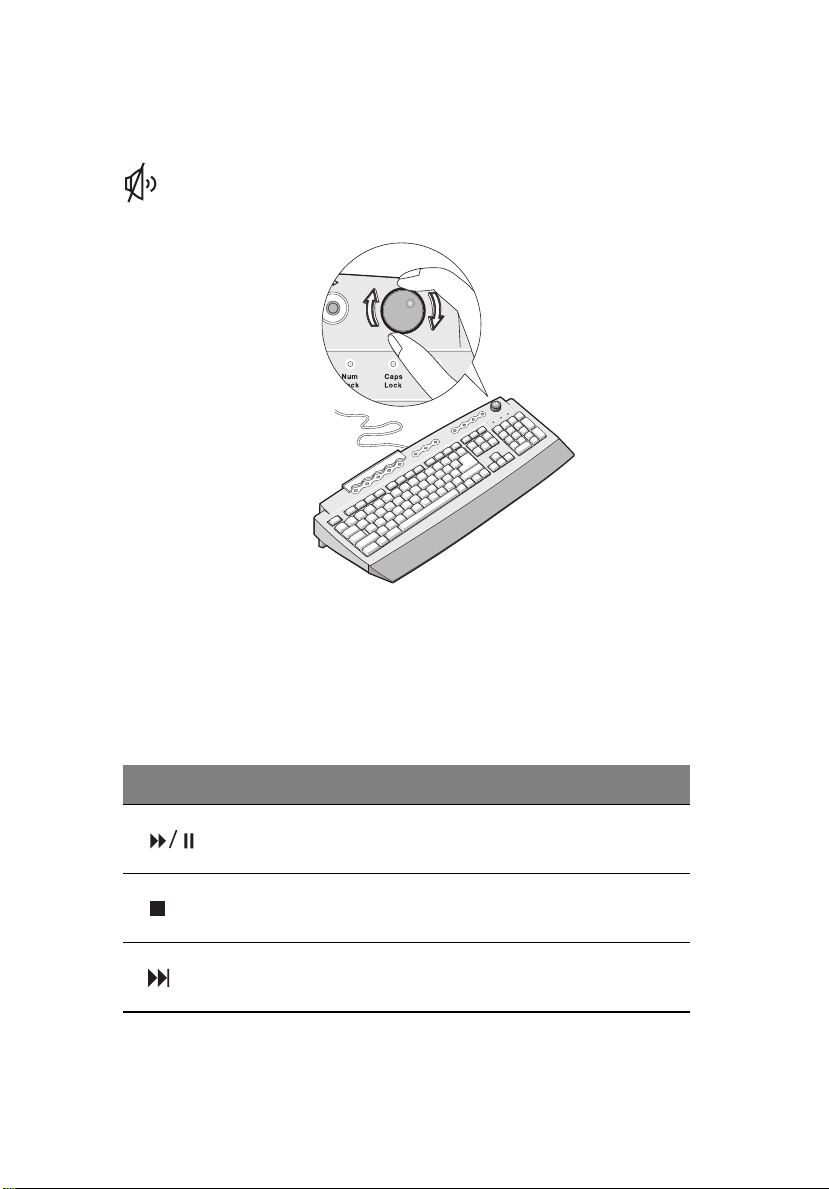
Volume control/Mute knob
The volume control/mute knob controls the speaker volume.
Turn it clockwise or counterclockwise to adjust the volume.
Press it to toggle between mute and sound.
2 System tour
Multimedia keys
Allow you to conveniently play, pause, stop, step forward, or step back
a song or movie using your keyboard.
Icon Key Description
Play/Pause Press to start playing the audio track or
video file. Press again to pause.
Stop Press to stop playing the audio track or
video file.
Forward Press to skip forward to the next track or
video file and start playing.
Icon Key Description
Backward Press to skip backward to the previous
track or video file and start playing.
Internet/Suspend keys
The Internet/Suspend keys consist of three buttons:
Icon Key Description
Email Launches your email application.
19
Web
browser
Suspend Press this button to put system to sleep.
Launches your current default browser.
Programmable keys
The programmable keys help you directly access a URL (Web site) or
launch any program, files, or application in your system. The fifth key is
set to launch the Windows Media Player. If you want to configure the
settings of each key, right click on the Magic Keyboard icon located on
the desktop.
 Loading...