

Acer V205HL, V225WL, V235HL, V195HQL User Manual
Safety Instructions
Observe the fol owing safety guidelines when connection and using your monitor:
· Be sure that your monitor is electrically rated to operate with the AC power available inyour location.
· Locate your monitor near an easily accessible electrical outlet.
· Place the monitor on a solid surface and treat it carefully. The screen can be damaged if dropped, sharply hit, or touched
· Put your monitor in a location with low humidity and a minimum of dust.
· Never use your monitor if the power cable has been damaged. Do not allow anything to rest on the power cable, and keep
· Never insert anything metallic into the monitor openings. Doing so may create the danger of electric shock.
· To avoid electric shock, never touch the inside of the monitor. Only a qualified technician should open the monitor’s case.
· Be sure to hold the plug, not the cable, when disconnecting the monitor from an electrical outlet.
· Openings in the monitor cabinet are provided for ventilation. To prevent overheating, these openings should not be
· Doing so may block the ventilation openings in the bottom of the cabinet. If you put the monitor in a bookcase or some
· Do not expose the monitor to rain or use it near water. If the monitor accidentally gets wet, unplug it and contact an
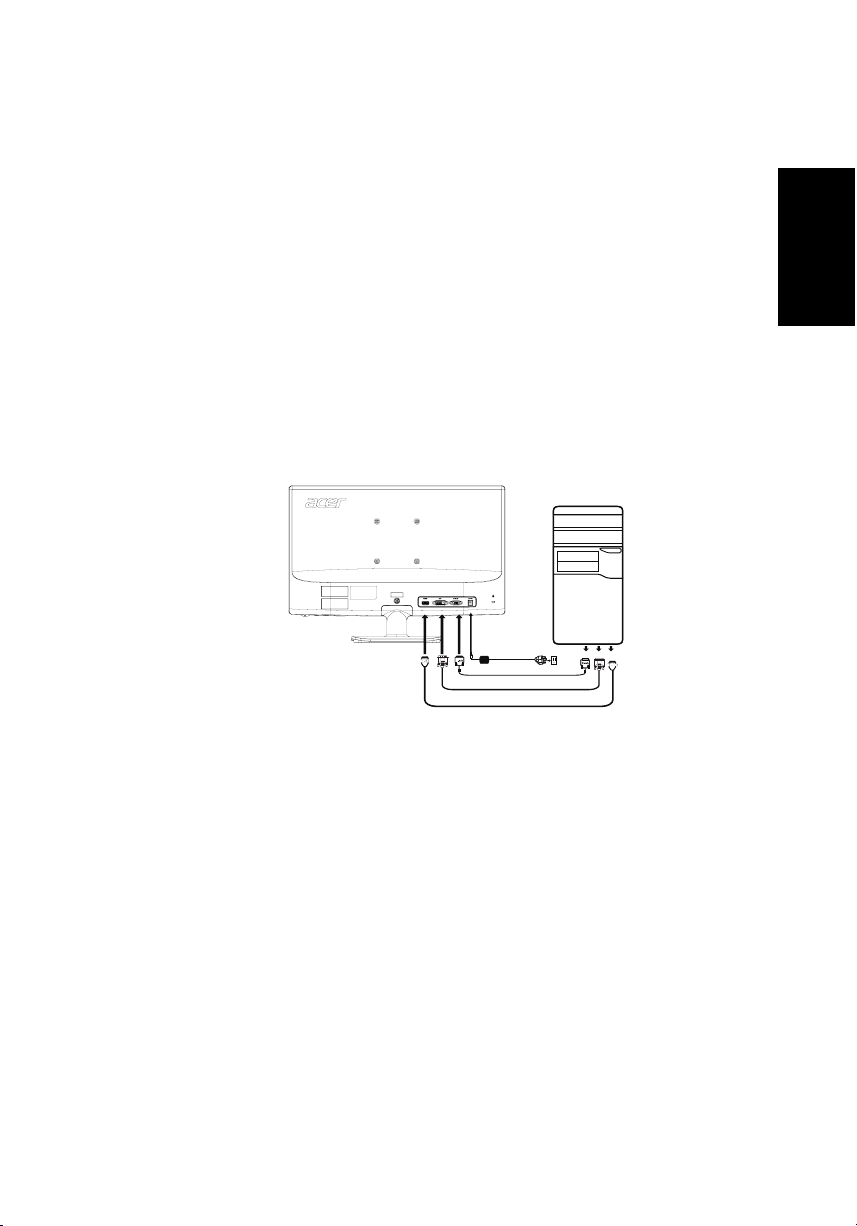
Connecting Your Monitor to a Computer
l
with a sharp or abrasive implement.
the cable away from where people could trip over it.
blocked or covered. Also, avoid using the monitor on a bed, sofa, rug, or other soft surface.
other enclosed space, be sure to provide adequate ventilation.
authorized dealer immediately. You can clean the exterior of the monitor with a damp cloth when necessary, but be sure
to unplug the monitor first. If your monitor does not operate normally-in particular, if there are any unusual sounds or smells
coming from it -unplug the monitor immediately and contact an authorized dealer or service center.
English
DC
D-Sub
DVI
HDMI
1.1-1 Connect Video Cable
a. Make sure both the monitor and computer are powered-OFF.
b. Connect the video cable to the computer.
(only Dual-Input Model) Connect one end of the 24-pin DVI cable to the back of the monitor and connect the other
1- 2
end to the computer’s port.
1-3
(only HDMI Model) Connect one end of the 19-pin HDMI cable to the back of the
the computer's port.
2. Connect power cord
Connect one end of the adapter to the monitor and the other end to
3.
Power-ON Monitor and Computer
Power-ON the monitor first, then power-ON the computer.
This sequence is very important.
4.
If the monitor still does not function properly, please refer to the troubleshooting section to diagnose the problem.
a properly grounded, AC outlet.
2
monitor and the other end to
Troubleshooting Tips
No Power - The monitor’s power indicator is off.
Make sure the monitor power cable is fully inserted in the monitor’s power port and the electrical outlet.
Test the electrical oulet by plugging in a working electrical device such as a lamp.
Try another power cable on the monitor. You can use the computer’s power cable to perform this test.
No Video - The monitor’s power indicator is on but there are no
image on the screen.
Ensure that the video connector is properly connected to the computer.
Ensure that the computer is on and functioning properly.
Turn off the monitor and check the video cable pins. Make sure no pins are bent.
Operationg Detail
Please refer to user’s guide in CD-ROM packaged with this monitor
LCD Monitor Quick Setup Guide

Regulations and safety notices
FCC notice
This device has been tested and found to comply with the limits for a Class B digital
device pursuant to Part 15 of the FCC rules. These limits are designed to provide reasonable protection against harmful interference in a residential installation. This device
English
generates, uses, and can radiate radio frequency energy and, if not installed and used in
accordance with the instructions, may cause harmful interference to radio communications.
However, there is no guarantee that interference will not occur in a particular installation. If this device does cause harmful interference to radio or television reception, which
can be determined by turning the device off and on, the user is encouraged to try to
correct the interference by one or more of the following measures:
• Reorient or relocate the receiving antenna.
• Increase the separation between the device and receiver.
• Connect the device into an outlet on a circuit different from that to which the
• Consult the dealer or an experienced radio/television technician for help.
CE declaration of conformity
Hereby, Acer Inc., declares that this LCD monitor is in compliance with the essential requirements
and other relevant provisions of EMC Directive 2004/108/EC, Low Voltage Directive 2006/95/EC,
and RoHS Directive 2002/95/EC and Directive 2009/125/EC with regard to establishing a framework
for the setting of ecodesign requirements for energy-related product.
Notice: Shielded cables
All connections to other computing devices must be made using shielded cables to
maintain compliance with C regulations.
Notice: Peripheral devices
Only peripherals (input/output devices, terminals, printers, etc.) certified to comply with
the Class B limits may be attached to this equipment. Operation with non-certified
peripherals is likely to result in interference to radio and TV reception.
Caution
Changes or modifications not expressly approved by the manufacturer could void the
user authority, which is granted by the Federal Communications Commission, to operate
this product.
receiver is connected.
CC
E
M
Operation conditions
This device complies with Part 15 of the FCC Rules. Operation is subject to the following
two conditions: (1) this device may not cause harmful interference,
must accept any interference received, including interference that may cause undesired
operation.
and (2) this device
Notice: Canadian users
This Class B digital apparatus complies with Canadian ICES-003.
Remarque à l’intention des utilisateurs canadiens
Cet appareil numérique de la classe B est conforme a la norme NMB-003 du Canada.
LCD Monitor Quick Setup Guide
 Loading...