

Acer TravelMate 340 User Guide

TravelMate 340 series
User’s guide

Copyright © 1999. Acer Incorporated.
All Rights Reserved.
TravelMate 34 0 series User’s guide
Part No. 49.40F01.001
Orig ina l Is su e: Septe mb e r 19 99
Changes may be made periodically to the information in this publication without obligation to notify any
person of such revision or changes. Such changes will be incorporated in new editions of this manual or
supplementary documents and publications. This company makes no representations or warranties, either
expressed or implied, with respect to the contents hereof and specifically disclaims the implied warranties of
merchantability or fitness for a particular purpose.
Record the model number, serial number, purchase date, and place of purchase information in the space
provided below . The serial number and model number are recorded on the label affix ed to your computer . All
correspondense concerning your unit should include the serial number, model number, and purchase
information.
No part of this publication may be reproduced, stored in a retrieval system, or transmitted, in any form or by
any means, electronic, mechanical, photocopy, recording, or otherwise, without the prior written permission
of Acer Incorporated.
TravelMate 340 series Notebook Computer
Model Number : __________ _______________________
Serial N umber: _________ _________________________
Purchase Date: __________________________________
Place of P urchase: _______________________________
Acer and the Acer logo are registered trademarks of Acer Incorporated. Other company's product names or
trademarks are used herein for identification purposes only and belong to their respective companies.

Notices vii
Preface xiii
Connecti ng the computer xiii
Getting help and supp or t xv
Care and maintenance xvii
1 Getting familiar with your computer 1
Features 3
Display 5
Indicators 7
Keyboard 8
Special keys 8
Keyboard ergonomics 13
Touchpad 14
Touchpad ba sics 14
Storage 16
Hard disk 16
EasyLink Comb o Drive 1 6
Ports 20
Left po r t 20
Rear ports 21
Right ports 24
Audio 27
Adjusti ng the volume 27
Enabling the 3D effect featur e 27
Secu ri ng your com p uter 29
Security keylock notch 29
Passwords 29
Contents
2 Operating on battery power 33
Battery pack 35
Battery pack characteristics 35
Using a battery pack for the first time 35
Replacing the battery pack 36
Charging the battery 37
Checking the battery level 38
Optimizing battery life 38
Battery-low warning 39
Power managem ent 41
Power management modes 42
Setting power management schemes 44

iv
3 Peripherals and options 45
External m onitor 47
Setting up dualview 47
Printer 4 8
External pointing device 49
External PS/ 2 mo use 49
External serial mouse 49
External USB mouse 50
External keyboard and keypad 51
Audio devi ces 52
PC Cards 53
USB devices 54
USB video capture kit - option 54
Mobile jacket 55
Miscellaneous options 56
Key component upgrades 58
Memory upgrade 58
Hard disk upgrade 59
4 Moving with your computer 61
Disconnecting from the desktop 63
Moving around 64
Preparing the computer 64
What to bring to short meetings 64
What to bring to long meetings 64
Taking the com puter home 66
Preparing the computer 66
What to bring with you 66
Special considerations 66
Settin g up a hom e office 67
Traveling with the computer 68
Preparing the computer 68
What to bring with you 68
Special considerations 68
Traveling internat i o nally with the com p u t e r 69
Preparing the computer 69
What to bring with you 69
Special considerations 69
5 Software 71
Sleep Manager 74
Accessing the Sleep Manager 74

Sleep Manager functions 76
Notebook Manager 79
Information Viewer 80
POST 81
Boot Sequence 82
Password 83
Power Managem ent 85
Display Device 87
BIOS Utility 88
Using th e BIO S U til it y 88
System In format ion 89
Basic System Settings 91
Startup Configuration 92
Onboard Devices Configuration 93
System Security 95
Power Managem ent 97
Load Def ault Settings 98
6 Troubleshooting 99
Freq ue n t l y-Aske d Q u estion s 101
Troubleshooting tips 105
Using P C -D o ctor 105
Online services 106
Before you call 106
Error messages 107
v
Appendix A Specifications 109
Index 115

vi

vii
Notices
FCC notice
This device has been tested and found to comply with the limits for a Class B digital device
pursuant to Part 15 of the FCC Rules. These limi ts ar e designed to provide reasonable
protection against harmful interference in a residential installation. This device generates,
uses, and can radiate radio frequency energy and, if not installed and used in accordance with
the instruct ions, may cause harmful inter f e r ence to radio communications.
However, there is no guarantee that interference will not occur in a particular installation. If
this device does cause harmful interference to radio or televis ion reception, which can be
determin ed by turning the device off and on, the user is encouraged to try to correct the
interference by one or more of the follo w ing measures:
• Reorient or relocate the receiving antenna
• Increase the se par ation between the device and receiver
• Connect the device into a n outlet on a circui t different from that to w hich the receiver is
connected
• Consult the dealer or an experienced radio/television technician for help
Notice: Shielded cables
All connections to other computing devices must be made using shielded cables to maintain
compliance with FCC regulations.
Notice: Peripheral devices
Only peripherals (input/output devices, terminals, printers, etc.) certified to comply with the
Class B limits may be at tach ed to this equ ipmen t. Oper atio n with no n-cert ifi ed peripher als i s
likely to res ult in interference to radio and TV reception.
Caution
Changes or modifications not expressly approved by the manufacturer could void the user’s
authority, which is granted by the Federal Communications Commission, to operate this
computer.
Use conditions
This part complies with Part 15 of the FCC Rules. Operation is subject to the following two
conditions : (1) this device may not cause harmful int erference, and (2) this device must
accept any interference received, including interfer ence that may cause undesired oper ation.

viii
Notice: Canadian users
This Class B digital apparatus meets all requirements of the Canadian Interference-Causing
Equipment Regulat ions.
Remarque à l’intention des utilisateurs canadiens
Cet appareil numérique de la classe B respected toutes les exigences du Règlement sur le
matériel brouilleur du Canada.
Modem notices
FCC
This equipment complies with Part 68 of the FCC rules. Located on the bottom side of the
modem is a label t hat contains, among other information, the FCC Registrat ion Number and
Ringer Equivalence Number (REN) for this equipment. Upon request, you must pr ovide this
information to your tele phone company.
If your telephone equipment causes harm to t he telephone network, the tel ephone company
may discontinue your service temporarily. If poss ible, they w ill notify you in advance. But,
if advance notice is not practical, you will be notified as soon as possible. You will also be
informed of your right to file a complaint with the FCC.
Your telephone company may make changes in its facilities, equipment, operations, or
procedures that could af fect the proper functioning of your equipment. If they do, you will
be notified in advance to give you an opportunity to maintain uninterrupted telephone
service.
If this equipment should fail to operate properly, disconnect the equipment from the pho ne
line to determine if it is causing the problem. If the problem is with the equipment,
discontinue use and contact your dea ler or vendor.
CTR 21
This equipment has been appr oved [Council Decisi on 98/482/EC - “CTR 21”] for panEuropean single terminal connection to the Public Switched Telephone Network (PSTN).
However, due to differences between the individual PSTNs provided in different countries,
the appro val does not, of itself, give an unconditional assurance of successf ul operation on
every PSTN termination point. In the e vent of problems, you should contact your equipment
supplier in the first instance.
Important safety inst ructions
Read these instructions carefully. Save these instructions for future reference.
1. Follo w all warnings and instructions marked on the product.

2. Unplug this product from the wall outlet before cleaning. Do not use liquid cleaners or
aerosol cle aners. Use a damp cloth for cleaning.
3. Do not use this pr oduct near water.
4. Do not place this product on an unstable cart, stand, or table. The product may fall,
causing serious damage to the product.
5. Slots and ope ni ngs in t he cab inet and the ba ck or bo ttom are pro vided f or v en tilat ion; to
ensure reliable operation of the produc t and to protect it f ro m overheating, these
openings must not be blocke d or covered. The openings s hould never be bloc ked by
placing the pr oduct on a bed, sofa, rug, or other similar surface. This product should
neve r be placed near or ov er a rad iato r or heat r egist er, or in a built-in installation unless
proper ventilation is provided.
6. This product sho uld be o perat ed fro m th e type of po wer ind icat ed on the marki ng la bel.
If you are not su r e of the type of power available, consult your dealer or local power
company.
7. Do not allo w anything to rest on the power cord. Do not locate this product where
persons will walk on the cord.
8. If an extension cord is used with this product, make sure that the total ampere rating of
the equipmen t pl ugged into the extension cord does not exceed the extension cord
ampere rating. Also, make sure that the total rating of all products plugged into the
wall outlet does not exceed the fuse rating.
9. Never pus h objects of any kind into this product through cabinet slots as they may
touch dangerous voltage points or s hort out parts that could result in a fir e or electric
shock. Never spill liquid of any kind on the product.
10. Do not attempt to service this product yourself, as opening or removing covers may
expose you to dangerous voltage points or other risks. Refer all servicing to qualified
service personnel.
11. Unplug this product from the wall outlet and refer servicing to qualified service
personne l under the following con ditions:
a. When the power cord or plug is damaged or frayed
b. If liquid has bee n spil led in to the produc t
c. If the product has been exposed to rain or water
d. If the product does not operate normally when the operating instructions are
followed. Adjust only those contro ls th at are covered by the opera ting
instructi ons since i mpro per ad jus tment of o ther co nt rols may r esult in dam age a nd
will often r equire extensive work by a qualified technician to restore the product
to normal condition.
e. If the product has been dropped or the cabinet has been damaged
f. If the product exhibits a di s tinct change in performance, indicating a need for
service.
ix

x
12. Replace the bat tery with the same type as the product's battery we recommend. Use of
another battery may present a risk of fire or explosion. Refer battery replacement to a
qualified serviceman.
13. Warning! Batteries may e xplode if not handled properly. Do not disassemble or
dispose of th em in fire. K eep them awa y from children an d dispose of used batteries
promptly.
14. Use only the proper type of power supply cord set (pr ovided in your accessories box)
for this unit. It should be a detachable type: UL listed/CSA certified, type SPT -2, rated
7A 125V minimu m , V DE ap p r ove d or i ts eq uivalent. Maxim um l e ng t h is 15 f ee t (4.6
meters).
Laser compliance statement
The CD-ROM or DVD-ROM drive used with this computer is a laser product. The CD-ROM
or DVD-ROM drive’s classification label (shown below) is located on th e drive.
CLASS 1 LASER PRODUCT
CAUTION:
BEAM.
APP ARE IL A LASER DE CLASSE 1 PRODUIT
LASERATTENTION:
D’OUVERTURE. EVITTER TOUTE EXPOSITION AUX RAYONS.
LUOKAN 1 LASERLAITE LASER KLASSE 1
VORSICHT:
GEÖFFNET NICHT DEM STRAHLL AUS SETZ EN
PRODUCTO LÁSER DE LA CLASE I
ADVER TENCIA:
EXPONERSE A LOS RAYOS.
ADVARSEL:
VARO! LA VATTAESSA OLET ALTTINA LASERSÅTEILYLLE.
VARNING:
SÅTEESEENSTIRRA EJ IN I STRÅLEN
VARNING:
STRÅLEN
ADVARSEL:
INVISIBLE LASER RADIATION WHEN OPEN. AVOID EXPOSURE TO
RADIA T ION DU FAISCEAU LASER INVISIBLE EN CAS
UNSICHTBARE LASERSTRAHLUNG, WENN ABDECKUNG
RADIACIÓN LÁSER INVISIBLE AL SER ABIERTO. EVITE
LASERSTRÅLING VEDÅBNING SE IKKE IND I STRÅLEN.
LASERSTRÅLNING NÅR DENNA DEL ÅR ÖPPNAD ÅLÅ TUIJOTA
LASERSTRÅLNING NAR DENNA DEL ÅR ÖPPNADSTIRRA EJ IN I
LASERSTRÅLING NAR DEKSEL ÅPNESSTIRR IKKE INN I STRÅLEN
Lithium battery s ta te ment
CAUTION
Danger of ex plosion if battery is incorrectly replaced. Replace only with the same or
equivalent type recommended by the manufacturer. Discard used batteries ac cording to the
manufacturer’s instructions .

ADVARSEL!
Lithiumbatteri - Eksplosionsfare ved fejlagtig håndtering. Udskiftning må kun ske med
batteri af samme fabrikat og type. Léver det brugte batteri tilbage til leverandøren.
ADVARSEL
Eksplosjonsfare ved feilaktig skifte av batteri. Benytt samme batteritype eller en tilsvarende
type anbef a lt av apparat fabrikanten. Brukte batterier kasseres i henhold til fabrika ntens
instruksj oner.
VARNING
Explosionsfara vid felaktigt batteribyte. Anvãnd samma batterityp eller en ekvivalent typ
som rekommenderas av apparattillverkaren. Kassera anvãnt batteri enligt fabrikantens
instruktion.
VAROITUS
Päristo voi räjähtää, jos se on vir heellisesti asennettu. Vaihda paristo ainoastaan
laitevalmistajan suo s ittelemaan tyypp iin . Hävitä käyte tt y pari sto valmi sta ja n ohjeid e n
mukaisesti .
VORSICHT!
Explosionsgefahr bei unsachgemäßen Austausch der Batteri e Ersatz nur dur ch denselben
oder einem v om H ersteller empfohlenem ähnli chen Typ. Entsorgung gebrauchter Batterien
nach Angaben des Herstellers.
Year 2000 compliance statement
The TravelMate 340 series not ebook computer carries the "Har dware NSTL Tested Year
2000 Compliant" logo, which certifies that this model has been tested by NSTL using the
YMark2000 t es t, and has been found to meet NSTL's s tandards for Y ear 2000 hardware
compliance.
xi
For more details, check the Ac er Year 2000 Resource Center Web site (www. acer.com.tw/
service/y2k)
Macrovision copyright protection notice
This product incor por ates cop yri gh t prot ecti on tech nol ogy t hat i s prot ected by method claim s
of certain U.S. patents and other intellectual property rights owned by Macrovision
Corporat ion and other rights owners. Use of this copyright protection technology must be
authorized by Macrovision Corporation, and is intended f or home and other limited vi ewing
uses on l y unless ot he rw ise aut h o r i z e d by Ma c r ov i s ion Corporation. Rever s e en gi n e e r ing or
disassembly is prohibited.

xii
xiii
Preface
This manual describes feat ures of the TravelMate 340 series notebook computers.
This seri es of ultra-slim computers incorporate such features as CardBus, 16-bit
PCI stereo audio, Fast Infrared, int ernal 56K modem, internal pointing device w ith
scroll function, Universal Serial Bus, and Accelera ted Graphics Port.
This manual should answer most of the questions you have about the day-to-day
operation of your T ravelMate notebook computer.
Use the Just for Starters… instructions that came with your computer to get your
compu te r ru n ning for th e firs t time.
You should also take advantage of the online help files that are available with
almost al l of the programs shippe d w ith your computer.
We hope you enjoy your TravelMate computer. With prop er care, your computer
will provide you with years of productive se rvice.
Connecting the computer
Connecting the computer is as ea sy as 1-2-3.
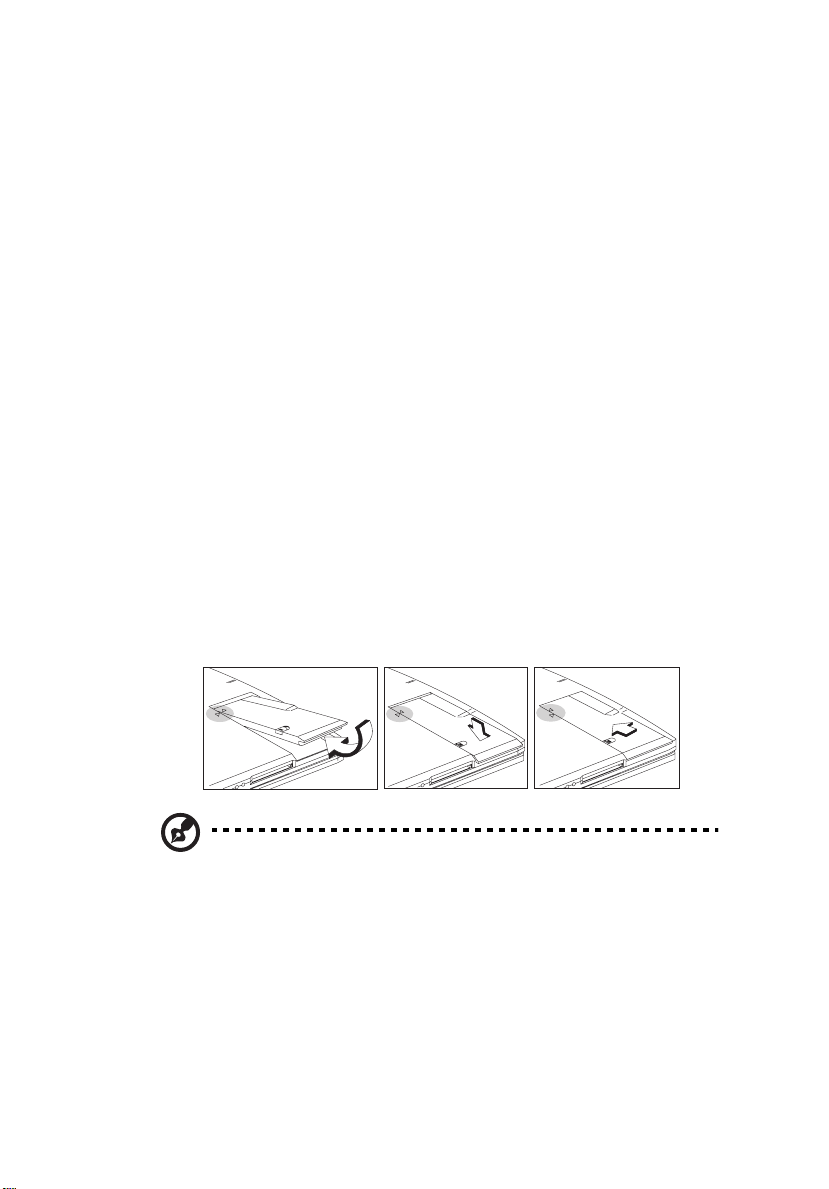
1. Gently insert the battery into the battery bay by following the guide sym bols
on both the battery and the bottom of the computer; then slide the battery in
until it clicks into place. The battery release latch locks.
When usi ng a battery pack for the first time, fully recharge the battery,
Note:
then disconnect the adapter to use up the battery before recharging again.
You only ne ed to do thi s on c e wi t h a new batter y.
xiv
2. Connect one end of the AC adapter to the DC- in jack on th e rear of the
computer and the other end to a power outlet.
3. Slide the display cover latch to the left to op en the display. Slide the power
switch towards the rear of the computer then release it to turn on the power.
The POST (Power On Self-Test) routine executes and Windo w s begins
loading.

Turning off the computer
Ther e ar e a n um b er of ways you can turn th e pow er off.
• Using the Windows Shut Down... co mmand
Click on Start, Shut Down..., and select Shut down; then click on OK.
• Using the power switch
You can also use the power s w itch to perfor m power management
Note:
functions . See “Setting advanced features in power management” on page
86.
• Using customized functions for power management
You can also shutdown the computer by closing the display cover, or by
pressing the sleep hot key (Fn-F4). See “Setting advanced features in power
management” on page 86.
If you cannot power off the computer nor mally, press and hold the
Note:
power switch for more than four seconds to shut down the computer. If you
turn off the computer and want to turn it on again, wait at least two seconds
before powering up.
xv
Getting help and support
This user’s guide provides clear and concise information about the computer, so
read it tho rou ghl y. T o prov id e you with help whe n tr a v eli ng, the com pu ter al so has
a comprehensive online documentation.
Accessing the online guide
To access the online guide, follow these steps:
1. Press the Windows logo button or click on the Start button.
2. Select Programs, then cl ic k on TravelMat e.
3. Click on TravelMate Online Guide.
The online g uide is easy to navigate with hypertext and hypergraphics. Clear
illustrations help describ e notebook operation as w ell.

xvi
Accessing the user’s guide
This print ed u ser ’s guide is also a v ail abl e in PD F for mat wh ic h may c ome i n ha ndy
if you need to print out a copy. Viewing the file requires Adobe Acrobat Reader
installed.
Follow these steps:
1. Click on Start, Programs, TravelMate.
2. Click on TravelMate User’s Guide.
If Adobe Acrob at Reader is not installed on your computer, clicking
Note:
on Tra vel mate U ser’s Guide will run the Acroba t Read er se tup prog ra m fir st.
Follow the instructions on the screen to complete the installation.
For ins tructions on how to use A dobe Acrobat Reader, access the Help menu.
Support information
Your computer is backed by an Inter n ational Tra veler’s Warranty (ITW) that give s
you secur ity and peac e of mind whe n tra v el ing. Our w orl dwid e net wo rk of se rvi ce
centers are there to give you a helping hand.
An ITW passp ort comes with your computer. This passpor t contains all you need
to know abo ut t he ITW pro gra m. A list of a v ail abl e, author iz ed se rvic e cent er s ar e
in this handy booklet. Read this passport thoroughly.
Always ha v e your ITW pa ssp ort on han d, es pecia ll y when you tr av el to re cei v e th e
benef its fr om our sup port ce nt ers . Place your proof- of -p urchas e i n the flap lo ca ted
inside the front cover of th e ITW passport.
If the coun try you are traveling in does not have an Acer-authorized IT W service
site, you can still get in contact w ith our offices worldwide.
For tec hnical assistance and support in the United States and Canada, you can call
1-800-81 6-2237. You can also contact a local dealer or distribu tor in the country
you are traveling in for assistance.
For more infor m ation, see “Online services ” on page 106.
Note:
If you are connected to the Internet and have World Wide Web access, visit our
Web site (www.acer.com
as inform ation about our products.
) and ge t an updated list of our worldwide offices, as well

xvii
Care and maintenance
Taking care of your computer
Your computer will serve you well if you take care of it.
• Do not expose the computer t o direct sunlight. Do not place near sources of
heat, such as a radiator.
• Do not expose the computer to temperatures below 0ºC (32ºF) or above 50ºC
(122ºF).
• Do not subject the computer to m agnetic fields.
• Do not expose the computer t o rain or moisture.
• Do not spill water or any liquid on the computer.
• Do not subject the computer to heavy shock and vibration.
• Do not expose the computer t o dust and dirt.
• Never place objects on top of the computer to avoid damaging the computer.
• Ne ver place the computer on uneven surfaces.
• When holding the computer, keep your fingers away from the ba ttery release
latch, as you may inadvertently release the battery pack from the computer.
These care and ma intenance tips also apply to the EasyLink Combo Drive when
possible.
Taking care of your AC adapter
Here are some ways to t a ke care of your AC adapter:
• Do not connect the adapter to any other device.
• Do not step on the power cord or place hea v y objects on top of it. Carefully
route th e power cord and any cables away from personal traffic.
• When unplugg ing the po wer cord, do no t pull on th e cor d its el f but pul l on the
plug.
• The total ampere ratings of the equipment plugged in should not exceed the
ampere rating of the cord if you are using an extension cord. Also, the total
current rating of all equipment plugged into a single wall outlet should not
exceed th e fuse ratin g.
Taking care of your battery pack
Here are some ways to take care of your battery pack:

xviii
• Use only batteries of the same kind as replacements (Model# BTP-25D1).
Turn the power of f before removing or replacing batteries.
• Do not tamper with batteries. Keep them away from children.
• Dispose of used batteries according to local regulations. Recycle if at all
possible.
Cleaning and servicing
When cleaning the computer, follow these steps:
1. Power off the computer and remove the battery pack.
2. Disconnect the AC adapter.
3. Use a soft cloth moistened with water. Do not use li quid or aerosol cleaners.
Contact yo ur dealer or see your service technician if an y of the following occurs:
• The computer has been dropped or the body has been damaged.
• Liquid has been spilled into the product.
• The computer does not operate normally.

1 Getting familiar with
your computer

This computer combines high-performance,
versatility, power management features and
multimedia capabilities with a unique style and
ergonomic design. Work with unmatched
productivity and reliability with your new power
computing partner.
This chapter giv e s an in-depth "tour" of the
computer’s man y features.

Features
This computer was designed with the user in mind. Here are just a few of its many
features:
Performance
• Intel Pentium® III processor with integr ated L2 cache memory
• 64-bit main memory
• Large and vibrant Thin-Film- Transistor (TFT) SVGA Liquid Crystal Di spl ay
(LCD)
• 64-bit graphics acceleration with 2.5MB graphics memory and Accelerated
Graphics Port (AGP)
• High-c a pa city, Enhance d -IDE rem ova bl e hard disk
• External EasyLink™ Combo Drive (floppy drive + CD-ROM)
• Lithium-Ion battery pack
• Pow er management system w ith ACPI (Advanced Configuration and Power
Interf ace) or APM (Advanced Power Management) support
Multimedia
• 16-bit high-fidel ity PCI stereo audio with 3D sound and wavetable
synthesizer
• Built-in speaker
• EasyLink™ Combo Drive
• Dualview capability
• D VD playbac k cap abil it y (with D VD-e qui pped Eas yLi nk D VD Combo Drive
option)
• USB video capture kit
3
Connectivity
• High-speed fax/data PCI modem
• Built-in network feature for Ethernet 10/100 LAN — optional
• F ast infrared (FIR) wirele ss communi cation
• Universal Serial Bus (USB) port

4
1 Getting familiar with your computer
Human-centric design and ergonomics
• Ultra-slim, sleek, smooth and stylish design
• Full-sized keyboard
• Wide and curved palm rest
• Ergonomically-centered touchpad pointing device with scroll function
• Stylish cover accessory
Expansion
• CardBus PC Card (formerly PCMCIA) slot (one type II/I) with Zoomed
Video (ZV) support
• Upg radeable memory and hard disk

Display
The large graphics display offers excellent viewing, display quality and desktop
performa nce graph ic s. Th e c omput er suppor t s a Thin- Fil m Transistor (T FT) liqui d
crysta l display (LCD) displaying 32-bit true-color at 800x600 Super Video
Graphics Array (SVGA) resolution.
V ideo performance
PCI local bus video with 64-bit graphics acceleration and 2.5MB high-speed
Synchonous D ynamic Random Access Memory (SDRAM) boost video
performa nce . The vi de o also in clu des 3D ca pab ili ties suc h as Gora ud s hadin g, and
Z-buffering, as well as DVD playback support.
Simultaneous display
The com p uter’s large di sp la y and mul timedi a ca pabil it ies are gr ea t for giving
presentat io ns. If you pref er, you can also connect an ex te rna l monit or whe n gi v ing
presentations. This computer sup ports simultaneous LCD and CRT display.
Simultaneous display allo w s you to control the presentation from your computer
and at the same time face your audience. You can also connect other output
displa y devices such as LCD projection panels for large-audience presentations.
5
Power management
The power management syste m incorporates an "automatic LCD dim" feature that
automatically decides the best settings for your display and at the same time
conserv es power. See “Power management” on page 41 for more information on
power management features.
Dualview
The computer’s video chip takes advantage of Windows 98’s multi-display
capability, allowing you to e xtend your desktop to an external display device, such
as an external monitor or projector. With this feature enabled, you can move
program wind o ws t o and from the com puter LCD and ex te rna l disp la y de vi ce. For
more information, see “Setti ng up dualview” on page 47.
Opening and closing the display
To open the display, slide the display cover latch to the left and lift up the cover.
Then tilt it to a comfor table viewing position. The computer empl oys a

6
1 Getting familiar with your computer
microswitch that turns off the display (and en ters Standby mode) to conserve
power when you close the display cover, and turns it back on when you open the
display cover.
Note: If an external monitor is co nnected, the computer turns off the display
(but does not enter standby mode) when you close t he display cover.
To close the display cover, fold it dow n gently until the display cover latc h clicks
into place.
Caution: To avoid damaging the display, do no t slam it when you close it.
Also, do not place any object on top of the computer when the disp lay is
closed.
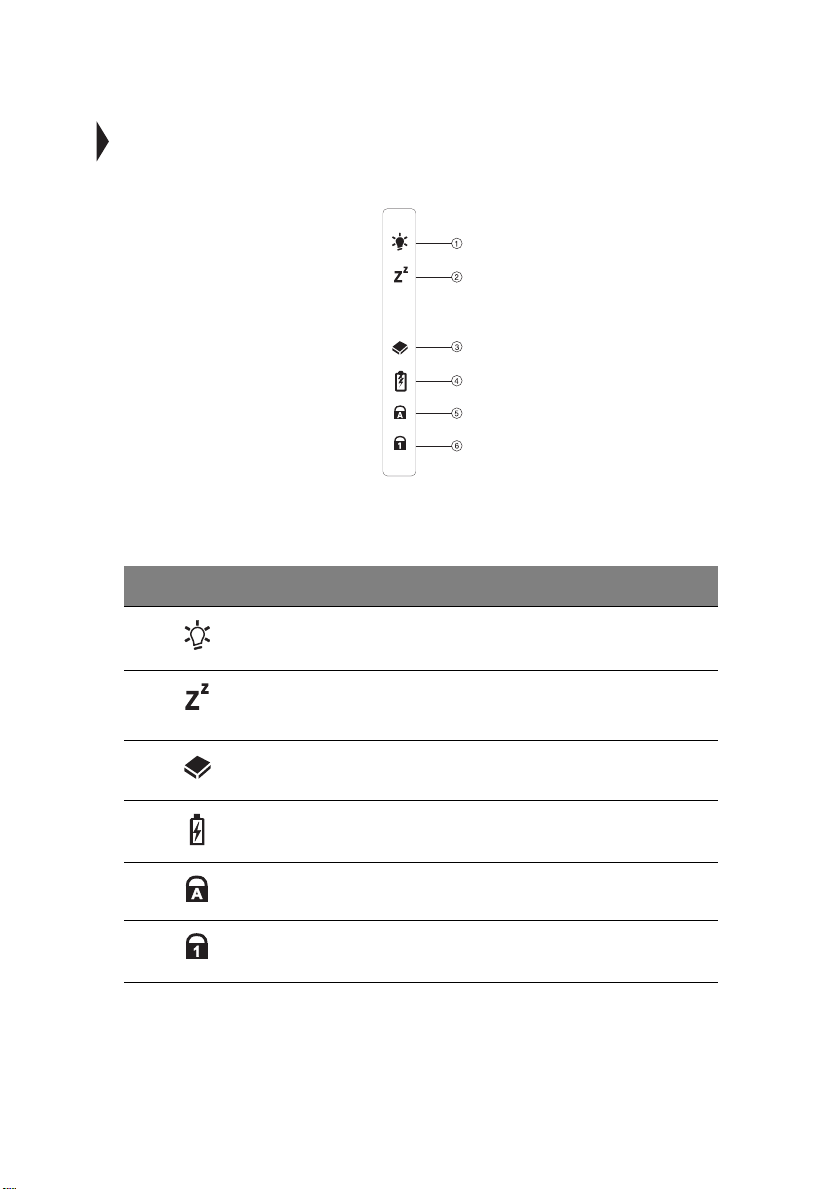
Indicators
The computer has six easy-to-re ad status icons on the right of the display screen.
The Powe r a nd S leep s ta tus i con s a re vis ib le ev en when you cl ose t he d isp lay c o ve r
so you can see the status of the co m pu ter whil e th e cover is clos ed.
# Icon Function Description
1 Power Lights when the computer is on.
7
2 Sleep Lights when the computer enters Sleep mode.
3 Media Activity Lights when th e floppy drive, hard disk or
4 Battery Ch arge Lights when the batte ry is being ch arged.
5 Caps Lock Lights when Caps Lock is activated.
6 Num Lock Lights when Num Lock is activated.
EasyLink™ Combo Drive is active.
8
1 Getting familiar with your computer
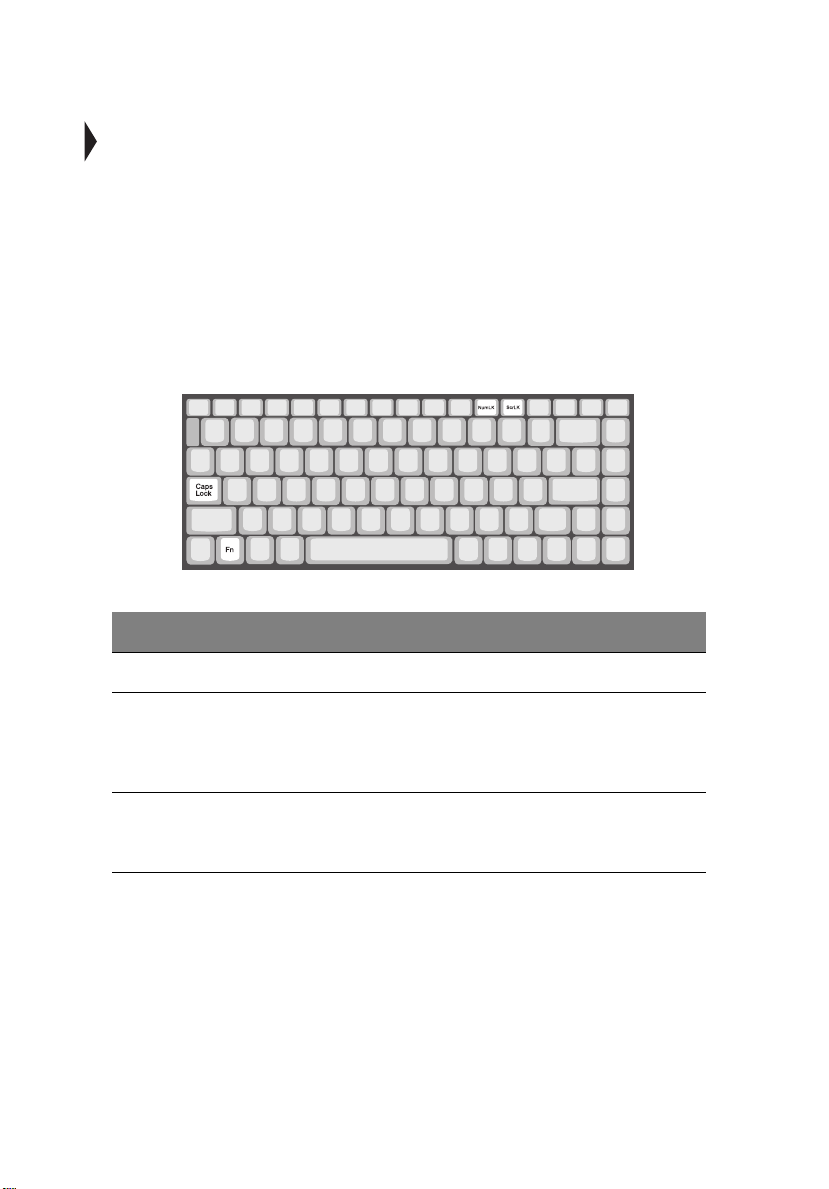
Keyboard
The keyboard has full-sized keys and an embedded keypad, separate cursor keys,
two Windows keys and tw elve function keys.
Spec ial keys
Lock keys
The keyboard has three lock ke ys which you can toggle on and off.
Lock key Description
Caps Lock Whe n C aps Lock is on, all alphabetic characters typed are in up percase.
Num Lock
(Fn-F11)
Scroll Lock
(Fn-F12)
When Num Lock is on, the embedded keypad is in numeric mode. The
keys function as a calculator (complete with the arithmetic operators +,
-, *, and /) . Us e this mode when you need to do a lot of numeric data
entry. A better solution would be to connect an external keypad.
When Scroll Lock is on, the screen moves one line up or down when
you press the up or down arrow keys respectively. Scroll Lock does not
work with some applications.
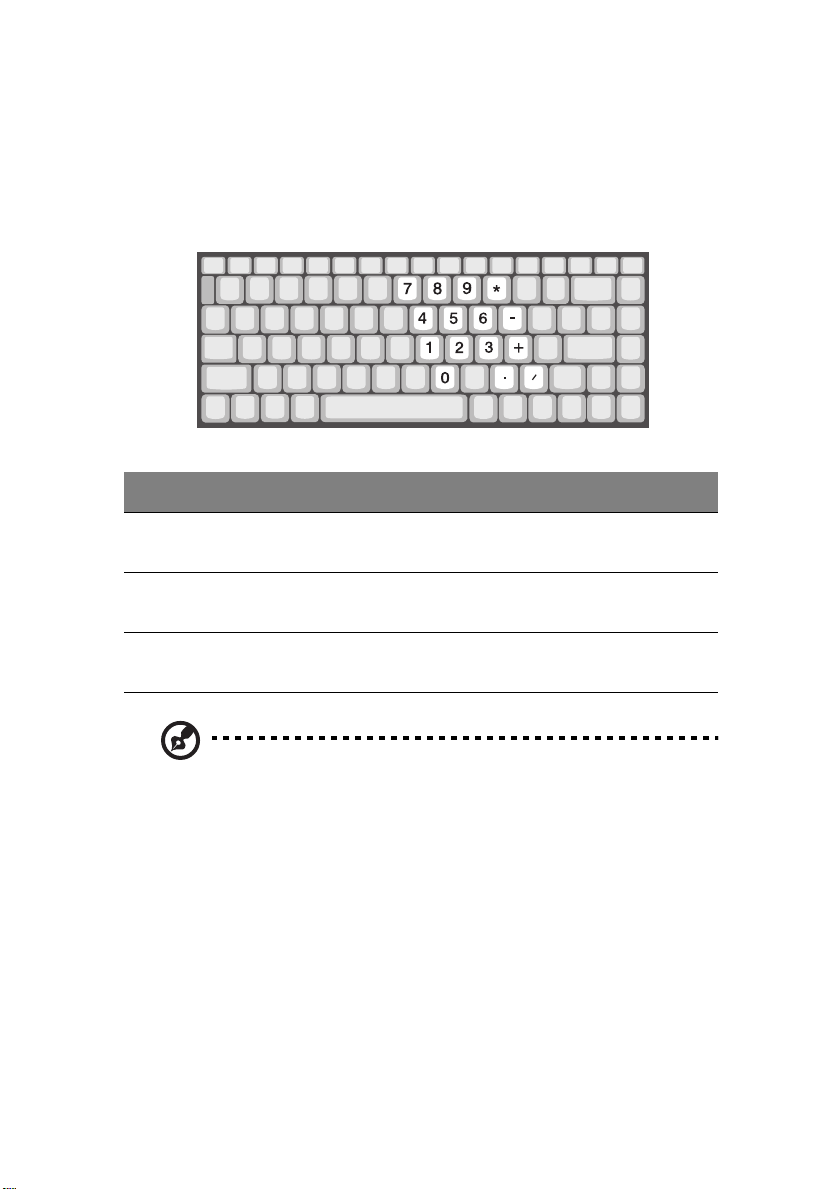
Embedded numeric keypad
The embedded numeric keypad fun ctions like a desktop numeric keypad. It is
indicated by small characters located on the upper right corner of the keycaps. To
simplif y the keyboard legend, cursor-control key symbols are not printed on the
keys.
Desired access Num lock on Num lock off
9
Number keys on
embedded ke ypad
Cursor-control keys on
embedded ke ypad
Main keyboard keys Hold Fn while typing letters on
If an external keyboard or keypad is con nected to the computer, the
Note:
Num Lock feature automatically shifts from the internal keyboard to the
external keyboard or keyp ad.
Type numbers in a normal
manner.
Hold Shift while using cursorcontrol keys.
embedded keypad.
Hold Fn while using
cursor-control keys.
Ty p e the lette rs in a
normal manner.
10
1 Getting familiar with your computer
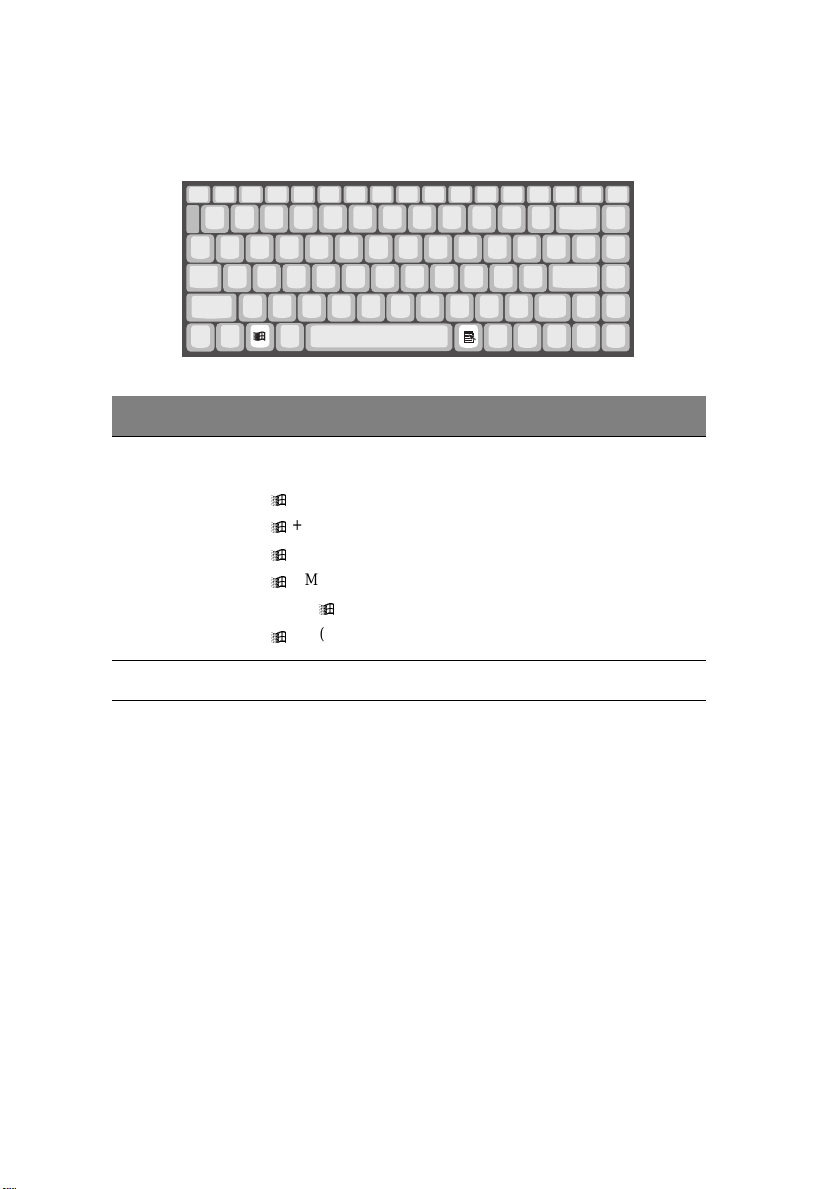
Windows keys
The keyboard has two keys that perform Windows-specific functions.
Key Description
Windows logo key Start button. Combinations with this key perform shortcut
functions. Below are a few examples:
+ Tab (Activates next taskbar button)
+ E (Explores My Computer)
+ F (Finds Document)
+ M (Minimizes All)
Shift + + M (Undoe s Minimize All)
+ R (Displays the Run... dialog box)
Application key Opens a cont ext menu (same as a right-click).
Hot keys
The computer employs hot keys or key combinations to access most of the
computer’s controls like screen brightness, volume output and the BIOS Utility.
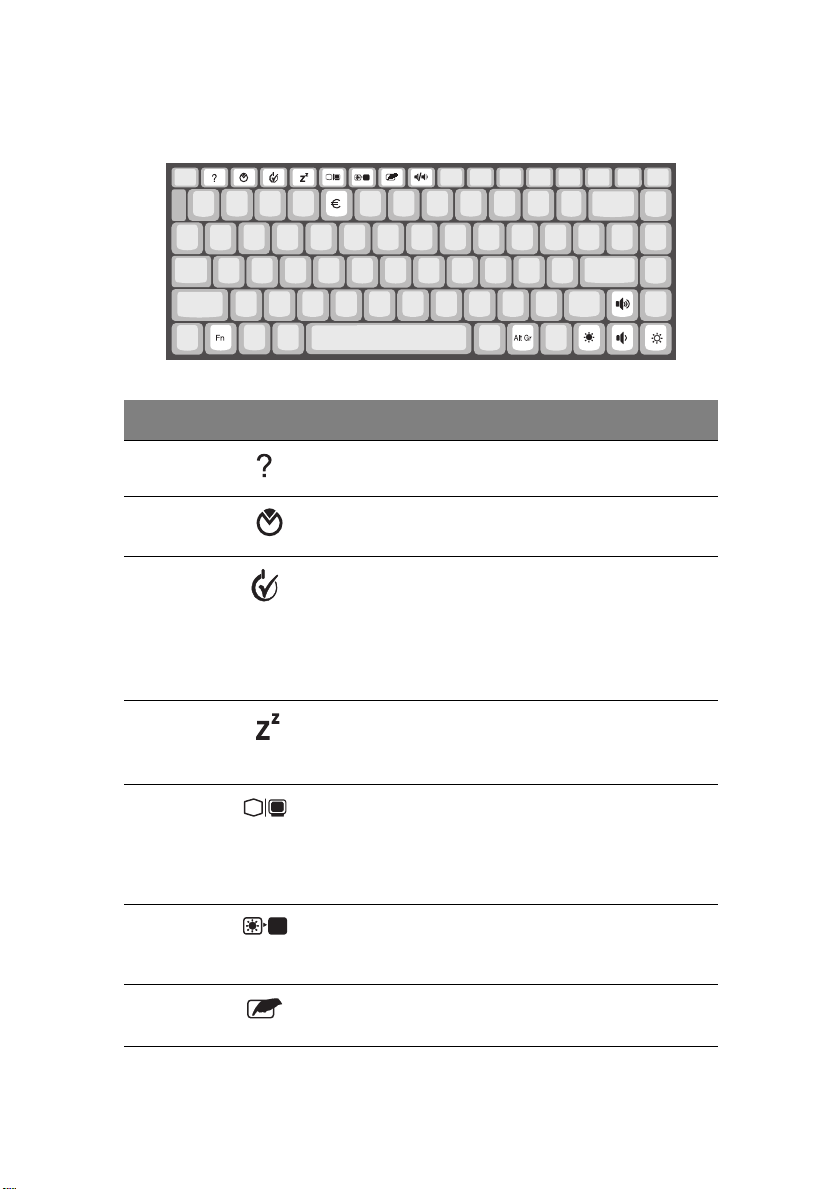
To activate hot keys, press and hold the Fn key before pressing the other key in the
hot key combination.
Hot key Icon Function Description
Fn-F1 Hot Key Help Displays help on ho t keys.
Fn-F2 Setup Accesses the computer’s
configuration utility.
11
Fn-F3 Powe r Management
Scheme Toggle
Fn-F4 Sleep (ACPI) or
Stand by (A PM )
Fn-F5 Display Toggle Switches display output between
Fn-F6 Screen Blank Tur ns the display screen backlig ht
Fn-F7 Touchpad Toggle Turns the internal t ouchpad on and
Switches the power management
scheme used by the computer
(function available if supported by
operating system)
See “Setting power management
schem e s ” on pa ge 44.
Puts the comput er in Sle ep mode
or Standby mode.
See “Sleep mode” on page 42.
the display s creen, external
monitor (if connected) and both the
display screen and external
monitor.
off to sa ve power. Press an y ke y to
return.
off.

12
Hot key Icon Function Description
Fn-F8 Speaker Toggle Turns the speakers on and of f .
1 Getting familiar with your computer
Fn-←
Fn-→
Fn-
↑
↓
Fn-
Alt Gr-Euro Euro Types the euro symbol.
Brightness Down Decreases the screen brightness.
Brightness Up Increases t he s creen brightness.
Volume Up Increases the volume.
Volume Down Decreases the vo lume.
The euro symbol
If your keyboard layout is set to United States-Internati onal or United Kin gdom or
if you have a keyboard with a European layout, you can type the Euro symbol on
your keyboard.
Note for US keyboard users: The keyboard layout is set when you first set
up Windows. For the Euro symbol to work, the keyboard layout has to be set
to United States-International.
To verify the keyboard type :
1. Click on
2. Double-click on
3. Click on th e
4. Verify that the keyboard layout used for "E n English (Unite d States)" is set to
United States-International.
If not, select and click on
International
5. Click on OK.
Start, Settings, Control Panel
Keyboard
Language
.
tab.
Properties
; then select
and clic k on OK.
.
United States-
 Loading...