

Acer S2 S520 User Manual

© 2013 All Rights Reserved
Acer Liquid S2 User’s Manual
Model: S520
This revision: 11/2013
Acer Liquid S2 Smartphone
Model number:_______________________________________________
Serial number: _______________________________________________
Date of purchase: ____________________________________________
Place of purchase: ___________________________________________
2

Table of contents
Table of contents - - - - - - - - - - - - - - - - - - - - - - - - - - - - - - - - - - - - - - 3
Setting up- - - - - - - - - - - - - - - - - - - - - - - - - - - - - - - - - - - - - - - - - - - - 5
Unpacking your smartphone . . . . . . . . . . . . . . . . . . . . . . . . . . . . . . . . . . . . . . . . 5
Getting to know your smartphone . . . . . . . . . . . . . . . . . . . . . . . . . . . . . . . . . . . .5
Charging the battery . . . . . . . . . . . . . . . . . . . . . . . . . . . . . . . . . . . . . . . . . . . . . .7
Inserting the microSD card . . . . . . . . . . . . . . . . . . . . . . . . . . . . . . . . . . . . . . . . . 7
Inserting the SIM card . . . . . . . . . . . . . . . . . . . . . . . . . . . . . . . . . . . . . . . . . . . . .8
Using your smartphone - - - - - - - - - - - - - - - - - - - - - - - - - - - - - - - - 10
Turning on for the first time . . . . . . . . . . . . . . . . . . . . . . . . . . . . . . . . . . . . . . . .10
Locking your smartphone . . . . . . . . . . . . . . . . . . . . . . . . . . . . . . . . . . . . . . . . .10
Navigating through menus and options . . . . . . . . . . . . . . . . . . . . . . . . . . . . . . .11
Using the touchscreen. . . . . . . . . . . . . . . . . . . . . . . . . . . . . . . . . . . . . . . . . . . .12
The Home screen . . . . . . . . . . . . . . . . . . . . . . . . . . . . . . . . . . . . . . . . . . . . . . .14
Turning off your smartphone . . . . . . . . . . . . . . . . . . . . . . . . . . . . . . . . . . . . . . .21
Managing contacts - - - - - - - - - - - - - - - - - - - - - - - - - - - - - - - - - - - - 22
Managing your contacts . . . . . . . . . . . . . . . . . . . . . . . . . . . . . . . . . . . . . . . . . . 22
Making calls - - - - - - - - - - - - - - - - - - - - - - - - - - - - - - - - - - - - - - - - - 24
Before making a call . . . . . . . . . . . . . . . . . . . . . . . . . . . . . . . . . . . . . . . . . . . . . 24
Making a call . . . . . . . . . . . . . . . . . . . . . . . . . . . . . . . . . . . . . . . . . . . . . . . . . . .24
The voice call screen. . . . . . . . . . . . . . . . . . . . . . . . . . . . . . . . . . . . . . . . . . . . .25
Internet calling - - - - - - - - - - - - - - - - - - - - - - - - - - - - - - - - - - - - - - - 28
Adding an Internet calling account . . . . . . . . . . . . . . . . . . . . . . . . . . . . . . . . . .28
Editing or removing an Internet calling account. . . . . . . . . . . . . . . . . . . . . . . . . 28
Using Internet calling . . . . . . . . . . . . . . . . . . . . . . . . . . . . . . . . . . . . . . . . . . . . .28
Receiving Internet calls . . . . . . . . . . . . . . . . . . . . . . . . . . . . . . . . . . . . . . . . . . .28
Calling a contact’s Internet calling address . . . . . . . . . . . . . . . . . . . . . . . . . . . .28
Calling a phone number using Internet calling . . . . . . . . . . . . . . . . . . . . . . . . .29
Messaging - - - - - - - - - - - - - - - - - - - - - - - - - - - - - - - - - - - - - - - - - - 30
Creating a new message. . . . . . . . . . . . . . . . . . . . . . . . . . . . . . . . . . . . . . . . . .30
Replying to a message . . . . . . . . . . . . . . . . . . . . . . . . . . . . . . . . . . . . . . . . . . .31
MMS messages. . . . . . . . . . . . . . . . . . . . . . . . . . . . . . . . . . . . . . . . . . . . . . . . . 31
Going online- - - - - - - - - - - - - - - - - - - - - - - - - - - - - - - - - - - - - - - - - 33
Browsing the Internet. . . . . . . . . . . . . . . . . . . . . . . . . . . . . . . . . . . . . . . . . . . . .33
Setting up your Google email . . . . . . . . . . . . . . . . . . . . . . . . . . . . . . . . . . . . . .34
3

Composing an email . . . . . . . . . . . . . . . . . . . . . . . . . . . . . . . . . . . . . . . . . . . . .34
Setting up Email . . . . . . . . . . . . . . . . . . . . . . . . . . . . . . . . . . . . . . . . . . . . . . . .34
Maps, Navigation, Local . . . . . . . . . . . . . . . . . . . . . . . . . . . . . . . . . . . . . . . . . .36
AcerCloud setup - - - - - - - - - - - - - - - - - - - - - - - - - - - - - - - - - - - - - 38
AcerCloud setup for Windows . . . . . . . . . . . . . . . . . . . . . . . . . . . . . . . . . . . . . .38
Using the Camera - - - - - - - - - - - - - - - - - - - - - - - - - - - - - - - - - - - - - 42
Camera icons and indicators . . . . . . . . . . . . . . . . . . . . . . . . . . . . . . . . . . . . . . .42
Taking a photo. . . . . . . . . . . . . . . . . . . . . . . . . . . . . . . . . . . . . . . . . . . . . . . . . . 45
Shooting a video . . . . . . . . . . . . . . . . . . . . . . . . . . . . . . . . . . . . . . . . . . . . . . . . 45
Viewing photos and videos . . . . . . . . . . . . . . . . . . . . . . . . . . . . . . . . . . . . . . . .46
Geotagging . . . . . . . . . . . . . . . . . . . . . . . . . . . . . . . . . . . . . . . . . . . . . . . . . . . .46
Advanced settings - - - - - - - - - - - - - - - - - - - - - - - - - - - - - - - - - - - - 47
Putting your smartphone in Airplane mode . . . . . . . . . . . . . . . . . . . . . . . . . . . .47
Adjusting settings . . . . . . . . . . . . . . . . . . . . . . . . . . . . . . . . . . . . . . . . . . . . . . .47
FM radio . . . . . . . . . . . . . . . . . . . . . . . . . . . . . . . . . . . . . . . . . . . . . . . . . . . . . .53
Multimedia playback . . . . . . . . . . . . . . . . . . . . . . . . . . . . . . . . . . . . . . . . . . . . . 53
Restoring to factory settings . . . . . . . . . . . . . . . . . . . . . . . . . . . . . . . . . . . . . . .54
Accessories and tips - - - - - - - - - - - - - - - - - - - - - - - - - - - - - - - - - - 55
Using the headset . . . . . . . . . . . . . . . . . . . . . . . . . . . . . . . . . . . . . . . . . . . . . . . 55
Using a Bluetooth headset . . . . . . . . . . . . . . . . . . . . . . . . . . . . . . . . . . . . . . . . 55
Inserting a microSD Card . . . . . . . . . . . . . . . . . . . . . . . . . . . . . . . . . . . . . . . . .55
Appendix - - - - - - - - - - - - - - - - - - - - - - - - - - - - - - - - - - - - - - - - - - - 56
FAQ and troubleshooting. . . . . . . . . . . . . . . . . . . . . . . . . . . . . . . . . . . . . . . . . .56
Other sources of help . . . . . . . . . . . . . . . . . . . . . . . . . . . . . . . . . . . . . . . . . . . .57
Warnings and precautions. . . . . . . . . . . . . . . . . . . . . . . . . . . . . . . . . . . . . . . . .57
Emergency calls . . . . . . . . . . . . . . . . . . . . . . . . . . . . . . . . . . . . . . . . . . . . . . . .59
Taking care of your smartphone . . . . . . . . . . . . . . . . . . . . . . . . . . . . . . . . . . . . 60
Specifications . . . . . . . . . . . . . . . . . . . . . . . . . . . . . . . . . . . . . . . . . . . . . . . . . .61
Safety . . . . . . . . . . . . . . . . . . . . . . . . . . . . . . . . . . . . . . . . . . . . . . . . . . . . . . . . 63
End User License Agreement - - - - - - - - - - - - - - - - - - - - - - - - - - - - 69
4
Setting up
8
21
3
4
5
6
7
15
910
11
12
13
14
Unpacking your smartphone
Your new smartphone comes packed in a protective box. Carefully unpack the box
and remove the contents. If any of the following items is missing or damaged,
contact your dealer immediately:
• Acer Liquid S2 Smartphone
•Battery
• Quick Guide
• USB cable
• AC adapter
• Headset
Note: In-box content varies depending on country and region.
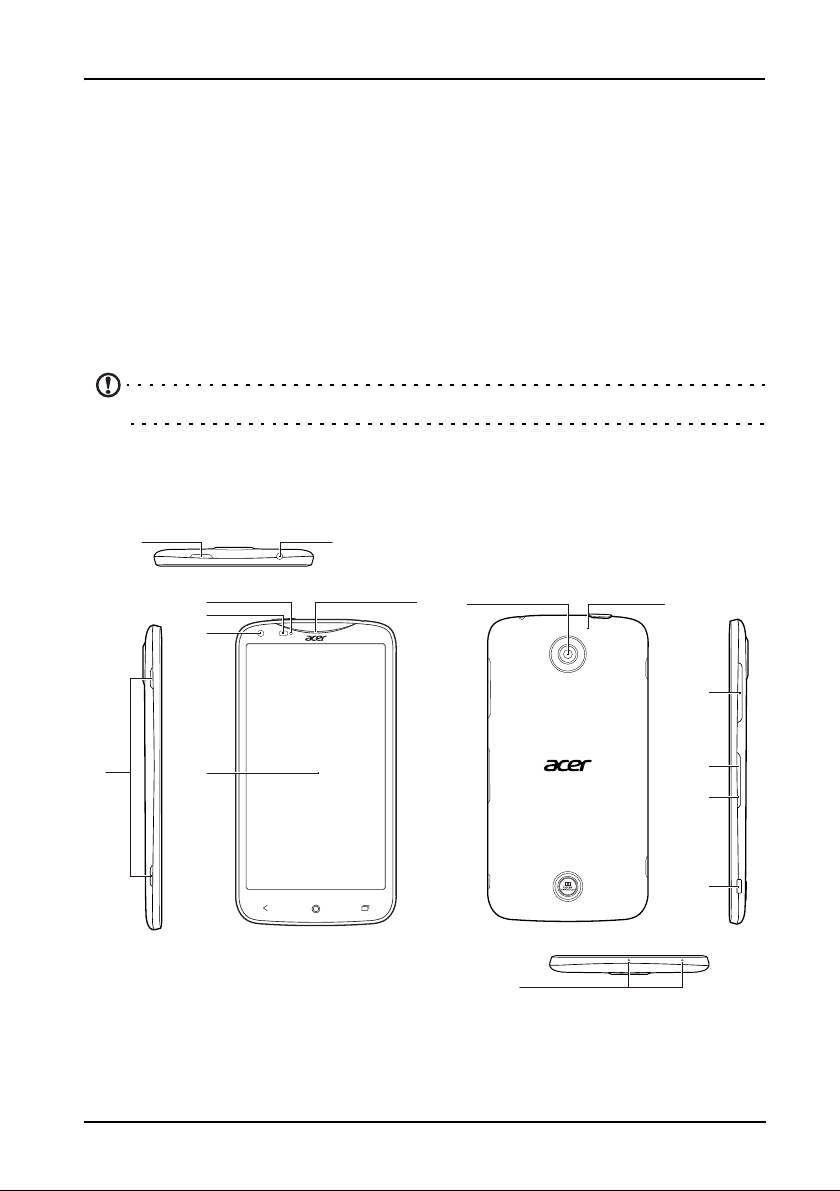
Getting to know your smartphone
Views
5
No. Item Description
1 Power button Press to turn the screen on/off or enter sleep
mode; press and hold to turn the smartphone on
or off.
2 3.5 mm headphone jack Connects to stereo headphones.
3 Phone speaker Emits audio from your smartphone; suitable for
holding to your ear.
4 LED indicator (see LED
indicator table)
5 Light sensor Detects ambient light to automatically adjust
6 Front camera Useful for taking self portrait images.
7 Touchscreen 5.98-inch, 1980 x 1080 pixel capacitive
8 Dual speakers Emit stereo audio from your smartphone; suitable
9 Second microphone For noise cancellation.
10 Rear camera A camera for taking high-resolution images.
11 Volume up/down button Increases or decreases the phone volume.
12 Nano-SIM card slot Accepts a nano-SIM card for mobile data
13 MicroSD™ card slot Insert a microSD card into the slot.
14 Micro USB connector Connects to a USB cable/charger.
15 Microphone Internal microphone
Indicates the phone’s charging status.
screen brightness.
touchscreen to display data, phone content and
enter information.
for handsfree use.
LED flash for camera.
connectivity.
Insert a 3G SIM card to enable 3G
communication.
LED indicator
Color State Description
Green Blinking You have a missed call, voice mail, or new message
(when phone is locked). LED indicator is the same
whether charging or not.
Red Blinking The battery is low and not charging (blinking
frequency increases when battery is critically low).
Red Solid The phone is on and charging.
Green Solid The phone is fully charged and plugged in.
Red Blinking quickly The phone is plugged in and the the battery is bad.
6
Color State Description
Blue Solid (for two seconds) The phone cannot power on because the battery is
too weak (or the phone is too cold or too hot).
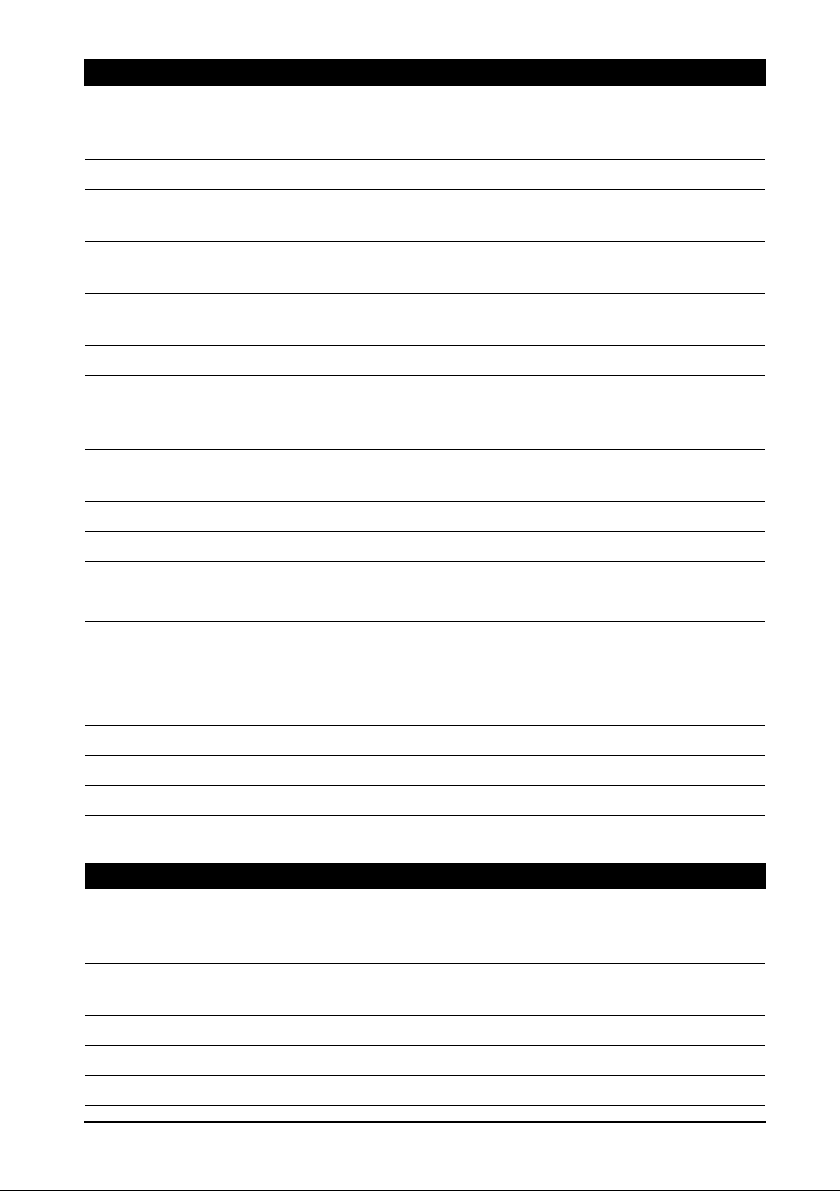
Charging the battery
For initial use, you need to charge your smartphone for eight hours. After that you
can recharge the battery as needed.
Note: Y
1. Connect the AC adapter cord to the micro USB connector on your smartphone.
2. Plug the AC adapter into any AC outlet and charge the phone.
It is normal for the phone to heat up when charging or during long periods of use. All
phones are factory tested before release.
our Acer Liquid S2 does NOT have a user-replaceable battery.
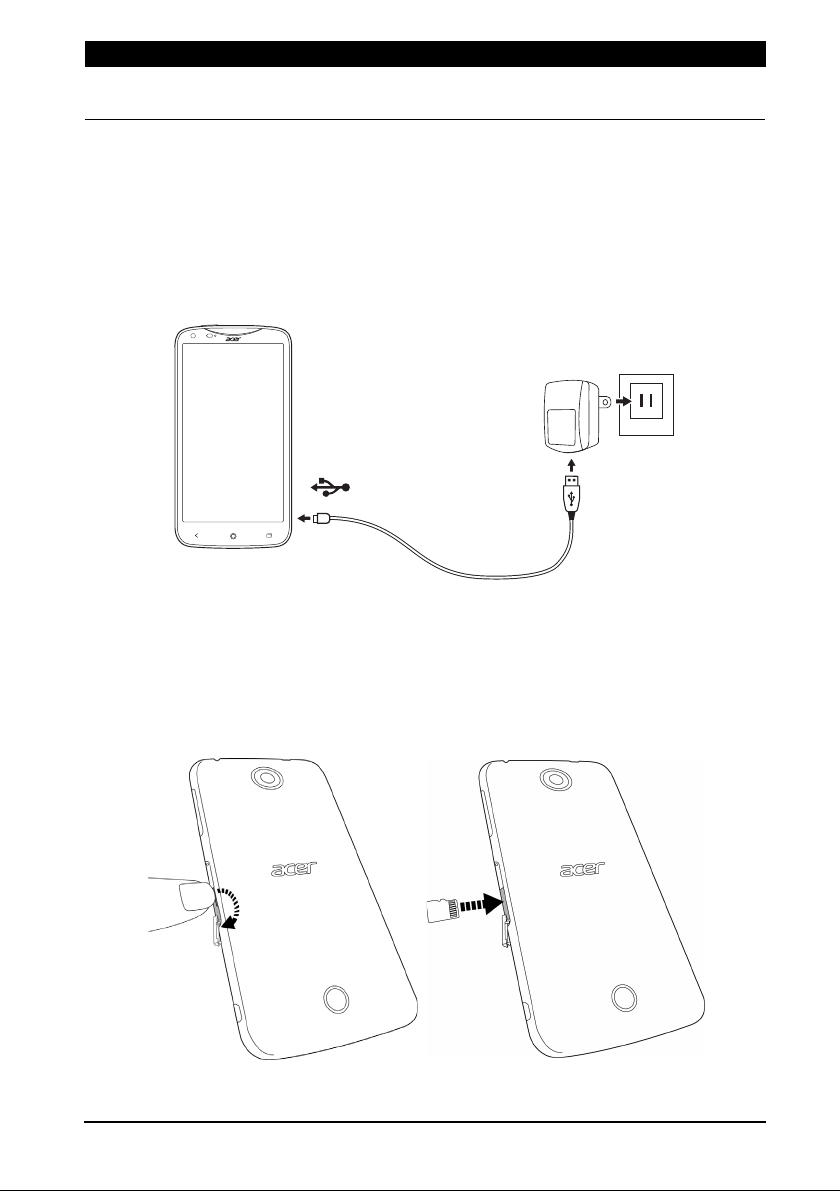
Inserting the microSD card
Additionally, you may wish to increase your smartphone’s storage by inserting a
microSD Card into the slot provided. This is next to the SIM card slot.
1. Insert your fingernail into the notch on the microSD card slot cover.
7
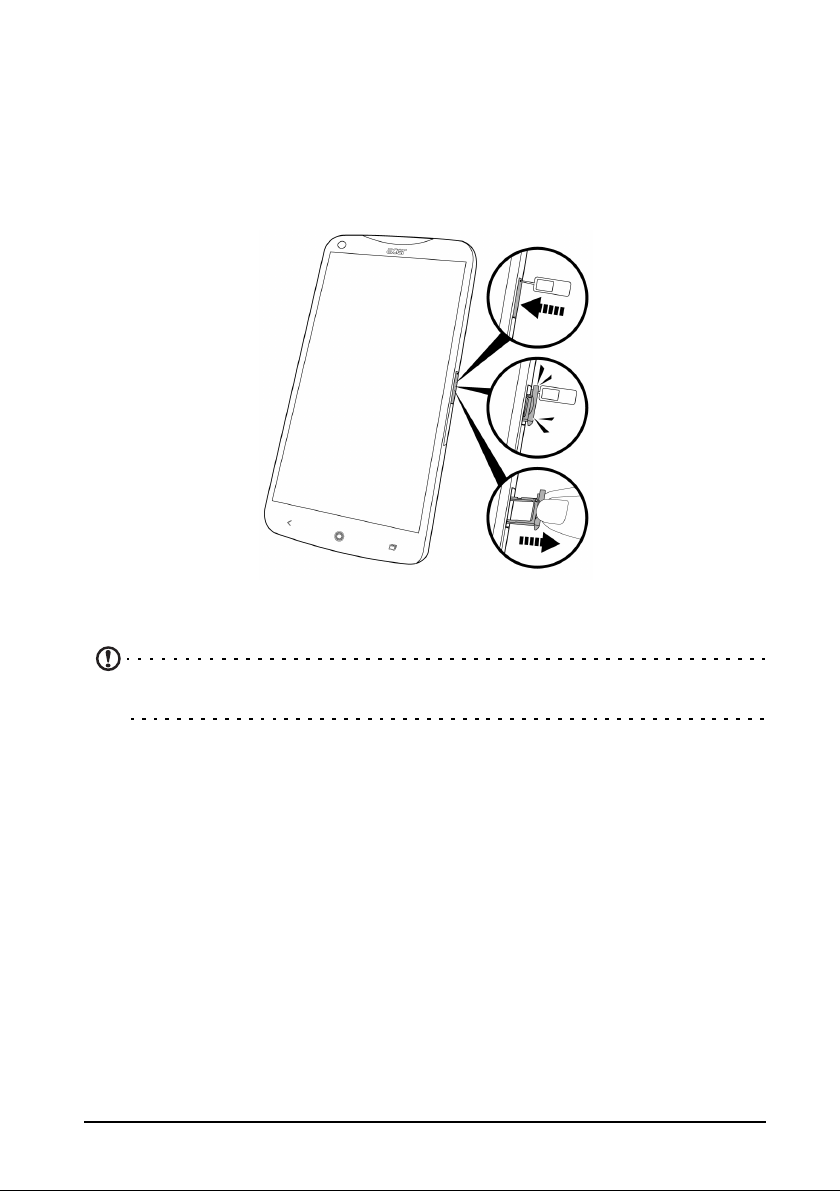
2. Flick towards the screen to open the slot cover.
3. Pull slot cover away from the phone to insert the card.
4. Insert the microSD Card as illustrated. When you hear a small click, the card is
se
curely in the slot.
Inserting the SIM card
To take full advantage of your smartphone’s telephony capabilities, you must install a
Nano-SIM card. The Nano-SIM card slot is located on the right side of the phone.
1. Insert the SIM eject tool (included) into the small hole in the slot holder.
2. Press lightly until the hol
der pops out slightly.
Note: Alternatively, you can use a paper clip or other small, thin object to open
the holder in the same manner.
3. Remove the holder from the cover and use your fingers to pull the holder out (see
image).
4. Use the the pattern on the holder to orien
holder.
5. Insert the holder into the phone (see image).
t and place the Nano-SIM card into the
8
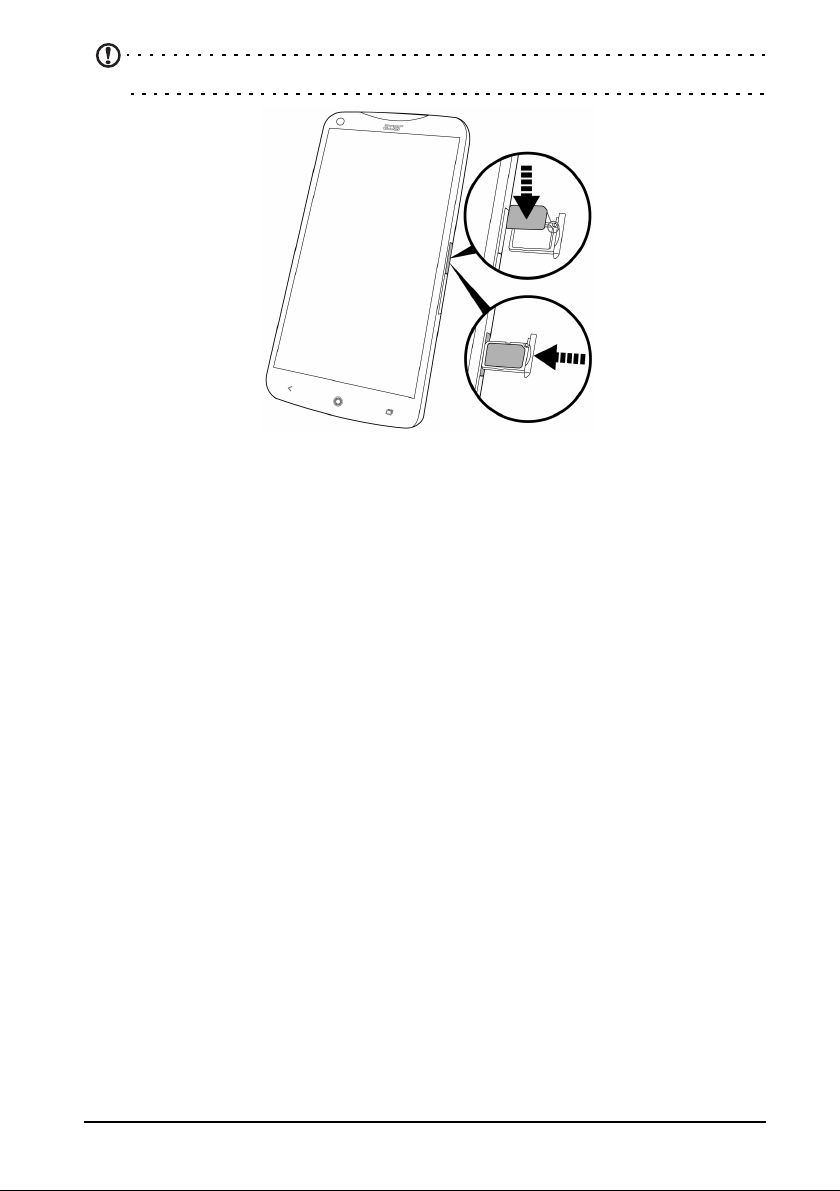
Note: The SIM card cover will only fit one way into the slot.
SIM card lock
Your smartphone may come with a SIM card lock, i.e., you will only be able to use
the SIM card provided by your network operator.
To cancel the SIM lock, contact your network provider.
9
Using your smartphone
Turning on for the first time
To turn on your smartphone for the first time, press and hold the power button until
the screen turns on. You will then be asked to configure some settings before you
can use your smartphone.
Follow the onscreen instructions to complete setup.
Sign in to or create a Google account
If you have Internet access, your smartphone allows you to synchronize information
with a Google account.
During the start-up process, you may create or sign in to your account, which will be
used to synchronize your contact list, email, calendar and other information. If you
do not yet have Internet access, or do not want to use this feature, then tap Skip.
Creating multiple Google accounts
You can create and easily access multiple Google accounts. Open the Application
menu and then tap Settings > Add account.
Entering your PIN
When you install a SIM card for the first time, you may need to enter a PIN using the
onscreen number pad.
Important: Depending on your settings, you may be required to enter your PIN
each time you switch on the phone function.
Activating a new SIM card
If you are using your SIM card for the first time, it may require activation. Contact
your network operator for details on how to do this.
Locking your smartphone
If you will not use your smartphone for a while, briefly press the power button to lock
access. This saves power and ensures your smartphone does not unintentionally
use any services. Your smartphone will lock automatically if it is not used for one
minute.
10
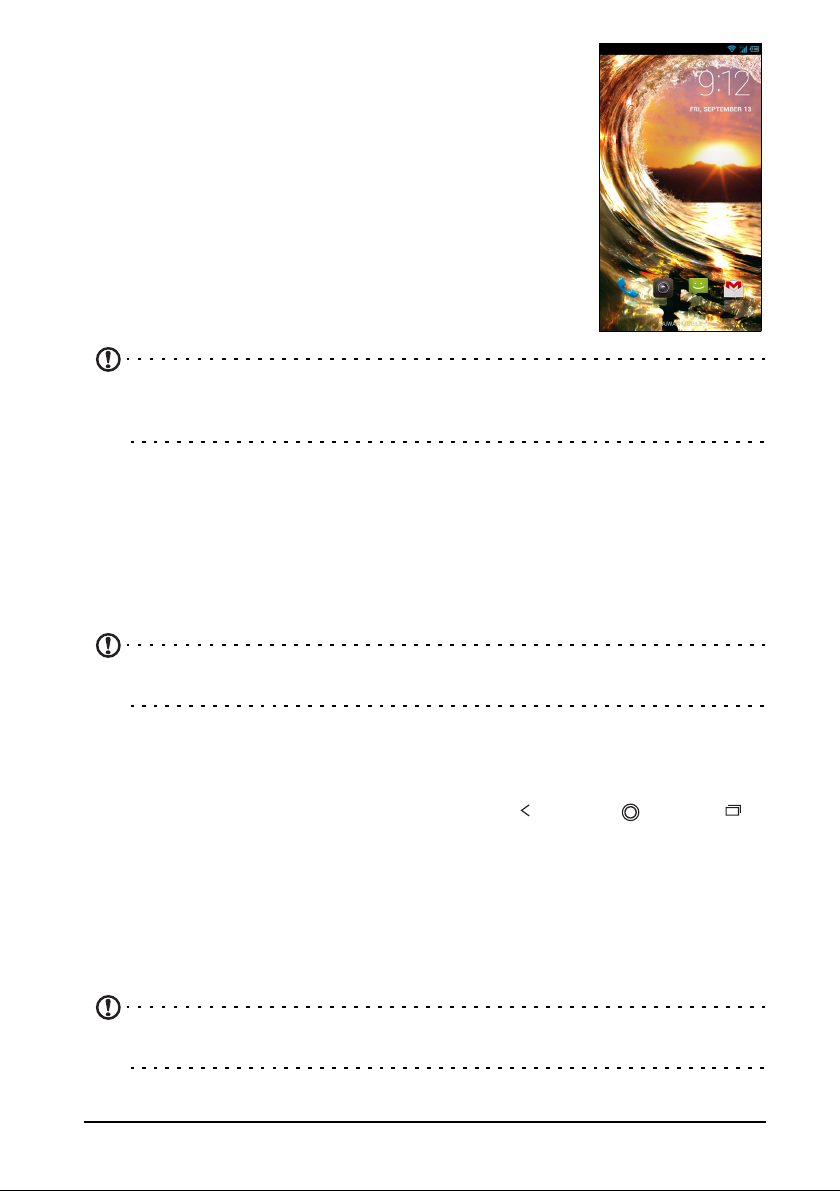
Waking your smartphone
Back
Home
Recent
If the screen is off and the smartphone does not react to any
taps on the screen or front panel button, then it has been
locked and is in sleep mode.
Press the power button to wake
your smartphone by sliding your finger from one side of the
screen to the other (it works both ways).
The lock screen extends to the left of the screen, giving you
om to add widgets for quick access. To view the extended
ro
lock screen, swipe in from the left edge of the display. Swipe
in from the right edge of the display to start the camera (see
).
Note: If you access the extended lock screen by accident while trying to unlock
the screen, you can disable it by tapping the bottom of the screen. Then, unlock
your smartphone as described above.
You may also directly enter the lock screen applications at the bottom of the screen.
Tap the icon and slide your finger to the left or right across to quickly access the
application. To change the lock screen applications, see "Managing the lock screen"
on page 17.
For additional security, you may set an unlock pattern, a set of dots that must be
ched in the correct order to access the phone. Open the Application menu and
tou
then tap Settings > Security > Screen lock.
your smartphone. Unlock
Note: If you forget your unlock pattern, please refer to "Unlock pattern" on
page 57.
Navigating through menus and options
To navigate through menus and options, there
are three buttons beneath the screen.
Back
Tap this button to go to the previous page, or to go up one level in a menu.
Home
Tap this button to go directly to the Home screen. Tap and hold this button to open
the Google Now app. If you are not signed into your Google account, tap and hold
this button to open the Search function.
Note: For information on Google Now, visit the following Google website http://
www.google.com/landing/now/.
11
Recent
Tap and hold this button to see recently opened applications. Tap an application to
open it, or tap anywhere on the screen to return to the Home screen. See
“Multitasking” on page 21.
Using the touchscreen
Your smartphone uses a touchscreen for selecting items and entering information.
Use your finger to tap the screen.
Touch the screen once to open items and select options.
Tap:
Drag: Ho
images.
Tap and hold: T
the pop-up menu that appears, tap the action you want to perform.
Scroll: T
screen in the direction that you want to scroll.
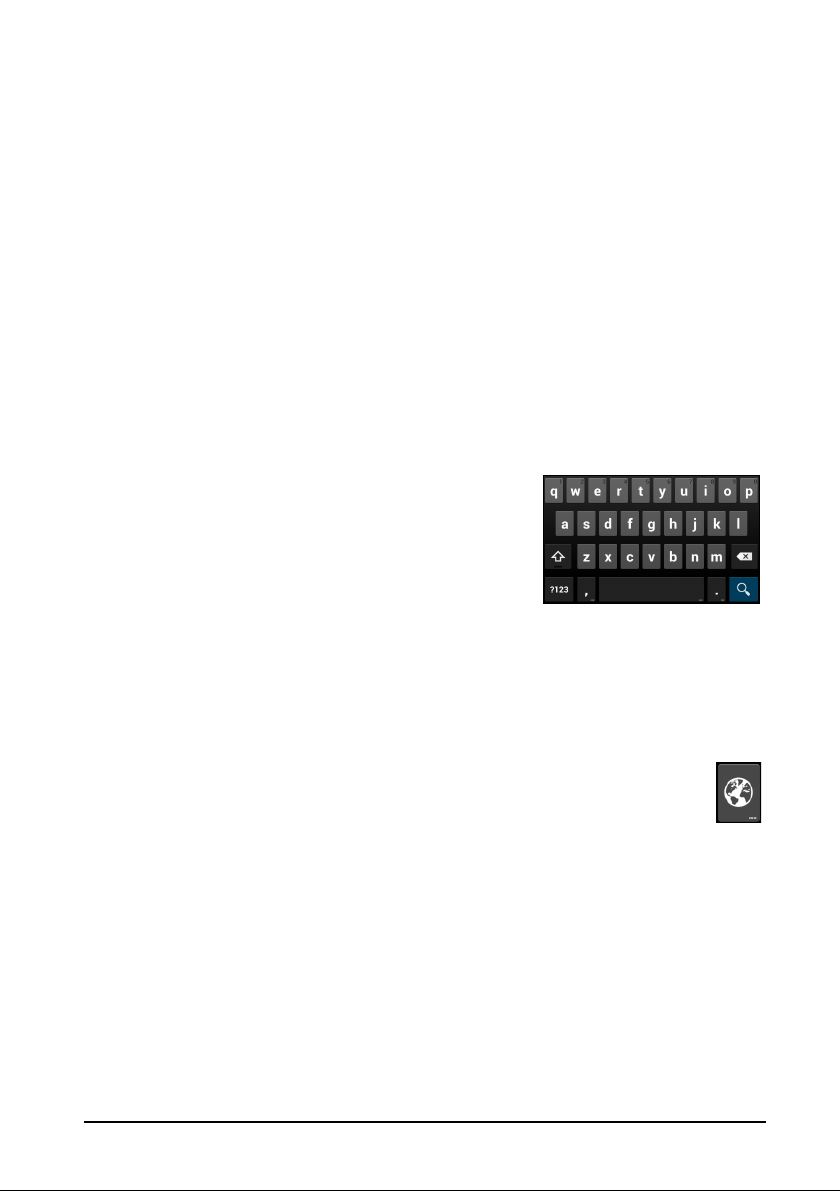
Android keyboard
This is a standard onscreen QWERTY keyboard that
allows you to enter text. Tap and hold a key with
numbers at the top to select alternative characters,
such as letters with accents.
Tap the ?123 button to see numbers and special
characters, and then tap the ALT key to see even
more.
You can choose another input language by tapping and holding the comma key.
Al
Language & input. Then tap the Settings button next to "Google Keyboard" >
Input languages. The keyboard layout changes according to the selected
language.
After setting up more than one language, the world button appears next to
the
languages.
Text assistance
The Android keyboard has various features that assist you to enter correct text. In
the Application menu, tap Settings > Language & input and then tap the Settings
button to the right of Google Keyboard. From here you can enable or disable
several keyboard-related settings.
ld your finger on the screen and drag across the screen to select text and
ap and hold an item to see a list of actions available for that item. On
o scroll up or down the screen, simply drag your finger up or down the
ternatively, you can open the Application menu and then tap Settings >
space bar. Tap this button to quickly toggle between multiple input
Changing the text input method
To change the input method, in the Application menu tap Settings > Language &
input > Default and then select your preferred input method.
12
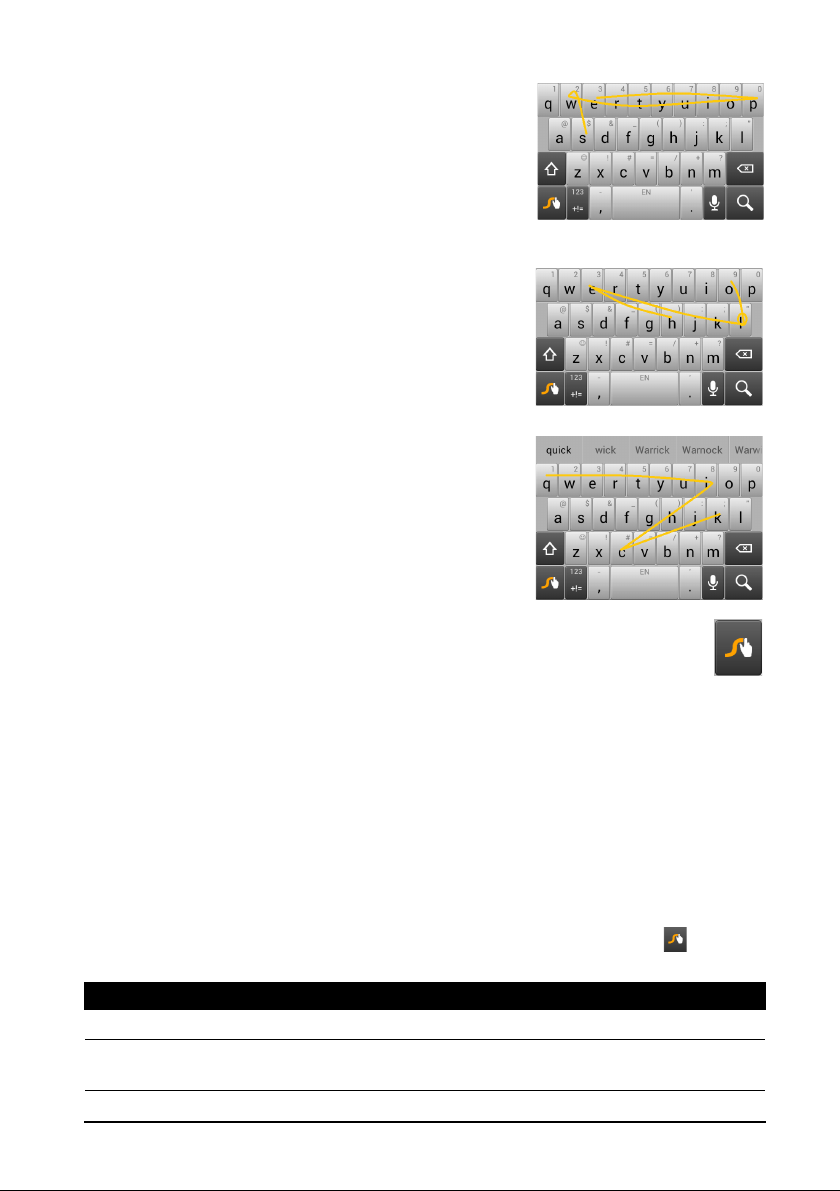
Swype
Swype is a fast way to enter text. It allows you to type
with one continuous motion across the screen
yboard; you create a word by drawing through
ke
letters.
Put your finger on the first letter of the word and draw
a path from letter to letter, lifting up only after the last
letter. Swype will insert spaces where necessary.
Swype will usually add a double letter in a word when
needed, but you can help Swype recognize you want
a double letter by scribbling slightly or making a loop
on the letter. For example, to get the "ll" in "hello",
scribble (or make a loop) on the "l" key.
When there are multiple suggestions for the word
u want to enter, Swype displays a Word Choice
yo
List. To accept the default word in the Word Choice
List, just keep Swyping. Otherwise, scroll through the
list by dragging your finger, and tap the word you
want.
Press and hold the Swype key to access settings, features, updates,
preferences, and help.
Tap the +!= bu
(shift) key to see even more.
Additional keys vary depending on the type of text you enter, e.g. a key to add a
ey is available when typing a text message. Like other keys, tap and hold for
smil
additional options.
To change the input method, open the Notification area (see "Status and
notification area" on page 18.) and tap Choose input
Text assistance
The Swype keyboard has various features that assist you to enter correct text. In the
Application menu, tap Settings > Language & input and then tap the Settings
button to the right of Swype. You can also tap and hold the Swype key . From
here you can enable or disable the following:
Function Description
Settings Change your text input preferences.
My Words Adjust settings and check words added you your personal
tton to see numbers and special characters; tap the page
method.
dictionary.
13
Time and Status
Navigation
Application menu
Function Description
Languages Set the language used by the keyboard.
Gestures A list and description of the various Swype gestures.
Help Learn how to use the Swype keyboard.
Updates Check for application and dictionary updates.
Predictive text
Both Swype and Android keyboard provide predictive text input for the browser. As
you tap the letters of a word, a selection of words are displayed above the keyboard
that continue the sequence of letters tapped, or are a close match allowing for
errors. The word list changes after every key press. If the word you need is
displayed, you can tap on it to insert it into your text.
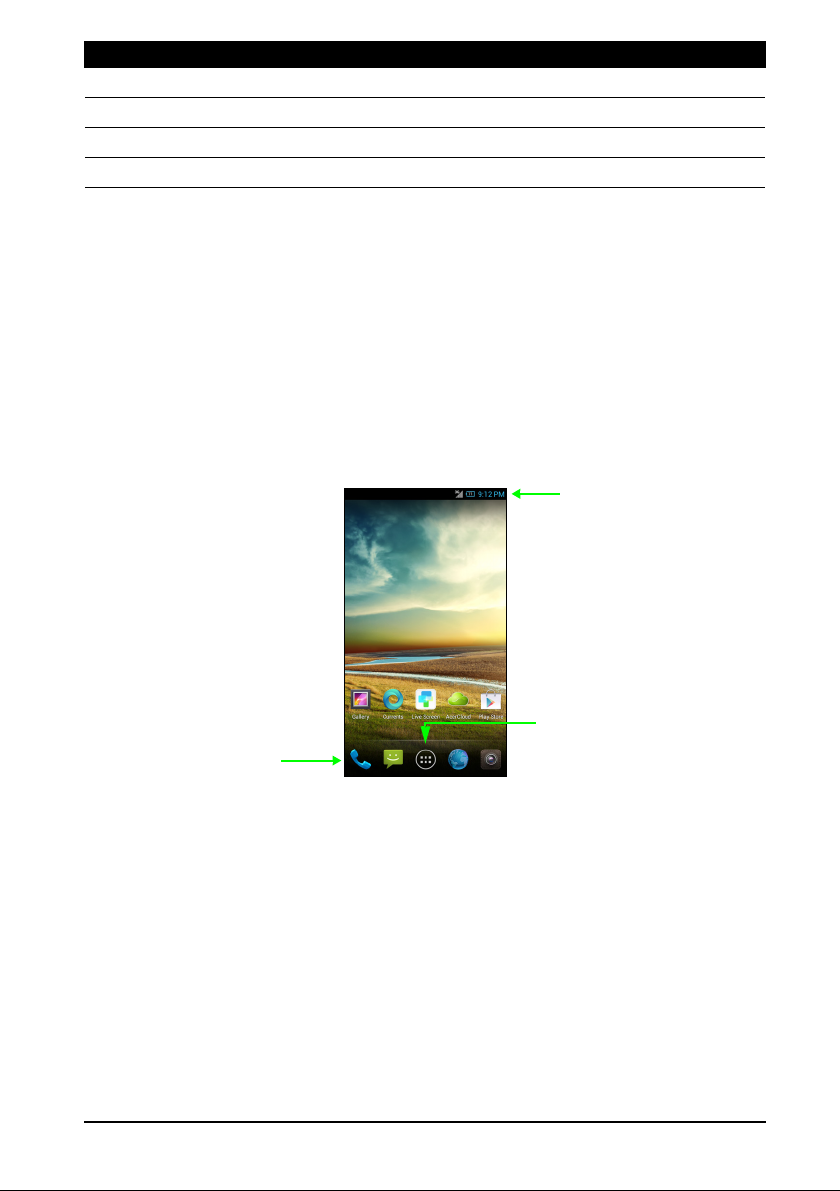
The Home screen
After rebooting, your smartphone will display the home screen. This screen gives
you quick access to information and simple controls with widgets or shortcuts. These
display information such as the time and weather, or provide additional controls and
direct access to applications and other frequently used features of your smartphone.
At the bottom of the screen is the application dock which displays default
applications. Tap an icon to open the application. Tap the Application icon in the
14
middle of the application dock to view your applications. To change applications, see
"Changing application dock icons" on page 17.
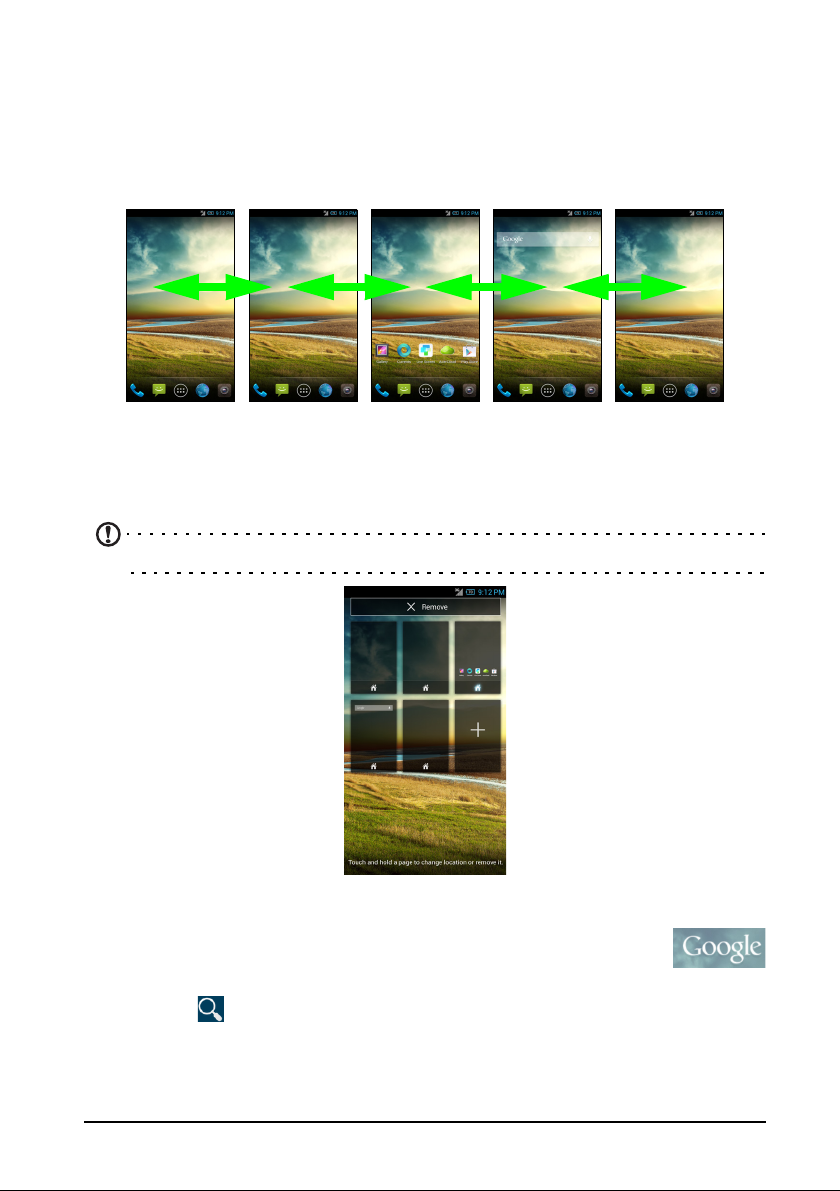
The extended Home screen
The Home screen extends to either side of the screen, giving you more room to add
icons, widgets or features. To view the extended screen, slide your finger to the left
or right.
You can even customize how many Home screen pages appear and the order they
appear in by simply tapping and holding any open area on the Home screen. To
remove a Home screen, tap, hold, and drag to the Remove option at the top of the
screen. To rearrange, tap, hold, and drag to the desired position.
Note: The main Home screen cannot be removed.
Search
The screen to the right of the Home screen contains a Google search
bar. To search for applications, files or for information on the Internet,
tap anywhere on the Google icon. Simply enter the text you want to
find and tap
You can also choose what Google Search searches for. Within search, tap the Back
button to hide the keyboard. Then tap the Menu icon > Settings > Phone search.
Select the applications you want Google Search to search.
or tap one of the suggestions, applications or files shown in the list.
15
Note: In order to search or browse the Internet, you must be connected to a
cellular data (if available) or wireless network. See “Going online” on page 33.
Voice search
If voice search is available, tap the microphone and speak your search
request. See “Voice search” on page 33.
Personalizing the Home screen
You may personalize your Home screen by adding or removing application shortcuts
or widgets, and by changing the wallpaper.
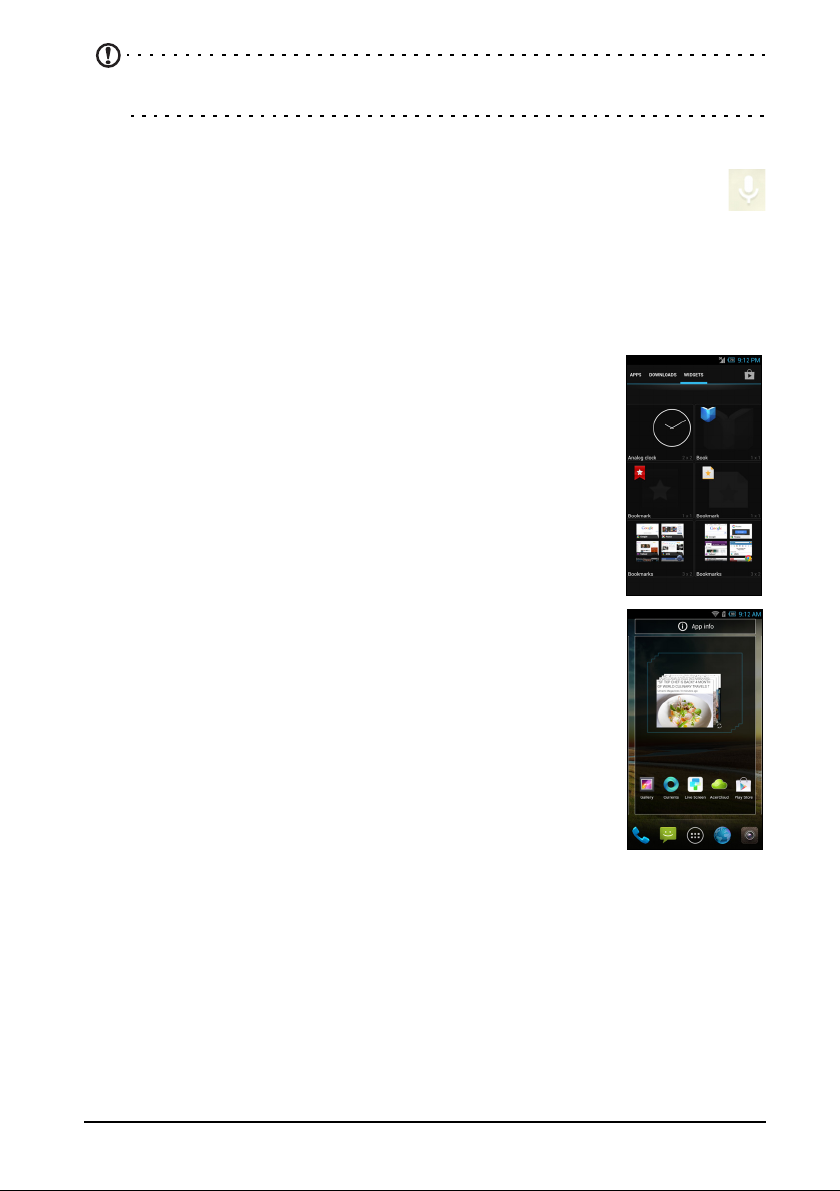
Adding and removing shortcuts and widgets
To add shortcuts or widgets, tap the Application menu icon in
the bottom-center of the Home screen.
Ta p APPS
to the Home screen.
Ta p WI
custom shortcuts, contacts or bookmarks) that you can add to a
Home screen. Widgets are small applications that display
constantly-updated information or quick shortcuts to applications
or special functions.
To move an App or Widget to the Home screen, tap and hold an
m until it is selected. The Home screen will open. Drag the
ite
item to any free area on the screen. To view information about
the App or Widget, drag it to the icon at the top of the screen.
To move the item to a different H
of the screen, the Home screen will switch to the screen in that
direction. Release the item when it is positioned correctly.
To remove a shortcut or widget from the Home screen, tap and
drag it
to see a list of shortcuts to applications you can drag
DGETS to see small applications and links (such as
ome screen, drag it to the side
to Remove at the top of the screen.
Resizing widgets
Some widgets can be resized. As soon as you place a widget on the Home screen,
you can resize it by dragging the corners.
To resize a widget that is already on the
Once the Remove icon appears, release the widget. If the widget is resizable, you
will be able to drag the sides of the widget to resize it.
Home screen, tap and hold the widget.
Adding or removing folders
You can also add folders to your Home screen. To create a new folder drag and drop
an application icon onto another application icon in the Home screen. This will
16
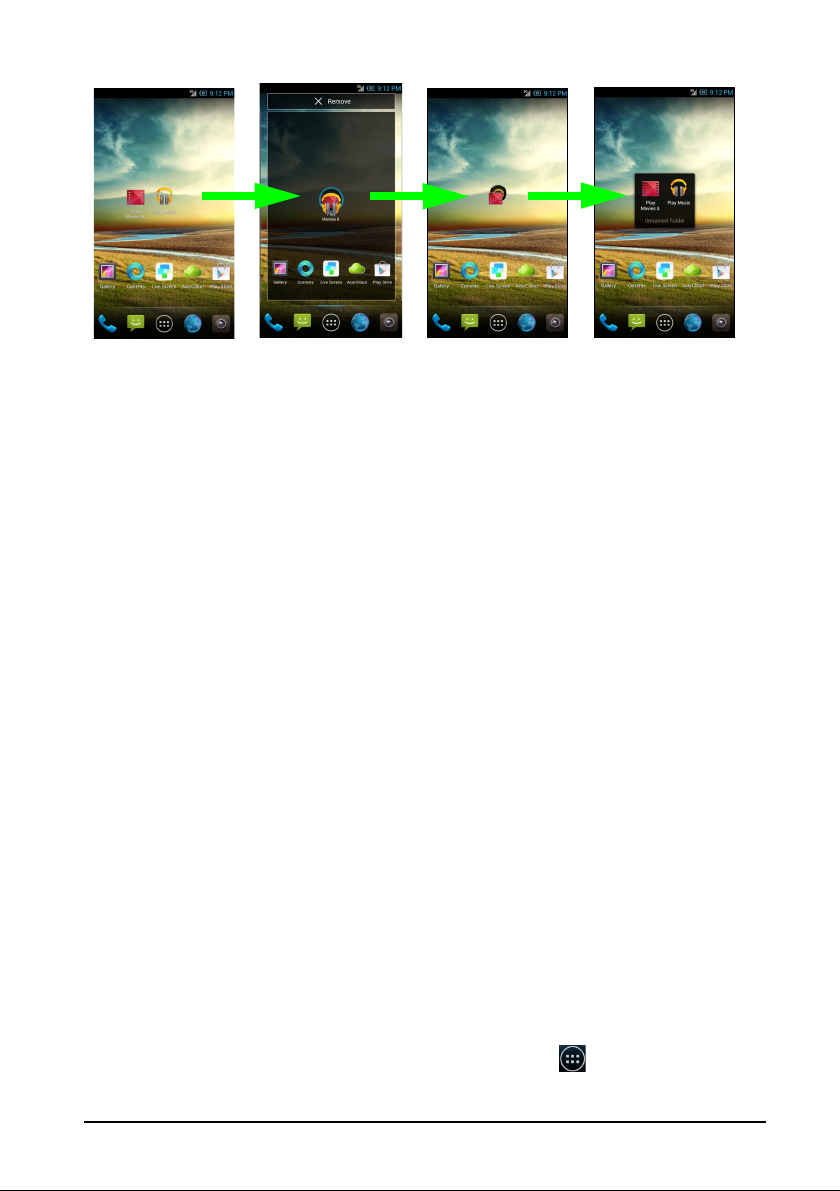
create an Unnamed Folder. Tap the folder icon and then tap the name of the folder
to rename it.
To delete an application shortcut from a folder, tap on the folder icon to display the
applications inside and then tap and hold the application icon that you want to
remove. Drag and drop the icon on Remove that will appear at the top of the screen.
To delete a folder, tap and hold on the folder and then drag and drop the folder on
Remove that
will appear at the top of the screen.
Changing application dock icons
You can set icons for installed applications in the application dock. Open the
Application menu and find the application you want to add. Tap and hold the icon,
then drag it to any open position in the dock. Dragging the new application to an
existing dock icon will create a folder for both icons.
To remove an icon from the dock, tap and hold th
icon to a different location outside the dock or to Remove at the top of the screen.
e icon to select it. Either drag the
Changing the wallpaper
In the Application menu, tap Settings > Display > Wallpaper. You can choose
from images stored in the Gallery, standard wallpapers, or Live Wallpapers featuring
animated or interactive backgrounds.
Managing the lock screen
In the Application menu, tap Settings > Lock screen. Modify lock screen settings,
such as the wallpaper, number of transition blinds, turning the application shortcuts
on and off, and choosing the application shortcuts.
Changing home screen settings
In the Application menu, tap Settings > Home screen. Modify home screen
settings, such as the wallpaper and transition effects, and toggle on or off repeat
transition and home screens looping.
The Application menu
To access the Application menu, on the Home screen tap in the center of the
dock.
17
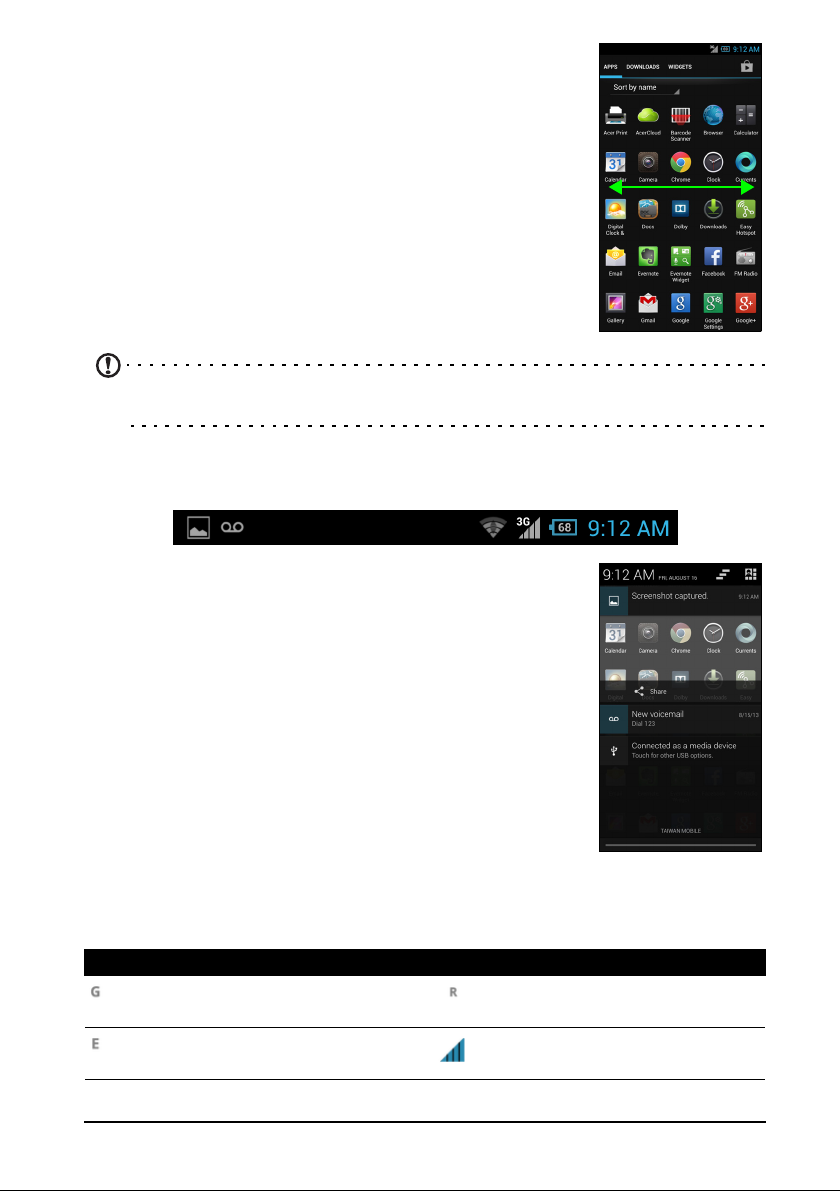
Applications are displayed in alphabetical order. Swipe the
page to the left or right to see more applications.When you
are on the last page of applications, swipe to the left to see
widgets available on your tablet, or tap WIDGETS at the top
of the page.
Tap the Pl
purchase apps and/or digital media.
To quickly jump to applications or widgets, tap APPS or
WIDGETS at the top of the Application menu.
ay Store icon to open Google Play to view and
Note: All images are for reference only. The applications installed on your device
can be different from the applications shown in illustrations.
Status and notification area
The Notification area is at the top of the screen.
This area contains a variety of icons to inform you of your
phone’s status. The left side of the Notification area displays
event icons that indicate a new event (such as a new
message).
Drag the Notification area down the screen to view more
information about new events adjust commonly used
settings.
Connection icons
The icons on the right side indicate signal strength, connection, battery status and
the time.
Icon Description Icon Description
Connected to GPRS mobile
network
Connected to EDGE mobile
network
Roaming
Cellular signal strength
18
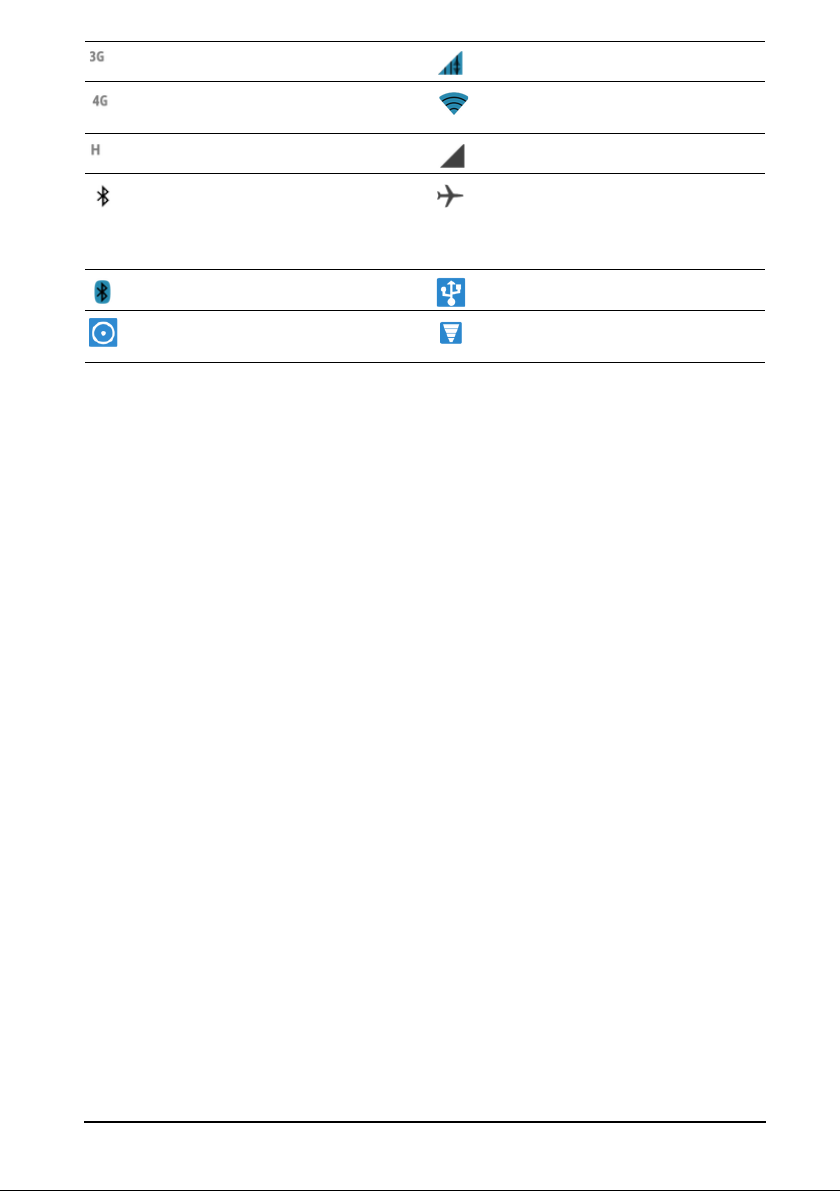
Connected to 3G mobile network Mobile data transferring
Connected to 4G (LTE) mobile
network
Connected to HSDPA network No signal
Bluetooth is on Airplane mode (Wireless
Bluetooth connected USB tethering is activated
USB and wireless tethering are
activated
Connected to a wireless
network
connectivity disconnected.
Please disable airplane mode
before trying to make a call.)
Wireless tethering is activated
19
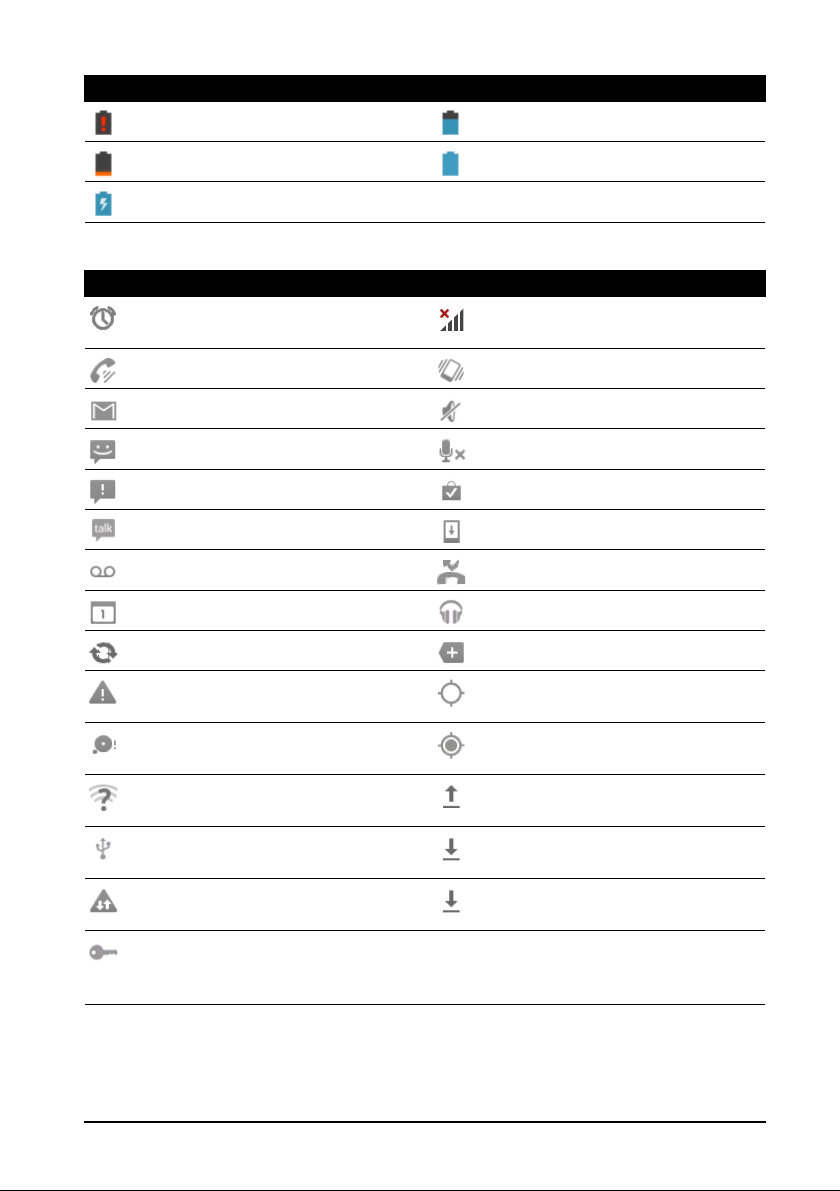
Battery icons
Icon Description Icon Description
Battery is very low Battery is partially drained
Battery is low Battery is full
Battery is charging
Notification icons
Icon Description Icon Description
Alarm is set SIM card is invalid or not
installed
Speakerphone is on Vibrate mode
New Gmail message Ringer is silenced
New/unread SMS/MMS Phone microphone is off
Problem with sending SMS/MMS Application update available
New Google Talk message System update available
New voicemail Missed call
Upcoming event Song is playing
Syncing data More notifications
Warning, open the notification
area for more information
SD card or USB storage is full Receiving location data from
An open wireless network is
available
Phone is connected to PC via
USB
Carrier data use threshold
exceeded
Connected to or disconnected
from virtual private network
(VPN)
GPS is on
GPS
Uploading data
Downloading data
Download finished
20
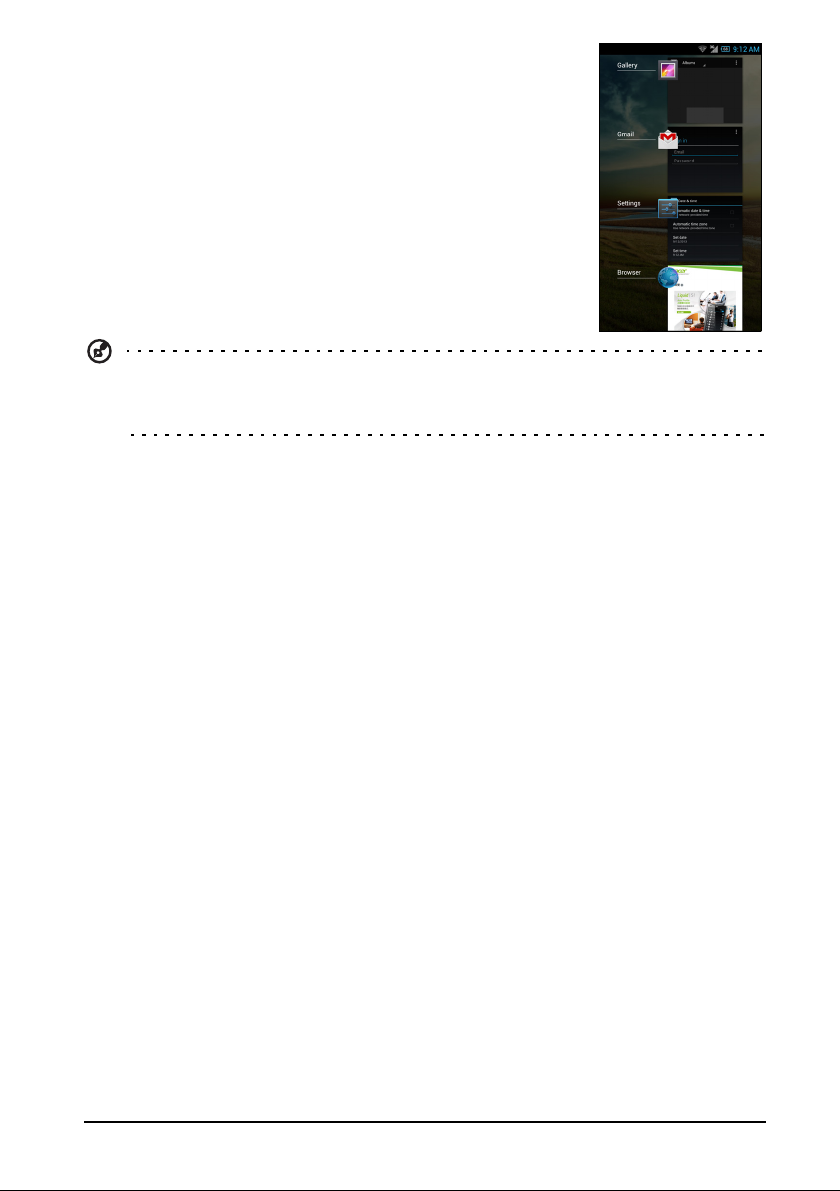
Multitasking
You can have multiple applications open at the same time. To
open a new application, tap the home button to return to the
Home screen, then start the new application.
Tip: To prolong battery life, it is better to close an application when you’ve
finished using it. Do this by either pressing the Back key or the Menu button and
selecting Exit (if available).
Turning off your smartphone
1. Press and hold the power button until you get the phone options menu.
2. Tap Power off > OK.
-OR-
• Simply press and hold the po
seconds).
wer button until the screen turns off (around 5
Forcing phone shutdown
If the normal shutdown isn’t helping, you can simulate a battery removal (or "battery
pull"). To do this, press the power button and hold for around 12 seconds.
21
 Loading...