

Acer Projector X1161P Series, Projector X1161PA Series, Projector X110P Series, Projector H110P Series, Projector X1161N Series User Guide
...Page 1

Acer Projector
X1161P/X1161PA/X110P/H110P/
X1161N/X1261P Series
User's Guide
Page 2

Copyright © 2010. Acer Incorporated.
All Rights Reserved.
Acer Projector X1161P/X1161PA/X110P/H110P/X1161N/X1261P Series User's Guide
Original Issue: 10/2010
Changes may be made periodically to the information in this publication without obligation
to notify any person of such revisions or changes. Such changes will be incorporated in new
editions of this manual or supplementary documents and publications. This company makes
no representations or warranties, either expressed or implied, with respect to the contents
hereof and specifically disclaims the implied warranties of merchantability or fitness for a
particular purpose.
Record the model number, serial number, purchase date and place of purchase information in
the space provided below. The serial number and model number are recorded on the label
affixed to your projector. All correspondence concerning your unit should include the serial
number, model number and purchase information.
No part of this publication may be reproduced, stored in a retrieval system, or transmitted, in
any form or by any means, electronically, mechanically, by photocopy, recording or otherwise,
without the prior written permission of Acer Incorporated.
Acer Projector X1161P/X1161PA/X110P/H110P/X1161N/X1261P Series
Model number: __________________________________
Serial number: ___________________________________
Date of purchase: ________________________________
Place of purchase: ________________________________
Acer and the Acer logo are registered trademarks of Acer Incorporated. Other companies' product
names or trademarks are used herein for identification purposes only and belong to their respective
companies.
Page 3

Information for your safety and comfort
Read these instructions carefully. Keep this document for future reference.
Follow all warnings and instructions marked on the product.
Turning the product off before cleaning
Unplug this product from the wall outlet before cleaning. Do not use liquid
cleaners or aerosol cleaners. Use a damp cloth for cleaning.
Caution for plug as disconnecting device
Observe the following guidelines when connecting and disconnecting power to
the external power supply unit:
• Install the power supply unit before connecting the power cord to the AC
power outlet.
• Unplug the power cord before removing the power supply unit from the
projector.
• If the system has multiple sources of power, disconnect power from the
system by unplugging all power cords from the power supplies.
Caution for Accessibility
Be sure that the power outlet you plug the power cord into is easily accessible
and located as close to the equipment operator as possible. When you need to
disconnect power to the equipment, be sure to unplug the power cord from the
electrical outlet.
iii
Warnings!
• Do not use this product near water.
• Do not place this product on an unstable cart, stand or table. If the product
falls, it could be seriously damaged.
• Slots and openings are provided for ventilation to ensure reliable
operation of the product and to protect it from overheating. These
openings must not be blocked or covered. The openings should never be
blocked by placing the product on a bed, sofa, rug or other similar surface.
This product should never be placed near or over a radiator or heat register, or
in a built-in installation unless proper ventilation is provided.
• Never push objects of any kind into this product through cabinet slots as
they may touch dangerous voltage points or short-out parts that could
result in a fire or electric shock. Never spill liquid of any kind onto or into
the product.
Page 4
iv
• To avoid damage of internal components and to prevent battery leakage,
do not place the product on a vibrating surface.
• Never use it under sporting, exercising, or any vibrating environment
which will probably cause unexpected short current or damage rotor
devices, lamp.
Using electrical power
• This product should be operated from the type of power indicated on the
marking label. If you are not sure of the type of power available, consult
your dealer or local power company.
• Do not allow anything to rest on the power cord. Do not locate this
product where people will walk on the cord.
• If an extension cord is used with this product, make sure that the total
ampere rating of the equipment plugged into the extension cord does not
exceed the extension cord ampere rating. Also, make sure that the total
rating of all products plugged into the wall outlet does not exceed the fuse
rating.
• Do not overload a power outlet, strip or receptacle by plugging in too
many devices. The overall system load must not exceed 80% of the branch
circuit rating. If power strips are used, the load should not exceed 80% of
the power strip's input rating.
• This product's AC adapter is equipped with a three-wire grounded plug.
The plug only fits in a grounded power outlet. Make sure the power outlet
is properly grounded before inserting the AC adapter plug. Do not insert
the plug into a non-grounded power outlet. Contact your electrician for
details.
Warning! The grounding pin is a safety feature. Using a power outlet that is
not properly grounded may result in electric shock and/or injury.
Note: The grounding pin also provides good protection from unexpected
noise produced by other nearby electrical devices that may interfere with
the performance of this product.
• Use the product only with the supplied power supply cord set. If you need
to replace the power cord set, make sure that the new power cord meets
the following requirements: detachable type, UL listed/CSA certified, VDE
approved or its equivalent, 4.6 meters (15 feet) maximum length.
Page 5
Product servicing
Do not attempt to service this product yourself, as opening or removing covers
may expose you to dangerous voltage points or other risks. Refer all servicing to
qualified service personnel.
Unplug this product from the wall outlet and refer servicing to qualified service
personnel when:
• the power cord or plug is damaged, cut or frayed
• liquid was spilled into the product
• the product was exposed to rain or water
• the product has been dropped or the case has been damaged
• the product exhibits a distinct change in performance, indicating a need
for service
• the product does not operate normally after following the operating
instructions
Note: Adjust only those controls that are covered by the operating
instructions, since improper adjustment of other controls may result in
damage and will often require extensive work by a qualified technician to
restore the product to normal condition.
Warning! For safety reasons, do not use non-compliant parts when adding
or changing components. Consult your reseller for purchase options.
v
Your device and its enhancements may contain small parts. Keep them out of
the reach of small children.
Additional safety information
• Do not look into the projector's lens when the lamp is on. The bright may
hurt your eyes.
• Turn on the projector first and then signal sources
• Do not place the product in following environments:
• Space that is poorly ventilated or confined. At least 50cm clearance from walls
and free flow of air around the projector is necessary.
• Locations where temperatures may become excessively high, such as inside of a
car with all windows rolled up.
• Locations where excessive humidity, dust, or cigarette smoke may contaminate
optical components, shortening the life span and darkening the image.
• Locations near fire alarms.
• Locations with an ambient temperature above 40 ºC/104 ºF.
• Locations where the altitudes are higher than 10000 feet.
• Unplug immediately if there is something wrong with your projector. Do
not operate if smoke, strange noise or odor comes out of your projector. It
Page 6

vi
might cause fire or electric shock. In this case, unplug immediately and
contact your dealer.
• Do not keep using this product to break or drop it. In this case contact your
dealer for inspection.
• Do not face the projector lens to the sun. It can lead to fire.
• When switching the projector off, suggest to ensure the projector
completes its cooling cycle before disconnecting power.
• Do not frequently turn off main power abruptly or unplug the projector
during operation. It can lead to lamp breakage, fire, electric shock or other
trouble. The best way is to wait for the fan to turn off before turning main
power off.
• Do not touch air outlet grille and bottom plate which becomes hot.
• Clean the air filter frequently if have. The temperature inside may rise and
cause damage when the filter/ventilation slots clogged with dirt or dust.
• Do not look into the air outlet grille when projector is operating. It may
hurt your eyes.
• Always open the lens shutter or remove the lens cap when the projector is
on.
• Do not block the projector lens with any object when the projector is
under operation as this could cause the object to become heated and
deformed or even cause a fire. To temporarily turn off the lamp, press HIDE
on the remote control.
• The lamp becomes extremely hot during operation. Allow the projector to
cool for approximately 45 minutes prior to removing the lamp assembly for
replacement.
• Do not operate lamps beyond the rated lamp life. It could cause it to break
on rare occasions.
• Never replace the lamp assembly or any electronic components unless the
projector is unplugged.
• The product will detect the life of the lamp itself. Please be sure to change
the lamp when is showing warning message.
• When changing the lamp, please allow unit to cool down, and follow all
changing instructions.
• Reset the "Lamp Hour Reset" function from the Onscreen display
"Management" menu after replacing the lamp module.
• Do not attempt to disassemble this projector. There are dangerous high
voltages inside which may hurt you. The only user serviceable part is the
lamp which has its own removable cover. Refer servicing only to suitable
qualified professional service personnel.
• Do not stand the projector on end vertically. It may cause the projector to
fall over, causing injury or damage.
• This product is capable of displaying inverted images for ceiling mount
installation. Only use acer ceiling mount kit for mounting the projector
and ensure it is securely installed.
Page 7
vii
Caution for Listening
To protect your hearing, follow these instructions.
• Increase the volume gradually until you can hear clearly and comfortably.
• Do not increase the volume level after your ears have adjusted.
• Do not listen to music at high volumes for extended periods.
• Do not increase the volume to block out noisy surroundings.
• Decrease the volume if you can't hear people speaking near you.
Disposal instructions
Do not throw this electronic device into the trash when discarding. To minimize
pollution and ensure utmost protection of the global environment, please
recycle. For more information on the Waste from Electrical and Electronics
Equipment (WEEE) regulations, visit
http://www.acer-group.com/public/Sustainability/sustainability01.htm
Mercury advisory
For projectors or electronic products containing an LCD/CRT monitor or display:
“Lamp(s) contain Mercury,
Dispose Properly.”
Lamp(s) inside this product contain mercury and must be recycled or disposed of
according to local, state or federal laws. For more information, contact the
Electronic Industries Alliance at www.eiae.org. For lamp-specific disposal
information, check www.lamprecycle.org
Page 8

viii
First things first
Usage Notes
Do:
• Turn off the product before cleaning.
• Use a soft cloth moistened with mild detergent to clean the display
housing.
• Disconnect the power plug from AC outlet if the product is not being used
for a long period of time.
Don't:
• Block the slots and openings on the unit provided for ventilation.
• Use abrasive cleaners, waxes or solvents to clean the unit.
• Use under the following conditions:
• In extremely hot, cold or humid environments.
• In areas susceptible to excessive dust and dirt.
• Near any appliance that generates a strong magnetic field.
• Place In direct sunlight.
Precautions
Follow all warnings, precautions and maintenance as recommended in this
user's guide to maximize the life of your unit.
Warning:
• Do not look into the projector's lens when the lamp is on. The bright light may hurt
your eyes.
• To reduce the risk of fire or electric shock, do not expose this product to rain or
moisture.
• Please do not open or disassemble the product as this may cause electric shock.
• When changing the lamp, please allow unit to cool down, and follow all changing
instructions.
• This product will detect the life of the lamp itself. Please be sure to change the lamp
when it shows warning messages.
• Reset the "Lamp Hour Reset" function from the Onscreen display "Management"
menu after replacing the lamp module.
• When switching the projector off, please ensure the projector completes its cooling
cycle before disconnecting power.
• Turn on the projector first and then the signal sources.
• Do not use lens cap when projector is in operation.
• When the lamp reaches the end of its life, it will burn out and may make a loud
popping sound. If this happens, the projector will not turn back on until the lamp
module has been replaced. To replace the lamp, follow the procedures listed under
"Replacing the Lamp".
Page 9

Information for your safety and comfort iii
First things first viii
Usage Notes viii
Precautions viii
Introduction 1
Product Features 1
Package Overview 2
Projector Overview 3
Projector Outlook 3
Remote Control and Control Panel Layout 5
Getting Started 7
Connecting the Projector 7
Turning the Projector On/Off 8
Turning on the Projector 8
Turning the projector off 9
Adjusting the Projected Image 10
Adjusting the Height of Projected Image 10
How to optimize image size and distance 11
How to get a preferred image size by adjusting
distance and zoom 13
Contents
User Controls 15
Installation menu 15
Acer Empowering Technology 16
Onscreen Display (OSD) Menus 17
Color 18
Image 19
Setting 22
Management 24
Audio 24
Language 25
Appendices 26
Troubleshooting 26
Page 10

LED & Alarm Definition Listing 30
Replacing and cleaning the dust filters 31
Replacing the Lamp 32
Ceiling Mount Installation 33
Specifications 36
Compatibility modes 38
Regulations and safety notices 40
Page 11

1
Introduction
Product Features
This product is a single-chip DLP® projector. Outstanding features include:
• DLP
• X1161P/X1161PA/X110P/H110P/X1161N series: Native 800 x 600 SVGA
• Acer ColorBoost technology delivers nature's true colors for vivid, life-like
• Acer Spectra Boost technology increases color range by 30%, delivering
• Acer Color Safe technology ensures consistent color rendition over time.
• High brightness and contrast ratio
• Versatile display modes (Standard, Video, Bright, Picture, Game, Education,
• NTSC / PAL / SECAM compatible and HDTV (720p, 1080i, 1080p) supported
®
technology
resolution
X1261P series : Native 1024 x 768 XGA resolution
4:3 / 16:9 aspect ratio supported
images
vivid colors like never before.
Presentation, User) for optimum performance in any situation
English
• Lower power consumption and economy (ECO) mode extends lamp life
• Acer EcoProjeciton Technology delivers Intelligent power management
approach and physical efficiency improvement.
• Empowering Key reveals Acer Empowering Technology utilities (Acer
eView, eTimer, ePower Management) for easy adjustment of settings
• Advanced digital keystone correction optimizes presentations
• Smart detection delivers quick, intelligent source detection.
• Multi-language onscreen display (OSD) menus
• Manual focus projection lens zooms up to 1.1X
• 2X digital zoom and pan move function
• Microsoft
compliant
®
Windows® 2000, XP, Vista®, Windows® 7, Macintosh® OS
Page 12
English
2
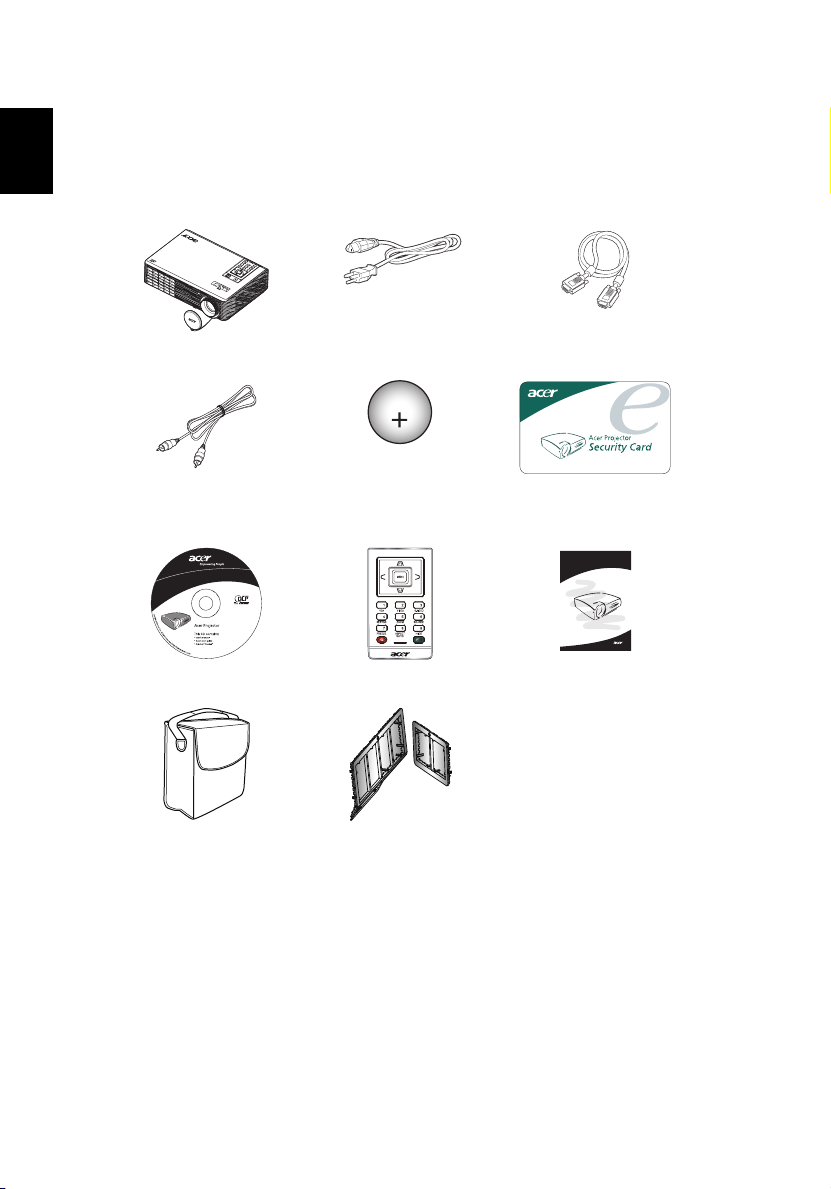
Package Overview
This projector comes with all the items shown below. Check to make sure your
unit is complete. Contact your dealer immediately if any thing is missing.
Projector with lens cap Power cord VGA cable
XXXXXX
3V
Composite video cable
(X1161P/X1261P series)
Battery Security card
User’s guide Remote control Quick start guide
Carrying case
(Optional)
Dust filters
(Optional)
Acer Projector
Quick Start Guide
Page 13
3
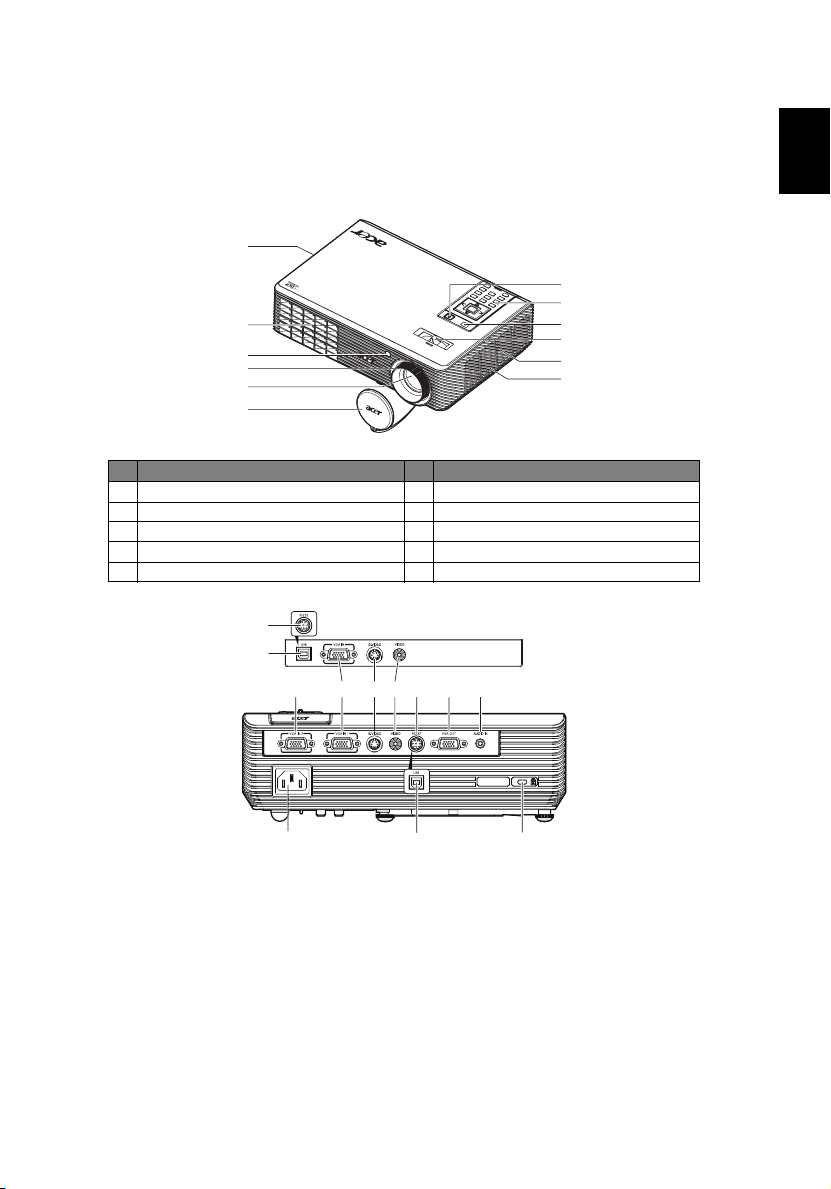
Projector Overview
Projector Outlook
Front / upper side
1
7
8
2
3
4
5
6
# Description # Description
1 Ventilation (inlet) 6 Lens cap
2 Ventilation (outlet) 7 Power button
3 Remote control receivers 8 Remote control
4 Focus ring 9 Zoom lever
5 Zoom lens 10 Horn
Rear side
*
7
10
*
6
345 89
7
3
9
1
10
English
*
1
10
2
Page 14
4
English
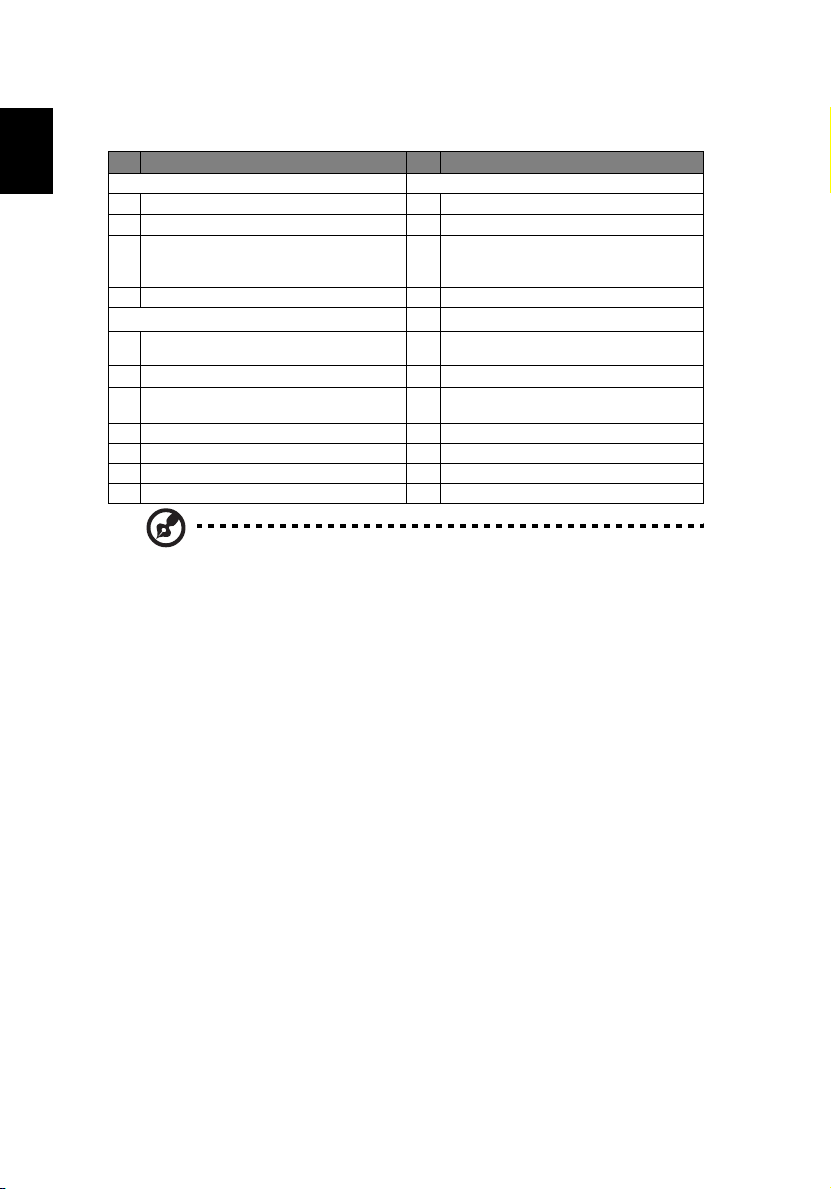
# Description # Description
X1161N Series: X1261P Series:
1 Power socket 1 Power socket
2
Kensington
3
PC analog signal input connector (VGA
In 1 or VGA In)
10 USB connector 4 S-Video input connector
X1161P/X1161PA/X110P/H110P only:
1 Power socket 6*
2
Kensington
PC analog signal/HDTV/component
3
video input connector
4 S-Video input connector 9 Audio input connector
5 Composite video input connector 10* USB connector
7* RS232 connector
10 USB connector
TM
lock port
TM
lock port
2
KensingtonTM lock port
PC analog signal/HDTV/component
3
video input connector (VGA IN 1 or
VGA IN)
5 Composite video input connector
PC analog signal/HDTV/component video input connector (VGA IN 2)
7 RS232 connector
Monitor loop-through output
8
connector (VGA-Out)
Note: "*" Optional.
Page 15
5
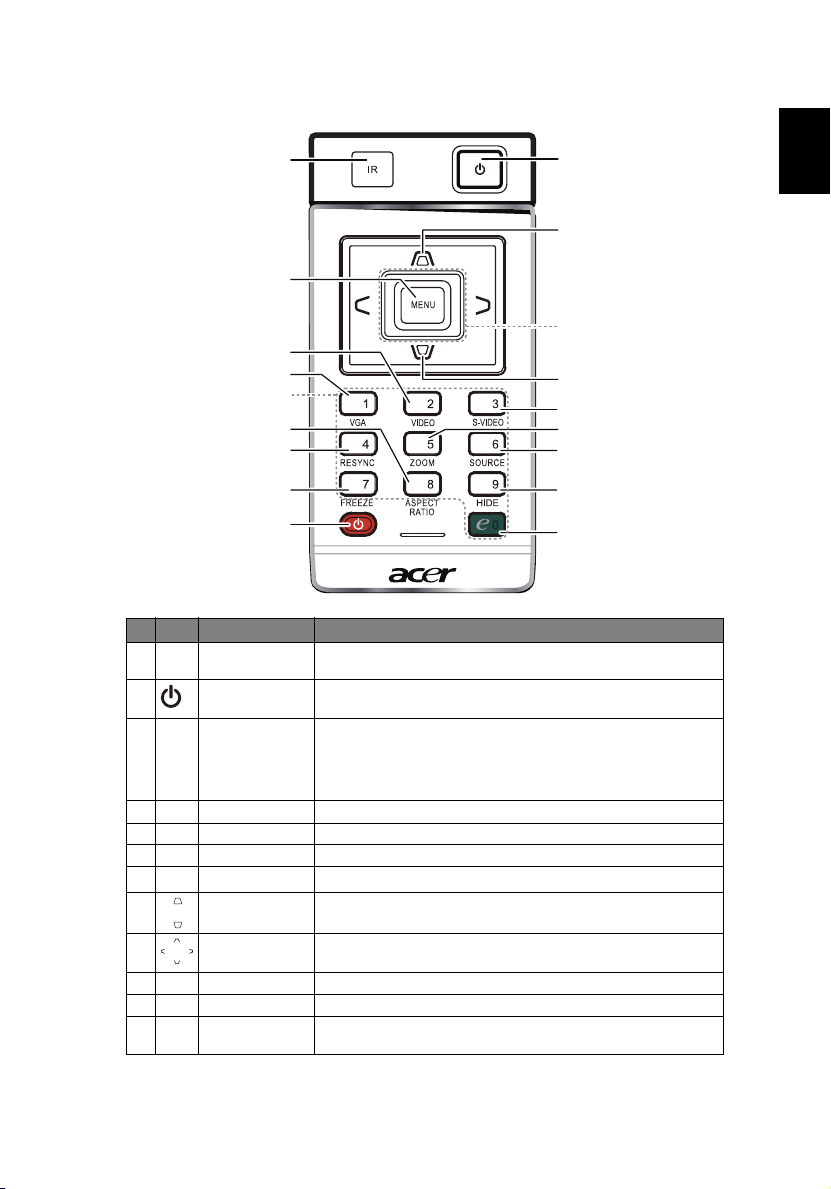
Remote Control and Control Panel Layout
1
3
15
14
4
5
6
7
2
# Icon Function Description
1 Remote control
2 POWER Refer to the "Turning the Projector On/Off" section.
receiver
Receives signals from remote control.
2
8
9
8
16
10
11
12
13
English
3 MENU
• Press "MENU" to launch the Onscreen display (OSD)
menu, back to the previous step for the OSD menu
operation or exit the OSD menu.
• Confirm your selection of items.
4 KeyPad 0~9 Press "0~9" to input a password in the "Security".
5 ASPECT RATIO To choose the desired aspect ratio (Auto/4:3/16:9).
6 RESYNC Automatically synchronizes the projector to the input source.
7
8 KEYSTONE Adjusts the image to compensate for distortion caused by
9 Four directional
10 ZOOM Zooms the projector display in or out.
11 SOURCE Changes the active source.
12 HIDE Momentarily turns off the video. Press "HIDE" to hide the
FREEZE To pause the screen image.
tilting the projector (± 40 degrees).
select keys
Use up, down, left, right buttons to select items or make
adjustments to your selection.
image, press again to display the image.
Page 16
English
6
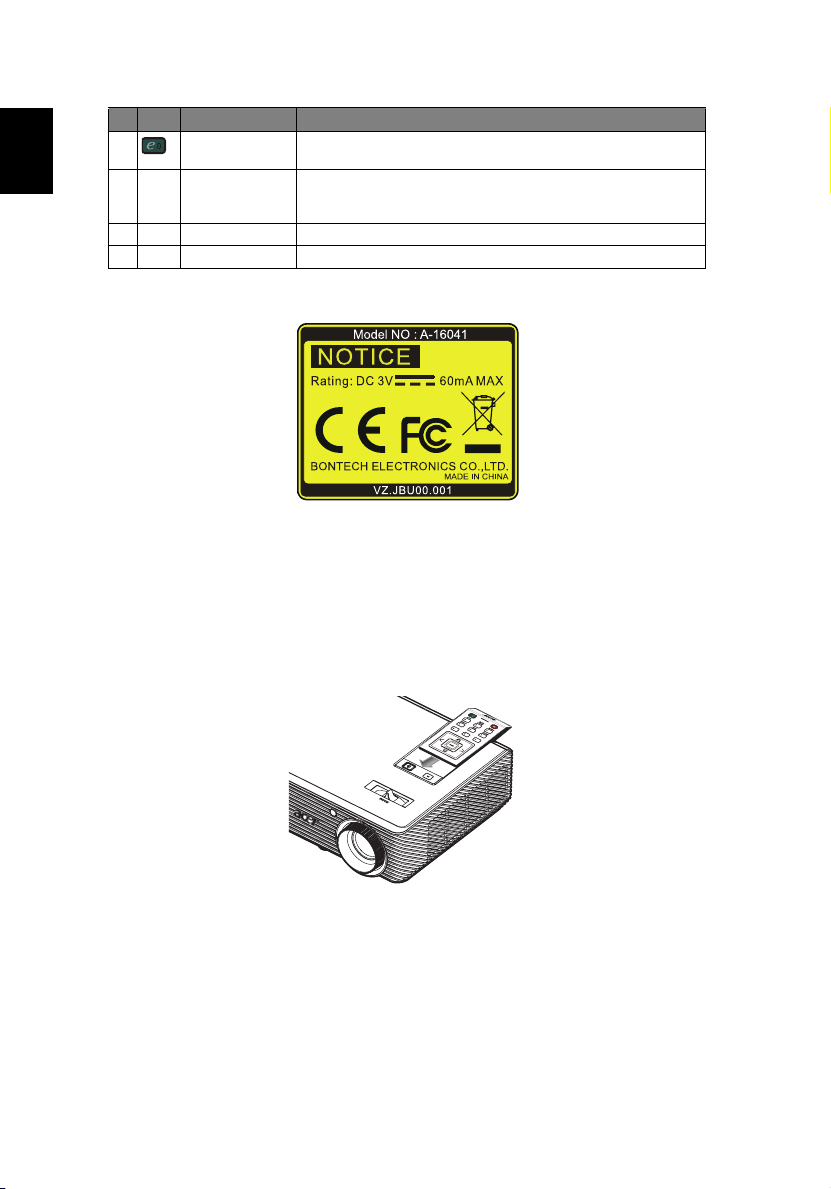
# Icon Function Description
13 Empowering
key
14 VGA Press "VGA" to change source to the VGA connector. This
15 VIDEO Press "VIDEO" to change source to composite video.
16 S-VIDEO Press "S-VIDEO" to change source to S-Video.
Unique Acer functions: eView, eTimer, ePower Management.
connector supports analog RGB, YPbPr (480p/576p/720p/
1080i), YCbCr (480i/576i) and RGBsync.
Note:
Remote Control Placement
Please refer to the illustration to attach the remote control to the projector.
Page 17
7
Getting Started
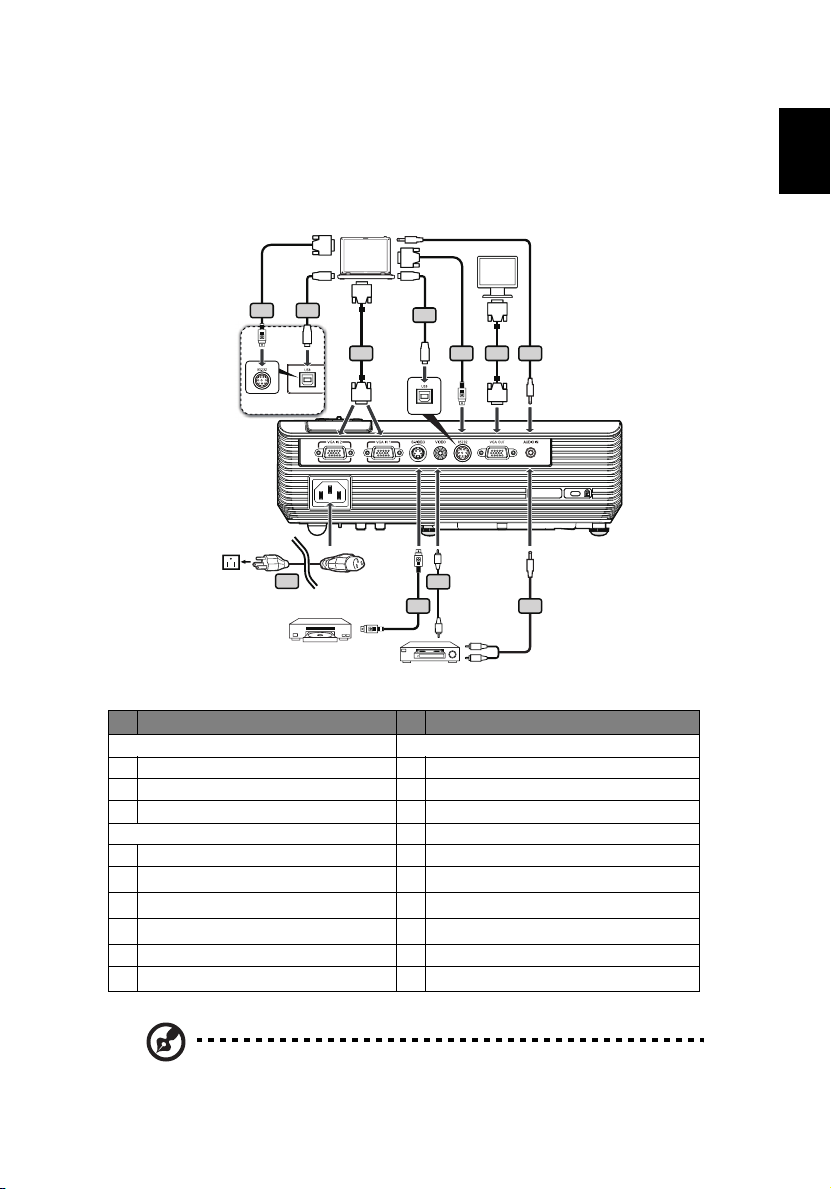
Connecting the Projector
VGA
4
X1161 series
S-Video output
RS232
USB
8
USB
1
D-Sub
2
D-Sub
Video output
RS232
USB
5
English
8
USB
D-Sub
2
4
Y
3
Y
6
D-Sub
7
W
R
# Description # Description
X1161N series: X1261P series:
1Power cord 1Power cord
2 VGA cable 2 VGA cable
8 USB cable 3 Composite video cable
X1161P/X1161PA/X110P/H110P series: 4 RS232 cable
1 Power cord 5 S-Video cable
*
2 VGA cable
3 Composite video cable
5S-Video cable
Audio cable jack/jack
6
*
Audio cable jack/RCA
7
*
USB cable
8
8 USB cable
*
RS232 cable
4
Note: To ensure the projector works well with your computer,
please make sure the timing of the display mode is compatible
with the projector.
Note: "*" Optional.
Page 18
8
Turning the Projector On/Off
English
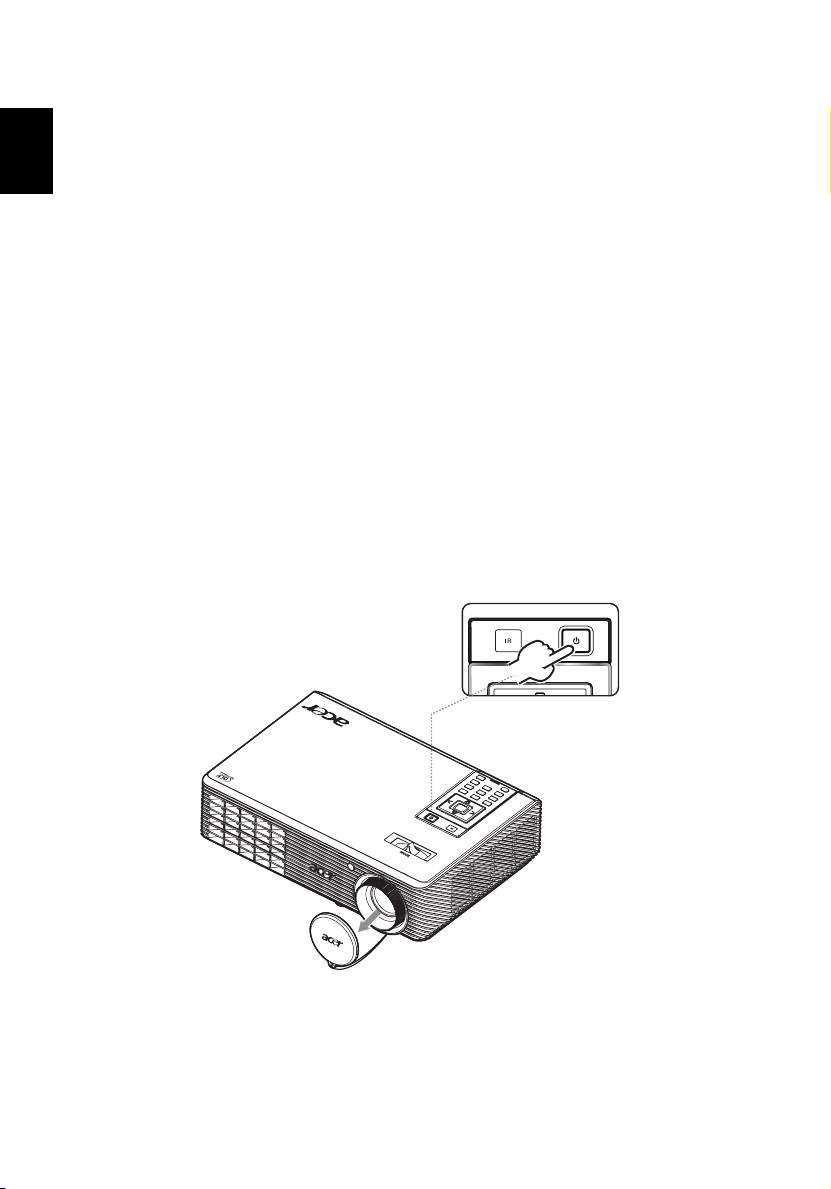
Turning on the Projector
1 Remove the lens cap.(Illustration #1)
2 Ensure that the power cord and signal cable are securely connected. The
Power indicator LED will flash red.
3 Turn on the projector by pressing "Power" button on the control panel,
and the Power indicator LED will turn blue. (Illustration #2)
4 Turn on your source (computer, notebook, video player ,etc.). The
projector will detect your source automatically.
• If the screen displays "Lock" and "Source" icons, it means the
projector is locked onto a specific source type and there is no such
type of input signal detected.
• If the screen displays "No Signal", please make sure the signal cables
are securely connected.
• If you connect to multiple sources at the same time, use the "Source"
button on the remote control to switch between inputs.
Power button
2
1
Lens cap
Page 19
9
Turning the projector off
1 To turn the projector off, press the power button. This message appears:
"Please press the power button again to complete the shutdown process."
Press the power button again.
2 The LED power indicator will turn RED and blink rapidly after the projector
is turned off, and the fan(s) will continue to operate for about 2 minutes to
ensure that the system cools properly.
3 As long as the power cord remains plugged in, you can press the power
button to turn the projector immediately back on anytime during the 2minute shutdown process.
4 Once the system has finished cooling, the LED power indicator will stop
blinking and turn solid red to indicate standby mode.
5 It is now safe to unplug the power cord.
Warning indicators:
• "Projector Overheated. Lamp will automatically turn off soon."
This onscreen message indicates that the projector has overheated.
The lamp with automatically turn off, the projector will automatically
shut down, and the LED temp indicator will turn solid red. Contact
your local dealer or service center.
• "Fan failed. Lamp will automatically turn off soon."
This onscreen message indicates that the fan has failed. The lamp will
automatically turn off, the projector will automatically shut down,
and the LED temp indicator will blink. Contact your local dealer or
service center.
English
Note: Whenever the projector automatically shuts down and the
LED lamp indicator turns solid red, contact your local reseller or
service center.
Page 20
10
Adjusting the Projected Image
English
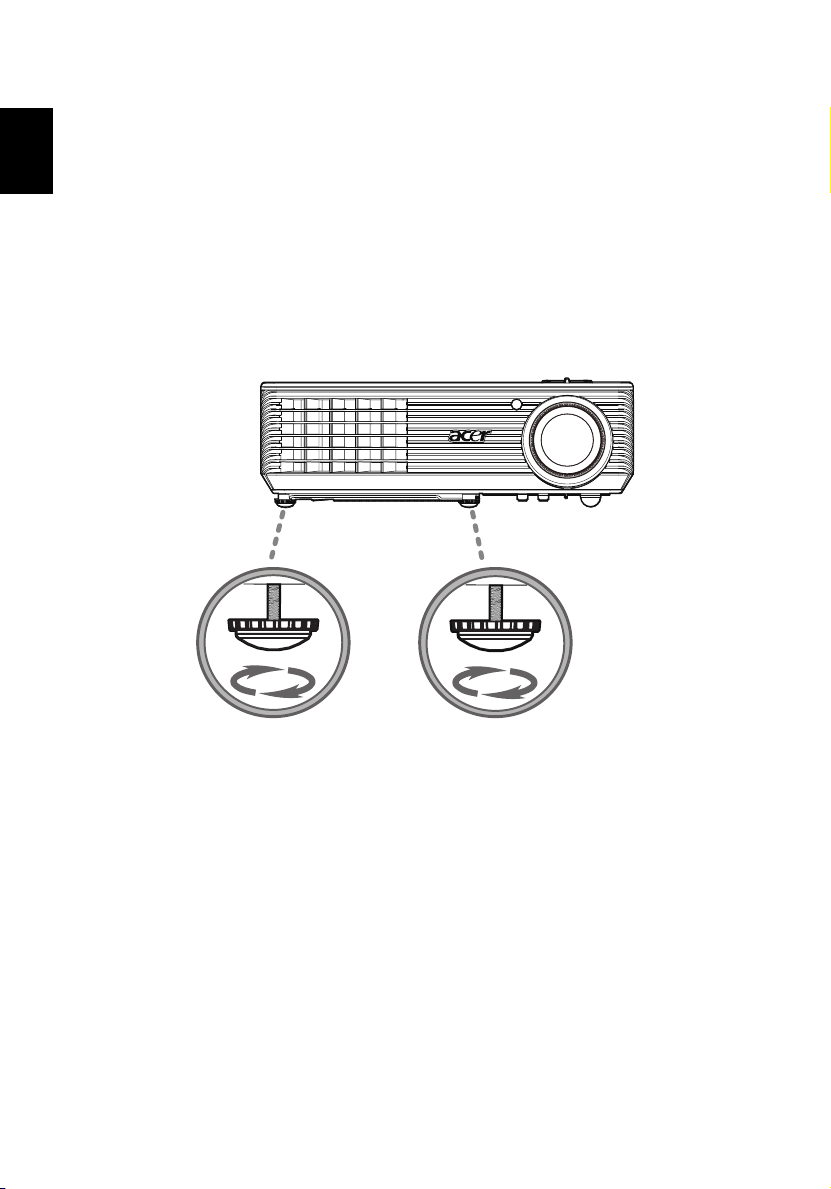
Adjusting the Height of Projected Image
The projector is equipped with elevator feet for adjusting the height of image.
To raise/lower the image:
1 Use Tilt adjusting wheel (Illustration #1) to fine-tune the display angle.
1
Tilt adjusting wheel
Page 21
11
Min screen size
69"
How to optimize image size and distance
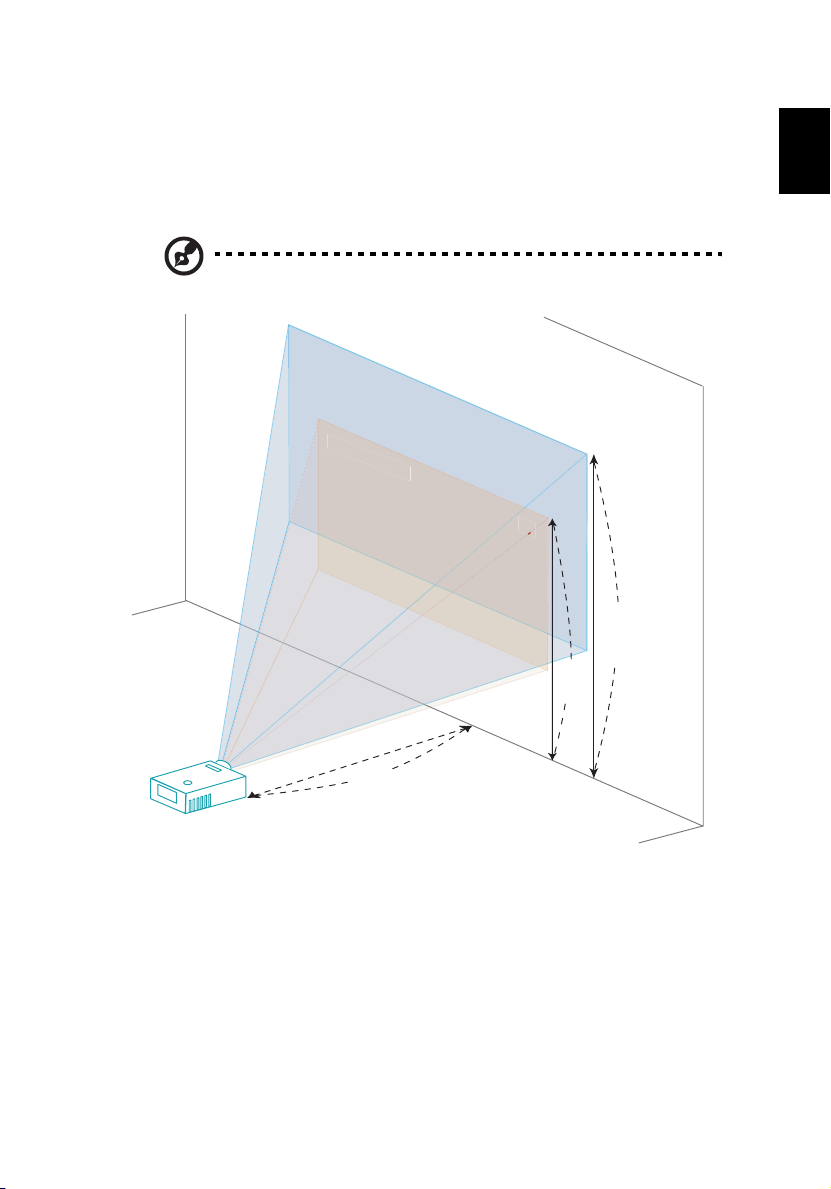
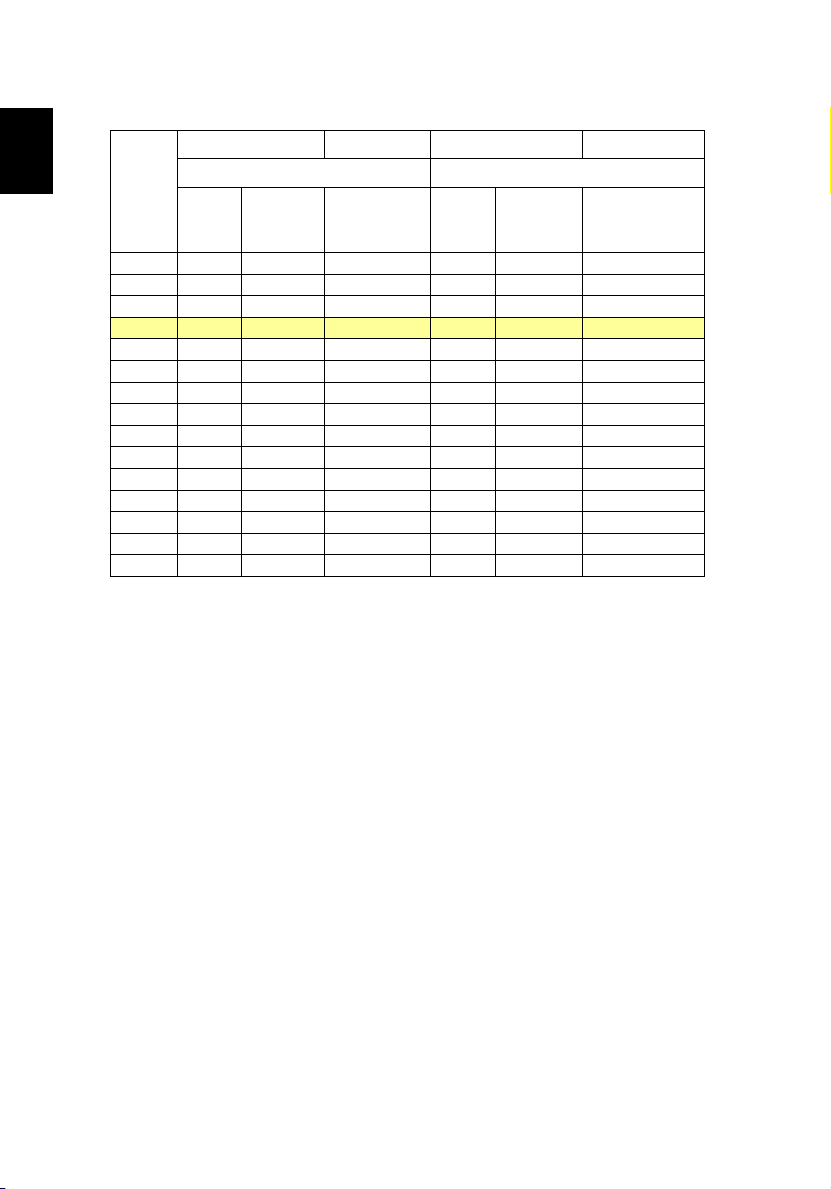
Consult the table below to find the optimal image sizes achievable when the
projector is positioned at a desired distance from the screen. Example: If the
projector is 3 m from the screen, good image quality is possible for image sizes
between 69" and 76".
Note: Remind as below figure, the space of 133 cm height is
required when located at 3m distance.
Max screen size
76"
B
Height: 133cm
Form base to
top of image
Height:
120cm
C
A
3m
Desired Distance
English
Figure: Fixed distance with different zoom and screen size.
Page 22
12
English
Screen size
Desired
Distance
(m)
Diagonal
<A>
Zoom Ratio: 1.1x
(inch)
<B>
1.5 34 70 x 52 60 38 77 x 58 66
2 46 93 x 70 80 50 103 x 77 88
2.5 57 116 x 87 100 63 128 x 96 111
3 69 140 x 105 120 76 154 x 115 133
3.5 80 163 x 122 140 88 179 x 135 155
4 92 186 x 140 160 101 205 x 154 177
4.5 103 209 x 157 181 114 231 x 173 199
5 114 233 x 174 201 126 256 x 192 221
6 137 279 x 209 241 151 308 x 231 265
7 160 326 x 244 281 177 359 x 269 310
8 183 372 x 279 321 202 410 x 308 354
9 206 419 x 314 361 227 462 x 346 398
10 229 465 x 349 401 252 513 x 385 442
11 252 512 x 384 441 278 564 x 423 487
12 275 558 x 419 481 303 615 x 462 531
(Min zoom) (Max zoom)
W (cm) x
H (cm)
Top
From base to
top of image
(cm) <C>
Screen size
Diagonal
(inch)
<B>
W (cm) x
H (cm)
From base to top
Top
of image (cm)
<C>
Page 23
13
How to get a preferred image size by adjusting
distance and zoom
A
50"
Desired
image size
D
Height
Form base to
top of image
2 m
2.2 m
C
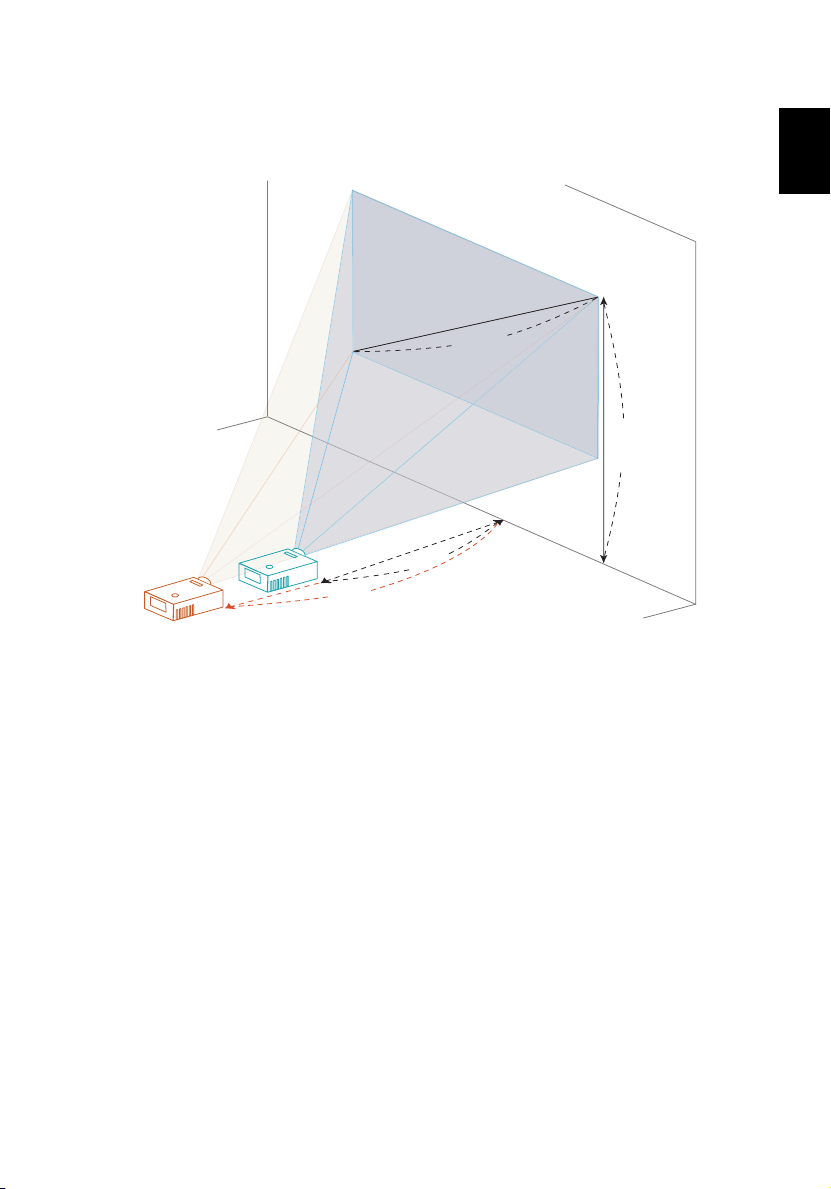
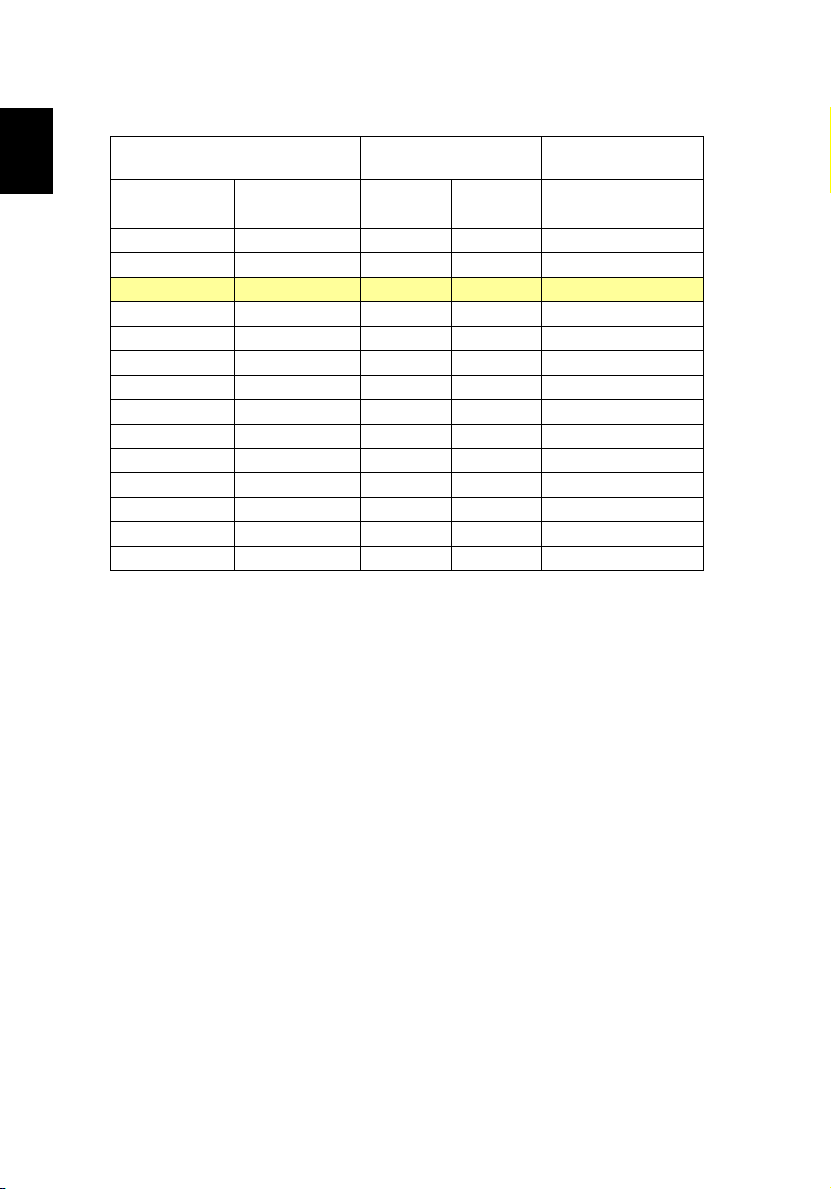
The table below shows how to achieve a desired image size by adjusting either
the position or the zoom ring. Example: to obtain an image size of 50" set the
projector at a distance 2 m and 2.2 m from the screen and adjust the zoom level
accordingly.
B
Desired Distance
English
Page 24
English
14
Desired Image Size Distance (m) Top (cm)
Diagonal (inch)
<A>
30 61 x 46 1.2 1.3 53
40 81 x 61 1.6 1.7 70
50 102 x 76 2.0 2.2 88
60 122 x 91 2.4 2.6 105
70 142 x 107 2.8 3.1 123
80 163 x 122 3.2 3.5 140
90 183 x 137 3.6 3.9 158
100 203 x 152 4.0 4.4 175
120 244 x 183 4.8 5.2 210
150 305 x 229 5.9 6.6 263
180 366 x 274 7.1 7.9 315
200 406 x 305 7.9 8.7 351
250 508 x 381 9.9 10.9 438
300 610 x 457 11.9 526
Zoom Ratio: 1.1x
W (cm) x H (cm)
Max zoom
<B>
Min zoom
<C>
From base to top of
image
<D>
Page 25
15
User Controls
Installation menu
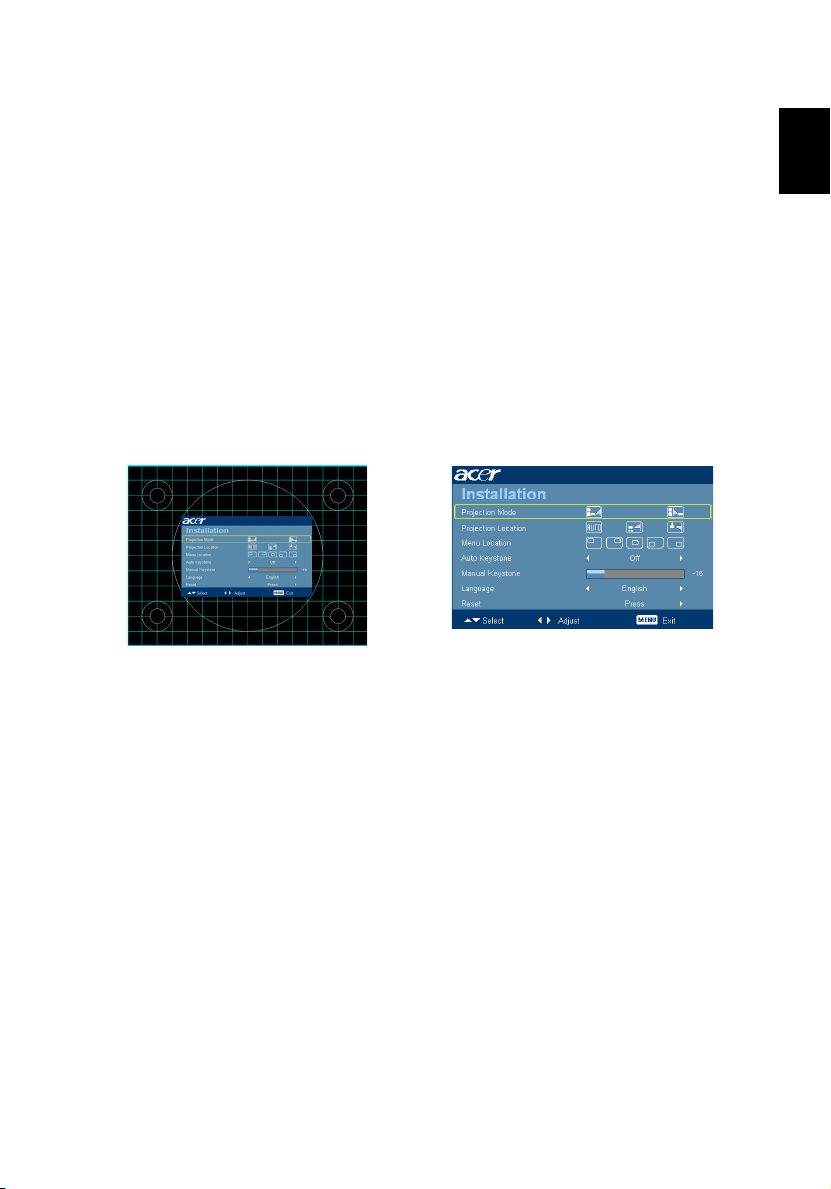
The installation menu provides an onscreen display (OSD) for projector
installation and maintenance. Use the OSD only when the message "No signal
input" is displayed on the screen.
The menu options include settings and adjustments for screen size and distance,
focus, keystone correction and more .
1 Turn on the projector by pressing "Power" button on the control pad.
2 Press the "MENU" button on the control pad to launch the OSD for
projector installation and maintenance.
3 The background pattern acts as a guide to adjusting the calibration and
alignment settings, such as screen size and distance, focus and more .
4 The Installation menu includes the following options:
English
•Projection method
•Projection location
•Menu location
•Keystone settings
•Language settings
•Reset to factory default function
Use the up and down arrow keys to select an option, the left and right
arrow keys to adjust selected option settings, and the right arrow key to
enter a submenu for feature setting. The new settings will be saved
automatically upon exiting the menu.
5 Push the menu button anytime to exit the menu and return to the Acer
welcome screen.
Page 26
16
Acer Empowering Technology
English
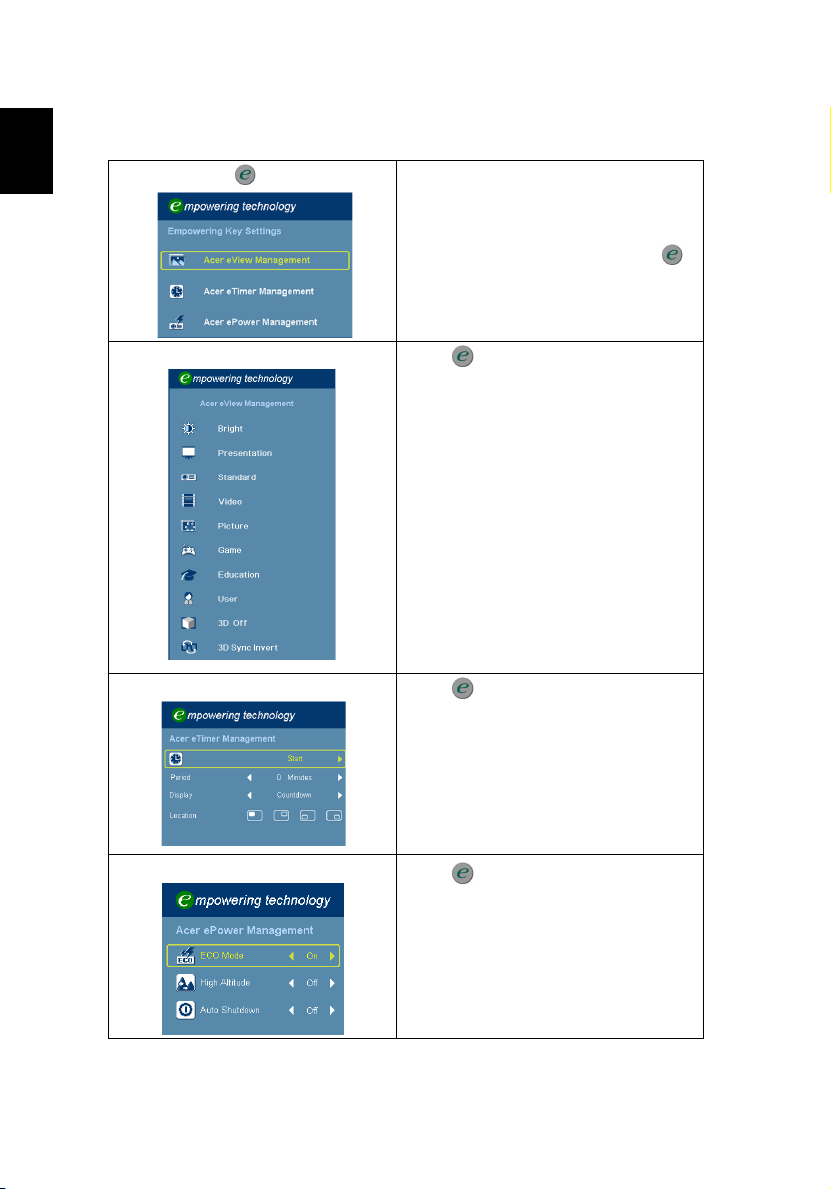
Empowering Key
Acer eView Management
Acer eTimer Management
Acer Empowering Key provide three
Acer unique functions, they are "Acer
eView Management", "Acer eTimer
Management" and "Acer ePower
Management" respectively. Press " "
key for more than one second to launch
the Onscreen display main menu to
modify its function.
Press " " to launch "Acer eView
Management" submenu.
"Acer eView Management" is for
display mode selection. Please refer to
Onscreen Display Menus section for
more detail.
The 3D and 3D Sync Invert functions
offer quick access of 3D functions here.
Press " " to launch "Acer eTimer
Management" submenu.
"Acer eTimer Management" provides
the reminding function for
presentation time control. Please refer
to Onscreen Display Menus section for
more detail.
Acer ePower Management
Press " " to launch "Acer ePower
Management".
"Acer ePower Management" provides
user one shortcut to save lamp and
projector life. Please refer to Onscreen
Display section for more detail.
Page 27
17
Onscreen Display (OSD) Menus
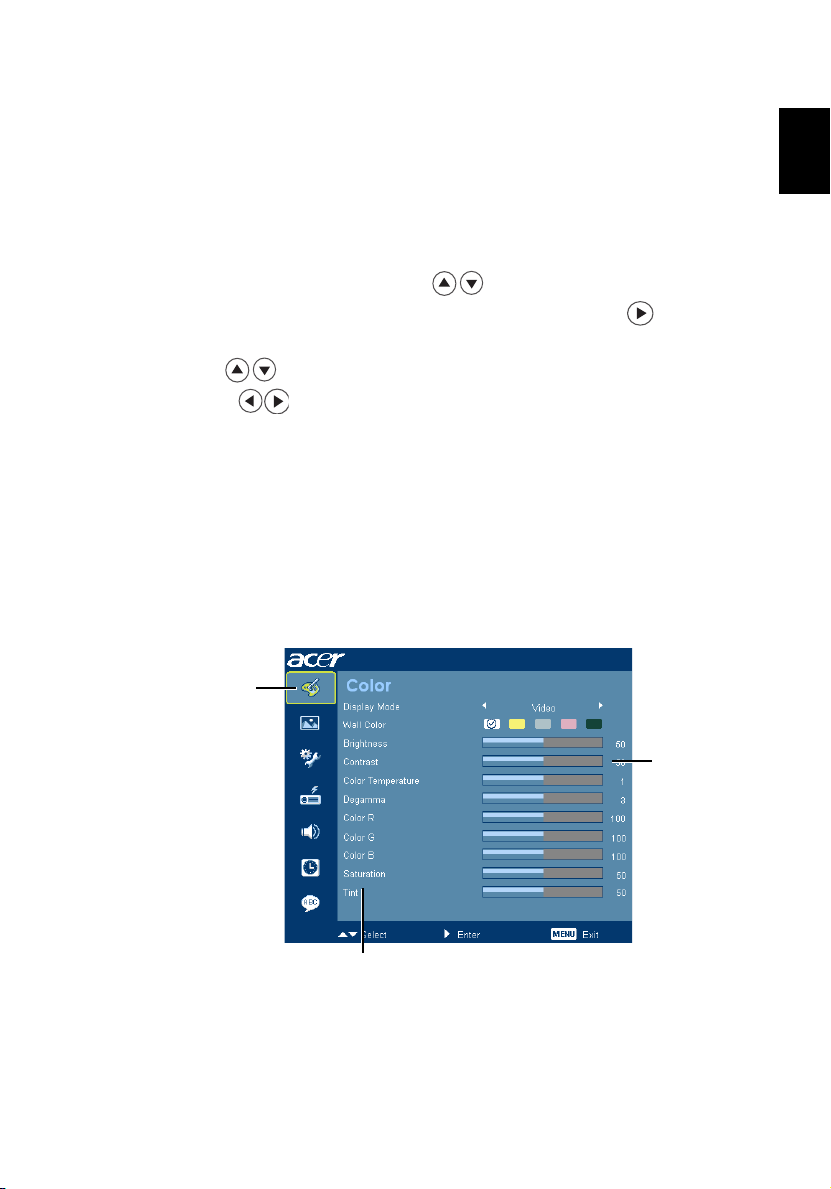
The projector has multilingual OSD that allow you to make image adjustments
and change a variety of settings.
Using the OSD menus
• To open the OSD menu, press "MENU" on the remote control.
• When the OSD is displayed, use the keys to select any item in the
main menu. After selecting the desired main menu item, press to enter
submenu for feature setting.
• Use the keys to select the desired item and adjust the settings by
using the keys.
• Select the next item to be adjusted in the submenu and adjust as described
above.
• Press "MENU" on the remote control, the screen will return to the main
menu.
• To exit OSD, press "MENU" on the remote control again. The OSD menu
will close and the projector will automatically save the new settings.
Main menu
English
Sub menu
Setting
Page 28
English
18
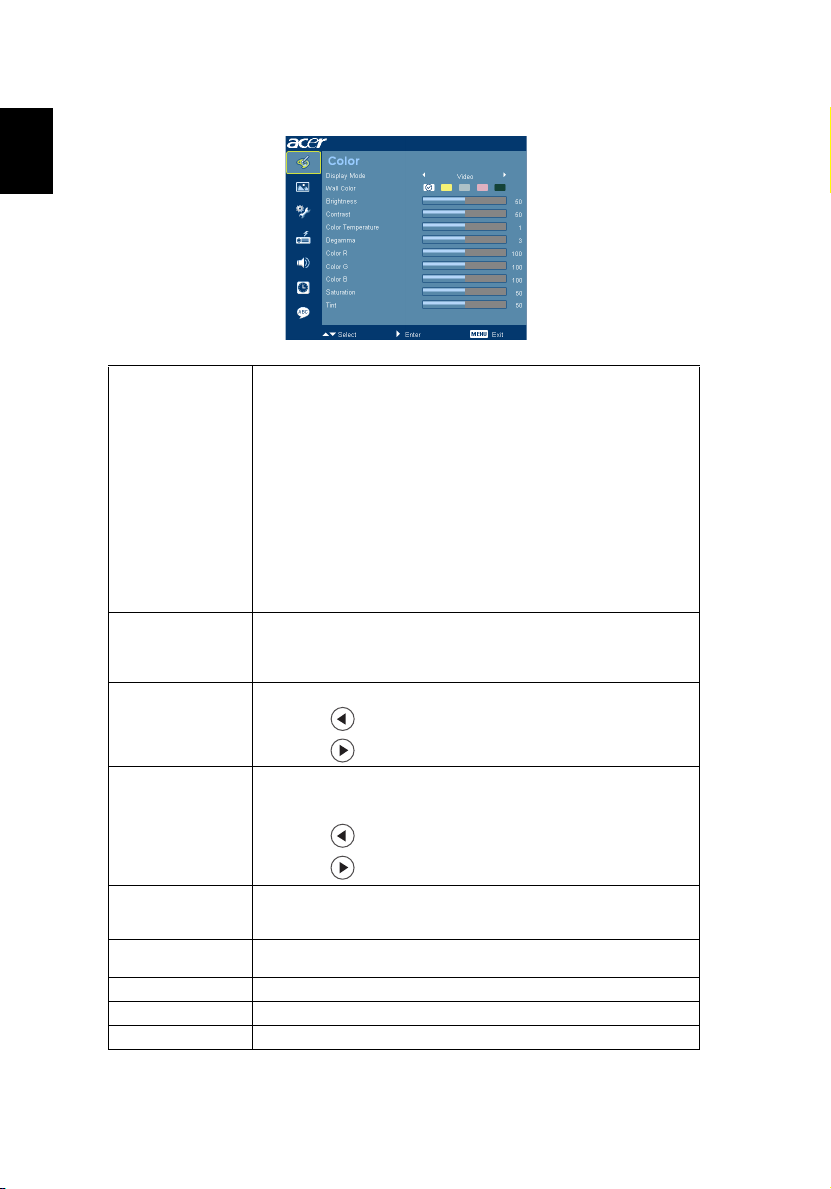
Color
Display Mode
Wall color
Brightness
Contrast
Color
Temperature
Degamma
Color R
Color G
Color B
There are many factory presets optimized for various types of
images.
• Bright: For brightness optimization.
• Presentation: For meeting presentation with higher
brightness.
• Standard: For common environment.
• Video: For playing video in a bright environment.
• Picture: For graphic picture.
• Game: For game content.
• Education: For education environment.
• User: Memorize user’s settings.
Use this function to choose a proper color according to the wall.
There are several choices, including white, light yellow, light blue,
pink, dark green. It will compensate the color deviation due to the
wall color to show the correct image tone.
Adjust the brightness of the image.
• Press to darken image.
• Press to lighten the image.
"Contrast" controls the difference between the lightest and
darkest parts of the picture. Adjusting the contrast changes the
amount of black and white in the image.
• Press to decrease the contrast.
• Press to increase the contrast.
Adjust the color temperature. At higher color temperatures, the
screen looks colder; at lower color temperatures, the screen looks
warmer.
Effects the representation of dark scenery. With greater gamma
value, dark scenery will look brighter.
Adjusts the red color.
Adjusts the green color.
Adjusts the blue color.
Page 29
19
Saturation
Tint
Image
Adjusts a video image from black and white to fully saturated
color.
• Press to decrease the amount of color in the image.
• Press to increase the amount of color in the image.
Adjusts the color balance of red and green.
• Press to increase the amount of green in the image.
• Press to increase the amount of red in the image.
Note: "Saturation" and "Tint" functions are not supported under computer
mode or DVI mode.
English
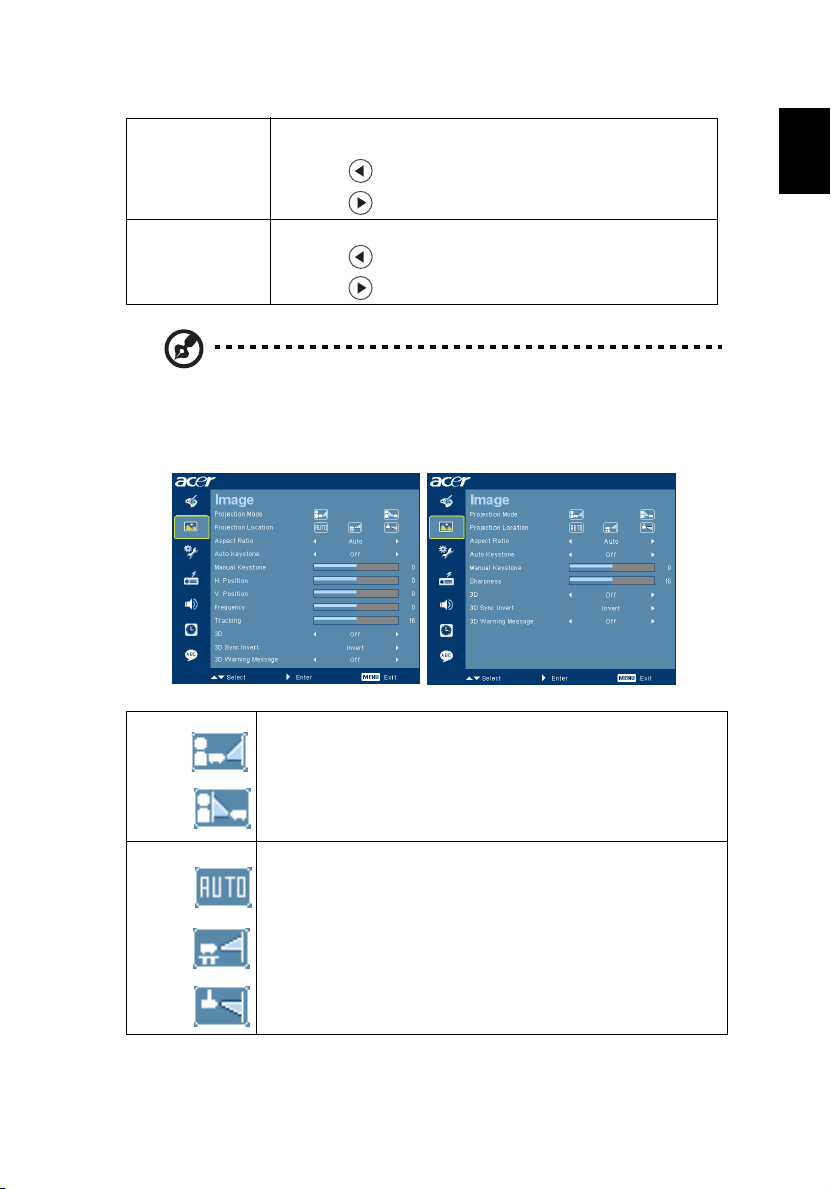
Projection mode
Projection Location
• Front: The factory default setting.
• Rear: Reverses the image so you can project from behind a
translucent screen.
• Auto: Automatically adjusts projection location of image.
• Desktop
• Ceiling: Turns the image upside down for ceiling-mounted
projection.
Page 30
20
English
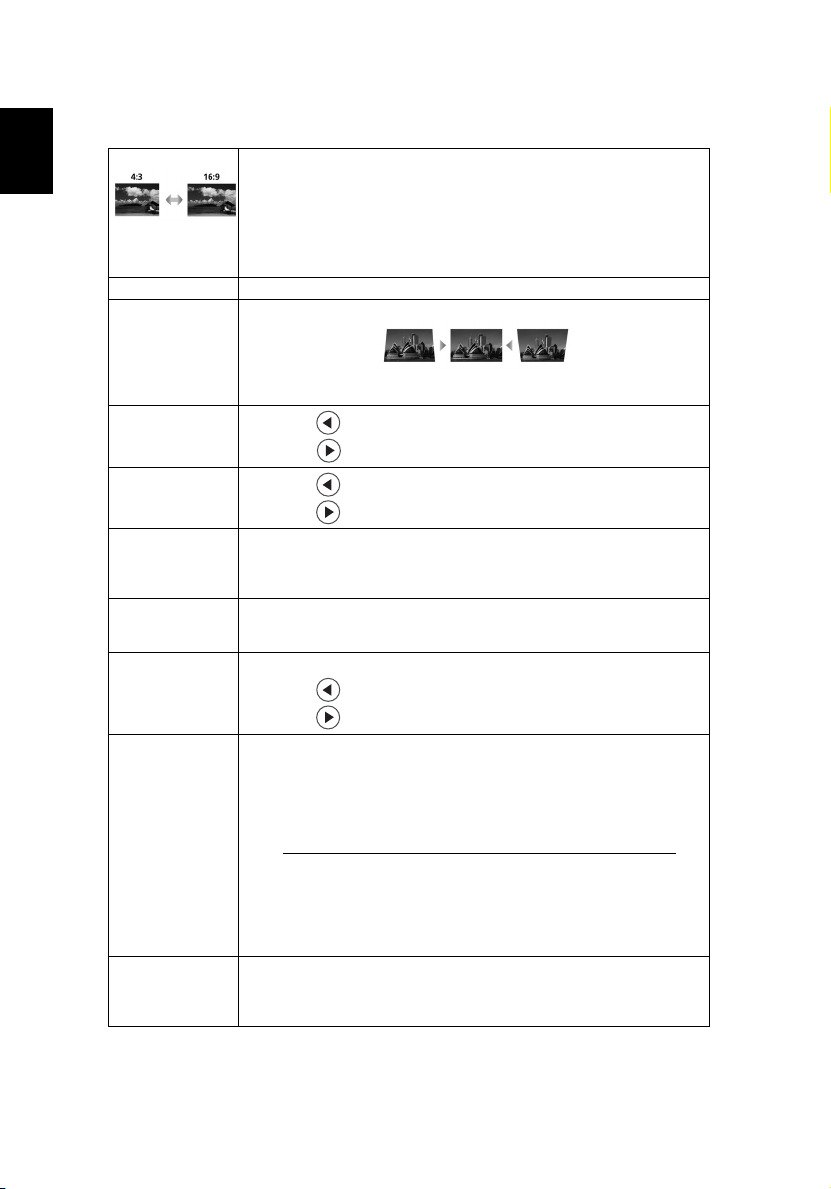
Aspect Ratio
Use this function to choose your desired aspect ratio.
• Auto: Keep the image with original width-higth ratio and maxi
• 4:3: The image will be scaled to fit the screen and displayed using
mize the image to fit native horizontal or vertical pixels.
• 16:9: The image will be scaled to fit the width of the screen and
a 4:3 ratio.
the height adjusted to display the image using a 16:9 ratio.
Auto Keystone Automatically adjusts vertical image.
Manual Keystone Adjust image distortion caused by tilting projection. (±40 degrees)
<Note> The Manual Keystone funcion is unavailable under Auto
Keystone setting to "On".
H. Position
(Horizontal
position)
V. Position
(Vertical position)
• Press to move the image left.
• Press to to move the image right.
• Press to move the image down.
• Press to move the image up.
Frequency "Frequency" changes the projector's refresh rate to match the
Tracking Synchronizes the signal timing of the projector with the graphics card.
Sharpeness Adjusts the sharpness of the image.
frequency of your computer’s graphics card. If you can see a vertical
flickering bar in the projected image, use this function to make the
necessary adjustments.
If you experience an unstable or flickering image, use this function to
correct it.
• Press to decrease the sharpness.
• Press to increase the sharpness.
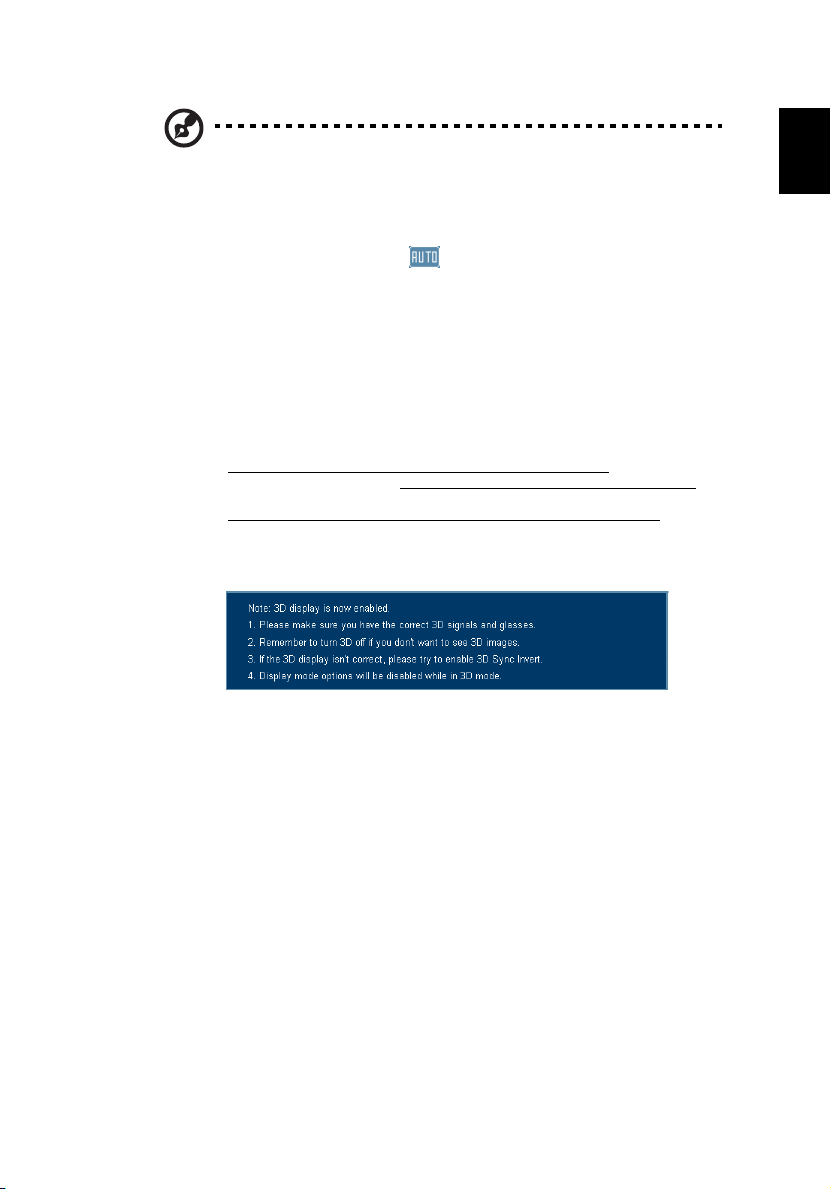
3D Choose "NVIDIA 3D Vision" or "DLP 3D" to enable 3D function
supported by NVIDIA or TI DLP 3D technology.
• NVIDIA 3D Vision: This is only supported on X1261P. Choose this
item while using NVIDIA 3D glasses, IR emitter, NVIDIA graphic
card and NVIDIA compliant 3D games or 3D movie with
corresponding SW player. Please visit NVIDIA URL
(http://www.nvidia.com/object 3D_Vision_Requirements.html
check detail system configuration.
) to
• DLP 3D: Choose this item while using DLP 3D glasses, quad buffer
(NVIDIA/ATI...) graphic card and HQFS format file or DVD with
corresponding SW player.
• Off: Turn off 3D mode.
3D Sync Invert If you see a discrete or overlapping image while wearing DLP 3D
glasses, you may need to execute "Invert" to get best match of left/
right image sequence to get the correct image (for DLP 3D). This
function is only available while DLP 3D is selected.
Page 31
Note: "H. Position", "V. Position", "Frequency" and "Tracking" functions
are not supported under DVI or Video mode.
Note: "Sharpness" functions is not supported under DVI and Computer
mode.
Note: "Auto Keystone" functions is not supported in X1161PA/X110P/
H110P/X1161N.
Note: "Projection Location--> " functions is not supported in X1161PA/
X110P/H110P/X1161N.
Note: 3D function is supported by VGA source only. Please see timing table
for detail 3D timings.
Note: While using NVIDIA 3D Vision, please download and install latest
NVIDIA 3D VISION driver from NVIDIA web site for your graphic card to
support this projector.
Note: It needs correct settings on graphic card 3D application program for
correct 3D display.
Note: The SW players, such as Stereoscopic Player and DDD TriDef Media
Player can support 3D format files. You can download these three players
on web page below,
- NVIDIA Stereoscopic 3D Video Player:
http://www.nvidia.com/object/3D_Drivers_Downloads.html
- Stereoscopic Player (Trial): http://www.3dtv.at/Downloads/Index_en.aspx
- DDD TriDef Media Player (Trial):
http://www.tridef.com/download/TriDef-3-D-Experience-4.0.2.html
Note: "3D Sync Invert" is only available when DLP 3D is enabled.
Note: There has reminder screen if 3D still enable when power on projector.
Please adjust setting depended on your purpose.
21
English
Page 32
English
22
Setting
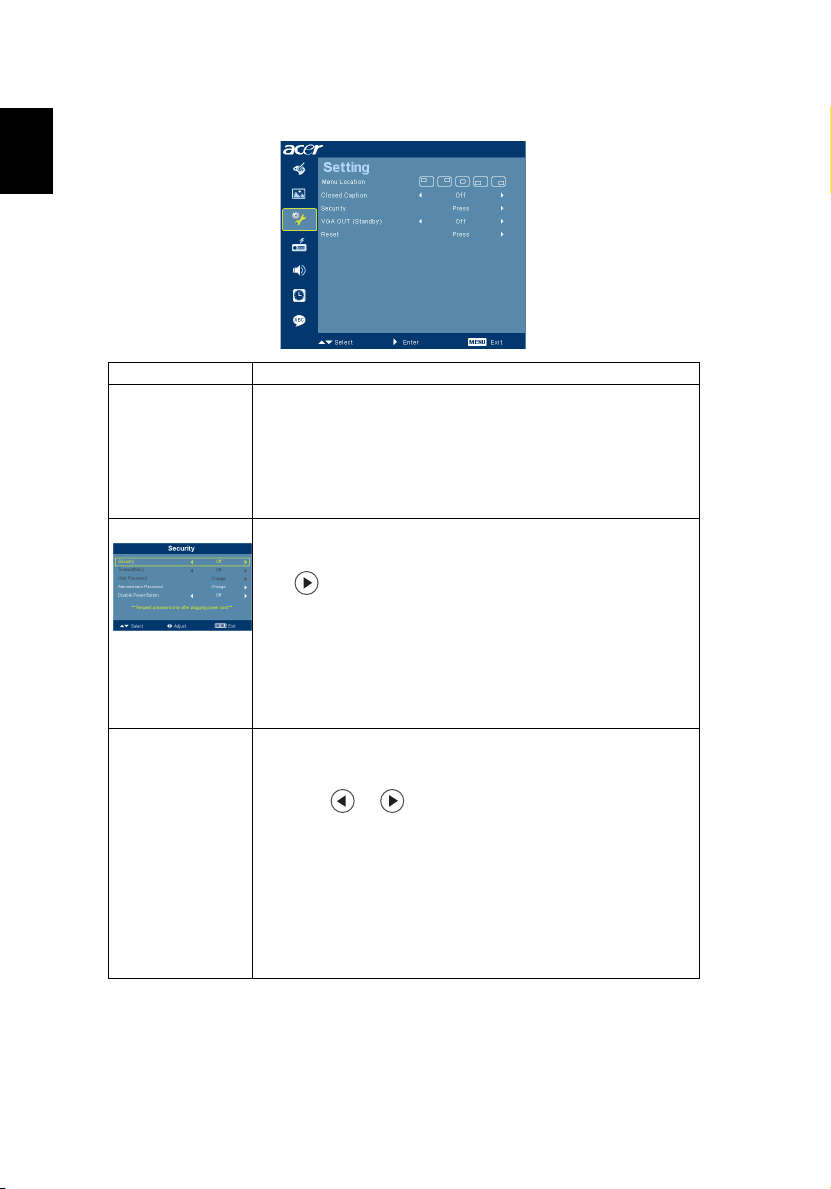
Menu Location Choose the menu location on the display screen.
Closed Caption Selects a preferred closed captioning mode from CC1, CC2, CC3,
Security Security
CC4, (CC1 displays captions in the primary language in your area).
Select "Off" to turn off the captioning feature. This function is only
available when a composite video or S-Video input signal is
selected and its system format is NTSC.
<Note> Denne funksjonen er ikke tilgjengelig når
bildesideforholdet er "16:9" eller et 16:9-format er registrert under
"Auto mode" (Auto-modus).
This projector provides a useful security function for the
administrator to manage usage of the projector .
Press to change the "Security" setting. If the security function
is enabled, your must enter the "Administrator Password" first
before changing the security settings.
• Select "On" to enable the security function. The user has to
enter a password to operate the projector. Please refer to the
"User Password" section for details.
• If "Off" is selected, then the user can turn on the projector
without password.
Timeout(Min.)
Once "Security" is activated to "On", the administrator can set
timeout function.
• Press or to select the timeout interval.
• The range is from 10 minute to 990 minutes.
• When the time is up, the projector will prompt the user to
enter the password again.
• The factory default setting of "Timeout(Min.)" is "Off".
• Once the security function is enabled, the projector will
request user to enter password when switch on the projector .
Both "User Password" and "Administrator Password" can be
accepted for this dialogue.
Page 33
23
VGA OUT (Standby)
Reset
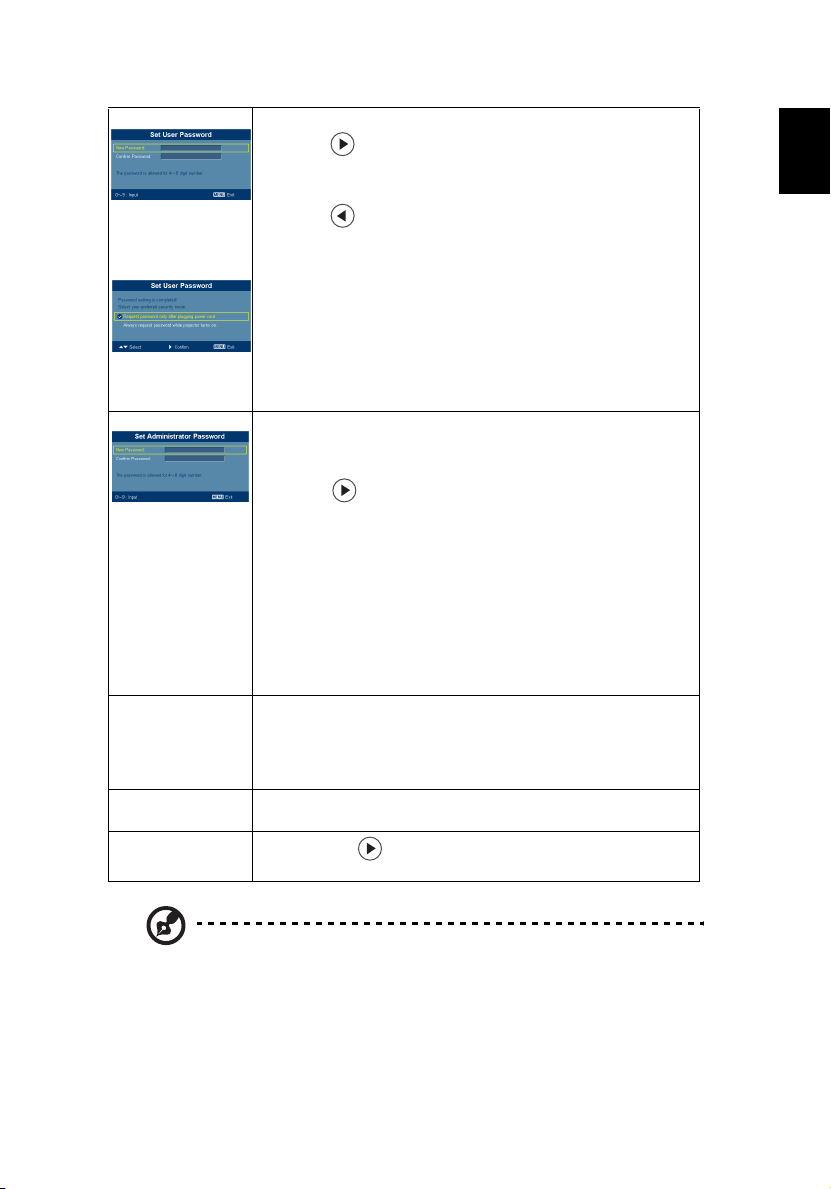
User password
• Press to setup or change the "User Password".
• Press number keys to set your password on the remote control
and press "MENU" to confirm.
• Press to delete character.
• Enter the password when you see "Confirm Password"
displayed.
• The password should be between 4 and 8 characters long.
• If you select "Request password only after plugging power
cord", the projector will prompt the user to enter the
password every time the power cord is plugged.
• If you select "Always request password while projector turns
on", the user has to enter the password every time when the
projector is turned on.
Administrator Password
The "Administrator Password" can be used in both the "Enter
Administrator Password" and "Enter Password" dialog boxes.
• Press to change the "Administrator Password".
• The factory default of "Administrator Password" is "1234".
If you forgot your administrator password, do the following to
retrieve the administrator password:
• An unique 6-digit "Universal Password" which is printed on
the Security Card (please check accessory in the box). This
unique password is the number which will be accepted by
projector anytime no matter what the Administrator
Password is.
• If losing this security card and number, please contact with an
Acer service center.
Disable Power button
• When "ON" is selected, only the Power Key on the remote
control can be used. If "OFF" is selected, then the Power Key
on either the remote control or the control panel can be used
to control the projector.
• Default is "Off". Choose "On" to enable VGA OUT
connection.
• Press the button and choose "Yes" to return the
parameters on all menus to the factory default settings.
English
Note: "Closed Caption" functions is not supported in X1161N.
Note: "VGA OUT (Standby)" function is supported in X1261P.
Page 34
English
24
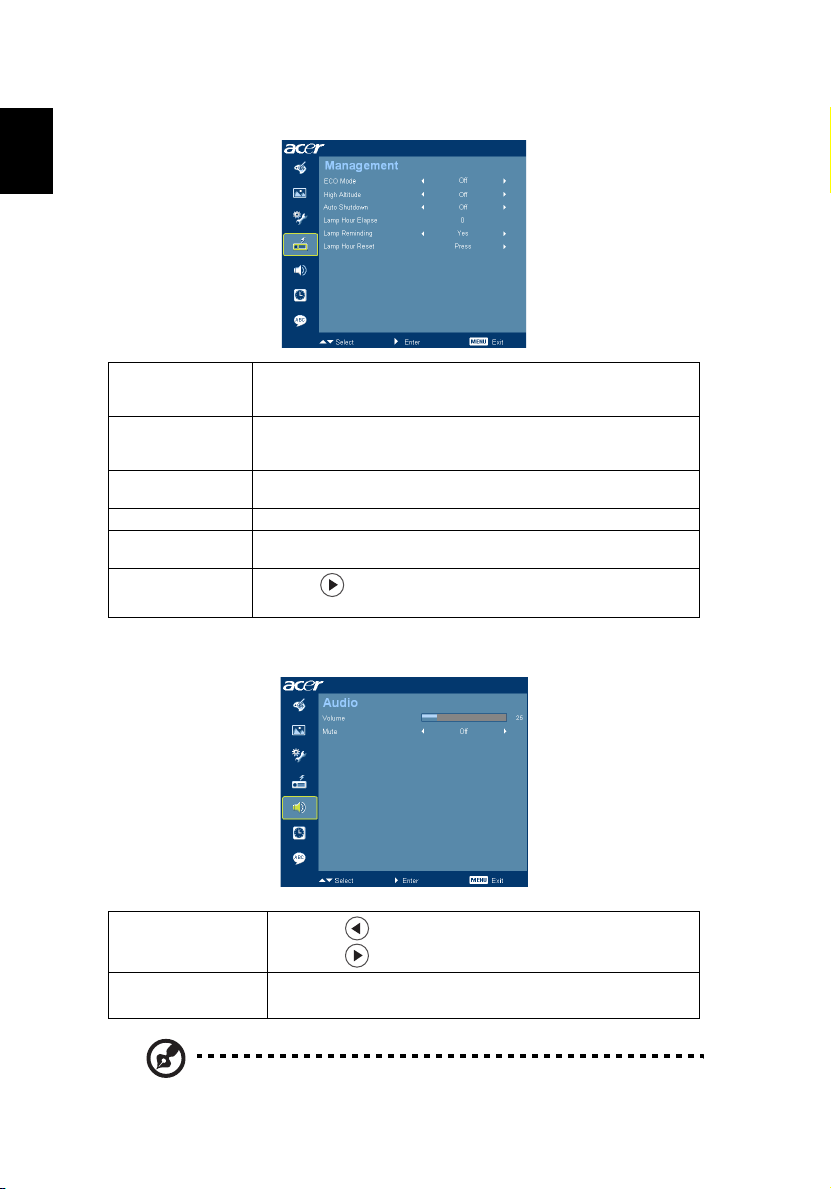
Management
ECO Mode
High Altitutde
Auto Shutdown The projector will automatically shutdown when there is no signal
Lamp Hour Elapse Displays the lamp’s elapsed operating time (in hours).
Lamp Reminding Activate this function to display a reminder to change the lamp 30
Lamp Hour Reset
Choose "On" to dim the projector lamp which will lower power
consumption, extend the lamp life and reduce noise. Choose "Off"
to return normal mode.
Choose "On" to turn on High Altitude mode. Operate the fans at
full speed continuously to allow for proper high altitude cooling of
the projector.
input after the allocated time. (in minutes)
hours before its expected end-of-life.
Press the button and choose "Yes" to turn the lamp hour
counter to 0 hours.
Audio
Volume
Mute
• Press to decrease the volume.
• Press to increase the volume.
• Choose "On" to mute the volume.
• Choose "Off" to restore the volume.
Note: Audio menu is for X1261P series.
Page 35
25
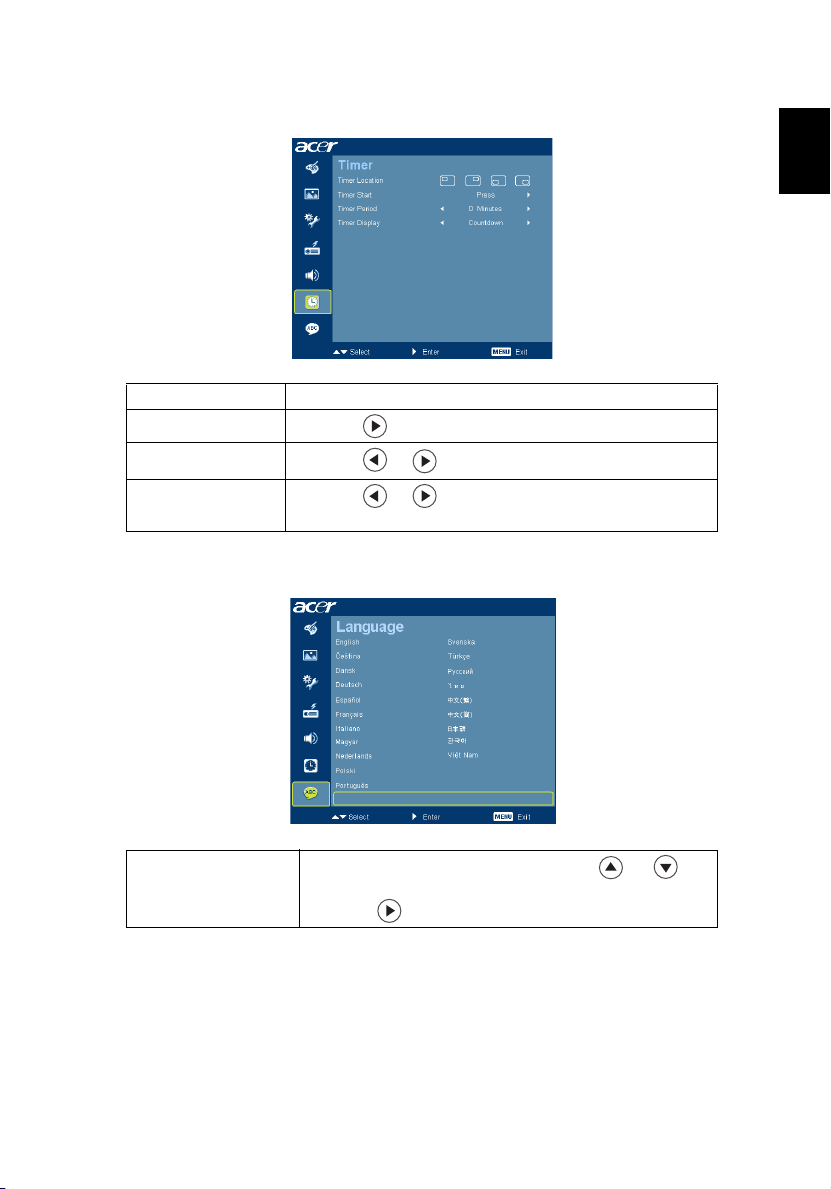
Timer
Timer Location
Timer Start
Timer Period
Timer Display
Language
English
• Choose the location of the timer on the screen.
• Press to start or stop the timer.
• Press or to adjust the timer period.
• Press or to which timer mode to display on the
screen.
Language
Choose the multilingual OSD menu. Use the or key
to select your preferred menu language.
• Press to confirm the selection.
Page 36
26
Appendices
English
Troubleshooting
If you experience a problem with your Acer projector, refer to the following
troubleshooting guide. If the problem persists, please contact your local reseller
or service center.
Image Problems and Solutions
# Problem Solution
1 No image appears
onscreen
2 Partial, scrolling
or incorrectly
displayed
image(For PC
(Windows 95/98/
2000/XP))
• Connected as described in the "Getting Started"
section.
• Ensure none of the connector pins are bent or
broken.
• Check if the projector lamp has been securely
installed. Please refer to the "Replacing the Lamp"
section.
• Make sure you have removed the lens cap and the
projector is switched on.
•
Press "
RESYNC
" on the remote control.
• For an incorrectly displayed image:
• Open "My Computer," open the "Control
Panel," and then double-click the "Display"
icon.
• Select the "Settings" tab.
• Verify that your display resolution setting is
lower than or equal to UXGA (1600 x 1200).
• Click the "Advanced Properties" button.
If the problem still appears, change the monitor display
you are using and follow the steps below:
• Verify that the resolution setting is lower than
or equal to UXGA (1600 x 1200).
• Click the "Change" button under the
"Monitor" tab.
• Click "Show all devices". Next, select "Standard
monitor types" under the SP box, and choose
the resolution mode you need under the
"Models" box.
• Verify that the resolution setting of the
monitor display is lower than or equal to UXGA
(1600 x 1200).
Page 37
27
3 Partial, scrolling
or incorrectly
displayed image
(For notebooks)
4 The screen of the
notebook
computer is not
displaying your
presentation
5 Image is unstable
or flickering
6 Image has vertical
flickering bar
• Press "RESYNC" on the remote control.
• For an incorrectly displayed image:
• Follow the steps for item 2 (above) to adjust
the resolution of your computer.
• Press the toggle output settings. Example:
[Fn]+[F4], Compaq [Fn]+[F4], Dell [Fn]+[F8],
Gateway [Fn]+[F4], IBM [Fn]+[F7], HP
[Fn]+[F4], NEC [Fn]+[F3], Toshiba [Fn]+[F5 ]
• If you experience difficulty changing resolutions or
your monitor freezes, restart all equipment
including the projector.
• If you are using a Microsoft
notebook: Some notebook PCs may deactivate their
own screens when a second display device is in use.
Each has a different way to be reactivated. Refer to
your computer's manual for detailed information.
• If you are using an Apple
notebook: In System Preferences, open Display and
select Video Mirroring "On".
®
Windows® based
®
Mac® OS based
• Adjust the "Tracking" to correct it. Refer to the
"Image" section for more information.
• Change the display color depth settings on your
computer.
• Use "Frequency" to make an adjustment. Refer to
the "Image" section for more information.
• Check and reconfigure the display mode of your
graphics card to make it compatible with the
projector.
English
7 Image is out of
focus
8 Image is stretched
when displaying a
"widescreen"
DVD title
• Make sure the lens cap is removed.
• Adjusts the focus ring on the projector lens.
• Make sure the projection screen is within the
required distance of 3.3 to 39.4 feet (1.0 to 12.0
meters) from the projector. Refer to the "How to
Get a Preferred Image Size by Adjusting Distance
and Zoom" section for more information.
When you play a DVD encoded in anamorphic or 16:9
aspect ratio you may need to adjust the following
settings:
• If you play a 4:3 format DVD title, please change the
format to 4:3 in the projector OSD.
• If the image is still stretched, you will also need to
adjust the aspect ratio. Set up the display format to
16:9 (wide) aspect ratio on your DVD player.
Page 38
28
English
9 Image is too small
or too large
• Adjust the zoom lever on the front of the projector.
• Move the projector closer to or further from the
screen.
• Press "MENU" on the remote control. Go to "Image
--> Aspect Ratio" and try different settings or
press"Aspect Ratio" on the remote control to adjust
directly.
10 Image has slanted
sides
• If possible, reposition the projector so that it is
centered on the screen.
• Press the "Keystone / " button on the remote
control until the sides are vertical.
• Press "MENU" on the remote control. Go to "Image -
-> Auto Keystone" and choose "Off" on the OSD, if
"Keystone" button is not available on the remote
control.
11 Image is reversed
• Select "Image --> Projection" on the OSD and adjust
the projection direction.
Problems with the Projector
# Condition Solution
1 The projector stops responding
to all controls
2 Lamp burns out or makes a
popping sound
If possible, turn off the projector, then
unplug the power cord and wait at least 30
seconds before reconnecting power.
When the lamp reaches the end of its useful
life, it will burn out and may make a loud
popping sound. If this happens, the projector
will not turn on until the lamp module has
been replaced. To replace the lamp, follow
the procedures in the "Replacing the Lamp"
section.
Page 39
29
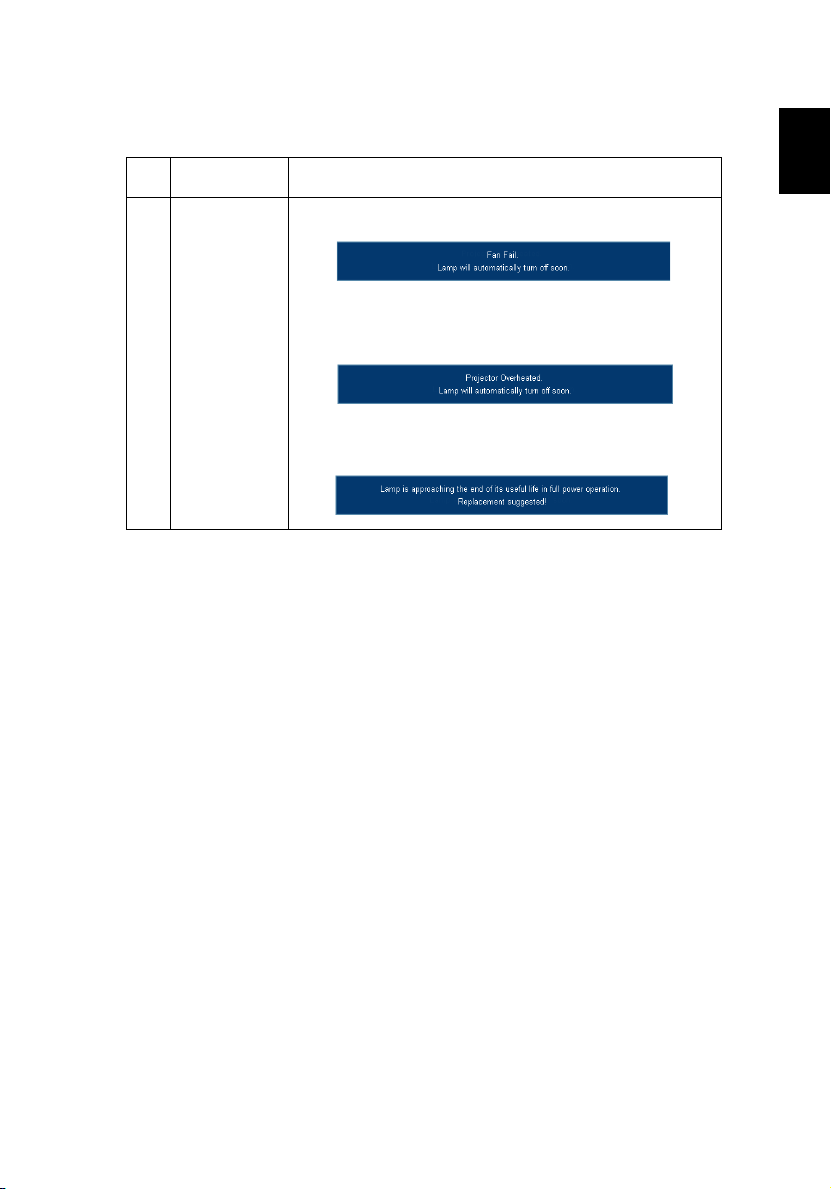
OSD Messages
# Condition Message Reminder
1 Message Fan Fail - the system fan is not working.
Projector Overheated - the projector has exceeded its
recommended operating temperature and must be allowed to
cool down before it may be used.
Replace the lamp - the lamp is about to reach its maximum
lifetime. Prepare to replace it soon.
English
Page 40
30
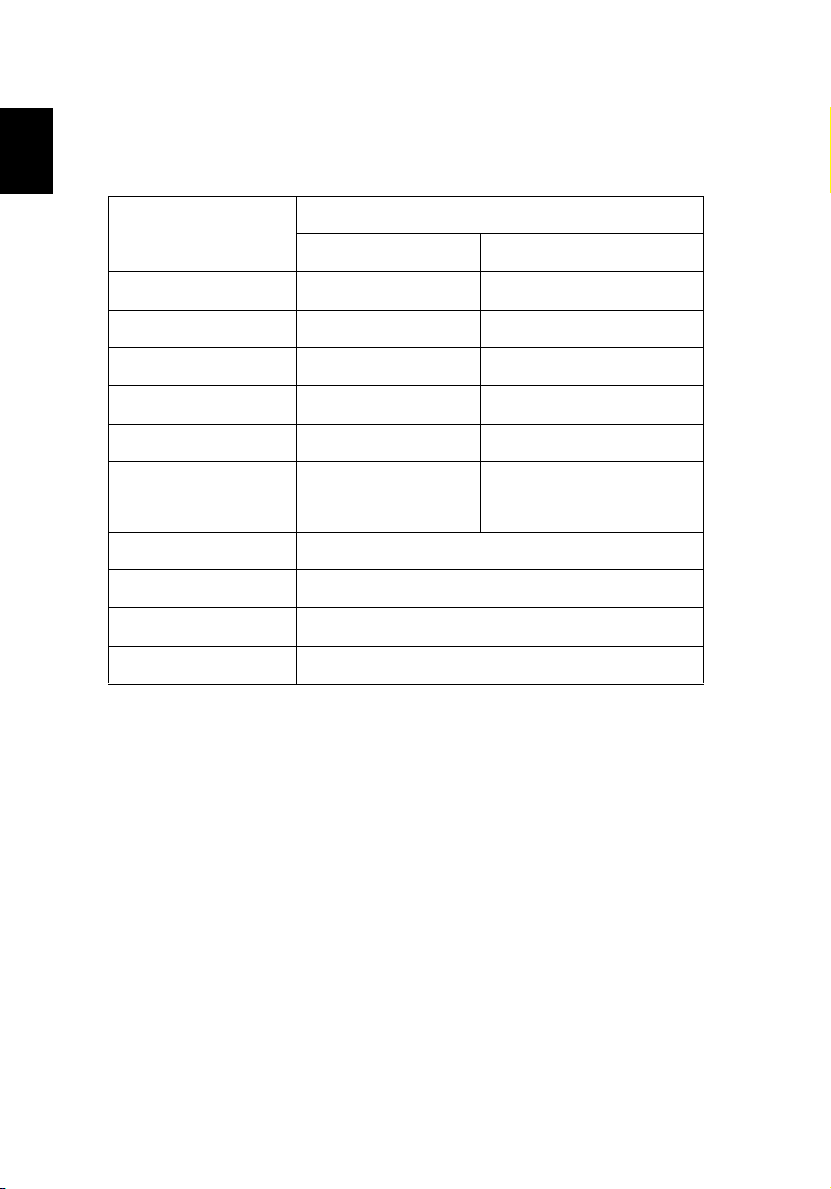
LED & Alarm Definition Listing
English
LED Messages
Message
Input Power Plug Flash ON to OFF 100ms --
Standby V --
Power button ON -- V
Lamp retry -- Quick Flashing
Power off (Cooling state) Quick Flashing --
Power button OFF:
Cooling completed;
Standby Mode
Error (Thermal Failure) Quick Flashing RED and Steady BLUE by returns
Error (Fan lock) Quick Flashing RED and Steady BLUE by returns
Error (Lamp breakdown) Quick Flashing BLUE and Steady RED by returns
Error (Color Wheel fail) Quick Flashing BLUE and Steady RED by returns
Red Blue
V--
Power LED
Page 41
31
Replacing and cleaning the dust filters
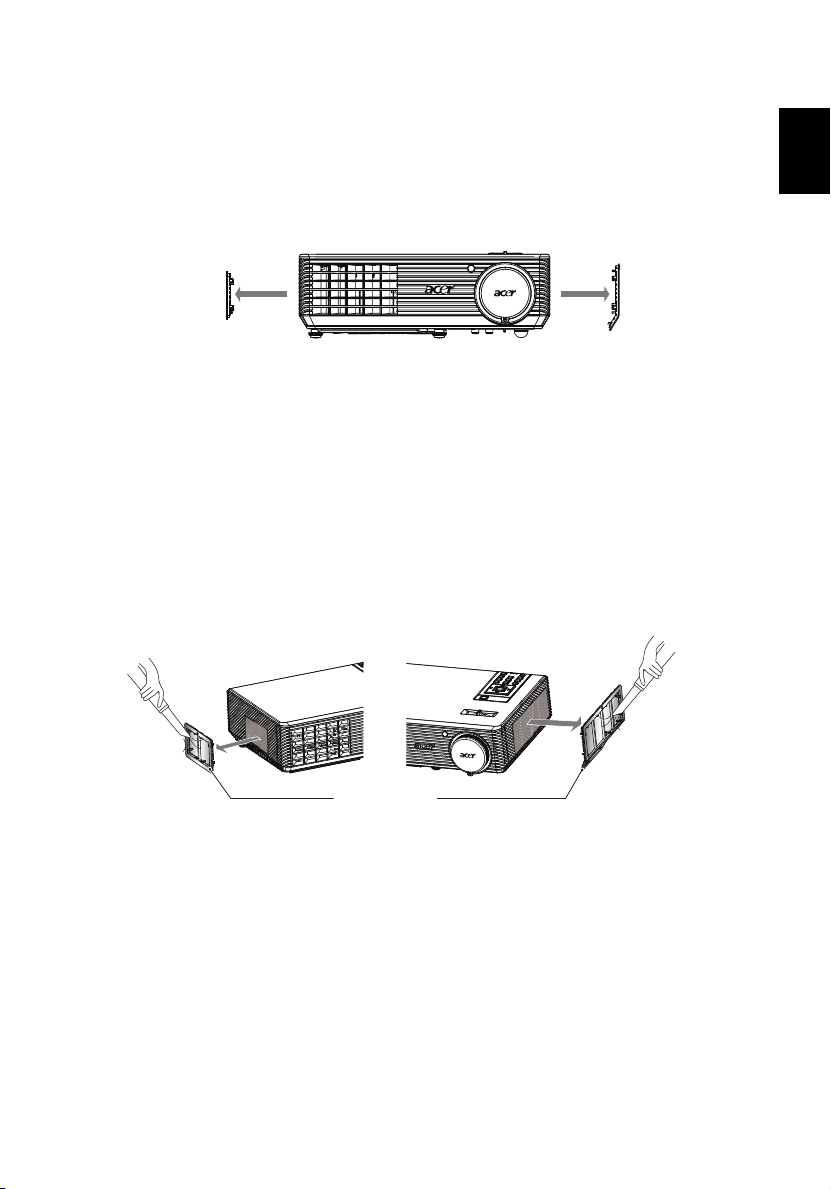
Replacing the dust filters
1 Turn the projector off then unplug the power cord.
2 Pull the both sides dust filters out. (Illustration #1)
3 Clean or replace the dust filter.
4 To put the dust filters back, reverse the previous step.
(Illustration #1)
Cleaning the dust filters
Clean the dust filters after every 1000 hours of use. If they are not cleaned
periodically, they can become clogged with dust, preventing proper ventilation.
This can cause overheating and damage the projector. (Normally 1000 hours is
recommended, clean period will be depending on actual environment)
Please find following steps for cleaning procdure:
1 To clean the dust filters, use a small vacuum cleaner designed for
computers and other office equipments. It also can be cleaned by water.
(Illustration #2)
2 If the dirt is difficult to remove or the filter is broken, please contact your
local dealer or service center to obtain a new filter.
English
Dust Filter
(Illustration #2)
Page 42
English
32
Replacing the Lamp
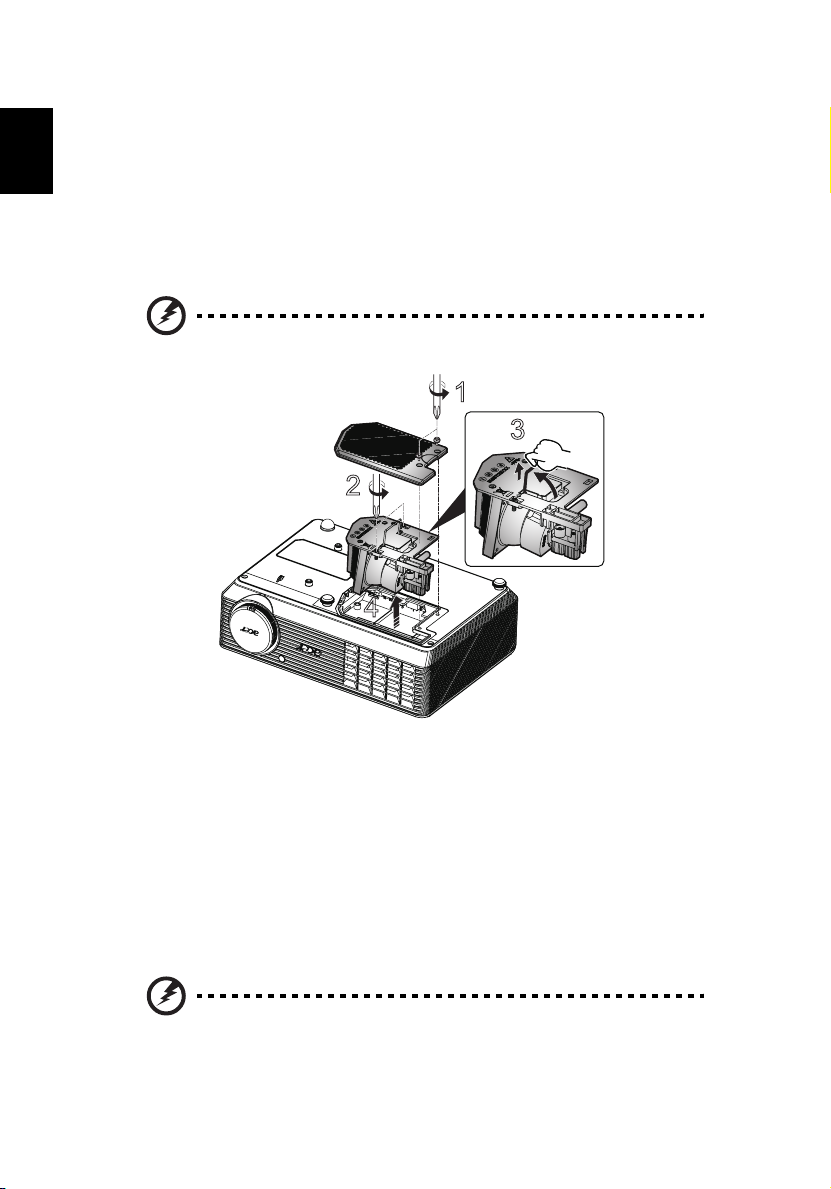
Use a screwdriver to remove the screw(s) from the cover, and then pull out the
lamp.
The projector will detect the lamp life. You will be shown a warning message
"Lamp is approaching the end of its useful life in full power operation.
Replacement Suggested!" When you see this message, change the lamp as soon
as possible. Make sure the projector has been cooling down for at least 30
minutes before changing the lamp.
Warning: The lamp compartment is hot! Allow it to cool down
before changing the lamp.
1
3
2
4
To Change the Lamp
1 Turn off the projector by pressing the Power button.
2 Allow the projector at least 30 mins to cool down.
3 Disconnect the power cord.
4 Use a screwdriver to remove the screw from the cover. (Illustration #1)
5 Push up and remove the cover.
6 Remove the two screws that secure the lamp module (Illustration #2) and
pull up the lamp bar.(Illustration #3)
7 Pull out the lamp module by force. (Illustration #4)
To replace the lamp module, reverse the previous step.
Warning: To reduce the risk of personal injury, do not drop the
lamp module or touch the lamp bulb. The bulb may shatter and
cause injury if it is dropped.
Page 43
33
Ceiling Mount Installation
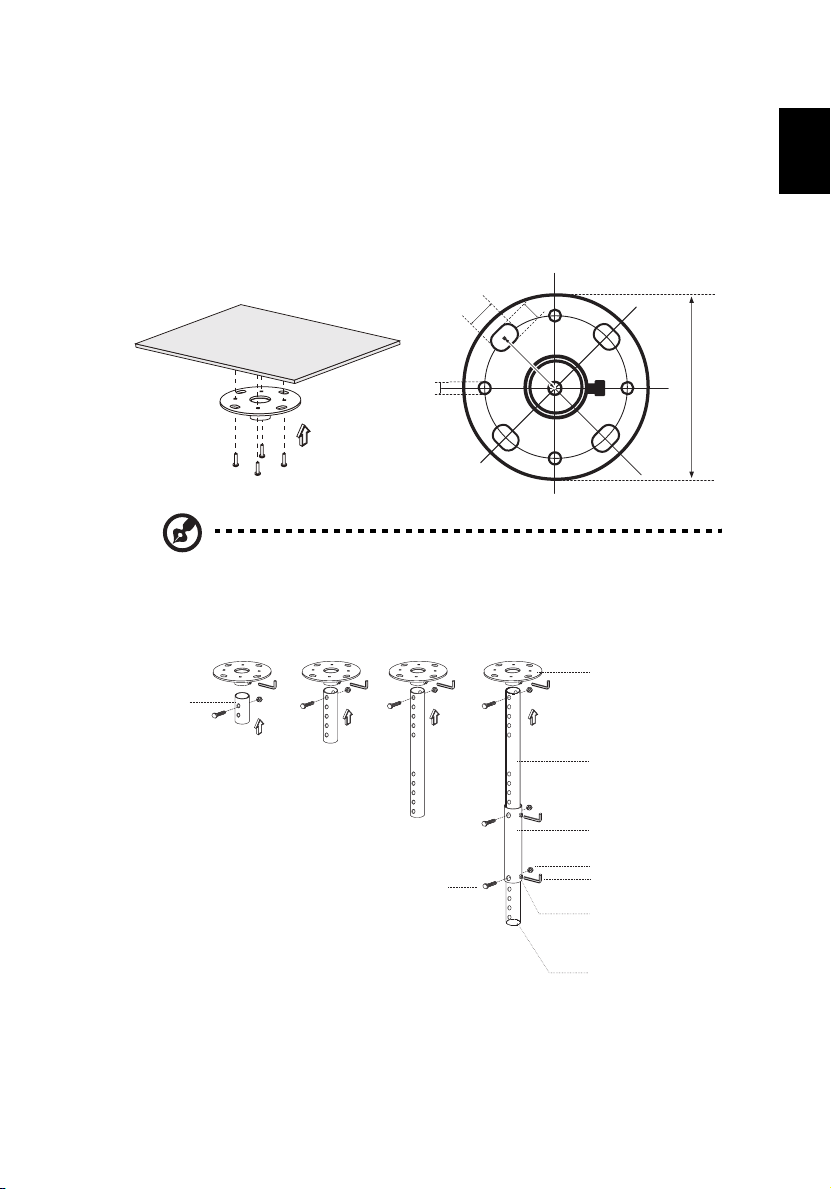
If you wish to install the projector using a ceiling mount, please refer to the
steps below:
1 Drill four holes into a solid, structurally sound part of the ceiling, and
secure the mount base.
13
mm
20
mm
49.9
mm
mm
8.4
Note: Screws are not included. Please obtain the appropriate
screws for your type of ceiling.
2 Secure the ceiling rod using the appropriate type of four-cylinder screws.
Ceiling Mount Base
- Attach to ceiling
Short Rod
English
130 mm
50 mm length / 8 mm diameter -
Screw Type A
Long Rod
Extension Rod
Long Cylinder Cap
Allen Key
- For tightening/loosening
Tightening Screw
Medium Rod
Page 44
English
34
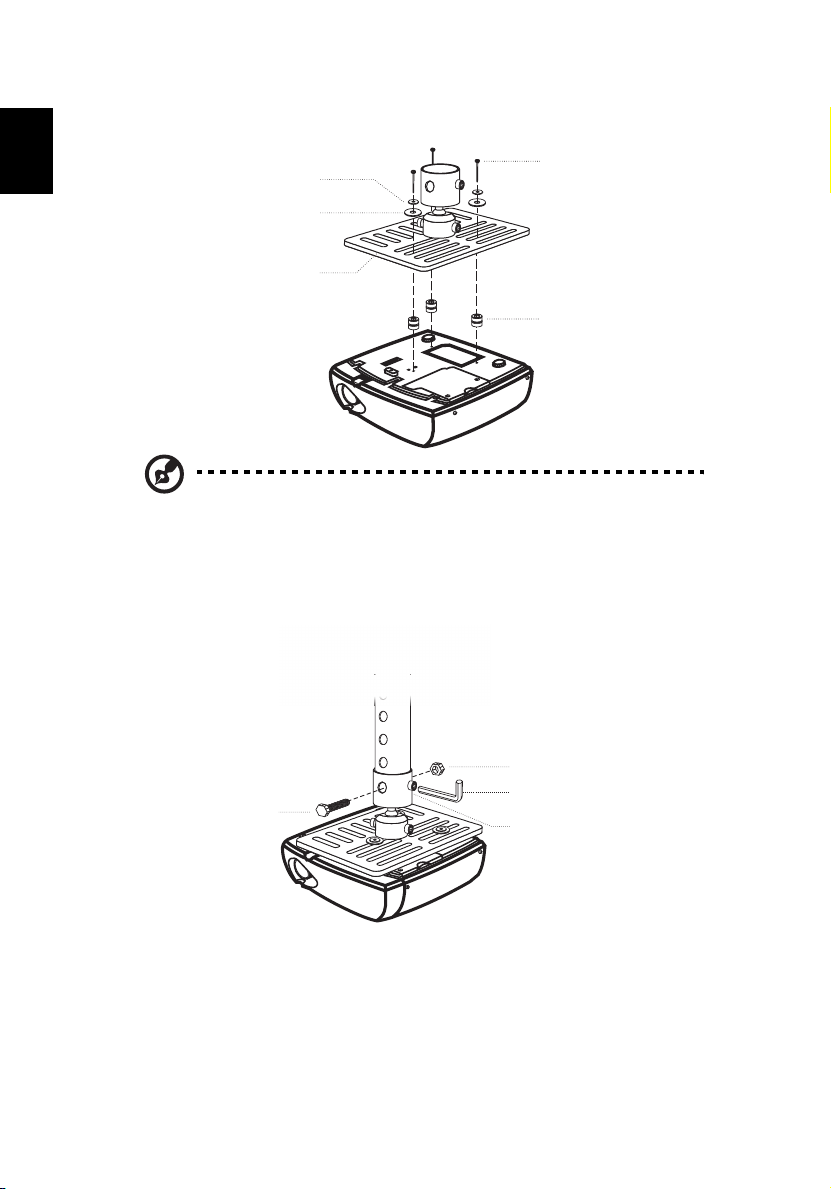
3 Use the appropriate number of screws for the projector size to attach the
projector to the ceiling mount bracket.
Screw Type B
Smaller Washer
Large Washer
Supports projector and allows -
for adjustments
Note: It is recommended that you keep a reasonable space
between the bracket and the projector to allow for proper heat
distribution. Use two washers for extra support, if deemed
necessary.
4 Attach the ceiling bracket to the ceiling rod.
Screw Type A
50 mm length -
08 mm diameter
Projector Bracket
Spacer
- For heat dissipation
Large cylinder cap
Allen Key
- For tightening/loosening
Tightening Screw
Page 45
35
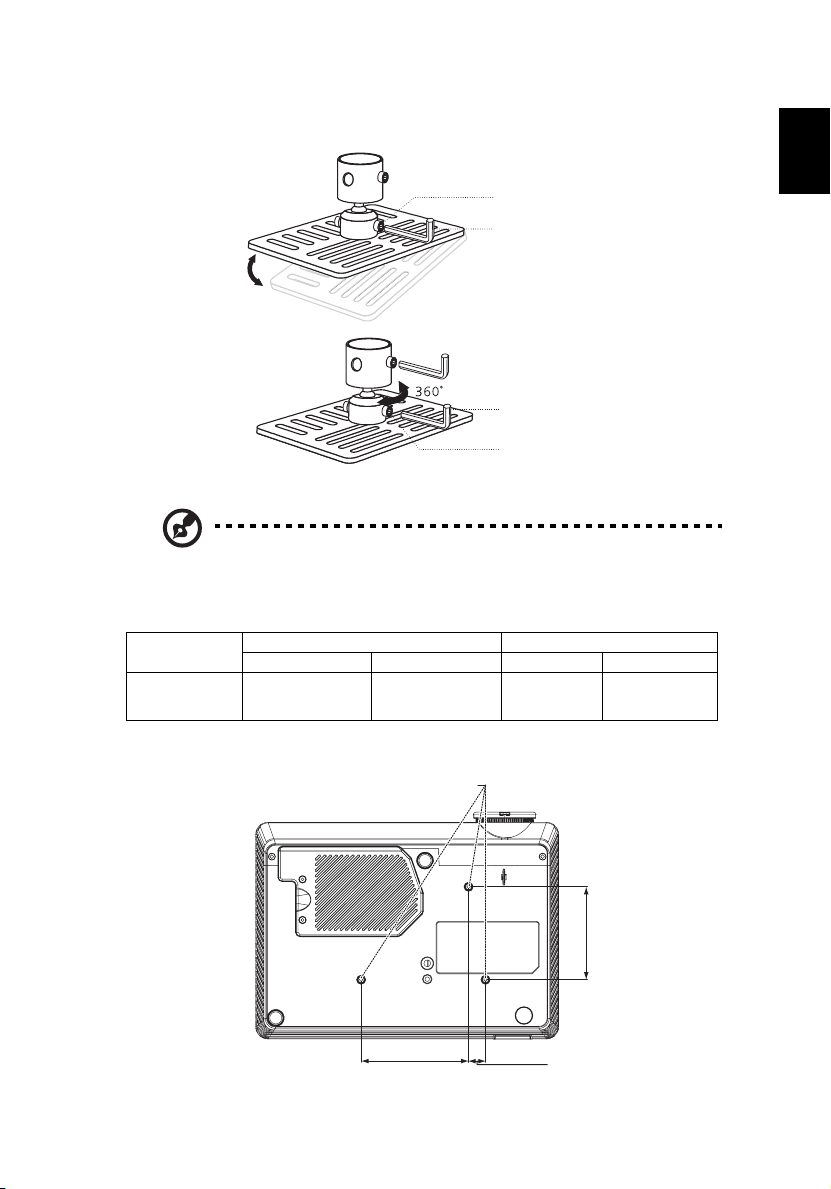
5 Adjust the angle and positioning as necessary.
Tightening Screw
Allen Key
30°
Allen Key
Tightening Screw
Note: The appropriate type of screw and washer for each model is
listed in the table below. 3 mm diameter screws are enclosed in
the screw pack.
Models Screw Type B Washer Type
Diameter (mm) Length (mm) Large Small
X1161P/X1161PA/
X110P/H110P/
X1161N/X1261P
325VV
English
SCREW SPEC. M3 x 25 mm
95.00 mm
82.30 mm
15.00 mm
Page 46
English
36
Specifications
The specifications listed below are subject to change without notice. For final
specs, please refer to Acer's published marketing specifications.
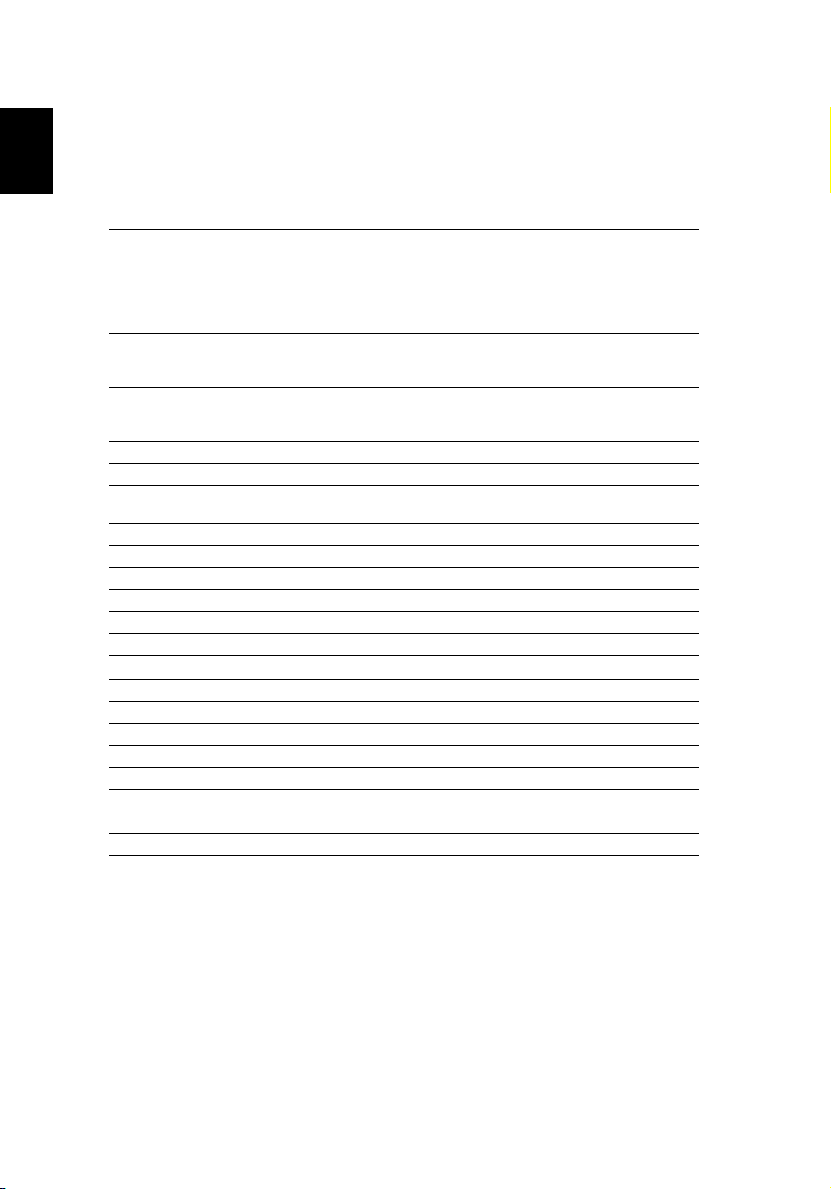
Projection system
Resolution X1161P/X1161PA/X110P/H110P/X1161N: Native: SVGA
Computer compatibility IBM PC and compatibles, Apple Macintosh, iMac and
Video compatibility NTSC (3.58/4.43), PAL (B/D/G/H/I/M/N), SECAM (B/D/G/
Aspect ratio 4:3 (native), 16:9
Displayable colors 16.7 million colors
Projection lens F/ 2.41 - 2.55, f = 21.79 mm - 23.99 mm, 1.1X manual
Projection screen size (diagonal) 23" (0.58 m) - 303" (7.70 m)
Projection distance 3.3' (1.0 m) - 39.4' (12.0 m)
Throw ratio 50"@2m (1.95 - 2.15:1)
Horizontal scan rate 30k - 100 kHz
Vertical refresh scan rate 50-120 Hz
Lamp type 180W user-replaceable lamp
Keystone correction
Audio Internal speaker with 2 W output (X1261P)
Weight 2.26 Kg (4.9 lbs.)
Dimensions (W x D x H) 268 mm x 192 mm x 80 mm (10.6" x 7.6" x 3.1")
Digital Zoom 2X
Power supply AC input 100 - 240 V auto-switching power supply
Power consumption
Operating temperature 5ºC to 35ºC / 41ºF to 95ºF
®
DLP
(800 x 600) , Maximum: UXGA (1600 x 1200), WSXGA+
(1680x1050), 1080p(1920x1080)
X1261P: Native: XGA (1024 x 768), Maximum: UXGA
(1600 x 1200), WSXGA+ (1680x1050),
1080p(1920x1080)
VESA standards: SXGA, XGA, VGA, SVGA, SXGA+,
WXGA, WXGA+, WSXGA +
K/K1/L), HDTV (720p, 1080i, 1080p), EDTV (480p,
576p), SDTV (480i, 576i)
zoom lens
±40 degrees
225W ±10% for normal mode
196W ±10% for ECO mode
Page 47

37
I/O connectors X1161N series:
• Power socket x1
• VGA input x1
• USB x1: for remote computer control
X1161P/X1161PA/X110P/H110P series:
• Power socket x1
• VGA input x1
• USB x1: for remote computer control
• Composite video x1
• S-Video x1
X1261P series:
• Power socket x1
• VGA input x1
• RS232 x1
• Composite video x1
• S-Video x1
• VGA output x1
• 3.5 mm audio jack input x1
Standard package contents
• AC power cord x1
• VGA cable x1
• Composite video cable x1 (X1161P/X1261P
series)
• Remote control x1
• Battery x1 (for remote control)
• User's guide (CD-ROM) x1
• Quick start guide x1
• Security card x1
• Carrying case x1 (Optional)
English
* Design and specifications are subject to change without notice.
Page 48
38
Compatibility modes
English
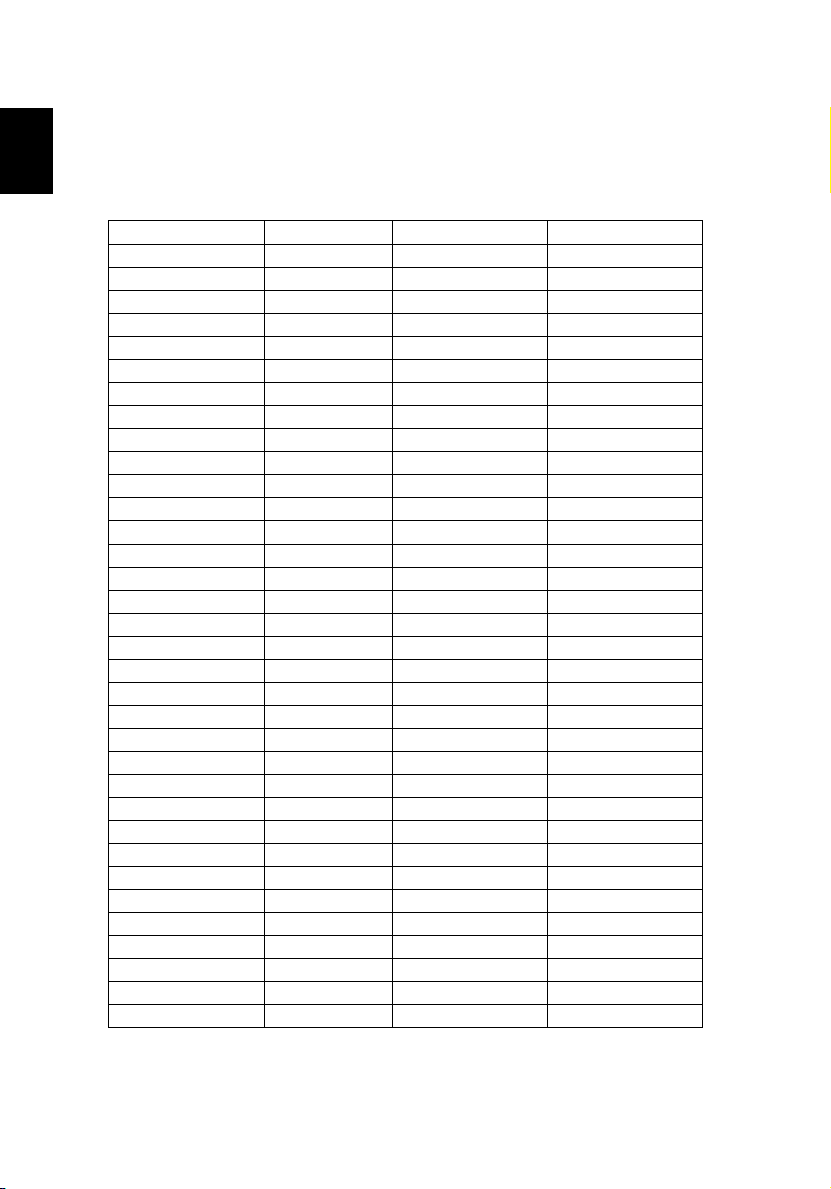
A. VGA Analog
1 VGA Analog - PC Signal
Modes Resolution V.Frequency [Hz] H.Frequency [KHz]
VGA 640x480 60 31.47
640x480 72 37.86
640x480 75 37.50
640x480 85 43.27
640x480 119.51 61.60
SVGA 800x600 56 35.20
800x600 60 37.88
800x600 72 48.08
800x600 75 46.88
800x600 85 53.67
800x600 119.85 77.20
XGA 1024x768 60 48.36
1024x768 70 56.48
1024x768 75 60.02
1024x768 85 68.67
1024x768 119.804 98.80
SXGA 1152x864 70 63.80
1152x864 75 67.50
1152x864 85 77.10
1280X1024 60 63.98
1280X1024 72 77.90
1280X1024 75 79.98
1280X1024 85 91.15
QuadVGA 1280x960 60 60.00
1280x960 75 75.00
SXGA+ 1400x1050 60 65.32
UXGA 1600x1200 60 75.00
PowerBook G4 640x480 60 31.50
640x480 66.6(67) 35.00
800x600 60 37.88
1024x768 60 48.36
1152x870 75 68.68
1280x960 75 75.20
i Mac DV (G3) 1024x768 75 60.30
Page 49
39
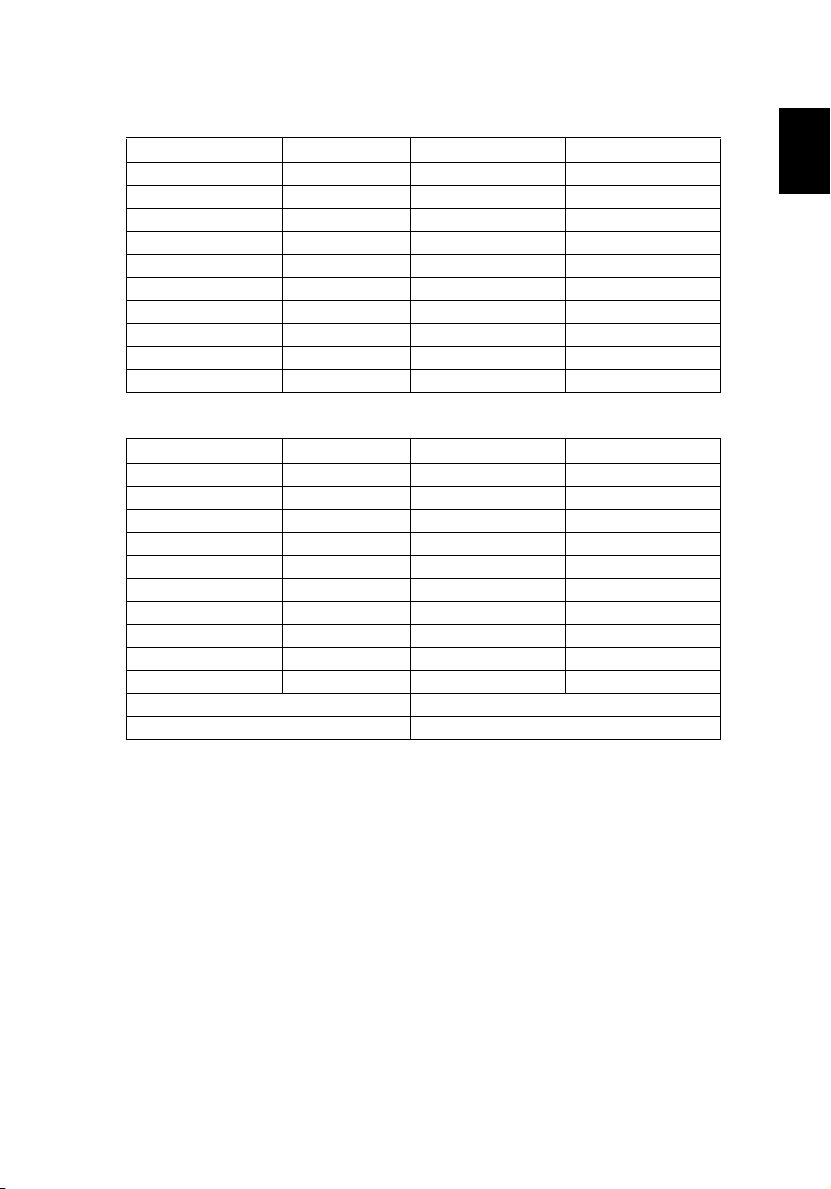
2 VGA Analog - Extended Wide Timing
Modes Resolution V.Frequency [Hz] H.Frequency [KHz]
WXGA 1280x768 60 47.78
1280x768 75 60.29
1280x768 85 68.63
1280x720 60 44.80
1280x800 60 49.60
1440x900 60 55.90
1680x1050 60 65.30
1366x768 60 47.71
1920x1080-RB 60 66.60
1024x600 60 37.30
3 VGA Analog -Component Signal
Modes Resolution V.Frequency [Hz] H.Frequency [KHz]
480i 720x480 59.94(29.97) 27.00
480p 720x480 59.94 31.47
576i 720x576 50(25) 27.00
576p 720x576 50 31.25
720p 1280x720 60 45.00
720p 1280x720 50 37.50
1080i 1920x1080 60(30) 33.75
1080i 1920x1080 50(25) 33.75
1080p 1920x1080 60 67.50
1080p 1920x1080 50 56.26
Horizontal scan rate: 30k-100kHz
Vertical scan rate: 50-120 Hz
English
Page 50

40
Regulations and safety notices
English
FCC notice
This device has been tested and found to comply with the limits for a Class B
digital device pursuant to Part 15 of the FCC rules. These limits are designed to
provide reasonable protection against harmful interference in a residential
installation. This device generates, uses, and can radiate radio frequency energy
and, if not installed and used in accordance with the instructions, may cause
harmful interference to radio communications.
However, there is no guarantee that interference will not occur in a particular
installation. If this device does cause harmful interference to radio or television
reception, which can be determined by turning the device off and on, the
user is encouraged to try to correct the interference by one or more of the
following measures:
• Reorient or relocate the receiving antenna.
• Increase the separation between the device and receiver.
• Connect the device into an outlet on a circuit different from that to which
the receiver is connected.
• Consult the dealer or an experienced radio/television technician for help.
Notice: Shielded cables
All connections to other computing devices must be made using shielded cables
to maintain compliance with FCC regulations.
Notice: Peripheral devices
Only peripherals (input/output devices, terminals, printers, etc.) certified to
comply with the Class B limits may be attached to this equipment. Operation
with non-certified peripherals is likely to result in interference to radio and TV
reception.
Caution
Changes or modifications not expressly approved by the manufacturer could
void the user's authority, which is granted by the Federal Communications
Commission, to operate this device.
Operation conditions
This device complies with Part 15 of the FCC Rules. Operation is subject to the
following two conditions: (1) this device may not cause harmful interference,
and (2) this device must accept any interference received, including interference
that may cause undesired operation.
Notice: Canadian users
This Class B digital apparatus complies with Canadian ICES-003.
Page 51
41
Remarque à l'intention des utilisateurs canadiens
Cet appareil numérique de la classe B est conforme a la norme NMB-003 du
Canada.
Declaration of Conformity for EU countries
Acer hereby declares that this projector series is in compliance with the essential
requirements and other relevant provisions of Directive 1999/5/EC.
Compliant with Russian regulatory certification
Radio device regulatory notice
Note: The regulatory information below is for models with
wireless LAN and/or Bluetooth only.
General
This product complies with the radio frequency and safety standards of any
country or region in which it has been approved for wireless use. Depending on
configurations, this product may or may not contain wireless radio devices (such
as wireless LAN and/or Bluetooth modules).
English
English
Canada — Low-power license-exempt radio
communication devices (RSS-210)
a Common information
Operation is subject to the following two conditions:
1. This device may not cause interference, and
2. This device must accept any interference, including interference
that may cause undesired operation of the device.
b Operation in 2.4 GHz band
To prevent radio interference to the licensed service, this device is
intended to be operated indoors and installation outdoors is subject
to licensing.
List of applicable countries
This device must be used in strict accordance with the regulations and constraints in the
country of use. For further information, please contact the local office in the country of use.
Please see http://ec.europa.eu/enterprise/rtte/implem.htm
for the latest country list.
Page 52
8F, 88, Sec. 1, Hsin Tai Wu Rd., Hsichih
Acer Incorporated
Taipei Hsien 221, Taiwan
Declaration of Conformity
We,
Acer Incorporated
8F, 88, Sec. 1, Hsin Tai Wu Rd., Hsichih, Taipei Hsien 221, Taiwan
Contact Person: Mr. Easy Lai, e-mail:[email protected]
And,
Acer Italy s.r.l
Via Lepetit, 40, 20020 Lainate (MI) Italy
Tel: +39-02-939-921, Fax: +39-02 9399-2913, www.acer.it
Hereby declare that:
Product: Projector
Trade Name: Acer
Model Number: DSV0008/DNX0009
Machine Type: X1161P/X1161PA/X110P/H110P/X1161
Is compliant with the essential requirements and other relevant provisions of the following EC
directives, and that all the necessary steps have been taken and are in force to assure that
production units of the same product will continue comply with the requirements.
EMC Directive 2004/108/EC as attested by conformity with the following
harmonized standards:
-. EN55022, AS/NZS CISPR22, Class B
-. EN55024
-. EN61000-3-2 Class A
-. EN61000-3-3
Low Voltage Directive 2006/95/EC as attested by conformity with the following
harmonized standard:
-. EN60950-1
X1261P series
RoHS Directive 2002/95/EC on the Restriction of the Use of certain Hazardous
Substances in Electrical and Electronic Equipment
-. The maximum concentration values of the restricted substances by weight in homogenous
material are:
Lead 0.1% Polybrominated Biphenyls (PBB’s) 0.1%
Mercury 0.1% Polybrominated Diphenyl Ethers (PBDE’s) 0.1%
Hexavalent Chromium 0.1% Cadmium 0.01%
!
Directive 2005/32/EC of the European Parliament and of the Council with
regard to Eco-design Requirements.
N/
Page 53
8F, 88, Sec. 1, Hsin Tai Wu Rd., Hsichih
The standards listed below are applied to the product if built with WLAN
module or wireless keyboard and mouse.
R&TTE Directive 1999/5/EC as attested by conformity with the following
harmonized standard:
z Article 3.1(a) Health and Safety
-. EN60950-1
-. EN62311
z Article 3.1(b) EMC
-. EN301 489-1
-. EN301 489-17
z Article 3.2 Spectrum Usages
-. EN300 328
-. EN301 893 (Applicable to 5GHz high performance RLAN).
Acer Incorporated
Taipei Hsien 221, Taiwan
Year to begin affixing CE marking 2009.
_______________________________
Easy Lai /Manager Date
Regulation Center, Acer Inc.
Nov. 3, 2010
-
Page 54

Acer America Corporation
333 West San Carlos St., San Jose
CA 95110, U. S. A.
Tel : 254-298-4000
Fax : 254-298-4147
www.acer.com
Federal Communications Commission
Declaration of Conformity
This device complies with Part 15 of the FCC Rules. Operation is subject to the
following two conditions: (1) this device may not cause harmful interference,
and (2) this device must accept any interference received, including interference
that may cause undesired operation.
The following local Manufacturer / Importer is responsible for this declaration:
Product: DLP Projector
Model Number: DSV0008/DNX0009
Machine Type: X1161P/X1161PA/X110P/H110P/X1161N/
Name of Responsible Party: Acer America Corporation
Address of Responsible Party: 333 West San Carlos St.
Contact Person: Acer Representative
Phone No.: 254-298-4000
Fax No.: 254-298-4147
X1261P series
San Jose, CA 95110
U. S. A.
 Loading...