

Page 1

Copyright ©2003 Acer Incorporated
All Rights Reserved.
Changes may be made periodically to the information in this publication without obligation
to notify any person of such revision or changes. Such changes will be incorporated in new
editions of this manual or supplementary documents and publications. This company makes
no representations or warranties, either expressed or implied, with respect to the contents
hereof and specifically disclaims the implied warranties of merchantability or fitness for a
particular purpose.
Record the model number, serial number, purchase date, and place of purchase information in
the space provided below. The serial number and model number are recorded on the label
affixed to your projector. All correspondence concerning your unit should include the serial
number, model number, and purchase information.
No part of this publication may be reproduced, stored in a retrieval system, or transmitted, in
any form or by any means, electronic, mechanical, photocopy, recording, or otherwise,
without the prior written permission of Acer Incorporated.
Model number :____________________________________
Serial number: _____________________________________
Purchase date: _____________________________________
Place of purchase: __________________________________
Acer is a registered trademark of Acer Incorporated. All other trademarks and registered
trademarks are the properties of their respective companies.
Page 2

FCC Notice
This equipment has been tested and found to comply with the limits
for a Class B digital device, pursuant to part 15 of the FCC Rules. These
limits are designed to provide reasonable protection against harmful
interference in residential installation. This equipment generates, uses
and can radiate radio frequency energy and if not installed and used in
accordance with the instructions, may cause harmful interference to
radio communications. However, there is no guarantee that
interference will not occur in a particular installation. If this equipment
does cause harmful interference to radio or television reception,
detectable by turning the equipment in question off and on, the user is
encouraged to try to correct the interference by one or more of the
following measures:
• Reorient or relocate the receiving antenna
• Increase the distance between the equipment and the receiver
• Connect the equipment to an outlet on a different circuit than
that which the receiver is connected to
• Or consult the dealer or an experienced radio/TV technician for
help.
This device complies with Part 15 of the FCC Rules. Operation is subject
to following two conditions:
1 This device may not cause harmful interference, and
2 This device must accept any interference that may cause undesired
operation.
ii
Page 3

Precautions
Safety Instructions
1 Check that the operating voltage of your unit is identical with the
voltage of your local power supply.
2 Should any liquid or solid object fall into the cabinet, unplug the
unit and have it checked by the qualified personnel before
operating it further.
3 Do not place the projector on an unstable stand or table.
4 Unplug the unit from the wall socket if it is not to be used for
several days.To disconnect the cord, pull it out by the plug. Never
pull the cord itself.
5 The wall socket should be near the unit and easily accessible.
6 Do not place the projector where the cord can be stepped on as
this may result in fraying or damage to the lead or the plug. Be
alert to tripping hazards.
7 Never look into the projector lens when the lamp is switched on as
the bright light can damage your eyes. Never let children look into
the lens when it is on.
8 Do not place your hand or objects near the ventilation holes. The
air coming out is hot.
9 Never open any covers on the projector except the lamp cover.
Dangerous electrical voltages inside the projector can cause severe
injury. Except as specifically directed in this Instruction Manual, do
not attempt to service this product yourself. Refer all servicing to
qualified service personnel.
10 Unplug the projector from the wall socket before cleaning. Use a
damp cloth for cleaning the projector housing. Do not use liquid
or aerosol cleaners.
11 Keep the plastic packing materials (from the projector, accessories
and optional parts) out of the reach of children as these bags may
result in death by suffocation. Be particularly careful around the
small children.
iii
Page 4

Cautions: The projector is equipped with ventilation holes
(intake) and ventilation holes (exhaust). Do not block or place
anything near these slots, or internal heat build-up may occur,
causing picture degradation or damage to the projector.
Cautions: When you replace the projector lamp, never touch the
new bulb with your bare hands. The invisible residue left by the oil
on your hands may be shorten the bulb life. Use lintfree gloves or
finger cots are recommended.
Preventing Internal Heat Build-Up
After you turn off the power with the Power button, do not disconnect
the unit from the wall outlet while the cooling fan is still running.
Repacking
Save the original shipping carton and packing material; they will come
in handy if you ever to ship your unit. For maximum protection, repack
your unit as it was originally packed at the factory.
iv
Page 5

Projector features and controls 1
Projector 1
Control panel 2
Remote controller 4
Getting the most out of your projector 6
Remote Controller 6
Auto Off Mode 6
Control Panel 6
Setup 7
Unpacking the Projector 7
Setting Up the Projector 9
Connecting to a Computer 10
Connecting to a Video Source 11
Using the Projector 12
Turning the Audio/Visual (A/V) Equipment On and Off 12
Turning the Projector On and Off 12
Focusing and Positioning the Screen Image 13
Operational Indicator (LED) 14
Projector control menus 15
Changing a Menu Setting 15
Menu Options 16
Input Menu 17
Picture Menu 17
Color Menu 19
Audio Menu 20
MISC Menu 21
Option Menu 22
Language Menu 24
Reset Menu 24
Other Related OSD Menus 25
Video Input Signal 25
Video Menu 25
Other OSD Menus 27
No Input Signal 28
Maintenance 29
Cleaning the Lens 29
Cleaning the Projector Housing 29
Cleaning the Air Filter 29
Replacing the Lamp 30
Technical specifications 32
Appendix A 34
Preset Signals 34
HDTV Preset Signals 35
Contents
Page 6
Projector features and controls
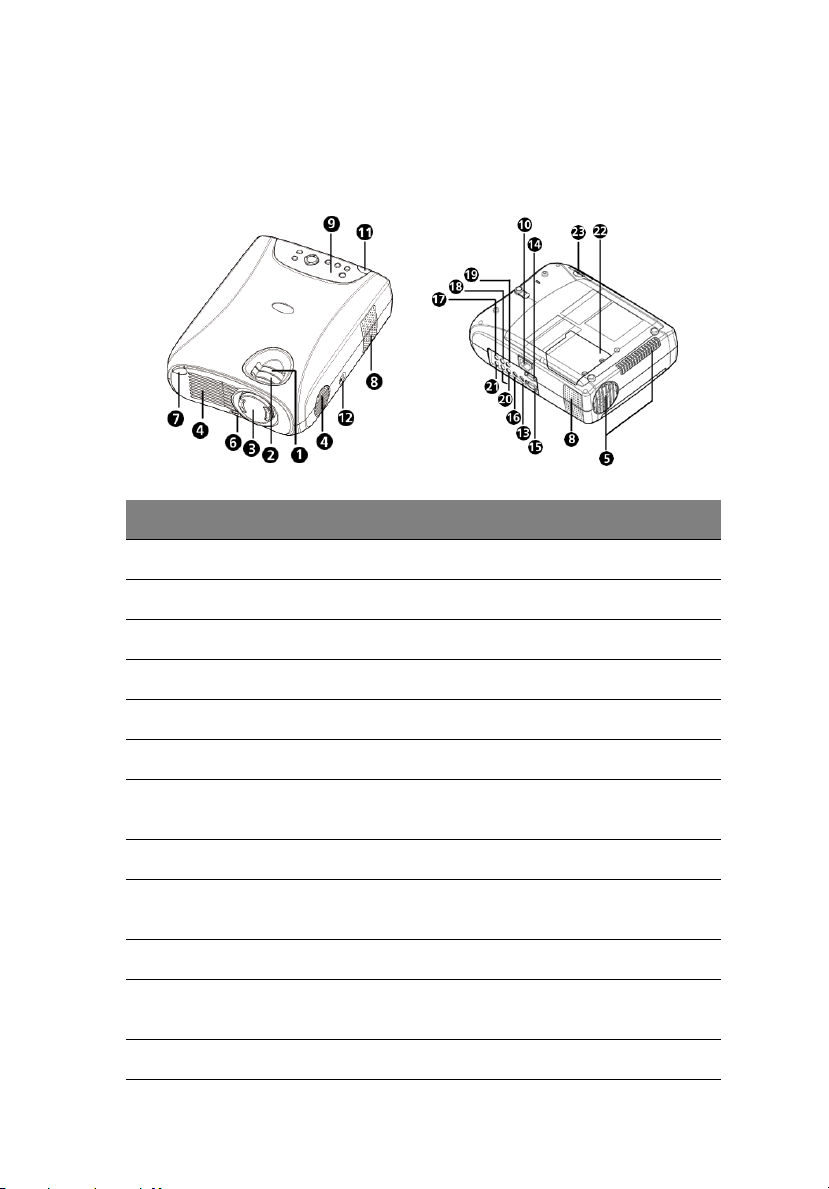
Projector
# Item # Item
1. Zoom ring 13. Control port
2. Focus ring 14. Computer IN (D-SUB) connector
3. Lens 15. Monitor OUT
1
4. Ventilation holes (intake) 16. S-Video input
5. Ventilation holes (exhaust) 17. Y connector
6. Adjuster button 18. Cb connector
7. Front IR remote controller
sensor
8. Speakers 20. Audio input jacks (L & R)
9. Control Panel including
Power button
10. AC power socket 22. Lamp cover
11. Rear IR remote controller
sensor
12. Security lock receptacle
19. Cr connector
21. Composite Video input jack
23. Air filter
Page 7
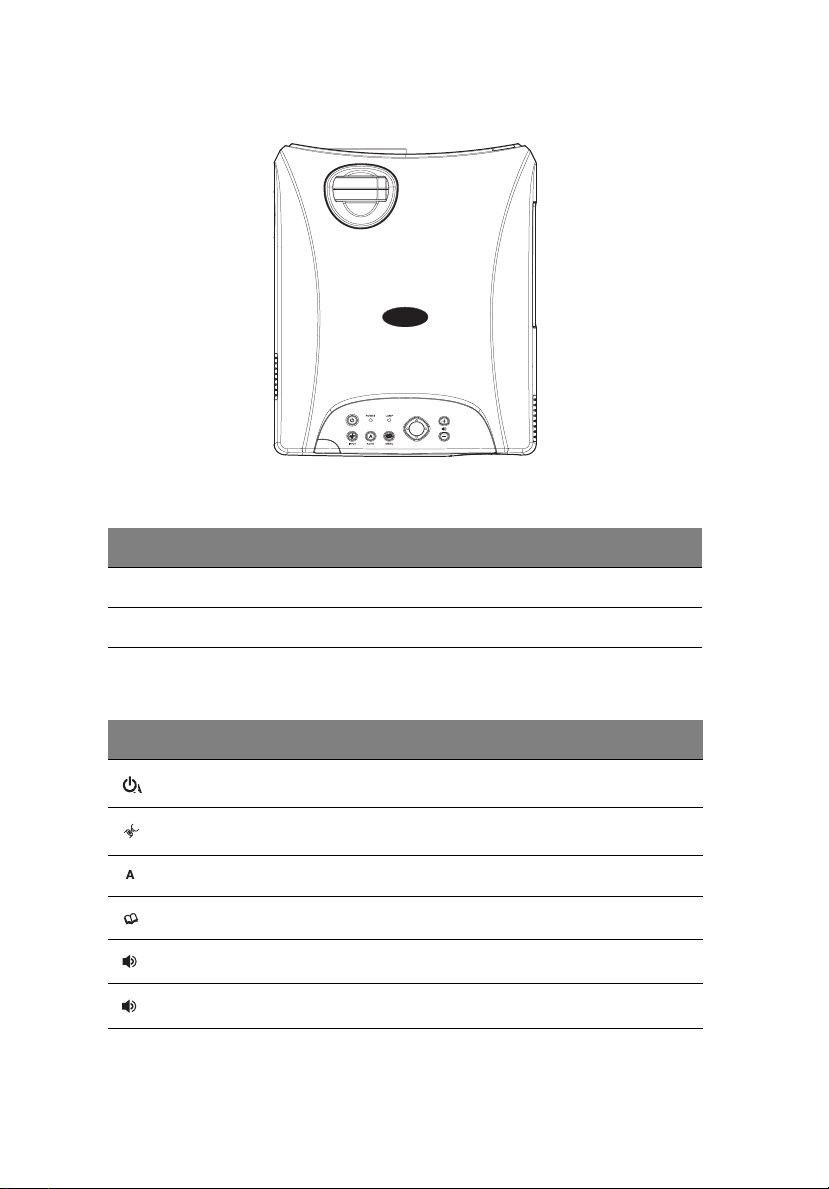
Control panel
LED
Key Description
POWER Power LED indicator - indicates power to projector.
LAMP Lamp LED indicator - indicates lamp power.
2
Button Function
Button Function
Turns the projector and lamp ON and OFF.
INPUT
AUTO
MENU
(+)
(-)
Manually selects an input source.
Automatically adjusts frequency and phase.
Displays (or hides) the on-screen control menus.
Increases the volume of the projector's speakers.
Decreases the volume of the projector's speakers.
Page 8

Button Function
3
Cursor Controller
()
It can be used as a navigation controller to navigate the
projector menus.
or confirms a menu selection.
- Scrolls up through the menu choices.
- Scrolls down through the menu choices.
- Increases the value setting on the selected sub-menus,
- Decreases the value setting on the selected sub-menus.
Page 9
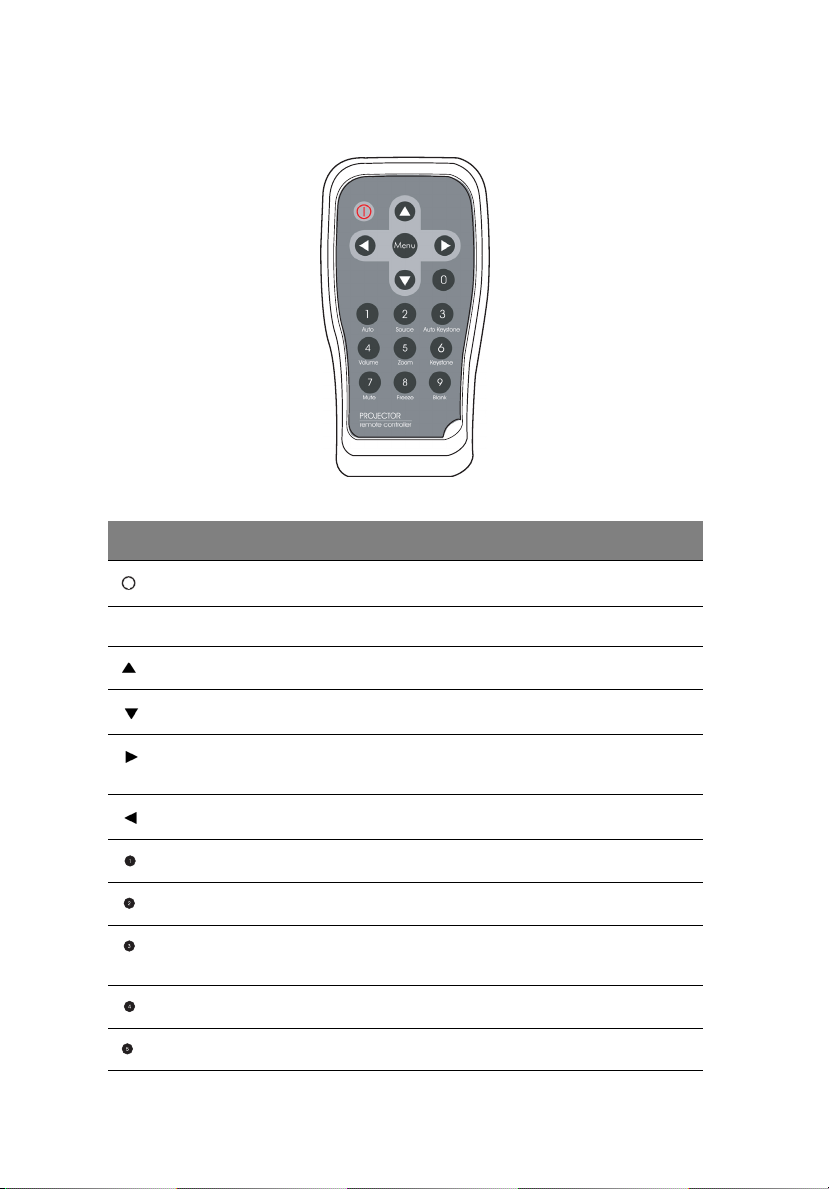
Remote controller
Button Function
Power Turns the projector and lamp ON and OFF.
Menu Displays (or hides) the on-screen display menus.
4
Scrolls up through the menu choices.
Scrolls down through the menu choices.
Increases the value setting on the selected sub-menus, or
confirms a menu selection.
Decreases the value setting on the selected sub-menus.
Auto Automatically adjusts frequency and phase.
Source Manually selects an input source.
Auto
Keystone
Volume Adjusts the volume of the projector's speakers.
Zoom Digitally zooms the current image window.
This model doesn't support this function.
Page 10
Button Function
Keystone Selects vertical trapezoidal distortion.
Mute Cuts off the sound temporarily.
5
Freeze Freezes the current graphics and video image on the
Blank Cuts off the screen temporarily.
Note: Press the KEYSTONE button to select the trapezoidal
distortion. To adjust the trapezoidal distortion of the projection,
press the or button.
Cautions: When replacing batteries on the Remote Controller,
take the following precautions:
Do not recharge used batteries or expose batteries to fire or
water.
Replace batteries as soon as they run down. If the batteries leak,
wipe away the fluid with a soft cloth. If battery fluid gets on your
hands, wash them immediately. Remove the batteries if you will
not be using the remote controller for a long period of time.
screen.
Page 11

Getting the most out of your projector
The projector has a full set of features that allow you to control the
settings for video, audio, power management, display parameters, and
much more. To derive the greatest utility from your projector, read this
section for a quick summary of the important features.
Remote Controller
The buttons on the Remote Controller allow direct and immediate
control of the most commonly used features including source selection,
keystone adjustment, volume control, image freeze-frame, zoom,
screen blanking, audio muting and power control. Remote Controller
buttons can also be used for advanced functions and to access the
projector's menu system.
Auto Off Mode
The auto off mode conserves electricity by automatically turning off
the lamp if the projector does not receive input signal for a specified
period (30 minutes). In the auto off mode, the lamp is turned off,
conserving electricity, cooling the projector and extending the life of
the lamp. Use the Power button on either the Remote Controller or the
Projector Control Panel to turn the projector on again if it has powered
off.
6
Control Panel
The control panel buttons on the top of projector offer access to
advanced functions, such as adjusting the brightness and contrast for
computer images.
Page 12
Setup
This section tells you how to unpack and set up your projector and
connect it to other equipment. The projector must be connected to a
computer or a video source such as a video tape deck, camcorder,
digital camera or laser disk player in order to make a projection. You
may want to connect the projector to both your computer and a video
source, or set up the projector for providing audio source. The audio
source can be the computer, video source, or another device such as a
stereo.
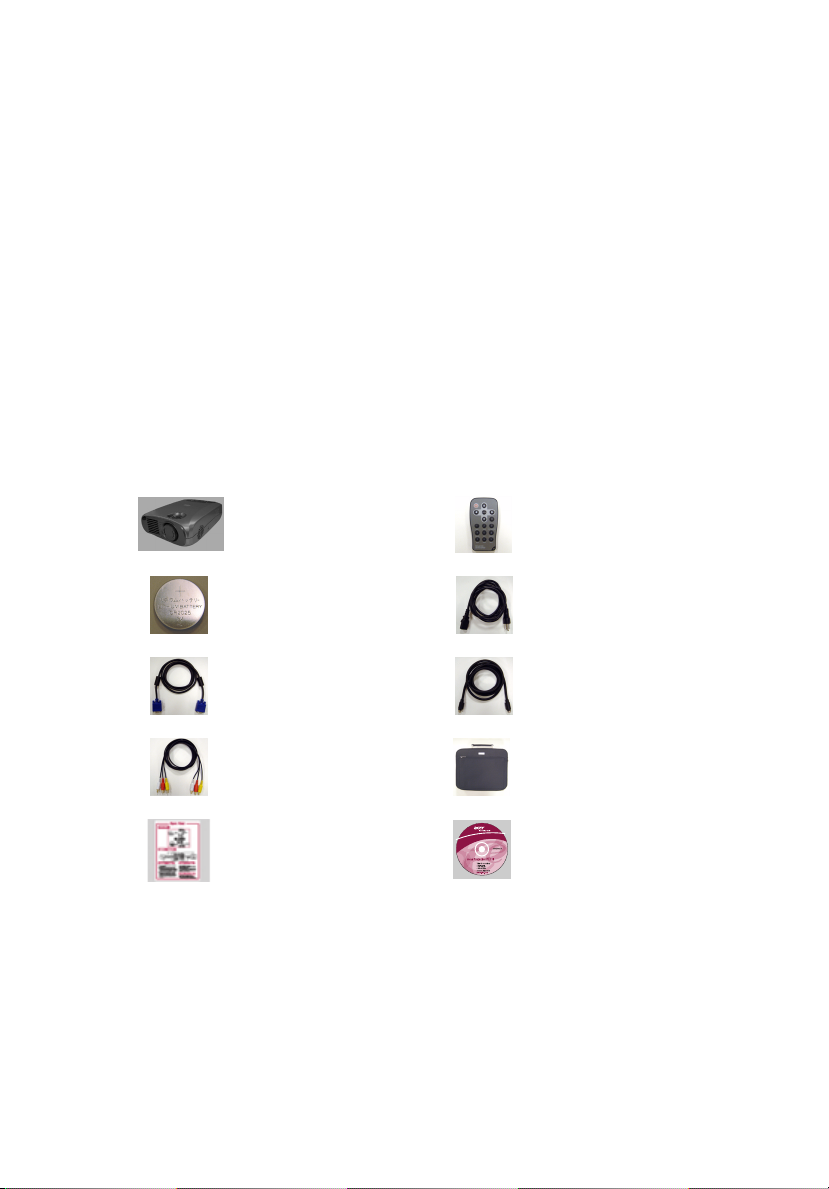
Unpacking the Projector
When you unpack the projector, make sure you have all these
components:
7
Projector with Lens
Cap
Battery for Remote
Controller
VGA Cable S-Video Cable
AV Composite Cable Carrying Case
Quick Start Card User's Guide
Remote Controller
AC Power Cord
Page 13

The following cables are optional accessories:
Audio Cable VGA (D-SUB) to
8
Component/HDTV (RCA)
Cable
Component Video Cable VGA Cable (For Monitor
Many of the above optional items may not be required for your particular
installation. Retain packaging materials in case you need to move or ship the
projector in the future. It should always be transported in its original protective
packaging.
OUT)
Page 14

Setting Up the Projector
1 Place the projector on a sturdy, level surface within five feet of the
computer or video source.
Caution: Do not hold the projector by the lens. This can damage
the lens.
2 Place the projector the correct distance from the screen. The
distance between the projector and the screen determines the
actual image size. Use the general guidelines below to determine
the correct distance.
Distance between the screen and the center of the lens
9
Projector
Projection
Size(Diagonal)
WIDE 34.3" 68.8" 83.8" 137.2" 167.6" 274.4" 331.4"
TELE 25.9" 51.8" 63.5" 103.6" 125.6" 207.2" 251.2"
Distance
1
Meter2 Meters
2.5
Meters4 Meters5 Meters8 Meters
10
Meters
Page 15

Connecting to a Computer
Audio Cable
Projector
Computer
IN
10
OUT
VGA OUT
The projector will always project at SVGA (800 x 600) resolution. (SVGA
is the native resolution of the projector.) However, you can connect the
projector to a computer source capable of displaying VGA (640 x 480),
SVGA (800 x 600), XGA (1024 x 768) or SXGA (1280 x 1024) resolutions.
The projector will resize VGA, XGA, and SXGA inputs for SVGA
projection. The types of computers supported by this projector include
IBM, Macintosh and Apple compatible laptop or desktop PCs (PC
compatibles).
Note: If the input source is Computer, it can produce MONITOR
OUT function.
VGA Cable
Page 16

Connecting to a Video Source
11
DVD Player or VCR
S-Video Cable
DVD Player
YPbPr (HDTV to D-SUB Cable)
YCbCr (Component Video Cable)
You can connect the projector to almost any common video sourceVHS player, DVD player, camcorder, laser disc player or any other
compatible video image source. The projector can accept composite,
component, or S-Video signals:
• Composite video is characterized by a single-pin "RCA-type" video
jack, usually colored yellow.
• Component video (YCbCr) is less common and features three
"RCA-type" video jacks, typically colored green, blue and red.
• S-Video is readily identified by a single connector with four small
pins.
• Component video (YPbPr) is characterized by D-SUB plug to " RCAtype" video jacks, typically colored green blue and red.
AV Composite Cable
W/R Y
You can connect the projector simultaneously to composite,
component, S-Video and YPbPr/HDTV sources. You can select which
video source to project using the control panel or remote controller. If
the Auto Search feature is ON (see later sections of this manual), the
projector will automatically detect and select a source. The projector
supports NTSC, PAL and SECAM video formats. The projector will
automatically detect and identify the video format. Note, however,
whereas the projector can accept multiple simultaneous sources it can
only accept one video format at a time.
Page 17

12
Note: The projector is not compatible with a cable TV-style coaxial
"F" connector.
Using the Projector
This section describes projector operations:
• Turning the projector and A/V equipment on and off
• Adjusting the projected image
• Projector controls
• Checking the projector status
Turning the Audio/Visual (A/V) Equipment On and Off
Always turn on the projector and related A/V equipment in the
following order.
1Projector
2Computer
3 Video source
4 Audio source
Turning the Projector On and Off
1 Connect the power cord to the projector.
2 Insert the power plug into a wall outlet.
3 Remove the projector lens cap.
4 Press the Power button (on either the Remote Controller or the
Projector Control Panel) to turn on the projector. When the lamp
LED indicator lights in green, the projecting image gets full
illumination.
Warning: Never look into the lens when the lamp is on. This
can damage your eyes. It is especially important that
children are not allowed to look into the lens.
Page 18

5 To turn off the projector, press the Power button. A message will
appear on the screen for about 10 seconds:
6 Press the Power button once again (to turn off the power) while
the message is stillshowing on the screen.
Note: Please wait until the fan motor and the Lamp LED turn off
before removing the power cord from the projector.
Focusing and Positioning the Screen Image
After an image appears on the screen, check
to see if it is in focus and whether it fits
properly on the screen.
• To adjust the focus of the image, rotate
the focus ring.
• To adjust the size of the image, rotate
the zoom ring. Zooming in to make the
image larger or zooming out make it
smaller on the screen.
Zoom Ring
Focus Ring
Adjuster Button
13
Note: Push the adjuster button to adjust the projected image
position. Hold down the adjuster button to pull the height
adjustment. Release the adjuster button and the height
adjustment position will be locked.
Page 19

14
Operational Indicator (LED)
There are two LEDs on the top of the projector, the Power LED and the
Lamp LED. They provide valuable information about the projector.
LED TYPE COLOR STATUS MEANING
Power LED Green Solid The projector is powered and ready.
Power LED Red Solid The projector system has some
problems with its fan, so the projector
cannot start up.
Lamp LED Green Solid The lamp is in good condition and is
Lamp LED Red Solid The lamp has reached its end of life
Lamp LED Amber Flashing The projector is shutting down. The
Lamp LED Red Flashing Temperature is too high. The lamp will
projecting at maximum brightness.
and must be changed soon. The lamp
will continue to operate until it fails.
Change the lamp and reset the lamp
time counter. If the lamp is off, then
the ballast will become malfunction.
fan motor is cooling the lamp for
shutdown. Do not unplug the power
cable or turn the power switch off
before the Lamp LED turns off. The fan
motor will turn off when the lamp has
cooled.
turn off.
Page 20

15
Projector control menus
This section describes how to make various adjustments and settings
using the menus.
Changing a Menu Setting
The projector menus can be accessed using either the Projector Control
Panel or the Remote Controller.
1 Changing the menu display:
Press the MENU button either on the Remote Controller or the
Projector Control Panel. Each press of the MENU button switches
the display format as follows:
OSD
Main Menu
OSD
Sub Menu
OSD
Main Menu
OSD Menu OFF
(OSD menu is inactive)
2 Selecting the desired menu or sub-menu (to scroll through the
menu choices):
On the Projector Control Panel: press the or button.
On the Remote Controller: press the or button.
Note:
To scroll up: press the button.
To scroll down: press the button.
3 Adjusting the value setting:
On the Projector Control Panel: press the or button.
On the Remote Controller: press the or button.
Note:
To increase value: press the button.
To decrease value: press the button.
To confirm the selection on the INPUT, LANGUAGE and RESET
Menus, press the button.
Page 21

Menu Options
The projector is equipped with three types of on-screen display (OSD)
menus. Each OSD menu interface you will see on the screen is
depending on the type of input signal.
Input Signal Type Menu Interface
Computer
YPbPr/HDTV
Input, Picture, Color, Audio, Misc, Option, Language,
Reset
S-Video Video
YCbCr
16
None
Input, Color, Video, Audio, Misc, Option, Language,
Reset
Input, Option, Language, Reset
Page 22

Input Menu
This menu allows to specify the signal source that you wish to project.
This is particularly useful if you have several sources (video and/or
computer) connected to your projector. Changing settings procedure
(using either the Projector Control Panel or the Remote Controller):
1 Press the MENU button to
display OSD menu.
2 Press the or button to
select INPUT menu.
3 To enter the sub-menu setting,
press the button or the
MENU button.
4 Press the or button to
select the desired input source.
5 Press the button to confirm the input selection.
6 To exit from the current menu, toggle the MENU button.
The following table provides detail of the available sub-menu choices:
Option Description
17
Auto Search Automatically scans the input source.
Computer Signal from computer (desktop or notebook).
YCbCr Component video signal.
S-Video S-Video signal.
Video Composite video signal.
YPbPr/HDTV Signal from YPbPr/HDTV. (High Definition TV - a high-
resolution TV standard, which is part of the group of
digital TV standards introduced in USA in late 1998).
Picture Menu
This menu provides precise control of the projected image including:
Brightness, contrast, horizontal position, vertical position, tracking,
sync and sharpness (just for computer signal).
Page 23

Changing settings procedure (using either the Projector Control Panel
or the Remote Controller):
1 Press the MENU button to
display OSD menu.
2 Press the or button to
select PICTURE menu.
3 To enter the sub-menu
setting, press the button
or the MENU button.
4 Press the or button to
select the sub-menu item.
5 Press the or button to adjust the value of desired sub-menu
item.
6 After you have done with the adjustment of a sub-menu item:
a To resume changing another sub-menu item: press the or
button.
b To exit from the current menu: toggle the MENU button.
The following table provides detail of the available sub-menu choices:
Sub-Menu Description
18
Brightness The higher the setting, the brighter the image. The lower
Contrast The higher the setting, the greater the contrast. The lower
PosiH Adjusts the horizontal position.
PosiV Adjusts the vertical position.
Tracking Adjusts the horizontal pixel of the image.
Sync Adjusts the dot phase of the input signal. Adjusts the
Sharpness The higher the setting, the sharper the image. The lower
the setting, the darker the image.
the setting, the lower the contrast.
picture to where it looks best.
the setting, the softer the image.
Page 24

19
Color Menu
This menu provides precise control of the color settings including: color
temperature (preset & user define) and gamma. Changing settings
procedure (using either the Projector Control Panel or the Remote
Controller):
1 Press the MENU button to
display OSD menu.
2 Press the or button to
select COLOR menu.
3 To enter the sub-menu
setting, press the button
or the MENU button.
4 Press the or button to
select the sub-menu item.
5 Press the or button to adjust the value of desired sub-menu
item.
• On the Color Temp and Gamma sub-menus, press the or
button to select the desired setting.
6 After you have done with the adjustment of a sub-menu item:
a To resume changing another sub-menu item: press the or
button.
b To exit from the current menu: toggle the MENU button.
The following table provides detail of the available sub-menu choices:
Sub-Menu Option Description
Color Temp Adjusts the whiteness of the screen.
L (Low) Gives the white colors a red tint.
M (Middle) Gives the white colors a neutral tint.
H (High) Gives the white colors a blue tint.
U (User) Selects customized color temperature.
User Manually adjusts color temperature.
Page 25

20
Sub-Menu Option Description
Gamma Selects a gamma correction curve.
Gamma1 Improves computer's image mode.
Gamma2 Improves video's image mode.
Note: The color adjustment on the User setting can only be made
if the Color Temp selection is "User".
Audio Menu
This menu allows you to control volume and mute (On/Off) the audio.
Changing settings procedure (using either the Projector Control Panel
or the Remote Controller):
1 Press the MENU button to
display OSD menu.
2 Press the or button to
select AUDIO menu.
3 To enter the sub-menu
setting, press the button
or the MENU button.
4 Press the or button to
select the sub-menu item.
5 Press the or button to adjust the value of desired sub-menu
item.
• On the Mute sub-menu, press the or button to select the
desired setting.
6 After you have done with the adjustment of a sub-menu item:
a To resume changing another sub-menu item: press the or
button.
b To exit from the current menu: toggle the MENU button.
Page 26
The following table provides detail of the available sub-menu choices:
Sub-Menu Option Description
Volume Adjusts the volume.
Mute Cuts off the sound temporarily.
On Mute function is active.
Off Mute function is inactive.
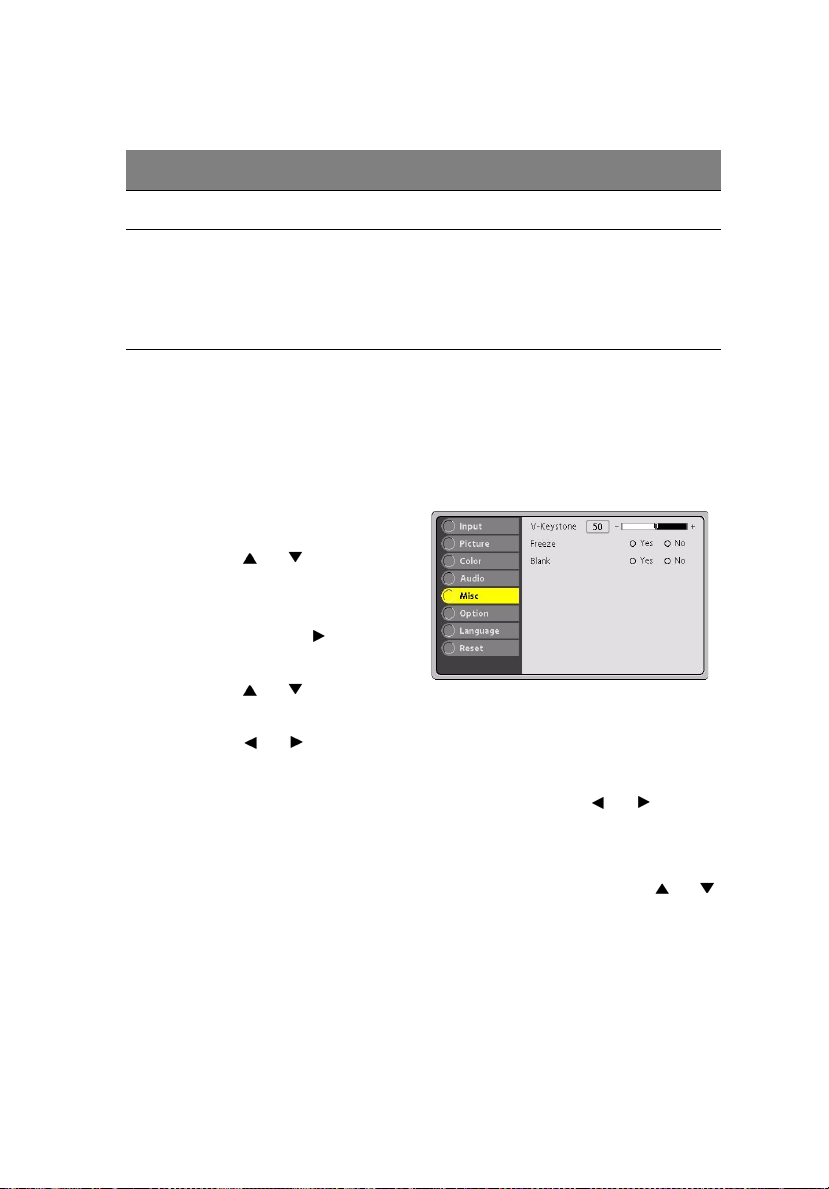
MISC Menu
This menu includes projector utilities for vertical keystone, freeze (yes/
no) and blank (yes/no) mode settings. Changing settings procedure
(using either the Projector Control Panel or the Remote Controller):
1 Press the MENU button to
display OSD menu.
2 Press the or button to
select MISC menu.
3 To enter the sub-menu
setting, press the button
or the MENU button.
4 Press the or button to
select the sub-menu item.
5 Press the or button to adjust the value of desired sub-menu
item.
21
• On the Freeze and Blank sub-menus, press the or button
to select the desired setting.
6 After you have done with the adjustment of a sub-menu item:
a To resume changing another sub-menu item: press the or
button.
b To exit from the current menu: toggle the MENU button.
Page 27

The following table provides detail of the available sub-menu choices:
Sub-Menu Option Description
22
V-Keystone Adjusts trapezoidal distortion (vertically) of the
Freeze Freezes the screen.
Yes Freeze function is active.
No Freeze function is inactive.
Blank Blanks the screen temporarily.
Yes Blank function is active.
No Blank function is inactive.
picture that may occur depending the projection
angle.
Option Menu
This menu includes projector utilities for OSD timeout, OSD horizontal
position, OSD vertical position, rear mode, ceiling mode, aspect ratio,
auto off and lamp life indication. Changing settings procedure (using
either the Projector Control Panel or the Remote Controller):
1 Press the MENU button to
display OSD menu.
2 Press the or button to
select OPTION menu.
3 To enter the sub-menu
setting, press the button
or the MENU button.
4 Press the or button to
select the sub-menu item.
5 Press the or button to adjust the value of desired sub-menu
item.
• On the Rear, Ceiling, Aspect Ratio and Auto Off sub-menus,
press the or button to select the desired setting.
• On the Lamp Life sub-menu, the lamp's lifetime counter is
calculated by the projector system.
Page 28

6 After you have done with the adjustment of a sub-menu item:
a To resume changing another sub-menu item: press the or
button.
b To exit from the current menu: toggle the MENU button.
The following table provides detail of the available sub-menu choices:
Sub-Menu Option Description
OSD Timeout Duration OSD menu stays active (at idle
state).
OSD PosiH Adjusts OSD menu display position
(horizontally - left & right) on the screen.
OSD PosiV Adjusts OSD menu display position
(vertically - up & down) on the screen.
Rear The image is reversed horizontally.
Yes Rear projection is active.
No Rear projection is inactive.
Ceiling The image is inverted vertically.
23
Yes Ceiling projection is active.
No Ceiling projection is inactive.
Aspect Ratio HDTV and video display selection.
1:1 Selects 1:1 aspect ratio.
16:9 Selects 16:9 aspect ratio.
4:3 Selects 4:3 aspect ratio.
Auto Off Automatically turns off the lamp if the
Yes Auto Off is active.
No Auto Off is inactive.
projector does not detect an input signal
for specified time period (30 minutes).
Page 29

Sub-Menu Option Description
Lamp Life Displays lamp's lifetime counter (by hour).
Note: Lamp life counter is displayed in read-only format, and this
setting cannot be manually adjusted.
Language Menu
This menu enables you to select the language used in the OSD (onscreen display) menus. Changing settings procedure (using either the
Projector Control Panel or the Remote Controller):
1 Press the MENU button to
display OSD menu.
2 Press the or button to
select LANGUAGE menu.
3 To enter the sub-menu
setting, press the button
or the MENU button.
4 Press the or button to
select the desired OSD language.
5 Press the button to confirm the OSD language selection.
6 To exit from the current menu, toggle the MENU button.
24
Note: This projector supports multilanguage.
Reset Menu
This menu allows you to restore all projector settings and adjustments
back to the factory defaults. Changing settings procedure (using either
the Projector Control Panel or the Remote Controller):
Page 30
1 Press the MENU button to
display OSD menu.
2 Press the or button to
select RESET menu.
3 To enter the sub-menu
setting, press the button
or the MENU button.
4 Press the or to select
YES if you want to restore all projector settings to the factory
defaults.
5 Press the button to confirm the selection.
6 To exit from the current menu, toggle the MENU button.
Other Related OSD Menus
Following are the descriptions on the on-screen display menus with
video input sources and without input source attached to your
projector.
Video Input Signal
25
If the input signal comes from S-Video, composite video or component
video (YCbCr), you may see VIDEO menu interface.
Video Menu
This menu enables you to adjust the video format settings, brightness,
contrast, saturation, tint and sharpness. Changing settings procedure
(using either the Projector Control Panel or the Remote Controller):
1 Press the MENU button to
display OSD menu.
2 Press the or button to
select VIDEO menu.
3 To enter the sub-menu
setting, press the button
or the MENU button.
4 Press the or button to
select the submenu item.
Page 31

5 Press the or button to adjust the value of desired sub-menu
item.
• On the Source sub-menu, press the or button to select
the desired setting.
6 After you have done with the adjustment of a sub-menu item:
a To resume changing another sub-menu item: press the or
button.
b To exit from the current menu: toggle the MENU button.
The following table provides detail of the available sub-menu choices:
Sub-Menu Option Description
Source Video format selection.
Auto Automatically scans video format.
PAL 4.43 Sets video format as PAL 4.43.
NTSC 4.43 Sets video format as NTSC 4.43.
PAL N Sets video format as PAL N.
26
NTSC 3.58 Sets video format as NTSC 3.58.
SECAM Sets video format as SECAM.
Brightness The higher the setting, the brighter the
Contrast The higher the setting, the greater the
Saturation The strength of a color especially the degree
Tint Adjusts the projection between red and
image. The lower the setting, the darker the
image.
contrast. The lower the setting, the lower
the contrast
to which it lacks its complimentary color.
The higher the setting, the stronger color
strength. The lower the setting, the weaker
color strength.
green color.
Page 32

Sub-Menu Option Description
27
Sharpness
The higher the setting, the sharper the
image. The lower the setting, the softer the
image.
Other OSD Menus
Other OSD menus operation and description are the same as the
previous pages.
• Input Menu: refer to page 17.
• Color Menu: refer to page 19.
• Audio Menu: refer to page 20.
• MISC Menu: refer to page 21.
• Option Menu: refer to page 22.
• Language Menu: refer to page 24.
• Reset Menu: refer to page 24.
Page 33

No Input Signal
If there is no input signal attached with your projector, you press the
MENU button (on either the Projector Control Panel or the Remote
Controller), one of the following on-screen display menus will appear
on the screen.
Input Menu
(refer to page 17)
Option Menu
(refer to page 22)
28
Reset Menu
(refer to page 24
Language Menu
(refer to page 24)
)
Page 34

29
Maintenance
The projector needs little maintenance. You should keep the lens clean
as dust, dirt or spots will project on the screen and diminish image
quality. You will also need to clean the air filter located at the bottom
of the projector periodically. It is important to keep the air filter clean
because a clogged air filter prevents proper ventilation which is
necessary to cool the projector and prevent it from overheating. The
only part you should replace yourself are the lamp and the air filter. If
any other parts need replacing, contact your dealer or qualified service
personnel. When cleaning any part of the projector, always switch off
and unplug the projector first.
Warning: Never open any of the covers on the projector
except the lamp and air filter covers. Dangerous electrical
voltages inside the projector can cause severe injury.
Except as specifically indicated in this Instruction Manual,
do not attempt to service this product yourself. Refer all
servicing to qualified service personnel.
Cleaning the Lens
Clean the lens whenever you notice dirt or dust on the surface. Wipe
the lens surface gently with a soft, dry, lint-free cloth. To remove dirt or
stains on the lens, moisten a soft cloth with water and a neutral
detergent and gently wipe the lens surface.
Cleaning the Projector Housing
To clean the projector housing, first unplug the power cable. To
remove dirt or dust, wipe the housing with a soft, dry, lint-free cloth.
To remove stubborn dirt or stains, moisten a soft cloth with water and
a neutral detergent. Then wipe the housing. Do not use alcohol,
benzene, thinners or other chemical detergents as these can cause
damage to the housing.
Cleaning the Air Filter
The air filter, which is located at the bottom of the projector, should be
cleaned after every 100 hours of use. If it is not cleaned periodically, it
can become clogged with dust and prevent the projector from being
ventilated properly. This can cause overheating and damage the
projector.
Page 35

To clean the air filter:
1 Switch the projector off and unplug
the power cable from the wall
socket.
2 Place a protective sheet (cloth)
beneath the projector. Turn the
projector over so you can see its
underside.
3 Remove the air filter by pulling the
filter tab.
4 Clean the air filter.
Caution: To clean the filter, you are advised to use a small vacuum
cleaner designed for computers and other office equipment.
If the dirt is difficult to remove or if the filter is torn, replace it.
5 Replace the filter.
6 Plug the power back into the projector.
Note: Be sure that the projector is stable after turning it over.
When replacing the filter, make sure it is inserted in the correct
direction as shown illustration.
30
Replacing the Lamp
The projector lamp used for the light source has a certain life. It is time
to replace them lamp when:
• The lamp dims, the projected image gets darker or starts to
deteriorate.
• The projector lamp LED indicator turns to red (See page 14).
Caution: The lamp becomes high temperature after turning off
the projector with the power button. If you touch the lamp, you
may scald your finger. When you replace the lamp, wait for at
least an hour for the lamp to cool. Be sure to turn off the
projector and unplug the power cord before replacing the lamp.
Page 36

1 Turn off the projector and unplug the power cable.
2 Turn the projector over so you can
access the lamp cover.
3 Remove the access panel screws and
open the panel.
4 Remove the screws on the bottom of
the lamp assembly.
5 Grasp the lamp handle and pull the
lamp assembly directly out of the
projector.
6 Replace with the new lamp.
7 Place back the screws on the bottom
of lamp assembly.
8 Place the panel and screw back the
screws on the lamp cover.
Note:
Be sure not to touch the optical surfaces with your fingers. Lintfree gloves or finger cots are recommended.
Do not put your hands into the lamp replacement spot, or not fall
any liquid or object into it to avoid electrical shock or fire.
Be sure to turn off the projector and unplug the power cord
before replacing thelamp.
31
Page 37

Technical specifications
Item Description
Projection System 3 panel 0.7" LCD projector
Native Resolution 800x600 (480,000 dotx3)
Image Brightness 1400 ANSI Lumens (TYP)
Uniformity 85%
Lens Manual Zoom (1.3X)
Focal Length 21.5~28mm
Contrast Ratio 500:1 (B/W)
Aspect Ratio 4:3, supports 16:9
Screen Size 25.9"~331.4"
Lamp 180W NUP
Projection Type Front, Rear, Ceiling, Rear+Ceiling
32
Video Input PAL, NTSC, SECAM
Input Source Computer, YPbPr/HDTV, YCbCr, S-Video,
Scanning Frequency
Horizontal Freq.
Vertical Freq.
Pixel Rate
Digital Keystone Correction ±15 degrees (digital)
Analog RGB (input signal) D-SUB connector
HDTV Display (YPbPr) 480p (60Hz), 720p (60Hz), 1080i (30Hz),
Integrated Speaker 1W x 2
Audible Noise 35dB
Video
15~79KHz
50~85Hz
12~135MHz
576p (50Hz)
Page 38

Item Description
Remote Control Multifunctional
OSD Language Multilanguage
Operational Ambient Temperature: 5~35°C
Humidity: 35~85%
33
Certification UL, CE, FCC Class B, VCCI, C-Tick, CCC, TUV-
Power Supply AC 100~240V, 50~60Hz
Power Consumption 240 Watts
Dimension (W x D x H) 225 x 280 x 80 mm (8.86" x 11" x 3.15")
Weight 3.0 kg/6.6 lb
GS, PSB, S-Mark
Design and Specifications are subject to change without prior notice.
Page 39

Appendix A
Preset Signals
Preset signal fH (kHz) fV (Hz) Sync Size
Video 60 Hz 15.734 59.940
Video 50 Hz 15.625 50.000
34
Component 60 Hz 15.734 59.940 S on G/Y or
Component 50 Hz 15.625 50.000 S on G/Y or
640 x 350 VGA mode 1 31.469 70.086 H(+), V(-) 800
VGA VESA 85 Hz 37.861 85.080 H(+), V(-) 832
640 x 400 VGA 85Hz 37.861 85.080 H(-), V(+) 832
720 x 400 VGA mode 2 31.500 70.087 H(-), V(+) 900
VGA VESA 85 Hz 37.927 85.038 H(-), V(+) 936
640 x 480 VGA mode 3 31.469 59.940 H(-), V(-) 800
VGA VESA 72 Hz 37.861 72.809 H(-), V(-) 832
VGA VESA 75 Hz 37.500 75.000 H(-), V(-) 840
VGA VESA 85 Hz 43.269 85.008 H(-), V(-) 832
800 x 600 SVGA VESA 56 Hz 35.156 56.250 H(+), V(+) 1024
SVGA VESA 60 Hz 37.879 60.317 H(+), V(+) 1056
SVGA VESA 72 Hz 48.077 72.188 H(+), V(+) 1040
SVGA VESA 75 Hz 46.875 75.000 H(+), V(+) 1056
Composite Sync
Composite Sync
SVGA VESA 85 Hz 53.674 85.061 H(+), V(+) 1048
1024 x 768 XGA VESA 60 Hz 48.363 60.004 H(-), V(-) 1344
XGA VESA 70 Hz 56.476 70.069 H(-), V(-) 1328
Page 40

Preset signal fH (kHz) fV (Hz) Sync Size
XGA VESA 75 Hz 60.023 75.029 H(+), V(+) 1312
XGA VESA 85 Hz 68.677 84.997 H(+), V(+) 1376
1152 x 864 SXGA VESA 70 Hz 63.995 70.016 H(+), V(+) 1472
SXGA VESA 75 Hz 67.500 75.000 H(+), V(+) 1600
SXGA VESA 85 Hz 77.487 85.057 H(+), V(+) 1568
1280 x 960 SXGA VESA 60 Hz 60.000 60.000 H(+), V(+) 1800
SXGA VESA 75 Hz 75.000 75.000 H(+), V(+) 1680
1280 x 1024 SXGA VESA 60 Hz 63.981 60.020 H(+), V(+) 1688
HDTV Preset Signals
35
Preset
Signals
Horizontal
Active Pixel
Vertical
Active Pixel
fH(kHz) fV(Hz)
480p 720 480 31.469 59.940
720p 1280 720 45.000 60.000
1080i 1920 1080 33.716 29.970
576p 720 576 31.250 50.000
Page 41

Monitor OUT cable (for data)
36
Display Set
IN
Monitor IN
Connecting the Computer (data)
Audio Cable
Projector
Computer
IN
VGA Cable
OUT
OUT
VGA Cable
VGA OUT
Page 42

Connecting the HDTV (data)
37
AV Composite Cable
OUT
Green,Blue,Red
OUT
RW
Audio OUT
Audio IN HDTV (HDTV to D-SUB Cable)
IN
Audio IN
IN
VGA to
HDTV Cable
Connecting to a Video Source (S-Video, Component,
Composite)
DVD Player or VCR
S-Video Cable
DVD Player
AV Composite Cable
W/R Y
YCbCr (Component Video Cable)
Page 43

38
 Loading...