

Page 1

Acer p600 Series
Portable Navigator
Page 2

Copyright © 2006. Acer Incorporated.
All Rights Reserved.
Acer p600 Series Portable Navigator User Guide
Original Issue: May 2006
Changes may be made periodically to the information in this publication without obligation to notify any
person of such revisions or changes. Such changes will be incorporated in new editions of this User Guide or
supplementary documents and publications. This company makes no representations or warranties, either
expressed or implied, with respect to the contents hereof and specifically disclaims the implied warranties of
merchantability or fitness for a particular purpose.
Record the model number, serial number, purchase date and place of purchase information in the space
provided below. The serial number and model number are recorded on the label affixed to your handheld. All
correspondence concerning your unit should include the serial number, model number, and purchase
information.
No part of this publication may be reproduced, stored in a retrieval system, or transmitted, in any form or by any
means, electronically, mechanically, by photocopy, recording or otherwise, without the prior written permission
of Acer Incorporated.
Acer p600 Series Portable Navigator
Model number: __________________________________
Serial number: ___________________________________
Date of purchase: ________________________________
Place of purchase: ________________________________
Acer and the Acer logo are registered trademarks of Acer Incorporated. Other companies' product names or
trademarks are used herein for identification purposes only and belong to their respective companies.
Microsoft, ActiveSync, Outlook, Pocket Outlook, Windows, Windows NT and the Windows logo are either
registered trademarks or trademarks of Microsoft Corporation in the United States and/or other countries.
Microsoft products are licensed to OEMs by Microsoft Licensing, Inc., a wholly owned subsidiary of Microsoft
Corporation.
Acer and its subsidiaries make no representations or warranties, either expressed or implied, with respect to the
contents hereof and specifically disclaims the implied warranties of merchantability or fitness for a particular
purpose. Acer and its subsidiaries assume no responsibility for any damage or loss resulting from the use of this
Acer p600 Series Portable Navigator User Guide.
Page 3
Disposal instructions
Do not throw this electronic device into the trash when discarding. To minimize
pollution and ensure utmost protection of the global environment, please reuse and
recycle.
Disposal instructions
USA
For electronic products containing an LCD/CRT monitor or display:
Lamp(s) inside this product contain mercury and must be recycled or disposed of
according to local, state or federal laws. For more information, contact the Electronic
Industries Alliance at www.eiae.org
www.lamprecycle.org
.
. For lamp-specific disposal information, check
Important safety instructions
Read these instructions carefully. Save them for future reference.
Follow all warnings and instructions marked on the product.
Unplug this product from the wall outlet before cleaning. Do not use liquid cleaners
or aerosol cleaners. Use a water-moistened cloth for cleaning.
Do not use this product near water.
i
Page 4

Disposal instructions
Do not place this product on an unstable cart, stand or table. If the product falls, it
could be seriously damaged.
This product should be operated from the type of power indicated on the marking
label. If you are not sure of the type of power available, consult your dealer or local
power company.
Do not allow anything to rest on the power cord. Do not locate this product where
people will walk on the cord.
If an extension cord is used with this product, make sure that the total ampere rating
of the equipment plugged into the extension cord does not exceed the extension cord
ampere rating. Also, make sure that the total rating of all products plugged into the
wall outlet does not exceed the fuse rating.
Never push objects of any kind into this product through cabinet slots as they may
touch dangerous voltage points or short-out parts that could result in a fire or electric
shock. Never spill liquid of any kind onto or into the product.
Do not attempt to service this product yourself, as opening or removing covers may
expose you to dangerous voltage points or other risks. Refer all servicing to qualified
service personnel.
Unplug this product from the wall outlet and refer servicing to qualified service
personnel under the following conditions:
When the power cord or plug is damaged or frayed.
If liquid has been spilled into the product.
If the product has been exposed to rain or water.
If the product does not operate normally when the operating instructions are
followed. Adjust only those controls that are covered by the operating instructions,
since improper adjustment of other controls may result in damage and will often
require extensive work by a qualified technician to restore the product to normal
condition.
If the product has been dropped or the case has been damaged.
If the product exhibits a distinct change in performance, indicating a need for service.
The Acer p600 Series Portable Navigator uses a lithium battery.
Replace the battery with the same type as the product's battery we recommend in the
product specification list. Use of another battery may present a risk of fire or
explosion.
Warning! Batteries may explode if not handled properly. Do not disassemble or
dispose of them in fire. Keep them away from children and dispose of used batteries
promptly.
To avoid hazard of unexpected electrical shock, use the AC adapter only when the
wall socket is properly grounded.
Do not use your device while exercising.
ii
Page 5

Acer p600 Series Portable Navigator feature highlights
Acer p600 Series Portable Navigator feature highlights
No more fumbling with wieldy, outdated paper maps. No more sheepish ”I think I’m
lost” expression. And most definitely, no more going in circles finding that particular
spot. Get to your destination the fast and easy way with your new Acer p600 Series
Portable Navigator.
Powerful system
• Microsoft Windows CE version 5.0 operating system
• Samsung 400 MHz processor
• SiRF Star III LP chipset and firmware solution
• Rechargeable 1200 mAh Lithium Ion battery (Certain models only)
Wide and accurate GPS coverage
• Intuitive and Intelligent Navigation software
• Integrated chip antenna for optimum satellite pick up
Mobile design
• Compact and lightweight body makes it easy for users to carry it anywhere
while driving or hiking
• Car mount kit for multi-vehicle usage
• On-the-road recharging options via the car charger
Battery life (Certain models only)
• Normal usage: 5 hours
• MP3 usage: with speaker: 2.5 hours, with earphones: 3 hours
• Navigation software usage: 3 hours
iii
Page 6

Acer p600 Series Portable Navigator feature highlights
Ergonomic features
• 4-inch WQVGA LCD touch-sensitive screen
• Accessible control hot keys with backlight illumination
• Simple, easy-to-use user interface with large icons and command buttons
• Multi-language support for user interface
• Advanced power-saving options
Multimedia programs
• MP3 for your musical entertainment
• Photo for your favourite digital pictures
Contacts management program
• Program for managing contact information on your device
iv
Page 7
Unpack the Acer p600 Series Portable Navigator
Unpack the Acer p600 Series Portable Navigator
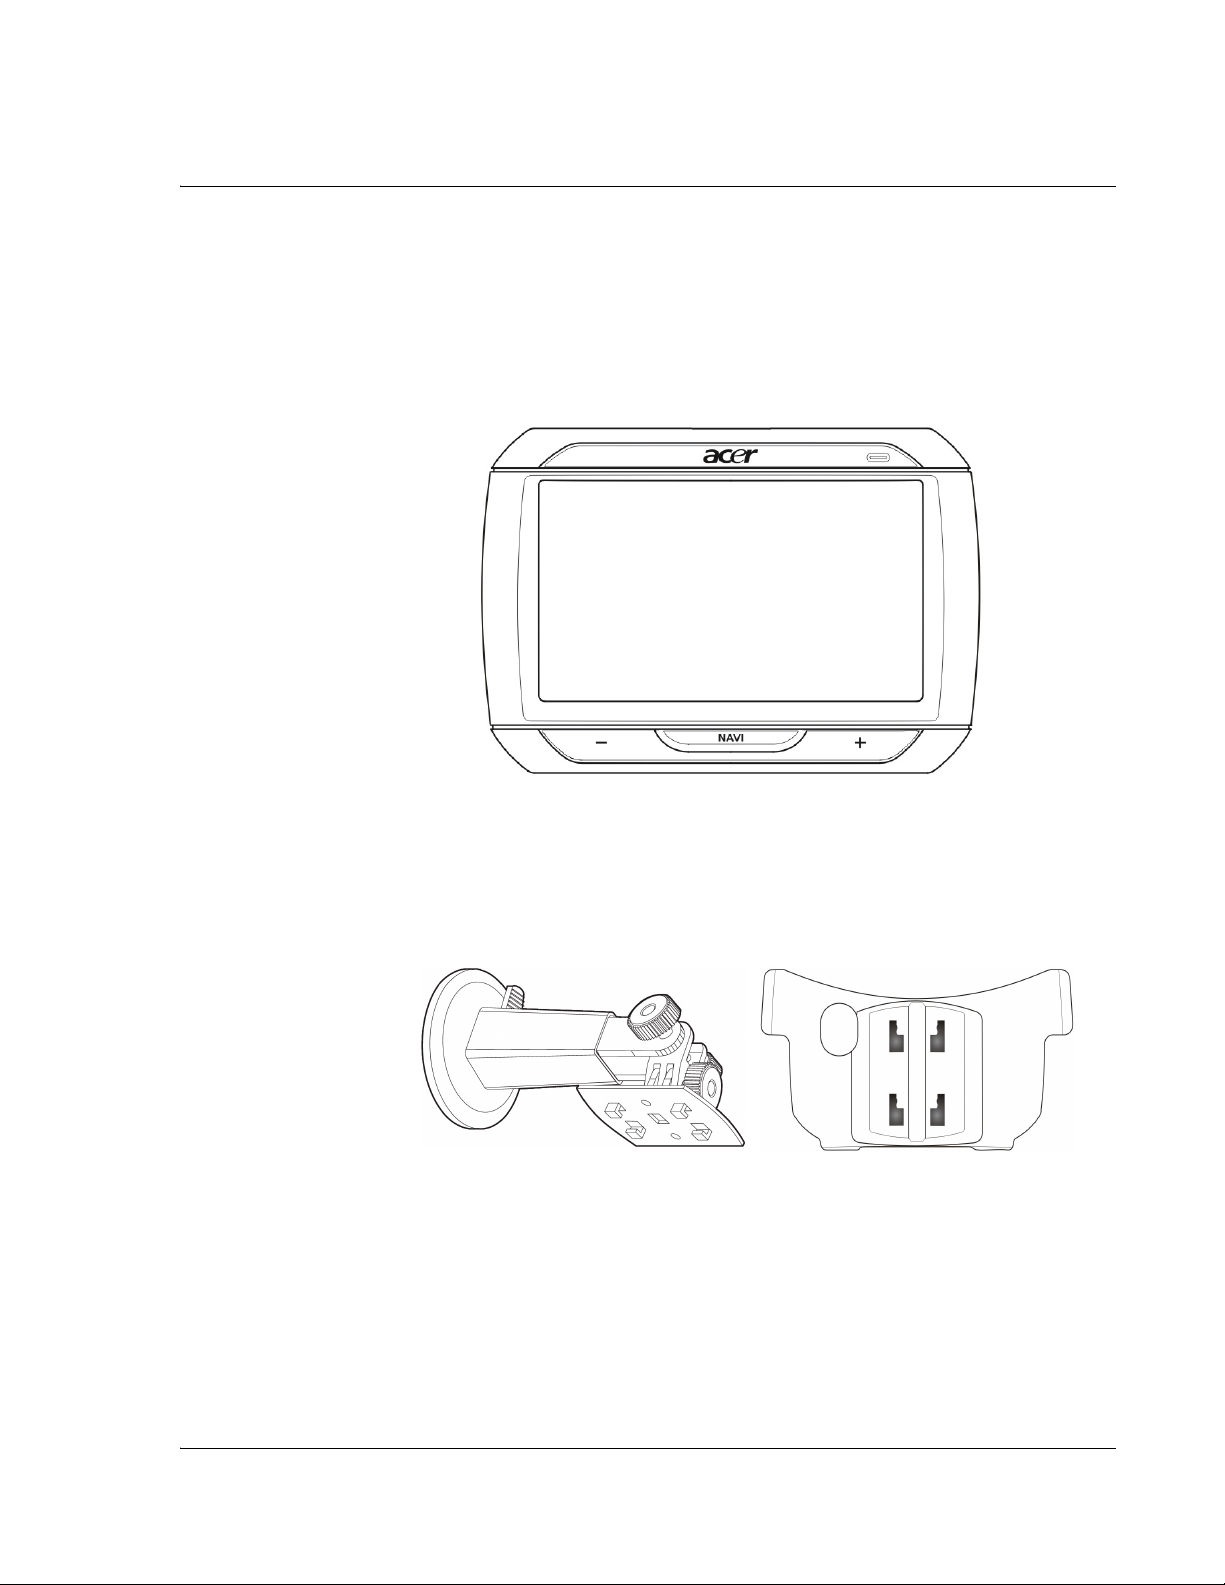
Thank you for purchasing the Acer p600 Series Portable Navigator. The Acer p600
Series Portable Navigator box contains all of the items listed below.
• Acer p600 Series Portable Navigator unit
• Car mount kit
Car mount Car holder
v
Page 8

Unpack the Acer p600 Series Portable Navigator
•Car charger
• Wall charger (Manufacture option)
• Mini USB Sync and charge cable
vi
Page 9
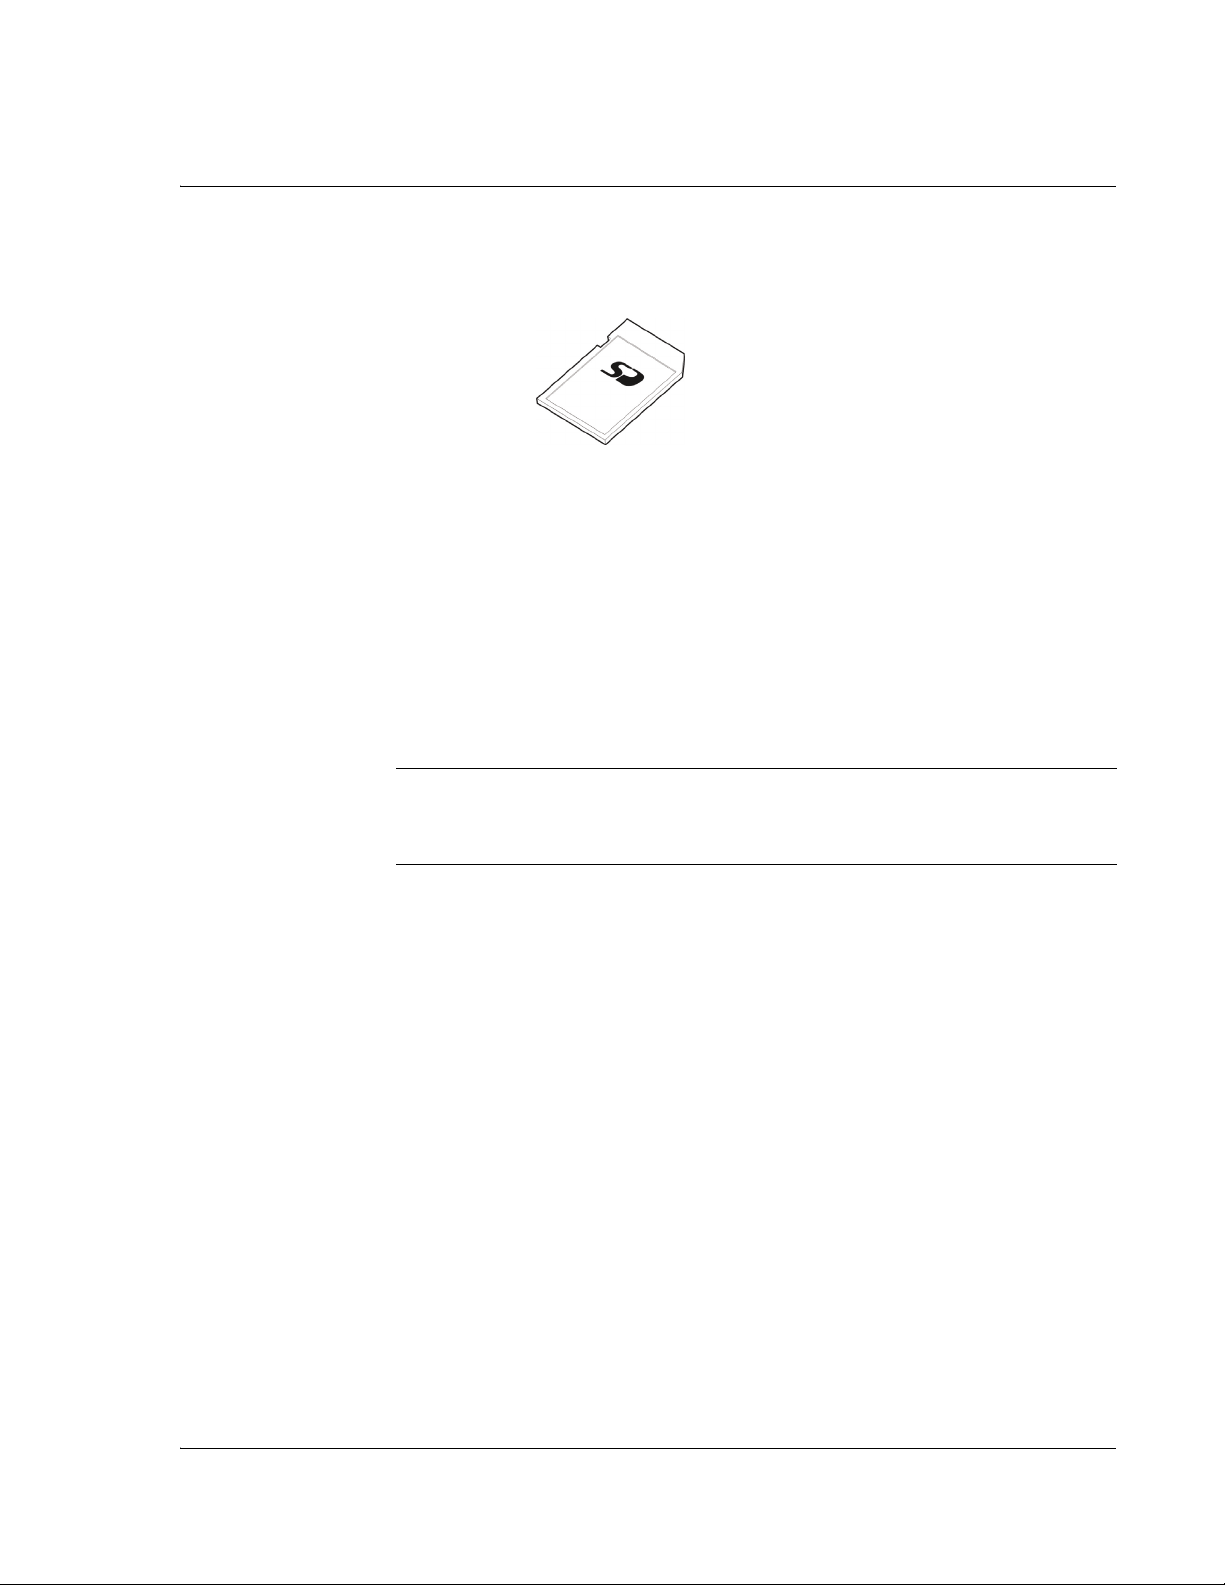
Unpack the Acer p600 Series Portable Navigator
• Navigation software SD card (Manufacture option)
• User documentation
– Acer p600 Series Portable Navigator CD (Manufacture option)
– Acer p600 Series Portable Navigator Getting Started Guide (Manufacture
option)
– Acer p600 Series Portable Navigator Warranty Booklet (Manufacture
option)
– Navigation software Quick Starter Guide (Manufacture option)
– Navigation software CD (Manufacture option)
NOTE: Report any product defects or missing items to the place of purchase immediately. Save
the boxes and packing materials for future use.
Some models may include optional accessories that might not be shown in the above
illustrations. Please check with your dealer for more details.
vii
Page 10
First things first
System tour
System tour
First things first
This chapter describes the hardware interface of the Acer p600 Series Portable
Navigator and its peripherals. Instructions for setting up the device and some basic
system operations are also discussed.
This section gives you a tour of the device hardware interface.
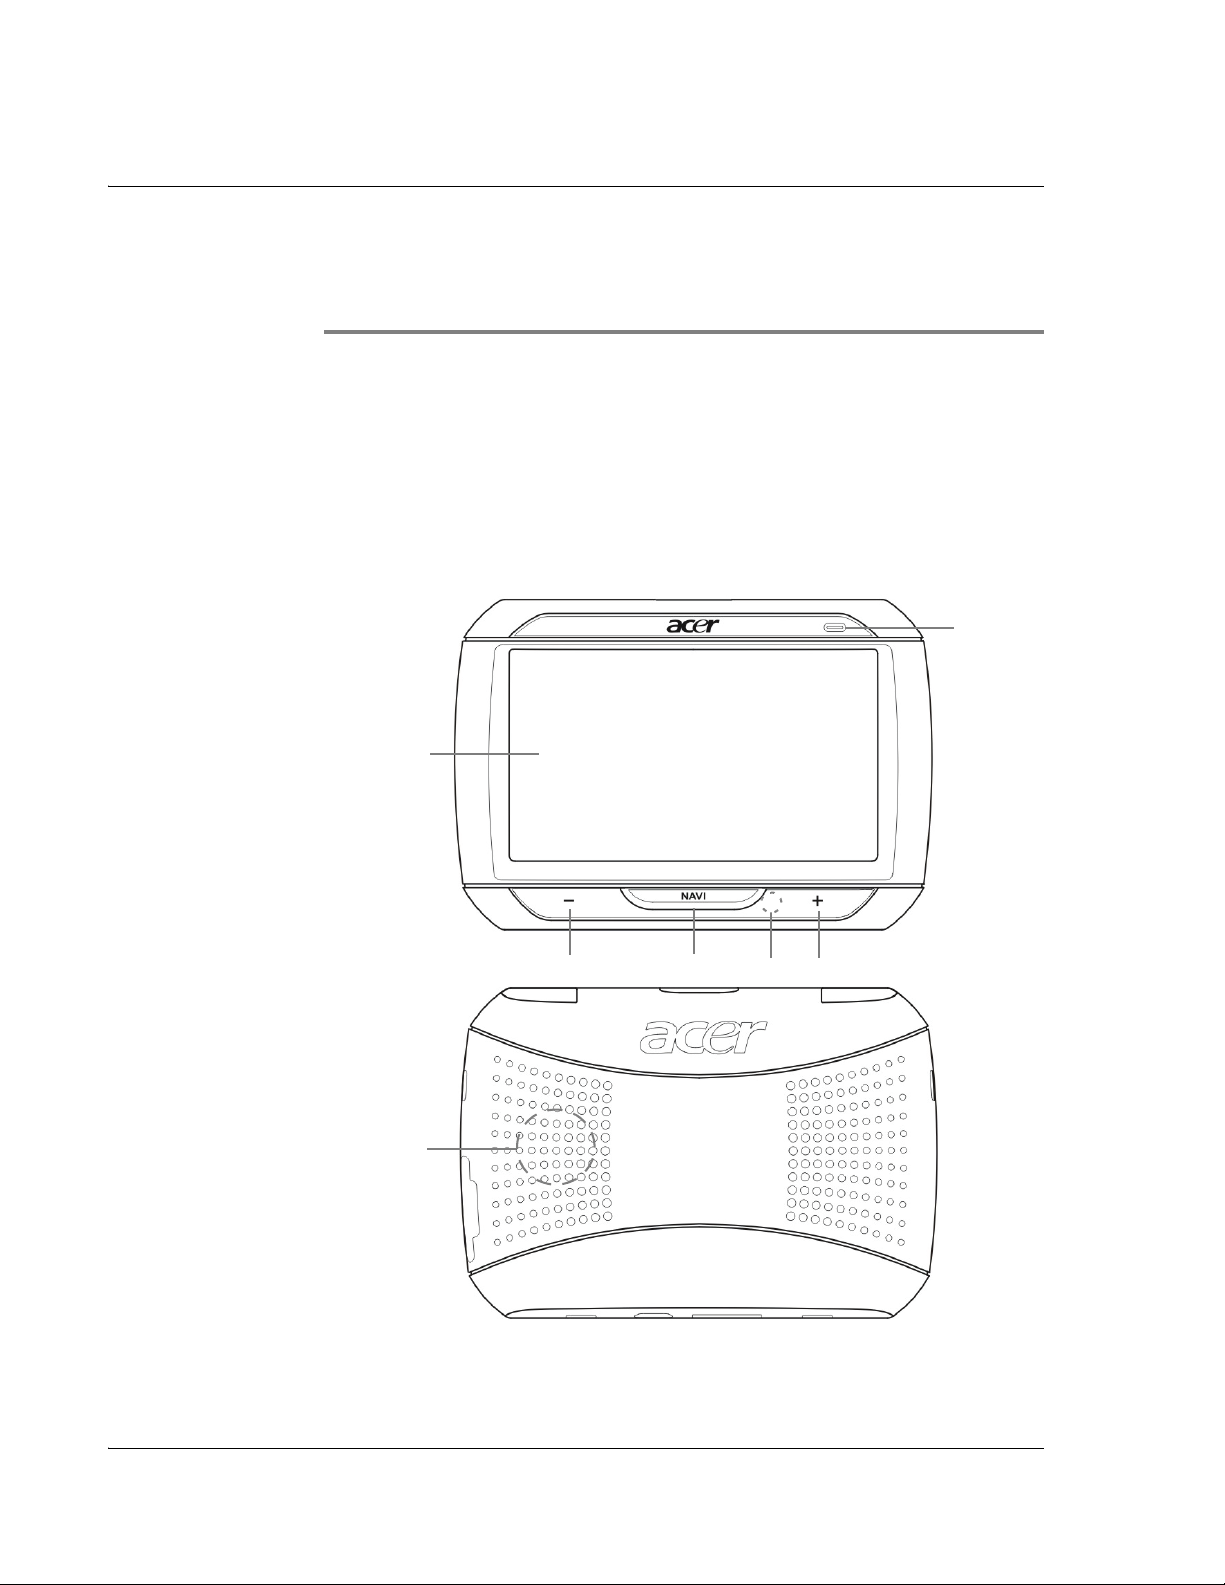
Front and Rear Panels
2
1
34 6
7
5
viii
Page 11

First things first
System tour
No Icon Component Description
1 Touch screen Displays the applications, data, and map
images available on your device. It is
touch sensitive and responds to finger
taps.
2 Power status LED indicator Indicates the battery charging status.
• Green – Battery is fully charged
• Orange – Battery charging
• Red – Battery low
3 Volume down button Turns down the volume of the speaker.
4 NAV Home/Navigation button Pressing this button while in the Main
5 Microphone Internal microphone is used during
6 Volume up button Turns up the volume of the speaker.
7 Speaker Emits system sounds.
NOTE: For more information on how to use your Acer p600 Series Portable Navigator in
navigation mode, refer to the Navigation software Quick Starter Guide or the Navigation
software User’s Guide (located in the Navigation software CD).
Menu panel will bring you to the
Navigation panel.
Pressing this button while in any panel
other than the Main Menu will bring
you to the Main Menu.
phone communication
ix
Page 12
First things first
System tour
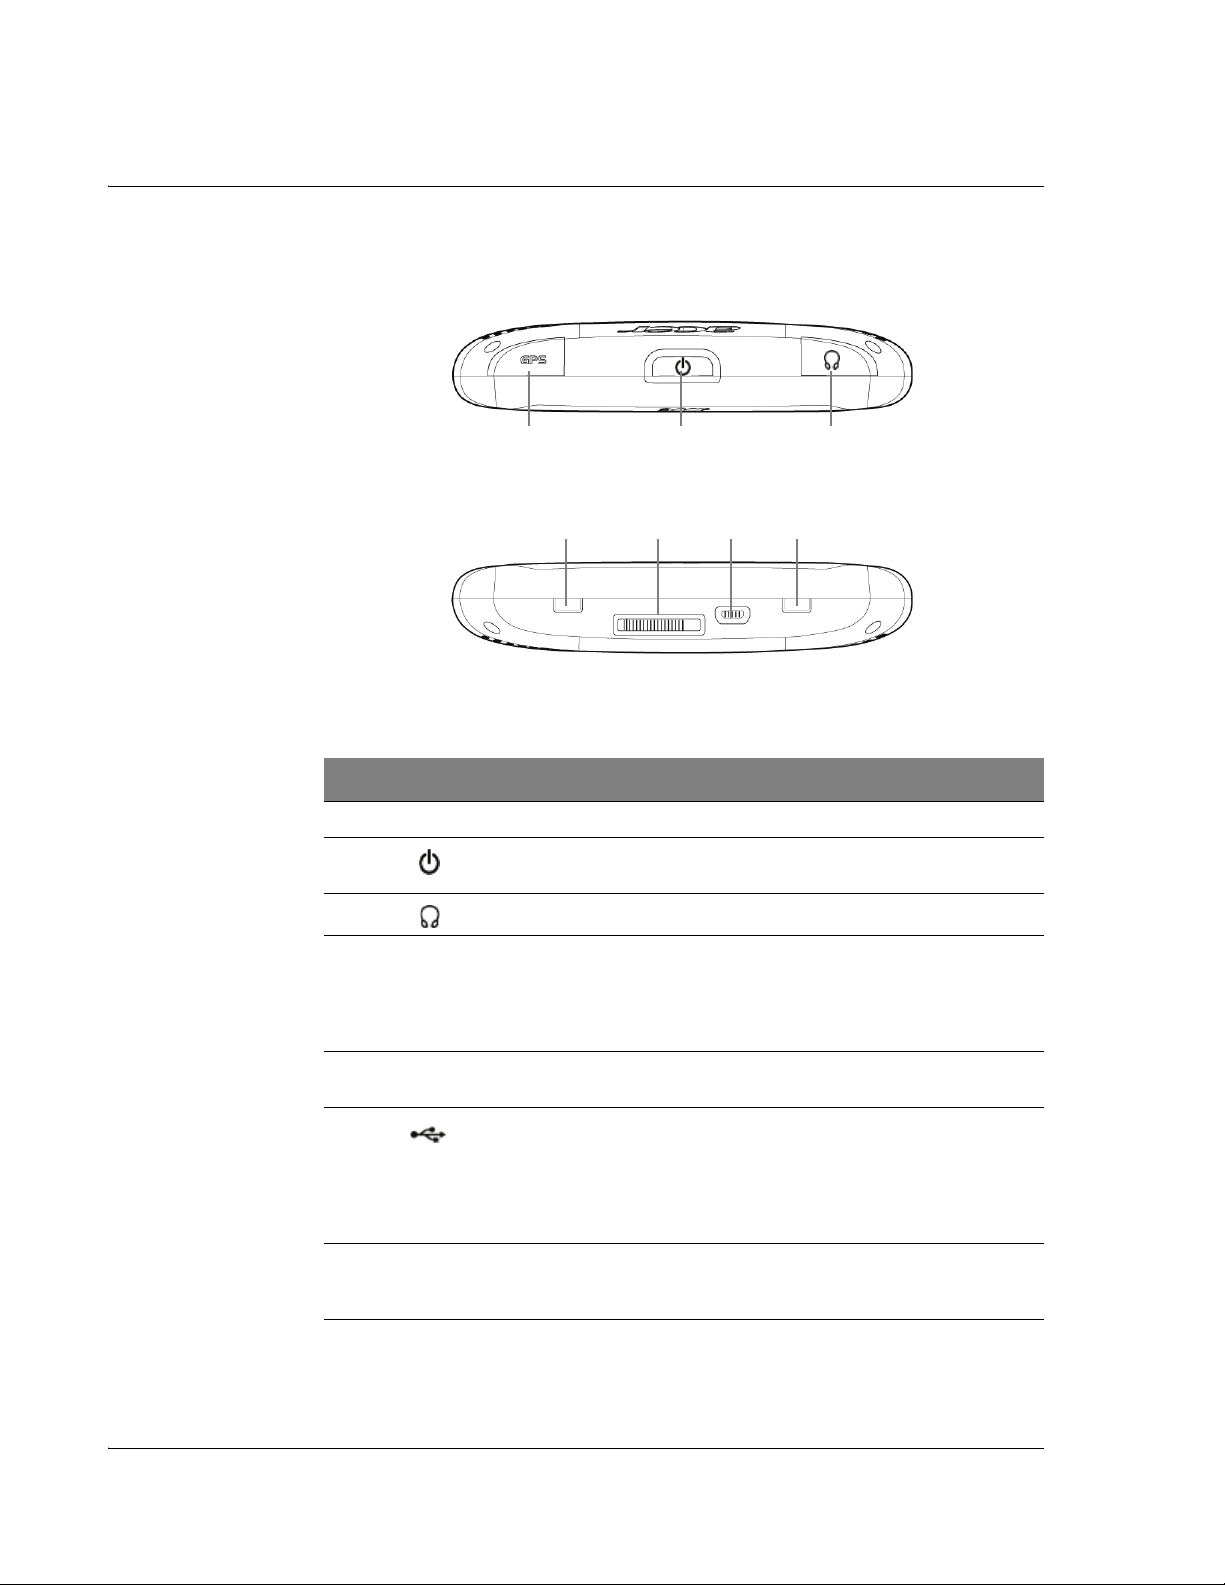
Top and bottom views
123
56
74
No. Icon Component Description
1 GPS GPS antenna jack Connects to an external GPS antenna.
2 Power button Switches the device into standby
mode.
3 Earphone jack Connects to earphones/headphones.
4 Power switch Used to switch device on initially, or to
5 Docking connector (Manufacture
option)
do a hard reset of the device. For more
information on performing a hard
reset, see "Performing a hard reset"
on page 33.
Connects to Car Mount Kit
6 USB port Connects the device to computer
running on the Microsoft Windows
platform. Also serves as the power
connector for charging the device.
Connects to external TMC module
(Selected models only).
7 Soft reset button Used to do a soft reset of the device.
For more information, see
"Performing a soft reset" on page 32.
x
Page 13
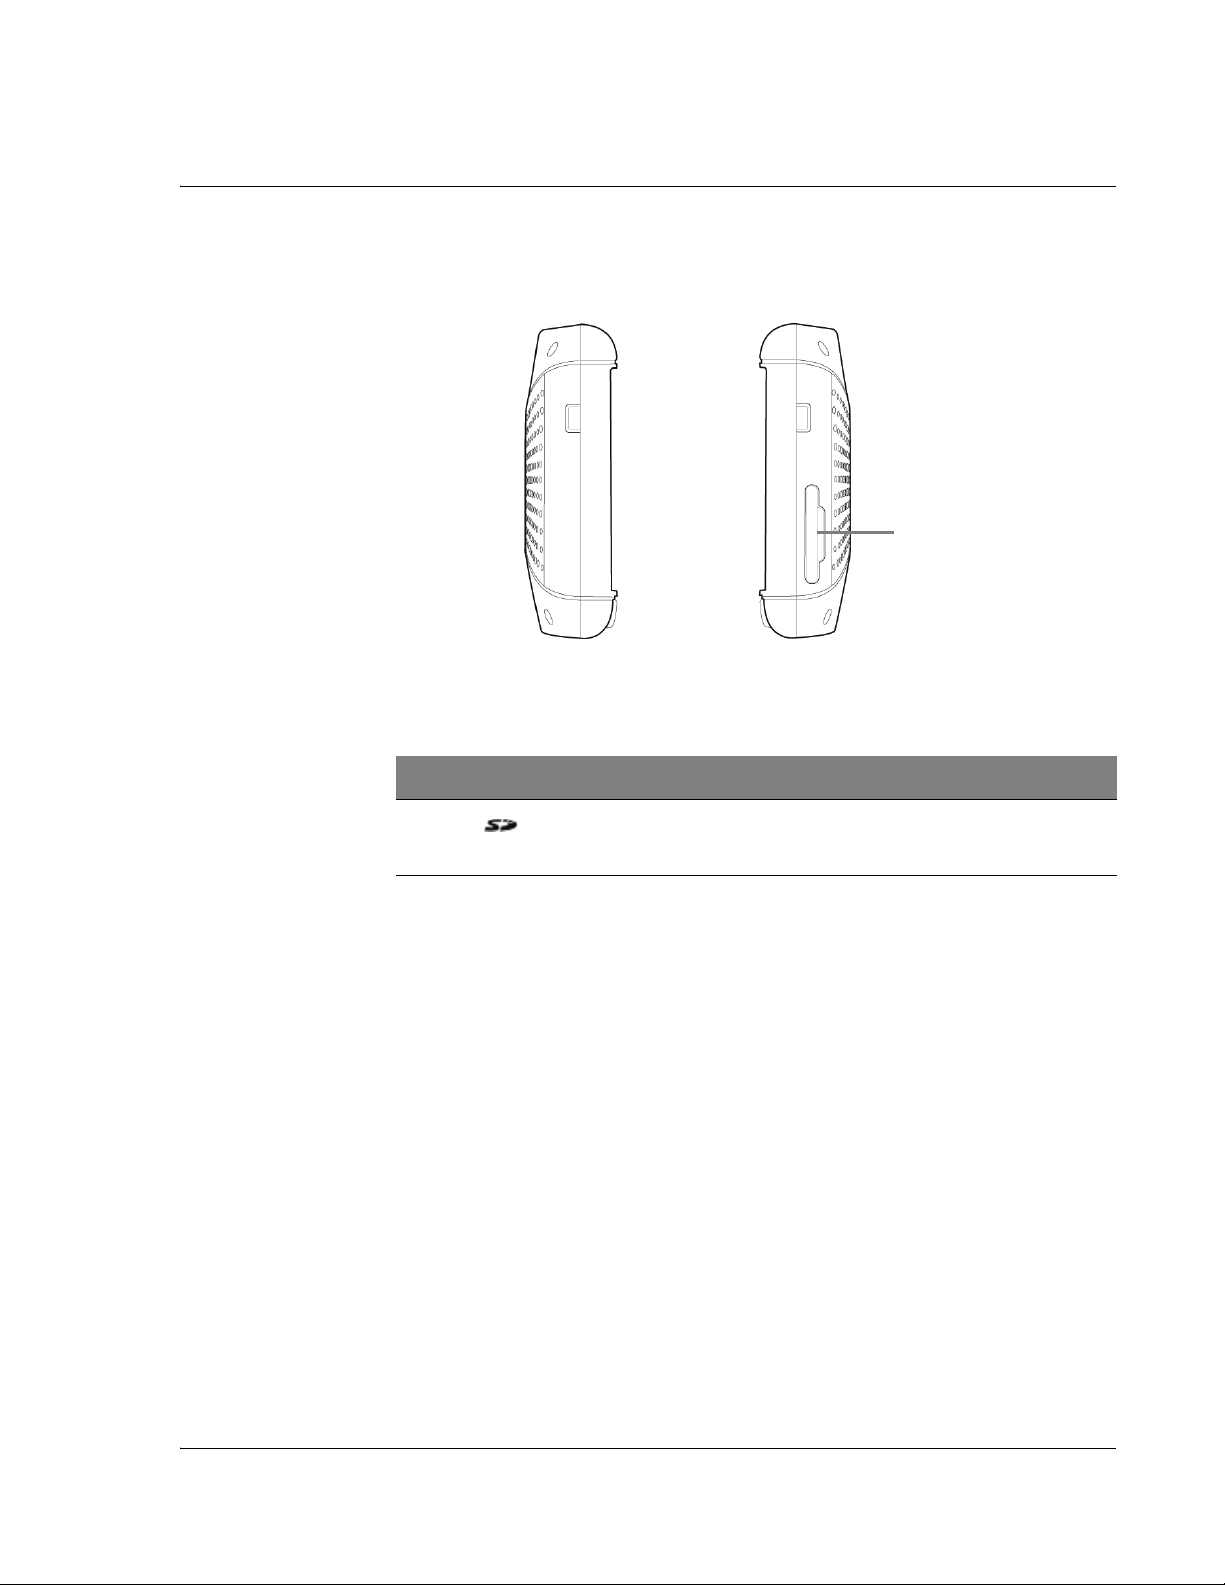
Left and right panels
First things first
System tour
1
No. Icon Component Description
1 SD/MMC slot Accepts SD and MMC storage cards, allowing you to
use audio, image, and map files stored in it for use
with internal applications.
xi
Page 14

First things first
Peripherals tour
Peripherals tour
This section gives you a tour of the peripherals bundled with your Acer p600 Series
Portable Navigator.
Car mount kit
The car mount kit consists of the car mount and the car holder.
8
No. Component Description
1 Holder plate Connects the car mount to the holder.
2 Horizontal angle adjustment knob Slightly loosen the knob to adjust the
viewing angle in a left-right direction.
3 Vertical angle adjustment knobs Slightly loosen the knobs to adjust the
viewing angle in an up-down direction.
4 Extendable rod Extend the rod to adjust the device
5 Suction cup locking lever Secures the vacuum seal of the car mount.
6 Suction cup Fixes the car mount on the selected
7 Suction cup release tab Pull to release the vacuum seal of the
8 Car mount holes Accepts the pegs on the holder plate of the
position in a front-to-rear direction.
mounting area.
suction cup.
car mount.
xii
Page 15
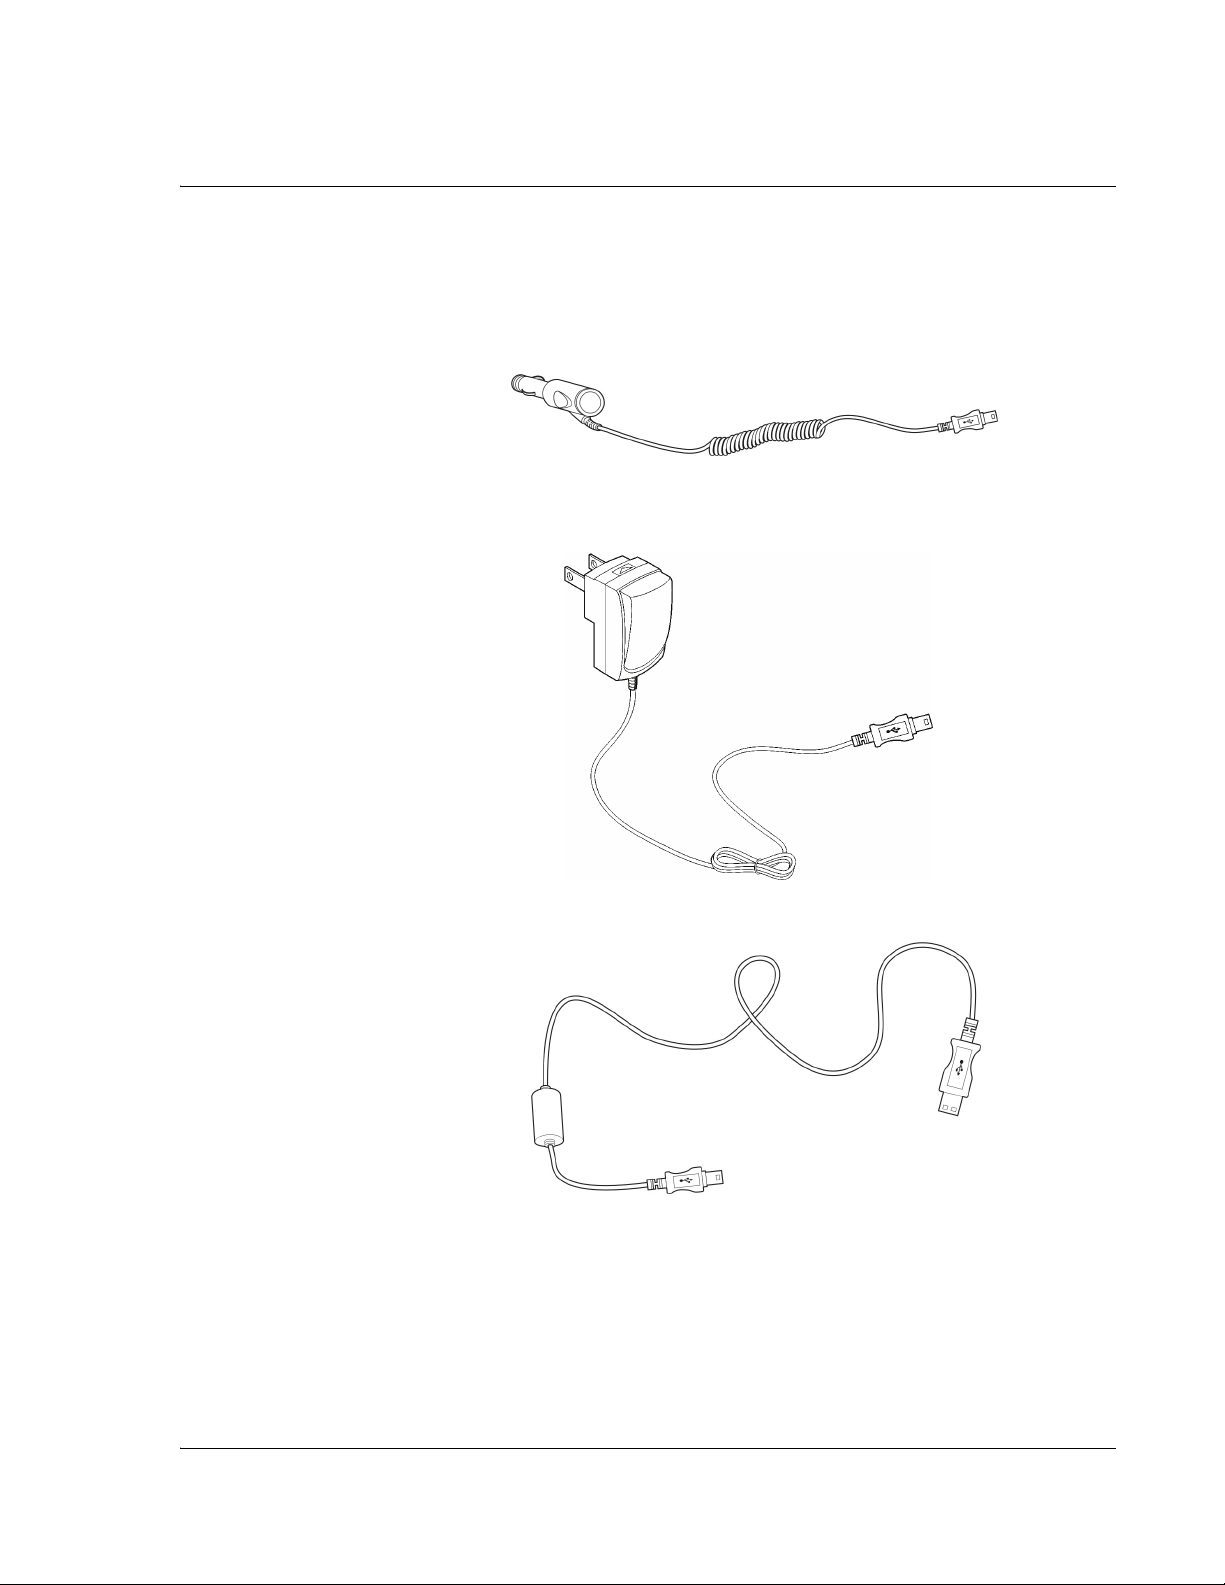
Chargers
Car charger
Wall charger
First things first
Peripherals tour
USB cable
The included USB cable is also used to transfer files from your computer to your
device.
xiii
Page 16
First things first
Acer p600 Series Portable Navigator setup
Acer p600 Series Portable Navigator setup
Using your new Acer p600 Series Portable Navigator for the first time is a snap.
Unpack, turn on, mount, and you’re ready to go. Perform the following easy
installation tasks to start using the device straight out of the box:
1 Unpack the device
2 Turn on and configure the device.
3 Set up the device in your vehicle.
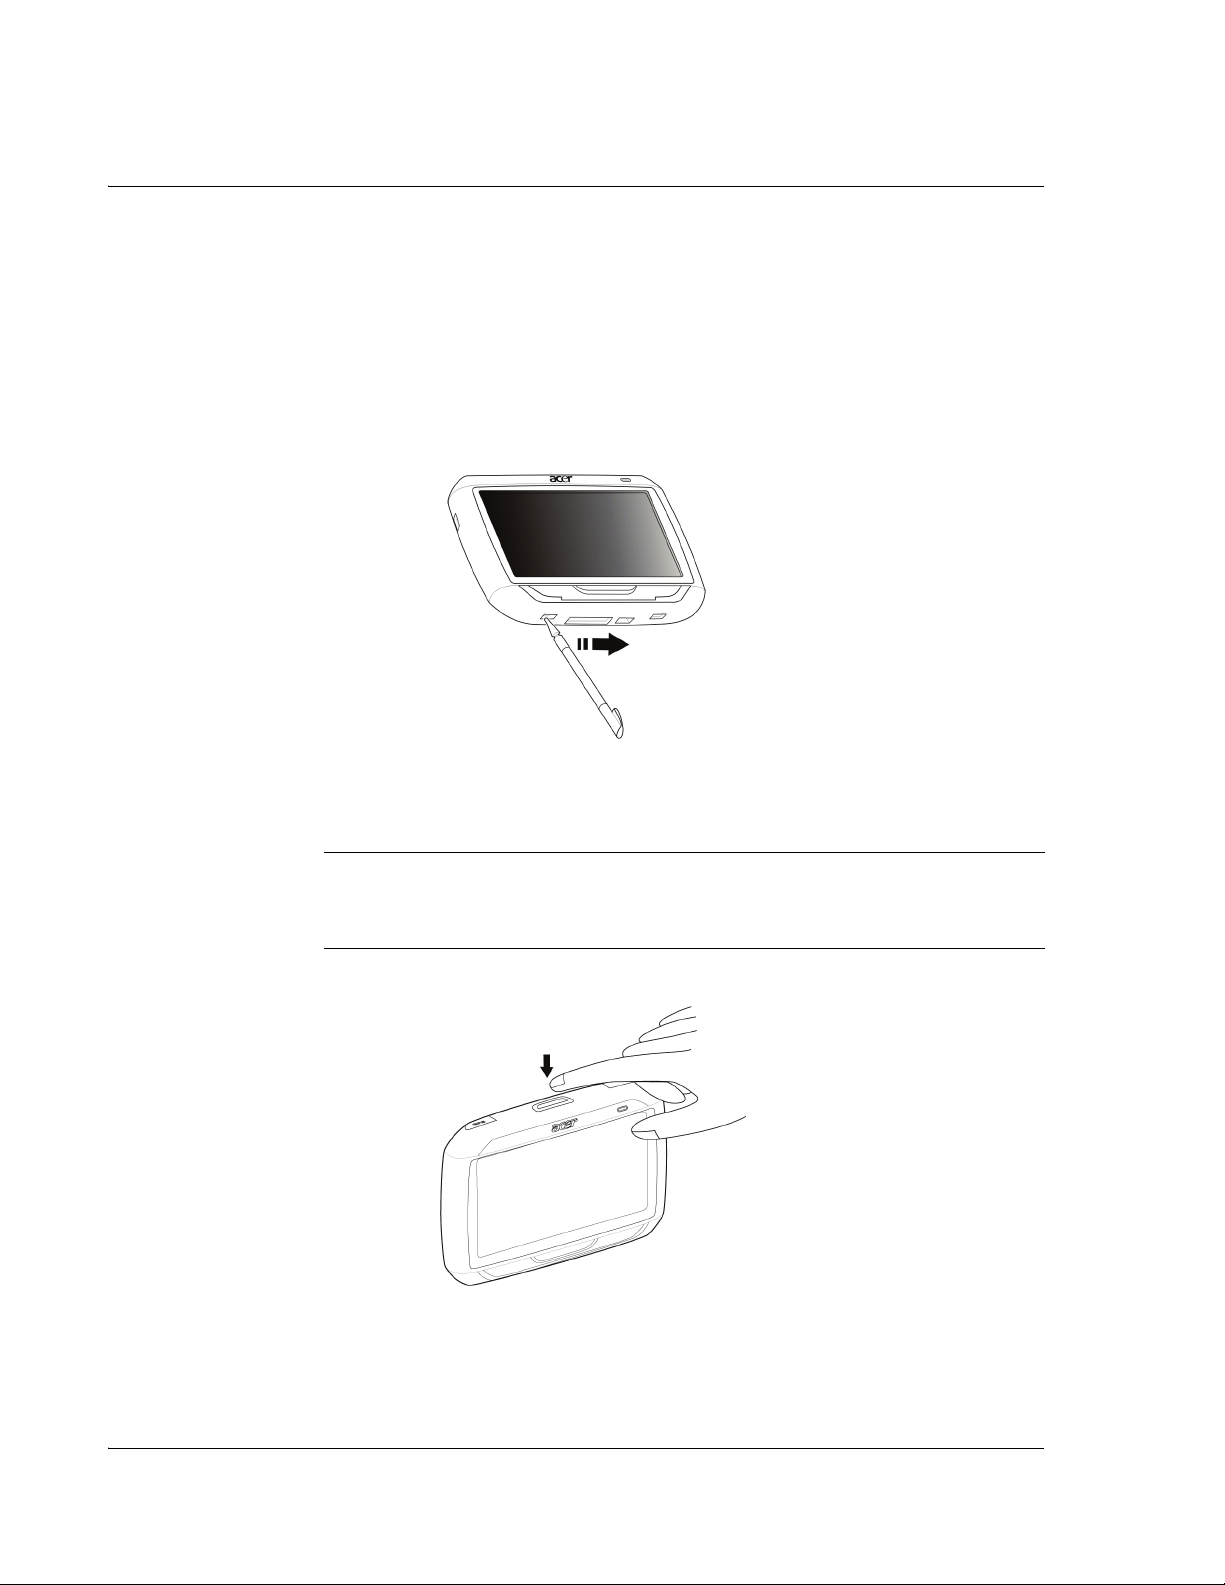
NOTE: After powering your device on for the first time by moving the power switch to the
right (see diagram above), you should not use the power switch again unless you want to do a
hard reset. See "Performing a hard reset" on page 33 for more information. Instead, use the
power button at the top of the device (see diagram below).
xiv
Page 17

First things first
Set up the Acer p600 Series Portable Navigator in your vehicle
Set up the Acer p600 Series Portable Navigator in your
vehicle
The Acer p600 Series Portable Navigator comes with a car mount kit and a car charger
with which you can set up your device in your vehicle. You can choose to position the
car mount kit on the windshield using the suction cup, or on the dashboard using the
self adhesive disc connector.
CAUTION: Some countries prohibit the mounting of any electronic device in any location on
the vehicle dashboard. Be sure to check your local laws for acceptable mounting areas before
installing the car mount bracket.
NOTE: Some newer vehicle models may have a heat reflective shield embedded in the
windshield. This may in some cases obstruct the GPS signal reception. If you encounter this
problem in your vehicle, you need to purchase an external GPS antenna. For more
information, contact your local Acer dealer.
Car mount installation reminders
Install the car mount on a surface of your vehicle:
• That is smooth, flat and free of dirt and oil
• Where the driver can easily view/reach it without taking his/her eyes too far
off the road
• Where the device will not obscure car controls nor restrict the driver's view of
the road
• Far from the air bag deployment area
To set up the device on your vehicle:
This section shows how to install the car mount kit in your vehicle’s windshield using
the suction cup. For dashboard installation procedures using the self adhesive power
disc connector refer to the
1 Clean the mounting surface with a glass cleaner and a clean cotton cloth.
2 If the ambient temperature is below 15°C (60°F) warm the mounting area and the
suction cup (e.g. with a hair dryer) to ensure a strong suction bond.
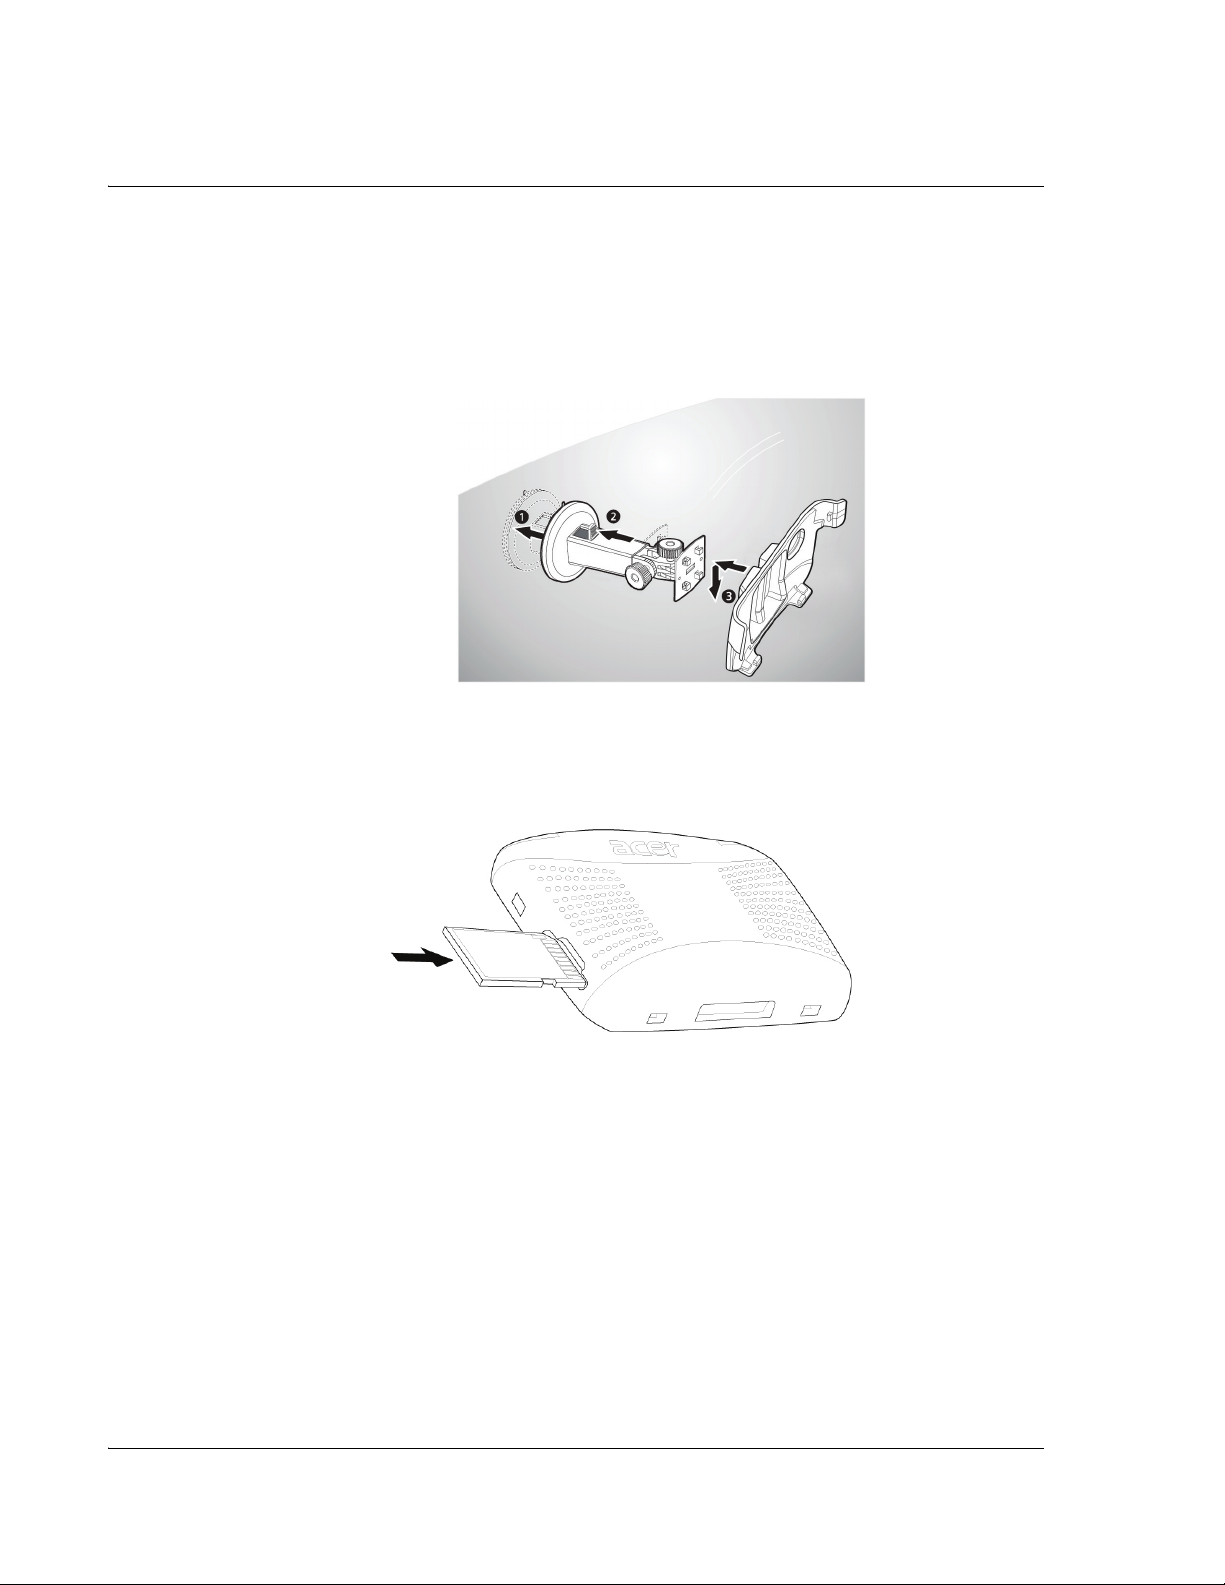
3 Install the car mount on the selected area.
• Fix the suction cup to the selected area with the locking lever facing up.
Acer p600 Series Portable Navigator Getting Started Guide
.
• Flip the locking lever away from you to create a vacuum between the suction
cup and the mounting surface.
xv
Page 18
First things first
Set up the Acer p600 Series Portable Navigator in your vehicle
• Make sure that the suction bond is strong enough before proceeding to the
next step.
• Insert the pegs on the car mount’s holder plate to the holes on the back of
the car holder, then move the car holder downwards until both parts are
engaged.
4 Insert the Navigation software SD card into the device.
xvi
Page 19
Set up the Acer p600 Series Portable Navigator in your vehicle
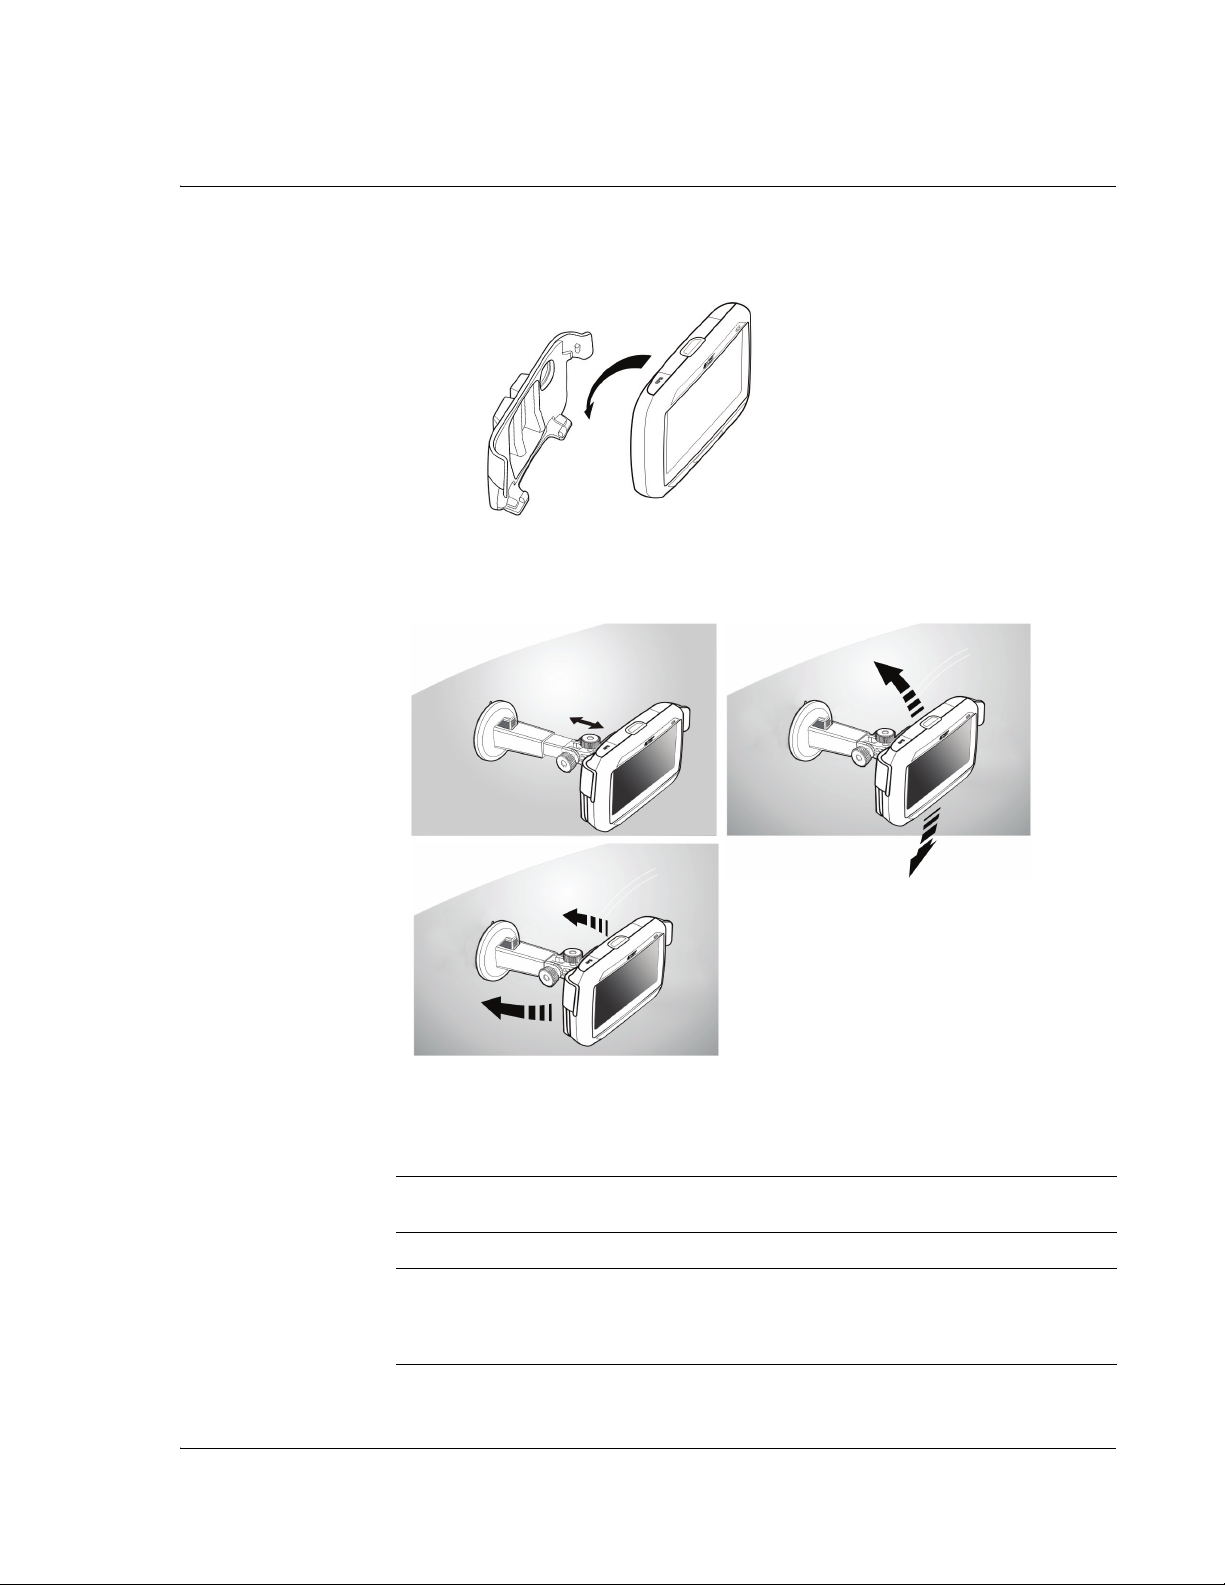
5 Dock the device on the car holder.
6 Adjust the car mount for the best viewing angle.
First things first
7 After setting up the device on the car mount, connect the car charger.
The power LED indicator lights up orange during charging.
NOTE: If the car engine is turned off, you may be required to switch the vehicle ignition back
into the Accessories position. Consult your vehicle owner’s manual.
NOTE: The device comes with the battery pre-charged to at least 30% capacity. You can start
using it once it is mounted in your vehicle and connected to the cigarette lighter. However,
for maximum usage time you need to charge your device to full capacity. Go to "Recharging
the Acer p600 Series Portable Navigator" on page 5 for instructions.
xvii
Page 20
First things first
Start up the Acer p600 Series Portable Navigator
Start up the Acer p600 Series Portable Navigator
Before mounting the Acer p600 Series Portable Navigator on your vehicle, you should
first calibrate the screen. After screen calibration, proceed to system settings
configuration.
To turn on and calibrate the device:
1 Turn on your device for the first time by sliding the power switch to the right. The
power switch is located at the bottom of the device. See "Top and bottom views" on
page x if you have any difficulty finding this switch.
When you first turn on your device, you will be asked to calibrate the screen. This process
ensures that when you tap the screen the item tapped is activated.
NOTE: After powering your device on for the first time, you should not use the power switch
unless you want to do a hard reset. See "Performing a hard reset" on page 33 for more
information. Instead, use the power button at the top of the device.
2 Follow the instructions on the screen.
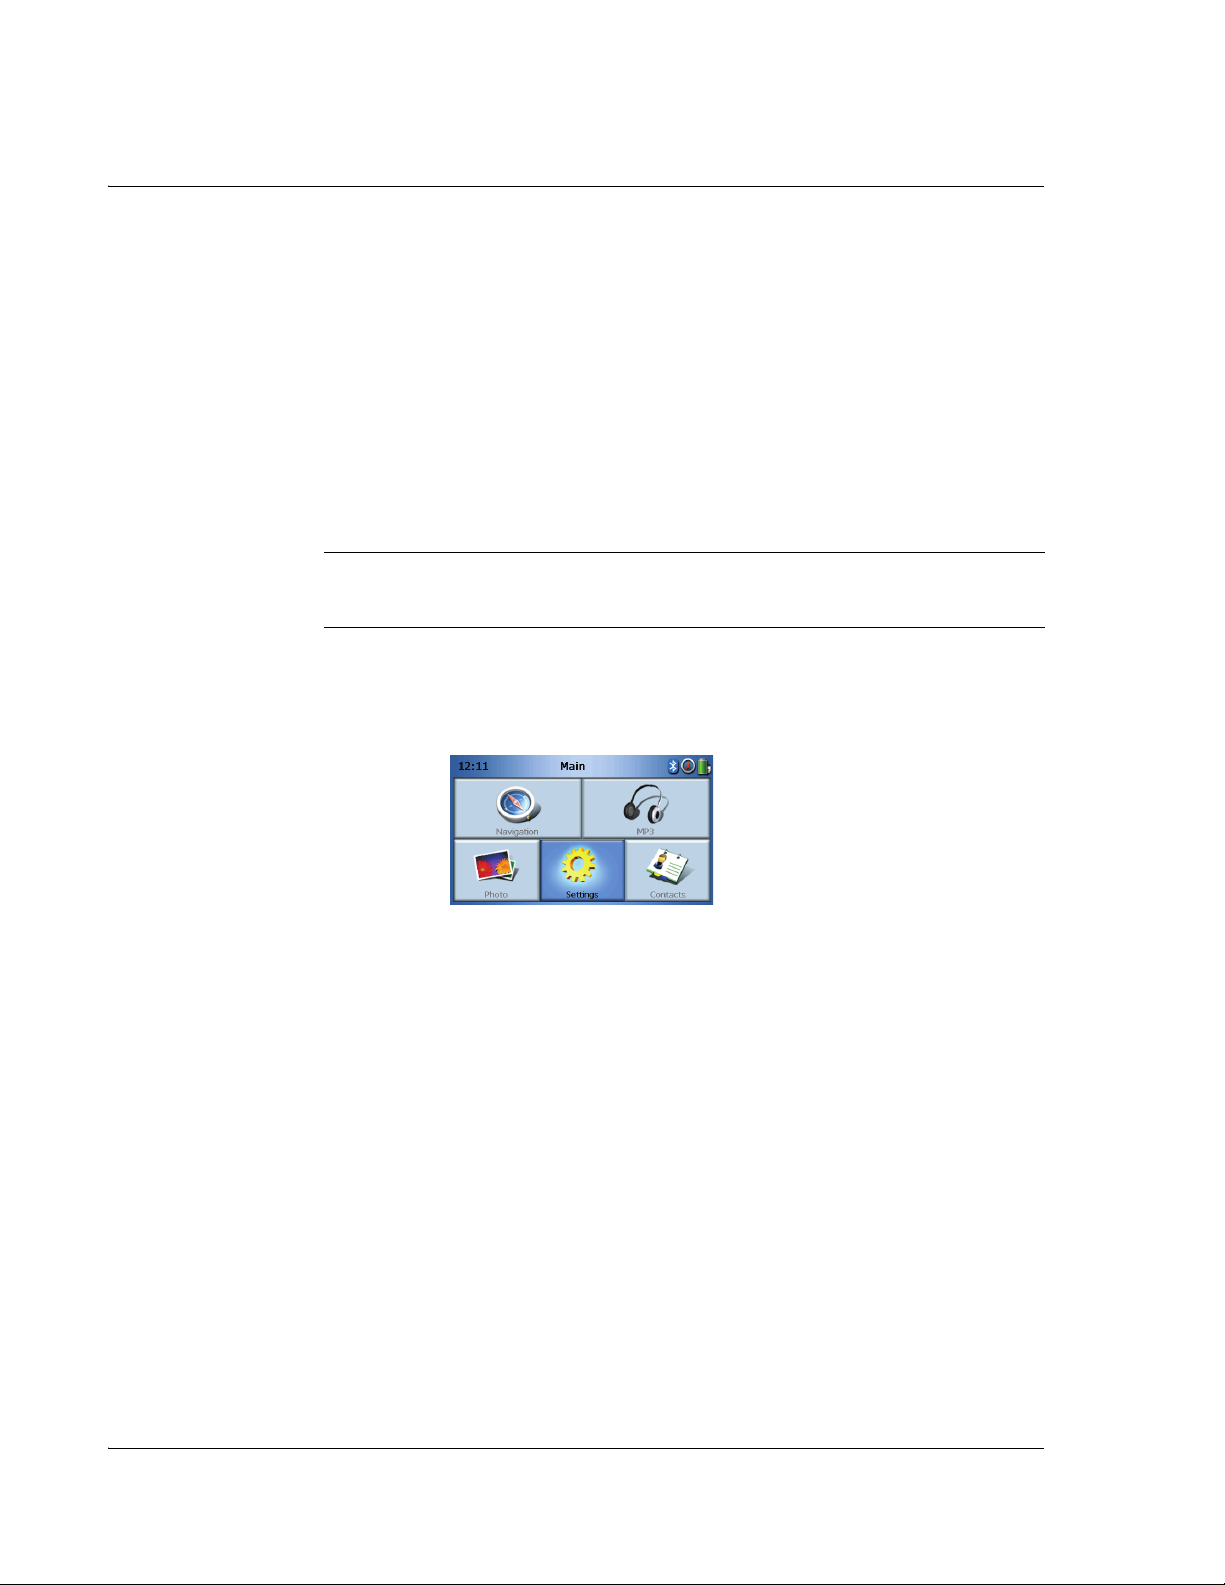
After calibrating the screen, the Main Menu screen displays. This is also referred to as the
Home screen.
To configure system settings:
If you intend to start using your Acer p600 Series Portable Navigator at once, we
recommend that you configure the language and date/time settings first. The rest of
the user preferences can be set up later.
1 Tap Settings on the Main Menu panel.
2 To set the system language settings, tap Language.
• Tap the down arrow beside the Text and Voice settings and choose the
language you prefer.
3 To set the system date and time, tap Date/Time.
4 Tap Date.
• Tap + or - beside the Year, Month, and Day settings to set the date values.
5 Tap Time.
• Tap + or - beside the Hour and Minute settings to set the time values.
xviii
Page 21

First things first
Start up the Acer p600 Series Portable Navigator
6 Tap Time Zone.
• Tap the down arrow beside the Time Zone until the time zone of your choice
is displayed.
7 Tap to return to the Main Menu screen.
For more information on the rest of the system configuration options, go to
"Settings" on page 24.
Congratulations! Your new Acer p600 Series Portable Navigator is now ready for use.
Proceed to "Acer p600 Series Portable Navigator fundamentals" on page 1 for more
information on the device’s user interface or you can refer to the Navigation software
Quick Starter Guide to start using the device in navigation mode.
xix
Page 22

Contents
Disposal instructions . . . . . . . . . . . . . . . . . . . . . . . . . . .i
Important safety instructions . . . . . . . . . . . . . . . . . . . . . . i
Acer p600 Series Portable Navigator feature highlights . . . . . . . . . . . . iii
Unpack the Acer p600 Series Portable Navigator . . . . . . . . . . . . . . . .v
First things first viii
System tour . . . . . . . . . . . . . . . . . . . . . . . . . . . . . . viii
Front and Rear Panels . . . . . . . . . . . . . . . . . . . . . . . viii
Top and bottom views. . . . . . . . . . . . . . . . . . . . . . . .x
Left and right panels . . . . . . . . . . . . . . . . . . . . . . . xi
Peripherals tour . . . . . . . . . . . . . . . . . . . . . . . . . . . . xii
Car mount kit . . . . . . . . . . . . . . . . . . . . . . . . . . xii
Chargers . . . . . . . . . . . . . . . . . . . . . . . . . . . . xiii
Acer p600 Series Portable Navigator setup . . . . . . . . . . . . . . . . . xiv
Set up the Acer p600 Series Portable Navigator in your vehicle . . . . . . . . . xv
Car mount installation reminders . . . . . . . . . . . . . . . . . . xv
To set up the device on your vehicle:. . . . . . . . . . . . . . . . . xv
Start up the Acer p600 Series Portable Navigator . . . . . . . . . . . . . xviii
1 Acer p600 Series Portable Navigator fundamentals 1
Hardware interface . . . . . . . . . . . . . . . . . . . . . . . . . . . 1
Using the touch screen backlight. . . . . . . . . . . . . . . . . . . . 1
Using the SD/MMC slot . . . . . . . . . . . . . . . . . . . . . . . . 1
Establishing device-PC connection. . . . . . . . . . . . . . . . . . . . . 3
Recharge the device via the USB connection . . . . . . . . . . . . . . . 3
Installing Microsoft ActiveSync. . . . . . . . . . . . . . . . . . . . . 3
Minimum installation requirements: . . . . . . . . . . . . . . . . . 3
To install Microsoft ActiveSync on your computer: . . . . . . . . . . . 4
Recharging the Acer p600 Series Portable Navigator . . . . . . . . . . . . . 5
To recharge the device using the car charger: . . . . . . . . . . . . . 6
To recharge the device using the USB cable:. . . . . . . . . . . . . . 6
Main Menu Screen . . . . . . . . . . . . . . . . . . . . . . . . . . . 7
Command interface . . . . . . . . . . . . . . . . . . . . . . . . . 7
Using the hot keys . . . . . . . . . . . . . . . . . . . . . . . . 7
Using the Acer p600 Series Portable Navigator touch screen . . . . . . . 7
Using the Main menu panel . . . . . . . . . . . . . . . . . . . . 8
2 Navigation 9
Accessing the Navigation Function . . . . . . . . . . . . . . . . . . . . 9
3 MP3 Player 10
Accessing the MP3 Player . . . . . . . . . . . . . . . . . . . . . . . . 10
Mp3 Player Button Definitions . . . . . . . . . . . . . . . . . . . . . . 11
Using the Player . . . . . . . . . . . . . . . . . . . . . . . . . . . . 11
Playing music . . . . . . . . . . . . . . . . . . . . . . . . . . . . 11
Adjusting the volume . . . . . . . . . . . . . . . . . . . . . . . . 11
Changing the order of tracks . . . . . . . . . . . . . . . . . . . . . 11
1
Page 23

Contents
Repeating tracks . . . . . . . . . . . . . . . . . . . . . . . . . . .11
Browsing for music files . . . . . . . . . . . . . . . . . . . . . . . .12
Deleting a Track . . . . . . . . . . . . . . . . . . . . . . . . . . .12
4 Photo Viewer 13
Accessing the Photo Viewer. . . . . . . . . . . . . . . . . . . . . . . .13
Using the Photo Viewer . . . . . . . . . . . . . . . . . . . . . . . . .13
Viewing photos . . . . . . . . . . . . . . . . . . . . . . . . . . .13
Viewing a Photo Full Screen . . . . . . . . . . . . . . . . . . . . . .15
Viewing a Slideshow . . . . . . . . . . . . . . . . . . . . . . . . .15
Copying Photos . . . . . . . . . . . . . . . . . . . . . . . . . . .15
Deleting photos . . . . . . . . . . . . . . . . . . . . . . . . . . .15
5 Contacts 16
Accessing Contacts . . . . . . . . . . . . . . . . . . . . . . . . . . .16
Managing Contacts . . . . . . . . . . . . . . . . . . . . . . . . . . .17
Creating a New Contact . . . . . . . . . . . . . . . . . . . . . . . .17
Editing a contact . . . . . . . . . . . . . . . . . . . . . . . . . . .18
Deleting a contact . . . . . . . . . . . . . . . . . . . . . . . . . .19
Importing/Exporting/Sending contacts . . . . . . . . . . . . . . . . . . .19
Importing. . . . . . . . . . . . . . . . . . . . . . . . . . . . . .19
Exporting . . . . . . . . . . . . . . . . . . . . . . . . . . . . . .20
Sending the Contact Information to Another Device . . . . . . . . . . . .21
6 Bluetooth 22
Bluetooth Options . . . . . . . . . . . . . . . . . . . . . . . . . . .22
7 Settings 24
Accessing the Settings Screen . . . . . . . . . . . . . . . . . . . . . . .24
Adjusting the Settings . . . . . . . . . . . . . . . . . . . . . . . . . .25
Setting the Volume. . . . . . . . . . . . . . . . . . . . . . . . . .25
Choosing the Language . . . . . . . . . . . . . . . . . . . . . . . .26
System Information. . . . . . . . . . . . . . . . . . . . . . . . . .27
Power . . . . . . . . . . . . . . . . . . . . . . . . . . . . . . .28
Standby Settings . . . . . . . . . . . . . . . . . . . . . . . . .28
Setting the Date/Time. . . . . . . . . . . . . . . . . . . . . . . . .29
Changing the Time Zone . . . . . . . . . . . . . . . . . . . . . .29
Choosing Daylight Saving. . . . . . . . . . . . . . . . . . . . . .30
Changing the Date . . . . . . . . . . . . . . . . . . . . . . . .30
Changing the Time . . . . . . . . . . . . . . . . . . . . . . . .30
Miscellaneous Settings . . . . . . . . . . . . . . . . . . . . . . . .31
8 Resetting the Acer p600 Series Portable Navigator 32
Performing a soft reset . . . . . . . . . . . . . . . . . . . . . . . .32
Performing a hard reset . . . . . . . . . . . . . . . . . . . . . . . .33
Loading the factory default settings . . . . . . . . . . . . . . . . . . .33
2
Page 24

Contents
Regulatory and safety notices 34
FCC notice . . . . . . . . . . . . . . . . . . . . . . . . . . . . . 34
Notice: Shielded cables . . . . . . . . . . . . . . . . . . . . . . . . 34
Notice: Peripheral devices. . . . . . . . . . . . . . . . . . . . . . . 35
Caution . . . . . . . . . . . . . . . . . . . . . . . . . . . . . . 35
Operation conditions . . . . . . . . . . . . . . . . . . . . . . . . 35
Notice: Canadian users . . . . . . . . . . . . . . . . . . . . . . . . 35
Remarque à l’intention des utilisateurs canadiens . . . . . . . . . . . . . 35
Declaration of Conformity for EU countries . . . . . . . . . . . . . . . 35
LCD pixel statement . . . . . . . . . . . . . . . . . . . . . . . . . 35
Radio device regulatory notice. . . . . . . . . . . . . . . . . . . . . 36
General . . . . . . . . . . . . . . . . . . . . . . . . . . . . . . 36
European Union (EU). . . . . . . . . . . . . . . . . . . . . . . . . 36
List of applicable countries . . . . . . . . . . . . . . . . . . . . . . 36
The FCC RF safety requirement. . . . . . . . . . . . . . . . . . . . . 36
Canada — Low-power license-exempt radio communication devices (RSS-210) . 37
Exposure of humans to RF fields (RSS-102) . . . . . . . . . . . . . . . . 37
FAQs 38
Customer support 40
Product warranty . . . . . . . . . . . . . . . . . . . . . . . . . . 40
System specifications 41
Hardware features. . . . . . . . . . . . . . . . . . . . . . . . . . 41
Software specifications . . . . . . . . . . . . . . . . . . . . . . . . 42
Design and ergonomics. . . . . . . . . . . . . . . . . . . . . . . . 43
Environmental specifications . . . . . . . . . . . . . . . . . . . . . 44
3
Page 25

Acer p600 Series Portable Navigator fundamentals
1 Acer p600 Series Portable Navigator fundamentals
This chapter describes basic hardware procedures in using your Acer p600 Series
Portable Navigator. Information on the device’s command interface is also discussed.
Hardware interface
Using the touch screen backlight
Hardware interface
Under some lighting conditions, viewing the information on your device may be
difficult. If this is the case, activate the backlight by tapping on the screen to
illuminate the touch screen.
Using the SD/MMC slot
Your Acer p600 Series Portable Navigator has an SD/MMC slot compatible with a
range of SD and MMC storage cards.
Also, the Acer p600’s GPS navigation system has its core on the Navigation software
program. Using this program requires that users load the digital maps available in the
Navigation software SD card included with the device (SD card is included with certain
models only).
1
Page 26

Acer p600 Series Portable Navigator fundamentals
Hardware interface
To insert an SD/MMC card:
• Hold the device securely; then push the card into the slot until you hear an
audible system sound; this will signal that the card is already properly seated
within the slot. The card is secure when it is not protruding from the slot.
To remove a storage card:
1 Hold the device securely; then push against the top of the card, as if you were pushing
it further into the slot, letting the card spring out. An audible system sound will signal
that the card has been released.
2 Gently remove the card from the slot.
2
Page 27

Acer p600 Series Portable Navigator fundamentals
Establishing device-PC connection
Establishing device-PC connection
The USB cable that comes with your device enables you to connect the device to your
computer.
Recharge the device via the USB connection
Installing Microsoft ActiveSync
Use Microsoft ActiveSync to exchange information between your Acer p600 Series
Portable Navigator and a computer running on the Microsoft Windows platform.
NOTE: If you have a previous version of the Microsoft ActiveSync installed in your computer,
uninstall it first before installing the Microsoft ActiveSync 4.1 version from the Acer p600
Series Portable Navigator CD.
Minimum installation requirements:
• Microsoft Windows XP, 2000, ME, and 98 SE
• Microsoft Internet Explorer 5.0 or later
• Hard disk drive with 12 to 65 MB of available hard disk space
• Available USB port
•CD-ROM drive
3
Page 28

Acer p600 Series Portable Navigator fundamentals
Establishing device-PC connection
• VGA graphics card or compatible video graphics adapter at 256 color or
higher
To install Microsoft ActiveSync on your computer:
1 Close any open programs, including those that run at startup, and disable any virus-
scanning software.
2 Insert the Acer p600 Series Portable Navigator CD into your computer’s CD-ROM drive.
The CD’s welcome page will be displayed.
3 Click the installation language of your choice.
4 Click “Install ActiveSync” on the Please select your task screen.
The installation wizard will automatically begin.
5 Follow the on-screen instructions.
After installation, the ActiveSync icon will appear on your computer’s system
tray (on the lower right-hand corner of the screen).
NOTE: For detailed information on how to use ActiveSync on your computer, start
“ActiveSync”; then click “Help”, “Microsoft ActiveSync Help”.
4
Page 29

Acer p600 Series Portable Navigator fundamentals
Recharging the Acer p600 Series Portable Navigator
Recharging the Acer p600 Series Portable Navigator
Your Acer p600 Series Portable Navigator uses a rechargeable 1200 mAh Lithium Ion
battery (Certain models only). The status icon located on the top right corner of the
Main Menu panel indicates the level of the device’s battery power.
If the battery level becomes low in the course of normal use, recharge the device.
Normally, you can use the wall charger to recharge your device.
Additionally, you can also use the Mini USB Sync and charge cable to recharge your
Acer p600 Series Portable Navigator. However, this may be difficult when there’s no
available computer on hand. When your device battery is drained while on the road,
you can still recharge your device by using either the car charger cable bundled with
your device. Recharging time varies depending on type of charge, but a charge from
empty to full capacity is recommended at about 3.5 hours.
NOTE: If the battery level reaches very low status, the device will automatically turn off. In this
case, you have about 12 hours to recharge your device after which you risk losing all data on
the device's internal memory. In case all data is lost, the next time you power on the device
you will be prompted to restore the data.
Certain models can only be used with external power. In this case, your device should be
connected to external power (car charger, wall charger, etc) at all times when being used.
5
Page 30

Acer p600 Series Portable Navigator fundamentals
Recharging the Acer p600 Series Portable Navigator
To recharge the device using the car charger:
Use the car charger to recharge your device while it is mounted on your vehicle.
To recharge the device using the USB cable:
The Mini USB Sync and charge cable that comes with your device enables you to
connect your device to a computer running on the Microsoft Windows platform.
When connected, the device battery is also recharged via the USB connection.
Go to the "Establishing device-PC connection" on page 3 for instructions on how to
connect your Acer p600 Series Portable Navigator to a computer.
6
Page 31

Acer p600 Series Portable Navigator fundamentals
Main Menu Screen
Command interface
Using the hot keys
The hot keys on your Acer p600 Series Portable Navigator allow users to:
• +/- - Control the volume level of sound from the speaker/earphones
• NAVI - Toggles between Main Menu screen and Navigation screen
Using the Acer p600 Series Portable Navigator touch screen
The Acer p600 Series Portable Navigator touch sensitive screen allows for a more
natural way of entering information into the device using fingers instead of a stylus no more wasted time finding a lost stylus or fumbling with an awkwardly shaped one!
In this Guide, the tap and hold-and-drag actions are done by:
• Tap - Touch the screen once to open items and select options.
Main Menu Screen
• Hold and drag – Tap a slider icon and drag it across the screen.
7
Page 32

Acer p600 Series Portable Navigator fundamentals
Main Menu Screen
Using the Main menu panel
When you turn on your device for the first time each day, you'll see the Main Menu
panel, also called the Home panel. From any other screen, you can revert to it by
pressing the Main Menu hot key NAVI or tapping .
The Main Menu title bar displays the current time (with 12-hour notation), the panel
name, and the battery power level status icon. Go to the "Recharging the Acer p600
Series Portable Navigator" on page 5 for more information on this status icon.
There are five program icons on the Main Menu panel.
Tap to display the Navigation panel. Refer to the Navigation software
Quick Starter Guide or the Navigation software User’s Guide for more
information on how to use the device in navigation mode.
Tap to launch MP3 for music mode operation. Go to "MP3 Player" on page
10 for more information.
Tap to launch Photo for picture mode operation. Go to "Photo Viewer" on
page 13 for more information.
Tap to launch the Contacts program to access your contacts list. Go to
"Contacts" on page 16 for more information.
Tap to open the Settings panel to configure the device’s user preferences.
Go to "Settings" on page 24 for more information.
8
Page 33

Accessing the Navigation Function
2 Navigation
Accessing the Navigation Function
Switch the unit on and tap Navigation in the Main Menu screen.
After the application loads, the main Navigation menu will appear.
Navigation
For more information regarding the Navigation function please see the Navigation
software Quick Starter Guide or the Navigation software User’s Guide.
9
Page 34

MP3 Player
Accessing the MP3 Player
3 MP3 Player
This chapter describes how to use the MP3 player included on this device.
Accessing the MP3 Player
Switch the unit on and tap MP3 in the Main Menu screen.
The MP3 screen will now appear in the display:
NOTE: Music must be loaded to the SD memory card from your computer. See "Establishing
device-PC connection" on page 3 for more information.
NOTE: The following file formats can be played on the MP3 Player: MP3, WMA, WAV.
Tap on the track(s) you want to play. If you cannot see the track(s) you want to play,
use the scroll buttons to search further up/down the list. Tap to play the
track(s). The media player screen will appear (see next image), and the first song will
begin to play.
10
Page 35

Mp3 Player Button Definitions
The MP3 Player buttons are defined as follows:
MP3 Player
Mp3 Player Button Definitions
Using the Player
Playing music
To play or pause music, tap the Play/Pause button .
To skip to the next track, tap the Skip forward button .
To go to the beginning of the current track or skip back to the previous track, tap the
Skip back button .
Adjusting the volume
Song title
Distance
through track
Skip back
Mute
Play / Pause
Main Menu
Browse
Linear / Repeat
Shuffle / Sequential
Skip forward
Volume
To adjust the volume, slide the volume control to the right (increase) or left
(decrease). Alternatively, you can use the +/- hot keys to adjust the volume.
Changing the order of tracks
To choose between playing tracks in random or sequential order, tap the Shuffle /
Sequential button .
NOTE: The appearance of the Shuffle / Sequential button changes depending on the current
mode.
Repeating tracks
To choose between repeating tracks or not, tap the Linear/Repeat button .
11
Page 36

MP3 Player
Using the Player
NOTE: The appearance of the Select linear/repeat button changes depending on the current
mode.
Browsing for music files
Tap the Browse button .
The following screen will now appear in the display:
To copy a track, highlight it and tap .You will now see the following screen:
Browse to the place where you would like to paste the track(s), then tap
The track(s) will then be copied to this place.
again.
Deleting a Track
To delete a track, highlight it and tap .
NOTE: To move up one level while browsing, tap
NOTE: To deselect a highlighted track, simply tap it again. You will see that it is no longer
highlighted. You can also highlight all tracks by tapping Select all , or deselect all tracks
by tapping Deselect All .
12
Page 37

4 Photo Viewer
This chapter describes how to access and use the photo viewer.
Accessing the Photo Viewer
Switch the unit on and tap Photo in the Main Menu screen.
Photo Viewer
Accessing the Photo Viewer
The Photo Viewer screen will now appear in the display:
Using the Photo Viewer
You can view either individual photos or slideshows on your device.
Viewing photos
If you cannot immediately see the photo thumbnails you are looking for, but see
folders, then you can tap these to access their contents.
You can also tap Scroll up
folders or photos.
or Scroll down to search up or down the list of
13
Page 38

Photo Viewer
Using the Photo Viewer
Tap on a photo to highlight it, then tap to view it as follows:
You will see several options on the screen, which are defined as follows:
Zoom in (slide up) or zoom out (slide down)
Go to previous photo
Go to next photo
Browse photos
View photo full screen
Start slideshow
Rotate photo 90°
Return to Main Menu
NOTE: When not all of the photo is viewable (due to using the zoom function), you can drag
the photo by tapping anywhere on the photo and moving it in any direction.
14
Page 39

Photo Viewer
Using the Photo Viewer
Viewing a Photo Full Screen
To view a photo full screen, tap the Full Screen button .
Tap anywhere on the screen to quit full screen display.
Viewing a Slideshow
To start a slideshow, tap more than one photo before tapping . The slideshow
will start automatically.
Tap anywhere on the screen to quit the slideshow.
Copying Photos
To copy a photo or photos from the SD/MMC card to the device, tap which photo(s)
you would like to copy and then tap . You will now see the following screen:
Browse to the place where you would like to paste the photo(s), then tap
again. The photos will then be copied to this place.
Deleting photos
To delete a photo, tap which photo(s) you would like to delete and then tap .
The photo(s) will then be deleted.
NOTE: To deselect a highlighted photo, simply tap it again. You will see that it is no longer
highlighted. You can also highlight all images by tapping Select all , or deselect all
images by tapping Deselect All .
NOTE: Photos must be loaded to the SD memory card from your computer. See "Establishing
device-PC connection" on page 3 for more information.
NOTE: The following file formats can be viewed on your device: BMP, GIF (Still images), JPEG,
PNG.
NOTE: To move up one level while browsing, tap
15
Page 40

Contacts
Accessing Contacts
5 Contacts
This chapter describes how to manage contact details, including importing, exporting
and sending to other Bluetooth-enabled devices.
Accessing Contacts
Switch the unit on and tap Contacts in the Main Menu screen.
The Contacts screen will now appear in the display:
Scroll up
Scroll down
Create new contact
Edit contact
Select All
Deselect All
16
Page 41

Delete contact
Import/Export/Send contact
Return to Main Menu
You can store and edit contact information on your device. You can then use this later
to find this contact’s address quickly on your GPS device, or send panic information to
these contacts through your Bluetooth enabled phone.
Managing Contacts
Creating a New Contact
Contacts
Managing Contacts
To create a new contact, tap the Create new contact button .
The following screen will now appear:
scroll up
scroll down
previous contact
Next contact
Enter into navigator
17
Page 42

Contacts
Managing Contacts
Return to previous window
Return to Main Menu
Enter the following information for the contact:
•Name
• Family (Last Name)
• Phone
• Mobile
• Address (Data fields may be different between languages)
• Street
•City
•State
•Zip
• Country
• Title
• Company
•Email
Also, if you wish this contact to be included in your panic list, tick the Used for panic
checkbox.
If you want to immediately feed this contact’s address into your GPS navigator, tap
the Enter into navigator button . If you have not yet saved the contact
information, you may be asked if you wish to do so now.
To leave this screen and return to your list of contacts, tap Back .
Editing a contact
To edit a contact, tap Scroll up or Scroll down to highlight a contact, then tap
Edit .
18
Page 43

Importing/Exporting/Sending contacts
Deleting a contact
To delete a contact, tap Scroll up or Scroll down to highlight a contact, then
tap Delete .
Importing/Exporting/Sending contacts
Importing
To import or export a contact, tap the Import/Export/send contact button from
the main contacts list. You will now see the following screen:
Contacts
To import a contact from the SD/MMC card to the main memory, tap Import.
The following screen will now appear:
You can either
Tap the checkboxes beside each contact to select (tapping again will deselect), or
Tap Select All to select all contacts, or
Tap Deselect All to deselect all contacts.
19
Page 44

Contacts
Importing/Exporting/Sending contacts
Once you have selected the contact(s) you wish to import, tap Import .
Exporting
To export a contact from the main memory to the SD/MMC card, tap Export.
The following screen will now appear:
You can either
Tap the checkboxes beside each contact to select (tapping again will deselect), or
Tap Select All to select all contacts, or
Tap Deselect All to deselect all contacts.
Once you have selected the contact(s) you wish to export, tap Export .
20
Page 45

Contacts
Importing/Exporting/Sending contacts
Sending the Contact Information to Another Device
To send the contact information to another Bluetooth device, tap Send.
You device will start to look for other Bluetooth devices that it can send contact
information to. Once the search is finished, a list of available devices will be shown, as
follows:
Tap the down arrow
to send contact information to. The information will now be sent.
NOTE: It may be necessary to input a pin code on your other Bluetooth device
before contact information is sent. If this is the case, then please enter 1111, when
asked for a pin code.
NOTE: Bluetooth function is for selected models only.
to display a drop-down list and choose the device you want
21
Page 46

Bluetooth
Bluetooth Options
6 Bluetooth
Bluetooth Options
NOTE: Bluetooth function is for selected models only.
To access the Bluetooth options, tap the Bluetooth icon in the top right-hand
corner of the Main Menu screen.
You will see the following options:
• Bluetooth Enable
• Connect mobile
•Dial
To activate or deactivate Bluetooth, tap Bluetooth Enable.
NOTE: Before you can use the Connect mobile or Dial features, your phone must be
paired with your Acer p600 Series Portable Navigator. To go through the pairing
procedure, please consult your mobile phone’s user guide. You must enable
Bluetooth on your Acer p600 Series Portable Navigator in order for your phone to
be able to discover it. If asked for a pin code, enter 1111.
To use your Acer device as a speakerphone for your mobile phone, tap Connect
mobile (Bluetooth must be enabled, and phone must be paired with device).
NOTE: Some Bluetooth enabled mobile phones may not support these features.
22
Page 47

Bluetooth
Bluetooth Options
To make a call from your device, tap Dial (Bluetooth must be enabled and phone must
be paired with device). A keypad will then appear on screen, as follows:
Use the keypad enter a number, then tap Dial .
To end a call, tap Back
When this call is ended, your device will still be paired with your phone, and will
continue to act as a speakerphone, until you disable Bluetooth.
.
23
Page 48

Settings
Accessing the Settings Screen
7 Settings
Accessing the Settings Screen
To access the Settings feature on your device:
Switch the unit on and tap Settings in the Main Menu screen.
The Settings screen will now appear in the display:
From this screen you can access:
Volume – Set the default volume
Language – Select the default language
Sys Info. – View system information
Power – Adjust power-saving options
Date/Time – Set the date/time
Misc. – Adjust other settings.
24
Page 49

Adjusting the Settings
Setting the Volume
Tap Volume on the Settings screen.
The Volume screen will now appear in the display:
Settings
Adjusting the Settings
Tap the + or – buttons to increase or decrease the volume.
(Alternatively, you can use the +/- hot keys to increase or decrease the volume.)
Check the Enable sounds for taps option if you would like to hear a clicking sound
each time you tap a button.
Once you have finished, tap Back .
25
Page 50

Settings
Adjusting the Settings
Choosing the Language
Tap Language on the Settings screen.
The Language screen will now appear in the display:
• To change the Text language, tap the down arrow to display a drop-
down list of languages, then tap a language from the list.
• To change the Voice language, tap the down arrow to display a drop-
down list of languages, then tap a language from the list.
Once you have finished, tap Back .
26
Page 51

System Information
Tap Sys Info on the Settings screen.
The System Info screen will now appear in the display:
Settings
Adjusting the Settings
Here you can see your device’s Product ID, Serial Number, OS Version, GPS firmware
version, PCB Version, Bluetooth MAC Address, Used/Capacity of flash disk,
Manufacturer and Copyright statement, trademark & logo (© 2006 Acer Inc.)
To leave this screen, tap Back .
27
Page 52

Settings
Adjusting the Settings
Power
Tap Power on the Settings screen.
The Power screen will now appear in the display:
• To adjust the brightness, tap the + or – buttons beside Backlight.
• To adjust how long the backlight will stay on while using battery power, tap
the + or – buttons beside Battery.
• To adjust how long the backlight will stay on while using external power, tap
the + or – buttons beside AC Power.
Standby Settings
At the bottom left-hand corner of the Power screen, you can see the current battery
status.
28
Page 53

Settings
Adjusting the Settings
Tap on the battery picture to access the standby settings.
standby settings screen
Here you can set how long the device waits before turning off when on battery power
only.
Once you have finished, tap Back .
Setting the Date/Time
Tap Date/Time on the Settings screen.
The Date/Time screen will now appear in the display:
Changing the Time Zone
To change the time zone, tap the down arrow beside Time Zone.
From the drop down list that appears, tap on the time zone you want to use.
29
Page 54

Settings
Adjusting the Settings
Choosing Daylight Saving
If you live in an area that uses daylight saving (moving the clock forward/back once a
year), then make sure that the Daylight saving checkbox is checked.
Changing the Date
To change the date, tap Date.
The Date screen will now appear:
• To adjust the year, tap the + or – buttons beside Year.
• To adjust the month, tap the + or – buttons beside Month.
• To adjust the day, tap the + or – buttons beside Day.
Once you have finished, tap Back .
Changing the Time
To change the time, tap Time (on the Time/Date screen).
The Time screen will now appear:
• To choose 24 hour or 12 hour format, tap either the 24HR or 12HR checkbox.
• To adjust the hour, tap the + or – buttons beside Hour.
• To adjust the minute, tap the + or – buttons beside Min.
30
Page 55

Once you have finished, tap Back .
Miscellaneous Settings
Tap Misc. on the Settings screen.
The Misc screen will now appear in the display:
Settings
Adjusting the Settings
• To reset your device back to factory default settings, tap Back to Factory
Default.
• To recalibrate the screen, tap Calibration, and follow the on-screen
instructions to calibrate the device.
• To send an emergency message to your chosen contact(s), tap Send Panic
Info. For more information on setting up contacts to receive panic
information, see "Creating a New Contact" on page 17.
To exit this screen, tap Back .
31
Page 56

Resetting the Acer p600 Series Portable Navigator
8 Resetting the Acer p600 Series Portable Navigator
You may have to perform a reset if the device freezes (i.e., device no longer responds
to the buttons on the screen). A soft reset allows your device to get a fresh start,
similar to rebooting a computer. This will restart your device and adjust memory
allocation. All records and entries are retained after a soft reset. GPS settings are also
retained.
Performing a soft reset
Hold the device securely; then press the soft reset button on the right side of your
device.
NOTE: Performing a soft reset will not clear the RAM in the unit.
32
Page 57

Resetting the Acer p600 Series Portable Navigator
Performing a hard reset
If a soft reset does not correct the problem, you can then try a hard reset. Slide the
power switch to the left and then slide it back to the right.
NOTE: Performing a hard reset will clear the RAM in the unit and reset the GPS of the unit.
Loading the factory default settings
If you still encounter system errors even after soft and hard resetting the device, load
the factory default settings to correct the error. These default settings have been
selected to optimize your device’s performance.
To load the factory default settings:
1 Tap Settings on the Main Menu panel.
2 Tap Misc. on the Settings panel.
3 Tap Back to Factory Default on the Misc. screen.
4 Tap OK on the dialog box.
5 After the factory reset, reconfigure your device’s user preferences.
NOTE: Performing a factory default will erase the RAM, reset the GPS and erase all the user/
application data on the unit’s flash storage. The data on the SD card will not be erased.
33
Page 58

Regulatory and safety notices
Regulatory and
safety notices
This device fully satisfies the requirements for CE marking when used in a residential,
commercial or light industrial environment.
Underwriters Laboratories Inc. ("UL") has not tested the performance or reliability of
the Global Positioning System ("GPS") hardware, operating software or other aspects
of this product. UL has only tested for fire, shock or casualty hazards as outlined in
UL's Standard(s) for Safety. UL Certification does not cover the performance or
reliability of the GPS hardware and GPS operating software. UL MAKES NO
REPRESENTATIONS, WARRANTIES OR CERTIFICATIONS WHATSOEVER REGARDING THE
PERFORMANCE OR RELIABILITY OF ANY GPS RELATED FUNCTIONS OF THIS PRODUCT.
This appendix lists the general notices of your portable navigation device.
FCC notice
This device has been tested and found to comply with the limits for a Class B digital
device pursuant to Part 15 of the FCC rules. These limits are designed to provide
reasonable protection against harmful interference in a residential installation. This
device generates, uses, and can radiate radio frequency energy and, if not installed
and used in accordance with the instructions, may cause harmful interference to radio
communications.
However, there is no guarantee that interference will not occur in a particular
installation. If this device does cause harmful interference to radio or television
reception, which can be determined by turning the device off and on, the user is
encouraged to try to correct the interference by one or more of the following
measures:
Reorient or relocate the receiving antenna.
Increase the separation between the device and receiver.
Connect the device into an outlet on a circuit different from that to which the receiver
is connected.
Consult the dealer or an experienced radio/television technician for help.
Notice: Shielded cables
All connections to other computing devices must be made using shielded cables to
maintain compliance with FCC regulations.
34
Page 59

Regulatory and safety notices
Notice: Peripheral devices
Only peripherals (input/output devices, terminals, printers, etc.) certified to comply
with the Class B limits may be attached to this equipment. Operation with noncertified peripherals is likely to result in interference to radio and TV reception.
Caution
Changes or modifications not expressly approved by the manufacturer could void the
user's authority, which is granted by the Federal Communications Commission, to
operate this computer.
Operation conditions
This device complies with Part 15 of the FCC Rules. Operation is subject to the
following two conditions: (1) this device may not cause harmful interference, and (2)
this device must accept any interference received, including interference that may
cause undesired operation.
Notice: Canadian users
This Class B digital apparatus complies with Canadian ICES-003.
Remarque à l’intention des utilisateurs canadiens
Cet appareil numerique de la classe B est conforme a la norme NMB-003 du Canada.
Declaration of Conformity for EU countries
Hereby, Acer, declares that this Acer p600 Series Portable Navigator is in compliance
with the essential requirements and other relevant provisions of Directive 1999/5/EC.
(Please visit http://global.acer.com/products/pda/reg-pda/index.htm for complete
documents.)
Compliant with Russian regulatory certification.
LCD pixel statement
The LCD unit is produced with high-precision manufacturing techniques. Nevertheless,
some pixels may occasionally misfire or appear as black or red dots. This has no effect
on the recorded image and does not constitute a malfunction.
35
Page 60

Regulatory and safety notices
Radio device regulatory notice
Note: Below regulatory information is for models with wireless LAN and/or Bluetooth
only.
General
This product complies with the radio frequency and safety standards of any country or
region in which it has been approved for wireless use. Depending on configurations,
this product may or may not contain wireless radio devices (such as wireless LAN and/
or Bluetooth modules). Below information is for products with such devices.
European Union (EU)
This device complies with the essential requirements of the European Council
Directives listed below:
73/23/EEC Low Voltage Directive
EN 60950
89/336/EEC Electromagnetic Compatibility (EMC) Directive
EN 55022
EN 55024
EN 61000-3-2/-3
99/5/EC Radio & Telecommunications Terminal Equipment (R&TTE) Directive
Art.3.1a) EN 60950
Art.3.1b) EN 301 489 -1/-17
Art.3.2) EN 300 328-2
List of applicable countries
EU member states as of May 2004 are: Belgium, Denmark, Germany, Greece, Spain,
France, Ireland, Italy, Luxembourg, the Netherlands, Austria, Portugal, Finland,
Sweden, United Kingdom Estonia, Latvia, Lithuania, Poland, Hungary, Czech Republic,
Slovak Republic, Slovenia, Cyprus and Malta. Usage allowed in the countries of
European Union, as well as Norway, Switzerland, Iceland and Liechtenstein. This
device must be used in strict accordance with the regulations and constraints in the
country of use. For further information, please contact local office in the country of
use.
The FCC RF safety requirement
The radiated output power of the wireless LAN Mini PCI Card and Bluetooth card is far
below the FCC radio frequency exposure limits. Nevertheless, the Acer p600 Series
Portable Navigator shall be used in such a manner that the potential for human
contact during normal operation is minimized as follows:
An improper installation or unauthorized use may cause harmful interference to radio
communications. Also any tampering of the internal antenna will void the FCC
certification and your warranty.
36
Page 61

Regulatory and safety notices
To comply with FCC RF exposure compliance requirements, a separation distance of at
least 20 cm (8 inches) must be maintained between this device and any other antennas
or transmitters.
Canada — Low-power license-exempt radio
communication devices (RSS-210)
Common information
Operation is subject to the following two conditions:
1. This device may not cause interference, and
2. This device must accept any interference, including interference that may cause
undesired operation of the device.
Operation in 2.4 GHz band
To prevent radio interference to the licensed service, this device is intended to be
operated indoors and installed outdoors is subject to licensing.
Exposure of humans to RF fields (RSS-102)
The Acer p600 Series Portable Navigator employs low gain integral antennas that do
not emit RF field in excess of Health Canada limits for the general population; consult
Safety Code 6, obtainable from Health Canada's website at www.hc-sc.gc.ca/rpb.
37
Page 62

FAQs
FAQs
This section lists down frequently asked questions that may arise during the use of
your Acer p600 Series Portable Navigator, and gives easy answers and solutions to
these questions.
Aspect Question Answer
Audio Why is there no
sound coming
from the device?
Touch screen Why is the touch
screen not
responding to
my finger taps?
Multimedia
mode
Navigation
mode
Why can’t I view
my picture files?
Why can’t I play
my music files?
Why is it that
sometimes my
device takes
longer than 5
minutes to get a
GPS fix?
• If the earphones are plugged into
the device, the speaker is
automatically shut off. Disconnect
the earphones.
• Check that the device’s volume
settings is not muted. In the System
panel, tap Volume.
• Check that the volume control is not
at its lowest setting.
The screen may have lost its calibration.
Recalibrate the screen. Go to "Miscellaneous
Settings" on page 31 for instructions.
You may be trying to view an image that is
not supported by Photo. Go to "Photo
Viewer" on page 13 for a list of supported
image formats.
You may be trying to play a file that is not
supported by the MP3 Player. Go to "MP3
Player" on page 10 for a list of supported file
formats.
If the previous GPS fix position was more than
500 km or 12 hours apart from your current
position and time, it will take significantly
longer than the standard TTFF time to get a
GPS fix. This is due to the nature of the GPS
algorithm and rotational velocity between
the satellites and planet Earth, and deemed
normal and is not the fault of your Acer p600
Series Portable Navigator device.
38
Page 63

Aspect Question Answer
FAQs
System
information
and
performance
Power I couldn’t turn
How do I check
the OS version
of my device?
How do I restore
the system back
to its default
factory settings?
What should I
do if the system
stops
functioning
normally?
on the device.
View the device’s OS version and other
technical specifications. In the Settings panel,
tap Sys Info.
Users can perform this task by using the
Factory Reset button on the System Info
screen. Go to "Loading the factory default
settings" on page 33 for instructions.
Perform a soft reset on the device. Go to
"Performing a soft reset" on page 32 for
instructions.
The battery power may be depleted.
Recharge the device. Go to "Recharging the
Acer p600 Series Portable Navigator" on page
5 for instructions.
39
Page 64

Customer support
Customer support
Technical assistance
If you encounter a problem with your Acer p600 Series Portable Navigator, review the
following first:
• "Resetting the Acer p600 Series Portable Navigator" on page 32
• "FAQs" on page 38
• Latest Acer p600 Series Portable Navigator User Guide on your regional Acer
If the problem still persists, you will need technical assistance. Refer to the http://
global.acer.com/about/webmaster.htm/ web site for information on how and where
to contact the Acer Service Centers available in your area.
web site. Go to http://global.acer.com/support/.
Product warranty
Refer to the Acer p600 Series Portable Navigator Warranty Booklet (Manufacture
option) for details on the warranty coverage of your Acer p600 Series Portable
Navigator.
40
Page 65

System specifications
System specifications
This chapter lists the features and operating specifications of the Acer p600 Series
Portable Navigator.
Hardware features
Aspect Description
Processor • Samsung S3C2440A 400 MHz application processor
GPS chipset • SiRF Star III AL chipset and firmware solution
Memory • 64 MB SDRAM for system memory
• 64 MB onboard Flash memory (for operating system and
embedded applications); Model with 2 GB Flash memory is
also available
Power • High-density rechargeable 1200 mAh Lithium Ion battery
– 3.5 hours charging time from empty to full capacity
(Certain models only)
• Recharging options
– Wall charger (Manufacture option)
– Car charger
– USB cable
• Power status LED indicator
Display • 4 inch screen for a wider viewing angle
Audio • 1W built-in speaker
• 3.5 mm stereo earphone jack
Connectivity • Mini USB 1.1 client (2.0 optional)
• SD/MMC slot (Supports up to 2 GB)
Hardware
command
interface
• Volume control hot keys
• Main Menu/ Navigation hot key
41
Page 66

System specifications
Software specifications
Aspect Description
Operating
system
Navigation
software
Address book Contacts
Multimedia
applications
Bluetooth
(Manufacture
option)
TMC (Traffic
Message
Channel)
(Manufacture
option)
Microsoft Windows CE 5.0
• Vehicle and pedestrian navigation
• Simple operation, intuitive menus and touch screen
• Maximum capacity of 300 contact entries
• Integrated with your Navigation software for faster
• MP3 – supports MP3, WMA, and WAV formats
• Photo – supports BMP, GIF (still images), JPEG and PNG
• Bluetooth Version 2.0
• HS (Headset) / HF (Hands-free)
• Send location
Real-time traffic and weather information, received through FM
channel and displayed on device.
buttons
navigation using address entries as destination points
formats
42
Page 67

Design and ergonomics
Aspect Description
System specifications
Compact and
lightweight
User-friendly
interface
Power-saving
options
Mobile design • Suction-based car mount facilitates multi-vehicle usage
• Dimensions (L x W x H): 116 x 81 x 23 mm
• Weight: 195g
• Acer p600 Series Portable Navigator
– Quick launch hot keys for Main Menu and
Navigation screens
– Control hot keys for volume level
– Touch sensitive screen
• Car mount
– Windshield Mount
– Firm grip suction cup provides a steady vibration-
free support
– Swiveling mechanism and axial rod allows for multi
angle adjustment for optimum viewing position
• Software
– Multi-language user interface options
– Contacts integration with navigation function
– System configuration based on individual user
preferences
• Auto-off function for touch screen backlight
Entertainment
function
• Compact and lightweight body makes it easy for users to
carry anywhere
• On-the-road recharging via car charger
• Simple, out-of-the-box operation: Mount, dock, and
you’re ready the go. No hassle with screws and cables.
Pre-loaded software for accessing digital music (MP3) and image
files (Photo)
43
Page 68

System specifications
Aspect Description
Bundled
peripherals
Accessory
options
•Car mount
• Car holder
• Car charger
• Wall charger (Manufacture option)
• USB cable
• External GPS antenna
• External TMC module with antenna
Environmental specifications
Aspect Description
Temperature Operating: 0°C to 40°C
Storage: -20°C to 60°C
Relative
humidity (noncondensing)
Operating: 20% to 90% RH
Non-operating: 20% to 90% RH
44
 Loading...