

Page 1
Acer projector provides powerful networking
display (via source LAN/WiFi, DLNA),
English
multimedia display (via source MEDIA), and
USB display (via source USB B) functions.
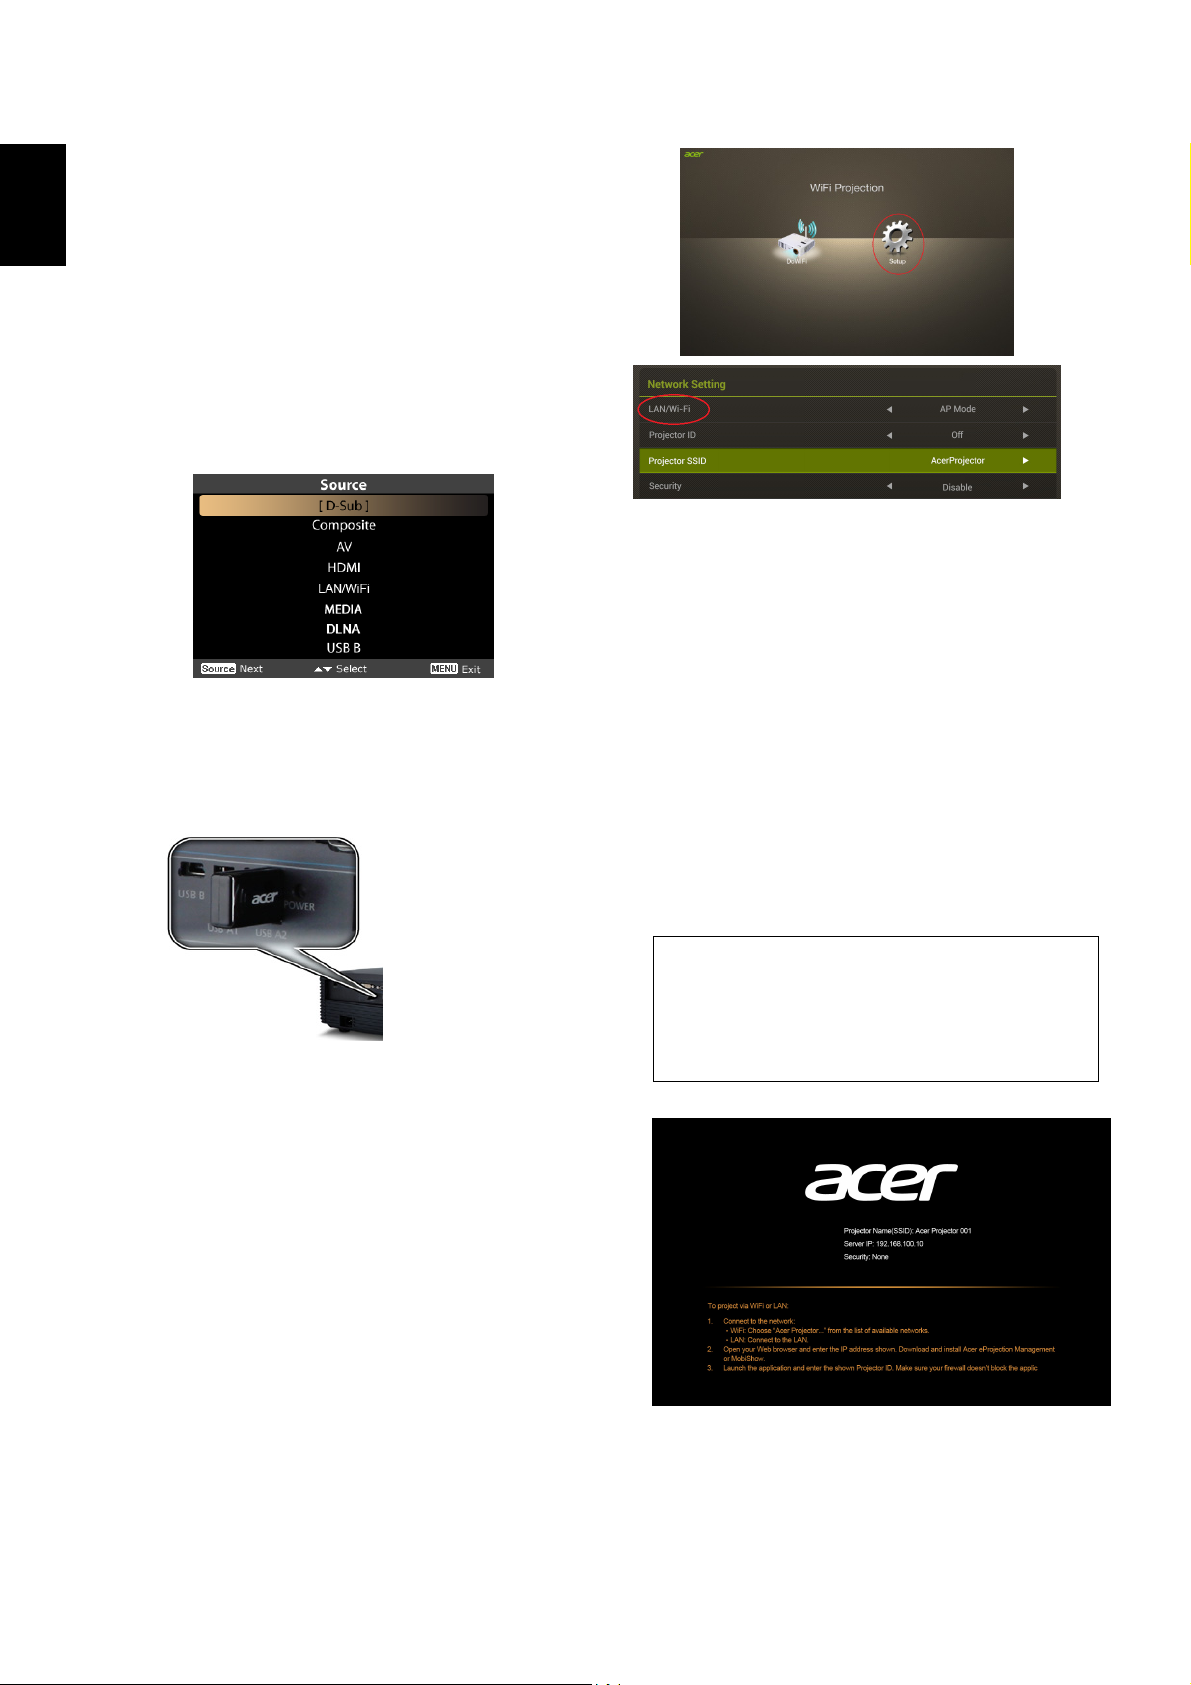
A. Projector Settings
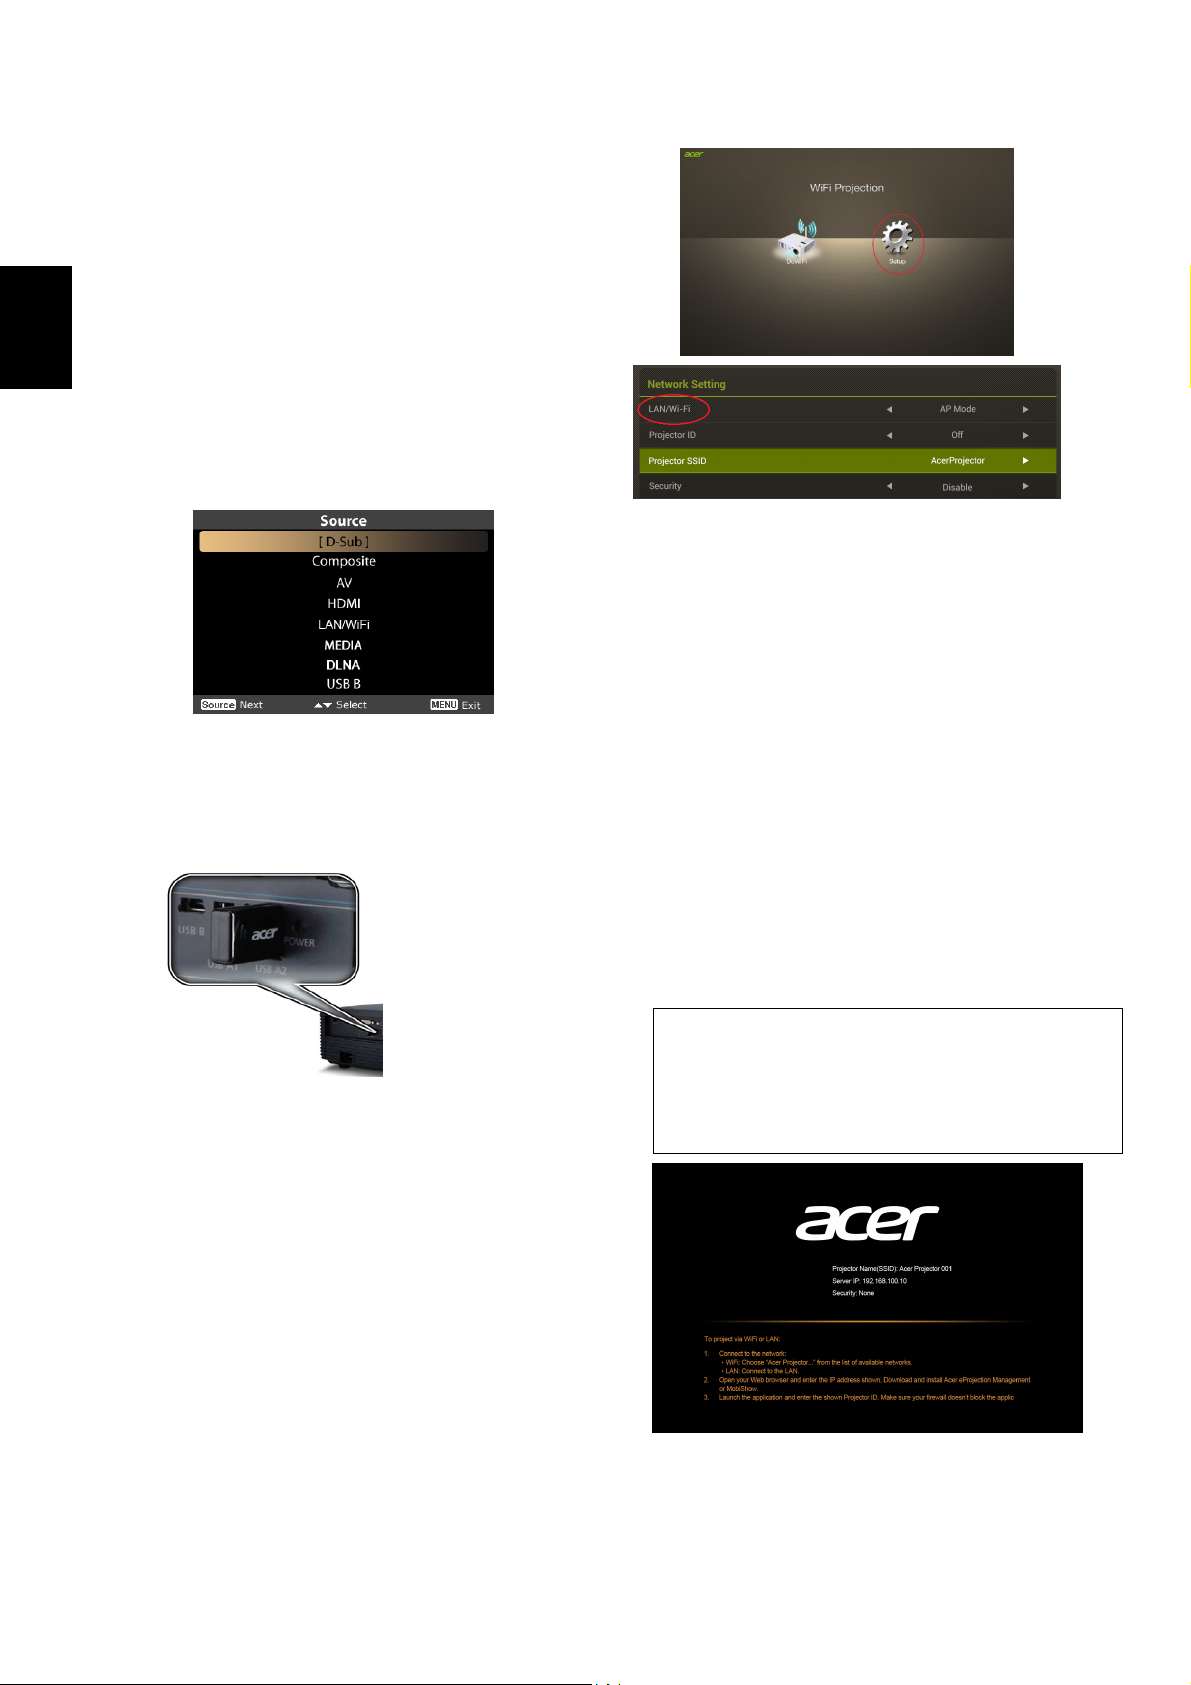
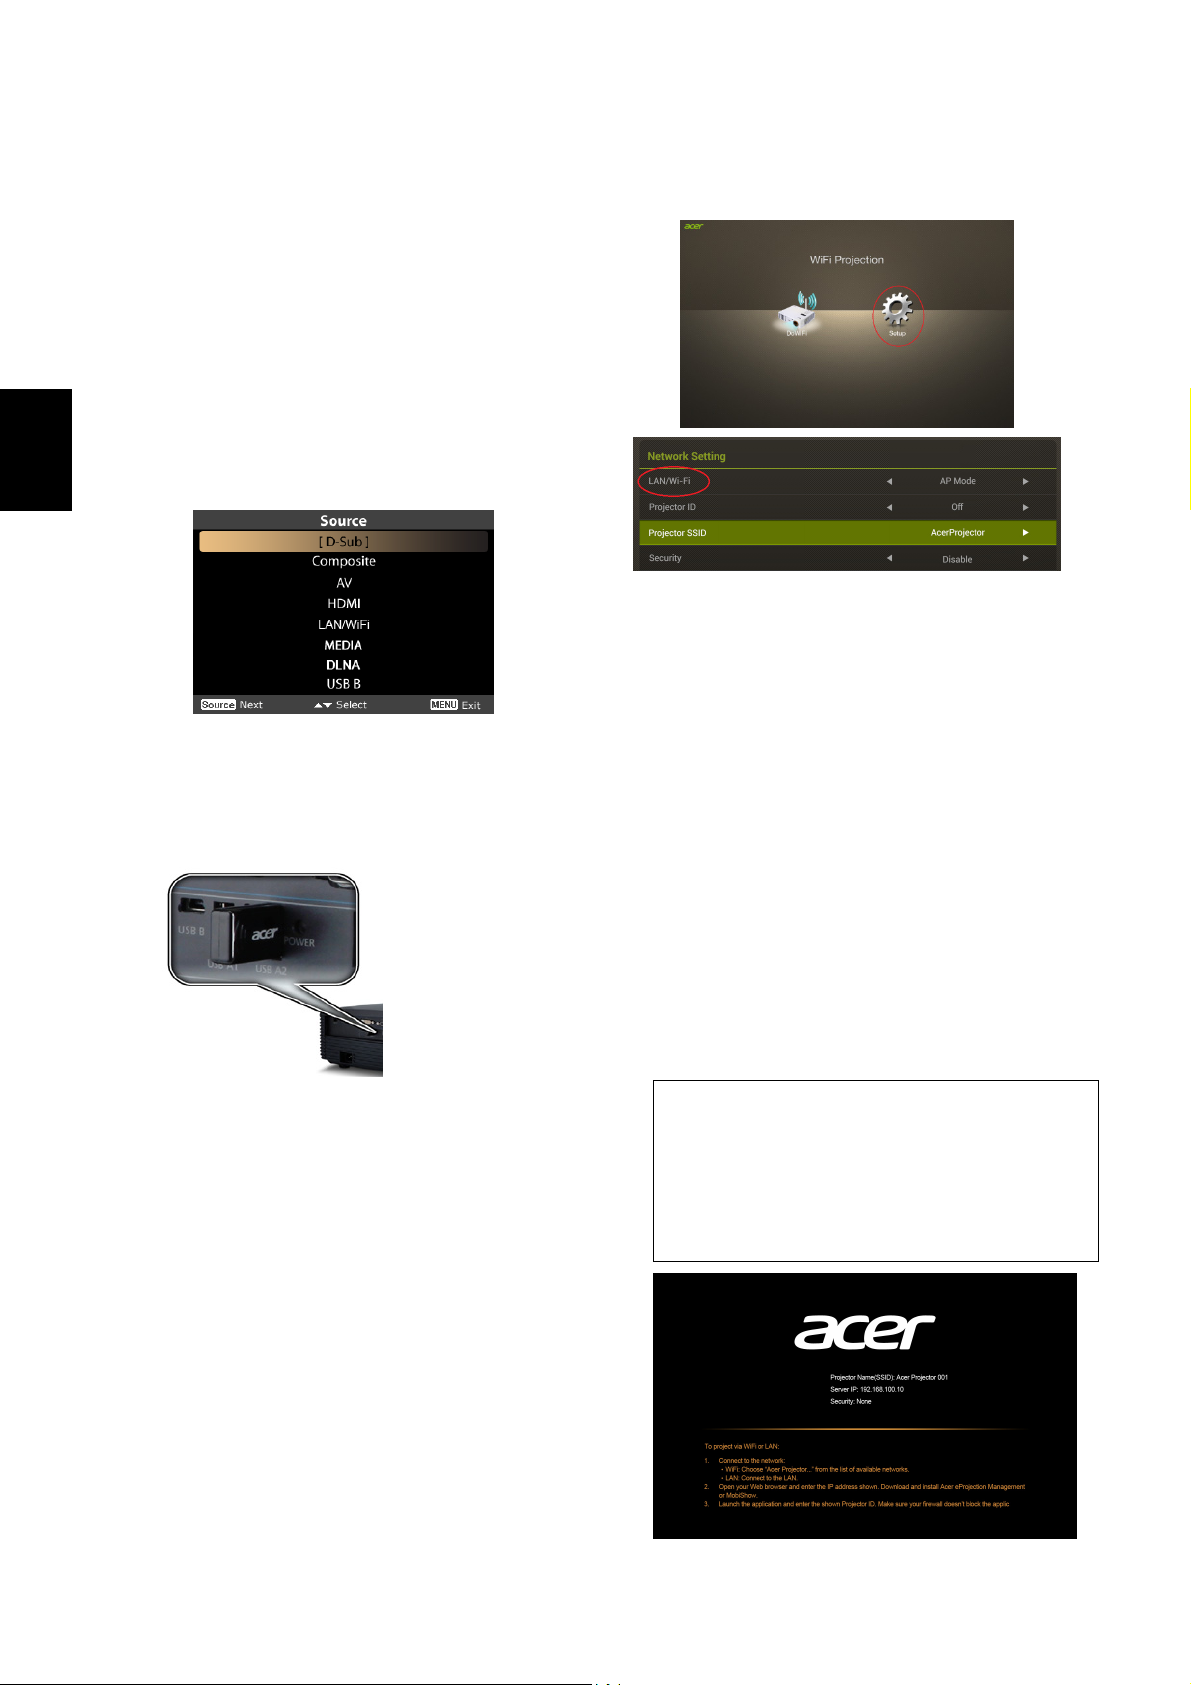
Press the Source button on the projector
keypad or remote control. You will see a source
list allowing you to choose your desired source.
Insert the USB WiFi adapter into the USB A
port or plug in the LAN cable (for selected
models with LAN port) for WiFi Display &
DLNA functions.
(1) Select AP Mode in the LAN/Wi-Fi setting
(the projector plays an AP role). Tap
“DoWiFi” and you will see below splash
screen. Check out below information:
Projector ID (if enabled, a 4-digit random
number will display on the upper-left
corner of the screen), Projector Name (SSID,
default name is AcerProjector), WiFi IP
(default IP is 192.168.100.10), Security
You can play multi-media contents from RAM,
USB handy drive, SD hard via the MEDIA
source.
You can plug the mini USB cable into the USB
B port for USB display.
WiFi Display
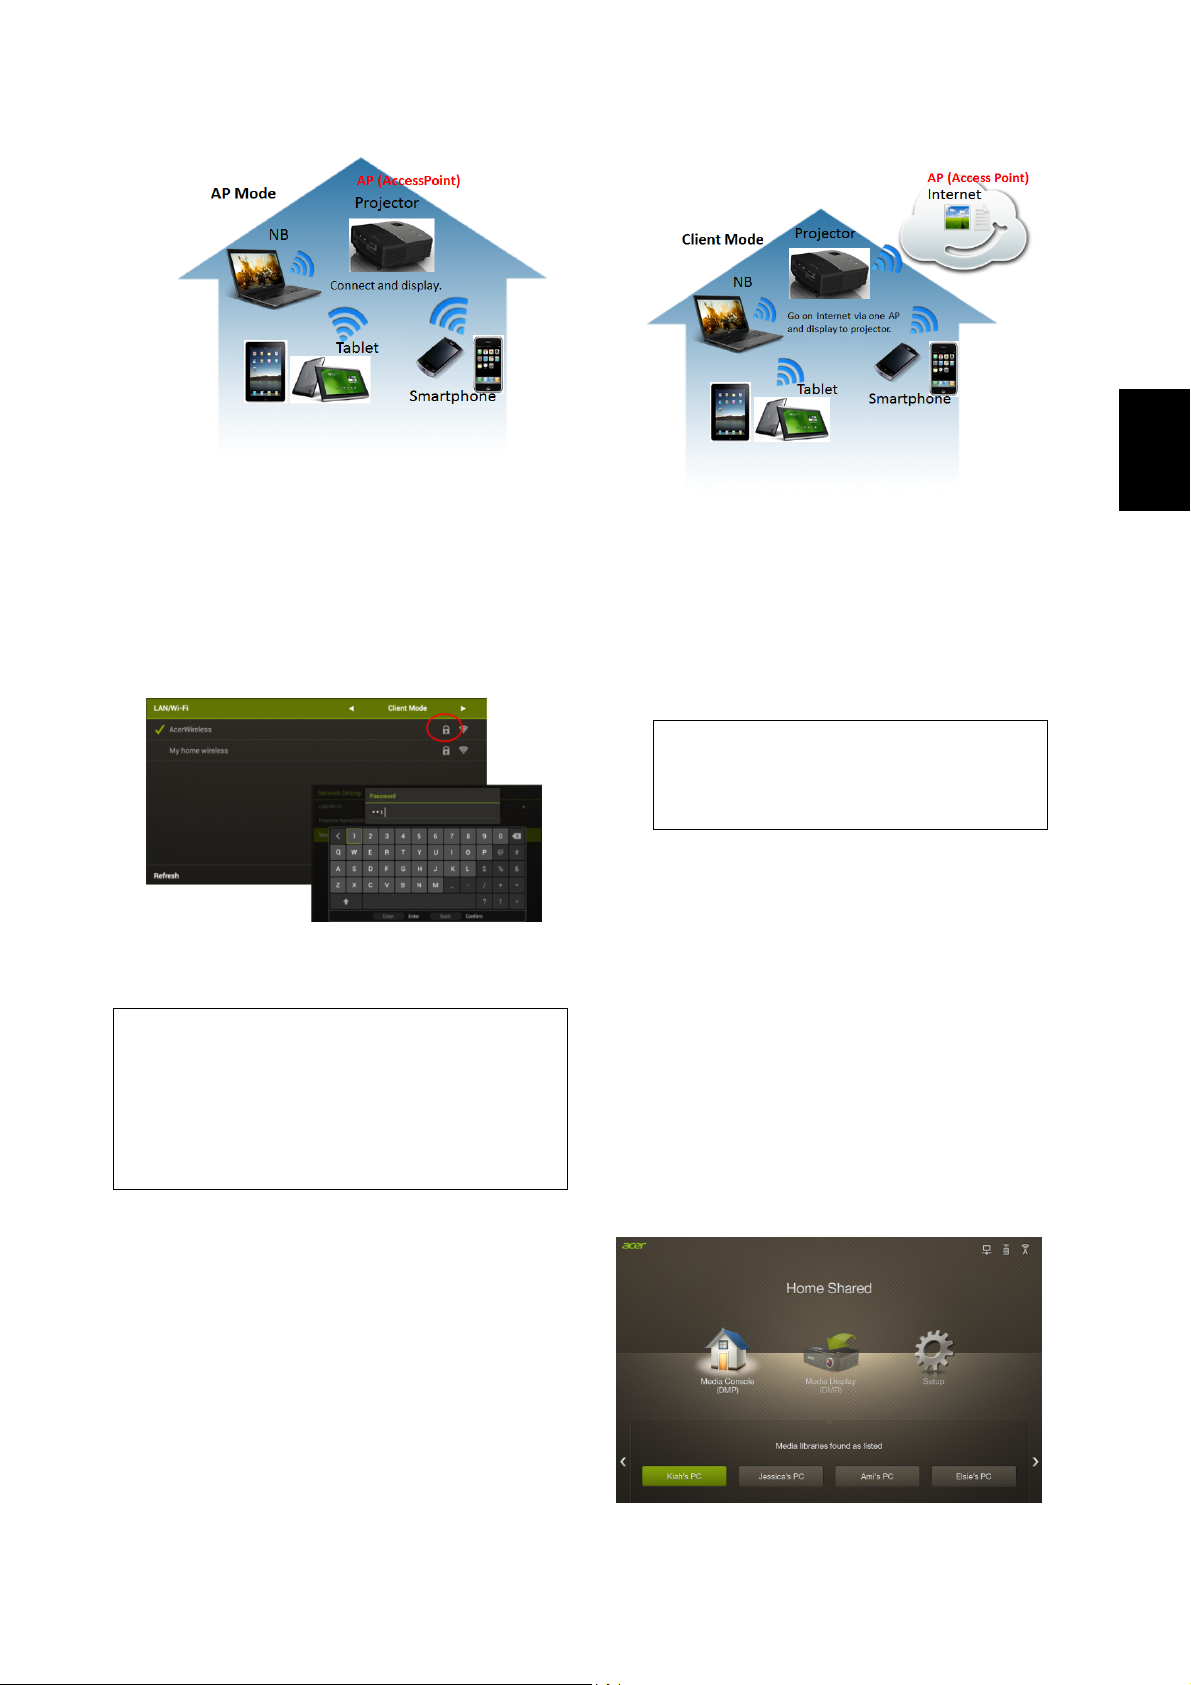
Select the source “LAN/WiFi”, and you will see
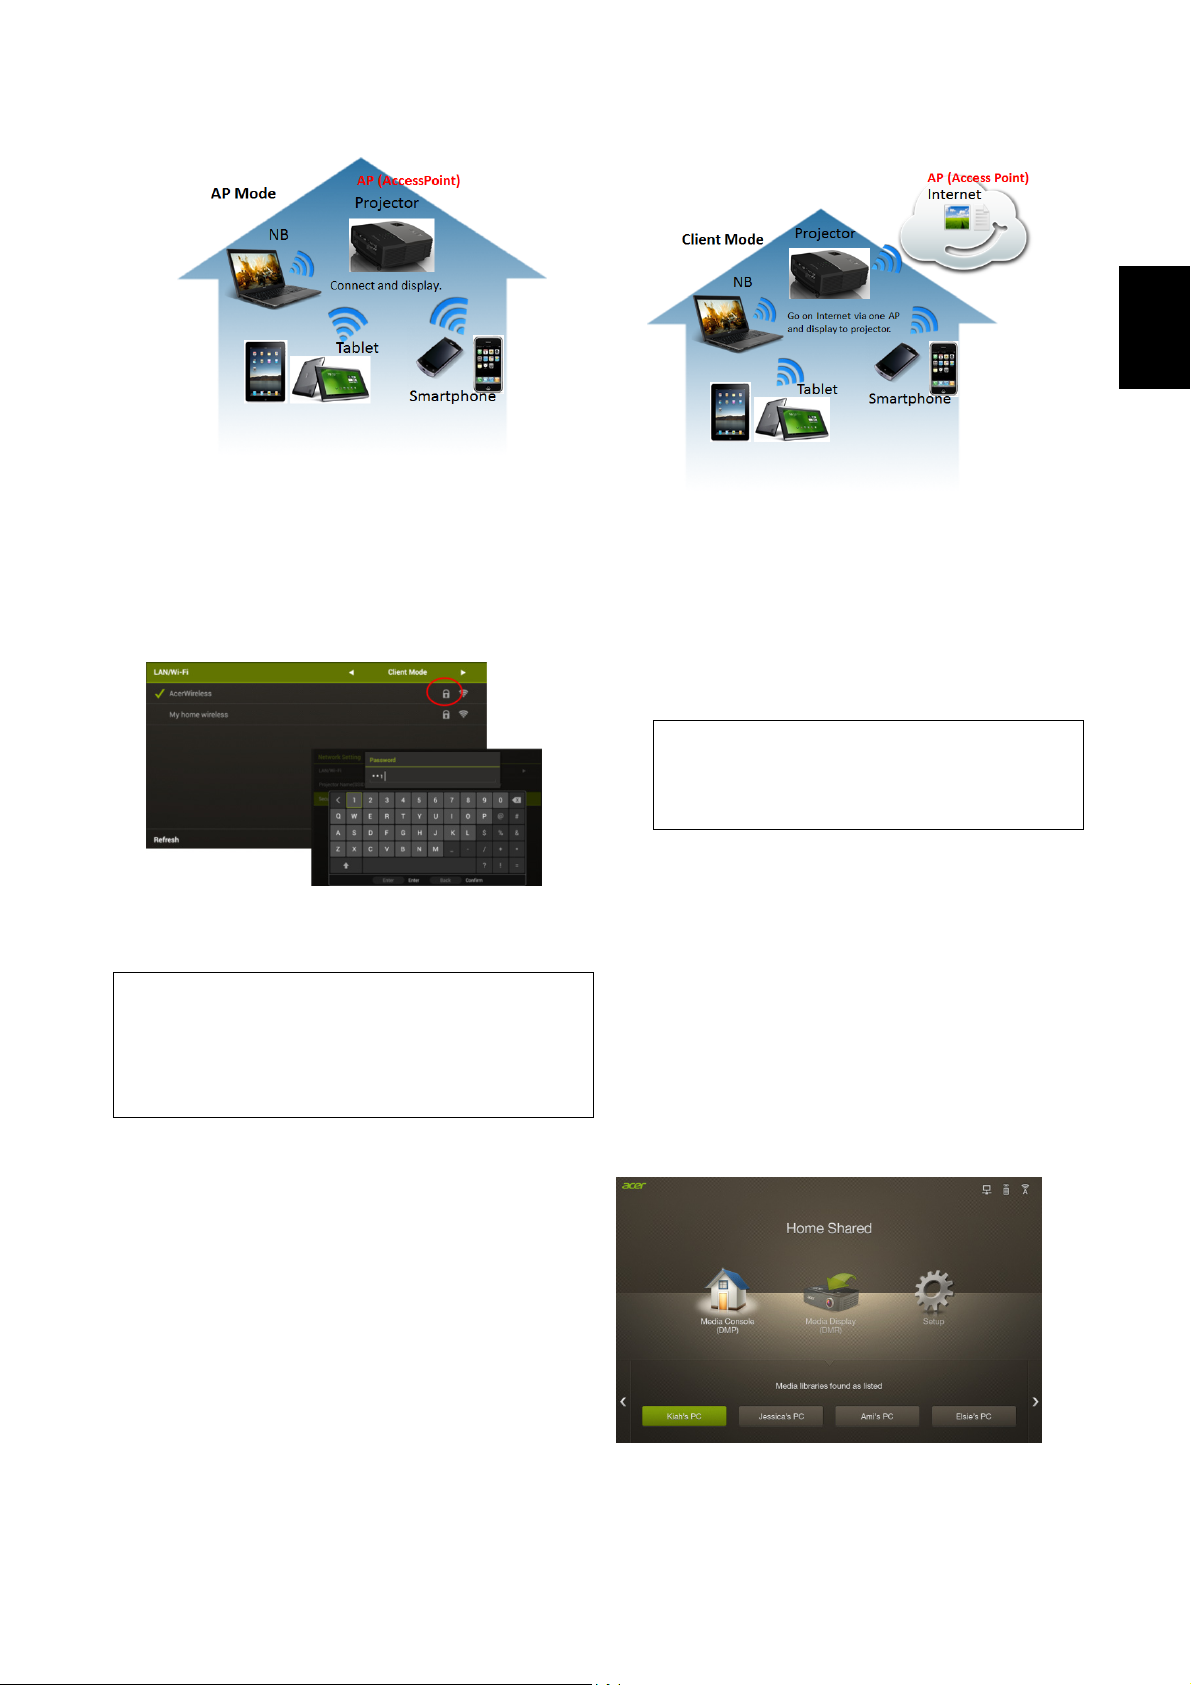
the WiFi Display welcome screen. Acer
Projector can play the following 3 roles: AP
Mode (Default), Client Mode or WiFi Direct by
(default is None), and LAN IP.
Press Apply/Enter when you finish the
adjustment.
Projector Name(SSID) : AcerProjectorXXX
WiFi IP : 192.168.100.10
Security : None (default)
LAN IP : 0.0.0.0 (if no LAN cable plugged in)
changing settings in the Setup LAN/WiFi
menu.
Page 2
English
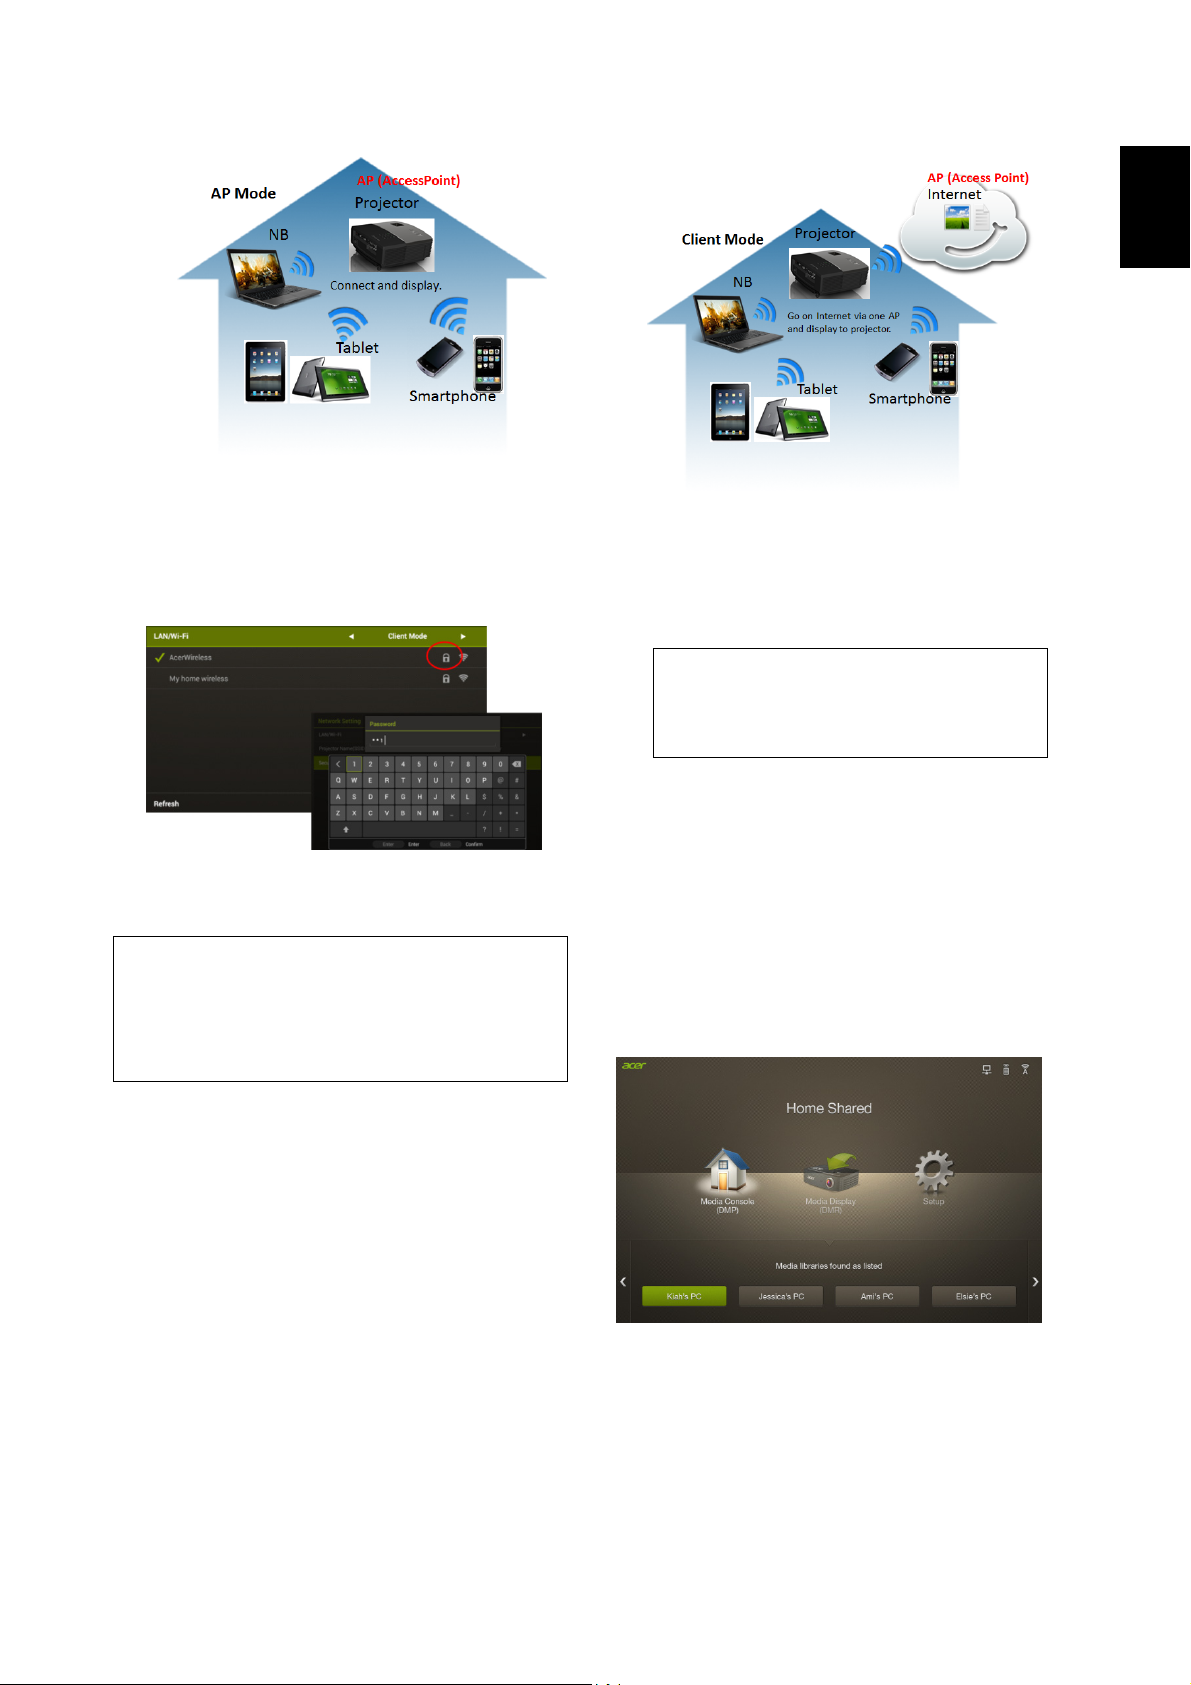
(2) Select Client Mode in the LAN/WiFi setting,
you will see below screen.
Please connect to an available AP and input
password if necessary.
Then the splash screen displays with below
information:
Connected AP Name(SSID) : Depended
Client IP : Depended
Security : Depended
(3) Select WiFi Direct in the LAN/WiFi setting,
and you can connect the projector to other
WiFi Direct-certified devices. Below
information will show on splash screen.
Projector Name : AcerProjectorXXX
WiFi Mode : WiFi Direct
WiFi Direct : On (Default is Off)
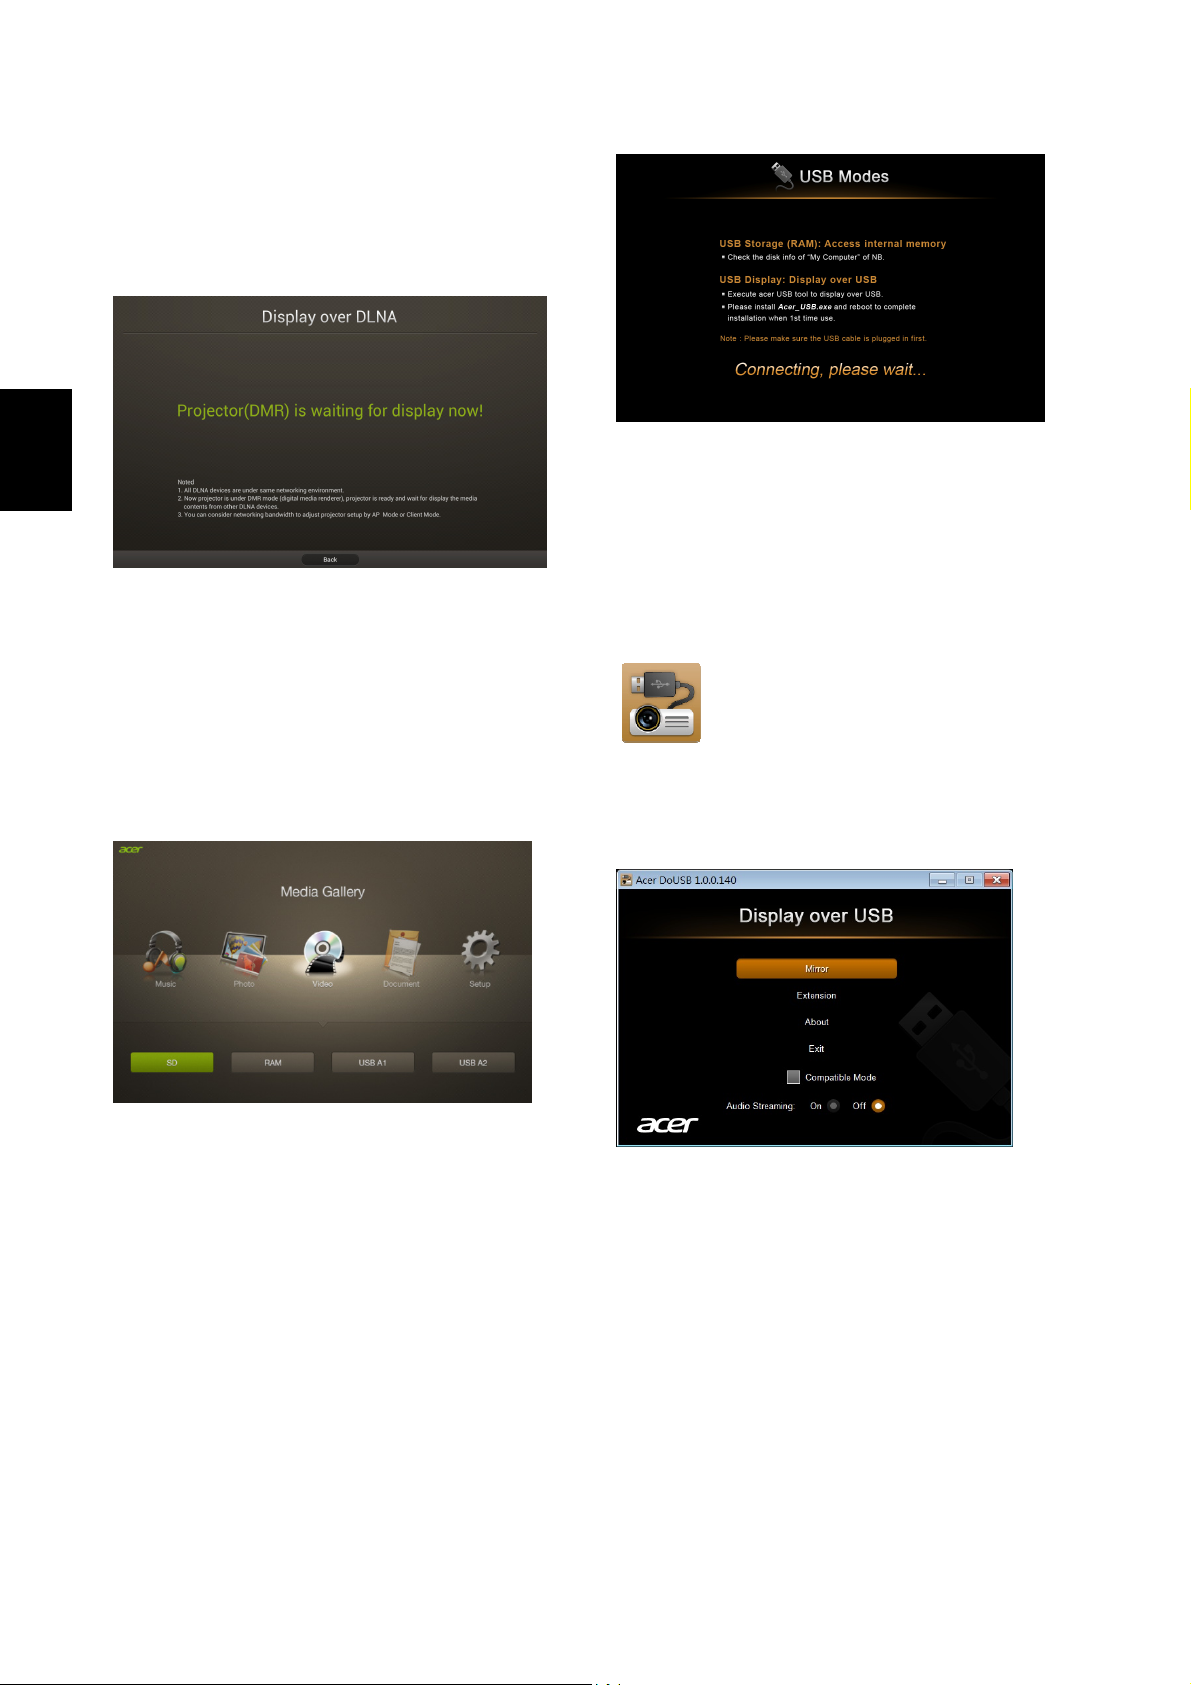
DLNA Mode
When the source “DLNA” selected, you can
choose DMP or DMR mode after you complete
the network settings (the same way as you do
for WiFi Display).
Media Console (DMP) : You can tap the media
libraries detected and play contents from the
selected library.
LAN IP : 0.0.0.0 ( if no LAN cable plugged in)
You can project the screen from your tablet or
smartphone to the projector by using the
application “eDisplay”. In Client mode, the
projector is also able to access the internet.
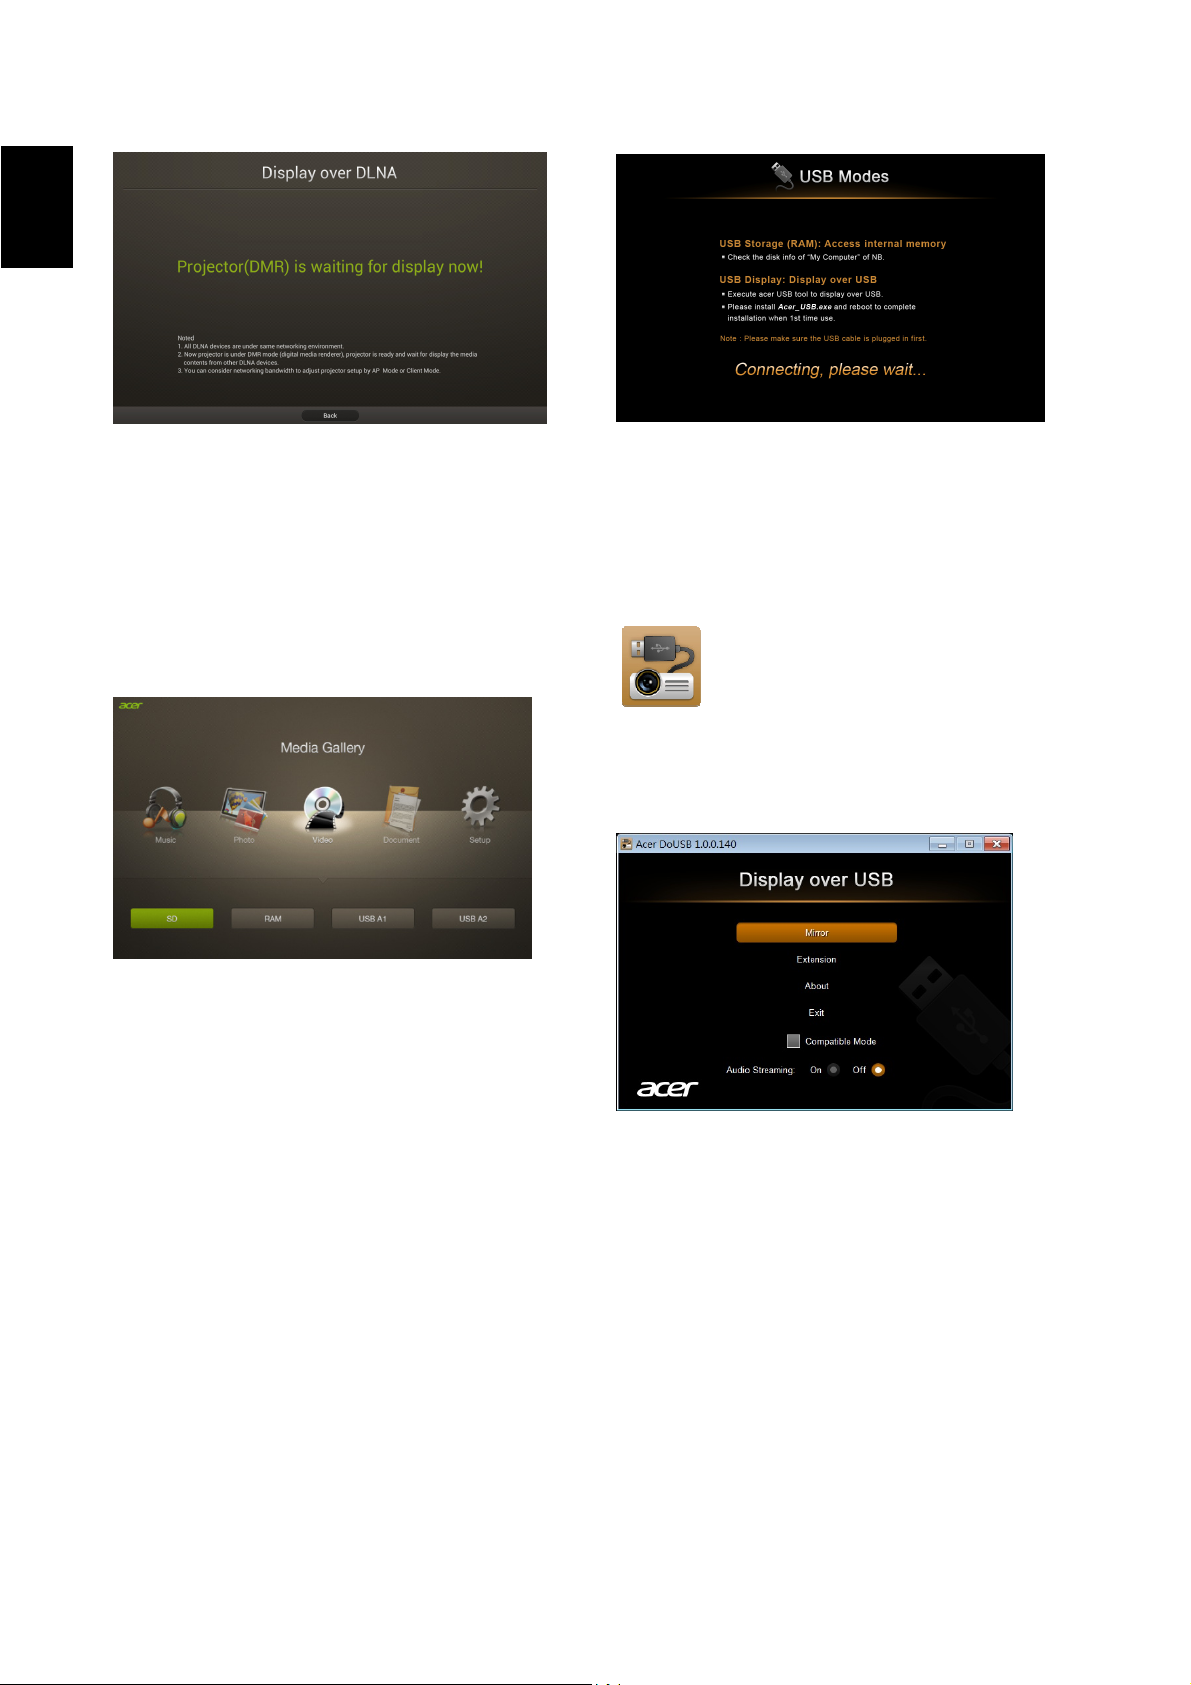
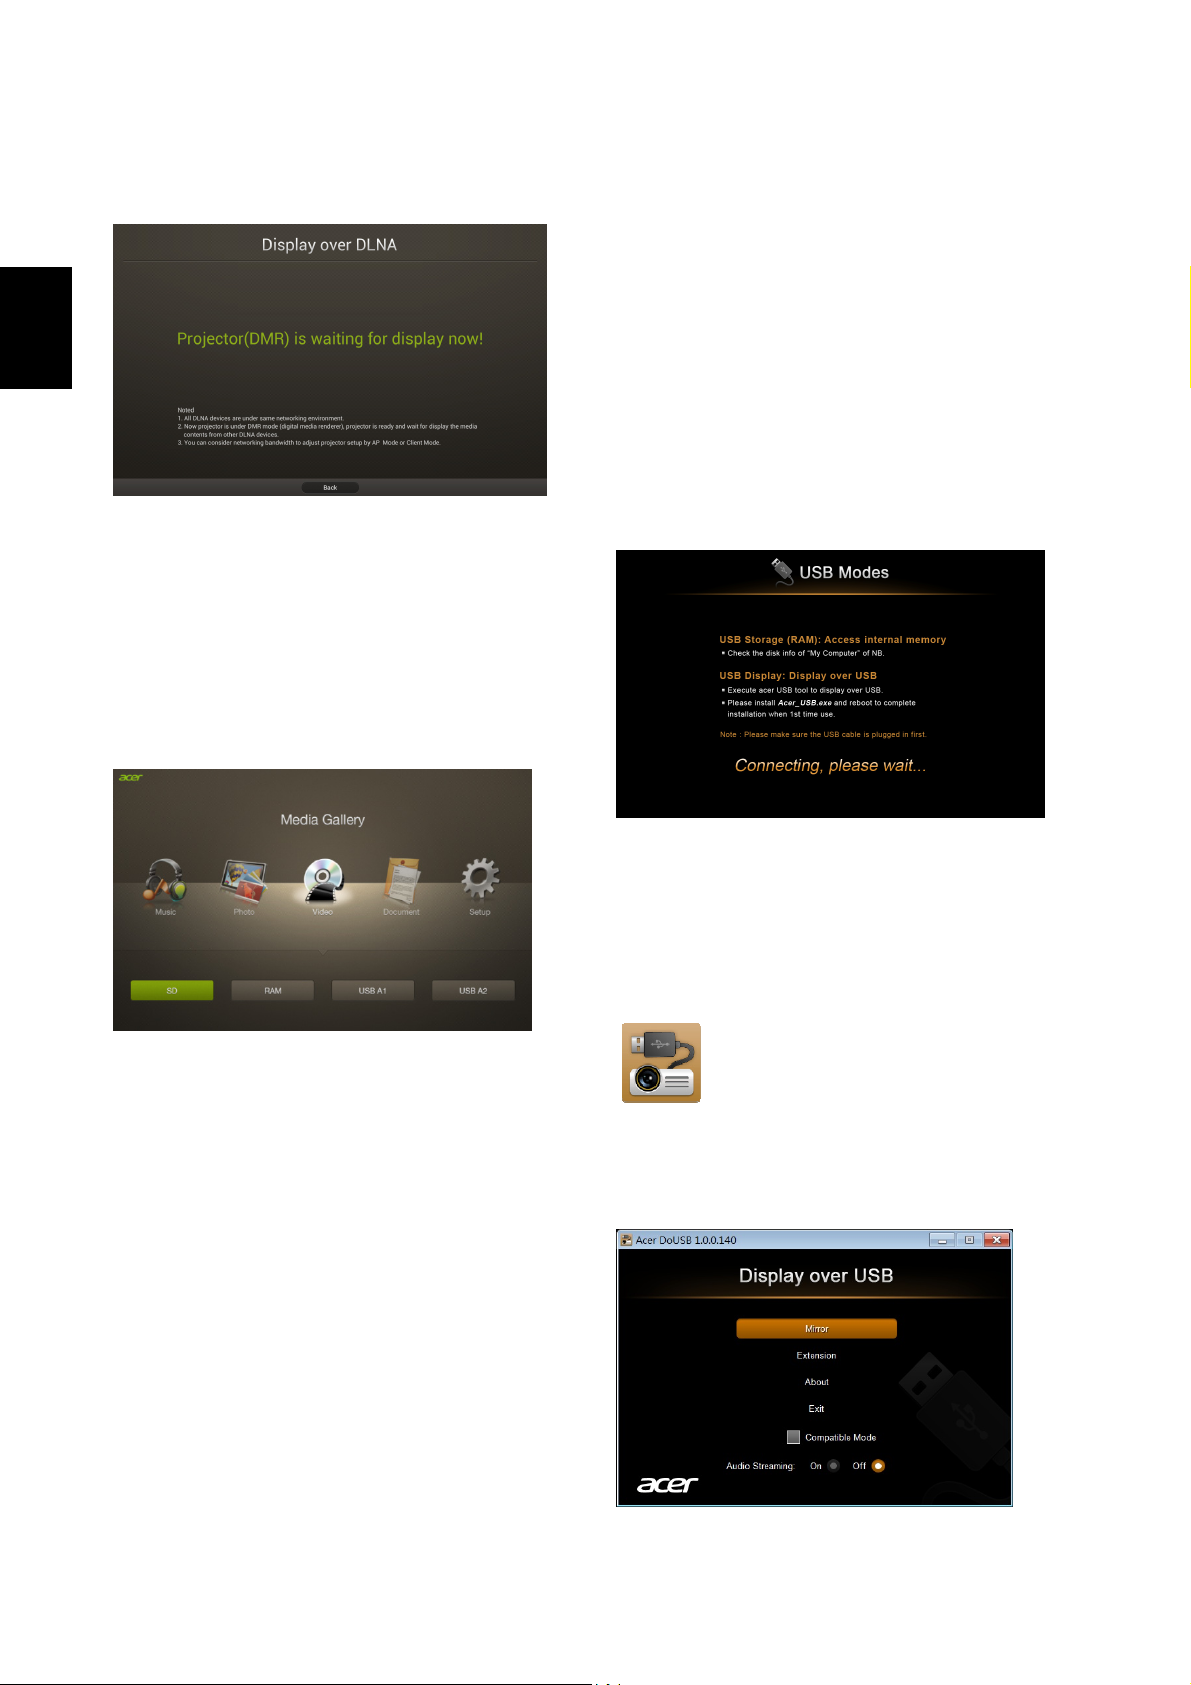
Media Display (DMR) : projector under the
DMR mode (digital media renderer) is ready for
displaying the contents from other DLNA
devices.
Page 3
English
MEDIA Mode
Select the source “MEDIA”, and there are 5
options for you to choose from Music, Photo,
Video, Document, and Setup. You can play
contents from RAM (Internal memory), USB
storage devices, or SD card (for selected
models).
USB Display
For USB display, please install Acer_USB.exe on
your NB and remember to reboot after the
installation completes.
Below shortcut icon will be on the desktop of
your NB.
Double click on the shortcut, and you can
mirror or extend your screen and
enable/disable audio streaming.
Select the source “USB B”, and you will see
below main page for you to choose from USB
storage (RAM) or USB display.
You can access the internal memory (RAM) via
USB Storage (RAM) or do USB projection via
USB Display.
Please make sure the USB cable is plugged in
first.
Page 4
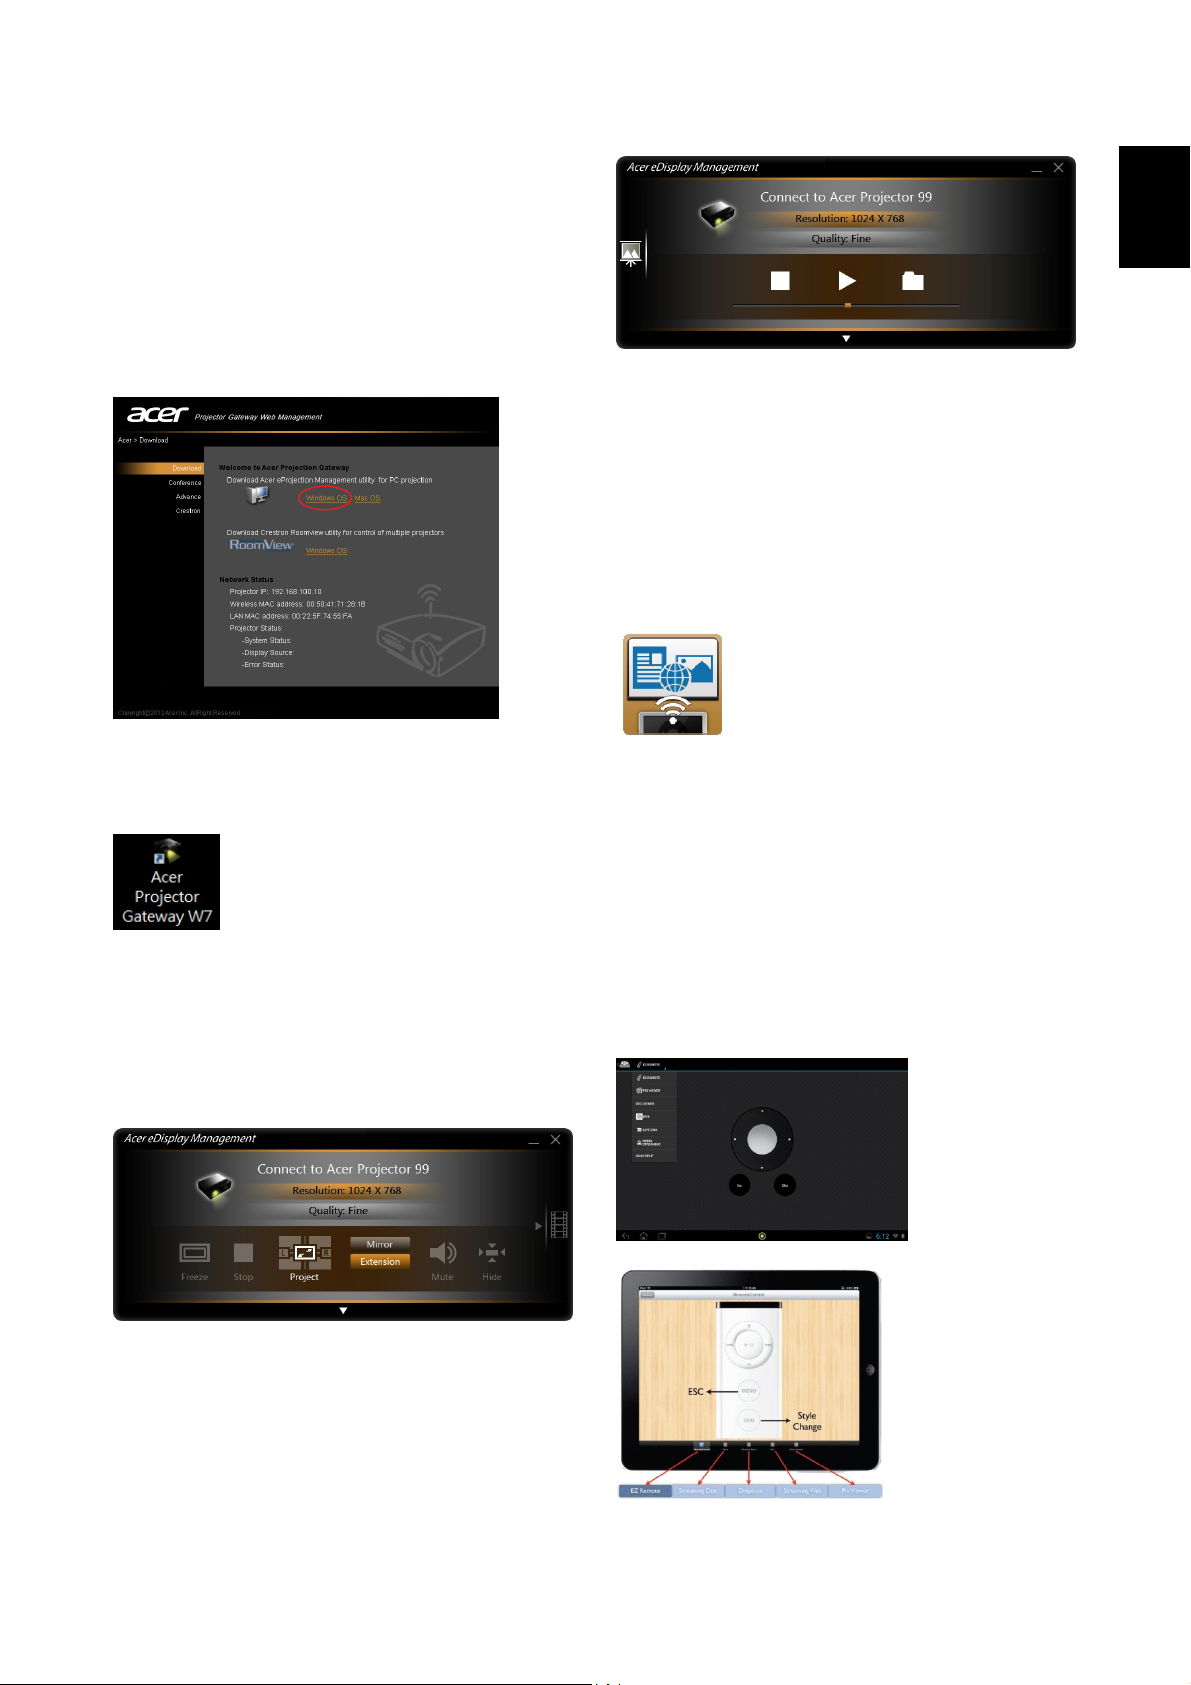
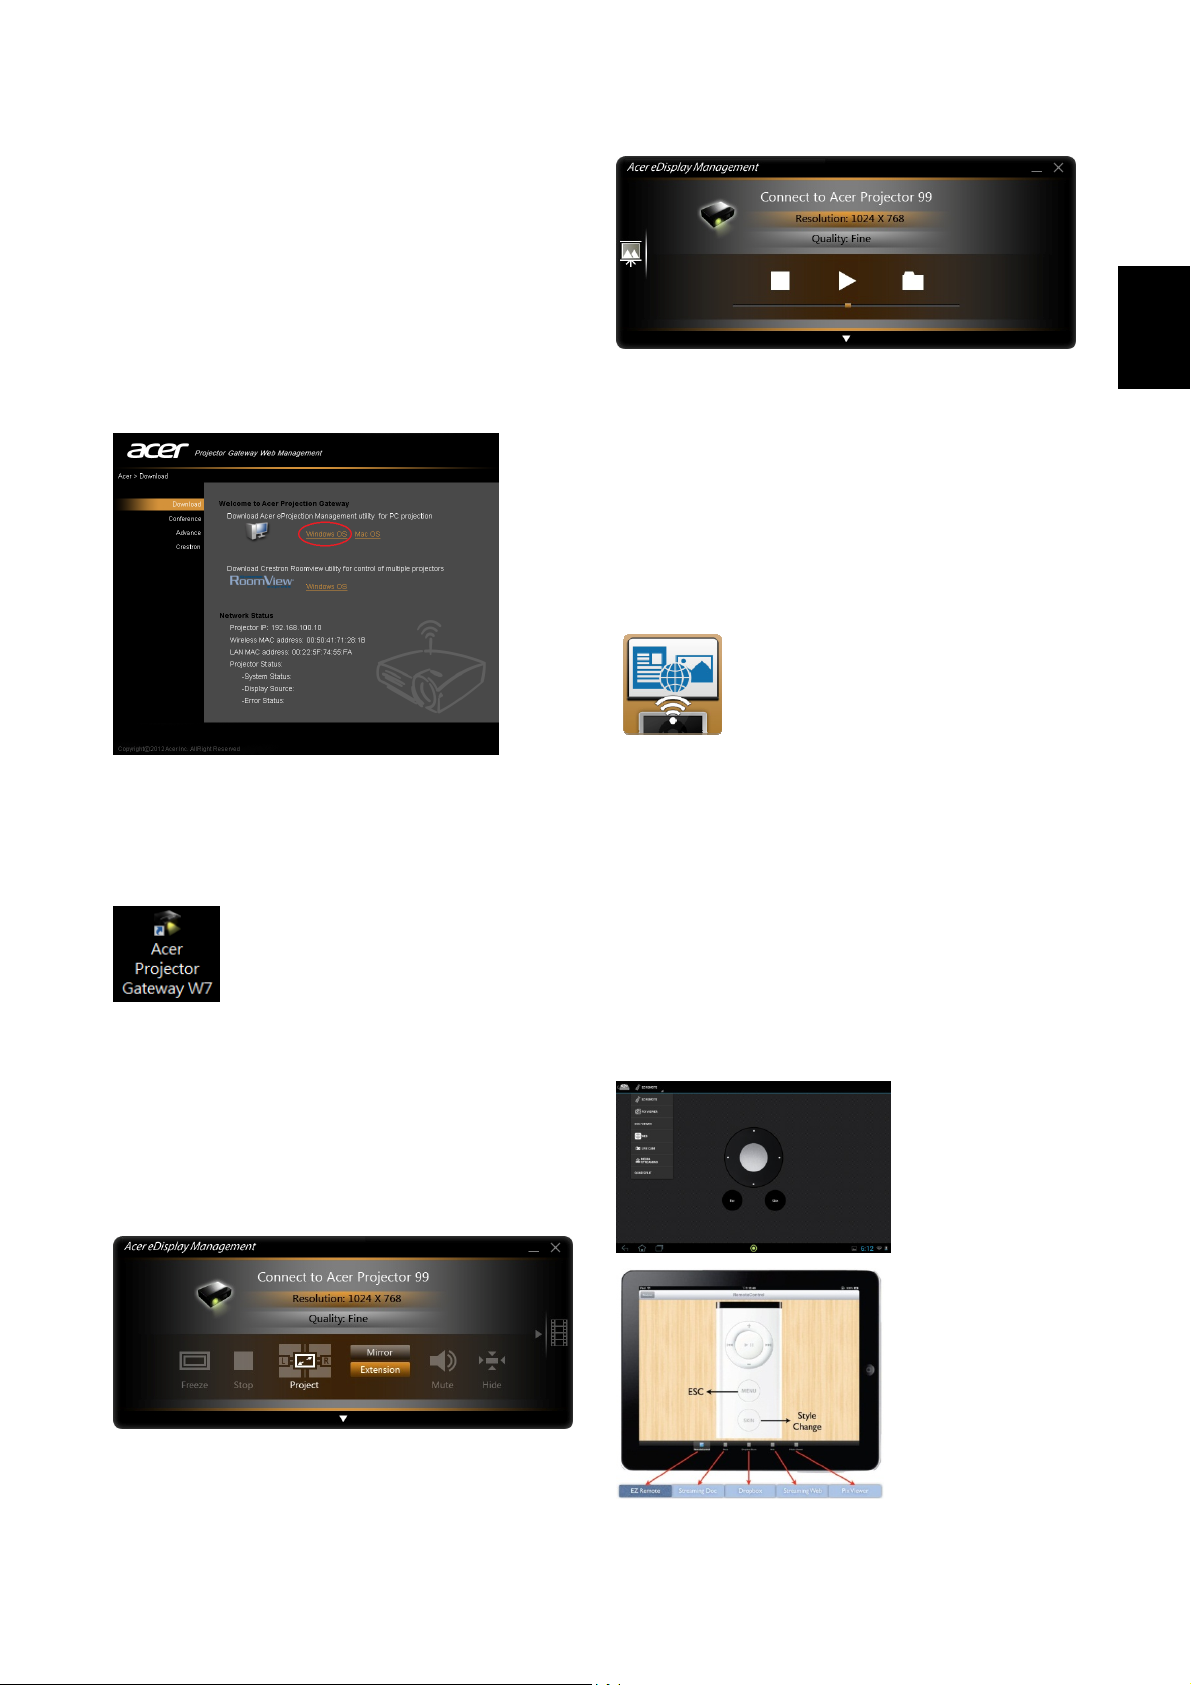
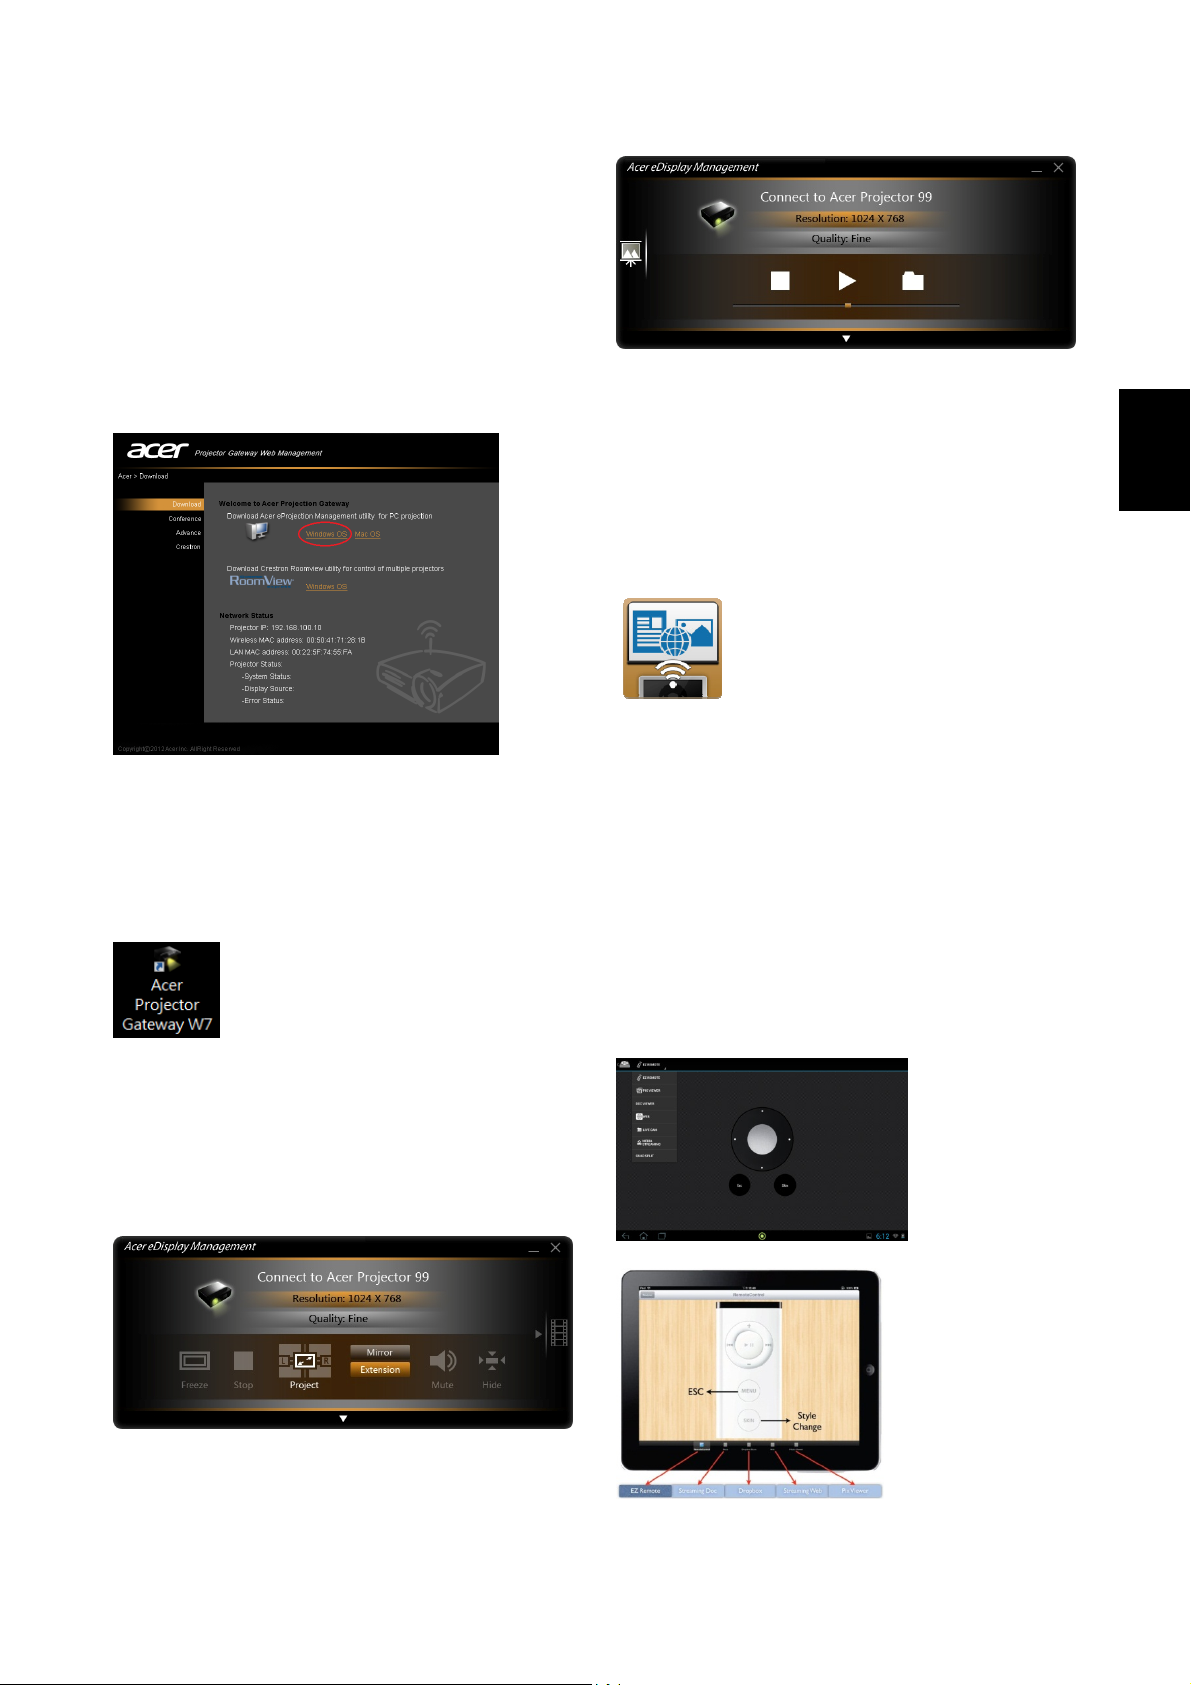
B. Device Installation (WiFi Display)
NB eDisplay (Windows & Mac OS)
You can download the application (acer
eDisplay Management) from CD or webpage
(192.168.100.10) when the projector is in AP
English
Mode.
Click RUN and follow the wizard to install, you
will get a shortcut Acer Projector Gateway W7
on your desktop and execute it.
“Projection mode” supports “Full, L/R, 4-Split
Tablet & Smartphone eDisplay
(Android & iOS)
You can get the application “eDisplay” from
Android’s Google Play or iOS’s Apple Store.
Execute the app to project the small screen
from your device to a bigger one via the
projector.
Support the following functions: EZ Remote,
Streaming Doc, Dropbox, Streaming Web, Pix
Viewer, & Sketch.
Note :
1. Android 4.0 and above supported.
2. iOS 5.0 and above supported.
Mirror projection” & “Full, L/R, 4-Split
Extension projection”, Audio On/Off, and
controls the projected screen to be frozen or
hidden.
“Video mode” supports video streaming.
3. If you want to use Dropbox or Streaming Web,
please set the projector to be in Client mode.
(Android eDisplay)
(iOS eDisplay)
Page 5
Français
Le projecteur Acer fournit un affichage en
réseau puissant (via source LAN/WiFi, DLNA),
un affichage multimédia (via source MÉDIA) et
un affichage USB (via source USB B).
A. Paramètres du projecteur
Appuyez le bouton Source sur le clavier du
projecteur ou la télécommande. Vous verrez
une liste des sources vous permettant de
choisir votre source souhaitée.
Insérez l’adaptateur USB WiFi dans le port
USB A ou branchez le câble réseau (pour
certains modèles avec port LAN) pour
l’affichage WiFi et les fonctions DLNA.
Vous pouvez lire les contenus multimédias
(1) Sélectionnez Mode AP dans le paramètre
LAN/WiFi (le projecteur aura un rôle AP).
Appuyez sur « DoWiFi » et vous verrez
l’écran d’accueil ci-dessous. Vérifiez les
informations ci-dessous : ID projecteur
(si activé, un nombre à 4 chiffres aléatoires
sera affiché sur le coin supérieur gauche de
l’écran), Nom de projecteur (SSID, le nom
par défaut est AcerProjector), IP WiFi (l’IP
par défaut est 192.168.100.10), Sécurité
(par défaut est Aucune), et IP LAN.
Appuyez « Apply/Enter (Appliquer/
Entrer) » quand vous avez terminé
l’ajustement.
Nom de projecteur (SSID) : AcerProjectorXXX
IP WiFi : 192.168.100.10
Sécurité : Aucune (par défaut)
depuis la mémoire RAM, une clé USB, une
carte SD via la source MÉDIA.
Vous pouvez brancher un câble mini USB au
port USB B pour l’affichage USB.
Affichage WiFi
Sélectionnez la source « LAN/WiFi », et vous
verrez l’écran de bienvenue de l’affichage WiFi.
Le projecteur Acer peut avoir les 3 rôles
suivants : Mode AP (par défaut), Mode client
ou WiFi Direct en changeant les paramètres
dans le menu Réglage LAN/WiFi.
IP LAN
: 0.0.0.0 (si aucun câble réseau branché)
Page 6
Français
(2) Sélectionnez Mode client dans le
paramètre LAN/WiFi, vous verrez l’écran
ci-dessous.
Veuillez vous connecter à un AP disponible
et saisissez le mot de passe si nécessaire.
Puis l’écran d’accueil s’affiche avec les
informations ci-dessous :
Nom d’AP connecté (SSID) : Variable
IP client : Variable
Sécurité : Variable
IP LAN
Vous pouvez projeter l’écran de votre tablette
: 0.0.0.0 (si aucun câble réseau branché)
(3) Sélectionnez WiFi Direct dans le paramètre
LAN/WiFi, et vous pouvez connecter le
projecteur à d’autres appareils avec la
fonction WiFi Direct. Les informations
ci-dessous s’afficheront sur l’écran
d’accueil.
Nom de projecteur :AcerProjectorXXX
Mode WiFi : WiFi Direct
WiFi Direct :
Mode DLNA
Quand la source « DLNA » est sélectionnée,
vous pouvez choisir le mode DMP ou DMR
après avoir terminé les paramètres réseau (de
la même manière que pour l’affichage WiFi).
« Media Console(DMP) (Console média
(DMP)) » : Vous pouvez appuyer sur les
médiathèques détectées et lire le contenu de
la bibliothèque sélectionnée.
Marche (par défaut est Arrêt)
ou Smartphone par le projecteur en utilisant
l’application « eDisplay » et accéder également
à Internet.
« Media Display (DMR) (Affichage média
(DMR)) » : Le projecteur en mode DMR
Page 7
(convertisseur média numérique) est prêt pour
Affichage USB
Français
afficher le contenu d’autres appareils DLNA.
Mode MÉDIA
Sélectionnez la source « MÉDIA », et il y a 5
options pour votre choix : Musique, Photo,
Vidéo, Document et Réglage. Vous pouvez lire
le contenu de la RAM (mémoire interne), des
appareils de stockage USB ou des cartes SD
(pour certains modèles).
Sélectionnez la source « USB B », et vous
verrez la page principale ci-dessous pour
choisir entre USB storage (RAM) (stockage USB
(RAM)) ou USB display (affichage USB).
Vous pouvez accéder à la mémoire interne
(RAM) via USB Storage (RAM) (stockage USB
(RAM)) ou effectuer la projection USB via USB
Display (affichage USB).
Veuillez d’abord vous assurer que le câble USB
est branché.
Pour l’affichage USB, veuillez installer
Acer_USB.exe sur votre notebook et n’oubliez
pas de redémarrer après la fin de l’installation.
L’icône de raccourci ci-dessous sera sur le
bureau de votre notebook.
Double-cliquez sur le raccourci, vous pouvez
afficher en miroir ou étendre votre écran et
commencer la diffusion audio.
Page 8
B. Installation de l’appareil
(Affichage WiFi)
NB eDisplay (Windows et Mac OS)
Vous pouvez télécharger l’utilitaire (Acer
eDisplay Management) depuis le CD ou la page
Web (192.168.100.10) lorsque le projecteur est
en mode AP.
Cliquez sur « RUN (EXÉCUTER) » et suivez
l’assistant pour installer, vous obtiendrez un
raccourci Acer Projector Gateway W7 sur votre
Français
eDisplay pour tablette ou Smartphone
(Android & iOS)
Vous pouvez obtenir l’application « eDisplay »
sur Google Play pour Android ou Apple Store
pour iOS. Exécutez l’appli pour projeter le petit
écran de votre appareil en un plus grand via le
projecteur.
Prend en charge les fonctions suivantes : EZ
Remote, Streaming Doc, Dropbox, Streaming
Web, Pix Viewer et Sketch.
bureau et exécutez-le.
« Mode de projection » prend en charge la
« projection Mirror (Miroir) plein écran, G/D,
écran divisé en 4 » et la « projection Extension
(Extension) plein écran, G/D, écran divisé en
4 », audio activé/désactivé, et contrôle l’écran
du projecteur en arrêt sur image et masqué.
« Mode vidéo » prend en charge la diffusion
vidéo.
Remarque :
1. Android 4.0 et supérieur pris en charge.
2. iOS 5.0 et supérieur pris en charge.
3. Si vous voulez utiliser Dropbox et Streaming
Web, veuillez définir le projecteur pour être en
Mode client.
(Android eDisplay)
(iOS eDisplay)
Page 9
Der Acer Projektor bietet eine leistungsstarke
durch Ändern der Einstellungen im Menü
Deutsch
Netzwerkanzeige (via Quell-LAN/WiFi, DLNA),
Multimediaanzeige (via Quell-Medien) und
USB-Anzeige (via Quell-USB-B) Funktionen.
A. Projektoreinstellungen
Drücken Sie auf dem Projektor Tastenfeld oder
der Fernbedienung auf Source. Es wird eine
Quellenliste angezeigt, aus der Sie Ihre
gewünschte Quelle auswählen können.
Verbinden Sie den USB WLAN-Adapter mit
dem USB A Port oder schließen Sie das
„Einstellungen“ „LAN/WiFi“.
(1) Wählen Sie „AP-Modus“ in den LAN/Wi-Fi
Einstellungen (der Projektor nimmt eine AP
Rolle ein). Tippen Sie auf „DoWiFi“,
woraufhin das unten abgebildete Fenster
angezeigt wird. Prüfen Sie die folgenden
Informationen: Projektor ID (wenn aktiviert,
LAN-Kabel (bei ausgewählten Modellen mit
LAN Ports) für WLAN & DLNA Funktionen an.
Sie können Multimediainhalte aus dem RAM,
von einem USB-Stick oder SD-Karte über die
Quelle Medien wiedergeben.
Sie können das Mini-USB-Kabel mit dem USB
B Port für USB-Anzeige verbinden.
WLAN-Anzeige
Wählen Sie die Quelle „LAN/WiFi“ und der
WLAN Anzeige Willkommensbildschirm wird
wird eine 4-stellige Zufallsnummer oben
links im Fenster angezeigt), Projektorname
(SSID, Standardname ist AcerProjektor),
WLAN-IP (Standard-IP ist 192.168.100.10),
Sicherheit (Standard ist Kein) und LAN-IP.
Drücken Sie auf „Apply/Enter
(Übernehmen/Eingabe)“, wenn Sie die
Einstellung beendet haben.
Projektorname (SSID): AcerProjektorXXX
WLAN-IP: 192.168.100.10
Sicherheit: Kein (Standard)
LAN-IP: 0.0.0.0 (wenn kein LAN-Kabel
angeschlossen ist)
angezeigt. Der Acer Projektor kann die
folgenden 3 Rollen einnehmen: AP-Modus
(Standard), Client-Modus oder WiFi Direct
Page 10
Deutsch
(2) Wählen Sie „Client-Modus“ in den
LAN/WLAN Einstellungen, woraufhin das
unten abgebildete Fenster angezeigt wird.
Bitte stellen Sie eine Verbindung zu einem
verfügbaren AP her und geben Sie ggf. das
Kennwort ein.
Daraufhin wird das folgende Fenster mit den
unten stehenden Informationen angezeigt:
Verbundener AP Name (SSID): Individuell
(3) Wählen Sie „WiFi Direct“ in den
LAN/WiFi-Einstellungen, um den Projektor
mit anderen Geräten mit WiFi Direct
Funktion zu verbinden. Die unten
stehenden Informationen werden im
Fenster angezeigt.
Projektor Name: AcerProjektorXXX
WLAN-Modus: WiFi Direct
WiFi Direct: Ein (Standard ist Aus)
DLNA Modus
Wenn die Quelle „DLNA“ ausgewählt ist,
können Sie den DMP oder DMR Modus
auswählen, nachdem Sie die
Netzwerkeinstellungen abgeschlossen haben
(in derselben Weise wie für die
Client-IP: Individuell
Sicherheit: Individuell
LAN-IP: 0.0.0.0 (wenn kein LAN-Kabel
angeschlossen ist)
Sie können die Anzeige Ihres Tablet oder
Smartphones über den Projektor projizieren,
indem Sie die „eDisplay“ Anwendung
verwenden und gleichzeitig mit dem Internet
verbunden sind.
WLAN-Anzeige).
Media Console (DMP) (Medienkonsole (DMP)):
Sie können die erkannten Medienbibliotheken
antippen und Inhalte aus der ausgewählten
Bibliothek wiedergeben.
Page 11
Media Display (DMR) (Medienanzeige (DMR)):
Projektor im DMR Modus (Digital Media
Renderer) ist für die Anzeige von Inhalten von
anderen DLNA Geräten bereit.
Installieren Sie für die USB-Anzeige bitte
Deutsch
Medien Modus
Wählen Sie die Quelle „Medien“, um aus den 5
Optionen Musik, Foto, Video, Dokument und
Einstellungen auszuwählen. Sie können Inhalte
aus dem RAM (internen Speicher), USB
Speichergeräten oder SD-Karte (bei auswählten
Modellen) wiedergeben.
Acer_USB.exe auf Ihrem NB und führen Sie
einen Neustart aus, nachdem die Installation
abgeschlossen wurde.
Das unten abgebildete Verknüpfungssymbol
wird auf dem Desktop Ihres NB angezeigt.
Doppelklicken Sie auf die Verknüpfung, um den
Bildschirm zu spiegeln oder zu erweitern und
die Audioübertragung zu starten.
USB-Anzeige
Wählen Sie die Quelle „USB B“, um die unten
abgebildete Hauptseite anzuzeigen, auf der Sie
„USB storage (RAM) (USB-Speicher
(RAM))“ oder „USB display
(USB-Anzeige)“ auswählen können.
Sie können über USB-Speicher (RAM) auf den
internen Speicher (RAM) zugreifen oder die
USB-Projektion über USB-Anzeige ausführen.
Bitte stellen Sie zuerst sicher, dass das
USB-Kabel angeschlossen ist.
Page 12
B. Geräteinstallation
(WLAN-Anzeige)
NB eDisplay (Windows & Mac OS)
Sie können das Dienstprogramm (Acer eDisplay
Management) von der CD oder Webseite
(192.168.100.10) herunterladen, wenn sich der
Projektor im AP-Modus befindet.
Klicken Sie auf „RUN (AUSFÜHREN)“ und folgen
Sie dem Assistenten für die Installation. Eine
Verknüpfung zu Acer Projektor Gateway W7
wird auf Ihrem Desktop angezeigt. Führen Sie
diese aus.
Tablet & Smartphone eDisplay (Android & iOS)
Sie können die „eDisplay“ App von Android
Google Play oder iOS Apple Store
herunterladen. Starten Sie die App, um das
kleine Display Ihres Gerätes über den Projektor
auf eine größeres zu projizieren.
Unterstützt die folgenden Funktionen: EZ
Remote, Streaming Doc, Dropbox, Streaming
Web, Pix Viewer, & Sketch.
Hinweis:
1. Android 4.0 und höher unterstützt.
2. iOS 5.0 und höher unterstützt.
3. Wenn Sie Dropbox und Streaming nutzen
Deutsch
„Projektionsmodus“ unterstützt „Voll, L/R,
4-Fach Mirror (Spiegel) Projektion“ & „Voll, L/R,
4-Fach Extension (Erweiterung) Projektion“,
Audio Ein/Aus und steuert den projizierten
Bildschirm für Einfrieren oder Ausblenden.
„Videomodus“ unterstützt Videoübertragung.
möchten, versetzen Sie den Projektor bitte in
den Client-Modus.
(Android eDisplay)
(iOS eDisplay)
Page 13

Il proiettore Acer offre una potente
Modalità AP (Predefinita), Modalità client o
visualizzazione di rete (tramite la sorgente
LAN/WiFi, DLNA), visualizzazione multimediale
WiFi Direct cambiando le impostazioni nel
menu Configurazione LAN/WiFi.
(tramite la sorgente MEDIA), visualizzazione
USB (tramite la sorgente USB B).
A. Impostazioni del proiettore
Premere il pulsante Source sul tastierino del
proiettore o sul telecomando. Viene
visualizzato l'elenco delle sorgenti tra cui è
possibile scegliere quella desiderata.
Italiano
(1) Selezionare la Modalità AP
nell’impostazione LAN/WiFi (il proiettore
riproduce con il ruolo AP). Toccare
Inserire l'adattatore WiFi USB nella porta USB
“DoWiFi” per visualizzare la schermata
iniziale. Verificare le informazioni di seguito:
A o collegare il cavo LAN (per i modelli con
porta LAN) per le funzioni Visualizzazione
WIFI e DLNA.
È possibile riprodurre i contenuti multimediali
da RAM, pennette USB, dischi SD tramite la
sorgente MEDIA.
È possibile collegare il cavo mini USB alla
porta USB B per la visualizzazione USB.
Visualizzazione WiFi
Selezionare l’origine “LAN/WiFi” per
ID proiettore (se attivato, sono le 4 cifre
casuali visualizzate nell'angolo superiore
sinistro dello schermo), Nome proiettore
(SSID, nome predefinito: AcerProjector), IP
WiFi (IP predefinito: 192.168.100.10),
Sicurezza (predefinito: Nessuno) e IP LAN.
Premere “Apply/Enter (Applica/Inserisci)”
Nome proiettore (SSID): AcerProjectorXXX
IP WiFi: 192.168.100.10
Sicurezza: Nessuno (predefinito)
IP LAN
: 0.0.0.0 (se non è collegato il cavo LAN)
visualizzare la schermata iniziale della
Visualizzazione WiFi. Il proiettore Acer può
eseguire la riproduzione nei seguenti 3 ruoli:
Page 14

(2) Scegliere la Modalità client
nell’impostazione LAN/WiFi per
visualizzare la schermata di seguito.
Impostare la connessione verso un AP
disponibile e immettere la password, se
necessario.
Viene visualizzata la schermata iniziale con le
seguenti informazioni:
Nome AP connesso (SSID): Dipende
(3) Selezionare WiFi Direct nell’impostazione
LAN/WiFi per connettere il proiettore a
altri dispositivi con funzione WiFi Direct.
Nella schermata iniziale vengono
visualizzate le seguenti informazioni.
Nome proiettore: AcerProjectorXXX
Modalità WiFi: WiFi Direct
WiFi Direct:
Modalità DLNA
Quando viene selezionata la sorgente “DLNA”,
è possibile scegliere la modalità DMP o DMR
dopo aver completato le impostazioni di rete
(la stessa procedura eseguita per la
Visualizzazione WiFi).
Media Console (DMP) (Console media (DMP)):
Attiva (predefinito: Disattiva)
Italiano
IP client: Dipende
Sicurezza: Dipende
IP LAN
È possibile proiettare la schermata da un tablet
o smartphone al proiettore utilizzando
l’applicazione “eDisplay” e accedendo a
Internet.
: 0.0.0.0 (se non è collegato il cavo LAN)
è possibile toccare le librerie multimediali
rilevate e riprodurre i contenuti dalla libreria
selezionata.
Media Display (DMR) (Visualizzazione media
(DMR)): il proiettore in modalità DMR
Page 15

(renderer multimediale digitale), è pronto per
Visualizzazione USB
visualizzare i contenuti multimediali da altri
dispositivi DLNA.
Modalità MEDIA
Italiano
Selezionare la sorgente “MEDIA”, sono quindi
disponibili 5 opzioni che consentono di
scegliere tra Musica, Foto, Video, Documento e
Configurazione. È possibile riprodurre i
contenuti dalla RAM (memoria interna),
dispositivi di archiviazione USB o scheda SD
Selezionare la sorgente “USB B” per
visualizzare la pagina principale di seguito che
consente di scegliere la “USB Storage (RAM)
(memoria USB (RAM))” o la “USB display
(visualizzazione USB)”.
È possibile accedere alla memoria interna
(RAM) tramite la memoria USB (RAM) o
eseguire la proiezione USB tramite la
visualizzazione USB.
Assicurarsi che il cavo USB sia collegato.
(solo per alcuni modelli).
Per la visualizzazione USB, installare
Acer_USB.exe sul notebook e ricordare di
riavviare il sistema dopo l'installazione.
Sul desktop del notebook viene visualizzata
l'icona di collegamento di seguito.
Fare doppio clic sul collegamento per poter
eseguire il mirroring o estendere lo schermo e
avviare lo streaming audio.
Page 16

B. Installazione del dispositivo
(Visualizzazione WiFi)
NB eDisplay (Sistema operativo Windows e
Mac)
È possibile scaricare l'utility (Acer eDisplay
Management) dal CD o dalla pagina web
(192.168.100.10) quando il proiettore è in
Modalità AP.
Fare clic su “RUN (ESEGUI)” e seguire
l'installazione guidata; eseguire il collegamento
a Acer Projector Gateway W7 quando viene
aggiunto sul desktop.
eDisplay per tablet e smartphone (Android e
iOS)
È possibile scaricare l'applicazione “eDisplay”
su Google Play di Android e Apple Store di iOS.
Eseguire l'applicazione per proiettare le piccole
schermate del dispositivo su uno schermo più
grande tramite il proiettore.
Supporta le seguenti funzioni: EZ Remote,
Streaming Doc, Dropbox, Streaming Web, Pix
Viewer e Sketch.
Nota:
1. supporta Android 4.0 e versioni successive.
2. supporta iOS 5.0 e versioni successive.
Italiano
La “Modalità proiezione” supporta la
“Proiezione Mirror Pieno, L/R, Divisione in 4” e
“Proiezione Extension (Estensione) Pieno, L/R,
Divisione in 4”, Audio attivo/disattivo, e la
possibile di bloccare o nascondere la
schermata proiettata.
La “Modalità video” supporta lo streaming
video.
3. Per usare Dropbox e Streaming Web, impostare
il proiettore in Modalità client.
(Android eDisplay)
(iOS eDisplay)
Page 17

El proyector Acer ofrece unas potentes
Cliente y WiFi Direct cambiando los ajustes del
Español
funciones de visualización de red (a través de
LAN/WiFi, DLNA), visualización multimedia (a
través de la fuente MEDIO) y una visualización
USB (a través de la fuente USB B).
A. Configuración del proyector
Pulse el botón Source en el teclado del
proyector o en el mando a distancia. Verá una
lista de fuentes que le permite elegir la fuente
que desea.
Inserte el adaptador USB WiFi en el puerto
menú Configuración LAN/WiFi.
(1) Seleccione Modo PA en la configuración
LAN/Wi-Fi (el proyector reproduce una
función PA). Pulse “DoWiFi” para ver la
siguiente pantalla de inicio. Compruebe la
siguiente información: ID del proyector
(si está habilitado, aparecerá un número
USB A o conecte el cable LAN (para modelos
seleccionados con el puerto LAN) para las
funciones de Visualización WiFi y DLNA.
Puede reproducir contenido multimedia de la
RAM, la práctica unidad USB, la unidad de
disco duro SD a través de la fuente MEDIO.
Puede conectar el mini cable USB en el puerto
USB B para la visualización USB.
Visualización WiFi
Seleccione la fuente “LAN/WiFi” y verá la
aleatorio de 4 dígitos en la esquina
superior izquierda de la pantalla), Nombre
del proyector (SSID, el nombre
predeterminado es AcerProjector), WiFi IP
(el IP predeterminado es 192.168.100.10),
Seguridad (por defecto es Ninguno), e IP de
LAN.
Pulse Apply/Enter (Aplicar/Intro) cuando
termine el ajuste.
Nombre del proyector (SSID):
AcerProjectorXXX
WiFi IP: 192.168.100.10
Seguridad: Ninguno (por defecto)
IP de LAN: 0.0.0.0 (si no hay ningún cable
LAN conectado)
pantalla de bienvenida de la Visualización WiFi.
El proyector Acer puede realizar las siguientes
3 funciones: Modo PA (por defecto), Modo
Page 18

Puede proyectar la pantalla desde su tableta o
smart phone en el proyector utilizando la
aplicación “eDisplay” y también podrá acceder
a Internet.
(2) Elija el Modo Cliente en la configuración
LAN/WiFi y verá los siguientes elementos.
Conéctese a un PA disponible e introduzca
la contraseña, si es necesario.
Seguidamente, se mostrará la pantalla de inicio
con la siguiente información:
Español
(3) Seleccione WiFi Direct en la configuración
LAN/WiFi y podrá conectar el proyector a
otros dispositivos con la función WiFi
Direct. Se mostrará la siguiente
información en la pantalla de inicio.
Nombre del proyector:
AcerProjectorXXX
Modo WiFi: WiFi Direct
WiFi Direct: Act. (por defecto es Des.)
Modo DLNA
Con la fuente “DLNA” seleccionada, podrá
elegir el modo DMP o DMR tras completar la
configuración de red (al igual que lo hace para
la Visualización WiFi).
“Media Console (DMP) (Consola Multimedia
Nombre PA conectado (SSID): dependiente
IP Cliente: dependiente
Seguridad: dependiente
IP de LAN: 0.0.0.0 (si no hay ningún cable
LAN conectado)
(DMP))”: Puede pulsar las bibliotecas
multimedia detectadas y reproducir el
contenido de la biblioteca seleccionada.
Page 19

Visualización USB
Seleccione la fuente “USB B” y verá la siguiente
página principal para que elija entre “USB
storage (RAM) (Almacenamiento USB (RAM))”
o “USB display (Visualización USB)”.
Puede acceder a la memoria interna (RAM) a
través de Almacenamiento USB (RAM) o
Español
“Media Display (DMR) (Pantalla Multimedia
(DMR))”: el proyector en el modo DMR
(intérprete de medios digital) está listo para
visualizar el contenido de otros dispositivos
DLNA.
Modo MEDIO
Seleccione la fuente “MEDIO”, y existe n 5
opciones para elegir desde Música, Foto, Vídeo,
realizar una proyección USB a través de
Visualización USB.
Compruebe en primer lugar que el cable USB
está conectado.
Para la visualización USB, instale Acer_USB.exe
en su portátil y recuerde reiniciarlo una vez
completada la instalación.
El siguiente icono de acceso directo aparecerá
en el escritorio de su portátil.
Documentos y Configuración. Puede
reproducir contenido de la RAM (memoria
interna), dispositivos de almacenamiento USB
o la tarjeta SD (para modelos seleccionados).
Haga doble clic en el acceso directo y podrá
duplicar o ampliar su pantalla e iniciar la
transmisión de audio.
Page 20

B. Instalación del dispositivo
(Visualización WiFi)
NB eDisplay (sistemas operativos Windows y
Mac)
Puede descargar la utilidad (Acer eDisplay
Management) desde el CD o la página Web
“Modo Vídeo” admite la transmisión de vídeo.
(192.168.100.10) cuando el proyector está en
el Modo PA.
Haga clic en “RUN (EJECUTAR)” y siga el
asistente para la instalación, obtendrá el
acceso directo a Acer Projector Gateway W7
en el escritorio para ejecutarlo.
eDisplay de Tableta y Smartphone (Android e
iOS)
Puede obtener la aplicación “eDisplay” en
Google Play de Android y Apple Store de iOS.
Ejecute la aplicación para proyectar la pequeña
pantalla de su dispositivo en una de más
grande a través del proyector.
Admite las siguientes funciones: EZ Remote,
Streaming Doc, Dropbox, Streaming Web, Pix
Viewer y Sketch.
Nota:
1. Compatible con Android 4.0 y superior.
2. Compatible con iOS 5.0 y superior.
Español
“Modo Proyección” es compatible con
“Proyección completa, izquierda/derecha,
pantalla dividida en 4 Mirror (Duplicada)” y
“Proyección completa, izquierda/derecha,
pantalla dividida en 4 Extension (Ampliación)”,
Audio Act./Des. y controla que la pantalla del
proyector se suspenda u oculte.
3. Si desea utilizar Dropbox y Streaming Web,
configure el proyector en el modo Cliente.
(Android eDisplay)
(iOS eDisplay)
Page 21

O projector Acer permite uma potente exibição
em rede (via fonte LAN/WiFi, DLNA), exibição
multimédia (via fonte MULTIMÉDIA), exibição
USB (via fonte USB B).
A. Definições do Projector
Prima o botão Source no teclado do projector
ou telecomando. Verá uma lista de fontes para
escolher a que deseja.
(1) Seleccione Modo AP na definição
LAN/WiFi (e o projector desempenhará um
papel AP). Toque em “DoWiFi” e verá o
ecrã de início abaixo. Veja as seguintes
Insira o adaptador USB WiFi na porta USB A
ou ligue o cabo LAN (para modelos com porta
LAN) para funções de Exibição WiFi e DLNA.
informações: ID do Projector (se activado,
um número de 4 dígitos aleatórios será
apresentado no canto superior esquerdo
do ecrã), Nome do projector (SSID,
predefinição AcerProjector), IP do Servidor
(predefinição 192.168.100.10) e Segurança
Português
(predefinição Nenhuma) e IP LAN.
Prima Apply/Enter (Aplicar/ Confirmar)
quando terminar o ajuste.
Pode reproduzir conteúdos multimédia de
RAM, unidade USB, cartão SD por fonte
MULTIMÉDIA.
Pode ligar o cabo mini USB à porta USB B para
exibição USB.
Exibição WiFi
Nome do projector (SSID):
AcerProjectorXXX
WiFi IP: 192.168.100.10
Segurança: Nenhuma (predefinido)
LAN IP: 0.0.0.0 (se não for ligado qualquer
cabo LAN)
Seleccione a fonte “LAN/WiFi”, e verá o ecrã
de boas vindas do Exibição WiFi. Acer
Projector pode desempenhar os 3 seguintes
papéis: Modo AP (Predefinição), Modo Cliente,
ou WiFi Direct alterando as definições no
menu Configuração LAN/WiFi.
Page 22

(2) Escolha o Modo Cliente na definição
LAN/WiFi e verá o ecrã abaixo.
Ligue a outro AP disponível e introduza a
palavra-passe se necessário.
Pode projectar o ecrã do seu tablet ou
smartphone para o projector usando a
aplicação “eDisplay” e aceder também à
Internet.
(3) Seleccione WiFi Direct na definição
LAN/WiFi e pode ligar o projector a outros
O ecrã de início apresentará as informações
abaixo:
Nome do AP Ligado (SSID): Depende
IP Cliente: Depende
Segurança: Depende
LAN IP: 0.0.0.0 (se não for ligado qualquer
cabo LAN)
dispositivos com a função WiFi Direct. As
Português
informações abaixo aparecem no ecrã de
início.
Nome do projector: AcerProjectorXXX
Modo WiFi: WiFi Directo
WiFi Directo: Ligado (Desligado é a
predefinição)
Modo DLNA
Quando a fonte “DLNA” está seleccionada,
pode escolher o modo DMP ou DMR depois de
concluir as definições de rede (do mesmo
modo que faz para Exibição WiFi).
“Media Console (DMP) (Consola Multimédia
(DMP))”: Pode tocar nas bibliotecas
multimédia detectadas e reproduzir conteúdos
da biblioteca seleccionada.
Page 23

Ecrã USB
Seleccione a fonte “USB B”, e verá a página
principal para escolher entre “USB Storage
(RAM) (Armazenamento USB (RAM))” ou “USB
display (Exibição USB)”.
Pode aceder à memória interna (RAM) através
do Armazenamento USB (RAM) ou realizar
“Media Display (DMR) (Exibção Multimédia
(DMR))”: projector no modo DMR
projecção USB através da Exibição USB.
Certifique-se que tem primeiro ligado um cabo
USB.
(renderizador multimédia digital), está pronto
para exibição de conteúdos de outros
dispositivos DLNA.
Para exibição USB, instale Acer_USB.exe no seu
NB e reinicie após a instalação.
Português
Modo MULTIMÉDIA
Seleccione a fonte “MEDIA”, e verá 5 opções
para escolher entre Música, Foto, Vídeo,
O ícone de atalho abaixo aparecerá no
ambiente de trabalho do seu NB.
Documento, e Configuração. Pode reproduzir
conteúdos de RAM (Memória Interna),
dispositivos de armazenamento USB ou cartão
SD (para certos modelos).
Clique duas vezes no atalho, e pode espelhar
ou expandir o seu ecrã e iniciar a transmissão
áudio.
Page 24

B. Instalação do dispositivo
(Exibição WiFi)
NB eDisplay (Windows & Mac OS)
Pode transferir o utilitário (Acer eDisplay
Management) do CD ou página web
(192.168.100.10) quando o projector está
configurado pelo Modo AP.
Clique em “RUN (EXECUTAR)” e siga o
assistente para instalar, e ficará com um atalho
Acer Projector Gateway W7 no ambiente de
trabalho, e pode executá-lo.
Tablet & Smartphone eDisplay (Android &
iOS)
Pode obter a aplicação “eDisplay” de Google
Play para Android e Apple Store para iOS.
Execute a aplicação para projectar o pequeno
ecrã do seu dispositivo num maior através do
projector.
Português
Suporta as seguintes funções: EZ Remote,
Streaming Doc, Dropbox, Streaming Web, Pix
Viewer, & Sketch.
Nota:
1. Suportado Android 4.0 e superior.
2. Suportado iOS 5.0 e superior.
“Modo de projecção” suporta “Projecção Total,
L/R, Dividido em 4 Mirror (Espelhar)” & “Total,
L/R, Dividido em 4 Extension (Expandir)”,
Áudio Ligado/Desligado, e controla o ecrã
projectado para congelar ou ocultar.
“Modo vídeo” suporta transmissão vídeo.
3. Se desejar usar a Dropbox e Streaming Web,
configure o Projector no modo Cliente.
(Android eDisplay)
(iOS eDisplay)
Page 25

Acer プロジェクタには強力なネットワー
WiFi ディスプレイ
キング ディスプレイ(LAN/WiFi、DLNA 等
のソースを介して)、マルチメディア ディ
スプレイ(メディア ソースを介して)、USB
ディスプレイ(USB B ソースを介して)が
備えられています。
A. プロジェクタの設定
プロジェクタのキーパッドまたはリモコン
の「Source」ボタンを押します。ソース リ
ストが表示されますので、この中からソー
スを選択してください。
WiFi ディスプレイおよび DLNA 機能を使
ソースとして LAN/WiFi を選択すると、
WiFi ディスプレイの「ようこそ」画面が表
示されます。Acer プロジェクタは、次の 3
つの役割を果たすことができます。AP モー
ド(デフォルト)、クライアント モード、
WiFi Direct の 3 つです。「設定」
「LAN/WiFi」メニューを選択してください。
(1) LAN/WiFi 設定から AP モードを選択す
用するためには、USB WiFi アダプタを
USB A ポートに挿入するか、または LAN
ケーブルを繋ぎます(LAN ポートを備えた
一部のモデル)。
日本語
ると、プロジェクタを AP として機能さ
せることができます。「DoWiFi」をタッ
プすると、次のスプラッシュ画面が表示
されます。次の情報を確認してくださ
い。プロジェクタ ID(有効にしたとき、
画面に 4 桁のランダムな番号が表示さ
れます)、プロジェクタ名(SSID、デフ
ォルト名は AcerProjector)、WiFi IP(デ
フォルトは 192.168.100.10)、セキュリ
「メディア」ソースを介して RAM、USB ハ
ンディ ドライブ、SD カードからマルチメ
ディア コンテンツを再生できます。
USB ディスプレイを使用する場合は、USB
B ポートに mini USB ケーブルを差し込ん
でください。
ティ(デフォルトはなし)。
調整が完了したら、「Apply(適用)/Enter
(入力)」を押します。
プロジェクタ名(SSID):AcerProjectorXXX
WiFi IP:192.168.100.10
セキュリティ:なし(デフォルト)
LAN IP:0.0.0.0(LAN
ケーブル接続していない場合)
Page 26

タブレットやスマートフォンのスクリーン
を投写することができます。インターネッ
トにもアクセスできます。
(3) LAN/WiFi 設定で WiFi Direct を選択す
ると、WiFi Direct 機能を使ってプロジェ
クタを別のデバイスに接続することが
できます。スプラッシュ画面に次の情報
(2) LAN/WiFi 設定でクライアント モード
を選択すると、次の画面が表示されま
す。
使用可能な AP に接続して、必要であれ
ばパスワードも入力してください。
すると、スプラッシュ画面に次の情報が表
示されます。
接続した AP 名(SSID):未定
クライアント IP:未定
セキュリティ:未定
が表示されます。
プロジェクタ名:AcerProjectorXXX
WiFi モード:Wi-Fi Direct
Wi-Fi Direct:オン(デフォルトはオ
フ)
DLNA モード
ソースとして DLNA を選択すると、ネット
ワーク設定完了後に DMP モードか DMR
モードを選択できます(WiFi ディスプレイ
の設定の場合と同じです)。
「Media Console(DMP)(メディア コンソ
ール(DMP))」:検出されたメディア ライ
ブラリをタップすると、選択したライブラ
リからコンテンツが再生されます。
日本語
LAN IP:0.0.0.0(LAN ケーブル接続して
いない場合)
「eDisplay」アプリケーションを使用すると
Page 27

「Media Display(DMR)(メディア ディス
USB ディスプレイ
プレイ(DMR))」:DMR(digital media
renderer)モードのプロジェクタは、別の
DLNA デバイスからコンテンツを表示する
ための準備ができています。
メディア モード
ソースとしてメディアを選択すると、
ミュージック、写真、ビデオ、ドキュメン
ト、セットアップの 5 つのオプションが提
示されます。RAM(内部メモリ)、USB メモ
ソースとして USB B を選択すると、「USB
Storage(RAM)(USB メモリ(RAM))」また
は「USB display(USB ディスプレイ)」を選
択できるメイン ページが表示されます。
USB メモリ(RAM)から内部メモリ(RAM)
にアクセスしたり、USB ディスプレイで
USB 投写を実行したりできます。
まず USB ケーブルが接続されているか確
認してください。
リ、SD カード(一部のモデルのみ)からコ
ンテンツを再生できます。
USB ディスプレイの場合は、ノートブック
に Acer_USB.exe をインストールした後
「リブート」をクリックしてください。
ノートブックのデスクトップに次のショー
日本語
トカット アイコンが追加されます。
ショートカットをダブルクリックすると、
スクリーンをミラー化または拡張し、オー
ディオ ストリーミングを開始できます。
Page 28

B. デバイスのインストール
(WiFi ディスプレイ)
NB eDisplay(Windows & Mac OS)
プロジェクタを AP モードに設定して、CD
またはウェブページ(192.168.100.10)から
グに対応しています。
ユーティリティ(Acer eDisplay Management)
をダウンロードしてください。
「Run(名前を指定して実行)」をクリック
してウィザードの指示に従ってください。
デスクトップ上に Acer Projector Gateway
W7 ショートカットが表示されますので、
これを実行してください。
タブレットおよびスマートフォン用
eDisplay(Android & iOS)
「eDisplay」 アプリケーションは、Android
Google Play および iOS Apple Store からダ
ウンロードできます。このアプリを実行す
ると、デバイスの小型スクリーンをプロジ
ェクタを介して大きいスクリーンに投写す
ることができます。
このアプリは、EZ Remote、Streaming Doc、
Dropbox、Streaming Web、Pix Viewer、Sketch
に対応しています。
注意:
1. Android 4.0 以上に対応
日本語
「投写モード」は「フル、L/R、4-スプリッ
ト 「Mirror(ミラー)」 投写」と「フル、
L/R、4-スプリット 「Extension(拡張)」 投
写」に対応し、オーディオ オン/オフ、投
写画面のコントロールをフリーズまたは非
表示にすることができます。
「ビデオ モード」はビデオ ストリーミン
2. iOS 5.0 以上に対応
3. Dropbox および Streaming Web をご使用に
なる場合は、プロジェクタをクライアント
モードに設定してください。
(Android eDisplay)
(iOS eDisplay)
Page 29

Проектор Acer позволяет выводить на экран
Просмотр по WiFi
содержимое по сети (когда в качестве источника
выбрано значение LAN/WiFi, DLNA),
воспроизводить мультимедийные файлы (когда
в качестве источника выбрано значение
МУЛЬТИМЕДИА) и воспроизводить файлы через
разъем USB (когда в качестве источника
выбрано значение USB B).
A. Настройки проектора
На кнопочной панели проектора или на пульте
ДУ нажмите кнопку Source. В открывшемся
списке выберите нужный источник входного
сигнала.
В качестве источника выберите “LAN/WiFi”,
в результате откроется приветственный
экран “Просмотр по WiFi”. Проектор Acer
может работать в следующих 3 режимах:
Режим AP (по умолчанию), Клиентский
режим или WiFi Direct, которые выбираются
в меню Настройка LAN/WiFi.
(1) Выберите Режим AP для параметра
Для использования функций “Просмотр по
WiFi” и DLNA вставьте USB-адаптер WiFi в
разъем USB A или подсоедините кабель
локальной сети (для выбранных моделей,
оснащенных портом LAN).
LAN/WiFi, чтобы проектор работал как
точка доступа. Нажмите “DoWiFi”, чтобы
открыть показанный внизу
экран-заставку. Проверьте следующие
данные: Код проектора (если он
установлен, то в верхнем левом углу
экрана будет показано случайное
Pyсскйй
4-значное число), имя проектора (SSID,
по умолчанию установлено значение
AcerProjector), WiFi IP (по умолчанию
для этого IP-адреса установлено
Для воспроизведения мультимедийных
файлов из ОЗУ, с USB-накопителя или карты
SD нужно в качестве источника выбрать
значение 192.168.100.10), Безопасность
(по умолчанию установлено значение
Нет) и LAN IP.
Закончив настройку параметров,
МУЛЬТИМЕДИА.
Для просмотра по USB нужно штекер mini
USB кабеля вставить в разъем USB B.
нажмите Apply/Enter (Применить/
Ввести).
Page 30

Имя проектора (SSID): AcerProjectorXXX
Имя подключенной точки доступа (SSID): В
WiFi IP: 192.168.100.10
Безопасность: Нет (по умолчанию)
LAN IP: 0.0.0.0 (если не подключен кабель
локальной сети (LAN))
зависимости от случая
Клиентский IP-адрес
Безопасность: В зависимости от случая
LAN IP: 0.0.0.0 (если не подключен кабель
локальной сети)
С помощью приложения “eDisplay” можно
выводить на проектор изображение экрана
планшетного ПК или смартфона, а также
выходить в Интернет.
: В зависимости от случая
(2) Если для параметра LAN/WiFi выбрать
Клиентский режим, то откроется
показанный внизу экран.
Подключитесь к доступной точке доступа,
при необходимости введя пароль.
Откроется показанный ниже
информационный экран-заставка:
(3) Для параметра LAN/WiFi выберите WiFi
Direct, чтобы подключать проектор к
другим устройствам, поддерживающим
функцию WiFi Direct. Откроется
показанный внизу информационный
экран-заставка.
Имя проектора: AcerProjectorXXX
Режим WiFi: WiFi Direct
WiFi Direct:
Режим DLNA
Если в качестве источника выбрать “DLNA”,
то после настройки сетевых параметров
можно будет выбрать режим DMP или DMR
(так же, как выбирается режим “Просмотр по WiFi”).
Media Console (Медиа-консоль)(DMP):
можно нажимать обнаруженные медиатеки
Вкл. (по умолчанию установлено значение Выкл.)
Pyсскйй
и воспроизводить файлы из выбранной
библиотеки.
Page 31

страницу и выбрать один из двух вариантов
- “USB Storage (RAM) (USB-хранилище
(ОЗУ))” или “USB display (Просмотр по USB)”.
Режим “USB-хранилище” предназначен для
доступа ко внутренней памяти (ОЗУ); режим
“Просмотр по USB” предназначен для
проецирования содержимого,
передаваемого через разъем USB.
Media Display (Просмотр медиафайлов)
(DMR): проектор находится в режиме DMR
(Обработчик цифрового мультимедиа) и
готов воспроизводить медиафайлы с других
устройств, поддерживающих стандарт DLNA.
Режим МУЛЬТИМЕДИА
В качестве источника выберите
“МУЛЬТИМЕДИА”, чтобы выбрать один из 5
вариантов (Музыка, Фото, Видео, Документ
и Настройка). Можно воспроизводить
Сначала подключите USB-кабель.
Для просмотра по USB нужно сначала
установить приложение Acer_USB.exe на
ноутбук и после установки обязательно
выполнить перезагрузку.
На рабочем столе ноутбука появится
показанный внизу ярлык.
файлы из ОЗУ (внутренней памяти), с
Pyсскйй
USB-накопителей или карты памяти SD (для
некоторых моделей).
Просмотр по USB
В качестве источника выберите “USB B”,
чтобы открыть показанную внизу главную
Дважды щелкнув этот ярлык, вы сможете
включить режим Отражение или
Расширение экрана и начать потоковое
воспроизведение звука.
Page 32

B. Установка устройства
(Просмотр по WiFi)
eDisplay для ноутбуков (ОС Windows и Mac)
Утилиту (Acer eDisplay Management) можно
установить с компакт-диска или загрузить с
веб-страницы (192.168.100.10), когда
проектор находится в режиме точки доступа
“Режим видео” поддерживает потоковое
воспроизведение видео.
(Режим АР).
Нажмите RUN (Выполнить) и следуйте
указаниям мастера установки. На рабочем
столе появится ярлык для запуска
приложения Acer Projector Gateway W7.
Поддерживаются следующие режимы
Приложение eDisplay для планшетных ПК и
смартфонов (Android и iOS)
Приложение “eDisplay” можно загрузить из
магазина Google Play (Android) или Apple
Store (iOS). Запустите это приложение, чтобы
изображение с небольшого экрана вашего
устройства через проектор проецировать на
большой экран.
Поддерживаются следующие функции: EZ
Remote, Streaming Doc, Dropbox, Streaming
Web, Pix Viewer и Sketch.
Примечание:
Pyсскйй
1. Поддерживаются версии Android 4.0 и выше.
2. Поддерживаются версии iOS 5.0 и выше.
проецирования: “Во весь экран, Лев./Прав.,
Разделить экран на 4 части Mirror
(Отражение)” и “Во весь экран, Лев./Прав.,
Разделить экран на 4 части Extension
(Расширение)”, “Вкл./выкл. звук”, а также
функции “Стоп-кадр” и
“Скрыть”.
3. Для использования приложений Dropbox и
Streaming Web переведите проектор в
Клиентский режим.
(eDisplay для Android)
(eDisplay для iOS)
Page 33

Acer 投影機提供強大的網路顯示(透過
LAN/WiFi、DLNA 訊號來源)、多媒體顯示
(透過媒體訊號來源)和 USB 顯示
(透過 USB B 訊號來源)功能。
A. 投影機設定
按下投影機鍵盤或遙控器上的 Source 按
鈕。接著即可在顯示的訊號來源清單中,
選擇需要的訊號來源。
將 USB WiFi 無線網卡插入 USB A 連接埠
或連接 LAN 纜線(僅適用於具備 LAN 連
接埠的特定機型),以使用 WiFi 顯示與
DLNA 功能。
(1) 在「 LAN/Wi-Fi」設定中,選取「AP 模式」
(將投影機作為 AP 用途)。點選
「DoWiFi」即可查看以下的開機畫面。
檢查以下資訊:「投影機 ID」(若使用此
ID,則在螢幕左上角會顯示 4 位數的隨
機編號)、「投影機名稱」(SSID 預設使用
為 AcerProjector)、「WiFi IP」(預設為
192.168.100.10)、「保全」(預設為「無」)
和「LAN IP」。
完成調整後,請按下「Apply(套用)/Enter
(確認)」。
投影機名稱(SSID):AcerProjectorXXX
WiFi IP:192.168.100.10
保全:無(預設)
透過媒體訊號來源播放 RAM、USB 隨身
碟、SD 記憶卡中的多媒體內容。
您可將 mini USB 訊號線插入 USB B 連接
繁體中文
埠,以使用 USB 顯示功能。
LAN IP:0.0.0.0(若未連接 LAN 纜線)
WiFi 顯示
若訊號來源為「LAN/WiFi」,則您會看見「WiFi
顯示」歡迎畫面。Acer 投影機具備以下 3 種
用途:只要在「設定 LAN/WiFi」功能表
中變更設定,即可使用「AP 模式」(預設)、
「用戶端模式」或「WiFi Direct」。
Page 34

(2) 在「LAN/WiFi」設定中選取「用戶端模
式」,即會看見以下畫面。
請連線至可用的 AP 並輸入密碼(若有的
話)。
接著在開機畫面中會顯示以下資訊:
連線 AP 名稱(SSID):視使用而定
用戶端 IP:視使用而定
保全:視使用而定
LAN IP:0.0.0.0(若未連接 LAN 纜線)
(3) 在「LAN/WiFi」設定中選取「WiFi Direct」,
即可透過「WiFi Direct」功能將投影機連
接至其它裝置。接著即會在開機畫面上顯
示以下資訊。
投影機名稱:AcerProjectorXXX
WiFi 模式:WiFi Direct
WiFi Direct:開啟(預設為「關」)
DLNA 模式
若您選取「DLNA」訊號來源,即可在完成網
路設定後選擇 DMP 或 DMR 模式(「WiFi
顯示」的操作亦同)。
Media Console(DMP)(媒體主控台(DMP)):
您可點選偵測到的媒體庫,然後播放所選媒
體庫中的內容。
您可使用「eDisplay」應用程式將平板電腦或
智慧型手機的螢幕畫面投影至投影機,此外
還可連線至網際網路。
繁體中文
Media Display (DMR)(媒體顯示(DMR)):若
投影機處於 DMR 模式(數位媒體轉譯器),
即可就緒並隨時播放其它 DLNA 裝置中的
內容。
Page 35

媒體模式
若選取「媒體」訊號來源,即可選擇「音樂」、
「相片」、「視訊」、「文件」和「設定」等 5 種
選項。您可播放來自 RAM(內建記憶體)、
USB 儲存裝置或 SD 記憶卡(針對特定機
型)的內容。
USB 顯示
若選取「USB B」訊號來源,則您會看見以下
針對 USB 顯示,請在筆記型電腦上安裝
Acer_USB.exe,然後在安裝完成後記得重新開
機。
接著在筆記型電腦桌面上將會顯示捷徑圖
示。
按兩下捷徑,然後即可鏡映或延伸螢幕並啟
動音訊串流。
主頁面,並可選擇「USB storage(USB 儲存)」
或「USB display(USB 顯示)」。
您可透過「USB 儲存」(RAM)來存取內建記
憶體,或是透過「USB 顯示」來執行 USB 投
繁體中文
影。
請先確認是否已連接 USB 訊號線。
Page 36

B. 裝置安裝(WiFi 顯示)
NB eDisplay(Windows 與 Mac OS)
投影機處於「AP 模式」時,您可從光碟或網
頁(192.168.100.10)下載公用程式(Acer
eDisplay Management)。
按一下「RUN(執行)」並依照精靈說明執行
安裝,隨後請執行桌面上出現的 Acer
Projector Gateway W7 捷徑。
「投影模式」支援「完整、L/R、4 格分割螢
幕 Mirror(鏡映)投影」與「完整、L/R、4 格
分割螢幕 Extension(延伸)投影」、「音訊開
啟/關閉」,且可將投影的螢幕控制為鎖定或
適用於平板電腦與智慧型手機的 eDisplay
(Android 與 iOS)
您可透過 Android 的「Google Play」和 iOS
的「Apple 商店」,取得「eDisplay」應用程
式。執行應用程式,即可透過投影機將裝置
上的小螢幕投影至大螢幕。
支援下列功能:EZ Remote、Streaming Doc、
Dropbox、Streaming Web、Pix Viewer 和
Sketch。
注意:
1. 支援 Android 4.0 和以上。
2. 支援 iOS 5.0 和以上。
3. 若您想要使用 Dropbox 和 Streaming Web,
請將投影機設為「用戶端模式」。
隱藏。
「視訊模式」支援視訊串流。
繁體中文
(Android eDisplay)
(iOS eDisplay)
Page 37

Acer 投影机提供了强大的网络显示(通过
LAN/WiFi、DLNA 输入源)、多媒体显示(通
过媒体输入源)和 USB 显示(通过 USB B 输
入源)功能。
A. 投影机设置
按投影机键盘和遥控器上的 Source 按钮。
您将看到输入源列表,让您选择所需的输入
源。
(1) 在 LAN/WiFi 设置中选择 AP 模式(投影
机将起到 AP 的作用)。点按 “DoWiFi”,
您将看到下列开机画面。检查以下信息:
投影机 ID(如启用,屏幕左上角会出现 4
将 USB WiFi 适配器插入 USB A 端口或插
入 LAN 线(仅适用于带 LAN 端口的型号)
以使用 WiFi 显示和 DLNA 功能。
通过媒体输入源,您可播放来自 RAM、USB
移动硬盘、SD 卡的多媒体内容。
您可将 mini USB 线插入 USB B 端口以使
用 USB 显示功能。
WiFi 显示
选择输入源 “LAN/WiFi”,您将看到 WiFi 显
个随机数字)、投影机名称(SSID,默认
名称为 AcerProjector)、WiFi IP(默认 IP
为 192.168.100.10)、密码设置(默认为
无)以及 LAN IP。
完成调整后按 “Apply/Enter(应用/
Enter)”。
投影机名称(SSID):AcerProjectorXXX
WiFi IP:192.168.100.10
密码设置:无(默认)
LAN IP:0.0.0.0(如果未插入 LAN 线)
示的欢迎屏幕。Acer 投影机可设置成以下 3
个模式:AP 模式(默认)、客户端模式或 WiFi
简体中文
Direct(在设置 LAN/WiFi 菜单中更改设
置)。
Page 38

(2) 在 LAN/WiFi 设置中选择客户端模式,您
将看到以下屏幕。
请连接到可用的 AP 并输入密码(如需
要)。
开机画面将显示以下信息:
已连接的 AP 名称(SSID):从属
客户端 IP:从属
密码设置:从属
LAN IP:0.0.0.0(如果未插入 LAN 线)
(3) 在 LAN/WiFi 设置中选择 WiFi Direct,
您可用 WiFi Direct 功能将投影机连接到
其它设备。开机画面将出现以下信息。
投影机名称:AcerProjectorXXX
WiFi 模式:WiFi Direct
WiFi Direct:开(默认为 “关”)
DLNA 模式
当选择输入源 “DLNA” 时,您可在完成网络
设置后(与设置 WiFi 显示的方式相同)选
择 DMP 或 DMR 模式。
Media Console(DMP)(媒体控制台(DMP)):
您可点按检测到的媒体库并播放所选媒体库
的内容。
您可使用应用程序 “eDisplay” 将平板电脑
或智能手机的屏幕投影到投影机并可访问
Internet。
Media Display(DMR)(媒体显示(DMR)):
投影机在 DMR 模式(数字媒体播放器)下,
准备就绪并等待显示来自其它 DLNA 设备
的媒体内容。
简体中文
Page 39

媒体模式
选择输入源 “媒体”,您可从 5 个选项(音
乐、照片、视频、文档、设置)中进行选择。
您可播放来自 RAM(内存)、USB 存储设置
和 SD 卡(适用于所选型号)中的内容。
USB 显示
选择输入源 “USB B”,您将看到以下主页
面,让您从 USB storage(USB 存储)(RAM)
或 USB display(USB 显示)中进行选择。
您可通过 USB 存储(RAM)访问内存(RAM),
对于 USB 显示,请在笔记本电脑上安装
Acer_USB.exe,并记住在安装完成后重启。
您的笔记本电脑的桌面上将显示以下快捷方
式图标。
双击该快捷方式,然后您可镜像或扩展屏幕
并启动音频串流。
或通过 USB 显示进行 USB 投影。
请先确认 USB 线已先插入。
简体中文
Page 40

B. 设备安装(WiFi 显示)
NB eDisplay(Windows 和 Mac 操作系统)
当投影机设置为 AP 模式后,您可从 CD 或
网页(192.168.100.10)下载实用程序(Acer
eDisplay Management)。
单击 RUN(运行)并按向导安装,您将在桌
适用于平板电脑和智能手机的 eDisplay
(Android 和 iOS)
您可从 Android 的 Google Play 或 iOS 的
Apple Store 上获取应用程序 “eDisplay”。执
行此应用程序可通过投影机将设备中的小屏
幕投影到较大的屏幕。
面上看到快捷方式 Acer Projector Gateway
W7 并执行它。
“投影模式” 支持 “全屏、左/右、4 分区屏幕
Mirror(镜像)投影” 和 “全屏、左/右、4 分
区屏幕 Extension(扩展)投影”、音频开/关
以及控制要冻结和隐藏的投影屏幕。
“视频模式” 支持视频串流。
支持以下功能:EZ Remote、串流文档、
Dropbox、串流网页、Pix Viewer(照片查看
器)和 Sketch(素描)。
注:
1. 支持 Android 4.0 和更高版本。
2. 支持 iOS 5.0 和更高版本。
3. 如果您要使用 Dropbox 和串流网页,请将投
影机设置为客户端模式。
(Android eDisplay)
简体中文
(iOS eDisplay)
 Loading...