

Page 1

Acer Projector
Multi-media
User's Guide
Page 2

Introduction 1
Multimedia Features 1
Getting Started 2
Connecting multi-media device to the projector 2
Control Panel and Remote Control 3
Onscreen Display (OSD) Menus 5
Media Gallery 6
Setup 8
Photo Setting 9
Music Setting 10
Video Setting 11
Using MPtG Converter Tool 12
Wireless Projection via acer USB WiFi Adapter 13
Projection with MobiShow 16
Using MobiShow 16
Photo reviewer 17
Wireless PtG 18
Using the PtG2 converter 19
Contents
Acer EquiView - Screen Projection from Acer Tablet20
Display over USB 21
Appendices 22
Troubleshooting 22
Problems and Solution 22
Multi-media format supported 23
1. Photo Format 24
2. Music Format 24
3. Video Format 25
Page 3

1
Introduction
The Acer multimedia support offers easier projection without PC and player
connected. Through SD card reader and USB type A slot, you can easily access
various photo, video and music media formats (See format supported table).
The stylish user interface gives you best experience while playing media files.
Multimedia Features
• Fancy and stylish user interface for better experience.
Supports SD/ SDHC card, USB memory stick and mass storage (FAT32,
FAT16, NTFS) device.
• Supports high resolution JPEG and BMP picture formats, slideshow and
kinds of slideshow effects for the best viewing experience.
• Supports MP3, PCM and WMA...audio formats, music spectrum and
random play function for your please control.
• Supports MJPEG, MPEG4, H.264, WMV, MKV and RMVB...video formats.
Smooth video playback with 1080p@30Hz.
• Support office documents playback (Word, Excel, Powerpoint, PDF).
• Easy control for all media functions by remote controller.
English
Copyright
All Rights Reserved.
Changes may be made periodically to the information in this publication
without obligation to notify any person of such revisions or changes.
Such changes will be incorporated in new editions of this manual or
supplementary documents and publications.
This company makes no representations or warranties, either expressed or
implied, with respect to the contents hereof and specifically disclaims the
implied warranties of merchantability or fitness for a particular purpose.
© 2011. Acer Incorporated.
Page 4
2
Getting Started
English
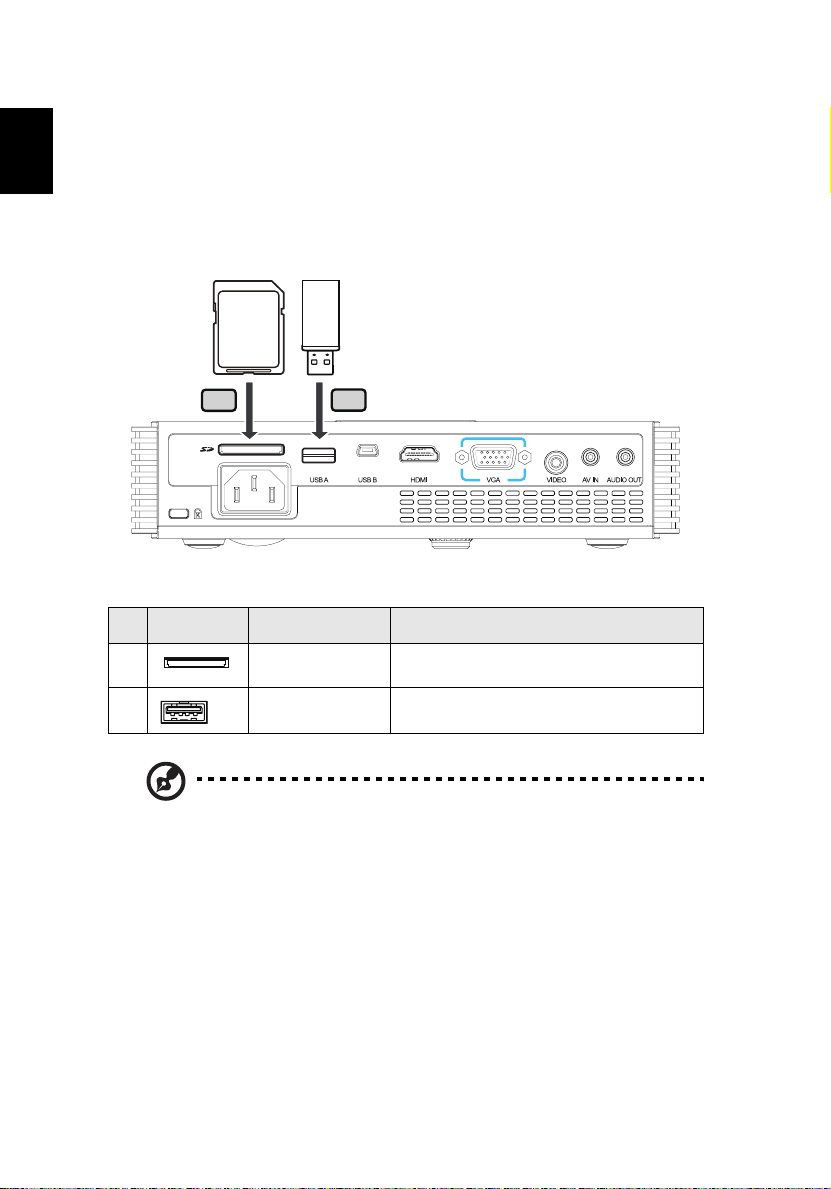
Connecting multi-media device to the projector
SD CARD
1
# Icon Component Description
1 SD Card reader Connects to SD Card.
2 USB connector Connects to USB disk/stick
2
Note: The media contents in external HDD drive via USB cable is
not supported.
Note: Support MicroSD with SD adapter.
Page 5
3
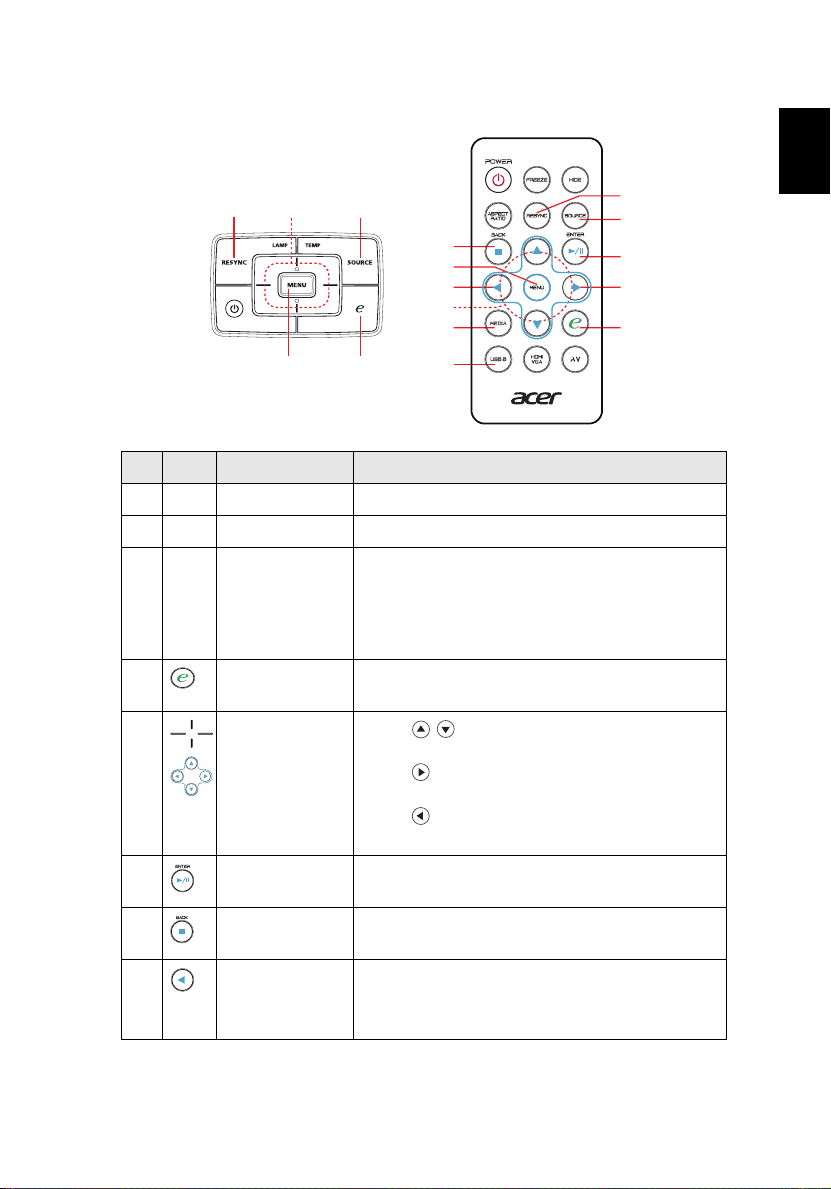
Control Panel and Remote Control
1
5
3
2
7
3
9
5
10
4
11
# Icon Component Description
1 RESYNC Back or stop function in multimedia controls.
2 SOURCE Changes the active source.
3 MENU Press "MENU" to launch the Onscreen display
(OSD) menu, back to the previous step for the
OSD menu operation or exit the OSD menu.
Also press "MENU" to adjust projector setting
in multimedia mode.
4
e key
5 Direction Keys
Enter or play function under certain control
conditions.
Press " " to select items or volume control
while media playing.
Press " " to enter or play function in most
multimedia controls.
Press " " to be back function in most
multimedia controls.
6Enter/Play/
Pause
Confirm your selection of items or play/pause
media file.
7 Back/Stop Stop playing media file or go back to upper
data folder.
8 Pre./Rewind
• <: Go to previous page or media file in file
list view.
• <<: Press 3 sec to have 2X speed backward.
1
2
6
8
4
English
Page 6

4
English
9 Next/Fast
forward
• >: Go to next page or media file in file list
view.
• >>: Press 3 sec to have 2X speed forward.
10 MEDIA Toggle between USB A, SD and RAM sources.
11 USB B Press "USB B" to change source to the USB B
connector.
Page 7
5
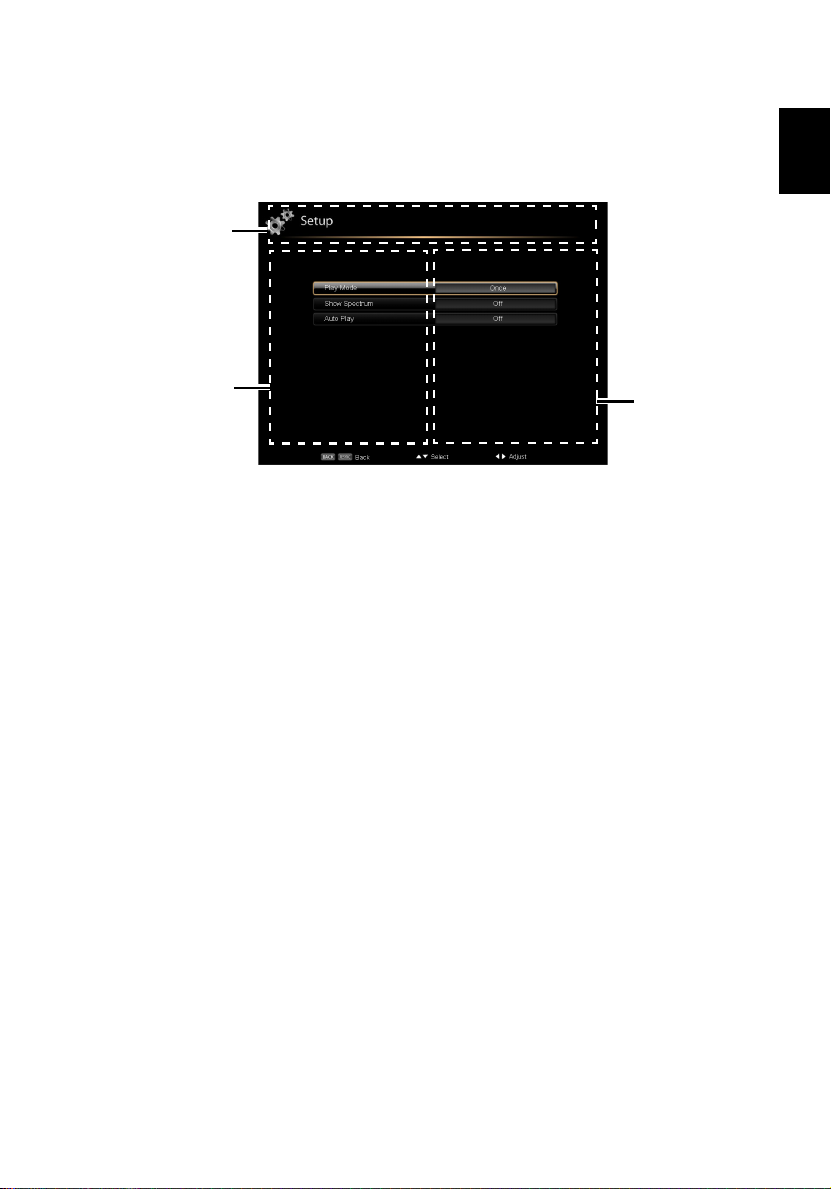
Onscreen Display (OSD) Menus
Main menu
Sub menu
English
Setting
Page 8
English
6
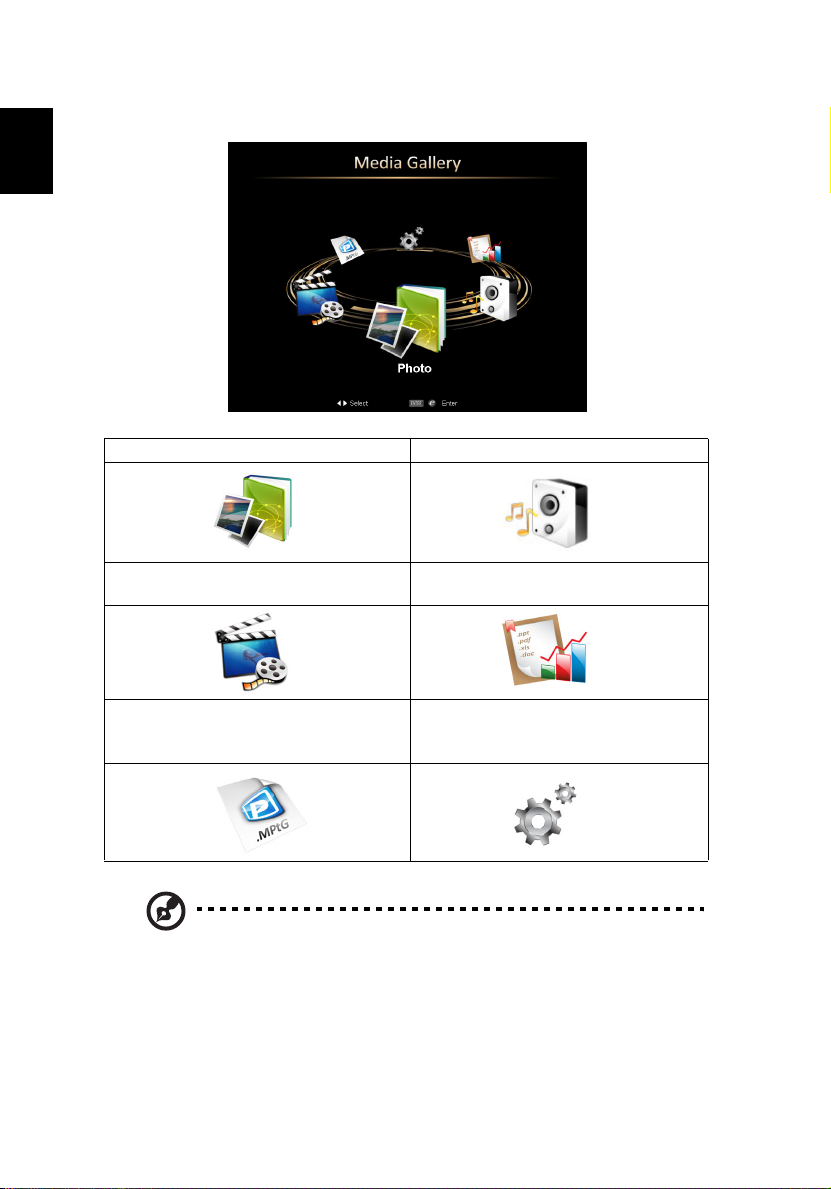
Media Gallery
Photo: For access of photo files. Music: For access of music files.
Video: For access of video files. Office Reader: For access of WORD,
EXCEL, PPT, PDF files.
MPtG: For access of MPtG files. Please
refer to section "Using MPtG Converter
Tool"
Note:
Change source to USB A to play your media contents in USB
drive.
Note:
Change source to SD to play your media contents in SD card.
Note:
Change source to RAM to play your media contents in
internal memory.
Setup: For access of kinds of settings.
Page 9

7
Note:
Change source to USB B, make sure to plug USB cable well
and you can see disk and edit 1GB free space of internal memory.
Note:
Only support USB 2.0 handy drive. USB hubs are not
supported. External USB Hard disk is not supported.
Note:
Support USB handy drive/ SD card upto 32GB.
Note:
Office Reader:
1. All IPR, including but not limited to copyright, in the Picsel
Products is owned by Picsel suppliers.
2. The End User may not:
• Make copies of the Picsel Products or make them available
for use by third parties.
• Reverse engineer, disassemble, reverse translate, or in any
way decode the Picsel Products or any copy or part of it in
order to derive any source code, save only as is permitted
by any applicable law.
3. Picsel make no representations or warranties whether express
or implied (by statute or otherwise) relating to the
performance, quality, merchantability or fitness for a
particular purpose of the Picsel Products or otherwise and all
such representations or warranties are specifically disclaimed
and excluded.
4. Picsel agrees and acknowledges that Picsel and the Picsel
Products will not be specifically mentioned in the end user
license agreement.
Note: No support for advanced settings, such as Microsoft Word
drawing plug-in or table background settings.
Note: Contents outside the defined borders in Microsoft Word
will not be displayed.
Note: Microsoft PowerPoint slide effects not supported.
Note: Worksheets are displayed individually and sequentially
when the workbook has multiple worksheets.
Note: Page layout and numbering may be changed during
decoding.
Note: Objects embedded in files cannot be activated or viewed.
Note: Decoding may take a while for large files with complex
contents.
English
Page 10

English
8
Setup
Photo Setting For access of photo settings.
Music Setting For access of music settings.
Video Setting For access of video settings.
Firmware Upgrade Press enter to do firmware upgrade by SD card.
Note: K330 provides Media FW upgrade via SD card.
1. Download new media FW files by one compressed file from
acer global website
2. Copy all uncompressed files in SD card (XXXX.bin as released
and UPGRADEINFO.INF) , and plug in projector.
3. Check projector source upto SD.
4. Media Gallery -> Setup Mode -> Firmware Upgrade
5. Confirm to go.
6. Projector will show welcome screen automatically when
finished upgrade.
Page 11

9
Photo Setting
Display Mode
Display Ratio
English
Press or to select display mode while
entering the photo list.
• File list
• Slideshow
• Thumbnail
• Browse Mode
Press or to select display ratio.
• Auto: Keep original aspect ratio and resize to
fit horizontal or vertical direction of the
screen.
• Full: Fit full screen without keeping the
original aspect ratio.
Slideshow Duration
Slideshow Repeat
Slideshow Effect
Press or to select the slideshow duration.
• Choose "On" to repeat slideshow always.
• Choose "Off" to stop slideshow when it goes
to the last page.
Press or to select what slideshow effect you
want. There are various kinds: Random, Snake,
Partition, Erase, Blinds, Lines, GridCross, Spiral,
Rect., Off.
Page 12

English
10
Music Setting
Play Mode
Press or to select the music play mode.
• Once
• Repeat One
• Repeat All
• Random
Show Spectrum Choose "On" to show the spectrum plot while music
is playing.
Auto Play Choose "On" to play music automatically while
entering the music list.
Page 13

11
Video Setting
Display Ratio
Play Mode
English
Press or to select display ratio
• Auto: Keep original aspect ratio and resize to fit
horizontal or vertical direction of the screen.
• Original Size: Display video in original size of the
content.
Press or to select the video play mode.
• Once
• Repeat One
• Repeat All
• Random
Auto Play Choose "On" to play the video automatically while
entering the video list.
Page 14

12
Using MPtG Converter Tool
English
Download MPtG converter tool from manual CD of projector. You can use this
tool to transfer PPT/PDF files and play by projector.
To install converter tool:
1 Insert manual CD in your PC, find "mptg.exe" in folder "Converter"
2 Execute the file "mptg.exe" on your PC/NB, and follow the onscreen
instructions to finish installation.
Click converter to select a PowerPoint or PDF files and start conversion.
The tool will transfer PowerPoint/PDF files to MPtG format. You can copy all of
converted results in media (ex. USB drive) you have and play MPtG files on
Presentation mode of Projector.
Note: Please make sure the Microsoft office is installed before
playing MPtG files. Office 2010 is not supported.
Note: Please make sure the Adobe reader or writer is installed
first. Adobe reader v.8, v.9, v9.1 are supported
Note: Please close required PowerPoint or PDF file before
conversion.
Page 15

13
Wireless Projection via acer USB WiFi Adapter
RESET
USB B
USB A1 USB A2
Plug in acer USB WiFi adapter in USB type A slot of projector. Change projector
source upto USB A, and screen of projector will as below.
Enable your WLAN of Notebook and select the access point labeled
AcerProjector or AcerProjector XXXX to connect wirelessly. The Server IP
indicates the IP address (192.168.100.10) your projector uses to connect to a
wireless network.
POWER
English
Open the Internet browser and type by 192.168.100.10 or installation CD to
download Acer eProjection Management from the welcome page, and then
click Run to launch the Welcome to the Acer Projector Gateway Setup Wizard.
Page 16

English
14
The installation will proceed automatically. Make sure the installation is
complete.
Execute shortcut - Acer eProjection Management on desktop and see below
compact UI.
• Resolution : change the projection resolution
• Project : start and stop screen projection via wireless.
• Setting : tap Setting and link webpage by 192.168.100.10.
(1) Download : Download eProjection Management installer and install
for first time use. Windows and Mac OS are supported.
(2) Configure
• Networking Settings: You can adjust SSID name. This leaves 11
characters available for you to customize the name.
• Security Settings: You can have protection by setting up a WEP
or WPA-PSK key.
Page 17

15
The WEP key can support from 64- up to 128-bit encryption for wireless
connections. This feature can be set and enabled by the supervisor. You
must key in 5 or 13 ASCII characters, or 10 or 26 hexadecimal characters.
The WPA-PSK/WPA2-PSK encryption key should be entered as 8 to 63 ASCII
characters. This feature can be set and enabled by the supervisor.
Note: ASCII (American Standard Code for Information
Interchange) is a code for representing characters as “0-9, a-z, A-Z,
!, @, #, $, %, &, *, -, _, +,=, /, ?“are allowed. Hexadecimal digits
consist of the numbers 0-9 and the letters A-F/a-f.
Note: If you are using Windows XP, you need to apply the WPA2PSK hotfix from Microsoft.
Note: Enabling WPA-PSK/WPA2-PSK increases the computing load,
which may affect projection performance.
• About: displays version information of Acer eProjection Management.
English
Page 18

16
Projection with MobiShow
English
MobiShow allows content projection from a Wi-Fi-enabled smartphone
(Android, iPhone). Install application - Mobishow on smartphone and connect
to wireless projector (SSID by AcerProjector) .
Note: Windows Mobile is not supported.
Using MobiShow
• Tape the MobiShow icon to launch application.
• MobiShow will turn on your mobile WiFi and display available access points
for you to choose.
• The MobiShow client will automatically search for wireless projectors (SSID
with prefix AcerProjector) and connect.
• If more than one projector is found, the following list is displayed for you
to select the one to use.
• You can enjoy photo viewer and PtG playback.
Page 19

17
Photo reviewer
When you select the Photo function, MobiShow will automatically open
Explorer for you to select a photo folder. Open a file (JPG format) and controls
show on your device's screen.
Icon Item Description
Prev/ Next Tap to go to the previous or next item on the
slide.
Pause/Stop Pause or stop playing photo.
Rotate Rotate to left or right photo.
English
Page 20

English
18
Wireless PtG
Install the PtG2 converter from the installation CD on your PC; this will enable
you to convert PowerPoint files to PtG2 format.
When you select PtG, the MobiShow client will automatically open Explorer for
you to select a PtG2 file. Select the file to open for your presentation. When the
file is open, the PtG2 slides will be projected while you will be shown controls
on your device screen. The slides are projected full screen with all the effects of
the original PowerPoint slides preserved.
Icon Item Description
Prev/ Next Tap to go to the previous or next item on the
slide.
PgUp/ PgDn Tap to go to previous or next slide.
Stop Tap to stop projecting the file. The icon will
become Play if the file is not being played. Tap
Play again to play the file if it is stopped.
Home Tap to go to the first slide.
Jump Tap and MobiShow client will show thumbnails
of every slide in the PtG file. You can select any
page to go to.
Open Tap to select another PtG2 file.
Note: PtG & PtG2 supports 800X600 and 1024X768 resolutions.
Page 21

19
Using the PtG2 converter
To use the Presentation-to-Go feature, you need to install the PtG2 Converter
on your PC from the CD. Put the CD into your CD-ROM and follow the onscreen
instructions to install the PtG2 Converter.
Open Programs > PtG Utility > PtG2 Converter from the Start menu. The
following control panel is displayed on your desktop.
Click Convert to select a PowerPoint file and start conversion. PtG2 Converter
will open the PowerPoint file and convert it to PtG2 format. You can see the
conversion process on your desktop.
Click Preview to expand or collapse the preview pane. Click Play to play back the
selected PtG2 file or click Open to select a different PtG2 file.
Note: Please close PowerPoint before conversion.
English
Page 22

20
Acer EquiView - Screen Projection
English
from Acer Tablet
EquiView provides screen projection of acer tablet via acer wireless projector.
• EquiView on acer tablet desktop or download EquiView from Android
Market.
• Turn on WiFi and connect the access Point where the EquiView compatibile
devices (SSID with prefix AcerProjector).
• Tape the EquiView icon to launch application.
• The EquiView client will automatically search EquiView compatible devices
• Choose a EquiView compatible device, you can control to project screen by
acer wireless projector.
Icon Item Description
Play Start screen projection.
Stop Stop screen projection.
Page 23

21
Display over USB
Display over USB (DoUSB) projection is an easy-to-use function to project a
computer's screen using a single USB cable (USB type A to mini USB) without
needing any drivers.
Set the projector source to USB B. Connect the USB cable to the miniUSB of
projector and USB type A of the computer. Detect the computer and screen will
be automatically projected out.
If you unplug the USB cable, the projector will stop projecting.
Note: Only one computer can be connected at a time.
Note: Support USB projection under windows OS.
English
Page 24

22
Appendices
English
Troubleshooting
If you experience a problem with your Acer projector, refer to the following
troubleshooting guide. If the problem persists, please contact your local reseller
or service center.
Problems and Solution
# Problem Solution
1 The projector stops
responding to all
controls
2 Image or projector
problems
3 USB/SD read fail Please make sure the USB device or SD card is
4 USB drive fail USB does not support USB hub function and
5 Media file not
found or can’t be
opened in file list
If possible, turn off the projector, then unplug
the power cord and wait at least 30 seconds
before reconnecting power.
Please refer to projector CD manual’s
troubleshooting.
good and well inserted. Remove to try for
several times if necessary.
which power consumption is over 500mA.
The files by un-supported codec won’t be shown
on file list. Please check the media support table
again in this manual.
Page 25

23
Multi-media format supported
1 JPEG Decode Supports JPEG picture formats
Thumbnails preview
Supports BMP picture formats
2 Video Decode and
Movie Formats
3 Music Formats Supports PCM, ADPCM audio formats
4 Card Reader
Interface
5 USB Interface Supports mass storage class
Supports MJPEG
Supports H263, H264
Supports AVI, MOV movie formats
Supports 3gp movie format
Supports SRT Subtitle format.
Supports WMA/OGG/MP3
Supports SD memory card
Supports SDHC memory card
Supports USB2.0
English
Note: The video clip and its SRT subtitle file must be located in
the same folder and with same filename (ex. Abcde.avi &
Abcde.srt).
Note: Some user-made subtitles may not work properly.
Note: Video clips produced with some encoders may not be
played correctly. Detail is to follow format supported table.
Page 26

24
1. Photo Format
English
Image type (ext
name)
Jpeg / Jpg Baseline YUV420 No Limitation
BMP No Limitation
Sub type Encode type Max pixels
YUV422
YUV440
YUV444
Progressive YUV420 5120 X 3840
YUV422
YUV440
YUV444
Note: JPEG header size must be under 512 Kbytes.
2. Music Format
Music type (ext name) Sample rate (KHz) Bit rate (Kbps)
MP3 8-48 8-320
WMA 22-48 5-320
OGG 8-48 64-320
ADPCM-WAV 8-48 32-384
PCM-WAV 8-48 128-1536
AAC 8-48 8-256
Page 27

25
3. Video Format
File
format
AVI
MKV
DIVX
TS MPEG-2
DAT
VOB
MPG
MPEG
MOV
MP4
3GP
RM
RMVB
WMV WMV3 1080P 20Mbps 30fps WMA2
Video
format
DIVX4/5/6
XVID
MPEG-2/4
H.264
M-JPEG
WMV3
H.264
MPEG-1
MPEG-2
MPEG-4
H.264
RV3
RV4
MAX
MAX
res
bit rate
1080P 20Mbps 30fps AC3
1080P 20Mbps 30fps AC3
1080P 20Mbps 30fps MPEG1/2/3
1080P 20Mbps 30fps AC3
720P 5Mbps 30fps Cook
Frame
rate
Audio
format
DTS
MPEG1/2/3
PCM
ADPCM
AAC
DTS
MPEG1/2/3
LPCM
AAC
AC3
DTS
LPCM
AMR
PCM
AAC
(RA6)
AAC (RA9)
RACP
(RA10)
WMA3
Remark
No support VC-1 AP
H. 264 support less
than 4 reference
frames
No Support AC3HD,DTS-HD
H. 264 support less
than 4 reference
frames
No Support AC3HD,DTS-HD
No Support AC3HD,DTS-HD
H. 264 support less
than 4 reference
frames
-
No Support VC-1 AP
English
Note: Doesn’t support B-Frame function.
4. Subtitle Format
Format Font Subtitle Size
Standard SRT UTF-8/ UTF-16 4bits up to 448x200
Note: DO NOT support mixed code in subtitle files.
2bits up to 896x200
 Loading...