

Page 1

Options
................................
...................
................................
......................
................................
...........
................................
..........
................................
............
................................
........
................................
........................
................................
..............
.........................
................................
This chapter provides information on options
available for your Extensa computer. For
further information, refer to the installation
instructions that come wi t h t he speci f i c opt ion.
Contents
4
AC Adapter
PC Cards
Numeric Keypad
External Monitor
External Mo use
External Keybo ar d
Memory
Audio Options
External Floppy Disk Drive
Miscellaneous Options
4-2
4-3
4-4
4-5
4-6
4-7
4-8
4-9
4-11
4-12
4-1
Page 2
AC Adapter
!
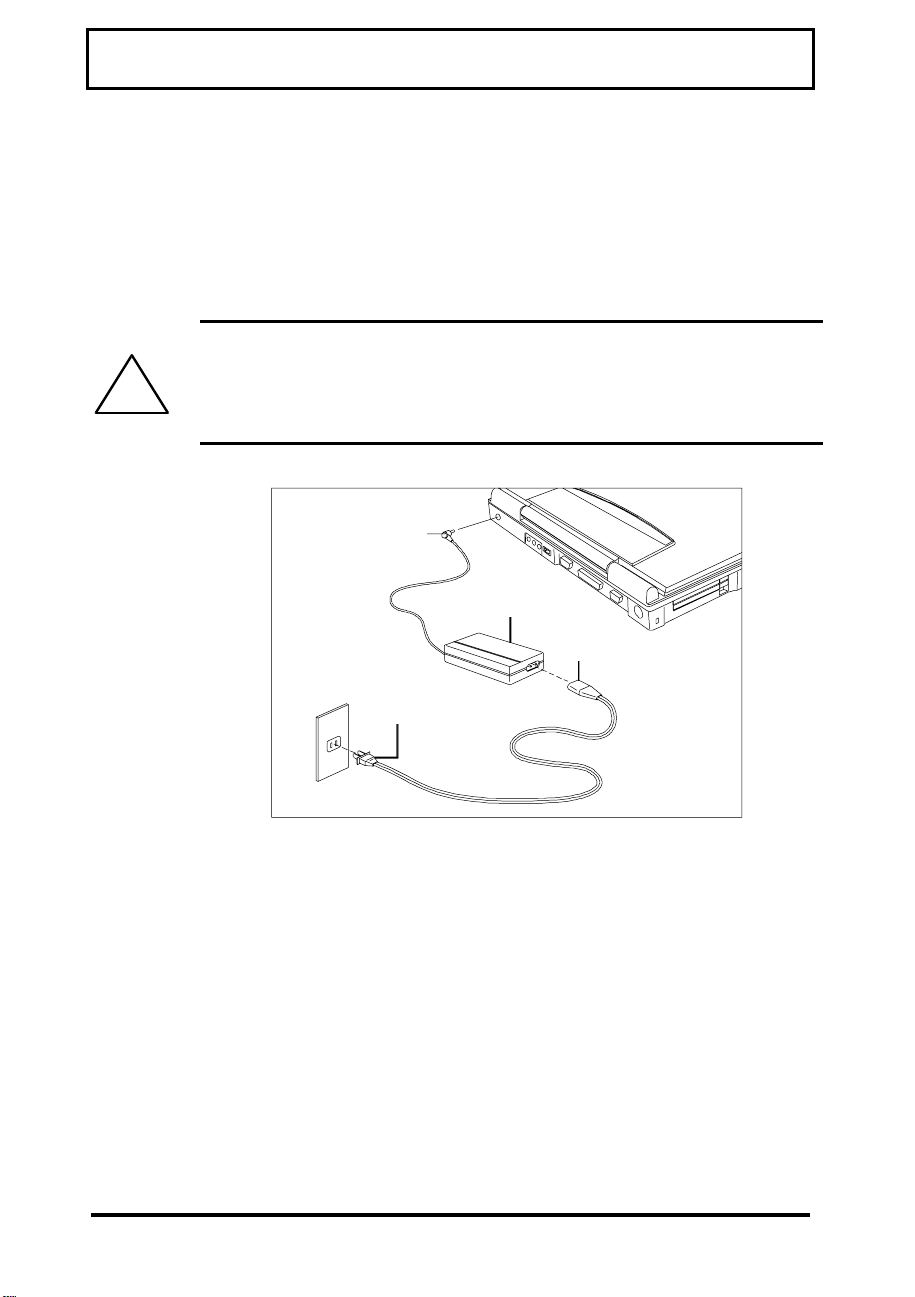
DC Connector
AC Adapter
Female Connector
Male Plug
The AC adapter charges the internal battery
pack and operates the computer on AC power.
The AC adapter can be operated anywhere
between 100 - 240 volts AC and has a
detachable AC power cord.
Caution: Use only the AC adapter
recommended in this document (TI Part No.
9813497-0001). Another adapter m ay damage
your computer.
4-2
AC Adapter
Page 3
PC Cards
PC cards are used to add functionalit y t o your
computer, such as communicating over a
telephone or connecting to a net w ork.
The computer has built-in slots that support one
Type III or t wo Type II/I PC Cards. F o r a Type III
card, insert it into the lower slot.
The following PC Cards are available:
14.4 KB data/send/receive/fax/ voice
modem with XJACK
(TI Part No. 9798074-0001).
®
Token Ring
®
Card
(TI Part No. 9791774-0001)
10BaseT Ethernet
®
Twisted-Pair Card
(TI Part No. 9791773-0001)
10Base2 Ethernet Thin Coax Card
(TI Part No. 9791773-0002)
For the current list of available PC cards, call
1-800-TI-TEXAS, option 2, 1.
4-3
Page 4
Numeric Keypad
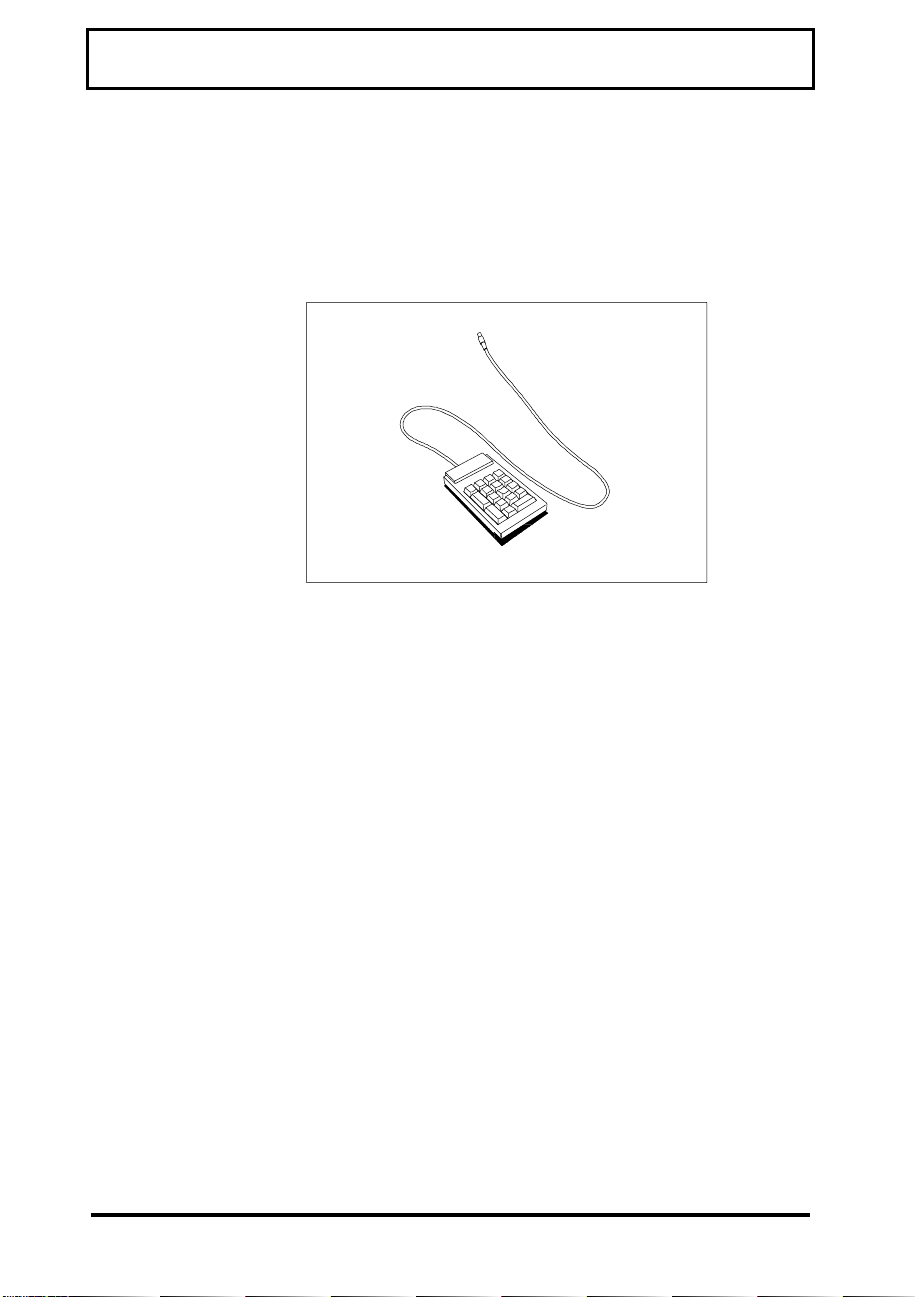
The optional PS/2 Numeric Keypad (TI Part No.
2581381-0001) can be used instead of t he
internal numeric keypad.
PS/2 Numeric Keypad
4-4
To use the PS/2 numeric keypad, turn the
computer off. Plug the keypad’s cable connector
into the computer’s PS/2 (Mouse/Keyboard)
connector located on the rear of the computer
(Refer to
2).
For further information on the PS/2 Numeric
Keypad, refer to instructions that come with
your keypad.
Using Connectors and Ports
in Chapter
Page 5

External Monitor
You can connect the computer to external
monitors, m any of which can display r esolutions
higher than 640 x 480.
When the computer is connected to an external
monitor, you can use the computer with t he
display closed.
You can also display images on the ext ernal and
internal display at the same time. This feature
is called SimulSCAN™. To enable this feature,
set the DISPLAY parameter in Setup to Both.
Setup is accessed via the Setup hot key (Fn+F1).
There is also a hotkey (Fn+
easily switch bet w een LCD, CRT or Both
(SimulSCAN).
F12
) that lets you
4-5
Page 6
External Mouse
Although the Extensa comes with a pointing
device already installe d, you may use an
external PS/2 or serial mouse.
To connect a PS/2 mouse, insert the
connector into the the PS/2 port in the rear
of the Extensa.
To connect a serial mouse, attach the
connector to the 9-pin serial port in the rear
of the Extensa.
To detect a serial mouse once plugged in,
use the
Control Panel.
Add Ne w H ardware
icon in the
4-6
Page 7

External Ke yboard
®
You can connect any IBM
PS/2 keyboard. Follow these st eps.
1.
Attach the six-pin mini-DIN connector to the
PS/2 connector on the rear of the Extensa.
2.
If the external keyboard is not automatically
detected by Windows 95, use the
Hardware
icon in the Control Panel.
-compatible exte rnal
Add New
4-7
Page 8
Memory
!
Your computer is equipped with 8 MB of random
access memory (RAM), occupying one memory
upgrade slot. There is another memory upgrade
slot on the computer. You can increase memory
by installing an upgrade module into this slot.
You may order the following opt i ons f r om TI:
You can expand RAM from 8 MB up to 64 M B.
For further information, refer to the installation
instructions that come with your optional
memory.
8 MB RAM (TI Part No. 9811344-0001)
16 MB RAM (TI Part No. 9811344-0002)
32 MB RAM (TI Part No. 9811344-0003)
Caut io n: TI do es not warrant the use any
mem ory o ther than that suppli e d by TI
specifically for the Extensa comput er. TI will
not be held responsible for problems or
deg radati on o f pe r f ormance inc urre d by using
any memory other than TI memory described
in this document.
4-8
Page 9
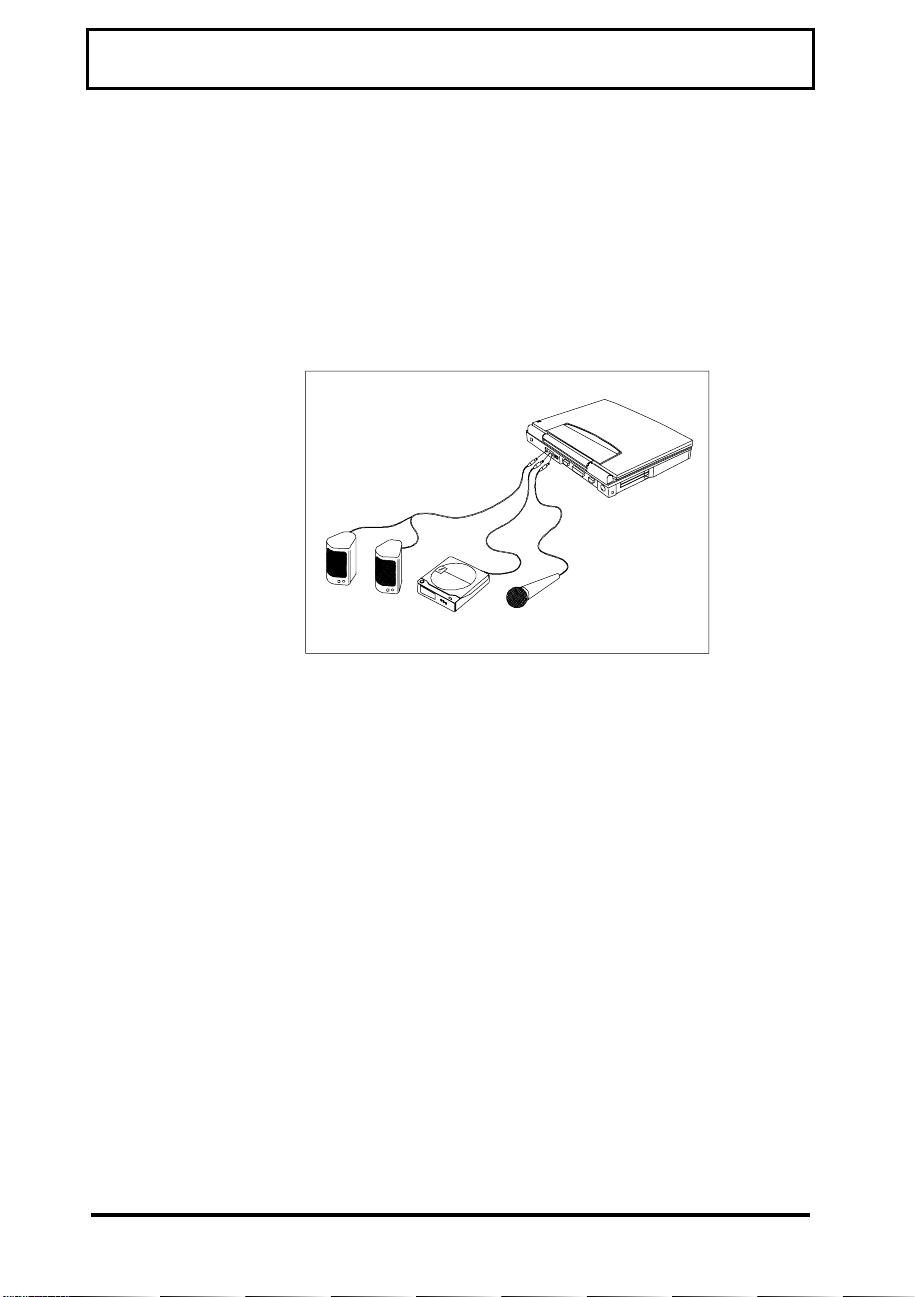
Audio Options
Your system comes with a set of bui l t -i n st ereo
speakers, but if you wish to use ot her st ereo
equipment and/or use a microphone, the system
comes with three audio jacks — Line Out, Line
In and Microphone In.
Connecting Audio Devices
Line Out allows you t o use external speakers or
headset. The system’s internal speakers are
disabled when external speakers or headsets are
plugged in.
Line In allows you to input an external st ereo
source into your computer. This allows you to
play an external CD through the system
speakers, for example, or make a recording if
you have the correct software.
4-9
Page 10

Audio Options
Microphone In allows you to record input into
the system through the microphone and allows
you to use the speakerphone functions of the
Data Race WinMAX
modem offered by TI.
PCMCIA speakerphone/
4-10
Page 11
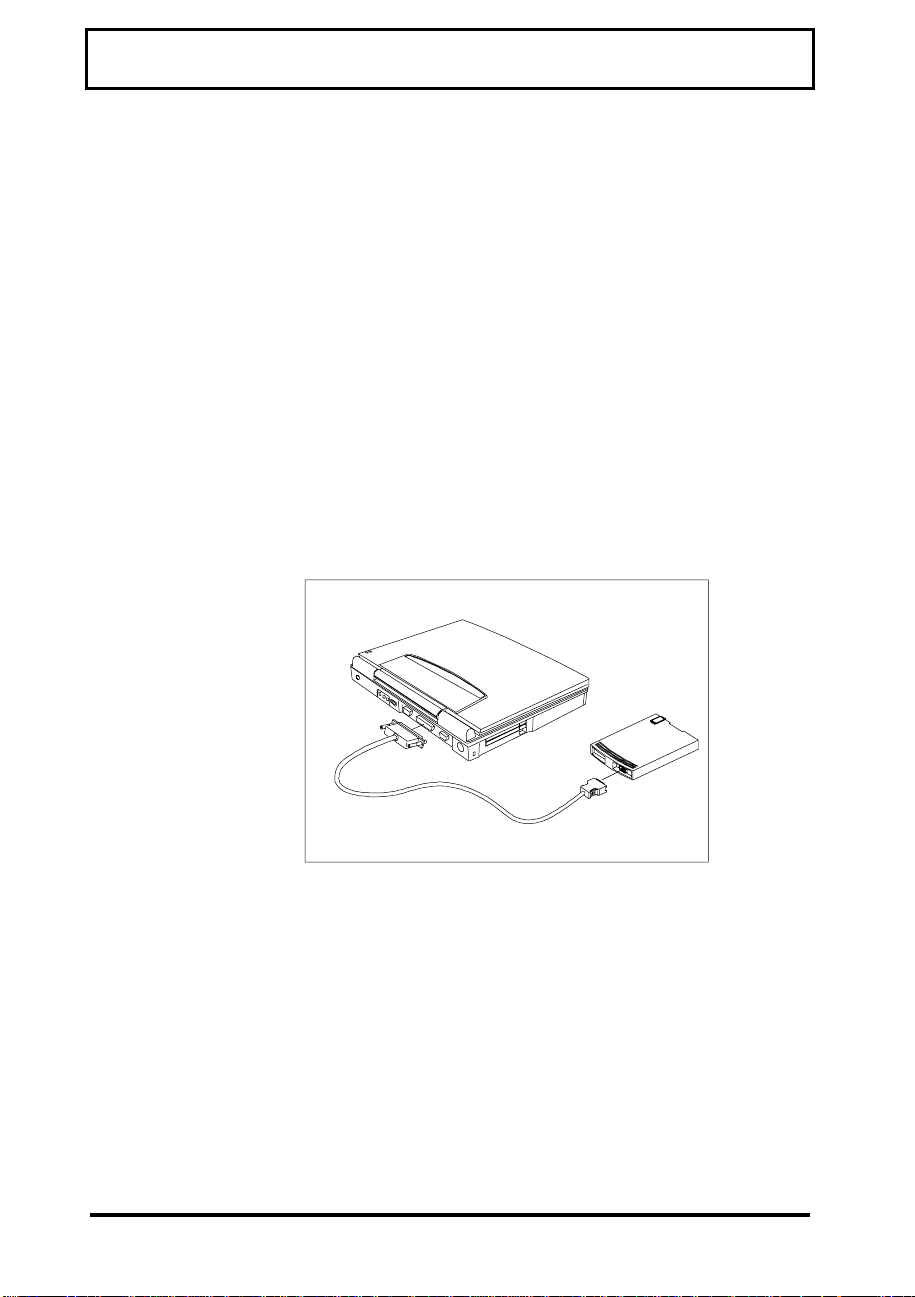
External Floppy Disk Drive
To connect the external floppy disk drive to you
computer you will need the floppy disk drive
cable that was included in the accessory box
with the fl oppy di sk dr i ve.
Follow these steps.
1.
Plug the 25-pin end of t he floppy disk drive
cable into the parallel port on t he rear panel
of the computer.
2.
Attach the other end of the cable to t he floppy
disk drive.
Connecting an Exter nal F loppy Dis k Drive
4-11
Page 12

Miscellaneous Options
There are additional options availabl e f or use
with your computer . These include:
Batteries
Carrying
Case
You can purchase spare batteries —
Duracell NiMH or Li-Ion — from your
local computer store or directly from
Duracell. A list of phone numbers to
call to order the Duracell batteries is
listed in your system. Simply click on
the Duracell icon to view the directory.
For information on these batteries, refer
to Chapte r 3, Using B attery Pow er.
Helps protect the computer and
accessories during transport.
Several carrying cases are available
including leather cases, accessory
cases, portfolios and backpacks.
For the current list of av ailable
accessories, call 1-800-TI-TEXAS.
4-12
Printers
You can connect a parallel printer to
the parallel port or a serial printer to
the serial port connectors.
 Loading...