

Page 1

Extensa 4610/4210
Series
User's Guide
Page 2

Copyright © 200
All Rights Reserved.
Extensa 4610/4210 Series User's Guide
Original Issue: 04/2007
Changes may be made periodically to the information in this publication without obligation
to notify any person of such revisions or changes. Such changes will be incorporated in new
editions of this manual or supplementary documents and publications. This company makes
no representations or warranties, either expressed or implied, with respect to the contents
hereof and specifically disclaims the implied warranties of merchantability or fitness for a
particular purpose.
Record the model number, serial number, purchase date and place of purchase information in
the space provided below. The serial number and model number are recorded on the label
affixed to your computer. All correspondence concerning your unit should include the serial
number, model number and purchase information.
No part of this publication may be reproduced, stored in a retrieval system, or transmitted, in
any form or by any means, electronically, mechanically, by photocopy, recording or otherwise,
without the prior written permission of Acer Incorporated.
7. Acer Incorporated.
Extensa 4610/4210 Series Notebook PC
Model number: __________________________________
Serial number: ___________________________________
Date of purchase: ________________________________
Place of purchase: ________________________________
Acer and the Acer logo are registered trademarks of Acer Incorporated. Other companies'
product names or trademarks are used herein for identification purposes only and belong to
their respective companies.
Page 3

Information for your safety and comfort
Safety instructions
Read these instructions carefully. Keep this document for future reference.
Follow all warnings and instructions marked on the product.
Turning the product off before cleaning
Unplug this product from the wall outlet before cleaning. Do not use liquid
cleaners or aerosol cleaners. Use a damp cloth for cleaning.
Warnings
• Do not use this product near water.
• Do not place this product on an unstable cart, stand or table. If the product
falls, it could be seriously damaged.
• Slots and openings are provided for ventilation to ensure reliable
operation of the product and to protect it from overheating. These
openings must not be blocked or covered. The openings should never be
blocked by placing the product on a bed, sofa, rug or other similar surface.
This product should never be placed near or over a radiator or heat
register, or in a built-in installation unless proper ventilation is provided.
• Never push objects of any kind into this product through cabinet slots as
they may touch dangerous voltage points or short-out parts that could
result in a fire or electric shock. Never spill liquid of any kind onto or into
the product.
• To avoid damage of internal components and to prevent battery leakage,
do not place the product on a vibrating surface.
iii
Using electrical power
• This product should be operated from the type of power indicated on the
marking label. If you are not sure of the type of power available, consult
your dealer or local power company.
• Do not allow anything to rest on the power cord. Do not locate this
product where people will walk on the cord.
• If an extension cord is used with this product, make sure that the total
ampere rating of the equipment plugged into the extension cord does not
exceed the extension cord ampere rating. Also, make sure that the total
rating of all products plugged into the wall outlet does not exceed the fuse
rating.
• Do not overload a power outlet, strip or receptacle by plugging in too
many devices. The overall system load must not exceed 80% of the branch
circuit rating. If power strips are used, the load should not exceed 80% of
the power strip's input rating.
Page 4

iv
This product's AC adapter is equipped with a three-wire grounded plug.
•
The plug only fits in a grounded power outlet. Make sure the power outlet
is properly grounded before inserting the AC adapter plug. Do not insert
the plug into a non-grounded power outlet. Contact your electrician for
details.
Warning! The grounding pin is a safety feature. Using a power
outlet that is not properly grounded may result in electric shock
and/or injury.
Note: The grounding pin also provides good protection from
unexpected noise produced by other nearby electrical devices that
may interfere with the performance of this product.
• Use the product only with the supplied power supply cord set. If you need
to replace the power cord set, make sure that the new power cord meets
the following requirements: detachable type, UL listed/CSA certified, type
SPT-2, rated 7 A 125 V minimum, VDE approved or its equivalent, 4.6
meters (15 feet) maximum length.
Product servicing
Do not attempt to service this product yourself, as opening or removing covers
may expose you to dangerous voltage points or other risks. Refer all servicing to
qualified service personnel.
Unplug this product from the wall outlet and refer servicing to qualified service
personnel when:
• the power cord or plug is damaged, cut or frayed
• liquid was spilled into the product
• the product was exposed to rain or water
• the product has been dropped or the case has been damaged
• the product exhibits a distinct change in performance, indicating a need
for service
• the product does not operate normally after following the operating
instructions
Note: Adjust only those controls that are covered by the operating
instructions, since improper adjustment of other controls may
result in damage and will often require extensive work by a
qualified technician to restore the product to normal condition.
Page 5

Replacing the battery pack
The notebook uses lithium batteries. Replace the battery with the same type as
that which came bundled with your product. Use of another battery may
present a risk of fire or explosion.
Warning! Batteries may explode if not handled properly. Do not
disassemble or dispose of them in fire. Keep them away from
children. Follow local regulations when disposing of used
batteries.
Telephone line safety
• Disconnect all telephone lines from the equipment when not in use and/or
before servicing.
• To avoid the remote risk of electric shock from lightning, do not connect
the telephone line to this equipment during lightning or thunderstorms.
Warning! For safety reasons, do not use non-compliant parts
when adding or changing components. Consult your reseller for
purchase options.
Disposal instructions
Do not throw this electronic device into the trash when discarding.
To minimize pollution and ensure utmost protection of the global environment,
please recycle. For more information on the Waste from Electrical and
Electronics Equipment (WEEE) regulations, visit
http://global.acer.com/about/
sustainability.htm.
v
Mercury advisory
For projectors or electronic products containing an LCD/CRT monitor or display:
Lamp(s) inside this product contain mercury and must be recycled or disposed of
according to local, state or federal laws. For more information, contact the
Electronic Industries Alliance at www.eiae.org
information, check www.lamprecycle.org
. For lamp-specific disposal
.
Page 6

vi
ENERGY STAR is a government program (public/private partnership) that gives
people the power to protect the environment in a cost effective way and
without sacrificing quality or product features. Products that earn the ENERGY
STAR prevent greenhouse gas emissions by meeting strict energy efficiency
guidelines set by the US Environmental Protection Agency (EPA) and the US
Department of Energy (DOE). In the average home, 75% of all electricity used
to power home electronics is consumed while the products are turned off.
ENERGY STAR qualified home electronic products in the off position use up to
50% less energy than conventional equipment. More information refers to
http://www.energystar.gov
As an ENERGY STAR partner, Acer Inc. has determined that this product meets
the ENERGY STAR guidelines for energy efficiency.
This product has been shipped enabled for power management:
and http://www.energystar.gov/powermangement.
• Activate display’ Sleep mode within 15 minutes of user inactivity.
• Activate computer’s Sleep mode within 30 minutes of user inactivity.
• Wake the computer from Sleep mode by pushing power button.
More power management settings can be done through Acer ePower
Management.
Tips and information for comfortable use
Computer users may complain of eyestrain and headaches after prolonged use.
Users are also at risk of physical injury after long hours of working in front of a
computer. Long work periods, bad posture, poor work habits, stress,
inadequate working conditions, personal health and other factors greatly
increase the risk of physical injury.
Incorrect computer usage may lead to carpal tunnel syndrome, tendonitis,
tenosynovitis or other musculoskeletal disorders. The following symptoms may
appear in the hands, wrists, arms, shoulders, neck or back:
• numbness, or a burning or tingling sensation
• aching, soreness or tenderness
• pain, swelling or throbbing
• stiffness or tightness
• coldness or weakness
If you have these symptoms, or any other recurring or persistent discomfort
and/or pain related to computer use, consult a physician immediately and
inform your company's health and safety department.
Page 7

vii
The following section provides tips for more comfortable computer use.
Finding your comfort zone
Find your comfort zone by adjusting the viewing angle of the monitor, using a
footrest, or raising your sitting height to achieve maximum comfort. Observe
the following tips:
• refrain from staying too long in one fixed posture
• avoid slouching forward and/or leaning backward
• stand up and walk around regularly to remove the strain on your leg
muscles
• take short rests to relax your neck and shoulders
• avoid tensing your muscles or shrugging your shoulders
• install the external display, keyboard and mouse properly and within
comfortable reach
• if you view your monitor more than your documents, place the display at
the center of your desk to minimize neck strain
Taking care of your vision
Long viewing hours, wearing incorrect glasses or contact lenses, glare, excessive
room lighting, poorly focused screens, very small typefaces and low-contrast
displays could stress your eyes. The following sections provide suggestions on
how to reduce eyestrain.
Eyes
• Rest your eyes frequently.
• Give your eyes regular breaks by looking away from the monitor and
focusing on a distant point.
• Blink frequently to keep your eyes from drying out.
Display
• Keep your display clean.
• Keep your head at a higher level than the top edge of the display so your
eyes point downward when looking at the middle of the display.
• Adjust the display brightness and/or contrast to a comfortable level for
enhanced text readability and graphics clarity.
• Eliminate glare and reflections by:
• placing your display in such a way that the side faces the window or
any light source
• minimizing room light by using drapes, shades or blinds
• using a task light
• changing the display's viewing angle
• using a glare-reduction filter
• using a display visor, such as a piece of cardboard extended from the
display's top front edge
• Avoid adjusting your display to an awkward viewing angle.
Page 8

viii
Avoid looking at bright light sources, such as open windows, for extended
•
periods of time.
Developing good work habits
Develop the following work habits to make your computer use more relaxing
and productive:
• Take short breaks regularly and often.
• Perform some stretching exercises.
• Breathe fresh air as often as possible.
• Exercise regularly and maintain a healthy body.
Warning! We do not recommend using the computer on a couch
or bed. If this is unavoidable, work for only short periods, take
breaks regularly, and do some stretching exercises.
Note: For more information, please refer to "Regulations and
safety notices" on page 76 in the AcerSystem User's Guide.
Page 9

First things first
We would like to thank you for making an Acer notebook your choice for
meeting your mobile computing needs.
Your guides
To help you use your Acer notebook, we have designed a set of guides:
First off, the Just for Starters... poster helps you get started with
setting up your computer.
The printed User's Guide introduces you to the basic features and
functions of your new computer. For more on how your computer
can help you to be more productive, please refer to the
AcerSystem User's Guide. This guide contains detailed
information on such subjects as system utilities, data recovery,
expansion options and troubleshooting. In addition it contains
warranty information and the general regulations and safety
notices for your notebook. It is available in Portable Document
Format (PDF) and comes preloaded on your notebook. Follow
these steps to access it:
1 Click on Start, All Programs, AcerSystem.
2 Click on AcerSystem User's Guide.
Note: Viewing the file requires Adobe Reader. If Adobe Reader is
not installed on your computer, clicking on AcerSystem User's
Guide will run the Adobe Reader setup program first. Follow the
instructions on the screen to complete the installation. For
instructions on how to use Adobe Reader, access the Help and
Support menu.
ix
Basic care and tips for using your computer
Turning your computer on and off
To turn on the computer, simply press and release the power button below the
LCD screen beside the easy-launch buttons. See "Front view" on page 15 for the
location of the power button.
Page 10

x
To turn the power off, do any of the following:
• Use the Windows shutdown command
Click on Start, Turn Off Computer, then click on Turn Off.
• Use the power button
You can also shut down the computer by closing the display cover, or by
pressing the sleep hotkey <Fn> + <F4>.
Note: If you cannot power off the computer normally, press and
hold the power button for more than four seconds to shut down
the computer. If you turn off the computer and want to turn it on
again, wait at least two seconds before powering up.
Taking care of your computer
Your computer will serve you well if you take care of it.
• Do not expose the computer to direct sunlight. Do not place it near sources
of heat, such as a radiator.
• Do not expose the computer to temperatures below 0 ºC (32 ºF) or above
50 ºC (122 ºF).
• Do not subject the computer to magnetic fields.
• Do not expose the computer to rain or moisture.
• Do not spill water or any liquid on the computer.
• Do not subject the computer to heavy shock or vibration.
• Do not expose the computer to dust or dirt.
• Never place objects on top of the computer.
• Do not slam the computer display when you close it.
• Never place the computer on uneven surfaces.
Taking care of your AC adapter
Here are some ways to take care of your AC adapter:
• Do not connect the adapter to any other device.
• Do not step on the power cord or place heavy objects on top of it.
Carefully route the power cord and any cables away from foot traffic.
• When unplugging the power cord, do not pull on the cord itself but pull
on the plug.
• The total ampere ratings of the equipment plugged in should not exceed
the ampere rating of the cord if you are using an extension cord. Also, the
total current rating of all equipment plugged into a single wall outlet
should not exceed the fuse rating.
Page 11

Taking care of your battery pack
Here are some ways to take care of your battery pack:
• Use only batteries of the same kind as replacements. Turn the power off
before removing or replacing batteries.
• Do not tamper with batteries. Keep them away from children.
• Dispose of used batteries according to local regulations. Recycle if possible.
Cleaning and servicing
When cleaning the computer, follow these steps:
1 Turn off the computer and remove the battery pack.
2 Disconnect the AC adapter.
3 Use a soft, moist cloth. Do not use liquid or aerosol cleaners.
If either of the following occurs:
• the computer has been dropped or the body has been damaged;
• the computer does not operate normally
please refer to "Frequently asked questions" on page 53.
xi
Page 12

xii
Page 13

Information for your safety and comfort iii
Safety instructions iii
Disposal instructions v
Tips and information for comfortable use vi
First things first ix
Your guides ix
Basic care and tips for using your computer ix
Turning your computer on and off ix
Taking care of your computer x
Taking care of your AC adapter x
Taking care of your battery pack xi
Cleaning and servicing xi
Acer Empowering Technology 1
Empowering Technology password 1
Acer eNet Management
(for selected models) 2
Acer ePower Management 4
Acer ePresentation Management 7
Acer eDataSecurity Management
(for selected models) 8
Acer eLock Management
(for selected models) 9
Acer eRecovery Management 11
Acer eSettings Management 13
Acer ePerformance Management 14
Your Acer notebook tour 15
Front view 15
Closed front view 16
Left view 17
Right view 18
Rear view 19
Base view 20
Specifications 21
Indicators 27
Easy-launch buttons 28
Touchpad 29
Touchpad basics 29
Using the keyboard 31
Lock keys and embedded numeric keypad 31
Windows keys 32
Hotkeys 32
Special keys 34
Contents
Page 14

Ejecting the optical (CD or DVD) drive tray 35
Using a computer security lock 35
Audio 36
Adjusting the volume 36
Using Acer Bluetooth® VoIP Phone 37
1. Getting to know your VoIP phone 37
1.1 Package contents 37
1.2 Layout 37
1.3 LED indicators 38
1.4 Charging the phone 38
2. Connecting the phone to your notebook 39
3. Using the phone 41
Acer OrbiCam
(for selected models) 42
Launching the Acer OrbiCam 43
Changing the Acer OrbiCam settings 43
Capturing photos/videos 46
Using the Acer OrbiCam as webcam 46
Enabling the Acer VisageON
(for selected models) 46
Using the system utilities 50
Acer GridVista (dual-display compatible) 50
Launch Manager 51
Norton AntiVirus 52
Frequently asked questions 53
Requesting service 56
International Travelers Warranty (ITW) 56
Before you call 56
Taking your notebook PC with you 57
Disconnecting from the desktop 57
Moving around 57
Preparing the computer 57
What to bring to meetings 58
Taking the computer home 58
Preparing the computer 58
What to take with you 58
Special considerations 59
Setting up a home office 59
Traveling with the computer 59
Preparing the computer 59
What to take with you 59
Special considerations 60
Page 15

Traveling internationally with the computer 60
Preparing the computer 60
What to bring with you 60
Special considerations 60
Securing your computer 61
Using a computer security lock 61
Using passwords 61
Entering passwords 62
Setting passwords 62
Expanding through options 63
Connectivity options 63
Fax/data modem 63
Built-in network feature 64
Fast Infrared (FIR)
(for selected models) 64
Universal Serial Bus (USB) 65
IEEE 1394 port
(for selected models) 65
PC Card slot 66
Installing memory 66
BIOS utility 67
Boot sequence 67
Enable disk-to-disk recovery 68
Password 68
Using software 69
Playing DVD movies 69
Acer eRecovery Management 69
Create backup 71
Restore from backup 71
Create factory default image CD 72
Re-install bundled software without CD 72
Change password 73
Troubleshooting 74
Troubleshooting tips 74
Error messages 74
Regulations and safety notices 76
FCC notice 76
Modem notices 77
Laser compliance statement 80
LCD pixel statement 80
Macrovision copyright protection notice 80
Radio device regulatory notice 81
General 81
Page 16

European Union (EU) 81
The FCC RF safety requirement 82
Canada — Low-power license-exempt radio
communication devices (RSS-210) 83
Federal Communications Comission
Declaration of Conformity 84
Declaration of Conformity for CE Marking 85
LCD panel ergonomic specifications 86
Index 90
Page 17

1
Acer Empowering Technology
Acer's innovative Empowering Technology toolbar makes it easy for you to
access frequently used functions and manage your new Acer computer.
Displayed by default in the upper-right corner of your screen, it features the
following handy utilities:
• Acer eNet Management (for selected models) hooks up to location-based
networks intelligently.
• Acer ePower Management extends battery power via versatile usage
profiles.
• Acer ePresentation Management connects to a projector and adjusts
display settings conveniently.
• Acer eDataSecurity Management (for selected models) protects data with
passwords and advanced encryption algorithms.
• Acer eLock Management (for selected models) limits access to external
storage media and interfaces.
• Acer eRecovery Management backs up and recovers data flexibly, reliably
and completely.
• Acer eSettings Management accesses system information and adjusts
settings easily
• Acer ePerformance Management improves system performance by
optimizing disk space, memory and registry settings..
Empowering Technology
For more information, right click on the Empowering Technology toolbar, then
select the Help or Tutorial function.
Empowering Technology password
Before using Acer eLock Management and Acer eRecovery Management, you
must initialize the Empowering Technology password. Right-click on the
Empowering Technology toolbar and select "Password Setup" to do so. If you
do not initialize the Empowering Technology password, you will be prompted
to do so when running Acer eLock Management or Acer eRecovery
Management for the first time.
If you lose your password, there is no method to reset it except by
reformatting your notebook or taking your notebook
to an Acer Customer Service Center. Be sure to remember or write
down your password.
Page 18

2
Acer eNet Management
(for selected models)
Acer eNet Management helps you to quickly and easily connect to both wired
and wireless networks in a variety of locations. To access this utility, either click
on the "Acer eNet Management" icon on your notebook, or start the program
from the Start menu. You also have the option to set Acer eNet Management to
start automatically when you boot up your PC.
Acer eNet Management automatically detects the best settings for a new
location, while offering you the freedom to manually adjust the settings to
Empowering Technology
match your needs.
Acer eNet Management can save network settings for a location to a profile,
and automatically switch to the appropriate profile when you move from one
location to another. Settings stored include network connection settings (IP and
DNS settings, wireless AP details, etc.), as well as default printer settings.
Page 19

3
Security and safety concerns mean that Acer eNet Management does not store
username and password information.
Empowering Technology
Page 20

4
Acer ePower Management
Acer ePower Management features a straightforward user interface. To launch
it, select Acer ePower Management from the Empowering Technology
interface.
AC mode (Adapter mode)
The default setting is "Maximum Performance." You can adjust CPU speed, LCD
brightness and other settings, or click on buttons to turn the following
functions on/off: Wireless LAN, Bluetooth, CardBus, FireWire(1394), Wired LAN
Empowering Technology
and Optical Device if supported.
DC mode (Battery mode)
There are four pre-defined profiles — Entertainment, Presentation, Word
Processing, and Battery Life. You can also define up to three of your own.
To create a new power profile:
1 Change power settings as desired.
2 Click "Save as ..." to save to a new power profile.
3 Name the newly created profile.
4 Select whether this profile is for Adapter or Battery mode, then click OK.
5 The new profile will appear in the profile list.
Page 21

5
Battery status
For real-time battery life estimates based on current usage, refer to the panel in
the upper half of the window.
Empowering Technology
For additional options, click "Settings" to:
• Set alarms.
• Re-load factory defaults.
• Select what actions to be taken when the cover is closed or the power
button is pressed.
• Set passwords for accessing the system after Hibernation or Standby.
• View information about Acer ePower Management.
Page 22

6
Empowering Technology
Page 23

7
Acer ePresentation Management
Acer ePresentation Management lets you project your computer's display to an
external device or projector using the hot key: Fn + F5. If auto-detection
hardware is implemented in the system and the external display supports it,
your system display will be automatically switched out when an external display
is connected to the system. For projectors and external devices that are not
auto-detected, launch Acer ePresentation Management to choose an
appropriate display setting.
Empowering Technology
If the restored resolution is not correct after disconnecting a
projector, or you need to use an external resolution that is not
supported by Acer ePresentation Management, adjust your
display settings using Display Properties or the utility provided by
the graphics vendor.
Page 24

8
Acer eDataSecurity Management
(for selected models)
Acer eDataSecurity Management is a handy file encryption utility that protects
your files from being accessed by unauthorized persons. It is conveniently
integrated with Windows Explorer as a shell extension for quick and easy data
encryption/decryption and also supports on-the-fly file encryption for MSN
Messenger and Microsoft Outlook.
The Acer eDataSecurity Management setup wizard will prompt you for a
supervisor password and default encryption. This encryption will be used to
Empowering Technology
encrypt files by default, or you can choose to enter your own file-specific
password when encrypting a file.
Note: The password used to encrypt a file is the unique key that
the system needs to decrypt it. If you lose the password, the
supervisor password is the only other key capable of decrypting
the file. If you lose both passwords, there will be no way to
decrypt your encrypted file! Be sure to safeguard all related
passwords!
Page 25

Acer eLock Management
(for selected models)
Acer eLock Management is a security utility that allows you to lock your
removable data, optical and floppy drives to ensure that data can't be stolen
while your notebook is unattended.
• Removable data devices — includes USB disk drives, USB pen drives, USB
flash drives, USB MP3 drives, USB memory card readers, IEEE 1394 disk
drives and any other removable disk drives that can be mounted as a file
system when plugged into the system.
• Optical drive devices — includes any kind of CD-ROM or DVD-ROM drives.
• Floppy disk drives — 3.5-inch disks only.
• Interfaces — includes serial port, parallel port, infrared (IR), and Bluetooth.
To activate Acer eLock Management, a password must be set first. Once set, you
can apply locks to any of the devices types. Lock(s) will immediately
be set without any reboot necessary, and will remain locked after rebooting,
until unlocked.
9
Empowering Technology
Page 26

10
Note: If you lose your password, there is no method to reset it
except by reformatting your notebook or taking your notebook
to an Acer Customer Service Center. Be sure to remember or write
down your password.
Empowering Technology
Page 27

11
Acer eRecovery Management
Acer eRecovery Management is a powerful utility that does away with the need
for recovery disks provided by the manufacturer. The Acer eRecovery
Management utility occupies space in a hidden partition on your system's hard
drive. By default, user-created backups are stored on the D:\ drive.
Acer eRecovery Management provides you with:
• Password protection.
• Recovery of applications and drivers.
• Image/data backup:
• Back up to HDD (set recovery point).
• Back up to CD/DVD.
• Image/data recovery tools:
• Recover from a hidden partition (factory defaults).
• Recover from the HDD (most recent user-defined recovery point).
• Recover from CD/DVD.
Empowering Technology
Page 28

12
Empowering Technology
For more information, please refer to "Acer eRecovery Management" on page
69 in the AcerSystem User's Guide.
Note: If your computer did not come with a Recovery CD or
System CD, please use Acer eRecovery Management's "System
backup to optical disk" feature to burn a backup image to CD or
DVD. To ensure the best results when recovering your system
using a CD or Acer eRecovery Management, detach all peripherals
(except the external Acer ODD, if your computer has one),
including your Acer ezDock.
Page 29

13
Acer eSettings Management
Acer eSettings Management allows you to inspect hardware specifications,
change BIOS passwords or other Windows settings, and to monitor the system
health status.
Acer eSettings Management also:
• Provides a simple graphical user interface for navigation.
• Displays general system status and advanced monitoring for power users
on Acer computer.
Empowering Technology
Page 30

14
Acer ePerformance Management
Acer ePerformance Management is a system optimization tool that boosts the
performance of your Acer computer. It provides an express optimization
method to release unused memory and disk space quickly. The user can also
enable advanced options for full control over the following options:
• Memory optimization — releases unused memory and check usage.
• Disk optimization — removes unneeded items and files.
• Speed optimization — improves the usability and performance of your
Empowering Technology
Windows XP system.
Page 31
15
Your Acer notebook tour
After setting up your computer as illustrated in the Just for Starters... poster,
let us show you around your new Acer notebook.
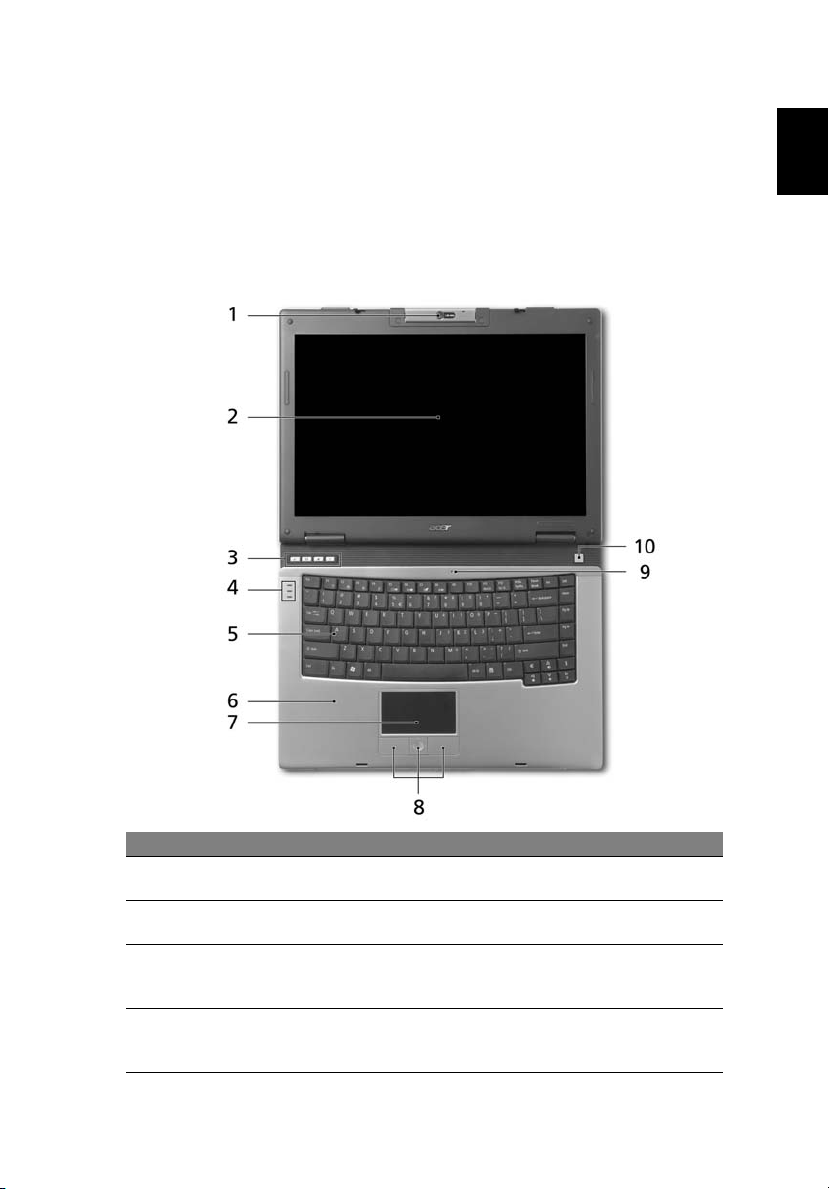
Front view
English
# Item Description
1 Built-in camera 1.3 megapixel/310,000 pixel web camera for video
2 Display screen Also called Liquid-Crystal Display (LCD), displays
3 Easy-launch
buttons
4 Status
indicators
communication. (for selected models)
computer output.
Buttons for launching frequently used programs.
See "Easy-launch buttons" on page 27 for more
details.
Light-Emitting Diodes (LEDs) that light up to show
the status of the computer's functions and
components.
Page 32
English
16
# Item Description
5 Keyboard For entering data into your computer.
6 Palmrest Comfortable support area for your hands when you
use the computer.
7 Touchpad Touch-sensitive pointing device which functions like a
8 Click buttons
(left, center
and right)
9 Microphone Internal microphone for sound recording.
10 Power button Turns the computer on and off.
computer mouse.
The left and right buttons function like the left and
right mouse buttons; the center button serves as a 4way scroll button.
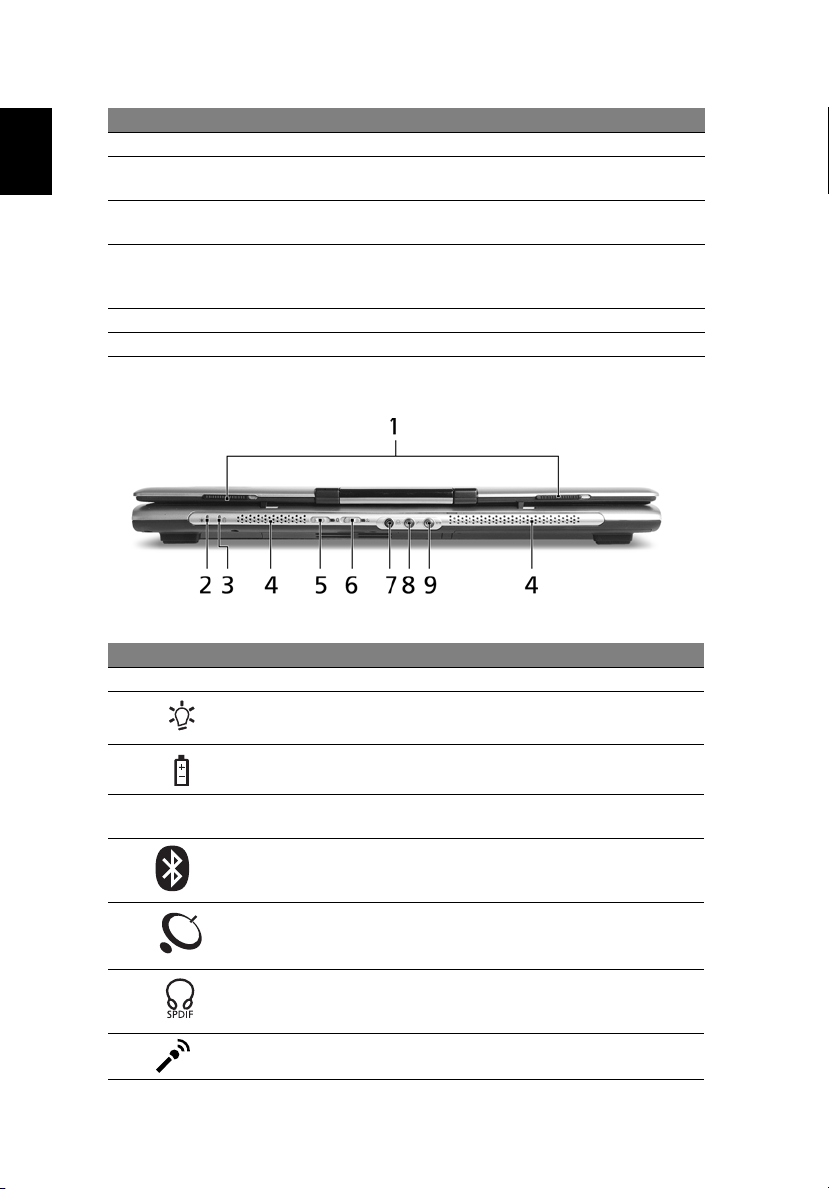
Closed front view
# Icon Item Description
1 Latch Locks and releases the lid.
2 Power indicator Indicates the computer's power status.
3 Battery indicator Indicates the computer's batttery
status.
4 Speakers Left and right speakers deliver stereo
audio output.
5Bluetooth
communication
switch/indicator
6 Wireless
communication
switch/indicator
7 Headphones/speaker/
line-out jack with
S/PDIF support
8 Microphone-in jack Accepts input from external
Enable/disables the Bluetooth function.
Indicates the status of Bluetooth
communication (optional).
Enable/disables the wireless function.
Indicates the status of wireless LAN
communication (optional).
Connects to audio line-out devices (e.g.,
speakers, headphones).
microphones.
Page 33
17
# Icon Item Description
9 Line-in jack Accepts audio line-in devices (e.g.,
audio CD player, stereo walkman).
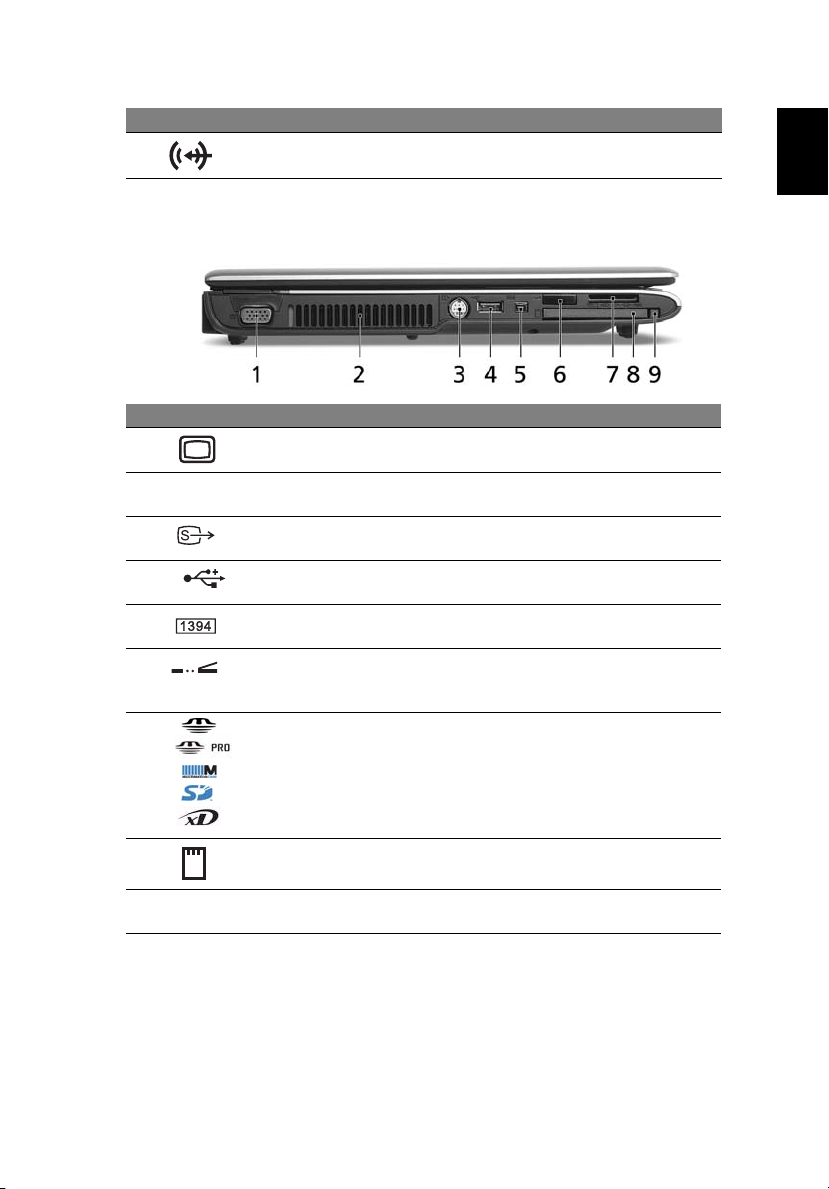
Left view
# Icon Item Description
1 External display
(VGA) port
2 Ventilation slots Enable the computer to stay cool, even
3 S-video/TV-out
(NTSC/PAL) port
4 USB 2.0 port Connects to USB 2.0 devices (e.g., USB
5 4-pin IEEE 1394
port
6 Infrared port Interfaces with infrared devices (e.g.,
7 5-in-1 card reader Accepts Memory Stick (MS), Memory Stick
8 PC Card slot Accepts one Type II PC Card.
Connects to a display device (e.g., external
monitor, LCD projector).
after prolonged use.
Connects to a television or display device
with S-video input.
mouse, USB camera).
Connects to IEEE 1394 devices.
(for selected models)
infrared printer and IR-aware computer)
(for selected models).
PRO (MS PRO), MultiMediaCard (MMC),
Secure Digital (SD) and
xD-Picture Card (xD) .
Note: Only one card can operate at any
given time.
English
9 PC Card slot eject
button
Ejects the PC Card from the slot.
Page 34
English
18
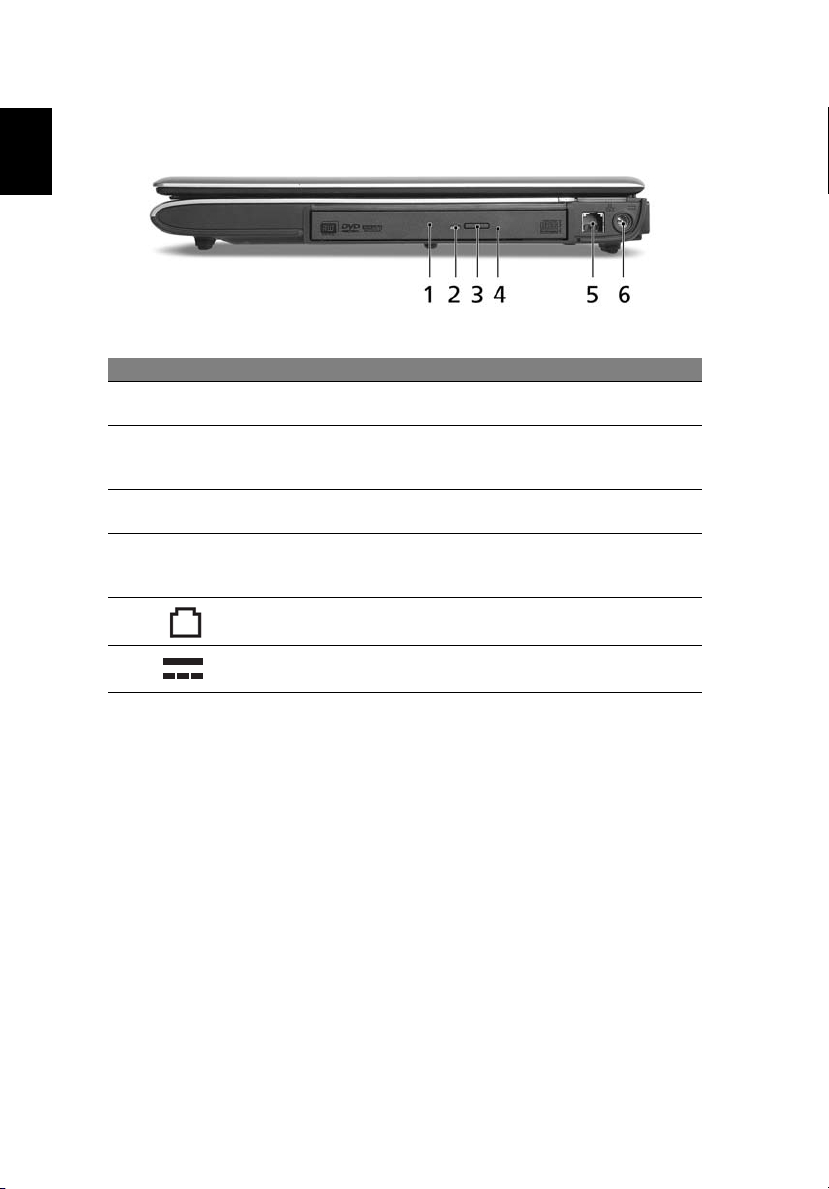
Right view
# Icon Item Description
1 Optical drive Internal optical drive; accepts CDs or DVDs
2 Optical disk
access
indicator
3 Optical drive
eject button
4Emergency
eject hole
5Modem (RJ-
11) port
6 DC-in jack Connects to an AC adapter.
(slot-load or tray-load depending on model).
Lights up when the optical drive is active
(location depends on model).
Ejects the optical disk from the drive (location
depends on model).
Ejects the optical drive tray when the
computer is turned off (location depends on
model).
Connects to a phone line.
Page 35
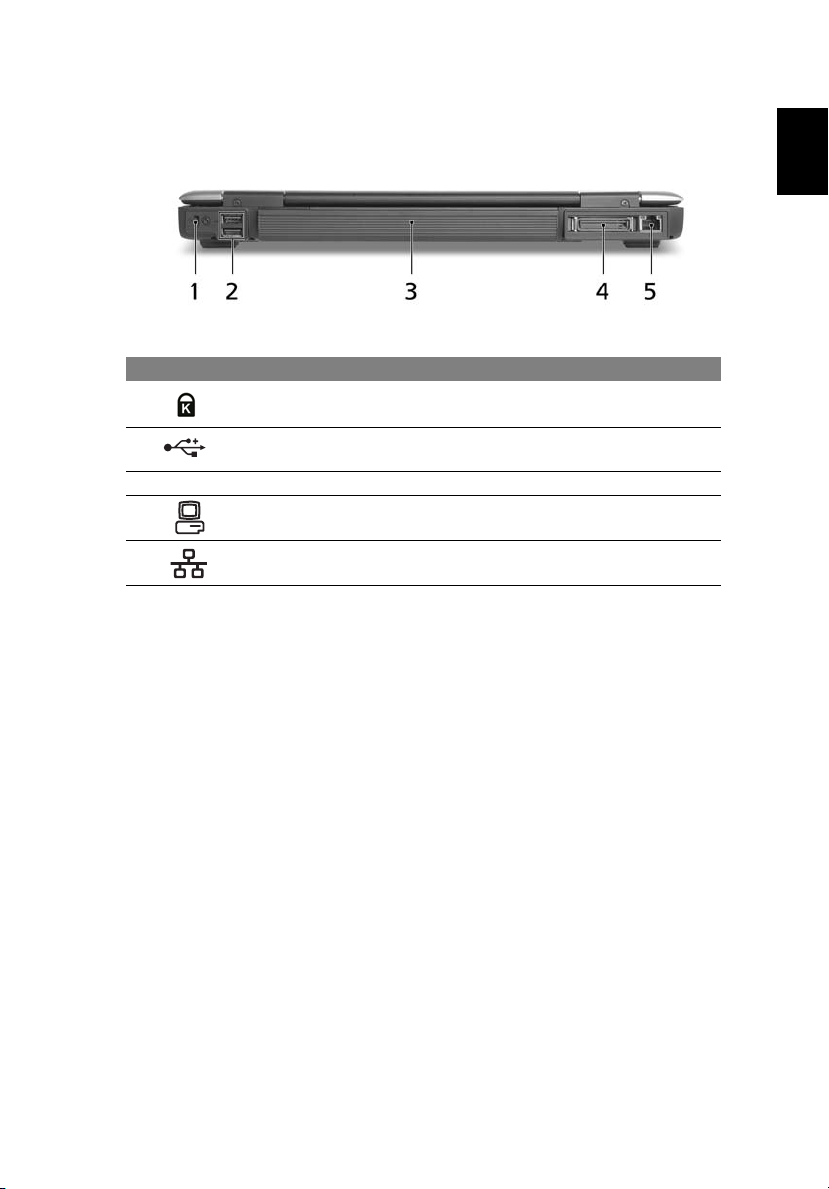
19
Rear view
# Icon Item Description
1 Kensington lock
slot
2 USB 2.0 ports Connect to USB 2.0 devices (e.g., USB
3 Battery Powers the computer.
4 124-pin Acer
ezDock connector
5 Ethernet (RJ-45)
port
Connects to a Kensington-compatible
computer security lock.
mouse, USB camera).
Connects to Acer ezDock (for selected
models).
Connects to an Ethernet 10/100/1000based network (for selected models).
English
Page 36
English
20
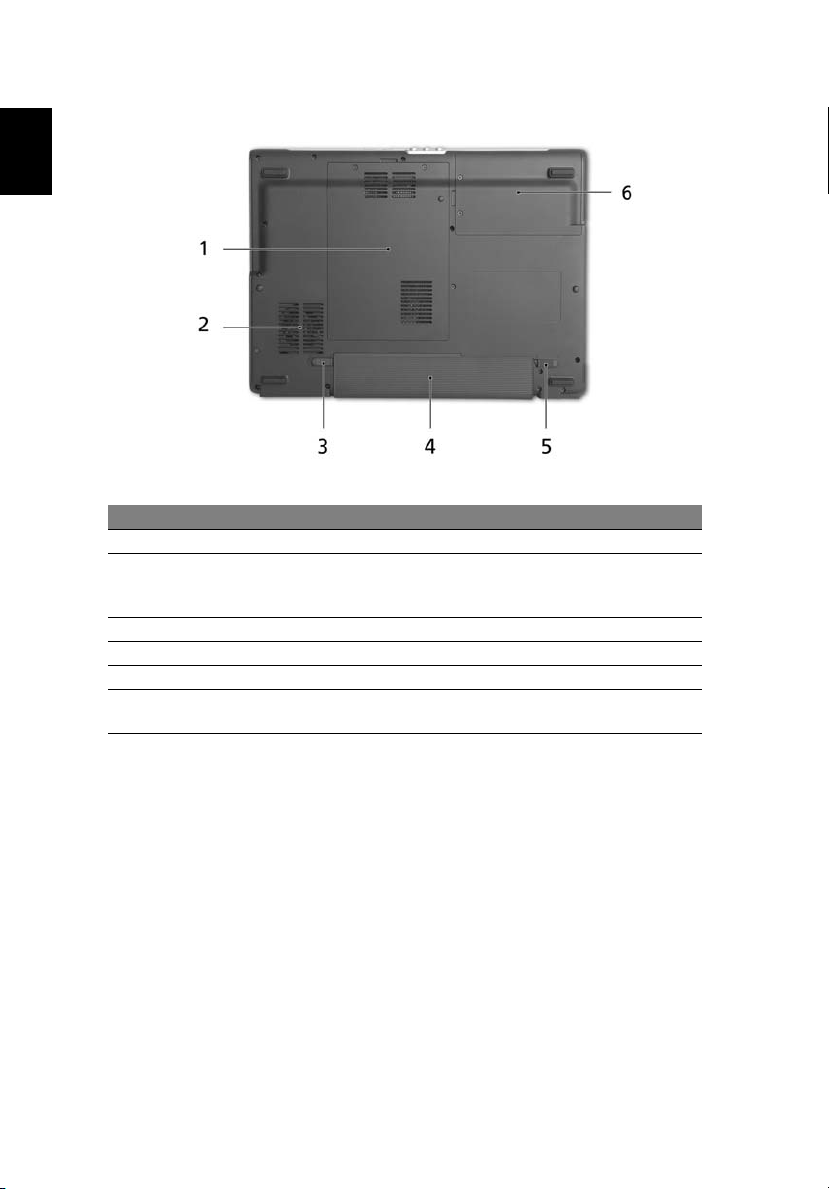
Base view
# Item Description
1 Memory compartment Houses the computer's main memory.
2 Cooling fan Helps keep the computer cool.
Note: Do not cover or obstruct the opening
of the fan.
3 Battery release latch Releases the battery for removal.
4 Battery bay Houses the computer's battery pack.
5 Battery lock Locks the battery in position.
6 Hard disk bay Houses the computer's hard disk (secured
with screws).
Page 37

21
Specifications
Operating
system
Platform
System memory
• Genuine Windows
• Genuine Windows
• Genuine Windows
• Intel
•Intel
•Intel
• Mobile Intel
•Intel
• Intel
cache, 1.46/1.60/1.73 GHz, 533 MHz FSB) or higher
(for Extensa 4210)
• Mobile Intel
(for Extensa 4210)
• Up to 2 GB of DDR2 533/667 MHz system memory,
upgradeable to 4 GB using two soDIMM modules
(dual-channel support)
• 256/512 MB of DDR2 533 MHz memory, upgradeable
to 2 GB using two soDIMM modules (dual-channel
support) (for Extensa 4210)
®
XP Home Edition (Service Pack 2)
®
XP Starter Edition
®
XP Professional (Service Pack 2)
®
Centrino® Duo mobile technology, featuring:
®
Core™ 2 Duo processor T5500/T5600 (2 MB
L2 cache, 1.66/1.83 GHz, 667 MHz FSB) or T7200/
T7400/T7600 (4 MB L2 cache, 2/2.16/2.33 GHz,
667 MHz FSB)
®
Core™ Duo processor T2300/T2400/T2500/
T2600 (2 MB L2 cache, 1.66/1.83/2/2.16 GHz,
667 MHz FSB)
connection (dual-band tri-mode 802.11a/b/g) or
Intel
(dual-mode 802.11 b/g)Wi-Fi CERTIFIED
solution, supporting Acer SignalUp
technology
®
Celeron® M processor 410/420/430 (1 MB L2
®
®
®
945GM/PM Express chipset
PRO/Wireless 3945ABG network
PRO/Wireless 3945BG network connection
®
940GML Express chipset
™
™
wireless
English
Page 38

22
English
Display and
graphics
Storage
subsystem
Dimensions
and weight
• 14.1" WXGA Acer CrystalBrite
™
TFT LCD, 1280 x 800
pixel resolution, supporting simultaneous multiwindow viewing on dual displays via Acer GridVista
• NVIDIA
®
GeForce® Go 7300 up to 256 MB
TurboCache
™
(128 MB of dedicated GDDR2 VRAM,
up to 128 MB of shared system memory), supporting
Microsoft
High Dynamic Range (HDR) technology, NVIDIA
PowerMizer
• Mobile Intel
3D graphics, featuring Intel
®
DirectX® 9.0, Shader Model 3.0, OpenEXR
™
6.0, PCI Express® (for selected models)
®
945GM Express chipset with integrated
®
Graphics Media
®
Accelerator 950, up to 224 MB of shared memory,
supporting Microsoft
• Mobile Intel
®
integrated 3D graphics, featuring Intel
®
DirectX® 9.0 and PCI Express
940GML Express chipset with
®
Graphics
Media Accelerator (GMA) 950, up to 224 MB of
®
shared system memory, supporting Microsoft
®
DirectX
(for
9.0, dual independent display
Extensa 4210)
• Dual independent displays supported
(for selected models)
• 16.7 million colors
• Simultaneous LCD and CRT display, with LCD panel
refresh rate at 70 Hz
• Up to 2048 x 1536 resolution via non-interlaced
CRT display
• MPEG-2/DVD hardware-assisted capability
• 40/60/80/100/120/160 GB hard disk drive with Acer
Disk Anti-Shock Protection (DASP)
• Optical drive options:
• 8X DVD-Super Multi double-layer
• DVD/CD-RW combo (for selected models)
• 5-in-1 card reader, supporting Memory Stick
™
Memory Stick PRO
(MMC), Secure Digital (SD) and xD-Picture Card
(MS PRO), MultiMediaCard
®
(MS),
™
(xD)
• 341 (W) x 251 (D) x 28/35 (H) mm
(13.4 x 9.88 x 1.10/1.37 inches)
• 2.4 kg (5.28 lbs.)
™
®
Page 39

23
Power
subsystem
Input devices
Audio
• ACPI 2.0 CPU power management standard: supports
Standby and Hibernation power-saving modes
• 44 .4W 4000 mAh (6-cell) Li-ion battery pack
• Acer QuicCharge
• 80% charge in 1 hour
• 2-hour rapid charge system-off
• 2.5-hour charge-in-use
™
technology: (for selected models)
• 90 W AC adapter (for selected models)
• 65 W AC adapter
• 88-/89-key Acer FineTouch
™
keyboard
• Touchpad with 4-way scroll button
• Four easy-launch buttons
• Two front-access LED-switches: WLAN, Bluetooth
®
• Audio system with two built-in speakers
• Intel
• Sound Blaster Pro
®
High-Definition audio support
™
and MS Sound compatible
• S/PDIF (Sony/Philips Digital Interface) support for
digital speakers
• Built-in microphone
English
Page 40

24
English
Communication
I/O interface
Security
• Modem: 56K ITU V.92 with PTT approval;
Wake-on-Ring ready
• LAN:
• gigabit Ethernet; Wake-on-LAN ready
(for selected models)
• Fast Ethernet; Wake-on-LAN ready
• WLAN:
•Intel
• Acer InviLink
• WPAN: Bluetooth
®
PRO/Wireless 3945ABG network
connection (dual-band tri-mode 802.11a/b/g) or
®
PRO/Wireless 3945BG network connection
Intel
(dual-mode 802.11b/g) Wi-Fi CERTIFIED
solution, supporting Acer SignalUp
technology
solution, supporting Acer SignalUp
technology (for
™
802.11b/g Wi-Fi CERTIFIED™
Extensa 4210)
®
2.0+EDR (Enhanced Data Rate)
™
™
wireless
™
wireless
• Acer Video Conference featuring Voice and Video
over Internet Protocol (VVoIP) support via Acer
OrbiCam and optional Acer Bluetooth
®
VoIP phone
• Acer Orbicam 1.3 megapixel/310,000 pixel CMOS
camera (LCD panel-mounted) featuring :
• 225-degree ergonomic rotation
• Acer VisageOn
• Acer PrimaLite
™
technology
™
technology
• 124-pin Acer ezDock port (for selected models)
• PC Card slot (one Type II)
• 5-in-1 card reader (MS/MS PRO/MMC/SD/xD)
• Three USB 2.0 ports
• IEEE 1394 port (4-pin) (for selected models)
• Infrared port (for selected models)
• External display (VGA) port
• S-video/TV-out (NTSC/PAL) port
• Headphones/speaker/line-out jack with S/PDIF
support
• Microphone-in jack
• Line-in jack
• Ethernet (RJ-45) port
• Modem (RJ-11) port
• DC-in jack for AC adapter
• Acer Disk Anti-Shock Protection (DASP)
• Kensington lock slot
• BIOS user and supervisor passwords
Page 41

25
Software
• Acer Empowering Technology
• Acer eDataSecurity Management
(for selected models)
• Acer eLock Management (for selected models)
• Acer ePerformance Management
• Acer eRecovery Management
• Acer eSettings Management
• Acer eNet Management
(for selected models)
• Acer ePower Management
• Acer ePresentation Management
• Acer GridVista
™
• Acer Launch Manager
• Adobe
®
• CyberLink
Reader
®
PowerDVD
®
™
• Norton AntiVirus™
™
®
VoIP phone
Options and
accessories
• NTI CD-Maker
• Acer ezDock / Acer ezDock Lite
(for selected models)
• Acer Bluetooth
• 9-cell Li-ion battery pack
• 6-cell Li-ion 2nd battery pack
• 90 W AC adapter (for selected models)
• 512 MB, 1 or 2 GB DDR2 533/667 MHz soDIMM
modules
• External USB floppy disk drive
Environment
• Temperature:
• Operating: 5 °C to 35 °C
• Non-operating: -20 °C to 65 °C
• Humidity (non-condensing):
• Operating: 20% to 80%
• Non-operating: 20% to 80%
System
compliance
• ACPI 2.0
• DMI 2.0
• Mobile PC 2002
• Wi-Fi
®
• Cisco Compatible Extensions (CCX)
Warranty One-year International Travelers Warranty (ITW)
English
Note: The specifications listed above are for reference only. The
exact configuration of your PC depends on the model purchased.
Page 42

English
26
Warning! For safety reasons, do not use non-compliant parts
when adding or changing components. Consult your reseller for
purchase options.
Page 43
27
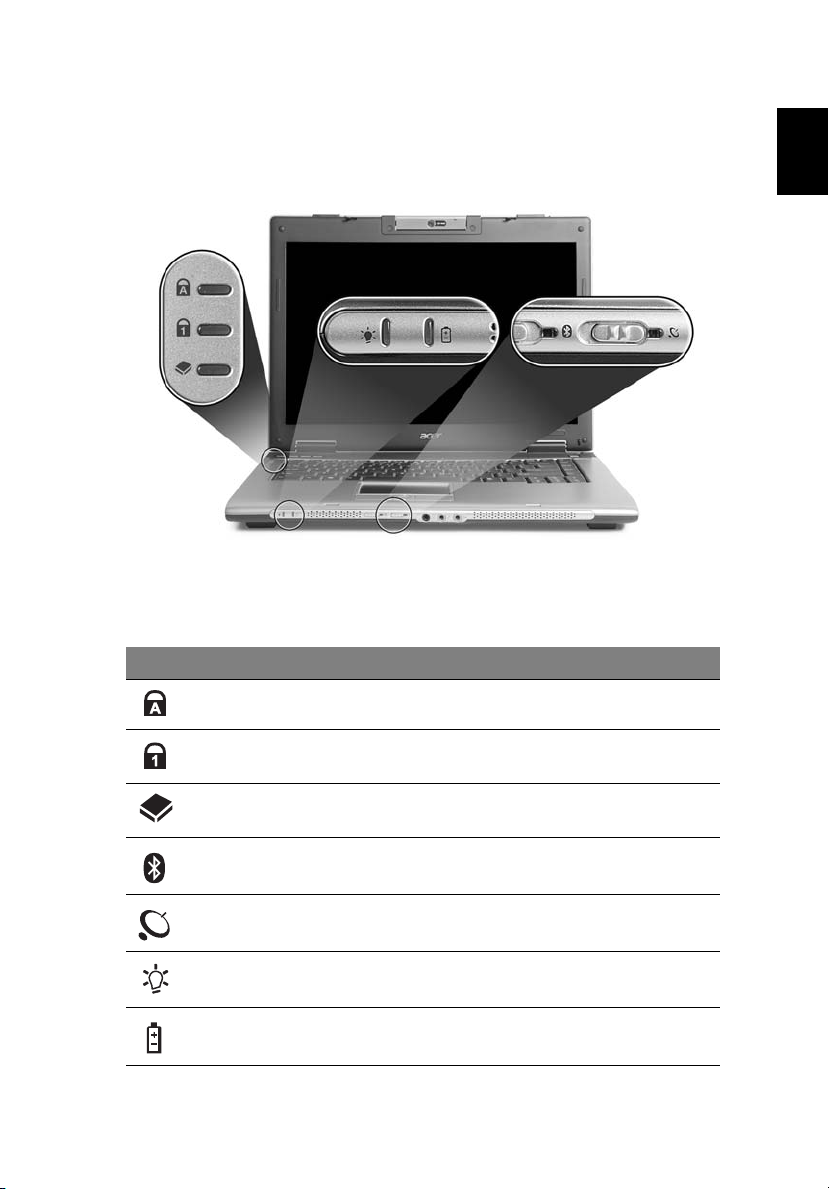
Indicators
The computer has serveral easy-to-read status indicators:
The front panel indicators are visible even when the computer cover is closed
up.
Icon Function Description
Caps Lock Lights up when Caps Lock is activated.
English
Num Lock Lights up when Num Lock is activated.
HDD Indicates when the hard disk drive is active.
Bluetooth Indicates the status of Bluetooth communication.
Wireless LAN Indicates the status of wireless LAN communication.
Power Indicates the computer's power status.
Battery Indicates the computer's batttery status.
Page 44
English
28
1. Charging: The light shows amber when the battery is charging.
2. Fully charged: The light shows green when in AC mode.
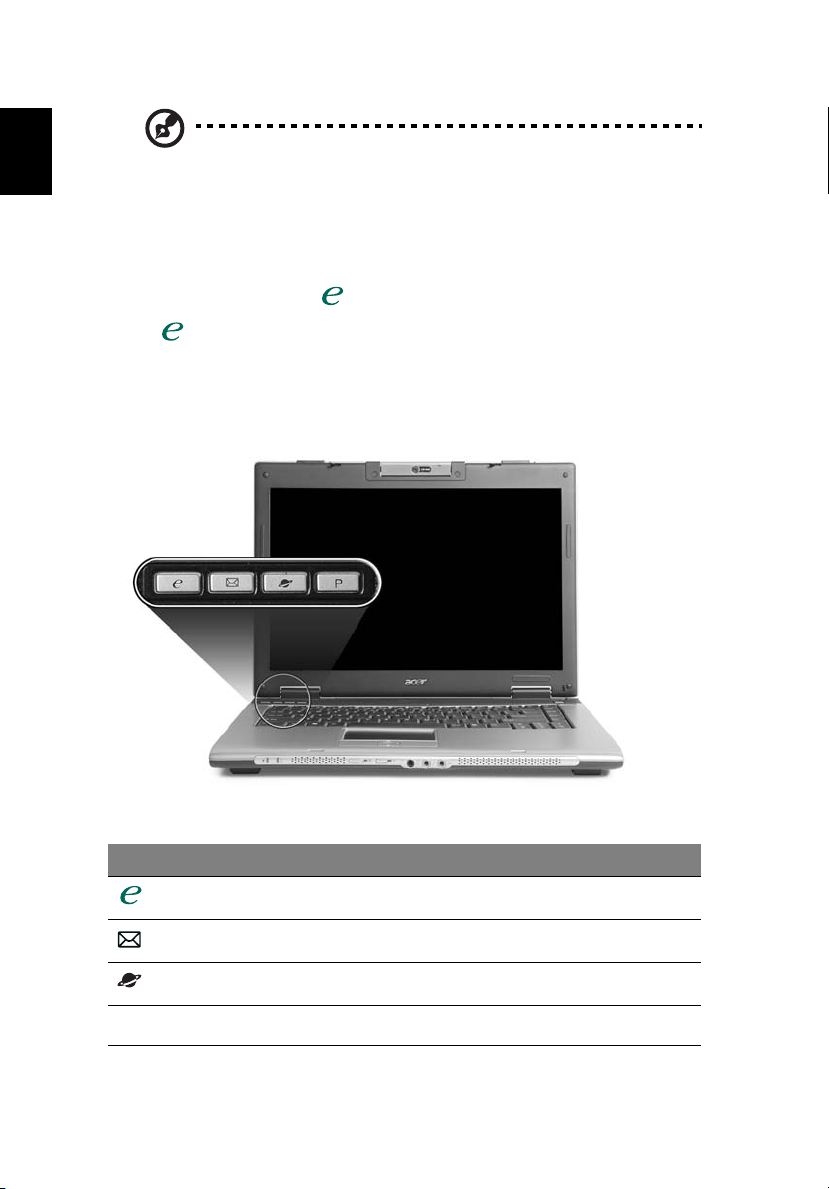
Easy-launch buttons
There are several conveniently located easy-launch buttons. They are: mail, Web
browser, Empowering Key < > and one user-programmable button.
Press < > to run the Acer Empowering Technology. Please see "Acer
Empowering Technology" on page 1. The mail and Web browser buttons are
pre-set to email and Internet programs, but can be reset by users. To set the
Web browser, mail and programmable buttons, run the Acer Launch Manager.
See "Launch Manager" on page 51.
Easy-launch button Default application
Acer Empowering Technology (user-programmable)
Email application (user-programmable)
Internet browser (user-programmable)
P
User-programmable
Page 45
29
Touchpad
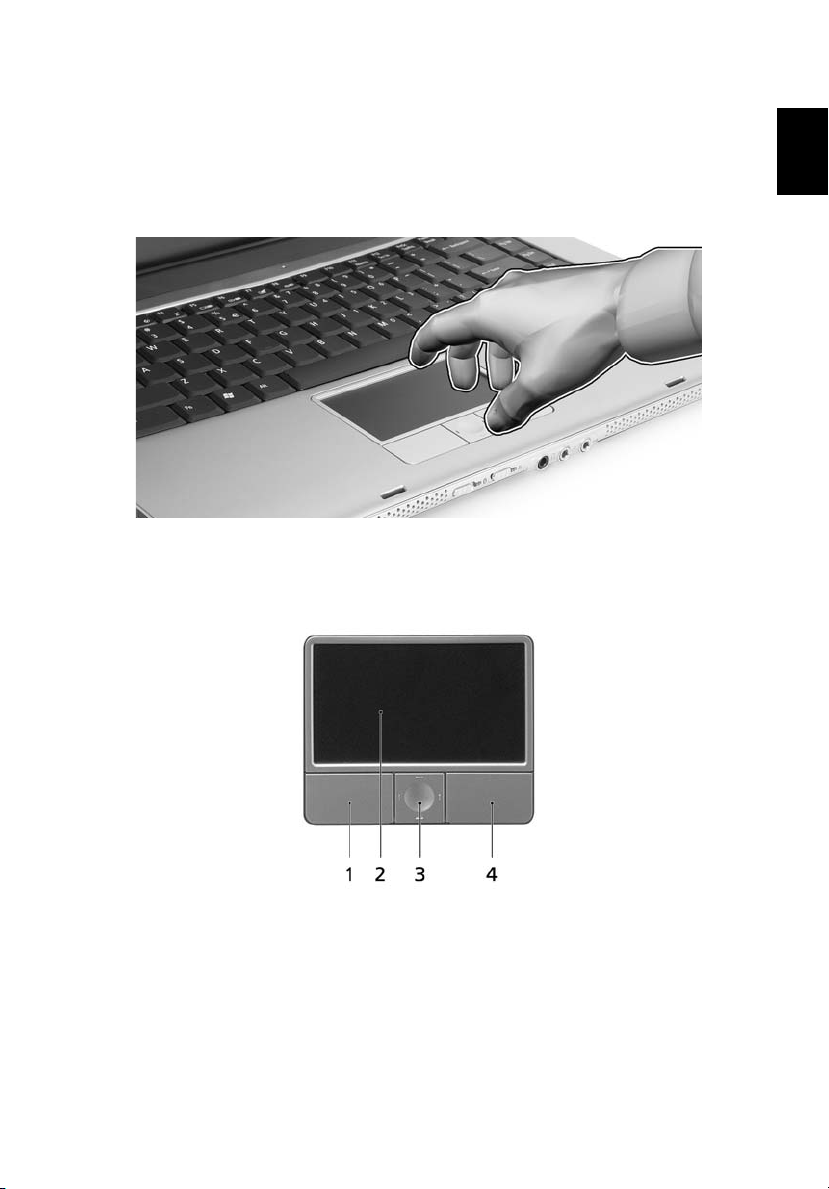
The built-in touchpad is a pointing device that senses movement on its surface.
This means the cursor responds as you move your finger across the surface of
the touchpad. The central location on the palmrest provides optimum comfort
and support.
Touchpad basics
The following items show you how to use the touchpad:
English
• Move your finger across the touchpad (2) to move the cursor.
• Press the left (1) and right (4) buttons located beneath the touchpad to
perform selection and execution functions. These two buttons are similar
to the left and right buttons on a mouse. Tapping on the touchpad is the
same as clicking the left button.
• Use the 4-way scroll (3) button to scroll up or down and move left or right
a page. This button mimics your cursor pressing on the right scroll bar of
Windows applications.
Page 46
30
English
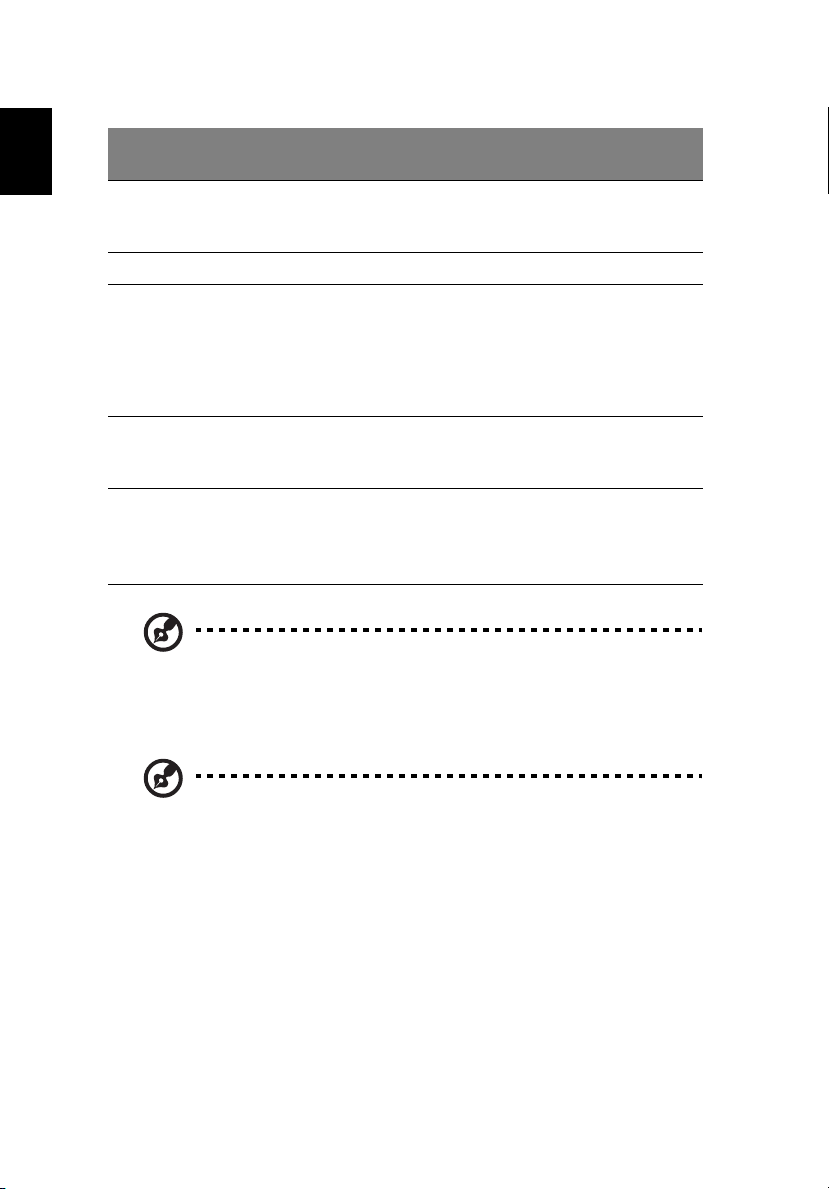
Function Left button (1)
Execute Quickly click
twice.
Select Click once. Tap once.
Drag Click and hold,
then use
finger on the
touchpad to
drag the
cursor.
Access
context
menu
Scroll Click and
Note: When using the touchpad, keep it — and your fingers — dry
and clean. The touchpad is sensitive to finger movement; hence,
the lighter the touch, the better the response. Tapping harder will
not increase the touchpad's responsiveness.
Right
button (4)
Click
once.
Main touchpad (2)
Tap twice (at the same
speed as double-clicking
a mouse button).
Tap twice (at the same
speed as double-clicking
a mouse button); rest
your finger on the
touchpad on the second
tap and drag the cursor.
Center
button (3)
hold to
move up/
down/left/
right.
Note: By default, vertical and horizontal scrolling is enabled on
your touchpad. It can be disabled under Mouse settings in
Windows Control Panel.
Page 47
31
Using the keyboard
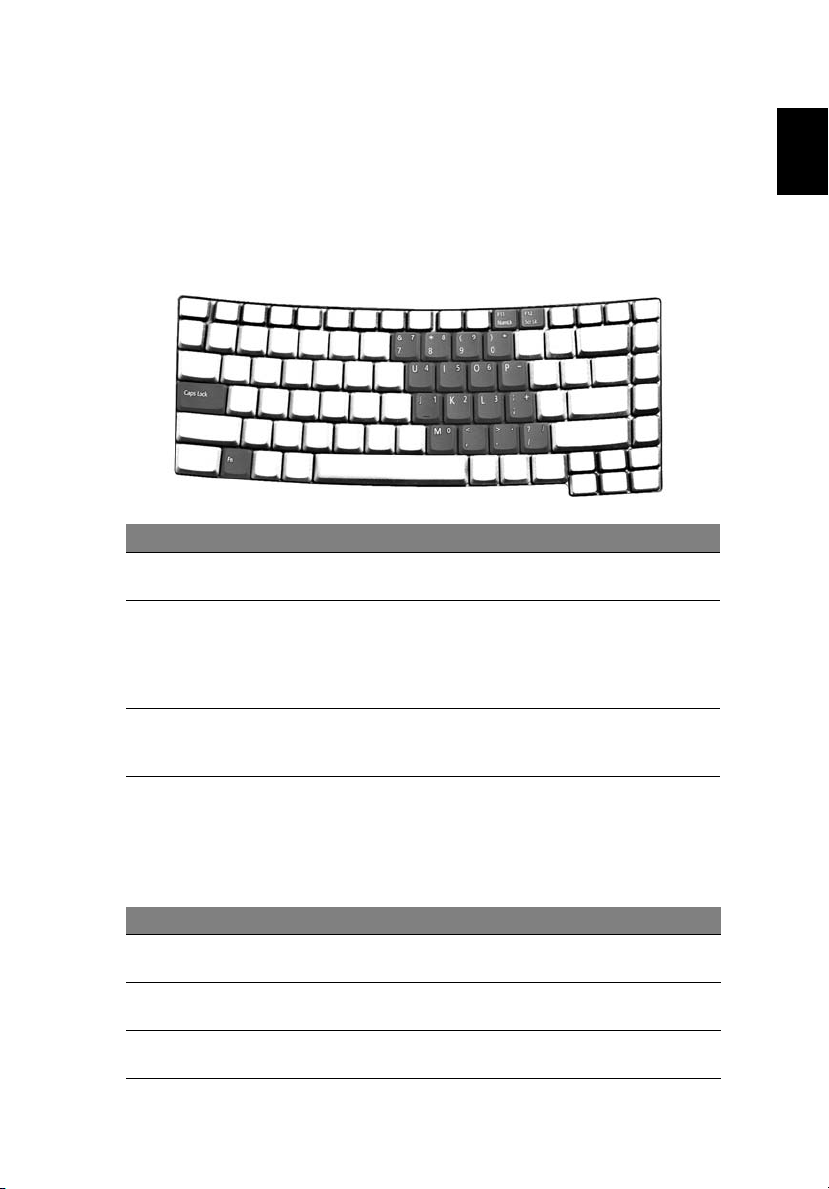
The keyboard has full-sized keys and an embedded numeric keypad, separate
cursor, lock, Windows, function and special keys.
Lock keys and embedded numeric keypad
The keyboard has three lock keys which you can toggle on and off.
Lock key Description
Caps Lock When Caps Lock is on, all alphabetic characters typed are
Num Lock
<Fn> + <F11>
Scroll Lock
<Fn> + <F12>
in uppercase.
When Num Lock is on, the embedded keypad is in numeric
mode. The keys function as a calculator (complete with the
arithmetic operators +, -, *, and /). Use this mode when you
need to do a lot of numeric data entry. A better solution
would be to connect an external keypad.
When Scroll Lock is on, the screen moves one line up or down
when you press the up or down arrow keys respectively.
Scroll Lock does not work with some applications.
English
The embedded numeric keypad functions like a desktop numeric keypad. It is
indicated by small characters located on the upper right corner of the keycaps.
To simplify the keyboard legend, cursor-control key symbols are not printed on
the keys.
Desired access Num Lock on Num Lock off
Number keys on
embedded keypad
Cursor-control keys
on embedded keypad
Main keyboard keys Hold <Fn> while typing
Type numbers in a normal
manner.
Hold <Shift> while using
cursor-control keys.
letters on embedded keypad.
Hold <Fn> while using
cursor-control keys.
Type the letters in a
normal manner.
Page 48
English
32
Windows keys
The keyboard has two keys that perform Windows-specific functions.
Key Description
Windows key Pressed alone, this key has the same effect as clicking on
Application
key
the Windows Start button; it launches the Start menu.
It can also be used with other keys to provide a variety
of functions:
< > + <Tab>: Activates the next Taskbar button.
< > + <E>: Opens the My Computer window.
< > + <F1>: Opens Help and Support Center.
< > + <F>: Opens the Search Results window.
<> + <R>: Opens the Run dialog box.
< > + <M>: Minimizes all windows.
<Shift> + < > + <M>: Undoes the minimize all
windows action.
This key has the same effect as clicking the right mouse
button; it opens the application's context menu.
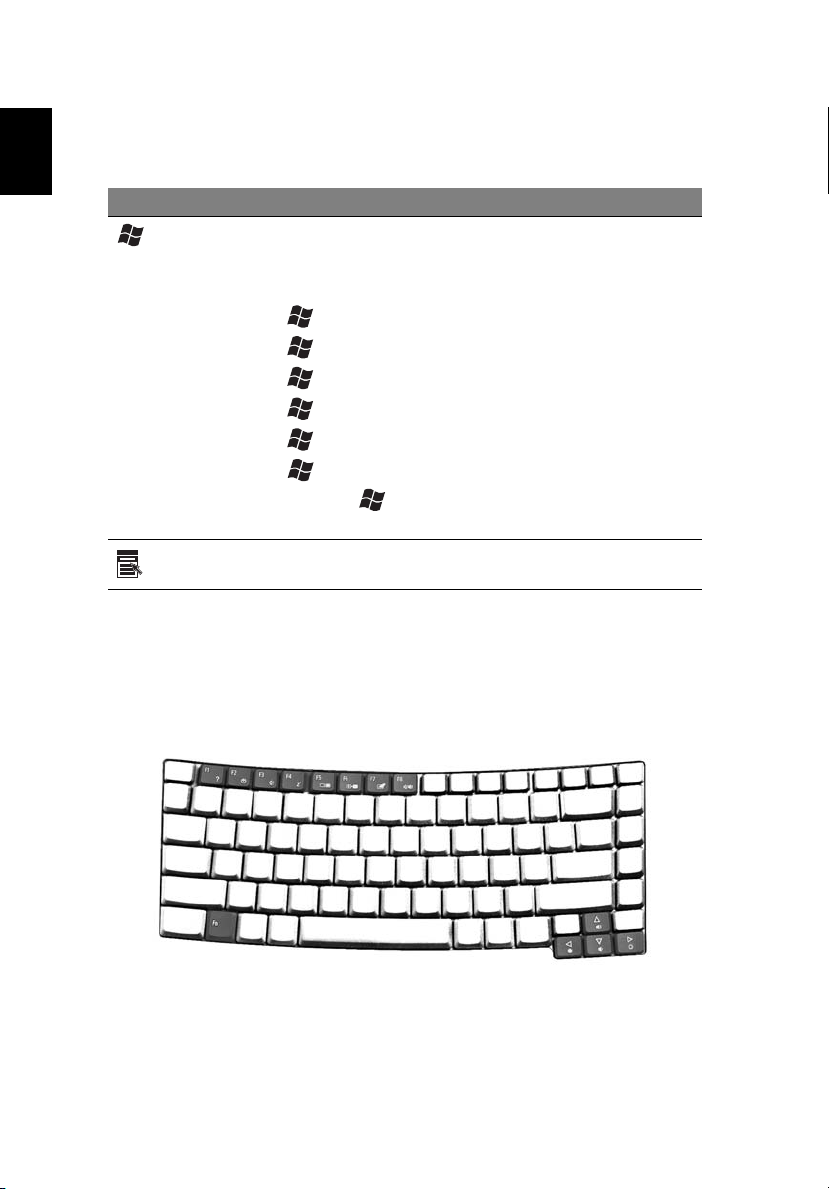
Hotkeys
The computer employs hotkeys or key combinations to access most of the
computer's controls like screen brightness, volume output and the BIOS utility.
To activate hotkeys, press and hold the <Fn> key before pressing the other key
in the hotkey combination.
Page 49
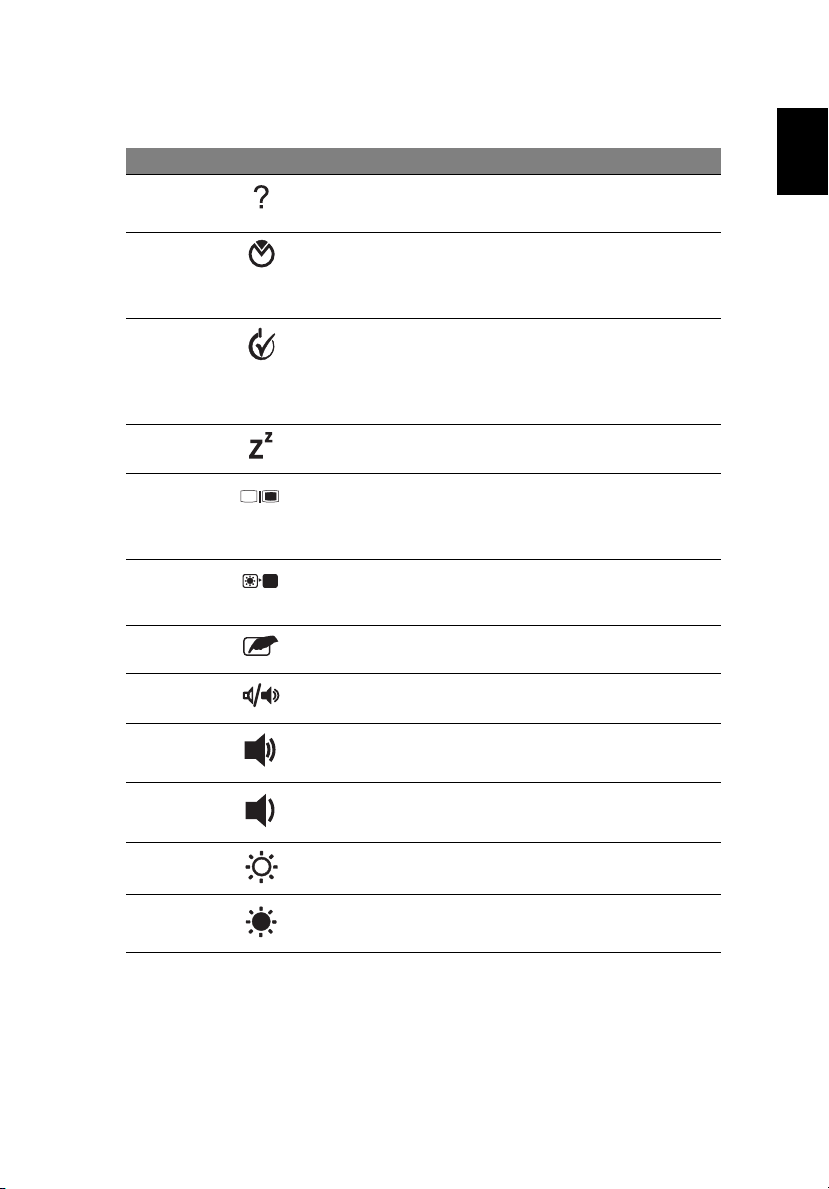
Hotkey Icon Function Description
<Fn> + <F1> Hotkey help Displays help on hotkeys.
<Fn> + <F2> Acer eSettings Launches Acer eSettings in Acer
Empowering Technology. See
"Acer Empowering
Technology" on page 1.
<Fn> + <F3> Acer ePower
Management
<Fn> + <F4> Sleep Puts the computer in Sleep
<Fn> + <F5> Display toggle Switches display output
<Fn> + <F6> Screen blank Turns the display screen
<Fn> + <F7> Touchpad toggle Turns the internal touchpad on
<Fn> + <F8> Speaker toggle Turns the speakers on and off.
Launches Acer ePower
Management in Acer
Empowering Technology. See
"Acer Empowering
Technology" on page 1.
mode.
between the display screen,
external monitor (if connected)
and both.
backlight off to save power.
Press any key to return.
and off.
33
English
<Fn> + <↑> Volume up Increases the sound volume.
<Fn> + <↓> Volume down Decreases the sound volume.
<Fn> + <→> Brightness up Increases the screen brightness.
<Fn> + <←> Brightness down Decreases the screen brightness.
Page 50
English
34
Special keys
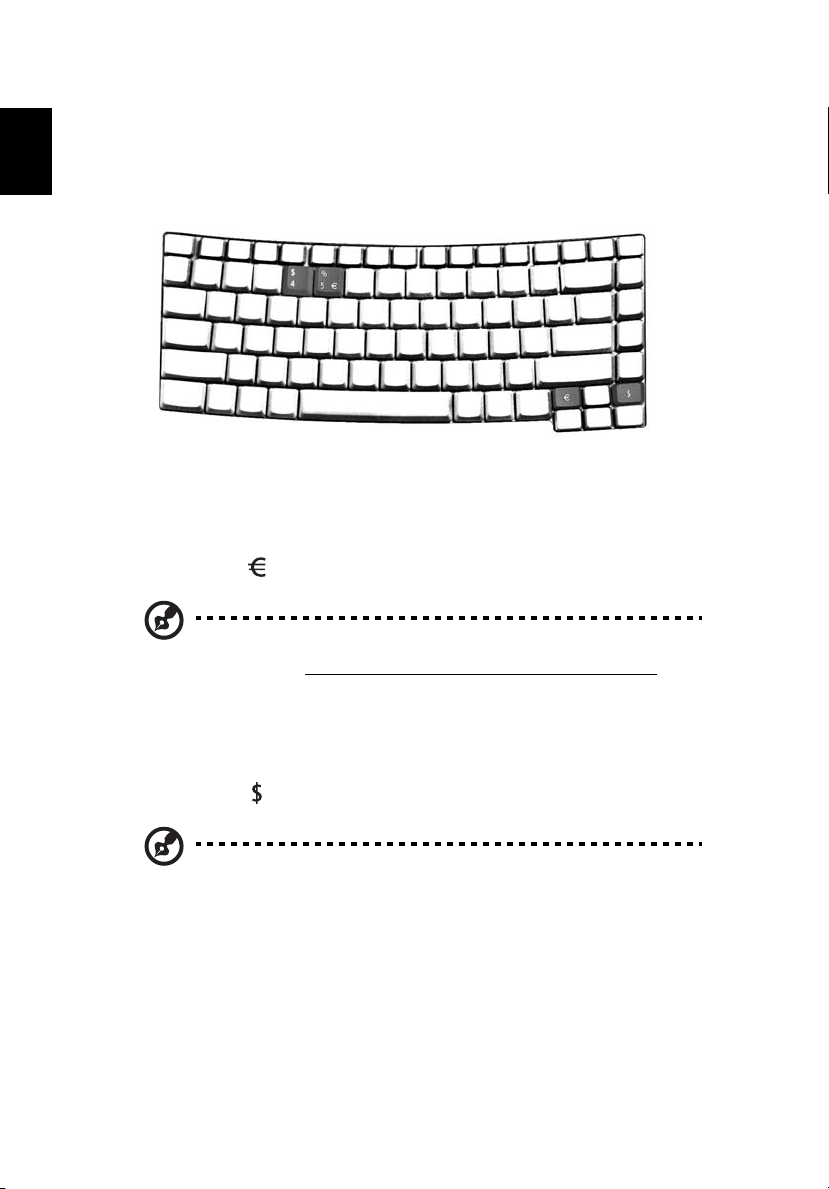
You can locate the Euro symbol and the US dollar sign at the upper-center
and/or bottom-right of your keyboard.
The Euro symbol
1 Open a text editor or word processor.
2 Either press < > at the bottom-right of the keyboard, or hold <Alt Gr>
and then press the <5> key at the upper-center of the keyboard.
Note: Some fonts and software do not support the Euro symbol.
Please refer to www.microsoft.com/typography/faq/faq12.htm
more information.
for
The US dollar sign
1 Open a text editor or word processor.
2 Either press < > at the bottom-right of the keyboard, or hold <Shift>
and then press the <4> key at the upper-center of the keyboard.
Note: This function varies according to the language settings.
Page 51
35
Ejecting the optical (CD or DVD) drive tray
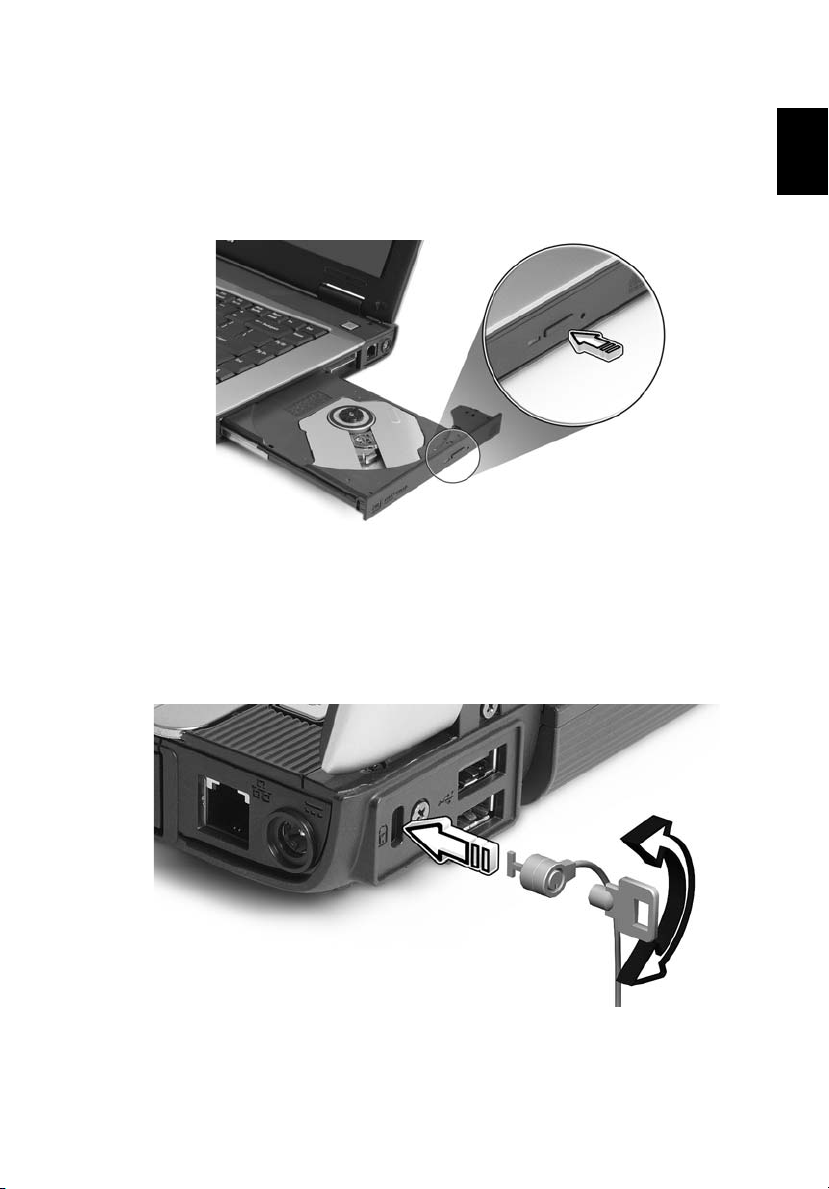
Press the drive eject button to eject the optical drive tray when the computer
is on.
Insert a paper clip to the emergency eject hole to eject the optical drive tray
when the computer is off.
Using a computer security lock
The notebook comes with a Kensington-compatible security slot for a security
lock.
English
Wrap the computer security lock cable around an immovable object such as a
table or handle of a locked drawer. Insert the lock into the notch and turn the
key to secure the lock. Keyless models are also available.
Page 52
36
Audio
English
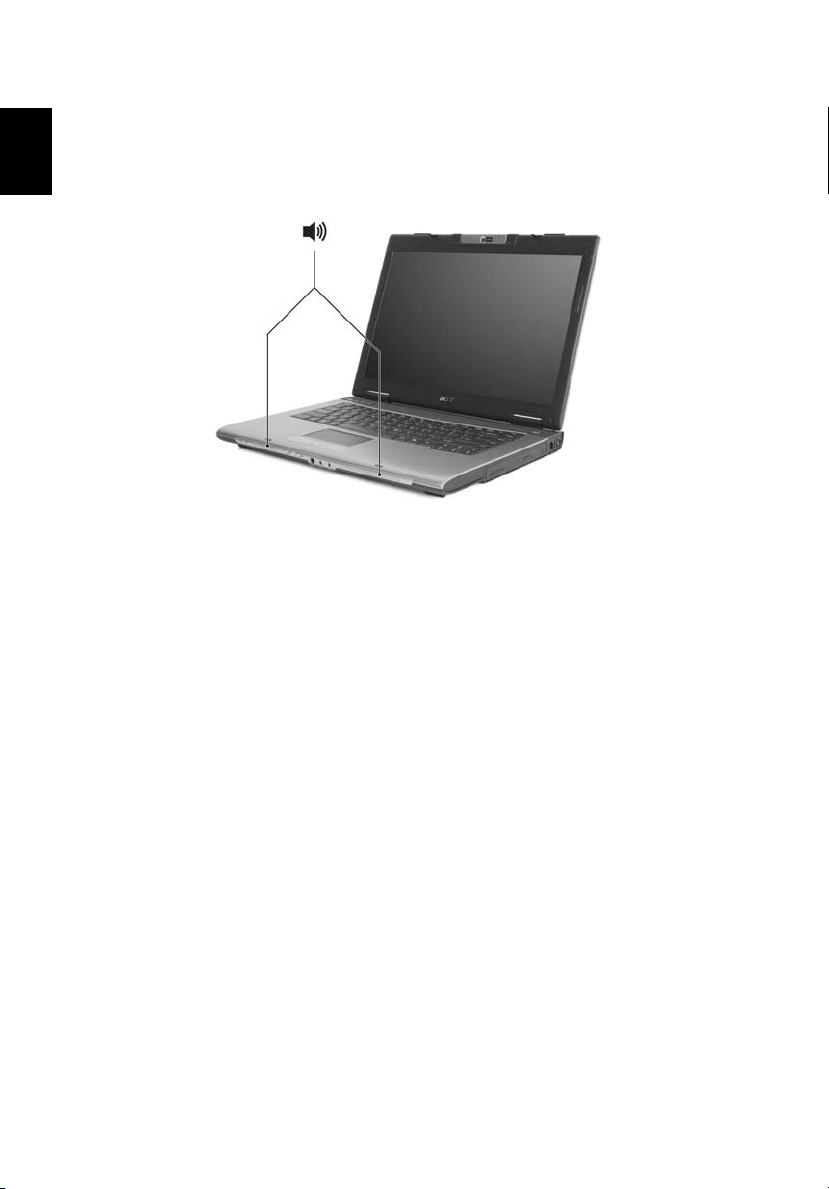
The computer comes with 32-bit Intel High-Definition audio, and built-in stereo
speakers.
Adjusting the volume
Use hotkeys to easily adjust the volume on your computer. See "Hotkeys" on
page 32 for more information on adjusting the speaker volume.
Page 53
37
Using Acer Bluetooth® VoIP Phone
1. Getting to know your VoIP phone
1.1 Package contents
Check the following items in your Bluetooth VoIP phone package:
1. Acer Bluetooth VoIP phone
2. Quick guide
Contact your retailer immediately if any of the items is damaged or missing.
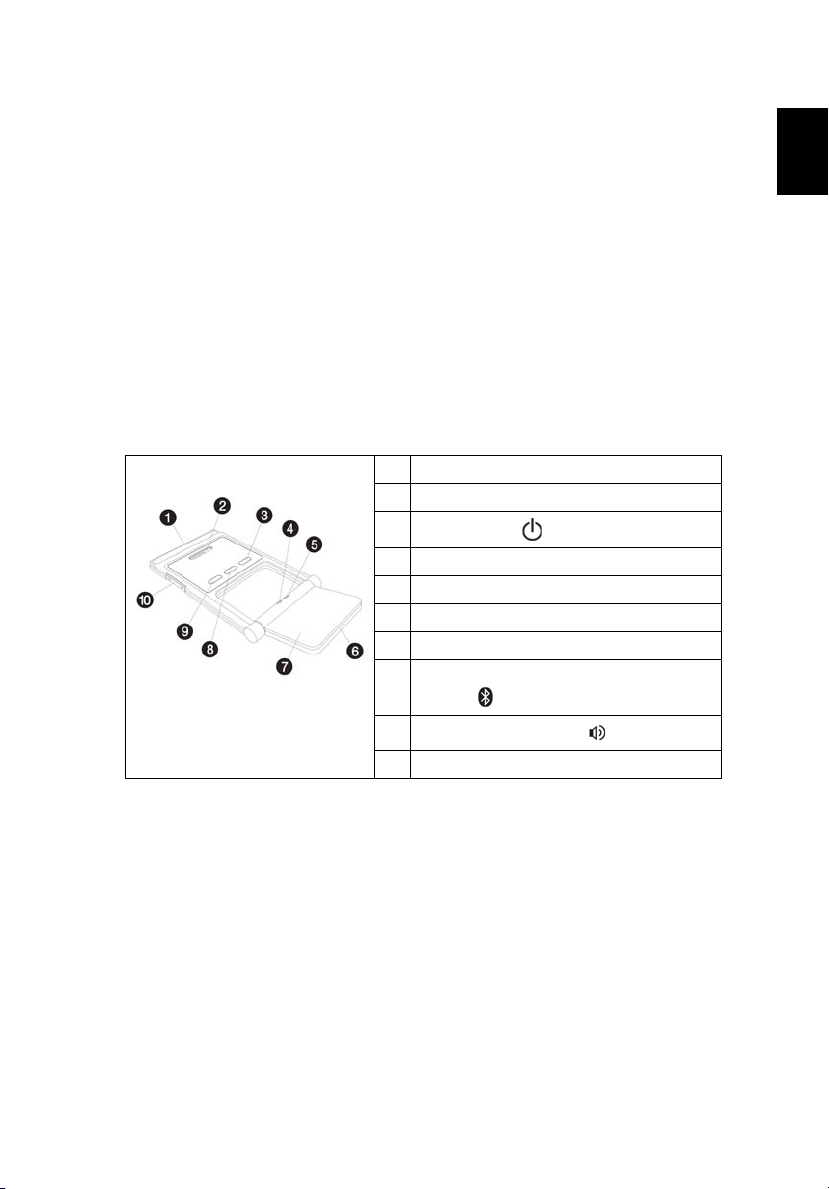
1.2 Layout
1 PC Card (PCMCIA) interface connector
2 Speaker
3
Power button
4 Bluetooth connection/pairing indicator
5 Charge/Power indicator
6 Microphone
7 Flip
8 Bluetooth connection/pairing
button
9
Speakerphone button
10 Volume up/down button
English
Page 54
38
1.3 LED indicators
English
LED Color Status Description
Bluetooth
connection/
pairing indicator
Charge/Power
indicator
Blue Blinking
fast
Blinking slow The phone is linking with the
Off The phone is not paired or
Amber On The phone is charging.
Off The phone is fully-charged.
Blinking The phone needs to be
The phone is in pairing mode.
notebook.
linked with the notebook.
recharged.
1.4 Charging the phone
You need to charge the phone before initial use. It takes approximately four
hours for a full charge.
To charge the phone:
1. Turn the notebook on.
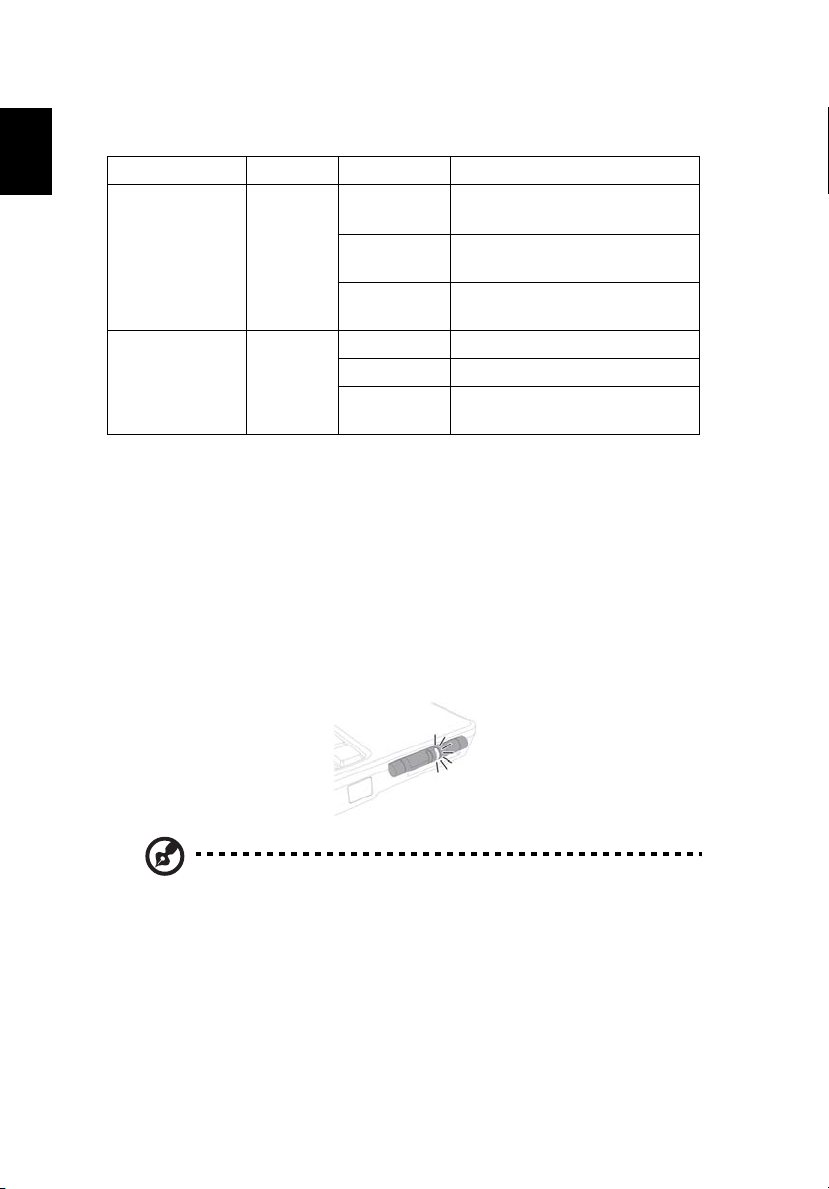
2. Locate the PC Card (PCMCIA) slot.
3. Insert the phone to the slot label up. Make sure that the phone is completely
pushed on the slot.
Note: The notebook detects the device and displays a New Device
Wizard window. Click No, not this time, then close the window.
4. The power/charge indicator lights up during charge and turns off when the
battery is full. Eject the phone from the PC Card slot when charging is finished.
Page 55
39
2. Connecting the phone to your notebook
The Acer VCM Bluetooth Headset Connection Center is a convenient tool to
connect the phone to your notebook.
To connect the phone to your notebook:
1. Eject the phone from the PC Card slot, if necessary, then press the phone
power button for three seconds. The phone beeps twice and the charge/power
LED flashes to indicate that the phone is on.
2. Press the Bluetooth connection/pairing button for three seconds to put
the phone in "pair-link mode". The phone beeps, and the connection/pairing
and charge/power LEDs flash alternately.
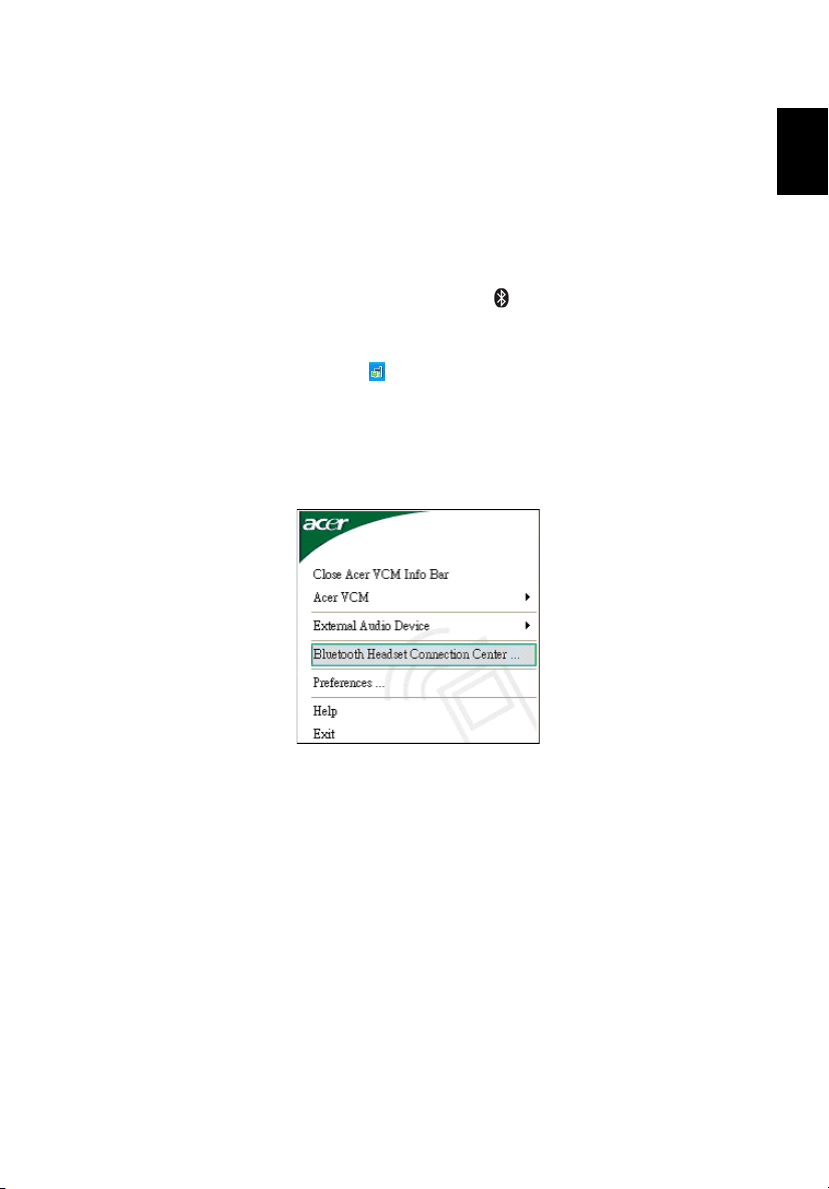
3. Right-click the Acer VCM icon on the taskbar, then select Bluetooth
Headset Connection Center... from the pop-up menu. If you have not paired any
Bluetooth headset devices with the notebook previously, Acer VCM
automatically scans all Bluetooth headset devices within range, then displays
them in the Bluetooth Headset List with a New status. Otherwise, any previously
paired Bluetooth headset device shows "Read to Use".
English
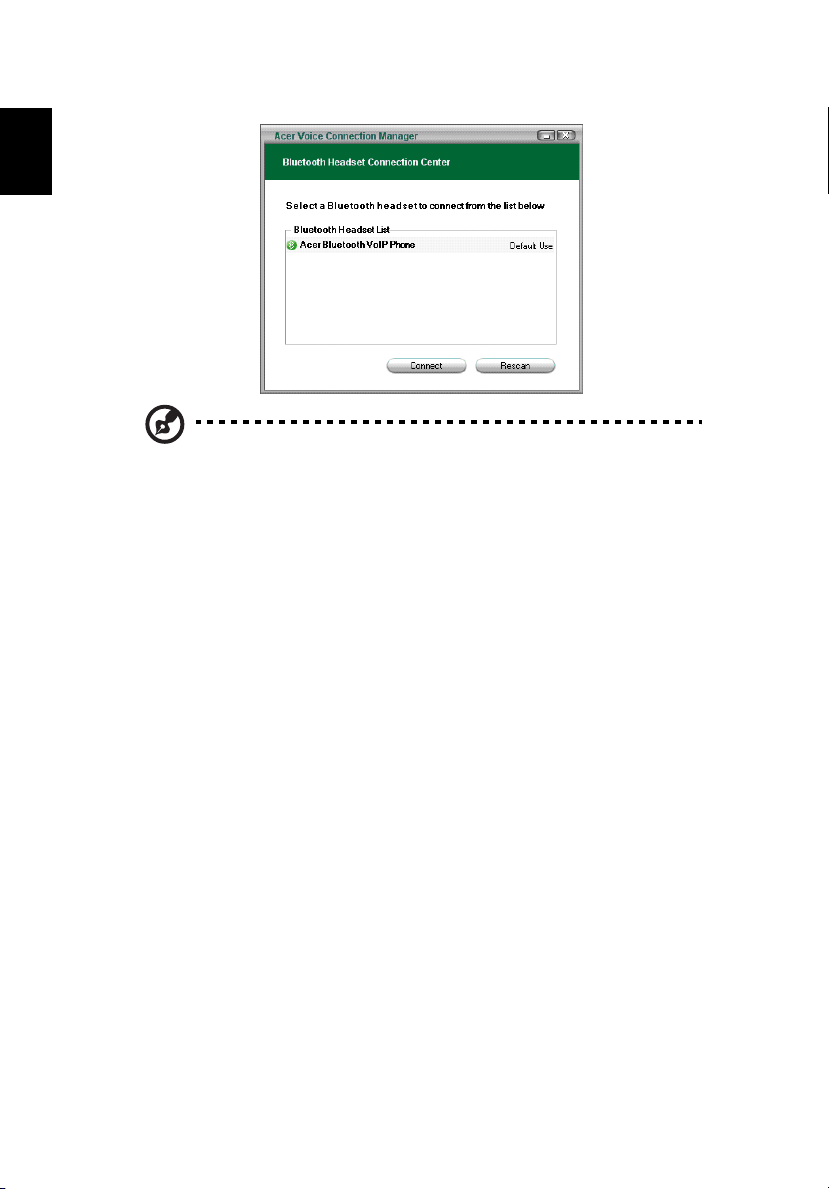
4. Click the Acer Bluetooth VoIP Phone from the list, then click Connect. Acer
VCM automatically pairs the phone to the notebook, then changes the phone
status to "Default Use".
Page 56
English
40
Note: Click Rescan if the Acer Bluetooth VoIP Phone does not
appear on the list. After pairing, Acer VCM automatically connects
the phone to the notebook each time you turn the phone on.
There is no need to connect the phone again.
Page 57
41
3. Using the phone
You can use the phone in handheld or hands-free (speakerphone) mode. When
you receive an Internet call from your Instant Messaging service (i.e. MSN
Messenger, Skype), press the Bluetooth connection/pairing button . The
incoming call voice automatically diverts to the phone speaker so you can
receive the call.
Note: You can only receive/answer Internet calls through the
phone when it is linked to the notebook. Every time you turn the
phone on, Acer VCM automatically links it to the notebook. When
linked, the Bluetooth connection/pairing indicator on the phone
blinks slowly.
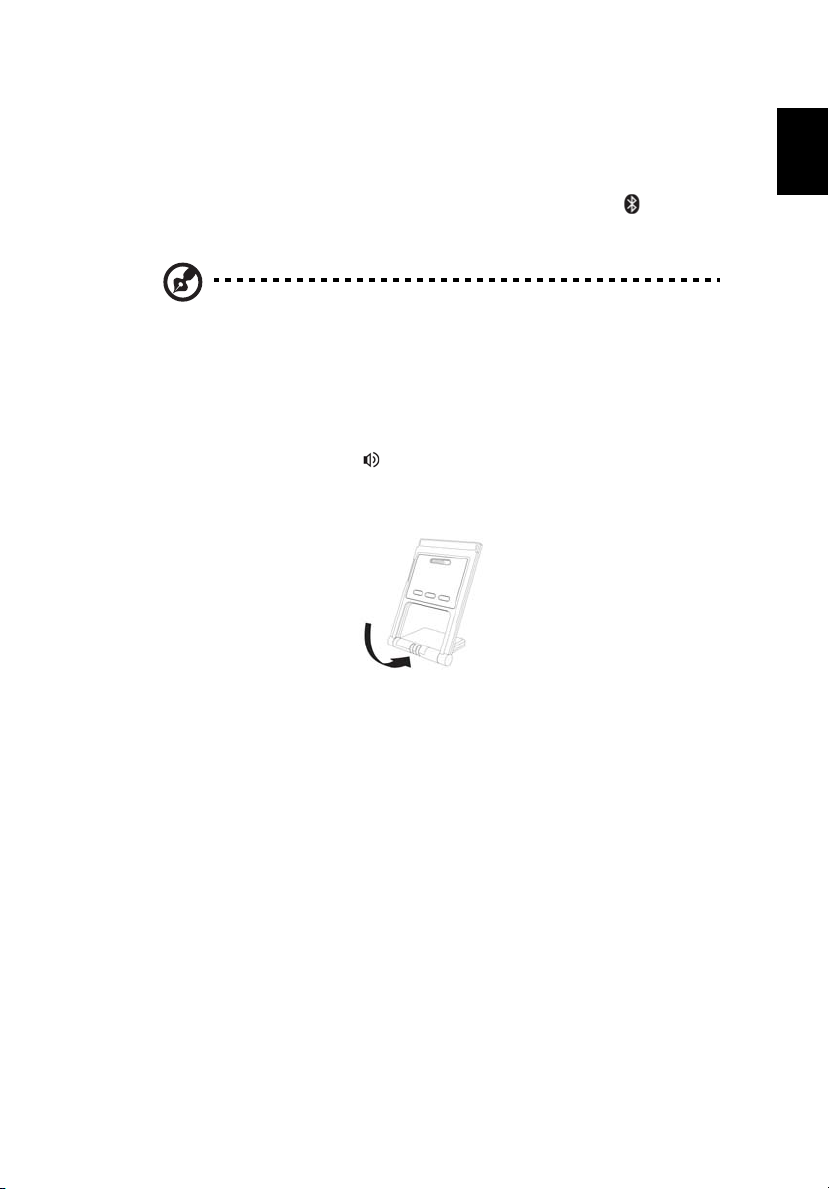
To switch to hands-free mode, rotate the phone flip counterclockwise, then
press the speakerphone button . Refer to the illustration.
®
English
Page 58
42
Acer OrbiCam
English
(for selected models)
The Acer OrbiCam is a 1.3 megapixel/310,000 pixel CMOS camera appropriately
mounted on top of the LCD panel. The camera's 225-degree ergonomic rotation
allows you to capture high-resolution photos or videos up front or at the back
of the LCD panel. The Acer OrbiCam fully supports the Acer Video Conference
technology so you transmit the best video conference quality over an Instant
Messenger service.
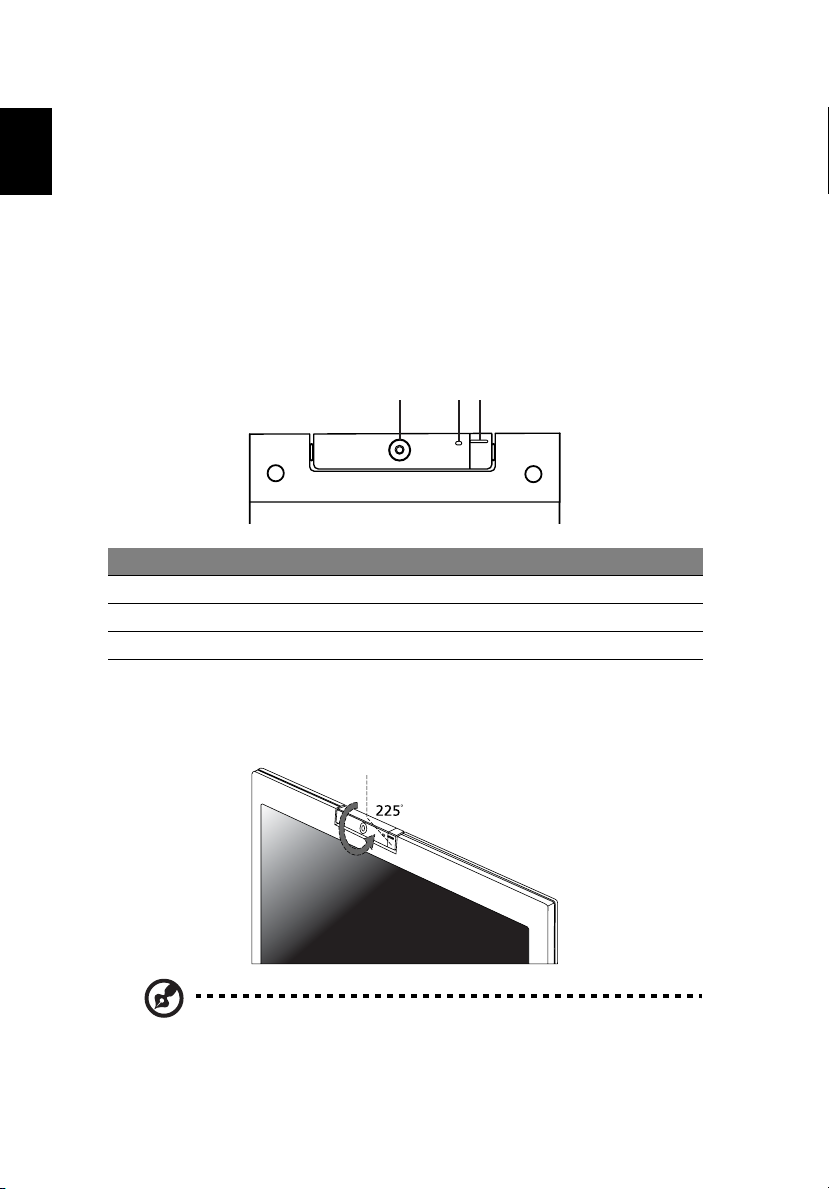
Getting to know your Acer OrbiCam
123
# Item
1Lens
2 Power indicator
3 Rubber grip (selected models only)
Rotating the Acer OrbiCam
The Acer OrbiCam rotates 225 degrees counterclockwise to achieve the desired
angle. Refer to the illustrations below.
Note: DO NOT rotate the camera clockwise to prevent damage to
the device.
Page 59
43
For your convenience, the camera snaps to 45 degrees to match the position of
your face in front or at the back of the LCD panel.
Launching the Acer OrbiCam
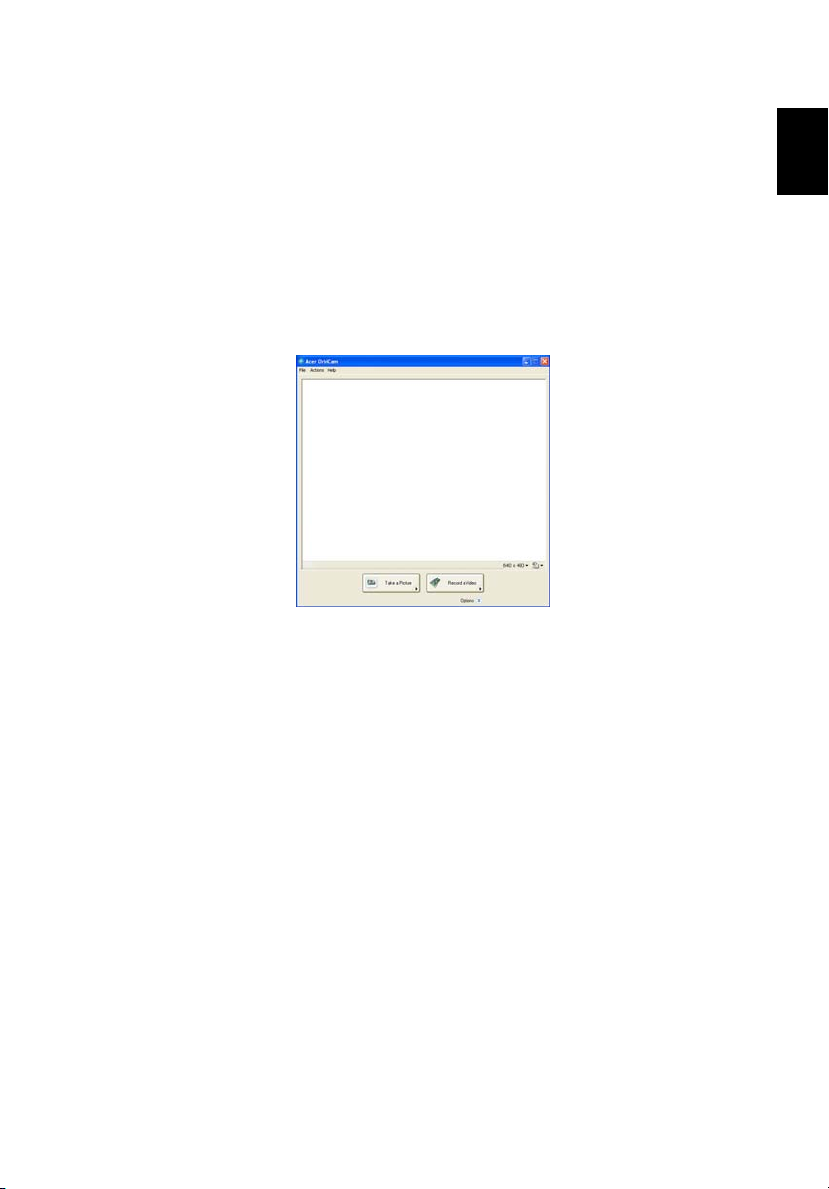
To launch the Acer OrbiCam, double-click on the Acer OrbiCam logo in the
desktop.
OR
Click Start > (All) Programs > Acer > Acer OrbiCam. The Acer OrbiCam capture
window appears.
Changing the Acer OrbiCam settings
English
Resolution
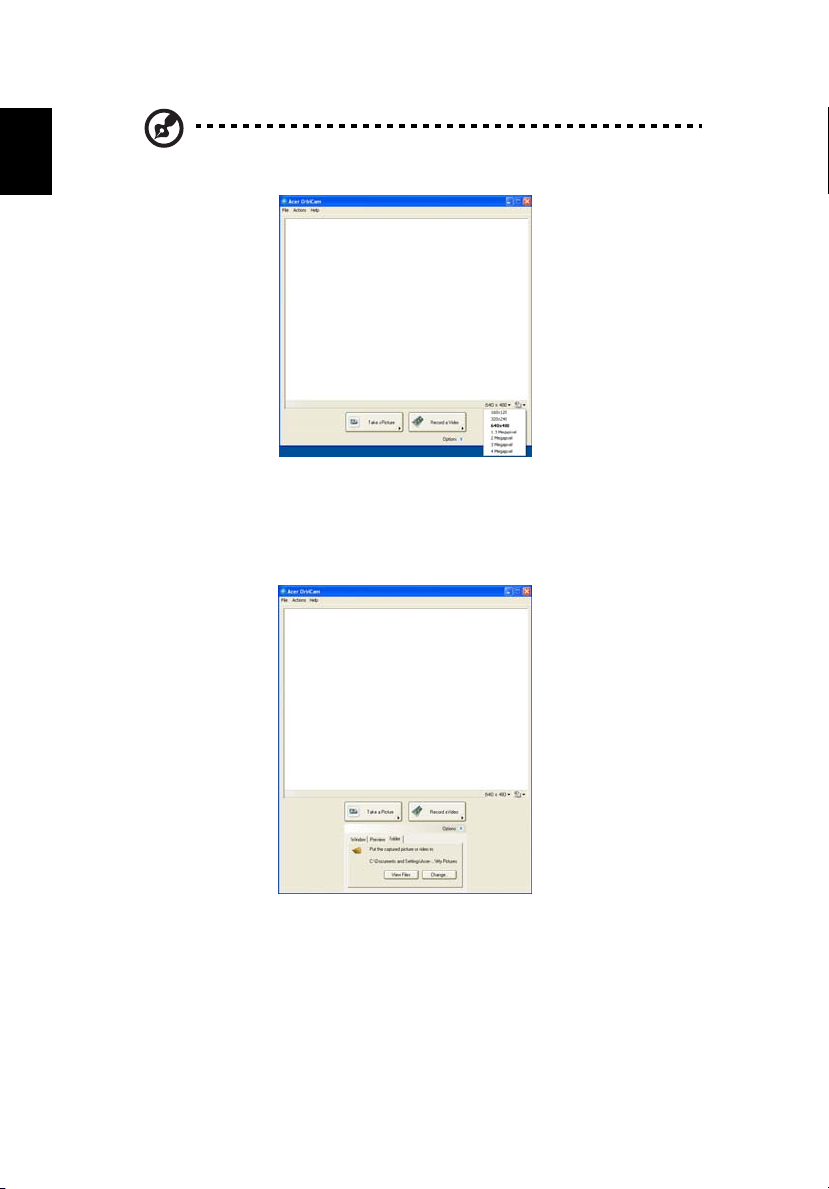
To change the capture resolution, click the displayed resolution at the bottom
right corner of the capture window, then select the desired resolution.
Page 60
English
44
Note: Setting the camera resolution to 640 x 480 or larger does
not change the capture window size.
Options
Click Options to display the Window, Preview, and Folder tabs. Use the options
to change the capture window size, preview settings, and the folder for
captured photos or videos.
Camera Settings
Basic settings
Page 61
45
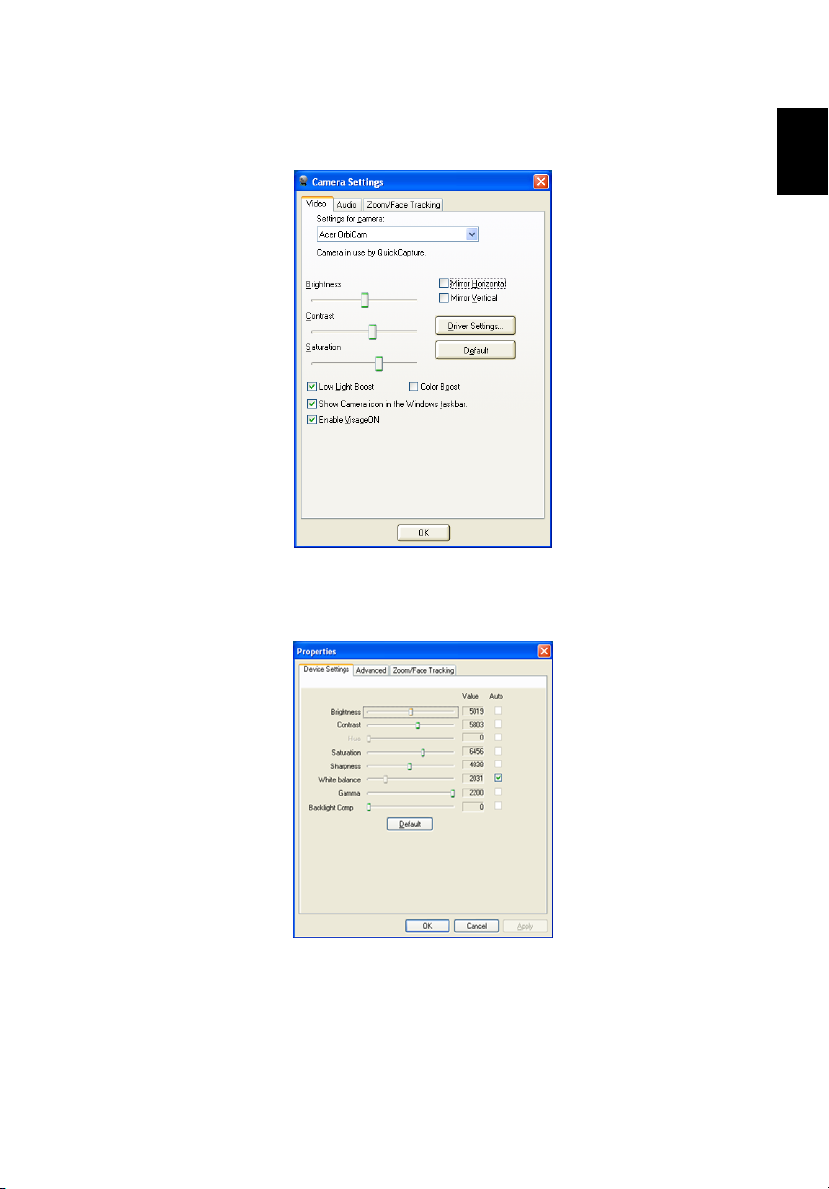
Click the Camera Settings icon on the bottom right corner of the capture
display, then select Camera Settings from the pop-up menu. You can adjust the
Video, Audio, and Zoom/Face tracking options from this window.
Capture settings
From the Camera Settings window, click the Driver Settings button. The
Properties window appears.
English
Device Settings allows you to change the camera brightness, contrast, hue,
saturation, sharpness, etc.
Advanced Settings allows you to activate gain control, implement image mirror,
select image enhancements and anti-flicker settings, and turn on/off the camera
indicator.
Page 62
46
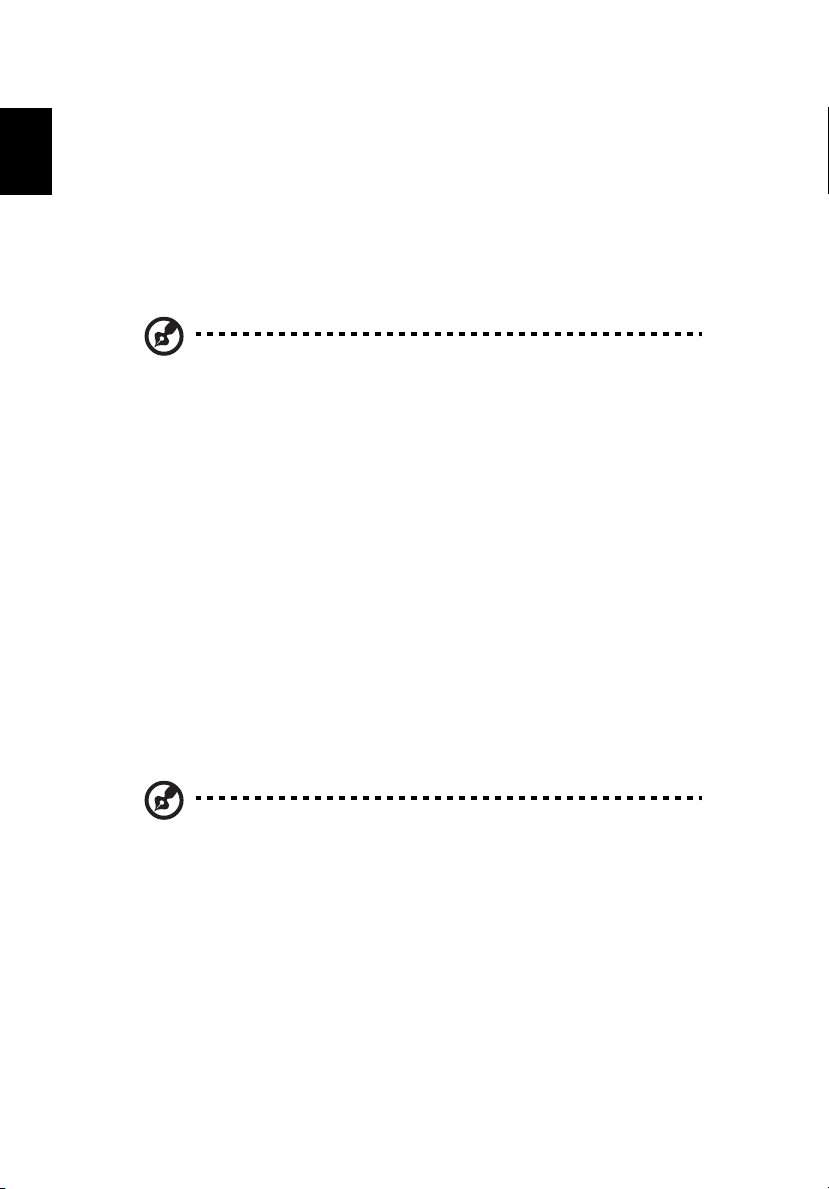
Zoom/Face Track Settings allows you to adjust the zoom level and turn the
face-tracking feature on or off.
English
Capturing photos/videos
To capture a photo or a video clip, rotate the Acer OrbiCam to get the desired
angle, then click the Take a Picture or Record a Video button. The Windows
Picture and Fax Viewer or the Windows Media Player automatically launches to
display/play a preview of the photo/video clip.
Note: By default, all photos and videos are saved in the My
Pictures and My Videos folder.
Using the Acer OrbiCam as webcam
The Acer OrbiCam is automatically selected as the capture device of any Instant
Messenger (IM) application. To use the Acer OrbiCam as a webcam, open the IM
service, then select the video/webcam feature. You can now broadcast from
your location to an IM partner anywhere in the world.
Enabling the Acer VisageON (for selected models)
The Acer VisageON technology comes with two features: Face tracking and
Video effects (selected models only). The face tracking feature tracks your head
movement and automatically centers your face in the capture window. The
video effects feature allows you to select and apply an effect to your video
transmissions.
Note: The face tracking feature is not capable of centering your
face beyond the capture window frame. Minimal head
movements are tracked more efficiently.
To enable the Acer VisageON:
Page 63
47
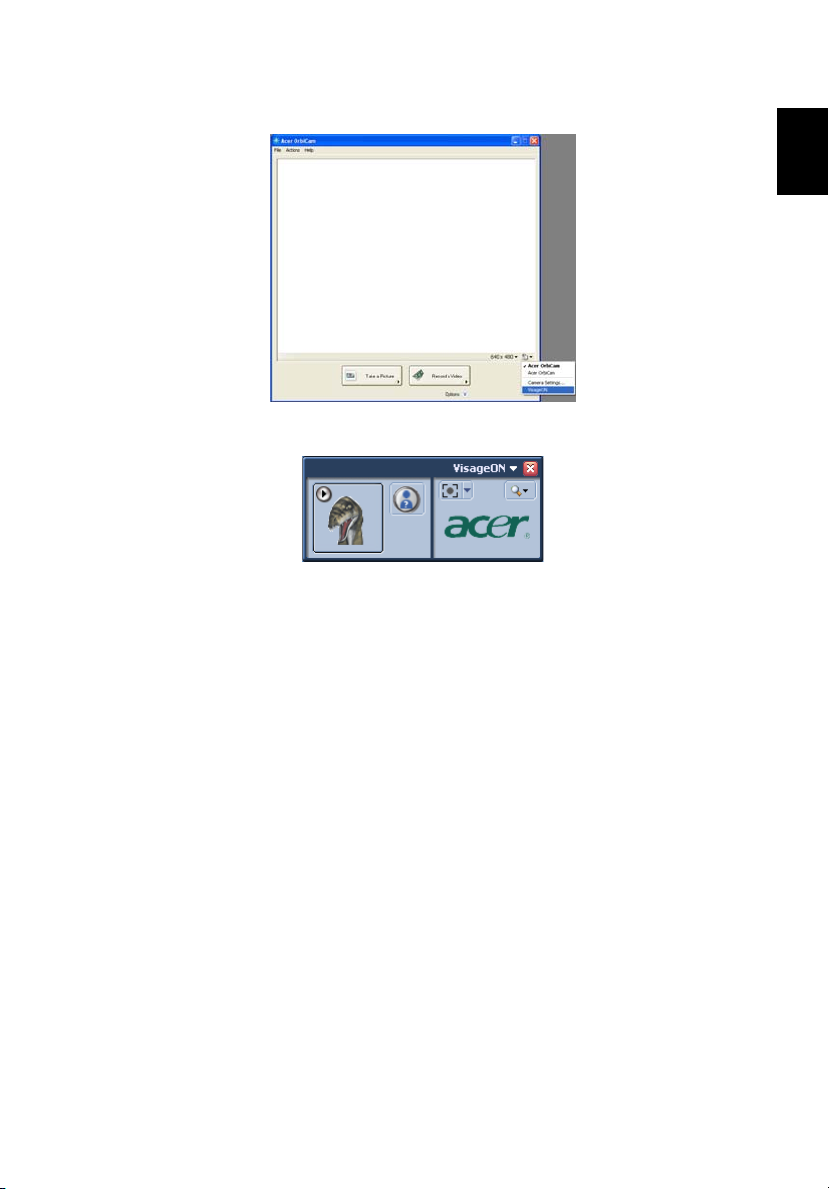
1 Right-click on this icon, then select VisageON from the pop-up menu.
The VisageON window appears.
2 Select and apply a video effect from the left section of the VisageON
window. Change the face tracking settings and options from the right
section.
English
Page 64
English
48
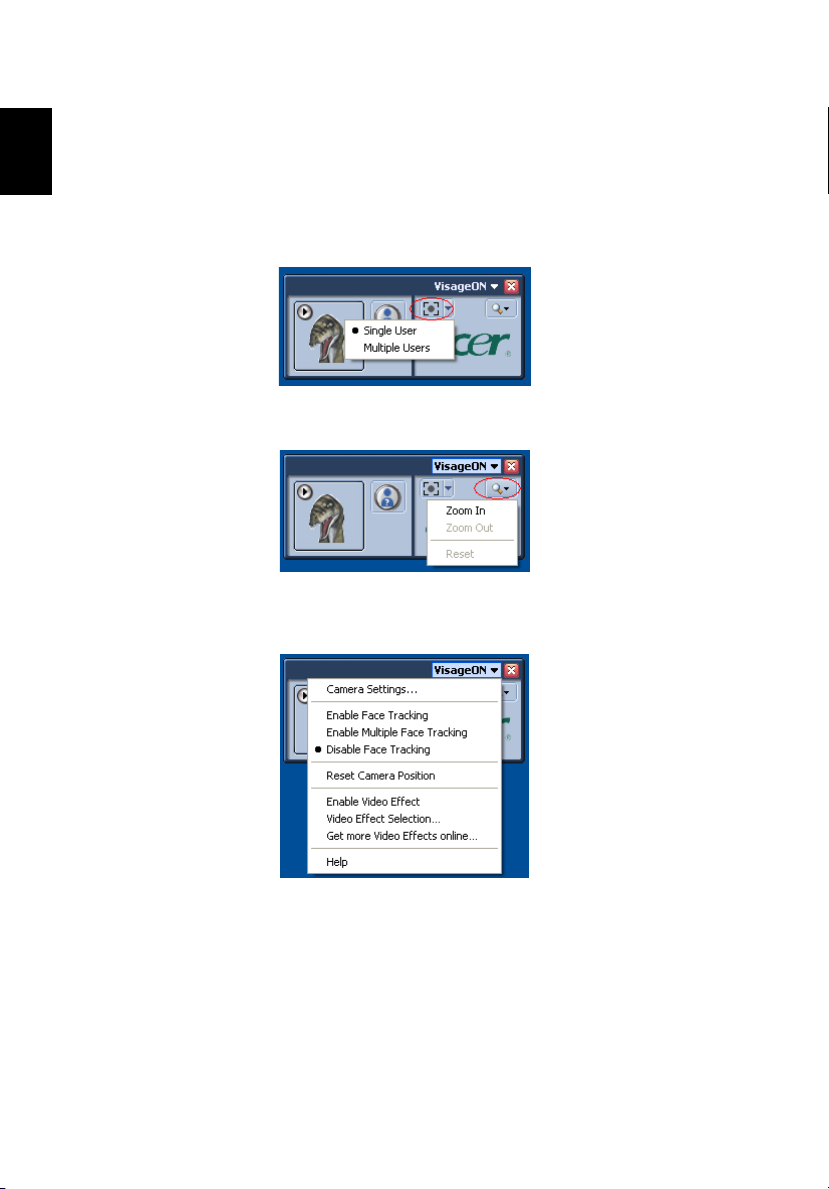
Using the face tracking feature
To use the face tracking feature:
1 Click the left icon down arrow button, then select Single User or Multiple
Users from the pop-up menu. For multiple users, the face tracking feature
automatically centers all the users' face in the capture window, otherwise
the utility centers the face of the user closest to the camera.
2 Click the right icon to zoom in/out or reset the current view.
3 Click VisageON to display a pop-menu that allows configuration of the
camera, face tracking and video effects settings.
Page 65
49
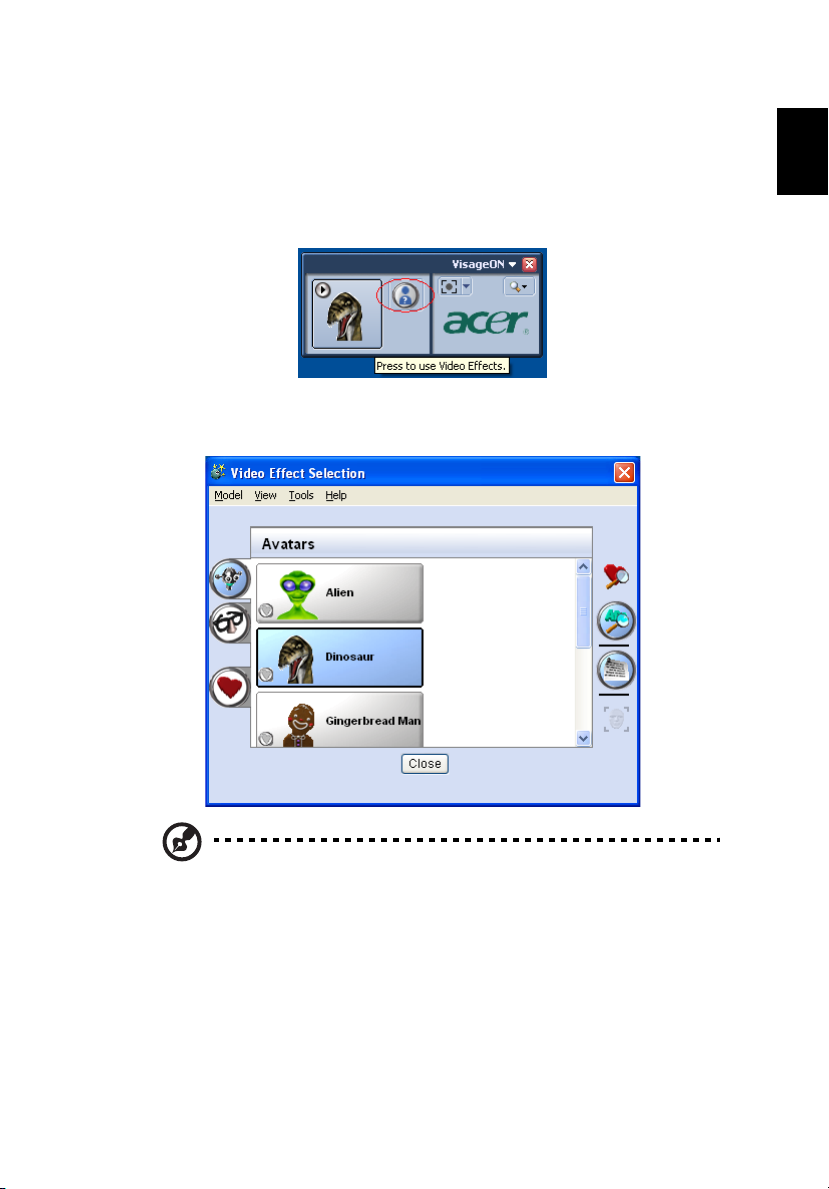
Using video effects (selected models only)
The Video Settings section allows you to select an avatar or accessory video
effect from the list. To select an effect:
1 Click the encircled icon to display the available video effects. The Video
Effect Selection window appears.
2 Click on a video effect to use. The selected effect appears in the video
effects section of the VisageON window.
English
Note:
1. When using avatars, you may have to calibrate the face points
to achieve better tracking. Follow screen instructions from the
VisageON window to continue.
2. You may use video effects when using the camera for IM chat/
video sessions or call conferences.
Page 66
English
50
Using the system utilities
Note: The system utilities work under Microsoft Windows XP only.
Acer GridVista (dual-display compatible)
Note: This feature is only available on certain models.
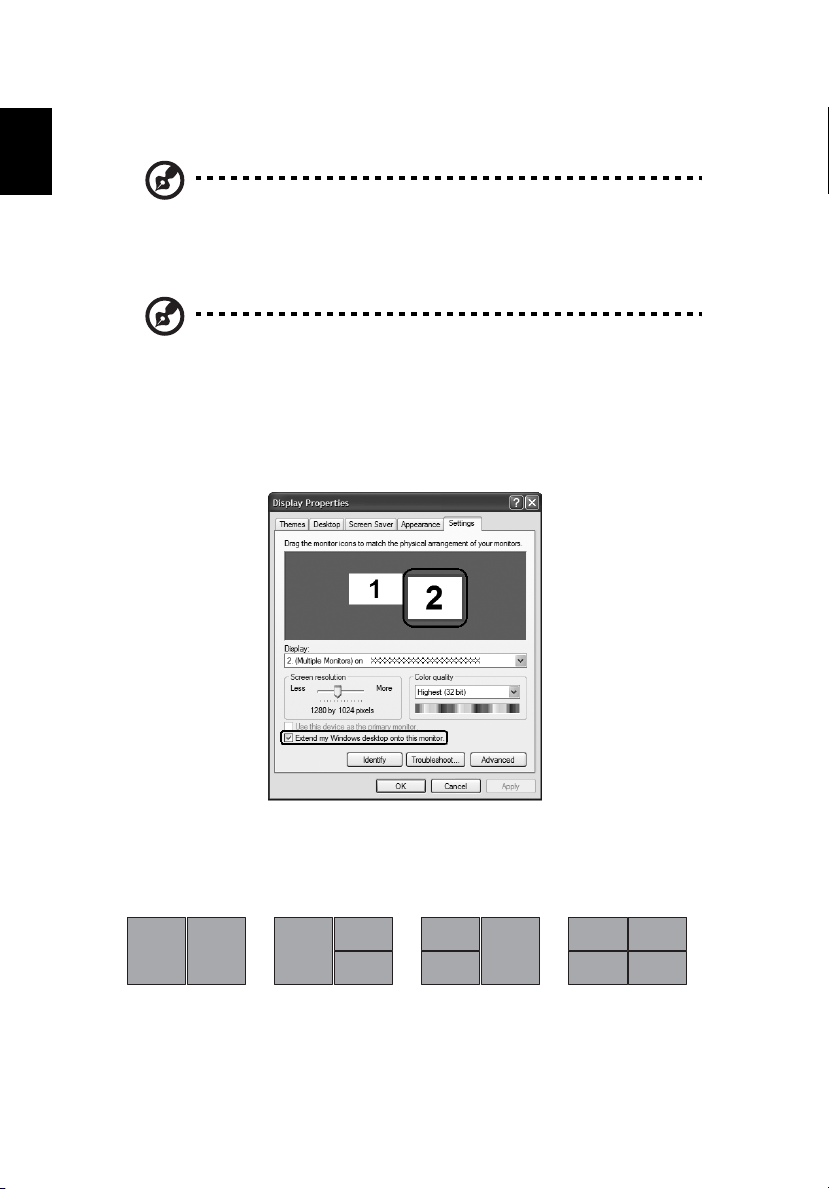
To enable the dual monitor feature of your notebook, first ensure that the
second monitor is connected, then, select Start, Control Panel, Display and click
on Settings. Select the secondary monitor (2) icon in the display box and then
click the check box Extend my Windows desktop onto this monitor. Finally, click
Apply to confirm the new settings and click OK to complete the process.
Acer GridVista is a handy utility that offers four pre-defined display settings so
you can view multiple windows on the same screen. To access this function,
please go to Start, All Programs and click on Acer GridVista. You may choose
any one of the four display settings indicated below:
12
Double (vertical), Triple (primary at left), Triple (primary at right), or Quad
Acer Gridvista is dual-display compatible, allowing two displays to be
partitioned independently.
1
3
2
1
1
3
2
2
3
4
Page 67
51
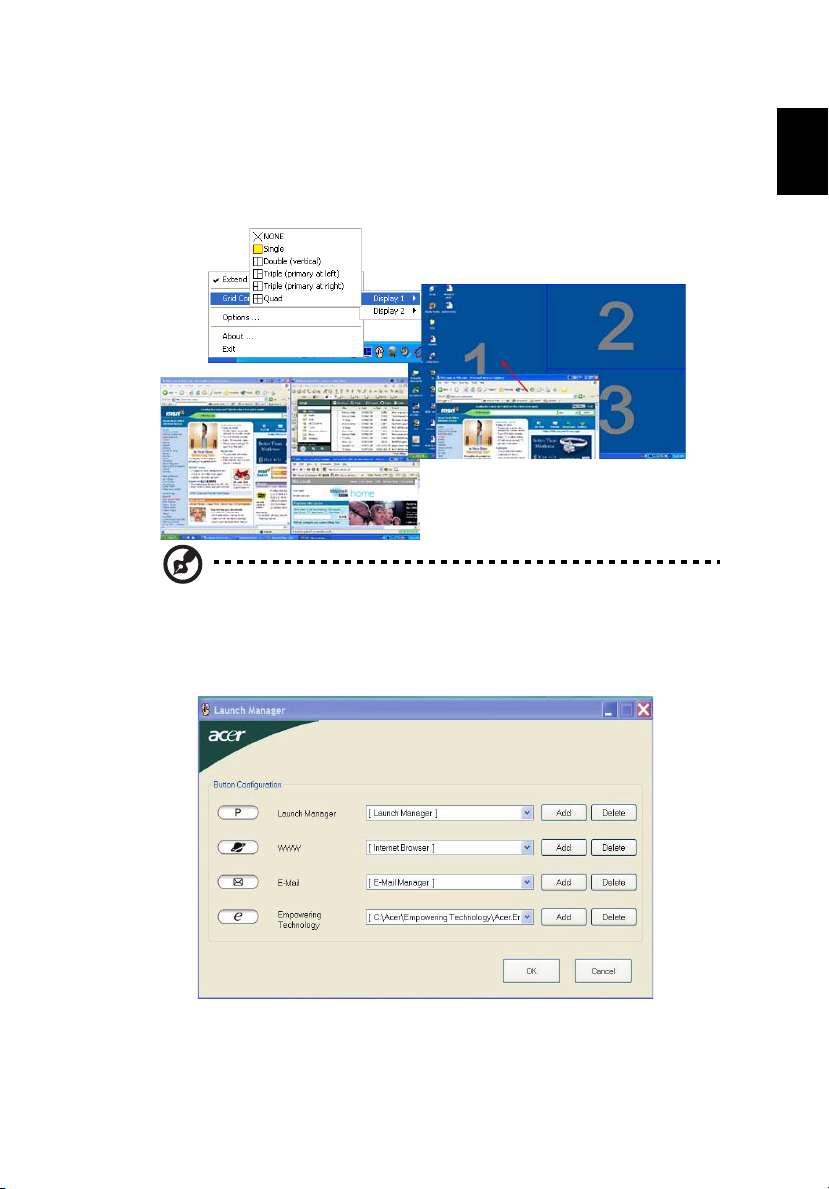
Acer GridVista is simple to set up:
1 Run Acer GridVista and select your preferred screen configuration for each
display from the taskbar.
2 Drag and drop each window into the appropriate grid.
3 Enjoy the convenience of a well-organized desktop.
Note: Please ensure that the resolution setting of your second
monitor is set to the manufacturer's recommended value.
Launch Manager
English
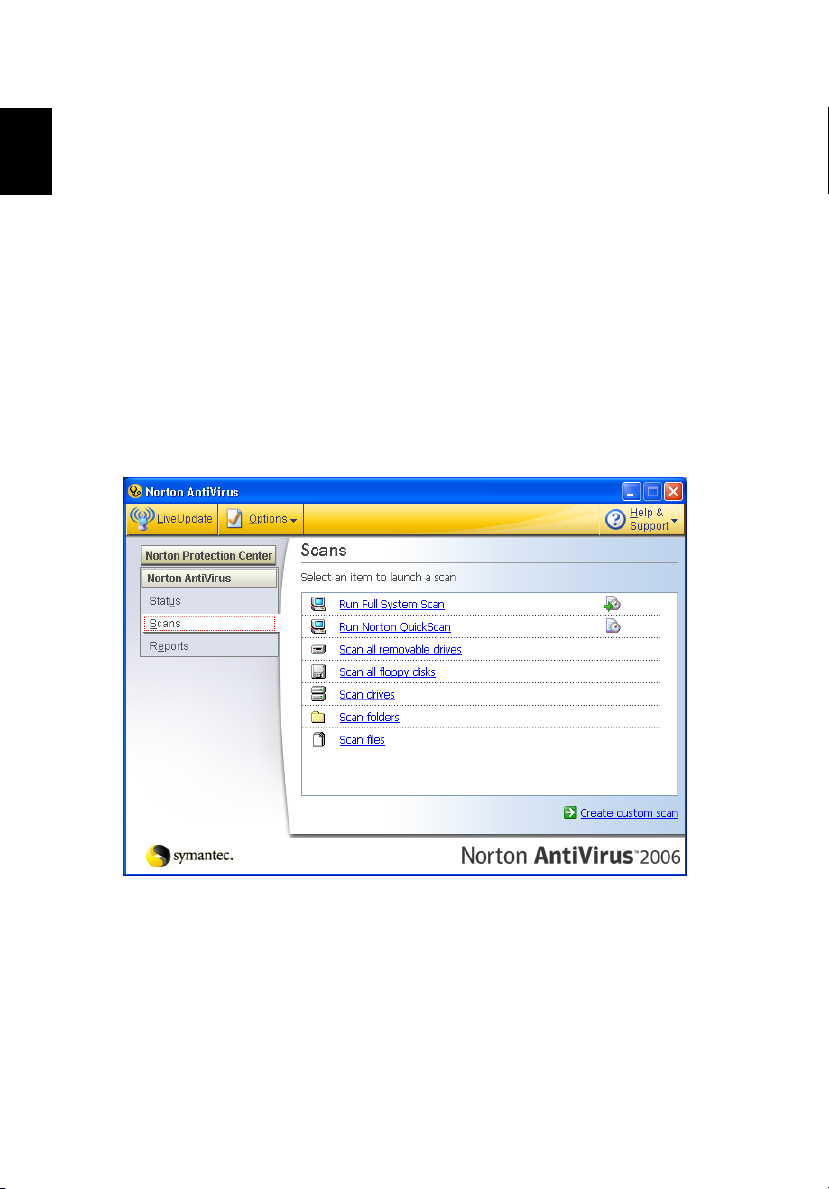
Launch Manager allows you to set the four easy-launch buttons located above
the keyboard. "Easy-launch buttons" on page 28 for the location of the easylaunch buttons.
Page 68
52
You can access the Launch Manager by clicking on Start, All Programs, and then
Launch Manager to start the application.
English
Norton AntiVirus
Norton AntiVirus is an anti-virus software that finds and repairs infected files,
and protects against viruses to keep your computer data safe and secure.
How do I check for viruses?
A Full System Scan scans all files on your computer. To perform a system scan:
1 Start Norton AntiVirus.
Double click on the Norton AntiVirus Icon on the desktop or click on the
Start menu in the Windows taskbar, highlight Programs, and select
Norton AntiVirus.
2 In the Norton AntiVirus main window, click Scans.
3In the Scans panel, click Run Full System Scan.
4 When the scan is complete, a scan summary appears. Click Finished.
You can schedule customized virus scans that run unattended on specific dates
and times or at periodic intervals. If you are using the computer when the
scheduled scan begins, it runs in the background so that you do not have to
stop working.
For more information refer to the Norton AntiVirus Help menu.
Page 69

53
Frequently asked questions
The following is a list of possible situations that may arise during the use of
your computer. Easy solutions are provided for each one.
I turned on the power, but the computer does not start or
boot up.
Look at the power indicator:
• If it is not lit, no power is being supplied to the computer. Check the
following:
• If you are using on the battery, it may be low and unable to power
the computer. Connect the AC adapter to recharge the battery pack.
• Make sure that the AC adapter is properly plugged into the computer
and to the power outlet.
• If it is lit, check the following:
• Is a non-bootable (non-system) disk in the external USB floppy drive?
Remove or replace it with a system disk and press <Ctrl> + <Alt> +
<Del> to restart the system.
Nothing appears on the screen.
The computer's power management system automatically blanks the screen to
save power. Press any key to turn the display back on.
If pressing a key does not turn the display back on, three things might be
the cause:
• The brightness level might be too low. Press <Fn> + <→> (increase) to
adjust the brightness level.
• The display device might be set to an external monitor. Press the display
toggle hotkey <Fn> + <F5> to toggle the display back to the computer.
• If the Sleep indicator is lit, the computer is in Sleep mode. Press and release
the power button to resume.
English
Image is not full-screen.
Each computer display has a different native resolution depending on the
screen. If you set the resolution lower than this native resoution, the screen
expands to fill the computer display. Right-click on your Windows desktop and
select Properties to bring up the "Display Properties" dialog box. Then click on
the Settings tab to make sure that the resolution is set to the appropriate
resolution. Resolutions lower than the specified resolution are not full-screen
on the computer or on an external monitor.
Page 70

English
54
No audio is heard from the computer.
Check the following:
• The volume may be muted. In Windows, look at the volume control
(speaker) icon on the taskbar. If it is crossed-out, click on the icon and
deselect the Mute all option.
• The volume level may be too low. In Windows, look at the volume control
icon on the taskbar. You can also use the volume control buttons to adjust
the volume. See "Hotkeys" on page 32 for more detail.
• If headphones, earphones or external speakers are connected to the line-
out port on the computer, the internal speakers automatically turn off.
I want to eject the optical drive tray without turning on the
power.
There is a mechanical eject hole on the optical drive. Simply insert the tip of a
pen or paperclip into the hole and push to eject the tray. (If your computer's
optical drive is a slot-load model, it will not have an eject hole.)
The keyboard does not respond.
Try attaching an external keyboard to a USB port on the computer. If it works,
contact your dealer or an authorized service center as the internal keyboard
cable may be loose.
The infrared port does not work.
Check the following:
• Make sure that the infrared ports of the two devices are facing each other
(+/- 15 degrees) a maximum of 1 meter apart.
• Make sure there is a clear path between the two infrared ports. Nothing
should be blocking the ports.
• Make sure you have the appropriate software running on both devices (for
file transfers) or you have the appropriate drivers (for printing to an
infrared printer).
• During the POST, press <F2> to access the BIOS utility and verify that the
infrared port is enabled.
• Make sure both devices are IrDA-compliant.
The printer does not work.
Check the following:
Page 71
55
• Make sure that the printer is connected to a power outlet and that it is
turned on.
• Make sure that the printer cable is connected securely to the computer's
parallel port or a USB port and the corresponding port on the printer.
I want to set up my location to use the internal modem.
To properly use your communication software (e.g. HyperTerminal), you need
to set up your location:
1 Click on Start, Settings, Control Panel.
2 Double-click on Phone and Modem Options.
3 Click on Dialing Rules and begin setting up your location.
Refer to the Windows manual.
Note: Please note, on first booting your notebook, that you can
skip the Internet Connection setup, as it is not necessary to
complete the installation of your Operating System. After the
Operating System is set up, you can proceed with the Internet
Connection setup.
I want to restore my computer to its original settings without
recovery CDs.
Note: If your system is the multilingual version, the operating
system and language you choose when you first turn on the
system will be the only option for future recovery operations.
English
This recovery process helps you restore the C: drive with the original software
content that is installed when you purchase your notebook. Follow the steps
below to rebuild your C: drive. (Your C: drive will be reformatted and all data
will be erased.) It is important to back up all data files before using this option.
Before performing a restore operation, please check the BIOS settings.
1 Check to see if Acer disk-to-disk recovery is enabled or not.
2 Make sure the D2D Recovery setting in Main is Enabled.
3 Exit the BIOS utility and save changes. The system will reboot.
Note: To activate the BIOS utility, press <F2> during POST.
Page 72
English
56
To start the recovery process:
1 Restart the system.
2 While the Acer logo is showing, press <Alt> + <F10> at the same time to
enter the recovery process.
3 Refer to the onscreen instructions to perform system recovery.
Important! This feature occupies 2 to 3 GB in a hidden partition
on your hard disk.
Requesting service
International Travelers Warranty (ITW)
Your computer is backed by an International Travelers Warranty (ITW) that
gives you security and peace of mind when traveling. Our worldwide network
of service centers are there to give you a helping hand.
An ITW passport comes with your computer. This passport contains all you need
to know about the ITW program. A list of available, authorized service centers is
in this handy booklet. Read this passport thoroughly.
Always have your ITW passport on hand, especially when you travel, to receive
the benefits from our support centers. Place your proof-of-purchase in the flap
located inside the front cover of the ITW passport.
If the country you are traveling in does not have an Acer-authorized ITW service
site, you can still get in contact with our offices worldwide. Please consult
http://global.acer.com
.
Before you call
Please have the following information available when you call Acer for online
service, and please be at your computer when you call. With your support, we
can reduce the amount of time a call takes and help solve your problems
efficiently. If there are error messages or beeps reported by your computer,
write them down as they appear on the screen (or the number and sequence in
the case of beeps).
You are required to provide the following information:
Name: _____________________________________________
Address: ___________________________________________
Telephone number: _________________________________
Machine and model type: ____________________________
Serial number: ______________________________________
Date of purchase: ___________________________________
Page 73

57
Taking your notebook PC with you
This section gives you tips and hints to consider when moving around or
traveling with your computer.
Disconnecting from the desktop
Follow these steps to disconnect your computer from external accessories:
1 Save any open files.
2 Remove any media, floppy disks or compact disks from the drive(s).
3 Shut down the computer.
4 Close the display cover.
5 Disconnect the cord from the AC adapter.
6 Disconnect the keyboard, pointing device, printer, external monitor and
other external devices.
7 Disconnect the Kensington lock if you are using one to secure the
computer.
Moving around
When you are just moving within short distances, for example, from your office
desk to a meeting room.
English
Preparing the computer
Before moving the computer, close and latch the display cover to place it in
Sleep mode. You can now safely take the computer anywhere you go within
the building. To bring the computer out of Sleep mode, open the display; then
press and release the power button.
If you are taking the computer to a client's office or a different building, you
may choose to shut down the computer:
Click on Start, Turn Off Computer, then click on Turn Off (Windows XP).
Or:
You can put the computer in Sleep mode by pressing <Fn> + <F4>. Then close
and latch the display.
When you are ready to use the computer again, unlatch and open the display;
then press and release the power button.
Page 74
English
58
Note: If the Sleep indicator is off, the computer has entered
Hibernation mode and is turned off. If the power indicator is off
but the Sleep indicator is on, the computer has entered Sleep
mode. In both cases, press and release the power button to turn
the computer back on. Note that the computer may enter
Hibernation mode after being in Sleep mode for a period of time.
What to bring to meetings
If your meeting is relatively short, you probably do not need to bring anything
with you other than your computer. If your meeting will be longer, or if your
battery is not fully charged, you may want to bring the AC adapter with you to
plug in your computer in the meeting room.
If the meeting room does not have an electrical outlet, reduce the drain on the
battery by putting the computer in Sleep mode. Press <Fn> + <F4> or close the
display cover whenever you are not actively using the computer. To resume,
open the display (if closed), then press and release the power button.
Taking the computer home
When you are moving from your office to your home or vice versa.
Preparing the computer
After disconnecting the computer from your desktop, follow these steps to
prepare the computer for the trip home:
• Check that you have removed all media and compact disks from the
drive(s). Failure to remove the media can damage the drive head.
• Pack the computer in a protective case that can prevent the computer from
sliding around and cushion it if it should fall.
Caution: Avoid packing items next to the top cover of the
computer. Pressure against the top cover can damage the screen.
What to take with you
Unless you have some items at home, take the following items with you:
• AC adapter and power cord
• The printed User's Guide
Page 75

59
Special considerations
Follow these guidelines to protect your computer while traveling to and
from work:
• Minimize the effects of temperature changes by keeping the computer
with you.
• If you need to stop for an extended period of time and cannot carry the
computer with you, leave the computer in the trunk of the car to avoid
exposing the computer to excessive heat.
• Changes in temperature and humidity can cause condensation. Allow the
computer to return to room temperature, and inspect the screen for
condensation before turning on the computer. If the temperature change
is greater than 10 °C (18 °F), allow the computer to come to room
temperature slowly. If possible, leave the computer for 30 minutes in an
environment with a temperature between outside and room temperature.
Setting up a home office
If you frequently work on your computer at home, you may want to purchase a
second AC adapter for use at home. With a second AC adapter, you can avoid
carrying the extra weight to and from home.
If you use your computer at home for significant periods of time, you might also
want to add an external keyboard, monitor or mouse.
Traveling with the computer
English
When you are moving within a larger distance, for instance, from your office
building to a client's office building or traveling locally.
Preparing the computer
Prepare the computer as if you were taking it home. Make sure that the battery
in the computer is charged. Airport security may require you to turn on your
computer when carrying it into the gate area.
What to take with you
Take the following items with you:
• AC adapter
• Spare, fully-charged battery pack(s)
• Additional printer driver files if you plan to use another printer
Page 76

English
60
Special considerations
In addition to the guidelines for taking the computer home, follow these
guidelines to protect your computer while traveling:
• Always take the computer as carry-on luggage.
• If possible, have the computer inspected by hand. Airport security X-ray
machines are safe, but do not put the computer through a metal detector.
• Avoid exposing floppy disks to hand-held metal detectors.
Traveling internationally with the computer
When you are moving from country to country.
Preparing the computer
Prepare the computer as you would normally prepare it for traveling.
What to bring with you
Bring the following items with you:
• AC adapter
• Power cords that are appropriate for the country to which you
are traveling
• Spare, fully-charged battery packs
• Additional printer driver files if you plan to use another printer
• Proof of purchase, in case you need to show it to customs officials
• International Travelers Warranty passport
Special considerations
Follow the same special considerations as when traveling with the computer. In
addition, these tips are useful when traveling internationally:
• When traveling in another country, check that the local AC voltage and the
AC adapter power cord specifications are compatible. If not, purchase a
power cord that is compatible with the local AC voltage. Do not use
converter kits sold for appliances to power the computer.
• If you are using the modem, check if the modem and connector is
compatible with the telecommunications system of the country you are
traveling in.
Page 77

61
Securing your computer
Your computer is a valuable investment that you need to take care of. Learn
how to protect and take care of your computer.
Security features include hardware and software locks — a security notch
and passwords.
Using a computer security lock
The notebook comes with a Kensington-compatible security slot for a security
lock.
Wrap a computer security lock cable around an immovable object such as a
table or handle of a locked drawer. Insert the lock into the notch and turn the
key to secure the lock. Some keyless models are also available.
Using passwords
Passwords protect your computer from unauthorized access. Setting these
passwords creates several different levels of protection for your computer
and data:
• Supervisor Password prevents unauthorized entry into the BIOS utility.
Once set, you must enter this password to gain access to the BIOS utility.
See "BIOS utility" on page 67.
• User Password secures your computer against unauthorized use. Combine
the use of this password with password checkpoints on boot-up and
resume from Hibernation for maximum security.
• Password on Boot secures your computer against unauthorized use.
Combine the use of this password with password checkpoints on boot-up
and resume from Hibernation for maximum security.
English
Important! Do not forget your Supervisor Password! If you forget
your password, please get in touch with your dealer or an
authorized service center.
Page 78
English
62
Entering passwords
When a password is set, a password prompt appears in the center of the
display screen.
• When the Supervisor Password is set, a prompt appears when you press
<F2> to enter the BIOS utility at boot-up.
• Type the Supervisor Password and press <Enter> to access the BIOS utility.
If you enter the password incorrectly, a warning message appears. Try
again and press <Enter>.
• When the User Password is set and the password on boot parameter is
enabled, a prompt appears at boot-up.
• Type the User Password and press <Enter> to use the computer. If you
enter the password incorrectly, a warning message appears. Try again and
press <Enter>.
Important! You have three chances to enter a password. If you fail
to enter the password correctly after three tries, the system halts.
Press and hold the power button for four seconds to shut down
the computer. Then turn on the computer again, and try again.
Setting passwords
You can set passwords using the BIOS utility.
Page 79
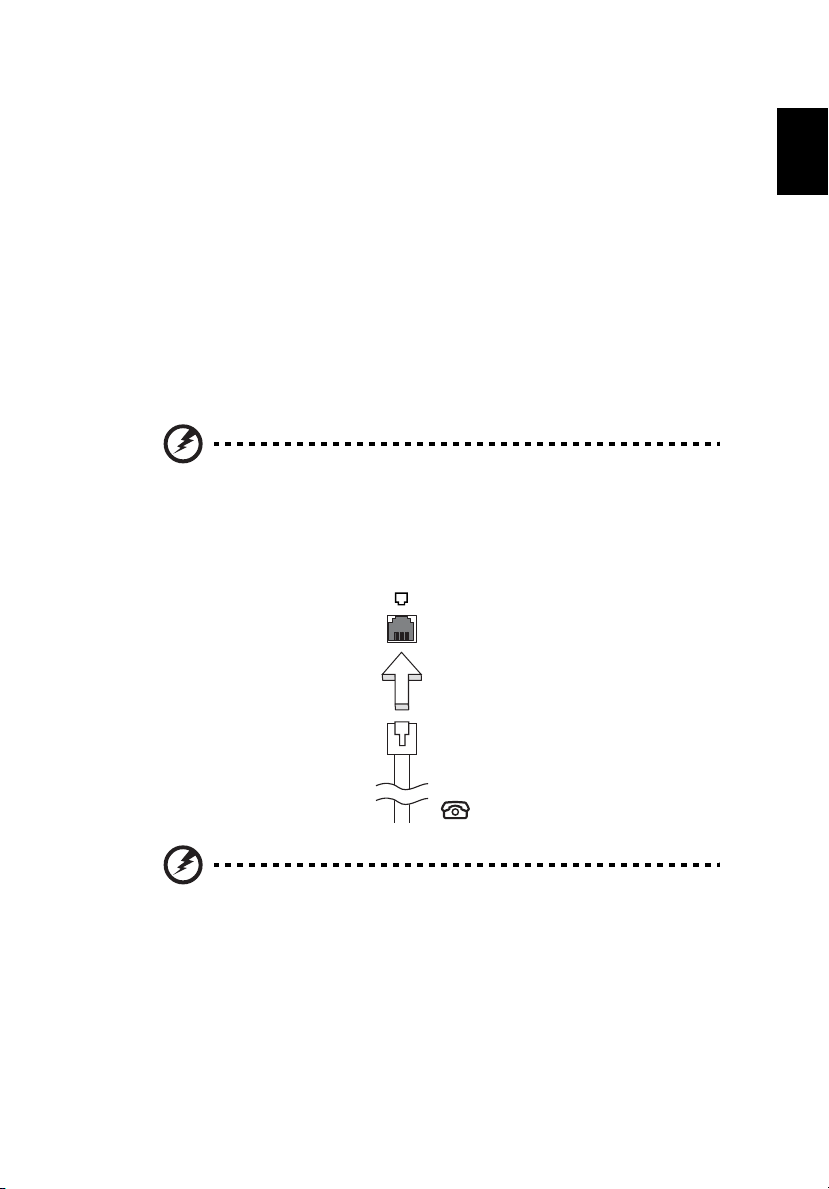
63
Expanding through options
Your notebook PC offers you a complete mobile computing experience.
Connectivity options
Ports allow you to connect peripheral devices to your computer as you would
with a desktop PC. For instructions on how to connect different external devices
to the computer, read the following section.
Fax/data modem
Your computer has a built-in V.92 56 Kbps fax/data modem.
Warning! This modem port is not compatible with digital phone
lines. Plugging this modem into a digital phone line will damage
the modem.
To use the fax/data modem port, connect a phone cable from the modem port
to a telephone jack.
English
Warning! Please make sure that the cable you use is appropriate
for the country in which you are working.
Page 80
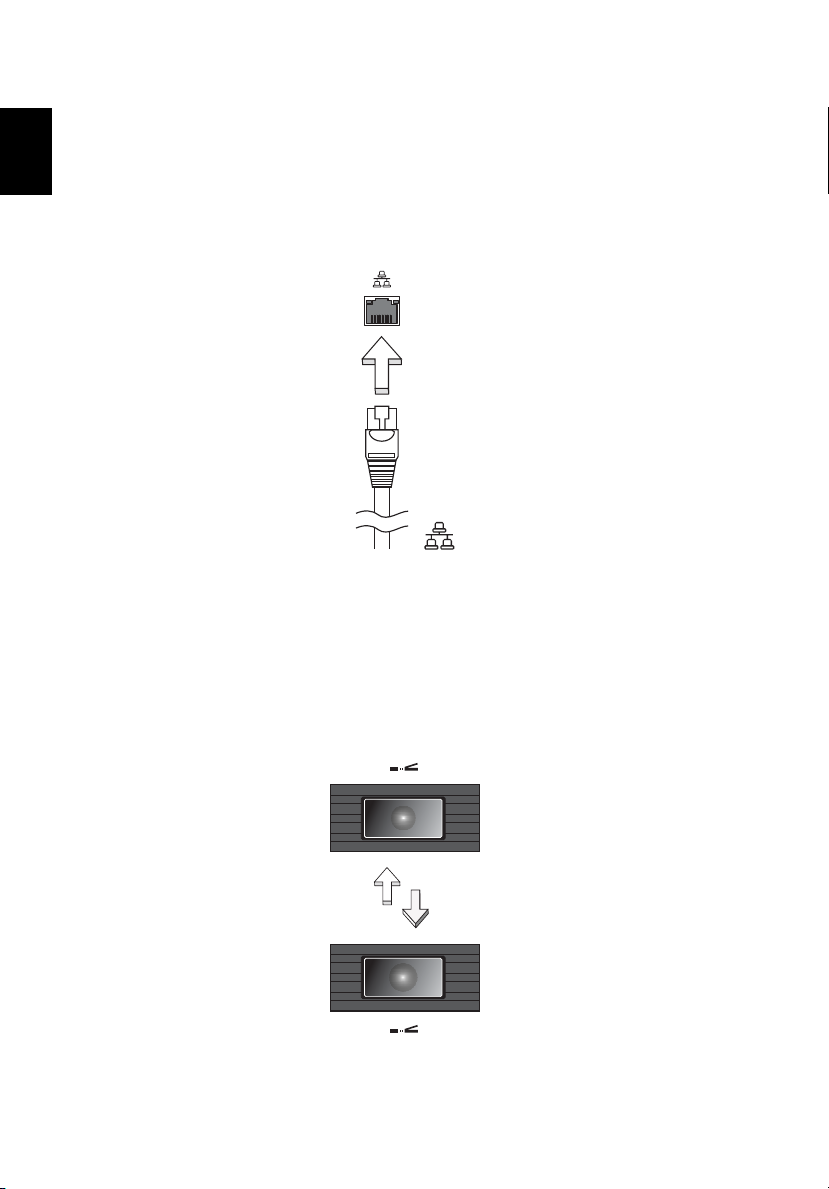
English
64
Built-in network feature
The built-in network feature allows you to connect your computer to an
Ethernet-based network.
To use the network feature, connect an Ethernet cable from the Ethernet
(RJ-45) port on the chassis of the computer to a network jack or hub on
your network.
Fast Infrared (FIR)
(for selected models)
The computer's Fast Infrared (FIR) port allows you to do wireless data transfer
with other IR-aware computers and peripherals such as PDAs, mobile phones,
and infrared printers. The infrared port can transfer data at speeds of up to 4
Mbps at a distance of up to one meter.
Page 81
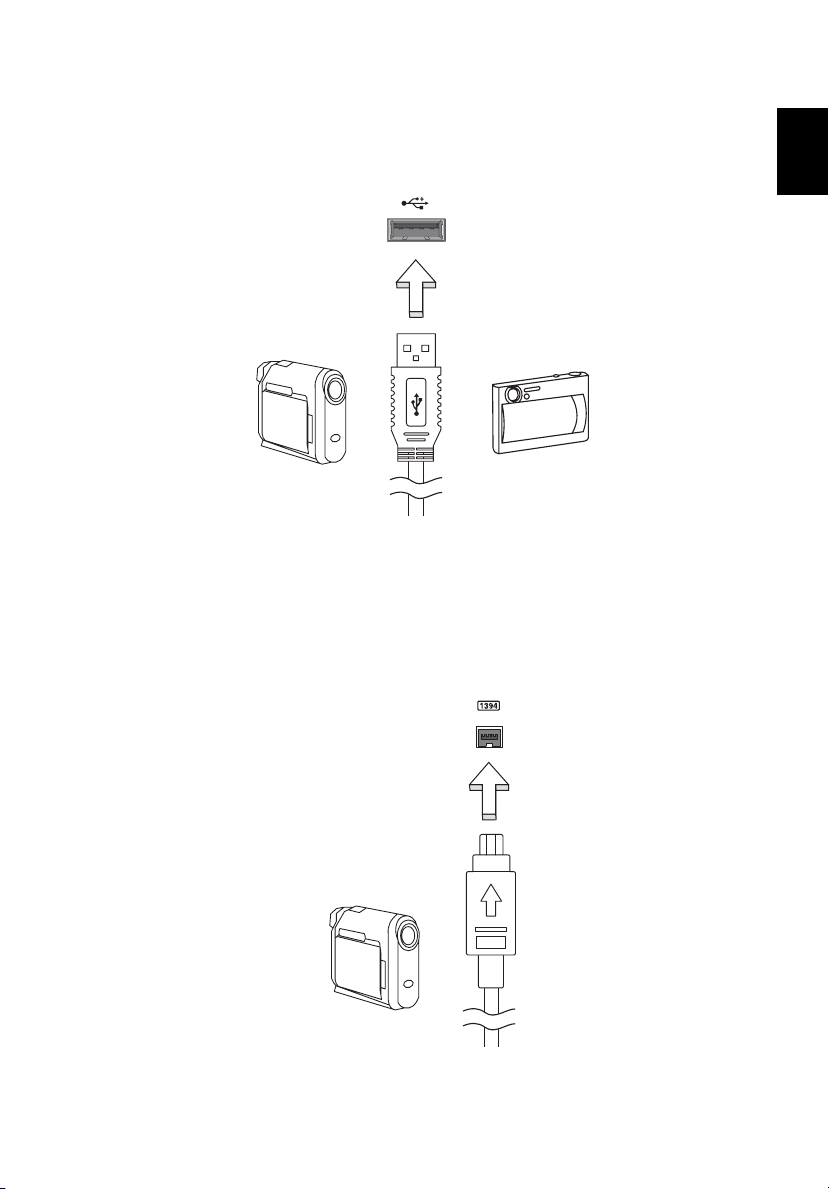
65
Universal Serial Bus (USB)
The USB 2.0 port is a high-speed serial bus which allows you to connect USB
peripherals without taking up precious system resources.
IEEE 1394 port
(for selected models)
The computer's IEEE 1394 port allows you to connect to an IEEE 1394compatible device like a video camera or digital camera. See your video or
digital camera's documentation for details.
English
Page 82
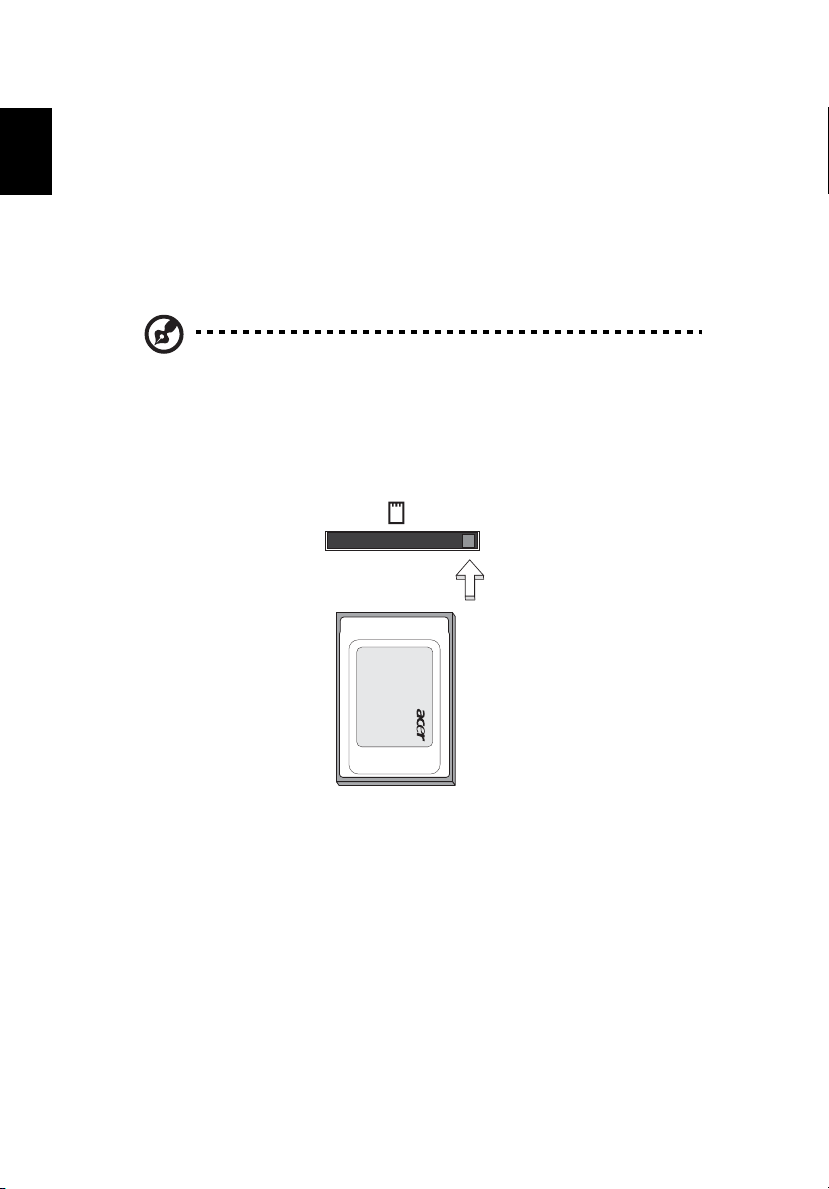
English
66
PC Card slot
The Type II PC Card slot of the computer accepts PC Cards that enhance the
usability and expandability of the computer. These cards should have a PC Card
logo on them.
PC Cards (formerly PCMCIA) are add-on cards for portable computers, giving
you expansion possibilities long afforded by desktop PCs. Popular PC Cards
include flash, fax/data modem, wireless LAN and SCSI cards. CardBus improves
on the 16-bit PC card technology by expanding the bandwidth to 32 bits.
Note: Refer to your card's manual for details on how to install and
use the card, and its functions.
Inserting a PC Card
Insert the card into the slot and make the proper connections (e.g., network
cable), if necessary. See your card manual for details.
Ejecting a PC Card
Before ejecting a PC Card:
1 Exit the application using the card.
2 Left-click on the PC Card icon on the taskbar and stop the card operation.
3 Press the slot eject button to pop out the eject button; then press it again
to eject the card.
Installing memory
Follow these steps to install memory:
Page 83
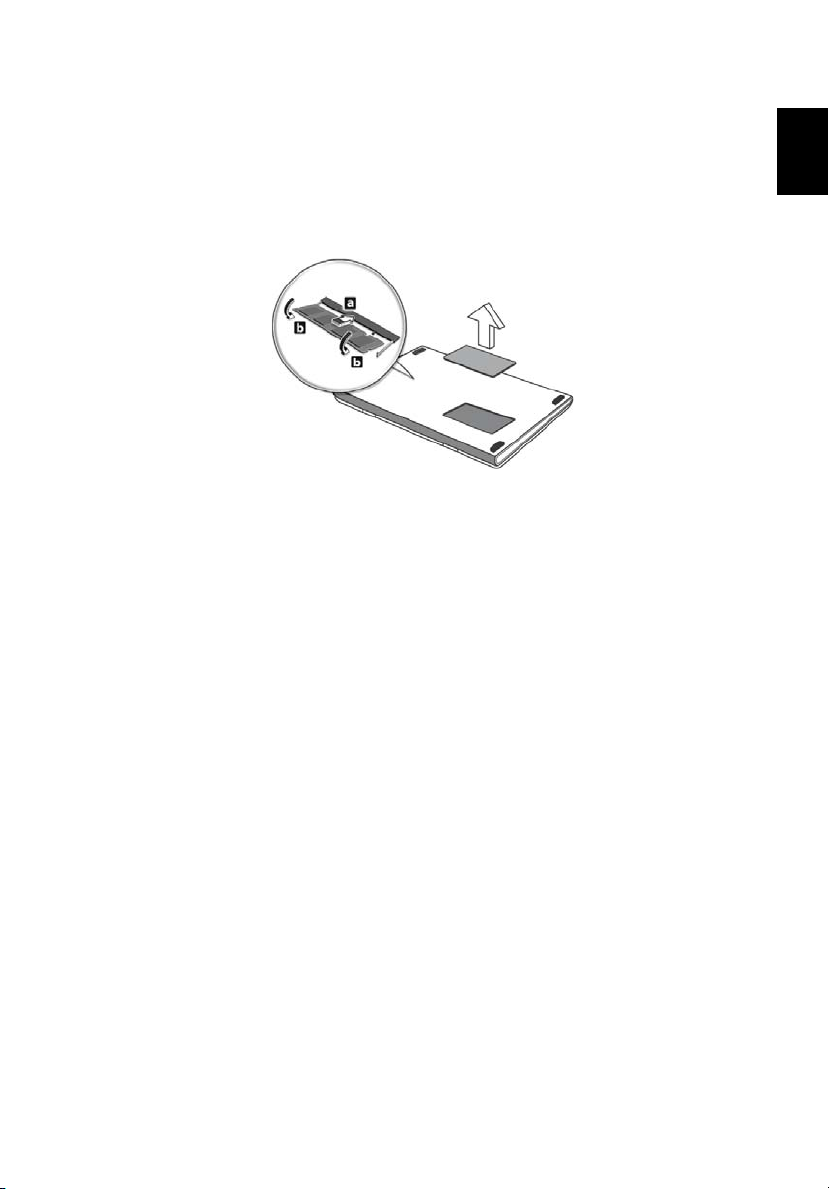
67
1 Turn off the computer, unplug the AC adapter (if connected) and remove
the battery pack. Then turn the computer over to access its base.
2 Remove the screws from the memory cover; then lift up and remove the
memory cover.
3 (a) Insert the memory module diagonally into the slot, then (b) gently press
it down until it clicks into place.
4 Replace the memory cover and secure it with the screw.
5 Reinstall the battery pack, and reconnect the AC adapter.
6 Turn on the computer.
The computer automatically detects and reconfigures the total memory size.
Please consult a qualified technician or contact your local Acer dealer.
BIOS utility
English
The BIOS utility is a hardware configuration program built into your
computer's BIOS.
Your computer is already properly configured and optimized, and you do not
need to run this utility. However, if you encounter configuration problems, you
may need to run it.
To activate the BIOS utility, press <F2> during the POST; while the notebook PC
logo is being displayed.
Boot sequence
To set the boot sequence in the BIOS utility, activate the BIOS utility, then select
Boot from the categories listed at the top of the screen.
Page 84

English
68
Enable disk-to-disk recovery
To enable disk-to-disk recovery (hard disk recovery), activate the BIOS utility,
then select Main from the categories listed at the top of the screen. Find D2D
Recovery at the bottom of the screen and use the <F5> and <F6> keys to set this
value to Enabled.
Password
To set a password on boot, activate the BIOS utility, then select Security from
the categories listed at the top of the screen. Find Password on boot: and use
the <F5> and <F6> keys to enable this feature.
Page 85
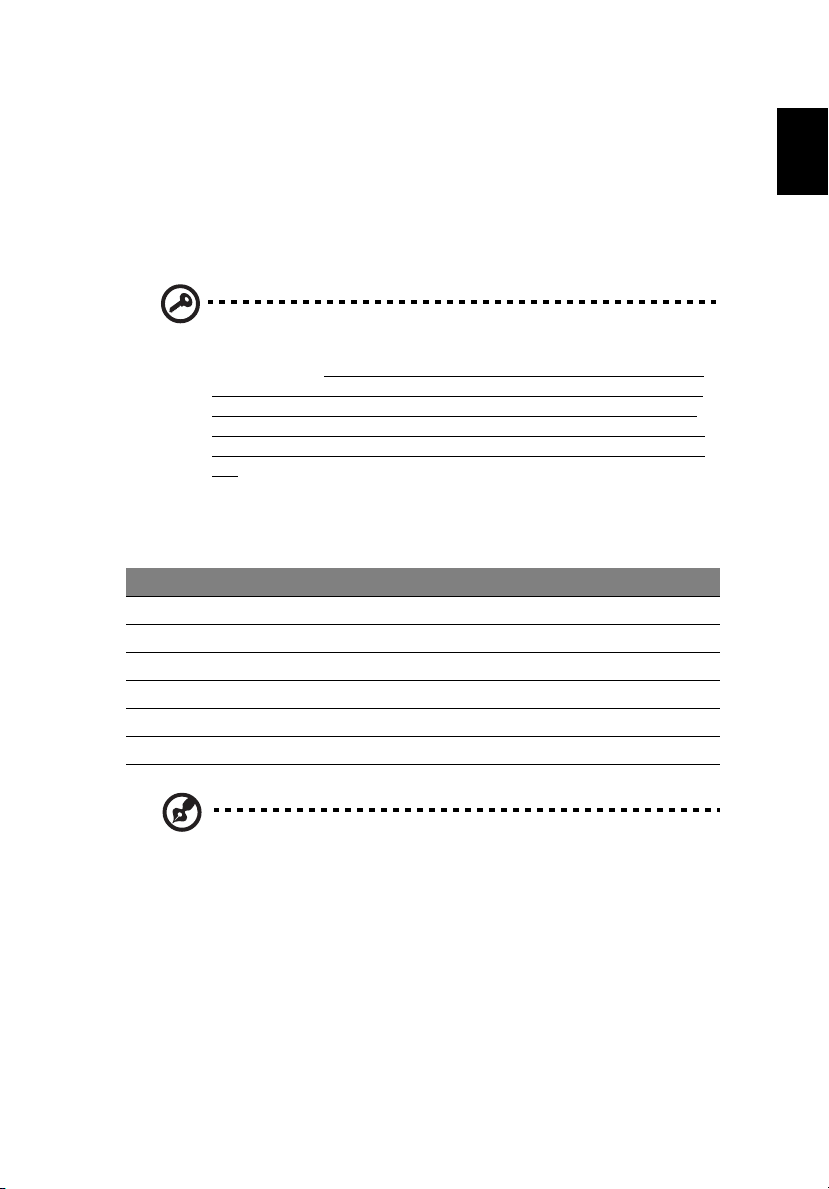
69
Using software
Playing DVD movies
When the DVD drive module is installed in the optical drive bay, you can play
DVD movies on your computer.
1 Eject the DVD tray and insert a DVD movie disk; then close the DVD tray.
Important! When you launch the DVD player for the first time, the
program asks you to enter the region code. DVD disks are divided
into 6 regions. Once your DVD drive is set to a region code, it will
play DVD disks of that region only. You can set the region code a
maximum of five times (including the first time), after which the
last region code set will remain permanent. Recovering your hard
disk does not reset the number of times the region code has been
set. Refer to the table below for DVD movie region code
information.
2 The DVD movie will automatically play after a few seconds.
Region code Country or region
1 USA, Canada
2 Europe, Middle East, South Africa, Japan
3 Southeast Asia, Taiwan, South Korea
4 Latin America, Australia, New Zealand
5 Former USSR, parts of Africa, India
6 People's Republic of China
English
Note: To change the region code, insert a DVD movie of a
different region into the DVD drive. Please refer to the online
help for more information.
Acer eRecovery Management
Acer eRecovery Management is a tool to quickly backup and restore the system.
You can create and save a backup of the current system configuration to hard
disk, CD or DVD.
Acer eRecovery Management consists of the following functions:
Page 86
English
70
1 Create backup
2 Restore from backup
3 Create factory default image CD, or burn bundled software to an
application CD
4 Re-install bundled software without CD
5 Change Acer eRecovery Management password
This chapter will guide you through each process.
Note: This feature is only available on certain models. For systems
that do not have a built-in optical disk burner, plug in an external
USB or IEEE 1394-compatible optical disk burner before entering
Acer eRecovery Management for optical disk-related tasks.
Acer eRecovery Management requires a specific hard disk
partitioning structure to function. If the system detects that the
hard disk does not use this structure, Acer eRecovery Management
functionality will be disabled.
Page 87

71
Create backup
You can create and save backup images to hard disk, CD or DVD.
1 Boot to Windows XP
2 Press <Alt> + <F10> to open the Acer eRecovery Management utility.
3 Enter the password to proceed. The default password is six zeros.
4 In the Acer eRecovery Management window, select Recovery settings and
click Next.
5 In the Recovery settings window, select Backup snapshot image and
click Next.
6 Select the backup method.
aUse Backup to HDD to store the backup disk image on drive D:.
b Backup to optical device to store the backup image on CD or DVD.
7 After choosing the backup method, click Next.
Follow the instructions on screen to complete the process.
Restore from backup
You can restore backups previously created (as stated in the Create backup
section) from hard disk, CD or DVD.
1 Boot to Windows XP.
2 Press <Alt> + <F10> to open the Acer eRecovery Management utility.
3 Enter the password to proceed. The default password is six zeros.
4 In the Acer eRecovery Management window, select Recovery actions and
click Next.
5 Select the desired restore action and follow the onscreen instructions to
complete the restore process.
English
Note: The "Restore C:" item is enabled only if there is a user
backup stored on the hard disk (D:\). Please refer to the Create
backup section.
Page 88
72
Create factory default image CD
English
When the System CD and Recovery CD are not available, you can create them by
using this feature.
1 Boot to Windows XP.
2 Press <Alt> + <F10> to open the Acer eRecovery Management utility.
3 Enter the password to proceed. The default password is six zeros.
4 In the Acer eRecovery Management window, select Recovery settings and
click Next.
5 In the Recovery settings window, select Burn image to disk and click Next.
6 In the Burn image to disk window, select 1. Factory default image or
2. Application CD and click Next.
7 Follow the instructions on screen to complete the process.
Note: Select 1. Factory default image when you want to burn a
bootable disk that contains your computer's entire operating
system as it was delivered to you from the factory. If you wish to
have a disk that will allow you to browse the contents and install
selected drivers and applications, select 2. Application CD — this
disk will not be bootable.
Re-install bundled software without CD
Acer eRecovery Management stores pre-loaded software internally for easy
driver and application re-installation.
1 Boot to Windows XP.
2 Press <Alt> + <F10> to open the Acer eRecovery Management utility.
3 Enter the password to proceed. The default password is six zeros.
4 In the Acer eRecovery Management window, select Recovery actions and
click Next.
5 In the Recovery settings window, select Reinstall applications/drivers and
click Next.
6 Select the desired driver/application and follow the instructions on screen
to re-install.
At first launch, Acer eRecovery Management prepares all the needed software
and may take few seconds to bring up the software content window.
Page 89

73
Change password
Acer eRecovery Management and Acer disk-to-disk recovery are protected by a
password that can be changed by the user. Follow the steps below to change
the password in Acer eRecovery Management.
1 Boot to Windows XP.
2 Press <Alt> + <F10> to open the Acer eRecovery Management utility.
3 Enter the password to proceed. The default password is six zeros.
4 In the Acer eRecovery Management window, select Recovery settings and
click Next.
5 In the Recovery settings window, select Password: Change Acer eRecovery
Management password and click Next.
6 Follow the instructions on screen to complete the process.
Note: If the system crashes, and will not boot to Windows, you can
run Acer disk-to-disk recovery to restore the factory default image
under DOS mode.
English
Page 90

74
Troubleshooting
English
This chapter shows you how to deal with common system problems.
Read it before calling a technician if a problem occurs. Solutions to more
serious problems require opening up the computer. Do not attempt to open
the computer yourself; contact your dealer or authorized service center
for assistance.
Troubleshooting tips
This notebook PC incorporates an advanced design that delivers onscreen error
message reports to help you solve problems.
If the system reports an error message or an error symptom occurs, see "Error
messages" below. If the problem cannot be resolved, contact your dealer. See
"Requesting service" on page 56.
Error messages
If you receive an error message, note the message and take the corrective
action. The following table lists the error messages in alphabetical order
together with the recommended course of action.
Error messages Corrective action
CMOS battery bad Contact your dealer or an authorized service center.
CMOS checksum error Contact your dealer or an authorized service center.
Disk boot failure Insert a system (bootable) disk into the floppy drive
(A:), then press <Enter> to reboot.
Equipment
configuration error
Hard disk 0 error Contact your dealer or an authorized service center.
Hard disk 0 extended
type error
I/O parity error Contact your dealer or an authorized service center.
Keyboard error or no
keyboard connected
Keyboard interface
error
Memory size mismatch Press <F2> (during POST) to enter the BIOS utility,
Press <F2> (during POST) to enter the BIOS utility,
then press Exit in the BIOS utility to reboot.
Contact your dealer or an authorized service center.
Contact your dealer or an authorized service center.
Contact your dealer or an authorized service center.
then press Exit in the BIOS utility to reboot.
Page 91

75
If you still encounter problems after going through the corrective measures,
please contact your dealer or an authorized service center for assistance. Some
problems may be solved using the BIOS utility.
English
English
Page 92

76
Regulations and safety notices
English
FCC notice
This device has been tested and found to comply with the limits for a Class B
digital device pursuant to Part 15 of the FCC rules. These limits are designed to
provide reasonable protection against harmful interference in a residential
installation. This device generates, uses, and can radiate radio frequency energy
and, if not installed and used in accordance with the instructions, may cause
harmful interference to radio communications.
However, there is no guarantee that interference will not occur in a particular
installation. If this device does cause harmful interference to radio or television
reception, which can be determined by turning the device off and on, the
user is encouraged to try to correct the interference by one or more of the
following measures:
• Reorient or relocate the receiving antenna.
• Increase the separation between the device and receiver.
• Connect the device into an outlet on a circuit different from that to which
the receiver is connected.
• Consult the dealer or an experienced radio/television technician for help.
Notice: Shielded cables
All connections to other computing devices must be made using shielded cables
to maintain compliance with FCC regulations.
Notice: Peripheral devices
Only peripherals (input/output devices, terminals, printers, etc.) certified to
comply with the Class B limits may be attached to this equipment. Operation
with non-certified peripherals is likely to result in interference to radio and TV
reception.
Caution
Changes or modifications not expressly approved by the manufacturer could
void the user's authority, which is granted by the Federal Communications
Commission, to operate this computer.
Operation conditions
This device complies with Part 15 of the FCC Rules. Operation is subject to the
following two conditions: (1) this device may not cause harmful interference,
Page 93

77
and (2) this device must accept any interference received, including interference
that may cause undesired operation.
Notice: Canadian users
This Class B digital apparatus complies with Canadian ICES-003.
Remarque à l'intention des utilisateurs canadiens
Cet appareil numérique de la classe B est conforme a la norme NMB-003 du
Canada.
Declaration of Conformity for EU countries
Hereby, Acer, declares that this notebook PC series is in compliance with the
essential requirements and other relevant provisions of Directive 1999/5/EC.
(Please visit http://global.acer.com/products/notebook/reg-nb/index.htm
complete documents.)
Compliant with Russian regulatory certification
for
Modem notices
English
English
Notice for USA
This equipment complies with Part 68 of the FCC rules. Located on the modem is
a label that contains, among other information, the FCC Registration Number
and Ringer Equivalence Number (REN) for this equipment. Upon request, you
must provide this information to your telephone company.
If your telephone equipment causes harm to the telephone network, the
telephone company may discontinue your service temporarily. If possible, they
will notify you in advance. But, if advance notice is not practical, you will be
notified as soon as possible. You will also be informed of your right to file a
complaint with the FCC.
Page 94

English
78
Your telephone company may make changes in its facilities, equipment,
operations, or procedures that could affect the proper functioning of your
equipment. If they do, you will be notified in advance to give you an
opportunity to maintain uninterrupted telephone service.
If this equipment should fail to operate properly, disconnect the equipment
from the phone line to determine if it is causing the problem. If the problem is
with the equipment, discontinue use and contact your dealer or vendor.
Caution: To reduce the risk of fire, use only No. 26 AWG or larger
UL Listed or CSA Certified Telecommunication Line Cord.
TBR 21
This equipment has been approved [Council Decision 98/482/EC - "TBR 21"] for
single terminal connection to the Public Switched Telephone Network (PSTN).
However, due to differences between the individual PSTNs provided in different
countries, the approval does not, of itself, give an unconditional assurance of
successful operation on every PSTN termination point. In the event of problems,
you should contact your equipment supplier in the first instance.
List of applicable countries
EU member states as of May 2004 are: Belgium, Denmark, Germany, Greece,
Spain, France, Ireland, Italy, Luxembourg, the Netherlands, Austria, Portugal,
Finland, Sweden, United Kingdom Estonia, Latvia, Lithuania, Poland, Hungary,
Czech Republic, Slovak Republic, Slovenia, Cyprus and Malta. Usage allowed in
the countries of European Union, as well as Norway, Switzerland, Iceland and
Liechtenstein. This device must be used in strict accordance with the regulations
and constraints in the country of use. For further information, please contact
local office in the country of use.
Notice for Australia
For safety reasons, only connect headsets with a telecommunications
compliance label. This includes customer equipment previously labelled
permitted or certified.
Page 95

79
Notice for New Zealand
1 The grant of a Telepermit for any item of terminal equipment indicates
only that Telecom has accepted that the item complies with minimum
conditions for connection to its network. It indicates no endorsement of
the product by Telecom, nor does it provide any sort of warranty. Above
all, it provides no assurance that any item will work correctly in all respects
with another item of Telepermitted equipment of a different make or
model, nor does it imply that any product is compatible with all of
Telecom's network services.
2 This equipment is not capable, under all operating conditions, of correct
operation at the higher speeds for which it is designed. Telecom will accept
no responsibility should difficulties arise in such circumstances.
3 Some parameters required for compliance with Telecom's Telepermit
requirements are dependent on the equipment (PC) associated with this
device. The associated equipment shall be set to operate within the
following limits for compliance with Telecom's Specifications:
a There shall be no more than 10 call attempts to the same number
within any 30 minute period for any single manual call initiation, and
b The equipment shall go on-hook for a period of not less than 30
seconds between the end of one attempt and the beginning of the
next call attempt.
4 Some parameters required for compliance with Telecom's Telepermit
requirements are dependent on the equipment (PC) associated with this
device. In order to operate within the limits for compliance with Telecom's
specifications, the associated equipment shall be set to ensure that
automatic calls to different numbers are spaced such that there is not less
than 5 seconds between the end of one call attempt and the beginning
of another.
5 This equipment shall not be set up to make automatic calls to Telecom's
111 Emergency Service.
6 This device is equipped with pulse dialing while the Telecom standard is
DTMF tone dialing. There is no guarantee that Telecom lines will always
continue to support pulse dialing.
7 Use of pulse dialing, when this equipment is connected to the same line as
other equipment, may give rise to bell tinkle or noise and may also cause a
false answer condition. Should such problems occur, the user should NOT
contact the telecom Fault Service.
8 This equipment may not provide for the effective hand-over of a call to
another device connected to the same line.
9 Under power failure conditions this appliance may not operate. Please
ensure that a separate telephone, not dependent on local power, is
available for emergency use.
English
English
Page 96

English
80
Laser compliance statement
The CD or DVD drive used with this computer is a laser product.
The CD or DVD drive's classification label (shown below) is located on the drive.
CLASS 1 LASER PRODUCT
CAUTION: INVISIBLE LASER RADIATION WHEN OPEN. AVOID EXPOSURE
TO BEAM.
APPAREIL A LASER DE CLASSE 1 PRODUIT
LASERATTENTION: RADIATION DU FAISCEAU LASER INVISIBLE EN CAS
D’OUVERTURE. EVITTER TOUTE EXPOSITION AUX RAYONS.
LUOKAN 1 LASERLAITE LASER KLASSE 1
VORSICHT: UNSICHTBARE LASERSTRAHLUNG, WENN ABDECKUNG GEÖFFNET
NICHT DEM STRAHLL AUSSETZEN
PRODUCTO LÁSER DE LA CLASE I
ADVERTENCIA: RADIACIÓN LÁSER INVISIBLE AL SER ABIERTO. EVITE EXPONERSE
A LOS RAYOS.
ADVARSEL: LASERSTRÅLING VEDÅBNING SE IKKE IND I STRÅLEN.
VARO! LAVATTAESSA OLET ALTTINA LASERSÅTEILYLLE.
VARNING: LASERSTRÅLNING NÅR DENNA DEL ÅR ÖPPNAD ÅLÅ TUIJOTA
SÅTEESEENSTIRRA EJ IN I STRÅLEN
VARNING: LASERSTRÅLNING NAR DENNA DEL ÅR ÖPPNADSTIRRA EJ IN I
STRÅLEN
ADVARSEL: LASERSTRÅLING NAR DEKSEL ÅPNESSTIRR IKKE INN I STRÅLEN
LCD pixel statement
The LCD unit is produced with high-precision manufacturing techniques.
Nevertheless, some pixels may occasionally misfire or appear as black or
red dots. This has no effect on the recorded image and does not constitute
a malfunction.
Macrovision copyright protection notice
"U.S Patent Nos. 4,631,603; 4,819,098; 4,907,093; 5,315,448; and 6,516,132."
This product incorporates copyright protection technology that is protected by
U.S. patents and other intellectual property rights. Use of this copyright
protection technology must be authorized by Macrovision, and is intended for
home and other limited viewing uses only unless otherwise authorized by
Macrovision. Reverse engineering or disassembly is prohibited.
Page 97
81
Radio device regulatory notice
Note: Below regulatory information is for models with wireless
LAN and/or Bluetooth only.
General
This product complies with the radio frequency and safety standards of any
country or region in which it has been approved for wireless use. Depending on
configurations, this product may or may not contain wireless radio devices (such
as wireless LAN and/or Bluetooth modules). Below information is for products
with such devices.
European Union (EU)
This device complies with the essential requirements of the European Council
Directives listed below:
73/23/EEC Low Voltage Directive
• EN 60950-1
89/336/EEC Electromagnetic Compatibility (EMC) Directive
• EN 55022
• EN 55024
• EN 61000-3-2/-3
99/5/EC Radio & Telecommunications Terminal Equipment (R&TTE) Directive
• Art.3.1a) EN 60950-1
• Art.3.1b) EN 301 489 -1/-17
• Art.3.2) EN 300 328-2
• Art.3.2) EN 301 893 *applies to 5 GHz only
English
English
Page 98
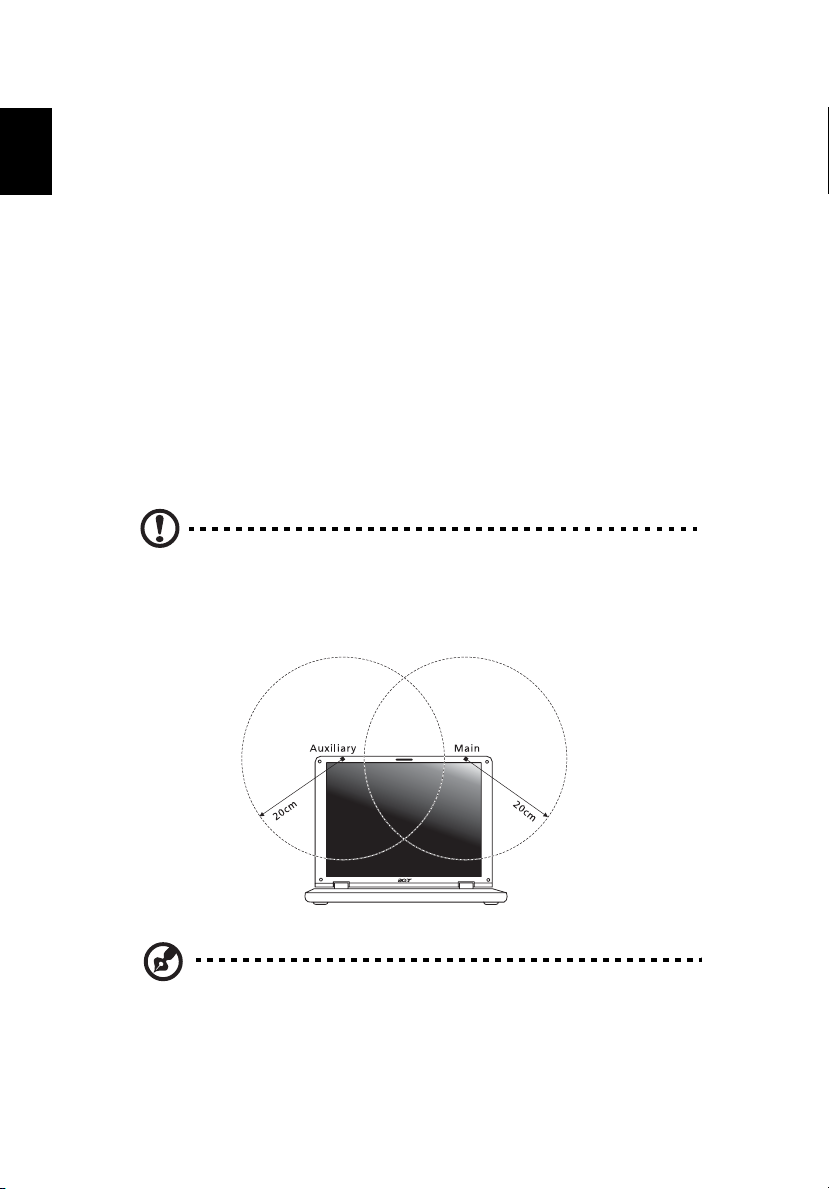
English
82
List of applicable countries
EU member states as of May 2004 are: Belgium, Denmark, Germany, Greece,
Spain, France, Ireland, Italy, Luxembourg, the Netherlands, Austria, Portugal,
Finland, Sweden, United Kingdom Estonia, Latvia, Lithuania, Poland, Hungary,
Czech Republic, Slovak Republic, Slovenia, Cyprus and Malta. Usage allowed in
the countries of European Union, as well as Norway, Switzerland, Iceland and
Liechtenstein. This device must be used in strict accordance with the regulations
and constraints in the country of use. For further information, please contact
local office in the country of use.
The FCC RF safety requirement
The radiated output power of the wireless LAN Mini PCI Card and Bluetooth
card is far below the FCC radio frequency exposure limits. Nevertheless, the
notebook PC series shall be used in such a manner that the potential for human
contact during normal operation is minimized as follows:
1 Users are requested to follow the RF safety instructions on wireless option
devices that are included in the user's manual of each RF option device.
Caution: To comply with FCC RF exposure compliance
requirements, a separation distance of at least 20 cm (8 inches)
must be maintained between the antenna for the integrated
wireless LAN Mini PCI Card built in to the screen section and all
persons.
Note: The Acer wireless Mini PCI adapter implements a
transmission diversity function. The function does not emit radio
frequencies simultaneously from both antennas. One of the
antennas is selected automatically or manually (by users) to ensure
good quality radiocommunication.
Page 99

83
2 This device is restricted to indoor use due to its operation in the 5.15 to
5.25 GHz frequency range. FCC requires this product to be used indoors for
the frequency range 5.15 to 5.25 GHz to reduce the potential for harmful
interference to co-channel Mobile Satellite systems.
3 High power radar are allocated as primary users of the 5.25 to 5.35 GHz
and 5.65 to 5.85 GHz bands. These radar stations can cause interference
with and/or damage this device.
4 An improper installation or unauthorized use may cause harmful
interference to radio communications. Also any tampering of the internal
antenna will void the FCC certification and your warranty.
Canada — Low-power license-exempt radio
communication devices (RSS-210)
a Common information
Operation is subject to the following two conditions:
1. This device may not cause interference, and
2. This device must accept any interference, including interference
that may cause undesired operation of the device.
b Operation in 2.4 GHz band
To prevent radio interference to the licensed service, this device is
intended to be operated indoors and installation outdoors is subject
to licensing.
c Operation in 5 GHz band
• The device for the band 5150-5250 MHz is only for indoor usage to reduce
potential for harmful interference to co-channel Mobile Satellite systems.
• High power radars are allocated as primary users (meaning they have
priority) of 5250-5350 MHz and 5650-5850 MHz and these radars could
cause interference and/or damage to LELAN (Licence-Exempt Local Area
Network) devices.
English
English
Page 100

English
84
Federal Communications Comission
Declaration of Conformity
This device complies with Part 15 of the FCC Rules. Operation is subject to the
following two conditions: (1) This device may not cause harmful interference,
and (2) This device must accept any interference received, including
interference that may cause undesired operation.
The following local manufacturer/importer is responsible for this declaration:
Product name: Notebook PC
Model number: ZR1
Machine type:
SKU number:
Name of responsible party: Acer America Corporation
Address of responsible party: 2641 Orchard Parkway
Contact person: Mr. Young Kim
Tel: 408-922-2909
Fax: 408-922-2606
Extensa 4610 and Extensa 4210
Extensa 461xxx and Extensa 421xxx
("x" = 0 - 9, a - z, or A - Z)
San Jose, CA 95134
USA
 Loading...