

Page 1
Page 2

© 2015. All Rights Reserved.
Acer Chromebook 15 User’s Manual
Covers: Chromebook CB5-571 / C910
This revision: January, 2015
Product Registration
When using your product for the first time, it is recommended that you immediately
register it. This will give you access to some useful benefits, such as:
• Faster service from our trained representatives.
• Membership in the Acer community: receive promotions and participate in
customer surveys.
• The latest news from Acer.
Hurry and register, as other advantages await you!
How to register
To register your Acer product, please visit www.acer.com. Select your country, click
Register a product and follow the simple instructions.
After we receive your product registration, you will be sent a confirmation email with
important data that you should keep in a safe place.
Obtaining Acer accessories
We are happy to inform you that Acer's warranty extension program and notebook
accessories are available online. Come and visit our online shop and find what you
need at store.acer.com.
The Acer store is being progressively rolled out, and, unfortunately may not be
available in some regions. Please check back regularly to see when it will be
available in your country.
Model number: __________________________________
Serial number: ___________________________________
Date of purchase: ________________________________
Place of purchase: ________________________________
Page 3

English
Table of contents
Getting started 5
Turn on your Chromebook .......................................................... 5
Select your language settings ..................................................... 5
Connect to a network .................................................................. 5
Accept the Terms of Service .............................................. 5
Sign in to your Google Account................................................... 5
Create a new Google Account............................................ 6
Browse as a guest .............................................................. 6
Set your account picture..................................................... 6
Your Acer Chromebook tour 7
Front view.................................................................................... 7
Keyboard view............................................................................. 8
Function keys ..................................................................... 9
Touchpad.......................................................................... 10
Left side view ............................................................................ 10
Right side view .......................................................................... 11
Bottom view............................................................................... 12
The Chrome OS Desktop 13
Desktop overview...................................................................... 13
Window controls ............................................................... 13
Launcher........................................................................... 14
Status area ....................................................................... 14
Apps 15
Managing apps.......................................................................... 15
Installing apps in Chrome OS ........................................... 15
Removing apps from Chrome OS .................................... 15
Customizing apps pinned to the launcher ........................ 15
Google Drive ............................................................................ 15
Sync files from Downloads to Google Drive ..................... 16
Enable offline access to Google Drive files ...................... 17
Gmail ........................................................................................ 17
Composing an email......................................................... 17
Google Docs ............................................................................. 17
Creating a new document................................................. 17
YouTube ................................................................................... 18
Page 4

Table of contents
English
Playing video or audio files ........................................................18
Other Supported File Types.......................................................18
Chrome Web Store ...................................................................18
Installing new apps from the Chrome Web Store.............. 18
Chrome OS tips and tricks.........................................................20
How to create documents .................................................20
How to share documents with other users ........................21
How to start a video chat...................................................21
How to listen to music .......................................................22
How to watch videos, TV, or movies .................................23
How to open Microsoft Word and Excel documents .........24
How to use your Chromebook when there’s no internet ...24
Settings 26
Changing the language settings ................................................26
Changing the clock settings.......................................................27
Customizing appearance ...........................................................27
Customizing the wallpaper ................................................27
Customizing the theme .....................................................27
Setting up a printer ....................................................................28
Updating Chrome OS.................................................................28
Automatic update ..............................................................28
Manual update ..................................................................28
Help 29
Online and offline help ...............................................................29
Page 5
English
Getting started
Turn on your Chromebook
On the Chromebook, the power button is located at the upper-right corner
of the keyboard. A "connect" screen will appear when the Chromebook first
boots up.
Select your language settings
Use the "Select your language" drop-down list to choose your default
language setting. If there is more than one way to type in your language,
you may be prompted to select a keyboard input method as well.
Connect to a network
Select a wireless network from the "Select a network" list to connect to the
Internet. If network access is protected, you will need an access password
to connect to it.
Accept the Terms of Service
Once connected to a network, accept the Terms of Service. Your
Chromebook will then download any available system updates, so you
automatically get the latest Chrome OS features.
5
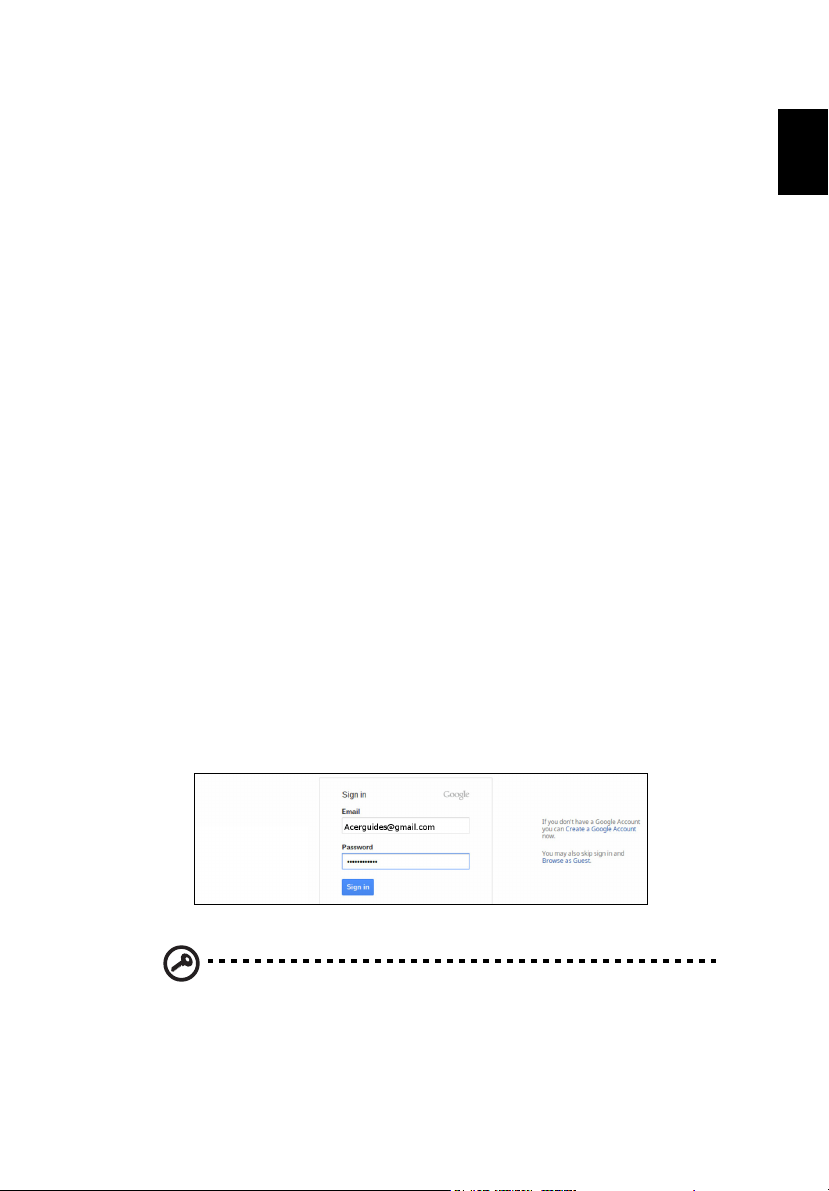
Sign in to your Google Account
If you already have a Google Account, enter your username and password
in the sign-in box that appears and click on the Sign in button.
Important: Sign in with your primary Google Account. This account
will be set as the owner and is the only account that will be able to
change certain Chrome settings.
Page 6
6
English
Getting started
Create a new Google Account
You can create a new Google Account if you don’t already have one. Click
Create a Google Account to set up a new account. A Google Account
gives you access to useful web services developed by Google, such as
Gmail, Google Docs, and Google Calendar.
Browse as a guest
You can also use the Chromebook without a Google Account by clicking
Browse as a Guest.
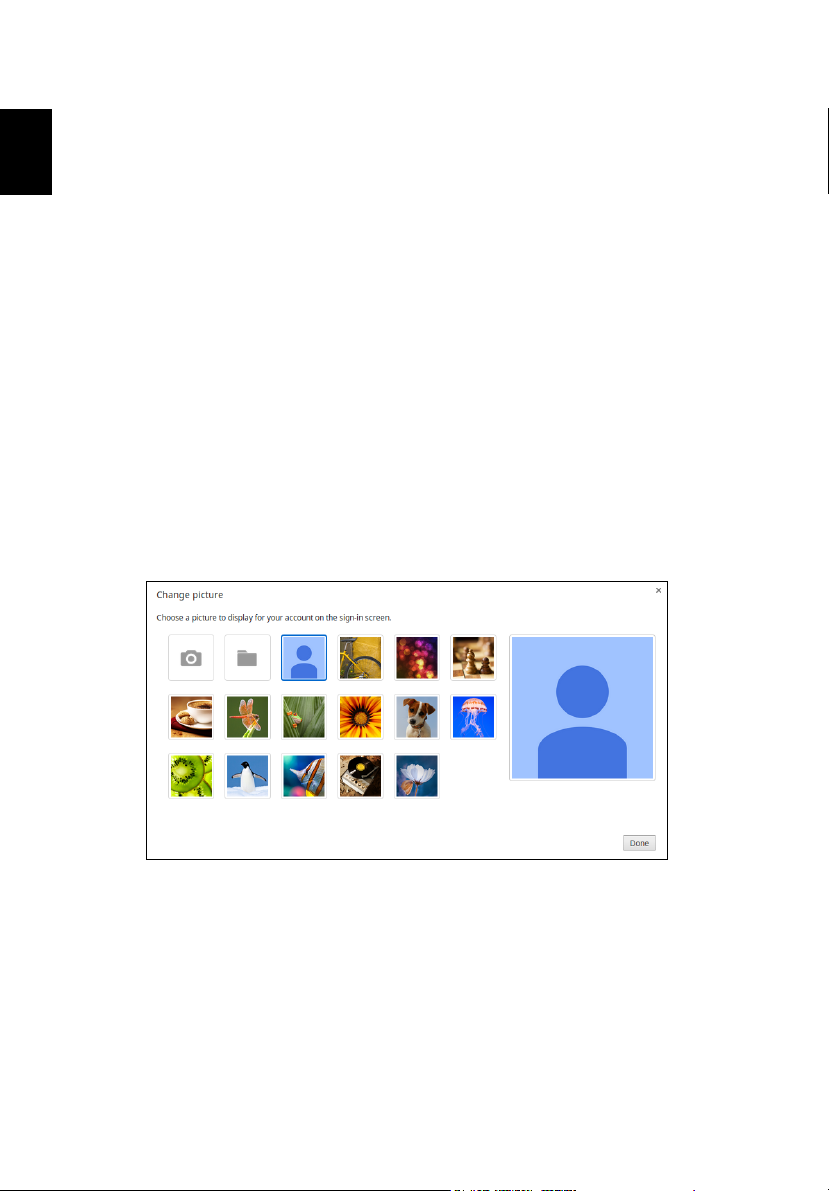
Set your account picture
This picture will represent your account on the main sign-in screen and
status area. If you like, you can use the Chromebook’s built-in webcam to
take a photo. If you don’t want to take a photo at this time, you can choose
an icon instead. You can always update your picture after you’ve signed in.
Also, your Chromebook is integrated with your Google account profile.
After signing in with your Google account you have the option of choosing
your Google account profile picture.
Page 7
English
Your Acer Chromebook tour
1
2
3
4
Now that you are done setting it up, let us show you around your new Acer
Chromebook.
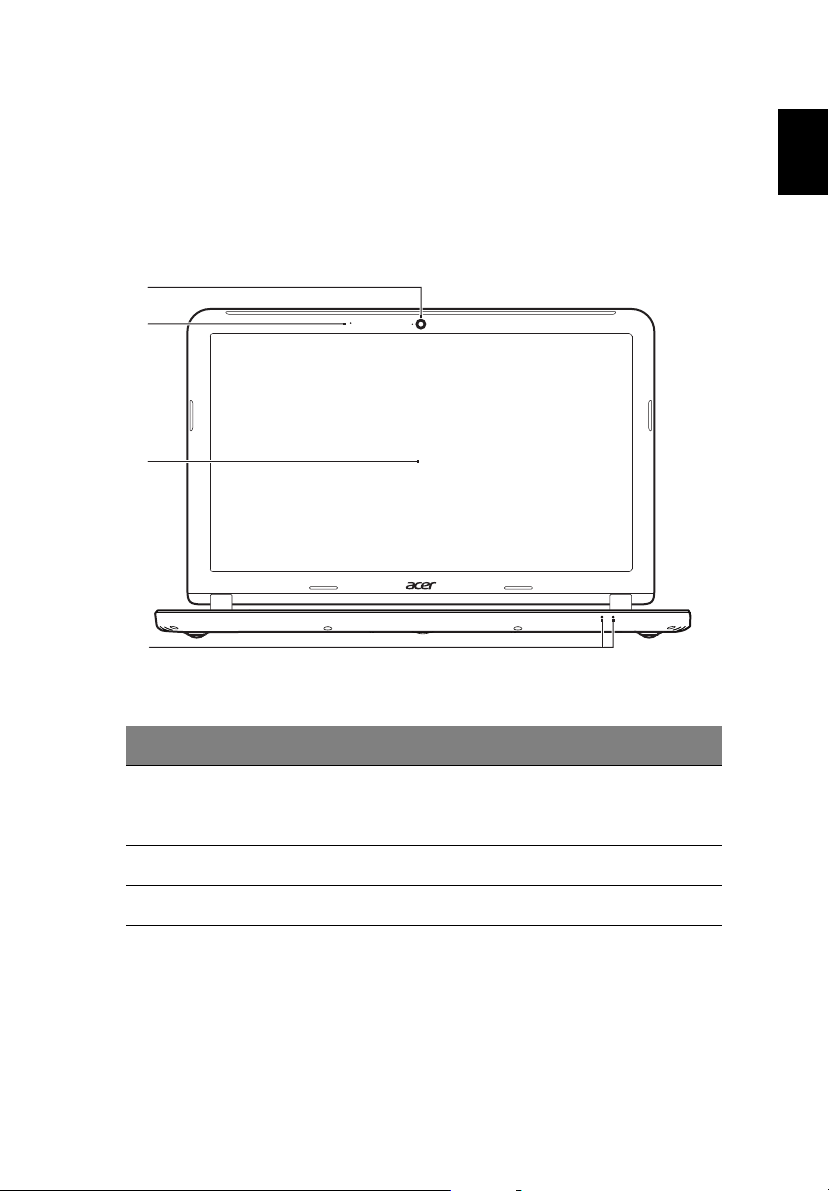
Front view
7
# Icon Item Description
Web camera for video communication.
1 Webcam
2 Microphone Internal microphone for sound recording.
3 Screen Displays computer output.
A light next to the webcam indicates that
the webcam is
active.
Page 8
8
English
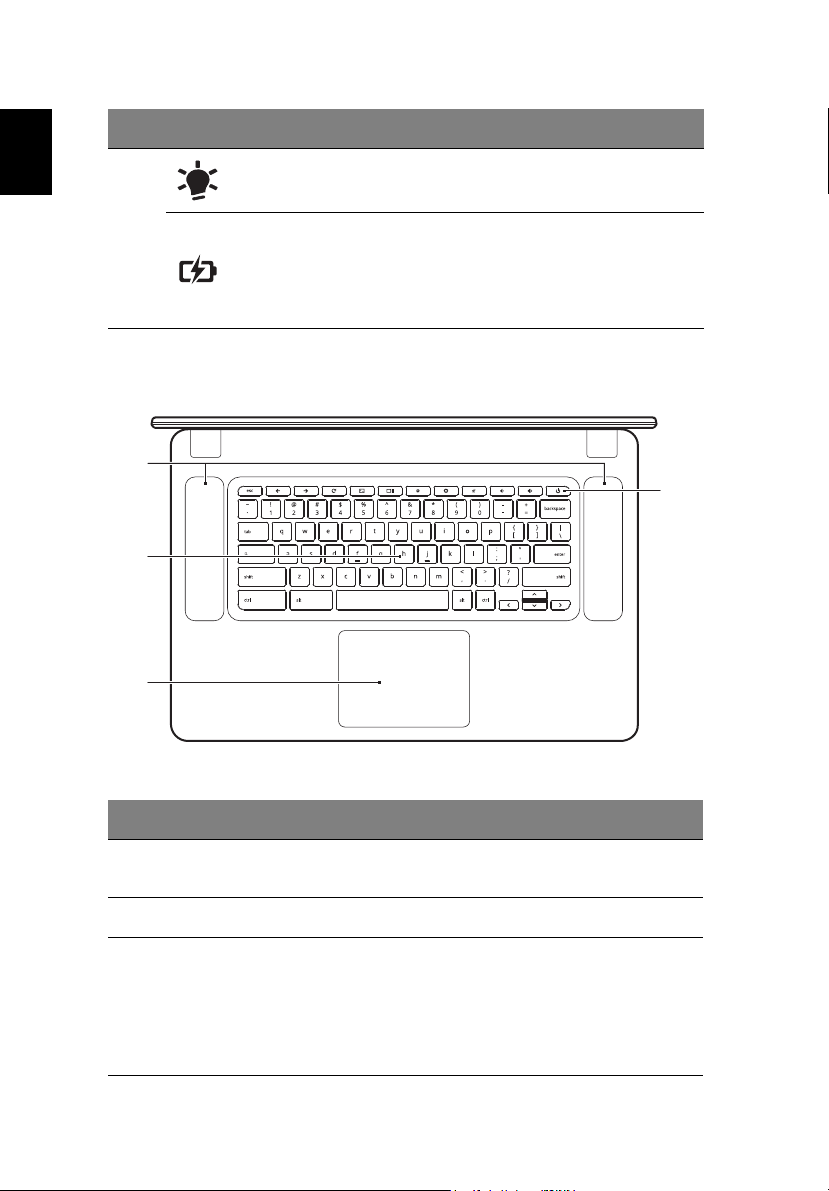
1
4
2
3
# Icon Item Description
Power indicator Indicates the computer's power status.
Your Acer Chromebook tour
4
Battery
indicator
Keyboard view
Indicates the computer's battery status.
1. Charging: The light shows amber
when the battery is charging.
2. Fully charged: The light shows blue
when in AC mode.
# Icon Item Description
1 Speakers
2 Keyboard For entering data into your computer.
3
Touchpad / click
button
Left and right speakers deliver stereo
audio output.
Touch-sensitive pointing device which
functions like a computer mouse
Pressing down anywhere on the pad
functions like the left butto
Pressing down anywhere with two fingers
functions like the ri
ght button of a mouse.
.
n of a mouse.
Page 9
English
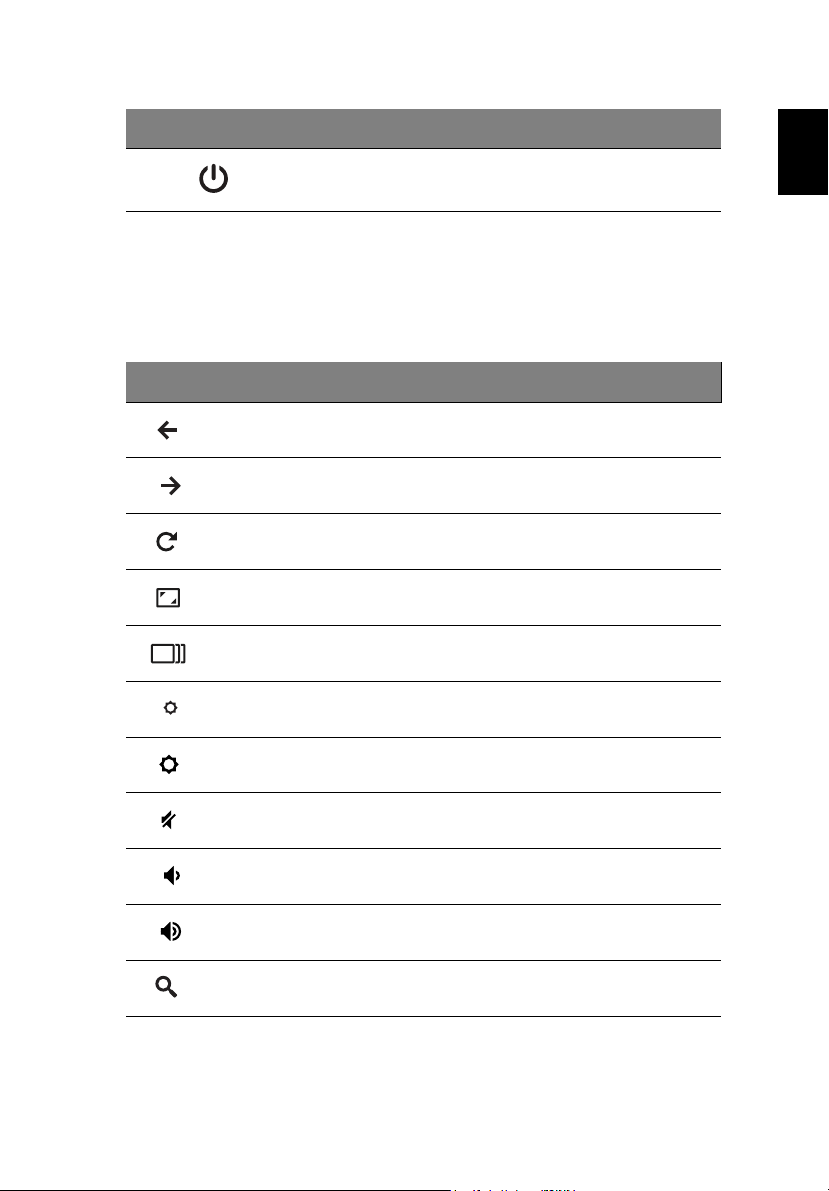
# Icon Item Description
4 Power key Turns the computer on and off.
Function keys
The computer uses function keys or key combinations to access some
hardware and software controls, such as screen brightness and volume.
The dedicated function keys each have a specific function..
Icon Function Description
Previous Go to the previous page.
Next Go to the next page.
Reload Reload the current page.
Full-screen Open the page in full-screen mode.
9
Next window Switch to the next window.
Brightness down Decreases the screen brightness.
Brightness up Increases the screen brightness.
Mute Turns off audio output.
Volume d own Decreases the volume.
Volume u p Increases the volume.
Search Search from the Apps panel.
Page 10
10
English
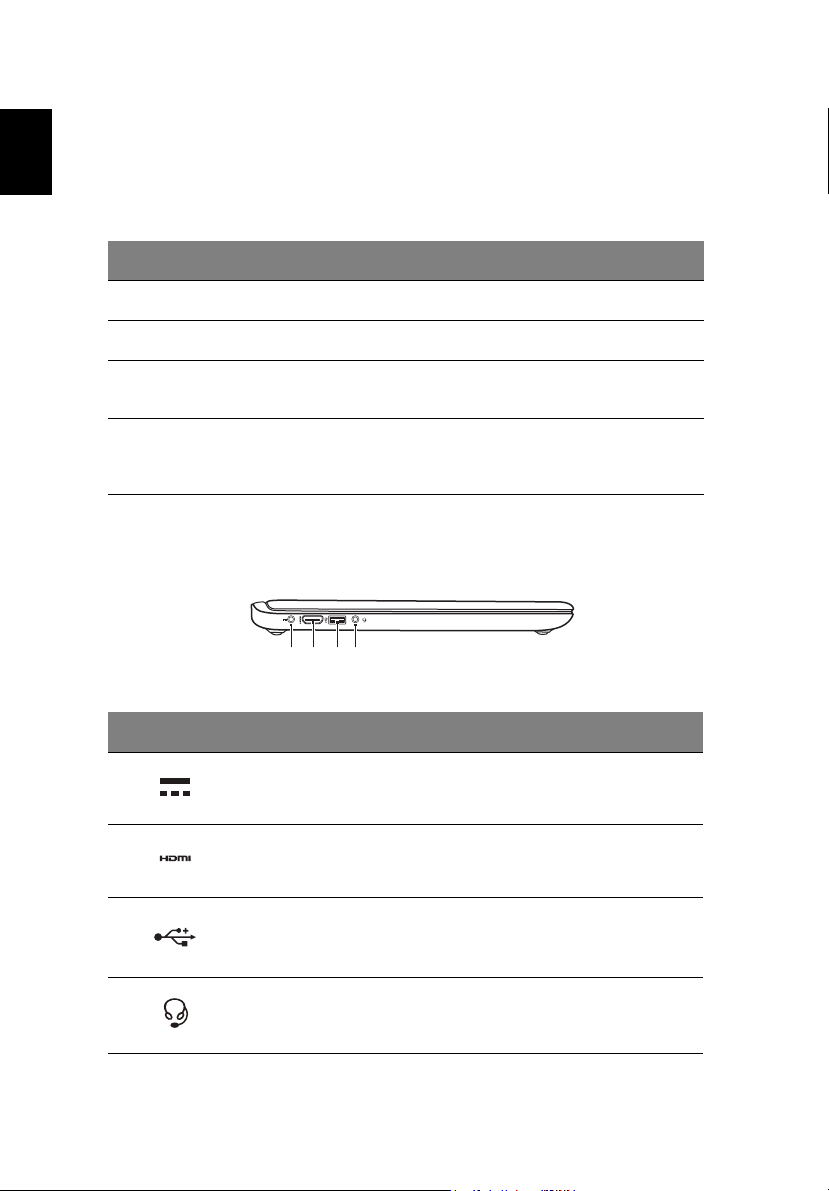
1 42 3
Your Acer Chromebook tour
Touchpad
The built-in touchpad is a pointing device that senses movement on its
surface. This means the cursor responds as you move your fingers across
the surface of the touchpad.
Action Gesture
Click Press down on any part of the touchpad.
Right-click Press the touchpad with two fingertips.
Scroll
Drag and drop
Place two fingers on the touchpad and move them up and
down to scroll vertica
Click the item you want to move with one finger. With a
secon
d finger, move the item. Release both fingers to
drop the item.
lly, left and right to scroll horizontally.
Left side view
# Icon Item Description
1
2
3
DC-in jack Connects to an AC adapter.
HDMI port
USB port
Supports high-definition digital video
connections.
Connects to USB devices.
If a port is black it is USB 2.0 compatible,
if it is blue it
is also USB 3.0 compatible.
4
Headset/speaker
jack
Connects to audio devices
(e.g., speakers, headphones), or a
dset with microphone.
hea
Page 11
English
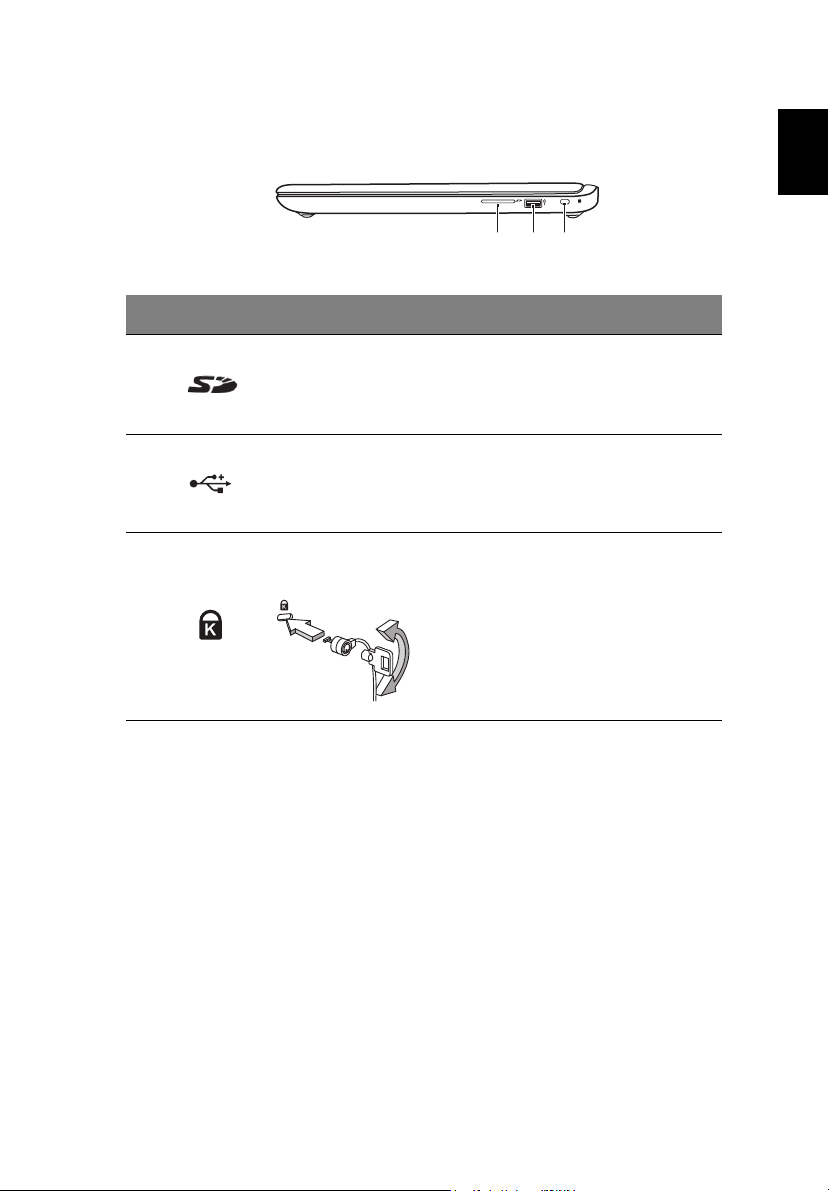
Right side view
132
# Icon Item Description
11
Accepts Secure Digital (SD
1
2
3
SD™ card reader
USB port
Kensington lock
slot
Note: Push to
The card reader uses one card at a
time.
Connects to USB devices.
If a port is black it is USB 2.0
atible, if it is blue it is also USB
comp
3.0 compatible.
Connects to a Kensington-compatible
computer security lock.
Note: Wr
lock cable around an immovable
object such as a table or handle of a
locked drawer. Insert the lock into the
notch and turn the key to secure the
lock. Some keyless models are also
available.
remove/install the card.
ap the computer security
™
) cards.
Page 12
12
English
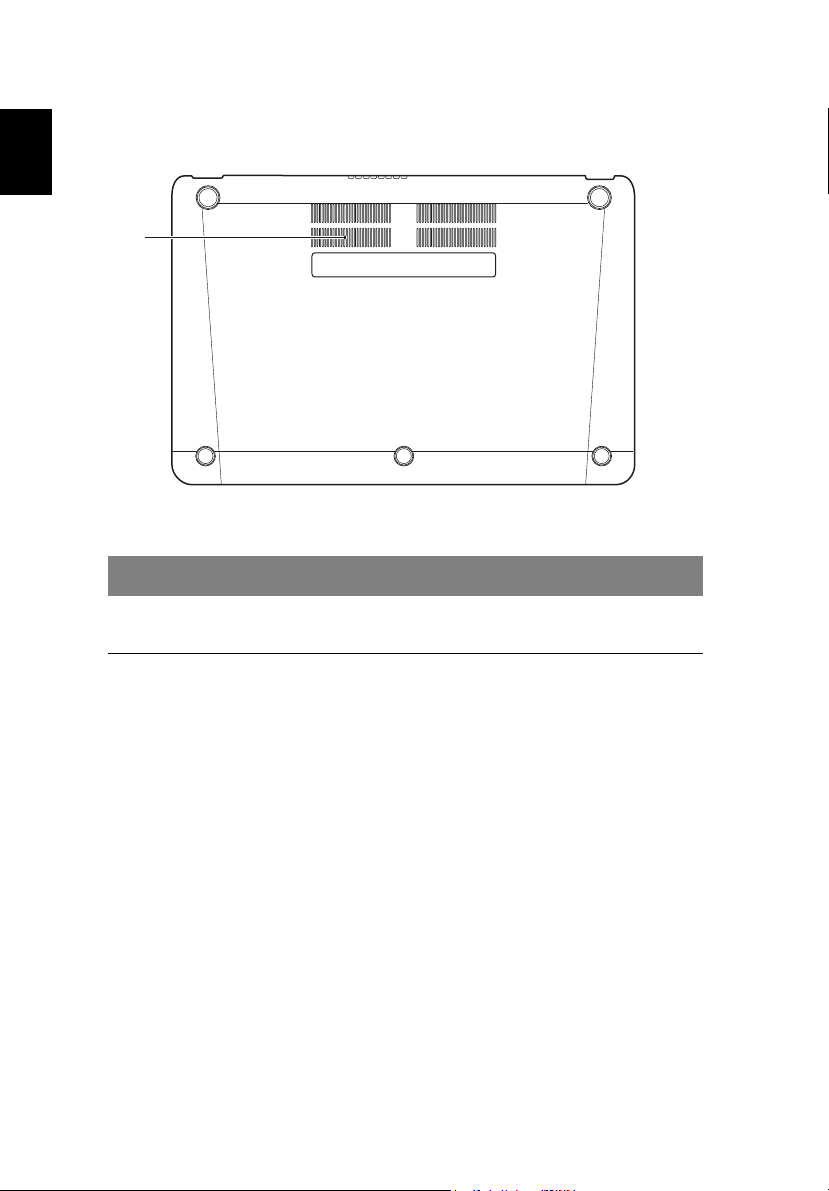
1
Bottom view
# Icon Item Description
Your Acer Chromebook tour
1
Ventilation and
fan
cooling
Allows the computer to stay cool.
Do not cover or obstruct the openings.
Page 13
English
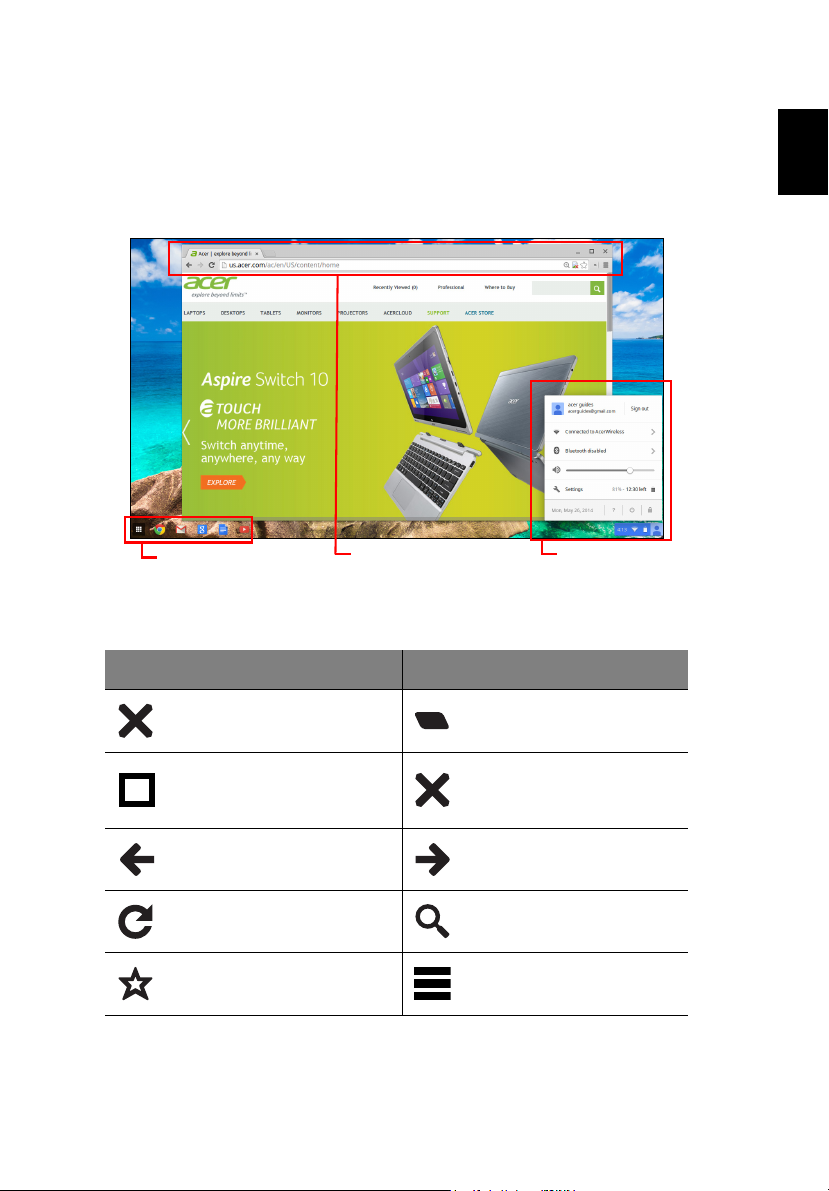
The Chrome OS Desktop
Launcher
Window controls Status area
Desktop overview
Window controls
13
Icon Description Icon Description
Close a tab Open a new tab
Minimize, maximize, or dock
the window on the left or
right
Back to the previous page Go to the next page
Reload the page Search
Bookmark Chrome controls
Close the window
Page 14
14
English
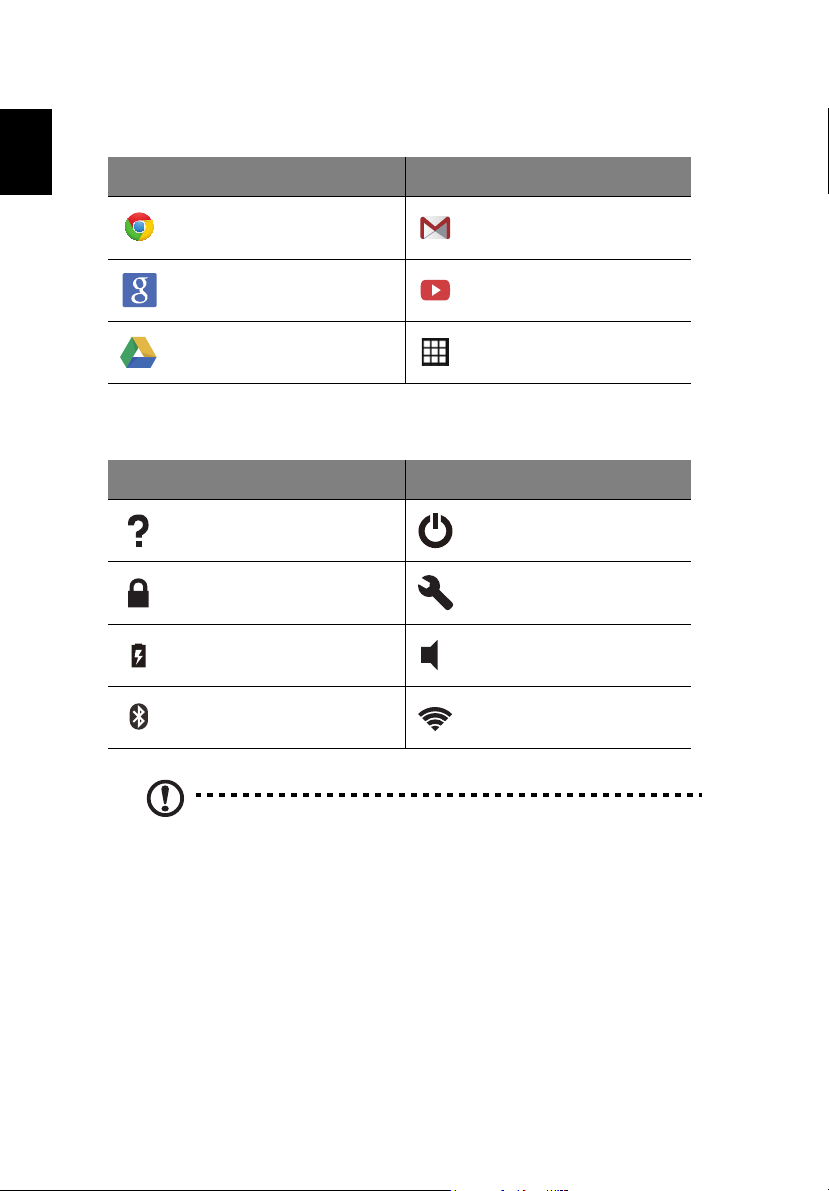
The Chrome OS Desktop
Launcher
Icon Description Icon Description
Google Chrome Gmail
Google Search YouTube
Google Drive Apps list
Status area
Icon Description Icon Description
Chrome OS help Shut down
Lock screen Settings
Battery status Volume control
Bluetooth status
Note: Specifications vary. Some icons may not be applicable to your
Chromebook.
Wireless network
connection
Page 15
English
Apps
Managing apps
Installing apps in Chrome OS
See "Installing new apps from the Chrome Web Store" on page 18.
Removing apps from Chrome OS
1. Click the Apps list button ( ).
2. Right-click (click with two fingers) on the app you want to remove.
3. Select Remove from Chr
Customizing apps pinned to the launcher
1. Click the Apps list button ( ).
2. Right-click (click with two fingers) on the app you want to add to the
launcher.
3. Select Pin to shelf.
ome.
15
To reorder the apps on the she
lf, just drag them around.
Google Drive
All files saved to your Google Drive are saved online and are accessible to
other devices, such as your smartphone or tablet. Files saved to the
Downloads folder are saved to your local drive and are only accessible to
your Chromebook.
Note: You must be connected to the Internet to do the following
Google Drive operations.
Page 16
16
English
Apps
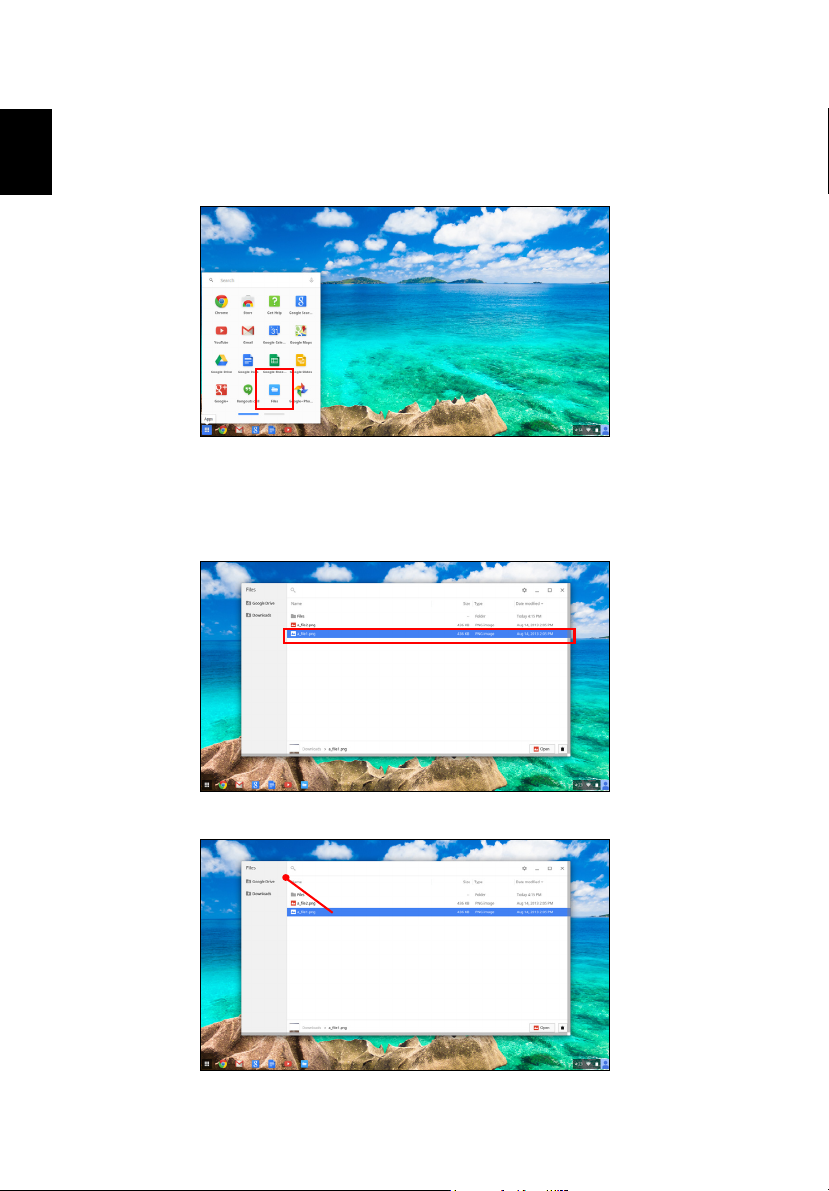
Sync files from Downloads to Google Drive
1. In the Apps list, click on the Files icon.
2. If this your first time accessing your Google Drive, click on the Google
Drive icon to enable access.
3. Once your Google Drive is enabled, select the files that you want to
upload.
4. Drag-and-drop the files on to Google Drive.
Page 17
English
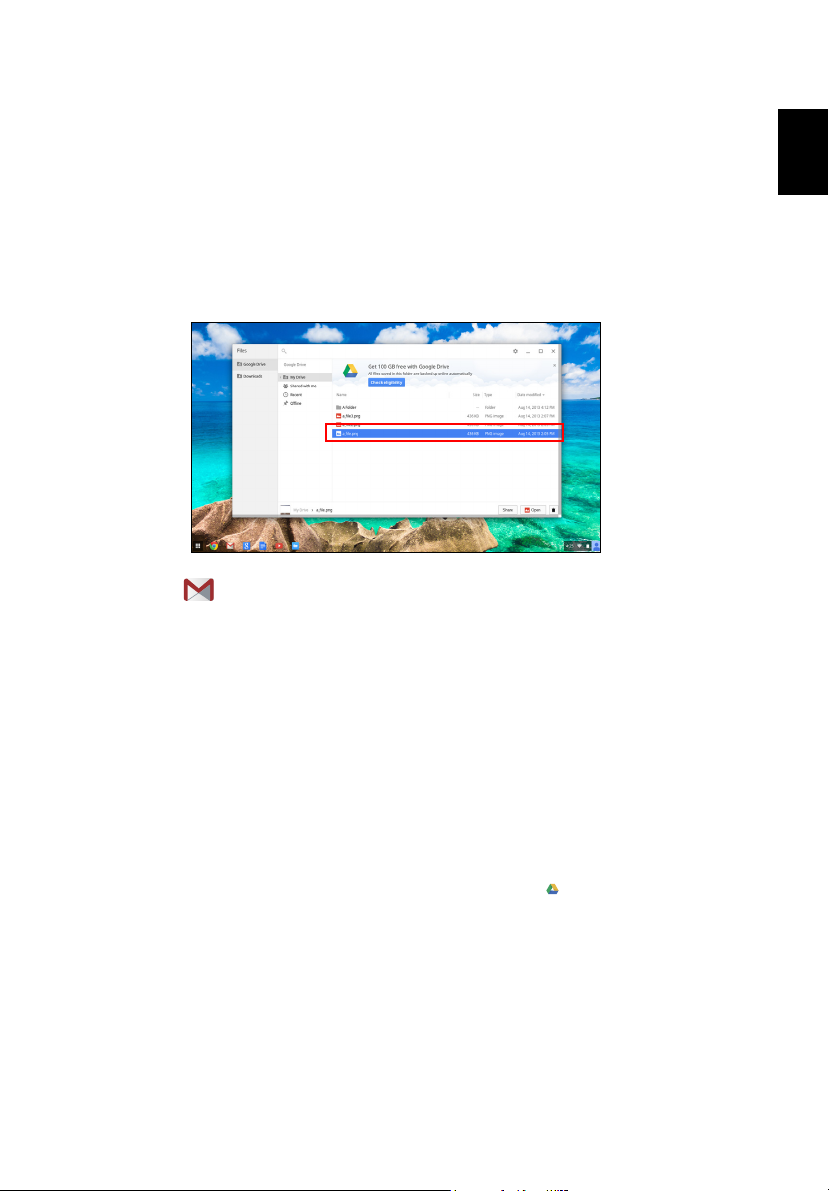
Enable offline access to Google Drive files
You can access files stored on your Google Drive while offline, but first you
must enable offline access:
1. In the Apps list, click on the Files icon, then click on Google Drive.
2. Select the file (s) you want to access offline.
3. Right-click (press with two fingertips or al
sensitive menu and click on Available offline. A check mark will
appear to indicate the file is available offline.
t-click) to bring up the context
Gmail
Composing an email
1. From the launcher, click on the Gmail icon.
2. Click COMPOSE.
3. Enter the recipient’s email address, the subject, and the message.
4. When you are finis/hed composing your message, click Send.
17
Google Docs
Creating a new document
1. From the Apps list, click on the Google Drive icon ( ).
2. Click on CREA
TE and select the type of document you want to create.
Page 18
18
English
Apps
You Tube
YouTube is a video-sharing website on which users can upload, share and
view videos. You can access it by clicking the YouTube icon from the
launcher.
Playing video or audio files
Your Chromebook has a built-in media player to play audio and video files.
To play a file, double-click on an audio or video file in your Files app.
Media type Supported formats
Audio / Video
.3gp,.avi, .mov, .mp4, .m4v, .m4a, .mp3, .mkv, .ogv,
.og
m, .ogg, .oga, .webm, .wav
Other Supported File Types
Your Chromebook supports a number of other file formats.
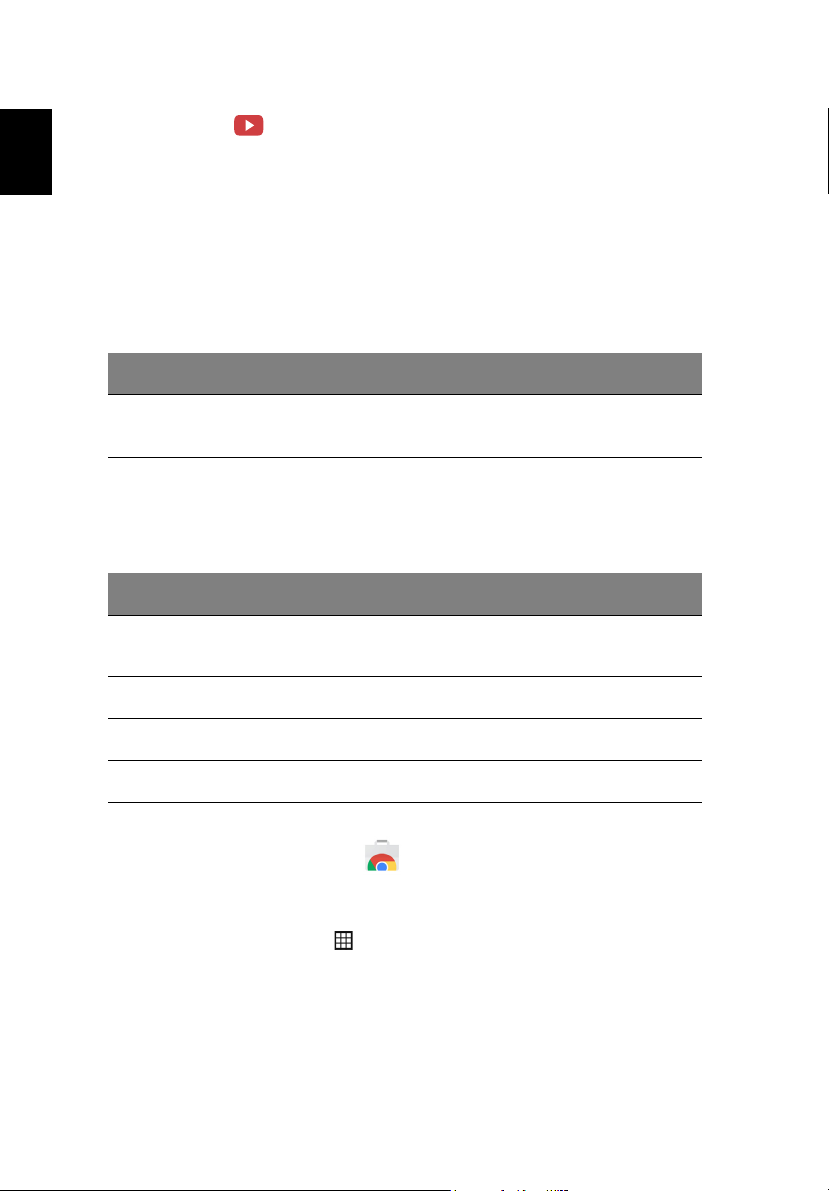
File type Supported formats
Microsoft
O
ffice files
Images .bmp, .gif, .jpg, .jpeg, .png, .webp
Compressed .zip, .rar, .tar, .tar.gz (.tgz), .tar.bz2 (.tbz2)
Other .txt, .pdf
.doc, .docx, .ppt, .pptx, .xls, .xlsx – (all read-only)
Chrome Web Store
Installing new apps from the Chrome Web Store
1. Click the Apps list icon ( ) and then click on Chrome Web Store.
2. You can then browse through the app categories in the left column or
search for a specific type of app using the search box.
3. When you find an app that you would like to add, hover your mouse
over it and then click on ADD TO CHROME.
Page 19

19
English
4. A verification window will pop up, click on Add to download and install
the app, or click on Cancel.
5. To open your new app, click the Apps list icon ( ) and then click on
the app.
Page 20
20
English
Chrome OS tips and tricks
Your Chromebook is a new type of computer that works somewhat
differently than what you may be used to, so you might like to know how
easy and useful things are when using it. Here are some tips and tricks.
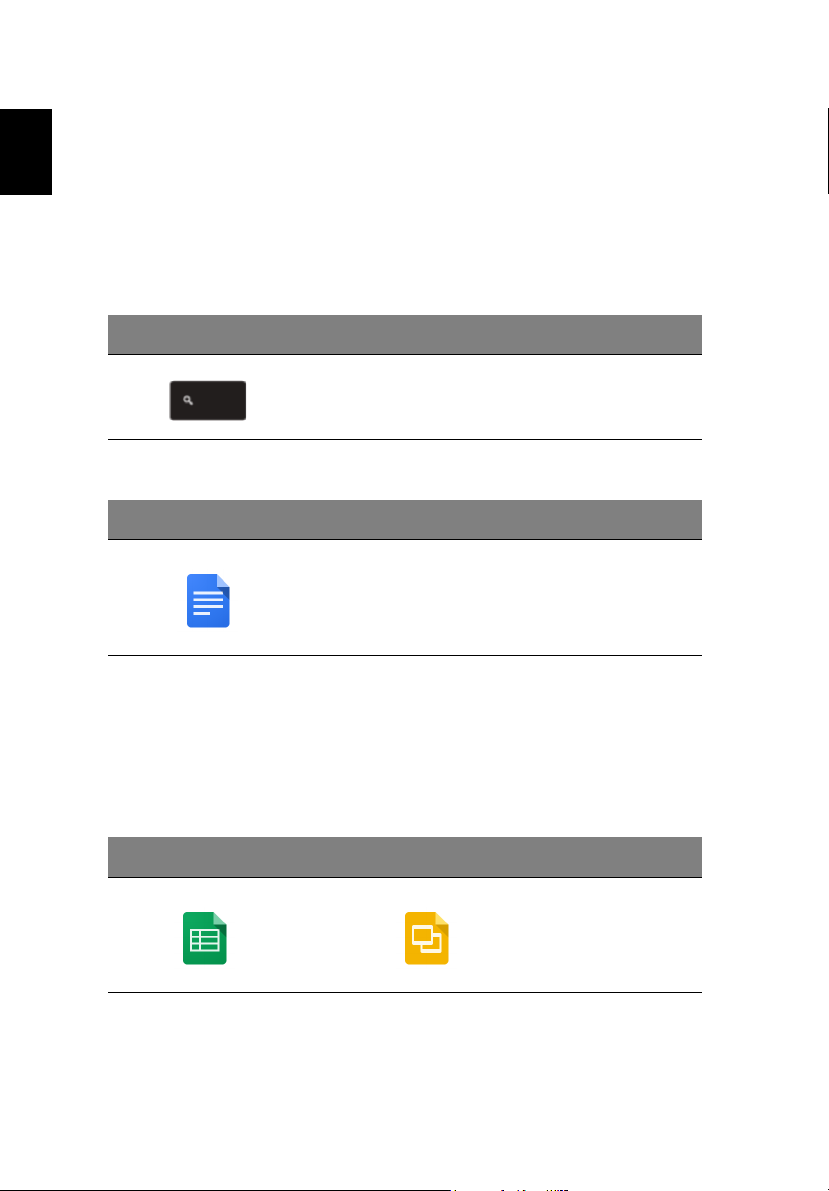
How to create documents
1. Press the Search key on your keyboard.
Press
2. Click on Google Docs.
Click
That’s it. You’ve just created a new document in less than one second. With
your new document, you can add text, insert images, change the font,
make it bold, underline it, italicize it – you get the gist. You can also click
Google Sheets to create spreadsheets and Google Slides to create
presentations.
Click
or
Page 21
English
How to share documents with other users
1. Click the Share button in the upper right corner of your document.
Click
2. Add people by typing in their email address.
3. After you click Done, they’l
document has been shared with them.
Click
To find your document later, click on the Google Drive icon – this opens
Google Drive, which shows you a list of your files and folders. You can
search for files by name at the top of the screen.
l receive an email letting them know a
21
How to start a video chat
1. Press the Search key and click on the Hangouts call icon.
Press Click
>
2. Type in the name or email address of a person.
Page 22
22
English
3. Click the Submit button to start your Hangout.
Click
For all you Skype users out there, Google+ Hangouts are free video chats
for up to ten people.
How to listen to music
Google Play Music
1. Press the Sear
Press Click
ch key and click Google Play Music.
>
2. To discover or buy songs, use the search box at the top.
3. To play a song, just double click on it.
4. All of the music you upload or buy will be saved under My Music.
For other streaming apps like Pandora, S
(availability varies by country):
1. Press the Sear
Store, then do a search for Pandora or other music apps.
Press Click
ch key and click on Store to go to the Chrome Web
potify, Rdio, Deezer and more
>
2. When you find what you want, click the Add to Chrome button.
Page 23
English
How to watch videos, TV, or movies
YouTube
1. Press the Sear
Press Click
ch key, click YouTube and you’re ready to roll.
>
Google Play Movies & TV
23
1. Press the Sear
Press Click
ch key and click Google Play Movies & TV.
>
To find more entertainment apps like Netflix, Flixster, and more (availability
varies by country):
1. Press the Sear
Press Click
ch key and click Store.
>
2. Select Entertainment on the left side.
3. Choose TV &
Movies.
Page 24
24
English
How to open Microsoft Word and Excel documents
1. Press the Search key and click Files.
Press Click
>
2. Double click on any Microsoft Office file stored in Google Drive or on an
external hard drive or USB flash drive connected to your Chromebook.
You can convert Microsoft Word and Excel files into Google Drive
Documen
Drive documents and spreadsheets as Microsoft Office files.
How to use your Chromebook when there’s no internet
Gmail:
ts and Spreadsheets and edit them. You can also export Google
1. Press the Sear
Store, then search for Gmail Offline in the upper left corner search box,
and add it.
Press Click
ch key and click on Store to go to the Chrome Web
>
2. The next time you find yourself offline, press the Search key
Press
Page 25

English
3. Click Gmail Offline to open it, and use Gmail like you normally would.
It’ll update and send your emails the next time you log on to the internet.
Click
Google Docs, Sheets, and Slides:
1. When you open Google Drive while conn
ected to the internet, it will
automatically enable Offline Drive.
25
2. Once the process completes, the next
time you want to create a
document offline, simply press the Search key and click on Google Docs,
Google Sheets, or Google Slides.
Find other useful offline apps at the
Chrome Web Store by pressing the
Search key and clicking on Store. When the Chrome Web Store opens,
click on Collections in the left column and then Offline Apps.
The Get S
tarted app and Help on your Chromebook have a lot of
additional very useful information. They are well worth a look.
Page 26
26
English
Settings
Settings
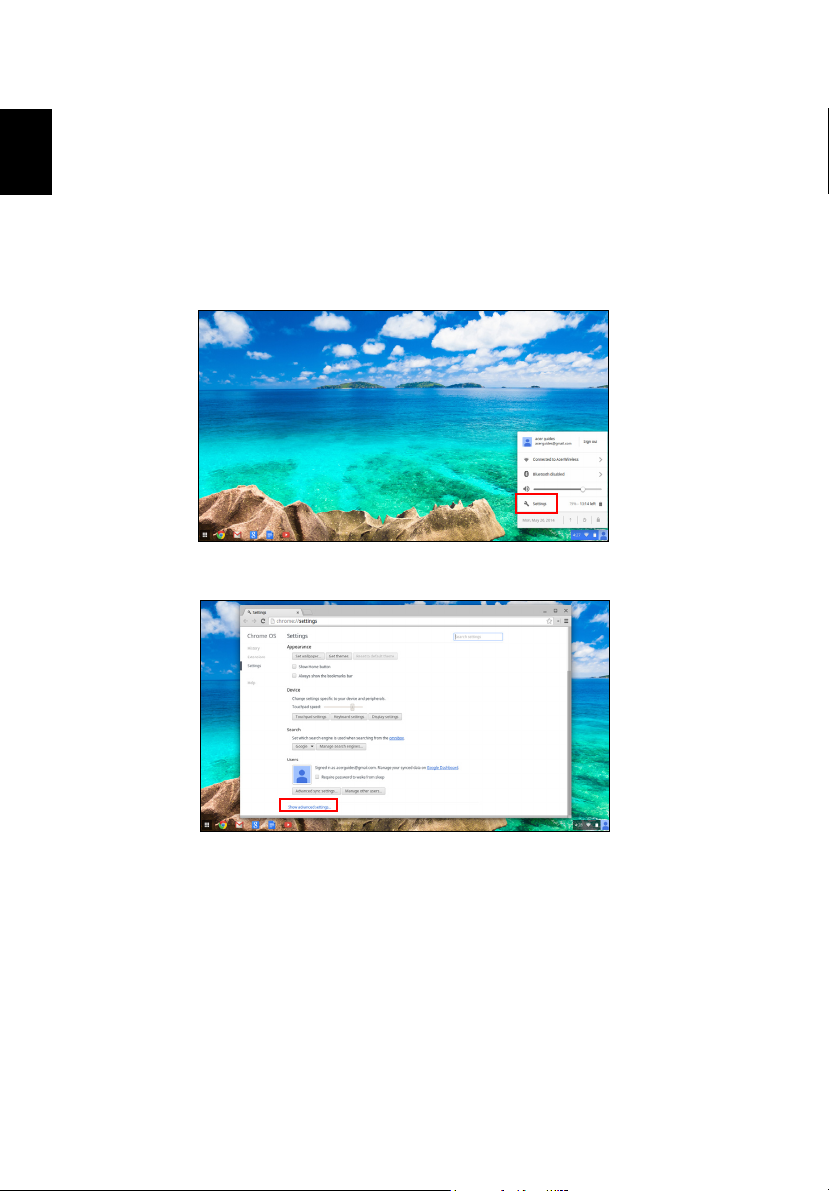
Use the settings menu to adjust the various options for your Chromebook.
To access the settings menu:
1. Click on the status area of the shelf, in the lower-right corner of the
screen, where your account picture appears.
2. Click on Settings.
3. To show the advanced settings, scroll to the bottom and click on Show
advanced settings.
Changing the language settings
1. Click the status area in the lower-right corner, where your account
picture appears.
2. Click on Settings.
3. Click on Sh
4. Scroll down and click on Customize languages and input.
5. Click on Add to add additional languages.
ow advanced settings.
Page 27

27
English
6. To enable a language for keyboard input, select the checkbox next to
the language after adding it.
7. Click on OK when finished.
Changing the clock settings
You can change the time format and time zone on your Chromebook. If the
date or time is incorrect on your Chromebook, try adjusting the time zone.
To change the time zone:
1. Click the status area in the lower-right corner, where your account
picture appears.
2. Click on Settings.
3. Click on Show advanced settings.
4. Scroll down and click on the drop down box next to Time zone.
Customizing appearance
Customizing the wallpaper
1. Click the status area in the lower-right corner, where your account
picture appears.
2. Click on Settings.
3. Click on Set wallpaper.
4. Select a preloaded wallpaper or click Browse to select your own
image. You can also choose I’m feeling lucky to have the wallpaper
change randomly.
5. Once selected, click OK.
Customizing the theme
1. Click the status area in the lower-right corner, where your account
picture appears.
2. Click on Settings.
3. Click on Get themes.
4. You’ll be taken to the Chrome Web Store, where you can find extra
resources for the Chrome browser.
5. Once you find a theme that you’d like to try out, click Choose theme.
Page 28
28
English
Settings
Setting up a printer
You can use the Google Cloud Print service to send print requests to your
printer. Not all printers are supported.
To learn more about Google Cloud Print and how to set up your printer,
ect to the Internet to access the more extensive online help from
conn
"Online and offline help" on page 29 and then search for Go
Print.
ogle Cloud
Updating Chrome OS
Automatic update
Each time you turn on your Chromebook, it automatically checks for
updates. When an update is available, this update icon (
the status area. To apply the update:
1. Click the status area of the shelf in the lower-right corner of the screen
where your account picture appears.
2. Click Restart to update.
3. Your Chromebook will shutdown and automatica
update applied.
Manual update
) will appear in
lly restart, with the
To manually check for an update or check what version of Chrome OS you
are using:
1. Click the status area in the lower-right corner, where your account
picture appears.
2. Click on Settings.
3. In the new tab that opens, click on Help in the left column.
4. If any updates are available, they will be displayed on the page.
Warning! Do not modify your Chromebook’s hardware yourself.
Doing so will cause the update function to no longer work.
Please get in touch with your dealer or an authorized service
center. Visit www.acer.com to find an authorized service site.
Page 29
English
Help
Online and offline help
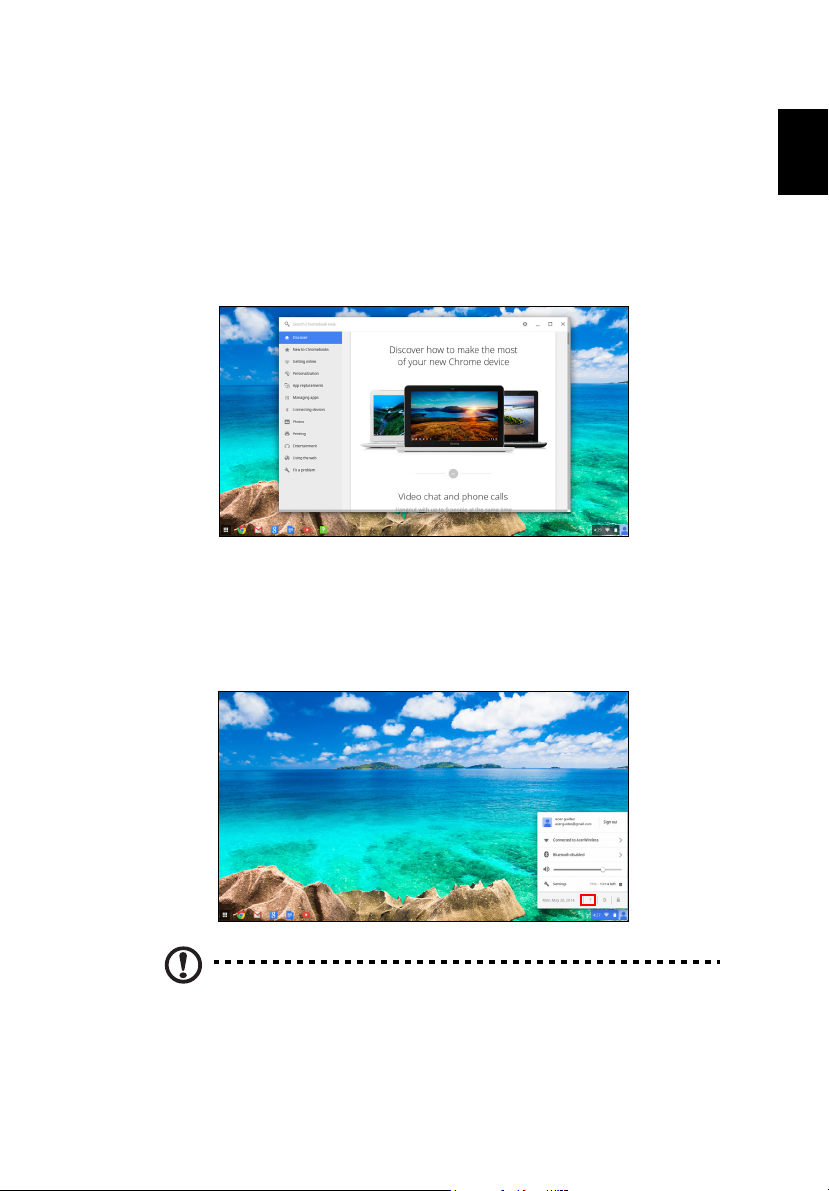
Additional help is available both online and offline. Help covers basic
troubleshooting as well as more detailed information about Chrome OS
and using your Chomebook.
To access the help pages:
1. Click the status area of the shelf in the lower-right corner of the screen
where your account picture appears.
2. Click on the question mark <?>.
29
Note: If you are connected to the Internet, the more extensive online
help will automatically open. Otherwise, the offline help will open.
 Loading...