

Page 1

Acer LCD TV
Contents
AT4250B-ATV
User's Guide
Important safety instructions 3
Disposal instructions 3
Declaration of Conformity
First things first 4
Packing checklist 4
Your LCD TV overview 4
Front panel view 4
Rear panel view
Remote control 6
General keys 6
Teletext
Basic connections 7
Connecting the power cord 7
Setting up the remote control
Enjoying your TV 7
Connecting an antenna/cable 7
Getting started watching your TV
Connecting external audio/video devices 8
Connecting a DVD, VCR, STB or audio/video equipment 8
CVBS and SCART AV connections
Connecting a camera, camcorder or video game 1
Connecting a PC or notebook computer 1
Selecting the input source 10
OSD navigation 11
Navigating the OSD with the remote control 11
Adjusting the OSD settings 1
Advanced features 13
Lock TV 13
Reorder for channels 1
Audio effects 1
Widescreen display mode 1
Troubleshooting 19
3
5
6
7
7
9
0
0
2
5
7
8
Product specifications 20
Page 2

Copyright © 2006. Acer Incorporated.
All Rights Reserved.
Acer LCD TV User's Guide
Original Issue: 08/2007
Changes may be made periodically to the information in this publication without obligation to notify any
person of such revisions or changes. Such changes will be incorporated in new editions of this manual or
supplementary documents and publications. This company makes no representations or warranties, either
expressed or implied, with respect to the contents hereof and specifically disclaims the implied warranties of
merchantability or fitness for a particular purpose.
Record the model number, serial number, purchase date, and place of purchase information in the space
provided below. The serial number and model number are indicated on the label affixed to your device.
All correspondence concerning your unit should include the serial number, model number, and purchase
information.
No part of this publication may be reproduced, stored in a retrieval system, or transmitted, in any form or
by any means, electronically, mechanically, by photocopy, recording, or otherwise, without the prior written
permission of Acer Incorporated.
Model Number:
Serial Number:
Purchase Date:
Place of Purchase:
Acer and the Acer Logo are registered trademarks of Acer Inc. Other companies' product names or trademarks
are used herein for identification purposes only and belong to their respective companies.
WOW, SRS and are trademarks of SRS Labs, Inc. WOW technology is incorporated under license from SRS Labs, Inc.
HDMI, the HDMI logo and High-Definition Multimedia Interface are trademarks or registered trademarks of HDMI Licensing LLC.
Page 3
Important safety instructions
Read these instructions carefully. Please put them somewhere safe for
future reference.
1 Follow all warnings and instructions marked on the product.
2 Unplug this product from the wall outlet before cleaning. Do
not use liquid cleaners or aerosol cleaners. Use a damp cloth for
cleaning.
3 Do not use this product near water.
4 Do not place this product on an unstable cart, stand or table. The
product may fall, sustaining serious damage.
5 Slots and openings are provided for ventilation; to ensure reliable
operation of the product and to protect it from overheating,
these openings must not be blocked or covered. The openings
should never be blocked by placing the product on a bed, sofa,
rug or other similar surface. This product should never be placed
near or over a radiator or heat register or in a built-in installation
unless proper ventilation is provided.
6 This product should be operated from the type of power
indicated on the marking label. If you are not sure of the type of
power available, consult your dealer or local power company.
7 Do not allow anything to rest on the power cord. Do not locate
this product where the cord will be stepped on.
8 If an extension cord is used with this product, make sure that the
total ampere rating of the equipment plugged into the extension
cord does not exceed the extension cord ampere rating. Also,
make sure that the total rating of all products plugged into the
wall outlet does not exceed the fuse rating.
9 Never push objects of any kind into this product through cabinet
slots as they may touch dangerous voltage points or short-out
parts, which could result in a fire or electric shock. Never spill
liquid of any kind on the product.
10 Do not attempt to service this product yourself, as opening or
removing covers may expose you to dangerous voltage points or
other risks. Refer all servicing to qualified service personnel.
11 Unplug this product from the wall outlet and refer servicing to
qualified service personnel under the following conditions:
a. When the power cord or plug is damaged or frayed.
b. If liquid has been spilled into the product.
c. If the product has been exposed to rain or water.
d. If the product does not operate normally when the operating
instructions are followed. Adjust only those controls that are
covered by the operating instructions.Improper adjustment
of other controls could result in damage; extensive work by
a qualified technician might then be required to restore the
product to normal condition.
e. If the product has been dropped or the case has been
damaged.
f. If the product exhibits a distinct change in performance,
indicating a need for service.
12 Use only the proper type of power supply cord set (provided in
your accessories box) for this unit. Always disconnect the power
cord from the wall outlet before servicing or disassembling this
equipment.
13. Do not overload an electrical AC outlet, power strip, or
convenience receptical. The overall system load must not exceed
80% of the branch circuit rating. If power strips are used, the load
should not exceed 80% of the power strip input rating.
14 Some products are equipped with a three-wire electrical
grounding-type plug that has a third pin for grounding. This plug
only fits into a grounded electrical outlet. This is a safety feature.
Make sure the AC outlet is properly grounded. Do not defeat the
safety purpose of the grounding-type plug by trying to insert it
into a non-grounded outlet. If you cannot insert the plug into the
outlet, contact your electrician to replace the obsolete outlet.
15 Do not use this LCD TV in the workplace, and maintain ample
distance from it when watching. Watching a big-screen TV too
close can cause eyestrain.
The grounding pin is an important safety feature. It is possible
to receive an electric shock from a system that is not properly
grounded
The grounding pin is also providing good immunity ability against
unexpected noise that interferes performance of this product and is
produced by other nearby electrical devices.
Disposal instructions
Do not throw this electronic device into the rubbish bin / container
when discarding. To minimize pollution and ensure utmost protection
of the global environment, please recycle.
For more information regarding WEEE, please refer to
http://global.acer.com/about/environmental.htm
Declaration of Conformity
We,
Acer Computer (Shanghai) Limited
3F, No. 168 Xizang medium road, Huangpu District, Shanghai, China
Contact Person: Mr. Easy Lai
Tel: 886-2-8691-3089 Fax: 886-2-8691-3120
E-mail: easy_lai@acer.com.tw
Hereby declare that:
Product: 32” LCD TV Monitor
Trade Name: Acer
Model Number: AT4250B-ATV
SKU Number: AT4250xxxxxx
(“x” = 0~9, a ~ z, or A ~ Z)
Is compliant with the essential requirements and other relevant provisions of the following EC directives, and that all the necessary steps
have been taken and are in force to assure that production units of
the same product will continue comply with the requirements.
EMC Directive 2004/108/EC as attested by conformity
with the following harmonized standards:
-. EN55022:1998 + A1:2000 + A2:2003, AS/NZS CISPR22:2002, Class B
-. EN55024:1998 + A1:2001 + A2:2003
-. EN55013:2001 + A1:2003
-. EN55020:2002 + A1:2003
-. EN61000-3-2:2000 +A2:2005, Class D
-. EN61000-3-3:1995 + A1:2001
Low Voltage Directive 2006/95/EC as attested by conformity with the following harmonized standard:
-. EN60065:2002
RoHS Directive 2002/95/EC on the Restriction of the
Use of certain Hazardous Substances in Electrical and
Electronic Equipment
Easy Lai / Director
Acer Computer (Shanghai) Limited
Compliant with Russian
regulatory certification
June 15, 2007
Date
English
3
Page 4
First things first
MENU
-
VOL+
VOL
INPUT
CH
CH
English
We would like to thank you for making this Acer LCD TV your choice. With proper care, your new Acer LCD TV will provide you
with years of entertainment and satisfaction.
This User's Guide introduces you to the various features your LCD TV can offer, and provides clear and concise information about
the product, so please read it thoroughly and retain it for future reference.
Packing checklist
Your LCD TV package should contain the following accessories, in addition to the accessory box. Please ensure that they are all
present. If any of the items is missing, then please contact your retailer.
•
Remote control (x1) / AAA batteries (x2)
•
Power cord (x1)
•
User's Guide / Quick Guide
• AV-
SCART connector (x2)
Your LCD TV overview
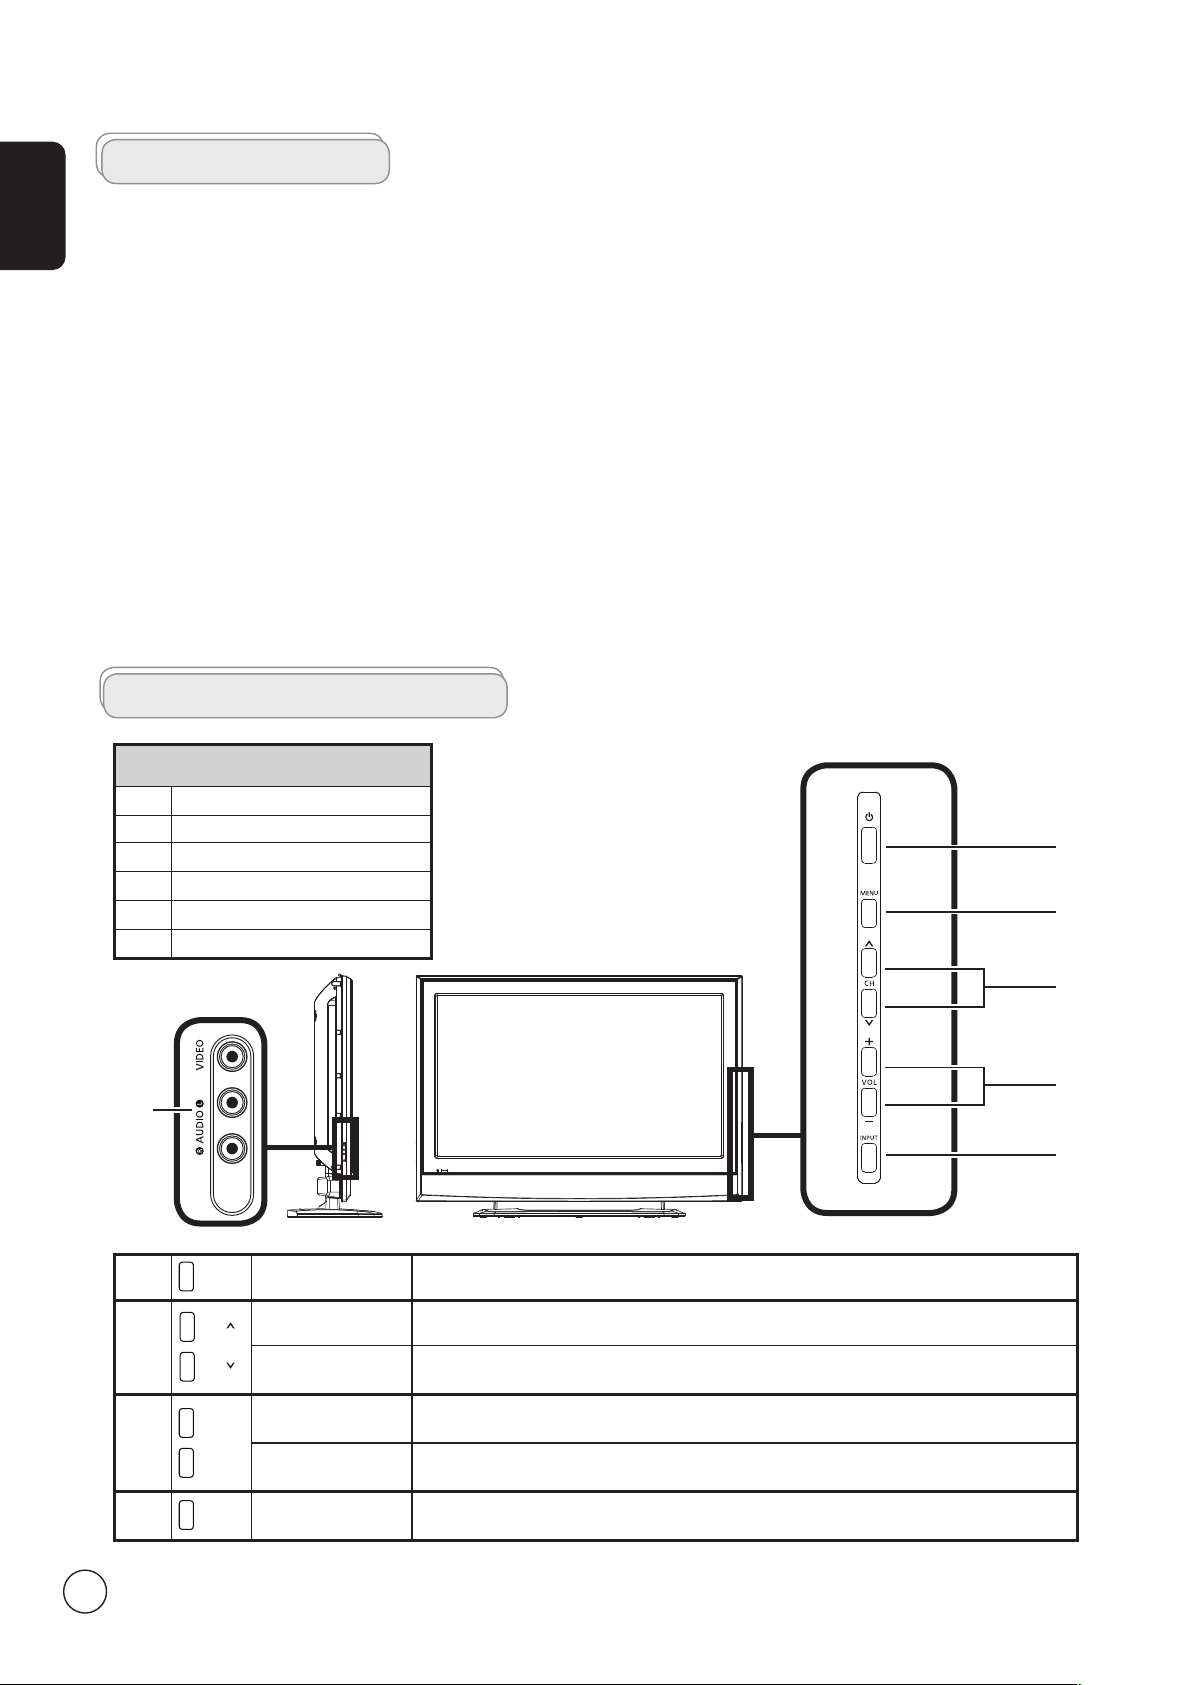
Front panel view
1
AV4-Audio L/R + CVBS
2 Power On/Off
3 Menu key
4 Channel up/down
5 Volume +/-
6 Input key
2
3
4
5
1
6
3
4
5
6
Menu key Turns the OSD menu ON and OFF
Channel up When the OSD is on, functions the same as the Up arrow
Channel down When the OSD is on, functions the same as the Down arrow
Volume up When the OSD is on, functions the same as the Right arrow
Volume down When the OSD is on, functions the same as the Left arrow
Input key When the OSD is on, press this button to confirm selection
4
Page 5
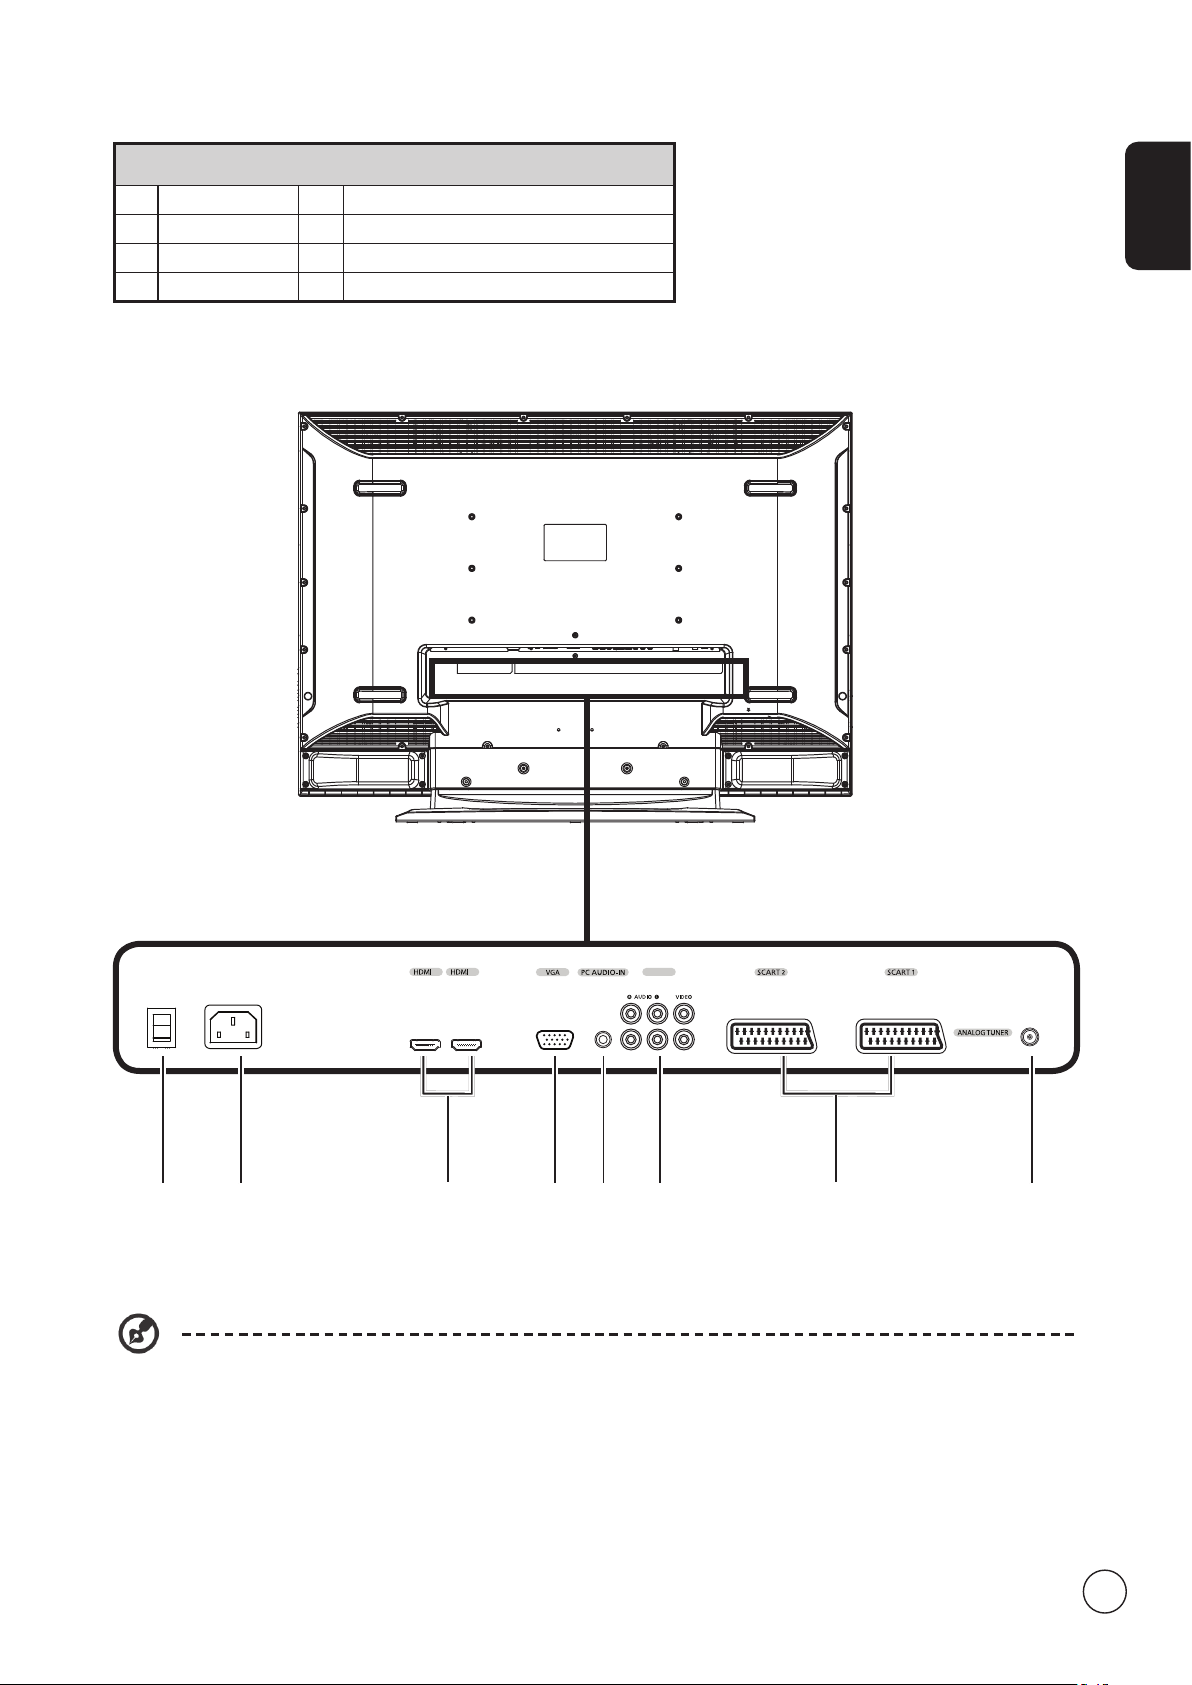
Rear panel view
2 1 AV3
Pr Pb Y
1 Power switch 2 AC-in
3 HDMI 4 VGA-in
5 PC Audio-in 6 AV3-Audio L/R + CVBS + COMPONENT *
7 SCART 8 Analog antenna
English
4321
* For AV3, Composite and component inputs share the same audio ports.
8765
5
Page 6
English
T
T
X
/
M
I
X
M
P
X
W
I
D
E
EPG CH LIST SRS
T
T
X
/
M
I
X
M
P
X
W
I
D
E
EPG CH LIST SRS
INDEX
SUBTITLE
SUBPAGE
REVEAL
SIZE HOLD
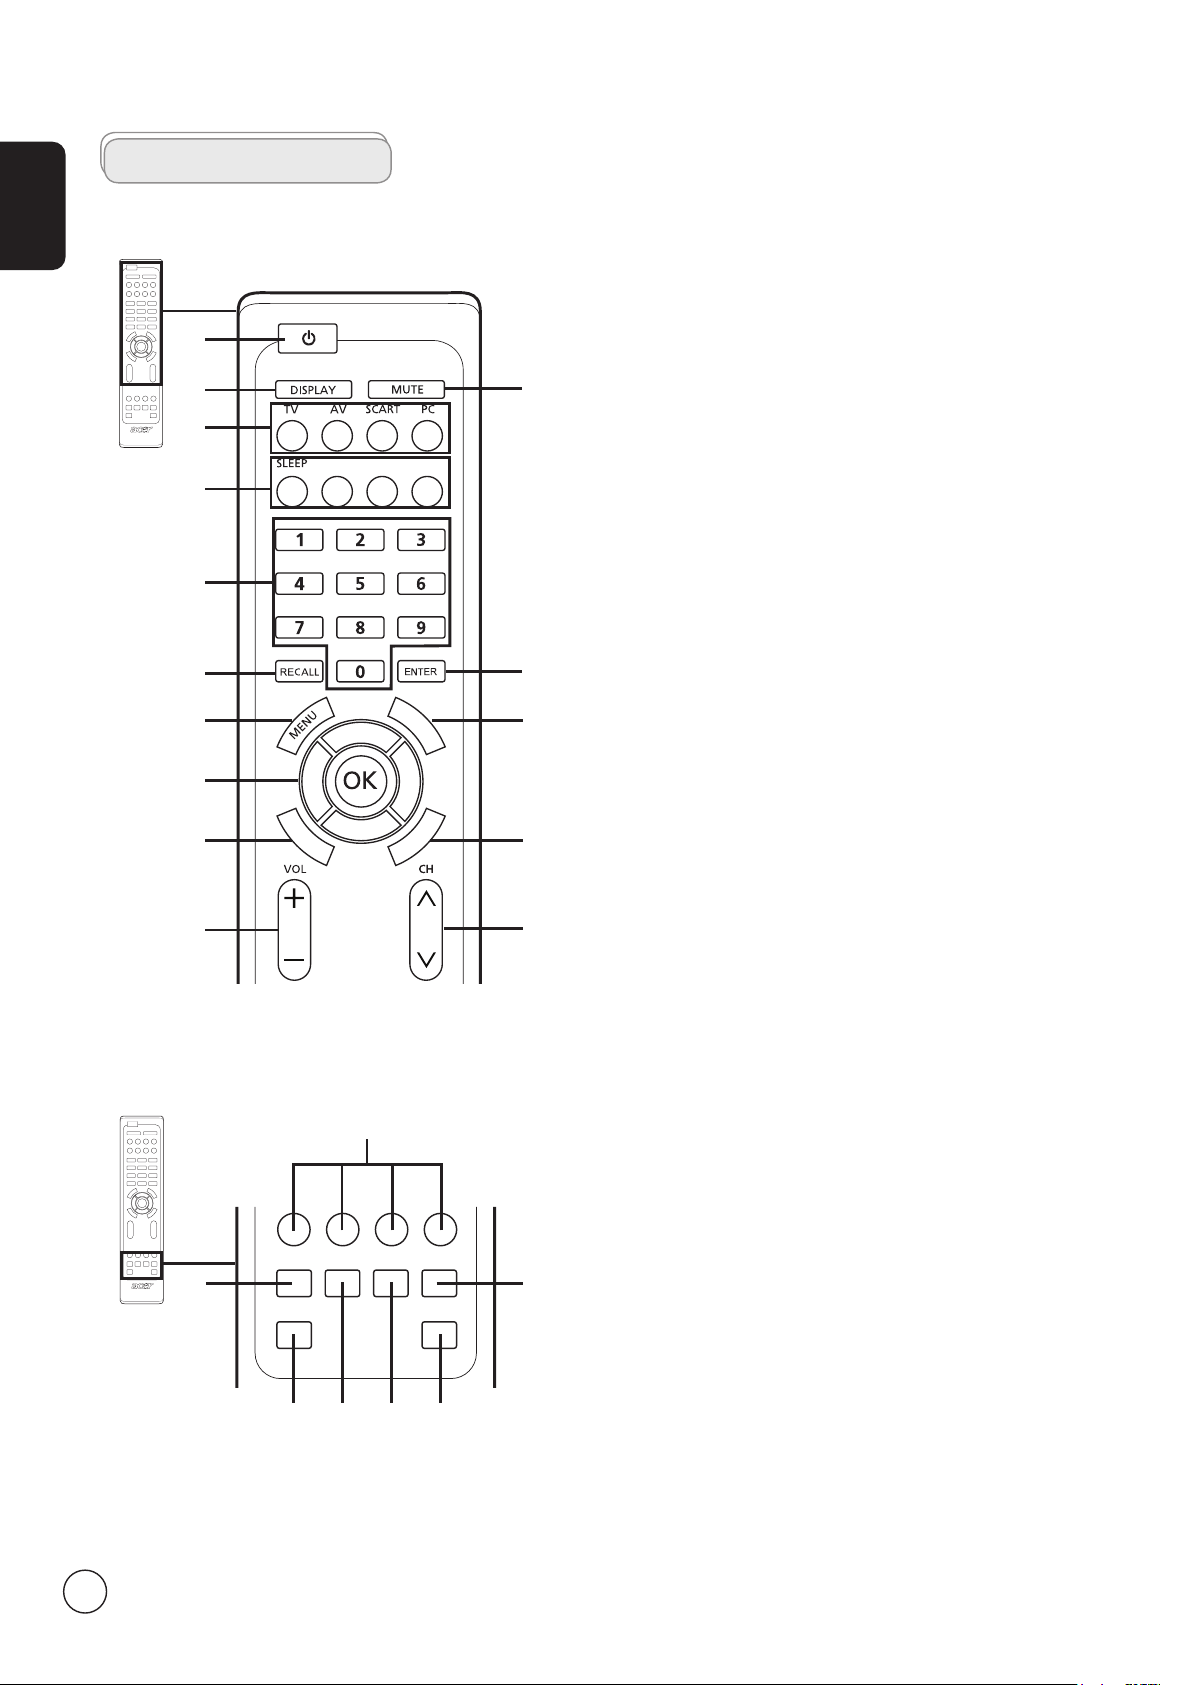
Remote control
General keys
1
2
4
5
6
7
9
11
12
14
Teletext
3
8
10
13
15
1 POWER
Press to turn your TV on/off.
2 DISPLAY
Press once to display input/channel information
(dependent on input/source type), press twice to show
more information.
3 MUTE
Press to toggle audio on and off.
4 Input buttons (TV/AV/SCART/PC)
Press to select correct input mode.
5-1 SLEEP
Press to set a time period after which the TV will switch
itself to standby (15, 30, 45, 60, 90 or 120 minutes).
5-2 EPG
No function.
5-3 CH LIST
No function.
5-4 SRS
Press to turn audio mode to SRS mode.
6 Number keys
7 RECALL
.
Press to return to the previous channel.
8 ENTER
Press to confirm channel number selection.
9 MENU
Press to open or close the Menu.
10 TTX/MIX (TELETEXT/MIX)
Press to switch from TV/AV to Teletext mode.
Press to overlay teletext page on the TV image.
11 Directional keys/OK
VOL (up/down), CH (up/down)
12 WIDE
Press to toggle scaling mode between 4:3, 16:9, Panorama
and Letterbox 1, 2, 3 modes.
13 MPX
Press to select the sound input, displayed in the top righthand corner (mono, stereo, bilingual).
14 VOL (+/-)
Press to increase or decrease the volume.
15 CH (up/down)
Press to sequentially select the TV channel.
2
1 Colour buttons (R/G/Y/B)
Operates corresponding button on the teletext page.
2 INDEX
Press to go to the index page
6
7
3 SIZE
Press once to zoom teletext page to 2X.
Press again to resume.
4 SUBTITLE
Press to view subtitles on the screen.
314 5 6
5 SUBPAGE
Press to access the teletext’s subpages directly.
6 HOLD
Press to pause the current teletext page in multi-page
viewing mode.
7 REVEAL
Press to reveal hidden telext information.
Page 7
Basic connections
Analog
I
O
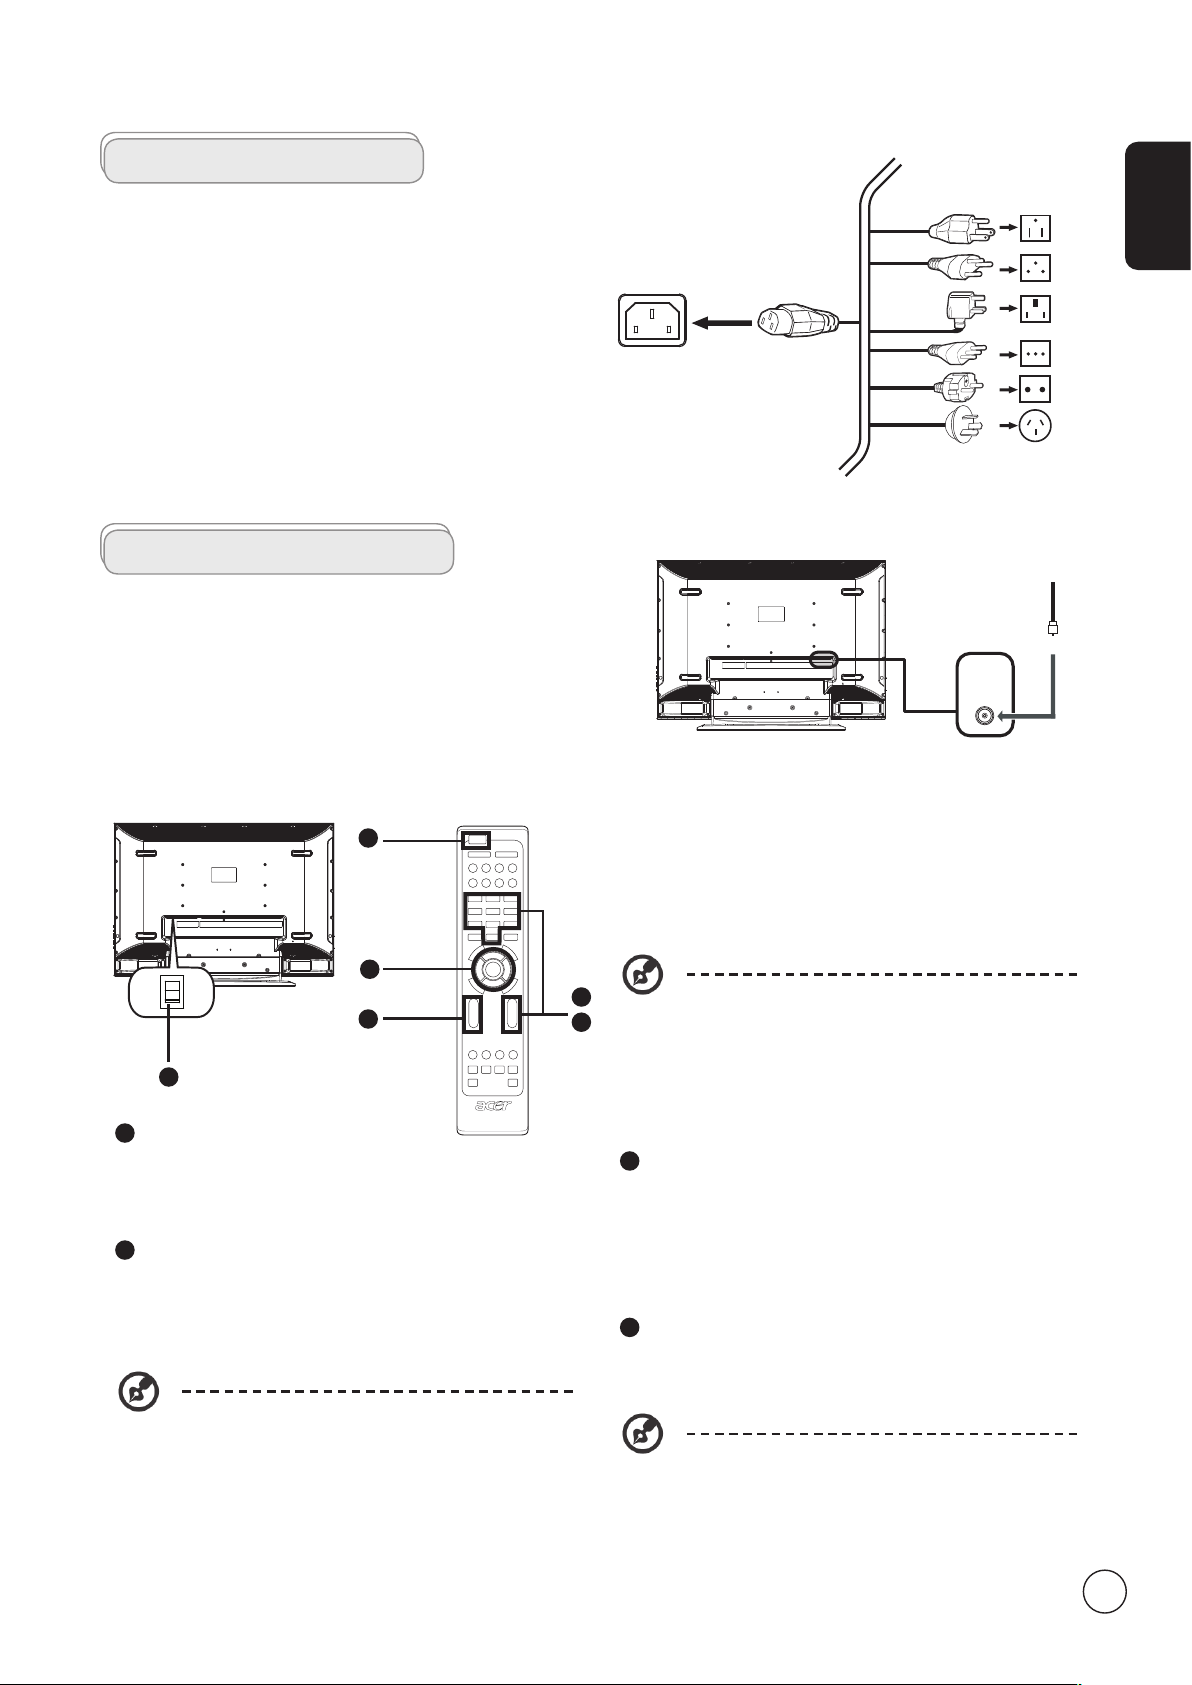
Connecting the power cord
1 Connect the AC cord into the AC input on the back of the
set.
2 Connect the plug to the wall outlet as shown.
Setting up the remote control
1 Open the cover on the back of the remote unit.
2 Insert two AAA batteries (supplied) to match the polarity
indicated inside the battery compartment.
Enjoying your TV
Connecting an antenna/cable
Connect the antenna cable to the appropriate antenna
terminal on the back of the TV set as shown below.
English
Getting started watching your TV
1
2
4
1
1
Power
a. Turn on the power switch beneath the screen.
b. Press the power button, number keys or channel up /
down button on the remote control.
2
Setup Wizard
The first time you switch on the TV, the Setup Wizard will
guide you to complete the language selection and channel
scanning.
Press the OK key to begin the setup process.
You can also adjust these settings using the front
control panel. Please see "Front panel view" on
page 4 for details.
Step 3. Ensure that your co-axial cables are connected
correctly before proceeding.
Step 4. Scan for analog channels.
Step 5. Setup is now complete. You are ready to begin
watching TV.
If you leave the setup process before it is complete,
1
3
3
a. Press 0 - 9 on the remote control to select a channel. The
b. Pressing the channel ( CH ) up / down button on the
4
Adjust the volume level using the ( VOL ) up/down button on
the remote control.
you will be given a choice of options:
1. Resume setup
2. Resume setup wizard at next startup
3. Exit and do not remind me
Select an option and press OK to exit.
Changing channels
channel changes after 2 seconds. Press ENTER to select
the channel immediately.
remote control will also change the channel.
Adjusting the volume
Setup may vary due to local broadcast differences.
Step 1. Select the setup language you prefer.
Step 2. Please select country.
7
Page 8

Connecting external audio/video devices
Y
R
W
R
R
W
R
W
B G
R B G
Y
Y
AUDIO
COMPOSITE
COMPONENT
AV3
AV3
AV3
or
DVD
VCR
STB
or
HDMI
D-Sub
D-Sub
R
W
R
W
Y
YS
S
AV
AUDIO
S-VIDEO
COMPOSITE
AV
Recorder
R
W
R
W
Y
YS
S
AV
AUDIO
S-VIDEO
COMPOSITE
B
G
English
Connecting a DVD, VCR, STB or audio/video equipment
Connect your DVD player, VCR or audio/video equipment using the SCART port located at the rear of your LCD TV as shown
below.
Source-IN
Yellow
Red
White
Blue
Green
* Acer recommends the following priority for connection types:
HDMI -> COMPONENT -> SCART -> Composite.
** For AV3, Composite and component inputs share the same audio ports.
TV-OUT
*SCART-out only works with analog broadcasts.
8
Page 9

CVBS and SCART AV connections
VIDEO
S-VIDEO
L-AUDIO-R
To provide multiple-source connectivity, your LCD TV supports both CVBS and SCART AV connections. The connectivity layout is
presented as follows:
English
9
Page 10

English
w
R
Y
w
R
Y
D-SubD-Sub
Connecting a camera, camcorder or video game
Connect your camera or camcorder to the video/audio ports on the left of the TV set as shown below.
Connecting a PC or notebook computer
To display PC output on your TV, connect your PC or notebook computer to the TV as shown below.
For VGA input, Acer recommends setting your PC’s external monitor resolution to 1920 x 1080 pixels @ 30 Hz refresh
rate.
Selecting the input source
Once you have connected your antenna or external equipment to the TV, you need to select the correct input source.
Press the corresponding button on the remote control to select the correct input source.
Input button guide:
1 TV key
Toggle Analog TV (ATV) between input sources.
2 AV key
Toggle AV3, AV4, HDMI1 and HDMI2 between input sources.
10
1 2 3 4
3 SCART key
Toggle SCART1 and SCART2 between input sources.
4 PC key
Toggle VGA between input sources.
Page 11
OSD navigation
Many of the advanced settings and adjustments are available through using the OSD (onscreen display) menus, as shown in the
example screenshot below.
Basic operations required to navigate these menus (Picture, Audio, Channel management, Options, Settings) are described in this
section.
Navigating the OSD with the remote control
English
You can also interact with these menus using the front panel controls. Please see "Front panel view" on page 3 for
details.
There are five main OSD menus. These are: Picture, Audio, Channel management, Options and Settings.
Use the following method to navigate these menus.
1 Press the MENU button on the remote control or the MENU button on the control panel.
2
3
Select your desired menu by using the up and down directional keys to switch between the five
menus.
Use the directional keys to interact with the menu. The up / down directions will scroll through the
menu options, while left/right will adjust the different settings (for example, in the Picture menu,
settings such as brightness, contrast, etc.). Press MENU to exit.
11
Page 12

English
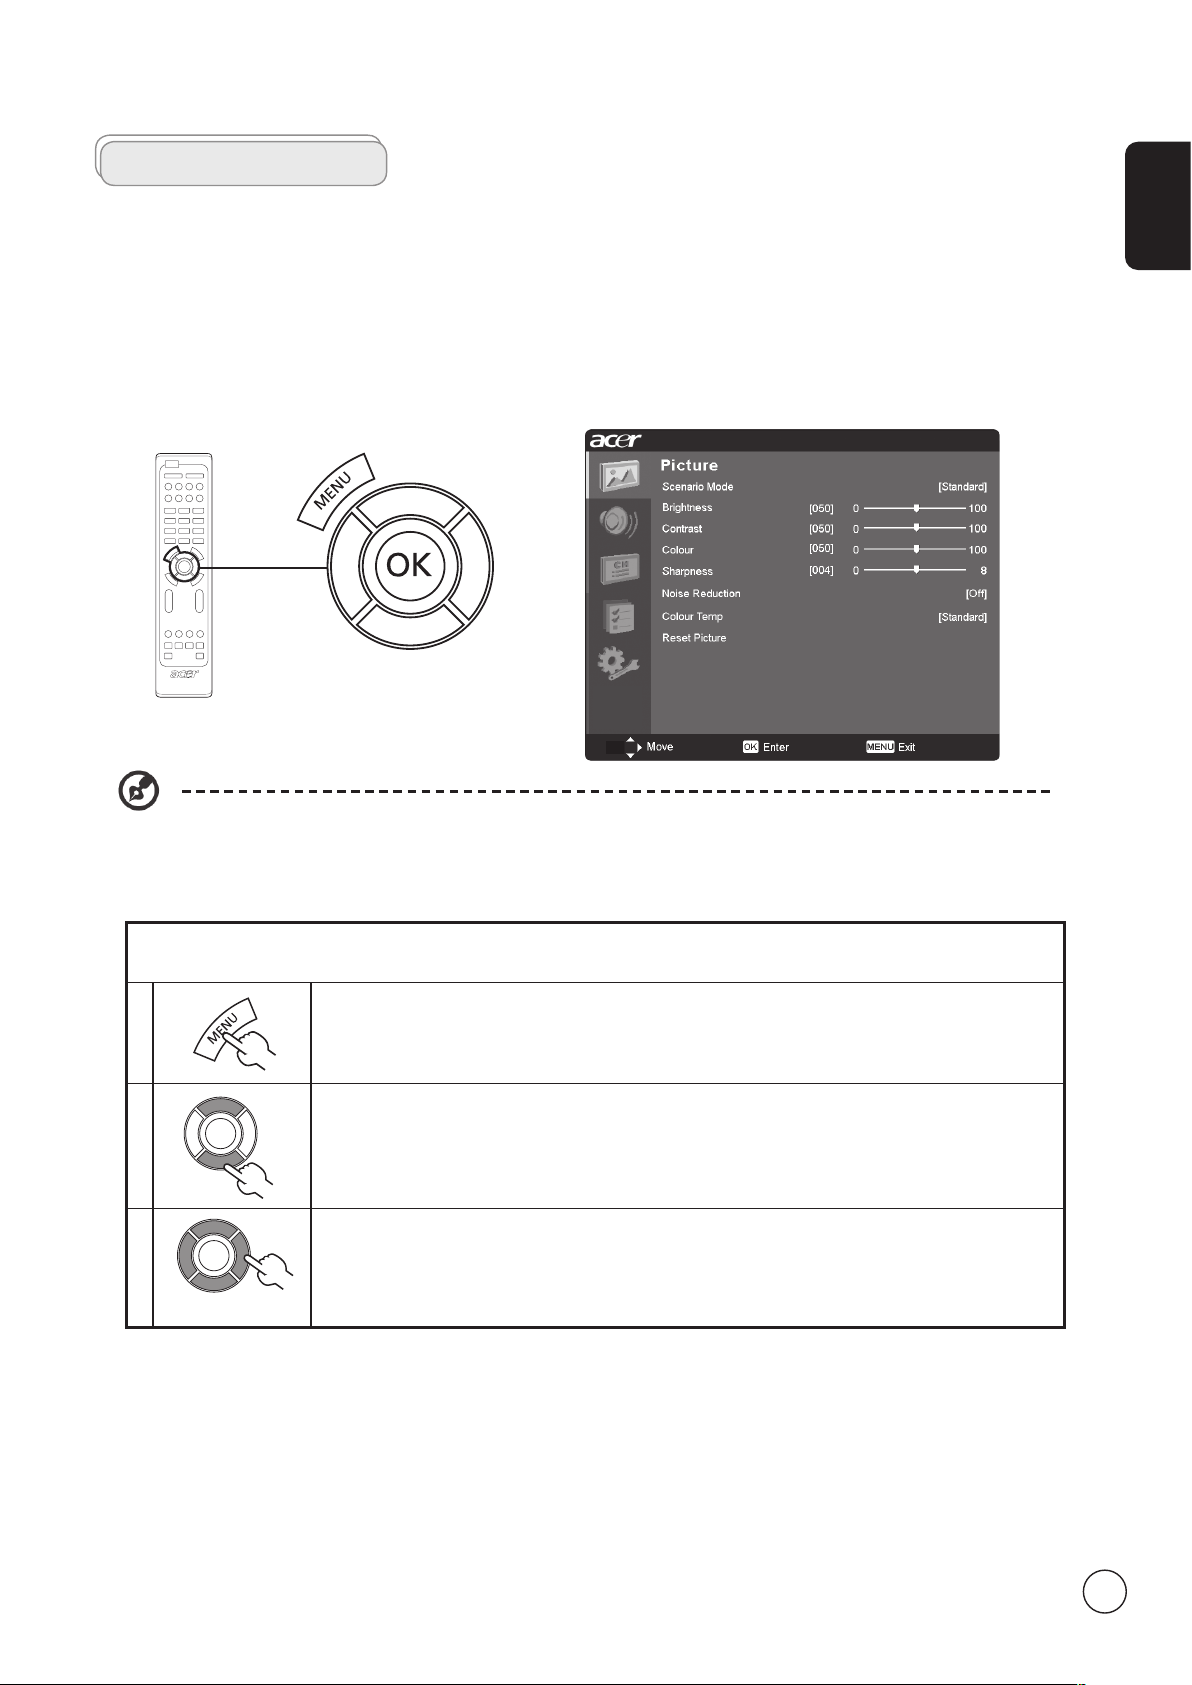
Adjusting the OSD settings
The OSD can be used for adjusting the settings of your LCD TV.
Press the MENU key to open the OSD. You can use the OSD to adjust the picture quality, audio settings, channel settings and
general settings. For advanced settings, please refer to following page:
Adjusting the picture quality
1 Press the MENU key to bring up the OSD.
2 Using the directional keys, select
element you wish to adjust.
3 Use the left or right keys to adjust the sliding scales.
4 The
colour, sharpness and other image-related qualities.
Adjusting the audio settings
1 Press the MENU key to bring up the OSD.
2 Using the directional keys, select
feature you wish to adjust.
3 Use the left or right keys to adjust the sliding scale. Press
4 The
important sound-related settings
Picture menu can be used to adjust the current Scenario mode, brightness, contrast,
Audio menu can also be used to adjust the treble, balance, Sound effects and other
Picture from the OSD. Then navigate to the picture
Audio from the onscreen display. Then navigate to the
OK to save.
Adjusting the channel management
1 Press the MENU key to bring up the OSD.
2 Using the directional keys, select
3 Use the directional keys to navigate the menus.
4 The
Channel management menu can be used to adjust frequency, and set the channel
namings.
Adjusting other options
1 Press the MENU key to bring up the OSD.
2 Using the directional keys, select
3 Use the directional keys to navigate the menus.
4 The
Options menu can be used to select the picture aspect-ratio mode, set the sleep timer
and reset options.
Adjusting the settings
1 Press the MENU key to bring up the OSD.
2 Using the directional keys, select
wish to adjust.
3 The
Settings menu can be used to adjust the menu language and other important
settings.
Channel management from the OSD.
Options from the OSD.
Settings from the OSD. Then navigate to the feature you
12
The options available on the OSD may vary depending on the TV signal source. Some digital options may not be
available with an analog signal and vice versa.
Page 13

Advanced features
Lock TV
Locking TV content
Lock TV is a handy feature that can block all TV sources.
Lock TV allows you to enter a password and effectively stop anyone without the password from watching TV.
To enable this feature:
Setting a personal PIN
English
1
2
3 Enter a four-digit password. Type it again and press OK to reconfirm.
4 Press MENU to exit.
The default PIN for this TV is "0000." First enter "0000" when you want to change the PIN. If you forget your PIN,
please enter 6163 to reset.
Use the directional keys to navigate to the Settings menu. Then select Set PIN.
(see note)
Press the MENU key on the remote control
to bring up the OSD.
13
Page 14

English
14
Locking your TV
1
2
3 Enter your PIN. Type it again and press OK to reconfirm. (see page 11 note)
Use the directional keys to navigate to the Settings menu. Then select Lock TV.
Press the MENU key on the remote control to
bring up the OSD.
Page 15
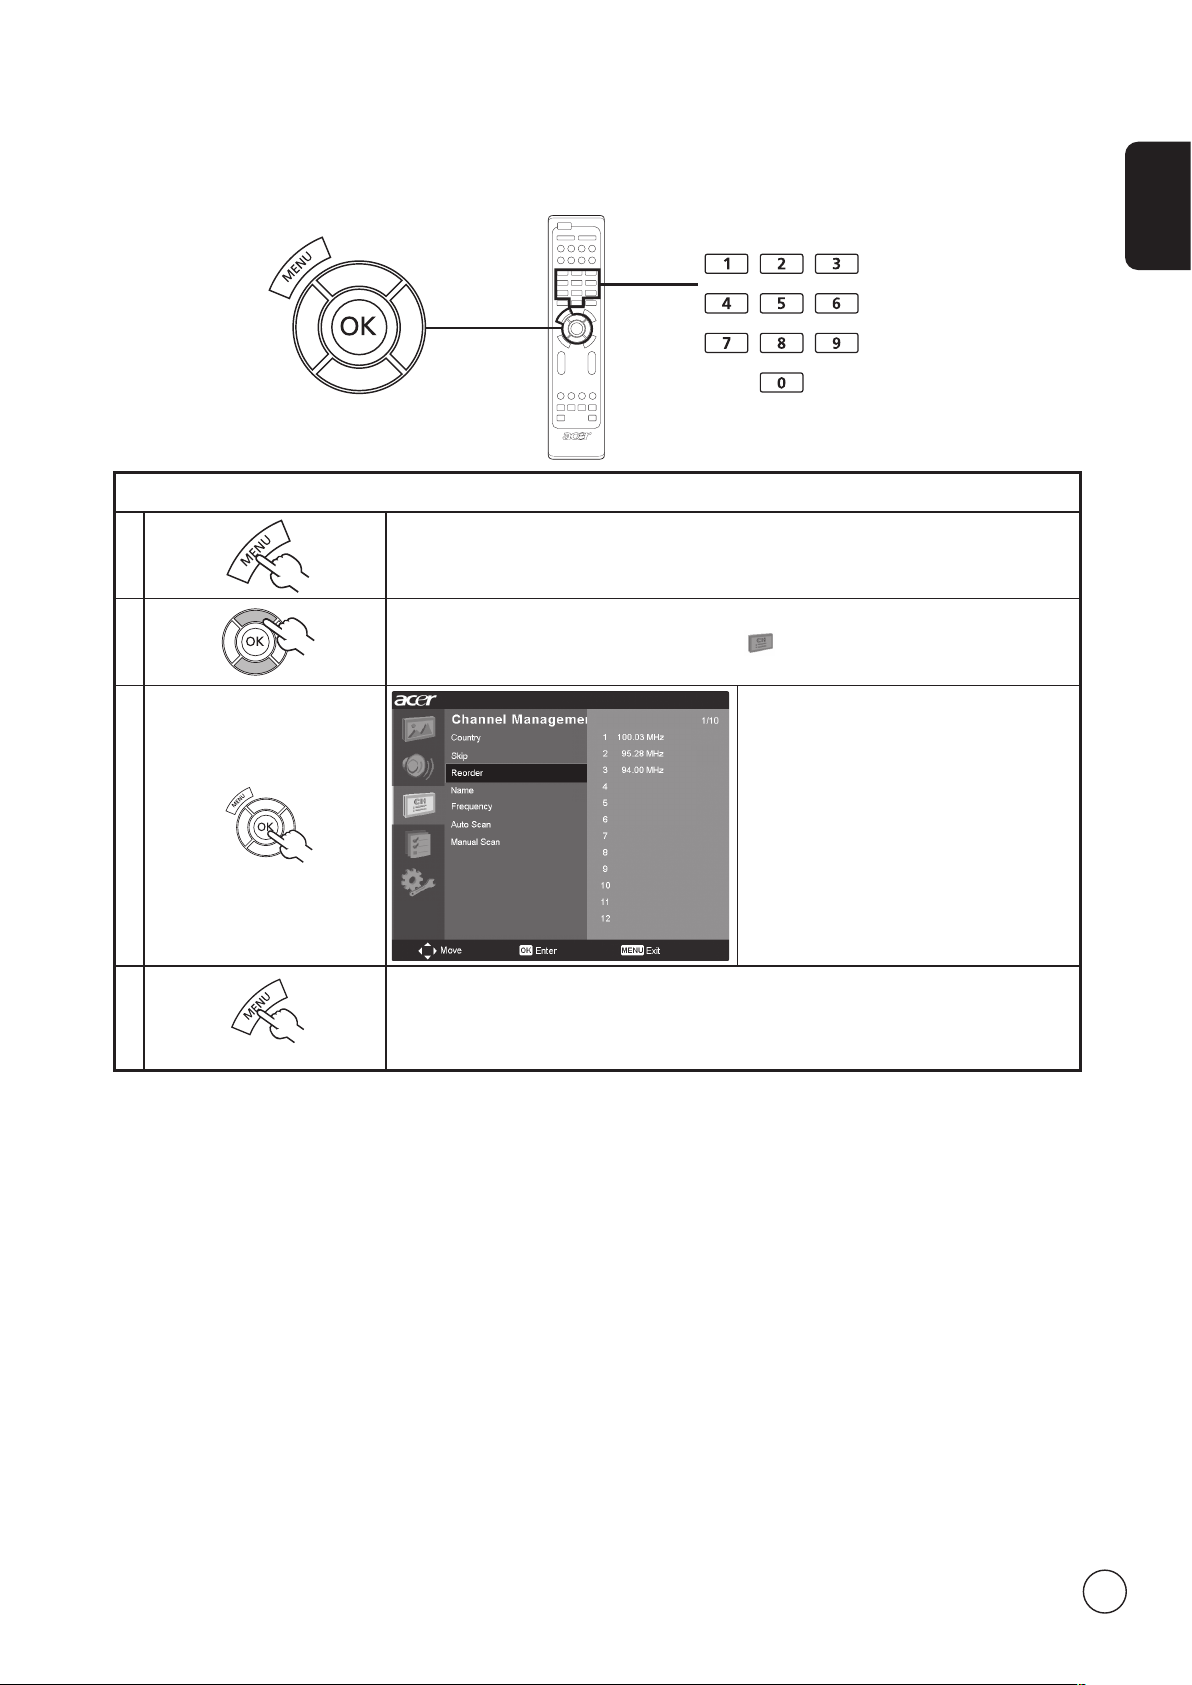
Reorder for channels
The first time you completed the setup wizard, all available channels were listed. If you need to reorder for new channels, please
follow the steps below:
Reordering for channels
1 Press the MENU key on the remote control to bring up the OSD.
English
2
3
4 Press MENU to exit.
Use the directional keys to navigate and select Channel Management.
Highlight Reorder. Then, select the channel
you wish to reorder and press OK to
confirm. Move to the right channel number
and press OK to reconfirm.
15
Page 16

English
16
MENU
MENU
EPG -/+CH LIST SRS
Re-scan for channels
The first time you completed the setup wizard, all available channels were listed. If you need to re-scan for new channels, please
follow the steps below:
Scanning for channels
1
2
3
4
Press the MENU key on the remote control to bring up the OSD.
Use the directional keys to navigate and select Channel Management.
Highlight Auto Scan. Then, select Start and
press OK to begin.
Press MENU to exit.
Page 17
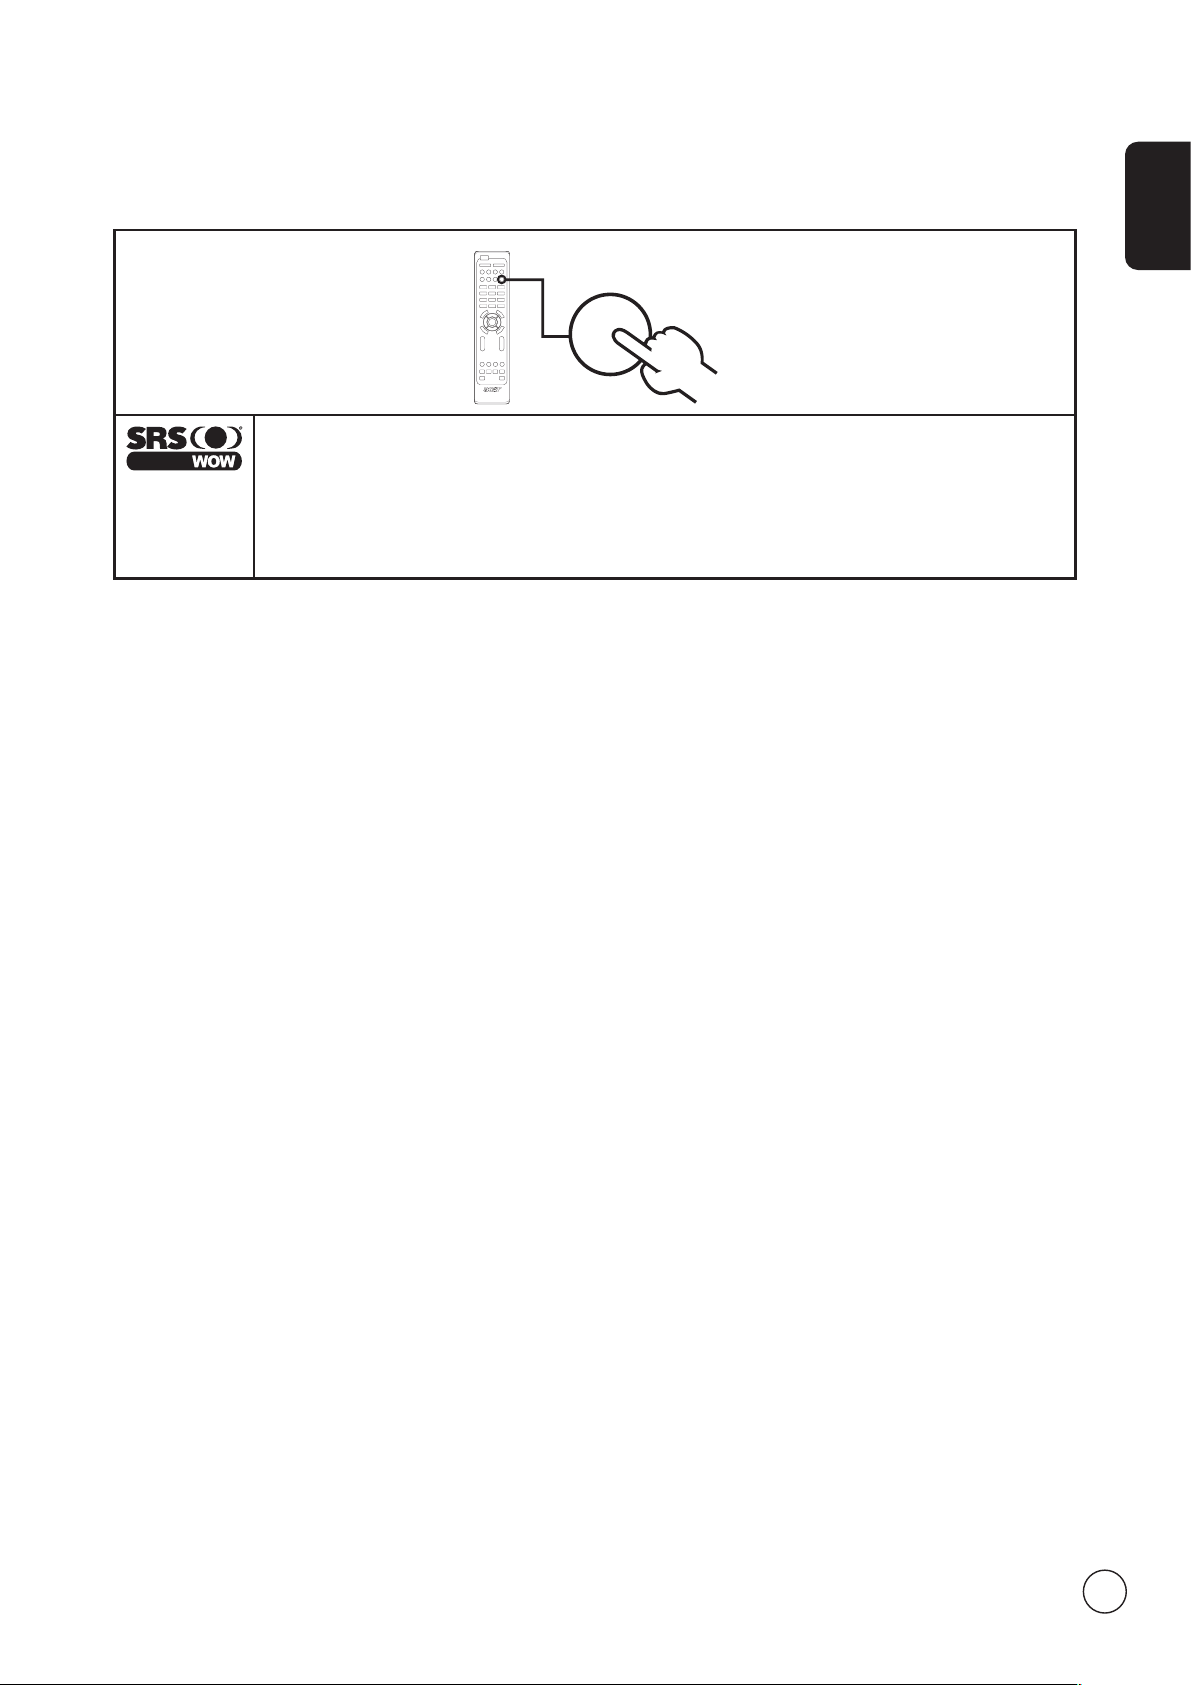
Audio effects
SRS
Your Acer LCD TV is equipped with high-quality sound specifications to ensure that you enjoy the best audio experience possible.
SRS WOW
SRS WOW is a special combination of SRS audio technologies that creates a thrilling experience with deep,
rich bass from any stereo sound source. Your audio sounds fuller, richer and wider. Based on the elements
of SRS 3D technology, WOW restores the spatial cues and ambient information that are lost during standard
stereo playback.
To enable SRS WOW: Press the SRS key on the remote control.
English
17
Page 18
English
W
I
D
E
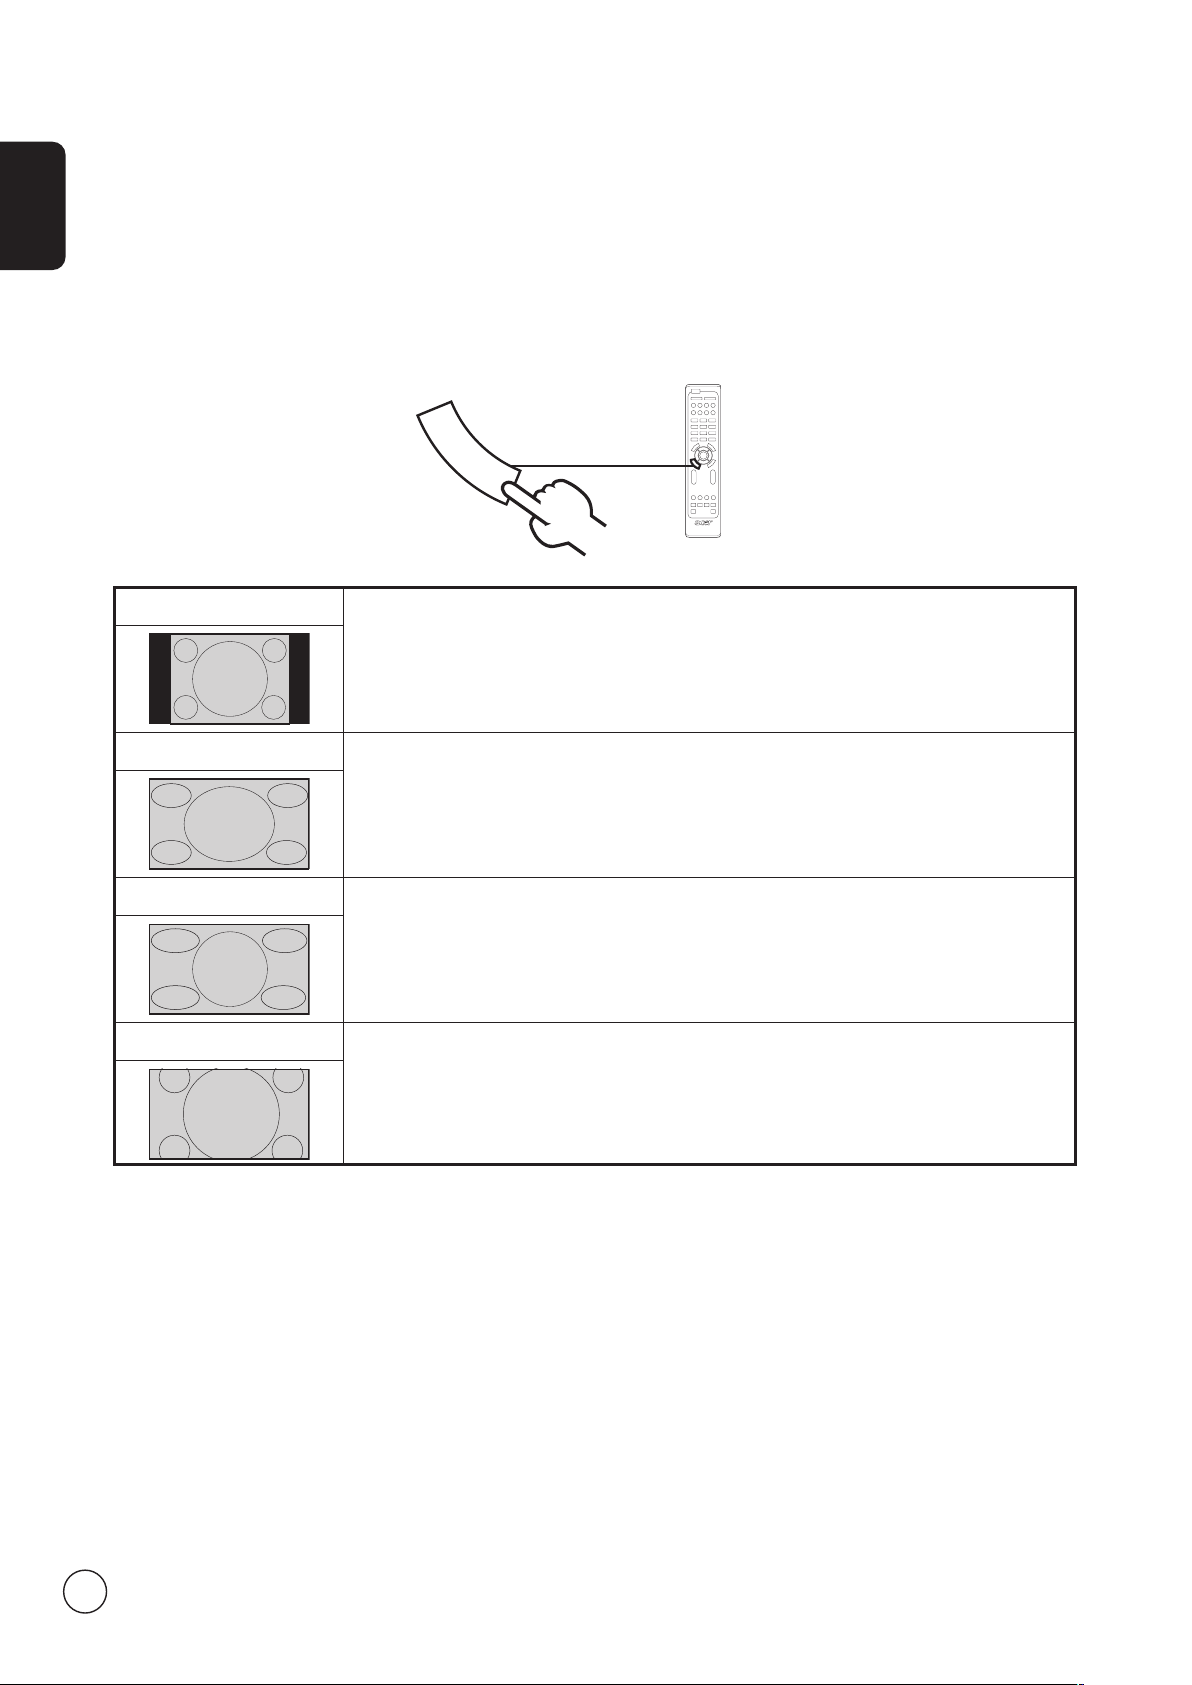
Widescreen display mode
Your Acer LCD TV has a special widescreen mode that allows you to toggle between 4:3, 16:9, Panorama, and Letterbox 1, 2 and
3 type views.
Press the WIDE key on the remote control to toggle the display between the four wide modes.
Wide mode
The Acer LCD contains four widescreen modes, including 4:3, 16:9, Panorama, and Letterbox 1, 2 and 3.
4:3
For 4:3 standard pictures. A side bar appears on each side.
16:9
Panorama
Letterbox 1, 2, and 3
In this mode, the whole picture is stretched toward each side of the screen.
In this mode, the picture is progressively stretched toward each side of the screen.
In this mode, the picture is enlarged linearly to fit the screen. The top and bottom portions of
the picture may be cut off.
18
Page 19

Troubleshooting
Before you call the Acer service center, please check the following items:
Here is a list of possible situations that may arise during the use of your LCD TV. Easy answers and solutions are provided for each.
There is no picture or sound.
• Make sure the power cord is properly inserted in the power outlet.
• Make sure the input mode is correctly set by your selected input.
• Make sure the antenna at the rear of the TV is properly connected.
• Make sure the main power switch is turned on.
• Make sure the volume is not set to minimum or the sound is not set to mute.
• Make sure the headphones are not connected.
• Reception other than those of broadcasting stations can be considered.
Picture is not clear.
• Make sure the antenna cable is properly connected.
• Consider whether your TV signal is being properly received.
• Poor picture quality can occur due to a VHS camera, camcorder, or other peripheral being connected at the same time. Switch
off one of the other peripherals.
• The 'ghost' or double image may be caused by obstruction to the antenna due to high-rise buildings or hills. Using a highly
directional antenna may improve the picture quality.
• The horizontal dotted lines shown on the pictures may be caused by electrical interference, e.g., hair dryer, nearby neon
lights, etc. Turn off or remove these.
English
Picture is too dark, too light or tinted.
• Check the colour adjustment.
• Check the brightness setting.
• Check the sharpness function.
• The fluorescent lamp may have reached the end of its service life.
Remote control does not work.
• Check the batteries of the remote control.
• Make sure the remote sensor window is not under strong fluorescent lighting.
• Try to clean the remote control sensor lens on the TV with a soft cloth.
• Use the buttons (hotkeys) on the TV before the remote control works.
If the above suggestions do not solve your technical issue, please refer to the warranty card for service information.
19
Page 20

Product specifications
English
Model AT4250B-ATV
Panel spec
Resolution (pixels) 1920 x 1080
Power supply
Input 100 to 240 V AC
Max. power consumption 291 W
Power saving <5 W
Mechanical
Dimensions (W x H x D mm) 1071 x 794 x 311
Weight (kg) 32.3
Weight (lbs.) 71.15
Wall-mounting holes 400 mm x 200 mm
Analog TV system
Colour system PAL, SECAM
Sound system B/G/D/K/I/L (multi-European)
Stereo system NICAM/A2
Subtitle Teletext 1.5
TV-tuner quantity 1
Terminal
Analog Tuner In Yes
AV1-SCART S-Video and FB
AV2-SCART S-Video and FB
AV3-COMPONENT YPbPr, YCbCr, Audio R/L
AV3-CVBS CVBS, Audio R/L share with AV3-COMPONENT
AV4 CVBS, Audio R/L
HDMI 1 Yes
HDMI 2 Yes
PC D-sub in Yes
PC audio-in Yes
Audio system
Speakers 10 W + 10 W
Sound effects SRS WOW
20
 Loading...