

Page 1

Contents
Enjoying card reader content 3
Operating the card reader 3
Enjoying computer media content with the MGW 4
eConsole software setup 4
The MGW setup 6
Operating the MGW 11
Navigating the MGW menus 11
Music mode 1
2
Picture mode 1
4
Video mode 16
Online media 1
8
Settings 1
9
Networking glossary 20
Network encryption 20
MGW
User's Guide
Acer LCD TV
Page 2
Dolby and the double-D symbol are registered trademarks of Dolby Laboratories.
SRS is a trademark of SRS Labs, Inc. WOW technology is incorporated under license from SRS Labs, Inc.
License: Manufactured under license from BBE Sound, Inc.
The BBE Digital name and BBE Digital symbols are registered trademarks of BBE Sound, Inc.
HDMI, the HDMI logo and High-Definition Multimedia Interface are trademarks or registered trademarks of HDMI Licensing LLC.
DVB is a registered trademark of the DVB Project.
Copyright © 2005. Acer Incorporated.
All Rights Reserved.
Acer LCD TV MGW User's Guide
Original Issue: September 2005
Changes may be made periodically to the information in this publication without obligation to notify any
person of such revisions or changes. Such changes will be incorporated in new editions of this manual or
supplementary documents and publications. This company makes no representations or warranties, either
expressed or implied, with respect to the contents hereof and specifically disclaims the implied warranties of
merchantability or fitness for a particular purpose.
Record the model number, serial number, purchase date, and place of purchase information in the space
provided below. The serial number and model number are indicated on the label affixed to your device.
All correspondence concerning your unit should include the serial number, model number, and purchase
information.
No part of this publication may be reproduced, stored in a retrieval system, or transmitted, in any form or
by any means, electronically, mechanically, by photocopy, recording, or otherwise, without the prior written
permission of Acer Incorporated.
Model Number: __________________________________
Serial Number: ___________________________________
Purchase Date: ___________________________________
Place of Purchase: ________________________________
Acer and the Acer Logo are registered trademarks of Acer Inc. Other companies' product names or trademarks
are used herein for identification purposes only and belong to their respective companies.
Page 3
English
3
Enjoying card reader content
The card reader module gives you the additional capacity of being able to access, view and play media files (pictures, music and
video) on your Acer LCD TV.
Depending on the model of your TV, the card reader is located either on the front or side of your TV set. Please see "Your LCD
TV overview" on page 6 for details.
The Acer LCD TV card reader supports the following popular flash memory cards:
- Compact Flash (CF) Type 1/2
- IBM MicroDrive
™
- Secure Digital (SD)
- MultiMediaCard (MMC)
- Memory Stick (MS) / Memory Stick Duo / Memory Stick Pro
MicroDrive™ is a registered trademark of IBM, Inc.
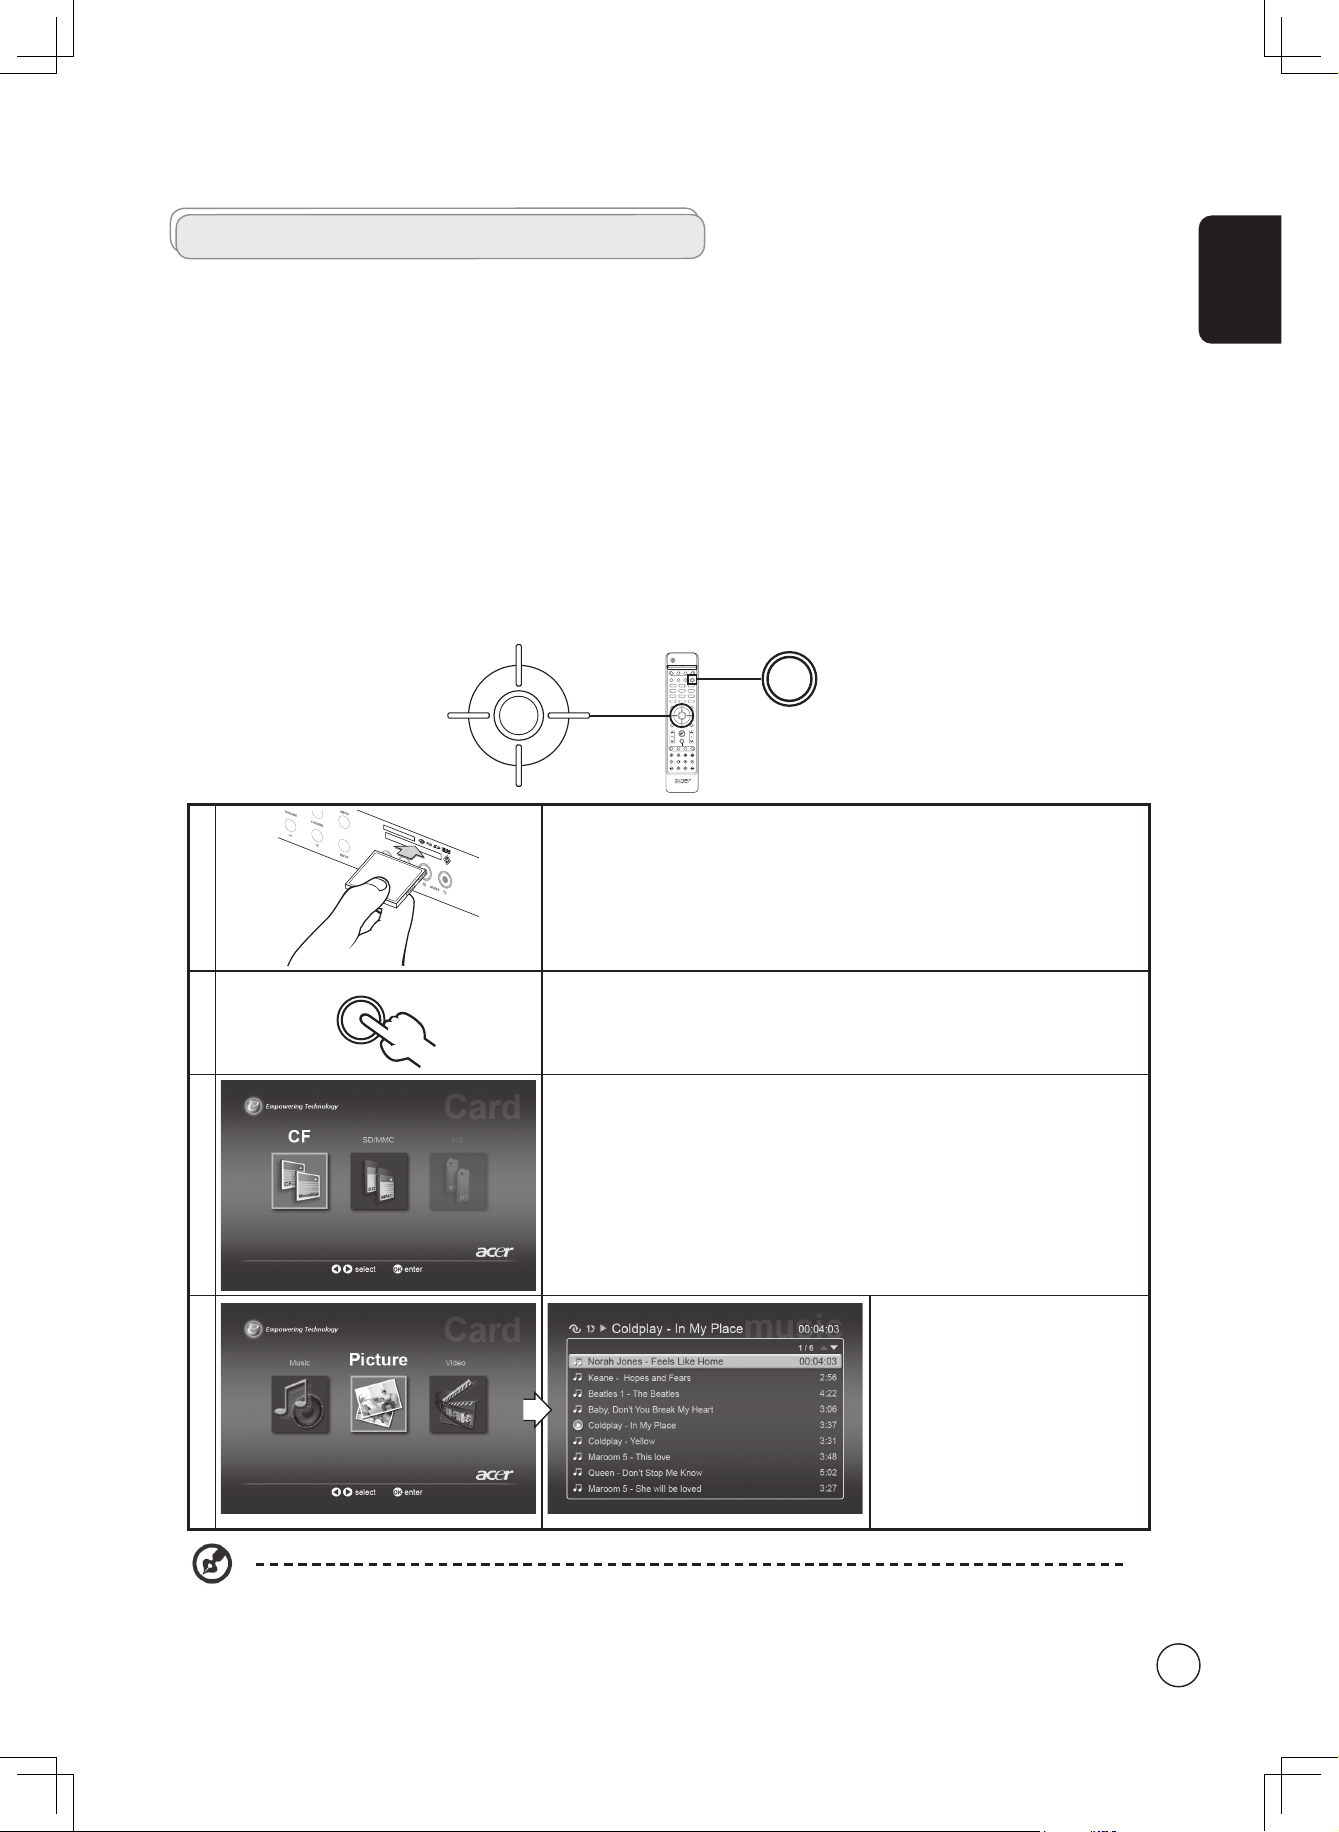
Operating the card reader
1
To access media from the card reader, first insert a media card into the slot in
the front TV panel as shown to the left.
2
PC
Press the CARD/MGW button on the remote control once to open the card
reader OSD.
3
Choose the kind of card you are using from the onscreen display using the
arrow keys. Press OK to select.
4
Then, using the remote arrow keys,
it is possible to select the picture or
music file you wish to view or listen
to. Press OK to open the file.
DISPLAY MUTE
TV
RECALL
MENU CH LIST
BACK EPG
SWAP ACTIVE POSITION
SIZE/MODE
TELETEXT
MPX
HOLD SIZE SUBTITLE
VOL
PIP/PBP/POP
CH/PG
ENTER
AV SCART
PC
SLEEP WIDE
ZOOM ROTATE
SLIDE
OPTION
SRS/BBE CARD/MGW
1 2 3
4 5 6
7 809
OK
DISPLAY MUTE
TV
RECALL
MENU CH LIST
BACK EPG
ENTER
AV SCART
PC
SLEEP WIDE
ZOOM ROTATE
SLIDE
OPTION
SRS/BBE CARD/MGW
1 2 3
4 5 6
7 8
0
9
OK
PC
Please refer to the MGW music/video/picture sections on pages 11 to 19 for remote control functions.
Page 4
English
4
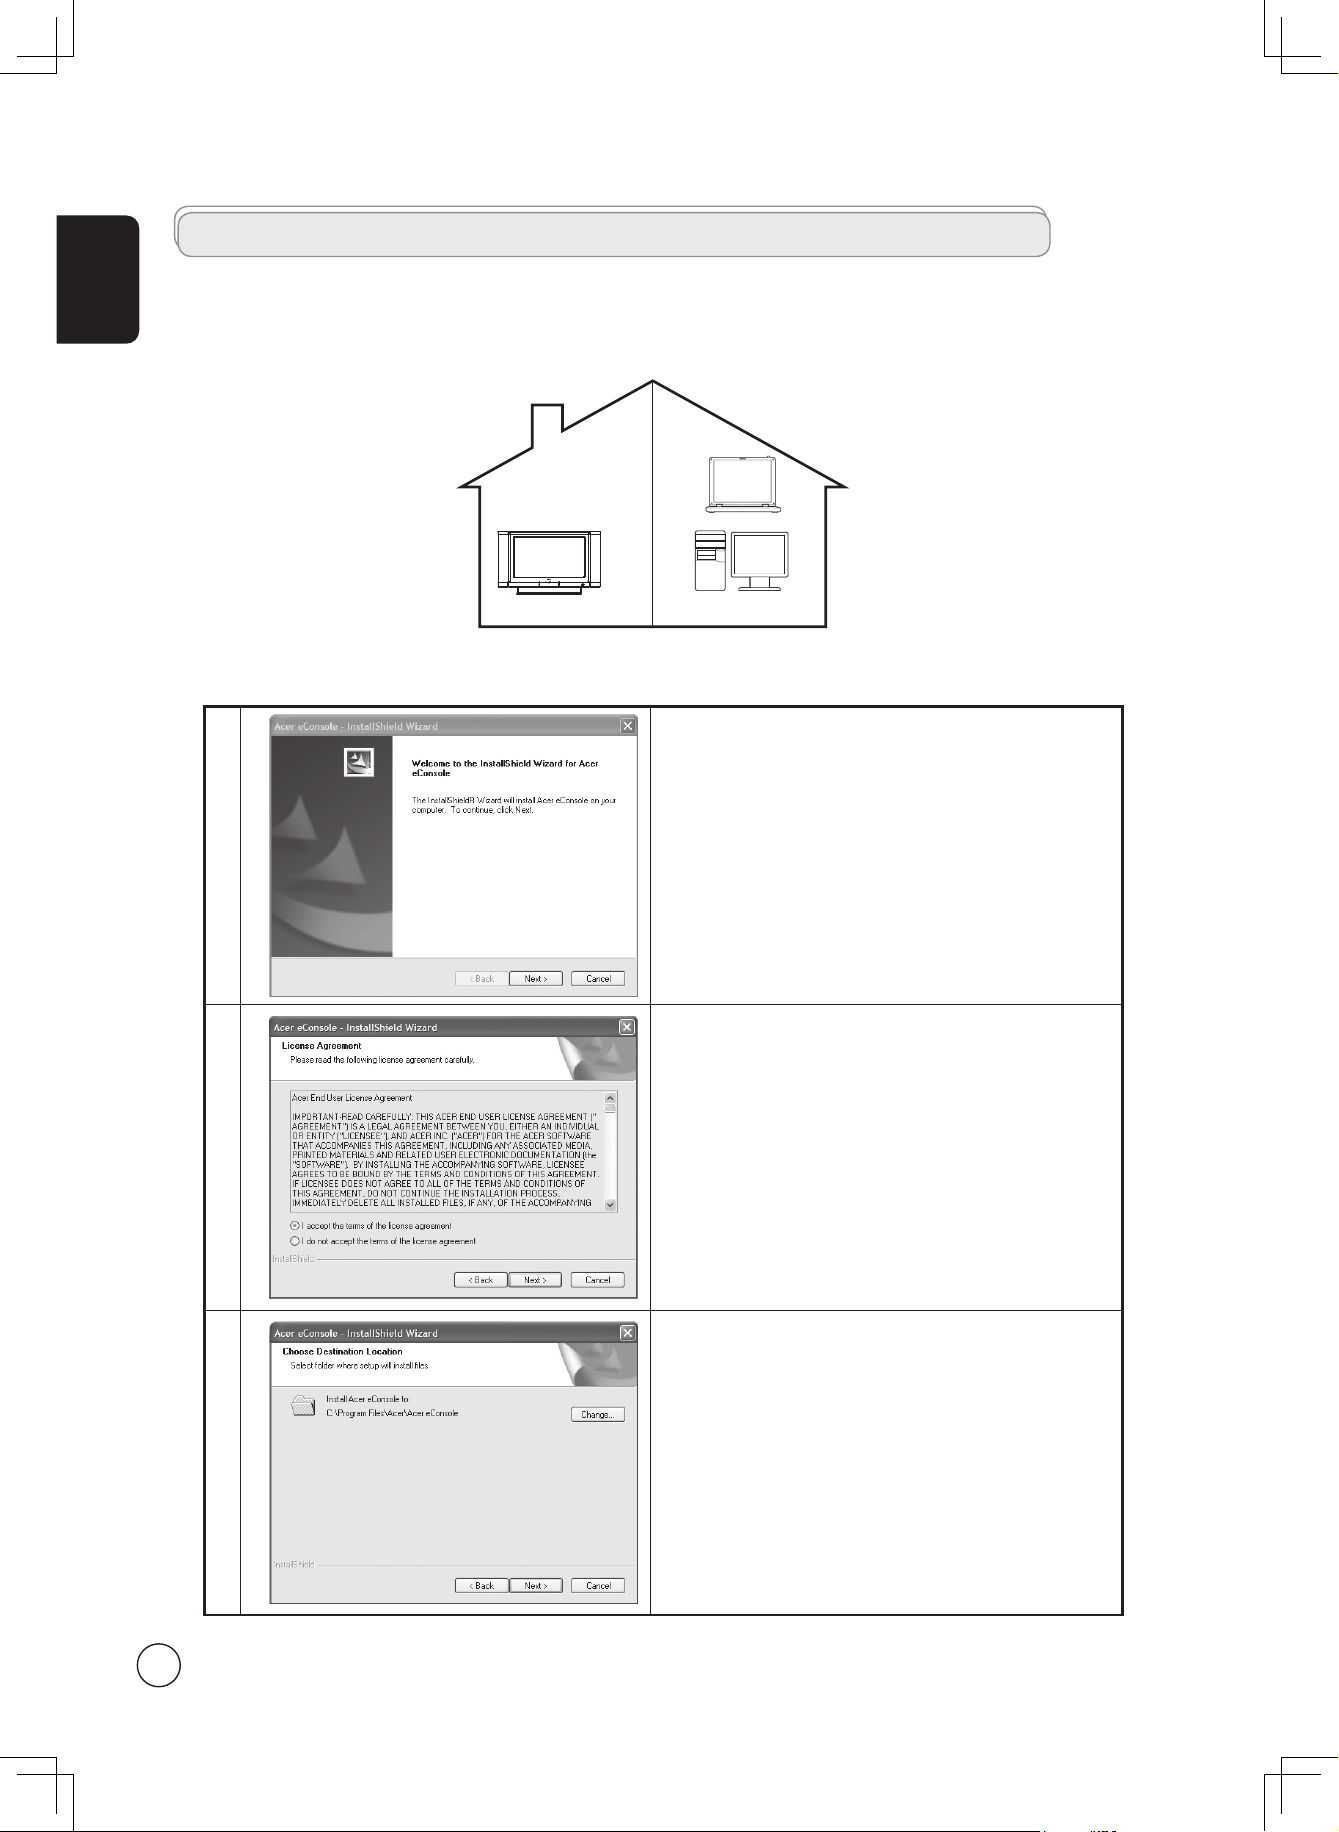
1
To install Acer eConsole software, insert the software disk
into your PC's optical drive tray. If your system is set to auto
start, the InstallShield Wizard screen will appear.
Select Next> to bring up the software license agreement
screen.
2
Read the agreement carefully and check "I accept the terms."
Then click Next> to advance to the file destination screen.
3
Select where you would like to install the eConsole files and
then click Next>. The install wizard will then begin installing
the eConsole software.
Once finished, the "Set-up Synchronize folders" dialog box
will appear.
Enjoying media content with the MGW
eConsole software setup
The Acer LCD TV also allows you to connect your computer and listen to music files, watch video content and view images from
your computer's hard drive and online radio.
First, you need to install eConsole software on your PC. To do this, follow the instructions below.
Acer LCD TV (Media server)
Page 5
English
5
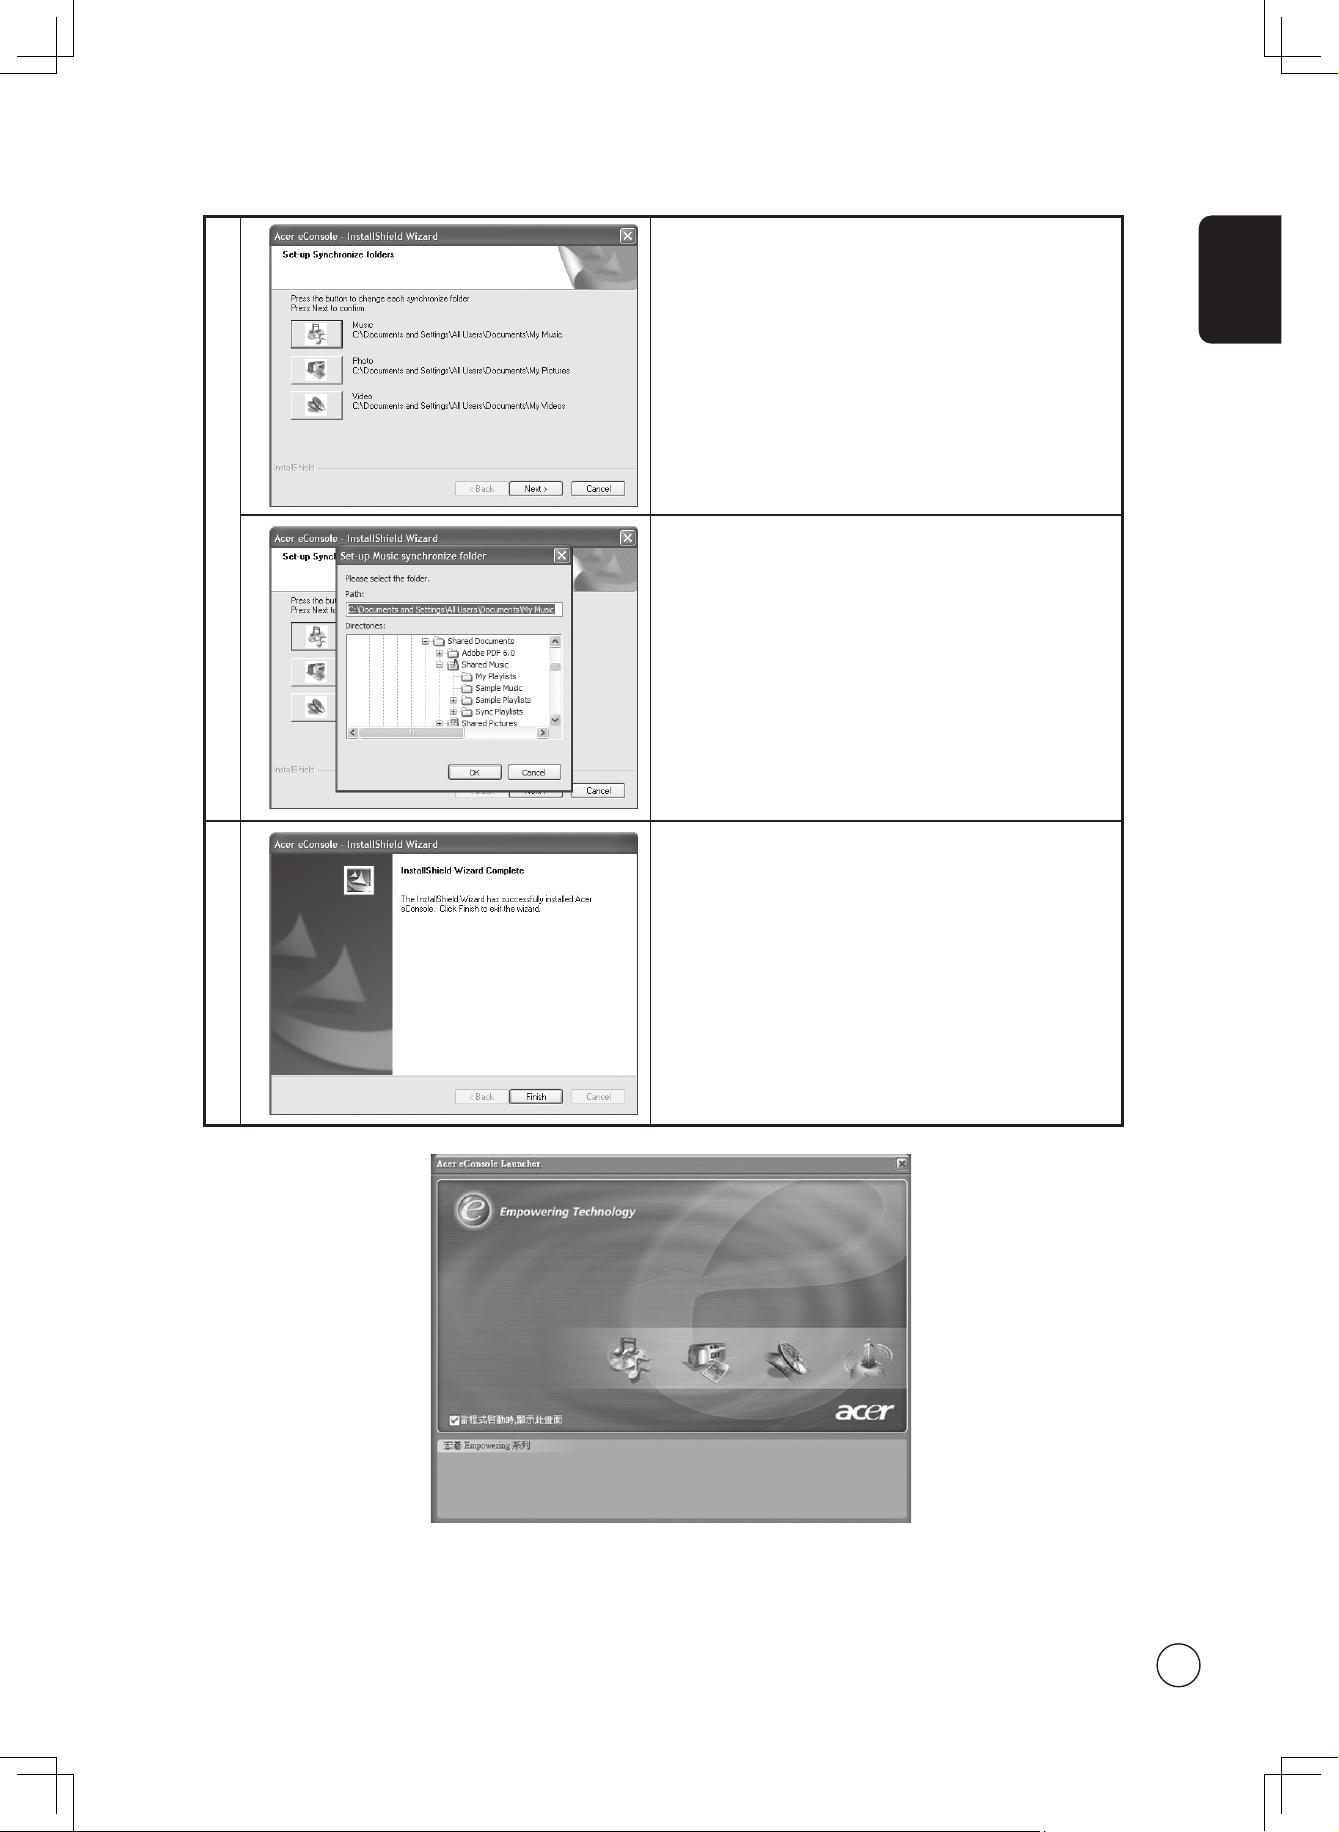
4
a. By default, the eConsole software will select the Windows
designated media files (My Music, My Pictures and My
Videos) to share.
If the default folders are correct, click Next> to continue
with the installation process.
b. If you want to change the default settings and share
different files, click on the corresponding icon and
browse to select the folder you want to share. Click OK to
continue.
Once you have selected the folders that you want to
share, click Next>.
5
When the installation process is finished, the completion
screen will appear. Click Finish to close the installation
software.
Now your computer is ready to share media and create playlists and favorites folders for playback and viewing on your TV.
For details about how to operate the eConsole software, please refer to the User's Guide on the MGW CD.
Page 6
English
6
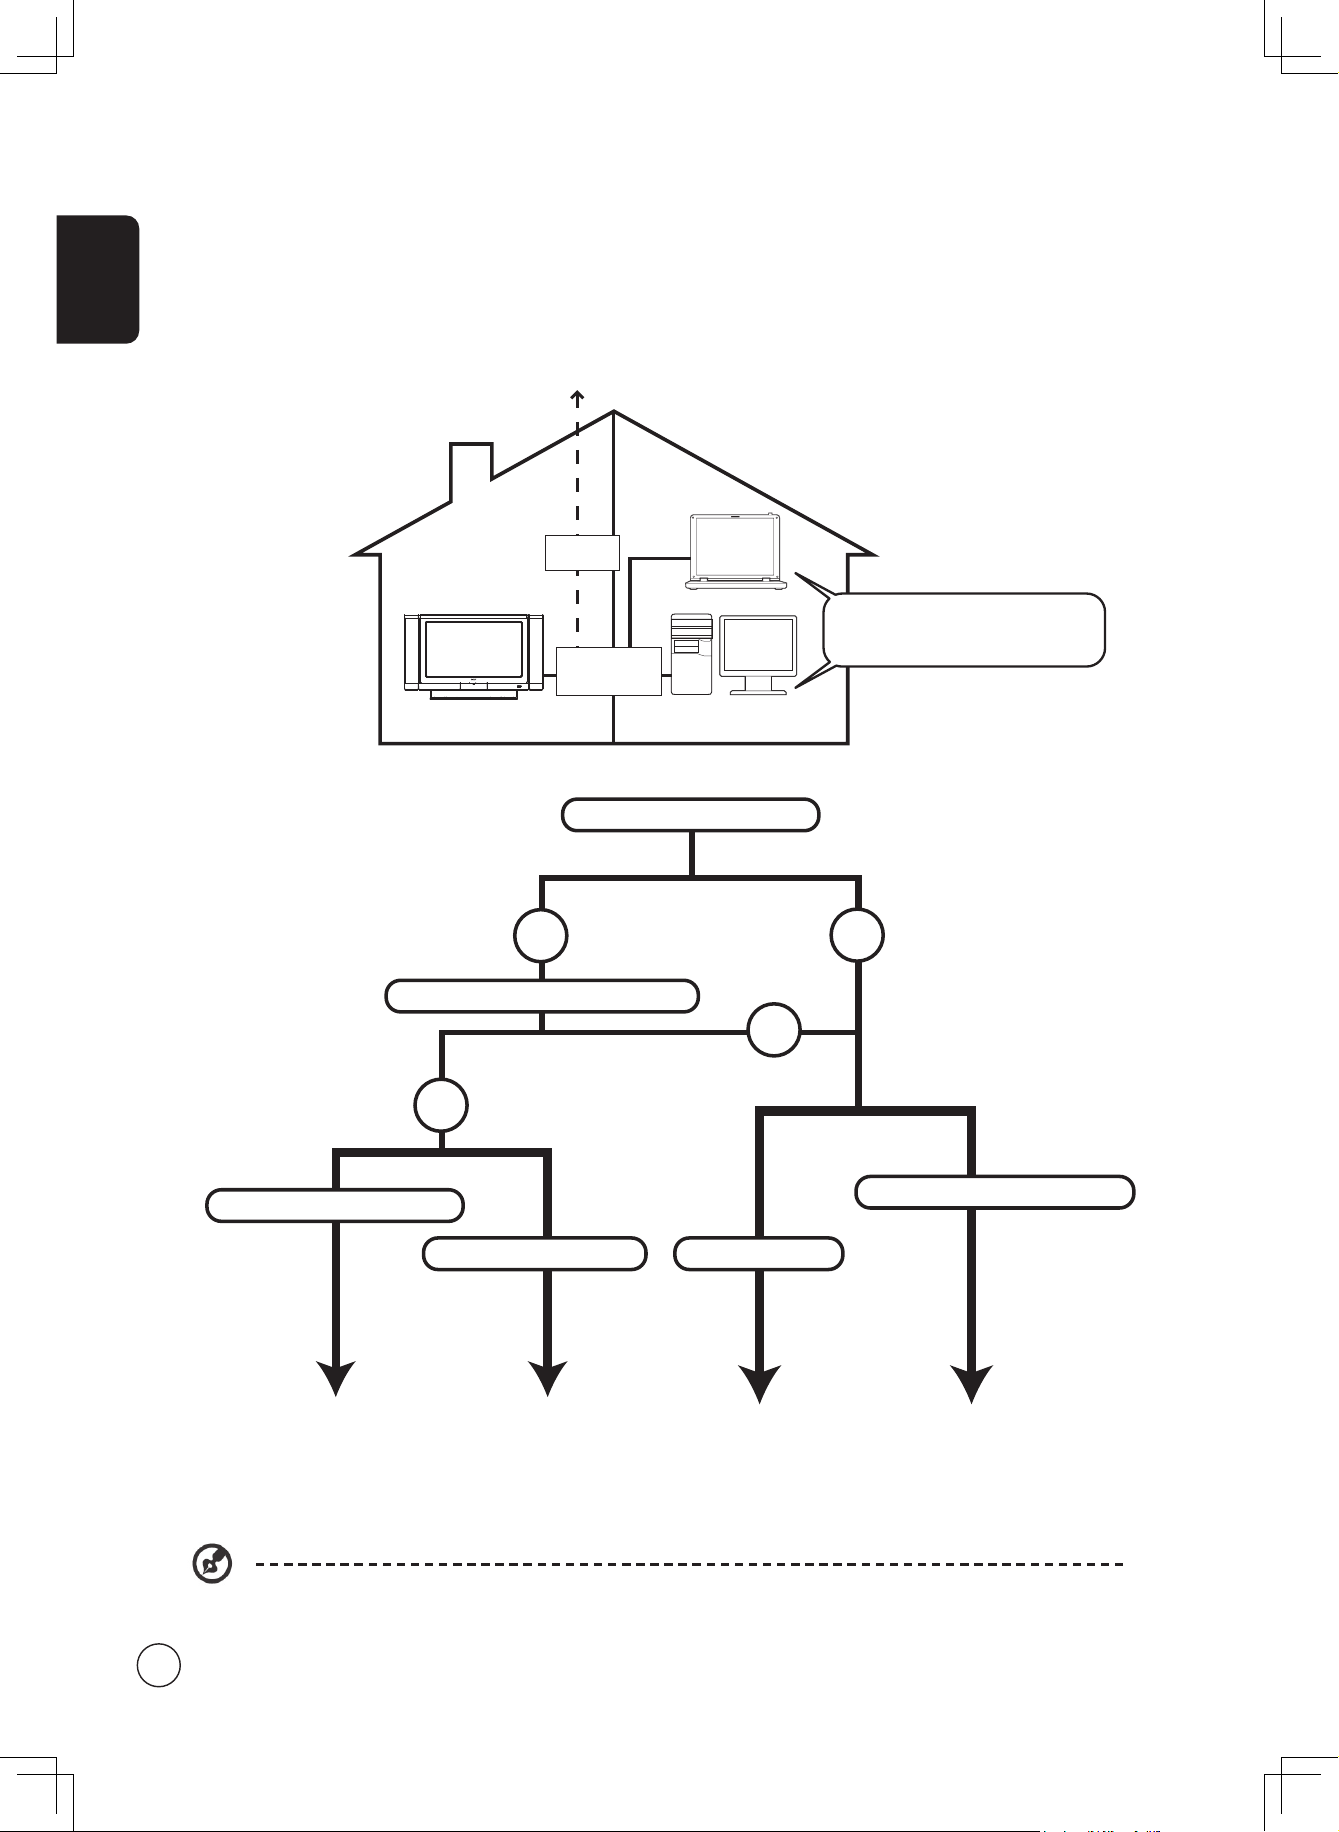
For detailed instructions about the setup and operation of the MGW, please refer to the User's Guide file on the
MGW CD.
Router/AP (DHCP server)?
Wireless (Access Point)
Wired(Ethernet)
Peer-to-peer
Cable/ADSL Modem?
Wireless (Ad Hoc)
Yes
Yes
No
No
Page 7 Page 8 Page 9
Page 10
The MGW setup
The first time you use the MGW function you will need to run through the setup to establish a link between your PC and TV.
Router/AP
DHCP Server
ADSL
Modem
Living room
Bedroom or study
Media server
(music/video/pictures)
Internet (Online radio)
Page 7

English
7
Cable/ADSL
Modem
Internet
Router/AP
DHCP Server
a. Connecting to a wireless network (using an access point)
To connect to your
access point
(AP), follow the instructions below:
1
CARD/MGW
Press the CARD/
MGW button to
open the MGW
home page.
From the home
page, navigate to
Settings and press
OK to begin the
setup procedure.
4-1
Select Network
Settings.
4-2
Select wireless
(access point) and
press OK. The
system will now
search for your
wireless
Service Set
Identifier (SSID)
.
2
Select Language
Setup from the
menu.
4-3
If successful, the
search will show
the available access
points. Choose the
SSID
of your desired
access point and
press OK.
3
Select your
preferred language
and press OK to
proceed.
4-4
If
Wireless
Encryption (WEP)
is
required, you will
be directed to the
encryption
page.
4-5
If successful, you
will be presented
with a list of media
servers. Select the
media server and
press OK to confirm.
Please see the networking glossary on page 20 for
an explanation of terms that are in
italics
.
If you require a Mac address for advanced WLAN
management, please refer to the WLAN Mac label
on the back panel of your LCD TV.
Please set up and confirm your router's SSID and WEP before setting up your MGW.
Page 8

English
8
Cable/ADSL
Modem
Internet
Router
DHCP Server
RJ-45 port
1
CARD/MGW
Press the CARD/
MGW button to
open the MGW
home page.
From the home
page, navigate to
Settings and press
OK to begin the
setup procedure.
4-1
Select Network Settings
4-2
Select Wired (Ethernet)
and press OK.
2
Select Language
Setup from the
menu.
4-3
Define the IP settings:
a. Assign the
IP address
automatically
(using
DHCP
).
3
Select your
preferred
language and
press OK to
proceed.
b. Refer to
your router's
configuration for
static IP settings.
4-4
Once you've successfully
connected to your
home network, the
MGW will search for,
and display, available
media servers. Select
the media server
desired and press OK to
confirm.
b. Connecting a wired (Ethernet) network
To connect your access point, follow the instructions below:
Please setup and confirm your router's IP and DHCP settings before starting to set up your MGW.
Please see the networking glossary on page 20 for
an explanation of terms that are in
italics
.
Page 9

English
9
or
RJ-45 port
c. Setting up a wired peer-to-peer connection
Connect your LCD TV to your PC as indicated below:
1
CARD/MGW
Press the CARD/
MGW button to
open the MGW
home page.
From the home
page, navigate
to Settings and
press OK to
begin the setup
procedure.
4-1
Select Network Settings
4-2
Select Wired (Ethernet)
and press OK.
2
Select Language
Setup from the
menu.
4-3
Define the IP settings:
Assign the IP address
automatically
(using
DHCP
).
3
Select your
preferred
language and
press OK to
proceed.
4-4
Once you've successfully
connected to your home
network, the MGW will
search for, and display,
available media server.
Select the media server
desired and press OK to
confirm.
Set up TV:
1
Open your Network
Connections
window from the
Start Menu.
3
Select Internet Protocol
(TCP/IP) and click the
Properties button.
2
Select Local Area
Connection, and
click the Properties
button.
4
Ensure the properties
are set to Obtain an IP
Address Automatically.
Set up PC (media server):
Please see the networking glossary on page 20 for an explanation of terms that are in
italics
.
Page 10

English
10
d. Connecting a wireless (ad hoc) network
To connect your PC via a wireless network, follow the instructions below:
1
Open your Network
Connections
window from the
Start Menu.
3
Click on the Wireless
Networks tab, and click
the Advanced button.
2
Select Wireless
Network
Connection, and
click the Properties
button.
4
Select Computer-to-
computer (ad hoc)
networks only and
click Close to close the
window.
5
Click Add and define an
SSID
for your computer.
You may also define any
WEP
settings you desire.
Make a note of the SSID
and WEP settings for
future reference.
Set up PC (media server):
1
CARD/MGW
Press the CARD/
MGW button to
open the MGW
home page.
From the home
page, navigate to
Settings and press
OK to begin the
setup procedure.
4-1
Select Network Settings
2
Select Language
Setup from the
menu.
4-2
Select Wireless (
Ad
Hoc
) and press OK. The
system will now search
for your wireless
Service
Set Identifier (SSID).
3
Select your
preferred
language and
press OK to
proceed.
4-3
If successful, the search
will show the available
access points. Choose
the SSID of your desired
access point and
press OK.
4-4
If
Wireless Encryption
(WEP)
is required, you
will then be directed to
the encryption page.
Set up TV
Please see the networking glossary on page 20 for
an explanation of terms that are in
italics
.
If you require a Mac address for advanced WLAN
management, please refer to the WLAN Mac label
on the back panel of your LCD TV.
Page 11

English
11
Navigating the MGW menus
To navigate around the MGW screens:
1. Use the directional keys to move between the onscreen buttons. Press OK to select your highlighted choice.
2. The MGW also has dedicated keys on the remote control .
3. Colored shortcut buttons are also used when in MGW mode. Functions for shortcuts are displayed at the bottom of each
screen when available.
Operating the MGW
Your Acer LCD TV incorporates media gateway technology to allow you to view and play your computer media files on the TV
screen.
Please ensure that you have completed the installation and setup. Details can be found on page 6.
DISPLAY MUTE
TV
RECALL
MENU CH LIST
BACK EPG
SWAP ACTIVE POSITION
SIZE/MODE
TELETEXT
MPX
HOLD SIZE SUBTITLE
VOL
PIP/PBP/POP
CH/PG
ENTER
AV SCART
PC
SLEEP WIDE
ZOOM ROTATE
SLIDE
OPTION
SRS/BBE CARD/MGW
1 2 3
4 5 6
7 809
OK
DISPLAY MUTE
TV
RECALL
MENU CH LIST
BACK EPG
ENTER
AV SCART PC
SLEEP WIDE
ZOOM ROTATE
SLIDE
OPTION
SRS/BBE CARD/MGW
1 2 3
4 5 6
7 8
0
9
OK
PC
Red Green Yellow Blue
Colored shortcut buttons
DISPLAY
CH/PG
Page 12

English
12
Music mode
MGW home page
CARD/MGW
a. Press the CARD/MGW key.
b. While in MGW mode, and with MGW as the Empowering Key
default, press the Empowering Key to access the main page.
Alternatively, press the Music shortcut (green) button on the remote
control to access the music folder page.
Selected folder
View, and select from, the folders defined in Acer eConsole.
Using the left-hand menu
The page will automatically open with the first file listed under the
"New" tab highlighted. To change the tab, press the left button on the
remote control to highlight the tab, and using the up or down buttons,
navigate to the tab you desire. The tabs are as follows:
New: Lists the most recently added files.
All: Lists all the files in the folder.
Favorite: Lists your favorites as defined using Acer eConsole.
Playlist: Lists any playlists you have defined using Acer eConsole.
Artist: Lists the files by artist.
Album: lists the files by album.
Genre: Lists the files by genre.
Albums are displayed using a disk icon, while a musical note icon
represents a song.
To enter and explore the contents of an album, highlight the album
and press OK.
BACK
MENU
OK
CH/PG
Page 13

English
13
Playing a song
To listen to a song, highlight it using the arrow buttons on the remote
and press OK. A green play symbol appears next to it to indicate that
this is the song currently playing. To stop the song currently playing,
push the STOP button on the remote.
Remote control shortcuts
Once a song is playing, use the shortcut buttons on the remote control.
1 OPTION
To delete the ad hoc playlist.
2 PROGRAM
Press to create an ad hoc playlist while in music mode; press Play
to activate this playlist.
3 Play/Pause
Press to play/pause music.
4 Stop
Press to stop music playback.
5 Previous
Press to return to the previous music track.
6 Random
Press to randomize selection of next song during audio playback.
7 Repeat
Press to repeat the current track. Press twice to repeat all.
8 Next
Press to advance to the next music track.
DISPLAY MUTE
TV
RECALL
MENU CH LIST
BACK EPG
SWAP ACTIVE POSITION
SIZE/MODE
TELETEXT
MPX
HOLD SIZE SUBTITLE
VOL
PIP/PBP/POP
CH/PG
ENTER
AV SCART PC
SLEEP WIDE
ZOOM ROTATE
SLIDE
OPTION
SRS/BBE CARD/MGW
1 2 3
4 5 6
7 8
0
9
OK
3
4
5 6 7 8
AV SCART
PC
OPTION
SRS/BBE CARD/MGW
9
1
DISPLAY MUTE
TV
RECALL
MENU CH LIST
BACK EPG
SWAP ACTIVE POSITION
SIZE/MODE
TELETEXT
MPX
HOLD SIZE SUBTITLE
VOL
PIP/PBP/POP
CH/PG
ENTER
AV SCART
PC
SLEEP WIDE
ZOOM ROTATE
SLIDE
OPTION
SRS/BBE CARD/MGW
1 2 3
4 5 6
7 809
OK
2
Page 14

English
14
Picture mode
MGW home page
CARD/MGW
a. Press the CARD/MGW key.
b. While in MGW mode, and with MGW as the Empowering Key
default, press the Empowering Key to access the main page.
Alternatively, press the Picture shortcut (yellow) button on the
remote control to access the picture folder page.
c. View, and select from, the folders defined in Acer eConsole.
Using the left-hand menu
The home page will automatically open with the first folder listed under
the "New" tab highlighted. To change the tab, press the left button
on the remote control to highlight the tab, and using the up or down
buttons, navigate to the tab you desire. The tabs are as follows:
New: Lists the most recently added files.
All: Lists all the files in the folder.
Favorite: Lists your favorites as defined using Acer eConsole.
Date: Lists the files by the date of creation.
Image folders have a small icon next to the reference number, and the
pictures inside are displayed as mini thumbnails. Individual pictures will
be displayed as single thumbnails.
BACK
MENU
OK
CH/PG
Page 15

English
15
Viewing pictures
To view a picture, highlight it using the arrow buttons on the remote
and press OK. The picture will appear as a full-screen image.
To access the picture file information at any time, press the DISPLAY
button on your remote.
Once viewing a file in picture mode, you can use the arrow buttons to
move to the next picture as they are displayed on the picture mode
menu.
Example: While viewing picture one, pressing right will take you to
picture two, and pressing down will take you to picture three.
Slideshows
Slideshows are a great way to view collections of your favorite pictures. They can also be viewed while listening to your choice
of music to further enhance the experience.
Viewing a slideshow
MENU
OK
BACK
SLIDE
0
To watch a slideshow, use the arrow buttons to navigate to the
folder you wish to view. Press OK to enter the folder, and once inside,
highlight a single picture.
Press the SLIDE/#0 button to begin the slideshow. Press SLIDE/#0 button
again to pause; press it once more to continue.
Press BACK at anytime to return to the picture mode page.
Editing slideshow time intervals
MENU
OK
BACK
OPTION
8
To change the time delay for each slide during a show, press the
OPTION/#8 button while you are in a picture folder. The time interval
screen will appear.
Use the left button to decrease and the right button to increase the
time interval. (Minimum time interval is 3 seconds and maximum is 20
seconds.) Press OK or BACK to save your settings and then exit.
Remote control shortcuts
Use the shortcut buttons on the remote control to zoom in, zoom out, rotate or start a slideshow when you’re viewing your
pictures.
Once a picture is playing, use the shortcut buttons on the remote
control.
1 OPTION
Press the #8 button to show the available functions.
2 SLIDE
Press to enter the slideshow mode. Press again to pause.
3 ZOOM
Zoom in on the displayed picture. Keep pressing to revert to the
original size
4 ROTATE
Rotates the displayed picture clockwise by 90 degrees each time.
1
2
DISPLAY MUTE
TV
RECALL
ENTER
AV SCART PC
SLEEP WIDE
ZOOM ROTATE
SLIDE
OPTION
SRS/BBE CARD/MGW
1 2 3
4 5 6
7 8
0
9
3
DISPLAY MUTE
TV
RECALL
MENU CH LIST
BACK EPG
SWAP ACTIVE POSITION
SIZE/MODE
TELETEXT
MPX
HOLD SIZE SUBTITLE
VOL
PIP/PBP/POP
CH/PG
ENTER
AV SCART
PC
SLEEP WIDE
ZOOM ROTATE
SLIDE
OPTION
SRS/BBE CARD/MGW
1 2 3
4 5 6
7 809
OK
4
Page 16

English
16
MGW home page
CARD/MGW
a. Press the CARD/MGW key.
b. While in MGW mode, and with MGW as the Empowering Key default,
press the Empowering Key to access the main page. Alternatively,
press the Video shortcut (blue) button on the remote control to access
the video folder page.
c. View, and select from, the folders defined in Acer eConsole.
Using the left-hand menu
The home page will automatically open with the first folder listed under
the "New" tab highlighted. To change the tab, press the left button
on the remote control to highlight the tab, and using the up or down
buttons, navigate to the tab you desire. The tabs are as follows:
New: Lists the most recently added files.
All: Lists all the files in the folder.
Favorite: Lists your favorites as defined using Acer eConsole.
Date: Lists the files by the date of creation.
Video folders have a small icon next to the reference number, and the clips
inside are displayed as mini thumbnails. Individual clips will be displayed
as single thumbnails.
BACK
MENU
OK
CH/PG
Viewing video clips
To view a video clip, highlight it using the arrow buttons on the remote
and press the OK or PLAY button. The clip will begin to play. To stop the
clip playback, press either the STOP or BACK buttons.
To freeze the clip at any time during the playback, press the PAUSE
button; press it again to continue watching.
To access the video clip information at any time, press the INFO button on
your remote control. This will bring up the information on screen.
Video mode
Page 17

English
17
Remote control shortcuts
1 Sound tracks
Press to toggle the different sound modes.
2 OPTION
Press to access Sound tracks and for jump by segment.
3 Rewind
Press to rewind during video playback.
4 Play/Pause
Press to play/pause video.
5 Stop
Press to stop video playback.
6 Fast Forward
Press to fast forward during video playback.
7 Previous
Press to return to the previous video track.
8 Next
Press to advance to the next video track.
9 Directional keys
Press the left or right directional keys to jump to a designated position
in a video clip.
DISPLAY MUTE
TV
RECALL
MENU CH LIST
BACK EPG
SWAP ACTIVE POSITION
SIZE/MODE
TELETEXT
MPX
HOLD SIZE SUBTITLE
VOL
PIP/PBP/POP
CH/PG
ENTER
AV SCART
PC
SLEEP WIDE
ZOOM ROTATE
SLIDE
OPTION
SRS/BBE CARD/MGW
1 2 3
4 5 6
7 809
OK
DISPLAY MUTE
TV
RECALL
MENU CH LIST
BACK EPG
SWAP ACTIVE POSITION
SIZE/MODE
TELETEXT
MPX
HOLD SIZE SUBTITLE
VOL
PIP/PBP/POP
CH/PG
ENTER
AV SCART PC
SLEEP WIDE
ZOOM ROTATE
SLIDE
OPTION
SRS/BBE CARD/MGW
1 2 3
4 5 6
7 8
0
9
OK
3
7 8
4 5 6
DISPLAY MUTE
TV
AV SCART
PC
SLEEP WIDE
ZOOM ROTATE
OPTION
SRS/BBE CARD/MGW
1 2 3
4 5 6
7 8
9
1
2
OK
9
Page 18

English
18
MGW home page
CARD/MGW
a. Press the CARD/MGW key.
b. While in MGW mode, and with MGW as the Empowering Key
default, press the Empowering Key to access the main page.
Alternatively, press the Online Media shortcut (red) button on the
remote control to access the Online Media page.
c. Make your selection from the Online Media available.
BACK
MENU
OK
CH/PG
The station information and song details will be shown on the screen as
you listen.
Online media
This function only works when your LCD TV is connected to a router. For router setup, please see page 8.
Page 19

English
19
Settings
Firmware updates are made available by Acer to correct software issues and/or add new features to the MGW in your LCD TV. To
access the updates, your TV will need to be connected to the Internet via a home network. Follow the steps below to update the
firmware.
1
Open the Settings menu on your OSD.
2
Select Firmware Update; this will display your current firmware version.
Click on Scan for updates.
3
Press OK to continue once you've reviewed the warning messages.
4
Press OK to reboot your MGW.
If you wish to change other settings, navigate to Settings from the home page, and change your settings by selecting
from the options listed.
Page 20

English
20
Networking glossary
802.11b/g:
Wireless networking standards that support data encryption
and data transfer rates of 11 and 54 megabytes per second
(Mb/s), respectively. 802.11g is backwards-compatible with
the 802.11b standard.
Ad hoc wireless network:
A network where two PCs communicate on a peer-to-peer
basis, without an access point or router.
DHCP (Dynamic Host Configuration Protocol):
Used by network devices to automatically obtain network
address information (IP address, subnet mask, gateway,
and DNS address.) Any PC with Internet Connection Sharing
Software running can act as a DHCP server; alternatively you
can use a router or an ISP server. If your network does not
have a DHCP enabled device, then you will need to assign an
IP address for your Acer LDC TV.
DNS (Domain Name System):
A system used by DNS servers to translate computer names
into IP addresses. For example, www.acer.com translates into
211.79.203.2
Ethernet:
A commonly used wired network technology, ranging in
speed from 10 up to 1000 Mb/s.
Gateway:
The gateway is the IP address of a device, such as a router,
that connects you to another network. The router acts as the
gateway between your Local Area Network (LAN) and the
Internet.
Access point wireless network:
A network that uses a router, hub or an access point.
IP address (Internet Protocol address):
An IP address consists of four groups of digits separated by
periods. Each group of digits contains an 8-bit value as a
number ranging from 0 to 255. Each computer must have
its own unique IP address. The IP addresses on your network
must be within the same range and must be sequential.
For example, if one device has an IP address of 192.168.1.2,
the IP addresses for the other devices in the network should
be 192.168.1.3 and 192.168.1.4.
Encryption key:
Encryption keys allow you to easily change wireless
encryption settings to maintain a secure network. The MGW
supports 64-bit and 128-bit keys.
Netmask:
Also known as a subnet mask, this is used to determine which
subnet an IP address belongs to.
SSID (Service Set Identifier):
Each Wireless Local Area Network (WLAN) has a designated
SSID. This can easily be changed to connect to an existing
wireless network.
Static IP:
As opposed to an automatically configured IP address, a static
IP address is configured manually. A static IP address must be
unique and remains the same.
WEP (Wired Equivalent Privacy):
A security protocol that provides the equivalent level of
wired security for wireless local area networks (WLAN). WEP
encrypts data sent through WLANs.
Network encryption
WEP (Wired Equivalent Privacy): An industry-standard
wireless device encryption technology. When using WEP, it is
important to determine the level of encryption.
The type of encryption determines the key length. 128-bit
encryption uses a longer key than 64-bit encryption.
Keys are defined by entering a string in either HEX
(hexadecimal - using characters 0-9, A-F) or ASCII (American
Standard Code for Information Interchange – alphanumeric
characters) formats.
ASCII format is designed to make strings that are easier to
remember. The ASCII string is converted to HEX for use. Up to
four keys can be defined to make key changes easy. A default
key is selected for use on the network.
There are five options configurable under the configuration
setting: Disable, 64-bit HEX, 128-bit HEX, 64-bit ASCII, and
128-bit ASCII.
Key Index: Select a number between 1 and 4.
Key: To connect to an encrypted wireless device, the key you
enter must match the device key exactly.
Key Types and Examples:
64-bit HEX: Keys are 10 characters in length.
Example: 01234567RH is a valid string of 10 characters for
64-bit encryption.
128-bit HEX: Keys are 26 characters in length.
Example: 789ABCDE123444100005271730 is a valid string of
26 characters for 128-bit encryption.
64-bit ASCII: Keys are 5 characters in length.
Example: ACERG is a valid string of 5 characters for 64-bit
encryption.
128-bit ASCII: Keys are 13 characters in length.
Example: 2005GALEDWIN9 is a valid string of 13 characters
for 128-bit encryption.
 Loading...