

Page 1

Acer LCD TV
Contents
AT2758ML
AT3258ML
User Guide
Important safety instructions 3
Disposal instructions . . . . . . . . . . . . . . . . . . . . . . . . . . . . . . . . . . . . . . 5
Your LCD TV overview 6
Front and side panels . . . . . . . . . . . . . . . . . . . . . . . . . . . . . . . . . . . . . . 6
Rear panel view . . . . . . . . . . . . . . . . . . . . . . . . . . . . . . . . . . . . . . . . . . 7
Remote control . . . . . . . . . . . . . . . . . . . . . . . . . . . . . . . . . . . . . . . . . . 8
Enjoying analog and digital TV . . . . . . . . . . . . . . . . . . . . . . . . . . . . . 11
Connecting devices 13
Basic connections . . . . . . . . . . . . . . . . . . . . . . . . . . . . . . . . . . . . . . . . 13
Connecting a DVD, VCR or audio/video equipment . . . . . . . . . . . . 14
TV-out . . . . . . . . . . . . . . . . . . . . . . . . . . . . . . . . . . . . . . . . . . . . . . . . . 15
Connecting a camera, camcorder or game console . . . . . . . . . . . . . 15
Connecting a PC or notebook computer . . . . . . . . . . . . . . . . . . . . . 16
Connecting a USB storage device . . . . . . . . . . . . . . . . . . . . . . . . . . . 16
Selecting the input source . . . . . . . . . . . . . . . . . . . . . . . . . . . . . . . . . 17
Channel controls 18
Channel list . . . . . . . . . . . . . . . . . . . . . . . . . . . . . . . . . . . . . . . . . . . . . 18
Favourite channel list . . . . . . . . . . . . . . . . . . . . . . . . . . . . . . . . . . . . . 18
Programme information . . . . . . . . . . . . . . . . . . . . . . . . . . . . . . . . . . 19
Electronic programme guide . . . . . . . . . . . . . . . . . . . . . . . . . . . . . . . 20
Navigating the EPG (for Digital TV mode) . . . . . . . . . . . . . . . . . . . . 21
Time shifting (digital channels only) . . . . . . . . . . . . . . . . . . . . . . . . . 21
Record programs to a USB storage device (digital channels only) . 22
Playing multimedia files from a USB storage device 23
Connecting a USB storage device . . . . . . . . . . . . . . . . . . . . . . . . . . . 23
OSD Menus 27
OSD navigation . . . . . . . . . . . . . . . . . . . . . . . . . . . . . . . . . . . . . . . . . 27
OSD Menu settings . . . . . . . . . . . . . . . . . . . . . . . . . . . . . . . . . . . . . . 28
Troubleshooting 35
There is no picture or sound . . . . . . . . . . . . . . . . . . . . . . . . . . . . . . . 35
Picture is not clear . . . . . . . . . . . . . . . . . . . . . . . . . . . . . . . . . . . . . . . 35
Picture is too dark, too light or tinted . . . . . . . . . . . . . . . . . . . . . . . 35
Remote control does not work . . . . . . . . . . . . . . . . . . . . . . . . . . . . . 35
PC input signal reference chart 36
Product specifications 37
Wall mount preparation / removing the base 39
Page 2

© 2010 All Rights Reserved
Acer AT2758ML/AT3258ML User Guide
First issue: 07/2010
Acer AT2758ML/AT3258ML
Model number: __________________________________
Serial number: ___________________________________
Date of purchase: ________________________________
Place of purchase: ________________________________
HDMI, the HDMI logo and High-Definition Multimedia Interface are trademarks or registered trademarks of HDMI Licensing LLC.
DVB is a registered trademark of the DVB Project.
2
Page 3

Important safety instructions
Read these instructions carefully. Please put them somewhere safe for future
reference.
1. Only use attachments/accessories specified by the manufacturer.
2. Use only with the cart, stand, tripod, bracket, or table
specified by the manufacturer, or sold with the apparatus.
When a cart is used, use caution when moving the cart/
apparatus combination to avoid injury from tip-over.
3. Unplug this apparatus during lightning storms or when
unused for long periods of time.
4. Do not install this equipment in a confined space such a book case or similar
unit.
5. No naked flame sources, such as lighted candles, should be placed on the
apparatus.
6. If the remote control will not to be used for a long time, remove the
batteries. Use the remote control carefully. Do not drop the remote control
on the floor. Keep it away from moisture, direct sunlight, and high
temperatures.
7. Used or discharged batteries must be properly disposed of or recycled in
compliance with all applicable laws. For detailed information, contact your
local solid waste disposal authority.
8. Follow all warnings and instructions marked on the product.
9. Unplug this product from the wall outlet before cleaning. Do not use liquid
cleaners or aerosol cleaners. Use a damp cloth for cleaning.
10.Do not use this product near water.
11.Do not place this product on an unstable cart, stand or table. The product
may fall, sustaining serious damage.
12.Slots and openings are provided for ventilation; to ensure reliable operation
of the product and to protect it from overheating, these openings must not
be blocked or covered. The openings should never be blocked by placing the
product on a bed, sofa, rug or other similar surface. This product should
never be placed near or over a radiator or heat register or in a built-in
installation unless proper ventilation is provided.
13.This product should be operated from the type of power indicated on the
marking label. If you are not sure of the type of power available, consult
your dealer or local power company.
14.Do not allow anything to rest on the power cord. Do not locate this product
where the cord will be stepped on.
15.If an extension cord is used with this product, make sure that the total
ampere rating of the equipment plugged into the extension cord does not
exceed the extension cord ampere rating. Also, make sure that the total
rating of all products plugged into the wall outlet does not exceed the fuse
rating.
3
Page 4

16.Never push objects of any kind into this product through cabinet slots as
they may touch dangerous voltage points or short-out parts, which could
result in a fire or electric shock. Never spill liquid of any kind on the product.
17.Do not attempt to service this product yourself, as opening or removing
covers may expose you to dangerous voltage points or other risks. Refer all
servicing to qualified service personnel.
18.Unplug this product from the wall outlet and refer servicing to qualified
service personnel under the following conditions:
a When the power cord or plug is damaged or frayed.
b If liquid has been spilled into the product.
c If the product has been exposed to rain or water.
d If the product does not operate normally when the operating
instructions are followed. Adjust only those controls that are covered by
the operating instructions.Improper adjustment of other controls could
result in damage; extensive work by a qualified technician might then be
required to restore the product to normal condition.
e If the product has been dropped or the case has been damaged.
f If the product exhibits a distinct change in performance, indicating a
need for service.
19.Use only the proper type of power supply cord set (provided in your
accessories box) for this unit. Always disconnect the power cord from the
wall outlet before servicing or disassembling this equipment.
20.Do not overload an electrical AC outlet, power strip, or convenience
receptical. The overall system load must not exceed 80% of the branch circuit
rating. If power strips are used, the load should not exceed 80% of the
power strip input rating.
21.Some products are equipped with a three-wire electrical grounding-type
plug that has a third pin for grounding. This plug only fits into a grounded
electrical outlet. This is a safety feature. Make sure the AC outlet is properly
grounded. Do not defeat the safety purpose of the grounding-type plug by
trying to insert it into a non-grounded outlet. If you cannot insert the plug
into the outlet, contact your electrician to replace the obsolete outlet.
22.Do not use this LCD TV in the workplace in accordance with BildscharbV, and
maintain ample distance from it when watching. Watching a big-screen TV
too close can cause eyestrain.
23.This TV is designed for home entertainment purposes only. Make sure there
is sufficient distance between you and the TV when you are viewing content
to avoid harming your eyes.
The grounding pin is an important safety feature. It is possible to receive an electric
shock from a system that is not properly grounded.
4
Page 5
The grounding pin also provides good immunity ability against unexpected noise that
interferes performance of this product and is produced by other nearby electrical
devices.
Disposal instructions
Do not throw this electronic device into the rubbish bin / container
when discarding. To minimize pollution and ensure utmost
protection of the global environment, please recycle.
For more information regarding WEEE, please refer to
http://global.acer.com/about/environmental.htm.
Соответствует сертификатам,
обязательным в РФ
Compliant with Russian regulatory certification.
5
Page 6
Your LCD TV overview
1
2
3
4
6 7 8 9 10 11 12
5
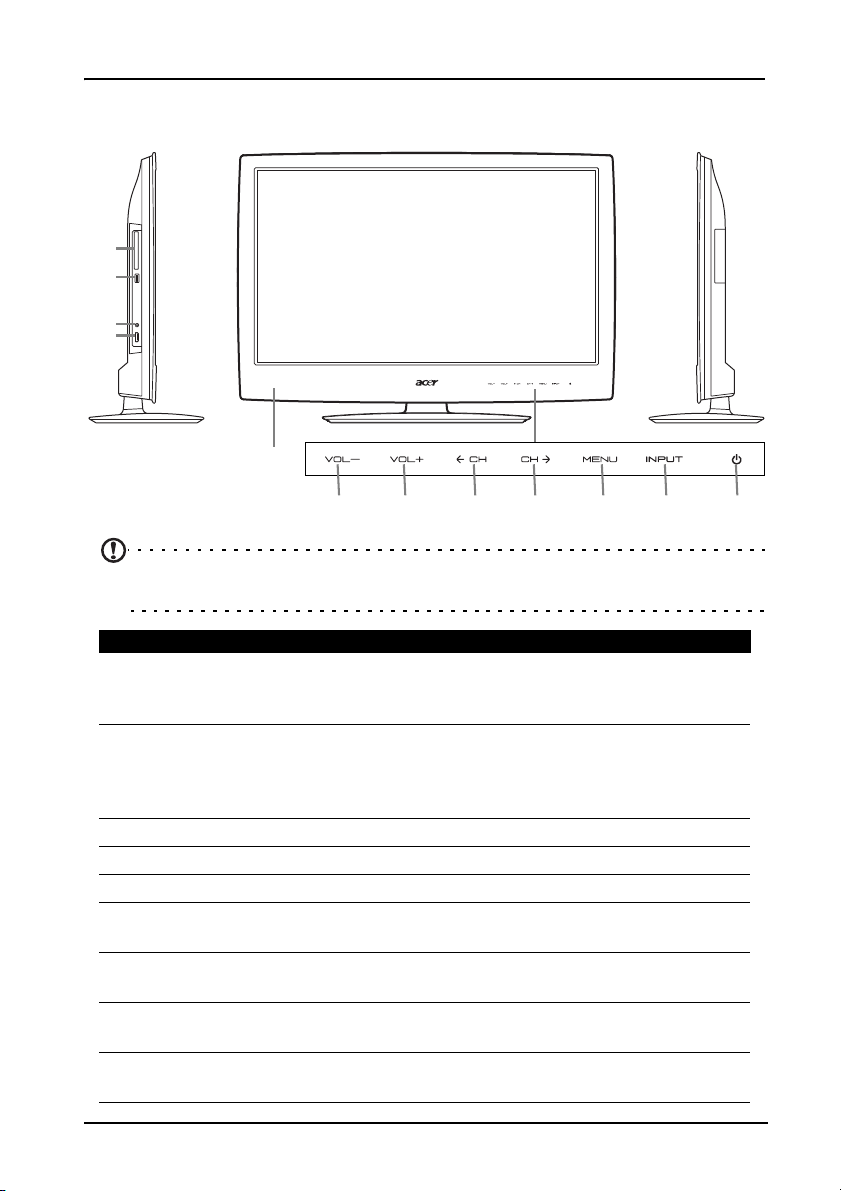
Front and side panels
Note: The control buttons are touch-sensitive. Simply touch the area to
activate the function.
No. Item Description
1 Common interface Insert a common interface module here. A
module may be required by certain channels
(e.g. some pay-per-view channels).
2 USB port Your TV can play multimedia files from a USB
storage device, or use is to record or pause
live TV. See “Connecting a USB storage
device” on page 16.
3 Earphone Insert a 3.5 mm headphone jack here.
4 HDMI port See “Connecting devices” on page 13.
5 Remote control receiver Receives signals from the remote control.
6 Volume down When the OSD is on, functions the same as
the Left arrow.
7 Volume up When the OSD is on, functions the same as
the Right arrow.
8 Channel down When the OSD is on, functions the same as
the Down arrow.
9 Channel up When the OSD is on, functions the same as
the Up arrow.
6
Page 7
No. Item Description
1
2
3
4
5
6
7
8
10 Menu key Turns the OSD menu ON and OFF.
11 Source (Input) key Press to change input source. When the OSD
is on, press this button to confirm selection.
12 Power button Press to turn the TV ON and OFF.
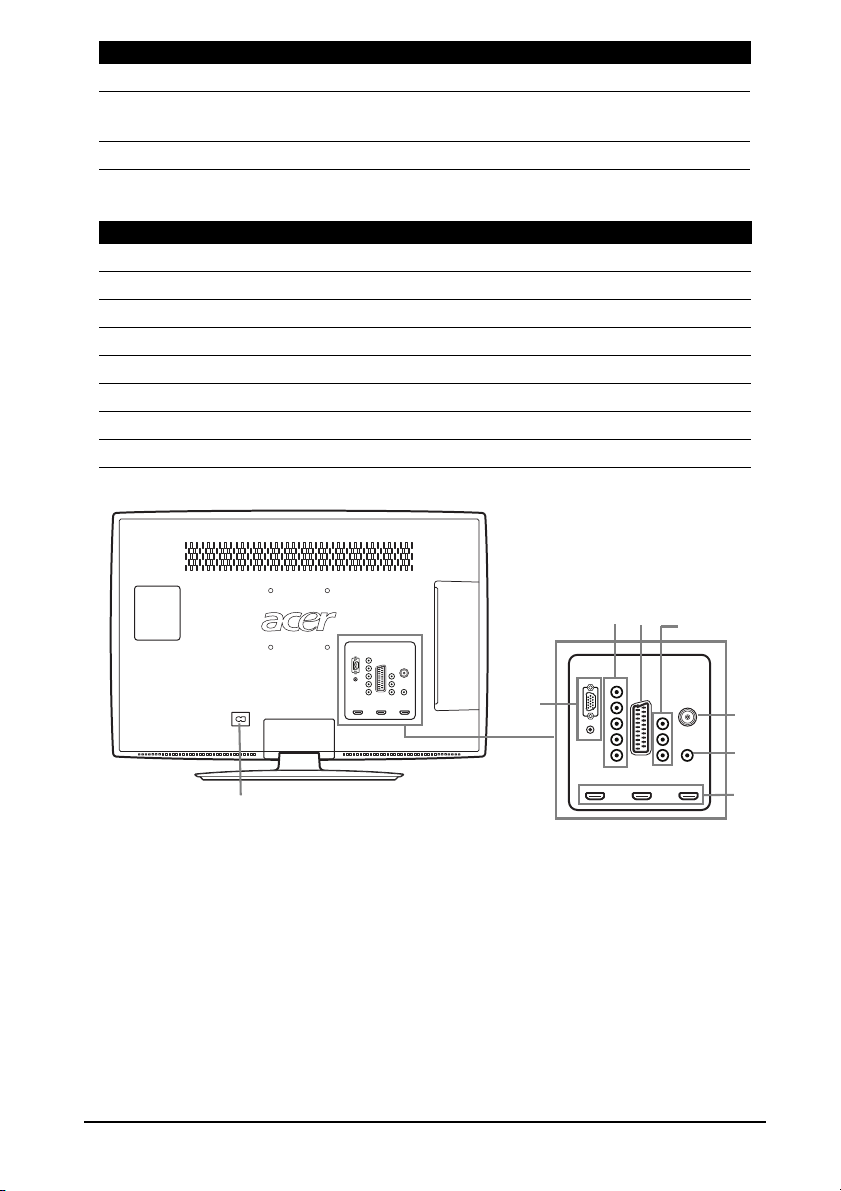
Rear panel view
No. Item
1AC-in
2 VGA-in + PC Audio-in
3 AV in-COMPONENT + Audio L/R
4SCART
5 AV in-CVBS, Audio L/R
6 Hybrid tuner (supports analog and digital signals)
7SPDIF out
8 HDMI ports
7
Page 8
Remote control
OK
DISPLAY GUIDE
WIDESOURCE
MENU
MUTE
TELETEXT SUBTITLE
BACK
CANCEL
FAV
MPX
1
3
2
4
5
6
7
11
8
12
10
9
13
14
16
17
15
Setting up the remote control
1. Open the cover on the back of the remote unit.
2. Insert two AA batteries (supplied) to match the polarity indicated inside the
battery compartment.
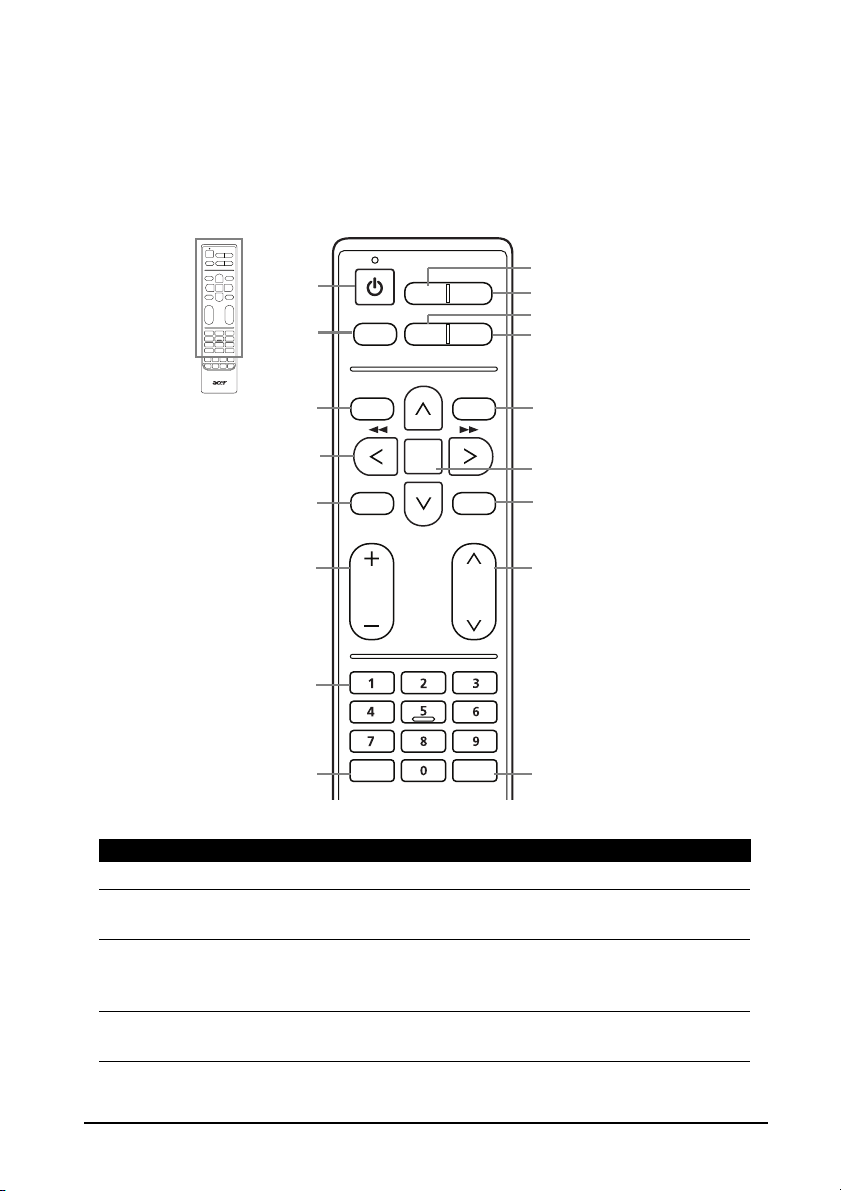
General keys
No. Item Description
1 POWER Press to turn your TV on/off.
2 DISPLAY Press to display or change input/channel information
3 GUIDE Press to launch Electronic Programme Guide (EPG)
4 SOURCE Press to select correct source/input mode.
8
(dependent on input/source type).
mode (Digital TV mode only).
See “Electronic programme guide” on page 20.
See “Selecting the input source” on page 17.
Page 9
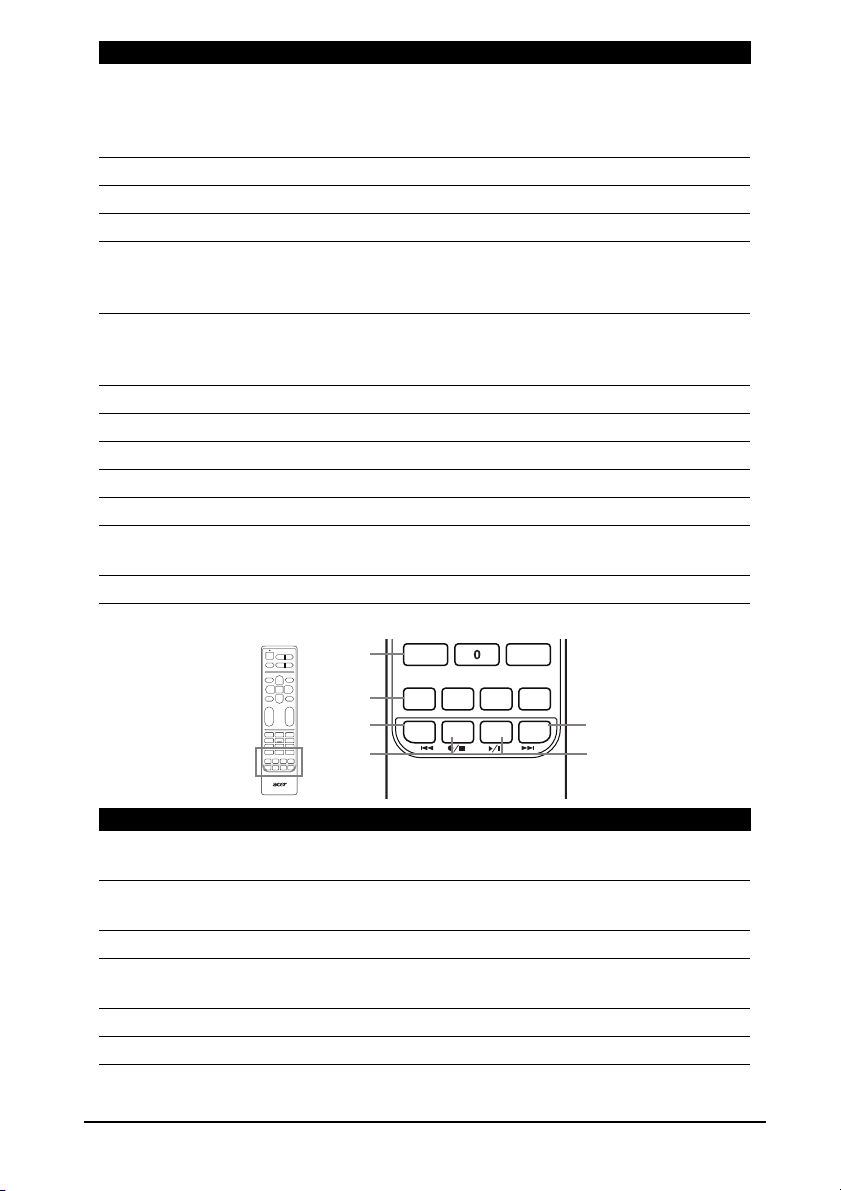
No. Item Description
TELETEXT
INDEX SIZE HOLD REVEAL
SUBTITLE
3
6
2
4
5
1
5 WIDE Press to toggle scaling mode between 4:3, 16:9 and
different Letterbox modes (1, 2, 3).
Wide Detect is also available when viewing digital TV,
HDMI and SCART signals.
6 MPX Press to display and select the audio signal.
7 MENU Press to open or close the Menu.
8 Back/CANCEL Press to back to previous Menu.
9 Directional keys On certain models, the left and right directional keys
also function as rewind and fast-forward keys when
viewing multimedia files.
10 OK/ENTER/
CH LIST
ENTER: Press to confirm channel number selection.
CH LIST: Press to launch the channel list.
See “Channel list” on page 18.
11 MUTE Press to toggle audio on and off.
12 FAV Press to display the favorite channel list.
13 VOL (+/-) Press to increase or decrease the volume.
14 CH (up/down) Press to sequentially select the TV channel.
15 Number keys Press 0 - 9 on the remote control to select a channel.
16 TELETEXT/MIX Press to switch from TV/AV to Teletext mode. Press to
overlay teletext page on the TV image.
17 SUBTITLE Press to view subtitles on the screen.
Teletext keys
No. Item Description
1 TELETEXT/MIX Press to switch from TV/AV to Teletext mode. Press to
2 Colour buttons
(R/G/Y/B)
3 INDEX Press to go to the index page.
4 SIZE Press once to zoom teletext page to 2X. Press again to
5 HOLD Press to pause the current teletext page.
6 REVEAL Press to reveal hidden teletext information.
overlay teletext page on the TV image.
Operates corresponding button on the teletext page.
resume.
9
Page 10
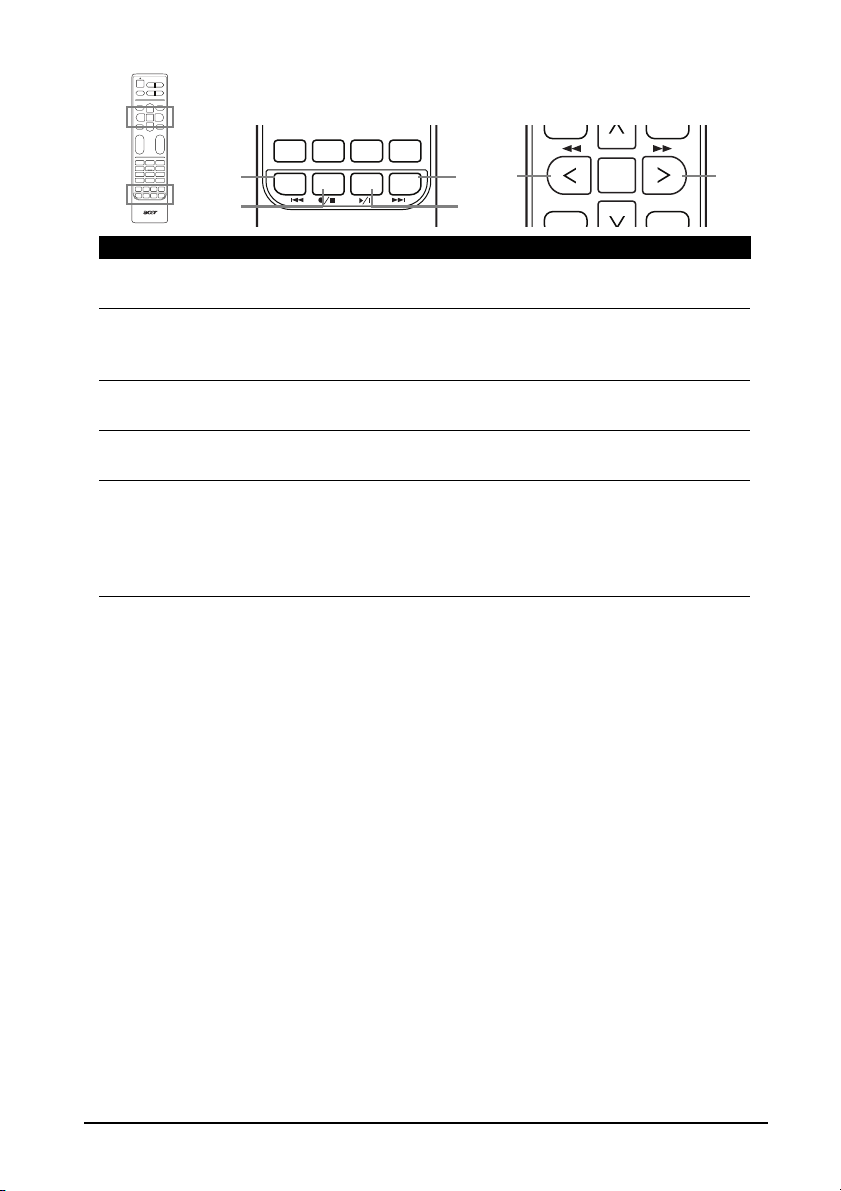
Multimedia keys
OK
MENU
MUTE
BACK
CANCEL
FAV
TELETEXT
INDEX SIZE HOLD REVEAL
SUBTITLE
1
4
2
3
5 6
No. Item Description
1 Previous Track Press to go to the beginning of a track, or the
previous track.
2 Stop Start recording a programme if a USB storage device
is connected.
Press to stop playback or recording.
3 Play/Pause Press to start playing the selected track, or pause a
track if it is already playing.
4 Next track Press to skip to the next track if multiple tracks have
been selected.
5
Rewind
&
&
6
Fast forward
You may use the left and right directional buttons to
fast forward or rewind.
Press the button again to increase how fast playback
advances (x2/x4/x8/x16).
Press the Play/Pause button to resume playback.
10
Page 11
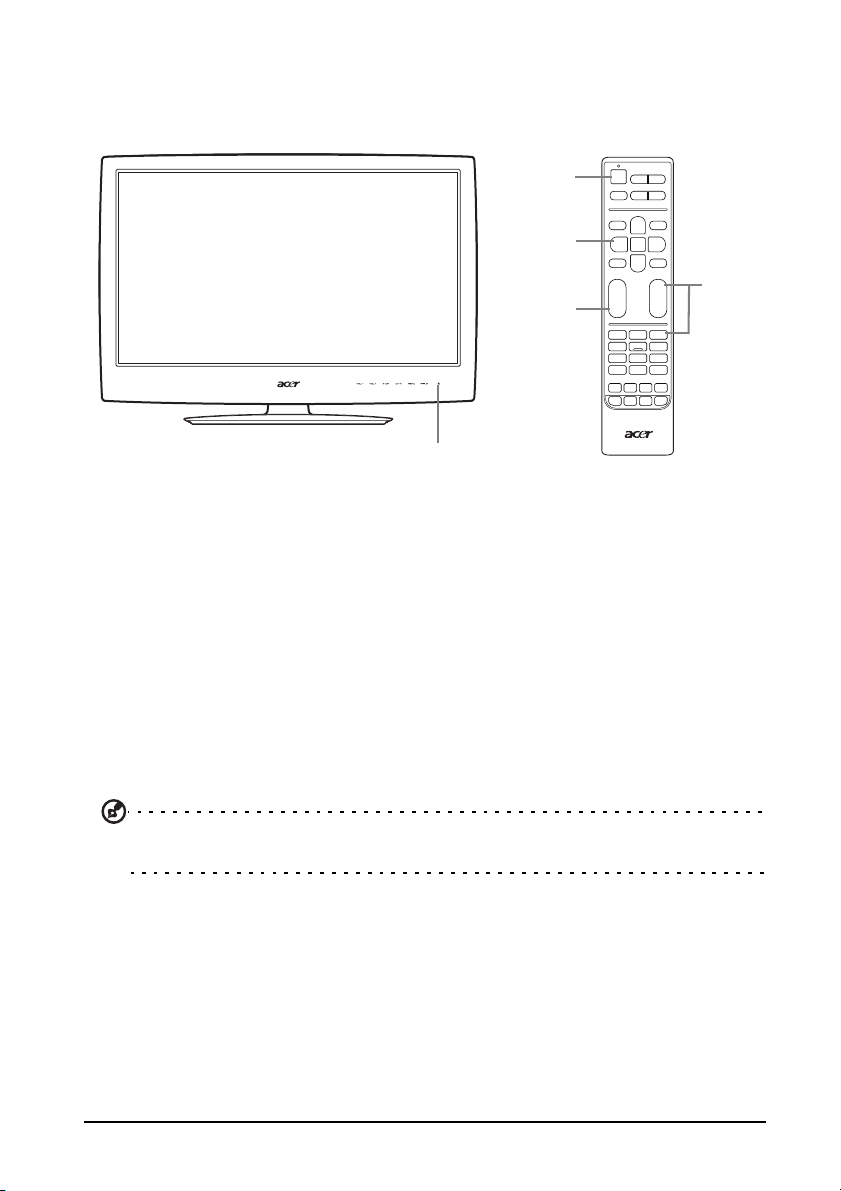
Enjoying analog and digital TV
1
1
2
3
4
There are a few steps to perform when you first use your TV.
Getting started watching your TV
1. Setup
a Connect the power and antenna cable to the TV. See “Basic
connections” on page 13.
b Insert the batteries in the remote control. See “Setting up the remote
control” on page 8.
2. Power
a Press the touch-sensitive power button beneath the screen OR press the
power button or channel up/down button on the remote control.
b Wait a few seconds for the TV to warm-up.
3. Installation guide
The first time you switch on the TV, you will be asked to select the language
and scan for channels.
Press the OK key to begin the setup process.
Tip: You can also adjust these settings using the front control panel. See
“Front and side panels” on page 6.
a Select the setup language you prefer.
b Please select the correct country for signal reception.
c Select Home mode.
d Ensure that is antenna cable is connected correctly before proceeding.
e Scan for digital channels and analog channels.
f Setup is now complete. You are ready to begin watching TV.
11
Page 12

4. Changing channels
a Press 0 - 9 on the remote control to select a channel. To allow you to
enter channels with more than one digit, the channel changes after
2 seconds. Press OK to select the channel immediately.
b Pressing the channel ( CH ) up / down button on the remote control will
also change the channel.
5. Adjusting the volume
Adjust the volume level using the ( VOL ) up / down button on the remote
control.
Note: Setup may vary due to local broadcast differences.
12
Page 13
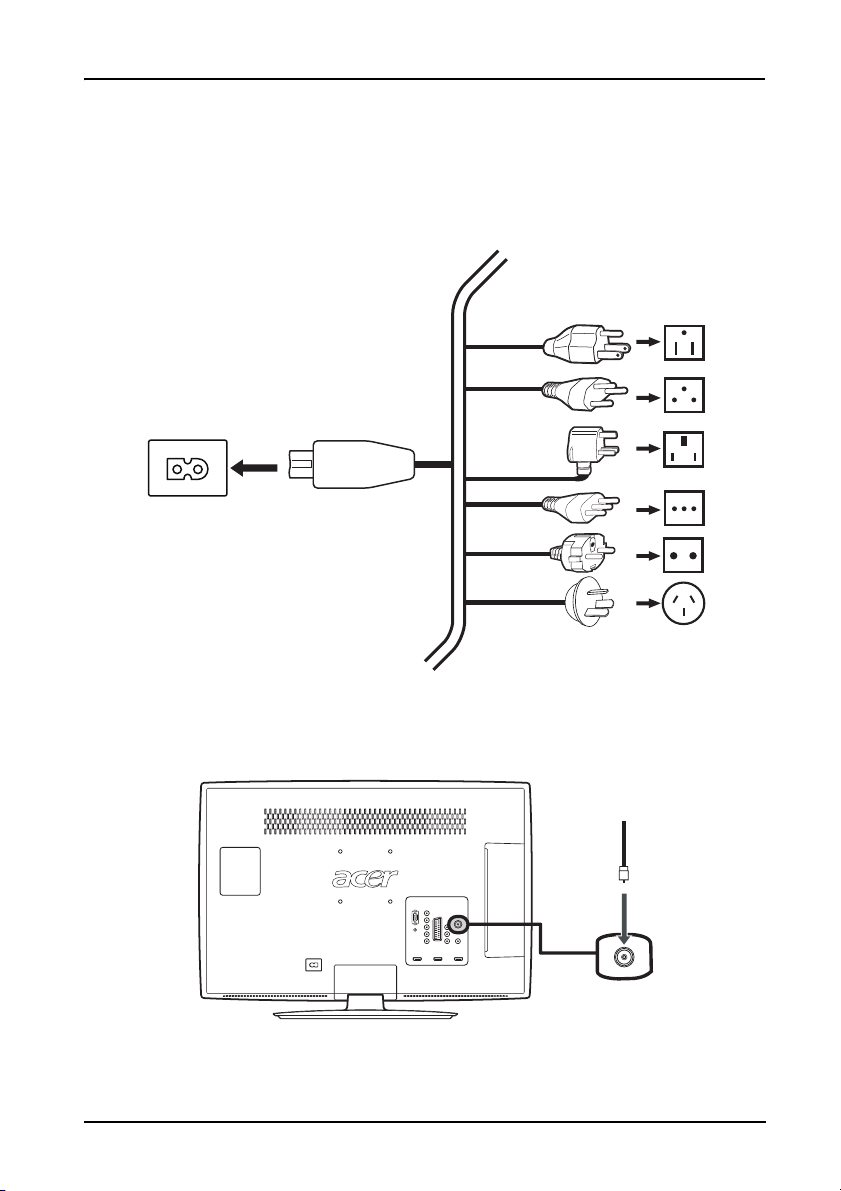
Connecting devices
Basic connections
Connecting the power cord
1. Connect the AC cord into the AC input on the back of the set.
2. Connect the plug to the wall outlet as shown.
Connecting an antenna/cable
Connect the antenna cable to the appropriate antenna terminal on the back of
the TV set as shown below.
Tuner
13
Page 14
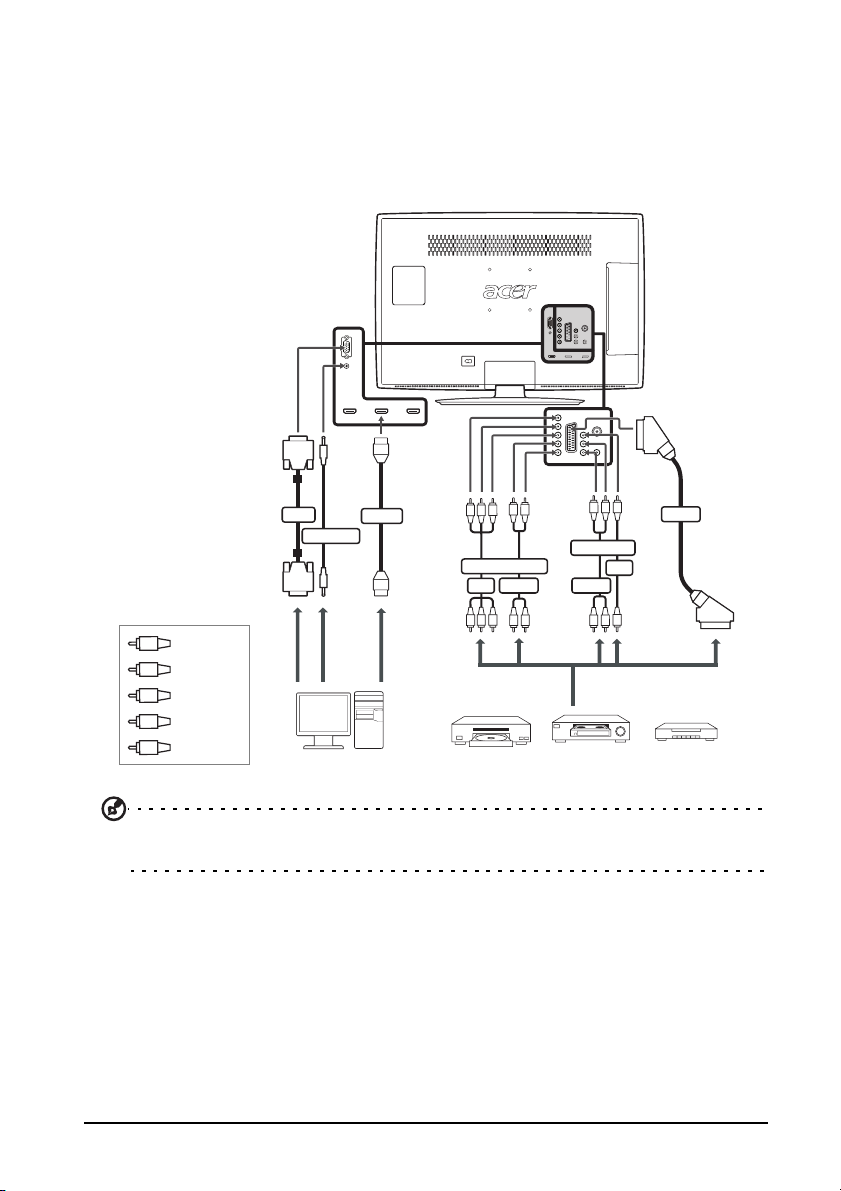
Connecting a DVD, VCR or audio/video
Y
R
W
B
G
Yellow
Red
White
Blue
Green
equipment
Connect your DVD player, VCR or audio/video equipment using the appropriate
port located at the rear of your LCD TV as shown below.
Source-in
D-Sub
Y
W
VGA
D-Sub
PC-Audio in
HDMI
W
RBG
COMPONENT
AUDIO
AV
RBG
W
R
R
R
COMPOSITE
AUDIO
R
W
SCART
AV
Y
14
or
DVDPC VCR STB
Acer recommends the following priority for connection types:
HDMI -> COMPONENT -> SCART -> Composite.
or
Page 15
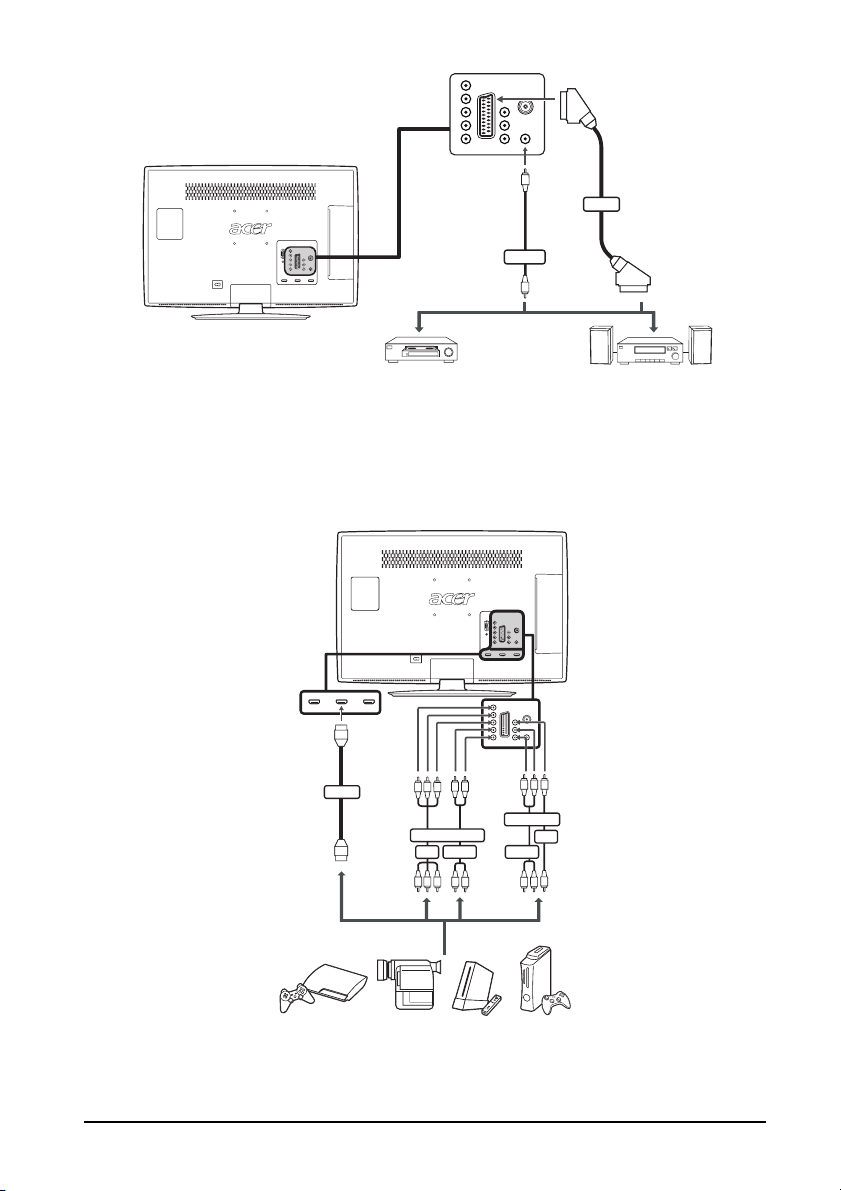
TV-out
SCART
SPDIF
Recorder
AV
Connecting a camera, camcorder or game console
Connect your camera or camcorder to the video/audio ports on the TV set as
shown below.
Y
W
HDMI
RBG
COMPONENT
AUDIO
AV
RBG
W
R
W
R
R
COMPOSITE
AUDIO
R
W
AV
Y
15
Page 16
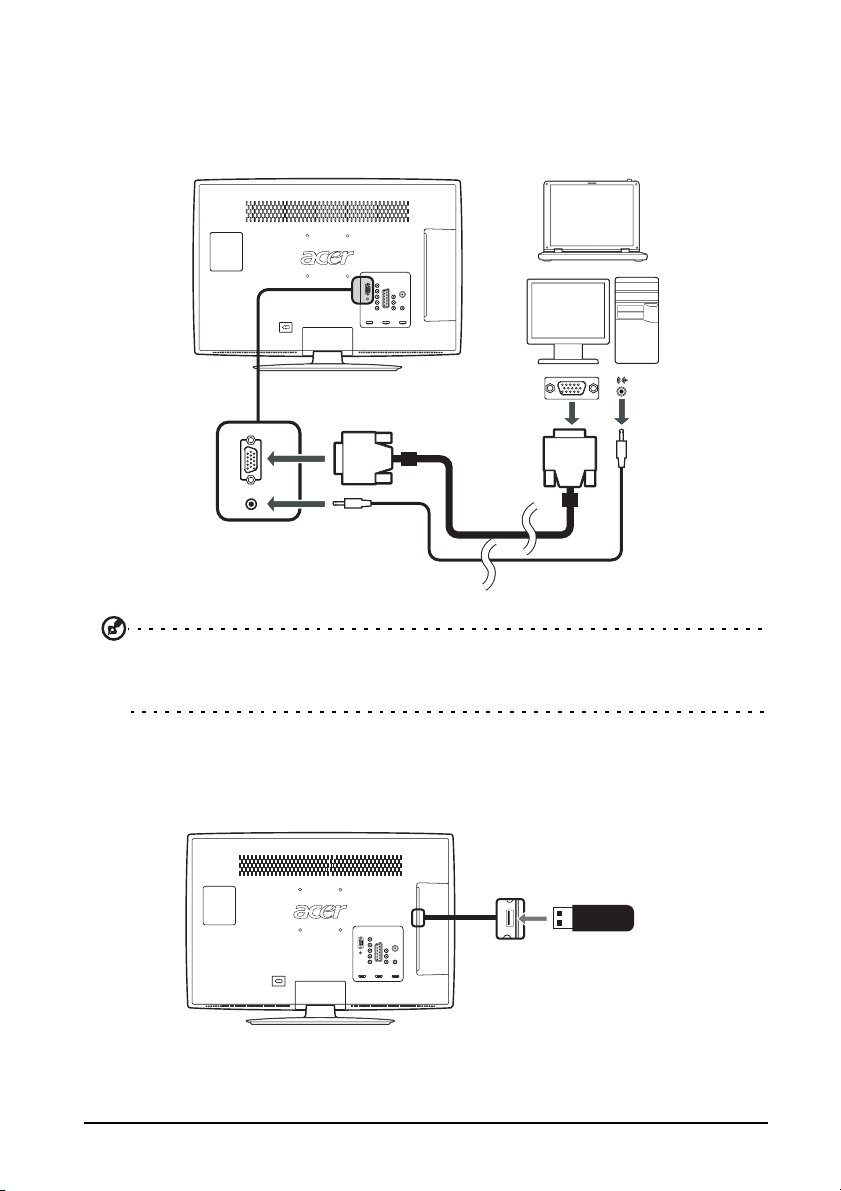
Connecting a PC or notebook computer
D-Sub
D-Sub
USB storage device
To display PC output on your TV, connect your PC or notebook computer to the
TV as shown below.
For VGA connections, Acer recommends setting your PC’s external monitor
resolution to match the screen resolution. See “Product specifications” on
page 37.
Connecting a USB storage device
To display multimedia content on your TV, connect the USB device to the TV as
shown below.
Handy drive
16
Page 17
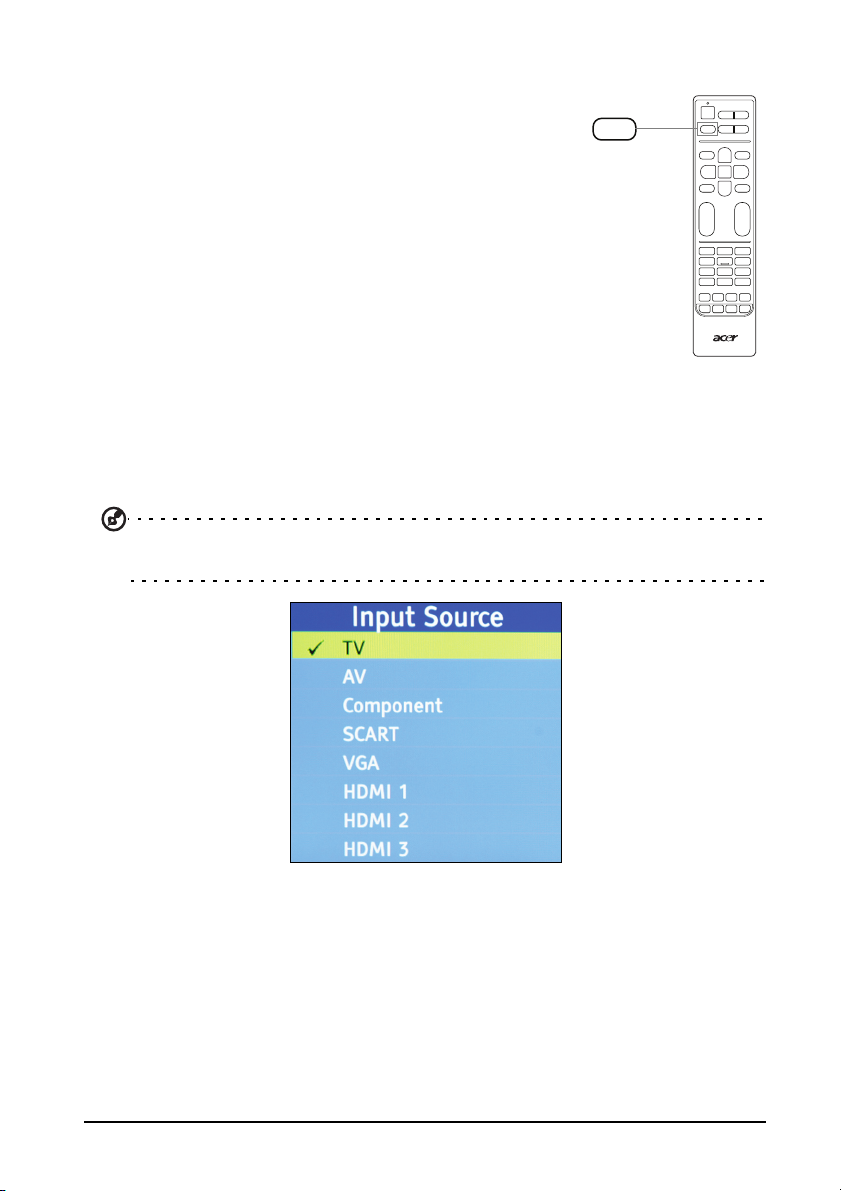
Selecting the input source
SOURCE
Once you have connected your antenna or external
equipment to the TV, you need to select the correct
input source.
Press the SOURCE button on the remote control to see
the list of available source connections:
•TV
• SCART
• Component
•PC-RGB
•AV
• HDMI1
• HDMI2
• HDMI3
• HDMI4
• Multimedia (USB)
Press the SOURCE button or the up and down directional keys to change the
selection.
Tip: Some options may be hidden at the bottom of the source list. Press the
down button, or the SOURCE button, until the options are visible.
17
Page 18
Channel controls
OK
OK
MENU
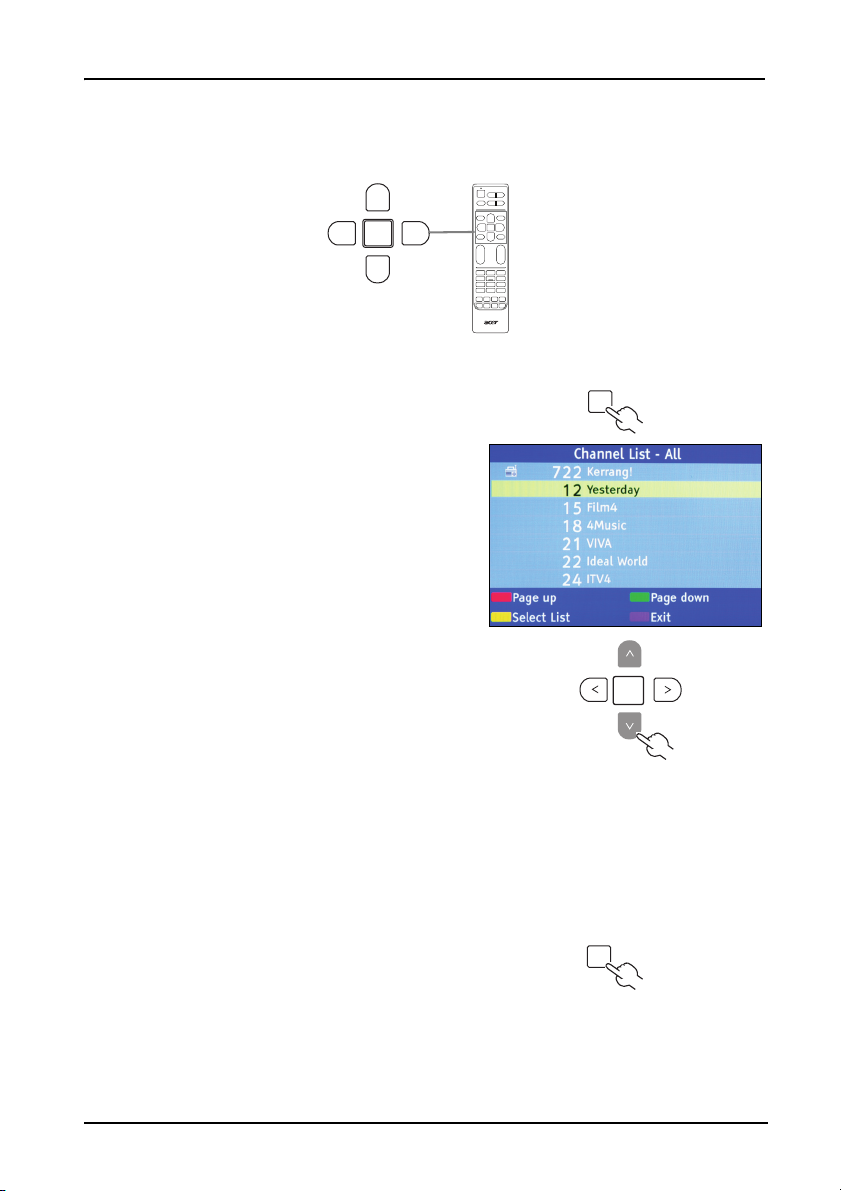
Channel list
Channel list allows you to quickly find the TV channel you are searching for.
To open the channel list feature:
1. Press the OK key on the remote control.
This will bring up the channel list menu.
2. The current channel will be highlighted.
3. Use the up and down directional keys to
navigate the list and press the OK key to
select the channel you wish to watch.
• Use the yellow key to switch between
the digital and analogue channel lists.
• Use the blue key to exit the list.
OK
Favourite channel list
The favourite channel list allows you to store your favourite TV channels and
flick between them at the touch of a button.
To set a favourite channel, follow the steps described on this page.
Storing favourite channels
1. Press the MENU key on the remote control
to open the OSD menu. See “OSD Menus”
on page 27.
18
Page 19
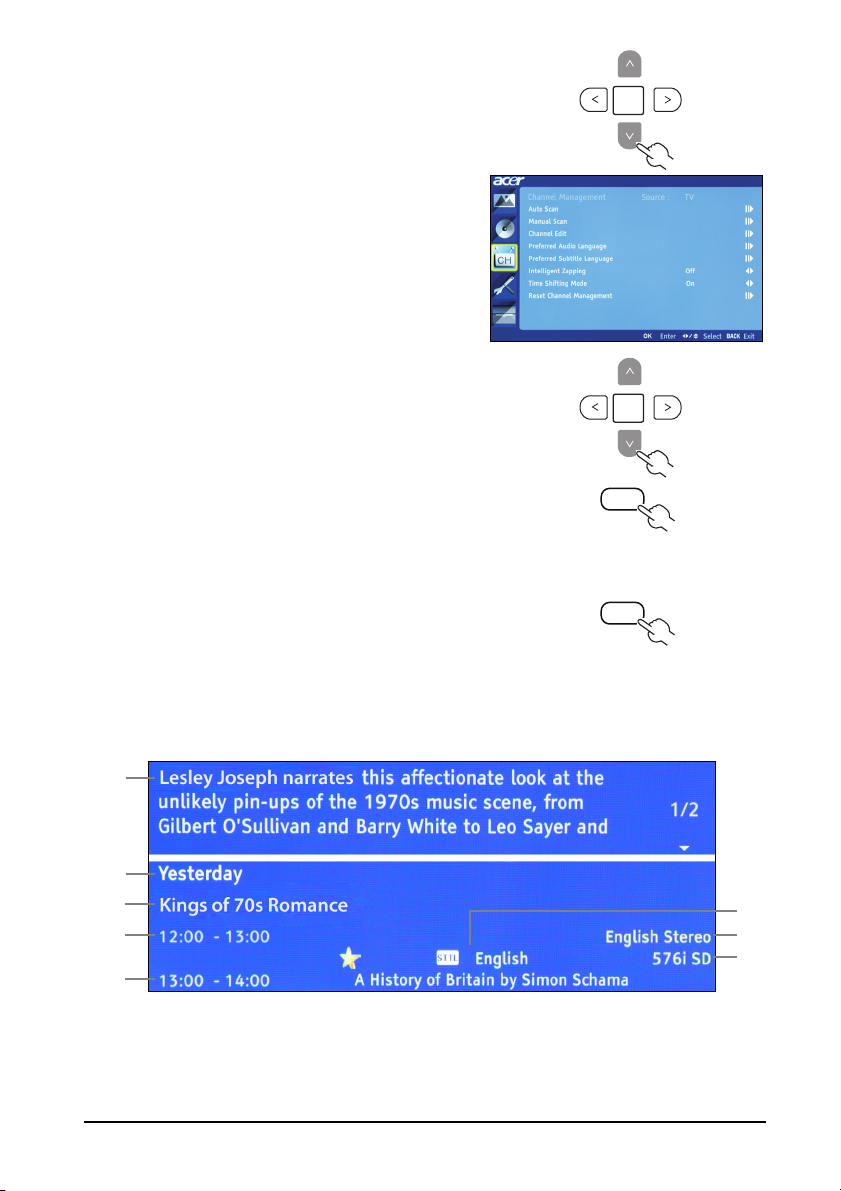
2. Use the directional keys to navigate to the
Channel management menu.
3. Select Channel edit, then Favourite list.
4. Navigate to a channel and press OK to
add or remove it from your favourite
channels.
OK
OK
5. Press the BACK key on the remote control
to exit.
Back
Viewing your favourite channels
On the remote control, press the FAV key to
disply the next favourite channel defined in
the favourite channel menu.
FAV
Programme information
Press the DISPLAY key to see information about the current programme (if
available).
a
b
c
d
e
a Programme summary
Use the up or down directional keys to see the entire summary.
b Channel title
c Programme title
f
g
h
19
Page 20
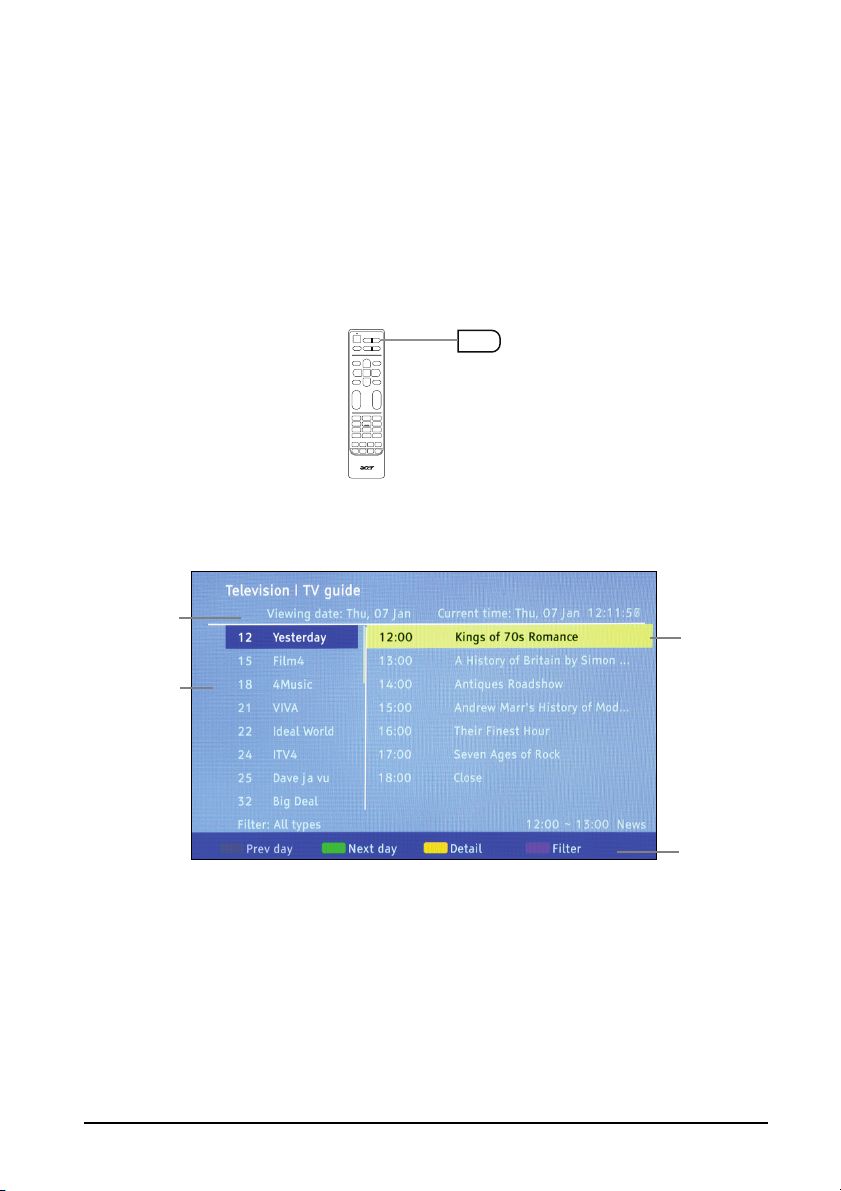
d Programme time
a
b
c
d
e Next scheduled programme
f Subtitle (and subtitle language)
If ‘STTL’ is displayed press the SUBTITLE key to display subtitles.
g Audio language
h Video definition
Electronic programme guide
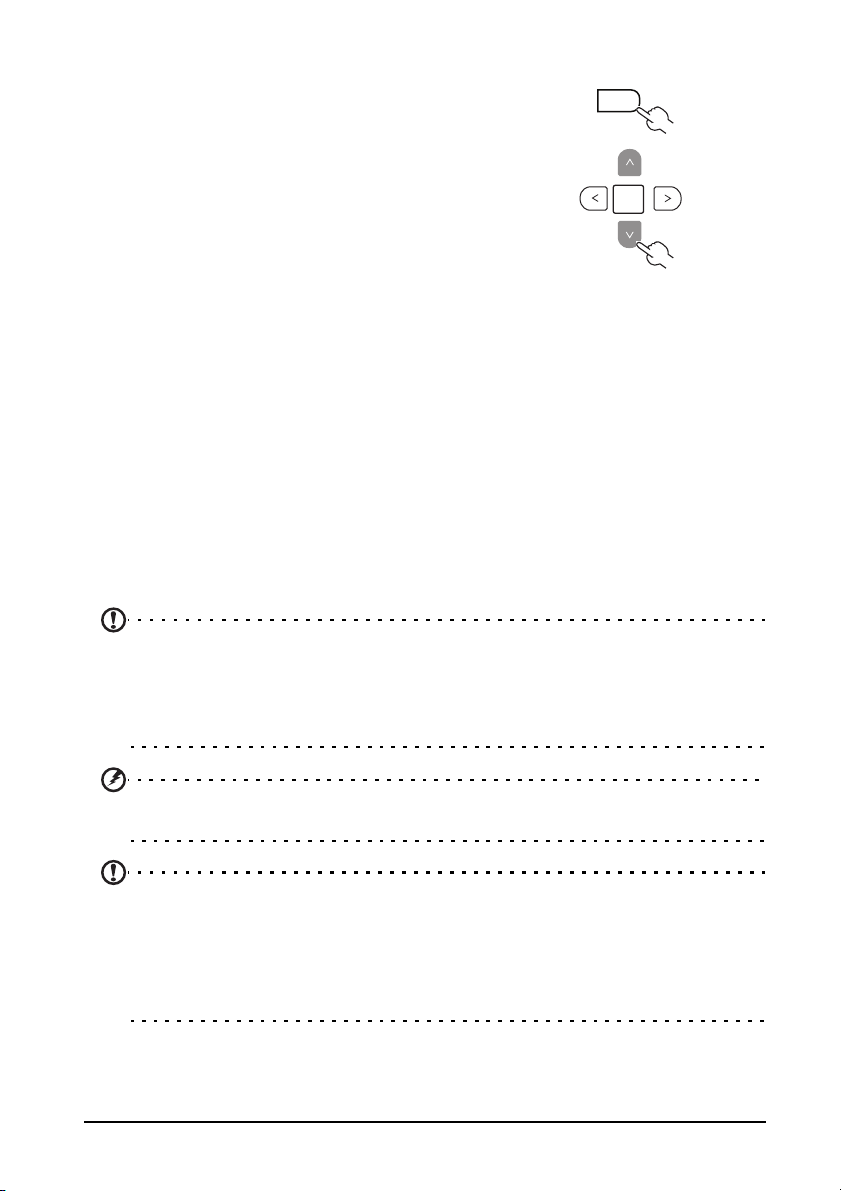
The electronic programme guide (EPG) is an onscreen service available on
digital and cable TV that provides information about scheduled broadcast
programmes on all digital channels by time, title and channel.
GUIDE
Guide screen
There are four main areas of the EPG screen:
a The top of the screen shows the date and time.
b The section on the left shows all names for digital channels.
Use the up or down directional keys to switch to the previous or next
channel.
c The section on the right shows the start time and title for programmes in
the selected channel. Press the yellow key to see the start and finish
times, any age rating and a summary.
d The bottom of the screen shows additional options for changing the list
of programs and channels.
20
Page 21
Navigating the EPG (for Digital TV mode)
GUIDE
OK
1. Press the GUIDE key on the remote
control.
2. Use the directional keys to navigate
around the EPG menu and press OK to
select your highlighted option.
Time shifting (digital channels only)
Your TV allows you to temporarily store (‘time shift’) a program to a USB
storage device (digital channels only); this allows you to pause the program,
and later resume playback from that point.
1. Connect a USB storage device to the USB port on your TV. See “Connecting a
USB storage device” on page 16.
2. While viewing a digital TV channel, press PAUSE to start the time shift
function. If the USB storage device has not been configured for use with your
TV, select Auto in the window that is displayed.
3. Use left and right direction keys to rewind and fast-forward the time-shifted
program.
4. Press BACK to disable time shifting.
Note: The USB storage device must have at least one gigabyte (GB) of free
space to store time shifting information. It is recommended you use an
empty USB device.
If a Sleep timer had been set before activating the time shift function, the
timer will be suspended.
Warning: Do not remove the USB storage device while time shifting is
active. Disable time shifting before removing the device from the USB port.
Note: 180 minutes of 480i content, or 30 minutes of 1080i content, requires
approximately four gigabytes (GB) of memory.
The time shift function cannot store more than four gigabytes of time shift
information. Once four gigabytes of data has been stored, the time shift
function will delete the stored data and restart storing content. This occurs
even if more storage is available.
21
Page 22

Record programs to a USB storage device (digital channels only)
Your TV allows you to record digital TV programs to a USB storage device.
1. Connect a USB storage device to the USB port on your TV.See “Connecting a
USB storage device” on page 16.
2. While viewing a digital TV channel, press STOP/REC to start recording the
program. A confirmation message will be displayed for a short duration.
3. A progress indicator in the lower-left corner of the screen shows the
duration of the recording.
4. Press STOP/REC again to stop recording the program.
5. Use the multimedia player to view your recorded programs (see “Playing
multimedia files from a USB storage device”). Recorded files are stored in the
“PVR“ folder.
Warning: Some USB storage devices may not support to the time shifting or
recording functions. Please use a different storage device.
22
Page 23
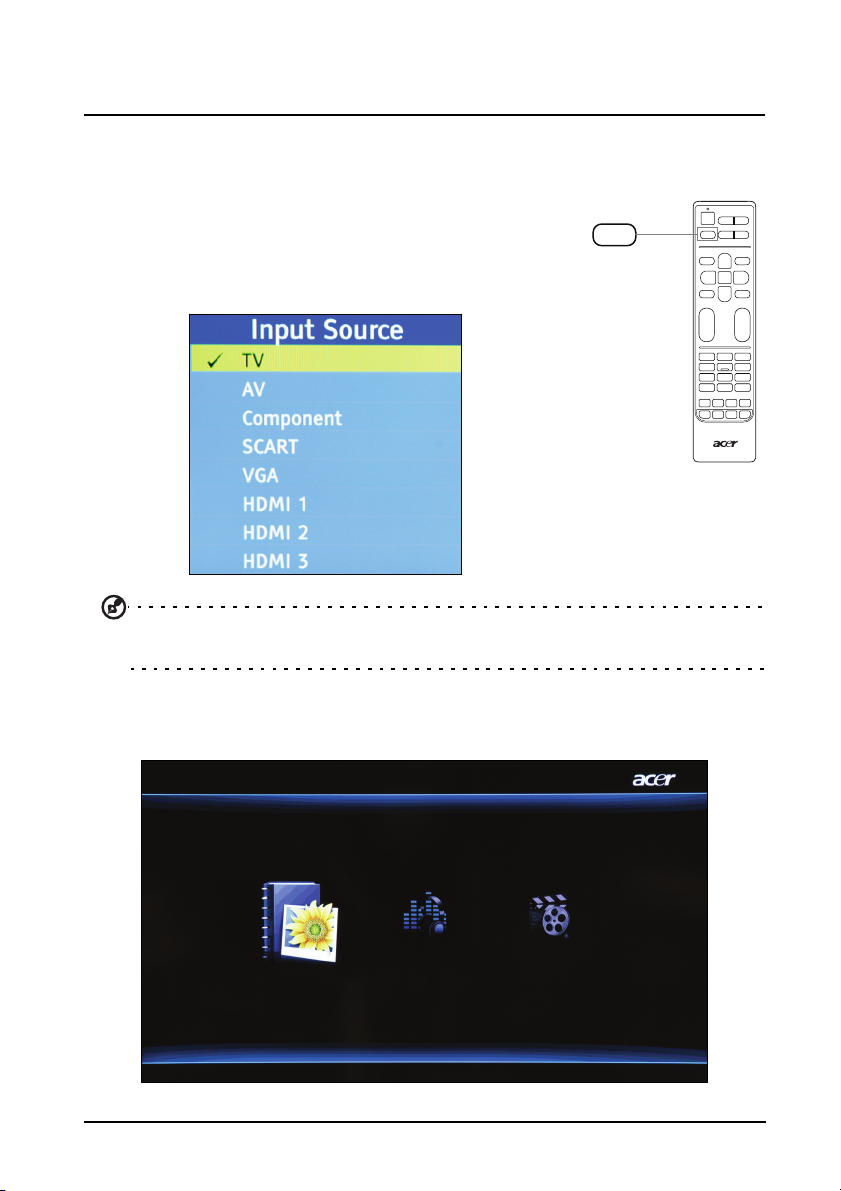
Playing multimedia files from a USB storage device
Connecting a USB storage device
Connect the USB storage device to the USB port on your
computer. See “Connecting a USB storage device” on
page 16.
Press the Source button on the remote control and
select Multimedia.
Tip: The Multimedia option may be hidden at the bottom of the source list.
Press the down button, or the Source button, until the option is visible.
SOURCE
Selecting multimedia (pictures, music or video)
The first screen allows you to select the type of media you want to access.
23
Page 24
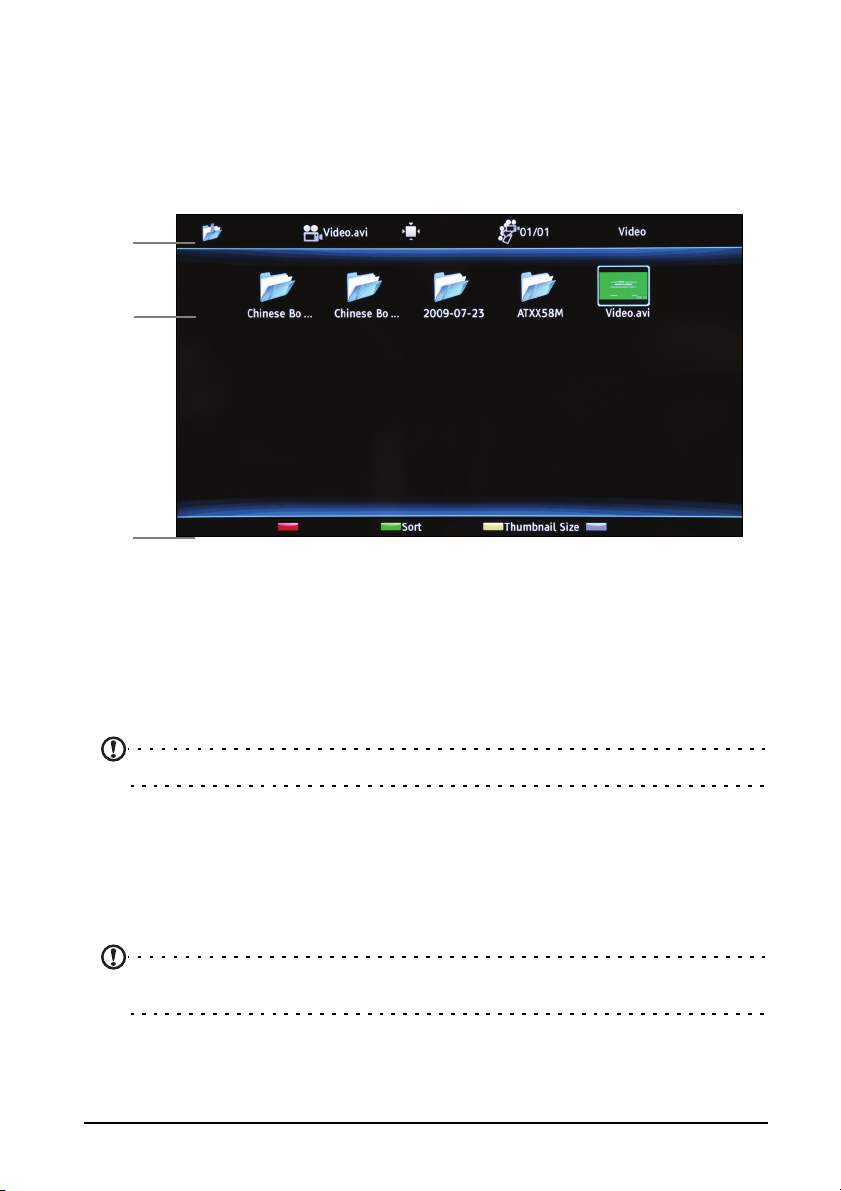
Use the left and right directional buttons to select Pictures, Music or Videos and
a
b
c
press the OK button to access the USB storage device.
If you want to change the selected media type, press MENU to return to this
screen.
Navigating your USB storage device
There are three main areas of the multimedia screen:
a Status bar
The top of the screen shows the type of media being viewed: Pictures, Music
or Movie, with some information about the selected file. To change the
selected media type, press MENU to return to the selection screen.
b Navigation menu
The middle of the screen shows the contents of the USB device. Use the directional keys and press OK to open a file or folder.
Note: Only files that match the selected media type are displayed.
Press the BACK button to return to the folder that contains the folder being
viewed.
c File option bar
The bottom of the screen shows additional options for the file being viewed,
such as volume level or special functions for the coloured buttons on the
remote control.
Note: When playing a movie or viewing photos, the top and bottom bars will
disappear after a short delay.
24
Page 25
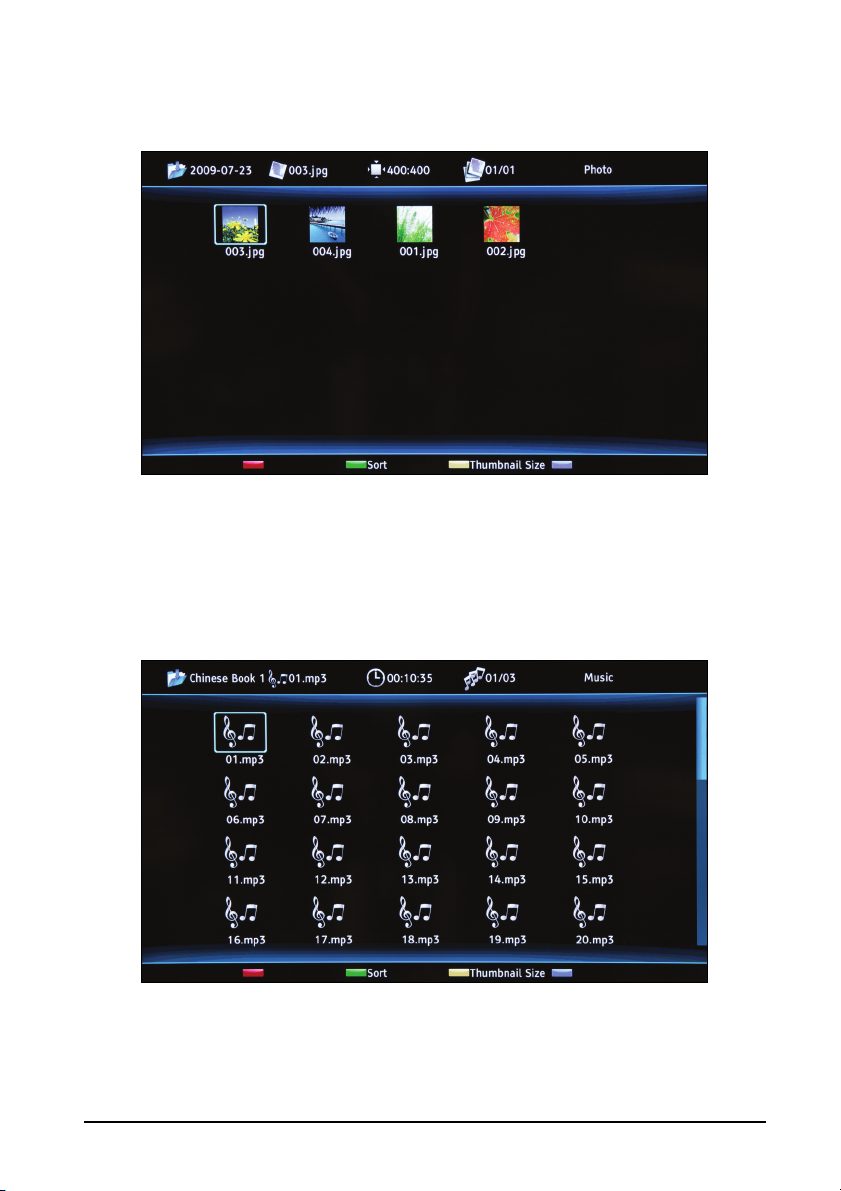
Picture files
Select a picture and press OK to open it. Picture files will be shown in a
slideshow, each picture will be displayed for a short duration. Press Play/Pause
to pause the display on a specific photo.
Press Previous (‘Index’) or Next (‘Reveal’) to return to the previous picture, or to
view the next picture.
Press BACK or return to the folder navigation list
Music files
Select a music file and press OK to open it. Press Play/Pause to pause a track.
Press Previous (‘Index’) or Next (‘Reveal’) to skip to the previous track or
advance to the next track in the folder.
Press and hold the left and right directional buttons to advance or rewind in a
track. Press BACK to return to the folder navigation list and preview screen.
25
Page 26
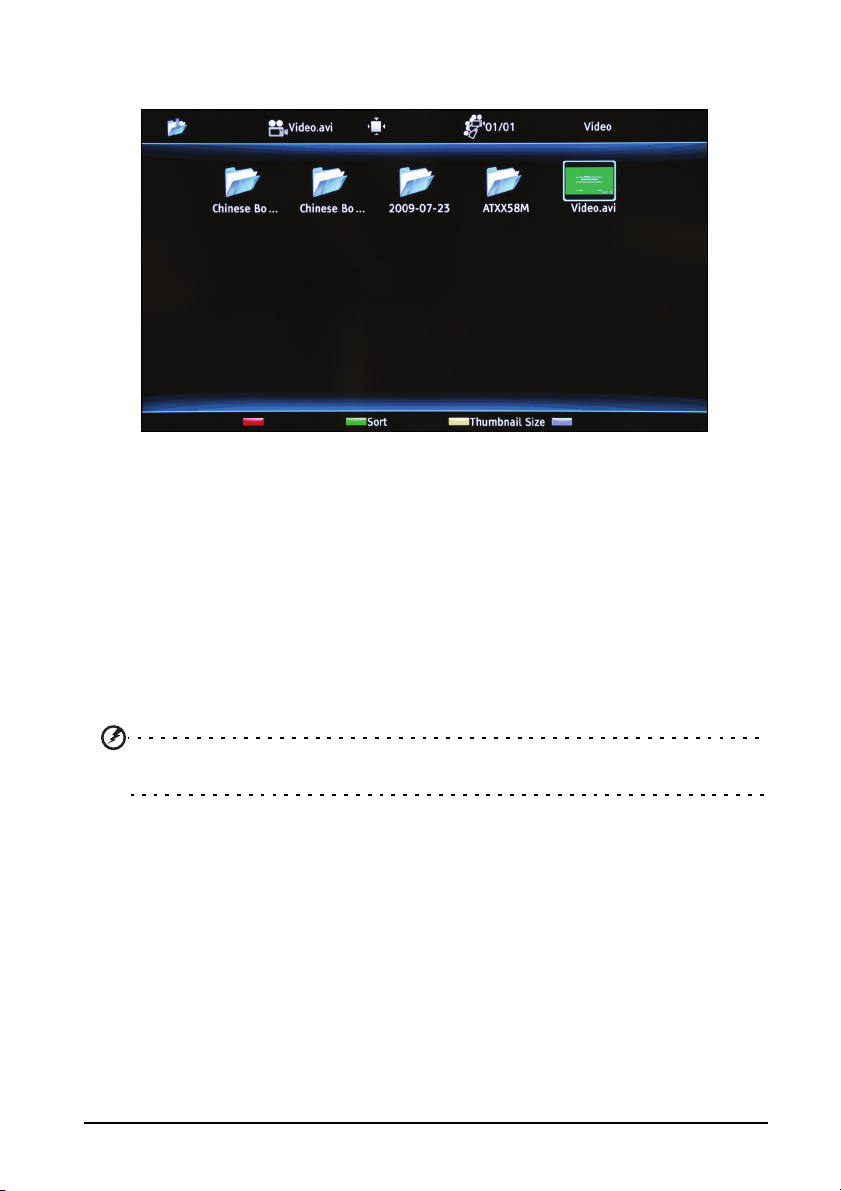
Video files
Select a video file and press OK to open it. Press Play/Pause to pause a movie.
Press Previous (‘Index’) or Next (‘Reveal’) to skip to the previous video or
advance to the next video in the folder.
You can use the left and right directional buttons to advance or rewind in a
video. Press the button again to increase how fast the track advances or
rewinds (x2/x4/x8/x16).
Press BACK to return to the folder navigation list and preview screen.
Leaving multimedia storage display
Simply stop playback and press SOURCE on the remote control to select a
different source type.
Do not remove the USB storage device while a media file is playing. Stop playback
and switch to a different source before removing the device from the USB port.
26
Page 27
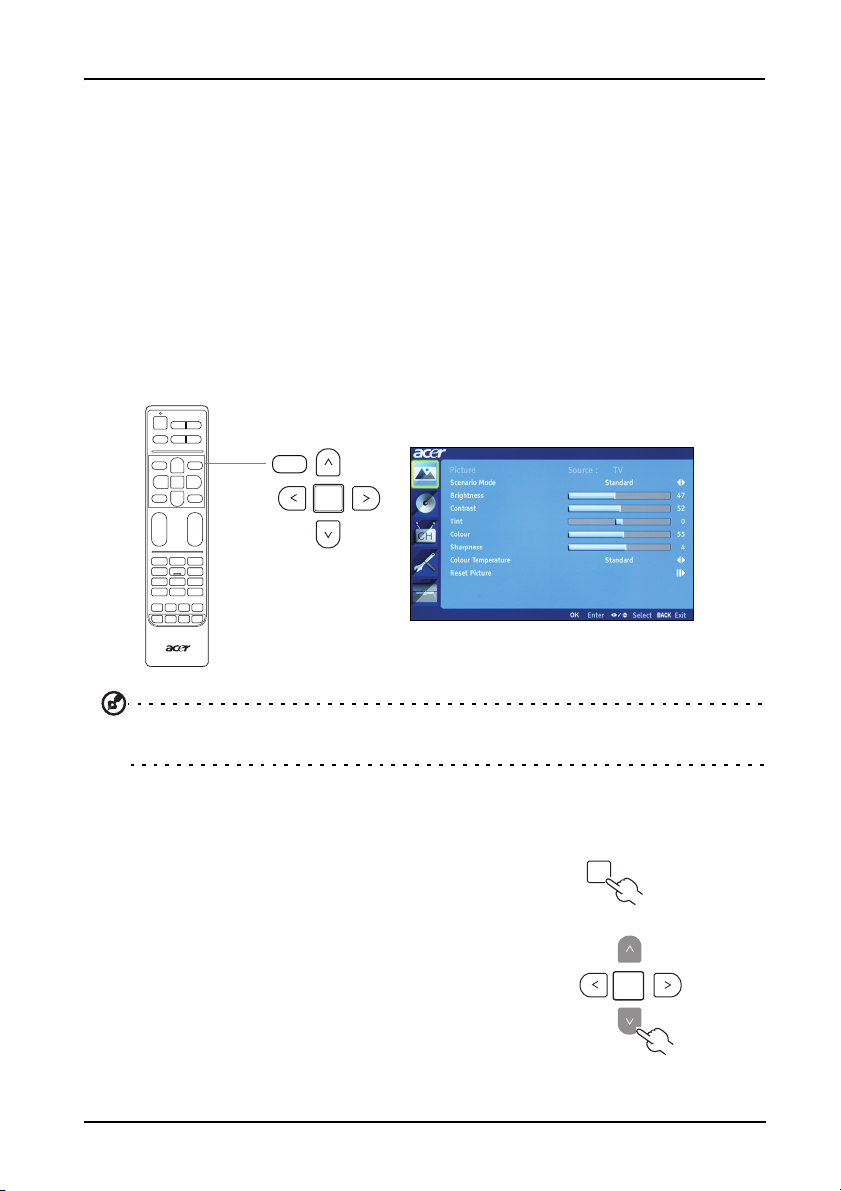
OSD Menus
Many of the advanced settings and adjustments are available through using the
OSD (onscreen display) menus:
• Picture settings (page 28),
• Sound settings (page 29),
• Channel management (page 31),
• Settings (page 32),
• Advanced (page 33).
OSD navigation
Basic operations required to navigate these menus are described in this section.
Navigating the OSD with the remote control
MENU
OK
Tip: You can also interact with these menus using the front panel controls.
Please see “Front and side panels” on page 6 for details.
There are five main OSD menus. These are: Picture settings, Sound settings,
Channel management, Settings and Advanced. Use the following method to
navigate these menus.
1. Press the MENU button on the remote
control or the MENU button on the
control panel.
2. Select your desired menu by using the up
and down directional keys to switch
between the five menus.
Press OK or the right directional key to
enter a menu.
Press BACK or the left directional key to
return to the menus.
MENU
OK
27
Page 28
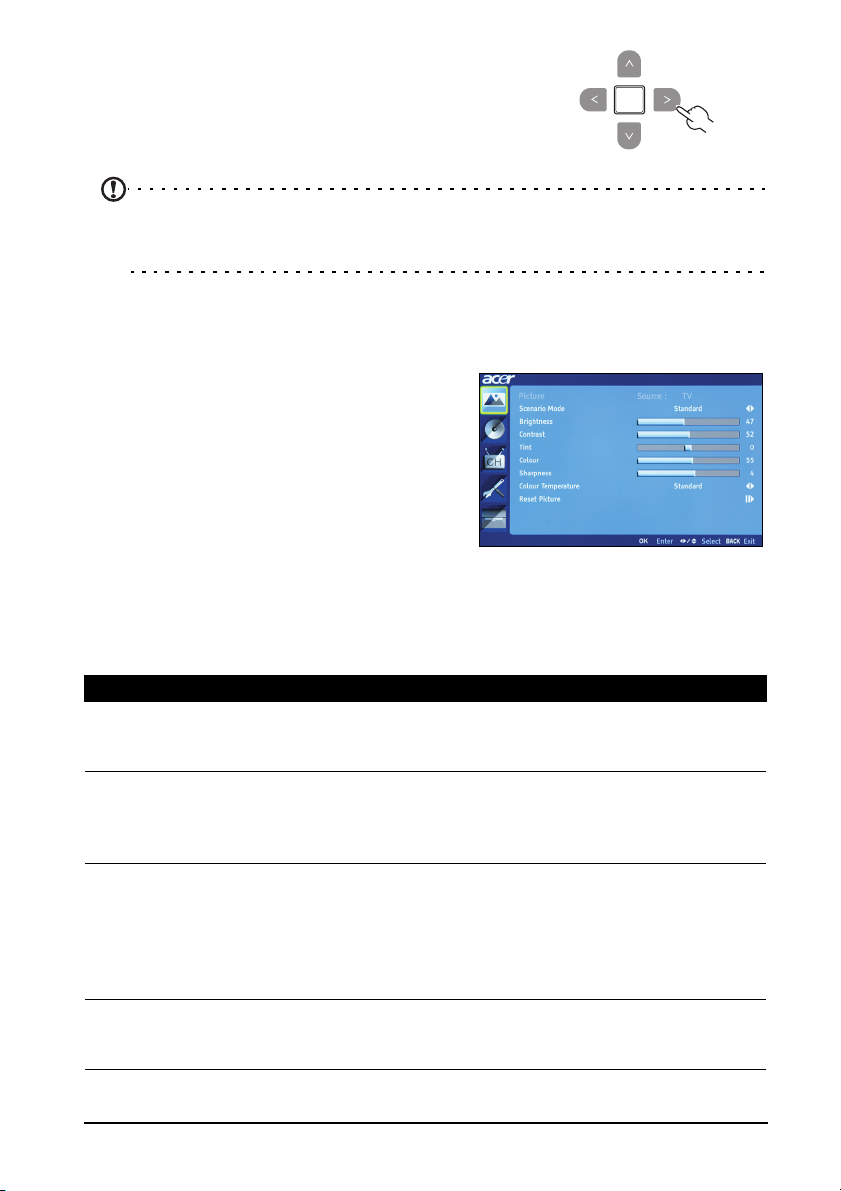
3. Use the directional keys to interact with
the menu. The up / down directions will
scroll through the menu options, while
left / right will adjust the different
settings.
Press MENU to exit.
Note: The options available on the OSD may vary depending on the TV
signal source and model. Some digital options may not be available with an
analog signal and vice versa.
OSD Menu settings
Several menus are available:
Picture settings
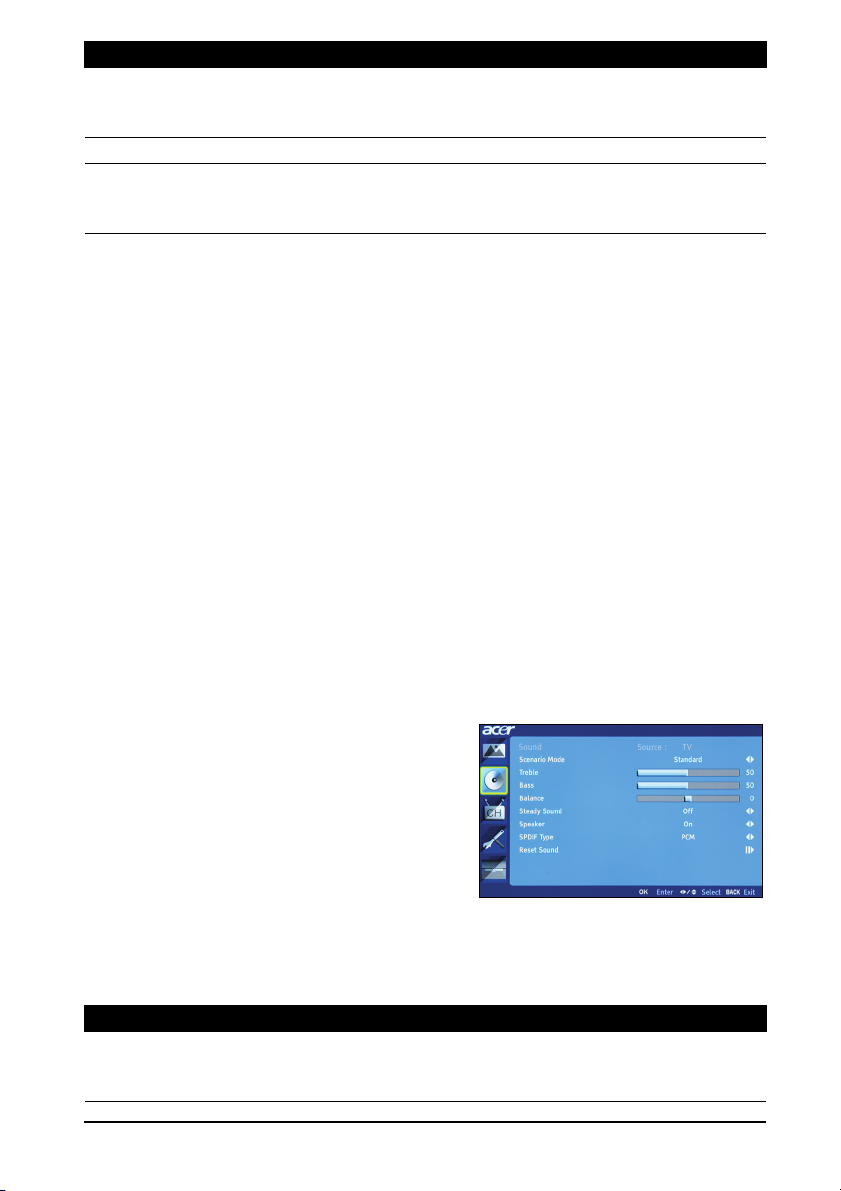
Open the Picture menu as described on
page 27. This menu provides the following
settings:
Scenario mode
Scenario mode provides preset viewing
modes designed to give you the best
picture quality when watching a particular
kind of programme. These provide preset values for brightness, contrast, hue
colour and sharpness. There are pre-defined audio and video settings for
optimal enjoyment of the following scenarios: Standard, Movie, Game, Sport,
Concert, User, NICE.
Mode Information
Standard Standard mode allows you to watch your favourite channels with
sharp, brilliant imagery via adaptive brightness and contrast adjustments.
Movie For comfortably enjoying movies at home, Movie mode displays dim
scenes in clear detail; compensates for colour; and smoothly presents
motion images. This is accomplished through optimal Gamma correction plus saturation, brightness and contrast adjustments.
Sport Sport mode is suited for outdoor sports programmes, with accurate
background depth and clear gradation between the bright, outdoor
playing field and darker auditoriums. Sports mode also brilliantly
enhances colours and presents swiftly moving pictures without residual images. All of this is achieved via specific Gamma corrections and
saturation adjustments.
Concert Concert mode places you in a virtual concert hall, opera house or
other dim environment by means of adaptive brightness and contrast adjustments.
28
Page 29
Mode Information
Game Game mode carefully details the exquisite graphics of modern video
games, providing lifelike entertainment while protecting your eye-
sight by adjusting brightness and contrast.
User User mode allows you to save your favourite video settings.
NICE NICE changes picture parameters automatically according to current
TV conditions, including source type, timing format, content cate-
gory on DTV, and viewing distance (page 34).
Brightness
Change the brightness of the image.
Contrast
Change the contrast of the image.
Tint
Change the tint of the image.
Colour
Change the colour depth of the image.
Sharpness
Change the sharpness of the image.
Colour temperature
This setting adjusts the colour temperature of the image. You can set it to
Standard, Cold, User or Warm depending on your preference. With the User
setting, you may change the colour values individually.
Reset picture
Return all picture settings to default values, removing any changes.
Sound settings
Open the Sound menu as described on
page 27. This menu provides the following
settings:
Scenario mode
Scenario mode provides preset audio
modes designed to give you the best sound
quality when listening to a particular kind
of programme. These provide preset values for treble and bass. There are predefined audio and video settings for optimal enjoyment of the following
scenarios: Standard, Movie, Game, Sport, Concert, User, NICE.
Mode Information
Standard Standard mode allows you to watch your favourite channels with
sharp, brilliant imagery via adaptive brightness and contrast adjust-
ments, and listen to clear-sounding audio.
29
Page 30

Mode Information
Movie For comfortably enjoying movies at home, Movie mode displays dim
scenes in clear detail; compensates for colour; and smoothly presents
motion images. This is accomplished through optimal Gamma correc-
tion plus saturation, brightness and contrast adjustments. Movie
mode makes the most of high-definition movie soundtracks.
Game Game mode carefully details the exquisite graphics of modern video
games, providing lifelike entertainment while protecting your eye-
sight by adjusting brightness and contrast. What's more, Game mode
provides a heightened audio experience.
Sport Sport mode is suited for outdoor sports programmes, with accurate
background depth and clear gradation between the bright, outdoor
playing field and darker auditoriums. Sports mode also brilliantly
enhances colours and presents swiftly moving pictures without resid-
ual images. All of this is achieved via specific Gamma corrections and
saturation adjustments. Precise audio can be heard.
Concert Concert mode places you in a virtual concert hall, opera house or
other dim environment by means of adaptive brightness and con-
trast adjustments. Concert mode accentuates symphonic harmonies
and the tenor audio range.
User User mode allows you to save your favourite video and audio set-
tings.
NICE NICE changes audio parameters automatically according to current
TV conditions, including source type, timing format, content cate-
gory on DTV, and viewing distance.
Treble
Boost or reduce high audio tones.
Bass
Boost or reduce low audio tones.
Balance
Change the balance between the left and right speakers.
Steady sound
This function prevents sudden changes in the audio output level. If this function
is On, volume levels will be consistent when switching between input sources
and changing channels.
Speaker
Turn the TV speakers on or off.
SPDIF type
This allows you to set the type of SPDIF audio signal that is used.
Reset audio
Return all audio settings to default values, removing any changes.
30
Page 31

Channel management
Open the Channel Management menu as
described on page 27. This menu provides
the following settings:
Auto scan
Auto scan allows you to scan for new or
deleted channels. If you completed the
setup wizard the first time you turned on
your TV, all available channels are listed.
To scan again, select the Auto Scan setting, and then your country from the
Country List. Use the directional keys to select Start tuning and press the OK
key.
Wait until the scan has finished; this will take several minutes.
Manual scan
Analog manual scan
You can manually add an analog channel by adjusting the settings here. Use
the up or down directional kays to select a setting to change, use the left or
right directional keys to change the setting. You may set: the analog channel
where the signal will be stored, the encoding system, which direction to search
through analog frequencies, fine tune to a specific frequency and if this
channel will be skipped in the channel list.
Use the left or right directional keys to change the channel being scanned.
Digital manual scan
You can manually add a digital channel by searching in specific UHF channels.
Use the left or right directional keys to change the channel being scanned.
Channel edit
You can edit the detected channels, to change how they are displayed in the
channel list. Use the up or down directional keys to select a channel, you can
perform different actions:
•Edit.
•Skip.
• Reorder.
• Decode (available for channels that require a decoder).
• Analog channel fine tune.
• Favourite list.
• Clean channel list (remove all detected channels).
Preferred audio language
If you are viewing an analog channel that supports multiple sound signals (e.g.
NICAM, Bilingual), you may set which signal is used.
31
Page 32
Preferred subtitle language
If multiple subtitles are available, the TV will display the language selected in
this option, if it is available.
When watching TV, press the SUBTITLE key to see a list of available subtitles.
Intelligent zapping
This option sets the delay before a channel is added to the zapping memory. If
a delay is set here, channels viewed for less than this period will not be added
to the zapping memory.
Time shifting mode
Turn the Time shifting features on or off.
Reset channel management
Return all channel settings to default values, removing any changes.
Settings
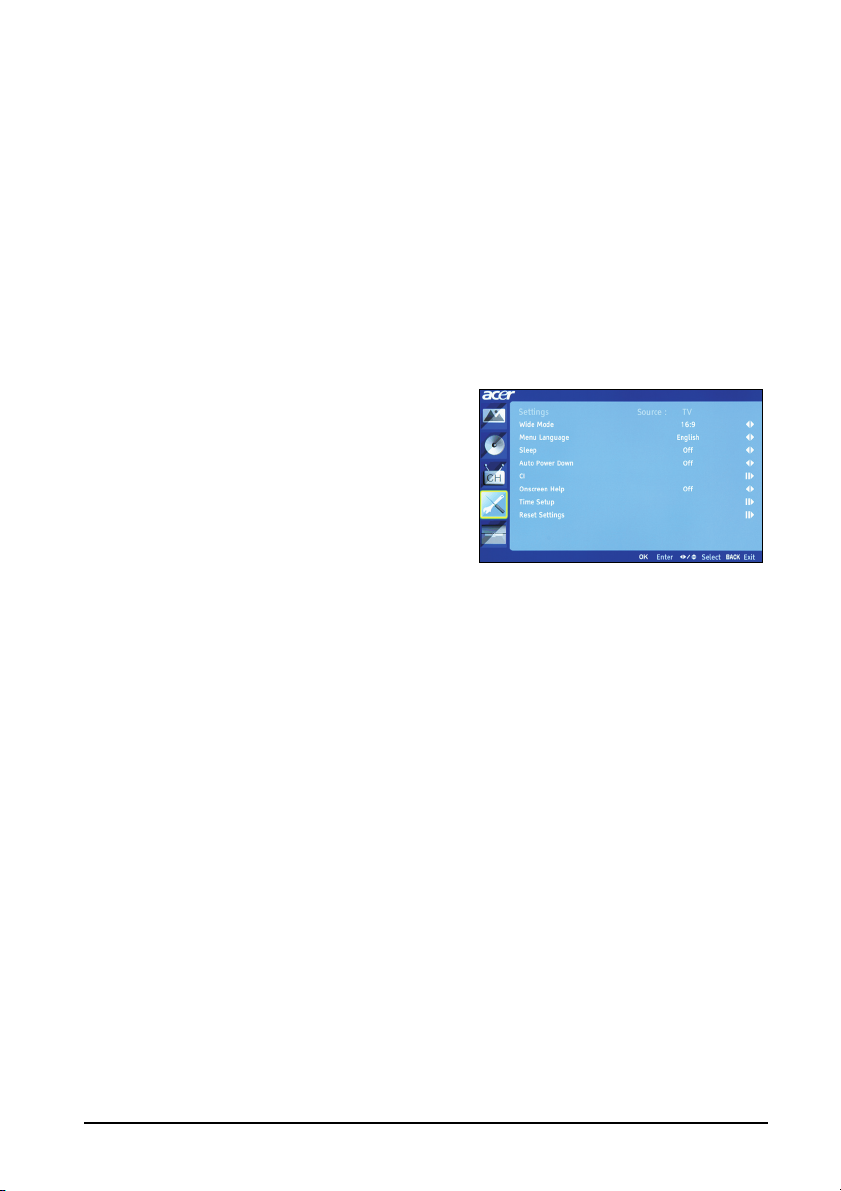
Open the Settings menu as described on
page 27. This menu provides the following
settings:
Wide mode
Press to toggle scaling mode between 4:3,
16:9 and different Letterbox modes (1, 2, 3).
Wide Detect is also available when viewing digital TV, HDMI and SCART signals.
Menu language
Set the language displayed for the OSD menus.
Sleep
You can set a time delay, after which the TV will turn off. The delay can be 15,
30, 45, 60, 90 or 120 minutes.
Auto power down
If Auto power down is active, if the TV on for four hours without any channel
changes or other activity, it will turn off. A warning message is displayed before
the TV turns off.
CI
This setting shows information about the CI interface, if a CI card is being used.
Onscreen help
Show onscreen help messages.
Time setup
Use these settings to set your time zone and daylight savings period.
Reset settings
Return all settings (in this section) to default values, removing any changes.
32
Page 33

Advanced
Open the Advanced menu as described on
page 27. This menu provides the following
settings:
Parental control
Parental control is a handy feature that can
block chosen TV sources.
Parental control allows you to enter a
password and effectively stop anyone
without the password from watching TV.
Select the Parental Contol setting and press OK. Enter your Password (see
below), then select one of the options.
Channel block
Press OK to see the list of channels. Use the up and down directional keys to
select the channel to block and then press OK. A padlock symbol is displayed
next to blocked channels. Press the OK again to unblock a channel.
When viewing channels, if a blocked channel is selected the TV will ask for your
password. Enter your password to view the channel.
Age rating (for digital TV)
Most digital TV allows you to block content according to rating systems. The
rating system used is dependent on region, and is only available on digital
channels. Analog channels will not be blocked with this option.
The settings cover from 4 to 18 years of age. When you lock a category, the
categories for that age and younger will be blocked.
Input block
Press OK to see the list of input sources (SCART, HDMI, etc.). Use the up and
down directional keys to select the input source to block and then press OK. A
padlock symbol is displayed next to blocked input sources. Press the OK again to
unblock an input source.
Change password
You can change the default password to a 4-digit code of your choice. If you are
using the parental controls, then we recommend you change the password
periodically.
Clean all
Return all parental settings to default values, removing any changes.
The default password for this TV is "0000." First enter "0000" when you
want to change the password. If you forget your password, please enter
6163 to reset.
33
Page 34

Advanced picture adjust
DNR
Dynamic noise reduction. Reduce any noise on the video signal.
ACM
Activates Automatic Contrast Management to adjust the backlight brightness
depending on the video.
Backlight
Change the brightness of the TV backlight.
Viewing distance
If you are using the NICE scenario mode, use this option to set the distance
between you and the TV.
SCART
A SCART connection can send AV, S-video, or both signals. Use this setting to
select the correct signal, or the signal that provides the best quality.
Accessibility
Subtitle type
You can choose between normal subtitles and subtitles for the hearing
impaired, when these are available.
Audio type
If audio for visually impaired audiences is available, it may be activated with
this option.
Visually impaired
This slider controls the volume of the Visually impaired audio.
LED light
You can turn off the standby power light here.
Blue Mute
If blue mute is on and the television receives no signal, a blue screen is
displayed.
Teletext language
Use these settings to adjust digital teletext settings.
Digital Teletext language
Set the language used for digital teletext pages.
Decoding page language
Set the type of text used for teletext pages.
Reset advanced
Return all advanced settings to default values, removing any changes.
34
Page 35

Troubleshooting
Before you call the Acer service center, please check the following items:
Here is a list of possible situations that may arise during the use of your LCD TV.
Easy answers and solutions are provided for each.
There is no picture or sound
• Make sure the power cord is properly inserted in the power outlet.
• Make sure the input mode is correctly set by your selected input.
• Make sure the antenna at the rear of the TV is properly connected.
• Make sure the main power switch is turned on.
• Make sure the volume is not set to minimum or the sound is not set to
mute.
• Make sure the headphones are not connected.
• Reception other than those of broadcasting stations can be considered.
Picture is not clear
• Make sure the antenna cable is properly connected.
• Consider whether your TV signal is being properly received.
• Poor picture quality can occur due to a VHS camera, camcorder, or other
peripheral being connected at the same time. Switch off one of the
other peripherals.
• The 'ghost' or double image may be caused by obstruction to the
antenna due to high-rise buildings or hills. Using a highly directional
antenna may improve the picture quality.
• The horizontal dotted lines shown on the pictures may be caused by
electrical interference, e.g., hair dryer, nearby neon lights, etc. Turn off
or remove these.
Picture is too dark, too light or tinted
• Check the colour adjustment.
• Check the brightness setting.
• Check the sharpness function.
• The fluorescent lamp may have reached the end of its service life.
Remote control does not work
• Check the batteries of the remote control.
• Make sure the remote sensor window is not under strong fluorescent
lighting.
• Try to clean the remote control sensor lens on the TV with a soft cloth.
• Use the buttons (hotkeys) on the TV before the remote control works.
If the above suggestions do not solve your technical issue, please refer to the
warranty card for service information.
35
Page 36
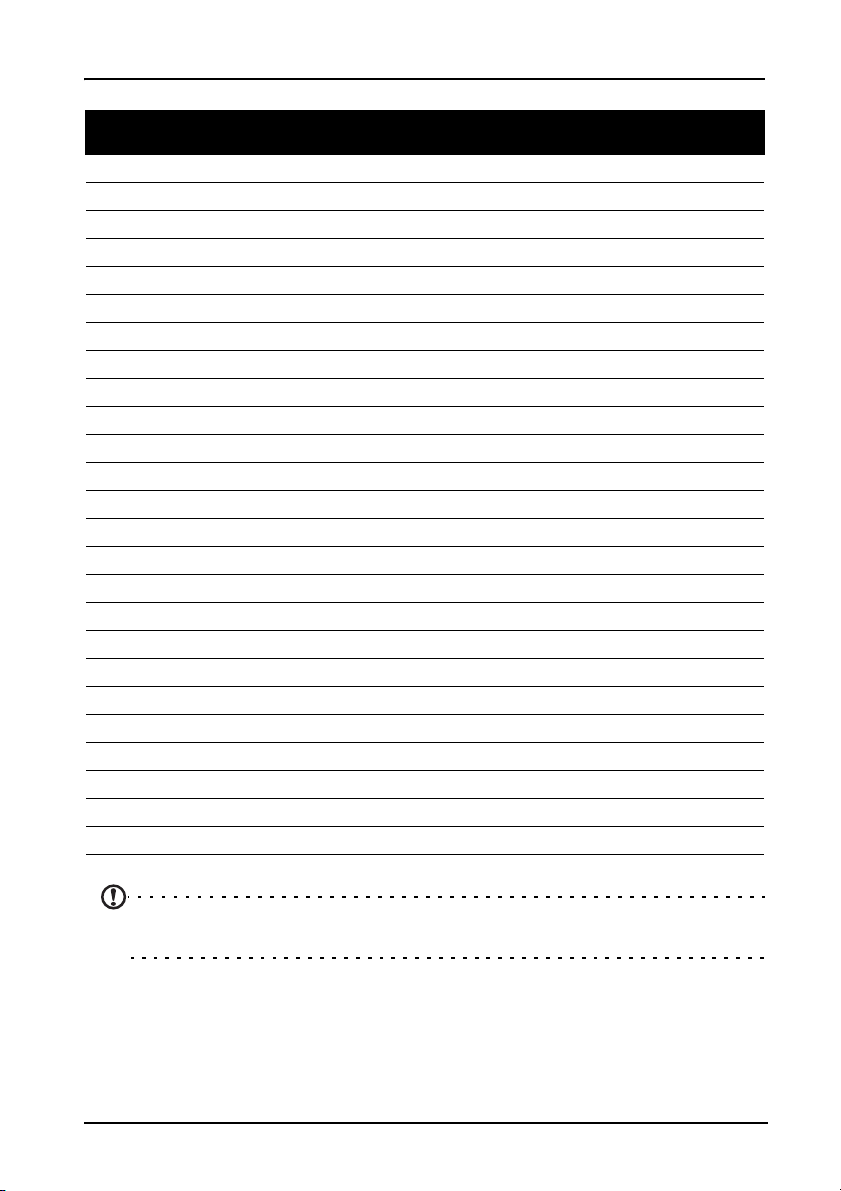
PC input signal reference chart
Resolution Horizontal Freq.
(kHz)
1 640 x 480 31.5 60.0 VGA
2 640 x 480 37.9 72.8 VGA
3 640 x 480 37.5 75.0 VGA
4 640 x 480 35.0 66.7 MAC
5 720 x 400 31.5 70.1 VESA
6 800 x 600 35.2 56.3 SVGA
7 800 x 600 37.9 60.3 SVGA
8 800 x 600 48.1 72.2 SVGA
9 800 x 600 46.9 75.0 SVGA
10 832 x 624 49.7 74.6 MAC
11 1024 x 768 48.4 60.0 XGA
12 1024 x 768 56.5 70.1 XGA
13 1024 x 768 60.0 75.0 XGA
14 1280 x 800 45.0 59.9 VESA
15 1152 x 864 67.5 75.0 VESA
16 1280 x 800 49.7 59.8 WXGA
17 1360 x 768 47.7 60.0 WXGA
18 1360 x 768 47.7 59.8 WXGA
19 1600 x 900 56.0 59.9 WXGA
20 1600 x 900 70.5 74.9 WXGA
21 1280 x 1024 64.0 60.0 SXGA
22 1400 x 1050 65.3 60.0 SXGA+
23 1680 x 1050 65.3 60.0 WSXGA+
24 1920 x 1080 67.5 60.0 -
25 1920 x 1080 66.6 59.9 -
Vertical Freq.
(Hz)
Standard
PC input does not support Sync on Green, Composite Sync or interlaced
signals.
36
Page 37

Product specifications
Model AT2758ML AT3258ML
Panel spec
Resolution (pixels) 1920 (H) x 1080 (V)
Brightness (typ.) 300 nit 400 nit
Contrast Ratio (typ.) 1200:1 4000:1
Display colour 16.7 M
Viewing angle (typ.) H: 170º ; V: 160º H: 178º ; V: 178º
Response (typ.) 3.4 ms (gray to gray) 6.5 ms (gray to gray)
Power supply
Input 220~240VAC, 50/60 Hz
Max. power consumption 70 W 108 W
Power saving <0.5 W
Mechanical
Dimensions (W x H x D mm) 669 x 477 x 196 791 x 544 x 202
Weight (kg) 6 10.5
Weight (lbs.) 13.22 23.15
Gross weight (kg) 8.3 12.4
Gross weight (lbs) 18.3 27.4
Wall-mounting holes VESA, 100 mm x 100 mm VESA, 200 mm x 100 mm
Analog TV system
Colour system PAL, SECAM
Sound system B/G/D/K/I/L
Stereo system NICAM / A2
Subtitle Teletext 1.5 (1000 pages)
Digital TV system
Digital TV standard DVB-T/C (H.264)
Sound system ISO11172-3 layer 1 & layer 2, ISO14496-3 HE-AAC
Stereo system MPEG (Layer I & II), HE-AAC, Dolby AC-3/AC-3 +
Frequency 7/8 MHz
Resolution 1080P
Terminal
Analog/ Digital Tuner Hybrid
HDMI x4 (1.3)
AV-in CVBS, Audio (R/L)
SCART CVBS (In/Out), RGB (In), Audio R/L (In/Out), ATV/DTV
32 KHz, 44.1 KHz, 48 KHz
37
Page 38

Model AT2758ML AT3258ML
Component in x1
PC D-sub in x1
PC audio in x1
SPDIF out Yes (coaxial)
Headphone out Yes
USB Port Yes
Resolution
HDMI 480i / 480P / 576i / 576P / 720P / 1080i / 1080P
Audio system
Speakers 10 W + 10 W
Mutimedia support via USB
Photo JPG, BMP, PNG
Audio MP3, AAC
Video MPEG-2, H264
PVR Yes
38
Page 39
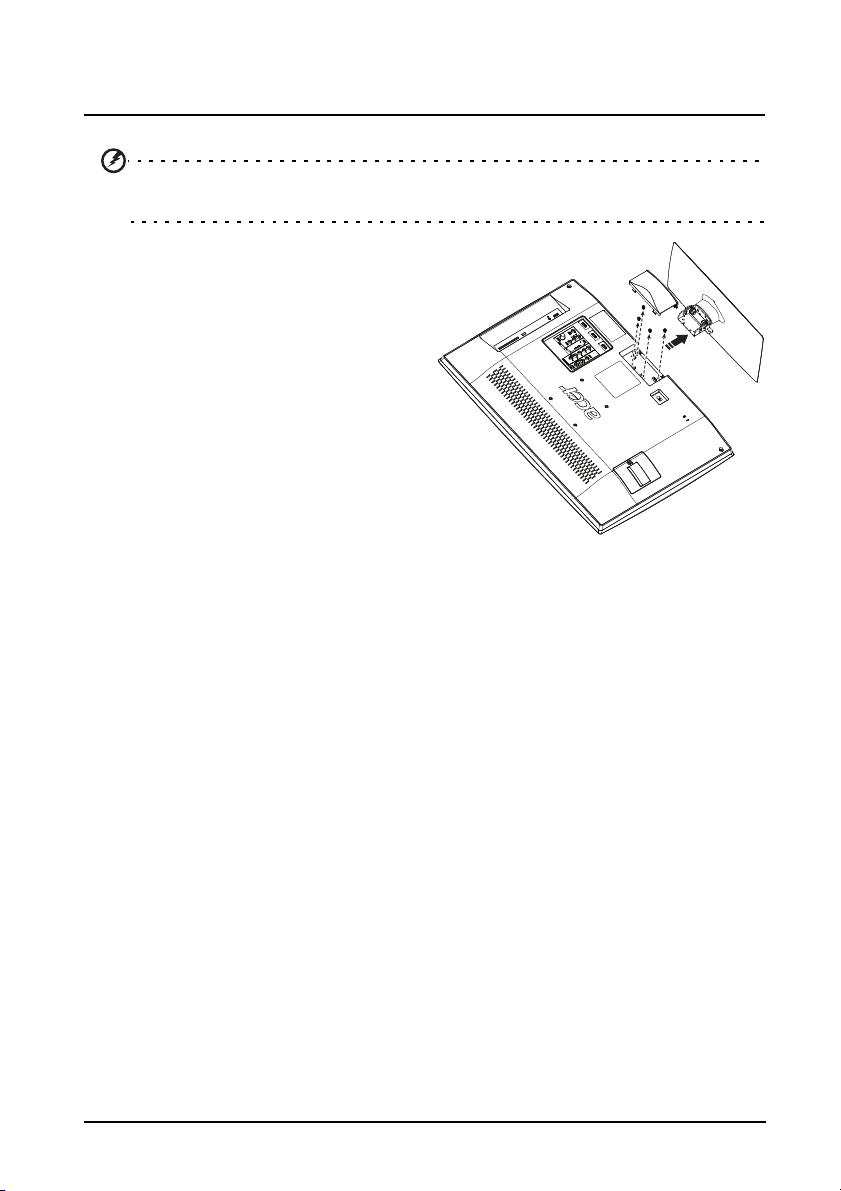
Wall mount preparation / removing the base
Caution: Disassemble the base carefully otherwise the plastic parts and/or
TV body may be damaged.
1. Remove the base cover.
2. Remove the screws that hold the
stand.
3. Remove the base.
4. Assemble the wall mount following
the instructions included with the
wall mount.
39
 Loading...