

Page 1

Acer AT2621/22 LCD TV
Service Guide
Service guide files and updates are available on
the ACER/CSD web. For more information,
please refer to http://csd.acer.com.tw
PRINTED IN CHINA
Page 2

Revision History
Please refer to the table below for the updates of LCD TV AT2621/22 service guide.
Date Chapter Updates
2007/10/10 Chapter 1 ~ 3 1st edition
II
Page 3

Copyright
Copyright®2006 by Acer Incorporated. All rights reserv ed. No par t of this publication may be reproduced,
transmitted, transc ribed, stored in a retrieval system, or tr anslated into any language or computer
langua ge, in any form or by any means, electronic, mechanical, mag netic, optical, chemical, manual or
otherwise, without the prior written permission of Acer I ncorporated.
III
Page 4

Disclaimer
The information in this guide is subject to change without notice.
Acer Incorporated makes no re presentations or warranties , either expressed or implied, with respect to the
contents hereof and specifically disclaims any warranties of merchantability or fitness for any particular
purpo se. Any Acer Incorporat ed software described in this manual is sold or licensed “as is ”. Should the
programs prove defec tive following their purchase, the buyer (and not Acer Incorporate d, its distributor, or
its dealer) assumes the entire cost of all necessary servicing, repair, and any incidental or cons equential
damages resulting from any defect in the software.
Acer is a registered trademark of Acer Incorporated.
Other brand and product names are tr adem arks and/or register ed trademarks of their respective holders.
IV
Page 5

Conventions
The following convent ions are u sed in this manual.
SCREEN MESSAGES Denotes actual messages that appear on screen.
NOTE
WARNING
CAUTION
IMPORTANT
Gives bits and pieces of additional information related to
the current topic.
Alerts you to any damage that might result from doing
or not doing specific actions.
Gives precautionary measures to avoid possible
hardware or software problems.
Reminds you to do specific actions relevant to the
accomplishment of procedures.
V
Page 6

Preface
Before using this information and the pro d uct it supports, please read the following general information.
1. This Service Gu ide provides you with all technical information relating to the BASIC CONFIGURATION
decided for Acer's “global” product offering. To better fit local market requireme nts and enhance
product competitiveness, your regional office MA Y have decided to extend the functionality of a machine
(e.g. add-on card, modem, or extra memory capability). These LOCALIZED FEATURES will NOT be
covered in this generic service guide. In such cases, please contact your regional offices or the
responsible personnel/channel to pr ovide you with further technical details.
2. Please note WHEN ORDERING FRU PARTS, you should check the most up-to-date information available
on your regional web or channel. For whatev er reason, if a part number change is made, it will not be
noted in the printed Service Guide. For ACER -AUTHORIZED SERVICE PROVIDERS, your Acer off ice may
have a DIFFERENT part number code to those given in the FRU list o f this printed Service Guide. You
MUST use the list provided by your regional Acer off ice to order FRU parts for repair and service of
customer machines.
VI
Page 7

Chapter 1
System Specification
Specification
LCD Panel
Max. resolution: 1366 x 768
6 CCFTs Backlight system
Display area: 575.769 (H) x 323.712 (V)
Display color: 16.7 M colors
Input Signal: 1-ch LVDS
Contrast ratio: 800:1 ( Typical )
Brightness: 500 Cd/m² ( Typical )
Response Time: 8 ms ( Gray to Gray )
Viewing angle: 80° ( L ) / 80° ( R ), 80° ( U ) / 80° ( D )
I/O functions
21 pin Euro-SCART ( RGB ) for Video, S-Video, R.G.B. and Audio
21 pin Euro-SCART ( RGB ) for Video, S-Video, R G B and Audio
RCA jack ( YUV and CVBS ) for YPbPr, YCbCr, Video and Audio
RCA jack ( R and L) for Audio Line Out (the output will change according to user’s selec tion)
15 pin D-Sub for VGA
19 pin HDMI connector * 2
DIN45325 ( IEC169-2 ) Terminal for TV / CATV input
3.5 mm∮Earphone jack for PC Audio Line input
Video Functions
Support PAL / NTSC / SECAM video format
Support 480i/576i, 480p/576p, 1080i and 720p format
Build in Teletext functions
Build in Dynamic adaptive smoothing filter
Build in Dynamic temporal frame-filtering Noise Reduction
Build in Dynamic motion and edge adaptive De-interlacing
1 Chapter1
Page 8

Film mode 3:2 & 2:2 pull down
Screen display model: Auto / 4:3 / 16:9 / panorama / Letterbox 1,2,3
Mechanical
VESA mounting holes
Compatibility
Multi-Sound system
NICAM
FM Stereo ( A2 )
Power Source
Input voltage: AC: 90 ~ 264 V, 47 ~ 63 Hz
Input current: 1A (AC 220V)
Power consumption: 161 Watts
Stand-by: 2 Watts Max.
Remote controllers
Multi-function remote controller
Speaker
Internal speaker: 5 W x 2 stereo
Others
On screen display adjustment function
ISP ( In System Programming ) function available fo r revising driver easily
Chapter1 2
Page 9

System Block & Wiring Diagram
d
R
M
INVERTE
POWER
Board
PANEL
AIN Board
I/O Board
Tuner
Scart RGB
Scart RGB
Line Out
IR & power button B
SPEAKER-L
SPEAKER-R
Key Board
3 Chapter1
Page 10
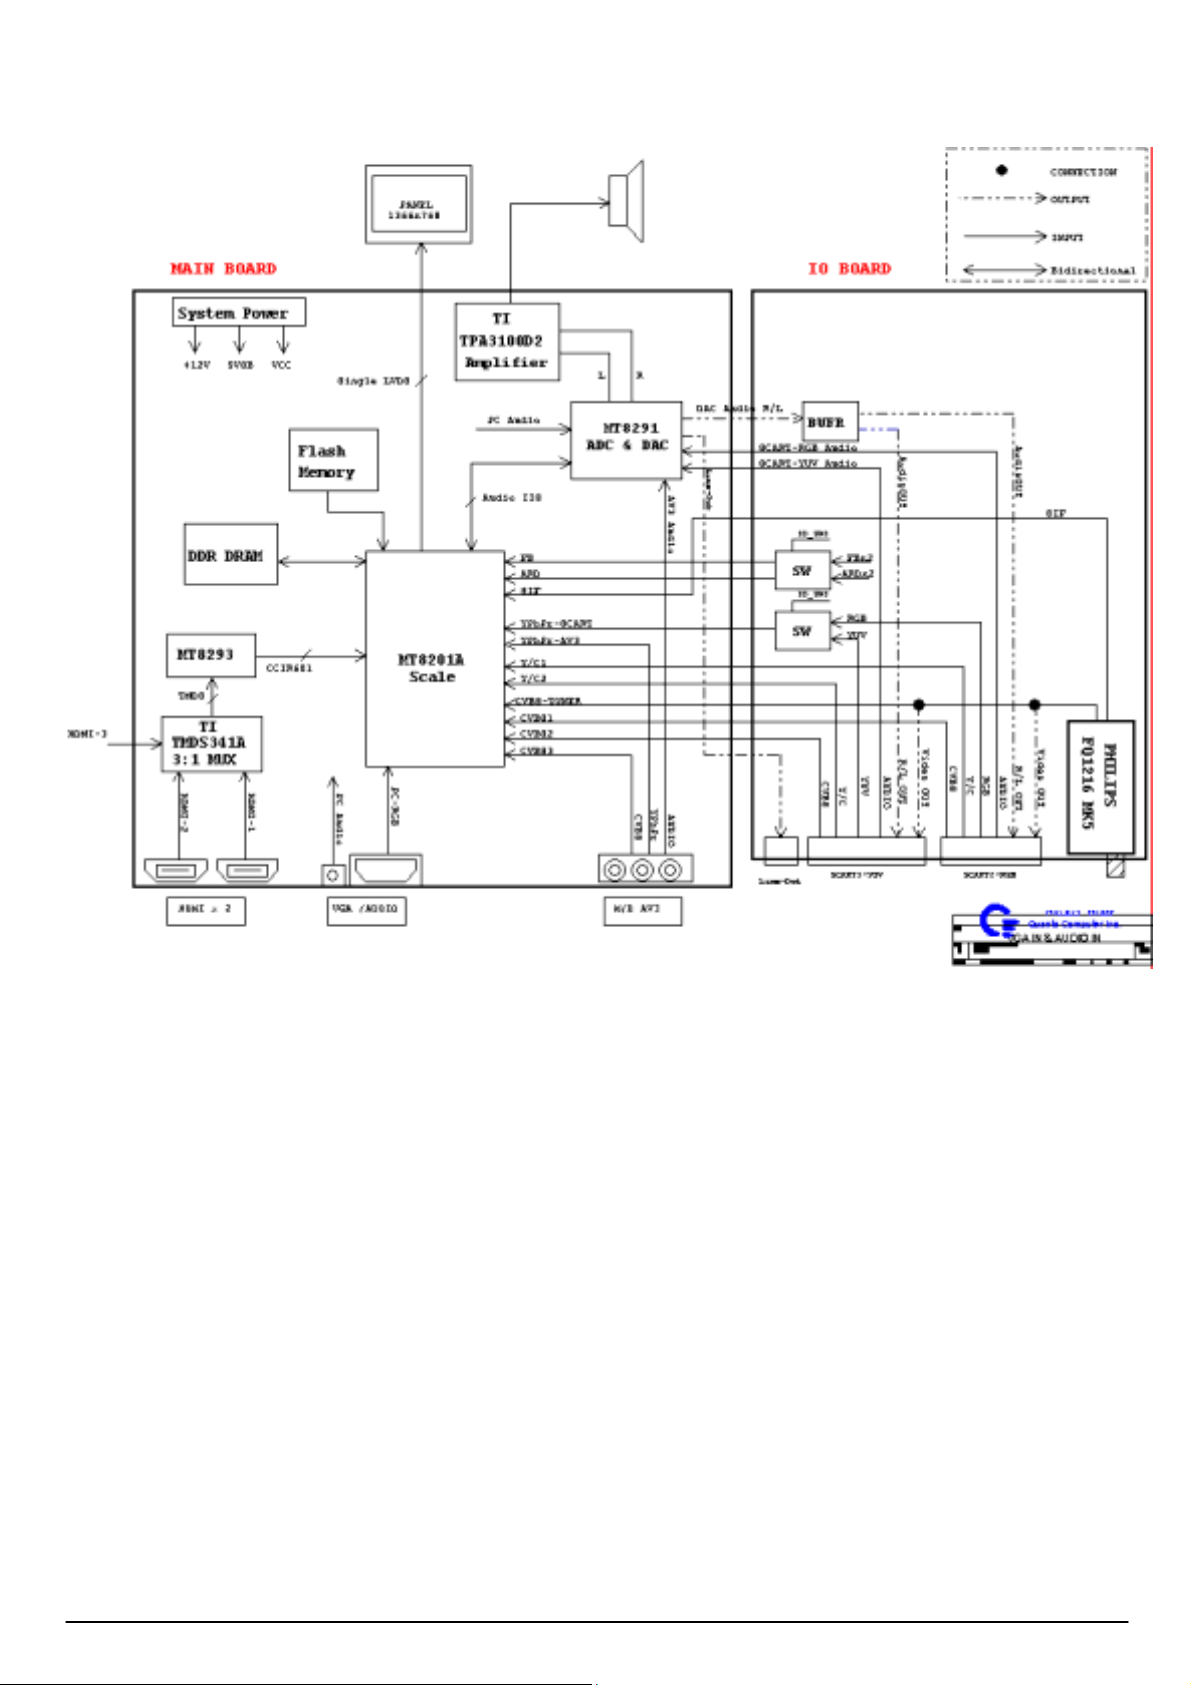
LCD Main Board Block Diagram
Chapter1 4
Page 11
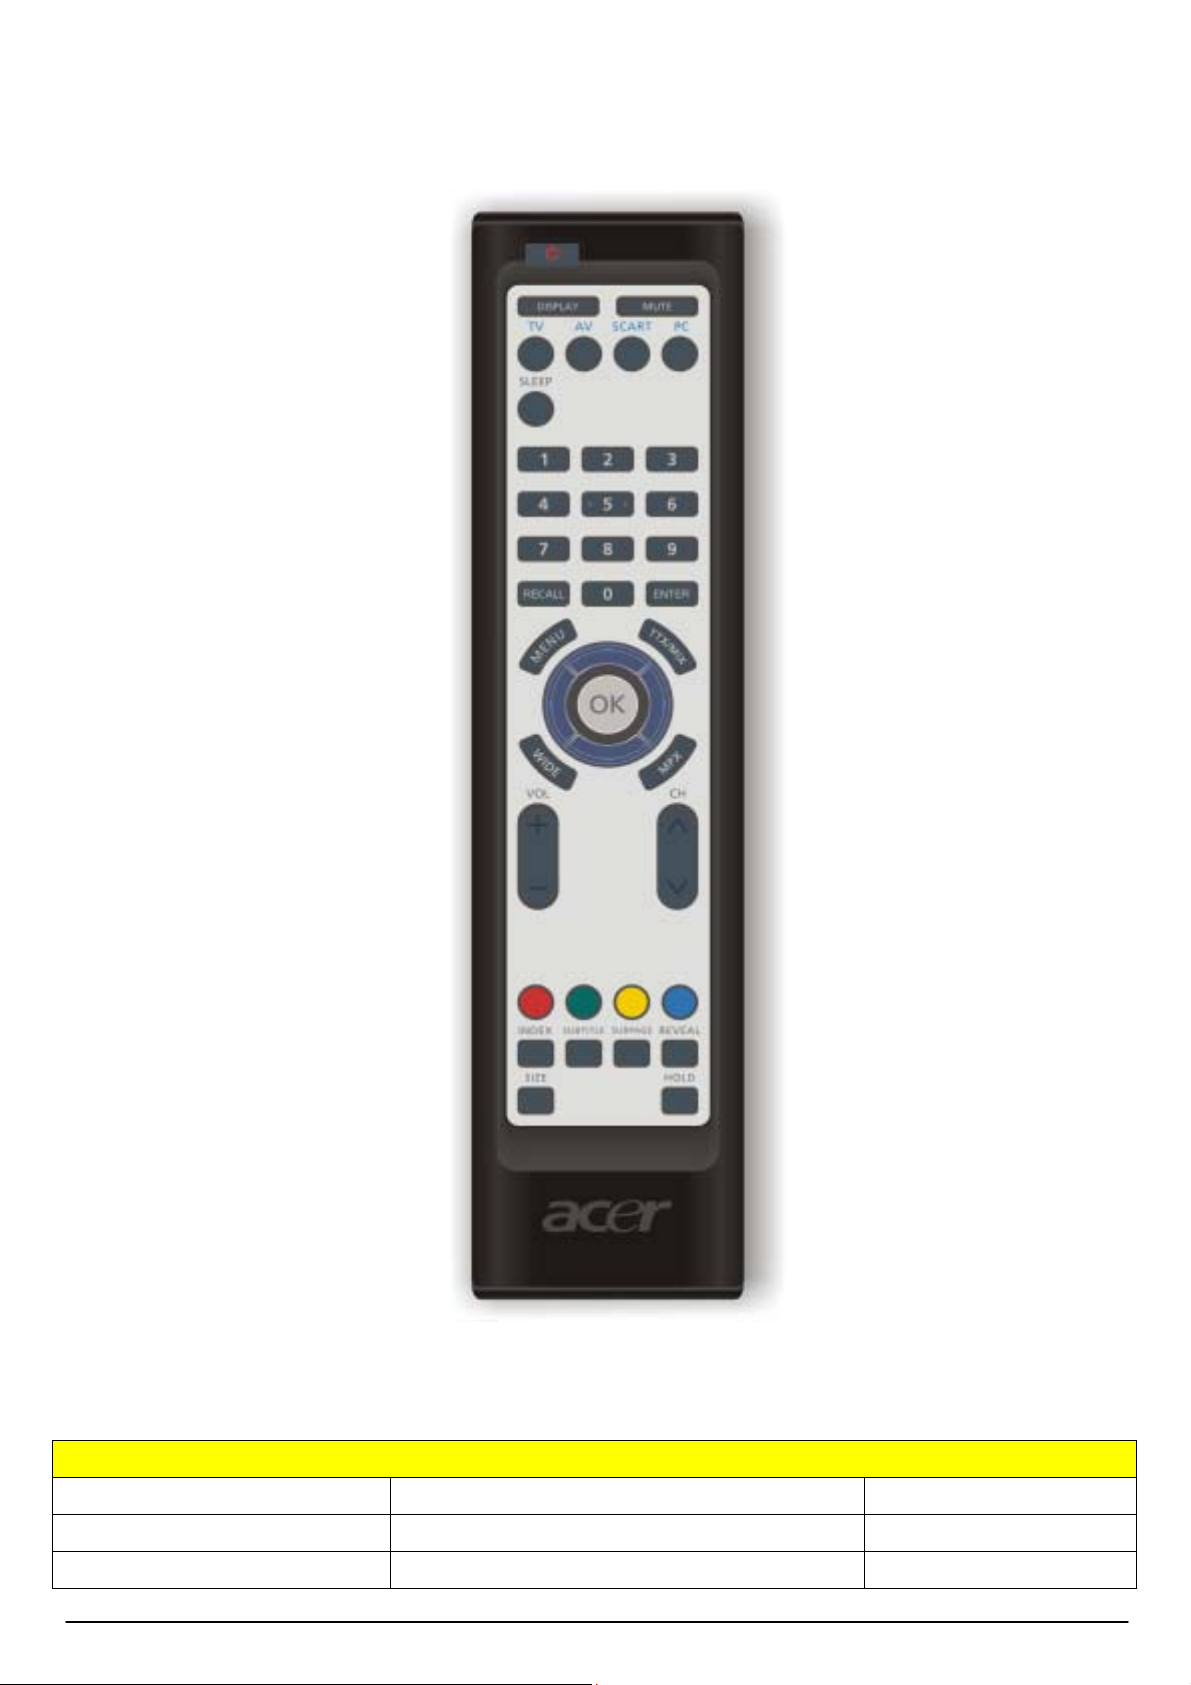
Remote Control
Key Functions
Remote Function des cription
R/C for Europe Key Functions Remark (for cardreader)
Power Power On/Off
Display Display Channel and Input Source
5 Chapter1
Page 12

Mute Mute On/Off
TV TV Turner
SCART SCART1/SCART2
AV AV3/HDMI1/HDMI2
PC VGA
Sleep Sleep Timeer Off 15/30/45/60/90/120
Wide Scaling Mode ( 4:3 /16: 9 /Panorama /Letterbox )
Menu Open Menu or leave Menu
Four way direction key
Navigate up in the OSD or next (sub)page in
up
down
left Navigate left in the OSD
right Navigate right in the OSD
OK Selection Confirm
Channel key
1 Number key 1
2 Number key 2
3 Number key 3
4 Number key 4
5 Number key 5
6 Number key 6
7 Number key 7
8 Number key 8
9 Number key 9
teletext mode
Navigate down in the OSD or pevious (sub) page in
teletext mode
0 Number key 0
Recall Return to previous channel
Enter Enter to confirm channel selection by number key
Channel UP Channel up
Channel Down Channel down
Volume key
NICAM
STEREO Broadcast : Stereo/Mono
BILIGUAL Broadcast : Sound 1 / Sound 2
MONAURAL Broadcast: Mono
FM-FM
STEREO Broadcast: Stereo/Mono
MPX
Volume up Volume up
BILINGUAL Broadcast : Sound 1 / Sound 2
Chapter1 6
Page 13

Volume down Volume down
Teletext Teletext on/off
Index Go to index page (usually page 100)
Subpage Enter/Leave subpage mode
Reveal Display Hidden Information
Temporarily holds the current teletext page if TEXT
on
Hold
Size
Teletext Turn teletext mode on/off
Subtitle Show subtitle on the screen
R Colour button to operate the teletext
G Colour button to operate the teletext
Y Colour button to operate the teletext
C Colour button to operate the teletext
Froze the picture if TEXT off
Zoom page toggle 1X/2X
Page select by Up-arrow and Down-arrow
7Chapter1
Page 14

Hardware Specification and Configuration
Electro/Optical
Model AT2621/22
Panel specificat ion
Resolution(pixels) 1366x768
Brightness(min.) 500 cd/m²
Contrast ratio(min.) 800:1(Typ.)
Display color 16.7 M
Viewing angle 160(H)/160(V)
Response(typ.) 8ms
Power supply
Input 90-264 V, 47-63 Hz
Max. power Consumption 161W
Power saving 2W
Mechanical
Dimensions(WxHxD mm) 692.9*531.6*201
Weight(Kg) 4.5
TV system
Destination PAL / SECAM
Color System CCIR B/G, D/K, I and L/L’
Sound System Sound 1 and Sound 2
Stereo System NICAM and FM Stereo ( A2 )
Channel System Full frequency range from 48.25 MHz to 863.25 MHz
Terminal
RF DIN45325 ( IEC169-2 ) Type
SCART 1 E uro-SCART ( RGB ) for Video, S-Video, RGB and Audio
SCART 2 E uro-SCART ( RGB ) for Video, S-Video, RGB and Audio
AV RCA for YPbPr or CVBS and Audio R/L
Line Out Audio R/L Output
HDMI1/HDMI2 HDMI connect for HDMI and DVI mode
PC Analog Port D-Sub 15 pin VGA
3.5 mm∮Earphone jack
Service Port ISP through D-Sub
PC Audio Line input
Audio system
Speaker 5 W x 2
Chapter1 8
Page 15

Firmware Specifications
Preset Mode for VGA Input
16 factory pre-set modes for VGA inputs are saved during the manufacturing pro cess.
Please press "Volume-" + "Channel+" + "POWER" to enter the LCD TV factory mode.
This LCD TV would detect the used mode automatically.
9 Chapter1
Page 16

Power Saving
While VGA is selected to be input, this LCD TV is equipped with a power-management. There is a delay of
8 seconds before the transition from On-state to power saving state to avoid unintentionally ente ring of a
power saving state during display resolution and timing mode changes. During the period of delay, the LED
shall indicate gr e e n color and OSD will show “ NO SIGNAL “. Transition from any power saving state to
another can be instantaneous. The recovery from Off-state requires no manual power on.
Mode Signal Power Indication Recovery time
Power-On On < 190W Green --
Stand-by Off < 3W Red <5s
Power off × < 3W Red Turn on > 6s
Sync on means: normal operation
Sync off means: Hsync: f < 1 KHz, duty cycle > 25 %, Vsync: f < 10 Hz, duty cycle > 25 %
The power-consumption is valid over the specified voltage and frequency range.
Power comsuption is measured from AC source.
There are no power saving modes for TV, SCART1/2 or HDMI1/2 inputs.
Performance Specifications
The performance shall be check at 25oC environment .
White Balance and U niformity
Set contrast and brightness at 50.
Set backlight at 80.
Please use HDMI 720P for white balance adjustment.
Chapter1 10
Page 17

Display Area, Phase, Cente r an d Tilt
Display Area: 26 inches diagonal
H-Phase: A-B Less than 1.5mm
V-Center: C- D Less than 1.5mm
Tilt: E-F Less than 1.5mm, but non-active area must be larger than zero for four sides
E
F
C
A
B
D
Max. Brightness
The brightness should exceed 350 Cd/m
temperature of Standard is selected. ( Typical value would be 500 Cd/m
2
while set both of contrast and brightness to max. and color
Power Supply Electrical Specifications
2
).
The power supply for this product is an internal conver ter, with a non-replace able fuse internally .
This converter shall be well designed to meet CE mark requirement.
11 Chapter1
Page 18

Input Voltage and Frequency Ra nge
The operating range of line voltage shall be:
AC 90 volts to 264 volts, 47 Hz to 63 Hz
Power comsuption shall be under 190 Watts
Variat ion of the line vo lta ge t hro ugh out the app lica ble op er atin g ra nge shal l no t r es ult in an y vis ib le imag e
anomalies such as image movement, changes in light output, nor changes in image stability or quality.
Line Fuse
The AC input shall be fused and become electrically open as a result of an unsafe curre nt condition. This
fuse is inside the power supply converter and is not user replaceable, and must be returned for
replacement.
This fu se s hall be we ll se lec te d to ha ndle inru sh curr ent for a ll co mbina tio ns of l ine v olta ge and fr eq uenc y.
Hot plug and power on/off sequence
Once hot plug occurs, at the ver y first time, the initial current sho uld be limited at 0.87 amps or lower when
power off. Current will stay below 100 m amps while power on, then ramp up to full power ( about 0.87
amps at AC 220 volts ) within 5 seconds when power-up signal is triggered. For the shut down sequence,
the current will stay at full power for about 150 m seconds or less, then ramp down to 100 m amps within
1 second.
Power on LED Location and Type
Power on indicator shall be easily visible from the front of the display.
Inverter
The inverter which is used to light up back -light of LCD panel shall be well designed to me et requirement of
panel’s specification.
Overall Dimensions
Height: 531.6 mm
Width: 692.9 mm
Depth: 201 mm
Chapter1 12
Page 19

Environmental Requirements
This display shall meet the follo wing environmental requirements under normal operating condition s.
Operating
25° ± 5° for Purity, White Point, Mis-convergence, Luminance measurements and White uniformity
measurement
Operating temperature: 0°C to 35°C
Operating humidity: 20 % to 80 % ( non-condensing )
Storage and Shipping
Storage temperature: -20°C to 60°C
Shipping temperature: -20°C to 60°C
13 Chapter1
Page 20

Storage humidity: 20 % to 80 % ( non-condensing )
Shipping humidity: 20 % to 80 % ( non-condensing )
Vibration Test
The packaged display shall be capable of passing sinusoidal vibration test as specified in follows.
Test condition as below :
1) Package sinusoidal vibration 7Hz, 1.05G acceleration, 20min/axe, 3axes
2) Random vibration,10-500 Hz, 1.47G RMS
The unit under test shall be run for a duration of 30 minute in :
Top and bottom side ( z axis ).
The unit shall suffer no visible cosmetic damage and should operate no degradation indisplay quality after
test.
Additionally, prior to production and prior to implementation of any design or manufacturing change that
might affect vibration performance, a minimum o f 2 units shall be demonstr ated to meet the requirements
of specification.
Drop Test
The packaged display shall be capable of passing drop test as specified in following specification without any
measurable degradation in performance or detectable mechanical or cosmetic damage.
Dropping way: 1 corner, 3 edges, 6 flats
Dropping Height: follow the below table
Chapter1 14
Page 21

Surface Edge Corner
1~9 KG 0.76 0.76 0.76
10~19 KG 0.39 N/A N/A
20~29 KG 0.36 N/A N/A
30~39 KG 0.33 N/A N/A
40~49 KG 0.3 N/A N/A
>=50 KG 0.25 N/A N/A
Additionally, prior to production and prior to implementation of any design or manufacturing change that
might affect vibration performance, a minimum o f 2 units shall be demonstr ated to meet the requirements
of specification.
VESA DDC
The VGA/HDMI inputs shall be capable of continuously transmitting its Extended Display Identification
( EDID ) information using Display Data Channel. It shall automatically switch to DDC2 mode if a DDC2
capable host is detected in accordance with the VESA DDC standard.
In addition, the display can respond to a request for EDID, to be transmitted using DDC2, level B commands.
If a DDC2 capable host is detected by the display, the display shall switch to DDC2 communication.
The EDID shall contain the manufacture name code QCI, product co de, date of manufacture, and serial
number.
For complete EDID data structure, please refer to VESA Extended Display Identification Data Standard.
Hardware implementation may be either integrate into micro-controller o r be a separate electrical
component. EDID memory must be protected against writing or other corruption through
customer-accessible electrical connection and required communication channels. Password protection, use
of an unpublished enable register, or use of direct electrical connection is acceptable levels of protection
provided that the power-on Default State is tha t disabling writing. The serial number fields in the EDID must
contain a unique identifying numbers among units of the same model. EDID Table is defined as below:
For VGA input: (TBD)
15 Chapter1
Page 22

For HDMI input 1
For HDMI input 2
Chapter2 16
Page 23

17 Chapter1
Page 24

Chapter 2
General Information
This chapter contains step-by-step procedures on how to disassemble the AT2621/22 series for
maintenance and troubleshooting. To disassemble the TV, you need the following tools:
Wrist grounding strap and conductive mat for preventing electrostatic discharge
Small Philips screwdriver
Philips screwdriver
Hexagonal screwdriver
Tweezers
Note:
The screws for the different components vary in size. During the disassembly process, please group
the screws with the corresponding components to avoid mismatch when doing assembly. When you
remove the boards, please be careful not to scrape them.
Warning!
The module is drived by high voltage. If you need to handle the module during operation or just after
powered off, you must take proper precautions against electric shock and must not touch the drive
circuit portion and metallic part of module within 10 minutes. The capacitors in the drive circuit portion
remain temporarily charged even after the unit is powered off. If the residual voltage is strong enough,
it could result in electric shock. Thus, we strongly suggest that you put on the wrist ground strap and
put the component on the conductive mat or bag. Besides, please keep the unit grounde d dur i n g the
whole process of disassembly and assembly.
Before You Begin
Before you proceed with the disassembly procedure, make sure that you do the following steps:
1 Turn off the power to the TV and all peripherals.
2 Unplug the AC adaptor and all power and signal cables from the TV.
Chapter2 18
Page 25

1. Release 2pcs screws and take off the base. 2. Release 8pcs screws from rear cover.
\
3. Release 7pcs screws from rear cover.
4. Release 8pcs screws from joint.
19 Chapter2
Page 26

5. Release 3pcs screws from shielding. 6. Release 7pcs screws from shielding.
7. Release 5pcs screws from Power/B and GND cable. 8. Release 3pcs screws from Power/B.
9. Release 7pcs screws from Main/B and IO/B. 10. Release 6pcs screws from PCB tray.
11. Release 4pcs screws from support bracket. 12. Release 2pcs screws from bezel dummy.
Chapter2 20
Page 27

13. Release 8pcs screws from speakers. 14. Release 2pcs screws from IR/B.
15. Release 3pcs screws from Button/B. 16. Release 5pcs screws as above show.
17. Release 5pcs screws from panel.
18. Release 4pcs screws as above show.
21 Chapter3
Page 28

19. Release 4pcs screws as above show.
20. Disconnect the cables.
Chapter3 22
Page 29

Chapter 3
FRU (Field Replaceable Unit) List
This section gives you the FRU (Field Replaceable Unit) list in global configurations of AT2621/22 series.
Please refer to this chapter whenever ordering for parts to repair or for RMA (Return Merchandise
Authorization). Please note that WHEN ORDERING FRU PARTS, you should check the most up-to-date
information available on your regional web or channel. For whatever reasons a part number change is made,
it will NO T be note d on the s ervic e guid e. F or Ace r auth oriz ed ser vic e prov ider s, your Acer offic e may h ave
a different part number code from those given in the FRU list of this printed service guide. You MUST use the
local FRU list provided by your regional Acer office to order FRU parts for repair and service of customer
machines.
Note: To scrap or to return the defective parts, you should follow the local government ordinance or
regulations on how to dispose it properly, or follow the rules set by your regional Acer office on how to
return it.
Chapter3
23
Page 30

PARTS
PART NAME DESCRIPTION TVE PART NO. ACER PART NO.
Accessory
REMOTE REMOTE CONTROL EURT54BEACQT1 GP DQ7T54BEA00 25.M25V7.001
BATTERY BATTERY LR03GW/2SK (ALKALINE 1.5V) GP AHDALR03006 23.M480E.002
BOARD
MAIN/B IV2E M/B ASSY(FOR IV6E)AUO GP 21IV2EMB026 55.M5507.001
IO/B IV2E IO/B ASSY(EU) GP 23IV2EIB004 55.M5507.002
IR/B IV2E IR/B ASSY GP 23IV2EIB012 55.M5607.004
KEYPAD/B IV2 KEYPAD/B ASSY GP 23IV2EKB001 55.M5607.005
POWER/B PWR 161W,DPS-161AP-2 A(90~264VAC) GP AF161B00000 55.M5307.001
Cable
CABLE LVDS CABLE LVDS(50P/30P,225MM) IV6E(AUO)V2 GP DDIV6ELC024 50.M6707.002
CABLE INVERTER CABLE INV(14P/4P/6P,320MM) AUO V2 GP DDIV6EIV003 50.M6707.001
CABLE MB-PWR CABLE MB-PWR(10P,110MM,R3A)VA1 GP DD0VA1PB013 50.M01V7.004
CABLE KEY-IR CABLE KEY-IR(10P/9P/8P,670MM)IV6E GP DDIV6EMX003 50.M6707.003
CABLE PW/AUDIO CABLE PW-AUDIO(8P/7P,180MM)IV6E GP DDIV6EAB006 50.M5507.001
CABLE SPEAKER CABLE SPEAKER(4P/3P+2P,R1A)HX6A GP DDHX6ASP009 50.M5307.003
CABLE ASSY CABLE ASSY HV9 GND(1P/1P,2A) GP DD0HV9TH108 50.M26V7.004
PWR CORD PWR CORD B 1.8M SP-027/10A SWI GP DM333181J29 27.M11V7.001
Case/Cover/Bracket/Assembly
LCD BEZEL ASSY IV6E FRONT BEZEL ASSY GP 32IV6EFB001 60.M5507.001
REAR COVER JL9J REAR-COVER ASSY GP 37JL9RCSA01 60.M26V7.002
STAND ASSY IV6E STAND ASSY GP 26IV6ESA000 60.M6707. 001
STAND BASE STAND BASE IV6E(EAIV6E02,REV3A)GP EAIV6E02016
PANEL BKT TOP PANEL BKT TOP HX6(FAHX6003,REV3C) GP FAHX6003013 33.M26V7.001
PANEL BKT DOWN PANEL BKT DOWN HX6(FAHX6004,REV3D) GP FAHX6004010 33.M5307.001
SUPPORT BKT SUPPORT BKT HX6(FAHX6005,REV3A) GP FAHX6005016 33.M26V7.003
PANEL BRACKET PANEL BRACKET H26(FBH26001,REV3A) GP FBH26001019 33.M11V7.006
STAND SUPPORT STAND SUPPORT IV6(FBIV6E01,REV3A)GP FBIV6E01011
LCD
LCD LCD(TFT)26" T260XW03 V2(XGA-WIDE)5V AA260XW0103 LK.26005.002
LCD LCD(TFT)26" T260XW03 V2 STN B/S AA260XW0104
LABEL
LABEL (POWER) LABEL (POWER) HV9N(HCHV9002,3A) GP HCHV9002014 40.M26V7.001
LABEL (BUTTONS) LABEL(BUTTON)IV2E(HCIV2E03,REV3A)GP HCIV2E03010
LABEL (IO&TUNER) LABEL(I/O.TUNER) FV2E(HCFV2E01,R3B)GP HCFV2E01011 40.M5607.002
BOX LABEL BOX LABEL(130WX150L)VT1(HCVT1004,R3A) GP HCVT1004017
24
Capter3
Page 31

RATING LABEL RATING LABEL IV4E(HCIV4E01,3A)MIC GP HCIV4E01014
MISCELLANEOUS
GASKET RIGHT GASKET RIGHT AU CX(GBCX6003,REV3A) GP GBCX6003015 47.M26V7.002
GASKET UP GASKET UP R/L CMO HV9(GBHV9002,REV3A) GP GBHV9002013 47.M26V7.003
GASKET TUNER GASKET 15X15 TUNER IV6(GBIV6E01,R3A)GP GBIV6E01011
SCREW
SCREW SCREW M4.0*4-I(NYLOK) GP MM40040ICI1 86.M11V7.001
SCREW SCREW T3*8-B(BNI) GP MT30080BJ20 86.M08V7.007
SCREW SCREW F3.0*6-B(NI)GP MF30060BBJ6 86.M25V7.002
SCREW SCREW M3*6-B(BNI) GP MM30060BJ25 86.M08V7.003
SCREW SCREW M4*6 P (NI) GP MM40060PCE2 86.M01V7.002
SCREW SCREW T4*10-B(BNI) GP MT40100BJ29 86.M26V7.001
SCREW SCREW M4*8 B-(BNI) GP MM40080BJ26 86.M26V7.002
SCREW SCREW M4*6-I (BNI)(NYLOK))GP MM40060IL69
SCREW SCREW T3*12-P(BNI)(WASHER)GP MS30120PJ67 86.M6707.001
SCREW SCREW F4.0*6-I(NI)GP MF40060IBJ2
SCREW SCREW M4.0*12-R ALLEN HEADER BLACK GP MS40120R002
IO NUT VT1 IO NUT VT1(MBVT1002,REV3A) GP MBVT1002013 86.M01V7.010
Chapter3
25
Page 32

Exploded parts list
ITEM DESCRIPTION TVI PART NO. ACER PART NO. QTY
1 IV2E M/B ASSY(FOR IV6E)AUO GP 21IV2EMB026 55.M5507.001 1
2 IV2E IR/B ASSY GP 23IV2EIB012 55.M5607.004 1
3 IV2 KEYPAD/B ASSY GP 23IV2EKB001 55.M5607.005 1
4 IV6E FRONT BEZEL ASSY GP 32IV6EFB001 60.M5507.001 1
5 JL9J REAR-COVER ASSY GP 37JL9RCSA01 60.M26V7.002 1
6 PANEL BKT TOP HX6(FAHX6003,REV3C) GP FAHX6003013 33.M26V7.001 1
7 PANEL BKT DOWN HX6(FAHX6004,REV3D) GP FAHX6004010 33.M5307.001 1
8 SUPPORT BKT HX6(FAHX6005,REV3A) GP FAHX6005016 33.M26V7.003 2
9 PANEL BRACKET H26(FBH26001,REV3A) GP FBH26001019 33.M11V7.006 2
10 LABEL (POWER) HV9N(HCHV9002,3A) GP HCHV9002014 40.M26V7.001 1
11 CONDUCTIVE TAPE-DN HR7(JXHR7005,R3A)GP JXHR7005012 47.M5307.001 1
12 HV7E FUNCTION KEY ASSY GP 3JHV7EKA008 60.M6707.003 1
13 GASKET UP R/L CMO HV9(GBHV9002,REV3A) GP GBHV9002013 47.M26V7.003 2
14 MAIN PCB TRAY IV6E(FAIV6E01,REV3A)GP FAIV6E01010 33.M6707.001 1
15 MAIN PCB SHIELD EU IV6E(FAIV6E02,R3A)GP FAIV6E02016 33.M6707.002 1
16 SCREW M4*8 B-(BNI) GP MM40080BJ26 86.M26V7.002 8
17 SCREW T4*10-B(BNI) GP MT40100BJ29 86.M26V7.001 19
18 CABLE INV(14P/4P/6P,320MM) AUO V2 GP DDIV6EIV003 50.M6707.001 1
19 CABLE LVDS(50P/30P,225MM) IV6E(AUO)V2 GP DDIV6ELC024 50.M6707.002 1
20 CABLE PW-AUDIO(8P/7P,180MM)IV6E GP DDIV6EAB006 50.M5507.001 1
21 CABLE MB-PWR(10P,110MM,R3A)VA1 GP DD0VA1PB013 50.M01V7.004 1
22 CABLE SPEAKER(4P/3P+2P,R1A)HX6A GP DDHX6ASP009 50.M5307.003 1
23 IV2E IO/B ASSY(EU) GP 23IV2EIB004 55.M5507.002 1
24 CABLE KEY-IR(10P/9P/8P,670MM)IV6E GP DDIV6EMX003 50.M6707.003 1
25 SCREW F3.0*6-B(NI)GP MF30060BBJ6 86.M25V7.002 3
26 SCREW M3*6-B(BNI) GP MM30060BJ25 86.M08V7.003 19
27 SCREW T3*8-B(BNI) GP MT30080BJ20 86.M08V7.007 8
28 SCREW M4*6 P (NI) GP MM40060PCE2 86.M01V7.002 1
29 SCREW M4.0*4-I(NYLOK) GP MM40040ICI1 86.M11V7.001 4
30 IO NUT VT1(MBVT1002,REV3A) GP MBVT1002013 86.M01V7.010 2
31 LABEL(I/O.TUNER) FV2E(HCFV2E01,R3B)GP HCFV2E01011 40.M5607.002 1
32 LCD(TFT)26" T260XW03 V2(XGA-WIDE)5V AA260XW0103 LK.26005.002 1
33 PWR 161W,DPS-161AP-2 A(90~264VAC) GP AF161B00000 55.M5307.001 1
34 SPK IV6E-R(4,5W,91*51.5*38.5)L15,P5 DNS4591P006 23.M6707.001 1
35 SPK IV6E-L(4,5W,91*51.5*38.5)L15,P2.5 DNS4591P014 23.M6707.002 1
36 IV6E STAND ASSY GP 26IV6ESA000 60.M6707.001 1
37 CABLE ASSY HV9 GND(1P/1P,2A) GP DD0HV9TH108 50.M26V7.004 2
38 GASKET RIGHT AU CX(GBCX6003,REV3A) GP GBCX6003015 47.M26V7.002 3
26
Capter3
Page 33

39 CONDUCTIVE TAPE IV6(JXIV6E01,R3A)GP JXIV6E01011 1
40 LENS IV4E(EBIV4E01,REV3A) GP EBIV4E01013 60.M6707.004 1
41 AV3 BEZEL DUMMY JL9(EBJL9002,REV3A) GP EBJL9002011 47.M6707.009 1
42 GASKET 15X15 TUNER IV6(GBIV6E01,R3A)GP GBIV6E01011 1
43 SCREW T3*12-P(BNI)(WASHER)GP MS30120PJ67 86.M6707.001 8
44 SCREW M4.0*12-R ALLEN HEADER BLACK GP MS40120R002 6
45 LVDS MYLAR IV6(FCIV6E01,R3A)GP FCIV6E01011 1
46 SCREW M4*6-I (BNI)(NYLOK))GP MM40060IL69 20
47 WIRE CLIP CH-10(EBVT2001,REV3A) GP EBVT2001011 47.M12V7.004 1
Chapter3
27
Page 34

 Loading...