

Page 1

English
Français
Deutsch
Italiano
Español
Português
Nederlands
Norsk
Dansk
Svenska
Suomi
Русский
Polski
Magyar
Čeština
Slovenčina
Slovenski
Hrvatski
Română
Български
Eesti
Latviski
Lietuviškai
Ελληνικά
Türkçe
한국어
繁體中文
简体中文
Bahasa Indonesia
ä·Â
Contents
Ver.: 01.01.06
Page 2

Page 3

Aspire Notebook
User’s Manual
Page 4

© 2013 All Rights Reserved
Aspire Notebook User’s Manual
This revision: 01/2013
Model number: __________________________________
Serial number: ___________________________________
Date of purchase: ________________________________
Place of purchase: ________________________________
Page 5

English
Information for your safety and comfort
Safety instructions
Read these instructions carefully. Keep this document for future reference. Follow all
warnings and instructions marked on the product.
Turning the product off before cleaning
Unplug this product from the wall outlet before cleaning. Do not use liquid cleaners
or aerosol cleaners. Use a damp cloth for cleaning.
Warnings
Accessing the power cord
Be sure that the power outlet you plug the power cord into is easily accessible and
located as close to the equipment operator as possible. When you need to
disconnect power to the equipment, be sure to unplug the power cord from the
electrical outlet.
Disconnecting the power source
Observe the following guidelines when connecting and disconnecting power to the
power supply unit:
Install the power supply unit before connecting the power cord to the AC power
outlet.
Unplug the power cord before removing the power supply unit from the computer.
If the system has multiple sources of power, disconnect power from the system by
unplugging all power cords from the power supplies.
iii
Using electrical power
• This product should be operated from the type of power indicated on the
marking label. If you are not sure of the type of power available, consult your
dealer or local power company.
• Do not allow anything to rest on the power cord. Do not locate this product
where people will walk on the cord.
• If an extension cord is used with this product, make sure that the total ampere
rating of the equipment plugged into the extension cord does not exceed the
extension cord ampere rating. Also, make sure that the total rating of all
products plugged into the wall outlet does not exceed the fuse rating.
Page 6

iv
Do not overload a power outlet, strip or receptacle by plugging in too many
•
devices. The overall system load must not exceed 80% of the branch circuit
rating. If power strips are used, the load should not exceed 80% of the power
strip's input rating.
• This product's AC adapter is equipped with a three-wire grounded plug. The
plug only fits in a grounded power outlet. Make sure the power outlet is properly
grounded before inserting the AC adapter plug. Do not insert the plug into a
non-grounded power outlet. Contact your electrician for details.
Warning! The grounding pin is a safety feature. Using a power
outlet that is not properly grounded may result in electric shock
and/or injury.
Note: The grounding pin also provides good protection from
unexpected noise produced by other nearby electrical devices that
may interfere with the performance of this product.
• The system can be powered using a wide range of voltages; 100 to 120 or 220
to 240 V AC. The power cord included with the system meets the requirements
for use in the country/region where the system was purchased. Power cords for
use in other countries/regions must meet the requirements for that country/
region. For more information on power cord requirements, contact an
authorized reseller or service provider.
Bundled dummy cards
Note: Information in this section may not apply to your computer.
Your computer shipped with plastic dummies installed in the card slots. Dummies
protect unused slots from dust, metal objects or other particles.
Save the dummies for use when no cards are in the slots.
General
• Do not use this product near water.
• Do not place this product on an unstable cart, stand or table. If the product falls,
it could be seriously damaged.
• Slots and openings are provided for ventilation to ensure reliable operation of
the product and to protect it from overheating. These openings must not be
blocked or covered. The openings should never be blocked by placing the
product on a bed, sofa, rug or other similar surface. This product should never
be placed near or over a radiator or heat register, or in a built-in installation
unless proper ventilation is provided.
• Never push objects of any kind into this product through cabinet slots as they
Page 7

English
may touch dangerous voltage points or short-out parts that could result in a fire
or electric shock. Never spill liquid of any kind onto or into the product.
• To avoid damage of internal components and to prevent battery leakage, do not
place the product on a vibrating surface.
• Never use it under sporting, exercising, or any vibrating environment which will
probably cause unexpected short current or damage rotor devices, HDD,
Optical drive, and even exposure risk from lithium battery pack.
• The bottom surface, areas around ventilation openings and AC adapter may
get hot. To avoid injury, ensure they do not come in contact with your skin or
body.
• Your device and its enhancements may contain small parts. Keep them out of
the reach of small children.
• The surface temperature of the base will rise during normal operation,
particularly when plugged in to AC power. Allowing sustained contact with
exposed skin can cause discomfort or burns.
Product servicing
Do not attempt to service this product yourself, as opening or removing covers may
expose you to dangerous voltage points or other risks. Refer all servicing to qualified
service personnel.
Unplug this product from the wall outlet and refer servicing to qualified service
personnel when:
• The power cord or plug is damaged, cut or frayed.
• Liquid was spilled into the product.
• The product was exposed to rain or water.
• The product has been dropped or the case has been damaged.
• The product exhibits a distinct change in performance, indicating a need for
service.
• The product does not operate normally after following the operating
instructions.
v
Note: Adjust only those controls that are covered by the operating
instructions, since improper adjustment of other controls may result in
damage and will often require extensive work by a qualified technician
to restore the product to normal condition.
Guidelines for safe battery usage
This notebook uses a Lithium-ion battery. Do not use it in a humid, wet or corrosive
environment. Do not put, store or leave your product in or near a heat source, in a
high temperature location, in strong direct sunlight, in a microwave oven or in a
pressurized container, and do not expose it to temperatures over 60° C (140° F).
Failure to follow these guidelines may cause the battery to leak acid, become hot,
explode or ignite and cause injury and/or damage. Do not pierce, open or
Page 8

vi
disassemble the battery. If the battery leaks and you come into contact with the
leaked fluids, rinse thoroughly with water and seek medical attention immediately.
For safety reasons, and to prolong the lifetime of the battery, charging will not occur
at temperatures below 0° C (32° F) or above 40° C (104° F).
The full performance of a new battery is achieved only after two or three complete
charge and discharge cycles. The battery can be charged and discharged hundreds
of times, but it will eventually wear out. When the operation time becomes noticeably
shorter than normal, buy a new battery.
Use only the approved batteries, and recharge your battery only with the approved
chargers designated for this device.
Use the battery only for its intended purpose. Never use any charger or battery that
is damaged. Do not short-circuit the battery. Accidental short-circuiting can occur
when a metallic object such as a coin, clip or pen causes direct connection of the
positive (+) and negative (-) terminals of the battery. (These look like metal strips on
the battery.) This might happen, for example, when you carry a spare battery in your
pocket or purse. Short-circuiting the terminals may damage the battery or the
connecting object.
The capacity and lifetime of the battery will be reduced if the battery is left in hot or
cold places, such as in a closed car in summer or winter. Always try to keep the
battery between 15° C and 25° C (59° F and 77° F). A device with a hot or cold
battery may not work temporarily, even when the battery is fully charged. Battery
performance is especially limited in temperatures well below freezing.
Do not dispose of batteries in a fire as they may explode. Batteries may also explode
if damaged. Dispose of batteries according to local regulations. Please recycle when
possible. Do not dispose as household waste.
Wireless devices may be susceptible to interference from the battery, which could
affect performance.
Note: Please refer to www.acer.com for battery shipping documents.
Replacing the battery pack
The notebook uses lithium batteries. Replace the battery with the same type as that
which came bundled with your product. Use of another battery may present a risk of
fire or explosion.
Warning! Batteries may explode if not handled properly. Do not
disassemble or dispose of them in fire. Keep them away from
children. Follow local regulations when disposing of used
batteries.
Caution for Optical Drive Device
Note: Information in this section may not apply to your computer.
Page 9

vii
English
CAUTION: This appliance contains a laser system and is classified as a "CLASS 1
LASER PRODUCT." In case of any trouble with this device, please contact your
nearest AUTHORIZED service station. To prevent direct exposure to the laser beam,
do not try to open the enclosure.
CLASS 1 LASER PRODUCT
CAUTION: INVISIBLE LASER RADIATION WHEN OPEN. AVOID EXPOSURE
TO BEAM.
APPAREIL A LASER DE CLASSE 1 PRODUIT
LASERATTENTION: RADIATION DU FAISCEAU LASER INVISIBLE EN CAS
D’OUVERTURE. EVITTER TOUTE EXPOSITION AUX RAYONS.
LUOKAN 1 LASERLAITE LASER KLASSE 1
VORSICHT: UNSICHTBARE LASERSTRAHLUNG, WENN ABDECKUNG
GEÖFFNET NICHT DEM STRAHLL AUSSETZEN
PRODUCTO LÁSER DE LA CLASE I
ADVERTENCIA: RADIACIÓN LÁSER INVISIBLE AL SER ABIERTO. EVITE
EXPONERSE A LOS RAYOS.
ADVARSEL: LASERSTRÅLING VEDÅBNING SE IKKE IND I STRÅLEN.
VAR O ! LAVATTAESSA OLET ALTTINA LASERSÅTEILYLLE.
VARNING: LASERSTRÅLNING NÅR DENNA DEL ÅR ÖPPNAD ÅLÅ TUIJOTA
SÅTEESEENSTIRRA EJ IN I STRÅLEN
VARNING: LASERSTRÅLNING NAR DENNA DEL ÅR ÖPPNADSTIRRA EJ IN I
STRÅLEN
ADVARSEL: LASERSTRÅLING NAR DEKSEL ÅPNESSTIRR IKKE INN I
STRÅLEN
Telephone line safety
• Disconnect all telephone lines from the equipment when not in use and/or
before servicing.
• To avoid the remote risk of electric shock from lightning, do not connect the
telephone line to this equipment during lightning or thunderstorms.
Warning! For safety reasons, do not use non-compliant parts
when adding or changing components. Consult your reseller for
purchase options.
Radio frequency interference
Warning! For safety reasons, turn off all wireless or radio
transmitting devices when using your laptop under the following
conditions. These devices may include, but are not limited to:
wireless LAN (WLAN), Bluetooth and/or 3G.
Page 10

viii
Remember to follow any special regulations in force in any area, and always switch
off your device when its use is prohibited or when it may cause interference or
danger. Use the device only in its normal operating positions. This device meets RF
exposure guidelines when used normally. To successfully transmit data files or
messages, this device requires a good quality connection to the network. In some
cases, transmission of data files or messages may be delayed until such a
connection is available. Ensure that the above separation distance instructions are
followed until the transmission is completed. Parts of the device are magnetic.
Metallic materials may be attracted to the device, and persons with hearing aids
should not hold the device to the ear with the hearing aid. Do not place credit cards
or other magnetic storage media near the device, because information stored on
them may be erased.
Medical devices
Operation of any radio transmitting equipment, including wireless phones, may
interfere with the functionality of inadequately protected medical devices. Consult a
physician or the manufacturer of the medical device to determine if they are
adequately shielded from external RF energy or if you have any questions. Switch
off your device in health care facilities when any regulations posted in these areas
instruct you to do so. Hospitals or health care facilities may be using equipment that
could be sensitive to external RF transmissions.
Pacemakers. Pacemaker manufacturers recommend that a minimum separation of
15.3 centimeters (6 inches) be maintained between wireless devices and a
pacemaker to avoid potential interference with the pacemaker. These
recommendations are consistent with the independent research by and
recommendations of Wireless Technology Research. Persons with pacemakers
should do the following:
• Always keep the device more than 15.3 centimeters (6 inches) from the
pacemaker
• Not carry the device near your pacemaker when the device is switched on.
If you suspect interference, switch off your device, and move it.
Hearing aids. Some digital wireless devices may interfere with some hearing aids. If
interference occurs, consult your service provider.
Vehicles
RF signals may affect improperly installed or inadequately shielded electronic
systems in motor vehicles such as electronic fuel injection systems, electronic antiskid (anti-lock) braking systems, electronic speed control systems, and air bag
systems. For more information, check with the manufacturer, or its representative, of
your vehicle or any equipment that has been added. Only qualified personnel should
service the device, or install the device in a vehicle. Faulty installation or service may
be dangerous and may invalidate any warranty that may apply to the device. Check
regularly that all wireless equipment in your vehicle is mounted and operating
properly. Do not store or carry flammable liquids, gases, or explosive materials in the
same compartment as the device, its parts, or enhancements. For vehicles equipped
with an air bag, remember that air bags inflate with great force. Do not place objects,
Page 11

English
including installed or portable wireless equipment in the area over the air bag or in
the air bag deployment area. If in-vehicle wireless equipment is improperly installed,
and the air bag inflates, serious injury could result. Using your device while flying in
aircraft is prohibited. Switch off your device before boarding an aircraft. The use of
wireless teledevices in an aircraft may be dangerous to the operation of the aircraft,
disrupt the wireless telephone network, and may be illegal.
Potentially explosive environments
Switch off your device when in any area with a potentially explosive atmosphere and
obey all signs and instructions. Potentially explosive atmospheres include areas
where you would normally be advised to turn off your vehicle engine. Sparks in such
areas could cause an explosion or fire resulting in bodily injury or even death. Switch
off the device at refueling points such as near gas pumps at service stations.
Observe restrictions on the use of radio equipment in fuel depots, storage, and
distribution areas; chemical plants; or where blasting operations are in progress.
Areas with a potentially explosive atmosphere are often, but not always, clearly
marked. They include below deck on boats, chemical transfer or storage facilities,
vehicles using liquefied petroleum gas (such as propane or butane), and areas
where the air contains chemicals or particles such as grain, dust or metal powders.
Do not switch the notebook on when wireless phone use is prohibited or when it may
cause interference or danger.
Emergency calls
Warning: You cannot make emergency calls through this device. To make an
emergency call you shall dial out through your mobile phone or other telephone call
system.
ix
Disposal instructions
Do not throw this electronic device into the trash when discarding.
To minimize pollution and ensure utmost protection of the global
environment, please recycle. For more information on the Waste from
Electrical and Electronics Equipment (WEEE) regulations, visit
www.acer-group.com/public/Sustainability
ENERGY STAR
Acer's ENERGY STAR qualified products save your money by
reducing energy cost and protecting the environment without
sacrificing features or performance. Acer is proud to offer our
customers products with the ENERGY STAR mark.
What is ENERGY STAR?
Products that are ENERGY STAR qualified use less energy and
prevent greenhouse gas emissions by meeting strict energy efficiency guidelines set
Page 12

x
by the U.S. Environmental Protection Agency. Acer is committed to offering products
and services worldwide that help customers save money, conserve energy and
improve the quality of our environment. The more energy we can save through
higher energy efficiency, the more we reduce greenhouse gases and the risks of
climate change. More information refers to
www.energystar.gov or www.energystar.gov/powermanagement.
Note: Information in this section may not apply to your computer.
Acer ENERGY STAR qualified products:
• Produce less heat and reduce cooling loads, and warmer climates.
• Automatically go into "display sleep" and "computer sleep" mode after 10
and 30 minutes of inactivity respectively.
• Wake the computer from sleep mode by pushing keyboard or moving
mouse.
• Computers will save more than 80% energy at "sleep" mode.
ENERGY STAR and the ENERGY STAR mark are registered U.S. marks
Tips and information for comfortable use
Computer users may complain of eyestrain and headaches after prolonged use.
Users are also at risk of physical injury after long hours of working in front of a
computer. Long work periods, bad posture, poor work habits, stress, inadequate
working conditions, personal health and other factors greatly increase the risk of
physical injury.
Incorrect computer usage may lead to carpal tunnel syndrome, tendonitis,
tenosynovitis or other musculoskeletal disorders. The following symptoms may
appear in the hands, wrists, arms, shoulders, neck or back:
• Numbness, or a burning or tingling sensation.
• Aching, soreness or tenderness.
• Pain, swelling or throbbing.
• Stiffness or tightness.
• Coldness or weakness.
If you have these symptoms, or any other recurring or persistent discomfort and/or
pain related to computer use, consult a physician immediately and inform your
company's health and safety department.
The following section provides tips for more comfortable computer use.
Finding your comfort zone
Find your comfort zone by adjusting the viewing angle of the monitor, using a
footrest, or raising your sitting height to achieve maximum comfort. Observe the
following tips:
• Refrain from staying too long in one fixed posture.
Page 13

English
• Avoid slouching forward and/or leaning backward.
• Stand up and walk around regularly to remove the strain on your leg muscles.
• Take short rests to relax your neck and shoulders.
• Avoid tensing your muscles or shrugging your shoulders.
• Install the external display, keyboard and mouse properly and within
comfortable reach.
• If you view your monitor more than your documents, place the display at the
center of your desk to minimize neck strain.
Taking care of your vision
Long viewing hours, wearing incorrect glasses or contact lenses, glare, excessive
room lighting, poorly focused screens, very small typefaces and low-contrast
displays could stress your eyes. The following sections provide suggestions on how
to reduce eyestrain.
Eyes
• Rest your eyes frequently.
• Give your eyes regular breaks by looking away from the monitor and focusing
on a distant point.
• Blink frequently to keep your eyes from drying out.
Display
• Keep your display clean.
• Keep your head at a higher level than the top edge of the display so your eyes
point downward when looking at the middle of the display.
• Adjust the display brightness and/or contrast to a comfortable level for
enhanced text readability and graphics clarity.
• Eliminate glare and reflections by:
• placing your display in such a way that the side faces the window or any
light source,
• minimizing room light by using drapes, shades or blinds,
• using a task light,
• changing the display's viewing angle,
• using a glare-reduction filter,
• using a display visor, such as a piece of cardboard extended from the
display's top front edge.
• Avoid adjusting your display to an awkward viewing angle.
• Avoid looking at bright light sources for extended periods of time.
xi
Developing good work habits
The following work habits make computer use more relaxing and productive:
• Take short breaks regularly and often.
Page 14

xii
Perform some stretching exercises.
•
• Breathe fresh air as often as possible.
• Exercise regularly and maintain a healthy body.
Warning! We do not recommend using the computer on a couch
or bed. If this is unavoidable, work for only short periods, take
breaks regularly, and do some stretching exercises.
Note: For more information, please refer to "Regulations and safety
notices" on page 59.
Page 15

xiii
English
First things first
We would like to thank you for making an Acer notebook your choice for meeting
your mobile computing needs.
Your guides
To help you use your Acer notebook, we have designed a set of guides:
First off, the setup poster helps you get started with setting up your computer.
This Aspire User’s Manual contains useful information applying to all models in the
Aspire product series. It covers basic topics such as using the keyboard and audio,
etc. Please understand that due to its nature, the User’s Manual will occasionally
refer to functions or features which are only contained in certain models of the
series, but not necessarily in the model you purchased. Such instances are marked
in the text with language such as "only for certain models."
The Quick Guide introduces you to the basic features and functions of your new
computer. For more on how your computer can help you to be more productive,
please refer to the Aspire User’s Manual. This guide contains detailed information
on such subjects as system utilities, data recovery, expansion options and
troubleshooting. In addition it contains warranty information and the general
regulations and safety notices for your notebook. It is available in Portable
Document Format (PDF) and comes preloaded on your notebook. Follow these
steps to access it:
1From Start, simply start typing "User" to open the Search charm.
2Click Acer User’s Manual to open the User’s Manual on your machine.
Basic care and tips for using your computer
Turning your computer on and off
To turn on the computer, simply press and release the power button. Please refer to
the setup poster for the location of the power button.
To turn the power off, do any of the following:
• Use the Windows shutdown command: Press the Windows key + <C>, click
Settings > Power then click Shut Down.
If you need to power down the computer for a short while, but don’t want to
completely shut it down, you can put it into Hibernate by:
• Pressing the power button.
You can also put the computer in sleep mode by pressing the sleep hotkey <Fn> +
<F4>.
Page 16

xiv
Note: If you cannot power off the computer normally, press and hold
the power button for more than four seconds to shut down the
computer. If you turn off the computer and want to turn it on again,
wait at least two seconds before powering up.
Taking care of your computer
Your computer will serve you well if you take care of it.
• Do not expose the computer to direct sunlight. Do not place it near sources of
heat, such as a radiator.
• Do not expose the computer to temperatures below 0º C (32º F) or above 50º C
(122º F).
• Do not subject the computer to magnetic fields.
• Do not expose the computer to rain or moisture.
• Do not spill water or any liquid on the computer.
• Do not subject the computer to heavy shock or vibration.
• Do not expose the computer to dust or dirt.
• Never place objects on top of the computer.
• Do not slam the computer display when you close it.
• Never place the computer on uneven surfaces.
Taking care of your AC adapter
Here are some ways to take care of your AC adapter:
• Do not connect the adapter to any other device.
• Do not step on the power cord or place heavy objects on top of it. Carefully
route the power cord and any cables away from foot traffic.
• When unplugging the power cord, do not pull on the cord itself but pull on the
plug.
• The total ampere ratings of the equipment plugged in should not exceed the
ampere rating of the cord if you are using an extension cord. Also, the total
current rating of all equipment plugged into a single wall outlet should not
exceed the fuse rating.
Page 17

xv
English
Taking care of your battery pack
Here are some ways to take care of your battery pack:
• Use only batteries of the same kind as replacements. Turn the power off before
removing or replacing batteries.
• Do not tamper with batteries. Keep them away from children.
• Dispose of used batteries according to local regulations. Recycle if possible.
Cleaning and servicing
When cleaning the computer, follow these steps:
1 Turn off the computer and remove the battery pack.
2 Disconnect the AC adapter.
3 Use a soft, moist cloth. Do not use liquid or aerosol cleaners.
If either of the following occurs:
• The computer has been dropped or the body has been damaged;
• The computer does not operate normally
Please refer to "Frequently asked questions" on page 52 .
Page 18

Information for your safety and comfort iii
Safety instructions iii
Warnings iii
Caution for Optical Drive Device vi
Radio frequency interference vii
Medical devices viii
Vehicles viii
Potentially explosive environments ix
Emergency calls ix
Disposal instructions ix
ENERGY STAR ix
Tips and information for comfortable use x
First things first xiii
Your guides xiii
Basic care and tips for using your computer xiii
Turning your computer on and off xiii
Taking care of your computer xiv
Taking care of your AC adapter xiv
Taking care of your battery pack xv
Cleaning and servicing xv
Touchpad 1
Touchpad basics (for models with separate buttons) 1
Touchpad basics (for models with integrated buttons) 2
Touchpad gestures 3
Using the keyboard 4
Lock keys and embedded numeric keypad\ 4
Hotkeys 5
Recovery 7
Creating a recovery backup 7
Creating a drivers and applications backup 9
Recovering your system 11
Reinstalling drivers and applications 11
Returning to an earlier system snapshot 13
Returning your system to its factory condition 14
Recovering from Windows 14
Recovering from a recovery backup 16
Acer Backup Manager 19
Acer clear.fi 21
Navigating media and photos 21
Shared files 21
Which devices are compatible? 22
Playing to another device 22
Power management 23
Saving power 23
Contents
Page 19

English
Disable Fast startup 23
Battery pack 25
Battery pack characteristics 25
Charging the battery 26
Optimizing battery life 26
Checking the battery level 27
Battery-low warning 27
Installing and removing the battery pack 27
Taking your notebook PC with you 29
Disconnecting from the desktop 29
Moving around 29
Preparing the computer 29
What to bring to meetings 30
Taking the computer home 30
Preparing the computer 30
What to take with you 30
Special considerations 30
Setting up a home office 31
Traveling with the computer 31
Preparing the computer 31
What to take with you 31
Special considerations 31
Traveling internationally with the computer 31
Preparing the computer 32
What to bring with you 32
Special considerations 32
Securing your computer 33
Using a computer security lock 33
Using passwords 33
Entering passwords 34
Setting passwords 34
Expanding through options 35
Connectivity options 35
Fax/data modem 35
Built-in network feature 36
Consumer Infrared (CIR) 36
Universal Serial Bus (USB) 37
IEEE 1394 port 38
High-Definition Multimedia Interface 38
ExpressCard 39
Installing memory 40
Enjoying TV with Windows Media Center 42
Choose your input type 42
Watching TV using the optional DVB-T (digital TV) antenna
xvii
Page 20

(for selected models) 42
To connect the digital antenna 43
Watching TV with an external antenna or cable socket 43
BIOS utility 44
Boot sequence 44
Password 44
Using software 45
Playing DVD movies 45
Using a Bluetooth connection 46
Enabling and disabling Bluetooth 46
Adding a Bluetooth device 47
Troubleshooting 50
Troubleshooting tips 50
Error messages 50
Frequently asked questions 52
Requesting service 53
International Travelers Warranty (ITW) 53
Before you call 53
Tips and hints for using Windows 8 55
Three concepts you might want to keep in mind 55
How do I access the charms? 55
How do I get to Start? 55
How do I jump between apps? 55
How do I turn off my computer? 55
Why is there a new interface? 55
How do I unlock my computer? 56
How do I personalize my computer? 56
I want to use Windows in the way that I'm used to - give me my
desktop back! 57
Where are my apps? 57
What is a Microsoft ID (account)? 57
How do I add a favorite to Internet Explorer? 58
How do I check for Windows updates? 58
Where can I get more information? 58
Regulations and safety notices 59
FCC statement 59
Modem notices 60
LCD pixel statement 62
Radio device regulatory notice 62
General 62
Wireless operation channels for different domains 63
France: Restricted wireless frequency bands 63
List of National Codes 64
The FCC RF safety requirement 64
Page 21

English
Canada — Low-power license-exempt radio
communication devices (RSS-210) 65
Exposure of humans to RF fields (RSS-102) 65
LCD panel ergonomic specifications 67
xix
Page 22

1
English
Touchpad
The built-in touchpad is a pointing device that senses movement on its surface. This
means the cursor responds as you move your finger across the surface of the
touchpad.
Note: Please keep the touchpad and your fingers dry and clean.
Touchpad basics (for models with separate buttons)
The following items show you how to use the touchpad with two buttons.
• Move your finger across the touchpad to move the cursor.
• Press the left and right buttons located beneath the touchpad to perform
selection and execution functions. These two buttons are similar to the left and
right buttons on a mouse. Tapping on the touchpad is the same as clicking the
left button.
Function Left button
Execute Quickly click
twice.
Select Click once. Tap once.
Drag Click and hold,
then use finger on
the touchpad to
drag the cursor.
Access context
menu
Note: Illustrations for reference only. The exact configuration of your
PC depends on the model purchased.
Right
button
Click
once.
Main touchpad
Tap twice (at the same
speed as double-clicking a
mouse button).
Tap twice (at the same
speed as double-clicking a
mouse button); rest your
finger on the touchpad on
the second tap and drag
the cursor.
Page 23

English
Note: When using the touchpad, keep it — and your fingers — dry
and clean. The touchpad is sensitive to finger movement; hence, the
lighter the touch, the better the response. Tapping harder will not
increase the touchpad's responsiveness.
Note: By default, vertical and horizontal scrolling is enabled on your
touchpad. It can be disabled under Mouse settings in Windows
Control Panel.
Touchpad basics (for models with integrated buttons)
Note: The touchpad is sensitive to finger movement; the lighter the
touch, the better the response. Tapping harder will not increase the
touchpad's responsiveness.
The cursor is controlled by some basic gestures:
• Single-finger slide: Slide a finger across the touchpad to move the
cursor.
• Single-finger press or tap: Press the touchpad down, or lightly tap
the touchpad with your finger, to perform a 'click', which will select
or start an item. Quickly repeat the tap to perform a double tap or
'double click'.
• Single-finger press or tap in the bottom-right corner: Press the bottom right
corner of the touchpad to perform a 'right click'. In the Start screen, this will
toggle the app commands, in most apps this will open a context menu related to
the selected item.
2
• Drag: Press and hold the bottom left corner of the touchpad, or tap twice
anywhere on the touchtap, then slide a finger across the touchpad to select all
items in an area.
Page 24

3
English
Touchpad gestures
Windows 8 and many applications support touchpad gestures that use one or more
fingers.
Note: Support for touchpad gestures depends on the active
application.
• Swipe in from right edge: Toggle the charms.
• Swipe in from top edge: Toggle the app commands.
• Swipe in from left edge: Switch to the previous app.
• Two-finger slide: Swiftly scroll through web pages, documents and
playlists by placing two fingers on the touchpad and moving both in
any direction.
• Two-finger pinch: Zoom in and out of photos, maps and
documents with a simple finger-and-thumb gesture.
Page 25

English
Using the keyboard
The keyboard has full-sized keys and an embedded numeric keypad*, separate
cursor, lock, Windows, function and special keys.
Lock keys and embedded numeric keypad\
Note: Information in this section may not apply to your computer.
The keyboard has three lock keys which you can toggle on and off.
Lock key Description
Caps Lock When Caps Lock is on, all alphabetic characters typed are
in uppercase.
4
Num Lock
<Fn> + <F11>*
Scroll Lock
<Fn> + <F12>
The embedded numeric keypad functions like a desktop numeric keypad. It is
indicated by small characters located on the upper right corner of the keycaps. To
simplify the keyboard legend, cursor-control key symbols are not printed on the
keys.
Desired access Num Lock on Num Lock off
Number keys on
embedded keypad
Cursor-control keys
on embedded
keypad
Main keyboard keys Hold <Fn> while typing
When Num Lock is on, the embedded keypad is in numeric
mode. The keys function as a calculator (complete with the
arithmetic operators +, -, *, and /). Use this mode when you
need to do a lot of numeric data entry. A better solution would
be to connect an external keypad.
When Scroll Lock is on, the screen moves one line up or down
when you press the up or down arrow keys respectively. Scroll
Lock does not work with some applications.
Type numbers in a normal
manner.
Hold <Shift> while using
cursor-control keys.
letters on embedded keypad.
Hold <Fn> while using
cursor-control keys.
Type the letters in a
normal manner.
Page 26

5
English
Hotkeys
The computer employs hotkeys or key combinations to access most of the
computer's controls like screen brightness and volume output.
To activate hotkeys, press and hold the <Fn> key before pressing the other key in
the hotkey combination.
Hotkey Icon Function Description
<Fn> + <F3> Communication
key
<Fn> + <F4> Sleep Puts the computer in Sleep
<Fn> + <F5> Display toggle Switches display output between
<Fn> + <F6> Display off Turns the display screen
<Fn> + <F7> Touchpad toggle Turns the built-in touchpad on
<Fn> + <F8> Speaker toggle Turns the speakers on and off.
<Fn> + <F11> NumLk Turns the embedded numeric
<Fn> + < >
Brightness up Increases the screen brightness.
Enables / disables the computer's
communication devices.
(Communication devices may
vary by configuration.)
mode.
the display screen, external
monitor (if connected) and both.
backlight off to save power. Press
any key to return.
and off.
keypad on or off (only for certain
models).
<Fn> + < >
<Fn> + < >
<Fn> + < >
Brightness down Decreases the screen brightness.
Volume up Increases the sound volume.
Volume down Decreases the sound volume.
Page 27

English
Hotkey Icon Function Description
6
<Fn> +
<Home>
<Fn> +
<Pg Up>
<Fn> +
<Pg Dn>
<Fn> + <End> Next Jump to the next media file.
Play/Pause Play or pause a selected media
file.
Stop Stop playing the selected
media file.
Previous Return to the previous media file.
Page 28

7
English
Recovery
If you are having trouble with your computer, and the frequently asked questions
(see page 52) do not help, you can 'recover' your computer - i.e. return it to an earlier
state.
This section describes the recovery tools available on your computer. Acer provides
Acer Recovery Management, which allows you to create a recovery backup, a drivers
and applications backup, and to start recovery options, either using Windows tools, or
the recovery backup.
Note: Acer Recovery Management is only available with a pre-
installed Windows operating system.
Important: We recommend that you create a Recovery Backup and
Drivers and Applications Backup and as soon as possible.
In certain situations a full recovery will require a USB recovery
backup.
Creating a recovery backup
To reinstall from a USB storage drive, you must first create a recovery backup. The
recovery backup includes the entire original contents of your computer’s hard drive,
including Windows and all factory-loaded software and drivers. Using this backup
will restore your computer to the same state as when you purchased it, while giving
you an option to retain all settings and personal data.
Note:
Make sure you have a USB drive with a capacity of at least
16 GB.
Page 29

English
1. From Start, type 'Recovery' and then click Acer Recovery Management in the
list of apps.
2. Click Create Factory Default Backup. The Recovery Drive window opens.
8
Make sure Copy contents from the recovery partition to the recovery drive is
selected. This provides the most complete and safest recovery backup.
3. Plug in the USB drive then click Next.
• Make sure your USB drive has enough capacity before continuing. The
recovery backup requires at least 16 GB of storage
Page 30

9
English
4. You will be shown the backup progress on the screen.
5. Follow the process until it completes.
6. After creating the recovery backup, you can choose to delete the recovery
information on your computer. If you delete this information, you can only use the
USB recovery backup to restore your computer, if you lose or erase the USB
drive, you cannot restore your computer.
7. Unplug the USB drive and label it clearly.
Important: Write a unique, descriptive label on the backup, such as
'Windows Recovery Backup'. Make sure you keep the backup in a
safe place that you will remember.
Creating a drivers and applications backup
To create a Drivers and Applications Backup, that contains the factory-loaded
software and drivers needed by your computer, you may use either a USB storage
drive or, if your computer features a DVD recorder, one or more blank recordable
DVDs.
Page 31

10
English
1. From Start, type 'Recovery' and then click Acer Recovery Management in the
list of apps.
2. Click Create Drivers and Applications Backup.
Plug in the USB drive or insert a blank DVD into the optical drive, then click Next.
• If you are using a USB drive, make sure your USB drive has enough capacity
before continuing.
• If using DVDs, it will also show the number of blank, recordable discs you will
need to complete the recovery discs. Make sure that you have the required
number of identical, blank discs.
3. Click Start to copy files.You will be shown the backup progress on the screen.
4. Follow the process until it completes:
Page 32

11
English
• If you are using optical discs, the drive ejects each disc as it completes
burning it. Remove the disc from the drive and mark it with a permanent
marker.
If multiple discs are required, insert a new disc when prompted, then click OK.
Continue until the process is complete.
• If you are using a USB drive, unplug the drive and label it clearly.
Important: Write a unique, descriptive label on each backup, such as
'Drivers and Applications Backup'. Make sure you keep the backup in
a safe place that you will remember.
Recovering your system
To recover your system:
1. Perform minor fixes.
If only one or two items of software or hardware have stopped working correctly,
the problem may be solved by reinstalling the software or the device drivers.
To reinstall software and drivers that were pre-installed at the factory, see
"Reinstalling drivers and applications" on page 11.
For instructions on reinstalling software and drivers that were not pre-installed,
see that product’s documentation or support Web site.
2. Revert to a previous system condition.
If reinstalling software or drivers does not help, then the problem may be solved
by returning your system to a previous state when everything was working
correctly.
For instructions, see "Returning to an earlier system snapshot" on page 13.
3. Reset your operating system.
If nothing else has solved the problem and you want to reset your system, but
keep your user information, see "Returning your system to its factory
condition" on page 14.
4. Reset your system to its factory condition.
If nothing else has solved the problem and you want to reset your system to
factory condition, see "Returning your system to its factory condition" on
page 14.
Reinstalling drivers and applications
As a troubleshooting step, you may need to reinstall the applications and device
drivers that came pre-installed on your computer from the factory. You can reinstall
using either your hard drive or the backup you have created.
• Other applications - If you need to reinstall software that did not come preinstalled on your computer, you need to follow that software’s installation
instructions.
• New device drivers - If you need to reinstall device drivers that did not come preinstalled on your computer, follow the instructions provided with the device.
Page 33

12
English
If you are reinstalling using Windows and the recovery information stored on your
computer:
•From Start, type 'Recovery' and then click Acer Recovery Management in
the list of apps.
• Click Reinstall Drivers or Applications.
• You should see the Contents section of the Acer Resource Center.
• Click the install icon for the item you want to install, then follow the
onscreen instructions to complete the installation. Repeat this step for
each item you want to reinstall.
If you are reinstalling from a Drivers and Applications Backup on a DVD or USB
drive:
1. Insert the Drivers and Applications Backup into the disc drive or connect it to a
free USB port.
• If you inserted a DVD wait for Acer Resource Center to start.
• If Acer Resource Center does not start automatically, press the Windows
key + <E>, then double-click on the optical drive icon.
• If you are using a USB drive, press the Windows key + <E>, then double-click
on the drive that contains the backup. Double-click on ResourceCenter.
Page 34

13
English
2. You should see the Contents section of the Acer Resource Center.
3. Click the install icon for the item you want to install, then follow the
onscreen prompts to complete the installation. Repeat this step for each
item you want to reinstall.
Returning to an earlier system snapshot
Microsoft System Restore periodically takes a 'snapshot' of your system settings and
saves them as restore points. In most cases of hard-to-resolve software problems,
you can return to one of these restore points to get your system running again.
Windows automatically creates an additional restore point each day, and also each
time you install software or device drivers.
Note: For more information about using Microsoft System Restore,
from Start, type 'Help' and then click Help and Support in the list of
apps. Type 'Windows system restore' in the Search Help box, then
press Enter.
Returning to a restore point
1. From Start, type 'Control Panel' and then click Control Panel in the list of apps.
2. Click System and Security > Action Center, then click Recovery at the bottom
of the window.
3. Click Open System Restore, then Next.
4. Click the latest restore point (at a time when your system worked correctly), click
Next, then Finish.
5. A confirmation window appears; click Yes. Your system is restored using the
restore point you specified. This process may take several minutes, and may
restart your computer.
Page 35

14
English
Returning your system to its factory condition
If your computer experiences problems that are not recoverable by other methods,
you may need to reinstall everything to return your system to its factory condition.
You can recover from either your hard drive or the recovery backup you have
created.
• If you can still run Windows and have not deleted the recovery partition, see
"Recovering from Windows" on page 14.
• If you cannot run Windows, your original hard drive has been completely reformatted or you have installed a replacement hard drive, see "Recovering from
a recovery backup" on page 16.
Recovering from Windows
Start Acer Recovery Management:
•From Start, type 'Recovery' and then click Acer Recovery Management in the
list of apps.
Two options are available, Restore Factory Settings (Reset my PC) or
Customized Restore (Refresh my PC).
Restore Factory Settings deletes everything on your hard drive, then reinstalls
Windows and all software and drivers that were pre-installed on your system. If you
can access important files on your hard drive, back them up now. See "Restore
Factory Settings with Acer Recovery Management" on page 15.
Customized Restore will attempt to retain your files (user data) but will reinstall all
software and drivers. Software installed since you purchased your PC will be
removed (except software installed from the Windows Store). See "Customized
Restore with Acer Recovery Management" on page 16.
Page 36

15
English
Restore Factory Settings with Acer Recovery Management
1. Click Restore Factory Settings.
Caution: 'Restore Factory Settings' will erase all files on your
hard drive.
2. The Reset your PC window opens.
3. Click Next, then choose how to erase your files:
Images for reference only.
a. Just remove my files quickly erases all files before restoring your computer
and takes about 30 minutes.
b. Fully clean the drive completely cleans the drive after each file is erased, so
no files can be viewed after the recovery. Cleaning the drive takes much
longer, up to 5 hours, but is much more secure as old files are completely
removed.
4. Click Reset.
5. The recovery process begins by restarting your computer, then continues by
copying files to your hard drive.
6. After the recovery has finished, you can start using your computer by repeating
the first-start process.
Page 37

16
English
Customized Restore with Acer Recovery Management
1. Click Customized Restore (Retain User Data).
2. The Refresh your PC window opens.
3. Click Next, then Refresh.
4. The recovery process begins by restarting your computer, then continues by
copying files to your hard drive. This process takes about 30 minutes.
Recovering from a recovery backup
To recover from a recovery backup on a USB drive:
1. Find your recovery backup.
2. Plug in the USB drive and turn on your computer.
3. If it is not already enabled, you must enable the F12 Boot Menu:
a. Press <F2> when starting your computer.
b. Use the left or right arrow keys to select the Main menu.
c. Press the down key until F12 Boot Menu is selected, press <F5> to change
this setting to Enabled.
d. Use the left or right arrow keys to select the Exit menu.
e. Depending on the type of BIOS your computer uses, select Save Changes
and Exit or Exit Saving Changes and press Enter. Select OK or Yes to
confirm.
f. Your computer will restart.
4. During startup, press <F12> to open the boot menu. The boot menu allows you to
select which device to start from, select the USB drive.
Page 38

17
English
a. Use your arrow keys to select USB Device, then press Enter.
b. Windows starts from the recovery backup instead of the normal startup
process.
5. Select your keyboard type.
6. Select Troubleshoot and then choose the type of recovery to use:
a. Click Advanced then System Restore to start Microsoft System Restore:
Microsoft System Restore periodically takes a 'snapshot' of your system
settings and saves them as restore points. In most cases of hard-to-resolve
software problems, you can return to one of these restore points to get your
system running again.
b. Click Reset your PC to start the reset process:
Reset your PC deletes everything on your hard drive, then reinstalls Windows
and all software and drivers that were pre-installed on your system. If you can
access important files on your hard drive, back them up now. See "Reset your
PC from the recovery backup" on page 17.
c. Click Refresh your PC to start the refresh process:
Refresh your PC will attempt to retain your files (user data) but will reinstall all
software and drivers. Software installed since you purchased your PC will be
removed (except software installed from the Windows Store). See "Refresh
your PC from the recovery backup" on page 18.
Reset your PC from the recovery backup
Caution: Reset your PC will erase all files on your hard drive.
1. The Reset your PC window opens.
Images for reference only.
2. Click Next.
3. Select the operating system to recover (normally only one option is available).
4. Choose to keep any changes to the hard drive:
a. If you have deleted the recovery partition or otherwise changed the partitions
on the hard drive and want to keep these changes, select No.
b. To completely restore your computer to Factory Settings, select Yes .
5. Choose how to erase your files:
a. Just remove my files quickly erases all files before restoring your computer
and takes about 30 minutes.
Page 39

18
English
b. Fully clean the drive completely cleans the drive after each file is erased, so
no files can be viewed after the recovery. Cleaning the drive takes much
longer, up to 5 hours, but is much more secure as old files are completely
removed.
6. Click Reset.
7. After the recovery has finished, you can start using your computer by repeating
the first-start process.
Refresh your PC from the recovery backup
1. The Refresh your PC window opens.
2. Click Next.
3. Select the operating system to recover (normally only one option is available).
4. Click Refresh.
5. The recovery process begins by restarting your computer, then continues by
copying files to your hard drive. This process takes about 30 minutes.
Page 40

19
English
Acer Backup Manager
Note: This feature is only available on certain models.
Acer Backup Manager is a utility that enables you to do a variety of backup functions
each accomplished in only three simple steps. You can even set these functions to
automatically recur as often as your like.
To start Acer Backup Manager in Windows 8, simply start typing "Backup Manager".
Alternatively, in Desktop mode, select Acer Backup Manager. This opens the
Welcome screen; from this screen you can select the type of backup you’d like to
create.
• Back Up My Files: Select files to back up.
• Image My Drive: Create a backup file for the entire drive. You can burn this file
to a DVD, save them to another drive on your computer*, or save them to
removable media (i.e. a flash drive) to restore your computer at a later time.
• Migrate My Files: Allows you to copy files to a USB device so that you can
migrate files from your old computer to your new one or any other computer
with Acer Backup Manager.
• Clear out / Restore Files: Remove seldom used files to free up disk space or
restore files from your backup.
Select the backup type you’d like to make and select the files or drive you want to
back up, then follow the onscreen instructions:
1 Select the content you want to back up. The less content you select, the
quicker the process will be, but it will increase your risks of losing data.
Page 41

20
English
2 Select where you want the backup copies to be stored. Your options include
removable media, a drive on your computer*, CD/DVD media, a remote PC, or
the cloud using Microsoft SkyDrive.
3 Select how often you want Acer Backup Manager to create backups.
Once you have finished these three steps, backups will be created according to the
schedule.
*NOTE: You will need to select an external drive or your D: drive; Acer
Backup Manager cannot store a backup on the source drive.
If you wish to change your settings at any time, go to the Acer Backup Manager
profiles screen. To get there from the Acer Backup Manager welcome screen, click
Launch My Backup Profiles.
From here you can edit or delete existing backup profiles.
Page 42

21
English
Acer clear.fi
Note: Only for certain models.
With Acer clear.fi, you can enjoy videos, photos and music. Stream media from, or
to, other devices with Acer clear.fi installed.
Note: All devices must be connected to the same network.
To watch videos or listen to music open clear.fi Media, to browse photos open
clear.fi Photo.
Important: When you first open a clear.fi application, Windows
Firewall will ask for permission to allow clear.fi to access the network.
Select Allow Access in each window.
Navigating media and photos
The list in the left panel shows your computer (’My Library’), then other devices if any
are connected to your network (’Home Shared’).
To view files on your computer, select one of the categories under ’My Library’, then
browse the files and folder on the right.
Shared files
Devices connected to your network are shown in the Home Shared section. Select
a device, then the select the category to explore.
After a short delay, shared files and folders are shown on the right. Browse to the file
you want to play, then double-click to start playback.
Page 43

English
Use the media controls in the bar across the bottom of the screen to control
playback. For example, when music is selected, you can play, pause or stop
playback, and adjust the volume.
Note: You must activate sharing on the device that stores the files.
Open clear.fi on the device that stores the files, select Edit then make
sure Share my library on local network is active.
Which devices are compatible?
Certified Acer devices with clear.fi or DLNA software can be used with the clear.fi
software. These include DLNA-compliant PCs, smartphones, and NAS (Network
Attached Storage) devices.
Playing to another device
If you want to play the media on another device, you need to do the following:
1. In the bottom right corner, select Play to.
2. Select the remote device that will be used to play the file.
22
Note: Only devices optimised for playback are available in this list, certain PCs
and storage devices will not appear. To add a Windows PC to this list, open
Windows Media Player, select Stream and Allow remote control of my Player...
3. Select a file in the main window, then use the media controls in the bar across the
bottom of the screen to control the remote device.
For more help, go to http://www.acer.com/clearfi/download/.
Page 44

23
Power management
English
This computer has a built-in power management unit that monitors system activity.
System activity refers to any activity involving one or more of the following devices:
keyboard, mouse, hard disk, peripherals connected to the computer, and video
memory. If no activity is detected for a period of time, the computer stops some or all
of these devices in order to conserve energy.
Saving power
Disable Fast startup
Your computer uses Fast startup to start quickly, but also uses a small amount of
power to check for signals to start. These checks will slowly drain your computer’s
battery.
If you prefer to reduce your computer’s power requirements and environmental
impact, turn off Fast startup:
Note: If Fast startup is off, your computer will take longer to start from
Sleep. If your computer features Acer Instant On or Acer Instant
Connect, these will also be turned off.
Your computer will also not start if it receives an instruction to start
over a network or from a connected HDMI device (Wake on LAN or
Wake on HDMI).
1. Open the Desktop.
2. Click Power Options in the Notification area.
3. Select More Power Options.
4. Select Choose what the power buttons do.
Page 45

24
English
5. To access Shutdown Settings, select Change settings that are currently
unavailable.
6. Scroll down and disable Turn on fast startup.
7. Select Save changes.
Page 46

25
English
Battery pack
The computer uses a battery pack that gives you long use between charges.
Battery pack characteristics
The battery pack has the following characteristics:
• Employs current battery technology standards.
• Delivers a battery-low warning.
The battery is recharged whenever you connect the computer to the AC adapter.
Your computer supports charge-in-use, enabling you to recharge the battery while
you continue to operate the computer. However, recharging with the computer
turned off results in a significantly faster charge time.
The battery will come in handy when you travel or during a power failure. It is
advisable to have an extra fully charged battery pack available as backup. Contact
your dealer for details on ordering a spare battery pack.
Note: Some models have an embedded battery. If the battery needs
to be replaced, please contact an authorized service center.
Conditioning a new battery pack
Before you use a battery pack for the first time, there is a conditioning process that
you should follow:
1 Insert the new battery without turning the computer on.
2 Connect the AC adapter and fully charge the battery.
3 Disconnect the AC adapter.
4 Turn on the computer and operate using battery power.
5 Fully deplete the battery until the battery-low warning appears.
6 Reconnect the AC adapter and fully charge the battery again.
Follow these steps again until the battery has been charged and discharged three
times.
Use this conditioning process for all new batteries, or if a battery hasn't been used
for a long time. If the computer is to be stored for more than two weeks, you are
advised to remove the battery pack from the unit.
Warning: Do not expose battery packs to temperatures below 0°
C (32° F) or above 45° C (113° F). Extreme temperatures may
adversely affect the battery pack.
Page 47

26
English
By following the battery conditioning process you condition your battery to accept the
maximum possible charge. Failure to follow this procedure will prevent you from
obtaining the maximum battery charge, and will also shorten the effective lifespan of
the battery.
In addition, the useful lifespan of the battery is adversely affected by the following
usage patterns:
• Using the computer on constant AC power with the battery inserted. If you want
to use constant AC power, you are advised to remove the battery pack after it is
fully charged.
• Not discharging and recharging the battery to its extremes, as described above.
• Frequent use; the more you use the battery, the faster it will reach the end of its
effective life. A standard computer battery has a life span of about 300 charges.
Charging the battery
To charge the battery, first make sure that it is correctly installed in the battery bay.
Plug the AC adapter into the computer, and connect to a mains power outlet. You
can continue to operate your computer on AC power while your battery is charging.
However, charging the battery with the computer turned off results in a significantly
faster charge time.
Note: You are advised to charge the battery before retiring for the day.
Charging the battery overnight before traveling enables you to start
the next day with a fully charged battery.
Optimizing battery life
Optimizing battery life helps you get the most out of battery operation, prolonging the
charge/recharge cycle and improving recharging efficiency. You are advised to follow
the suggestions set out below:
• Purchase an extra battery pack.
• Use AC power whenever possible, reserving battery for on-the-go use.
• Eject a PC Card if it is not being used, as it will continue to draw power (for
selected models).
• Store the battery pack in a cool, dry place. The recommended temperature is
10° C (50° F) to 30° C (86° F). Higher temperatures cause the battery to selfdischarge faster.
• Excessive recharging decreases the battery life.
• Look after your AC adapter and battery.
Page 48

27
English
Checking the battery level
The Windows power meter indicates the current battery level. Rest the cursor over
the battery/power icon on the taskbar to see the battery's present charge level.
Battery-low warning
When using battery power pay attention to the Windows power meter.
Warning: Connect the AC adapter as soon as possible after the
battery-low warning appears. Data will be lost if the battery to
become fully depleted and the computer shuts down.
When the battery-low warning appears, the recommended course of action depends
on your situation:
Situation Recommended Action
The AC adapter
and a power outlet
are available.
An extra fully
charged battery
pack is available.
The AC adapter or
a power outlet is
unavailable. You
have no spare
battery pack.
1. Plug the AC adapter into the computer, and then
connect to the mains power supply.
2. Save all necessary files.
3. Resume work.
Turn off the computer if you want to recharge the
battery rapidly.
1. Save all necessary files.
2. Close all applications.
3. Turn off the computer.
4. Replace the battery pack.
5. Turn on the computer and resume work.
1. Save all necessary files.
2. Close all applications.
3. Turn off the computer.
Installing and removing the battery pack
Note: Some models have an embedded battery. If the battery needs
to be replaced, please contact an authorized service center.
Page 49

English
Important! Before removing the battery from the unit, connect the AC
adapter if you want to continue using your computer. Otherwise, turn
off the computer first.
To install a battery pack:
1 Align the battery with the open battery bay; make sure that the end with the
contacts will enter first, and that the top surface of the battery is facing up.
2 Slide the battery into the battery bay and gently push until the battery locks in
place.
To remove a battery pack:
1 Slide the battery release latch to release the battery.
2 Pull the battery from the battery bay.
28
Page 50

29
English
Taking your notebook PC with you
This section gives you tips and hints to consider when moving around or traveling
with your computer.
Disconnecting from the desktop
Follow these steps to disconnect your computer from external accessories:
1 Save any open files.
2 Remove any media, floppy disks or compact disks from the drive(s).
3 Shut down the computer.
4 Close the display cover.
5 Disconnect the cord from the AC adapter.
6 Disconnect the keyboard, pointing device, printer, external monitor and other
external devices.
7 Disconnect the Kensington lock if you are using one to secure the computer.
Moving around
When you are just moving within short distances, for example, from your office desk
to a meeting room.
Preparing the computer
Before moving the computer, close and latch the display cover to place it in Sleep
mode. You can now safely take the computer anywhere you go within the building.
To bring the computer out of Sleep mode, open the display; then press and release
the power button.
If you are taking the computer to a client's office or a different building, you may
choose to shut down the computer:
press the Windows key + <C> and click Start > Shut Down.
Or:
You can put the computer in Sleep mode by pressing <Fn> + <F4>. Then close and
latch the display.
When you are ready to use the computer again, unlatch and open the display; then
press and release the power button.
Note: If the Sleep indicator is off, the computer has entered
Hibernation mode and is turned off. If the power indicator is off but the
Sleep indicator is on, the computer has entered Sleep mode. In both
cases, press and release the power button to turn the computer back
Page 51

30
English
on. Note that the computer may enter Hibernation mode after being in
Sleep mode for a period of time.
What to bring to meetings
If your meeting is relatively short, you probably do not need to bring anything with
you other than your computer. If your meeting will be longer, or if your battery is not
fully charged, you may want to bring the AC adapter with you to plug in your
computer in the meeting room.
If the meeting room does not have an electrical outlet, reduce the drain on the
battery by putting the computer in Sleep mode. Press <Fn> + <F4> or close the
display cover whenever you are not actively using the computer. To resume, open
the display (if closed), then press and release the power button.
Taking the computer home
When you are moving from your office to your home or vice versa.
Preparing the computer
After disconnecting the computer from your desktop, follow these steps to prepare
the computer for the trip home:
• Check that you have removed all media and compact discs from the drive(s).
Failure to remove the media can damage the drive head.
• Pack the computer in a protective case that can prevent the computer from
sliding around and cushion it if it should fall.
Caution: Avoid packing items next to the top cover of the computer.
Pressure against the top cover can damage the screen.
What to take with you
Unless you have some items at home, take the following items with you:
• AC adapter and power cord.
• The printed setup poster.
Special considerations
Follow these guidelines to protect your computer while traveling to and
from work:
• Minimize the effects of temperature changes by keeping the computer with you.
• If you need to stop for an extended period of time and cannot carry the
computer with you, leave the computer in the trunk of the car to avoid exposing
the computer to excessive heat.
Page 52

31
English
• Changes in temperature and humidity can cause condensation. Allow the
computer to return to room temperature, and inspect the screen for
condensation before turning on the computer. If the temperature change is
greater than 10° C (18° F), allow the computer to come to room temperature
slowly. If possible, leave the computer for 30 minutes in an environment with a
temperature between outside and room temperature.
Setting up a home office
If you frequently work on your computer at home, you may want to purchase a
second AC adapter for use at home. With a second AC adapter, you can avoid
carrying the extra weight to and from home.
If you use your computer at home for significant periods of time, you might also want
to add an external keyboard, monitor or mouse.
Traveling with the computer
When you are moving within a larger distance, for instance, from your office building
to a client's office building or traveling locally.
Preparing the computer
Prepare the computer as if you were taking it home. Make sure that the battery in the
computer is charged. Airport security may require you to turn on your computer
when carrying it into the gate area.
What to take with you
Take the following items with you:
• AC adapter
• Spare, fully-charged battery pack(s)
• Additional printer driver files if you plan to use another printer
Special considerations
In addition to the guidelines for taking the computer home, follow these guidelines to
protect your computer while traveling:
• Always take the computer as carry-on luggage.
• If possible, have the computer inspected by hand. Airport security X-ray
machines are safe, but do not put the computer through a metal detector.
• Avoid exposing floppy disks to hand-held metal detectors.
Traveling internationally with the computer
When you are moving from country to country.
Page 53

32
English
Preparing the computer
Prepare the computer as you would normally prepare it for traveling.
What to bring with you
Bring the following items with you:
• AC adapter
• Power cords that are appropriate for the country to which you
are traveling
• Spare, fully-charged battery packs
• Additional printer driver files if you plan to use another printer
• Proof of purchase, in case you need to show it to customs officials
• International Travelers Warranty passport
Special considerations
Follow the same special considerations as when traveling with the computer.
In addition, these tips are useful when traveling internationally:
• When traveling in another country, check that the local AC voltage and the AC
adapter power cord specifications are compatible. If not, purchase a power
cord that is compatible with the local AC voltage. Do not use converter kits sold
for appliances to power the computer.
• If you are using the modem, check if the modem and connector are compatible
with the telecommunications system of the country you are traveling in.
Page 54

33
English
Securing your computer
Your computer is a valuable investment that you need to take care of. Learn how to
protect and take care of your computer.
Security features include hardware and software locks — a security notch
and passwords.
Using a computer security lock
The notebook comes with a Kensington-compatible security slot for a
security lock.
Wrap a computer security lock cable around an immovable object such as a table or
handle of a locked drawer. Insert the lock into the notch and turn the key to secure
the lock. Some keyless models are also available.
Using passwords
Passwords protect your computer from unauthorized access. Setting these
passwords creates several different levels of protection for your computer
and data:
• Supervisor Password prevents unauthorized entry into the BIOS utility. Once
set, you must enter this password to gain access to the BIOS utility. See "BIOS
utility" on page 44.
• User Password secures your computer against unauthorized use. Combine the
use of this password with password checkpoints on boot-up and resume from
Hibernation for maximum security.
• Password on Boot secures your computer against unauthorized use. Combine
the use of this password with password checkpoints on boot-up and resume
from Hibernation for maximum security.
Important! Do not forget your Supervisor Password! If you forget your
password, please get in touch with your dealer or an authorized
service center.
Page 55

34
English
Entering passwords
When a password is set, a password prompt appears in the center of the
display screen.
• When the Supervisor Password is set, a prompt appears when you press <F2>
to enter the BIOS utility at boot-up.
• Type the Supervisor Password and press <Enter> to access the BIOS utility. If
you enter the password incorrectly, a warning message appears. Try again and
press <Enter>.
• When the User Password is set and the password on boot parameter is
enabled, a prompt appears at boot-up.
• Type the User Password and press <Enter> to use the computer. If you enter
the password incorrectly, a warning message appears. Try again and press
<Enter>.
Important! You have three chances to enter a password. If you fail to
enter the password correctly after three tries, the system halts. Press
and hold the power button for four seconds to shut down the
computer. Then turn on the computer again, and try again.
Setting passwords
You can set passwords using the BIOS utility.
Page 56

35
English
Expanding through options
Your notebook PC offers you a complete mobile computing experience.
Connectivity options
Ports allow you to connect peripheral devices to your computer as you would with a
desktop PC. For instructions on how to connect different external devices to the
computer, read the following section.
Fax/data modem
Note: Information in this section may not apply to your computer.
Your computer has a built-in V.92 56 Kbps fax/data modem.
Warning! This modem port is not compatible with digital phone
lines. Plugging this modem into a digital phone line will damage
the modem.
To use the fax/data modem port, connect a phone cable from the modem port to a
telephone jack.
Warning! Please make sure that the cable you use is appropriate
for the country in which you are working.
Page 57

English
Built-in network feature
The built-in network feature allows you to connect your computer to an Ethernetbased network.
To use the network feature, connect an Ethernet cable from the Ethernet
(RJ-45) port on the chassis of the computer to a network jack or hub on
your network.
Consumer Infrared (CIR)
36
Note: Information in this section may not apply to your computer.
The computer’s Consumer Infrared (CIR) port is used to receive signals from your
remote control, or other devices with CIR capability.
Page 58

37
English
Universal Serial Bus (USB)
The USB 2.0 port is a high-speed serial bus which allows you to connect USB
peripherals without taking up precious system resources.
Page 59

English
IEEE 1394 port
Note: Information in this section may not apply to your computer.
The computer's IEEE 1394 port allows you to connect to an IEEE 1394-compatible
device like a video camera or digital camera. See your video or digital camera's
documentation for details.
38
High-Definition Multimedia Interface
Note: Information in this section may not apply to your computer.
HDMI (High-Definition Multimedia Interface) is an industry-supported,
uncompressed, all-digital audio/video interface. HDMI provides an interface between
any compatible digital audio/video source, such as a set-top box, DVD player, and A/
V receiver and a compatible digital audio and/or video monitor, such as a digital
television (DTV), over a single cable.
Page 60

39
English
Use the HDMI port on your computer to connect with high-end audio and video
equipment. Single cable implementation allows tidy setup and fast connection.
ExpressCard
Note: Information in this section may not apply to your computer.
The ExpressCard is the newest version of the PC Card. It is a smaller and faster
interface that further enhances the usability and expandability of your computer.
ExpressCards support a vast number of expansion options, including flash memory
card adapters, TV-tuners, Bluetooth connectivity and IEEE 1394b adapters.
ExpressCards support USB 2.0 and PCI Express applications.
Important! There are two types, ExpressCard/54 and ExpressCard/
34 (54 mm and 34 mm), each with different functions. Not all
ExpressCard slots will support both types. Please refer to your card’s
manual for details on how to install and use the card, and its functions.
Page 61

40
English
EXPRESS CARD
Inserting an ExpressCard
Insert the card into the slot and push gently until it clicks into position.
Ejecting an ExpressCard
Before ejecting an ExpressCard:
1 Exit the application using the card.
2 Left-click the remove hardware icon on the taskbar and stop the card operation.
3 Push the card gently into the slot and release to pop out the card. Then pull the
card free from the slot.
Installing memory
Note: Information in this section may not apply to your computer.
Follow these steps to install memory:
1 Turn off the computer, unplug the AC adapter (if connected) and remove the
battery pack. Then turn the computer over to access its base.
2 Remove the screws from the memory cover; then lift and remove the memory
cover.
Page 62

41
English
3 (a) Insert the memory module diagonally into the slot, then (b) gently press it
down until it clicks into place.
4 Replace the memory cover and secure it with the screw.
5 Reinstall the battery pack, and reconnect the AC adapter.
6 Turn on the computer.
The computer automatically detects and reconfigures the total memory size. Please
consult a qualified technician or contact your local Acer dealer.
Page 63

42
English
Enjoying TV with Windows Media Center
Note: This feature is only available on certain models.
Computers that include Windows Media Center Edition or InstantOn Arcade may be
used to watch TV and to access video content (via an audio/video connection to an
external device, such as a video camera).
Choose your input type
The audio/video connection may be either a DVB-T digital antenna (for selected
models) or a PAL/SECAM or NTSC connector. Please refer to the appropriate
section:
Watching TV using the optional DVB-T (digital TV) antenna (for selected models)
DVB-T digital TV is an international standard that is used to transmit terrestrial
television services in digital format. It is gradually replacing analog broadcasts in
many countries. The DVB-T digital antenna can be used with Windows Media
Center to watch local DVB-T digital TV broadcasts on your notebook PC.
Page 64

43
English
Notebook
RF
To connect the digital antenna
1 Plug the antenna cable into the RF jack of your computer.
Note: Do not twist or loop the antenna cable. Extend the antenna
cable up to 20 cm to improve signal quality.
Watching TV with an external antenna or cable socket
You may use conventional TV cables (connected to an external antenna or cable
socket) to watch TV on your computer.
Connecting antenna cables
To connect your cables:
1 Plug the antenna connector into the RF jack of your computer.
Page 65

44
English
2 Connect the other end to your TV cable, using the cable converter if necessary.
Important! Please ensure you use the correct cable system for your
region before attempting to connect the antenna cable.
BIOS utility
The BIOS utility is a hardware configuration program built into your
computer's BIOS.
Your computer is already properly configured and optimized, and you do not need to
run this utility. However, if you encounter configuration problems, you may need to
run it.
To activate the BIOS utility, press <F2> during the POST while the notebook PC logo
is being displayed.
Boot sequence
To set the boot sequence in the BIOS utility, activate the BIOS utility, then select
Boot from the categories listed at the top of the screen.
Password
To set a password on boot, activate the BIOS utility, then select Security from the
categories listed at the top of the screen. Find Password on boot: and use the
<F5> and <F6> keys to enable this feature.
Page 66

45
English
Using software
Playing DVD movies
Note: This feature is only available on certain models.
When the DVD drive module is installed in the optical drive bay, you can play DVD
movies on your computer.
1 Eject the DVD.
Important! When you launch the DVD player for the first time, the
program asks you to enter the region code. DVD discs are divided into
6 regions. Once your DVD drive is set to a region code, it will play
DVD disks of that region only. You can set the region code a maximum
of five times (including the first time), after which the last region code
set will remain permanent. Recovering your hard disk does not reset
the number of times the region code has been set. Refer to the table
below for DVD movie region code information.
2 The DVD movie will automatically play after a few seconds.
Region code Country or region
1 USA, Canada
2 Europe, Middle East, South Africa, Japan
3 Southeast Asia, Taiwan, South Korea
4 Latin America, Australia, New Zealand
5 Former USSR, parts of Africa, India
6 People’s Republic of China
Note: To change the region code, insert a DVD movie of a different
region into the DVD drive. Please refer to the online help for more
information.
Page 67

46
English
Using a Bluetooth connection
Bluetooth is a technology enabling you to transfer data wirelessly over short
distances between many different types of devices. Bluetooth-enabled devices
include computers, cell phones, tablets, wireless headsets, and keyboards.
To use Bluetooth, you must ensure the following:
1. Bluetooth is enabled on both devices.
2. Your devices are "paired" (or connected).
Enabling and disabling Bluetooth
The Bluetooth adapter must be enabled on both devices. For your computer, this
may be an external switch, a software setting, or a separate Bluetooth dongle
plugged into the computer’s USB port (if no internal Bluetooth adapter is available).
Note: Please check your devices owner’s manual to determine how to
turn on its Bluetooth adapter.
Then, from the notification area, click the Bluetooth icon, and select Open Settings.
Page 68
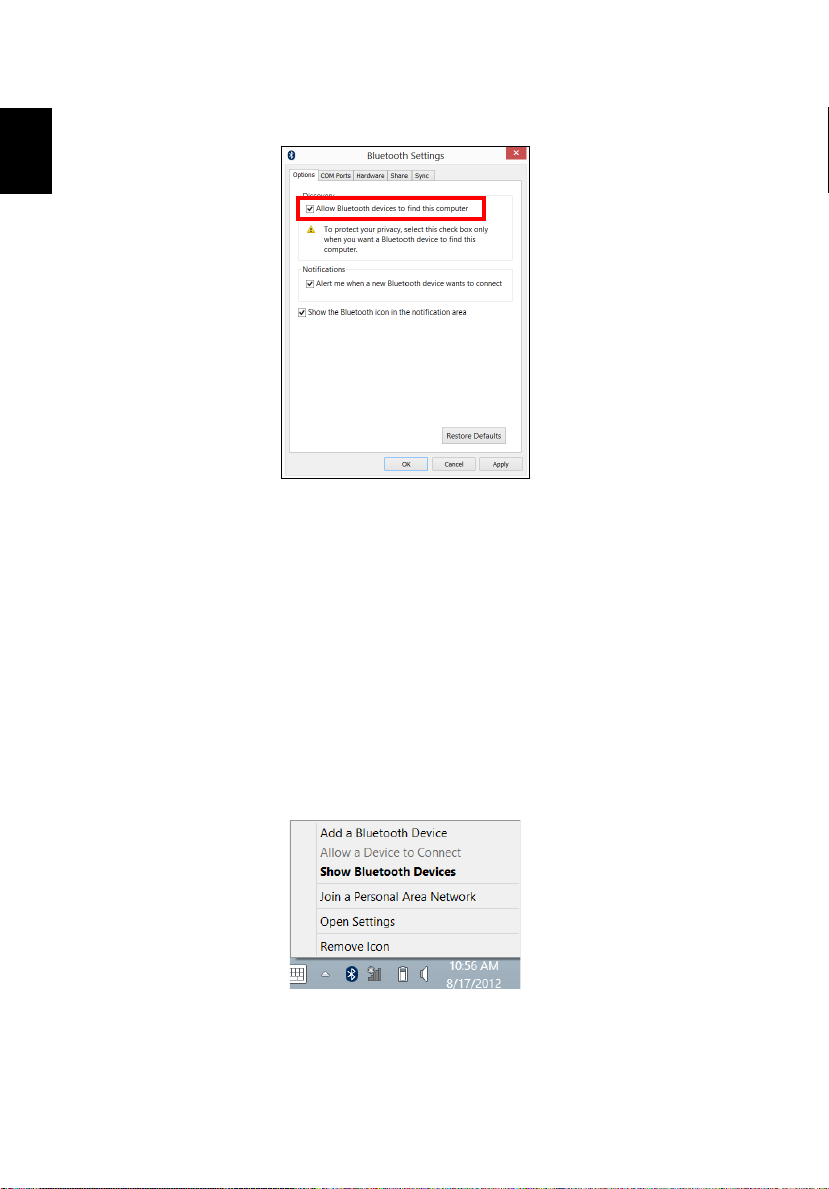
47
English
Select the Allow Bluetooth devices to find this computer check box, click Apply,
and then click OK.
The Bluetooth adapter in your computer is now enabled and ready for you to add
Bluetooth devices.
To disable your computer’s Bluetooth adapter, do the following:
1. Press the Windows key
2. In the results, click on Wireless.
3. Click the toggle under Bluetooth to enable/disable it.
+ <W> and then type Wireless.
Adding a Bluetooth device
Every new device must first be "paired" with your computer’s Bluetooth adapter. This
means it must first be authenticated for security purposes. You only need to pair
once. After that, simply turning on the Bluetooth adapter of both devices will connect
them.
From the notification area, click the Bluetooth icon, and select Add a Bluetooth
Device.
Page 69

48
English
Click on the device you want to add.
A code displays on your computer, which should match the code displayed on your
device. Select Yes. Then, accept the pairing from your device.
Note: Some devices using older versions of the Bluetooth technology
require both devices to enter a PIN. In the case of one of the devices
not having any inputs (as in a headset), the passcode is hardcoded
into the device (usually "0000" or "1234"). Consult your device’s user
manual for more information.
Your device will show up in the list of devices if it was successfully paired. Open the
Control Panel and under Hardware and Sound click on View devices and
Page 70

49
English
printers. Right cilck on your device and select Advanced Operations > Connect to
operation window.
The operation window enables you to play music and audio from your device
through your computer, send files to your device and change Bluetooth settings.
Page 71

English
Troubleshooting
This chapter shows you how to deal with common system problems.
Read it before calling a technician if a problem occurs. Solutions to more serious
problems require opening up the computer. Do not attempt to open the computer
yourself; contact your dealer or authorized service center For assistance.
Troubleshooting tips
This notebook PC incorporates an advanced design that delivers onscreen error
message reports to help you solve problems.
If the system reports an error message or an error symptom occurs, see "Error
messages" below. If the problem cannot be resolved, contact your dealer. See
"Requesting service" on page 53.
Error messages
If you receive an error message, note the message and take the corrective action.
The following table lists the error messages in alphabetical order together with the
recommended course of action.
Error messages Corrective action
CMOS battery bad Contact your dealer or an authorized service center.
50
CMOS checksum error Contact your dealer or an authorized service center.
Disk boot failure Insert a system (bootable) disk, then press <Enter> to
reboot.
Equipment
configuration error
Hard disk 0 error Contact your dealer or an authorized service center.
Hard disk 0 extended
type error
I/O parity error Contact your dealer or an authorized service center.
Keyboard error or no
keyboard connected
Keyboard interface
error
Press <F2> (during POST) to enter the BIOS utility,
then press Exit in the BIOS utility to reboot.
Contact your dealer or an authorized service center.
Contact your dealer or an authorized service center.
Contact your dealer or an authorized service center.
Page 72

51
English
Error messages Corrective action
Memory size mismatch Press <F2> (during POST) to enter the BIOS utility,
then press Exit in the BIOS utility to reboot.
If you still encounter problems after going through the corrective measures, please
contact your dealer or an authorized service center for assistance.
Page 73

52
English
Frequently asked questions
The following is a list of possible situations that may arise during the use of your
computer. Easy solutions are provided for each one.
I turned on the power, but the computer does not start or
boot up.
Look at the power indicator:
• If it is not lit, no power is being supplied to the computer. Check the following:
• If you are using on the battery, it may be low and unable to power the
computer. Connect the AC adapter to recharge the battery pack.
• Make sure that the AC adapter is properly plugged into the computer and
to the power outlet.
• If it is lit, check the following:
• Is a non-bootable (non-system) disk in the external USB floppy drive?
Remove or replace it with a system disk and press <Ctrl> + <Alt> + <Del>
to restart the system.
Nothing appears on the screen.
The computer’s power management system automatically blanks the screen to save
power. Press any key to turn the display back on.
If pressing a key does not turn the display back on, three things might be
the cause:
• The brightness level might be too low. Press <Fn> + < > (increase) to adjust
the brightness level.
• The display device might be set to an external monitor. Press the display toggle
hotkey <Fn> + <F5> to toggle the display back to the computer.
• If the Sleep indicator is lit, the computer is in Sleep mode. Press and release
the power button to resume.
No audio is heard from the computer.
Check the following:
• The volume may be muted. In Windows, look at the volume control (speaker)
icon on the taskbar. If it is crossed-out, click the icon and deselect the Mute all
option.
• The volume level may be too low. In Windows, look at the volume control icon
on the taskbar. You can also use the volume control buttons to adjust the
volume.
• If headphones, earphones or external speakers are connected to the line-out
port on the computer, the internal speakers automatically turn off.
Page 74

53
English
I want to eject the optical drive tray without turning on the power.
There is a mechanical eject hole on the optical drive. Simply insert the tip of a pen or
paperclip into the hole and push to eject the tray.
The keyboard does not respond.
Try attaching an external keyboard to a USB port on the computer. If it works,
contact your dealer or an authorized service center as the internal keyboard cable
may be loose.
The printer does not work.
Check the following:
• Make sure that the printer is connected to a power outlet and that it is turned
on.
• Make sure that the printer cable is connected securely to a USB port and the
corresponding port on the printer.
Requesting service
International Travelers Warranty (ITW)
Your computer is backed by an International Travelers Warranty (ITW) that gives you
security and peace of mind when traveling. Our worldwide network of service
centers are there to give you a helping hand.
An ITW passport comes with your computer. This passport contains all you need to
know about the ITW program. A list of available, authorized service centers is in this
handy booklet. Read this passport thoroughly.
Always have your ITW passport on hand, especially when you travel, to receive the
benefits from our support centers. Place your proof-of-purchase in the flap located
inside the front cover of the ITW passport.
If the country you are traveling in does not have an Acer-authorized ITW service site,
you can still get in contact with our offices worldwide. Please visit
www.acer.com.
Before you call
Please have the following information available when you call Acer for online
service, and please be at your computer when you call. With your support, we can
reduce the amount of time a call takes and help solve your problems efficiently. If
there are error messages or beeps reported by your computer, write them down as
they appear on the screen (or the number and sequence in the case of beeps).
You are required to provide the following information:
Name: __________________________________________
Address: ________________________________________
Telephone number: _______________________________
Page 75

English
Machine and model type: ___________________________
Serial number: ___________________________________
Date of purchase: _________________________________
54
Page 76

English
FRE QU
55
Tips and hints for using Windows 8
We know this is a new operating system that will take some getting used to, so we've
created a few pointers to help you get started.
Three concepts you might want to keep in mind
1. Start
The Start button is no longer available; you can launch apps from the Start screen.
2. Tiles
Live tiles are similar to thumbnails of the apps.
3. Charms
Charms allow you to perform useful functions, such as sharing content, turning off
your PC or changing settings.
How do I access the charms?
Move the cursor to the upper or lower right-hand corner of the screen to access the
charms, or press the Windows key + <C>.
How do I get to Start?
Press the Windows key on the keyboard; press the Windows key + <C> and click
Start; or move the cursor to the lower left-hand corner of the screen and click Start.
How do I jump between apps?
Move the cursor to the left-hand edge of the screen to view thumbnails of apps that
are currently running.
You may also press the Windows key + <Tab > to open and scroll through the current
apps.
How do I turn off my computer?
Press the Windows key + <C>, click Settings > Power and select the action you'd
like to take. Alternatively, from Desktop, click Acer Power Button and select the
action you'd like to take.
Why is there a new interface?
The new interface for Windows 8 is designed to work well with touch input. Windows
Store apps will automatically use the whole screen and don't require closing in the
traditional way. Windows Store apps will be displayed on Start using live-tiles.
Page 77

56
English
What are ’live tiles?’
Live tiles are similar to thumbnails of the apps that will be updated with new content
whenever you're connected to the Internet. So, for example, you can view weather
or stock updates without needing to open the app.
How do I unlock my computer?
Press the any key and click on a user account icon to unlock the computer. If your
account has a password set, you will need to enter the password to continue.
How do I personalize my computer?
You can personalize Start with a different background image or by arranging the tiles
to suit your personal needs.
To change the background, press the Windows key + <C> and click Settings >
Change PC settings > Personalize. Click Start screen at the top of the page and
select a color and image.
How do I move tiles?
Click and hold a tile to select it, then drag it to the place on Start that you want it to
appear. Other tiles will be moved to accommodate the tile in its new location.
Can I make tiles bigger or smaller?
Right-click on a tile, then select Smaller or Larger from the menu that appears at
the bottom of the screen.
How do I personalize the Lock screen?
You can personalize the lock screen with a different image or to show you quick
status and notifications to suit your personal needs.
To change the background, press the Windows key + <C> and click Settings >
Change PC settings > Personalize. Click Lock screen at the top of the page and
select the image and apps you would like to see on the lock screen.
So, how do I close an app?
Move the cursor to the top of the screen and click and drag the window downwards
to close the app.
You can close apps from the thumbnails on the left-hand edge of the screen by rightclicking on a thumbnail and selecting Close.
Can I change the screen resolution?
From Start, start typing ’Control Panel’ to open Search and display the results; click
Control Panel > Adjust screen resolution.
Page 78

57
English
I want to use Windows in the way that I'm used to - give
me my desktop back!
From Start click the Desktop tile to see a traditional desktop. You can pin apps you
frequently use to the taskbar to easily open them.
If you click an app that is not a Windows Store app, Windows will automatically open
the app using Desktop.
Where are my apps?
From Start, simply start typing the name of the app you would like to open, and
Search will automatically open and list results.
To view the complete list of apps, press the space bar or the Menu key and click All
apps.
How do I make an app appear on Start?
If you're in All apps and you want to make an app appear on Start, you can select the
app and right-click on it. Select Pin to Start from the menu that appears at the
bottom of the screen.
How do I remove a tile from Start?
Right-click the tile and click Unpin from Start from the menu that appears at the
bottom of the screen.
How do I make an app appear on my taskbar in Desktop?
If you're in All apps and you want to make an app appear on the taskbar in Desktop,
you can select the app and right-click on it. Select Pin to taskbar from the menu that
appears at the bottom of the screen.
How do I install apps?
You can download Windows Store apps from Store. You will need to have a
Microsoft ID to purchase and download apps from Store.
I can't find apps like Notepad and Paint! Where are they?
From Start you can simply start typing the name of the app you're looking for to open
Search and list the results. Alternatively, open All apps and scroll to ’Windows
Accessories’ to see the list of legacy programs.
What is a Microsoft ID (account)?
A Microsoft account is an email address and password that you use to sign in to
Windows. You can use any email address, but it is best if you choose the one you
already use to communicate with friends and sign in to your favorite websites. When
you sign in to your PC with a Microsoft account, you'll connect your PC to the people,
files, and devices you care about.
Page 79

58
English
Do I need one?
You do not need a Microsoft ID to use Windows 8, but it makes life easier because
you can sync data across different machines you sign in to using a Microsoft ID.
How do I get one?
If you've already installed Windows 8 and didn't sign in with a Microsoft account or
you don't have a Microsoft account and want to get one, press the Windows key +
<C> and click Settings > Change PC settings > Users > Switch to a Microsoft
account, and follow the onscreen instructions.
How do I add a favorite to Internet Explorer?
Internet Explorer 10 doesn't have traditional favorites, instead you can pin shortcuts
to Start. Once you have the page open, right-click anywhere on the page to open the
menu at the bottom of the screen. Click Pin to Start.
How do I check for Windows updates?
Press the Windows key + <C> and click Settings > Change PC settings >
Windows Updates. Click Check for updates now.
Where can I get more information?
For more information please visit:
• Windows 8 tutorials: www.acer.com/windows8-tutorial
• Support FAQs: www.acer.com/support
Page 80

59
English
Regulations and safety notices
FCC statement
This device has been tested and found to comply with the limits for a Class B digital
device pursuant to Part 15 of the FCC rules. These limits are designed to provide
reasonable protection against harmful interference in a residential installation. This
device generates, uses, and can radiate radio frequency energy and, if not installed
and used in accordance with the instructions, may cause harmful interference to
radio communications.
However, there is no guarantee that interference will not occur in a particular
installation. If this device does cause harmful interference to radio or television
reception, which can be determined by turning the device off and on, the user is
encouraged to try to correct the interference by one or more of the following
measures:
• Reorient or relocate the receiving antenna.
• Increase the separation between the device and receiver.
• Connect the device into an outlet on a circuit different from that to which the
receiver is connected.
• Consult the dealer or an experienced radio/television technician for help.
Notice: Shielded cables
All connections to other computing devices must be made using shielded cables to
maintain compliance with FCC regulations.
Notice: Peripheral devices
Only peripherals (input/output devices, terminals, printers, etc.) certified to comply
with the Class B limits may be attached to this equipment. Operation with noncertified peripherals is likely to result in interference to radio and TV reception.
Caution
Changes or modifications not expressly approved by the manufacturer could void
the user's authority, which is granted by the Federal Communications Commission,
to operate this computer.
Notice: Canadian users
This Class B digital apparatus complies with Canadian ICES-003.
Page 81

60
English
Remarque à l'intention des utilisateurs canadiens
Cet appareil numérique de la classe B est conforme a la norme NMB-003 du
Canada.
Compliant with Russian regulatory certification
Modem notices
Note: Information in this section may not apply to your computer.
Notice for USA
This equipment complies with Part 68 of the FCC rules. Located on the modem is a
label that contains, among other information, the FCC Registration Number and
Ringer Equivalence Number (REN) for this equipment. Upon request, you must
provide this information to your telephone company.
If your telephone equipment causes harm to the telephone network, the telephone
company may discontinue your service temporarily. If possible, they will notify you in
advance. But, if advance notice is not practical, you will be notified as soon as
possible. You will also be informed of your right to file a complaint with the FCC.
Your telephone company may make changes in its facilities, equipment, operations,
or procedures that could affect the proper functioning of your equipment. If they do,
you will be notified in advance to give you an opportunity to maintain uninterrupted
telephone service.
If this equipment should fail to operate properly, disconnect the equipment from the
phone line to determine if it is causing the problem. If the problem is with the
equipment, discontinue use and contact your dealer or vendor.
Caution: To reduce the risk of fire, use only No. 26 AWG or larger UL
Listed or CSA Certified Telecommunication Line Cord.
TBR 21
This equipment has been approved [Council Decision 98/482/EC - "TBR 21"] for
single terminal connection to the Public Switched Telephone Network (PSTN).
However, due to differences between the individual PSTNs provided in different
Page 82

61
English
countries, the approval does not, of itself, give an unconditional assurance of
successful operation on every PSTN termination point. In the event of problems, you
should contact your equipment supplier in the first instance. For more information
about applicable countries, please refer to "Regulations and safety notices" on
page 59.
Notice for Australia
For safety reasons, only connect headsets with a telecommunications compliance
label. This includes customer equipment previously labeled permitted or certified.
Notice for New Zealand
1 The grant of a Telepermit for any item of terminal equipment indicates only that
Telecom has accepted that the item complies with minimum conditions for
connection to its network. It indicates no endorsement of the product by
Telecom, nor does it provide any sort of warranty. Above all, it provides no
assurance that any item will work correctly in all respects with another item of
Telepermitted equipment of a different make or model, nor does it imply that
any product is compatible with all of Telecom's network services.
2 This equipment is not capable, under all operating conditions, of correct
operation at the higher speeds for which it is designed. Telecom will accept no
responsibility should difficulties arise in such circumstances.
3 Some parameters required for compliance with Telecom's Telepermit
requirements are dependent on the equipment (PC) associated with this
device. The associated equipment shall be set to operate within the following
limits for compliance with Telecom's Specifications:
a There shall be no more than 10 call attempts to the same number within
any 30-minute period for any single manual call initiation, and
b The equipment shall go on-hook for a period of not less than 30 seconds
between the end of one attempt and the beginning of the next call attempt.
4 Some parameters required for compliance with Telecom's Telepermit
requirements are dependent on the equipment (PC) associated with this
device. In order to operate within the limits for compliance with Telecom's
specifications, the associated equipment shall be set to ensure that automatic
calls to different numbers are spaced such that there is not less than 5 seconds
between the end of one call attempt and the beginning of another.
5 This equipment shall not be set up to make automatic calls to Telecom's 111
Emergency Service.
6 This device is equipped with pulse dialing while the Telecom standard is DTMF
tone dialing. There is no guarantee that Telecom lines will always continue to
support pulse dialing.
7 Use of pulse dialing, when this equipment is connected to the same line as
other equipment, may give rise to bell tinkle or noise and may also cause a
Page 83

62
English
false answer condition. Should such problems occur, the user should NOT
contact the telecom Fault Service.
8 This equipment may not provide for the effective hand-over of a call to another
device connected to the same line.
9 Under power failure conditions this appliance may not operate. Please ensure
that a separate telephone, not dependent on local power, is available for
emergency use.
LCD pixel statement
The LCD unit is produced with high-precision manufacturing techniques.
Nevertheless, some pixels may occasionally misfire or appear as black or red dots.
This has no effect on the recorded image and does not constitute a malfunction.
Radio device regulatory notice
Note: Below regulatory information is for models with wireless LAN
and / or Bluetooth only.
General
To prevent radio interference to the licensed service, this device is intended to be
operated indoors.
This product complies with the radio frequency and safety standards of any country
or region in which it has been approved for wireless use. Depending on
configurations, this product may or may not contain wireless radio devices (such as
wireless LAN and/or Bluetooth modules). Below information is for products with such
devices.
Declaration of Conformity for EU countries
Hereby, Acer, declares that this computer is in compliance with the essential
requirements and other relevant provisions of Directive 1999/5/EC.
Page 84

63
English
01 Ain Orientales
02 Aisne
03 Allier
05 Hautes Alpes
08 Ardennes
09 Ariege
11 Aude
12 Aveyron
16 Charente
24 Dordogne
25 Doubs
26 Drome
32 Gers
36 Indre
37 Indre et Loire
41 Loir et Cher
45 Loret
50 Manche
55 Meuse
58 Nievre
59 Nord
60 Oise
61 Orne
63 Puy Du Dome
64 Pyrenees Atlantique
66 Pyrenees
67 Bas Rhin
68 Haut Rhin
70 Haute Saone
71 Saone et Loire
75 Paris
82 Tarn et Garonne
84 Vaucluse
88 Vosges
89 Yonne
90 Territoire de Belfort
94 Val de Marne
Wireless operation channels for different domains
N. America 2.412-2.462 GHz Ch01 through Ch11
Japan 2.412-2.484 GHz Ch01 through Ch14
Europe ETSI 2.412-2.472 GHz Ch01 through Ch13
France: Restricted wireless frequency bands
Some areas of France have a restricted frequency band. The worst case maximum
authorized power indoors is:
• 10 mW for the entire 2.4 GHz band (2400 MHz - 2483.5 MHz)
• 100 mW for frequencies between 2446.5 MHz and 2483.5 MHz
Note: Channels 10 through 13 inclusive operate in the band 2446.6
MHz to 2483.5 MHz.
There are few possibilities for outdoor use: On private property or on the private
property of public persons, use is subject to a preliminary authorization procedure by
the Ministry of Defense, with maximum authorized power of 100 mW in the 2446.5 -
2483.5 MHz band. Use outdoors on public property is not permitted.
In the departments listed below, for the entire 2.4 GHz band:
• Maximum authorized power indoors is 100 mW
• Maximum authorized power outdoors is 10 mW
Departments in which the use of the 2400 - 2483.5 MHz band is permitted with an
EIRP of less than 100 mW indoors and less than 10 mW outdoors:
This requirement is likely to change over time, allowing you to use your wireless LAN
card in more areas within France.
Please check with ART for the latest information (www.art-telecom.fr).
Note: Your WLAN Card transmits less than 100 mW, but more than 10
mW.
Page 85

64
English
Country
Austria
Belgium
Cyprus
Czech Republic
Denmark
Estonia
Finland
France
Germany
Greece
Hungary
Ireland
Italy
Latvia
Lithuania
Luxembourg
ISO 3166
2 letter code
AT
BE
CY
CZ
DK
EE
FI
FR
DE
GR
HU
IE
IT
LV
LT
LU
Country
Malta
Netherlands
Poland
Portugal
Slovakia
Slovenia
Spain
Sweden
United Kingdom
Iceland
Liechtenstein
Norway
Switzerland
Bulgaria
Romania
Turkey
ISO 3166
2 letter code
MT
NT
PL
PT
SK
SL
ES
SE
GB
IS
LI
NO
CH
BG
RO
TR
List of National Codes
This equipment may be operated in the following countries:
The FCC RF safety requirement
The radiated output power of the wireless LAN Mini PCI Card and Bluetooth card is
far below the FCC radio frequency exposure limits. Nevertheless, the notebook PC
series shall be used in such a manner that the potential for human contact during
normal operation is minimized as follows:
1 Users are requested to follow the RF safety instructions on wireless option
devices that are included in the user's manual of each RF option device.
Caution: To comply with FCC RF exposure compliance requirements,
a separation distance of at least 20 cm (8 inches) must be maintained
Page 86

65
English
20cm
20cm
Main
Auxiliary
between the antenna for the integrated wireless LAN Mini PCI Card
built in to the screen section and all persons.
Note: The wireless Mini PCI adapter implements a transmission
diversity function. The function does not emit radio frequencies
simultaneously from both antennas. One of the antennas is selected
automatically or manually (by users) to ensure good quality
radiocommunication.
2 This device is restricted to indoor use due to its operation in the 5.15 to 5.25
GHz frequency range. FCC requires this product to be used indoors for the
frequency range 5.15 to 5.25 GHz to reduce the potential for harmful
interference to co-channel Mobile Satellite systems.
3 High power radar is allocated as the primary user of the 5.25 to 5.35 GHz and
5.65 to 5.85 GHz bands. These radar stations can cause interference with and/
or damage this device.
4 An improper installation or unauthorized use may cause harmful interference to
radio communications. Also any tampering of the internal antenna will void the
FCC certification and your warranty.
Canada — Low-power license-exempt radio communication devices (RSS-210)
Exposure of humans to RF fields (RSS-102)
The notebook PC series employs low gain integral antennas that do not emit RF field
in excess of Health Canada limits for the general population; consult Safety Code 6,
obtainable from Health Canada's website at www.hc-sc.gc.ca/rpb.
This device complies with RSS210 of Industry Canada.
Page 87

66
English
This Class B digital apparatus complies with Canadian ICES-003, Issue 4, and RSS210, No 4 (Dec 2000) and No 5 (Nov 2001).
Cet appareil numérique de la classe B est conforme à la norme NMB-003, No. 4, et
CNR-210, No 4 (Dec 2000) et No 5 (Nov 2001).
"To prevent radio interference to the licensed service, this device is intended to be
operated indoors and away from windows to provide maximum shielding. Equipment
(or its transmit antenna) that is installed outdoors is subject to licensing."
« Pour empêcher que cet appareil cause du brouillage au service faisant l'objet
d'une licence, il doit être utilisé a l'intérieur et devrait être placé loin des fenêtres afin
de fournir un écran de blindage maximal. Si le matériel (ou son antenne d'émission)
est installé à l'extérieur, il doit faire l'objet d'une licence.
Caution: When using IEEE 802.11a wireless LAN, this product is restricted to indoor
use due to its operation in the 5.15- to 5.25-GHz frequency range. Industry Canada
requires this product to be used indoors for the frequency range of 5.15 GHz to 5.25
GHz to reduce the potential for harmful interference to co-channel mobile satellite
systems. High power radar is allocated as the primary user of the 5.25- to 5.35-GHz
and 5.65 to 5.85-GHz bands. These radar stations can cause interference with and/
or damage to this device.
The maximum allowed antenna gain for use with this device is 6dBi in order to
comply with the E.I.R.P limit for the 5.25- to 5.35 and 5.725 to 5.85 GHz frequency
range in point-to-point operation.
Page 88

67
LCD panel ergonomic specifications
English
Design viewing distance 500 mm
Design inclination angle 0.0°
Design azimuth angle 90.0°
Viewing direction range class Class IV
Screen tilt angle 85.0°
Design screen illuminance
• Illuminance level:
[250 + (250cos
• Color: Source D65
Reflection class of LCD panel
(positive and negative polarity)
Image polarity Both
Reference white:
Pre-setting of luminance and
color temperature @ 6500K
(tested under BM7)
Pixel fault class Class II
• Ordinary LCD: Class I
• Protective LCD: Class III
• Yn
• u'n
• v'n
α)] lx where α = 85°
Part no.:
Ver.: 01.01.06
Page 89

Notebook Aspire
Manuel d’utilisation
Page 90

© 2012 Tous droits réservés.
Manuel d’utilisation du notebook Aspire
Cette révision : 01/2013
Des modifications peuvent être apportées de temps à autre aux informations contenues dans cette
publication sans obligation d’en notifier qui que ce soit. Ces modifications seront ajoutées aux
nouvelles éditions de ce manuel ou dans des documents et publications complémentaires.
Cette société ne fournit aucune espèce de garantie expresse ou implicite, relative à aucune des
informations contenues dans ce manuel et n’offre notamment aucune garantie d’aucune sorte
quant à la valeur marchande de ce produit ou son adéquation à une application particulière.
Enregistrez le numéro de série, la date d’achat, et le numéro du modèle dans l’espace prévu
ci-dessous. Le numéro de série et le numéro de modèle sont imprimés sur l’étiquette collée sur le
châssis. Toutes les correspondances concernant cette unité doivent inclure ces informations.
Toute reproduction, mise en mémoire de ce manuel sur un support quelconque, ainsi que toute
transmission, par quelque procédé que ce soit, de manière électronique ou mécanique, par
photocopie ou enregitrement et autres sont interdites sans l’autorisation écrite préalable d’Acer
Incorporated.
Modèle : ______________________________________
No. de série : __________________________________
Date d’achat : _________________________________
Lieu d’achat : __________________________________
Page 91

iii
Informations pour votre sécurité et votre confort
Consignes de sécurité
Lisez ces instructions avec attention. Conservez ce document pour des références
futures. Conformez-vous aux consignes et avertissements indiqués sur cet appareil.
Mise hors tension de l’appareil avant le nettoyage
Débranchez l’alimentation secteur avant tout nettoyage. N’utilisez pas de liquide ou
d’aérosol de nettoyage. Utilisez un chiffon, légèrement humecté d’eau pour le
nettoyage.
MISE EN GARDE pour la prise comme moyen de déconnexion
Respectez les instructions suivantes lors de la connexion et la déconnexion de
l’alimentation de l’unité d’alimentation :
Installez l’unité d’alimentation avant de connecter le cordon d’alimentation à la prise
secteur.
Débranchez le cordon d’alimentation avant de retirer l’unité d’alimentation de
l’ordinateur.
Si le système a plusieurs sources d’alimentation, déconnectez l’alimentation du
système en débranchant tous les cordons d’alimentation des unités d’alimentation.
Français
MISE EN GARDE pour l’accessibilité
Assurez-vous que la prise secteur à laquelle vous branchez le cordon d’alimentation
est facilement accessible et située aussi proche que possible de l’utilisateur de
l’équipement. Lorsque vous devez déconnecter l’alimentation de l’équipement,
assurez-vous de toujours débrancher le cordon d’alimentation de la prise secteur.
MISE EN GARDE pour carte(s) factice(s) fournie(s) (seulement
pour certains modèles)
Votre ordinateur est livré avec des cartes factices en plastique installées dans les
connecteurs de carte. Celles-ci protègent les connecteurs non utilisés de la
poussière, des objets métalliques et d’autres particules. Conservez les cartes
factices pour utilisation les connecteurs ne contiennent pas de carte.
Page 92

iv
Avertissements
• N’utilisez pas cet appareil près d’une source d’eau.
Français
• Ne placez pas cet appareil sur un chariot, un support ou une table instables. Si
le produit tombait, il pourrait être sérieusement endommagé.
• Les fentes et ouvertures sont prévues pour la ventilation, pour assurer le bon
fonctionnement de l’appareil et le protéger de la surchauffe. Ces ouvertures ne
doivent jamais être obstruées ou bloquées. L’appareil ne doit jamais être placé
sur un lit, un divan, une couverture ou toute autre surface similaire susceptible
d’obstruer les ouvertures. Il ne doit jamais être placé à proximité ou au contact
d’un radiateur ou d’une source de chaleur. Il ne doit pas être placé dans une
installation encastrée à moins qu’une ventilation suffisante ne soit assurée.
• N’enfoncez jamais d’objets dans les fentes de l’unité centrale car ils pourraient
entrer en contact avec des points de voltage ou court-circuiter des éléments,
d’où un risque d’incendie ou d’électrocution. Ne renversez jamais de liquide,
quel qu’il soit, sur ou dans l’appareil.
• Pour éviter d’endommager les composants internes et prévenir la fuite de la
batterie, ne placez pas l’appareil sur une surface vibrant.
• Ne l’utilisez jamais dans un environnement sportif, d’exercice ou vibrant qui
pourrait probablement causer un court-circuit inopiné ou endommager les
périphériques rotatifs, disque dur, lecteur optique, et même créer un risque
d’exposition pour la batterie au lithium.
• La surface inférieure, les zones autour des ouvertures de ventilation et
l’adaptateur secteur peuvent devenir chauds. Pour éviter des blessures,
assurez-vous qu’ils n’entrent pas en contact avec votre peau ou votre corps.
• Votre appareil et ses améliorations peuvent contenir des petits composants.
Éloignez-les des jeunes enfants.
• La température de surface de la base augmente pendant le fonctionnement
normal, en particulier lorsque branchée à l’alimentation secteur. Le contact
prolongé avec la peau peut causer de l’inconfort ou des brûlures.
Utilisation de l’alimentation électrique
• L’alimentation électrique de l’appareil doit être conforme aux caractéristiques
figurant sur l’étiquette d’identification. En cas de doute, consultez votre
revendeur ou la compagnie d’électricité appropriée.
• Ne placez aucun objet sur le cordon d’alimentation et installez l’appareil en
dehors des zones de passage.
• Lors de l’utilisation éventuelle d’une rallonge, assurez-vous que l’ampérage
total des appareils reliés par la rallonge reste dans les limites admises. De
même, vérifiez que l’ampérage de tous les appareils reliés à une même prise
secteur ne dépasse pas la valeur du fusible.
• Ne surchargez pas une prise électrique ou une barrette multiprise en branchant
trop d’appareils. La charge globale du système ne doit pas dépasser 80% de la
capacité du circuit dérivé. Si des barrettes multiprise sont utilisées, la charge ne
doit pas dépasser 80% de la capacité en entrée de la barrette multiprise.
Page 93

v
• L’adaptateur secteur de cet appareil est équipé d’une prise mise à la terre à
trois fils. La prise ne peut s’insérer que dans une prise secteur mise à la terre.
Assurez-vous que la prise secteur est correctement mise à la terre avant
d’insérer la prise de l’adaptateur secteur. N’insérez pas la prise dans une prise
secteur non mise à la terre. Contactez votre électricien pour des détails.
Avertissement ! La broche de mise à la terre est une
fonctionnalité de sécurité. L’utilisation d’une prise secteur qui
n’est pas correctement mise à la terre présente un risque
d’électrocution ou de blessure.
Remarque : La broche de mise à la terre fournit également une
bonne protection contre les bruits imprévus produits par d’autres
appareils électriques qui peuvent interférer avec les performances de
cet appareil.
• Le système peut être alimenté avec une large plage de tensions : 100 à 120 ou
220 à 240 V CA. Le cordon d’alimentation fourni avec le système répond aux
exigences d’utilisation du pays ou de la région dans lequel le système a été
acheté. Les cordons d’alimentation pour utilisation dans d’autre pays/régions
doivent aux exigences de ces pays/régions. Pour plus d’informations pour les
exigences des cordons d’alimentation, contactez un revendeur agréé ou un
fournisseur de service.
Maintenance de l’appareil
N’essayez jamais de réparer vous-même cet appareil : l’ouverture ou la dépose du
panneau supérieur vous expose à divers risques, électrocution notamment.
L’entretien doit être confié à un spécialiste.
Débranchez l’appareil et adressez-vous au service après-vente dans les cas
suivants :
• Lorsque le cordon d’alimentation est endommagé ou dénudé.
• Un liquide a été renversé dans l’appareil.
• Le produit a été exposé à la pluie ou à de l’eau.
• L’appareil est tombé ou le châssis a été endommagé.
• Les performances de l’appareil deviennent irrégulières, indiquant la nécessité
du recours au S.A.V.
• L’appareil ne fonctionne pas correctement bien que les consignes d’installation
aient été respectées.
Français
Remarque : Effectuez uniquement les réglages indiqués dans les
consignes d’installation ; d’autres réglages incorrects risquent de
provoquer des dommages nécessitant l’intervention prolongée d’un
technicien qualifié.
Page 94

vi
Règles d’utilisation sure de la batterie
Ce notebook utilise une batterie au lithium-ion. N’utilisez pas dans un environnement
humide, mouillé ou corrosif. Ne placez pas, ne stockez pas et ne laissez pas votre
Français
produit dans ou à proximité d’une source de chaleur, dans un lieu à température
élevé, dans la lumière directe du soleil, dans un four micro-ondes ou dans un
conteneur pressurisé, et ne l’exposez pas à des températures supérieures à 60°C
(140°F). Le non-respect de ces règles peut causer une fuite d’acide de la batterie, sa
surchauffe, son explosion ou son inflammation et causer des blessures et/ou des
dommages. Ne percez pas, n’ouvrez pas et démontez pas la batterie. Si la batterie
fuit et si vous êtes en contact avec des liquides de la batterie, rincez abondamment
avec de l’eau et consultez un médecin immédiatement. Pour des raisons de
sécurité, et pour prolonger l’autonomie de la batterie, la charge ne se produira pas à
des températures au-dessous de 0°C (32°F) ou au dessus de 40°C (104°F).
La pleine performance d’une nouvelle batterie est atteinte seulement après deux ou
trois cycles complets de charge et de décharge. La batterie peut être chargée et
déchargée des centaines des fois, mais éventuellement elle s’usera. Lorsque le
temps de fonctionnement deviendra nettement plus court qu’à l’habitude, achetez
une nouvelle batterie. Utilisez uniquement les batteries approuvées, et rechargezles uniquement avec les chargeurs approuvés conçus pour cet appareil.
N’utilisez cette batterie que pour le but à laquelle elle est destinée. N’utilisez jamais
de chargeur ou de batterie qui serait endommagé. Ne court-circuitez pas la batterie.
Un court-circuit accidentel peut se produire lorsqu’un objet métallique, tel qu’une
pièce de monnaie, un trombone ou un stylo cause une connexion directe des bornes
positive (+) et négative (-) de la batterie. (Ce sont des bandes de métal sur la
batterie.) Ceci peut se produire, par exemple, lorsque vous avez une batterie de
rechange dans votre poche ou votre sac. Le court-circuit des bornes peut
endommager la batterie ou l’objet connectant.
La capacité et l’autonomie de la batterie sera réduite si la batterie est laissée dans
un endroit chaud ou froid, tel qu’une voiture fermée en été ou en hiver. Essayez de
toujours conserver la batterie entre 15°C et 25°C (59°F et 77°F). Un appareil avec
une batterie chaude ou froide peut ne pas fonctionner temporairement, même si la
batterie est pleinement chargée. La performance de la batterie est particulièrement
limitée dans des températures inférieures à 0°C.
Ne jetez pas les batteries dans un feu, car elles peuvent exploser. Les batteries
peuvent également exploser si elles sont endommagées. Mettez les batteries au
rebut en respect avec la réglementation locale. Si possible, veuillez les recycler. Ne
les jetez pas avec les déchets domestiques.
Les appareils sans fil peuvent être susceptibles aux interférences de la batterie, ce
qui peut affecter leurs performances.
Page 95

vii
Remplacement de la batterie
L’ordinateur notebook utilise des batteries au lithium. Remplacez la batterie avec le
même type que celle qui a été fournie avec votre appareil. L’utilisation d’une autre
batterie peut présenter un risque d’incendie ou d’explosion.
Avertissement ! Une batterie incorrectement manipulée risque
d’exploser. Vous ne devez jamais la démonter, ni l’exposer au
feu. Placez-la hors de portée des enfants. Respectez la
réglementation locale pour mettre au rebut les batteries usagées.
Avertissement pour le lecteur optique (seulement pour certains modèles)
Attention : Cet appareil contient un système à laser et est classé comme
« APPAREIL À LASER DE CLASSE 1 ». En cas de problème avec cet appareil,
veuillez contacter le centre de service AGRÉÉ la plus proche. Pour éviter une
exposition directe au rayon laser, n’essayez pas d’ouvrir le boîtier.
APPAREIL À LASER DE CLASSE 1
ATTENTION : RADIATION LASER VISIBLE ET INVISIBLE EN CAS
D’OUVERTURE. ÉVITER TOUTE EXPOSITION AUX RAYONS.
APPAREIL A LASER DE CLASSE 1 PRODUIT
LASERATTENTION: RADIATION DU FAISCEAU LASER INVISIBLE EN CAS
D’OUVERTURE. EVITTER TOUTE EXPOSITION AUX RAYONS.
LUOKAN 1 LASERLAITE LASER KLASSE 1
VORSICHT: UNSICHTBARE LASERSTRAHLUNG, WENN ABDECKUNG
GEÖFFNET NICHT DEM STRAHLL AUSSETZEN
PRODUCTO LÁSER DE LA CLASE I
ADVERTENCIA: RADIACIÓN LÁSER INVISIBLE AL SER ABIERTO. EVITE
EXPONERSE A LOS RAYOS.
ADVARSEL: LASERSTRÅLING VEDÅBNING SE IKKE IND I STRÅLEN.
VAR O ! LAVATTAESSA OLET ALTTINA LASERSÅTEILYLLE.
VARNING: LASERSTRÅLNING NÅR DENNA DEL ÅR ÖPPNAD ÅLÅ TUIJOTA
SÅTEESEENSTIRRA EJ IN I STRÅLEN
VARNING: LASERSTRÅLNING NAR DENNA DEL ÅR ÖPPNADSTIRRA EJ IN I
STRÅLEN
ADVARSEL: LASERSTRÅLING NAR DEKSEL ÅPNESSTIRR IKKE INN I
STRÅLEN
Français
Page 96

viii
Sécurité de la ligne téléphonique
• Déconnectez toujours toutes les lignes téléphoniques de leurs prises murales
Français
avant de maintenir ou de démonter cet appareil.
• Évitez d’utiliser une ligne téléphonique (autre qu’un téléphone sans fil) pendant
un orage. Il peut y avoir un risque minime d’électrocution due à la foudre.
Avertissement ! Pour des raisons de sécurité, n’utilisez pas des
pièces non conformes lors de l’ajout ou du changement de
composants. Consultez votre revendeur pour des options
d’achat.
Environnement d’utilisation
Avertissement ! Pour des raisons de sécurité, éteignez tous les
périphériques de transmission sans fil ou radio lorsque vous
utilisez votre ordinateur portable dans les conditions suivantes.
Ces appareils peuvent inclure, mais sans limitation : réseau sans
fil, Bluetooth et/ou 3G.
Suivez bien toutes les règles spéciales en place dans les différents lieux et éteignez
toujours votre appareil lorsque son utilisation est interdite ou lorsqu’il peut causer
des interférence ou un danger. Utilisez l’appareil uniquement dans ses positions
d’utilisation normales. Cet appareil est conforme aux directives concernant
l’exposition de fréquence radioélectrique lorsqu’il est utilisé normalement. Pour
transmettre des fichiers de données ou des messages, cet appareil nécessite une
connexion de bonne qualité au réseau. Dans certains cas, la transmission des
fichiers de données ou des messages peut être retardée jusqu’à ce qu’une telle
connexion soit disponible. Assurez-vous que les instructions de distance de
séparation ci-dessus sont respectées jusqu’à la fin de la transmission. Des
composants de l’appareil sont magnétiques. Des matériaux métalliques peut être
attirés par l’appareil et des personnes avec une aide auditive ne doivent pas tenir
l’appareil contre l’oreille équipée de l’aide auditive. Ne placez pas les cartes crédits
ou autres médias de stockage magnétique à côté de l’appareil, parce que les
informations contenues pourraient être effacées.
Page 97

ix
Appareils médicaux
L’utilisation de tout équipement de transmission radio, y compris les téléphones
sans fil, peut interférer avec la fonctionnalité d’appareils médicaux incorrectement
protégés. Consultez un médecin ou le fabricant de l’appareil médical pour
déterminer s’il est protégé correctement contre l’énergie RF externe ou si vous avez
des questions. Éteignez votre appareil dans les bâtiments de la santé lorsque des
règlements postés dans ces lieux vous indiquent de le faire. Les hôpitaux et les
bâtiments de la santé peuvent utiliser des équipements sensibles aux transmissions
RF externes.
Stimulateurs cardiaques. Les fabricants de stimulateurs cardiaques
recommandent une distance minimale de 15,3 centimètres (6 pouces) entre cet
appareil sans fil et un stimulateur cardiaque pour éviter des interférences possibles
avec le stimulateur cardiaque. Ces recommandations sont conformes à la recherche
indépendante et les recommandations de la recherche technologique sans fil. Les
personnes avec un stimulateur cardiaque doivent faire ce qui suit :
• Maintenez toujours l’appareil à plus de 15,3 centimètres (6 pouces) du
stimulateur cardiaque
• Ne portez pas l’appareil à proximité du stimulateur cardiaque lorsque l’appareil
est allumé. Si vous soupçonnez une interférence, éteignez votre appareil et
éloignez l’appareil.
Aides auditives. Certains appareils sans fils numériques peuvent interférer avec
certaines aides auditives. En cas d’interférences, consultez votre fournisseur de
service.
Véhicules
Les signaux RF peuvent affecter les systèmes électroniquement inconvenablement
installés ou incorrectement protégés dans les véhicules à moteur, tels que les
systèmes d’injection électroniques, les systèmes de freinage antiblocage
électroniques, les régulateurs de vitesse électroniques et les systèmes d’airbag.
Pour plus d’informations, consultez le fabricant, ou son représentant, de votre
véhicule ou de tout équipement qui a été ajouté. Seul un technicien qualifié doit
réparer l’appareil ou installer l’appareil dans un véhicule. Une mauvaise installation
ou réparation pourrait être dangereuse et pourrait annuler la garantie pouvant
s’appliquer à l’appareil. Vérifiez régulièrement que tout appareil sans fil dans votre
véhicule est installé et utilisé correctement. Ne stockez pas et ne portez pas de
liquides inflammables, de gaz ou de matériaux explosifs dans le même
compartiment que l’appareil, ses composants ou améliorations. Pour les véhicules
équipés d’airbags, rappelez-vous que les airbags se déploient avec une grande
force. Ne placez pas d’objets, y compris un équipement sans fil portable ou installé
dans la zone au-dessus de l’airbag ou dans la zone de déploiement de l’airbag. Si
l’équipement sans fil est incorrectement installé à l’intérieur du véhicule et l’airbag se
déploie, il y a un risque de blessures sérieuses. L’utilisation de votre appareil en vol
dans un avion est interdite. Éteignez votre appareil avant d’embarquer dans un
appareil. L’utilisation d’appareils sans fil dans un avion peut être dangereuse pour le
fonctionnement de l’avion, peut perturber le réseau téléphonique sans fil et peut être
illégale.
Français
Page 98

x
Environnement avec des risques d’explosion
Éteignez votre appareil dans un environnement avec des risques d’explosion et
Français
respectez toutes les instructions ou signalements du site. Des environnements avec
des risques d’explosion comprennent les zones où il serait normalement
recommandé d’arrêter le moteur de votre véhicule. Des étincelles dans de telles
zones pourraient causer une explosion ou un incendie et entraîner des dommages
corporels ou un décès. Éteignez le notebook à proximité des pompes à essence
dans les stations service. Respectez les restrictions sur l’utilisation des équipements
radio dans les zones de dépôt, de stockage ou de distribution d’essence, les usines
chimiques, ou dans les endroits ou des explosions sont en cours. Les zones
possédant des risques d’explosion sont généralement, mais pas toujours indiquées.
Ces zones comprennent les zones sous le pont des bateaux, les centres de
stockage ou de transfert des produits chimiques, les véhicules qui utilisent du gaz de
pétrole liquéfié (comme le propane ou le butane) et les zones où l’air peut contenir
des particules ou des produits chimiques, comme de la poussière, des grains ou de
la poudre métallique. N’allumez pas le notebook, lorsque l’utilisation des téléphones
sans fil est interdite ou lorsqu’il peut causer des interférences ou un danger.
Appels d’urgence
Avertissement : Vous ne pouvez pas effectuer d’appels d’urgence via cet appareil.
Pour effectuer un appel d’urgence, vous devez appeler via votre téléphone mobile
ou autre système d’appel téléphonique.
Instructions de mise au rebut
Ne jetez pas cet appareil électronique à la poubelle lors de sa mise au
rebut. Pour minimiser la pollution et assurer une protection maximale de
l’environnement global, veuillez la recycler. Pour plus d’information sur
les réglementations sur les déchets d’équipements électriques et
électroniques (DEEE), visitez
www.acer-group.com/public/Sustainability
ENERGY STAR
Les produits qualifiés ENERGY STAR d'Acer vous font économiser
de l'argent en réduisant les coûts énergétiques et en protégeant
l'environnement, sans compromettre les fonctionnalités ou les
performances. Acer est fier d'offrir à ses clients des produits
pourvus du label ENERGY STAR.
Qu'est que ENERGY STAR ?
Les produits qualifiés ENERGY STAR utilisent moins d'énergie et empêchent les
émissions de gaz à effet de serre en respectant des directives strictes sur l’efficacité
énergétique définies par l’agence américaine de protection de l’environnement. Acer
s’engage à proposer dans le monde entier des produits et services qui aident les
consommateurs à faire des économies, économiser l’énergie et améliorer la qualité
de l'environnement. Plus nous pouvons économiser d'énergie en étant plus
efficaces, plus nous pourrons réduire les gaz à effet de serre et les risques de
changement climatique. Vous trouverez plus de renseignements sur le site
www.energystar.gov
ou www.energystar.gov/powermanagement.
Page 99

xi
Les produits qualifiés ENERGY STAR Acer : (seulement pour certains modèles)
• Produisent moins de chaleur et réduisent les charges de refroidissement,
ainsi que les ambiances surchauffées.
• Passent automatiquement en mode de « veille écran » et « veille
ordinateur » respectivement après 10 et 30 minutes d'inactivité.
• Sortez l'ordinateur du mode veille en pressant une touche du clavier ou en
déplaçant la souris.
• En mode « veille », les ordinateurs économisent plus de 80 % d'énergie.
ENERGY STAR et le label ENERGY STAR sont des marques déposées aux
États-Unis.
Conseils et informations pour une utilisation confortable
Les utilisateurs d’informatique peuvent se plaindre de fatigue visuelle et de mots de
tête après une utilisation prolongée. Les utilisateurs ont également un risque de
blessure physique après de longues heures de travail devant un ordinateur. De
longues périodes de travail, une mauvaise position, de mauvaises habitudes de
travail, des conditions de travail inadaptées, la santé personnelle et d’autres facteurs
augmentent fortement le risque de blessure physique.
Une utilisation incorrecte de l’ordinateur peut causer un syndrome du canal carpien,
une tendinite, une ténosynovite ou d’autres problèmes musculaires et osseux. Les
symptômes suivants peuvent apparaître dans les mains, les poignets, les bras, les
épaules, le cou ou le dos :
• Une sensation d’engourdissement, de brûlure ou de fourmillement.
• Un endolorissement, une algie ou une sensibilité.
• Une douleur, une tuméfaction ou une inflammation.
• Une raideur ou une crampe.
• Un froid ou une faiblesse.
Si vous avez ces symptômes ou tout autre gêne et/ou douleur récurrentes ou
persistantes en rapport avec l’utilisation de l’ordinateur, consultez un docteur
immédiatement et informez le service de santé et de sécurité de votre entreprise.
La section suivante donne des conseils pour une utilisation plus confortable de
l’ordinateur.
Français
Trouver votre zone de confort
Trouvez votre zone de confort en ajustant l’angle de vue du moniteur, en utilisant un
repose-pied ou en élevant votre position assise pour obtenir un confort maximal.
Respectez les conseils suivants:
• Ne restez pas trop longtemps dans une position fixe.
• Évitez d’être avachi vers l’avant et/ou penché en arrière.
Page 100

xii
• Levez-vous et marchez un peu régulièrement pour réduire la fatigue
musculaire de vos jambes.
• Faites des petites pauses pour reposer votre cou et vos épaules.
Français
• Évitez de raidir vos muscles ou de hausser vos épaules.
• Installez l’affichage externe, le clavier et la souris correctement et à distance
confortable.
• Si vous regardez votre moniteur plus que vos documents, placez l’affichage au
centre du bureau pour minimiser les douleurs au cou.
Soin à apporter à votre vue
De longues heures de vision, en portant des lunettes ou lentilles incorrectes, avec
du reflet, une lumière excessive, des écrans mal réglés, des polices très petites et
des affichages avec faible contraste pourraient fatiguer vos yeux. Les sections
suivantes fournissent des suggestions pour réduire la fatigue visuelle.
Ye ux
• Reposez vos yeux fréquemment.
• Faites faire des coupures à vos yeux régulièrement en regardant à côté du
moniteur et en faisant le point sur un point distant.
• Clignez fréquemment les yeux pour leur éviter de sécher.
Affichage
• Maintenez votre affichage propre.
• Gardez votre tête à un niveau plus haut que le bord supérieur de l’affichage
pour que vos yeux regardent vers le bas lorsque vous regardez au milieu de
l’affichage.
• Ajustez la luminosité et/ou le contraste à un niveau confortable pour améliorer
la lisibilité du texte et la clarté des graphiques.
• Éliminez l’éclat et les réflexions en :
• Plaçant votre affichage de manière à ce que le côté soit face à la fenêtre
ou toute autre source de lumière,
• Réduisant la lumière de la pièces en utilisant des rideaux, des stores ou
des volets,
• Utilisant une lampe articulée,
• Changeant l’angle de vue de l’affichage,
• Utilisant un filtre pour réduire le reflet,
• Utilisant un viseur d’affichage, comme un morceau de carton débordant
du bord supérieur de l’affichage.
• Évitant d’ajuster votre affichage à un angle de vue anormal.
• Évitez de regarder des sources de lumière brillante pendant de longues
périodes de temps.
 Loading...