

Page 1

English
Français
Deutsch
Italiano
Español
Português
Nederlands
Norsk
Dansk
Svenska
Suomi
Русский
Polski
Magyar
Čeština
Slovenčina
Slovenski
Hrvatski
Română
Български
Eesti
Latviski
Lietuviškai
Ελληνικά
Türkçe
한국어
繁體中文
简体中文
Bahasa Indonesia
ä·Â
Contents
Ver.01.01.03
Page 2

Page 3

Acer Aspire S7-191
Quick Guide
Product registration
When using your product for the first time, it is recommended that you immediately
register it. This will give you access to some useful benefits, such as:
• Faster service from our trained representatives.
• Membership in the Acer community: receive promotions and participate in customer
surveys.
• The latest news from Acer.
Hurry and register, as other advantages await you!
How to register
To register your Acer product, please visit www.acer.com. Select your country, click
PRODUCT REGISTRATION and follow the simple instructions.
You will also be asked to register your product during the setup process, or you can
double-click the Registration icon on the desktop.
After we receive your product registration, you will be sent a confirmation email with
important data that you should keep in a safe place.
Obtaining Acer accessories
We are happy to inform you that Acer's warranty extension program and Notebook
accessories are available online. Come and visit our online shop and find what you need
at store.acer.com.
The Acer store is being progressively rolled out, and, unfortunately may not be available
in some regions. Please check back regularly to see when it will be available in your
country.
Page 4

© 2012. All Rights Reserved.
Acer Aspire S7-191 Quick Guide
This revision: 4 January 2013
Model number:
Serial number:
Date of purchase:
Place of purchase:
Page 5

3
English
First things first
We would like to thank you for making an Acer notebook your choice for
meeting your mobile computing needs.
Your guides
To help you use your Acer notebook, we have designed a set of guides:
First off, the Setup Poster helps you get started with setting up your
computer.
The Quick Guide introduces you to the basic features and functions of your
new computer.
For more on how your computer can help you to be more productive, please
refer to the Aspire S7-191 User’s Manual. The Aspire S7-191 User’s
Manual contains useful information applying to your new computer. It covers
basic topics such as using the keyboard and audio, etc.
This guide contains detailed information on such subjects as system utilities,
data recovery, expansion options and troubleshooting. In addition it contains
warranty information and the general regulations and safety notices for your
notebook.
Follow these steps to access it:
1. Type ‘User’ from Start.
2. Click on Acer User’s Manual.
Environment
• Temperature:
• Operating: 5 °C to 35 °C
• Non-operating: -20 °C to 65 °C
• Humidity (non-condensing):
• Operating: 20% to 80%
• Non-operating: 20% to 80%
Page 6

4
English
Your Acer notebook tour
Your Acer notebook tour
After setting up your computer as illustrated in the setup poster, let us show
you around your new Acer notebook.
Screen view
1
5
2
4
3
# Icon Item Description
Web camera for video communication.
1 Webcam
2 Touchscreen
3 Microphone Internal microphone for sound recording.
Power indicator
4
Battery indicator
5 Ambient light sensor Controls the keyboard and monitor backlights.
A light next to the webcam indicates that the
webcam is active.
Displays computer output, supports multitouch inp
Indicates the computer’s power status.
Blue: The
Amber, slow flash: T
Standby.
Amber, fast flash: Th
Hibernate / Deep Sleep.
Indicates battery status.
Amber: The battery is charging.
Blue: The
ut.
computer is turned on.
he computer is in
e computer is entering
battery is fully charged.
Page 7

English
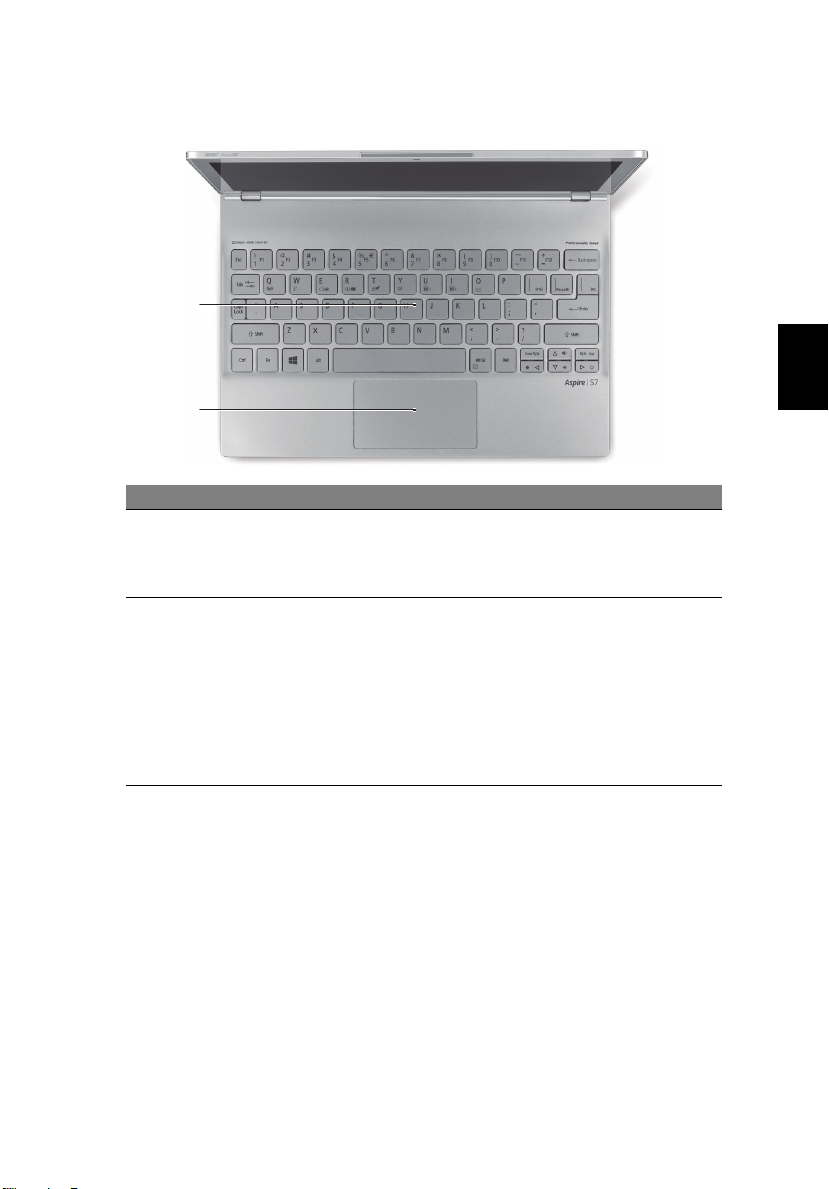
Keyboard view
1
2
# Icon Item Description
For entering data into your computer.
1 Keyboard
2 Touchpad
Caution: Do
or similar cover as the keyboard includes
ventilation intakes for cooling.
Touch-sensitive pointing device.
The touchpad and selection buttons form a
single surface.
Press down firmly on the touchpad surface
to perform a left click.
Press down firmly on the lower right corner
to perform a right click.
Swipe the right-hand edge of the touchpad
inward to access the charms.
5
not use a keyboard protector
Page 8

6
English
1
3 421
Rear view
# Icon Item Description
1
HDMI Micro port
Supports high-definition digital video
connections.
Left view
# Icon Item Description
1
Extended battery
securing location
Secures the optional extended battery in
place.
Your Acer notebook tour
2
3
4
DC-in jack Connects to an AC adapter.
Connects to USB devices.
USB port
Power button
If a port is black it is USB 2.0 compatible, if it
is also USB 3.0 compatible (see
is blue it
below).
Turns the computer on and off.
Note: Opening the lid will also turn the
computer on.
Information on USB 3.0
• Compatible with USB 3.0 and earlier devices.
• For optimal performance, use USB 3.0-certified devices.
• Defined by the USB 3.0 specification (SuperSpeed USB).
Page 9

English
Right view
1 23 4
# Icon Item Description
Accepts one microSD Card.
1 microSD card reader
2
3
4
Headset/speaker jack
USB port with poweroff chargin
Extended battery
curing location
se
Note: Push
Only one card can operate at any given
time.
Connects to audio devices (e.g.,
speaker
s, headphones) or a headset with
microphone.
Connects to USB devices.
If a port is black it is USB 2.0 compatible,
if it is blue it is also U
(see below).
Secures the optional extended battery in
place.
to remove/install the card.
SB 3.0 compatible
7
Page 10

8
English
1
4
3
2
Using the keyboard
Base view
# Icon Item Description
Simulates removing and reinstalling the
ba
1
2 Screw holes
3 Microphone Internal microphone for sound recording.
4 Speakers Deliver stereo audio output.
Battery reset pinhole
ttery
Insert a paperclip into the hole and press for
r seconds to reset the computer.
fou
Screw holes for the optional extended
ttery.
ba
Using the keyboard
The keyboard has full-sized keys, separate cursor, and Windows keys.
Hotkeys
The computer employs hotkeys or key combinations to access most of the
computer's controls like screen brightness and volume output.
To activate hotkeys, press and hold the <Fn> key before pressing the other
key in the hotkey combination.
Hotkey Icon Function Description
<Fn> +
<Q>
Airplane mode
Enables/disables the computer’s
communication devices.
Page 11

English
Hotkey Icon Function Description
9
<Fn> +
<W>
<Fn> +
<E>
<Fn> +
<R>
<Fn> +
<T>
<Fn> +
<Y>
<Fn> +
<U>
<Fn> +
<I>
<Fn> +
<U> + <I>
<Fn> +
<O>
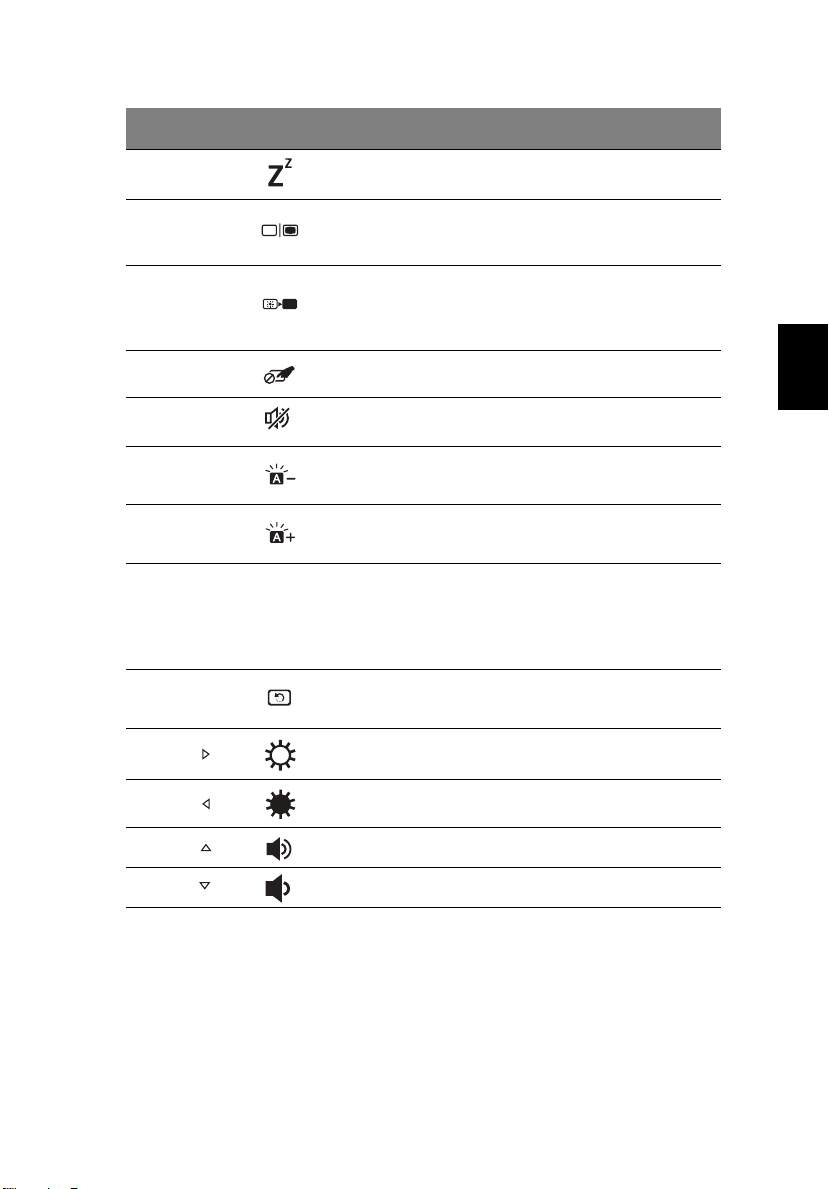
Sleep Puts the computer in Sleep mode.
Switches display output between the
Display toggle
Screen blank
Touchpad toggle Turns the internal touchpad on and off.
Speaker toggle Turns the speakers on and off.
Decrease backlight
brightness
Increase backlight
brightness
Backlight toggle
Rotate screen
display screen, external monitor (if
connected) and both.
Turns the display screen backlight off to
save power. Press any key to return.
Decreases the brightness of the
keyboard backlight.
Increases the brightness of the
keyboard backlight.
Turns the keyboard backlight on and
off.
Note: This function is disabled if the
light sensor detects a bright
environment.
Rotates the image displayed on the
screen.
<Fn> +
<>
<Fn> +
<>
<Fn> +
<>
<Fn> +
<>
Brightness up Increases the screen brightness.
Brightness down Decreases the screen brightness.
Volume up Increases the sound volume.
Volume down Decreases the sound volume.
Note: To use Function keys (such as F1, F2 ...) press <Fn> and the
corresponding number key. Thus, <Fn> + <1> for <F1> etc.
During boot up, press <Fn> + <2> to access BIOS.
Page 12

English
10
Connecting to the Internet
Your computer's wireless connection is turned on by default. Windows will
detect and display a list of available networks during setup. Select your
network and enter the password if required.
Otherwise, open Internet Explorer and follow the instructions. Please also refer
to your ISP or router documentation.
Acer Instant Connect
Instant Connect ensures a faster connection to any of the networks that your
computer connects to most frequently.
Power management
This computer has a built-in power management unit that monitors system
activity, such as activity involving one or more of the following devices:
keyboard, mouse, hard disk, peripherals connected to the computer, and video
memory. If no activity is detected for a period of time, the computer stops
some or all of these devices in order to conserve energy.
Acer Green Instant On
The Acer Green Instant On feature allows your computer to wake up from
Sleep mode in less than the time it takes to open the lid. When you close the
lid, or leave your computer for a while, your computer enters Sleep mode.
While the computer is in Sleep mode, the power indicator LED will flash
orange.
Open the lid or press any key to wake the computer from Sleep mode.
After a certain amount of time in Sleep mode, the computer will automatically
enter Deep Sleep to preserve battery life. When the computer is in Deep Sleep,
the power indicator LED will be turned off. In this state, battery remains ready to
use for many weeks.
Your computer should wake from Deep Sleep when you open the lid.
Otherwise, press the power button.
Note: Once in Deep Sleep, your PC will consume significantly less power
compared with Sleep mode, but it will take a little longer to wake up from
Deep Sleep.
Deep Sleep and Sleep mode work together to ensure that your computer
saves as much power as possible while still enabling quick, instant on access.
To save more power, your computer will typically enter and stay in Deep Sleep
during times when it will not be frequently accessed, for example, during the
middle of the night. To provide quicker access, your computer will enter and
stay in Sleep mode during times when it will be frequently accessed, for
example, during working hours.
Part no.: NC.M4211.001
Ver.: 01.01.03
Page 13

Acer Aspire S7-191
Guide rapide
Enregistrer votre produit
Lors de la première utilisation de votre produit, il est recommandé de l’enregistrer
immédiatement. Cela vous donne accès à des avantages utiles, comme :
• Service plus rapide de nos représentants entraînés.
• Une adhésion à la communauté Acer : recevez des promotions et participez à nos
enquêtes clients.
• Les dernières nouvelles d’Acer.
Dépêchez-vous et inscrivez-vous, car d’autres avantages vous attendent !
Comment s’enregistrer
Pour enregistrer votre produit Acer, veuillez visiter www.acer.com. Sélectionnez votre
pays, cliquez sur ENREGISTRER VOTRE PRODUIT et suivez simplement les
instructions.
Il vous sera également demandé d’enregistrer votre produit pendant le processus
d’installation, ou vous pouvez double-cliquer sur l’icône Enregistrement sur le bureau.
Une fois votre demande d’inscription reçue, nous vous enverrons un email de
confirmation avec les données importantes que vous devrez conserver précieusement.
Obtenir des accessoires Acer
Nous sommes heureux de vous informer que le programme d’extension de garantie Acer
et les accessoires pour notebook sont disponibles en ligne. Venez et visitez notre
boutique en ligne et trouvez ce dont vous avez besoin sur store.acer.com.
La boutique Acer est progressivement mise en œuvre, et, malheureusement, peut ne pas
être disponible dans certaines régions. Veuillez consulter le site régulièrement pour voir
quand il sera disponible dans votre pays.
Page 14

© 2012 Tous droits réservés.
Guide rapide de la Acer Aspire S7-191
Cette révision : 01/2013
Modèle : ______________________________________
No. de série : __________________________________
Date d’achat : _________________________________
Lieu d’achat : __________________________________
Page 15

3
Pour commencer
Nous désirons vous remercier d’avoir fait d’un notebook Acer votre choix
pour répondre à vos besoins informatiques mobiles.
Vos guides
Pour vous aider à utiliser votre notebook Acer, nous avons conçu plusieurs
guides:
Tout d’abord, le Poster de configuration vous aide à configurer votre
ordinateur.
Le Guide rapide présente les fonctionnalités et fonctions de base de votre
ordinateur.
Pour plus d’information sur l’aide que votre ordinateur peut vous apporter
pour être plus productif, veuillez vous reporter au Manuel d’utilisation
Aspire S7-191. Le Manuel d’utilisation Aspire S7-191 contient des
informations utiles qui s’appliquent à votre nouvel ordinateur. Il couvre les
notions de base, telles que l’utilisation du clavier et du son, etc.
Ce guide contient des informations détaillées sur des sujets tels que les
utilitaires systèmes, la récupération des données, les options d’extension
et le dépannage. De plus, il contient des informations de garantie et les
réglementations générales et les avis de sécurité pour votre notebook.
Procédez comme suit pour y accéder :
1. Saisissez « utilisation » depuis Démarrer.
2. Cliquez sur Manuel d’utilisation Acer.
Français
Environnement
• Température :
• En marche : 5°C à 35°C
• À l’arrêt : -20°C à 65°C
• Humidité (sans condensation) :
• En marche : 20% à 80%
• À l’arrêt : 20% à 80%
Page 16

Français
4
Visite guidée de votre notebook Acer
Visite guidée de votre notebook Acer
Après avoir configuré votre ordinateur comme illustré dans le poster de
configuration, nous allons vous faire explorer votre nouveau notebook
Acer.
Vue de l’écran
1
2
# Icône Élément Description
Webcam pour communication vidéo.
1 Webcam
2 Écran tactile
3 Microphone
Indicateur
d’alimentation
4
Indicateur de la
batterie
5
Capteur de
lumière ambiante
Une lumière à côté de la webcam indique que
la webcam est active.
Affiche la sortie de l’ordinateur, prend en
charge la saisie multipoint.
Microphone interne pour l’enregistrement
sonore.
Indique l’état d’alimentation de l’ordinateur.
Bleu : L’ordinateur est allumé.
Orange, clignote lentement : L’ordinateur est
en veille.
Orange, clignote rapidement : L’ordinateur
entre en veille prolongée / sommeil profond.
Indique l’état de la batterie.
Orange : La batterie se recharge.
Bleu : La batterie est pleinement chargée.
Contrôle le rétroéclairage du clavier et du
moniteur.
5
4
3
Page 17

5
Vue du clavier
1
2
# Icône Élément Description
Pour l’entrée des informations dans votre
ordinateur.
1Clavier
2 Touchpad
Attention : N’utilisez pas un protecteur de
clavier ou housse similaire, car le clavier
comprend des entrées de ventilation pour le
refroidissement.
Périphérique de pointage sensible au
toucher.
Le touchpad et les boutons de sélection
forment une surface unique.
Appuyez fermement sur la surface tactile
pour effectuer un clic gauche.
Appuyez fermement sur le coin inférieur droit
pour effectuer un clic droit.
Faites glisser le bord droit de l’écran du
touchpad vers l’intérieur pour accéder aux
charms.
Français
Page 18

Français
6
Visite guidée de votre notebook Acer
Vue arrière
1
# Icône Élément Description
1 Port micro HDMI
Prend en charge les connexions vidéo
numériques à haute définition.
Vue gauche
3 421
# Icône Élément Description
1
Emplacement de
sécurisation de la
batterie étendue
Verrouille la batterie étendue optionnelle en
place.
2 Prise d’alimentation Se connecte à un adaptateur secteur.
Se connecte à des périphériques USB.
Si un port est noir, il est compatible
3Port USB
4
Bouton
d’alimentation
USB 2.0, si un port est bleu, il est
également compatible USB 3.0
(voir ci-dessous).
Met l’ordinateur sous tension et hors
tension.
Remarque : Ouvrir l’écran allumera
également l’ordinateur.
Informations sur USB 3.0
• Compatible avec les périphériques USB 3.0 et version antérieure.
• Pour des performances optimales, utilisez des périphériques certifiés
USB 3.0.
• Défini par la spécification USB 3.0 (SuperSpeed USB).
Page 19

7
Vue droite
# Icône Élément Description
Accepte une carte microSD.
1
2
3
4
Lecteur de carte
microSD
Prise haut-parleur/
casque
Port USB avec
charge hors tension
Emplacement de
sécurisation de la
batterie étendue
Remarque : Poussez pour retirer/installer
la carte.
Seule une carte peut fonctionner à un
moment donné.
Se connecte à des périphériques audio
(p.ex. haut-parleurs ou un casque stéréo)
ou à un casque avec microphone.
Se connecte à des périphériques USB.
Si un port est noir, il est compatible
USB 2.0, si un port est bleu, il est
également compatible USB 3.0
(voir ci-dessous).
Verrouille la batterie étendue optionnelle en
place.
Français
1 23 4
Page 20

Français
8
Vue de la base
# Icône Élément Description
Simule le retrait et la réinstallation de la
Trou de
1
2 Trous de vis
3 Microphone
4 Haut-parleurs Produit le son stéréo.
réinitialisation
de la batterie
batterie.
Insérez un trombone dans le trou et
appuyez pendant quatre secondes pour
réinitialiser l’ordinateur.
Trous de vis pour la batterie étendue en
option.
Microphone interne pour l’enregistrement
sonore.
Utilisation du clavier
1
2
3
4
Utilisation du clavier
Le clavier a des touches de dimension normale, des touches de direction
séparées et des touches Windows.
Touches spéciales
L’ordinateur emploie des touches spéciales (combinaisons de touches)
pour accéder à la plupart des contrôles de l’ordinateur comme la
luminosité de l’écran et le volume sonore.
Pour activer les touches spéciales, appuyez et maintenez la touche <Fn>
avant d’appuyer sur l'autre touche dans la combinaison de la touche
spéciale.
Page 21

9
Tou che
spéciale
<Fn> + <Q> Mode avion
<Fn> + <W> Sommeil Place l’ordinateur en mode de Sommeil.
<Fn> + <E>
<Fn> + <R> Écran noir
<Fn> + <T> Touchpad Active et désactive le touchpad.
<Fn> + <Y> Haut-parleur Active et désactive les haut-parleurs.
<Fn> + <U>
<Fn> + <I>
<Fn> +
<U> + <I>
Icône Fonction Description
Active/désactive les périphériques de
communication de l’ordinateur.
Choix de
l’affichage
Diminuer la
luminosité du
rétroéclairage
Augmenter la
luminosité du
rétroéclairage
Commutateur du
rétroéclairage
Permet de permuter l’affichage entre
l’écran d’affichage, le moniteur externe
(s’il est connecté) et les deux.
Désactive le rétro éclairage de l’écran
pour économiser l’énergie. Appuyez sur
une touche pour le rallumer.
Diminuez la luminosité du rétroéclairage
du clavier.
Augmentez la luminosité du
rétroéclairage du clavier.
Allume et éteint le rétroéclairage du
clavier.
Remarque : Cette fonction est
désactivée si le capteur lumineux détecte
un environnement lumineux.
Français
<Fn> + <O>
<Fn> + < >
<Fn> + < >
<Fn> + < >
<Fn> + < >
Faire pivoter
l’écran
Luminosité + Augmente la luminosité de l’écran.
Luminosité - Diminue la luminosité de l’écran.
Volume + Augmente le volume sonore.
Volume - Diminue le volume sonore.
Fait pivoter l’image affichée sur l’écran.
Remarque : Pour utiliser les touches de fonction (telles que F1, F2 ...)
appuyez sur <Fn> et la touche numérique correspondante. Donc,
<Fn> + <1> pour <F1> etc. Pendant le démarrage, appuyez sur
<Fn> + <2> pour accéder BIOS.
Page 22

Français
10
Se connecter à Internet
La connexion sans fil de votre ordinateur est activée par défaut.
Windows détectera et affichera une liste des réseaux sans fil disponibles
pendant la configuration. Sélectionnez votre réseau, et entrez le mot de
passe si nécessaire.
Dans le cas contraire, ouvrez Internet Explorer et suivez les instructions.
Veuillez également consulter la documentation de votre routeur ou de votre
FAI.
Acer Instant Connect
Instant Connect assure une connexion plus rapide à un des réseaux
auquel votre ordinateur se connecte le plus souvent.
Gestion de l’alimentation
Cet ordinateur a une unité de gestion de l’alimentation intégrée qui
supervise l’activité du système, comme l’activité qui implique un ou plus
des périphériques suivants : clavier, souris, disque dur, périphériques
connectés à l’ordinateur et mémoire vidéo. Si aucune activité n’est
détectée pendant une période de temps spécifiée, l’ordinateur arrête
certains ou tous ces périphériques pour conserver l’énergie.
Acer Green Instant On
La fonction Acer Green Instant On permet à votre ordinateur de se réveiller
du mode Veille en moins de temps qu’il faut pour ouvrir l’écran. Lorsque
vous fermez le couvercle, ou quittez votre ordinateur pour quelques
instants, votre ordinateur passe en mode Veille. Lorsque l’ordinateur est en
mode Veille, la diode d’alimentation clignote en orange.
Ouvrez l’écran ou appuyez une touche pour réveiller l’ordinateur depuis le
mode Veille.
Après un certain temps en mode Veille, l’ordinateur entrera
automatiquement en sommeil profond pour préserver l’autonomie de la
batterie. Lorsque l’ordinateur est en sommeil profond, la diode
d’alimentation est éteinte. Dans cet état, la batterie reste prête à être
utilisée pendant de nombreuses semaines.
Votre ordinateur devrait se réveiller du sommeil profond lorsque vous
ouvrez l’écran. Dans le cas contraire, appuyez le bouton d’alimentation.
Page 23

11
Remarque : Une fois en sommeil profond, votre PC consommera
beaucoup moins d’énergie qu’en mode veille, mais il faudra un peu
plus de temps pour se réveiller du sommeil profond.
Les modes veille et sommeil profond fonctionnent ensemble pour assurer
que votre ordinateur économise autant d’énergie que possible, tout en
permettant un accès instantané.
Pour économiser plus d’énergie, votre ordinateur accèdera normalement et
restera en sommeil profond pendant les périodes où il ne sera pas
fréquemment accédé, par exemple, au milieu de la nuit. Pour fournir un
accès plus rapide, votre ordinateur accèdera normalement et restera en
mode veille pendant les périodes où il sera accédé plus fréquemment, par
exemple, pendant les heures de travail.
Français
Part no.: NC.M4211.00S
Ver.: 01.01.03
Page 24

Page 25

Acer Aspire S7-191
Kurzanleitung
Produktregistrierung
Wenn Sie das Produkt zum ersten Mal verwenden, sollten Sie es umgehend registrieren.
Sie kommen so in den Genuss einer Reihe von Vorteilen, einschließlich:
• Schnellere Dienstleistungen durch unsere geschulten Vertreter.
• Mitgliedschaft in der Acer-Community: Empfang von Sonderangeboten und
Teilnahme an Kundenumfragen.
• Die aktuellsten Neuigkeiten von Acer.
Registrieren Sie sich auf der Stelle, da noch andere Vorteile auf Sie warten!
Wie Sie Ihr Produkt registrieren können
Un Ihr Acer Produkt zu registrieren, besuchen Sie bitte www.acer.com. Wählen Sie Ihr
Land aus, klicken Sie auf PRODUKTREGISTRIERUNG und folgen Sie den einfachen
Anweisungen.
Sie werden während des Einrichtungsprozesses ebenfalls zur Registrierung Ihres
Produktes aufgefordert. Alternativ können Sie einen Doppelklick auf das Symbol
Registrierung auf dem Desktop ausführen.
Nachdem wir Ihre Produktregistrierung erhalten haben, senden wir Ihnen eine
E-Mail zur Bestätigung, die wichtige Informationen enthält, die Sie an einem sicheren Ort
aufbewahren sollten.
Acer Zubehör
Wir freuen uns Ihnen mitzuteilen, dass das Garantie-Erweiterungsprogramm von Acer
sowie Notebook-Zubehör online erhältlich sind. Besuchen Sie unseren Online Shop unter
store.acer.com.
Der Acer Store befindet sich im Aufbau und könnte möglicherweise in einigen Regionen
nicht verfügbar sein. Bitte schauen Sie regelmäßig vorbei, um zu erfahren, wann er in
Ihrem Land verfügbar ist.
Page 26

© 2012 Alle Rechte vorbehalten.
Kurzanleitung für Acer Aspire S7-191
Diese Überarbeitung: 01/2013
Modellnummer: ________________________________
Seriennummer: ________________________________
Kaufdatum: ___________________________________
Kaufort: ______________________________________
Page 27

Das Wichtigste zuerst
Wir möchten uns bei Ihnen dafür bedanken, dass Sie sich in Bezug auf
mobilen Computerbedarf für ein Acer-Notebook entschieden haben.
3
Hilfen
Als Hilfe für Sie beim Benutzen Ihres Acer-Notebooks haben wir einen Satz
von Richtlinien aufgestellt:
Zuallererst hilft Ihnen das Übersichtsblatt, den Computer das erste Mal in
Betrieb zu nehmen.
Die Kurzanleitung stellt Ihnen die grundlegenden Features und
Funktionen Ihres neuen Computers vor.
Für weitere Informationen dazu, wie Ihnen Ihr Computer helfen kann, noch
produktiver zu arbeiten, lesen Sie bitte die Aspire S7-191
Benutzerhandbuch. Das Aspire S7-191 Benutzerhandbuch enthält
nützliche Informationen über Ihren neuen Computer. Es werden Themen
wie z. B. die Verwendung von Tastatur und Audio usw. behandelt.
Dieses Benutzerhandbuch enthält detaillierte Informationen zu Themen wie
z. B. Systemprogramme, Datenwiederherstellung, Erweiterungsoptionen
und Problembehebung. Darüber hinaus enthält es Informationen zur
Garantie und allgemeine Bestimmungen und Sicherheitshinweise zu Ihrem
Notebook.
Gehen Sie folgendermaßen vor, um auf die Bedienungsanleitung
zuzugreifen:
1. Geben Sie unter Start „Benutzer“ ein.
2. Klicken Sie auf Acer Benutzerhandbuch.
Umgebung
• Temperatur:
• Betrieb: 5°C bis 35°C
• Nichtbetrieb: -20°C bis 65°C
• Luftfeuchtigkeit (nicht kondensierend):
• Betrieb: 20% bis 80%
• Nichtbetrieb: 20% bis 80%
Deutsch
Page 28

Deutsch
4
Ihre Acer-Notebook-Tour
Ihre Acer-Notebook-Tour
Nachdem Sie den Computer wie im Übersichtsblatt gezeigt aufgestellt
haben, finden Sie im Folgenden eine Übersicht über Ihr neues AcerNotebook.
Display Übersicht
1
2
5
4
3
# Symbol Element Beschreibung
Web-Kamera für Videokommunikation.
1Webcam
2 Touchscreen
3 Mikrofon Internes Mikrofon für die Tonaufnahme.
Ein/Aus-Anzeige
4
Akkuanzeige
5
Umgebungslichtsensor
Ein Licht neben der Webcam bedeutet, dass
die Webcam aktiv ist.
Zeigt die Ausgabe des Computers an und
unterstützt Mehrfach-Fingereingabe.
Zeigt den Ein/Aus-Status des Computers an.
Blau: Der Computer ist eingeschaltet.
Gelb, langsam blinkend: Der Computer
befindet sich im Standby-Modus.
Gelb, schnell blinkend: Der Computer
aktiviert den Ruhezustand / Tiefschlaf.
Zeigt die Ladung des Akkus an.
Gelb: Der Akku wird geladen.
Blau: Der Akku ist voll geladen.
Hiermit wird die Beleuchtung von Tastatur und
Bildschirm gesteuert.
Page 29

Tastatur Übersicht
1
2
# Symbol Element Beschreibung
Dient der Eingabe von Daten in den Computer.
1 Tastatur
2 Touchpad
Achtung: Verwenden Sie bitte keinen
Tastaturschutz oder eine ähnliche Abdeckung,
um die Belüftungsschlitze nicht zu verdecken.
Berührsensibles Zeigegerät.
Das Touchpad und die Auswahltasten befinden
sich auf einer einzelnen Oberfläche.
Drücken Sie fest auf die Touchpad-Oberfläche
für einen Links-Klick.
Drücken Sie fest auf die rechte untere Ecke für
einen Rechts-Klick.
Wischen Sie vom rechten Rand des Touchpads
nach innen, um auf die Charms zuzugreifen.
5
Deutsch
Page 30

Deutsch
6
Ihre Acer-Notebook-Tour
Rückseite
1
# Symbol Element Beschreibung
1
Micro HDMI
Anschluss
Unterstützt digitale High-Definition-VideoVerbindungen.
Linke Seite
3 421
# Symbol Element Beschreibung
1
2 DC-Eingangsbuchse Hier schließen Sie das Netzteil an.
3 USB-Anschluss
4 Ein/Aus-Taste
Anschluss für
zusätzlichen Akku
Hier wird ein optionaler zusätzlicher Akku
befestigt.
Dient dem Anschluss von USB-Geräten.
Wenn ein Anschluss schwarz ist, ist er mit
USB 2.0 kompatibel; wenn er blau ist, ist er
auch mit USB 3.0 kompatibel (siehe
unten).
Schaltet den Computer ein und aus.
Hinweis: Wenn Sie die Klappe öffnen, wird
der Computer eingeschaltet.
Informationen zu USB 3.0
• Kompatibel mit USB 3.0 und früheren USB-Geräten.
• Für eine optimale Leistung sollten zertifizierte USB 3.0 Geräte verwendet
werden.
• Definiert nach USB 3.0 Spezifikation (SuperSpeed USB).
Page 31

Rechte Seite
# Symbol Element Beschreibung
Eignet sich für eine microSD-Karte.
Hinweis: Drücken Sie hier, um die Karte zu
1 microSD-Kartenleser
2
3
4
Kopfhörer-/
Lautsprecher-Buchse
USB-Anschluss mit
Ladung bei
ausgeschaltetem
Gerät
Anschluss für
zusätzlichen Akku
entfernen/einzusetzen.
Es kann nicht mehr als eine Karte
gleichzeitig verwendet werden.
Hier schließen Sie Audiogeräte (z. B.
Lautsprecher, Kopfhörer) oder ein Headset
mit Mikrofon an.
Dient dem Anschluss von USB-Geräten.
Wenn ein Anschluss schwarz ist, ist er mit
USB 2.0 kompatibel; wenn er blau ist, ist er
auch mit USB 3.0 kompatibel (siehe unten).
Hier wird ein optionaler zusätzlicher Akku
befestigt.
7
Deutsch
1 23 4
Page 32

Deutsch
8
Ihre Acer-Notebook-Tour
Unterseite
# Symbol Element Beschreibung
Entspricht dem Herausnehmen und
Loch für die
1
2 Schraubenlöcher
3 Mikrofon Internes Mikrofon für die Tonaufnahme.
4 Lautsprecher Geben Sie Ton in Stereo aus.
Zurücksetzung des
Computers
Wiedereinsetzen des Akkus.
Stecken Sie eine Büroklammer in dieses
Loch und drücken Sie vier Sekunden lang,
um den Computer zurückzusetzen.
Schraubenlöcher für den optionalen
Zusatzakku.
1
2
3
4
Page 33

Verwenden der Tastatur
Die Tastatur besitzt Tasten in Standardgröße, eine separate Cursor-Taste
und Windows-Tasten.
9
Hotkeys
Der Computer besitzt Direkttasten oder Tastenkombinationen für den
Zugriff auf Computersteuerungen wie z. B. Bildschirmhelligkeit und
Ausgangslautstärke.
Zum Aktivieren von Direkttasten (Hotkeys) müssen Sie zuerst die <Fn>
Taste drücken und halten und dann die andere Taste der
Tastenkombination drücken.
Direkttaste Symbol Funktion Beschreibung
Aktiviert/Deaktiviert die
<Fn> + <Q> Flugmodus
<Fn> + <W>
<Fn> + <E> Display-Schalter
<Fn> + <R> Bildschirm leer
<Fn> + <T>
<Fn> + <Y>
<Fn> + <U>
<Fn> + <I>
Energiesparmodus
TouchpadSchalter
Lautsprecherschalter
Beleuchtungshelligkeit
verringern
Beleuchtungshelligkeit
erhöhen
Kommunikationseinrichtungen des
Computers.
Schaltet den Computer in den
Energiesparmodus.
Wechselt die Anzeigeausgabe
zwischen Anzeigebildschirm,
externem Monitor (falls
angeschlossen) und gleichzeitig
beiden Anzeigen.
Schaltet die Hintergrundbeleuchtung
des Bildschirms aus, um Energie zu
sparen. Drücken Sie zum Einschalten
eine beliebige Taste.
Schaltet das interne Touchpad ein
oder aus.
Schaltet die Lautsprecher ein und
aus.
Hiermit verringern Sie die Helligkeit
der Tastaturbeleuchtung.
Hiermit erhöhen Sie die Helligkeit der
Tastaturbeleuchtung.
Deutsch
Page 34

10
Direkttaste Symbol Funktion Beschreibung
Dient dem Ein- oder Ausschalten der
<Fn> +
<U> + <I>
Beleuchtungsschalter
Tastaturbeleuchtung.
Hinweis: Diese Funktion ist
deaktiviert, wenn die Lichtsensoren
eine helle Umgebung erkennen.
Verwenden der Tastatur
Deutsch
<Fn> + <O>
<Fn> + < >
<Fn> + < >
<Fn> + < >
<Fn> + < > Lautstärke - Verringert die Lautstärke.
Bildschirm
drehen
Heller Erhöht die Bildschirmhelligkeit.
Dunkler Verringert die Bildschirmhelligkeit.
Lautstärke + Erhöht die Lautstärke.
Hiermit drehen Sie das auf dem
Bildschirm angezeigte Bild.
Hinweis: Wenn Sie Funktionstasten (z. B. F1, F2 ...) verwenden
möchten, drücken Sie auf <Fn> und anschließend auf die
entsprechende Zifferntaste. Beispiel: <Fn> + <1> für <F1> usw.
Drücken Sie während des Startvorgangs auf <Fn> + <2>, um zum
BIOS zu gelangen.
Page 35

11
Herstellung einer Internetverbindung
Die Drahtlos-Verbindung des Computers ist standardmäßig aktiviert.
Windows erkennt während des Setups verfügbare Netzwerke und zeigt sie
in einer Liste an. Wählen Sie Ihr Netz aus und geben Sie bei Bedarf das
Kennwort ein.
Öffnen Sie ansonsten Internet Explorer und folgen Sie den Anweisungen.
Erkundigen Sie sich auch beim Internetanbieter oder lesen Sie die
Router-Bedienungsanleitung.
Acer Instant Connect
Instant Connect sorgt für eine schnellere Verbindung zu allen Netzen, die
vom Computer am häufigsten genutzt werden.
Energieverwaltung
Dieser Computer besitzt eine integrierte Energieverwaltungsvorrichtung,
die die Systemaktivität überwacht, z.B. Aktivitäten, die eine oder mehrere
der folgenden Geräte betreffen: Tastatur, Maus, Festplatte, zum Computer
verbundene Peripheriegeräte und Videospeicher. Wenn keine Aktivität
innerhalb einer bestimmten Zeit erkannt wurde, dann schaltet der Computer
einige oder alle dieser Geräte aus, um Energie zu sparen.
Deutsch
Acer Green Instant On
Die Funktion Acer Green Instant On kann den Computer schneller aus dem
Schlaf-Modus heraus aktivieren, als Sie für das Öffnen der Klappe
benötigen. Wenn Sie die Klappe schließen oder den Rechner für eine Weile
nicht bedienen, wird der Energiesparmodus aktiviert. Während sich der
Computer im Schlaf-Modus befindet, leuchtet die Stromanzeige-LED
orangen auf.
Öffnen Sie die Klappe oder drücken Sie auf eine beliebige Taste, um den
Computer aus dem Schlaf-Modus heraus zu aktivieren.
Nach einer bestimmten Zeit im Schlaf-Modus aktiviert der Computer
automatisch einen Tiefschlaf-Zustand, um Akkuladung zu sparen. Im
Tiefschlaf-Zustand leuchtet die Stromanzeige-LED nicht auf. In diesem
Zustand, steht der Akku für viele Wochen zur Nutzung bereit.
Wenn Sie die Klappe öffnen, sollte der Computer aus dem Tiefschlaf
heraus aktiviert werden. Drücken Sie ansonsten auf die Ein/Aus-Taste.
Page 36

Deutsch
12
Hinweis: Im Tiefschlaf-Modus wird der PC im Vergleich zum
Standbymodus deutlich weniger Strom verbrauchen, aber etwas
länger benötigen, um aus dem Tiefschlaf-Modus wieder aktiviert zu
werden.
Der Tiefschlaf- und der Standbymodus arbeiten zusammen, um zu
gewährleisten, dass Ihr Computer so viel Strom wie möglich spart, zugleich
aber einen schnellen und sofortigen Zugriff ermöglicht.
Um mehr Strom zu sparen, wird der Computer in der Regel den
Tiefschlaf-Modus aktivieren, wenn er nicht häufig verwendet wird, zum
Beispiel mitten in der Nacht. Um einen schnelleren Zugriff zu ermöglichen,
wird der Computer den Standbymodus an Zeiten aktivieren, in denen er
häufiger verwendet wird, zum Beispiel während der Arbeitszeit.
Part no.: NC.M4211.014
Ver.: 01.01.03
Page 37

Acer Aspire S7-191
Guida rapida
Registrazione del prodotto
Quando usate il prodotto per la prima volta si raccomanda di registrarlo immediatamente.
Ciò vi darà accesso ad una serie di benefici utili, come:
• Assistenza più veloce da parte dei nostri rappresentanti specializzati.
• Diventare membro della comunità Acer: ricezione di promozioni e partecipazione ai
sondaggi.
• Le ultime notizie da Acer.
Affrettatevi e registratevi, altri vantaggi vi attendono!
Come eseguire la registrazione
Per registrare il prodotto Acer, visitare www.acer.com. Selezionare il proprio paese, fare
clic su REGISTRAZIONE DEL PRODOTTO e seguire le istruzioni.
Verrà richiesto di registrare il prodotto durante il processo di configurazione, oppure è
possibile fare doppio clic sull'icona Registrazione sul desktop.
Dopo aver ricevuto la registrazione del vostro prodotto, vi invieremo una e-mail di
conferma con dati importanti che dovrete conservare in un posto sicuro.
Ottenere gli accessori Acer
Siamo lieti di informarvi che il programma di estensione della garanzia Acer e gli accessori
Netbook sono disponibili online. Venite a visitare il nostro negozio online e trovate ciò che
vi serve su store.acer.com.
Il negozio Acer è ancora in fase di lancio e, sfortunatamente, potrebbe non essere
disponibile in alcune regioni. Ricontrollate regolarmente per vedere quando sarà
disponibile nel vostro paese.
Page 38

© 2012 Tutti i diritti riservati.
Guida rapida per Acer Aspire S7-191
Prima edizione: 01/2013
Numero di modello: _____________________________
Numero di serie: _______________________________
Data di acquisto: _______________________________
Luogo d'acquisto: ______________________________
Page 39

Avvertenze preliminari
Grazie per aver scelto il notebook Acer, la scelta ideale per poter lavorare
in piena libertà anche in movimento.
Le guide disponibili
Sono state realizzate delle guide per assistere l’utente nell’uso del
notebook Acer:
Innanzitutto, il Manifesto aiuta a semplificare la cofnigurazione del
computer.
La Guida rapida presenta le caratteristiche e le funzioni principali del
nuovo computer.
Per altre nozioni su come il vostro computer può aiutarvi a diventare
ancora più produttivi, consultate il Manuale dell'utente di Aspire S7-191.
Il Manuale dell'utente di Aspire S7-191 contiene informazioni utili relative
al nuovo computer. Copre gli argomenti base come ad esempio l’uso della
tastiera, audio, ecc.
Questa guida contiene informazioni dettagliate su argomenti come utilità
del sistema, ripristino dei dati, opzioni di espansione e ricerca guasti.
Contiene inoltre informazioni sulla garanzia, le norme e gli standard di
riferimento e le avvertenze per la sicurezza del vostro notebook.
Per accedervi seguite questi passaggi:
1. Digitare "Utente" da Start.
2. Fare clic su Manuale dell'utente Acer.
3
Italiano
Condizioni operative
• Temperatura:
• Di esercizio: da 5°C a 35°C
• Non di esercizio: da -20°C a 65°C
• Umidità (senza condensa):
• Di esercizio: da 20% a 80%
• Non di esercizio: da 20% a 80%
Page 40

4
Presentazione del notebook Acer
Presentazione del notebook Acer
Dopo aver configurato il computer come illustrato nel manifesto, far
riferimento alla presente documentazione per la presentazione del nuovo
notebook Acer.
Vista schermo
Italiano
1
5
2
4
3
# Icona Voc e Descrizione
Web camera per la comunicazione video.
1 Webcam
2 Touchscreen
3 Microfono Microfono interno per la registrazione di audio.
Indicatore
d’alimentazione
4
Indicatore della
batteria
5
Sensore luce
ambiente
Una luce accanto alla webcam indica che la
webcam è attiva.
Visualizza l'uscita del computer, supporta l'input
multi-touch.
Indicano lo stato di accensione/alimentazione del
computer.
Blu: Il computer è acceso.
Ambra, lampeggio lento: Il computer è in
Standby.
Ambra, lampeggio rapido: Il computer sta
entrando in Ibernazione / Sospensione profonda.
Indica lo stato della batteria.
Ambra: La batteria è in carica.
Blu: La batteria è completamente carica.
Controlla la tastiera e monitora la
retroilluminazione.
Page 41

Vista tastiera
1
2
# Icona Vo ce Descrizione
Per l'immissione di dati sul computer.
Attenzione: Non utilizzare un dispositivo di
1 Tastiera
2 Touchpad
protezione della tastiera o un coperchio simile
siccome la tastiera include dei fori di ventilazione
per il raffreddamento.
Dispositivo di puntamento sensibile al tatto.
Il touchpad e i pulsanti di selezione da una
singola superficie.
Premere con decisione sulla superficie del
touchpad per eseguire un clic a sinistra.
Premere con decisione nell'angolo in basso a
destra per eseguire un clic a destra.
Scorrere l'estremità destra del bordo del
touchpad verso l'interno per accedere ai Charms.
5
Italiano
Page 42

6
Vista posteriore
1
# Icona Voc e Descrizione
1 Porta HDMI Micro
Supporta il collegamento per video digitali
ad alta definizione.
Presentazione del notebook Acer
Italiano
Vista da sinistra
3 421
# Icona Voce Descrizione
Posizione di
1
2 Jack ingresso CC Per il collegamento all'adattatore CA.
3Porta USB
4
fissaggio della
batteria estesa
Pulsante di
accensione
Informazioni su USB 3.0
• Compatibile con USB 3.0 e i dispositivi precedenti.
• Per una prestazione ottimale, usare dispositivi certificati USB 3.0.
• Definito dalle specifiche USB 3.0 (SuperSpeed USB).
Fissa la batteria opzionale estesa al suo
posto.
Connette a dispositivi USB.
Se la porta è nera, è compatibile con
USB 2.0, se la porta è blu è compatibile
anche con USB 3.0 (vedere di seguito).
Accende/spegne il computer.
Nota: l'apertura del coperchio accenderà
anche il computer.
Page 43

Vista da destra
# Icona Vo ce Descrizione
Per l’inserimento di una scheda microSD.
1
2
3
4
Lettore di schede
microSD
Jack auricolari/
altoparlanti
Porta USB con
caricamento da
spento
Posizione di
fissaggio della
batteria estesa
Nota: Premere per rimuovere/installare la
scheda.
È possibile utilizzare una sola scheda di
memoria alla volta.
Effettua il collegamento ai dispositivi audio
(ad es., altoparlanti, auricolari) o a una cuffia
con microfono.
Connette a dispositivi USB.
Se la porta è nera, è compatibile con
USB 2.0, se la porta è blu è compatibile
anche con USB 3.0 (vedere di seguito).
Fissa la batteria opzionale estesa al suo
posto.
7
1 23 4
Italiano
Page 44

8
Vista base
Uso della tastiera
1
2
Italiano
3
4
# Icona Vo ce Descrizione
Simula la rimozione e il reinserimento della
1
2 Fori delle viti
3 Microfono Microfono interno per la registrazione di audio.
4 Altoparlanti Emette l'uscita audio stereo.
Forellino di reset
della batteria
batteria.
Inserire una graffetta nel foro e premere per
quattro secondi per resettare il computer.
Fori di fissaggio delle viti per la batteria estesa
opzionale.
Uso della tastiera
Sono presenti sulla tastiera tasti full-sized, un cursore separato e i tasti
Windows.
Tasti di scelta rapida
Il computer utilizza i tasti di scelta o le combinazioni di tasti per l'accesso a
molti controlli del computer come luminosità dello schermo e uscita
volume.
Per attivare i tasti di scelta rapida, premere e tenere premuto il tasto <Fn>
prima di premere l'altro tasto della combinazione.
Tasti di scelta
rapida
<Fn> + <Q> Modalità aereo
Icona Funzione Descrizione
Attiva/disattiva i dispositivi di
comunicazione del computer.
Page 45

9
Tasti di scelta
rapida
<Fn> + <W> Sospensione
<Fn> + <E>
<Fn> + <R>
<Fn> + <T>
<Fn> + <Y>
<Fn> + <U>
<Fn> + <I>
<Fn> + <U> +
<I>
<Fn> + <O> Ruota schermo
Icona Funzione Descrizione
Passaggio da uno
schermo all'altro
Avvio di screen
saver
Attivazione e
disattivazione del
touchpad
Attivazione e
disattivazione degli
altoparlanti
Riduce la
retroilluminazione
Aumenta la
retroilluminazione
Attivazione/
disattivazione della
retroilluminazione
Attiva la modalità sospensione del
computer.
Consente la commutazione in uscita
display tra video del display o
monitor esterno (se collegato) e
entrambi.
Disattiva la retroilluminazione dello
schermo per risparmiare energia.
Premere un tasto qualsiasi per
tornare allo stato precedente.
Attiva e disattiva il touchpad interno.
Attiva e disattiva gli altoparlanti.
Riduce la luminosità della
retroilluminazione della tastiera.
Aumenta la luminosità della
retroilluminazione della tastiera.
Attiva o disattiva la
retroilluminazione della tastiera.
Nota: Questa funzione è disattivata
se il sensore di luce rileva un
ambiente luminoso.
Ruota l'immagine visualizzata sullo
schermo.
Italiano
<Fn> + < >
<Fn> + < >
<Fn
> + < >
<Fn> + < >
Aumento della
luminosità
Riduzione della
luminosità
Aumento del
volume
Riduzione del
volume
Consente di aumentare la
luminosità dello schermo.
Riduce la luminosità dello schermo.
Aumenta il volume.
Riduce il volume.
Nota: Per utilizzare i tasti funzione (come F1, F2 ...) premere <Fn> e
il tasto numerico corrispondente. Quindi, <Fn> + <1> per <F1> ecc.
Durante l'avvio, premere <Fn> + <2> per accedere ai BIOS.
Page 46

Italiano
10
Connessione a Internet
La connessione wireless del computer viene attivata di default.
Durante la configurazione Windows rileverà e visualizzerà un elenco di reti
disponibili. Selezionare la rete e inserire la password se richiesta.
In caso contrario, aprire Internet Explorer e seguire le istruzioni. Consultare
anche la documentazione fornita con l'ISP o router.
Acer Instant Connect
Instant Connect assicura una connessione più rapida a una qualsiasi delle
reti a cui il computer si connette con maggior frequenza.
Risparmio dell’energia
Questo computer possiede una unità integrata di risparmio energetico che
controlla l’attività del sistema, ovvero un'attività che preveda uno o più dei
seguenti dispositivi: tastiera, mouse, disco rigido, periferiche collegate,
memoria video. Se non è rilevata alcuna operazione per un periodo di
tempo determinato, il computer spegne alcuni o tutti i dispositivi, per
risparmiare energia.
Acer Green Instant On
La funzione Acer Green Instant On consente al computer di riattivarsi dalla
modalità Sospensione in un tempo inferiore a quello necessario per aprire
il coperchio. Quando chiudi il coperchio o lasci il computer per un po', il
computer entra nella modalità di Sospensione. Mentre il computer è in
modalità Sospensione, il LED dell'indicatore di alimentazione lampeggia di
colore arancione.
Aprire il coperchio o premere qualsiasi tasto per riattivare il computer dalla
modalità Sospensione.
Dopo una determinata quantità di tempo nella modalità di Sospensione, il
computer entra automaticamente nella Sospensione Profonda per
conservare la durata della batteria. Quando il computer è nella
Sospensione Profonda, il LED dell'indicatore di accensione si spegne. In
questo stato, la batteria rimane pronta per l'uso per molte settimane.
Il computer dovrebbe riattivarsi dalla Sospensione Profonda quando si
apre il coperchio. Altrimenti, premere il pulsante di accensione.
Page 47

11
Nota: Una volta in modalità di Sospensione Profonda, il PC
consumerà molta meno energia rispetto alla modalità di Sospensione,
tuttavia impiegherà un po' più di tempo a riattivarsi dalla Sospensione
Profonda.
Le modalità di Sospensione Profonda e di Sospensione funzionano
insieme per garantire che il computer consumi meno energia possibile pur
rendendo possibile un accesso rapido e istantaneo.
Per risparmiare più energia, il computer entrerà e rimarrà nella modalità di
Sospensione Profonda nei momenti in cui non viene solitamente effettuato
l'accesso, per esempio durante la notte. Per fornire un accesso più rapido,
il computer entrerà e rimarrà nella modalità di Sospensione nei momenti in
cui viene effettuato l'accesso più di frequente, per esempio durante le ore
lavorative.
Italiano
Part no.: NC.M4211.015
Ver.: 01.01.03
Page 48

Page 49

Acer Aspire S7-191
Guía rápida
Registro del producto
Al usar su producto por primera vez, se recomienda que lo registre inmediatamente.
Ello le permitirá disfrutar de algunas útiles ventajas, tales como:
• Un servicio más rápido de nuestros representantes cualificados.
• Ser miembro de la comunidad Acer: recibir promociones y participará en encuestas
de clientes.
• Las últimas noticias de Acer.
Apresúrese a registrarse, ¡allí le esperan un sinfín de ventajas!
Cómo registrarse
Para registrar su producto de Acer, visite www.acer.com. Seleccione su país, haga clic
en REGISTRO DE PRODUCTO y siga las sencillas instrucciones.
También se le pedirá que regitre su producto durante el proceso de configuración, o
puede hacer doble clic en el icono de Registro en el escritorio.
Después de recibir su registro de producto, se le remitirá un correo electrónico de
confirmación con datos importantes que deberá guardar en un lugar seguro.
Obtener los accesorios de Acer
Nos complace informarle que el programa de ampliación de garantía de Acer y los
accesorios del portátil están disponibles en línea. Venga a visitar nuestra tienda en línea y
encuentre lo que necesita en store.acer.com.
La tienda de Acer se está implementando de forma progresiva y, lamentablemente, puede
que no esté disponible en algunas regiones. Consúltela regularmente para ver cuándo
estará disponible en su país.
Page 50

© 2012 Reservados todos los derechos.
Guía rápida de la Acer Aspire S7-191
Esta revisión: 01/2013
Número de modelo: _____________________________
Número de serie: _______________________________
Fecha de compra: ______________________________
Lugar de compra: ______________________________
Page 51

Primero lo más importante
Le agradecemos que haya elegido el ordenador portátil de Acer para
satisfacer sus necesidades de informática móvil.
Sus guías
Para ayudarle a utilizar el ordenador portátil Acer, hemos elaborado un
conjunto de guías:
En primer lugar, el Póster de configuración contiene información de
ayuda para configurar su ordenador.
Esta Guía rápida presenta las características y funciones básicas de su
nuevo ordenador.
Si desea más información sobre cómo puede su ordenador ayudarle a ser
más productivo, consulte el Manual de usuario de Aspire S7-191. El
Manual de usuario de Aspire S7-191 contiene información útil sobre su
nuevo equipo. Contempla aspectos básicos como el uso del teclado, el
audio, etc.
Esta guía contiene información detallada sobre temas como utilidades del
sistema, recuperación de datos, opciones de ampliación y solución de
problemas. Además, contiene información sobre garantías y las
normativas generales y advertencias de seguridad para su ordenador
portátil.
Siga estos pasos para acceder al manual:
1. Escriba "Usuario" desde Inicio.
2. Haga clic en Manual de usuario de Acer.
3
Español
Medio ambiente
• Temperatura:
• Encendido: entre 5°C y 35°C
• Apagado: entre -20°C y 65°C
• Humedad (sin condensación):
• Encendido: entre 20% y 80%
• Apagado: entre 20% y 80%
Page 52

4
Un paseo por el ordenador portátil Acer
Un paseo por el ordenador portátil Acer
Una vez configurado el ordenador del modo indicado en el póster,
iniciaremos un paseo por su nuevo portátil Acer.
Vista de pantalla
1
Español
2
5
4
3
# Icono Elemento Descripción
Cámara Web para comunicación de vídeo.
1 Webcam
2 Pantalla táctil
3 Micrófono Micrófono interno para la grabación del sonido.
Indicador de
encendido
4
Indicador de
batería
5
Sensor de luz
ambiental
Una luz junto a la webcam indica que esta está
activa.
Muestra la salida del ordenador, admite entrada
multitáctil.
Proporciona información sobre el estado de
energía del ordenador.
Azul: El ordenador está encendido.
Ámbar, parpadeo lento: El ordenador está en
espera.
Ámbar, parpadeo rápido: El ordenador
está entrando en el modo de Hibernación /
Suspensión profunda.
Indica el estado de la batería.
Ámbar: La batería se está cargando.
Azul: La batería está totalmente cargada.
Permite controlar la retroiluminación del teclado
y del monitor.
Page 53
Vista de Teclado
1
2
# Icono Elemento Descripción
Para introducir datos en su ordenador.
1Teclado
2 Panel táctil
Precaución: No utilice un protector de teclado o
similar, ya que el teclado incluye ranuras de
ventilación para permitir la refrigeración.
Dispositivo de punteo táctil.
El panel táctil y los botones de selección forman
una única superficie.
Presione firmemente la superficie táctil para
realizar un clic izquierdo.
Presione firmemente en la esquina inferior
derecha para realizar un clic derecho.
Deslice el borde derecho del panel táctil hacia
dentro para acceder a los charms.
5
Español
Page 54

6
Un paseo por el ordenador portátil Acer
Vista trasera
1
# Icono Elemento Descripción
1 Puerto Micro HDMI
Compatible con conexiones de vídeo digital
de alta definición.
Español
Vista izquierda
3 421
# Icono Elemento Descripción
1
2
3 Puerto USB
4 Botón de encendido
Conexión de la
batería ampliada
Conector de entrada
de CC
Información sobre USB 3.0
• Compatible con dispositivos USB 3.0 y anteriores.
• Para un rendimiento óptimo, utilice dispositivos con certificación
USB 3.0.
• Definido por la especificación USB 3.0 (SuperSpeed USB).
Permite conectar la batería ampliada
opcional instalada.
Conexión para un adaptador de CA.
Permite la conexión con dispositivos USB.
Si un puerto es negro, significa que es
compatible con USB 2.0. Si es azul, también
es compatible con USB 3.0 (véase a
continuación).
Enciende o apaga el ordenador.
Nota: Al abrir la tapa, también se encenderá
el ordenador.
Page 55

Vista derecha
# Icono Elemento Descripción
1
2
3
4
Lector de tarjeta
microSD
Toma de
auriculares/
altavoces
Puerto USB con
carga en estado
apagado
Conexión de la
batería ampliada
Acepta una tarjeta microSD.
Nota: Presione para extraer/instalar la tarjeta.
No se pueden usar varias tarjetas a la vez.
Conexión para dispositivos de audio (p. ej.,
altavoces, auriculares, etc.) o auriculares con
micrófono.
Permite la conexión con dispositivos USB.
Si un puerto es negro, significa que es
compatible con USB 2.0. Si es azul, también
es compatible con USB 3.0 (véase a
continuación).
Permite conectar la batería ampliada opcional
instalada.
7
1 23 4
Español
Page 56

8
Vista de la base
Utilizar el teclado
1
2
Español
3
4
# Icono Elemento Descripción
1
2
3 Micrófono
4 Altavoces Proporciona una salida de audio.
Orificio de reinicio
de la batería
Orificios para
tornillos
Simula la retirada y reinstalación de la batería.
Inserte un clip en el orificio y presione durante
cuatro segundos para reiniciar el ordenador.
Orificios para tornillos de la batería ampliada
opcional.
Micrófono interno para la grabación del
sonido.
Utilizar el teclado
El teclado cuenta con teclas de tamaño completo, un cursor independiente
y teclas de Windows.
Teclas de acceso directo
El ordenador permite usar teclas de acceso directo o combinaciones de
teclas para acceder a la mayoría de controles del ordenador, como el brillo
de la pantalla o la salida de volumen.
Para activar las teclas de acceso directo, mantenga pulsada la tecla <Fn>
y pulse la siguiente tecla de la combinación.
Tecla de
acceso directo
<Fn> + <Q> Modo avisón
Icono Función Descripción
Activa/desactiva los dispositivos de
comunicación del ordenador.
Page 57
9
Tecla de
acceso directo
<Fn> + <W> Suspensión
<Fn> + <E>
<Fn> + <R> Pantalla negra
<Fn> + <T> Panel táctil
<Fn> + <Y> Alternar altavoces Activa o desactiva los altavoces.
<Fn> + <U>
<Fn> + <I>
<Fn> + <U> +
<I>
<Fn> + <O> Girar pantalla
Icono Función Descripción
Pone el ordenador en modo de
suspensión.
Selector de
pantalla
Reducir brillo de
retroiluminación
Aumentar brillo de
retroiluminación
Interruptor de
retroiluminación
Permite cambiar la salida entre la
pantalla y el monitor externo (si
está conectado) o ambos.
Apaga la luz de fondo de la
pantalla para ahorrar energía.
Pulse cualquier tecla para
encenderla.
Activa o desactiva el panel táctil
interno.
Permite reducir el brillo de la
retroiluminación del teclado
Permite aumentar el brillo de la
retroiluminación del teclado.
Permite activar o desactivar la
retroiluminación del teclado.
Nota: Esta función se deshabilitará
si el sensor de luz detecta un
entorno luminoso.
Permite girar la imagen mostrada
en la pantalla.
Español
<Fn> + < >
<Fn> + < >
<Fn> + < > Subir volumen Sube el volumen.
<Fn> + < > Bajar volumen Baja el volumen.
Aumentar brillo Aumenta el brillo de la pantalla.
Disminuir brillo Disminuye el brillo de la pantalla.
Nota: Para usar las teclas de función (como F1, F2, etc.), pulse <Fn>
y la tecla numérica correspondiente. Por ejemplo, <Fn> + <1> para
<F1>, etc. Durante el arranque, pulse <Fn> + <2> para acceder a la
BIOS.
Page 58

10
Conectarse a Internet
La conexión inalámbrica de su equipo viene activada por defecto.
Durante la configuración, Windows detectará y mostrará una lista de las
redes disponibles. Seleccione su red y, si es necesario, introduzca la
contraseña.
Si no, abra Internet Explorer y siga las instrucciones. Póngase en contacto
con su ISP o consulte la documentación del router.
Acer Instant Connect
Español
La Instant Connect garantiza una conexión más rápida a cualquiera de las
redes a las que su equipo suela conectarse normalmente.
Administración de energía
Esta ordenador dispone de una unidad integrada de administración de
energía que controla la actividad del sistema, como la relativa a uno o más
de los siguientes dispositivos: teclado, ratón, disco duro, periféricos
conectados al ordenador y memoria de vídeo. Si no se detecta ninguna
actividad durante un periodo de tiempo, el ordenador detendrá algunos de
estos dispositivos o todos ellos para ahorrar energía.
Acer Green Instant On
Acer Green Instant On permite desactivar el modo de suspensión del
equipo en menos de lo que se tarda en abrir la tapa. Si cierra la tapa, o
deja de usar el equipo durante un rato, este entrará en el modo de
suspensión. Mientras el equipo esté en el modo de suspensión, el
indicador de encendido parpadeará en naranja.
Abra la tapa o pulse cualquier tecla para desactivar el modo Suspensión
del equipo.
Tras un tiempo determinado en el modo de suspensión, el ordenador
accederá automáticamente al modo de suspensión profunda para
prolongar la duración de la batería. Cuando el equipo esté en el modo de
suspensión profunda, el indicador de encendido estará apagado. En este
estado, la batería permanece lista para su uso durante muchas semanas.
Su ordenador debería salir del modo de Suspensión profunda al abrir la
tapa. De lo contrario, pulse el botón de encendido.
Page 59

11
Nota: Una vez en el modo Suspensión Profunda, su PC reducirá el
consumo de energía de forma significativa respecto al modo
Suspensión pero tardará algo más en salir de Suspensión Profunda.
Los modos Suspensión Profunda y Suspensión se unen para garantizar
que el ordenador disminuya al máximo su consumo energético,
permitiendo siempre un acceso rápido e instantáneo.
Para reducir aún más el consumo, el ordenador entrará y saldrá del modo
Suspensión Profunda si no se utiliza como, por ejemplo, durante la noche.
Para agilizar el acceso, el ordenador entrará y permanecerá en el modo
Suspensión mientras se utilice con frecuencia como, por ejemplo, durante
la jornada laboral.
Español
Page 60

12
Notificacion Regulatoria Adicional
[Argentina]
Acer notebook is bundled with the approved telecom modules for your networking.
Those modules’ model number and specific homologation number refers to below:
[Modem]
Modelo: RD02-D330 CNC 54-4512
Modelo: Delphi D40 (AM5) CNC 54-5681
[Bluetooth]
Modelo: BCM92046 CNC 16-6735
Modelo: BCM92070MD_REF CNC 16-7165
Español
Modelo: T77H056 CNC 16-7788
Modelo: AR5BBU12 CNC 16-7946
[Bluetooth+802.11bgn]
Modelo: BCM943225HMB CNC C-7497
[802.11AGN]
Modelo: 512AN_MMW CNC C-6399
Modelo: 533AN_MMW CNC C-6385
Modelo: 512AN_HMW CNC C-7612
Modelo: 533AN_HMW CNC C-7618
Modelo: 622ANHMW CNC C-7682
Modelo: 633ANHMW CNC C-7681
[802.11BGN]
Modelo: AR5B95 CNC C-7152
Modelo: AR5B93 CNC C-7151
Modelo: 112BNHMW CNC C-7470
Modelo: 112BNMMW CNC C-7471
Modelo: RTL8192SE CNC C-7495
Modelo: BCM943225HM CNC C-7395
Modelo: AR5B97 CNC C-7781
Modelo: BCM94313HMG2L CNC C-7881
[802.11BG]
Modelo: BCM94312HMG CNC 16-6180
[3G]
Modelo: UNDP-1 CNC 17-6334
Modelo: Gobi2000 CNC 17-7291
Page 61

[Brasil] Noticia adicional de regulamento Anatel
Os componentes de telecomunicacao usados nos notebooks Acer em Portugues
sao homologados atendendo a requisicao da Agencia Nacional de
Telecomunicacoes Anatel, conforme referencia abaixo:
[Modem]
Modelo:
RD02-D330
1406-05-1675
Modelo:
Delphi_D40
0455-06-2565
[Bluetooth]
Modelo:
BCM92046
Modelo:
BCM92070MD_REF
Modelo:
T77H056
Modelo:
AR5BBU12
[Bluetooth+802.11bgn]
Modelo:
BCM943225HMB
[802.11AGN]
Modelo:
512AN_MMW
Modelo:
512AN_HMW
Modelo:
533AN_MMW
Modelo:
533AN_HMW
Modelo:
622ANHMW
Modelo:
633ANHMW
1434-08-2859
0395-09-1869
2281-09-3987
0127-10-3987
1260-09-1869
0800-08-2198
0807-08-2198
0809-08-2198
0812-08-2198
2123-09-2198
2128-09-2198
13
Español
Page 62

14
[802.11BGN]
Modelo:
AR5B95
0223-09-3987
Modelo:
AR5B93
0190-09-3987
Modelo:
112BNHMW
1238-09-2198
Modelo:
112BNMMW
1237-09-2198
Modelo:
Español
RTL8192SE
Modelo:
BCM943225HM
Modelo:
AR5B97
Modelo:
BCM94313HMG2L
[802.11BG]
Modelo:
BCM94312HMG
[3G]
Modelo:
UNDP-1
Modelo:
Gobi2000
Modelo:
EM770W
1349-09-4076
0795-09-1869
2178-09-3987
2429-09-1869
0060-08-1869
0307-08-0540
NA
0412-09-0540
NA
2460-09-3257
Page 63

Notificacion Regulatoria Adicional
[Mexico-COFETEL]
Acer notebook is bundled with the approved telecom modules for your networking.
Those modules’ model number and specific homologation number refers to below:
[Modem]
Modelo: RD02-D330 COFETEL: TTDCORD06-536
Modelo: Delphi_D40 (AM5) COFETEL: TTDAGDE07-056
[Bluetooth]
Modelo: BCM92046 COFETEL: RCPFOBC08-0472
Modelo: BCM92070MD_REF COFETEL: RCPBRBC09-0213
Modelo: T77H056 COFETEL: RCPATT709-1049
Modelo: AR5BBU12 COFETEL: RCPATAR10-0064
[Bluetooth+802.11BGN]
Modelo: BCM943225HMB COFETEL: RCPBRBC09-0574
[802.11AGN]
Modelo: 512AN_HMW COFETEL:RCPIN5108-0260
Modelo: 512AN_MMW COFETEL:RCPIN5108-0260-A3
Modelo: 533AN_HMW COFETEL:RCPIN5108-0260-A2
Modelo: 533AN_MMW COFETEL:RCPIN5108-0260-A1
Modelo: 622ANHMW COFETEL:RCPIN6209-1009
Modelo: 633ANHMW COFETEL:RCPIN6309-1010
[802.11BGN]
Modelo: AR5B95 COFETEL:RCPATAR09-0168
Modelo: AR5B93 COFETEL: RCPATAR09-0167
Modelo: 112BNHMW COFETEL: RCPIN1109-0613-A1
Modelo: 112BNMMW COFETEL: RCPIN1109-0613
Modelo: RTL8192SE COFETEL: RCPRERT09-0751
Modelo: BCM943225HM COFETEL: RCPBRBC09-0464
Modelo: AR5B97 COFETEL: RCPATAR09-1103
Modelo: BCM94313HMG2L COFETEL: RCPBRBC09-1196
[802.11BG]
Modelo: BCM94312HMG COFETEL: RCPBRBC08-0015
[3G]
Modelo: UNDP-1 COFETEL:RTIQUUN08-0253
Modelo: Gobi2000 COFETEL:RTIQUGO09-0555
Modelo: EM770W COFETEL:RTIHUEM10-0096
[WiMax]
Modelo: 622ANXHMW COFETEL: RCPIN6210-0219
15
Español
Part no.: NC.M4211.00Z
Ver.: 01.01.03
Page 64

Page 65

Acer Aspire S7-191
Guia rápido
Registo do produto
Ao utilizar o dispositivo pela primeira vez, recomenda-se que o registe. O registo
dar-lhe-á acesso a vantagens úteis, como:
• Assistência mais rápida por representantes formados.
• Subscrição na comunidade Acer para receber promoções e participar em inquéritos
ao cliente.
• As últimas novidades da Acer.
Registe-se já e usufrua tantas outras vantagens!
Como registar
Para registar o seu produto Acer, visite www.acer.com. Seleccione o seu país, clique em
REGISTAR PRODUTO e sigas as instruções.
Também ser-lhe-á solicitado que registe o seu produto durante a instalação, ou poderá
clicar duas vezes no ícone de registo no ambiente de trabalho.
Quando recebermos o seu registo, ser-lhe-á enviada uma mensagem de confirmação
com dados importantes que deverá guardar.
Obter acessórios Acer
Temos o prazer de o informar que poderá encontrar online o programa de extensão da
garantia da Acer e acessórios para Notebook. Visite a nossa loja online e encontre o que
precisa em store.acer.com.
A loja Acer é actualizada de forma progressiva, sendo que poderá não estar disponível
em alguns países. Aceda ao site regularmente de modo verificar quando estará
disponível no seu país.
Page 66

© 2012 Todos os Direitos Reservados.
Guia rápido da Acer Aspire S7-191
Esta revisão: 01/2013
Número de Modelo: _____________________________
Número de Série: ______________________________
Data de Compra: _______________________________
Local de Aquisição: _____________________________
Page 67

Primeiro que tudo
Gostaríamos de lhe agradecer por ter escolhido um computador portátil
Acer para preencher as suas necessidades de computador móvel.
Os seus manuais
Para o ajudar a usar o seu computador portátil Acer, preparámos uma
série de manuais:
Antes de mais, o Cartaz de configuração ajuda-o a iniciar e a configurar
o seu computador.
O Guia Rápido apresenta as características e funções básicas do seu
novo computador.
Para mais detalhes sobre como o seu computador o pode ajudar a ser
mais produtivo, consulte o Manual do Utilizador Aspire S7-191.
O Manual do Utilizador Aspire S7-191 contém informações úteis
aplicáveis ao seu novo computador. Abrange tópicos básicos como a
utilização do teclado, áudio, etc.
Esse manual contém informações pormenorizadas sobre temas como
utilitários do sistema, recuperação de dados, opções de expansão e
solução de problemas. Além disso, contém a informação da garantia e as
regulamentações gerais e notas de segurança para o seu computador
portátil.
Seguir estes passos para o consultar:
1. Digite "Utilizador" a partir de Iniciar.
2. Clique em Manual do Utilizador Acer.
3
Português
Português
Ambiente
• Temperatura:
• Funcionamento: 5ºC a 35ºC
• Não em funcionamento: -20°C a 65°C
• Humidade (não condensação):
• Funcionamento: 20% a 80%
• Não em funcionamento: 20% a 80%
Page 68

4
Visita guiada ao seu computador portátil Acer
Visita guiada ao seu computador portátil Acer
Após montar o computador tal como indicado na ilustração do cartaz de
configuração, deixe-nos mostrar-lhe o seu novo computador portátil Acer.
Vista do ecrã
Português
Português
1
5
2
4
3
# Ícone Item Descrição
Câmara web para comunicações de vídeo.
1Webcam
2Ecrã táctil
3 Microfone Microfone interno para gravação de som.
Indicador de
alimentação
4
Indicador da bateria
5
Sensor de luz
ambiente
Uma luz junto da Webcam indica que a
webcam está ativa.
Apresenta a informação no ecrã, suporta
introdução multi-toque.
Indica o estado da alimentação do
computador.
Azul: O computador está ligado.
Âmbar, a piscar lentamente:
O computador está em Espera.
Âmbar, a piscar rapidamente:
O computador está a entrar em
Hibernação / Sono Profundo.
Indica o estado da bateria.
Âmbar: A bateria está a carregar.
Azul: A bateria está completamente
carregada.
Controla a retroiluminação do teclado e
monitor.
Page 69

Vista do teclado
1
2
# Ícone Item Descrição
Para introduzir informações no seu
computador.
1 Teclado
2 Teclado táctil
Precaução: Não utilize um protector de
teclado ou capa similar uma vez que o
teclado inclui entradas de ventilação para
arrefecimento.
Dispositivo apontador sensível ao toque.
O painel táctil e botões de selecção
formam uma única superfície.
Prima firmemente a superfície do painel
táctil para executar um clique esquerdo.
Prima firmemente no canto inferior direito
para executar um clique direito.
Passe a mão direita da margem do painel
táctil para dentro, para aceder aos
charms.
5
Português
Português
Page 70

Português
Português
6
Visita guiada ao seu computador portátil Acer
Visão traseira
1
# Ícone Item Descrição
1 Porta HDMI Micro
Suporta ligações de vídeo digital de alta
definição.
Vista esquerda
3 421
# Ícone Item Descrição
Localização de
1
2
3Porta USB
4
fixação da bateria
expandida
Tomada de entrada
CC
Botão de ligar/
desligar
Fixa a bateria expandida opcional na sua
posição.
Liga a um adaptador CA.
Liga a dispositivos USB.
Se uma porta for preta é compatível com
USB 2.0, se for azul é também compatível
com USB 3.0 (ver abaixo).
Liga e desliga o computador.
Nota: Abrir a tampa irá também ligar o
computador.
Informações sobre USB 3.0
• Compatível com dispositivos USB 3.0 e anteriores.
• Para melhor desempenho, utilize dispositivos com certificação USB 3.0.
• Definido pela especificação USB 3.0 (USB SuperSpeed).
Page 71

Vista direita
# Ícone Item Descrição
Aceita um cartão microSD.
1
2
3
4
leitor de cartões
microSD
Tomada de
auriculares/altifalante
Porta USB com
carregamento em
modo desligado
Localização de
fixação da bateria
expandida
Nota: Empurre para remover/instalar o
cartão.
Apenas pode ser utilizado um cartão de
cada vez.
Liga a dispositivos áudio (por ex. colunas,
auscultadores) ou auriculares com
microfone.
Liga a dispositivos USB.
Se uma porta for preta é compatível com
USB 2.0, se for azul é também compatível
com USB 3.0 (ver abaixo).
Fixa a bateria expandida opcional na sua
posição.
1 23 4
7
Português
Português
Page 72

Português
Português
8
Utilizar o teclado
Vista da base
1
2
3
4
# Ícone Item Descrição
Simula a remoção e reinstalação da
1
2 Orifícios
3 Microfone Microfone interno para gravação de som.
4 Altifalantes Obtenha saída de áudio em estéreo.
Orifício de reposição
da bateria
bateria.
Insira um clipe no orifício e prima durante
quatro segundos para repor o
computador.
Orifício de parafusos para bateria
expandida opcional.
Utilizar o teclado
O teclado possui teclas de tamanho normal, um cursor separado e teclas
do Windows.
Teclas de atalho
O computador utiliza teclas de atalho ou combinações de teclas para
aceder à maior parte dos seus comandos, tais como a luminosidade do
ecrã e o volume de saída.
Para activar as teclas de atalho, prima e mantenha premida a tecla <Fn>
antes de premir a outra tecla na combinação de teclas de atalho.
Page 73
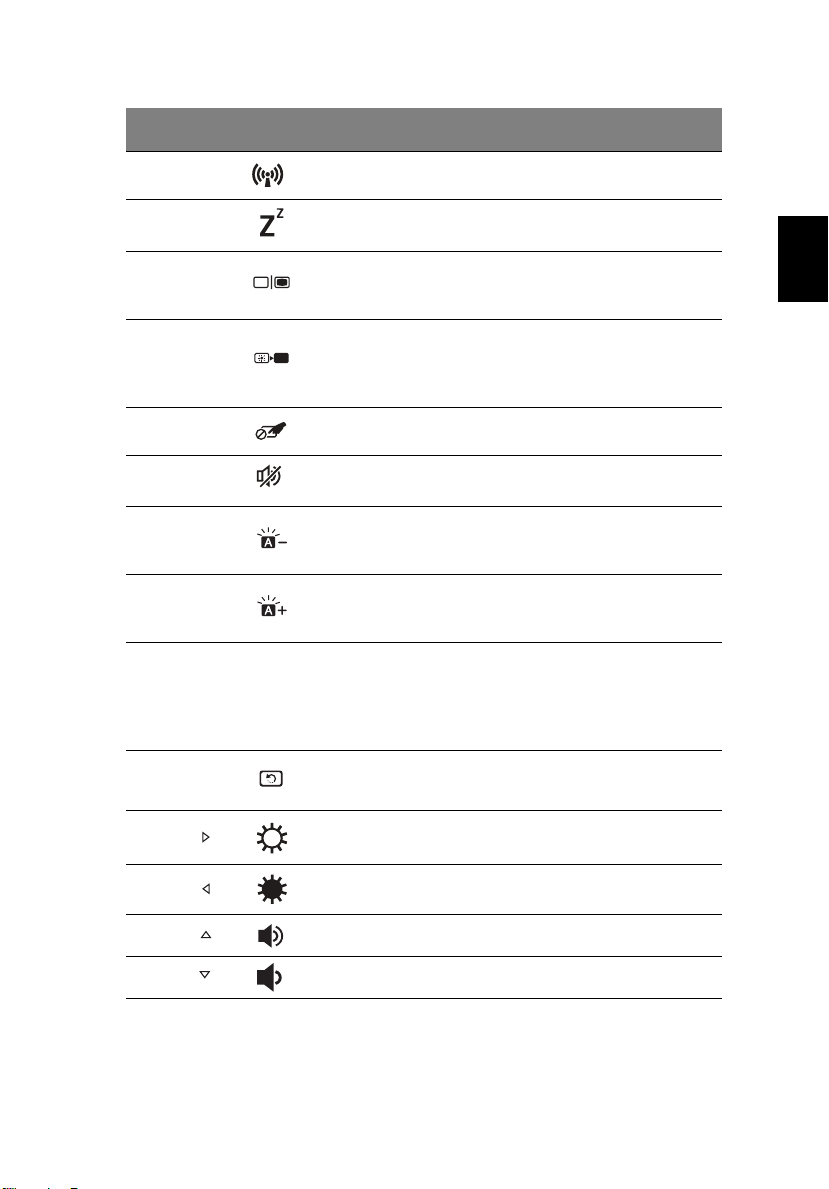
9
Tecla de
atalho
<Fn> + <Q> Modo de avião
<Fn> + <W> Suspensão
<Fn> + <E>
<Fn> + <R> Ecrã em branco
<Fn> + <T>
<Fn> + <Y>
<Fn> + <U>
<Fn> + <I>
<Fn> +
<U> + <I>
Ícone Função Descrição
Comutação de
visualização
Comutação de
teclado táctil
Comutação de
altifalante
DIminui a
luminosidade da
retroiluminação
Aumenta a
luminosidade da
retroiluminação
Alternar
retroiluminação
Activa / desactiva os dispositivos de
comunicação do computador.
Coloca o computador no modo de
Suspensão.
Alterna a saída entre o ecrã de
visualização, o monitor externo
(se está ligado) e ambos.
Desliga a luz de fundo do ecrã de
visualização para economizar
energia. Prima qualquer tecla para
retomar a actividade.
Liga e desliga o teclado táctil
interno.
Liga e desliga os altifalantes.
Diminui a luminosidade da
retroiluminação do teclado
Aumenta a luminosidade da
retroiluminação do teclado.
Liga e desliga a retroiluminação do
teclado.
Nota: Esta função é desactivada se
o sensor de luz detecta um
ambiente iluminado.
Português
Português
<Fn> + <O> Rodar ecrã
<Fn> + < >
<Fn> + < >
<Fn> + < >
<Fn> + < >
Aumentar
luminosidade
Reduzir
luminosidade
Aumentar volume Aumenta o volume de som.
Diminuir volume Diminui o volume de som.
Roda a imagem apresentada no
ecrã.
Aumenta a luminosidade do ecrã.
Reduz a luminosidade do ecrã.
Nota: Para usar as teclas de Função (como F1, F2 ...) prima <Fn> e
a tecla numérica correspondente. Assim, <Fn> + <1> para <F1> etc.
Durante o arranque, prima <Fn> + <2> para entrar na BIOS.
Page 74

10
Ligar à Internet
A ligação sem fios do seu computador está ligada por predefinição.
O Windows detecta e apresenta uma lista das redes disponíveis durante a
configuração. Seleccione a sua rede e introduza a palavra-passe, se
necessário.
Português
Português
Caso contrário, abra o Internet Explorer e siga as instruções. Consulte
também a documentação do seu ISP ou router.
Acer Instant Connect
Instant Connect garante uma ligação mais rápida a qualquer das redes à
qual o seu computador se liga com frequência.
Gestão de energia
Este computador tem uma unidade de gestão de energia integrada que
monitoriza a atividade do sistema, como atividade que envolve um ou mais
dos seguintes dispositivos: teclado, rato, disco rígido, periféricos ligados às
computador e memória de vídeo. Caso não seja detectada qualquer
actividade durante um determinado período de tempo, o computador pára
alguns ou todos estes dispositivos para poupar energia.
Acer Green Instant On
A funcionalidade Acer Green Instant On permite ao seu computador
despertar do modo de Suspensão em menos tempo que o levantar do
ecrã. Quando fecha a tampa ou larga por um tempo o computador, este
entra no modo de Suspensão. Quando o computador está no modo de
Suspensão, a LED indicadora de energia irá piscar a laranja.
Abra o monitor ou prima qualquer tecla para despertar o computador do
modo de Suspensão.
Após um certo período de tempo no modo de Suspensão, o computador
entra automaticamente em Sono Profundo para preservar a bateria.
Quando o computador está em Sono Profundo, a LED indicadora de
energia será desligada. Neste estado, a bateria continua pronta a usar
durante muitas semanas.
O seu computador deverá despertar do Sono Profundo quando abrir a
tampa. Caso contrário, prima o botão energia.
Page 75

11
Nota: Uma vez em Sono Profundo, o seu PC irá consumir bastante
menos energia quando comparado com o modo de Suspensão, mas
irá demorar mais a retomar do Sono Profundo.
O modo Sono Profundo e de Suspensão funcionam em conjunto para
garantir que o seu computador poupa o máximo de bateria possível,
enquanto mantém acesso rápido e instantâneo.
Para poupar mais bateria, o seu computador entre normalmente no modo
de Sono Profundo quando não está a ser acedido com frequência, por
exemplo, a meio da noite. Para acesso mais rápido, o seu computador irá
entrar e permanecerá no modo de Suspensão quando está a ser acedido
com maior frequência, por exemplo, durante o horário de expediente.
Português
Português
Part no.: NC.M4211.00Y
Ver.: 01.01.03
Page 76

Page 77

Acer Aspire S7-191
Snelgids
Productregistratie
Als u het product voor het eerst gebruikt, wordt aanbevolen dat u het onmiddellijk
registreert. U heeft dan namelijk toegang tot enkele handige voordelen, zoals:
• Snellere dienstverlening door onze opgeleide vertegenwoordigers.
• Lidmaatschap van de Acer-community: aanbiedingen ontvangen en meedoen aan
enquêtes.
• Het laatste nieuws van Acer.
Aarzel niet en registreer, andere voordelen wachten op u!
Zo registreert u
Registreer uw Acer-product op www.acer.com Selecteer uw land, klik op
PRODUCTREGISTRATIE en volg de eenvoudige instructies.
Eveneens zal u tijdens het installatieproces gevraagd worden uw product te registreren;
ook kunt u dubbelklikken op het registratiepictogram op het bureaublad.
Zodra we uw productregistratie hebben ontvangen, sturen we u via e-mail een bevestiging
met belangrijke gegevens. Bewaar deze gegevens op een veilige plek.
Acer accessoires verkrijgen
Het verheugt ons u te kunnen informeren dat verlenging van de Acer garantie en
Notebookaccessoires u online ter beschikking staan. Bezoek onze online-winkel en vind
alles wat u nodig hebt op store.acer.com.
De Acer-winkels wordt stapsgewijs gelanceerd en is helaas in sommige regio’s niet
beschikbaar. Controleert u regelmatig opnieuw om te zien wanneer de site in uw land
beschikbaar zal zijn.
Page 78

© 2012 Alle rechten voorbehouden.
Snelgids voor de Acer Aspire S7-191
Deze uitgave: 01/2013
Modelnummer: ________________________________
Serienummer: _________________________________
Aankoopdatum: ________________________________
Plaats van aankoop: ____________________________
Page 79

Om te beginnen
Bedankt dat u hebt gekozen voor een notebook van Acer als oplossing
voor uw mobiele computereisen.
Uw gidsen
Om u te helpen met het werken op het Acer notebook hebben we een
aantal gidsen ontworpen:
Allereerst helpt de Instelkaart u bij het instellen van uw computer.
In de Snelgids krijgt u een introductie over de basiseigenschappen en
functies van uw nieuwe computer.
Als u meer wilt weten over hoe uw computer u kan helpen productiever te
werken, raadpleeg dan de Gebruikershandleiding van de
Aspire S7-191. De Gebruikershandleiding van de Aspire S7-191 bevat
nuttige informatie over uw nieuwe computer. De handleiding behandelt
basale onderwerpen, zoals het gebruik van het toetsenbord, geluid, enz.
Deze Gebruikershandleiding bevat gedetailleerde informatie over
onderwerpen zoals systeemfuncties, gegevensherstel, uitbreidingsopties
en probleem oplossen. Daarnaast bevat het informatie over garantie en de
algemene voorwaarden en veiligheid voor uw notebook.
Volg deze stappen voor toegang tot dit document:
1. Voer in Start "Gebruiker" in.
2. Klik op Acer Gebruikershandleiding.
3
Nederlands
Omgeving
• Temperatuur:
• In gebruik: 5°C tot 35°C
• Niet in gebruik: -20°C tot 65°C
• Vochtigheidsgraad (geen condensvorming):
• In gebruik: 20% tot 80%
• Niet in gebruik: 20% tot 80%
Page 80
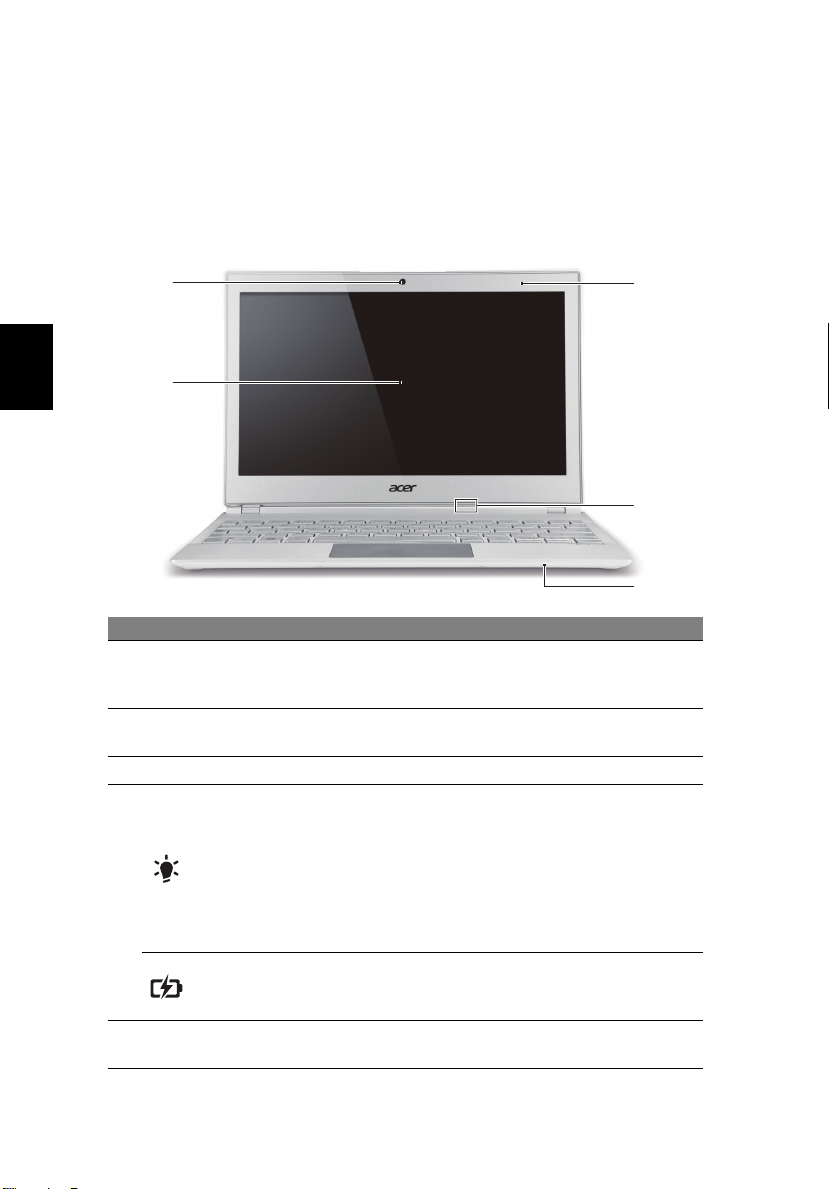
4
Rondleiding door uw Acer notebook
Rondleiding door uw Acer notebook
Nadat u de computer hebt ingesteld zoals is beschreven op de poster,
bent u nu klaar voor een rondleiding door de nieuwe Acer notebook.
Schermoverzicht
1
Nederlands
2
5
4
3
# Pictogram Item Beschrijving
Webcam voor videocommunicatie.
1 Webcam
2 Touchscreen
3 Microfoon Interne microfoon voor geluidsopname.
Stroomindicator
4
Indicator batterij
5
Omgevend
lichtsensor
Een lichtje naast de webcam geeft aan
dat de webcam actief is.
Geeft het beeld van de computer weer,
ondersteunt multi-touchbediening.
Geeft de vermogenstatus van de
computer aan.
Blauw: De computer is ingeschakeld.
Oranje, langzaam knipperend:
De computer staat in stand-by.
Oranje, snel knipperend:
De computer gaat in de sluimerstand /
diepe slaapstand.
Geeft de batterijstatus aan.
Geelbruin: De accu wordt opgeladen.
Blauw: De accu is volledig opgeladen.
Regelt de achtergrondverlichting van het
toetsenbord en het scherm.
Page 81

Toetsenbord-overzicht
1
2
# Pictogram Item Beschrijving
Om gegevens in te voeren in de computer.
Pas op: Bedek het toetsenbord niet met
1 Toetsenbord
2 Touchpad
een beschermhoes o.i.d., het toetsenbord
is uitgerust met ventilatieopeningen voor
koeling.
Aanraakgevoelig aanwijsapparaat.
Het touchpad en de selectietoetsen
vormen één enkel oppervlak.
Druk stevig op het oppervlak van het
touchpad om een linkerklik uit te voeren.
Druk stevig op de rechterbenedenhoek om
een rechterklik uit te voeren.
Veeg de rechterzijde van het touchpad
naar binnen om toegang te krijgen tot de
charms.
5
Nederlands
Page 82
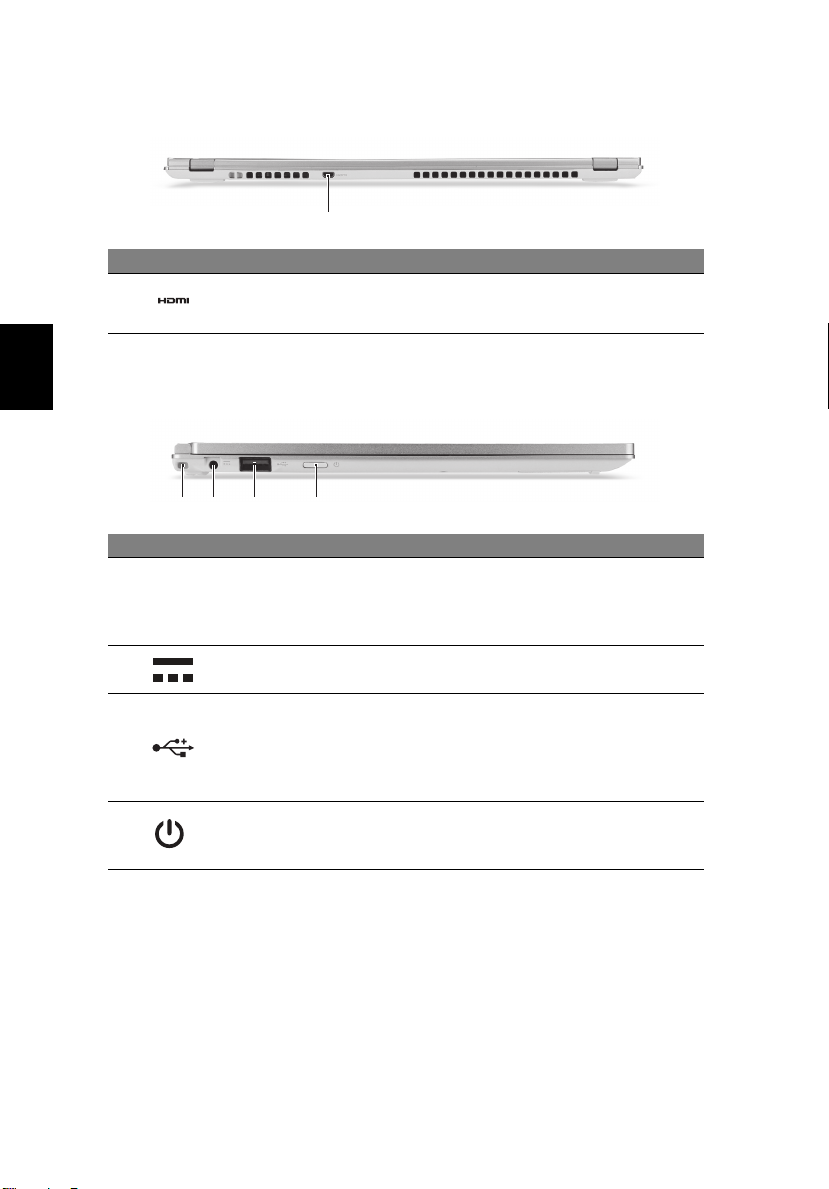
6
Rondleiding door uw Acer notebook
Achterkant
1
# Pictogram Item Beschrijving
1 Hdmi-micro-poort
Ondersteunt high-definition digitale
videosignalen.
Nederlands
Linkerkant
3 421
# Pictogram Item Beschrijving
Locatie voor het
1
2
3 USB-poort
4 Aan/uit-toets
plaatsen van de
accu met extra
levensduur
Gelijkstroomaansluiting
Hier wordt de optionele accu met extra
levensduur geplaatst.
Aansluiting voor een adapter.
Aansluiting voor usb-apparaten.
Is de poort zwart, dan is deze
compatibel met usb 2.0; wanneer hij
blauw is, dan is hij ook compatibel met
usb 3.0 (zie onderstaand).
Schakelt de computer aan en uit.
Opmerking: Door het deksel te openen
wordt ook de computer ingeschakeld.
Informatie over USB 3.0
• Compatibel met USB 3.0 en eerdere apparaten.
• Voor optimale prestaties gebruikt u USB 3.0-gecertificeerde apparaten.
• Op basis van de usb 3.0-specificatie (SuperSpeed usb).
Page 83

Rechterkant
# Pictogram Item Beschrijving
Geschikt voor een microSD-kaart.
Opmerking: Duwen om de kaart te
1 microSD-kaartlezer
2
3
4
Headset/
luidsprekeraansluiting
Usb-poort met
uitschakeling van
opladen
Locatie voor het
plaatsen van de
accu met extra
levensduur
verwijderen/plaatsen.
Slechts één kaart tegelijk mag gebruikt
worden.
Aansluiting voor audioapparaten
(bijv. luidsprekers, hoofdtelefoon) of een
headset met microfoon.
Aansluiting voor usb-apparaten.
Is de poort zwart, dan is deze
compatibel met usb 2.0; wanneer hij
blauw is, dan is hij ook compatibel met
usb 3.0 (zie onderstaand).
Hier wordt de optionele accu met extra
levensduur geplaatst.
7
1 23 4
Nederlands
Page 84

8
Werken met het toetsenbord
Onderkant
1
2
3
Nederlands
4
# Pictogram Item Beschrijving
Dit simuleert het verwijderen en opnieuw
1
2 Schroefgaten
3 Microfoon Interne microfoon voor geluidsopname.
4 Luidsprekers Levert stereogeluid.
Opening voor
batterijreset
plaatsen van de accu.
Steek een paperclip in het gat en druk er
vier seconden op om de computer te
herstellen.
Schroefgaten voor de optionele extra
batterij.
Werken met het toetsenbord
Het toetsenbord heeft toetsen van normale grootte, een aparte cursor en
Windows-toetsen.
Sneltoetsen
De computer gebruikt sneltoetsen of toetscombinaties voor toegang tot de
meeste besturingselementen, zoals helderheid en geluidsvolume.
Page 85

Op een sneltoets te gebruiken drukt u de toets <Fn> in voordat u de
andere toets van de combinatie indrukt.
Sneltoets Pictogram Functie Beschrijving
<Fn> + <Q> Vliegtuigmodus
<Fn> + <W> Standby
Schakeltoets
<Fn> + <E>
<Fn> + <R> Leeg scherm
<Fn> + <T>
<Fn> + <Y>
<Fn> + <U>
<Fn> + <I>
<Fn> +
<U> + <I>
voor
beeldscherm
Schakeltoets
voor touchpad
Schakeltoets
voor luidspreker
De helderheid
van de achtergrondverlichting
verlagen
De helderheid
van de achtergrondverlichting
verhogen
Verlichting aan/
uit
Schakelt de communicatieapparaten van de computer
in / uit.
Hiermee plaatst u de computer
in de Standby-stand.
Schakelt de weergave-uitvoer
tussen het scherm, externe
monitor (indien aangesloten) en
beide.
Hiermee schakelt u de lamp van
het beeldscherm uit om stroom
te besparen. Druk op een
willekeurige toets om het
beeldscherm weer te activeren.
Hiermee schakelt u het interne
touchpad in en uit.
Hiermee schakelt u de
luidsprekers in en uit.
Verlaag de helderheid van de
achtergrondverlichting van het
toetsenbord.
Verhoog de helderheid van de
achtergrondverlichting van het
toetsenbord.
Schakelt de verlichting van het
toetsenbord in en uit.
Opmerking: Deze functie wordt
uitgeschakeld wanneer de
lichtsensor een lichte omgeving
detecteert.
9
Nederlands
<Fn> + <O> Scherm draaien
<
Fn> + < >
Helderheid
verhogen
Draait het beeld dat op het
scherm wordt weergegeven.
Verhoogt de helderheid van het
beeldscherm.
Page 86

10
Sneltoets Pictogram Functie Beschrijving
<Fn> + < >
<Fn> + < >
<Fn> + < >
Helderheid
verlagen
Volume omhoog
Volume omlaag
Werken met het toetsenbord
Hiermee verlaagt u de
helderheid van het
beeldscherm.
Hiermee verhoogt u het
luidsprekervolume.
Hiermee verlaagt u het
luidsprekervolume.
Opmerking: Om de functietoetsen te gebruiken (zoals F1, F2 ...)
drukt u op <Fn> en op de desbetreffende nummertoets. Dus <Fn> +
<1> voor <F1> etc. Tijdens het opstarten drukt u op <Fn> + <2> om
toegang te krijgen tot de BIOS.
Nederlands
Page 87

11
Verbinding maken met het Internet
De draadloze verbinding is ingeschakeld als de default.
Windows detecteert tijdens het instellen alle beschikbare netwerken en
plaatst ze in een lijst. Kies uw netwerk en voer indien nodig het
wachtwoord in.
Of open Internet Explorer en volg de instructies. Kijk eveneens in de
documentatie van uw netwerkaanbieder of modem.
Acer Instant Connect
Instant Connect zorgt voor een snellere verbinding met de netwerken
waarmee uw computer het vaakst verbinding maakt.
Energiebeheer
Deze computer heeft een ingebouwde energiebeheereenheid die de
systeemactiviteit controleert, zoals de activiteiten van een of meer van de
volgende apparaten: toetsenbord, muis, harde schijf, randapparatuur
aangesloten op de computer en videogeheugen. Wanneer er geen
activiteit gedetecteerd wordt gedurende een bepaalde periode, schakelt de
computer enkele of alle apparaten uit om energie te besparen.
Nederlands
Acer Green Instant On
Met Acer Green Instant On kunt u uw computer in minder tijd uit de
slaapstand halen dan nodig is om de computer open te klappen. Wanneer
u de klep van uw computer sluit of deze een tijd niet gebruikt, dan gaat de
computer in de slaapstand. Als de computer in Slaapstand staat, knippert
het aan/uit-lampje oranje.
Om de computer uit de Slaapstand te halen, opent u de klep of drukt op
een willekeurige toets.
Na een periode in de Slaapstand gaat de computer automatisch in Diepe
slaapstand om energie van de accu te sparen. Als de computer in de Diepe
slaapmodus staat, brandt het aan/uit-lampje niet. In deze stand zal de
batterij gedurende vele weken gereed voor gebruik blijven.
Het openen van de klep dient de computer uit de diepe slaapstand te
halen. Druk anders op de aan/uit-toets.
Page 88

12
Opmerking: Eenmaal in de Diepe slaapstand zal uw PC beduidend
minder energie verbruiken dan in de Slaapstand, maar zal het langer
duren om het uit de Diepe slaapstand te halen.
De Diepe slaapstand en de Slaapstand werken samen om ervoor te zorgen
dat uw computer zoveel mogelijk energie bespaart, terwijl onmiddellijke en
snelle toegang mogelijk blijft.
Om meer energie te besparen, zal uw computer normaalgesproken
gedurende periodes van minder frequent gebruik in de Diepe slaapstand
gaan, bijvoorbeeld wanneer het nacht is. Voor snellere toegang, zal uw
Nederlands
computer in de Slaapstand gaan en daarin blijven staan gedurende
periodes dat deze vaker gebruikt wordt, bijvoorbeeld tijdens werkuren.
Part no.: NC.M4211.00T
Ver.: 01.01.03
Page 89

Acer Aspire S7-191
Hurtigguide
Produktregistrering
Når du bruker produktet for første gang, bør du registrere det umiddelbart.
Dette gir deg noen nyttige fordeler, for eksempel:
• Raskere service fra våre kvalifiserte representanter.
• Medlemskap i Acer-brukergruppen: kampanjetilbud og deltakelse i
kundeundersøkelser.
• De siste nyhetene fra Acer.
Vær rask med å registrere deg – du har flere fordeler i vente!
Hvordan registrere deg
Når du skal registrere Acer-produktet ditt, gå til www.acer.com. Velg land, klikk på
PRODUKTREGISTRERING og følg de enkle instruksjonene.
Du vil også bli bedt om å registrere produktet under oppsettprosessen, eller du kan
dobbeltklikke på Registrering-ikonet på skrivebordet.
Etter at vi har mottatt produktregistreringen, blir du tilsendt en bekreftelsesmelding med
viktige data som du bør oppbevare på en trygg plass.
Få tak i Acer-tilbehør
Vi er glade for å informere deg om at Acers garantiutvidelsesprogram og Notebooktilbehør er tilgjengelig online. Kom og besøk vår onlinebutikk og finn det du ønsker på
store.acer.com.
Acer-butikken er under kontinuerlig utvikling, men er dessverre ikke tilgjengelig i alle
regioner. Besøk oss igjen regelmessig for å se når den blir tilgjengelig i landet ditt.
Page 90

© 2012 Med enerett.
Hurtigguide for Acer Aspire S7-191
Denne revisjonen: 01/2013
Modellnummer: ________________________________
Serienummer: _________________________________
Innkjøpsdato: __________________________________
Innkjøpssted: __________________________________
Page 91

Begynne med begynnelsen
Vi vil gjerne takke deg for at du har valgt en Acer-notisbok til dine mobile
databehandlingsbehov.
3
Dine veiledere
Som hjelp til bruk av Acer-notisboken har vi utformet et sett av veiledere:
Til å begynne med vil oppsettplakaten hjelpe deg i gang med oppsettet
av datamaskinen.
I Hurtigguide får du en innføring i de grunnleggende egenskapene og
funksjonene til den nye datamaskinen.
Hvis du vil vite mer om hvordan datamaskinen kan gjøre deg mer
produktiv, kan du slå opp i Aspire S7-191-brukerhåndboken.
Aspire S7-191-brukerhåndboken inneholder nyttig informasjon om din
nye datamaskin. Den dekker grunnleggende emner som
systemgjenoppretting, bruk av tastaturet, lyd, osv.
Denne guiden innholder detaljert informasjon om emner som
systemverktøy, datagjenvinning, utbyggingsalternativer og feilsøking/
problemløsing. I tillegg finner du garantiopplysninger, generell informasjon
og sikkerhetsmerknader for notisbokmaskinen din.
Følg disse trinnene for å åpne den:
1. Skriv "Bruker" fra Start.
2. Klikk på Acer Brukerhåndbok.
Miljø
• Temperatur:
• Drift: 5°C til 35°C
• Ikke i bruk: -20°C til 65°C
• Luftfuktighet (ikke-kondenserende):
• Drift: 20% til 80%
• Ikke i bruk: 20% til 80%
Norsk
Page 92

4
En omvisning i Acer-notisboken
En omvisning i Acer-notisboken
Når du har satt opp datamaskinen som vist på plakaten, la oss ta en
omvisning i din nye Acer-notisbokmaskin.
Skjermvisning
Norsk
1
5
2
4
3
# Ikon Element Beskrivelse
Webkamera til videokommunikasjon.
1Webkamera
2 Berøringsskjerm
3 Mikrofon Intern mikrofon for lydinnspilling.
Strømindikator
4
Batteriindikator
5 Miljølyssensor Styrer tastaturets og skjermens baklys.
Et lys ved siden av webkameraet angir det
er aktivt.
Viser utdata fra datamaskinen. Støtter
flerberøringsinndata.
Angir datamaskinens strømstatus.
Blå: Datamaskinen er slått på.
Gul, blinker sakte: Datamaskinen er i
standby.
Gul, blinker raskt: Datamaskinen er i
dvale / dyp søvn.
Angir batteriets status.
Gul: Batteriet lades.
Blå: Batteriet er fulladet.
Page 93

Tastaturvisning
1
2
# Ikon Element Beskrivelse
Legger inn data i datamaskinen.
Forsiktig: Ikke bruk en tastaturbeskytter
1Tastatur
2 Pekeplate
eller et lignende deksel ettersom
tastaturets design omfatter
ventilasjonsinntak for kjøling.
Berøringsfølsom pekeenhet.
Pekeplaten og valgknappene danner en
enkelt overflate.
Trykk fast ned på pekeplatens overflate for
å utføre et venstreklikk.
Trykk fast ned i nedre høyre hjørne for å
utføre et høyreklikk.
Sveip høyre kant av pekeplaten innover
for å få tilgang til charms.
5
Norsk
Page 94

6
En omvisning i Acer-notisboken
Bakre visning
1
# Ikon Element Beskrivelse
Norsk
1 HDMI-mikroport
Støtter høydefinisjons digitale
videoforbindelser.
Venstre visning
3 421
# Ikon Element Beskrivelse
1
2 Strøm inn-tilkobling Kobler til en batterieliminator.
Sikker plassering for
utvidet batteri
Har plass til det valgfrie utvidede batteriet.
Kobler til USB-enheter.
3 USB-port
4 Av/på-knapp
Hvis en port er svart, er den USB 2.0kompatibel. Hvis den er blå, er den også
USB 3.0-kompatibel (se nedenfor).
Slår datamaskinen av og på.
Merk: Datamaskinen slås på når du åpner
lokket.
Informasjon om USB 3.0
• Kompatibel med USB 3.0- og tidligere enheter.
• Optimal ytelse oppnås med USB 3.0-sertifiserte enheter.
• Definert av USB 3.0-spesifikasjonen (SuperSpeed USB).
Page 95

Høyre visning
# Ikon Element Beskrivelse
Godtar ett microSD-kort.
1 microSD-kortleser
2
3
4
Headset/høyttalerkontakt
USB-port med
avslått-lading
Sikker plassering for
utvidet batteri
Merk: Skyv inn for å fjerne/installere
kortet.
Bare ett kort kan operere til enhver tid.
Kobler til lydenheter (f.eks. høyttalere,
hodetelefoner) eller et headset med
mikrofon.
Kobler til USB-enheter.
Hvis en port er svart, er den USB 2.0kompatibel. Hvis den er blå, er den også
USB 3.0-kompatibel (se nedenfor).
Har plass til det valgfrie utvidede batteriet.
7
Norsk
1 23 4
Page 96

8
Bruk av tastaturet
Bunnvisning
1
2
Norsk
3
4
# Ikon Element Beskrivelse
Simulerer å fjerne og gjeninstallere
1
2 Skruehull
3 Mikrofon Intern mikrofon for lydinnspilling.
4 Høyttalere Lever lydutdata i stereo.
Bindershull for
batteritilbakestilling
batteriet.
Sett inn en binders inn i hullet og trykk i
fire sekunder for å tilbakestille
datamaskinen.
Skruehull for det valgfrie utvidede
batteriet.
Bruk av tastaturet
Tastaturtastene er i full størrelse, og det finnes egne markør- og Windowstaster.
Hurtigtaster
Datamaskinen bruker hurtigtaster eller tastekombinasjoner for å få tilgang
til datamaskinens kontroller, for eksempel skjermens lysstyrke og
volumutgang.
Når du skal aktivere hurtigtaster, trykker du på og holder <Fn>-tasten inne
før du trykker på den andre tasten i en hurtigtastkombinasjon.
Page 97

Hurtigtast Ikon Funksjon Beskrivelse
<Fn> + <Q> Flymodus
<Fn> + <W>Søvn
<Fn> + <E> Skjermbytte
<Fn> + <R> Blank skjerm
<Fn> + <T> Pekeplate av/på
<Fn> + <Y> Høyttaler av/på Slår høyttalerne av og på.
Aktiverer/deaktiverer
datamaskinens
kommunikasjonsenheter.
Setter datamaskinen i
søvnmodus.
Bytter mellom visning på vanlig
skjerm, ekstern skjerm (hvis
tilkoblet) eller begge deler.
Slå av skjermens
bakgrunnsbelysning for å spare
strøm. Trykk på en hvilken som
helst tast for å gå tilbake.
Slår den interne pekeplaten av
og på.
9
Norsk
<Fn> + <U>
<Fn> + <I> Øk baklysets styrke
<Fn> + <U> +
<I>
<Fn> + <O> Roter skjermen
<Fn> + < >
<Fn> + < >
<Fn> + < >
<Fn> + < > Volum ned Reduserer lydvolumet.
Reduser baklysets
styrke
Baklys av/på
Lysstyrke opp Øker skjermens lysstyrke.
Lysstyrke ned Reduserer skjermens lysstyrke.
Volum opp Øker lydvolumet.
Reduser styrken på tastaturets
baklys
Øker styrken på tastaturets
baklys.
Slå tastaturets baklys av og på.
Merk: Denne funksjonen
deaktiveres hvis lyssensoren
oppdager lyse omgivelser.
Roterer bildet som vises på
skjermen.
Merk: Hvis du vil bruke funksjonstastene (F1, F2 ... osv.), trykker du
på <Fn> og den tilsvarende nummertasten. Med andre ord <Fn> +
<1> for <F1> osv. Under oppstart trykker du på <Fn> + <2> for å gå
inn i BIOS.
Page 98

10
Koble til Internett
Datamaskinens trådløse tilkobling er slått på som standard.
Windows vil oppdage og vise en liste over tilgjengelige nettverk under
oppsett. Velg nettverket og skriv inn passordet hvis nødvendig.
I motsatt fall åpner du Internet Explorer og følger instruksjonene. Kontakt
Norsk
ISPen eller slå opp i ruterdokumentasjonen.
Acer Instant Connect
Instant Connect sikrer en raskere tilkobling til et av nettverkene som
datamaskinen kobler til oftest.
Strømstyring
Denne datamaskinen har en innebygd strømstyringsenhet som overvåker
systemaktivitet, for eksempel aktivitet som involverer en eller flere av
følgende enheter: tastatur, mus, harddisk, periferutstyr koblet til
datamaskin, og skjermminne. Hvis ingen aktivitet blir oppdaget i løpet av
en tidsperiode, stopper datamaskinen noen av eller alle disse enhetene for
å spare energi.
Acer Green Instant On
Acer Green Instant On kan vekke opp datamaskinen fra søvnmodus på
kortere tid enn det tar å åpne lokket. Når du lukker lokket eller forlater
datamaskinen en stund, går datamaskinen inn i søvnmodus. Mens
datamaskinen er i søvnmodus, vil strømlampen blinke oransje.
Åpne lokket, eller trykk på en vilkårlig tast for å vekke opp datamaskinen fra
søvnmodus.
Etter en viss tid i søvnmodus vil datamaskinen automatisk gå inn i Dyp
søvn for å bevare batterilevetid. Når datamaskinen er i Dyp søvn, vil
strømlampen slås av. I denne tilstanden vil batteriet være klart til bruk i
mange uker.
Datamaskinen våkner opp fra dyp søvn når du åpner lokket. I motsatt fall
trykker du på strømknappen.
Page 99

Merk: Så snart PCen er i Dyp søvn, forbruker det betydelig mindre
strøm sammenlignet med søvnmodus. Det tar imidlertid lengre tid å
vekke den fra Dyp søvn.
Dyp søvn og søvnmodus er koordinert for å sikre at datamaskinen sparer
så mye strøm som mulig. Samtidig tillater systemet rask, øyeblikkelig
tilgang.
For å spare mer strøm vil datamaskinen vanligvis gå inn i og holde seg i
Dyp søvn i perioder når med lavt behov for tilgang, for eksempel midt på
natten. For å tilby raskere tilgang vil datamaskinen gå inn i og holde seg i
søvnmodus i travlere perioder, for eksempel i arbeidstiden.
11
Norsk
Part no.: NC.M4211.00W
Ver.: 01.01.03
Page 100

 Loading...