

Acer ASPIRE A3-600 User Manual
Aspire A3-600
User’s Manual

© 2013. All Rights Reserved.
Aspire A3-600 User's Manual
Model: A3-600
This Revision: 09/2013
Acer A3-600
Model number: __________________________________
Serial number*: ___________________________________
Date of purchase: ________________________________
Place of purchase: ________________________________
2
*Note: See the back of the A3-600.

Table of contents
Getting to know your A3 -600
Features and functions . . . . . . . . . . . . . . . . . . . . . . . . . . . . . . . . . . . . . . . . . . . .4
Product registration . . . . . . . . . . . . . . . . . . . . . . . . . . . . . . . . . . . . . . . . . . . . . .4
Setting up
Unpacking your A3-600 . . . . . . . . . . . . . . . . . . . . . . . . . . . . . . . . . . . . . . . . . . .5
Getting to know your A3-600 . . . . . . . . . . . . . . . . . . . . . . . . . . . . . . . . . . . . . . .6
Using your A3-600
Setting up your A3-600 . . . . . . . . . . . . . . . . . . . . . . . . . . . . . . . . . . . . . . . . . . . .9
Turning on for the first time . . . . . . . . . . . . . . . . . . . . . . . . . . . . . . . . . . . . . . . . .9
Using the touchscreen . . . . . . . . . . . . . . . . . . . . . . . . . . . . . . . . . . . . . . . . . . .10
The Home screen . . . . . . . . . . . . . . . . . . . . . . . . . . . . . . . . . . . . . . . . . . . . . . .10
The onscreen keyboard . . . . . . . . . . . . . . . . . . . . . . . . . . . . . . . . . . . . . . . . . .15
Editing text . . . . . . . . . . . . . . . . . . . . . . . . . . . . . . . . . . . . . . . . . . . . . . . . . . . .16
Locking your A3-600 . . . . . . . . . . . . . . . . . . . . . . . . . . . . . . . . . . . . . . . . . . . . .18
Shutting down your A3-600 . . . . . . . . . . . . . . . . . . . . . . . . . . . . . . . . . . . . . . .18
Connecting devices to your A3-600
Connecting to AC power . . . . . . . . . . . . . . . . . . . . . . . . . . . . . . . . . . . . . . . . . .19
Inserting a SD card (optional) . . . . . . . . . . . . . . . . . . . . . . . . . . . . . . . . . . . . . . 19
Connecting a USB device to your A3-600 . . . . . . . . . . . . . . . . . . . . . . . . . . . .19
Connecting to a router or modem . . . . . . . . . . . . . . . . . . . . . . . . . . . . . . . . . . .19
Connecting a Bluetooth device . . . . . . . . . . . . . . . . . . . . . . . . . . . . . . . . . . . . .20
Using the webcam
Using the webcam as a camera . . . . . . . . . . . . . . . . . . . . . . . . . . . . . . . . . . . .2 1
Using the webcam to record a video . . . . . . . . . . . . . . . . . . . . . . . . . . . . . . . .22
Viewing photos and videos . . . . . . . . . . . . . . . . . . . . . . . . . . . . . . . . . . . . . . . .23
Advanced settings
Wireless & Networks . . . . . . . . . . . . . . . . . . . . . . . . . . . . . . . . . . . . . . . . . . . .24
Device . . . . . . . . . . . . . . . . . . . . . . . . . . . . . . . . . . . . . . . . . . . . . . . . . . . . . . . .25
Personal . . . . . . . . . . . . . . . . . . . . . . . . . . . . . . . . . . . . . . . . . . . . . . . . . . . . . . 26
System . . . . . . . . . . . . . . . . . . . . . . . . . . . . . . . . . . . . . . . . . . . . . . . . . . . . . . .27
Updating your A3-600’s operating system . . . . . . . . . . . . . . . . . . . . . . . . . . . . 27
Resetting your A3-600 . . . . . . . . . . . . . . . . . . . . . . . . . . . . . . . . . . . . . . . . . . .28
FAQ and troubleshooting
Other sources of help . . . . . . . . . . . . . . . . . . . . . . . . . . . . . . . . . . . . . . . . . . . . 3 0
3

Getting to know your A3-600
Features and functions
Your new A3-600 offers leading, easy-to-access multimedia and entertainment
features. You can:
• Connect to the Internet.
• Access your email.
• Play music and video.
• Keep in touch with your friends via your People and social networking apps.
• View content from an HDMI device.
Product registration
When using your product for the first time, it is recommended that you immediately
register it. This will give you access to useful benefits, such as:
• Faster service from our trained representatives.
• Membership in the Acer community: receive promotions and participate in
customer surveys.
• The latest news from Acer.
Hurry and register, as other advantages await you!
How to register
To register your Acer product, please visit www.acer.com. Tap REGISTER A
PRODUCT and follow the simple instructions.
You can also register directly from your A3-600 by tapping the Registration icon.
After we receive your pro duc t registration, you will be sent a confirmation em ail wi th
important data that you should keep in a safe place.
4

Setting up
Unpacking your A3-600
Your new A3-600 comes packed in a protective box. Carefully unpack the box and
remove the contents. If any of the following items is missing or damaged, contact
your dealer immediately:
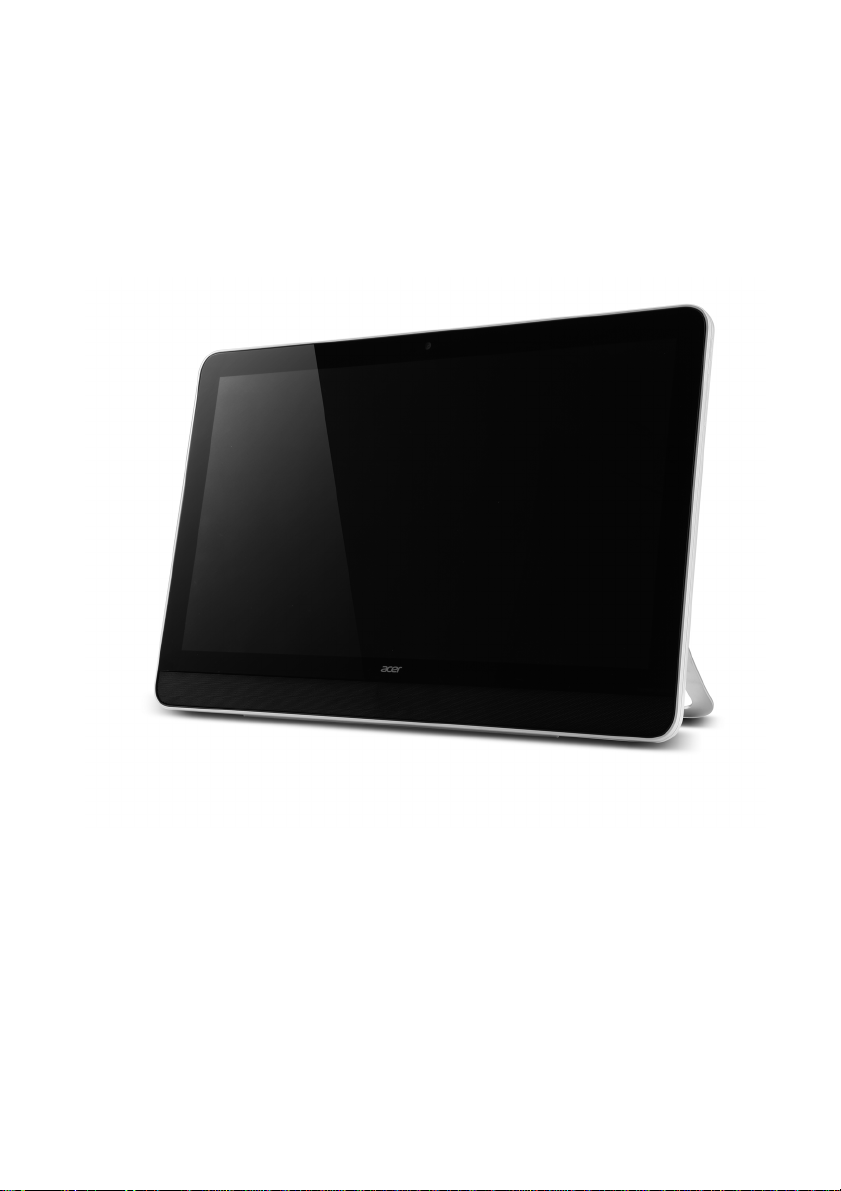
• Acer A3-600
• Setup guide
• USB cable
• HDMI cable (optional)
• Audio cable
• AC adapter
• Warranty card
5Unpacking your A3-600
Getting to know your A3-600
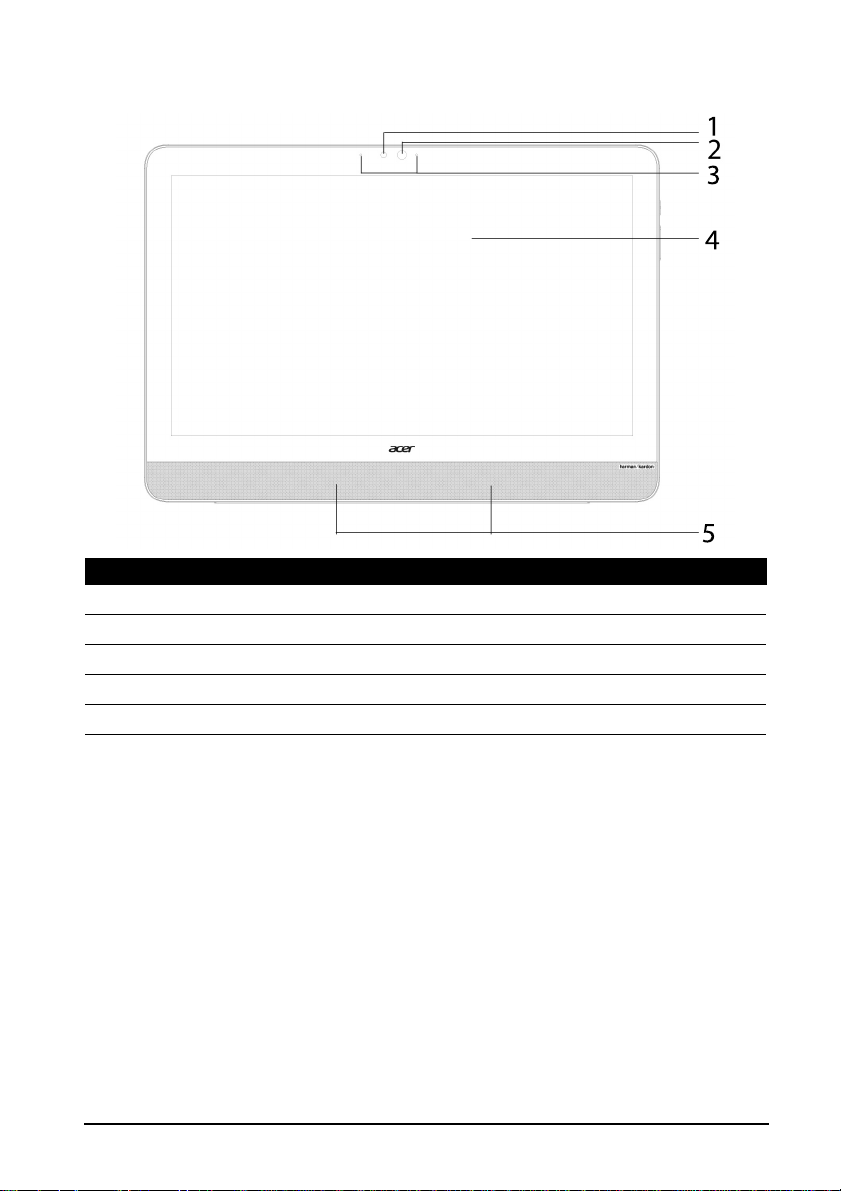
Front view
No. Item Description
1 Ambient light sensor Detects light le vels an d adjus ts di splay brightn ess .
2 Front-facing camera A 1-megapixel camera for video chats.
3 Microphones Receive audio for video chats and Internet calls.
4 Touchscreen 21.5” 1920 x 1080 optical touch screen.
5 Speakers Emit stereo audio.
6
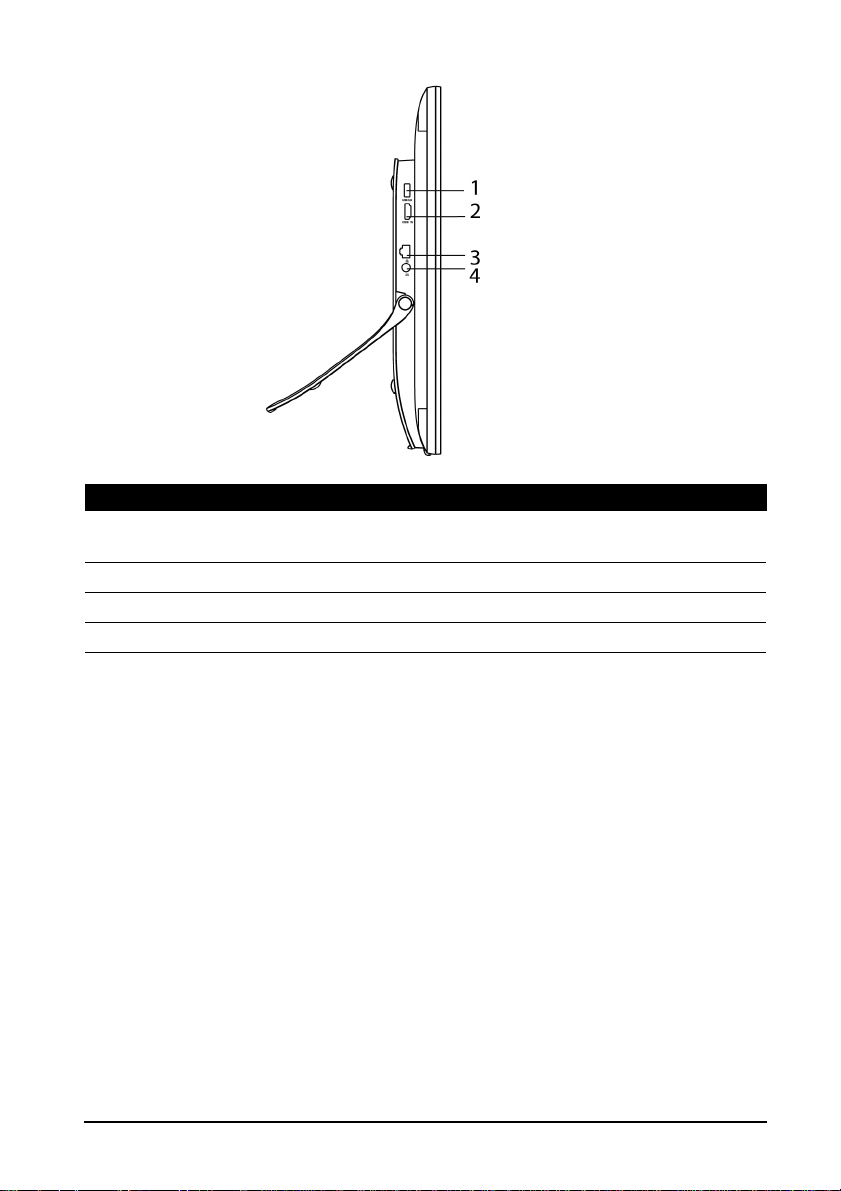
Left view
No. Item Description
1 USB 3.0 port Connects to external USB devices, such as a
keyboard, mouse or storage device.
2 HDMI-in port (MHL) Supports high-definition digital video connections.
3 Ethernet (RJ-45) port Connects to an Ethernet network.
4 DC-in jack Connects to the DC power supply.
7Getting to know your A3-600
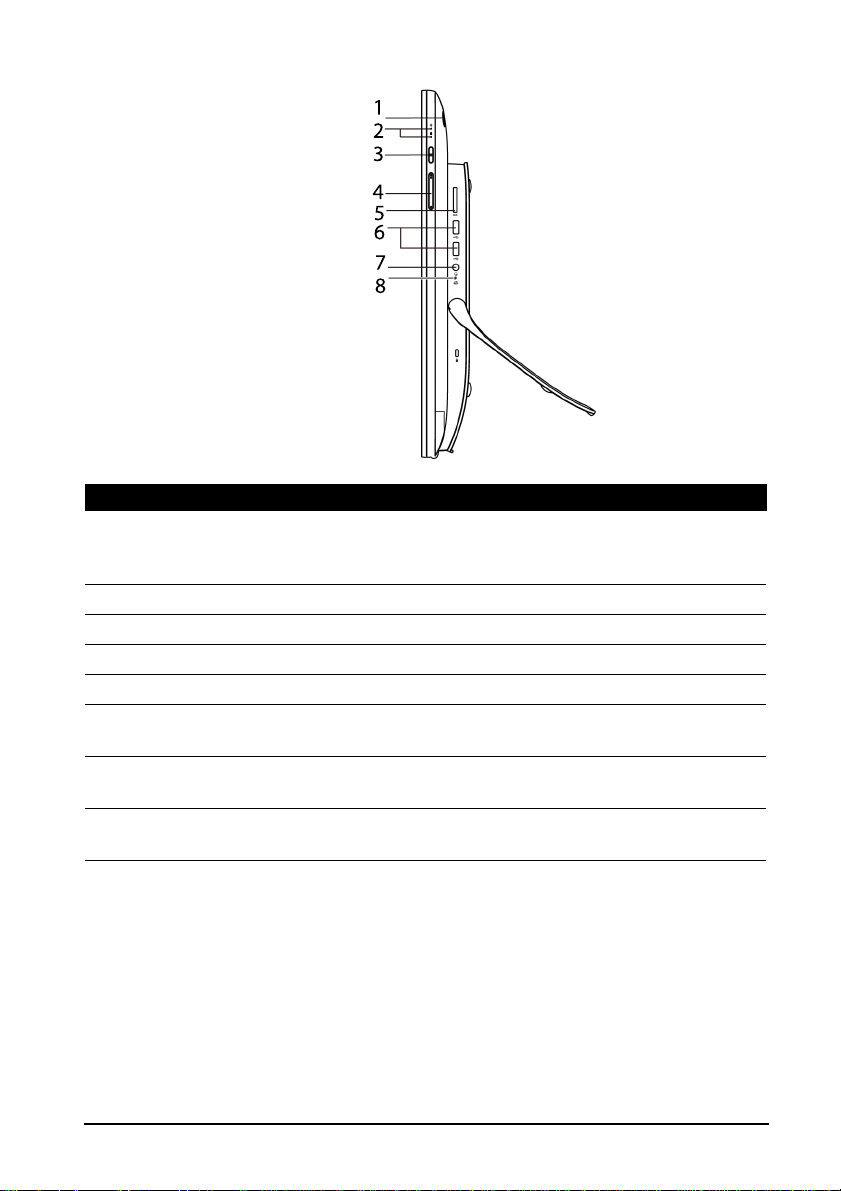
Right view
No. Item Description
1 Power button Press and hold to turn the A3-600 on, pres s briefly
to turn the screen on/off or enter sleep mode;
press and hold to turn the A3-600 off.
2 Indicators Indicates power / driv es status.
3 Input switch key Press to switch input source.
4 Volume control key Increases and decreases the volume.
5 Card reader slot Insert a memory card.
6 USB ports Connects to external USB devices, such as a
keyboard, mouse or storage device.
7 Audio combo jack Connects to audio devices (e.g., speakers,
headphones) or a headset with microphone.
8 Shutdown pinhole Insert a small thin object (such as a paperclip) to
shut down the computer.
8
Using your A3-600
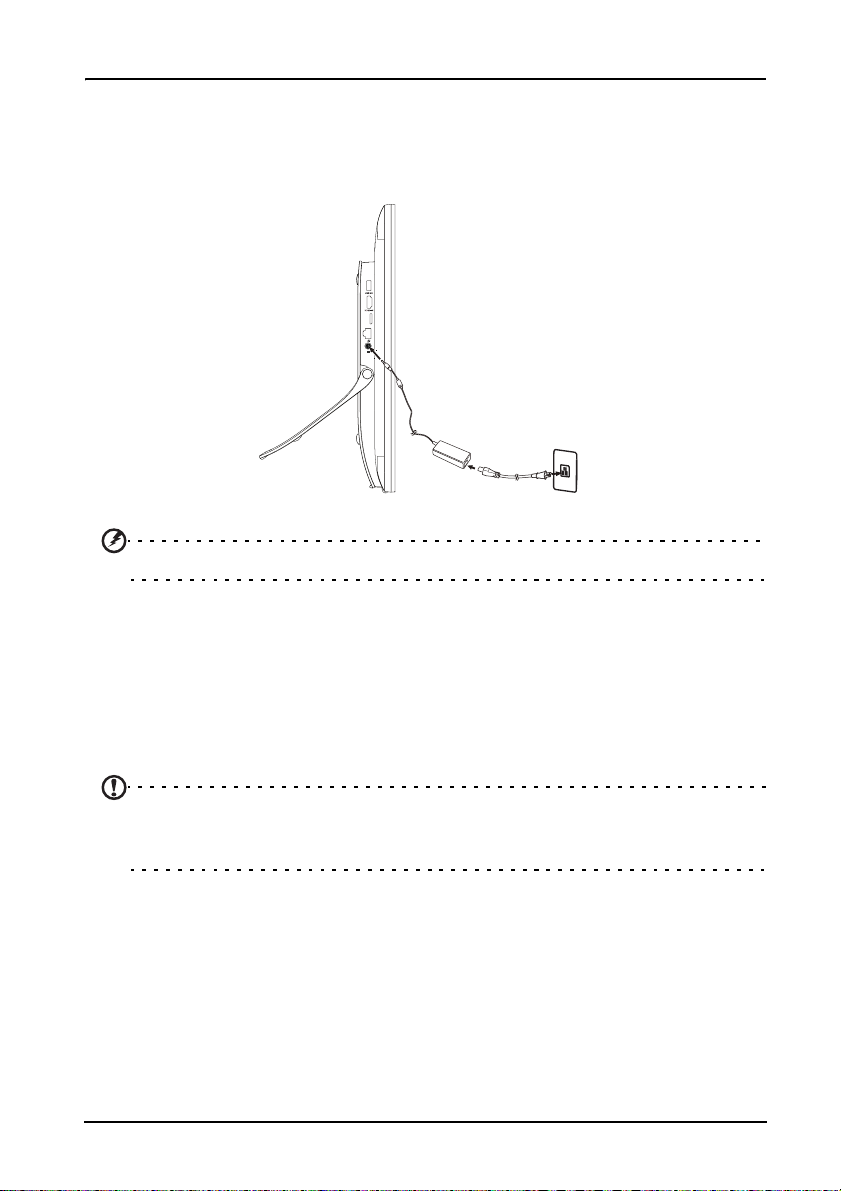
Setting up your A3-600
Open the stand and ti lt t he comput er to you r de sired v iewing a ngle. C onne ct the DC in jack to your A3-600 and plug the AC adapter into any AC outlet.
Warning: Only use the bundled power adapter to power your A3-600.
Turning on for the first time
To turn on your A3-600, press and hold the power button until the screen turns on.
Wait a moment for yo ur A3-600 to ge t read y. Y ou will then be aske d some qu estions
before you can use your A3-600.
To start, tap to select your language and country, then tap Start. Follow the rest of
the instr uctions as they are displayed.
Note: If the A3-600’s screen turns off, it has entered sleep mode. Briefly press
the power button to wak e it up. For m ore info rmation, see "Waking your A3-600 "
on page 18.
Sign in to or create a Google account
If you have Internet acces s , yo ur A3-6 00 a llo w s you to synchronize information with
a Google account.
During the start-up process, you may create or sign in to an account, which will be
used to synchronize your contact list, email, calendar and other information. If you
do not yet have Internet access, or do not want to use this feature, then tap Skip.
9Setting up your A3-600
 Loading...