

Acer Aspire 8920 Service Manual

Aspire 8920 Series
Service Guide
Service guide files and updates are available
on the ACER/CSD web; for more information,
please refer to http://csd.acer.com.tw
PRINTED IN TAIWAN

Revision History
Please refer to the table below for the updates made on Aspire 8920 service guide.
Date Chapter Updates
II

Copyright
Copyright © 2008 by Acer Incorporated. All rights reserved. No part of this publication may be reproduced,
transmitted, transcribed, stored in a retrieval system, or translated into any language or computer language, in
any form or by any means, electronic, mechanical, magnetic, optical, chemical, manual or otherwise, without
the prior written permission of Acer Incorporated.
Disclaimer
The information in this guide is subject to change without notice.
Acer Incorporated makes no representations or warranties, either expressed or implied, with respect to the
contents hereof and specifically disclaims any warranties of merchantability or fitness for any particular
purpose. Any Acer Incorporated software described in this manual is sold or licensed "as is". Should the
programs prove defective following their purchase, the buyer (and not Acer Incorporated, its distributor, or its
dealer) assumes the entire cost of all necessary servicing, repair, and any incidental or consequential
damages resulting from any defect in the software.
Acer is a registered trademark of Acer Corporation.
Intel is a registered trademark of Intel Corporation.
Pentium and Pentium II/III are trademarks of Intel Corporation.
Other brand and product names are trademarks and/or registered trademarks of their respective holders.
III

Conventions
The following conventions are used in this manual:
SCREEN MESSAGES Denotes actual messages that appear
on screen.
NOTE Gives bits and pieces of additional
information related to the current
topic.
WARNING Alerts you to any damage that might
result from doing or not doing specific
actions.
CAUTION Gives precautionary measures to
avoid possible hardware or software
problems.
IMPORTANT Reminds you to do specific actions
relevant to the accomplishment of
procedures.
IV

Preface
Before using this information and the product it supports, please read the following general information.
1. This Service Guide provides you with all technical information relating to the BASIC CONFIGURATION
decided for Acer's "global" product offering. To better fit local market requirements and enhance product
competitiveness, your regional office MAY have decided to extend the functionality of a machine (e.g.
add-on card, modem, or extra memory capability). These LOCALIZED FEATURES will NOT be covered
in this generic service guide. In such cases, please contact your regional offices or the responsible
personnel/channel to provide you with further technical details.
2. Please note WHEN ORDERING FRU PARTS, that you should check the most up-to-date information
available on your regional web or channel. If, for whatever reason, a part number change is made, it will
not be noted in the printed Service Guide. For ACER-AUTHORIZED SERVICE PROVIDERS, your Acer
office may have a DIFFERENT part number code to those given in the FRU list of this printed Service
Guide. You MUST use the list provided by your regional Acer office to order FRU parts for repair and
service of customer machines.
V

VI

System Specifications
Features
Below is a brief summary of the computer’s many feature:
Operating system
• Windows Vista™
NOTE: Windowsl® VistaTM Capable PCs come with Windows® XP installed, and can be upgraded to
Windows
Microsoft.com/windowsvista.
Platform and memory
Intel® Core™2 Duo mobile processor Mobile Intel® GM965 Express Chipset
Mobile Intel® GM965 Express Chipset
Intel® Wireless WiFi Link Wi-Fi CERTIFIED® network connection, or Intel® PRO/Wireless Wi-Fi
CERTIFIED® network connection
System memory •
Dual-Channel DDR2 SDRAM support
Up to 2 GB of DDR2 667 MHz memory, upgradeable to 4 GB using two soDIMM modules
®
VistaTM. For more information on Windows® VistaTM and how to upgrade, go to:
Chapter 1
Display and graphics
18.4" WUXGA
NV ID IA ® G eF orc e® 965 0M GS wit h u p to 128 0 M B of Turbo Ca ch e™ o r N VID IA ® Ge Fo rc e®
8600M GT with up to 1280 MB of TurboCache™
TV-tuner
Digital TV-tuner supporting DVB-T
Audio
Dolby® -certified surround sound system with five built-in stereo speakers and one subwoofer
supporting lowfrequency effects
S/PDIF (Sony/Philips Digital Interface) support for digital speakers
Built-in stereo microphones
Storage subsystem
2.5" hard disk drive
Optical drive options:
Blu-ray Disc™ (BD) drive
DVD-Super Multi double-layer drive
6-in-1 card reader
Input devices
105-/106-key keyboard
Touchpad pointing device
Acer CineDash media console capacitive human interface device
Chapter 1 1

Communication
Acer Video Conference, featuring:
Integrated Acer Crystal Eye webcam
Acer PureZone technology
Optional Acer Xpress VoIP phone
WLAN:
Intel® Wireless WiFi Link network connection or Intel® PRO/Wireless network connection
I/O Ports
ExpressCard™/54 slot
6-in-1 card reader (SD™, MMC, MMCplus™, MS, MS PRO, xD)
USB 2.0 ports
HDMI™ port with HDCP support
Consumer infrared (CIR) port
External display (VGA) port
Headphone/speaker/line-out jack with S/PDIF support
Microphone-in jack
Line-in jack
Ethernet (RJ-45) port
Modem (RJ-11) port
DC-in jack for AC adapter
Environment
Temperature:
•operating: 5 C to 35 C
•Non-operating: -20 C to 65 C
Humidity (non-condensing):
•operating: 20%~80%
•Non-operating: 20%~80%
°°
°°
2 Chapter 1

System Block Diagram
Chapter 1 3
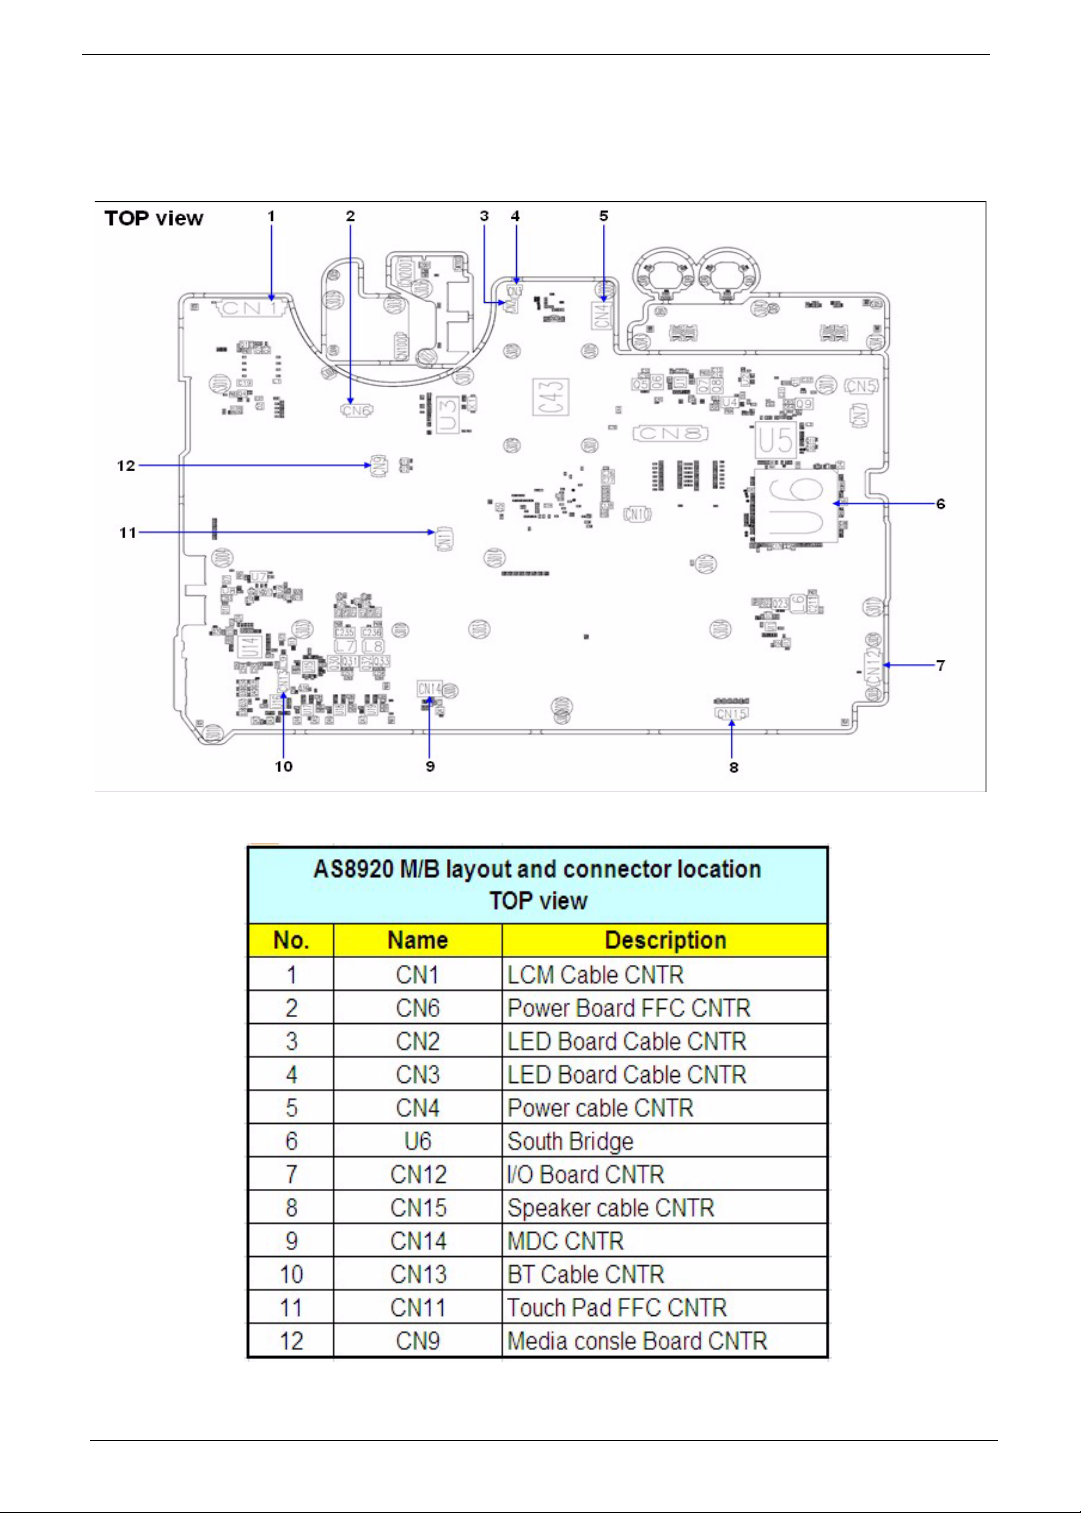
Board Layout
4 Chapter 1
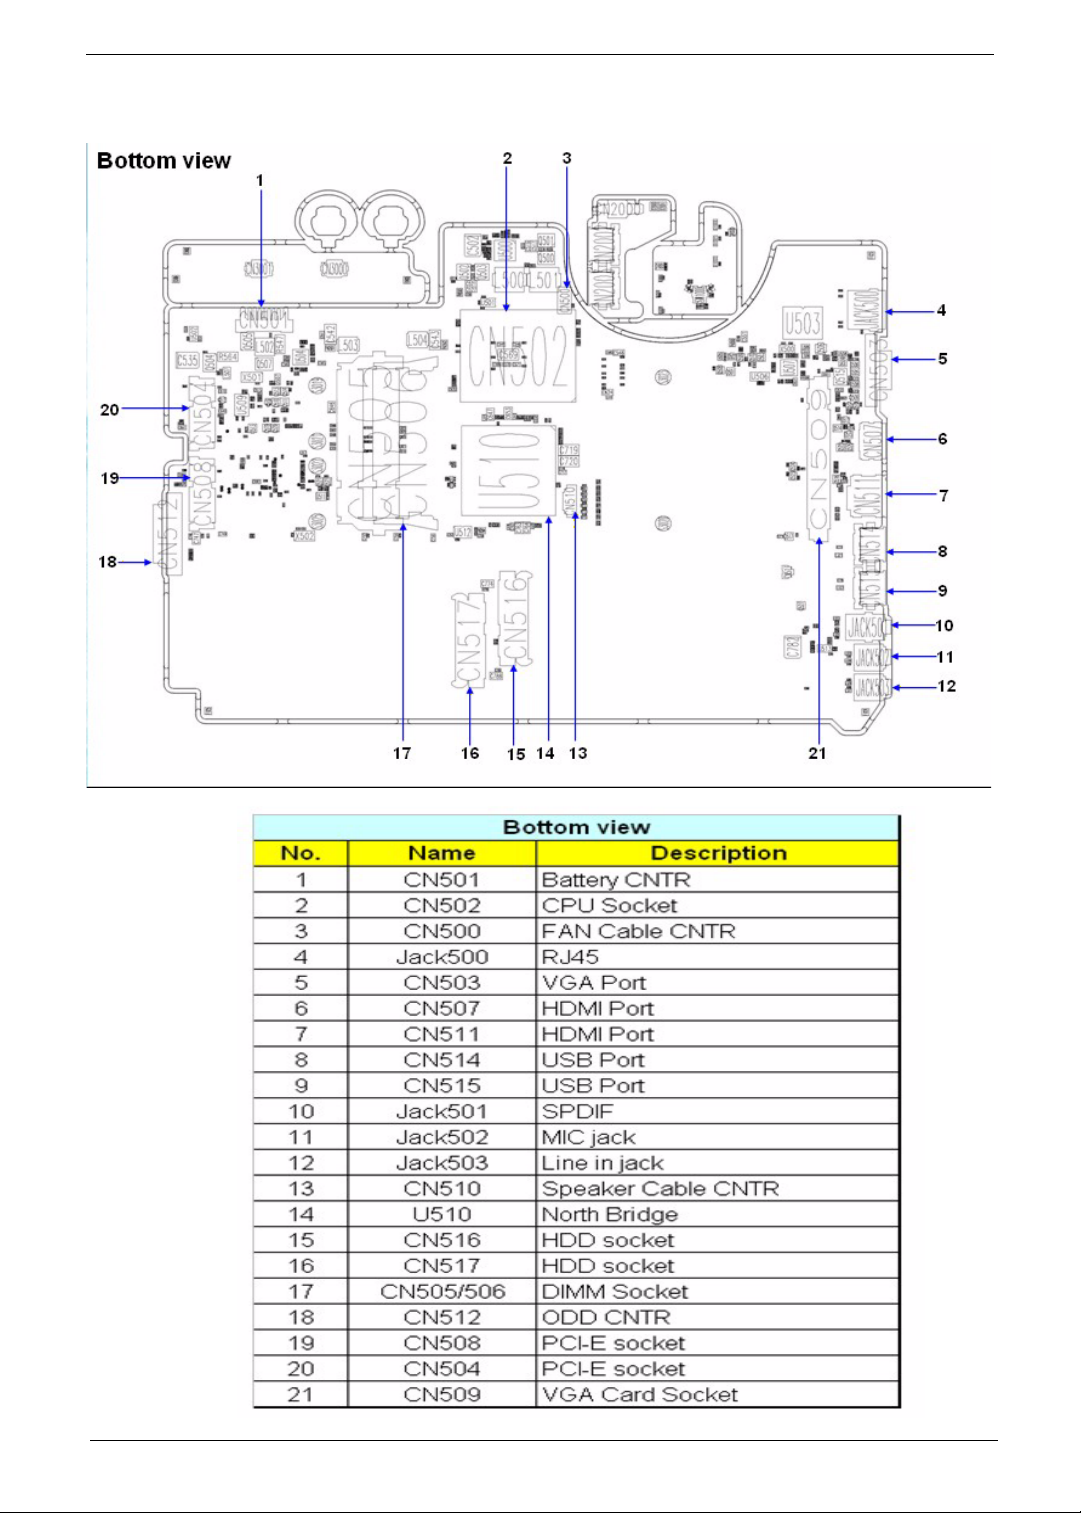
Chapter 1 5
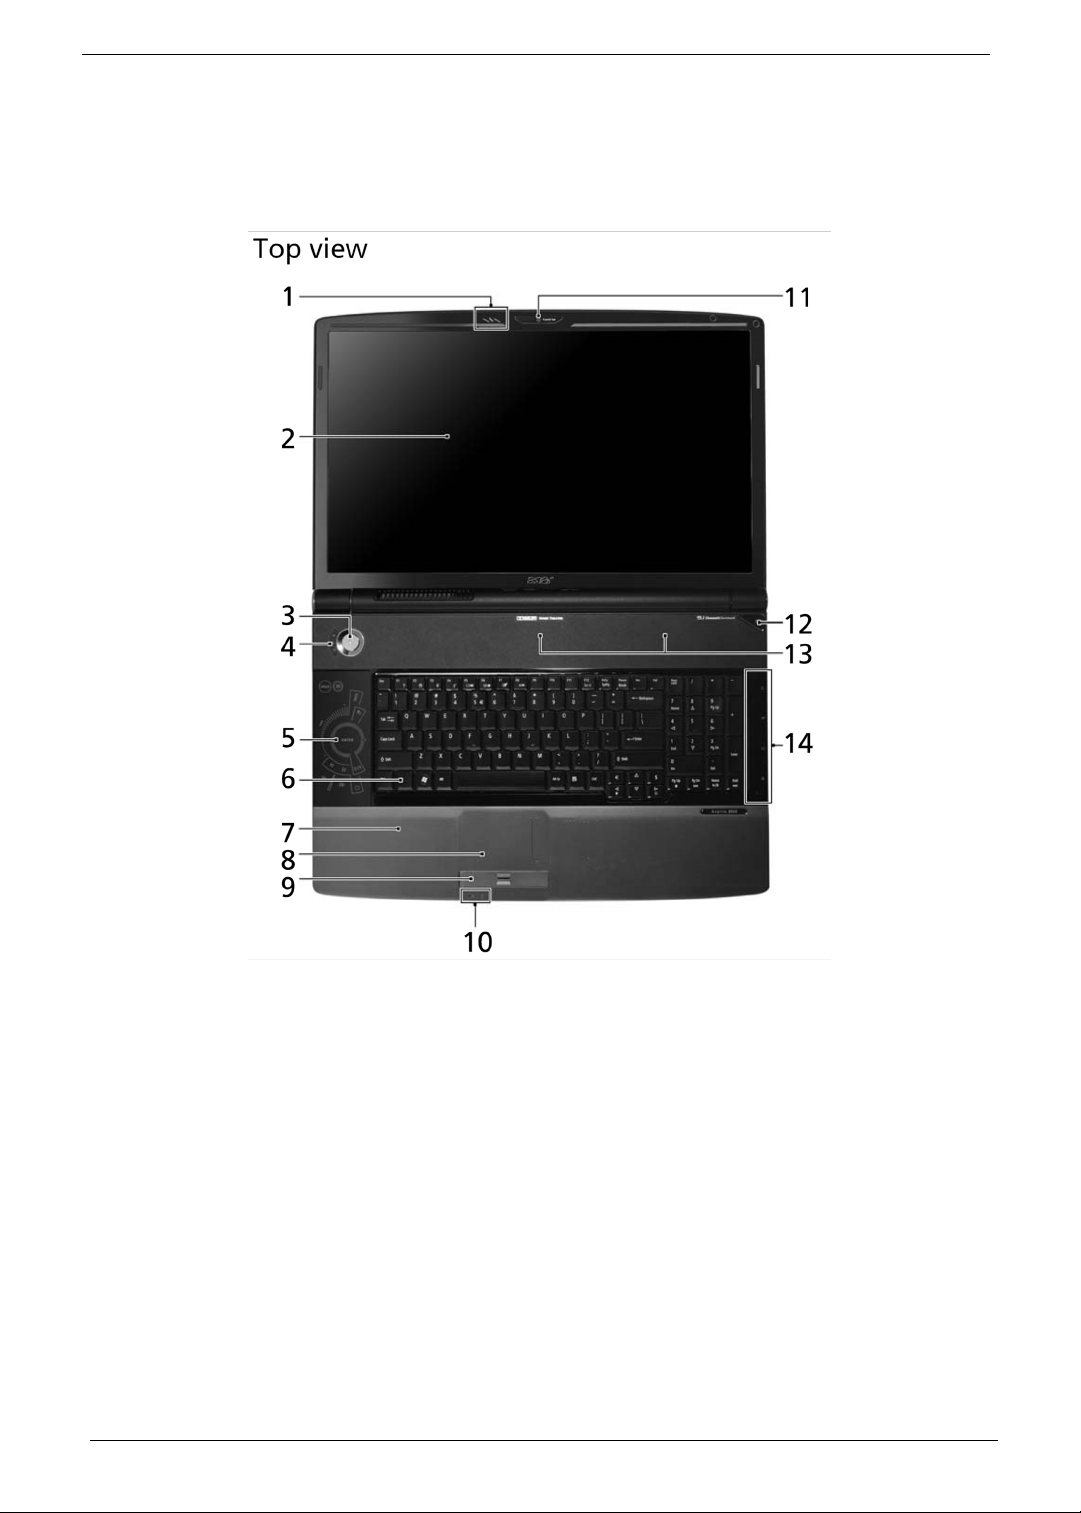
Your Acer Notebook tour
After knowing your computer features, let us show you around your new Aspire computer.
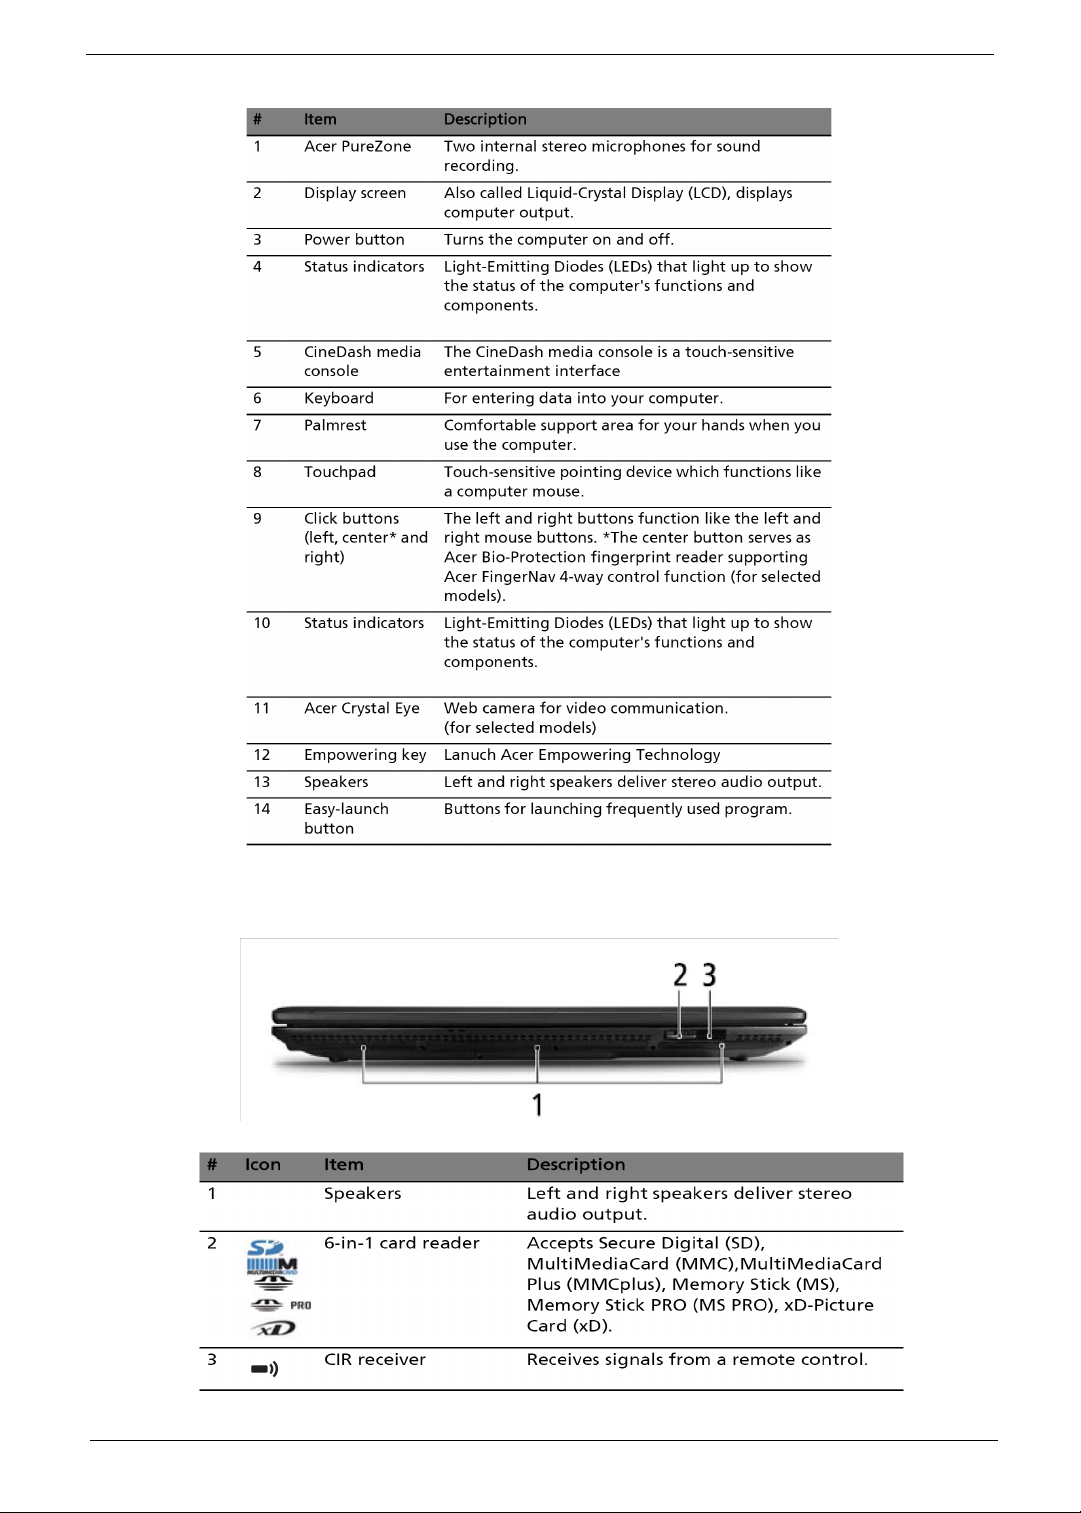
Front View
6 Chapter 1
Closed Front View
Chapter 1 7
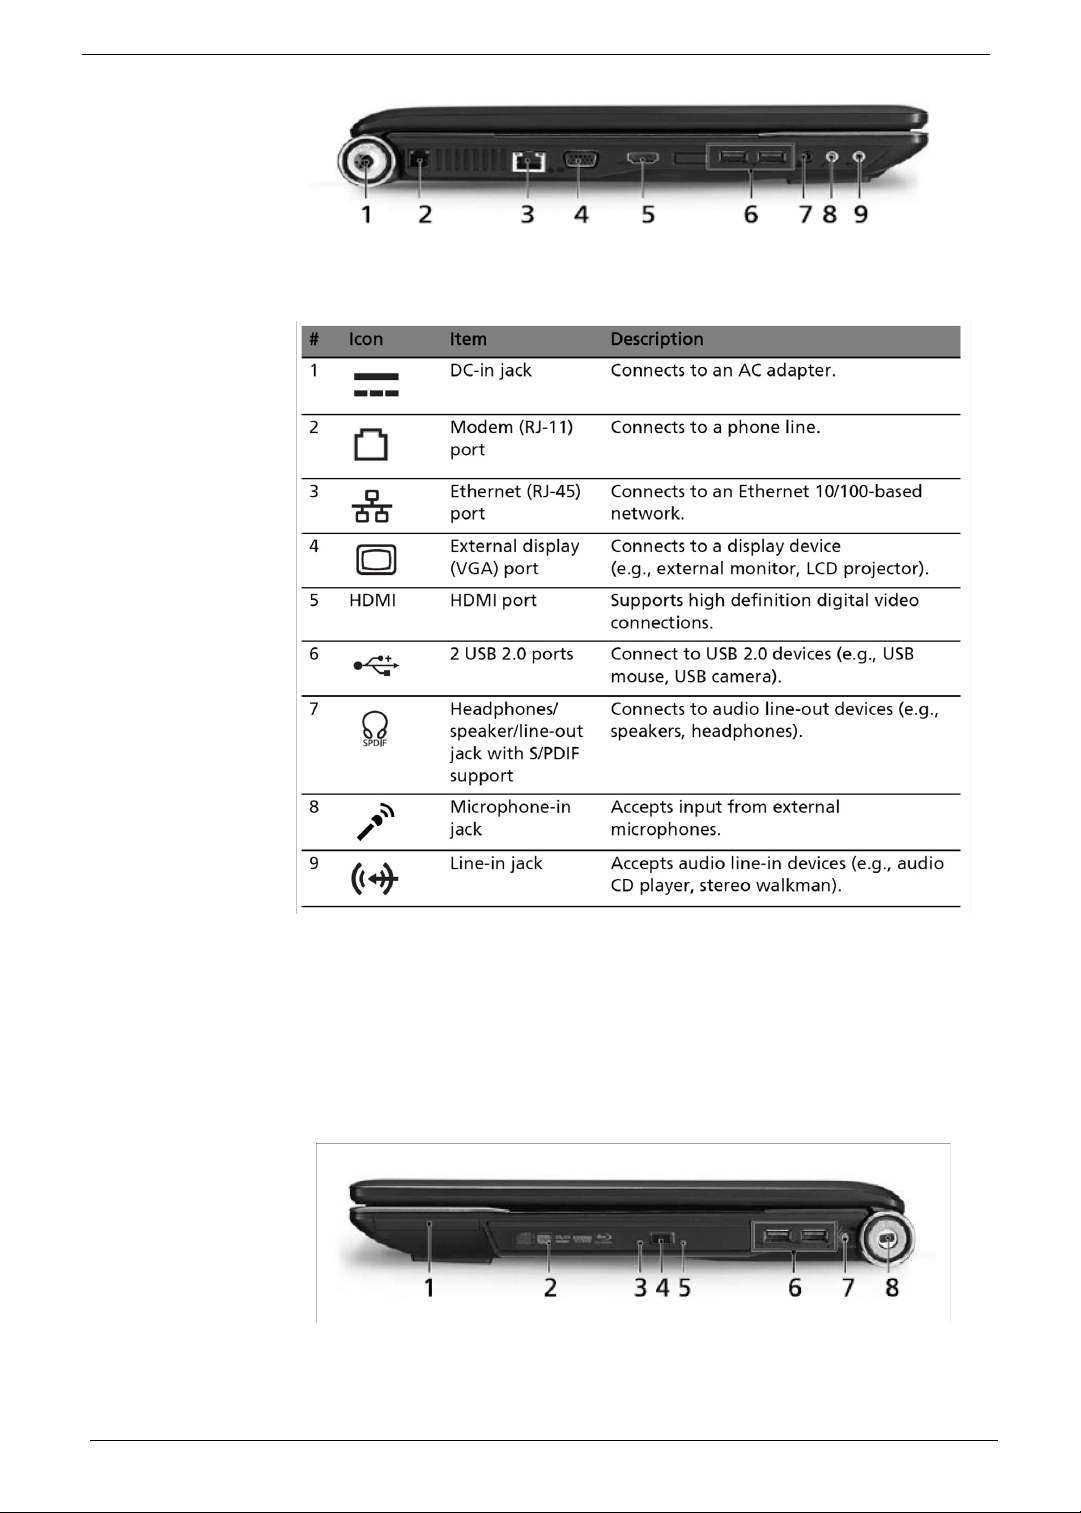
Left View
Notice:
The HDMI connector on Aspire 8920G equals to a singal DVI connector, not dual DVI mode.
Therefore its maximum supporting output resolution is 1920x1200.
Right View
8 Chapter 1
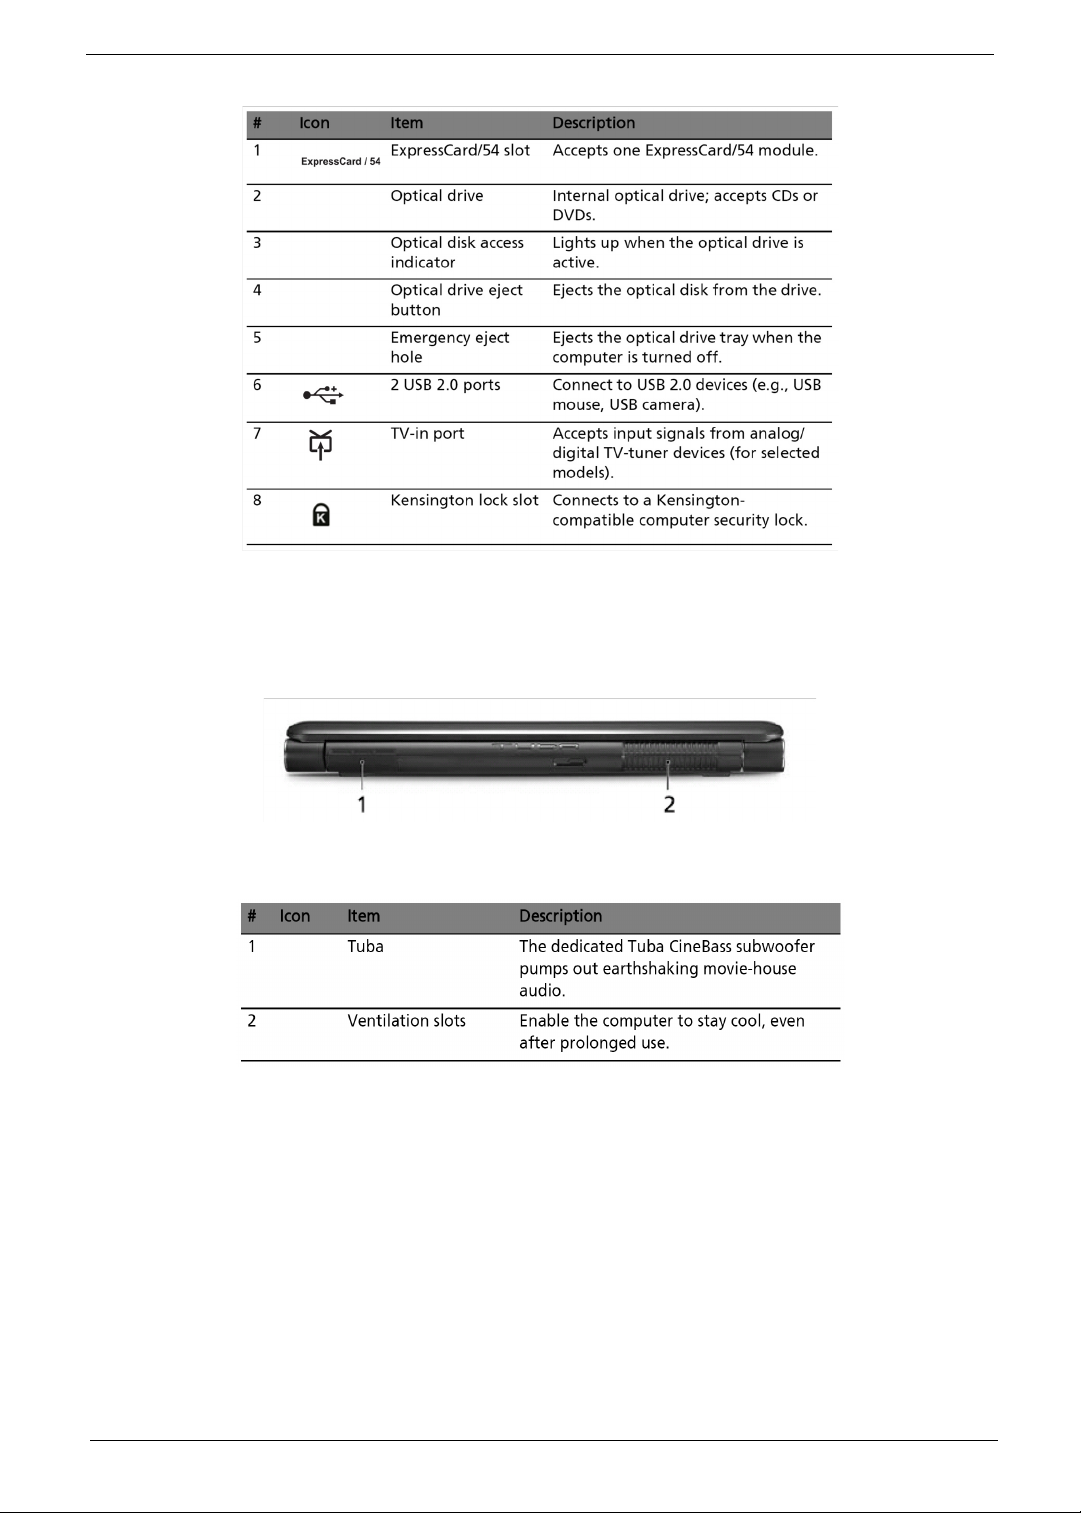
Rear view
Chapter 1 9
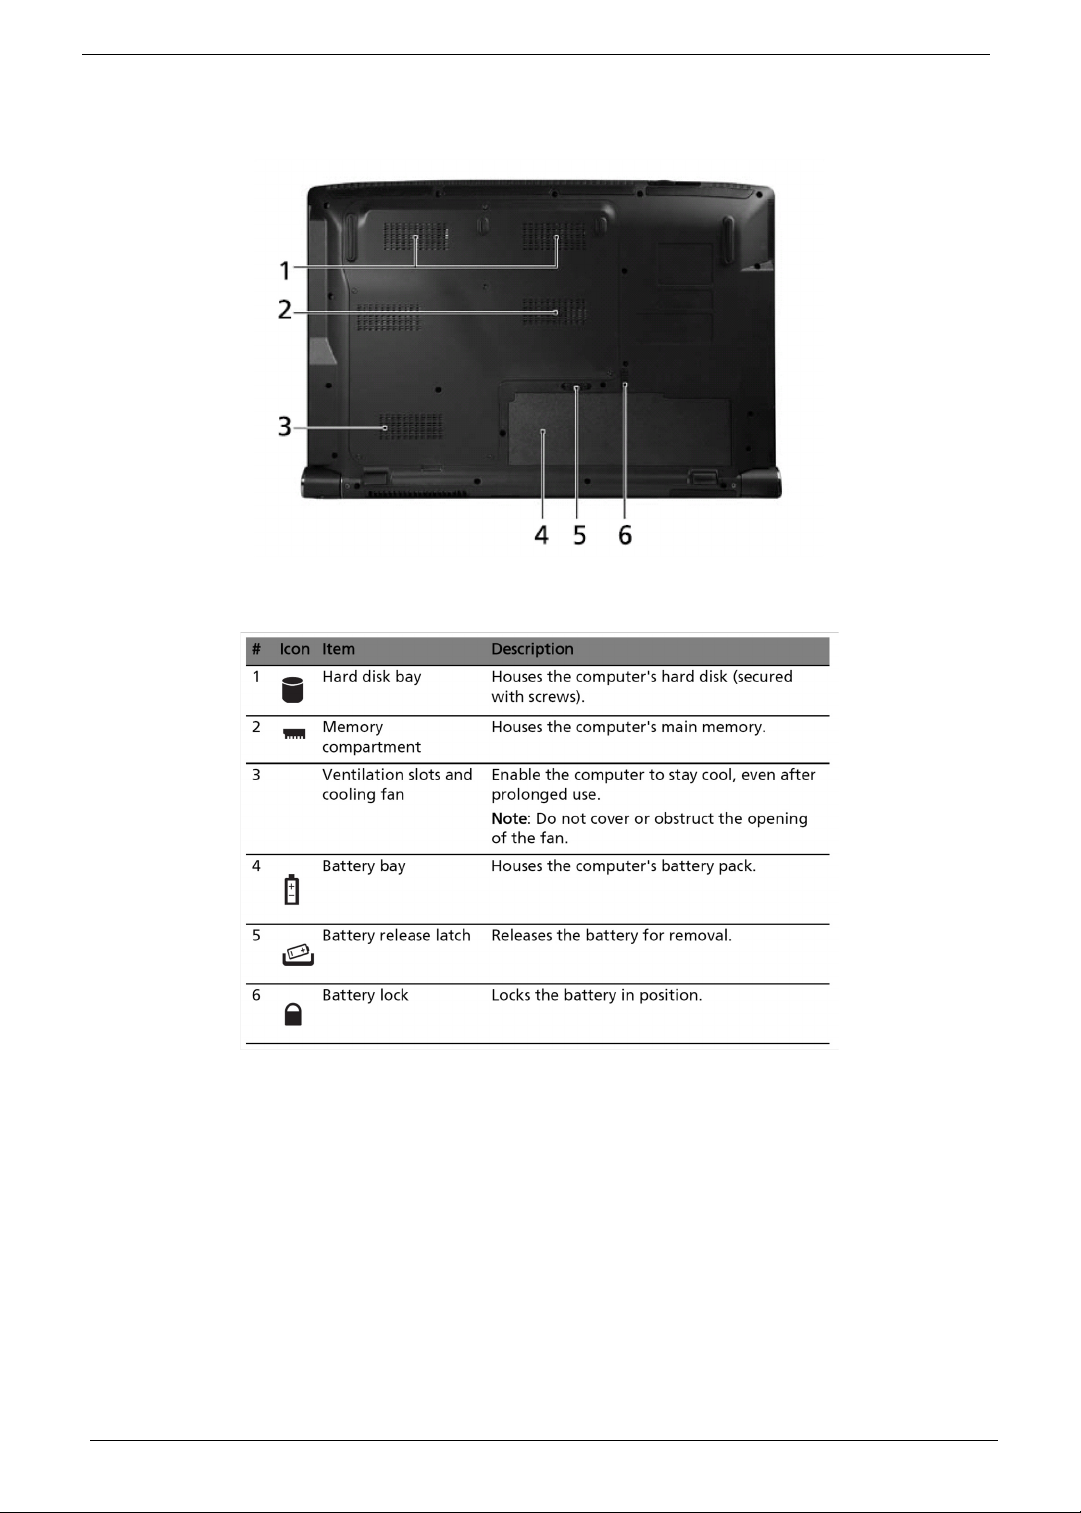
Base view
Indicators
The computer has several easy-to-read status indicators.
10 Chapter 1
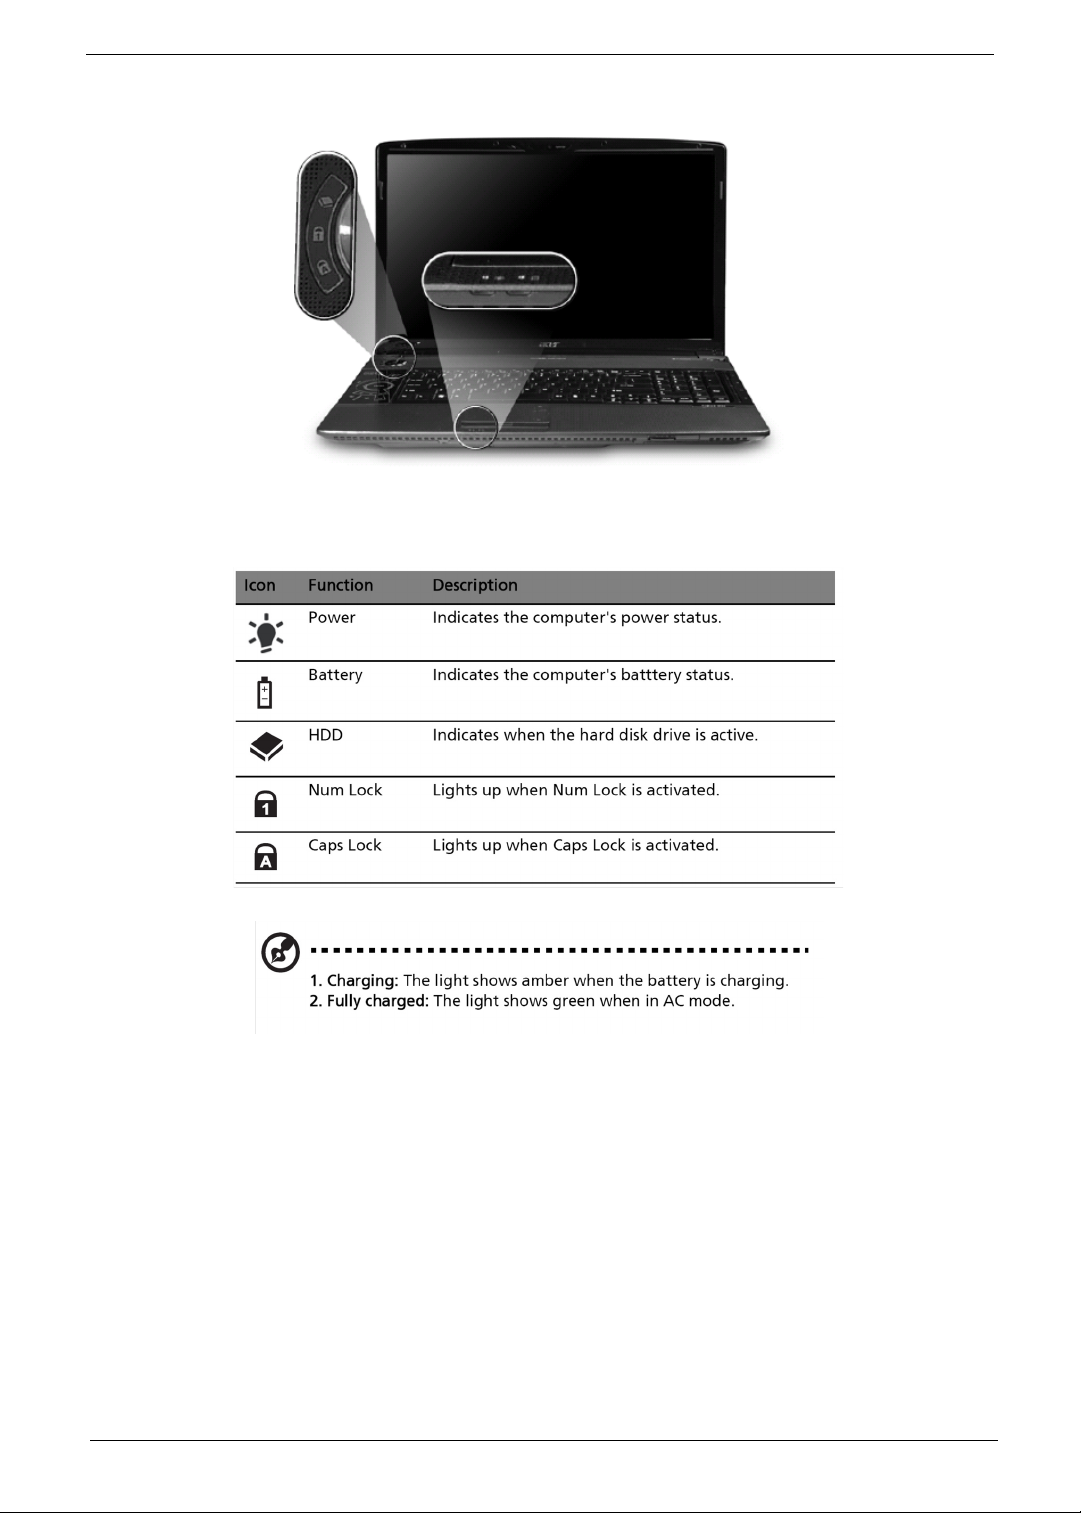
The front panel indicators are visible even when the computer cover is closed up.
NOTE:
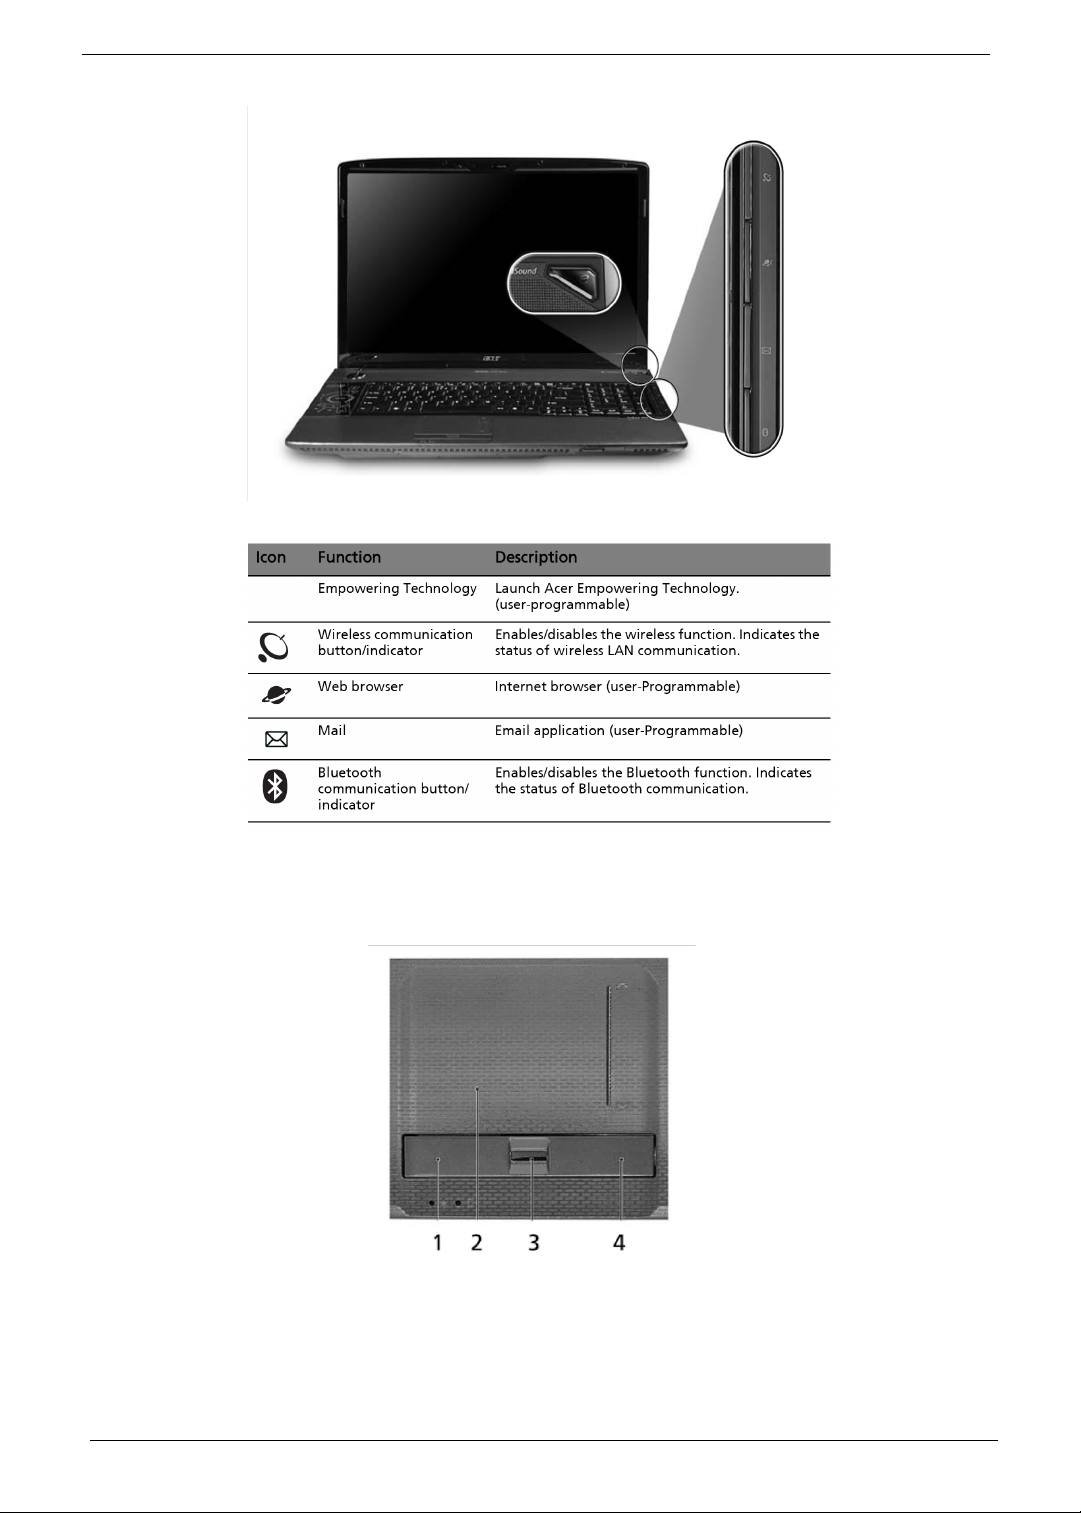
Easy-Launch Buttons
Located beside the keyboard are application buttons. These buttons are called easy-launch buttons. They are:
WLAN, Internet, email, Bluetooth and Acer Empowering Technology.
The mail and Web browser buttons are pre-set to email and Internet programs, but can be reset by users. To set
the Web browser, mail and programmable buttons, run the Acer Launch Manager.
Chapter 1 11
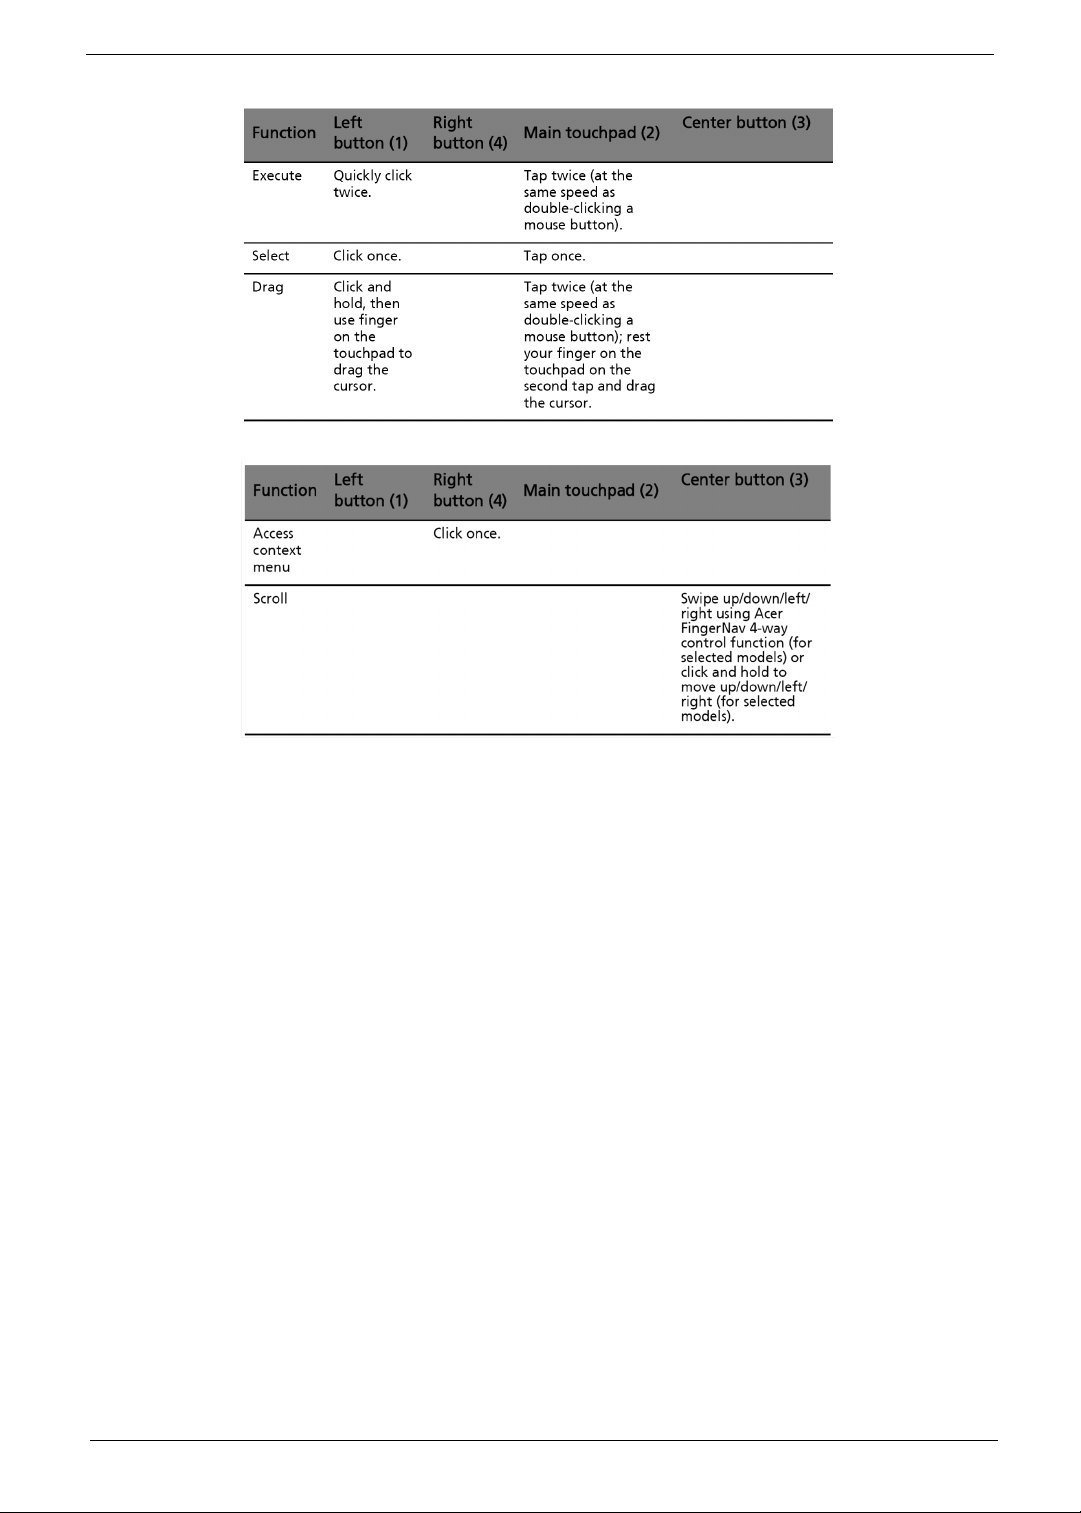
Touchpad Basics
The following teaches you how to use the touchpad:
Move your finger across the touchpad (2) to move the cursor.
Press the left (1) and right (4) buttons located beneath the touchpad to perform selection and execution
functions. These two buttons are similar to the left and right buttons on a mouse. Tapping on the touchpad is
the same as clicking the left button.
Use the 4-way scroll (3) button to scroll up or down and move left or right a page. This button mimics your
cursor pressing on the right scroll bar of Windows applications.
12 Chapter 1
NOTE: When using the touchpad, keep it - and your infers - dry and clean. The touchpad is sensitive to finger
movements; hence, the lighter the touch, the better the response. Tapping too hard will not increase the
touchpad’s responsiveness.
Chapter 1 13
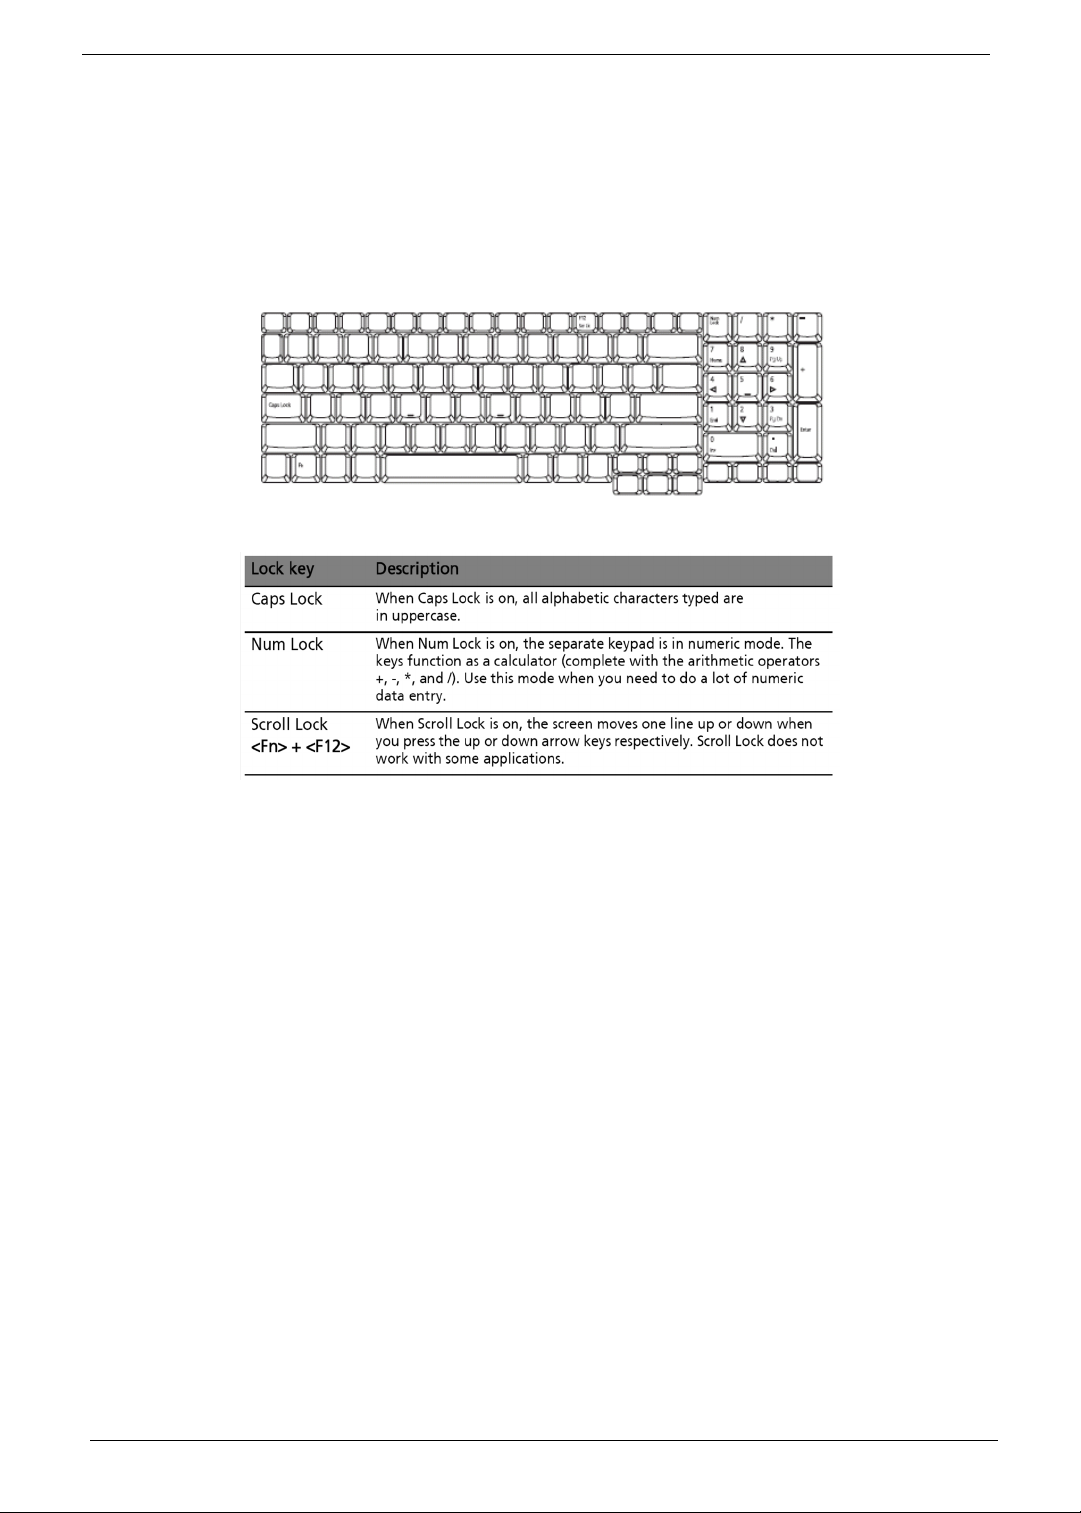
Using the Keyboard
The keyboard has full-sized keys and an embedded keypad, separate cursor keys, two Windows keys and
twelve function keys.
Lock Keys and embedded numeric keypad
The keyboard has three lock keys which you can toggle on and off.
14 Chapter 1
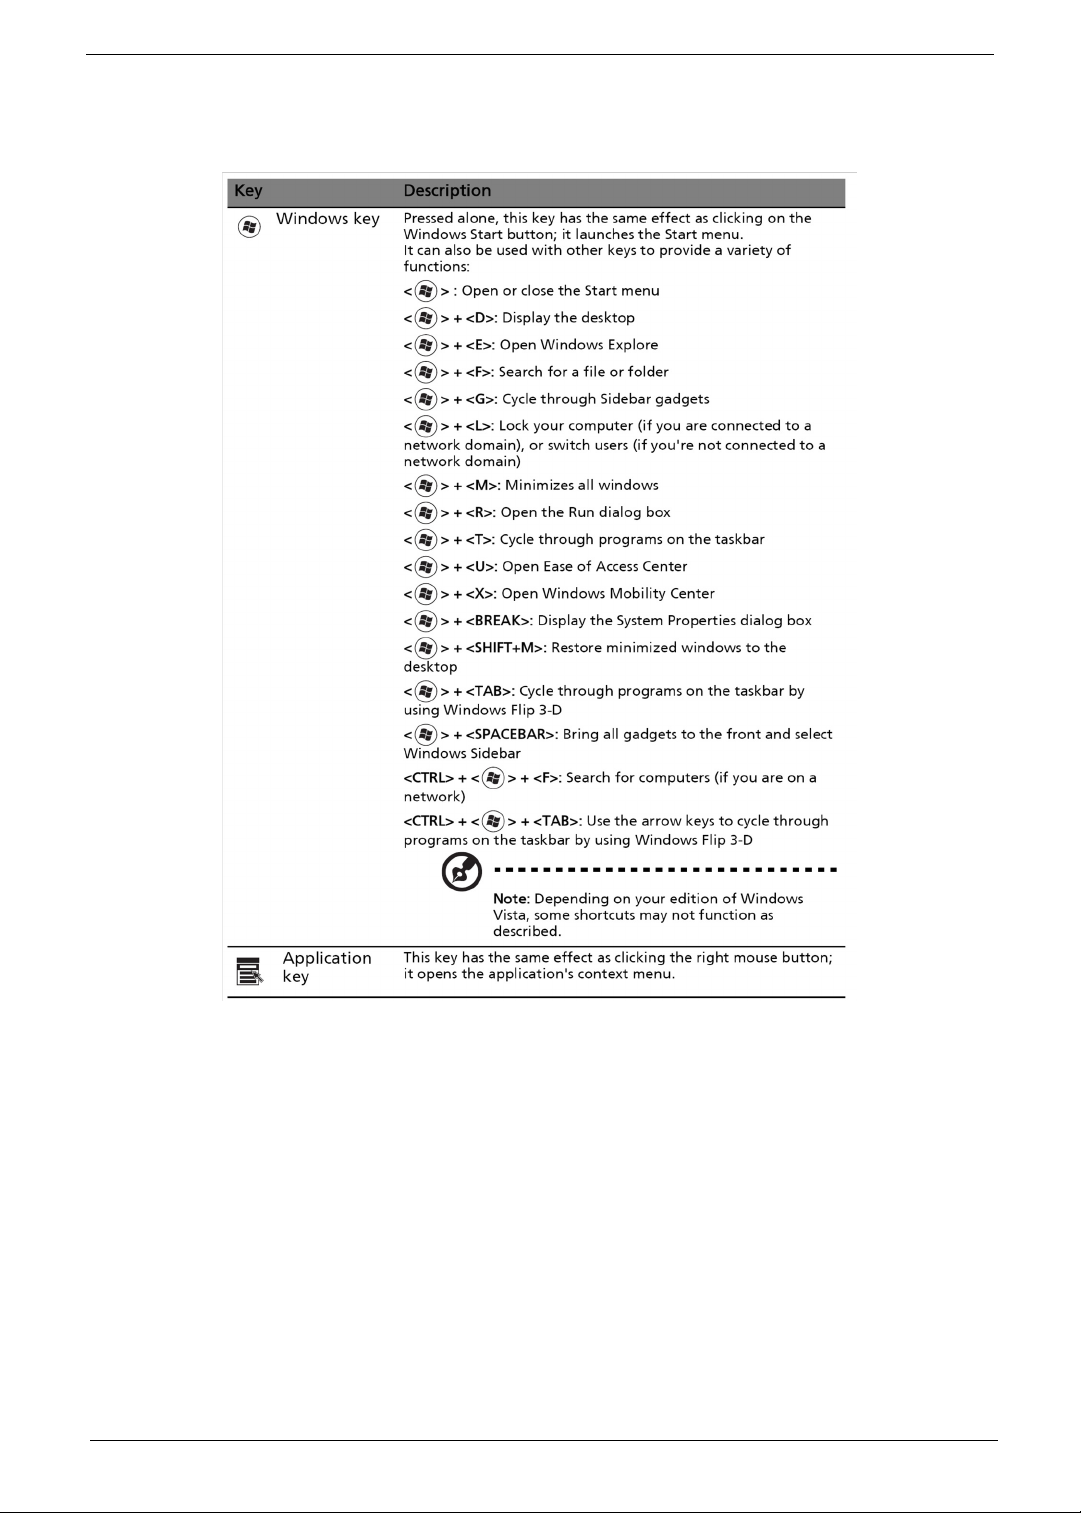
Windows Keys
The keyboard has two keys that perform Windows-specific functions.
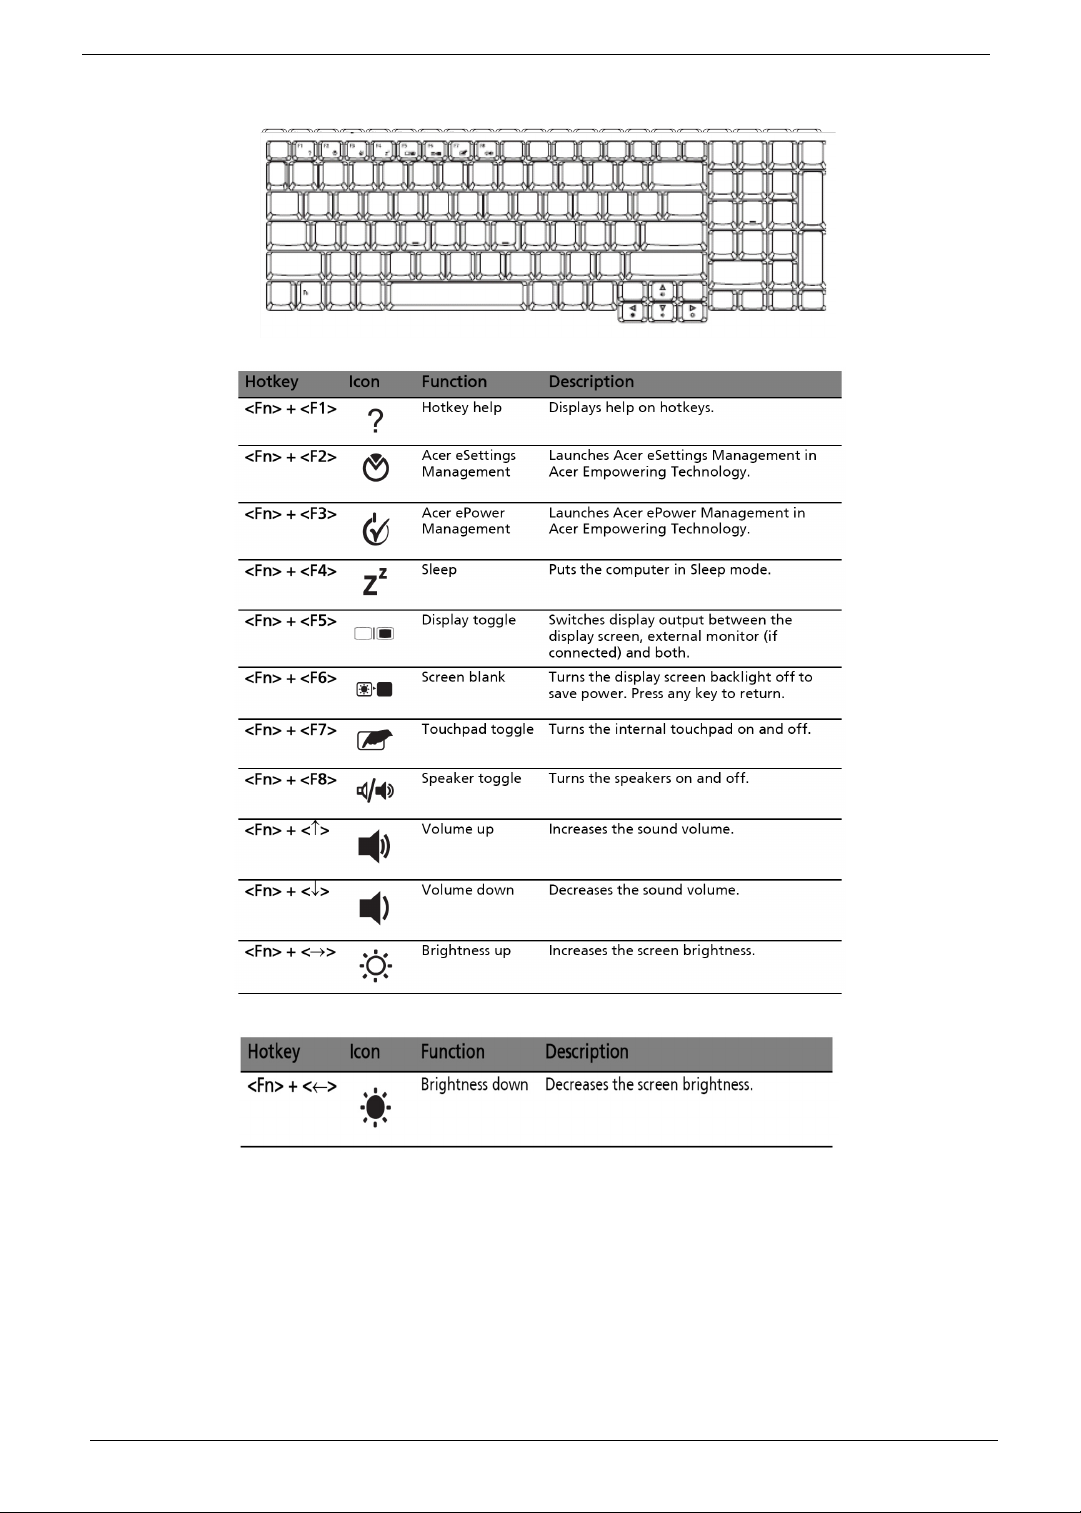
Hot Keys
The computer employs hotkeys or key combinations to access most of the computer’s controls like sreen
brightness, volume output and the BIOS utility.
To activate hot keys, press and hold the <Fn> key before pressing the other key in the hotkey combination.
Chapter 1 15
Special Key
You can locate the Euro symbol and US dollar sign at the upper-center and/or bottom-right of your keyboard.
To t y pe :
16 Chapter 1
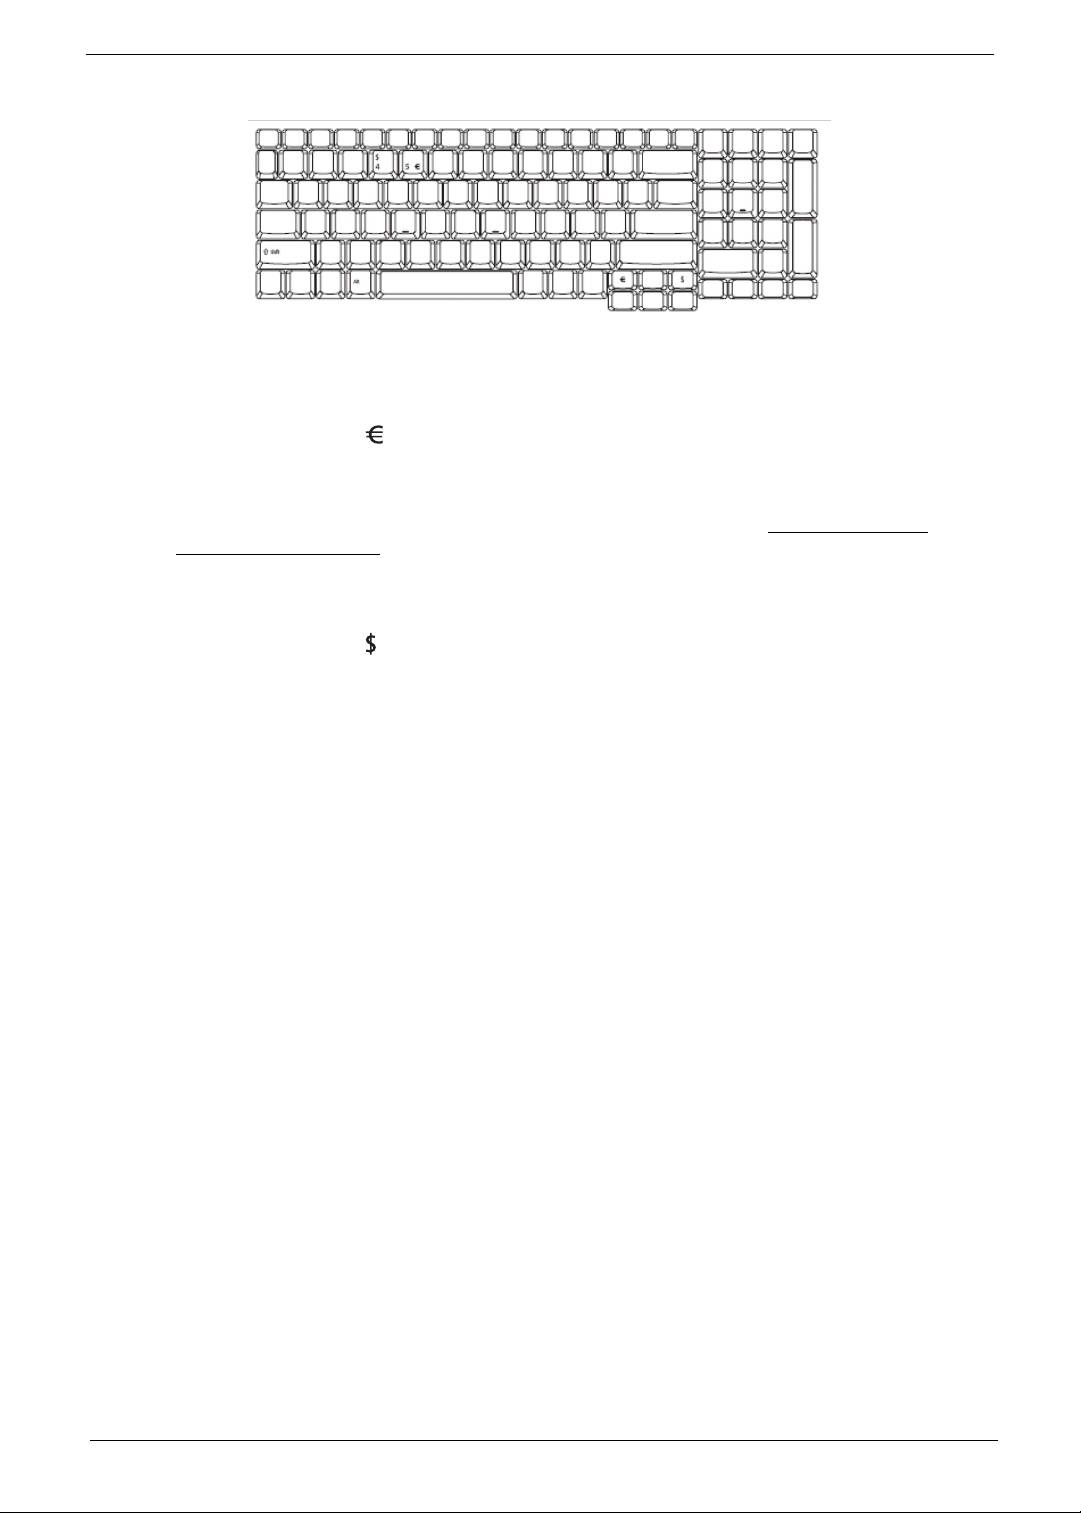
The Euro symbol
1. Open a text editor or word processor.
2. Either directly press the <> symbol at the bottom-right of the keyboard, or hold <Alt Gr> and then
press the<5> symbol at the upper-center of the keyboard.
NOTE: Some fonts and software do not support the Euro symbol. Please refer to www.microsoft.com/
typography/faq/faq12.htm for more information.
The US dollar sign
1. Open a text editor or word processor.
2. Either directly press the <> key at the bottom-right of the keyboard, or hold <Shift> and then press the
<4> key at the upper-center of the keyboard.
NOTE: This function varies by the operating system version.
Chapter 1 17
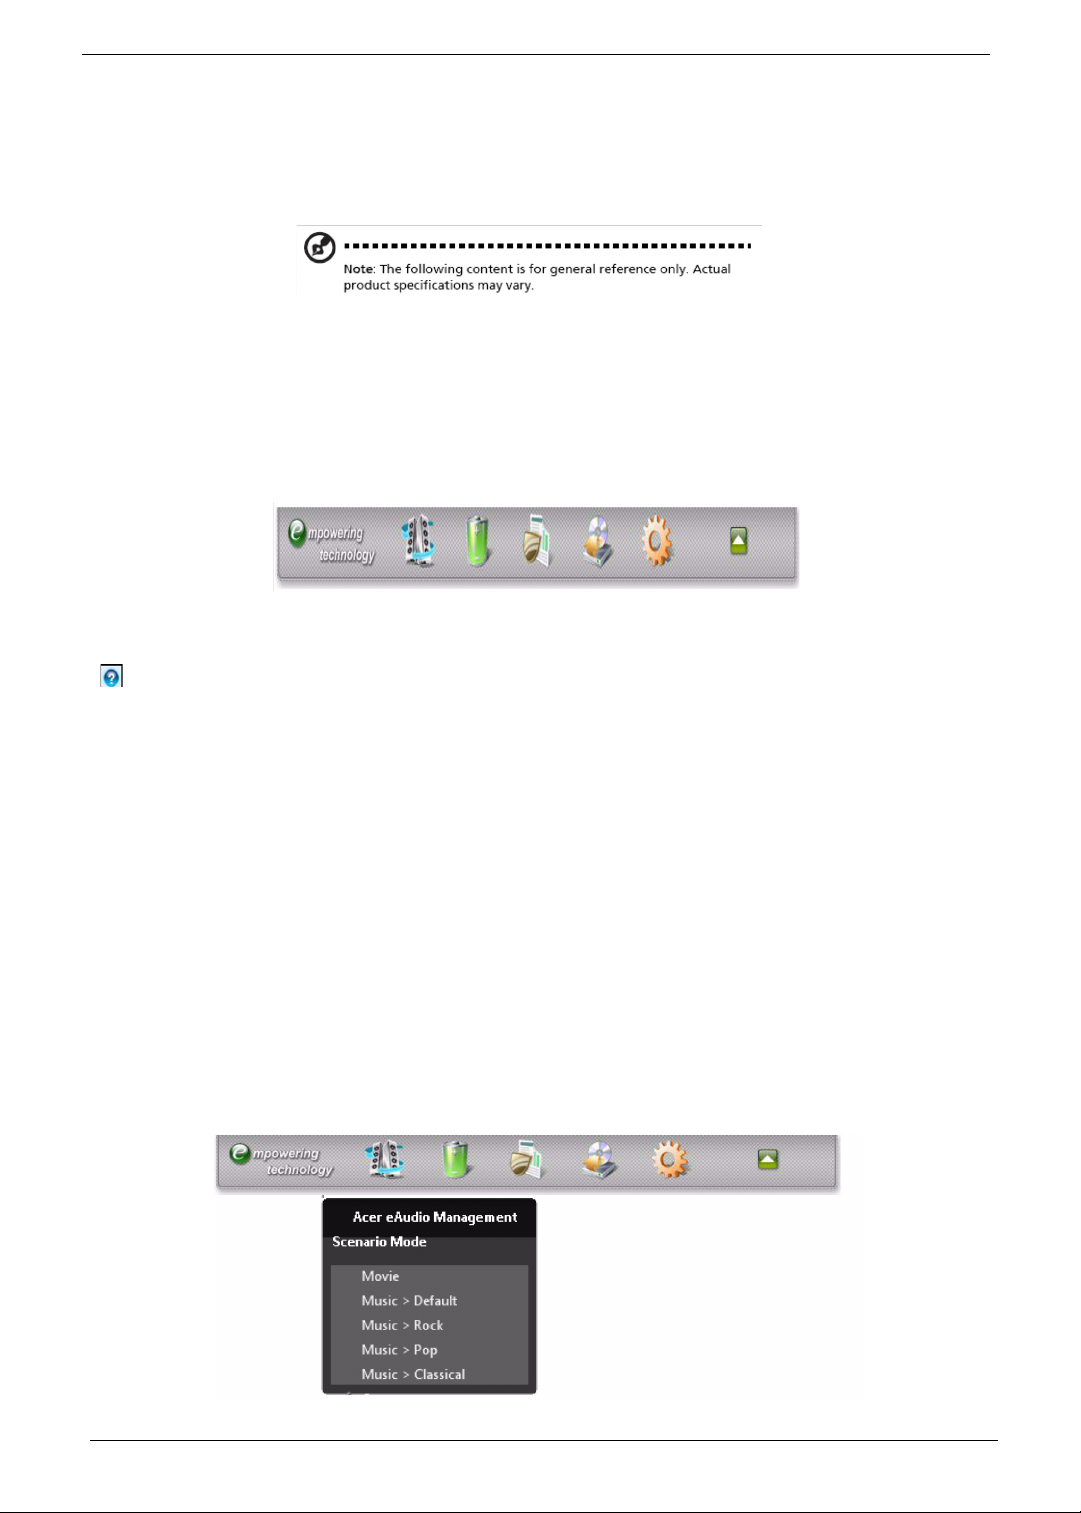
Acer Empowering Technology
The Empowering Technology toolbar makes it easy for you to access frequentlyused functions and manage your
new Acer system. Activated by pressing theEmpowering Key, it provides access to the following utilities:
• Acer eAudio Management allows you to easily control the enhanced sound effects of Dolby Home Theater on
your system.
• Acer ePower Management optimizes battery usage via customizable power plans.
• Acer eDataSecurity Management protects data with passwords and encryption (for selected models).
• Acer eRecovery Management backs up and recovers data flexibly, reliably and completely.
• Acer eSettings Management accesses system information and adjusts settings easily.
For more information, right-click on the Empowering Technology toolbar, then select Help.
For help with a particular utility, launch the utility and click the
icon at the buttom of the active window.Launching Acer Empowering Technology
To launch Acer Empowering Technology:
1 Press the Empowering Key to display the Acer Empowering Technology toolbar on the desktop.
2 To hide the toolbar, press the Empowering Key again or click the hide button on the toolbar.
You may also launch Acer Empowering Technology by running the program from the Acer Empowering Technology program group in the Start menu, or by double-clicking the icon if you have created adesktop shortcut.
To launch Acer Empowering Technology applications:
On the Acer Empowering Technology toolbar, click the icon that corresponds to the application you want to
launch.
When you mouse over an application icon, a quick menu appears below the toolbar. The quick menu allows
you to perform certain tasks simply and quickly.
You may also run the application by selecting it from the Acer Empowering Technology program group in the
Start menu.
18 Chapter 1
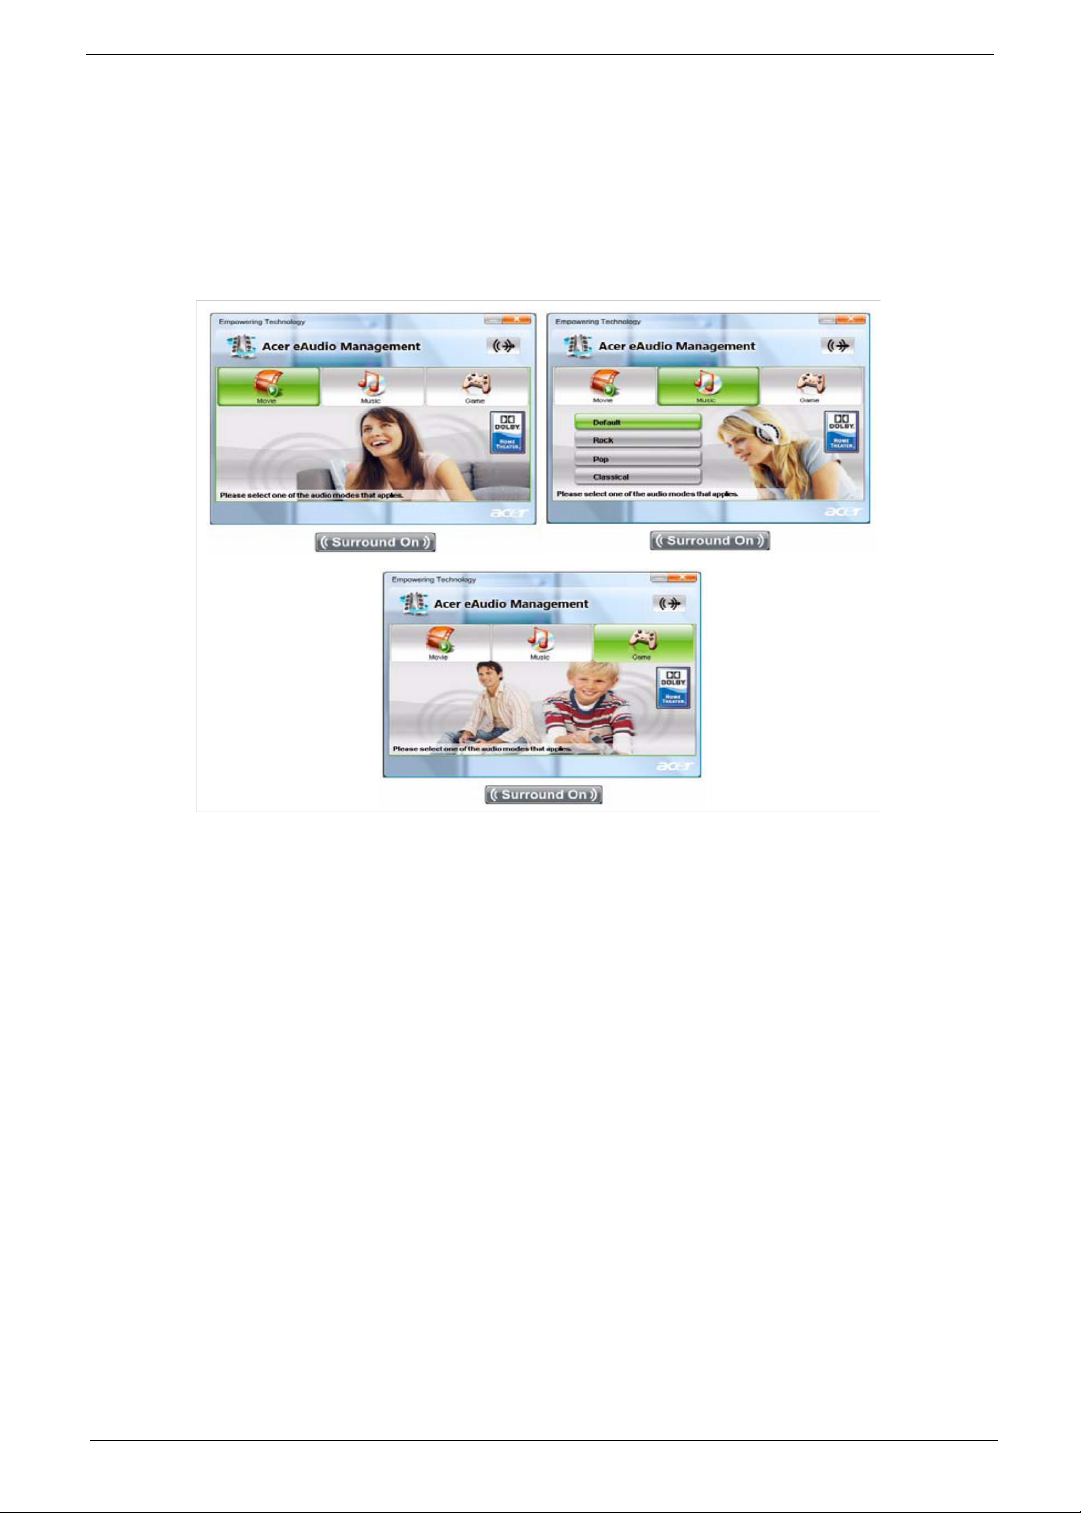
Acer eAudio Management
Acer eAudio Management allows you to easily control the enhanced sound
effects of Dolby Home Theater on your system. Select Movie or Game mode to
experience the awesome realism of 5.1-channel surround sound from just two
speakers, via Dolby Virtual Speaker technology. Music mode lets you enjoy your
favorite tunes, in vivid detail.
To choose your playback device, click the icon on the upper right side ofthe Acer eAudio Management window.
Chapter 1 19

Acer ePower Management
Acer ePower Management features a straightforward user interface for configuring your power management
options. To access this utility, select Acer ePower Management from the Empowering Technology toolbar, run the
program from the Acer Empowering Technology program group in Start menu, or right-click the Windows power
icon in the system tray and select Acer ePower Management.
Using power plan
Acer ePower Management comes with three predefined power plans: Balanced,
High performance and Power saver. You can also create customized power plans. You can create,
switch between, edit, delete and restore power plans, as described below
View and adjust settings for On Battery and Plugged In modes by clicking the
appropriate tabs. For more power options, click in the Acer ePower and select Power Options.
To create a new power plan:
Creating customized power plans allows you to save and quickly switch to a personalized set of power options.
1 Click the New power plan option or icon .
2 Enter a name for your new power plan.
3 Choose a predefined power plan to base your customized plan on.
4 If necessary, change the display, sleep and hibernation settings you want your computer to use.
5 Click OK to save your new power plan.
To switch between power plans:
1 Mouse over the Acer ePower Management application on the Acer Empowering Technology toolbar. The
quick menu appears
2 Select the power plan you want to switch to You may also switch between power plans by launching the Acer
ePower Management application. Select the power plan you wish to switch to, thenclick Apply.click Apply
To edit a power plan:
Editing a power plan allows you to adjust system settings like LCD brightness and CPU speed.
1 Switch to the power plan you wish to edit.
2 Adjust settings as required.
3 Click Apply to save your new settings.
To delete a power plan:
You cannot delete the power plan you are currently using. If you want to delete
the active power plan, switch to another one first.
1 Select the power plan you wish to delete.
2 Click the Delete Power Plan icon.
Battery status
The quick menu shows the remaining battery life based on current usage. You
can also launch the Acer ePower Management application and refer to the
Battery status panel located just below the power plans. Click the Battery tab to
view remaining battery life, battery status, and remaining battery life in standby and hibernate modes.
20 Chapter 1

..
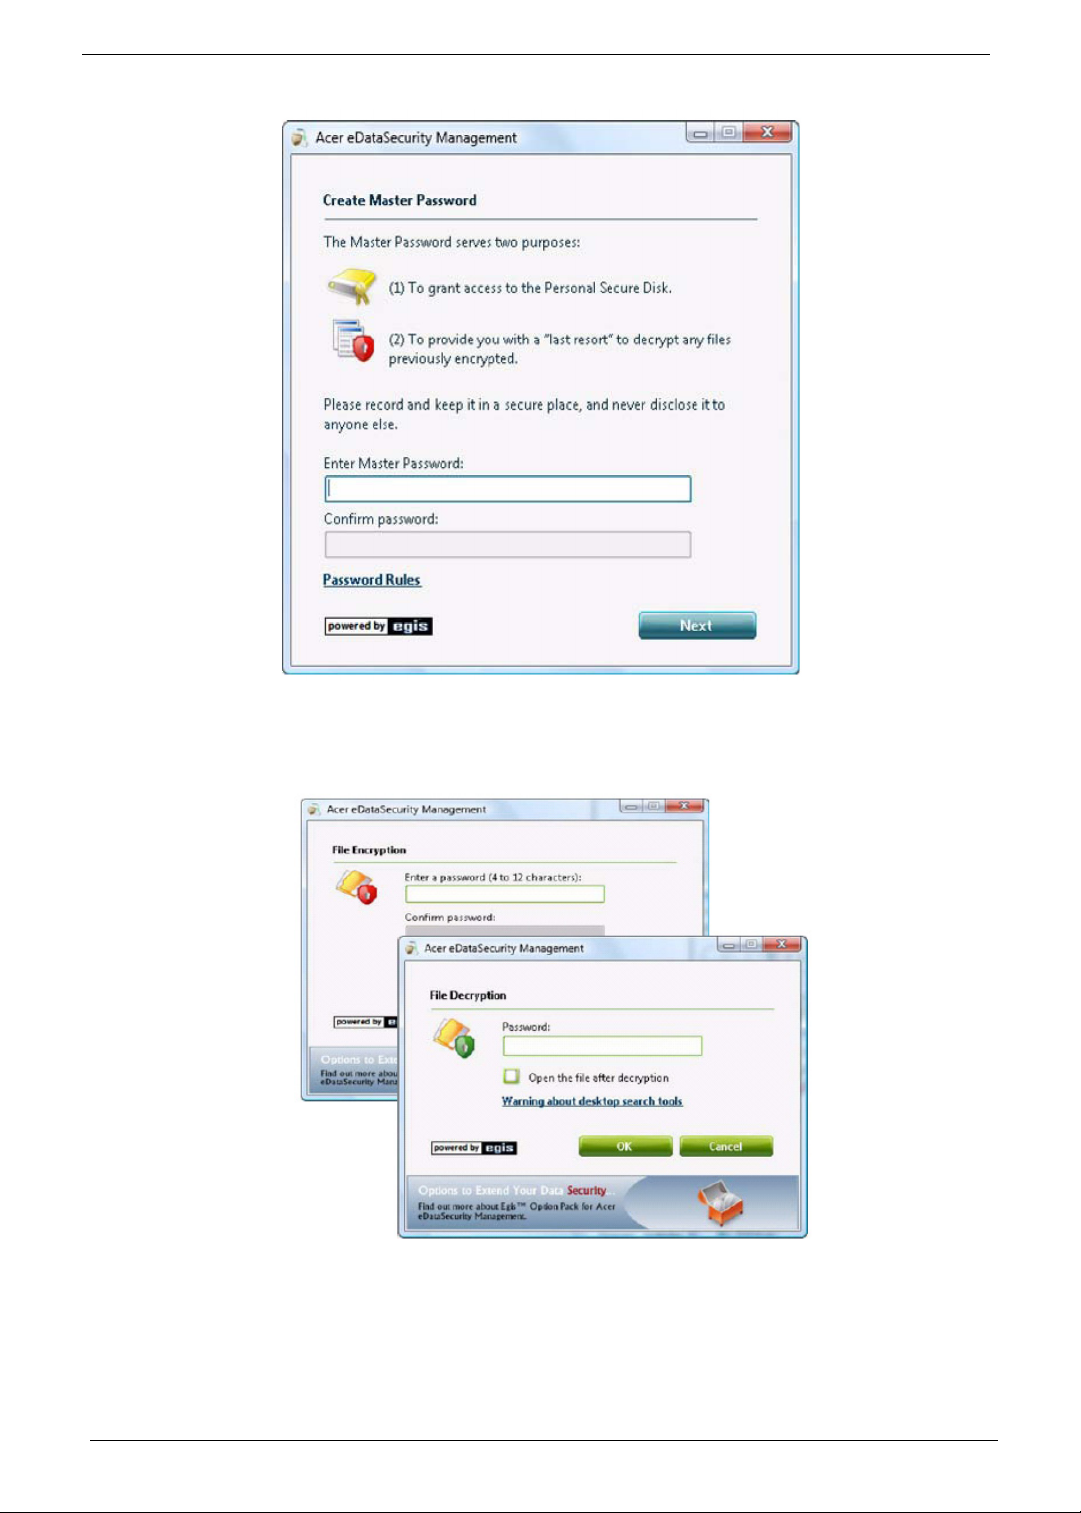
Acer eDataSecurity Management
(for selected models)
Acer eDataSecurity Management is an encryption utility that protects your files from being accessed by
unauthorized persons. It is conveniently integrated with Windows Explorer as a shell extension for quick data
encryption/decryption and also supports on-the-fly file encryption for Lotus Notes and Microsoft Outlook.
On first use, the Acer eDataSecurity Management setup wizard will prompt you to create the Master Pas
word. You will use this password to access the Personal Secure Disk (PSD). The Master Password may also
be used to encrypt/decrypt files by default.
If you set a different password to encrypt a file, but you forgot the encryption password, you can use the
Mater Password to decrypt the file.
Chapter 1 21
.
22 Chapter 1
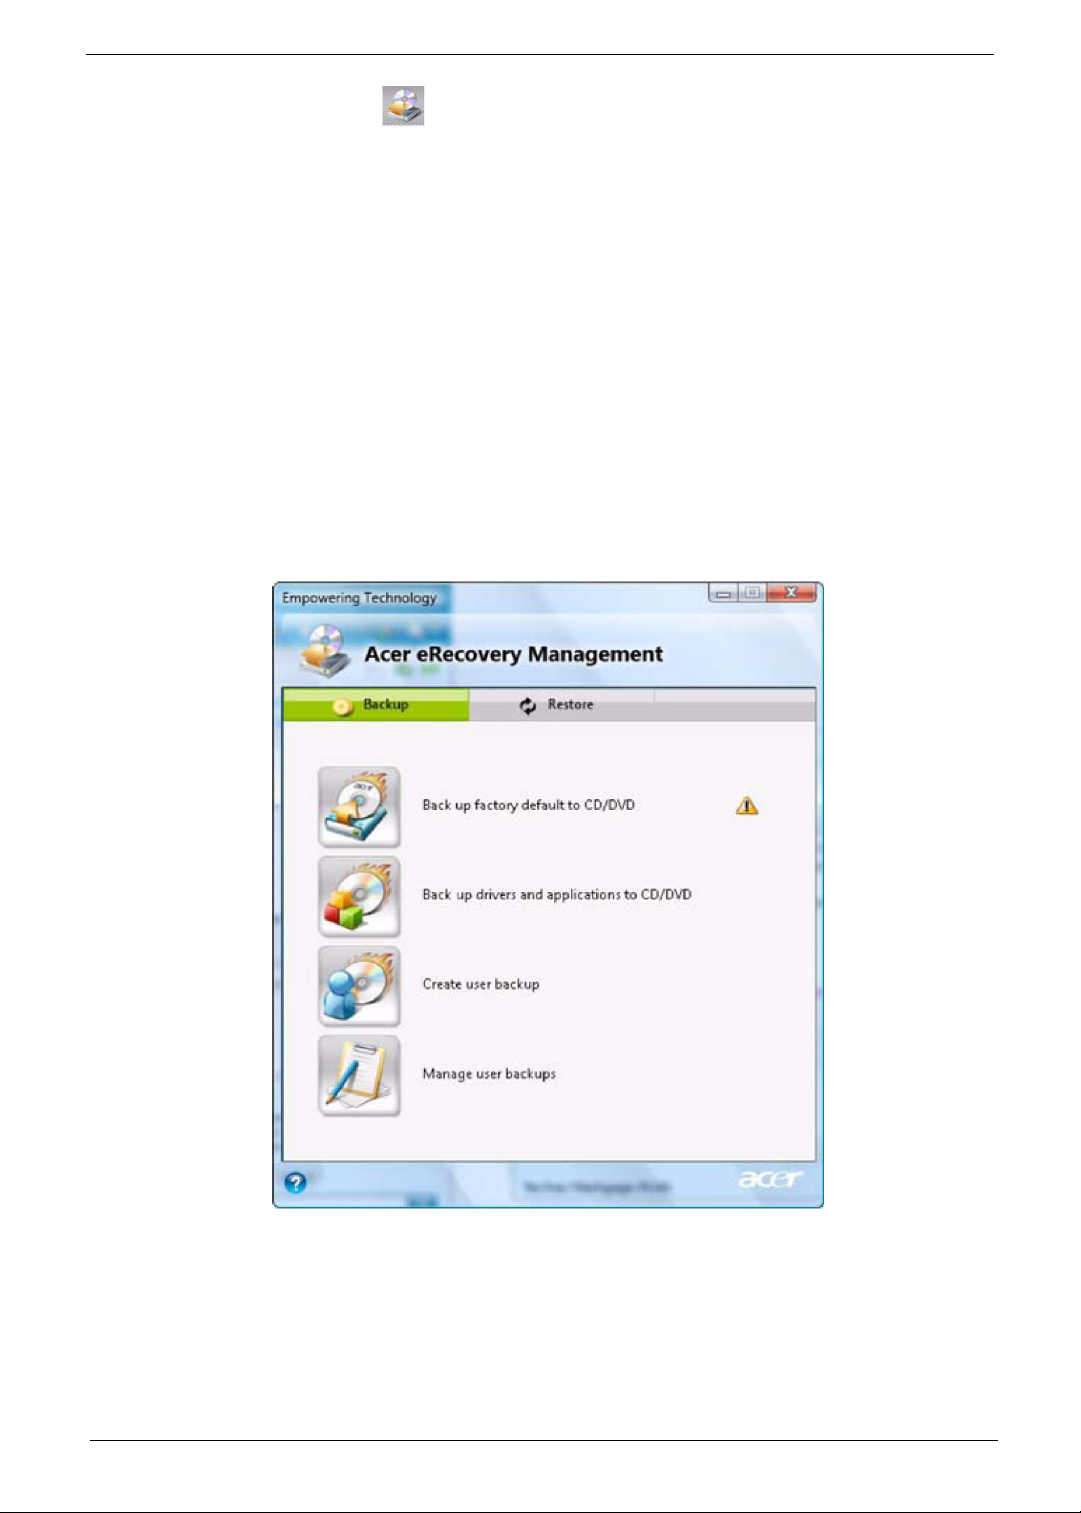
Acer eRecovery Management
Acer eRecovery Management is a versatile backup utility. It allows you to create full or incremental backups,
burn the factory default image to optical disc, and restore from previously created backups or reinstall
applications and drivers. By
default, user-created backups are stored to the D:\ drive
D:\ drive. Acer eRecovery Management provides you with:
Password protection.
Recovery of applications and drivers.
Image/data backup:
Back up to HDD (set recovery point).
Back up to CD/DVD.
Image/data recovery tools:
Recover from a hidden partition (factory defaults).
Recover from the HDD (most recent user-defined recovery point).
Recover from CD/DVD.
.system’s HDD. User-created backups are stored on
For more information, please refer to “Acer eRecovery Management”
NOTE: If your computer did not come with a Recovery CD or System CD, please use Acer eRecovery
Management’s “System backup to optical disk” feature to burn a backup image to CD or DVD. To
ensure the best results when recovering your system using a CD or Acer eRecovery Management,
detach all peripherals (except the external Acer ODD, if your computer has one), including your Acer
ezDock.
Chapter 1 23
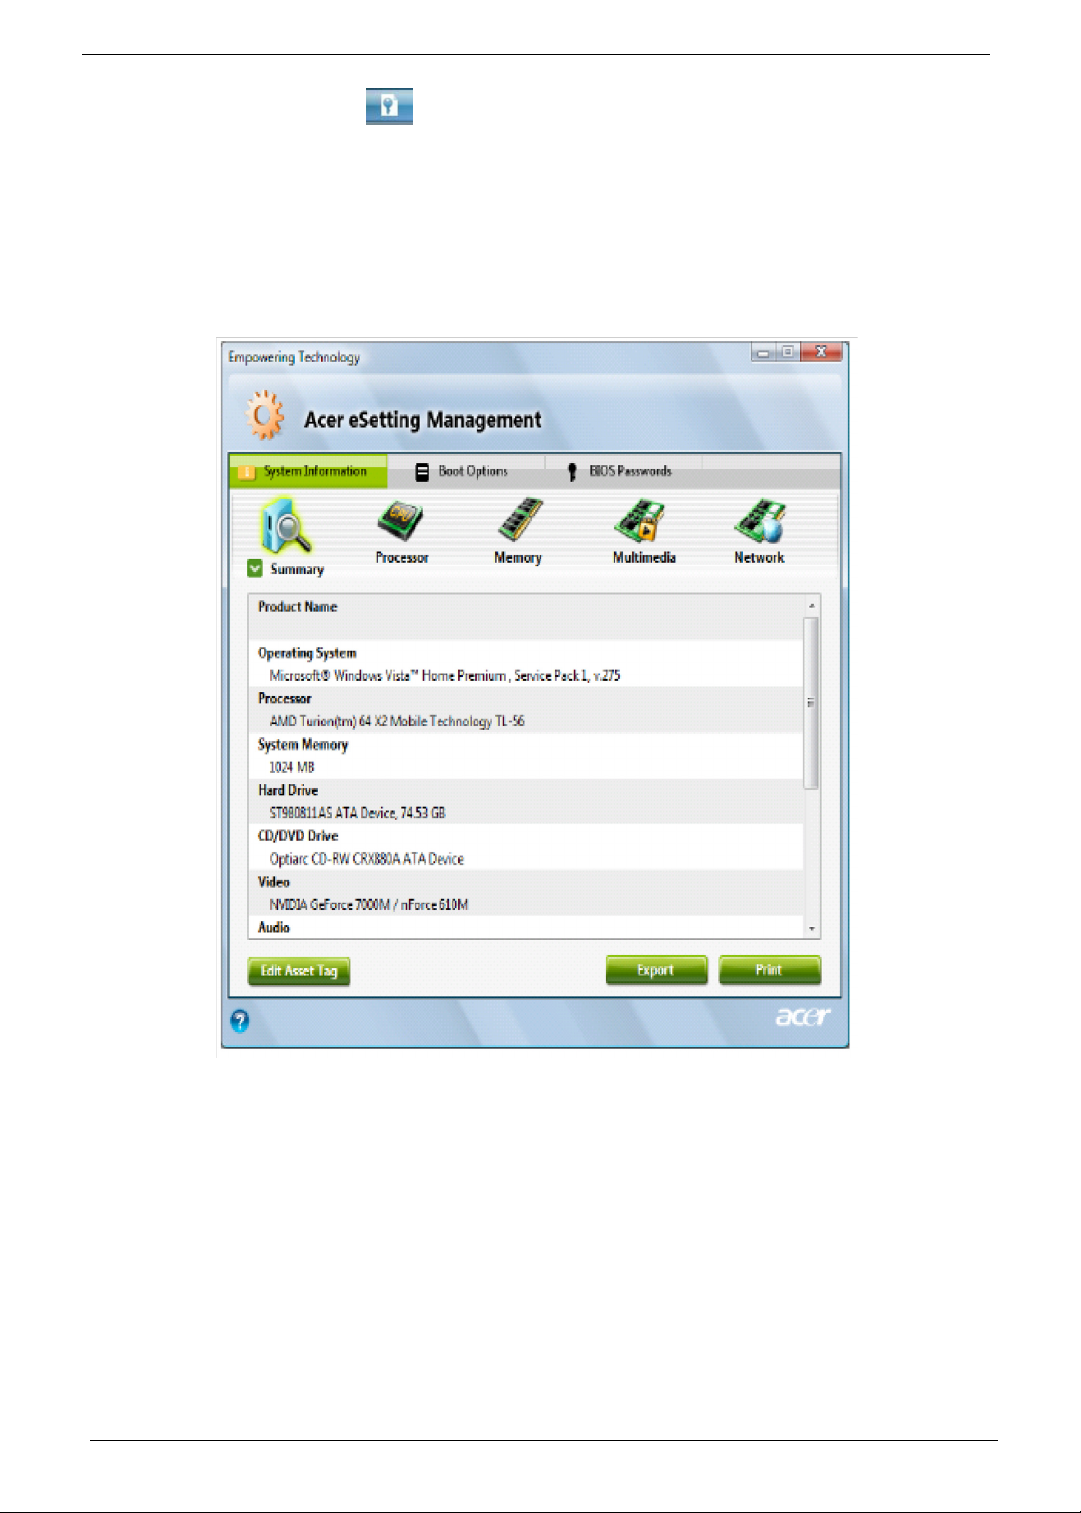
Acer eSettings Management
Acer eSettings Management allows you to inspect hardware specifications and to monitor the system health
status. Furthermore, Acer eSettings Management enables you to optimize your Windows operating system, so
your computer runs faster, smoother and better.
Acer eSettings Management also:
Provides a simple graphical user interface for navigating.
Displays general system status and advanced monitoring for power users.
Windows Mobility Center
The Windows Mobility Center collects key mobile-related system settings in one
easy-to-find place, so you can quickly configure your Acer system to fit the
situation as you change locations, networks or activities. Settings include display
brightness, power plan, volume, wireless networking on/off, external display
settings, display orientation and synchronization status.
Windows Mobility Center also includes Acer-specific settings like Bluetooth Add
Device (if applicable), sharing folders overview/sharing service on or off, and a
shortcut to the Acer user guide, drivers and utilities. To launch Windows Mobility Center:
•
24 Chapter 1
Use the shortcut key < > + <X>.
 Loading...