

Page 1

Acer Aspire 1450 series
User’s guide
Page 2

Copyright © 2003
All Rights Reserved
Acer Aspire 1450 Series Notebook Computer User's Guide
Original Issue: September 2003
Changes may be made periodically to the information in this publication without obligation
to notify any person of such revision or changes. Such changes will be incorporated in new
editions of this manual or supplementary documents and publications. This company makes
no representations or warranties, either expressed or implied, with respect to the contents
hereof and specifically disclaims the implied warranties of merchantability or fitness for a
particular purpose.
Record the model number, serial number, purchase date, and place of purchase information in
the space provided below. The serial number and model number are recorded on the label
affixed to your computer. All correspondense concerning your unit should include the serial
number, model number, and purchase information.
No part of this publication may be reproduced, stored in a retrieval system, or transmitted, in
any form or by any means, electronic, mechanical, photocopy, recording, or otherwise,
without the prior written permission of Acer Incorporated.
Acer Aspire 1450 series Notebook computer
Model Number : _________________________________
Serial Number: ___________________________________
Purchase Date: ___________________________________
Place of Purchase: ________________________________
All trademarks and registered trademarks are the properties of their respective companies.
Page 3
iii
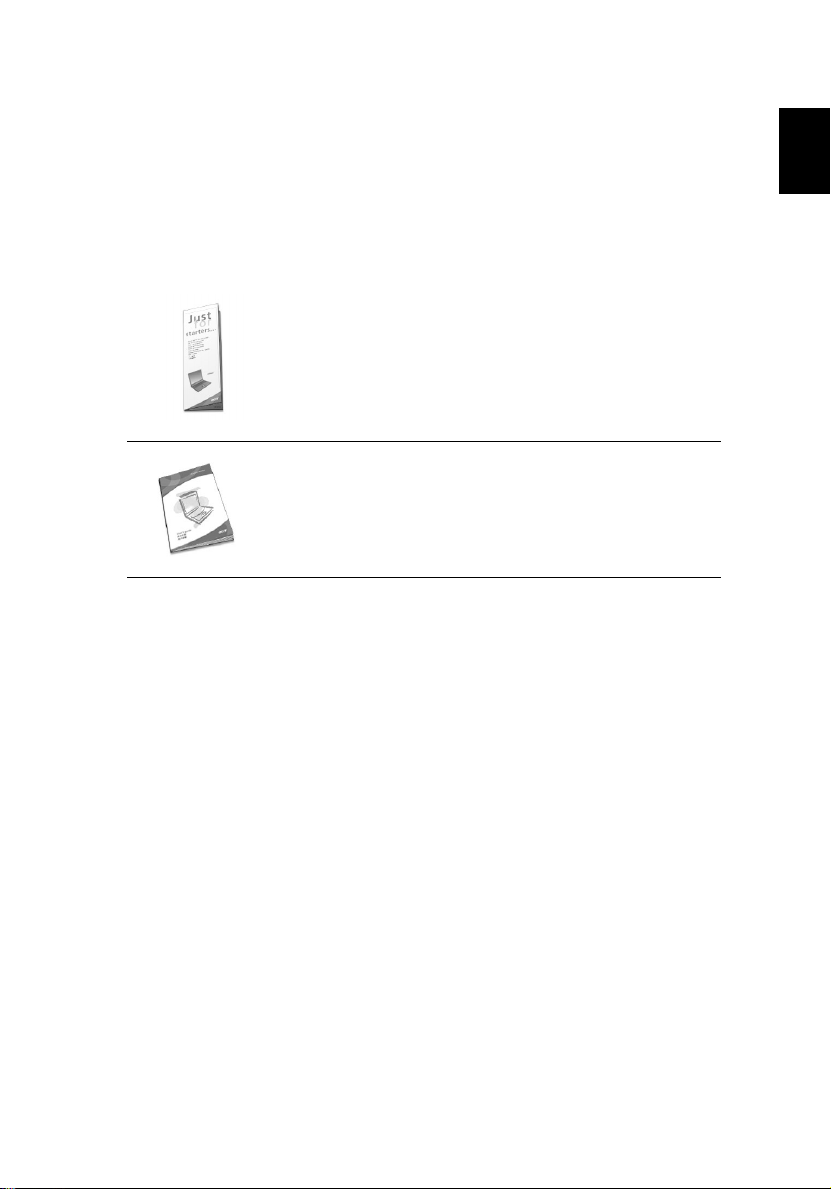
First things first
Your guides
A set of guides is provided to help you set up and use your Aspire
computer.:
The Just for starters… poster shows you how to set up your
computer.
This User's Guide provides clear and concise information on
using your computer productively. You are advised to read
it thoroughly and keep it handy for future reference.
For more information on our products, services, and support, please
visit our web site: www.global.acer.com.
Basic care and tips for using your computer
English
English
Turning your computer on and off
To turn on your computer, open the lid and press the power button
above the keyboard.
To turn the power off, you can do any of the following:
• Click on the Start button in Windows, and then select Shut Down
on the popup menu.
• Push the power button.
To use this method, you must first click on the Power
Management icon in Windows Control Panel, and then check
that the power button is set to shut down the computer when
pressed. See Windows Help for more information.
Page 4

iv
English
Note: If you are unable to shut down the computer in the usual
way, press and hold the power button for more than four seconds.
You should then wait at least two seconds before turning the
computer on again.
Taking care of your computer
Your computer will serve you well if you take care of it.
• Do not expose the computer to direct sunlight. Do not place it
near sources of heat, such as a radiator.
• Do not expose the computer to temperatures below 0°C (32°F), or
above 50°C (122°F).
• Do not expose the computer to magnetic fields.
• Do not expose the computer to rain or moisture.
• Do not spill water or any liquid on the computer.
• Do not subject the computer to heavy shock or vibration.
• Do not expose the computer to dust or dirt.
• Do not place objects on top of the computer.
• Do not slam the lid shut. Close the computer gently.
• Do not place the computer on unstable or uneven surfaces.
Taking care of your AC adapter
It is important that you look after your AC adapter.
• Do not connect the adapter to any other device.
• Do not step on the power cord or place heavy objects on it. Route
the power cord away from areas where people might walk on it or
trip over it.
• Do not pull on the power cord when disconnecting from the mains
power socket. Grasp and pull the plug instead.
• The total ampere ratings of equipment plugged into a power strip
should not exceed the ampere rating for that power strip.
Page 5

v
Taking care of your battery pack
It is also important that you look after your computer's battery pack.
• Use the correct battery model for your computer. Do not use other
kinds of batteries.
• Turn the power off before removing or replacing the battery.
• Do not tamper with the battery. Keep the battery away from
children.
• Dispose of batteries according to local regulations. Recycle if
possible.
Cleaning and servicing
When cleaning your computer, it is important that you follow these
steps:
• Turn off the computer and remove the battery.
• Disconnect the AC adapter.
• Clean with a soft cloth moistened with a little water. Do not use
liquid or aerosol cleaners.
Refer to the chapter entitled “Frequently asked questions” on page 67
if any of the following occurs:
• You drop the computer or damage the case.
• You spill liquid on the computer.
• The computer does not operate normally.
English
English
Page 6

English
vi
Page 7

First things first iii
Your guides iii
Basic care and tips for using your computer iii
Getting familiar with
your computer 1
A tour of your computer 3
Front open view 3
Front view 4
Left view 6
Right view 7
Rear view 8
Bottom view 9
Features 11
Indicators 13
Using the Keyboard 14
Special keys 14
Touchpad 21
Touchpad basics 21
Launch Keys 23
24
Storage 25
Hard disk 25
Optical drive 25
Emergency ejection of the optical drive tray 26
Audio 27
Adjusting the volume 27
Connectivity options 28
Ethernet and LAN 28
Fax/data modem 29
Fast infrared 30
Securing your computer 31
Using a computer security lock 31
Using passwords 31
English
Contents
Operating on
battery power 33
Battery pack 35
Battery pack characteristics 35
Installing and removing the battery pack 36
Charging the battery 37
Checking the battery level 37
Page 8

English
Optimizing battery life 37
Battery-low warning 38
Power management 39
Peripherals and options 41
External display devices 43
External input devices 43
External keyboard 43
External keypad 43
External pointing device 43
USB devices 44
IEEE 1394 Port 45
Printer 46
Audio devices 46
Expansion devices 47
PC Card 47
Miscellaneous options 49
Battery pack 49
AC adapter 49
Key component upgrades 50
Memory upgrade 50
Hard disk upgrade 51
Moving with your computer 53
Disconnecting from the desktop 55
Moving around 56
Preparing the computer 56
What to bring to short meetings 56
What to bring to long meetings 56
Taking the computer home 57
Preparing the computer 57
What to bring with you 57
Special considerations 57
Setting up a home office 58
Traveling with the computer 59
Preparing the computer 59
What to take with you 59
Special considerations 59
Traveling internationally with your computer 60
Preparing the computer 60
What to take with you 60
Special considerations 60
Page 9

Software 61
System software 63
Launch Manager 63
BIOS Setup Utility 64
Troubleshooting 65
Frequently asked questions 67
Requesting service 70
International Travelers Warranty (ITW) 70
Before you call 70
72
Appendix A Specifications 73
Appendix B Notices 79
Index 87
English
Page 10

English
Page 11

Getting familiar with
your computer
Page 12

Your Aspire 1450 series notebook computer
combines solid performance, versatility,
multimedia capabilities and portability with
a stylish design. Increase your productivity
by working wherever you are.
This chapter provides an in-depth "tour" of
your computer's features.
Page 13
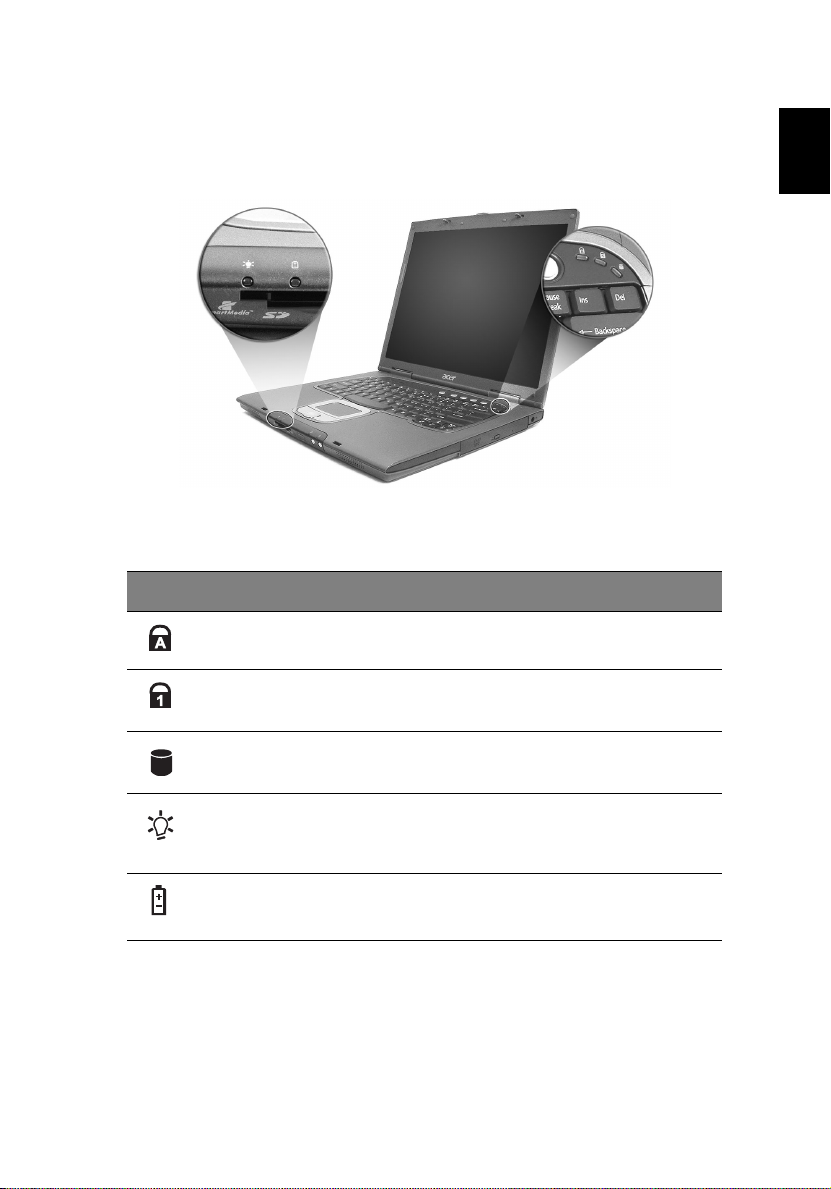
3
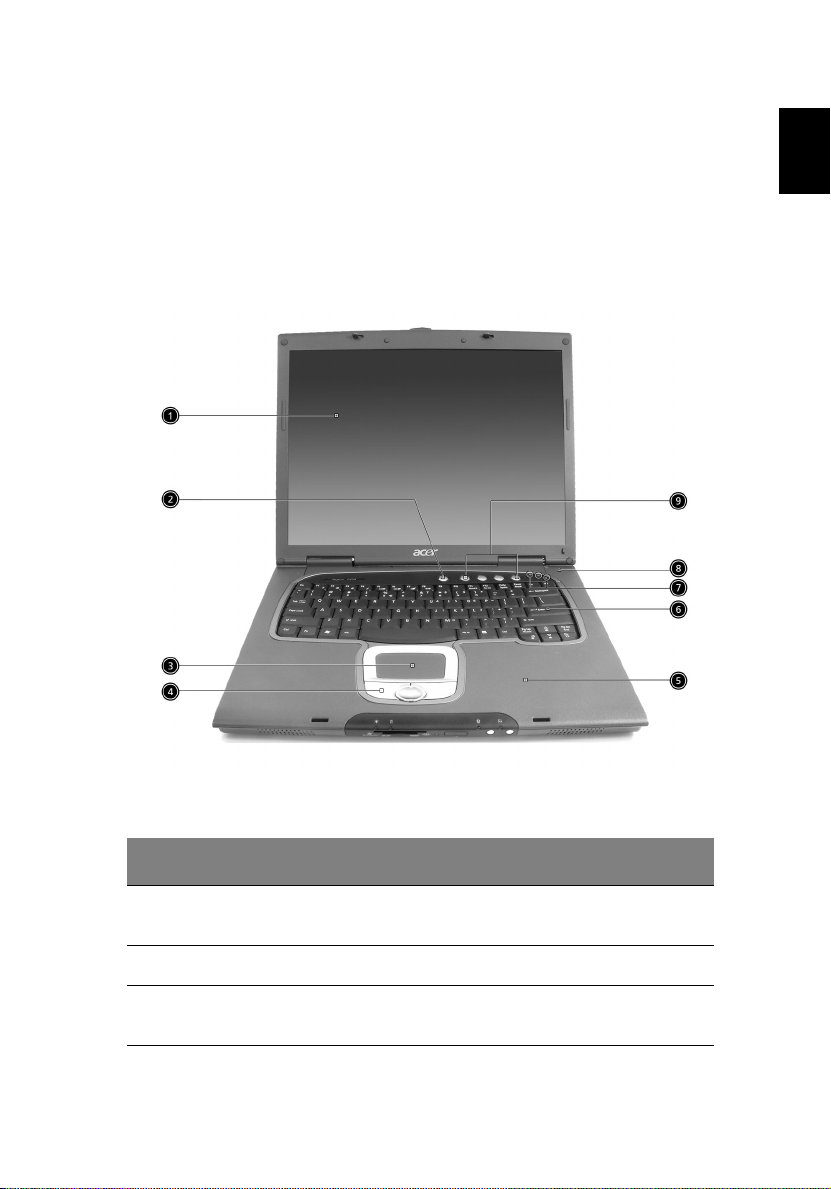
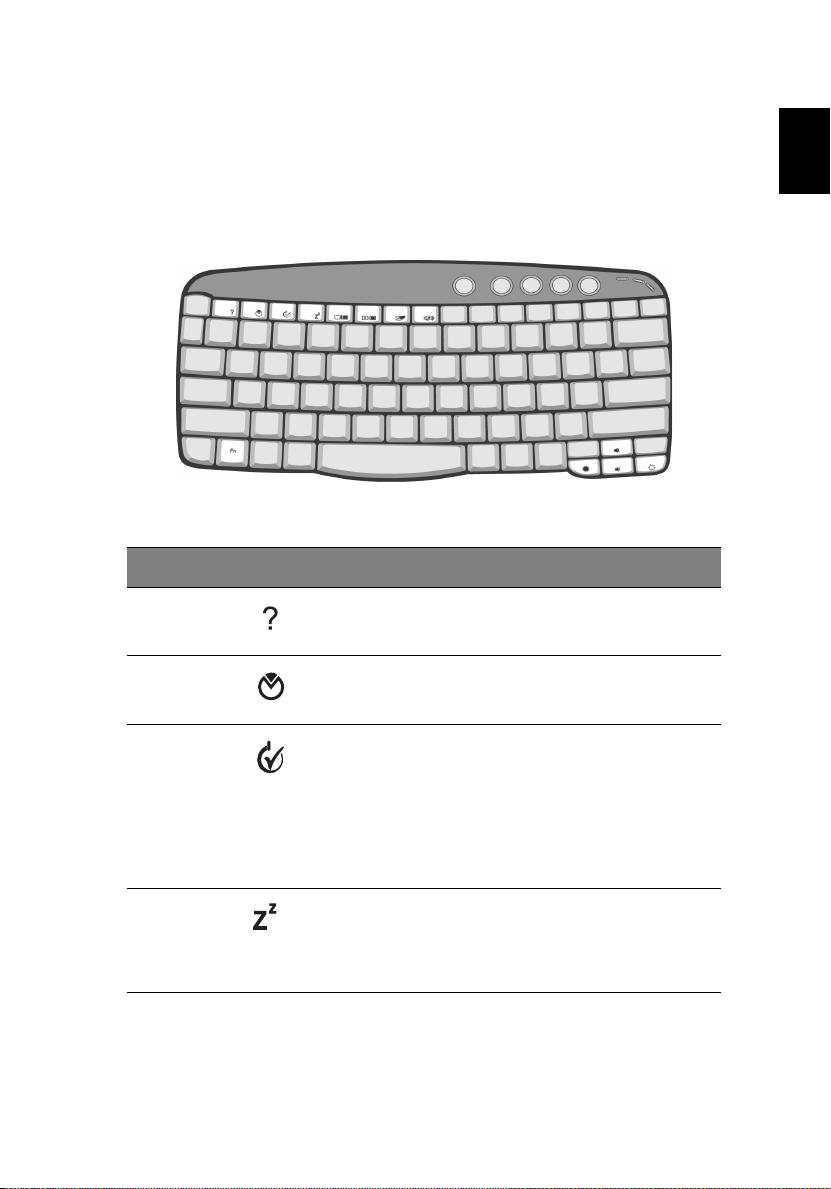
A tour of your computer
After setting up your new Aspire notebook computer, as illustrated in
the Just for starters… poster, take a few minutes to explore the unit.
Front open view
English
English
# Item Description
1 Display screen Also called LCD (liquid-crystal display),
2 Power button Turns on the computer.
3 Touchpad Touch-sensitive pointing device which
displays computer output.
functions like a computer mouse.
Page 14
4
# Item Description
Getting familiar with your computer
English
4 Click buttons (left, center
and right)
5 Palmrest Comfortable support area for your
6 Keyboard Inputs data into your computer.
7 Status indicators LEDs (light-emitting diode) that turn
8 Microphone Internal microphone for sound
9 Launch keys Special keys for launching internet
The left and right buttons function like
the left and right mouse buttons; the
center button serves as a 4-way scroll
button.
hands when you use the computer.
on and off to show the status of the
computer, its functions and
components.
recording.
browser, email program and frequently
used programs. See “Launch Keys” on
page 23 for more details.
Front view
# Item Description
1 Speaker Outputs sound.
Page 15
5
# Item Description
2
4-in-1 card reader
1
Reads cards from Smart Media,
Memory Stick, MultiMedia, and Secure
Digital cards.
3
4-in-1 card reader
1
Displays activity of 4-in-1 card reader.
indicator
4 Infrared port Interfaces with infrared devices (e.g.,
infrared printer, IR-aware computer).
5
Bluetooth button
6
Bluetooth indicator
7
InviLink button
8
InviLink indicator
2
Enables or disables Bluetooth
functionality.
Indicates that (optional) Bluetooth is
2
3
enabled.
Enables or disables wireless LAN
feature.
Indicates status of wireless LAN
3
communication.
9 Latch Latch for opening and closing the
laptop.
English
English
Notes:
1.Four-in-one card reader is a manufacturing option, subject to
configuration. Only one card can operate at any given time.
2.Bluetooth button and indicator work on models with Bluetooth
only.
3 .I nv iL in k b ut to n a nd in d ic at or wo rk o n m od el s w ith wi re le ss
LAN only.
Page 16
English
6
Getting familiar with your computer
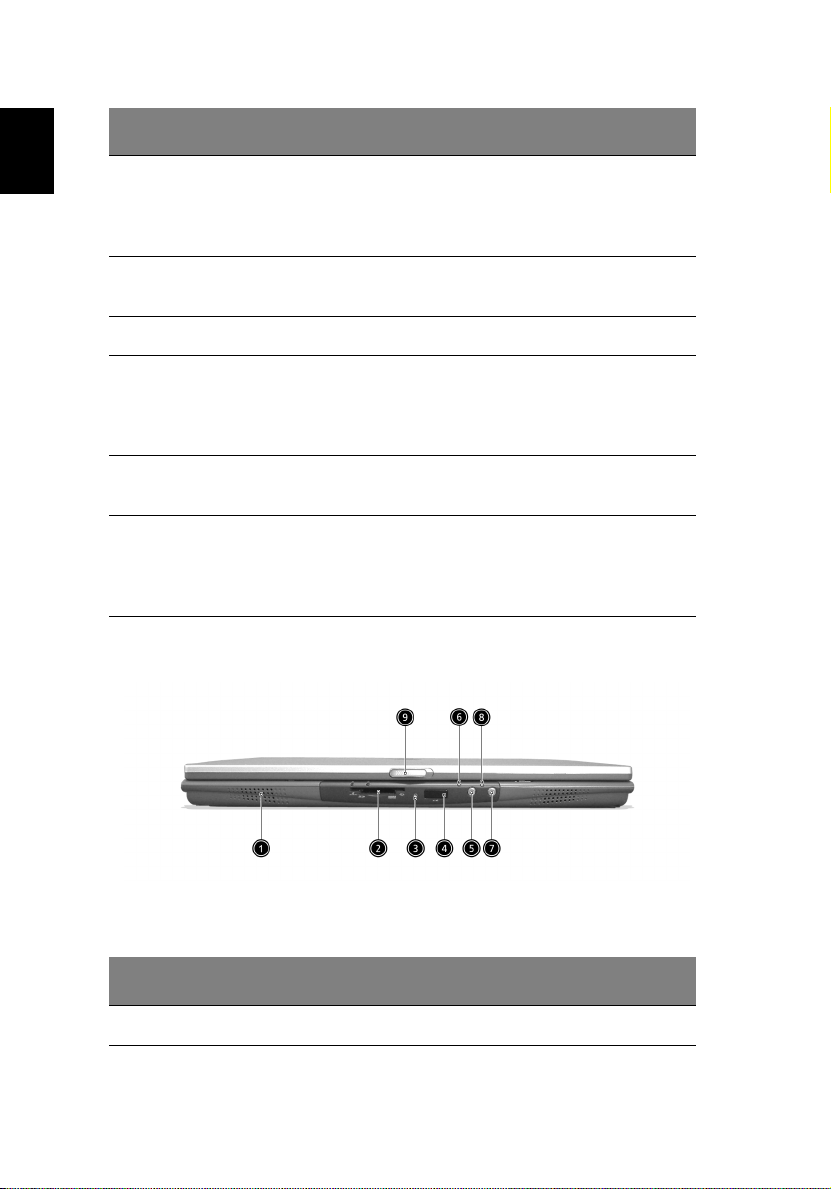
Left view
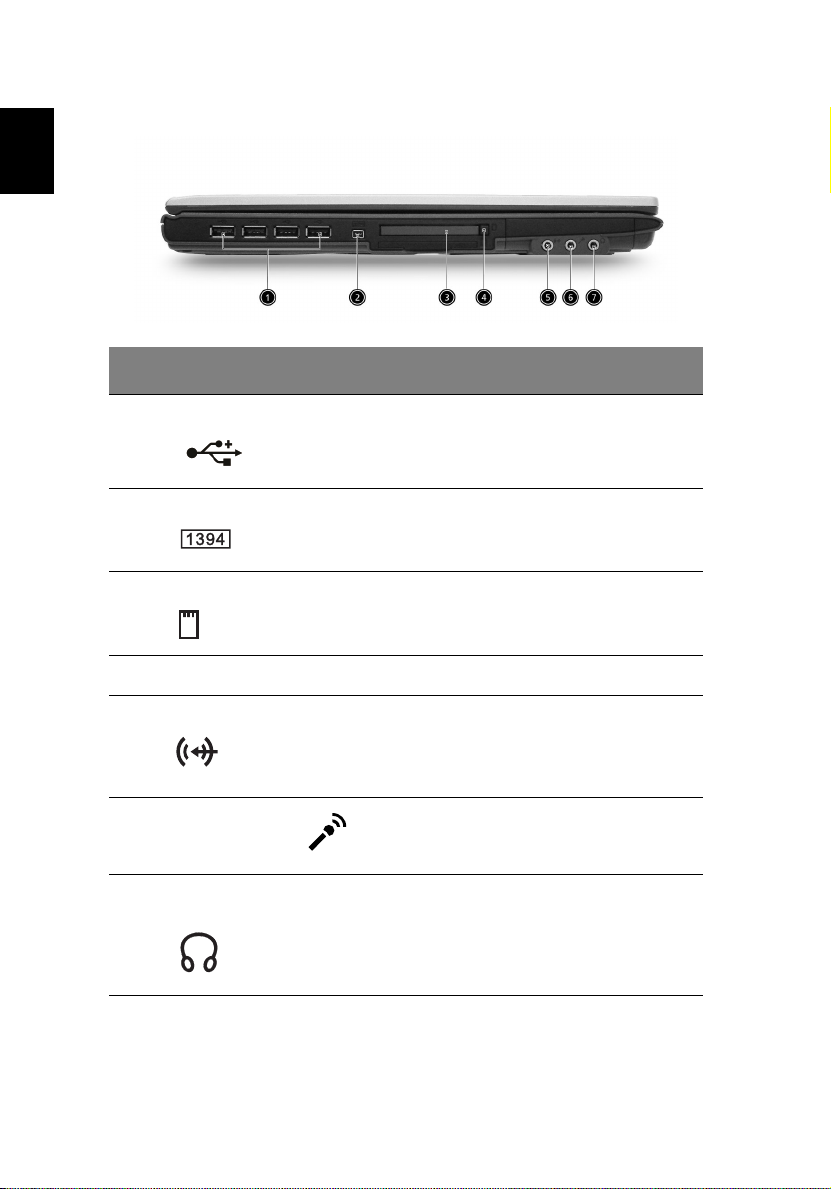
# Item Description
1 Four USB 2.0 ports Connect to Universal Serial Bus devices
(e.g., USB mouse, USB camera).
2 IEEE 1394 port Connects to IEEE 1394 devices.
3 PC Card slot The slot supports a standard Type II
4 PC Card eject button Ejects the PC Card from the slot.
5 Line-in jack Accepts audio line-in devices (e.g., audio
6
Microphone jack
7 Headphone/ Speaker/
Line-out jack
CardBus PC Card.
CD player, stereo walkman).
Accepts input from external
microphones.
Connect to headphones or other lineout audio devices (speakers).
Page 17
7
Right view
# Item Description
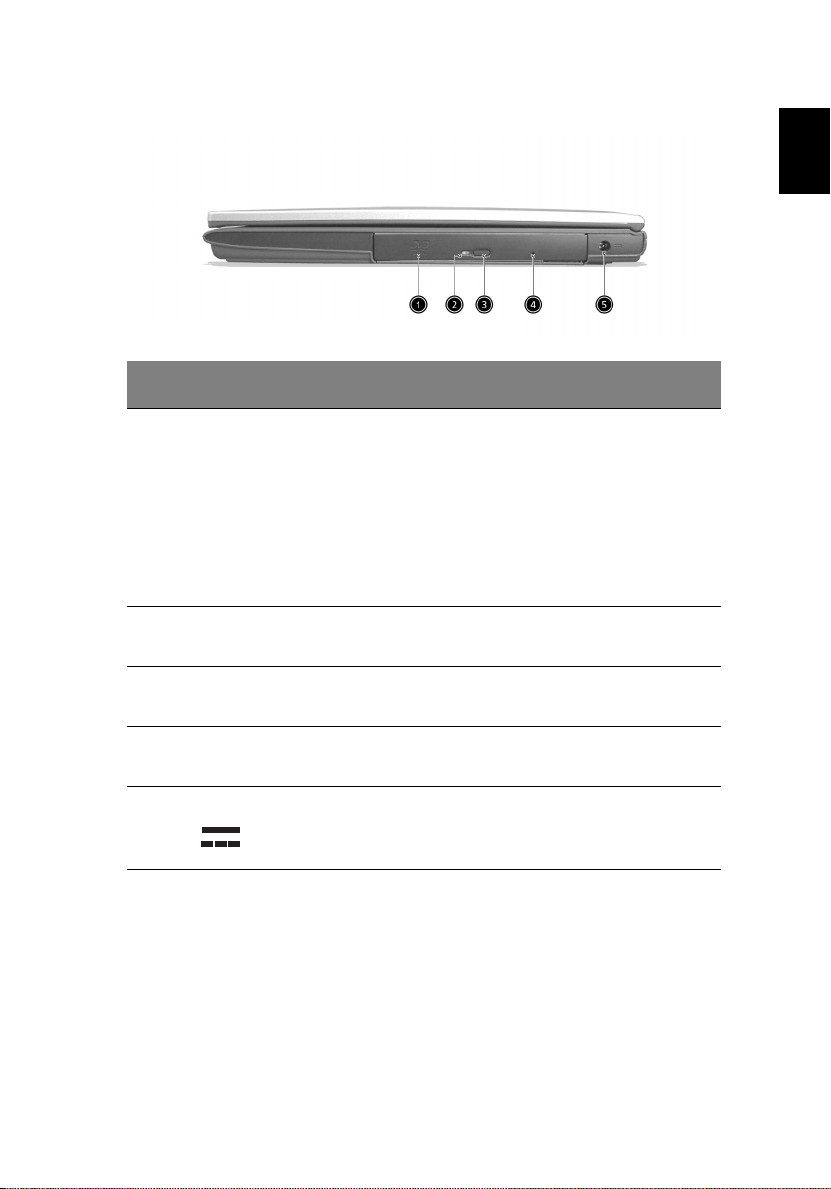
1 Optical drive Depending on your model, the optical
drive is one of the following:
• DVD-ROM drive for reading CDs and
DVDs.
• DVD/CD-RW combo drive for reading
CDs and DVDs and writing to CD-RWs.
• DVD dual for reading both DVD+/RWs and writing to DVD+/-RWs.
2 Optical disc access
indicator
3 Optical drive eject
button
LED that indicates when an optical disc is
being read or written.
Press the eject button to remove a disc
from the optical drive.
English
English
4 Optical drive
emergency eject hole
5 Power jack Connects to an AC adapter.
Used to eject an optical disc when the
computer is turned off.
Page 18
English
8
Getting familiar with your computer
Rear view
# Item Description
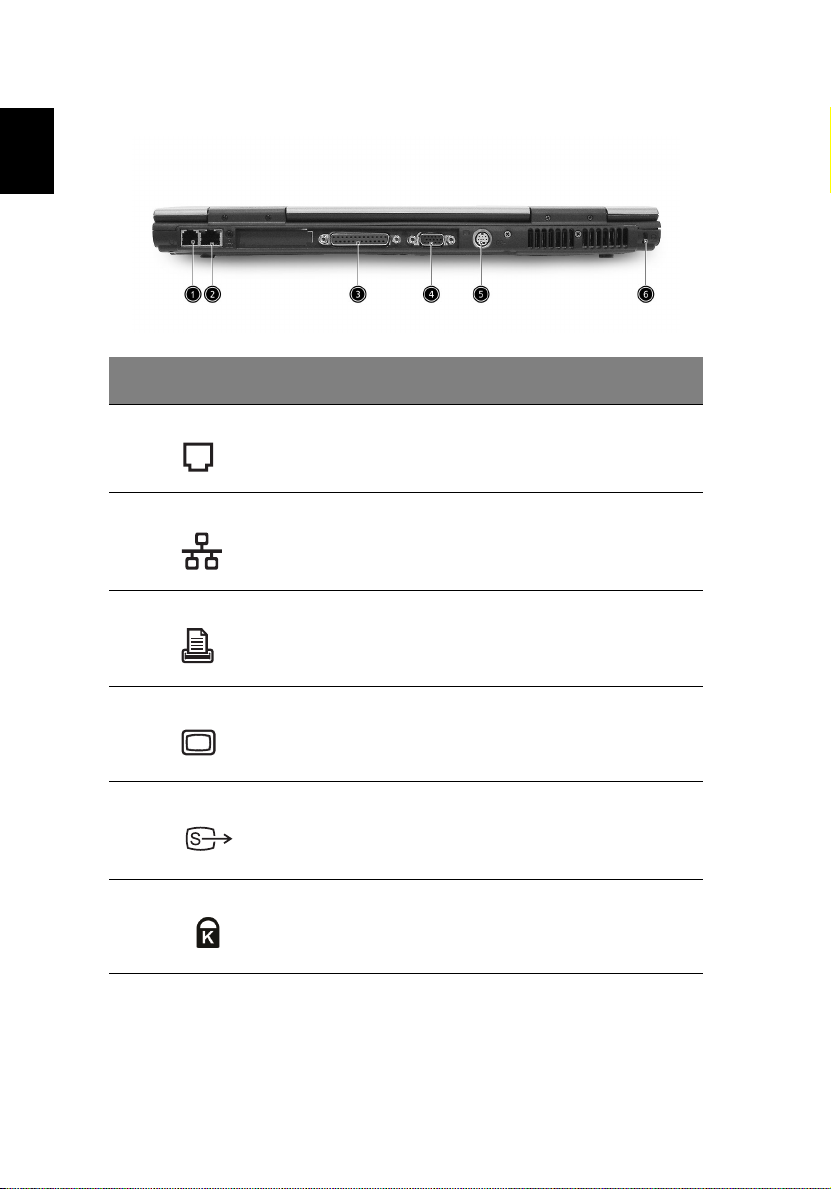
1 Modem jack Connects to a phone line.
2 Network jack Connects to an Ethernet 10/100-based
network.
3 Parallel port Connects to a parallel device (e.g., parallel
printer).
4 External display port Connects to a display device (e.g., external
monitor, LCD projector) .
5 S-video Connects to a television or display device
with S-video input.
6 Security keylock Connects to a Kensington-compatible
computer security lock.
Page 19
9
Bottom view
# Item Description
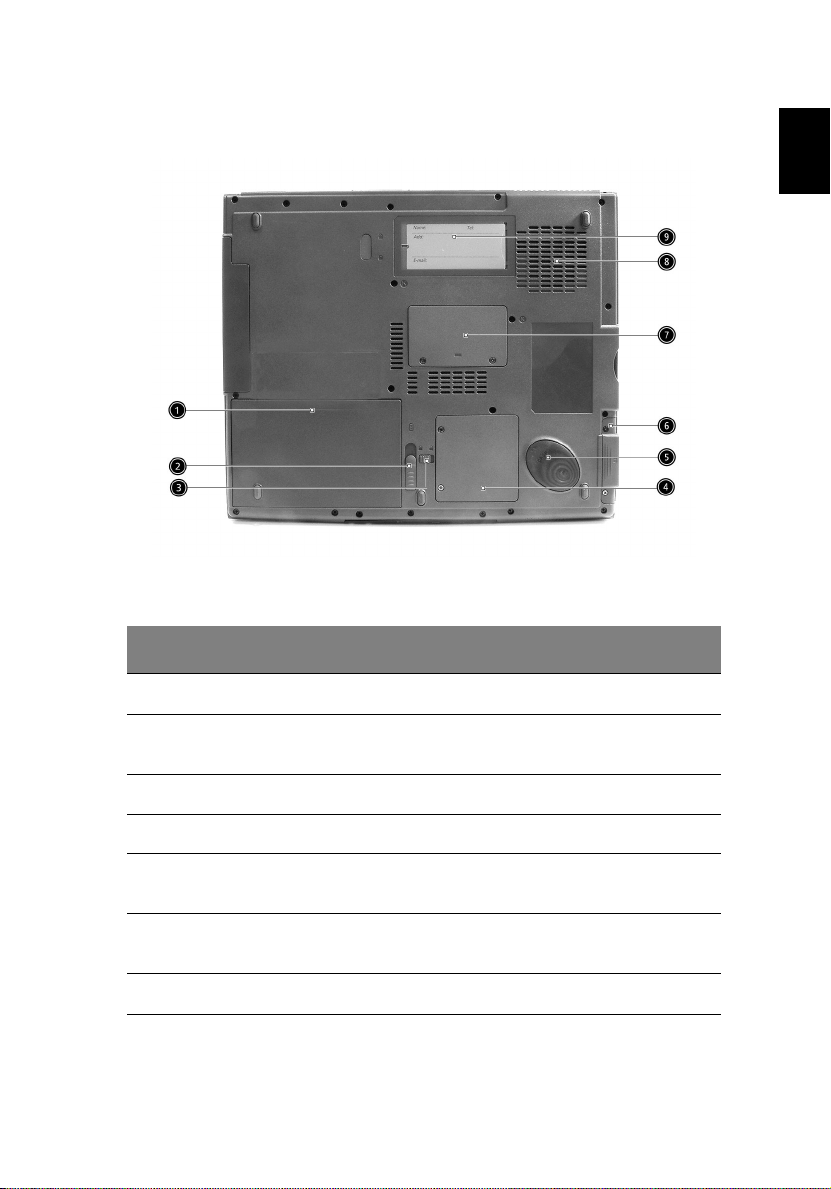
1 Battery bay Houses the computer's battery pack.
English
English
2 Battery release latch Unlatches the battery to remove the
battery pack.
3 Battery lock Locks the battery in place.
4 Mini-PCI slot Slot for adding mini-PCI cards.
5 Hard disk protector Protects the hard disk from accidental
bumps and vibration.
6 Hard disk bay Houses the computer's hard disk (secured
by a screw).
7 Memory compartment Houses the computer’s main memory.
Page 20

10
# Item Description
Getting familiar with your computer
English
8 Cooling fan Helps keep the computer cool.
Note: Don’t cover or obstruct the opening
of the fan.
9 Personal identification
slot
Insert a business card or similar-sized
identification card to personalize your
computer.
Page 21

11
Features
Performance
• AMD AthlonTM XP-M processor at available in 1800+~2400+ and
higher.
• Memory upgradeable up to 2 GB with 2 slots (Only one slot for
user accessible)
• High-capacity, Enhanced-IDE hard disk
• Li-ion main battery pack
• Microsoft Windows XP operating system
Display
• Thin-Film Transistor (TFT) liquid crystal display (LCD) displaying 32bit high color up to 1024 x 768 eXtended Graphics Array (XGA)
resolution for 14.1”/15”
• 3D graphics engine
• Simultaneous LCD and CRT display support
• S-video for output to a television or display device that supports S-
video input
• "Automatic LCD dim" feature that automatically decides the best
settings for your display and conserves power
• DualView
TM
English
English
Multimedia
• AC’97 stereo audio
• Built-in dual speakers.
• Built-in microphone.
• High-speed optical drive
• Built-in optical drive (DVD-ROM, DVD/CD-RW combo or DVD dual).
• 14.1” or 15.0” TFT XGA(1024x768 resolution) panel.
• Audio input and output jacks.
Connectivity
• High-speed fax/data modem port
• Ethernet/Fast Ethernet port
Page 22

English
12
• Fast infrared wireless communication
• Four USB 2.0 (Universal Serial Bus) ports
• IEEE 1394 port
• InviLink 802.11g wireless LAN (manufacturing optional)
• Bluetooth ready (manufacturing optional)
• SD/MMC/SM/MS memory slot (manufacturing optional)
Getting familiar with your computer
Human-centric design and ergonomics
• Internet 4-way scroll button
• Sleek, smooth and stylish design
• Acer FinTouch full-sized curved keyboard
• Ergonomically-centered touchpad pointing device
Expansion
• One type II CardBus PC Card slot
• Upgradeable memory
Page 23
13
Indicators
The computer has three easy-to-read status indicators below the display screen, and two on the front of the computer.
The Power and Battery status indicators are visible even when the display is closed.
Icon Function Description
Caps lock Lights when Caps Lock is activated.
Num lock Lights when Num Lock is activated.
English
English
Media Activity Lights when the disc or optical drive is
activated.
Power Lights green when the power is on and
orange when the computer is in
standby mode.
Battery Lights orange when the battery is
charging.
Page 24
14
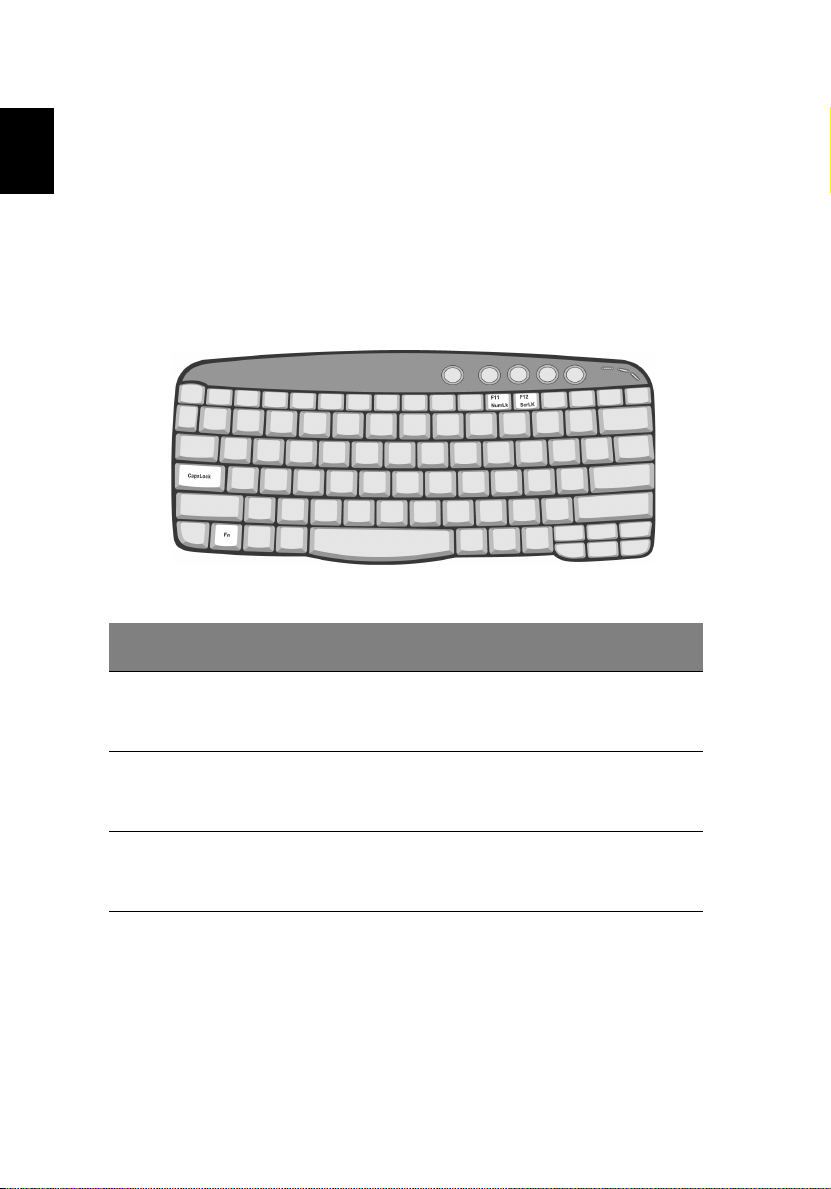
Using the Keyboard
Getting familiar with your computer
English
The full-sized keyboard includes an embedded numeric keypad,
separate cursor keys, two Windows keys and twelve function keys.
Special keys
Lock keys
The keyboard has three lock keys which you can toggle on and off.
Lock Key Description
Caps Lock When Caps Lock is on, all alphabetic characters are typed in
uppercase. Toggle on and off by pressing the Caps Lock key on
the left side of the keyboard.
Num Lock When Num Lock is on, the embedded numeric keypad can be
used. Toggle on and off by pressing the Fn + F11 keys
simultaneously.
Scroll Lock When Scroll Lock is on, the screen toggles up or down one
line at a time when the up and down cursor control keys are
pressed.
Page 25
15
Embedded numeric keypad
The embedded numeric keypad functions like a desktop numeric keypad. It is indicated by small characters located on the upper right corner of the keycaps. To simplify the keyboard legend, cursor-control key
symbols are not printed on the keys.
Desired Access Num lock On Num lock Off
Number keys on
embedded keypad
Cursor-control keys on
embedded keypad
Type numbers in a
normal manner.
Hold Shift while using
cursor-control keys.
Hold Fn while using
cursor-control keys.
English
English
Main keyboard keys Hold Fn while typing
letters on embedded
keypad.
Type the letters in a
normal manner.
Page 26
English
16
Getting familiar with your computer
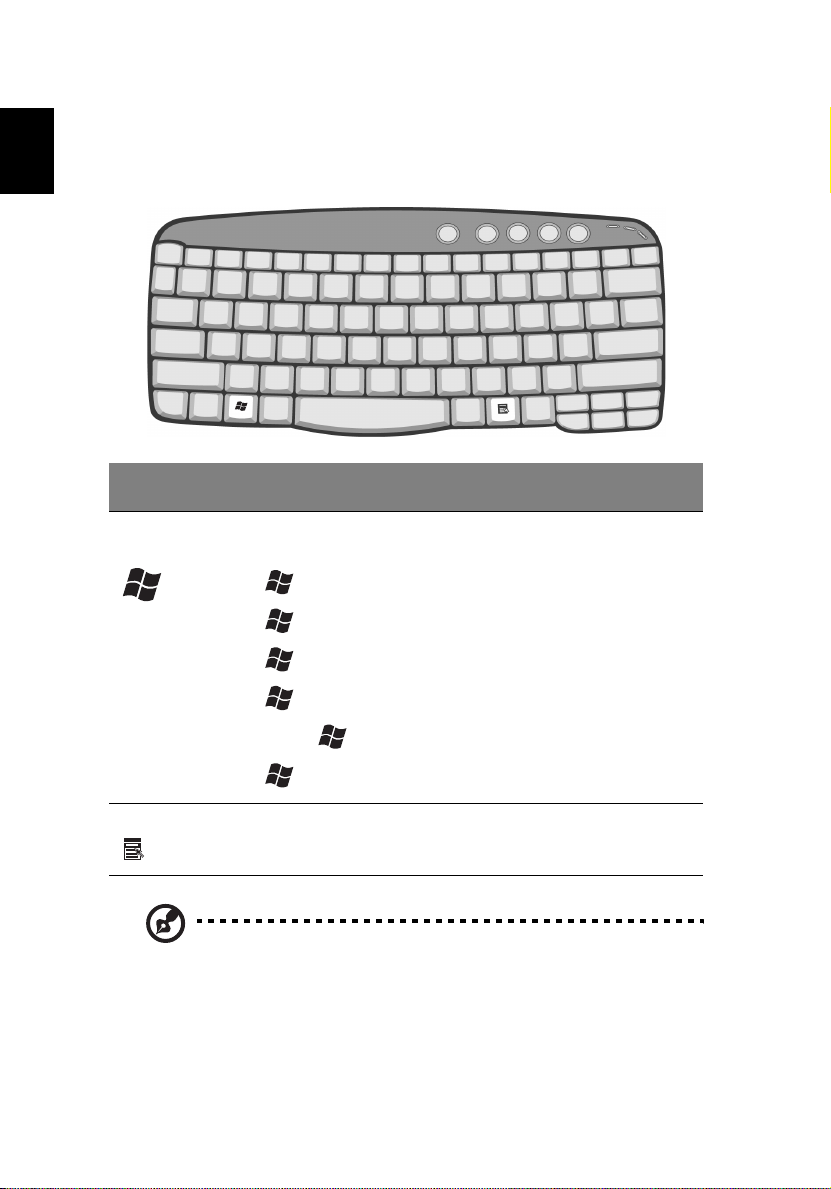
Windows keys
The keyboard features two keys that provide Windows-specific
functions.
Key Description
Windows logo
key
Application key Opens a context menu (same as a right-click).
Note : If an external keyboard or keypad is connected to the
computer, the Num Lock feature automatically shifts from the
internal keyboard to the external keyboard or keypad.
Start button. Combinations with this key perform
shortcut functions. Below are a few examples:
+ Tab (Activates next taskbar button)
+ E (Explores My Computer)
+ F (Finds Document)
+ M (Minimizes All)
Shift + + M (Undoes Minimize All)
+ R (Displays the Run... dialog box)
Page 27
17
Hot keys
Using the Fn key with another key creates a hot key, providing a quick
and convenient method for controlling various functions.
To use a hot key, first hold down the Fn key. Next, press the second key
in the combination. Finally, release both keys.
Your computer provides the following hot keys:
Hot key Icon Function Description
Fn-F1 Hot key help Displays help on hot keys.
Fn-F2 Setup Accesses the computer’s
configuration utility.
English
English
Fn-F3 Power
management
scheme toggle
Fn-F4 Sleep Puts the computer in Sleep
Switches the power
management scheme used by
the computer (function
available if supported by
operating system).
See “Connectivity options” on
page 28.
mode.
See “Connectivity options” on
page 28.
Page 28
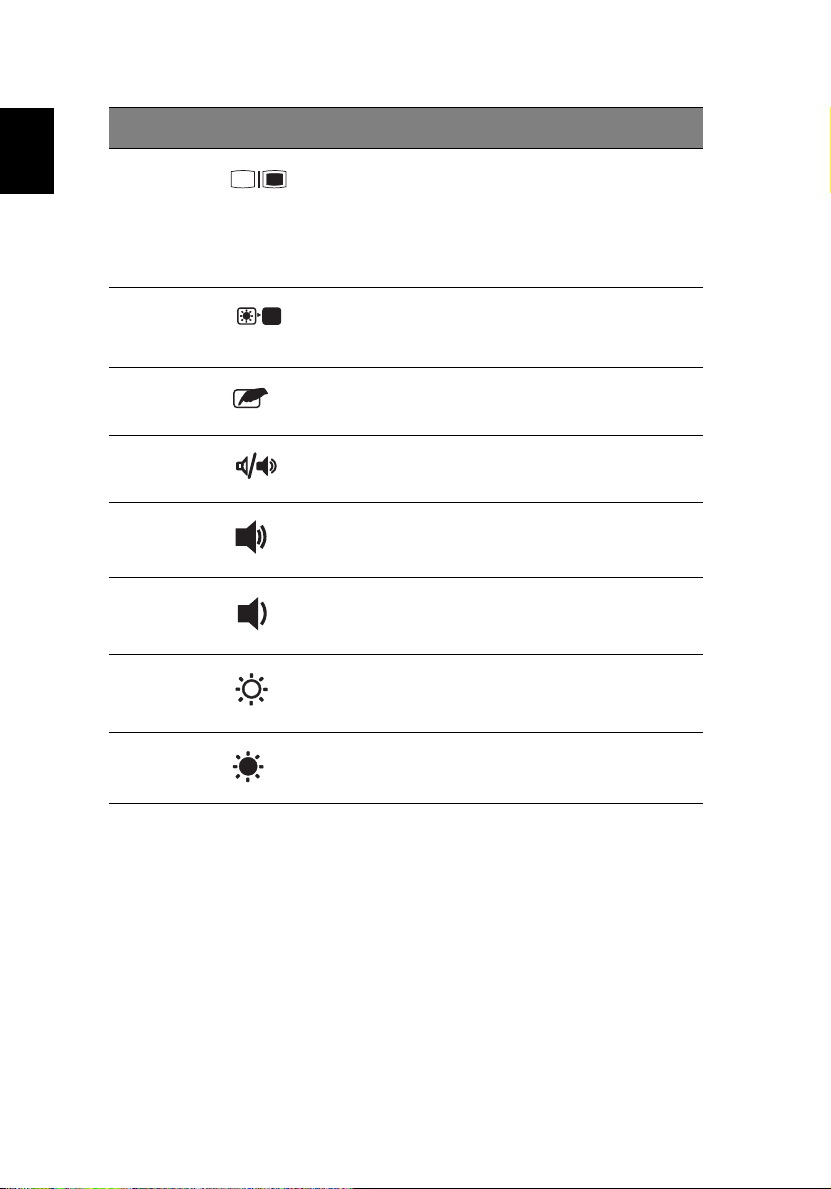
18
Hot key Icon Function Description
Getting familiar with your computer
English
Fn-F5 Display toggle Switches display output
between the display screen,
external monitor (if
connected) and both the
display screen and external
monitor.
Fn-F6 Screen blank Turns the display screen
backlight off to save power.
Press any key to return.
Fn-F7 Touchpad toggle Turns the internal touchpad
on and off.
Fn-F8 Speaker toggle Turns the speakers on and off.
Fn-↑ Volume up Increases the speaker volume.
Fn-↓ Volume down Decreases the speaker
volume.
Fn-→ Brightness up Increases the screen
brightness.
Fn-
←
Brightness down Decreases the screen
brightness.
Page 29
19
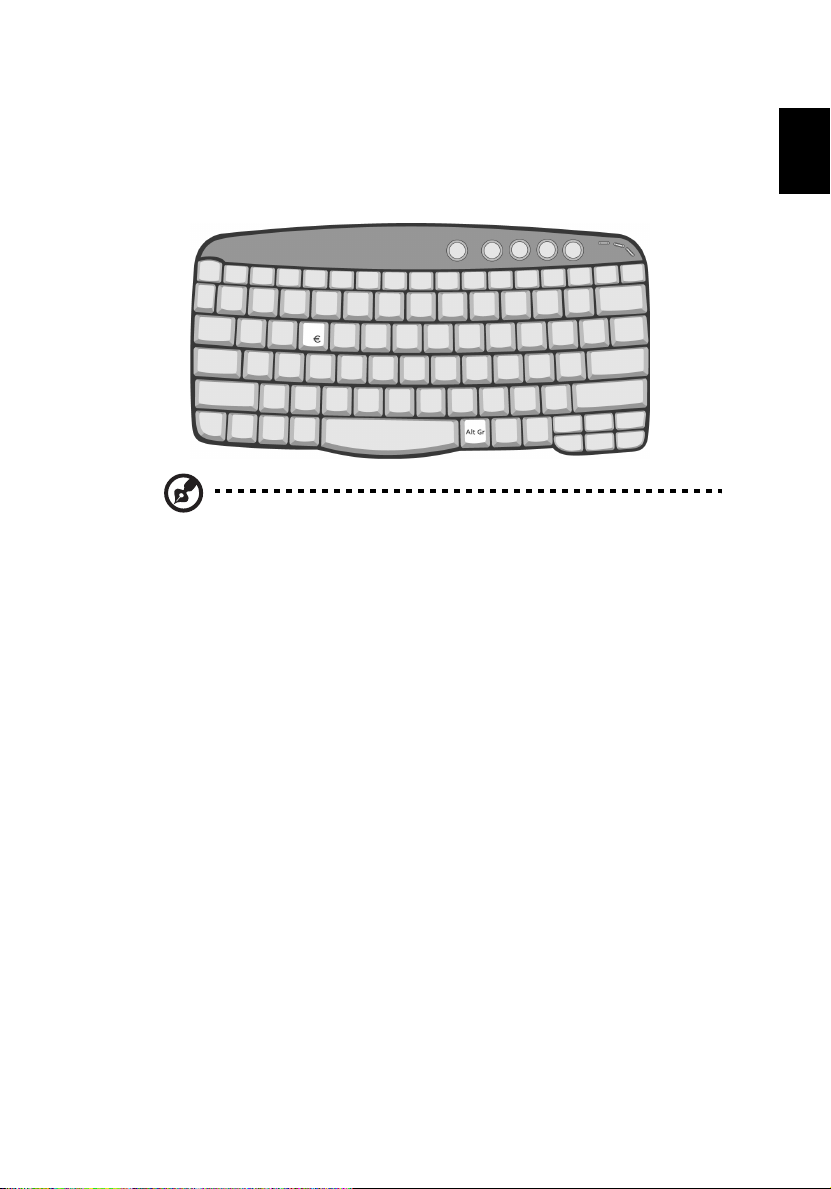
The Euro symbol
If your keyboard layout is set to United States-International or United
Kingdom or if you have a keyboard with a European layout, you can
type the Euro symbol on your keyboard.
Note for US keyboard users: The keyboard layout is set when
you first set up Windows. For the Euro symbol to work, the
keyboard layout has to be set to United States-International.
To verify the keyboard type in Windows XP, follow the steps below:
1 Click on Start, Control Panel.
2 Double-click on Regional and Language Options.
3 Click on the Language tab and click on Details.
4 Verify that the keyboard layout used for "En English (United
States)" is set to United States-International.
If not, select and click on ADD; then select United States-
International and click on OK.
5 Click on OK.
English
English
To type the Euro symbol:
1 Locate the Euro symbol on your keyboard.
2 Open a text editor or word processor.
3Hold Alt Gr and press the Euro symbol.
Page 30

English
20
Getting familiar with your computer
Note: Some fonts and software do not support the Euro symbol.
Please refer to www.microsoft.com/typography/faq/faq12.htm
more information.
for
Page 31

21
To u c h p a d
The built-in touchpad is a pointing device that senses movement on its
surface. This means the cursor responds as you move your finger on the
surface of the touchpad. The central location on the palmrest provides
optimum comfort and support.
Note: When using an external USB mouse, you can press Fn-F7 to
disable the touchpad.
Touchpad basics
The following items teach you how to use the touchpad:
English
English
• Move your finger across the touchpad to move the cursor.
• Press the left (1) and right (3) buttons located on the edge of the
touchpad to do selection and execution functions. These two
buttons are similar to the left and right buttons on a mouse.
Page 32

English
22
Getting familiar with your computer
Tapping on the touchpad produces similar results.
• Use the 4-way scroll (2) button (top/bottom/left and right) to scroll
a page up, down, left or right. This button mimics your cursor
pressing on the vertical and horizontal scroll bars of Windows
applications.
Function Left button
Execute Click twice
quickly
Select Click once Tap once
Drag Click and
hold, then
use finger to
drag the
cursor on the
touchpad
Access
context
menu
Scroll Click and
Right
button
Click
once
Center
buttons
hold the
button in
the desired
direction
(up/down/
left/right)
Tap
Tap twice (at the
same speed as
double-clicking a
mouse button)
Tap twice (at the
same speed as
double-clicking a
mouse button)
then hold finger
to the touchpad
on the second tap
and drag the
cursor
Note: Keep your fingers dry and clean when using the touchpad.
Also keep the touchpad dry and clean. The touchpad is sensitive to
finger movements. Hence, the lighter the touch, the better the
response. Tapping harder will not increase the touchpad’s
responsiveness.
Page 33

23
Launch Keys
Located above the keyboard are five buttons. The left-most button is
the power button. To the right of the power button are the four
launch keys. They are designated as the mail button, the web browser
button, and two programmable buttons (P1 and P2).
Launch key Default application
English
English
Mail Email application
Web browser Internet browser application
P1 User-programmable
P2 User-programmable
E-Mail Detection
Click right button at the Launch Manager icon on the taskbar and click
on E-Mail Detection. In this dialog box, you have the option to enable
disable mail checking, set the time interval for mail checking, etc. If
you already have an email account, you can fill in User Name, Password
and POP3 Sever in the dialog box. The POP3 Sever is the mail server
where you get your email.
Page 34

English
24
Getting familiar with your computer
Aside from the email checking function, there is a mail button that is
used to launch the email application. It is located above the keyboard
right below the LCD.
Page 35

25
Storage
This computer supplies you with the following media storage:
• The High-capacity Enhanced-IDE hard disk
• The high speed optical drive
Hard disk
The high-capacity hard disk is the answer to your storage needs. This is
where your programs and data are stored.
Optical drive
Depending on your model, you have a CD-ROM, DVD-ROM, DVD/CDRW combo drive,DVD-R, or DVD dual drive. The optical drive provides
increased storage capacity, as well as offering a host of multimedia
possibilities.
English
English
Page 36

26
Ejecting the optical drive tray
Getting familiar with your computer
English
To eject the optical drive tray when the computer is turned on, press
the drive eject button.
To load an optical disc:
• Place a CD or DVD on the open tray. Align the disc's center hole
with the tray's spindle.
• Gently push down on the disc until it clicks in place on the spindle.
• Gently push in the tray until it clicks closed.
Emergency ejection of the optical drive tray
If you need to eject the optical drive tray when the computer is turned
off, push a straightened paper clip into the optical drive emergency
eject hole. The tray will be released, and partially pop open.
Page 37

27
Audio
The computer comes with 16-bit high-fidelity AC’97 stereo audio, and
includes a built-in sensitive microphone and dual stereo speakers.
There are audio ports on the left of the computer. See “Left view” on
page 6 for more information on connecting external audio devices.
English
English
Adjusting the volume
Adjusting the volume on the computer is as easy as pressing some
buttons. See “Hot keys” on page 17 for more informations on
adjusting the speaker volume.
Page 38

28
Connectivity options
Getting familiar with your computer
English
Your computer has built-in connectivity options, enabling you to hook
up to a network or communicate over a phone line.
Ethernet and LAN
The built-in network feature allows you to connect your computer to
an Ethernet-based (10/100Mbps) network.
To use the network feature, connect an Ethernet cable from the network jack on the rear of the computer to a network jack or hub on
your network.
See Windows Help for information on setting up a network
connection.
Page 39

29
Fax/data modem
Your computer has a built-in V.92 56Kbps AC’97 Link fax/data modem.
Warning: This modem port is not compatible with digital
phone lines. Plugging the computer into a digital phone
system will damage the modem.
To use the fax/data modem port, connect a phone cable from the
modem port to a telephone jack.
English
English
Page 40

English
30
Getting familiar with your computer
Fast infrared
The computer’s fast infrared (FIR) port allows you to do wireless data
transfer with other IR-aware computers and peripherals such as PDAs
(personal digital assistants), mobile phones, and infrared printers. The
infrared port can transfer data at speeds of up to four megabits per
second (Mbps) at a distance of up to one meter.
Page 41

31
Securing your computer
Your computer is a valuable investment that you need to take care of.
Learn how to protect and take care of your computer.
Security features include hardware and software locks — a security
notch, Smart Card and passwords.
Using a computer security lock
A security keylock notch located on the left panel of the computer lets
you connect a Kensington-compatible computer security lock.
Wrap a computer security lock cable around an immovable object such
as a table or locked drawer handle. Insert the lock into the notch and
turn the key to secure the lock. Some keyless models are also available.
English
English
Using passwords
Passwords protect your computer from unauthorized access. Setting
these passwords creates several different levels of protection for your
computer and data:
• Supervisor Password prevents unauthorized entry into the BIOS
Utility. Once set, you must key-in this password to gain access to
the BIOS Utility. See “BIOS Setup Utility” on page 64.
• User Password secures your computer against unauthorized use.
Combine the use of this password with password checkpoints on
boot-up and resume from hibernation for maximum security.
• Password on Boot secures your computer against unauthorized
use. Combine the use of this password with password checkpoints
Page 42

English
32
Getting familiar with your computer
on boot-up and resume from hibernation for maximum security.
• Hard Disk Password protects your data by preventing
unauthorized access to your hard disk. Even if the hard disk is
removed from the computer and moved to another computer, it
cannot be accessed without the Hard Disk Password.
Important! Do not forget your Supervisor and Hard Disk
Password! If you forget your password, please get in touch with
your dealer or an authorized service center.
Entering passwords
When a password is set, a password prompt appears in the left-hand
corner of the display screen.
• When the Supervisor Password is set, a prompt appears when you
press F2 to enter the BIOS Utility at boot-up.
• Type the Supervisor Password and press Enter to access the BIOS
Utility. If you enter the password incorrectly, a warning message
appears. Try again and press Enter.
• When the User Password is set and the Password on boot
parameter is enabled, a prompt appears at boot-up.
• Type the User Password and press Enter to use the computer. If
you enter the password incorrectly, a warning message appears.
Try again and press Enter.
• When the Hard Disk Password is set, a prompt appears at boot-up.
• Type the Hard Disk Password and press Enter to use the computer.
If you enter the password incorrectly, a warning message appears.
Try again and press Enter.
Important! You have three chances to enter a password. If you
fail to enter the password correctly after three tries, the system
halts. Slide and hold the power switch for four seconds to shut
down the computer. Then turn on the computer again, and try
again. If you fail to enter the Hard Disk Password, please contact
your dealer or an authorized service center.
Setting passwords
You can set passwords using the BIOS Utility.
Page 43

Operating on
battery power
Page 44

Your Aspire 1450 series notebook computer
operates on battery or AC power.
This chapter provides information for
operating on battery power, as well as
information on how your computer
manages and saves power.
Page 45

35
Battery pack
The computer uses a re-chargeable Li-Ion battery pack.
Battery pack characteristics
The battery pack has the following characteristics:
• Employs current battery technology standards.
• Delivers a battery-low warning.
The battery is recharged whenever you connect the computer to the
mains power supply. Your computer supports charge-in-use, enabling
you to recharge the battery while you continue to operate the
computer. However, recharging with the computer turned off results in
a significantly faster charge time.
The battery will come in handy when you travel or during a power
failure. It is advisable to have an extra fully charged battery pack
available as backup. Contact your dealer for details on ordering a spare
battery pack.
Maximizing the battery's life
Like all other batteries, your computer's battery will degrade over
time. This means that the battery's performance will diminish with
time and use. To maximize your battery's life, you are advised to
adhere to the recommendations set out below.
English
English
Conditioning a new battery pack
Before you use a battery pack for the first time, there is a
"conditioning" process that you should follow:
1 Insert the new battery without turning the computer on.
2 Connect the AC adapter and fully charge the battery.
3 Disconnect the AC adapter.
4 Turn on the computer and operate using battery power.
5 Fully deplete the battery until the battery-low warning appears.
6 Reconnect the AC adapter and fully charge the battery again.
Page 46

English
36
Operating on battery power
Follow these steps again until the battery has been charged and
discharged three times.
Use this conditioning process for all new batteries, or if a battery hasn't
been used for a long time. If the computer is to be stored for more
than two weeks, you are advised to remove the battery pack from the
unit.
Warning: Do not expose battery packs to temperatures
below 0°C (32°F) or above 60°C (140°F). Extreme
temperatures may adversely affect the battery pack.
By following the battery conditioning process you condition your
battery to accept the maximum possible charge. Failure to follow this
procedure will prevent you from obtaining the maximum battery
charge, and will also shorten the effective lifespan of the battery.
In addition, the useful lifespan of the battery is adversely affected by
the following usage patterns:
• Using the computer on constant AC power with the battery
inserted. If you want to use constant AC power, you are advised to
remove the battery pack after it is fully charged.
• Not discharging and recharging the battery to its extremes, as
described above.
• Frequent use; the more you use the battery, the faster it will reach
the end of its effective life. A standard computer battery has a life
span of about 500 charges.
Installing and removing the battery pack
Important! Before removing the battery from the unit, connect
the AC adapter if you want to continue using your computer.
Otherwise, turn off the computer first.
To install a battery pack:
1 Align the battery with the open battery bay; make sure that the
end with the contacts will enter first, and that the top surface of
the battery is facing up.
2 Slide the battery into the battery bay and gently push until the
battery locks in place.
Page 47

37
To remove a battery pack:
1 Slide the battery release latch to release the battery.
2 Pull the battery from the battery bay.
Charging the battery
To charge the battery, first make sure that it is correctly installed in the
battery bay. Plug the AC adapter into the computer, and connect to a
mains power outlet. You can continue to operate your computer on AC
power while your battery is charging. However, charging the battery
with the computer turned off results in a significantly faster charge
time.
Note: You are advised to charge the battery before retiring for the
day. Allowing the battery to charge overnight before traveling
enables you to start the next day with a fully charged battery.
Checking the battery level
The Windows Power Meter indicates the current battery level. Rest the
cursor over the battery/power icon on the taskbar to see the battery's
present charge level.
Optimizing battery life
Optimizing battery life helps you get the most out of battery
operation, prolonging the charge/recharge cycle and improving
recharging efficiency. You are advised to follow the suggestions set out
below:
• Purchase an extra battery pack.
• Use AC power whenever possible, reserving your battery for onthe-go use.
• Eject a PC card if it is not being used, as it will continue to draw
power.
• Store the battery pack in a cool, dry place. The recommended
temperature is 10°C to 30°C. Higher temperatures cause the
battery to self-discharge faster.
• Excessive recharging decreases the battery life.
• Look after your AC adapter and battery.
English
English
Page 48

English
38
Operating on battery power
Battery-low warning
When using battery power pay attention to the Windows Power
Meter.
Warning: Connect the AC adapter as soon as possible after
the battery-low warning appears. Data will be lost if the
battery to become fully depleted and the computer shuts
down.
When the battery-low warning appears, the recommended course of
action depends on your situation:
Situation Recommended Action
The AC adapter
and a power
outlet are
available.
An extra fully
charged battery
pack is available.
The AC adapter or
a power outlet is
unavailable. You
have no spare
battery pack.
1. Plug the AC adapter into the computer, and then
connect to the mains power supply.
2. Save all necessary files.
3. Resume work.
Turn off the computer if you want to recharge the
battery rapidly.
1. Save all necessary files.
2. Close all applications.
3. Shut down the operating system to turn off the
computer.
4. Replace the battery pack.
5. Turn on the computer and resume work.
1. Save all necessary files.
2. Close all applications.
3. Shut down the operating system to turn off the
computer.
Page 49

39
Power management
Your computer features a built-in power management unit that
constantly monitors system activity. System activity refers to any
activity involving one or more of the following devices: keyboard,
touchpad/mouse, floppy disk drive, hard disk drive, optical drive,
peripherals connected to the computer, and video memory. If no
activity is detected for a period of time (the settings are controlled in
Windows Power Management), the computer turns off some, or all, of
these devices in order to conserve power.
Your computer employs a power management scheme that supports
ACPI (Advanced Configuration and Power Interface), enabling
maximum power conservation without compromising system
performance. ACPI allows Windows to control the amount of power
given to each device attached to the computer. In this way, Windows
handles all power-saving chores for your computer. Refer to Windows
Help for more information.
English
English
Page 50

English
40
Operating on battery power
Page 51

Peripherals and
options
Page 52

Your Aspire 1450 series notebook computer
offers good expansion capabilities.
This chapter provides information on
connecting peripherals to expand your
system. It also describes how to upgrade key
components to enhance system
performance and keep your computer in
step with the latest technology.
You are advised to consult your dealer for
information on peripherals. In addition,
make sure that you read the manuals and
other documentation provided with new
hardware.
Page 53

43
External display devices
You can connect an external (VGA) monitor or projector to your
computer's external display port. See the section entitled "Display" for
information on using the computer's simultaneous display and multidisplay features.
Use the Fn + F5 hot key to toggle the display setting between the
computer's LCD panel and the external display device. See “Hot keys”
on page 17 for more information.
External input devices
You can connect a variety of input devices to your computer's USB
ports, providing increased functionality and greater ease-of-use. In
addition, the USB ports can be used to connect many other peripheral
devices, such as digital cameras, printers and scanners. See “Expansion
devices” on page 47 for more information on connecting USB devices.
External keyboard
Your computer features a full-size keyboard. However, if you prefer,
you can connect an external keyboard to one of your computer's USB
ports. This enables you to enjoy the comfort and added features of a
full-size desktop system keyboard when inputting typed data on your
notebook computer.
English
English
External keypad
Your computer features an embedded keypad that, when combined
with the Num Lock feature, enables you to easily input typed numeric
data. Alternatively, you can connect a 17-key numeric keypad to one of
your computer's USB ports. This enables you to enjoy the benefits of a
numeric keypad without interfering with your use of the computer's
keyboard for typing text.
External pointing device
Your computer features a sensitive touchpad pointing device with two
click buttons and a scroll key. However, if you prefer to use a
conventional mouse or other pointing device, you can connect it to
one of your computer's USB ports.
Page 54

English
44
Peripherals and options
USB devices
Your computer features four USB (Universal Serial Bus) 2.0 ports for
connecting a range of USB peripherals. See “External input devices” on
page 43 and “Printer” on page 46 for information on connecting a USB
keyboard, keypad, mouse or printer. Other common USB devices
include digital cameras, scanners, and external storage devices.
USB is plug and play, which means that you can connect and start using
a USB device without having to restart your computer. You can also
disconnect the device at any time.
A further advantage of USB is the ability to use USB hubs. This means
that several devices can share a USB port simultaneously.
Page 55

45
IEEE 1394 Port
The computer’s IEEE 1394 port allows you to connect to an IEEE 1394
supported device like a digital video camera.
See your video or digital camera’s documentation for details.
English
English
Page 56

46
Printer
Peripherals and options
English
Your computer supports both parallel and USB printers.
Refer to the printer's manual for information on:
• Setting up the hardware.
• Installing the necessary drivers in Windows.
• Operating instructions.
To use a USB printer, simply connect the device to one of your
computer's USB ports, and then wait for Windows to find the new
hardware.
To connect a parallel printer, first shut down the operating system.
Connect the printer to the parallel port, and then restart the computer.
Wait for Windows to find the new hardware.
Audio devices
Your computer offers built-in stereo speakers. See the section entitled
“Audio” on page 25 for more information on these features. However,
in addition to the integrated devices, the two audio ports on the left
side of the unit enable you to connect external audio input and output
devices.
You can plug an external microphone into your computer's
microphone-in jack. This offers the convenience of greater freedom of
movement, as well as improved audio input quality.
Connect headphones to the headphone jack for private listening and
improved audio output quality.
Page 57

47
Expansion devices
PC Card
Your computer features a PC card slot that supports a standard Type II
PC card (PCMCIA or CardBus). This greatly increases your computer's
usability and expandability. A variety of PC cards are available, such as
flash memory, SRAM, fax/data modem, LAN, and SCSI cards. Consult
your dealer for information on PC card options for your computer.
Note: Refer to your card's manual for details on how to install and
use the card.
To insert a PC card:
1 Align the card with your computer's PC card slot. Make sure that
the edge with the connectors is facing the slot, and that the card is
the right way up. Many cards are marked with an arrow to help
you insert them correctly.
2 Slide the card into the slot, and push gently until the card
3 If necessary, connect the card's cable to the jack on the outer edge
of the card.
4 Windows will automatically detect the card's presence.
connects.
English
English
Page 58

English
48
Peripherals and options
To remove a PC card:
1 Close the application that is using the PC card.
2 Double click on the PC card icon on the taskbar, and then select
the option to safely remove the card. Wait for the message telling
you that it is now safe to remove the card.
3 Press the PC card eject button to partially eject the card.
4 Pull the card from the slot.
Page 59

49
Miscellaneous options
Battery pack
It is a good idea to have a spare battery, especially when you travel
with your computer. This greatly increases your productive range when
you are on the move.
AC adapter
Having a spare AC adapter allows you to keep one in two different
places. For example, you could have one AC adapter at home and
another at work. This means that you don't have to carry an AC
adapter when traveling between your two base locations.
English
English
Page 60

50
Key component upgrades
Peripherals and options
English
Your computer is designed to deliver solid performance. However, in
time, you might find that your applications demand even more
computing power. For this reason, you are able to upgrade key
components.
Note: Contact your authorized dealer if you decide to perform a
key component upgrade.
Memory upgrade
Memory is expandable to 2GB, employing 256/512 MB or 1 GB industry
standard soDIMMs (Small Outline Dual Inline Memory Modules). The
computer supports DDR (Double Data Rate) DRAM.
There are two memory slots on your computer, one of which is occupied by standard memory. You can upgrade memory by installing a
memory module into the other available slot, or replacing the standard
memory with a higher-capacity memory module.
Installing memory:
Follow these steps to install memory:
1 Turn off the computer, unplug the AC adapter (if connected) and
remove the battery pack. Then turn the computer over to access its
base.
2 Remove the screws from the memory cover (a); then lift up and
remove the memory cover (b).
Page 61

51
3 Insert the memory module diagonally into the slot (a), then gently
press it down (b) until it clicks into place.
4 Replace the memory cover and secure it with the screw.
5 Reinstall the battery pack, and reconnect the AC adapter.
6 Turn on the computer.
The computer automatically detects and reconfigures the total
memory size.
Hard disk upgrade
It is possible to replace your hard disk with a higher capacity drive
when you need more storage space. Your computer uses a 9.5mm 2.5inch Enhanced-IDE hard disk. Consult your dealer if you need to
perform a hard disk upgrade.
English
English
Page 62

English
52
Peripherals and options
Page 63

Moving with your
computer
Page 64

Your Aspire 1450 series notebook computer
is ideal for taking with you when you move
around.
This chapter provides tips on things to
consider when traveling with your
computer.
Page 65

55
Disconnecting from the desktop
Before moving with your computer, you must turn it off and disconnect
all peripherals:
1 Save your work and close all applications.
2 Shut down Windows to turn off your computer.
3 Unplug the AC adapter from the mains outlet, and then
disconnect it from the computer.
4 Disconnect any external devices, such as a keyboard, mouse, or
printer, that are attached to your computer.
5 If you are using a security lock cable, disconnect the lock from the
computer.
6 Pack your computer in a strong, waterproof bag or case.
English
English
Page 66

56
Moving around
Moving with your computer
English
Sometimes you might need to move your computer a short distance.
For example, you might need to move from your office desk to a
meeting room. In these situations, you don't have to shut down the
operating system.
Preparing the computer
First, disconnect any peripherals that you don't want to take with you.
Next close the lid, placing your computer in Standby mode. You can
now safely carry it around the building with you.
When you are ready to use your computer again, open the lid and then
press the power button to bring it out of Standby mode.
What to bring to short meetings
If your battery is fully charged, you probably won't need to take
anything else with you to the meeting.
What to bring to long meetings
For longer meetings, take along the AC adapter. You can use mains
power throughout the meeting, or you can run down your battery
first, and then connect the AC adapter after receiving the battery-low
warning.
If the meeting room does not have an available power outlet, reduce
your computer's power consumption by putting it in Standby mode
during long periods of inactivity. It is advisable to take along a spare
battery if you have one.
Page 67

57
Taking the computer home
When you move between your office and home you will need to
prepare your computer for the short trip.
Preparing the computer
After disconnecting your computer from the desktop, prepare the unit
as follows:
1 Remove all media from the drives. Loaded media can damage the
drive heads during transit.
2 Pack the computer in a protective case that is padded to guard
against knocks. Make sure that the unit cannot slide around inside
the case.
Caution: Avoid packing items next to the top of the computer, as
this could result in damage to the screen.
What to bring with you
If you don't have spare items at home, it is advisable to take along the
AC adapter and this User's Guide.
Special considerations
To protect your computer in transit, it is advisable to pay attention to
the following:
• Minimize the effect of temperature changes. Keep your computer
with you instead of placing it in storage holds.
• Avoid leaving your computer in a hot car.
• Changes in temperature and humidity can cause condensation to
form in your computer. Before turning the computer on, allow it
to return to room temperature, and then check the screen for
signs of condensation. If the temperature change is greater than
10°C (18°F), allow the computer to come to room temperature
slowly by placing it in a room with a temperature between the
outside and room temperatures.
English
English
Page 68

English
58
Moving with your computer
Setting up a home office
If you frequently work on your computer at home, as well as at work, it
may be worthwhile purchasing a second AC adapter. This will allow
you to travel lighter, as you can keep an AC adapter in each location.
You might also find it worthwhile keeping a second set of peripherals
at home, such as a keyboard, keypad, mouse and printer.
Page 69

59
Traveling with the computer
Sometimes you might need to make longer trips with your computer.
Preparing the computer
Prepare the computer as you would for moving between your office
and home. It is advisable to make sure that the battery is fully charged.
If you are traveling by air, you might be required to turn on the
computer during security checks.
What to take with you
It is advisable to take the following items with you:
• AC adapter.
• Spare, fully charged battery packs.
• Additional printer driver files (if you plan to use another printer).
• Phone and network cables (if you plan to use the computer's
modem and network connections).
Special considerations
In addition to the considerations for taking your computer home, keep
the following in mind:
• Always take your computer as carry-on luggage.
• If possible, have your computer manually inspected at security
checks. Although the computer can pass safely through security
X-ray machines, you should never expose it to a metal detector.
• If carried separately, avoid exposing floppy disks to hand-held
metal detectors.
English
English
Page 70

60
Moving with your computer
Traveling internationally with your
English
computer
Occasionally you might need to travel between countries with your
computer.
Preparing the computer
Prepare the computer as you would for normal travel. Remember to
take special precautions for air travel.
What to take with you
It is advisable to take the following items with you:
• AC adapter.
• Power cords that are appropriate for the countries you plan to
visit.
• Spare, fully charged battery packs.
• Additional printer driver files (if you plan to use another printer).
• Phone and network cables (if you plan to use the computer's
modem and network connections). Check that your modem is
suitable for the telephone system in the countries you plan to visit.
You might have to use a PC card modem in some locations.
Special considerations
In addition to the considerations for normal travel with your computer,
keep the following in mind when traveling internationally:
• Check that your power cord is suitable for the local power supply.
If necessary, purchase a power cord that meets local requirements.
Avoid using converter kits.
• If you plan to connect over a phone line, check that the computer's
modem and your phone cord are suitable for the local phone
system. If necessary, purchase a PC card modem that meets local
requirements.
• If carried separately, avoid exposing floppy disks to hand-held
metal detectors.
Page 71

Software
Page 72

Your Aspire 1450 series notebook computer
includes system utilities.
This chapter provides information on the
important software that comes with your
computer.
Page 73

63
System software
Your computer comes preloaded with the following software:
• Microsoft Windows operating system.
• Hardware BIOS setup utility.
• System utilities, drivers and application software.
Note: To run software applications in Windows, first click on the
Start button. Next, select the appropriate folder, and then click on
the application icon. To learn about the software and utility, make
use of the online help provided by the software.
Launch Manager
Launch Manager allows you to set the four launch keys located above
the keyboard. See “Launch Keys” on page 23 for the location of the
launch keys.
You can access the Launch Manager by clicking on Start, All Programs,
and then Launch Manager to start the application.
English
English
Page 74

64
BIOS Setup Utility
Software
English
The BIOS (basic input/output system) contains important information
used to configure the hardware and system software settings. Your
computer reads the BIOS when it first starts up, before it loads the
operating system.
Your computer's BIOS includes a built-in setup utility called Insyde
Software SCU (system configuration utility). It can be started shortly
after you turn the computer on, by pressing the F2 key during POST.
The BIOS setup utility displays summary information on your computer,
its devices, processor and memory.
Your computer is already configured for optimal performance, and so
you should not need to run this utility. However, you may need to
change the BIOS settings if you encounter configuration problems in
the future. Refer to “Frequently asked questions” on page 67 if a
problem arises.
Page 75

Troubleshooting
Page 76

This chapter instructs you on how to deal
with common system problems. Please read
it before calling a technician.
Solutions to more serious problems may
require opening the computer. Do not
attempt to open and service the computer
by yourself. Contact your dealer or an
authorized service center for assistance.
Page 77

67
Frequently asked questions
This section suggests solutions to commonly encountered problems.
I press the power button, but my computer does not start or boot-up.
Look at the Power status indicator:
• If it is not lit, no power is being delivered to the computer. Check
the following:
- If you are running on battery power, the battery may be low
and unable to power the computer. Connect the AC adapter
to recharge the battery pack.
- If you are running on mains power, make sure that the AC
adapter is properly plugged in to the computer and to the
power outlet.
• If it is lit, check the following:
- Make sure that there is not a non-bootable (non-system)
diskette in the floppy disk drive. If so, remove the diskette and
then press Ctrl-Alt-Del to restart the system.
Nothing appears on the screen.
The computer's power management system automatically blanks the
screen to save power. Press any key to turn the display back on.
If pressing a key does not turn the display back on, check the
following:
• The brightness level might be too low. Press Fn +
increase the screen brightness level.
• The display device might be set to an external monitor. Press the
Fn + F5 hot key to toggle the display setting.
• The system may be in standby mode. Try pressing the power
button to resume.
→ hot key to
English
English
The image is not full-screen.
Make sure that the resolution is set to a resolution your system
supports:
• Right click on your Windows desktop and select Properties to bring
up the Display Properties dialog box. Alternatively, click on the
Display icon in Control Panel.
• Click on the Settings tab to check the resolution setting.
Resolutions lower than the specified resolution result in a display
that is less than full-screen.
Page 78

English
68
Troubleshooting
There is no audio coming from my computer.
Check the following:
• The volume may be muted. In Windows, look at the volume
control icon on the taskbar. If it is crossed-out, click on the icon
and deselect the Mute option.
• The volume level may be too low. In Windows, click on the volume
control icon on the taskbar, and then use the slider control to
increase the volume level.
• If headphones are connected to the headphone jack on the
computer, your computer's built-in speakers will be turned off.
My external microphone does not work.
Check the following:
• Make sure that the external microphone is properly plugged into
the microphone-in jack on the computer.
• Make sure that the volume is not muted or set too low.
I can't eject the optical drive tray with my computer turned off.
The computer needs to be turned on for the optical drive eject button
to function. If you need to eject the optical drive tray when the
computer is turned off, push a straightened paper clip into the optical
drive emergency eject hole. See “Ejecting the optical drive tray” on
page 26 for more information.
The keyboard does not respond.
Try attaching an external USB keyboard to one of your computer's USB
ports. If it works, the internal keyboard might have become
disconnected. Contact your dealer or an authorized service center.
The floppy disk drive cannot read a diskette.
Check the following:
• Make sure the diskette is properly inserted in the floppy disk drive.
• Make sure that the diskette is formatted.
• Try to read a second diskette. If this works, then the first diskette
might have a problem.
• If the diskette is not the cause of the problem, then the drive head
might be dirty. Clean it using a drive head cleaning kit.
Page 79

69
The optical drive cannot read a disc.
Check the following:
• Make sure that the disc is supported by the drive. If your computer
has a CD-ROM drive, it can read CDs but cannot read DVDs. If your
computer has a DVD drive, it can read CDs and DVDs.
• When placing a disc in the drive tray, make sure that it is secure on
the spindle of the drive tray.
• Make sure that the disc is free from scratches or smudges. If the
disc is dirty, clean it using a disc cleaning kit.
• If the disc is OK, the drive head might be dirty. Clean it using a
drive head cleaning kit.
The printer does not work.
Check the following:
• Make sure that the printer is connected to a power outlet and it is
turned on.
• Check that the cable is properly connected to the appropriate
ports on both the computer and the printer.
• If you are using a printer connected to your computer's parallel
port, restart the computer. Windows needs to find the new
hardware and install the necessary drivers.
I want to set up my location to use the internal modem.
Follow these steps:
• Click on Start, and then click on Control Panel.
• Double-click on Phone and Modem Options.
•In the Dialing Rules tab, begin setting up your location.
Refer to Windows Help for more information.
English
English
When the battery is 95-99% full, it won't charge to 100% capacity.
To preserve the life of the battery, the system only lets you charge the
battery when its capacity falls below 95%. It is recommended that you
run down the battery, and then fully recharge it.
Page 80

70
Requesting service
Troubleshooting
English
International Travelers Warranty (ITW)
Your computer is backed by an International Travelers Warranty (ITW)
that gives you security and peace of mind when traveling. Our
worldwide network of service centers are there to give you a helping
hand.
An ITW passport comes with your computer. This passport contains all
you need to know about the ITW program. A list of available,
authorized service centers is in this handy booklet. Read this passport
thoroughly.
Always have your ITW passport on hand, especially when you travel to
receive the benefits from our support centers. Place your proof-ofpurchase in the flap located inside the front cover of the ITW passport.
If the country you are traveling in does not have an Acer-authorized
ITW service site, you can still get in contact with our offices worldwide.
There are two ways to access Acer for technical support and
information:
• Internet service worldwide (www.acersupport.com
• Technical support numbers in various countries
You can view a list of technical support numbers by following these
steps:
1 Click on Start, Settings, Control Panel.
2 Double-click on System.
3 Click on the Support Information button.
)
Before you call
Please have the following information available when you call Acer for
online service, and please be at your computer when you call. With
your support, we can reduce the amount of time a call takes and help
solve your problems efficiently.
If there are error messages or beeps reported by your computer, write
them down as they appear on the screen (or the number and sequence
in the case of beeps).
Page 81

71
You are required to provide the following information:
Name:______________________________________
Address:____________________________________
___________________________________________
Telephone number:___________________________
Machine and model type:______________________
Serial number:_______________________________
Date of purchase:____________________________
English
English
Page 82

English
72
Troubleshooting
Page 83

Appendix A
Specifications
Page 84

This appendix lists the general specifications
of your computer.
Page 85

75
Microprocessor
• AMD AthlonTM XP-M processors at 1800+~2400+ and higher
Memory
• Main memory expandable to 2GB
• Dual 200-pin soDIMM sockets
• Support 256M, 512M & 1GB DDR 333 RAM
• 512 KB flash ROM BIOS
Data storage
• One high-capacity E-IDE hard disk
• One high speed optical drive
Display and video
• Thin-Film Transistor (TFT) liquid crystal display (LCD) displaying 32bit true color up to 1024 x 768 eXtended Graphics Array (XGA)
resolution for 14.1” / 15.0”
• Simultaneous LCD and CRT display support
• DualView
• S-video for output to a television or display device that support Svideo input
• “Automatic LCD dim” feature that automatically selects the best
setting for the display in order to conserve power
TM
English
English
Audio
• AC'97 stereo audio
• Dual speakers and one internal microphone
• Separate audio ports for headphone-out, line-in and microphonein devices
Keyboard and pointing device
• 84-/85-/88-key Windows keyboard
• Ergonomically-centered touchpad pointing device with 4-way
scroll button
Page 86

English
76
Appendix A Specifications
I/O ports
• One type II CardBus PC Card slot
• One RJ-45 network jack (Fast Ethernet 10/100)
• One RJ-11 modem jack (V.92, 56K)
• One DC-in jack
• One parallel port (ECP/EPP)
• One VGA port for external monitor
• One speaker/headphone-out jack (3.5mm mini jack)
• One audio line-in jack (3.5mm mini jack)
• One microphone-in jack
• One IEEE 1394 port
• One S-video TV-out port
• Four USB 2.0 ports
• One FIR port (IrDA)
• 4-in-1 Card Reader (Manufacture optional)
Weight and dimensions
• 14.1”-display model:
- 2.87 kg (6.32 lbs)
- 330(W) x 272(D) x 28.9(H) mm
• 15.0”-display model:
- 2.93 kg (6.45 lbs)
- 330(W) x 272(D) x 31.8(H) mm
Environment
• Temperature:
- Operating: 5°C ~ 35°C
- Non-operating: -20°C ~ 65°C
• Humidity (non-condensing):
- Operating: 20% ~ 80% RH
- Non-operating: 10% ~ 90% RH
System
• ACPI support
• SMBIOS 2.3 support with asset tag capability
• Microsoft Windows operating system
Page 87

77
Power
• 65Wh 8-cell Li-Ion battery pack
• 90-Watt AC adapter, auto sensing 100~240 Vac, 50~60Hz
Options
• 256/512 MB or 1 GB memory upgrade module
• Additional AC adapter
• Additional battery pack
• USB Floppy drive
• 802.11g wireless LAN
•Bluetooth
English
English
Page 88

English
78
Appendix A Specifications
Page 89

Appendix B
Notices
Page 90

This appendix lists the general notices for
your computer.
Page 91

81
English
English
Page 92

English
82
Appendix B Notices
Page 93

83
Modem notices
TBR 21
This equipment has been approved [Council Decision 98/482/EC - "TBR 21"] for
pan-European single terminal connection to the Public Switched Telephone
Network (PSTN). However, due to differences between the individual PSTNs
provided in different countries, the approval does not, of itself, give an
unconditional assurance of successful operation on every PSTN termination
point. In the event of problems, you should contact your equipment supplier in
the first instance.
Telecommunications notices
Note: Below regulatory information is for models with wireless
LAN and/or Bluetooth only.
Regulatory Information
The Wireless module must be installed and used in strict accordance
with the manufacturer’s instructions. This device complies with the
following radio frequency and safety standards.
Europe - EU Declaration of Conformity
English
English
This device complies with the standards listed below, following the
provisions of the EMC Directive 89/336/EEC:
• ETSI EN 301 489-1/17
• ETSI EN 300 328-2
• EN 300 328 V1.4.1.
Important safety instructions
Read these instructions carefully. Save them for future reference.
1 Follow all warnings and instructions marked on the product.
2 Unplug this product from the wall outlet before cleaning. Do not use
liquid cleaners or aerosol cleaners. Use a damp cloth for cleaning.
3 Do not use this product near water.
4 Do not place this product on an unstable cart, stand, or table. The product
may fall, causing serious damage to the product.
Page 94

English
84
5 Slots and openings are provided for ventilation; to ensure reliable
operation of the product and to protect it from overheating. These
openings must not be blocked or covered. The openings should never be
blocked by placing the product on a bed, sofa, rug, or other similar surface.
This product should never be placed near or over a radiator or heat
register, or in a built-in installation unless proper ventilation is provided.
6 This product should be operated from the type of power indicated on the
marking label. If you are not sure of the type of power available, consult
your dealer or local power company.
7 Do not allow anything to rest on the power cord. Do not locate this
product where persons will walk on the cord.
8 If an extension cord is used with this product, make sure that the total
ampere rating of the equipment plugged into the extension cord does not
exceed the extension cord ampere rating. Also, make sure that the total
rating of all products plugged into the wall outlet does not exceed the fuse
rating.
9 Never push objects of any kind into this product through cabinet slots as
they may touch dangerous voltage points or short out parts that could
result in a fire or electric shock. Never spill liquid of any kind on the
product.
10 Do not attempt to service this product yourself, as opening or removing
covers may expose you to dangerous voltage points or other risks. Refer all
servicing to qualified service personnel.
11 Unplug this product from the wall outlet and refer servicing to qualified
service personnel under the following conditions:
a When the power cord or plug is damaged or frayed.
b If liquid has been spilled into the product.
c If the product has been exposed to rain or water.
d If the product does not operate normally when the operating
instructions are followed. Adjust only those controls that are covered
by the operating instructions since improper adjustment of other
controls may result in damage and will often require extensive work
by a qualified technician to restore the product to normal condition.
e If the product has been dropped or the case has been damaged.
f If the product exhibits a distinct change in performance, indicating a
need for service.
12 Replace the battery with the same type as the product's battery we
recommend. Use of another battery may present a risk of fire or explosion.
13 Warning! Batteries may explode if not handled properly. Do not
disassemble or dispose of them in fire. Keep them away from children and
dispose of used batteries promptly.
Appendix B Notices
Page 95

85
14 Use only the proper type of power supply cord set (provided in your
accessories box) for this unit. It should be a detachable type: UL listed/CSA
certified, type SPT-2, rated 7A 125V minimum, VDE approved or its
equivalent. Maximum length is 15 feet (4.6 meters).
Laser compliance statement
The CD or DVD drive used with this computer is a laser product. The CD or DVD
drive's classification label (shown below) is located on the drive.
CLASS 1 LASER PRODUCT
CAUTION: INVISIBLE LASER RADIATION WHEN OPEN. AVOID EXPOSURE TO
BEAM.
APPAREIL A LASER DE CLASSE 1 PRODUIT
LASERATTENTION: RADIATION DU FAISCEAU LASER INVISIBLE EN CAS
D’OUVERTURE. EVITTER TOUTE EXPOSITION AUX RAYONS.
LUOKAN 1 LASERLAITE LASER KLASSE 1
VORSICHT: UNSICHTBARE LASERSTRAHLUNG, WENN ABDECKUNG GEÖFFNET
NICHT DEM STRAHLL AUSSETZEN
PRODUCTO LÁSER DE LA CLASE I
ADVERTENCIA: RADIACIÓN LÁSER INVISIBLE AL SER ABIERTO. EVITE
EXPONERSE A LOS RAYOS.
ADVARSEL: LASERSTRÅLING VEDÅBNING SE IKKE IND I STRÅLEN.
VARO! LAVATTAESSA OLET ALTTINA LASERSÅTEILYLLE.
VARNING: LASERSTRÅLNING NÅR DENNA DEL ÅR ÖPPNAD ÅLÅ TUIJOTA
SÅTEESEENSTIRRA EJ IN I STRÅLEN
VARNING: LASERSTRÅLNING NAR DENNA DEL ÅR ÖPPNADSTIRRA EJ IN I
STRÅLEN
ADVARSEL: LASERSTRÅLING NAR DEKSEL ÅPNESSTIRR IKKE INN I STRÅLEN
English
English
Lithium battery statement
The Aspire 1450 series uses the lithium battery, models SQ-1100 and SQU-202 only.
CAUTION
Danger of explosion if battery is incorrectly replaced. Replace only with the
same or equivalent type recommended by the manufacturer. Discard used
batteries according to the manufacturer’s instructions.
Page 96

English
86
ADVARSEL!
Lithiumbatteri - Eksplosionsfare ved fejlagtig håndtering. Udskiftning må kun
ske med batteri af samme fabrikat og type. Léver det brugte batteri tilbage til
leverandøren.
ADVARSEL
Eksplosjonsfare ved feilaktig skifte av batteri. Benytt samme batteritype eller
en tilsvarende type anbefalt av apparatfabrikanten. Brukte batterier kasseres i
henhold til fabrikantens instruksjoner.
VARNING
Explosionsfara vid felaktigt batteribyte. Anvãnd samma batterityp eller en
ekvivalent typ som rekommenderas av apparattillverkaren. Kassera anvãnt
batteri enligt fabrikantens instruktion.
VAROITUS
Päristo voi räjähtää, jos se on virheellisesti asennettu. Vaihda paristo
ainoastaan laitevalmistajan suosittelemaan tyyppiin. Hävitä käytetty paristo
valmistajan ohjeiden mukaisesti.
VORSICHT!
Explosionsgefahr bei unsachgemäßen Austausch der Batterie Ersatz nur durch
denselben oder einem vom Hersteller empfohlenem ähnlichen Typ. Entsorgung
gebrauchter Batterien nach Angaben des Herstellers.
Appendix B Notices
LCD pixel statement
The LCD unit is produced with high-precision manufacturing techniques.
Nevertheless, some pixels may occasionally misfire or appear as black or red
dots. This has no effect on the recorded image and does not constitute a
malfunction.
Macrovision copyright protection notice
This product incorporates copyright protection technology that is protected by
method claims of certain U.S. patents and other intellectual property rights
owned by Macrovision Corporation and other rights owners. Use of this
copyright protection technology must be authorized by Macrovision
Corporation, and is intended for home and other limited viewing uses only
unless otherwise authorized by Macrovision Corporation. Reverse engineering
or disassembly is prohibited.
Apparatus Claims of U.S. Patent Nos. 4,631,603, 4,577,216, 4,819,098, and
4,907,093 licensed for limited viewing uses only.
Page 97

87
Index
A
AcerMedia drive 25
ACPI 39
audio 27
adjusting the volume 27
connecting externally 46
troubleshooting 68
B
battery pack
battery-low warning 38
caring for v
characteristics 35
charging 37
checking charge level 37
installing 36
low conditions 38
maximizing life 35
optimizing 37
removing 37
using the first time 35
BIOS Setup Utility 64–??
entering 64
brightness
hotkeys 18
C
caps lock 14
on indicator 13
care
battery pack v
computer iv
CD
troubleshooting 69
CD-ROM
ejecting 26
charging
checking level 37
cleaning
computer v
computer
bringing to meetings 56
caring for iv
cleaning v
disconnecting 55
features 11
moving around 56
security 31
setting up a home office 58
taking home 57
traveling internationally 60
traveling on local trips 59
turning off iii
connections
audio 46
external display devices 43
external input devices 43
keyboard, external 43
keypad, external 43
mouse 43
printer 46
USB 44
connectivity options 28
Ethernet 28
D
display 12
hotkeys 18
troubleshooting 67
DVD
troubleshooting 69
E
Ethernet connection 28
Euro 19
F
FAQ. See frequently-asked questions
floppy drive
troubleshooting 68
frequently-asked questions 67
front view 3
G
guide iii
H
hard disk 25
upgrading 51
help iii
online services 70
Hibernation mode
hotkey 17
hotkeys 17
English
English
Page 98

88
Index
English
I
ITW. See warranty
K
keyboard 14
connecting externally 43
embedded numeric keypad 15
hotkeys 17
lock keys 14
troubleshooting 68
Windows keys 16
keypad
connecting externally 43
L
left view 6
M
memory
installing 50– 51, ??– 51
upgrading 50
microphone
troubleshooting 68
modem
setting location 69
mouse
connecting externally 43
N
Notebook Manager
hotkey 17
notice
DVD copyright protection 86
num lock 14
on indicator 13
numeric keypad
embedded 15
O
online services 70
options
hard disk upgrade 51
memory upgrade 50
PC Cards 47
spare AC adapter 49
spare battery 49
P
password 31
types 31
PC Card
inserting 47
removing 48
power management 39
printer
connecting 46
troubleshooting 69
problems 67
audio 68
CD 69
diskette 68
display 67
DVD 69
floppy drive 68
keyboard 68
printer 69
startup 67
R
rear view 8
right view 7
S
safety
CD or DVD 85
general instructions 83
lithium battery 85
security
keylock 31
passwords 31
smart card 31
service
when to call v
software
bundled 63
speakers
hotkey 18
troubleshooting 68
Standby mode
hotkey 17
status indicators 13
status LCD 13
storage 25
AcerMedia drive 25
hard disk 25
support
information 70
Page 99

89
T
touchpad 21
hotkey 18
using 21– 22
travel
international flights 60
local trips 59
U
USB
connecting 44
utility
BIOS Setup 64–??
V
volume
adjusting 27
W
warranty
International Traveler’s Warran-
ty 70
Windows keys 16
English
English
 Loading...