

Page 1

English
Analog LCD Monitor
AL702 User’s Manual
Page 2

English
TABLE OF CONTENTS
FCC compliance statement.........................................................................1
DOC compliance notice..............................................................................1
Introduction .................................................................................................2
Features ......................................................................................................2
Unpacking ................................................................................................... 3
Screen position adjustment..........................................................................4
Connecting the power cord.........................................................................4
Safety precaution ........................................................................................5
Cleaning your monitor .................................................................................5
Preset modes .............................................................................................. 6
Power saving .............................................................................................. 7
DDC ...........................................................................................................7
Installation ...................................................................................................8
User controls............................................................................................... 9
Front panel controls ................................................................................. 9
Basic section of a OSD screen ............................................................. 10
Standard OSD operation ....................................................................... 1 1
OSD function description ...................................................................... 11
Troubleshooting ......................................................................................... 13
Specification..............................................................................................14
Page 3

English
AL702
1
FCC Compliance Statement
This equipment has been tested and found to comply with the limits for a Class B digital
device, pursuant to Part 15 of the FCC Rules. These limits are designed to provide resonable
protection against radio frequency interference in a residential installation. This equipment
generates, uses, and can radiate radio frequency energy. If not installed and used in
accordance with the instructions, it may cause interference to radio communications.
However, there is no guarantee that intereference will not occur in a particular installation.
If this equipment does cause interference to radio or television reception (this can be
determined by turning this equipment off and on), the user is encouraged to try to correct
the interference by one or more of the following measures:
· Reorient or relocate the receiving antenna.
· Increase the separation between this equipment and the receiver.
· Connect this equipment to an outlet on a circuit different from which the
receiver is connected to.
· Consult the dealer or an experienced radio/TV technician for help.
Caution:
T o comply with the limits for an FCC Class B computing device, always use the shielded
signal cord and shielded DC power cord supplied with this unit.
Caution to the user:
The Federal Communications Commission warns the user that changes or modifications to
the unit not expressly approved by the party responsible for compliance could void the
user’s authority to operate the equipment.
Notice of Compliance Canadian
Interference-causing Equipment Regulations
DOC Compliance Notice:
This digital apparatus does not exceed the Class B limits for radio noise emissions from
digital apparatus set out in the Radio Interference Regulations of the Canadian Department
of Communications.
DOC Avis de Conformation
Le présent appareil numérique n’emet pas de bruits radioélectriques dépassant les limites
applicable aux appareils numériques de la class B prescrites dan le Réglement sur le brouillage
radioélectriques édicté par le ministére des Communications du Canada.
Page 4

2
User’s Guide
INTRODUCTION
Congratulations for purchasing model AL702, a high performance 17-inch color TFT LCD
monitor. The AL702 monitor provides flicker-free and color images at optional resolutions.
Through this user guide, we will introduce you step-by-step all the features, functions and
technical specifications of the LCD monitor. Surely you will have a refreshing experience
working with the monitor.
FEATURES
The AL702 is a 17-inch TFT LCD monitor that is intelligent, microprocessor-based and
ergonomically designed display, compatible with most analog RGB (Red, Green, Blue)
display standards, including PS/V, PS/2, optional for Apple Macintosh Centris, Quadra,
and Macintosh II family signals. The LCD monitor is capable of displaying crisp and
vibrant color graphics with VGA, SVGA, XGA, SXGA (non-interlaced), and most Macintosh
compatible color video cards.
· The monitor is able to properly function even in case of upgrade video cards or
software because of the wide auto-scanning compatibility range without requiring to
buy a new monitor.
· The internal microprocessor digitally controls auto-scanning. For horizontal scan
frequencies between 31.5 KHz and 80 KHz, and vertical scan frequencies between
56.3 Hz and 75 Hz. In each frequency mode, the microprocessor-based circuitry allows
the monitor to function at the precision-of a fixed frequency.
· The resident memory allows for storing factory default settings and also additional
user adjustment parameters.
· The maximum resolution achievable is SXGA (1280 x 1024), best suited for Windows
applications
· The compact and sleek cabinet design saves lot of your desk space and makes your
desk look neat and tidy.
· The monitor is compliant with VESA-DPMS power management standard. In oder to
save energy , the monitor must be connected to a system compliant with the standard.
· The monitor is also compliant with the most stringent environmental scheme of TCO
99. In this scheme, no environmental harmful substances are used during the entire
manufacturing process.
Page 5

English
AL702
3
UNPACKING
Please check the following items are present when you unpack the box, and save the
packing materials in case you will need to ship or transport the monitor in future.
· LCD Monitor (AL702 model)
Speakers
· AC Power Cord · Audio Cable
· User Manual
· Floppy Disk
(for test pattern and set up)
Page 6
4
User’s Guide
SCREEN POSITION ADJUSTMENT
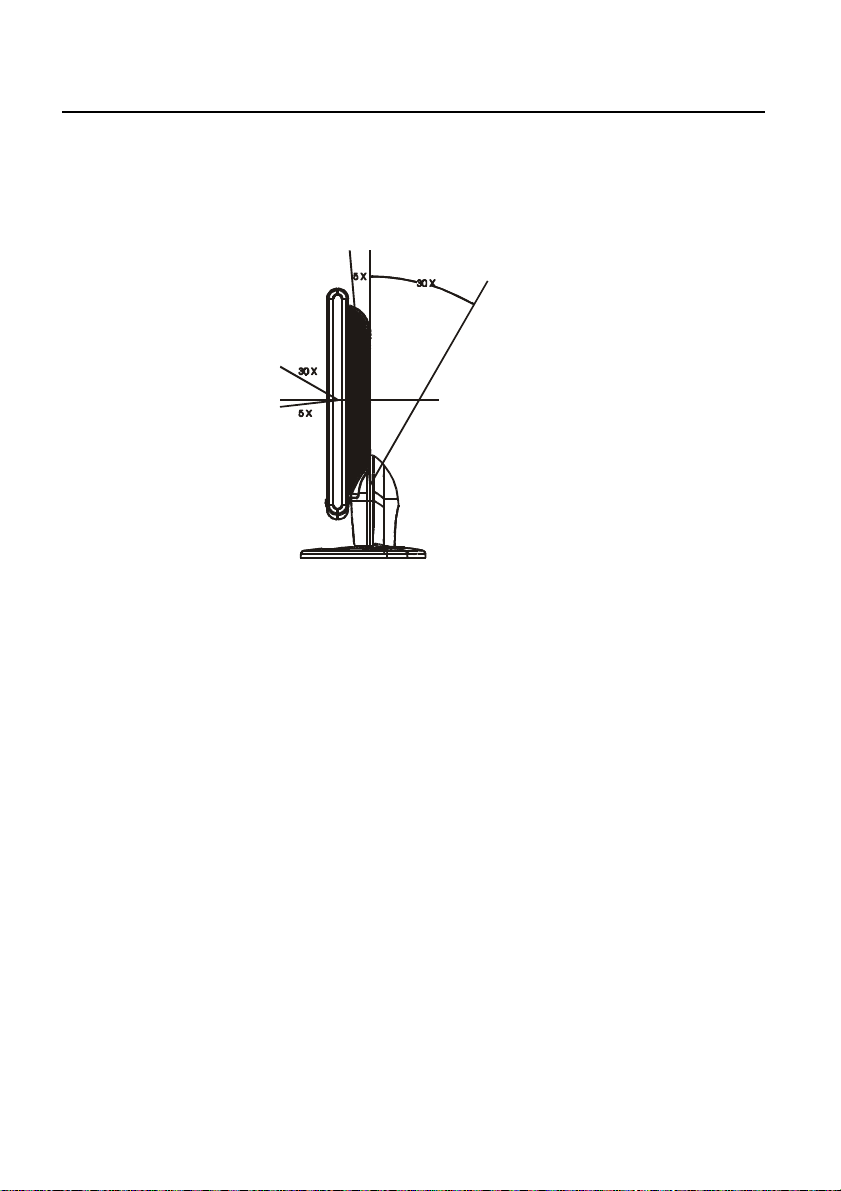
In oder to optimize the best viewing position, you can adjust the tilt of the monitor by
using both of your hands to hold the edges of the monitor as shown in the figure below.
The monitor can be adjusted to 30 degrees up or 5 degrees down as indicated by arrow
below.
CONNECTING THE POWER CORD
· Check first to make sure that the power cord you use is the correct type required for
your area.
· This monitor has a universal power supply that allows operation in either 100/120V
AC or 220/240 V AC voltage area. No user-adjustment is required.
· Plug one end of the power cord to the power connector, plug another end to a proper
AC outlet.
· For unit using at 120 V AC:
Use a UL Listed Cord Set, T ype SVT wire and plug rated 10 A/125 V .
· For unit using at 220/240 V AC (outside of U.S.):
Use a Cord Set consisting of H05VV-F cord and plug rated 16 A, 250 V. The cord set
should have the appropriate safety approvals for the country in which the equipment
will be installed.
Page 7

English
AL702
5
SAFETY PRECAUTION
· A void placing the monitor , or any other heavy object, on the power cord to prevent
it from fire or electrical shock.
· Do not expose the monitor to rain, excessive moisture, or dust to avoid fire or shock
hazard.
· Do not cover the slots or openings of the monitor for proper heat dissipation.
Always put the monitor in a place where there is adequate ventilation.
· A void placing the monitor against a bright background or where sunlight or other
light sources may reflect on the face of the monitor. Place the monitor just below
eye level.
· Handle with care when transporting the monitor.
· Refrain from giving shock or scratch to the screen, as screen is fragile.
CLEANING YOUR MONITOR
Please carefully follow the below guidelines when cleaning the monitor.
· Always unplug the monitor before cleaning.
· Use a soft cloth to wipe the screen and cabinet front and sides.
· Apply a small quantity of alcohol to a soft cloth to clean the monitor screen, if requires
more than dusting.
Page 8
6
User’s Guide
PRESET MODES
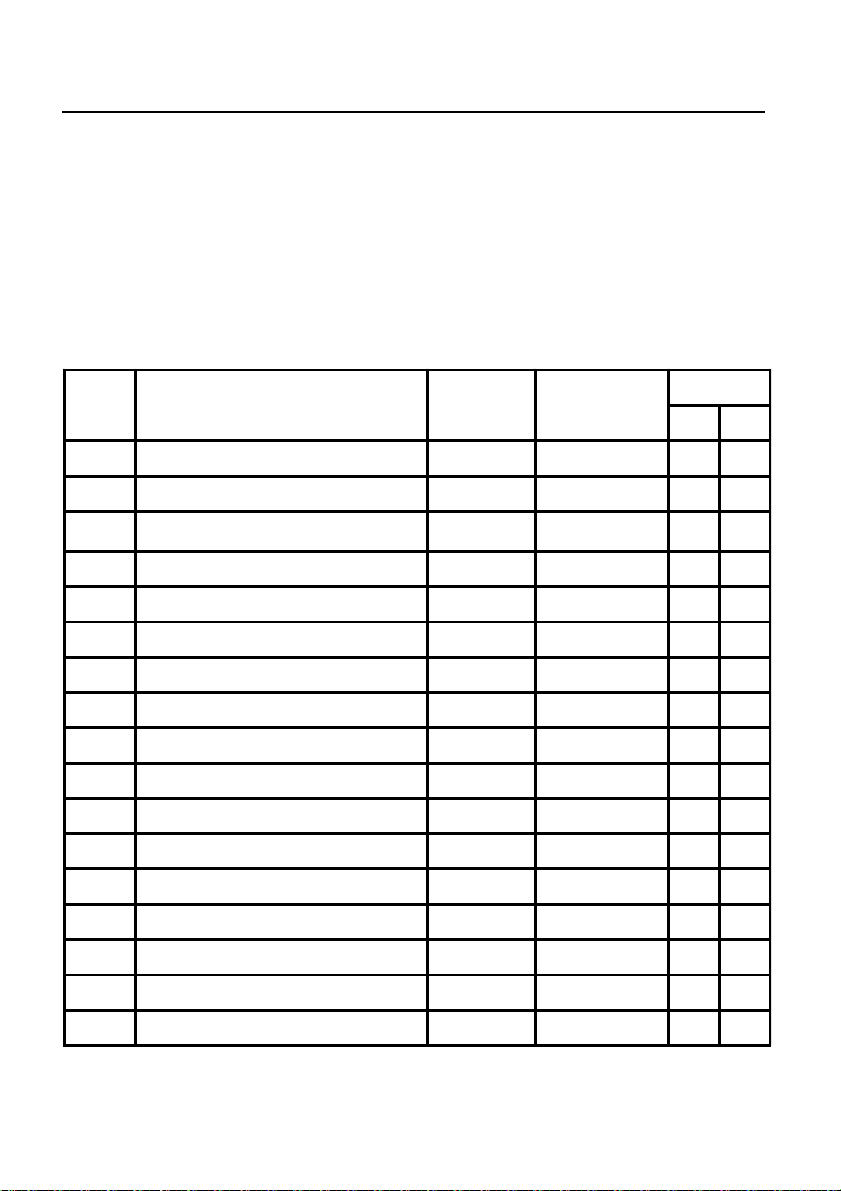
To reduce the need for adjustment for different modes, the monitor has default setting
modes that are most commonly used as given in the table below. For optimum adjustment,
the user is suggested to perform the Auto Setup under Windows “Full Screen” pattern or
using the pattern in the floppy disk provided. When none of the mode is matched, the user
can store their preferred modes in the user modes. The monitor is capable of storing up to
9 user modes. The only condition to store as a user mode is the new display information
must have 1 KHz difference for horizontal frequency or 1 Hz for vertical frequency or the
sync signal polarities are different from the default modes.
Mode Resolution
1 VGA 720 x 400 70 Hz 31.47 28.322 - +
2 VGA 640 x 480 60 Hz 31.47 25.175 - -
3 MAC 640 x 480 66 Hz 35.00 32.24 - 4 VES A 640 x 480 72 Hz 3 7.86 31.5 - -
5 VESA 640 x 48 0 75 Hz 37.50 31.5 - 6 VESA 800 x 60 0 56 Hz 35.16 36 + +
7 VESA 800 x 600 60 Hz 37.88 40 + +
8 VESA 800 x 60 0 75 Hz 4 6.88 49.5 + +
9 VESA 800 x 60 0 72 Hz 4 8.08 50 + +
10 MAC 832 x 624 75 Hz 49.72 57.283 - 11 VESA 1024 x 768 60 Hz 48.36 65 - 12 VESA 1024 x 768 70 Hz 56.48 75 - 13 VESA 1024 x 768 75 Hz 60.02 78.75 + +
14 VESA 1280 x 1024 60 Hz 64 108 + +
15 VESA 1280 x 1024 75 Hz 80 135 + +
H. Freq.
(KHz)
B a nd Width
(MHz)
Polarity
HV
16 VESA 1152 x 864 75 Hz 67.5 108 + +
17 VESA 1280 x 960 60 Hz 60 108 + +
Page 9
English
AL702
7
POWER SAVING
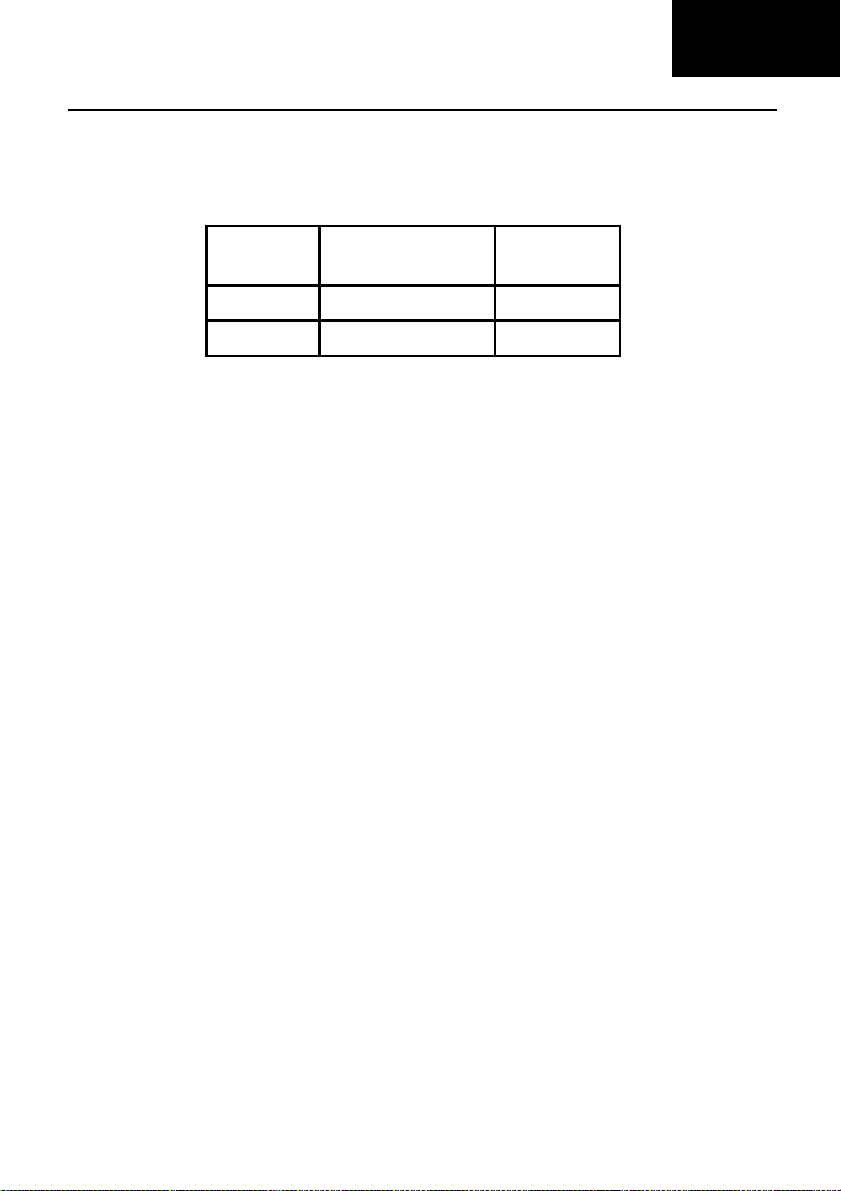
The monitor will be driven into “Power Saving” mode by the control signal from the
display controller, as indicated by the amber-color power LED.
State
ON Normal Green
OFF < 5 W Amber
The power saving states will be kept until a control signal has been detected or the
keyboard or mouse is activated. The recovery time from Active OFF state back to ON state
is around 10 seconds.
Power
Consumption
LED Lig ht
DDC
T o make your installation easier , the monitor is able to Plug and Play with your system if
your system also supports DDC protocol. The DDC (Display Data Channel) is a
communication protocol through which the monitor automatically informs the host system
about its capabilities, for example, supported resolutions and corresponding timing. The
monitor supports DDC2B standard.
Page 10
8
User’s Guide
INSTALLATION
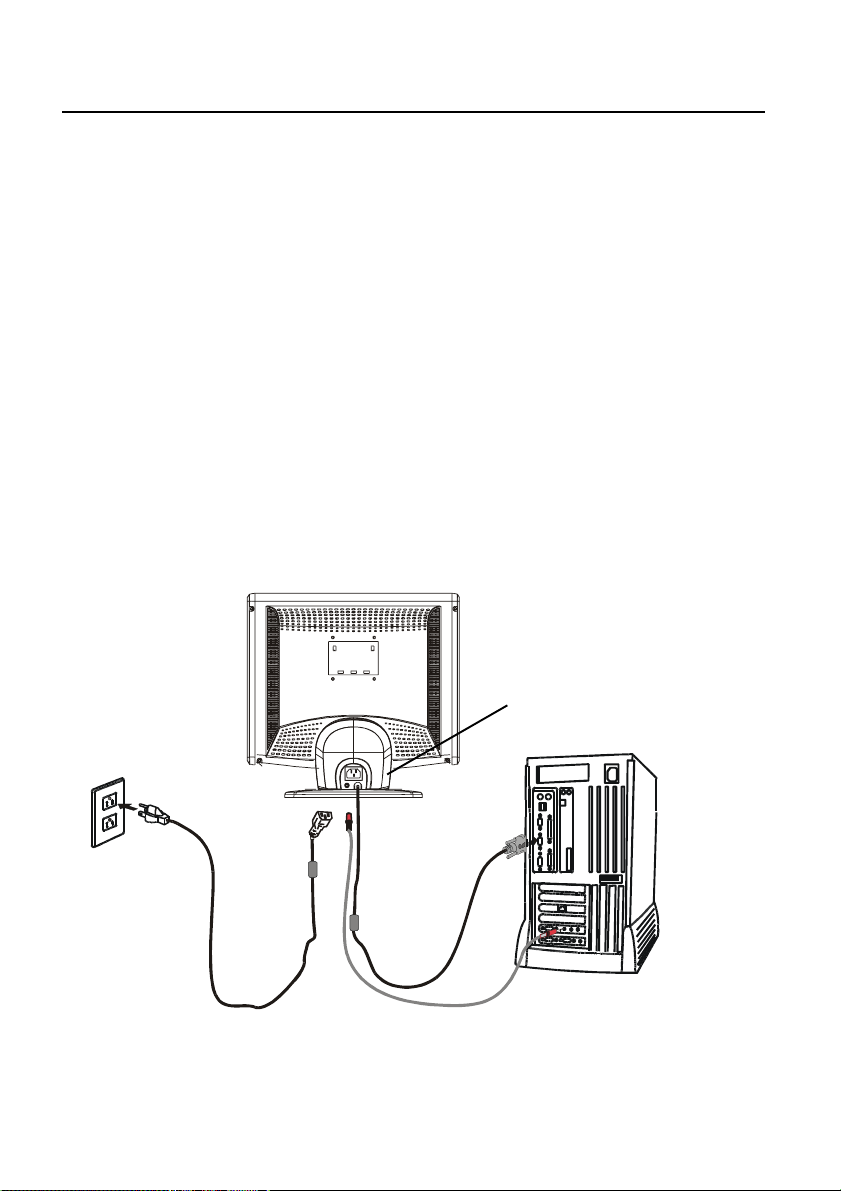
To install the monitor to your host system, please follow the steps as given below:
Steps
1 . Connect V ideo Cable
a. Make sure both the monitor and computer are powered-OFF.
b. Connect the video cable to the computer.
2. Connect power cord
Connect the power cord to the monitor, then to a properly grounded AC outlet.
3. Connect the Audio cable.
4 . Power-ON Monitor and Computer
Power-ON the monitor first, then power-ON the computer .
This sequence is very important.
5 . If the monitor still does not function properly, please refer to the troubleshooting section
to diagnose the problem.
* Please don’t open the Cover
Page 11
English
AL702
9
USER CONTROLS
MENU
1
Front Panel Controls
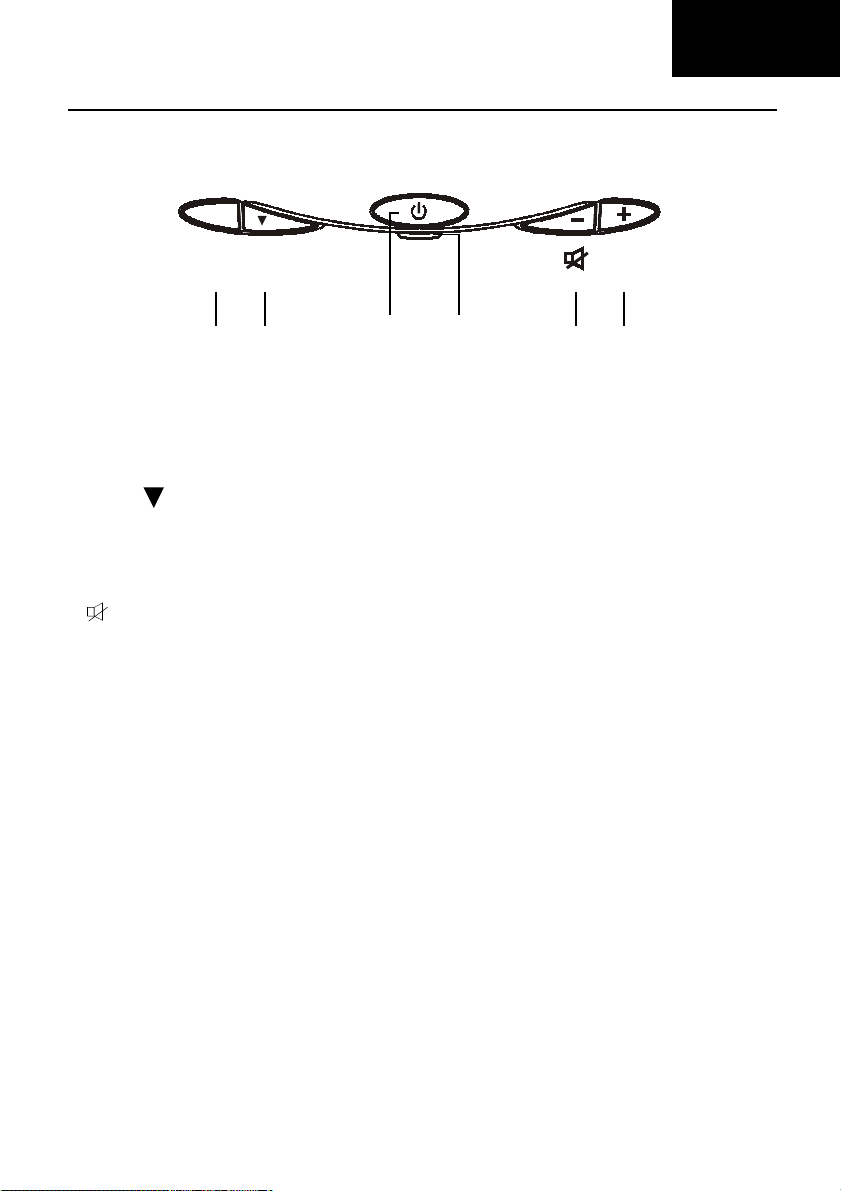
1 . Power Switch: T o turn ON or OFF the power .
2 . Power LED: Lights up to indicate the power is turned ON.
3 . Select MENU: To exit and enter OSD menu.
4. Select : T o move downward in the OSD Item.
5. -: To decrease the value of the parameter in the OSD, which has been selected for
adjustment.
-: Chosse the previous OSD MENU page.
: Act as Audio Mute hot key when OSD is not displayed.
6. +: To increase the value of the parameter in the OSD, which has been selected for
adjustment.
+: Choose the next OSD MENU page.
AUTO: Act as AUTO adjustment hot key when OSD is not displayed.
2
AUTO
346 5
Page 12
10
User’s Guide
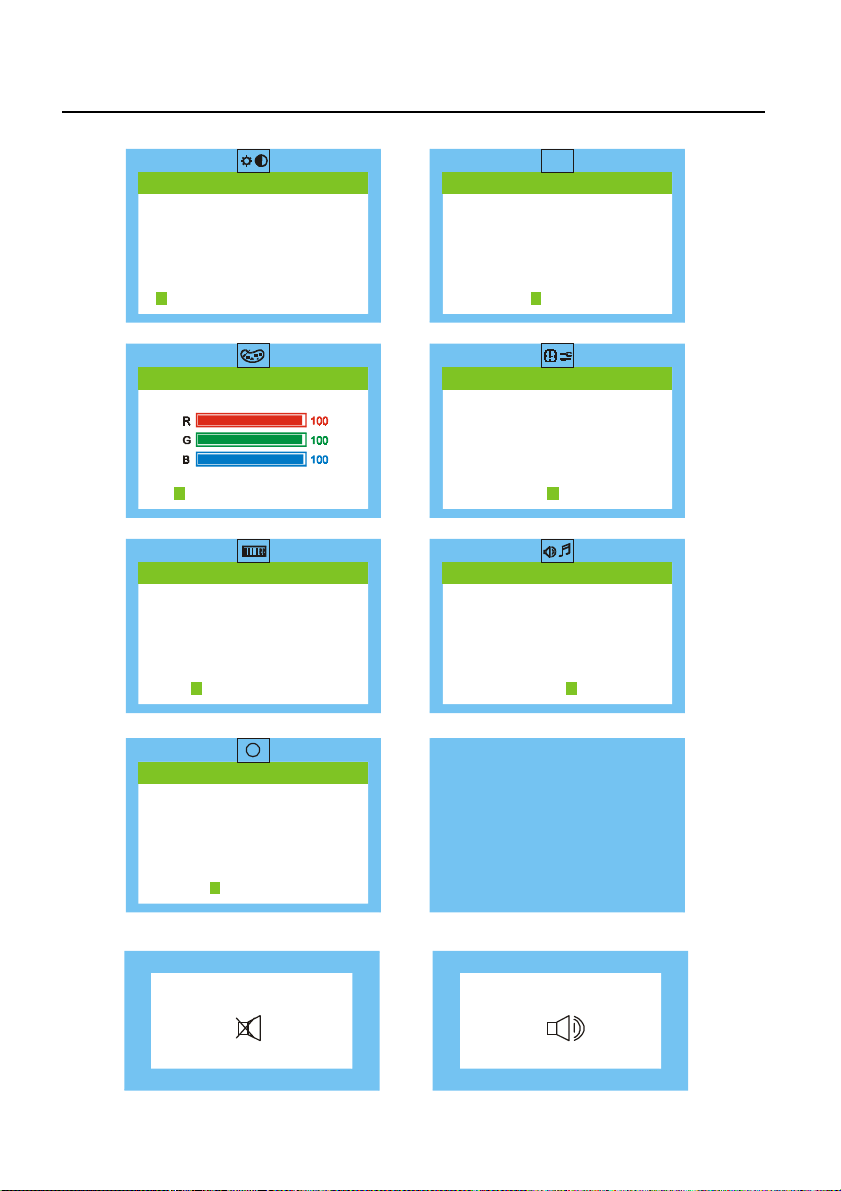
Basic Sections of a OSD Screen
SELECT M EN U
BRIGHTNESS
CONTRAST
ANALOG CONTRAST
AUTO CONTRAST
YUV
SELECT M EN U
SATURATIO N
HUE
FLESH TON E
1 2 3 4 5 6 7
SELECT M EN U
COLOR TEMPERATURE
1 2 3 4 5 6 7
SELECT M EN U
AUTO ADJUS T
LEFT/RIGHT
UP/DOWN
H.SIZE
FINE
1 2 3 4 5 6 7
I
SELECT M EN U
IN FOR M ATION
1 2 3 4 5 6 7
SELECT M EN U
LANGUAGE
RECALL DEFAULTS
OSD TIMEOUT
OSD LEFT/RIGHT
OSD UP/DOWN
1 2 3 4 5 6 7
SELECT M EN U
VOLUM E
1 2 3 4 5 6 7
AUTO ADJUS TING
PLEASE WAIT
1 2 3 4 5 6 7
Page 13
English
AL702
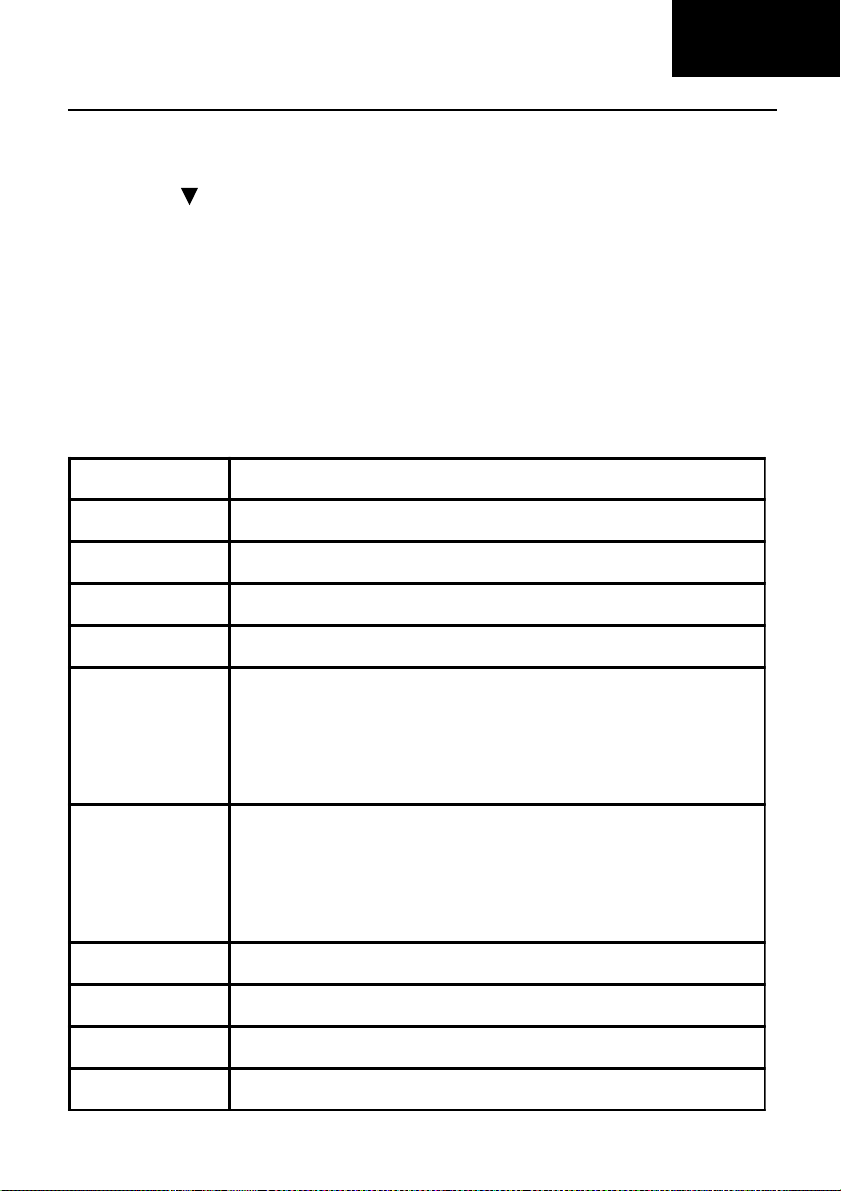
Standard OSD Operation
1. Press MENU key to activate the OSD menu, when OSD is not displayed.
2. Use Select key to move down through the menu cyclically. The parameter will be
highlighted when selected.
3 . Then use + or - to increase or decrease the value of the parameter, or make selection
between different options.
4 . T o quit the OSD screen at any time during the operation, press MENU key . If no keys
are pressed for a time period, the OSD automatically disappears.
5. When OSD is not displayed, press + key to start Auto-Adjust.
6 . When OSD is not displayed, press - key to turn speaker ON/ OFF.
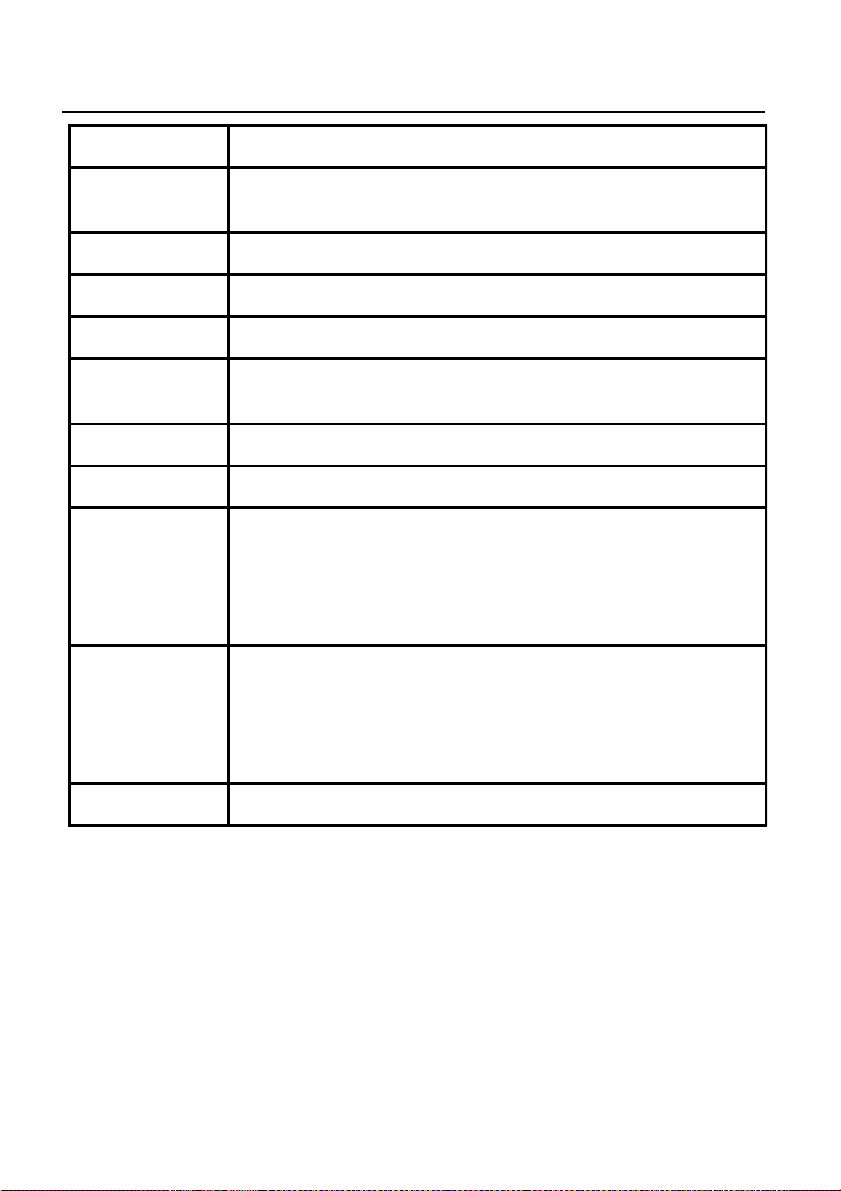
OSD Function Description
It e m Funct io n De s c ripti on
Brightness To increase or decrease the brightness.
Contrast To increase or decrease the contrast.
Analog Contrast To adjust Contrast in the part of analog input.
Auto Co ntrast Pres s + ke y to start auto a nalog contrast.
11
Color
Temperature
Auto-Ad just Pre ss + to turn on this function. The Auto-Adjust will
Left /Right To move the sc ree n to wa rd left o r right.
Up/Down To mo ve the screen upward or downward.
H.Size To increase or decrease the size of image.
Fine To increase or decrease the snow no ise of the image.
Pressing "-" or "+" to select 9300, 7500, 5500, NATIVE
and US ER. O nly when selecting USER, you can make
adjustments to the R/G/B content, otherwise not.
Press + and - simultaneously to restore to factory default
setting.
automatically adjust V- Position, H- Po sition, Clock, a nd
Clock-Phase, the whole process takes about 5 seconds.
(P le a s e ins t a ll the a tt ac h ed LC D mo nito r ut ility d is k for
Auto-Ad just).
Page 14
12
User’s Guide
It e m Functio n D e s cript io n
Information Indicates the current resolution, H-Frequency, and
V-Frequency.
Saturation To ad just saturation of color.
Hue To adjust hue or color.
F le s h Tone To a dj us t fles h t one of c olo r.
O SD Langua ge Se lect amo ng English, Fr enc h, I ta lian, Ge rman a nd S p anish
(C hines e fo r se ria l mod el).
Recall Defa ults To return the monitor to its default s ettings.
OSD Time Out To a djust the period of OSD auto turn- off time.
OSD
Left/Right
OSD
Up/Down
Volume To increase or decrease the sound level.
To move the OS D p o sition ho rizo ntally on t he s cr ee n.
When the "+" key is pressed, the O SD control menu will
move to the right side of the screen. Likewise when the "- "
k e y is p re s s ed , t he O S D c o ntr o l me nu will mo ve t o th e le ft
side.
To mov e th e O SD p o s it ion ve r tic a lly o n t he s c r ee n.
When the "+" key is pressed, the O SD control menu will
move to the up side of the scree n. Lik ewise when the "-"
k e y is p re s s ed , t he O S D c o ntr o l me nu will mo ve t o th e
lo we r s id e.
Note: For above adjustment action, press + and - simultaneously will return to the
factory default setting.
Page 15
English
AL702
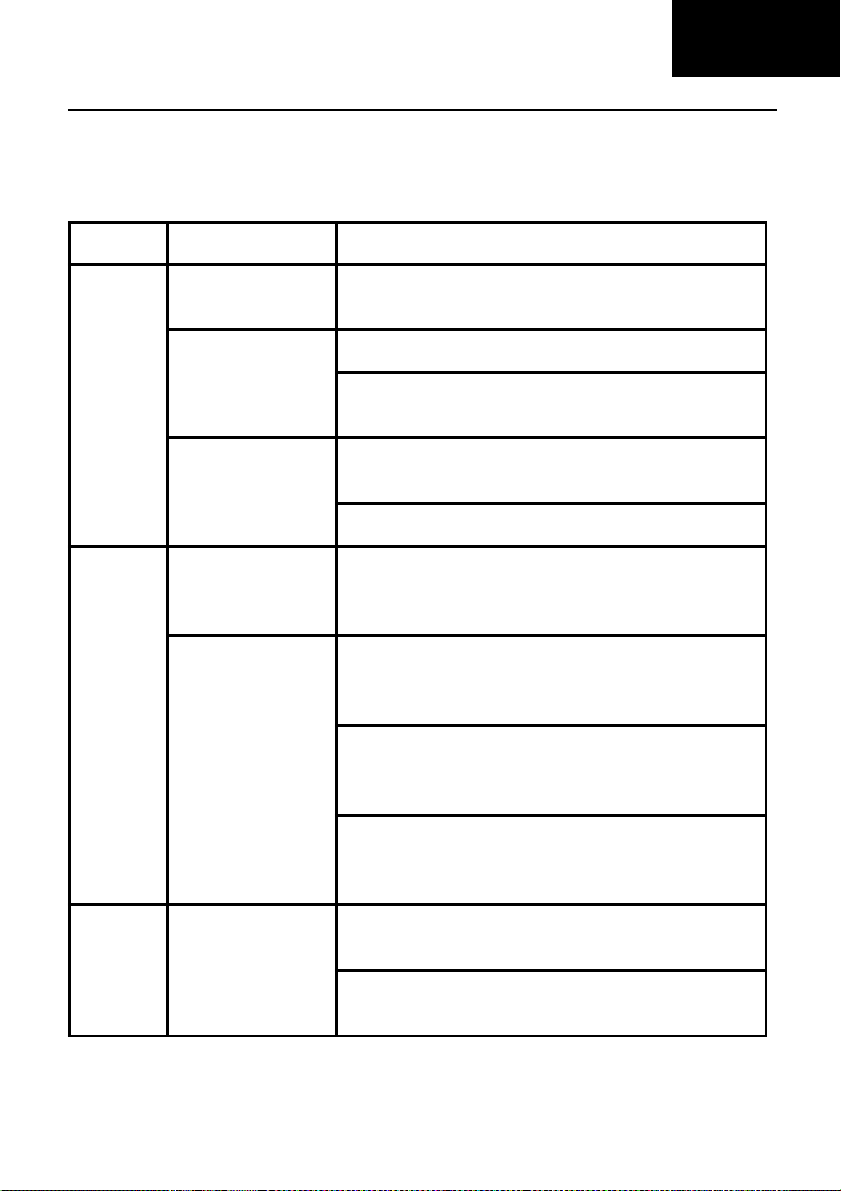
TROUBLESHOOTING
Before sending your LCD monitor for servicing, please check the troubleshooting list
below to see if you can self-diagnose the problem.
Problems Current Status Remedy
No
Picture
Abnormal
Picture
LED O N
LED O F F
LED disp lays
amber color
Unstab le Picture
Display is miss in g,
center shift, or too
s ma ll or t oo larg e
in d isplay s iz e
Using O S D, adjust brightness and contrast to
•
maximum or reset to their default s ettings.
Check the power switch.
•
Check if AC power cord is properly connected
•
to the monitor.
Check if video signal cable is properly
•
connected at the back of monitor.
Check if the power of computer system is ON.
•
Check if the specification of graphics adapter
•
a nd mon it or is in c omp lia n c e w h ich m a y b e
causing the input signal frequency mismatch.
Using OSD, adjust RESOLUTION, CLOCK,
•
CLOCK-PHASE, H-POSITION and VPOS ITION with non-standard signa ls.
Us ing OSD , in ca s e o f missing full-s c r e e n image,
•
please select other resolution or other vertical
re fre s h timing.
13
Abnormal
Sound
No sound, or
s o u nd lev e l is t oo
low
Wait for a few seconds after adjusting the size of
•
the image before changing or disconnecting the
signal cab le or p o w er ing O F F t he mo nito r.
Check the audio cable with the host PC is
•
connected.
Check the setups of the host PC a minimum or
•
off status.
Page 16
14
User’s Guide
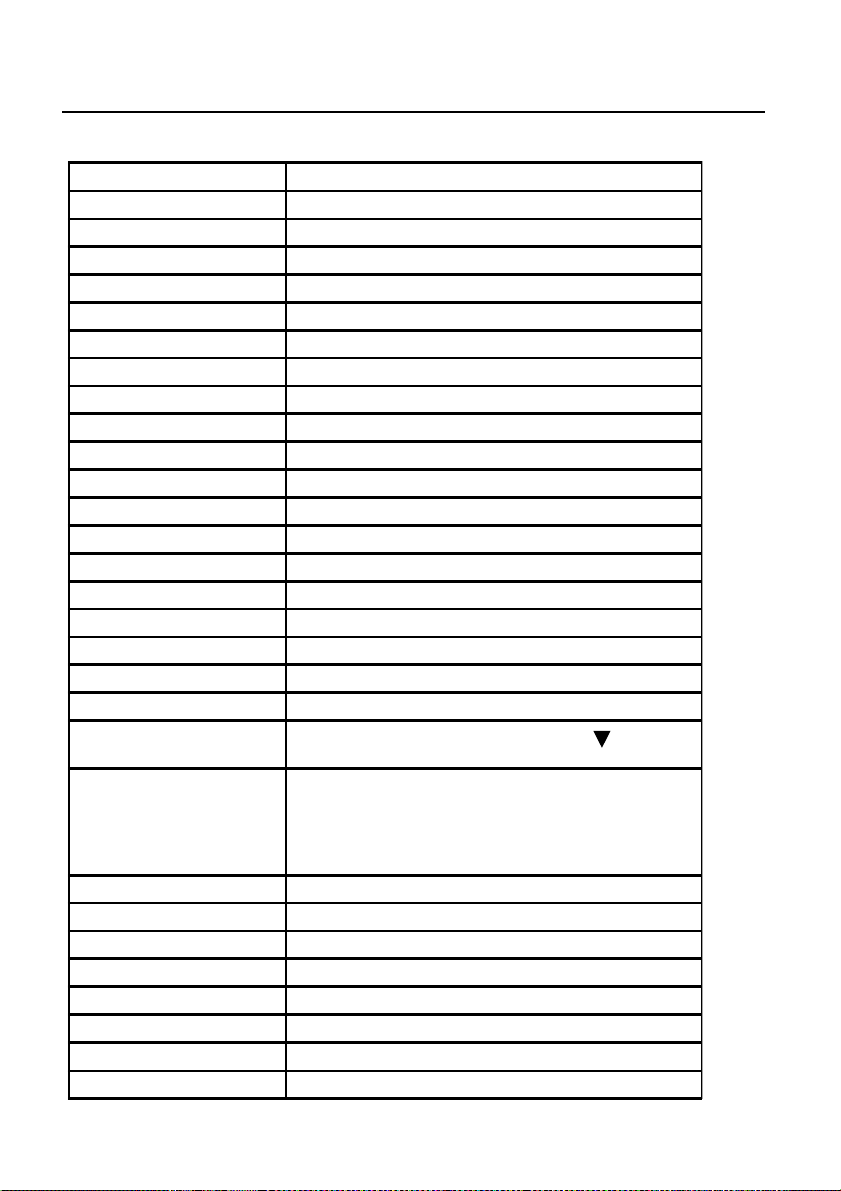
SPECIFICATION
Model Name
LCD D ispla y
Display Type 17 " TFT LC D
Display Area (H x W) 337.92 x 270.336 mm
Contrast Ratio 400:1 (Typ.)
View ing Angle 12 0
Powe r Input
Voltage 100-240Vac
Frequency 50-60Hz
Current Rating 0.9 A
Operational Features
Display C olors 16.7M
Resolution SXGA (1280 x 1024) at 75 Hz maximum.
Brightness 250 cd/m² (Typ.)
Response Time Tr: 30 ms Tf: 15 ms (Typ.)
Interface Analo g RGB
Input Co nne c t or
Multimedia
Two Internal S peakers 1 watt output x 2
Us e rs Controls
Front Panel Controls Power On/Off, MENU, Select DOWN( ) ,
O S D C o ntro ls Br ightnes s, C o ntr as t, Ana log C o ntr as t, Aut o Co ntr as t,
Phys ical Specification
Dimension (H x W x D) 433 x 420 xD 195 (mm)
Net Weight 5.8 Kg
Power
Power Saving VESA DPMS standard
Power Consumption 45 W (Typ.), 58 W (Max. )
Re gulation
Sa fety & EM I UL, C UL, TUV-GS , F C C - B, CE, TC O 9 9 ( op tional)
AL702
o
H 115oV (Min.)
15-pin D- sub, Audio input
Val ue ( +/ - )
Co lor Tempera ture, Auto Adjust, Left/Right, Up/Down,
H.Size, Fine, Information, Saturation, Hue, Flesh Tone,
Langua ge, Re c all de faults, O S D Timeout , O S D
Left/Right, OS D Up/Do wn, Vo lume
* All specifications are subject to change without notice.
 Loading...