

Page 1

User Guide
Acer SOHO Router
AIR-104 / AIR-204
Page 2

Acer SOHO Router AIR-104/204
User Guide
February 2000
Limitation of Liability
Information in this document is subject to change without notice and does not represent a commitment on
the part of Acer Netxus, Inc. The material contained herein is supplied without representation or warranty of
any kind. Acer Netxus, Inc. therefore assumes no responsibility and shall have no liability of any kind arising
from the supply or use of this document or the material contained herein.
¡·2000, Acer Netxus Incorporated
This manual copyright 2000 by Acer Netxus, Inc. All rights reserved. No part of this document may be
copied or re-used without prior written consent from Acer Netxus, Inc.
Page 3

Contents
Chapter 1 Introduction
Overview of the AIR-104/204 ..............................................................................1-1
Accessing the Internet ...............................................................................1-1
Security overview .........................................................................................1-2
What’s in the box? ..............................................................................................1-2
The connectors on the back ...............................................................................1-3
The LEDs on the front ..........................................................................................1-4
LED operation ......................................................................................................1-4
Chapter 2 Installation
Power ................................................................................................................2-1
Modem connections ...........................................................................................2-1
First modem connection .............................................................................2-1
Second modem connection ........................................................................2-1
Network connections ..........................................................................................2-2
Connecting PC’s directly to the router .........................................................2-3
Connecting PC’s directly to the router via a hub or switch ............................2-3
Console connection ...................... ......................................................................2-3
External phone line .............................................................................................2-3
Chapter 3 Configuring PC’s in the Network
Why do I need to configure PC’s? ........................................................................3-1
When do I need to configure PC’s? ......................................................................3-1
What do I need to configure PC’s? .......................................................................3-1
How to configure network PC’s? ..........................................................................3-2
Chapter 4 Basic Router Configuration
What is "basic configuration" ?..............................................................................4-1
What do I need to configure the AIR-104/204?.....................................................4-1
Network requirements ...................................................................................4-1
Internet access .............................................................................................4-1
Using two Internet service accounts ..............................................................4-2
How do I log onto the AIR-104/204 ?....................................................................4-2
Accessing the AIR-104/204 via web browser ................................................4-2
Logging on to the AIR-10/204 .......................................................................4-3
The Internet Configuration Console browser screen ...............
The System Status monitoring window ........................................................4-5
How to configure your modem connection ..........................................................4-6
Using the ICC to configure the modem connection ..............................................4-6
How to configure your Internet connetcion ..........................................................4-8
Using the ICC to configure the Internet connection ......................................4-8
After successful configuration, what next?...........................................................4-12
.......................4-3
User Guide for AIR-104/AIR-204 iii
Page 4

Chapter 5 Advanced Router Configuration
What is "advanced configuration" ?......................................................................5-1
Viewing the connection log ..................................................................................5-1
To view the connection Log ..........................................................................5-1
Setting the time ............................................................................................5-2
Setting Internet access time restrictions ...............................................................5-3
To set Internet access time restrictions .........................................................5-4
Advanced system configuration ...........................................................................5-4
To set advanced configuration options ...................................
Static DHCP Assignments ............................................................................5-6
......................5-5
Chapter 6 Management
What is "management" ?.......................................................................................6-1
How to save or clear configuration changes .........................................................6-1
How to restart the AIR-104/204 ..........................................................................6-2
How to change the ICC password .......................................................................6-2
What if I forget the ICC password? ...............................................................6-3
How to upgrade the AIR-104/204 software .........................................................6-3
Chapter 7 The Command Line Interface
What is the Command Line Interface? .................................................................7-1
Using the Command Line Interface ......................................................................7-1
Connecting to the CLI via Telnet ...................................................................7-1
Connecting to the CLI through the console port ..........................................7-1
General guidelines ...............................................................................................7-2
Conventions ........................................................................................................7-3
Command Categories .........................................................................................7-3
Command List .....................................................................................................7-4
DHCP Commands ........................................................................
Diagnostic Commands .................................................................................7-5
IP Commands ..............................................................................................7-6
Port Commands ...........................................................................................7-9
Profile Commands ......................................................................................7-10
Statistics Commands ..................................................................................7-12
System Commands ....................................................................................7-14
..............7-4
Appendix AMessages
System messages ...............................................................................................A-1
Connection log messages ...................................................................................A-4
Embedded HTTP server messages .....................................................................A-4
Appendix B Glossary
Appendix CSpecifications
iv User Guide for AIR-104/AIR-204
Page 5

Appendix DWarranty, Copyrights, EMI
Warranty ............................................................................................................D-1
Copyrights and Trademarks ..............................................................................D-2
EMI Notice ........................................................................................................D-3
User Guide for AIR-104/AIR-204 v
Page 6

1AIR-104/204
About This User Guide
Acer welcomes you to the world of shared Internet access! Thank you for investing in an
Acer SOHO Router AIR-104/204. We are dedicated to providing you with the most
efficient, easy-to-configure, and trouble-free equipment in the networking industry.
This manual will help you become familiar with the AIR-104/204 . You will find helpful
information covering everything from basic installation and set-up to advanced
configuration and firmware upgrades.
If you are installing and configuring the AIR-104/204 for the first time, you should initially
concentrate your attention on chapters 1-4. These chapters contain all the information
you need to get your AIR-104/204 installed and configured in just a few minutes. After
you’ve gotten started and the AIR-104/204 is providing shared Internet access for your
entire network, you’ll want to take a look at the next two chapters (chapters 5 and 6).
These two chapters tell you about some more sophisticated functions that will allow you
to get the most out of your AIR-104/204. Finally, when you’re familiar with the features
and operations of the AIR-104/204, chapter 7 provides nuts-and-bolts details about the
Command Line Interface, a useful tool for displaying advanced system information and
for troubleshooting.
This manual consists of seven chapters and three appendices:
Chapter One
Chapter Two
hardware.
Chapter Three
your network for communication with the AIR-104/204. Before you begin using the AIR104/204, you will need to configure at least one PC so that it, in turn, can configure the
AIR-104/204.
Chapter Four
to provide shared Internet access by means of a user-friendly, web-based configuration
utility (the ICC). This chapter is the primary resource for using the AIR-104/204 to access
the Internet.
Chapter Five
that let you fine-tune the performance of the AIR-104/204.
Chapter Six
Chapter Seven
104/204 by means of the text-based Command Line Interface (CLI), which is necessary
for certain advanced or emergency procedures.
Appendix A
Appendix B
Appendix C
: Introduction explains the features and capabilities of the AIR-104/204.
: Installation, gives the simple steps you follow to install the necessary
: Configuring PC’s in the network, shows you how to prepare the PCs in
: Basic Router Configuration, explains how to prepare your AIR-104/204
: Advanced Router Configuration, explains the more high-powered tools
: Management, tells you how to keep your AIR-104/204 up-to-date.
: The Command Line Reference, tells you how to interact with the AIR-
: ICC Messages
: Glossary
: Specifications
Appendix D
User Guide for AIR-104/AIR-204 i
: Warranty, Copyright, EMI
Page 7

About This User Guide
How to Reach Us
If you require technical support, please email:
netxus@acer.com.tw
Our website’s URL is:
http://www.acernetxus.com.tw
Safety Warnings
• Before applying power to the AIR-104/204, make sure you are using a properly
grounded electrical outlet.
• The AIR-104/204 is not intended to be serviced by the user. Please do not open the
case.
ii User Guide for AIR-104/AIR-204
Page 8
1AIR-104/204
Chapter 1 Introduction
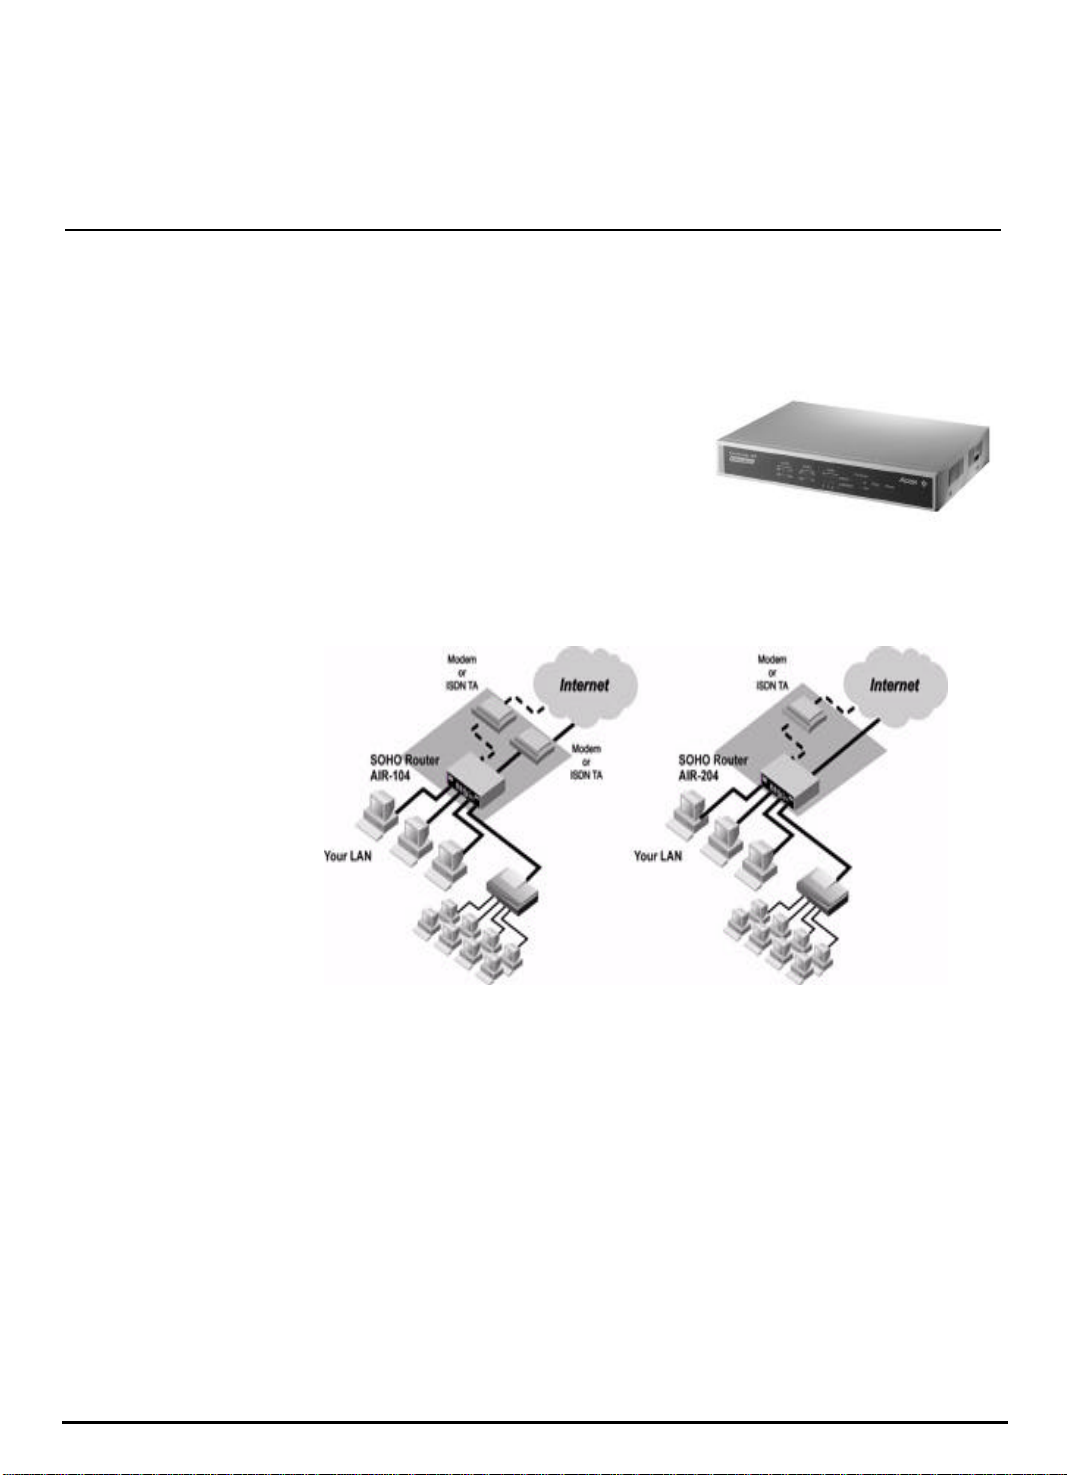
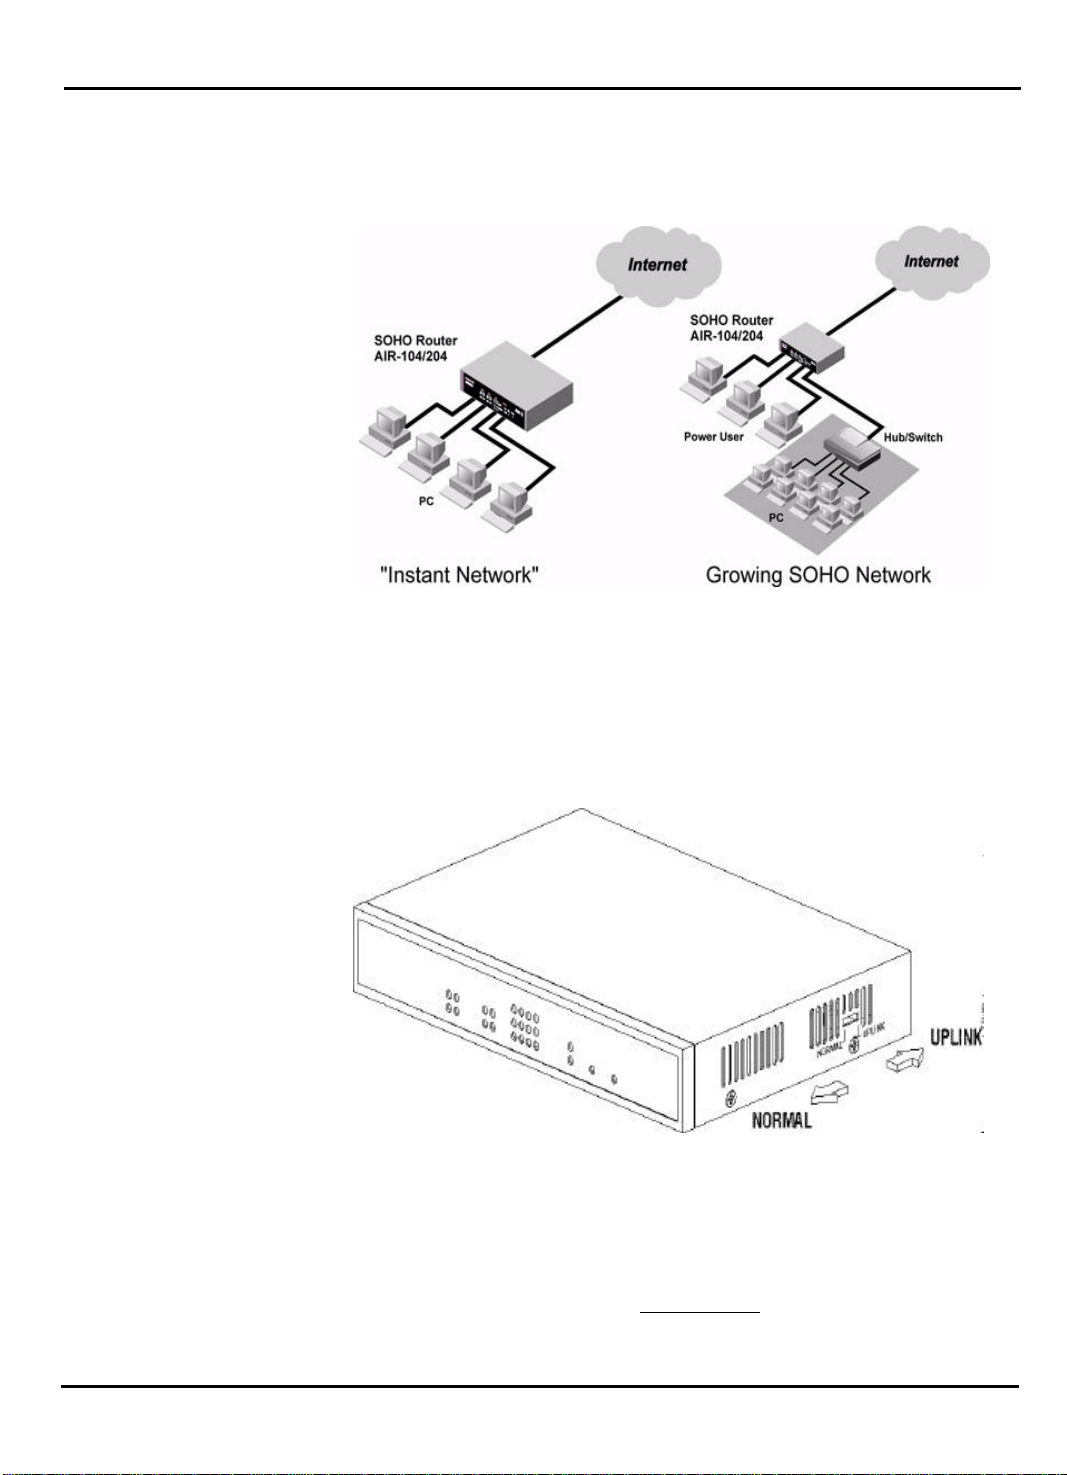
Overview of the AIR-104/204
The AIR-104 and the AIR-204 are small desktop
devices that mediate between your local area network
(LAN) and the Internet. Each AIR-104/204 provides dual
modem connections to access the Internet (the AIR-104
has two external modem ports, while the AIR-204 has
one built-in modem and one external modem port). Your
LAN connects to the AIR-104/204 via a four-port dualspeed Fast Ethernet repeater hub. The AIR-104/204
also features an auxiliary port for a directly connected management console. Data comes in to the
AIR-104/204 from your local network and then is “directed” to the Internet, and vice versa. The AIR104/204 dual-modem design allows connections to either one or two Internet accounts to be
opened and managed automatically.
Figure 1-1
Internet Access with the AIR-104/204
Accessing the Internet
The AIR-104/204 provides shared Internet access, so that everyone on your LAN can surf the web
and send/receive e-mail or files.
The AIR-104/204 utilizes single IP address technology that greatly simplifies the configuration process: the AIR-104/204 automatically acquires the necessary IP addresses when the connection to
the Internet is established, and distributes access to your entire network. You don’t need to apply for
and assign an IP address to each PC or workstation on your network.
The AIR-104/204 features “bandwidth on demand”. Any user’s initial access of an Internet resource
will cause a connection to the Internet to be set up automatically. As the traffic builds up (e.g., more
users try to access the Internet, or the same user generates a lot of traffic), the AIR-104/204 will
automatically establish a second connection through a second Internet account, if one has been
configured. As traffic decreases, one Internet connection will be taken down, until finally, after a configurable period of inactivity, the remaining Internet connection will also be disconnected.
User Guide for AIR-104/AIR-204 1-1
Page 9
Chapter 1 Introduction
Security overview
More and more people are concerned about security of their data in this Internet era.
The AIR-104/204 provides many ways to help make your network and data secure:
• The AIR-104/204 uses a private IP addressing scheme that protects devices on your LAN from
access by users from the Internet outside.
• All access to the AIR-104/204 (Console, Talent and the browser-based Internet Configuration
Console) is protected by password verification.
• Internet access can be configured to occur only at certain times of the day and on certain days
of the week.
What’s in the box?
Your AIR-104/204 package should contain the items listed below.
* 1 AIR-104 or AIR-204
* User manual
* 1 Power Adapter, 12V DC, 1.5A input
* Cables:
Type of Cable AIR-104 AIR-204
RS-232 Null Modem Cable 1 1
RS-232 Modem Cable 2 1
RJ-11 Telephone Cable 0 1
1-2 User Guide for AIR-104/AIR-204
Page 10
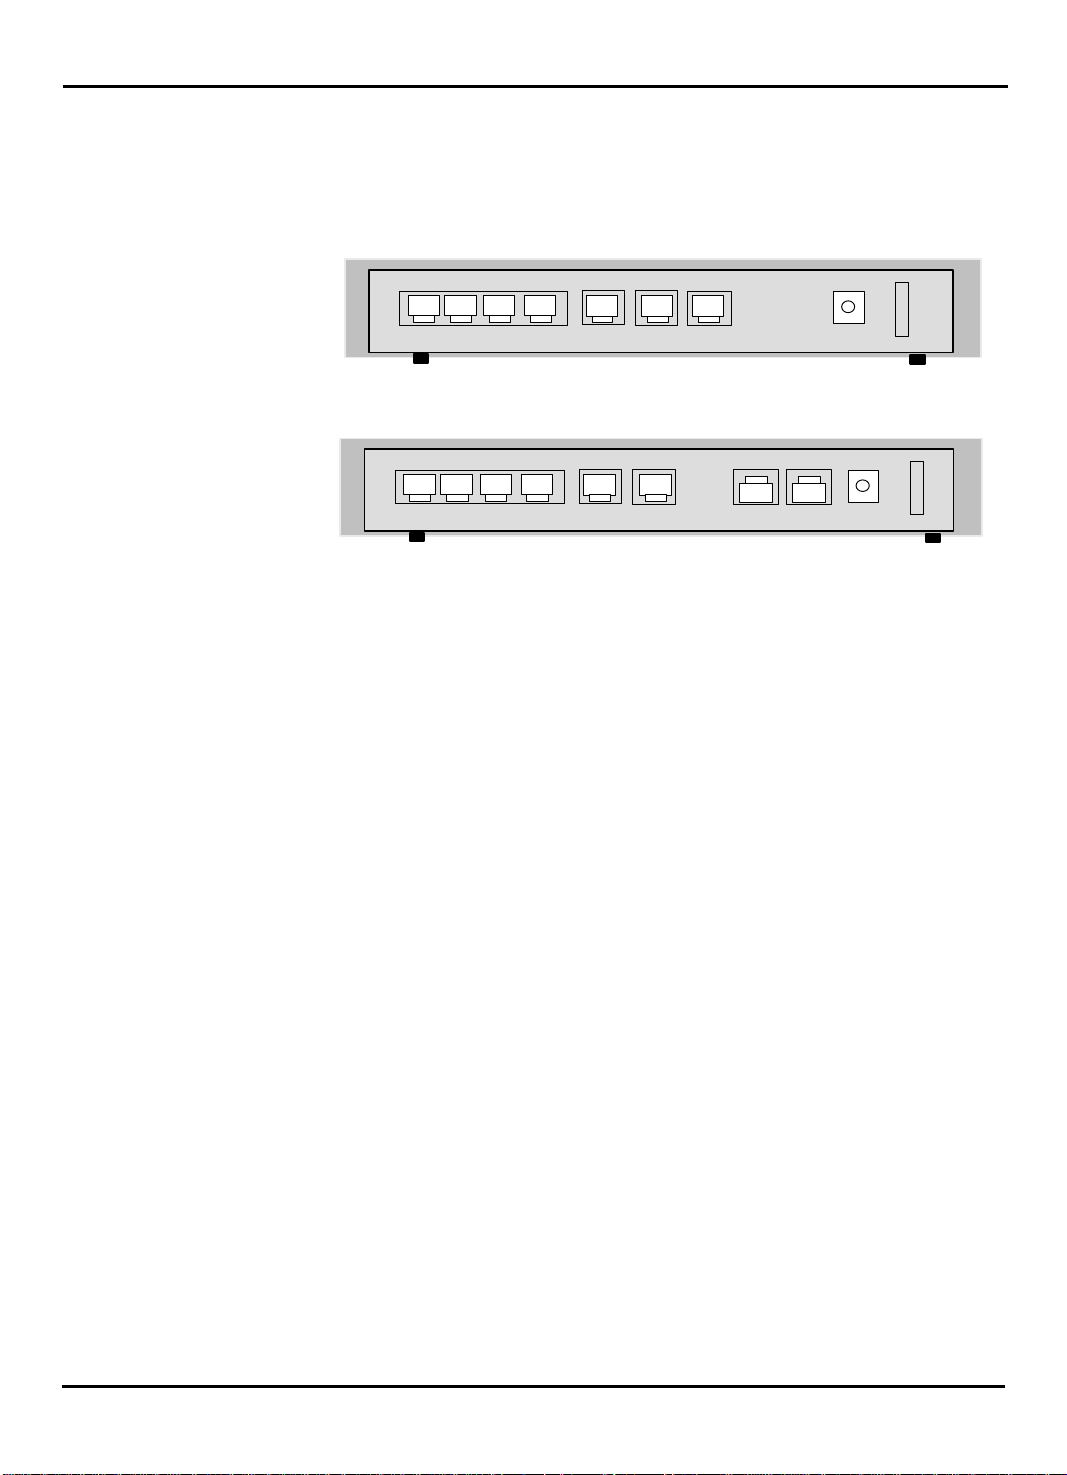
Chapter 1 Introduction
The connectors on the back
UPLINK
1 2 3 4
UPLINK
Figure 1-3
CONSOLE COM2 COM1 DC 12V
Figure 1-2
CONSOLE COM2 1 2 3 4
AIR-104 Back Panel
PHONE LINE
AIR-204 Back Panel
DC 12V
ON
OFF
ON
OFF
RJ-type connectors are used for all cable connection into your AIR-104/204 (except for
the power adapter cord). The types of connectors and their cables are
- 4 RJ-45 10/100Base-T Ethernet connectors for connecting to PCs/
workstations (Node) or an Ethernet repeater hub (Hub). These accommodate
standard Category 5 Ethernet cables.
- 1 RJ-45 connector for connecting to a console (or equivalent). This is a special
null modem cable supplied with the device which has an RJ-45 plug on one
end and a DB-9 “D” connector on the other end.
- 1 or 2 RJ-45 connectors for connecting to external modems. This is a special
cable supplied with the device that has an RJ-45 plug on one end and a DB-25
“D” connector on the opposite end. The AIR-104 is shipped with two of these, and
the AIR-204 is shipped with one.
- 0 or 1 RJ-11 connectors for connecting a telephone handset or fax machine to
the AIR-104/204 via the built-in modem. Only the AIR-204 has this type of
connector.
- 1 power connector for connecting through a power adapter (included as part of
the product) to the wall power outlet.
User Guide for AIR-104/AIR-204 1-3
Page 11
Chapter 1 Introduction
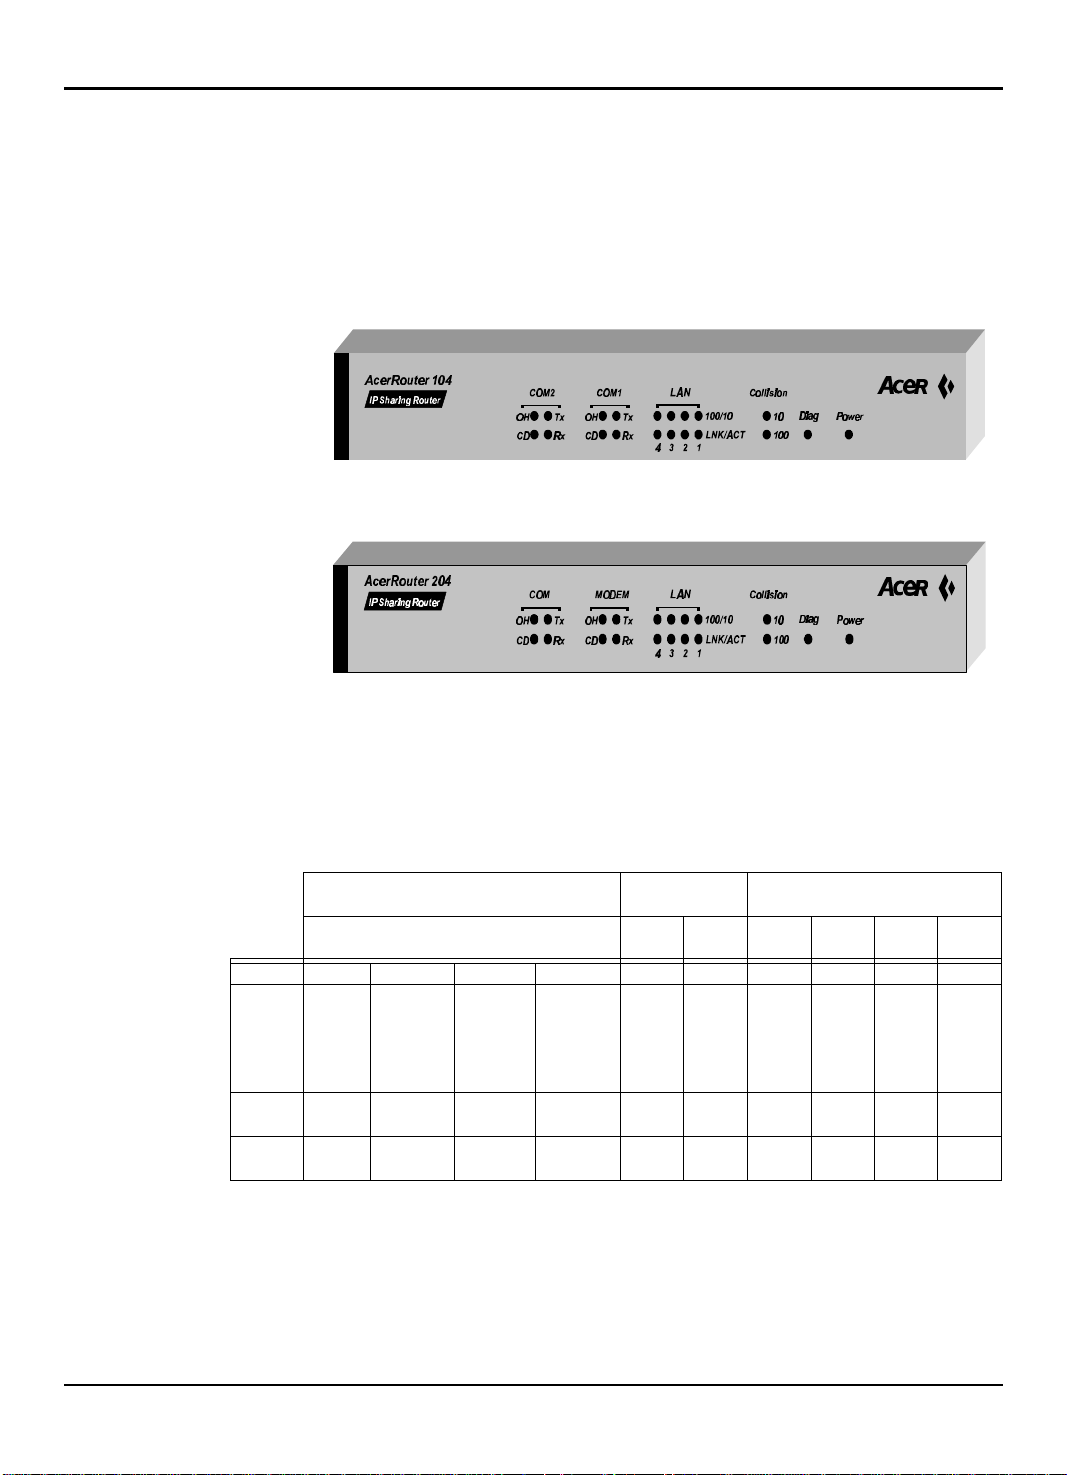
The LEDs on the front
There are 20 LEDs on the front of the AIR-104/204 that show the status of the modem
ports, the LAN ports, and the power. You can tell at a glance if your AIR-104/204 is functioning properly, and if there is any traffic passing through it.
Figure 1-4
Figure 1-5
AIR-104 Front Panel LEDs
AIR-204 Front Panel LEDs
LED operation
The operation and meaning of the LEDs are described in the following table:
Power Diag 10-
COLOR GREENORANGE ORANGE ORANGE GREENGREENGREENGREENGREENGREEN
ON Power Fail
(or Diag
still in
process)
BLINK --- --- Collision Collision --- Receiv-
OFF No
power
Diag OK Normal Normal 10
Collision
--- --- 100
100Collision
LAN 1-4 COM1 & COM2
100/10LNK/
ACT
Mbps
Mbps
Link
active
ing data
No link No dataNo dataOn hookNo con-
Tx Rx OH CD
--- --- Off hookLine is
Tx dataRx data --- ---
connected
nection
1-4 User Guide for AIR-104/AIR-204
Page 12

2
Chapter 2 Installation
Power
The AIR-104/204 comes with an external power supply. Plug the round end of the power
cable into the
supply into an electrical outlet.
Modem connections
The AIR-104/204 can access the Internet utilizing either one or two modem connections,
depending on the user’s bandwidth requirements.
You will need at least one modem connection to access the Internet. The AIR-204
supplies this connection with a buit-in 56K modem. The AIR-104 requires an external
device, either a modem or an ISDN terminal adapter.
For both the AIR-104 and the AIR-204, a second modem connection may be made with
an external device (either a modem or an ISDN terminal adapter).
DC 12V
socket on the AIR-104/204, and plug the body of the power
First modem connection
AIR-104
Connect an external modem or ISDN terminal adapter to the
Use one of the RJ-45 to DB-25 cables (supplied) to make the connection.
AIR-204
The AIR-204 contains an internal V.90 56Kbps modem. Connect the
AIR-204 to your telephone line. Use the RJ-11 to RJ-11 cable (supplied) to make the
connection.
Additionally, you may connect either a telephone handset or a fax machine to the AIR204 via the
connection.
PHONE
jack. Use another RJ-11 to RJ-11 cable (not supplied) to make the
Second modem connection
Both the AIR-104 and the AIR-204 allow you to expand your Internet access by
connecting an external modem or ISDN terminal adapter to the
RJ-45 to DB-25 cable (supplied) to make the connection.
COM1
jack on the AIR-104.
LINE
COM2
jack. Use an
jack on the
User Guide for AIR-104/AIR-204 2-1
Page 13
Chapter 2 Installation
Network connections
The AIR-104/204 includes a built-in 4-port Ethernet repeater hub. Each of these four LAN
ports can directly connect to a PC to create an “instant network” of up to four PC’s. LAN
port 1 can be switched to
which in turn connects many PC’s to create a larger network.
Figure 2-1
AIR-104/204 allows your LAN to expand
UPLINK
mode in order to connect to a network hub/switch,
Figure 2-2
Uplink Switch
Connecting PC’s directly to the router
LAN ports 2,3, and 4 on the AIR-104/204 are dedicated to NORMAL mode usage - they
are intended to connect PC’s directly. Connect the Ethernet network interface
on your PC to LAN port 2,3, or 4. Use an RJ-45 to RJ-45 cable (not supplied) to make the
connection. LAN port 1 may also connect a PC directly. The switch that controls the mode
2-2 User Guide for AIR-104/AIR-204
Page 14

Chapter 2 Installation
of operation for LAN port 1 is located along the right edge of the router case (see Figure
2-2). Locate the switch and set it to NORMAL mode. Then use an RJ-45 to RJ-45 cable
(not supplied) to connect LAN port 1 to your PC’s Ethernet interface.
Connecting PC’s to the router via a hub or switch
If your network contains more than four PC’s, you will need first to connect the majority of
your PC’s to each other with an external hub or switch, and then connect that hub or
switch to LAN port 1 on the AIR-104/204 (see Figure 2-1). In this configuration, LAN
ports 2,3, and 4 on the AIR-104/204 can still directly connect to PC’s as described
above.
Step 1 Connect your PC’s to the external hub or switch. Consult the manufacturer’s
instructions for direction.
Step 2 Connect a node port (one that would normally be used to connect a PC
directly) on the external hub or switch to LAN port 1 on the AIR-104/204,
using an RJ-45 to RJ-45 cable (not supplied). Locate the switch that controls
the mode of operation for LAN port 1 on the AIR-104/204, and set it to
UPLINK (this switch is located along the right edge of the router case). See
Figure 2-2. If you are using a special uplink port on the external hub or switch
to connect to LAN port 1 on the AIR-104/204 , then set the mode of
operation for LAN port 1 on the AIR-104/204 to
NORMAL.
Console connection
You may directly connect a console PC running terminal emulator such as HyperTerminal
to the AIR-104/204. To make the connection, use the special RJ-45 to DB-9 cable (
Modem Cable
cable; plug this into either the
screws until finger-tight to seat. The other end of the connector cable is a standard RJ-45
network-cable plug; plug this into the
) supplied in the package. One end of the cable is a 9-pin DB-9 SCSI
External phone line
You may connect either a telephone handset or a fax machine to the AIR-204 (not the
AIR-104) via the
make the connection.
PHONE
COM1
or
COM2
port of the console PC and turn the
CONSOLE
jack. Use an RJ-11 to RJ-11 cable (only one is supplied) to
jack on the AIR-104/204.
Null
User Guide for AIR-104/AIR-204 2-3
Page 15

2AIR-104/204
Chapter 3 Configuring PC's in the Network
Why do I need to configure PC's?
Any PC that is connected to the network (either plugged directly into the AIR-104/204 or
uplinked from an external hub/switch) requires configuration before it can communicate
with the AIR-104/204.
Each PC must have TCP/IP installed. Additionally, each PC must either be configured to
obtain an IP address through a DHCP server, or must have its IP address set manually.
Only PC’s configured in this manner can share Internet access by means of the AIR-104/
204 .
Note: Any TCP/IP capable workstation can be used to communicate with or through
the AIR-104/204. Other types of workstations may or may not be compatible; please
consult the manufacturer’s documentation.
Note: It is strongly recommended that you configure each network PC to obtain its IP
address automatically from a DHCP server. Only this configuration procedure is escribed
below. If you wish to set network IP addresses manually, please consult more detailed
TCP/IP documentation.
When do I need to configure PC's?
When you first install the AIR-104/204 in your network, you will need to configure a PC so
that you can use it, in turn, to configure the AIR-104/204.
After the AIR-104/204 is properly configured, you will need to configure each PC that is
connected to the network.
What do I need to configure PC's?
For configuration, a PC must have a properly-installed Ethernet or Fast Ethernet network
interface, and that network interface must be connected properly to the network (either
connected directly to a LAN port of the AIR-104/204, or uplinked via a properlyconnected external hub or switch).
There are no operating system requirements for PC’s to be configured. However,
Windows 95 and Windows 98 are the most popular operating systems currently in use;
the procedure described below applies for Windows 95/98. To configure PC’s or
terminals running other operating systems, consult the relevant user manual for
information about installing TCP/IP.
User Guide for AIR-104/AIR-204 3-1
Page 16
Chapter 3 Configuring PC's
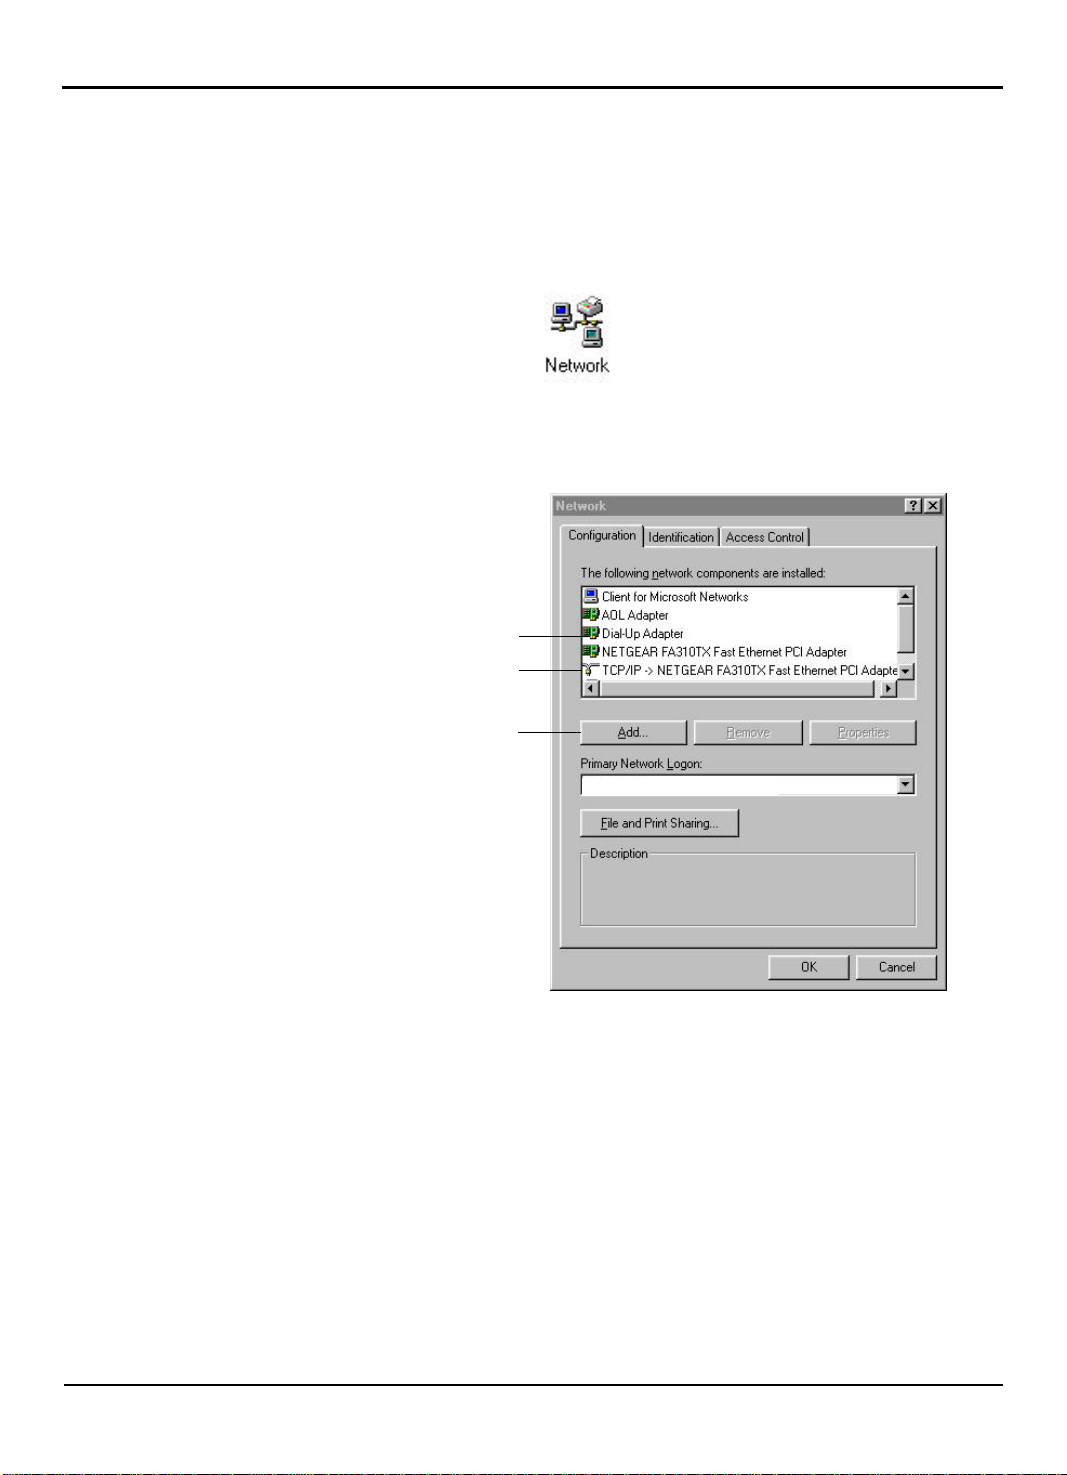
How to configure network PC's
Step 1 Click on the Win95/98
Panel. The Win95/98
Start
Button, select Settings, and click on Control
Control Panel
will appear.
Step 2 Double-click on the Network icon. The
Installed components
Look for TCP/IP
Add button
Client for Microsoft Networks
Network
window will appear.
Step 3 In the Network window, click on the Configuration tab. Check the list of
Network Components. If TCP/IP has already been installed, proceed to
(below). Otherwise, click on the Add button with the mouse. The
7
Component Type
Step 4 In the
3-2 User Guide for AIR-104/AIR-204
Network Component Type
mouse. The
window will appear.
window, click the Protocol button with the
Select Network Protocol
window will appear.
Step
Network
Page 17

Chapter 3 Configuring PC's
Step 5 In the
manufacturers by clicking it with the mouse. Select TCP/IP from the list of
network manufacturers by clicking it with the mouse. Click on the OK button
with the mouse to accept. The installation procedure for TCP/IP will begin.
You may need to insert the Win95/98 system software CD to complete the
installation.
Select
Microsoft
Select Network Protocol
window, select Microsoft from the list of
Select
TCP/IP
Step 6 After TCP/IP installation is complete, go back to the Network window shown
in
Step 4
.
Step 7
Select TCP/IP from the list of network components by clicking it with the
mouse, and then click on the Properties button. The
window will appear.
TCP/IP Properties
TCP/IP Properties Tabs
(IP Address Tab shown)
User Guide for AIR-104/AIR-204 3-3
Page 18

Chapter 3 Configuring PC's
Step 8 Check each of the following settings under its indicated tab:
-
Bindings Tab
for Microsoft Networks should be selected.
-
Gateway Tab
DNS Configuration Tab
-
-
IP Address Tab
Note: If you do not disable DNS on every PC that is connected to the network,
then the Windows operating system may emit DNS broadcast packets, which may
in turn cause the AIR-104/204 to dial up your ISP even if there is no real Internet
traffic.
Step 9 Make sure that both the PC and the AIR-104/204 are properly connected to
the network, and then reboot the PC. The PC should now be prepared to
communicate with the AIR-104/204.
: both Client for Microsoft Networks and File and printer sharing
: All fields should be blank
: Disable DNS should be selected
: Obtain IP address automatically should be selected
3-4 User Guide for AIR-104/AIR-204
Page 19

3AIR-104/204AIR-104/204AIR-
Chapter 4 Basic Router Configuration
What is "basic configuration"?
Basic configuration of the AIR-104/204 encompasses the minimum procedure necessary
for Internet access. If you are configuring the AIR-104/204 for the first time, following the
procedures outlined in this chapter will allow you to begin accessing the Internet right
away. Advanced configuration is covered in
chapter 5
What do I need to configure the AIR-104/204?
Network requirements
.
In order to configure the AIR-104/204, it must have been installed properly. See
2
for the procedure.
Requirements for configuration via web browser
To configure the AIR-104/204 remotely via web broswer, at least one properlyconfigured PC must be connected to the network. Additionally, that PC must be
equipped with a web browser: Netscape 4.5 or newer, Internet Explorer 5.0 or newer, or
another compatible web browser. Consult your browser documentation if you have any
questions.
Internet access
Obtain an account from an Internet Service Provider
In order to configure the AIR-104/204 for Internet access, you will need previously to
have arranged an account with an Internet Service Provider (ISP). Your ISP account
must meet the following requirements:
Standard modem
• dial-up account for V.90 modem (or your external modem type), using standard PPP
transmissions
• dynamically assigned IP address
Chapter
ISDN
• dial-up account for an ISDN terminal adapter, using standard PPP transmissions
• dynamically assigned IP address
These requirements represent common basic standards; you should have no trouble
communicating them to your ISP and arranging for suitable service.
User Guide for AIR-104/AIR-204 4-1
Page 20

Chapter 4 Basic Configuration
Using two Internet service accounts
If you have connected two modems or ISDN terminal adapters to your AIR-104/204 for
increased bandwidth, then you must also arrange a second ISP account that meets the
same requirements listed above. Each modem or ISDN terminal adapter utilizes a
separate ISP account when accessing the Internet, and you pay for each account
separately. However, the “bandwidth on demand” feature of the AIR-104/204 allows
you to minimize the costs of utilizing a double ISP account, and still to maximize
bandwidth for Internet traffic. For more details, see the section entitled
in
configuration
Chapter 5
.
Advanced system
How do I log onto the AIR-104/204?
The basic procedure for configuring the AIR-104/204 utilizes a web browser running on a
network PC to access the Internet Configuration Console (ICC) controlled by firmware on
the AIR-104/204. This section is an introduction to using the ICC. The following section
How to configure your Internet connection
(
the ICC to get everyone on your LAN connected to the Internet immediately. The ICC is
specifically designed for user-friendliness; by following the procedures outlined in this
chapter, you should be able to configure the AIR-104/204 for basic Internet access in
less than five minutes. Alternatively, you may configure the AIR-104/204 by using the
Command Line Interface (CLI). The CLI can be accessed remotely, via Telnet, or directly,
via a console attached to the AIR-104/204. See
Command Line Interface.
) provides step-by-step instructions for using
Chapter 7
for full details about the
Accessing the AIR-104/204 via web browser
Connect a PC to the network as described in
Chapter 3
bar of the browser window frame contains a box that allows you to enter the URL
address of the desired website (on Netscape, this box is labeled “Location”; on Internet
Explorer, this box is labeled "Address”). In this box, enter the private IP address of the
AIR-104/204, and then hit the Return key. By default, the private IP address of the AIR104/204 is:
The AIR-104/204, as shipped from the factory, is set with this private IP address.
If you are configuring the AIR-104/204 for the first time, then enter the default
(“
192.168.168.230
If you have reconfigured the AIR-104/204 to another private IP address (see
then enter the AIR-104/204’s current private IP address instead of the default.
If you have changed the IP address of the router and subsequently forgotten the new IP
address, you can connect a PC directly into the console port of the AIR-104/204 and use
the Command Line Interface to learn or reconfigure the router’s IP address. See
for the procedure.
7
. Re-boot your PC and router, and open the Web browser on your PC. The top
192.168.168.230
”) into your web browser as the location or address.
Chapter 2
, and configure it as indicated in
Logging on to the AIR-104/204
When you successfully access the AIR-104/204, a password prompt screen will appear
on the web browser, requiring that you log on. The default password always appears in
the password box, displayed as a string of asterisks (“********”).
Chapter 5
Chapter
),
4-2 User Guide for AIR-104/AIR-204
Page 21

Chapter 4 Basic Configuration
I
nternet
(Forget your password? See the User’s Guide for instructions)
By default, the password set in the AIR-104/204 is:
password
This password will always appear in the box, whether you have changed it or not.
If you are logging on for the first time, or if you haven’t changed the default password,
then simply click the
If you have changed the password to one of your own choosing, then enter the current
password in the password box. Whatever you type, every character will be displayed as
an asterisk (“*”) for privacy.
If you have changed the password and then forgotten the new password, you must
need to clear the entire configuration of the AIR-104/204 and return all values to factory
default. See
Chapter 6
Log On
C
onfiguration Console
Please enter your password:
********
button to accept the default.
for the procedure.
Log On!
The Internet Configuration Console browser screen
After you have successfully entered the current password, the Internet Configuration
Console (ICC) screen will appear on your web browser. The ICC browser screen
contains all the utilities that you need to configure the AIR-104/204 for Internet access.
For added network security, a “time out” feature is built into the ICC browser screen - if
the ICC lies inactive for 10 minutes, then you will need to log on again to use it.
The ICC browser screen is divided into three main areas:
• ICC Menu
• Configuration Window
• Message Window
User Guide for AIR-104/AIR-204 4-3
Page 22

Chapter 4 Basic Configuration
ICC Menu
Main
Window
Message
Window
ICC Menu
This area of the ICC browser screen contains a list of utilities you can use to configure
and manage the AIR-104/204. The list of utilities is organized under four category
headings: Configuration, Monitoring, System Tools, and Help. To make use of the menu,
click on one of these utilities with the mouse (e.g., Internet Connection Setup
Configuration heading). The selected utility will appear in the
browser screen.
If you are configuring the router for the first time after installation, please direct your
attention to the Configuration heading on the ICC Menu. Here you will find all the utilities
that you need to start accessing the Internet right away.
Main Window
under the
of the ICC
Main Window
This area of the ICC browser screen is the "workspace” of the Internet Configuration
Console. When selected, the various utilities from the
that you can interact with them.
When the ICC browser screen first appears, before any utility has been selected, the
Main Window will display a schematic of the rear panel of the AIR-104/204, along with
the devices that can be attached to each port.
ICC Menu
appear in this area so
Message Window
This area of the ICC browser screen is reserved for the display of important messages
(such as error messages and progress messages) that provide feedback on the AIR-104/
204’s activities and status. For example, if you attempt to access the Internet but the
4-4 User Guide for AIR-104/AIR-204
Page 23

Chapter 4 Basic Configuration
AIR-104/204 has not been configured with the correct password for your ISP account,
the Message Window will display a message to inform you of this situation. A full
explanation of these messages can be found in
Appendix A
.
The System Status monitoring window
The System Status monitoring window is not integrated into the ICC browser screen.
Rather, it appears as a separate, dedicated browser window that contains no utilities, so
that you may monitor the status of the AIR-104/204 as you use it, even if you have
already logged off from the ICC.
The System Status monitoring window appears automatically each time you successfully
log on to the ICC. If you close the System Status monitoring window for any reason, you
can re-open it by clicking System Status under the Monitoring heading in the
Unlike the main ICC browser screen, the System Status monitoring window does not
“time out”; it will continue to display the status of the AIR-104/204 until it is closed.
The System Status window displays a table, each of whose rows represents a status
report for one of the AIR-104/204’s interfaces. Each column of the table represents one
category of the status report.
ICC Menu
Current Status
(Host: 192.168.168.230)
.
Device Rcv Pkts Err PktsXmt Pkts
LAN
Modem1
Modem 2Upisp1
Status
Up
Disconnect Clear
12620 14266 0
15432 28236 6
8542 10426 0
The System Status monitoring table
Device:
indicates the nature of the interface whose status is being monitored; interfaces
LAN, Modem1
are
is reported as a single unit (
only if a modem or ISDN terminal adapter is connected to the
respectively (the V.90 modem built into the AIR-204 occupies the
always is reported as
Status:
indicates the current state of the interface. The status of the
Up
(indicating that the built-in hub is functional and connected) or
be
status for the
not currently accessing the Internet) or
Internet, using the first or second ISP account, respectively). If you have disabled the
Modem1
connection
Modem1
Xmt Pkts:
or
or
indicates the number of packets that the interface has transmitted since it was
, and
Modem2
Modem1
Modem1
Modem2
later in this chapter), that interface’s status will be reported as
Modem2
and
interface from the ICC menu (see
interface experiences an error, its status will be reported as
. The four-port Ethernet hub built into the AIR-104/204
LAN
). Status reports for
).
Modem2
interfaces should be either
isp1/isp2
Modem1
(the modem is currently accessing the
or
Modem2
COM1
or
COM1
LAN
Down
NoCall
How to configure your modem
will appear
COM2
port, and so
interface can
(the modem is
disabled
port,
. Normal
. If the
error
.
User Guide for AIR-104/AIR-204 4-5
Page 24

Chapter 4 Basic Configuration
last cleared (see
Rcv Pkts:
was last cleared (see
Err Pkts:
was last cleared (see
The Clear button
indicates the total number of packets that the interface has received since it
The Clear button
indicates the number of flawed packets that the interface has received since it
The Clear button
below).
below).
below).
The Disconnect button
The
Disconnect
convenient shortcut for quickly disconnecting an active Internet connection on the
Modem1
System Status monitoring table, and then use the mouse to click the
That interface’s ISP connection will be taken down as soon as possible . Attempting to
disconnect the
button at the bottom of the System Status window provides a
or
Modem2
interface. Using the mouse, highlight
LAN
interface has no effect.
Modem1
The Clear button
The Clear button at the bottom of the System Status window lets you reset the
accumulated packet statistics (
fresh count. Using the mouse, highlight the interface that you wish to reset, and then use
the mouse to click the Clear button. The
should immediately reset to zero and begin accumulating a fresh set of statistics.
Xmt Pkts, Rcv Pkts
Xmt Pkts, Rcv Pkts
, and
Err Pkts
, and
) to zero and begin a
Err Pkts
How to configure your modem connection
or
Modem2
Disconnect
columns
on the
button.
Before the AIR-104/204 can establish a connection with your Internet Service Provider
(ISP), you may need to input some information about the modem(s) you have connected
to it, so that the AIR-104/204 can communicate properly with the modem(s).
Additionally, you may configure the AIR-104/204 to enable or disable either of the
modem ports. You should disable those modem ports (external or internal) that are not
connected to live phone lines, so that the AIR-104/204 will not keep attempting to set up
Internet connections with them, thereby causing delays for the users on your LAN as the
AIR-104/204 continually attempts to make a call that can never go through. Disabling a
modem causes the AIR-104/204 to ignore it, and instead try the call only on the
remaining good line.
The simplest procedure for configuring the AIR-104/204 utilizes the Internet
Configuration Console (ICC), which is fully described above in the section entitled
I log onto the AIR-104/204?
beginning of this chapter, in the section entitled
204?
Alternatively, you may configure the AIR-104/204 by using the Command Line Interface
(CLI). The CLI can be accessed remotely, via Telnet, or directly, via a console attached to
the AIR-104/204. See
System requirements for this procedure are detailed at the
What do I need to configure the AIR-104/
Chapter 7
for full details about the Command Line Interface.
Using the ICC to configure the modem connection
The procedure for configuring Modem1 and Modem2 is the same in both cases. You
should input configuration information for any external modem connected to the AIR104/204 , but there is no need to input this information for the internal V.90
COM1
modem built into the
port of the AIR-104/204 . However, you can still
How do
4-6 User Guide for AIR-104/AIR-204
Page 25

Chapter 4 Basic Configuration
use this configuration procedure to enable or disable the built-in V.90 modem of the AIR104/204 (by clicking on Modem1
Follow the same procedure to enable or disable any external modem connected to the
AIR-104/204 .
under the Configuration heading of the
Step 1 From a properly-connected network PC, use your Web browser to log on to
the ICC (see
Step 2 On the
Modem2
connected to the
How do I interface with the AIR-104/204?
ICC Menu
, depending on whether you wish to configure the modem
, locate the Configuration heading, and click on Modem1 or
COM1
port or the
COM2
port, respectively.
)
ICC Menu
).
Note: The built-in V.90 modem of the AIR-104/204 occupies the
which is configured by clicking Modem1 on the
Modem 1 Initialization
String (Optional)
Step 3 Enable or disable the selected modem by clicking on the appropriate area
Step 4
Step 5
COM1
ICC Menu
The following screen appears (Modem1 is chosen as an example).
.
Modem 1 Configuration
Enable Modem Disable Modem
Select Modem Type
with the mouse.
Select Modem Type
connected to an external modem (not the built-in V.90 modem of the AIR104/204 ). Click on the down arrow with the mouse. A drop-down list will
appear; select the brand name of your external modem, and then click it with
the mouse to select it. If you cannot find your modem on the list, then select
Other
(the default).
Modem Initialization String
automatically, according to the modem type you selected in the previous
step. If the selected modem is the built-in V.90 modem of the AIR-104/204,
this field will remain blank; no input is required. You need to input a modem
initialization string only if you selected
step. Enter standard Hayes set commands to be sent to the modem by the
AIR-104/204 upon initialization. See your modem’s user guide for more
information.
Other
Apply
: this item only appears if the port you have selected is
Cancel
: the contents of this field should appear
Other
for Modem Type in the previous
port,
Note: If modem initialization information is not available, then just leave this field
blank. Most modem types will operate properly by default.
User Guide for AIR-104/AIR-204 4-7
Page 26

Chapter 4 Basic Configuration
Step 6 Click the
Apply
button with the mouse.
How to configure your Internet connection
After you have configured the modem connection(s) of your AIR-104/204 , the last step
required for Internet access is configure your Internet connection.
Unlike more complicated routers, the AIR-104/204 is specifically optimized for userfriendly Internet access. You may safely ignore the whole system of applying for and
assigning IP addresses - the AIR-104/204 handles all these processes for you
automatically.
To allow the AIR-104/204 to communicate with your Internet Service Provider (ISP) for
Internet access, you just need to input your ISP’s contact telephone number, your ISP
account name, and your ISP account password. The AIR-104/204 will take care of
everything else, and you can begin accessing the Internet right away.
The simplest procedure for configuring the AIR-104/204 utilizes the Internet
Configuration Console (ICC), which is fully described above in the section entitled
I log onto the AIR-104/204?
beginning of this chapter, in the section entitled
204?
Alternatively, you may configure the AIR-104/204 by using the Command Line Interface
(CLI). The CLI can be accessed remotely, via Telnet, or directly, via a console attached to
the AIR-104/204. See
Using the ICC to configure the Internet connection
System requirements for this procedure are detailed at the
What do I need to configure the AIR-104/
Chapter 7
for full details about the Command Line Interface.
How do
Step 1 From a properly-configured and connected network PC, use your Web
browser to log on to the ICC (see
How do I log onto the AIR-104/204?
)
Step 2 On the ICC Menu, locate the Configuration heading, and click on Internet
Connection Setup. The
Configuration Window of the ICC browser screen.
Configure Internet Access
screen will appear in the
Configure Internet Access
How do you connect to the Internet ?
I use one modem to access the Internet
I want to use two modems for increased speed to and from the
Internet
Next
If the AIR-104/204 is connected only to a single modem, or if dual modems are
connected but you only wish to use one of them, then select “I use one modem to
access the Internet”. If the AIR-104/204 is connected to two modems and you wish to
be able to use both of them, then select “I want to use two modems for increased speed
to and from the Internet”.
4-8 User Guide for AIR-104/AIR-204
Page 27

Chapter 4 Basic Configuration
After you have made your selection, click on the
selection, proceed to consult either the
Modem Configuration
section below.
Single-Modem Configuration
Next
button. Depending on your
section or the
Single-modem configuration
From the Configuration heading on the
Connection Setup and then selected “I use one modem to access the Internet”. The
Internet Access Configuration
browser screen.
screen appears in the Configuration Window of the ICC
ICC Menu
, you should have clicked Internet
Dual-
Step 1 Enter the following information:
Phone Number for Internet Account:
your ISP account.
ISP Account Name:
ISP Account Password:
Step 2 On the line that reads
the port number (
the Internet.
Step 3 Click on the
Note: When you click
attempt to place a call to your Internet Service Provider, using the modem you have
just identified. Watch the Message Window on the ICC browser screen for any
messages. If the connection is opened successfully, your LAN users should re-boot
their PCs, after which they may begin to access the Internet. If the connection is not
successful, the Message Window will provide you with information about the nature
of the problem.
the username of your ISP account.
the password of your ISP account.
Test Connection Using Port
COM1
or
COM2
) of the modem that you will use to access
APPLY and TEST
APPLY and TEST
button.
, the AIR-104/204 will immediately
Dual-modem configuration
If you have connected modems to both the
(the built-in V.90 modem on the AIR-104/204 occupies the
COM1
the telephone number used to access
, click and drag to select
and
COM2
ports of the AIR-104/204
COM1
port) and you select
User Guide for AIR-104/AIR-204 4-9
Page 28

Chapter 4 Basic Configuration
dual-modem configuration to maximize bandwidth, you will also need previously to have
arranged two ISP accounts (see
AIR-104/204?
Dual-modem configuration allows you to take advantage of the “Bandwidth on Demand”
feature of the AIR-104/204. For more information about this feature, consult the section
entitled
at the beginning of this chapter).
Advanced System Configuration
Internet Access
in
under
Chapter 5
What do I need to configure the
.
From the Configuration heading on the
Connection Setup and then selected “I want to use two modems for increased speed to
and from the Internet”. The
account appears in the Main Window of the ICC browser screen.
Configure Internet Access
ICC Menu
, you should have clicked Internet
screen for the first Internet
Configure Internet Access
First Internet Account
Phone Number for Internet Account
Internet Account Name
Internet Account Password
Test connection using port
APPLY and TEST CANCEL
Press Here to Activate a Second Account
Step 1 Enter the following information for the first Internet account:
Phone Number for Internet Account:
this ISP account.
Internet Account Name:
Internet Account Password:
Step 2 On the line that reads
the port number (
this ISP account.
Step 3 Click on the
APPLY and TEST
the username of this ISP account.
the password of this ISP account.
Test Connection Using Port
COM1
or
COM2
button.
1
the telephone number used to access
, click and drag to select
) of the modem to which you intend to test
Note: When you click
attempt to place a call to your Internet Service Provider, using the modem you have
just identified. Watch the Message Window on the ICC browser screen for any
messages. If the connection is opened successfully, your LAN users should re-boot
their PCs, after which they may begin to access the Internet. If the connection is not
successful, the Message Window will provide you with information about the nature
of the problem.
Step 4
After Step 3 has been successfully completed, click on the button that
reads
Access
of the ICC browser screen.
4-10 User Guide for AIR-104/AIR-204
Press Here to Activate a Second Account
screen for the second Internet account appears in the Main Window
APPLY and TEST
, the AIR-104/204 will immediately
. The
Configure Internet
Page 29

Chapter 4 Basic Configuration
Configure Internet Access
Second Internet Account
Phone Number for 2nd Internet Account
2nd Internet Account Name
2nd Internet Account Password
Test connection using port
APPLY and TEST CANCEL
Step 4 Enter the following information for the second Internet account:
Phone Number for 2nd Internet Account:
access this ISP account.
2nd Internet Account Name:
2nd Internet Account Password:
the username of this ISP account.
1
the telephone number used to
the password of this ISP account.
Step 5 On the line that reads
the port number (
test
this ISP account.
Step 6 Click
APPLY and TEST
Note: When you click
attempt to place a call to your Internet Service Provider, using the modem you have
just identified. Watch the Message Window on the ICC browser screen for any
messages. If the connection is opened successfully, your LAN users should re-boot
their PCs, after which they may begin to access the Internet. If the connection is not
successful, the Message Window will provide you with information about the nature
of the problem.
Test Connection Using Port
COM1
or
COM2
) of the modem to which you intend to
.
APPLY and TEST
, the AIR-104/204 will immediately
, click and drag to select
After successful configuration, what next?
After the ISP account(s) specified by your configuration has been opened successfully, all
the users on your LAN may begin accessing the Internet immediately. However, each PC
that wishes to communicate with the Internet must be configured to obtain an IP address
from the AIR-104/204 automatically. The procedure to configure network PC’s is
described fully in
Additionally, every time that the AIR-104/204 opens a new ISP connection, there is a
possibility that the DNS information provided by the ISP may have changed (for more
information, see the section entitled
occurs, users on the LAN may need to reboot their computers in order to access the
Internet successfully.
Chapter 3
.
Advanced System Configuration
in
Chapter 5
). If this
Happy surfing!
User Guide for AIR-104/AIR-204 4-11
Page 30

4AIR-104/204
Chapter 5 Advanced Router Configuration
What is "advanced configuration"?
Advanced configuration of the AIR-104/204 covers a range of options that allow you to
fine-tune your Internet access and your network configuration. These options are listed
as the section titles in this chapter.
None of the advanced configuration options is mandatory for basic Internet access. If
you are configuring the AIR-104/204 for the first time, then you should begin with
Chapter 4
Knowledge of the procedures detailed in
assumed as a basic background for this chapter. Specifically, Chapter 4 gives
instructions for using a network PC to log onto the Internet Configuration Console (ICC)
utility contained in the AIR-104/204’s firmware. Most of the procedures described in this
chapter utilize this same procedure; if you have any questions about accessing the ICC,
please refer to
, which lists all the procedures necessary to get going immediately.
Chapter 4 (Basic Router Configuration
Chapter 4
.
) is
Viewing the Connection Log
To enhance network monitoring and cost control, the AIR-104/204 keeps a running
record of its Internet access activity (the Connection Log). The Connection Log records
the date and time of occurence for two different categories of events: trigger events and
connect /disconnect events.
A trigger event is recorded every time that a network device’s request to access the
Internet causes the AIR-104/204 to attempt to open a new connection to your ISP.
Reviewing trigger events allows you to identify which workstation (and, more specifically,
which application) creates the demand for Internet access.
A connect /disconnect event is recorded every time that a connection between the AIR-
104/204 and your ISP is established or taken down, respectively. Reviewing connect
and disconnect events allows you to determine your telephone charges and Internet
service charges.
The Connection Log is large enough to record up to 128 separate events. If the
Connection Log fills up, the oldest entries are overwritten first, in favor of new entries.
To view the Connection Log
To view the Connection Log, find the Monitoring heading on the
Connection Log
The Connection Log appears in the main window of the ICC browser screen.
.
ICC Menu
, and click
5-1 User Guide for AIR-104/AIR-204
Page 31

Chapter 5 Advanced Configuration
Trigger events
In addition to the date and time of the event, the
the network device triggering the connection, the IP address that the network device is
attempting to contact, the TCP port of the application that is triggering the connection,
and the protocol of the attempted transmission.
Connect events
In addition to the date and time of the event, the
phone number and the connection rate.
Setting the time
The AIR-104/204 maintains a real-time clock, which is used to provide timestamps for
entries in the Connection Log and the System Log. The AIR-104/204’s internal clock
also controls Internet access time restrictions. For more information about the
Connection Log and Internet access time restrictions, see the relevant sections in this
chapter; for more information about messages that may appear in the System Log, see
Appendix A
The AIR-104/204 does not contain a battery to back up its internal clock, so the time will
not be maintained across a system reset or power-down. Therefore, in order to utilize
properly any feature that requires the clock to be accurate, you will need to reset the AIR104/204’s clock to the correct date and time after a system reset or power-down.
However, please note that when you set your local time zone and current Daylight
Savings Time status, these indicators are stored in flash memory; therefore they do NOT
need to be re-entered after a system reset or power-down.
Detail
column records the IP address of
Detail
column records the destination
.
Note: Unsaved configuration items are automatically saved to non-volatile flash
memory every 30 minutes. They can also be manually saved by the
Configuration
User Guide for AIR-104/AIR-204 5-2
procedure described in
Chapter 6
.
Save
Page 32

Chapter 5 Advanced Configuration
For your convenience, and to ensure consistency, the AIR-104/204 is designed to
automatically capture the date and time kept by your management PC whenever it logs
onto the ICC. If you wish to reset the AIR-104/204’s clock, you should first ensure that
your management PC is set to the correct date and time, and then apply your
management PC’s time to the router. The procedure is outlined below. The same
procedure allows you to modify your local time zone, as well as your current Daylight
Savings Time status.
Alternatively, you can use the Command Line Interface to manually set the time in the
router. See
chapter 7
for details.
To adjust the time settings
Step 1 Log onto the ICC. Find the System Tools heading on the
click on System Time
window of the ICC browser screen. Current time settings within the router
are displayed at the top of the window.
. The
System Time Setting
window appears in the main
ICC Menu
, and
System Time Setting
Current Router Time
and Time Zone: GMT -8, Daylight Saving
Proposed Router Time
Select to Change the Time Zone for the Router Location
12/06/99 16:20:09
(GMT-08:00)PacificTime(US&Canada):Tijuana
Step 2 The date and time captured from your management PC are displayed in the
box labeled Proposed Router Time. Click the Daylight Savings Time box with
the mouse to select and de-select this option.
Step 3 If necessary, click on the down arrow to the right of the Time Zone box, and
the drop-down list of time zones appears. Find the appropriate time zone for
your location, and click it with the mouse to select your choice.
12/06/99 16:20:09
Daylight Savings Time
APPLY
Note: Your settings for Daylight Savings Time status and Time Zone will be stored
in the AIR-104/204’s flash memory (see previous note). It is not necessary to reset
them every time the AIR-104/204 powers down or resets.
Step 4 Click the
changed to reflect your adjustments and displayed immediately at the top of
the
5-3 User Guide for AIR-104/AIR-204
Apply
button with the mouse. The AIR-104/204’s clock time will be
System Time Setting
window.
Page 33

Chapter 5 Configuration
Setting Internet access time restrictions
To enhance security, efficiency, and cost control, you can configure the AIR-104/204 to
disallow Internet access except on certain days, at certain times.
In order for this feature to be effective, the AIR-104/204’s internal clock must already
have been set to the correct date and time. See
When the AIR-104/204 has undergone a system reset or a power-down, at first the date
and time will be unset. If you have configured the AIR-104/204 to restrict Internet
access to certain days and times, it will not be able to comply with these restrictions until
you set the correct date and time. Therefore, the AIR-104/204 can be configured to
respond to this circumstance either by freely allowing Internet access, or by disallowing
all Internet access until the clock is set. Once you have set the correct date and time
from a management PC, the AIR-104/204 will once again begin complying with the
underlying Internet access time restrictions stored in memory.
To set Internet access time restrictions
Setting the Time
(above) for full details.
Step 1 Log onto the ICC. Find the Configuration heading on the
on Internet Access Time
appears in the main window of the ICC browser screen. Current settings
(stored in memory) are displayed.
Internet Access Time Configuration
Enter the day & time range during which Internet access will be allowed
Day of the Week:
Time of the Day
If the system loses its time setting, allow Internet access?
. The
Internet Access Time Configuration
All (7 days) Day Range
From:
Mon
All (24 hrs) Time Range (hh: 00-23, mm: 00-59)
From: To::
08:00
APPLY
(hh:mm) (hh:mm)
To::
ICC Menu
Fri
18:00
Yes
, and click
window
Step 2 Specify which days of the week Internet access should be allowed. Set the
days of the week during which Internet access is allowed. You may specify a
Day Range
allow Internet access every day.
Step 3 Specify which times Internet access should be allowed. Specify a
Range
wish Internet access privileges to begin and end (Please note that this setting
is based upon a 24 hour clock). Select
midnight to midnight on the days you selected in
Select a default status for Internet access privilege when the AIR-104/204 cannot comply
with your desired Internet access time restrictions (i.e. after the router has been reset or
powered down). If you select "Yes" (the default), then Internet access will be allowed until
by clicking on the appropriate drop-down lists, or click on
by clicking on the appropriate boxes and typing in the times that you
All
to allow Internet access from
Step 2.
All
Time
to
User Guide for AIR-104/AIR-204 5-4
Page 34

Chapter 5 Advanced Configuration
the clock is set. If you select "No", then Internet access will not be allowed until the clock
is set.
Step 4 Click on the
Apply
button with the mouse when you are finished.
Advanced System Configuration
The Advanced System Configuration utility allows you to fine-tune the AIR-104/204’s
handling of shared Internet access.
The most basic function provided by this utility is to set the
primary ISP connection from the
should be allowed to remain idle before the AIR-104/204 disconnects it.
The
Multiple Account Usage
feature, which causes a second Internet Account to be established or terminated
automatically in response to changing demand for Internet access.
You may also modify the AIR-104/204’s
different IP subnet, or to avoid any conflict caused by two network devices sharing the
same private IP address. If you change the router’s IP subnet (the third section of the
four-part IP address) from the default value of 168, then all new DHCP assignments will
use this new subnet value.
Primary
You may specify
access. Normally, the AIR-104/204 will acquire from your ISP the IP addresses of primary
and secondary Domain Name Servers (DNS) that translate website or other Internet
names into IP addresses. You may instead configure the AIR-104/204 to assign others of
your own choosing.
Finally, you may enable
your network PC’s, or disable DHCP if you wish to set IP addresses mamually (DHCP is
enabled by default). Also, you may select
which causes that PC always to receive the same IP address (this may be necessary for
certain network applications). The AIR-104/204 supports up to 20 such static DHCP
assignments.
and
DHCP
COM1
port (or the built-in V.90 modem of the AIR-204)
area lets you enable or disable the “bandwidth on demand”
Private IP Address
Secondary DNS IP Addresses
, causing your AIR-104/204 to provide IP addresses to
Static DHCP
Idle Timeout
, if you wish, to assign it to a
to be used for Internet
for any of your network PC’s,
, i.e. how long the
To set advanced configuration options
Step 1 Log onto the ICC. Find the Configuration heading on the
on Advanced Configuration
appears in the main window of the ICC browser screen. Current settings are
displayed.
5-5 User Guide for AIR-104/AIR-204
. The
Advanced System Configuration
ICC Menu
, and click
window
Page 35

Chapter 5 Advanced Configuration
Advanced System Configuration
Private IP Address
Private IP Netmask:
192 168 168 230
255 255 0
Primary DNS IP Address
Secondary DNS IP Address
DHCP
Multiple Account Usage
Connect 2nd Account if Needed
Idle timeout (0-3600 seconds)
APPLY
STATIC DHCP
Step 2 Enter the following information:
Private IP Address
interface. The default private IP address is:
192.168.168.230
: the private IP address for the AIR-104/204’s LAN
. . .
255
. .
.
. . .
. . .
Enable Disable
300
Note: Once you change the private IP address (e.g., from the default of
192.168.168.230 to 192.168.167.230), network PC’s will no longer be able to
communicate with your AIR-104/204 - specifically, the management PC that just
changed the IP address will no longer be able to communicate with the AIR-104/
204. To reconnect, you need to re-boot your computer. Similarly, all other devices
on the LAN need to be restarted before they can access the Internet again.
Private IP Netmask:
255.255.255.0
Primary DNS IP Address
(DNS). By default, the IP address of the primary DNS server acquired from
your ISP will appear here. Here you may change that IP address to another,
if you wish.
Secondary DNS IP Address
Server. By default, the IP address of the primary DNS server acquired from
your ISP will appear here. Here you may change that IP address to another,
if you wish.
DHCP:
select
Protocol (DHCP). When enabled, the AIR-104/204 will act as a DHCP server,
providing an IP address, network mask, gateway address (the AIR-104/204’s
private IP address), and DNS addresses to any requesting network device
that is configured as a DHCP client.
the network mask for your LAN. Its value is
and cannot be changed.
: the IP address of the primary Domain Name Server
: the IP address of the secondary Domain Name
enable
(the default) or
disable
the Dynamic Host Configuration
User Guide for AIR-104/AIR-204 5-6
Page 36

Chapter 5 Advanced Configuration
Multiple Account Usage
you may control the “bandwidth on demand” feature. If you select “
2nd Account Only if Needed
feature will be enabled, and the AIR-104/204 will only establish a second
connection if Internet traffic increases above an upper threshold. Once the
traffic decreases below a lower threshold, the second connection will be
taken down. If you select “
connections from
together.
and ISP charges.
Idle Timeout
allowed to remain idle before the AIR-104/204 will disconnect from the ISP.
The idle timeout may set from 0 to
If you select
Please note that this latter choice may result in increased phone
: Set the number of seconds that the modem connection is
0
, the connection will never time out.
Step 3 When you are finished, click the
Step 4 If you want to configure static DHCP assignments, click the
button and continue on to the next section.
Static DHCP Assignments
You will need to create an entry on the DHCP Static Assignment Table for each PC that is
to be assigned a static IP address.
Step 1 Log onto the ICC. Find the Configuration heading on the
on Advanced Configuration
appears in the main window of the ICC browser screen. Current settings are
displayed.
: If you have configured two Internet accounts, here
” (the default), then the “bandwidth on demand“
COM1
Always Use Two Accounts
and
COM2
will always be opened and closed
3600
seconds (the default setting is
Apply
button.
. The
Advanced System Configuration
”, then both
STATIC DHCP
ICC Menu
Connect
300
, and click
window
).
Step 2 At the bottom of the
STATIC DHCP
window of the ICC browser screen.
Advanced System Configuration
button. The
Static Assignment Table
screen, click on the
appears in the main
DHCP Configuration
Static Assignment Table
IP AddressName MAC Address
Bing 192.168.168.95 00-aa-00-62-c6-09
Add
Edit
Delete
5-7 User Guide for AIR-104/AIR-204
Page 37

Chapter 5 Advanced Configuration
Step 3 To add an entry to the DHCP Static Assignment Table, click on the
Add
button at the bottom of the table. The
appears in the main window of the ICC browser screen.
Add a Static Entry
screen
Step 4
Enter the following information to create a static DHCP entry:
Name:
Enter a name for your reference.
IP Address:
MAC Address:
of the network device. Please note that dashes must separate each pair of
hexadecimal digits.
The IP address to be consistently assigned to this device.
The hardware address associated with the Ethernet adapter
Step 5 When you are finished, click on the
ment Table
Step 6 Repeat
an existing static DHCP entry by clicking it with the mouse; then click on the
Edit
will appear again in the main window of the ICC browser screen.
steps 3-5
button to edit the selected entry, or click on
to assign further static DHCP entries. You may also select
Apply
button. The
Delete
DHCP Static Assign-
to delete it.
User Guide for AIR-104/AIR-204 5-8
Page 38

5AIR-104/204AIR-104/204
Chapter 6 Management
What is "management"?
The management functions of the AIR-104/204 provide you with convenient tools
necessary to update the AIR-104/204 over the long term. This chapter covers the
following common tasks:
• How to save or clear configuration changes
• How to restart the AIR-104/204
• How to change my ICC password
• What if I forget the ICC password?
• How to upgrade the AIR-104/204’s software
How to save or clear configuration changes
While fine-tuning your Internet access, you may need to make temporary adjustments to
the AIR-104/204; therefore, the configurations you enter will NOT be saved to flash
memory instantly. Instead, the AIR-104/204 is designed to save to flash memory any
unsaved configuration changes, every thirty minutes, automatically. For closer
management, you can use the
clear the configuration completely.
Configuration Options
Step 1 Log onto the ICC. Find the System Tools heading on the
on Configuration Data Options
appears in the main window of the ICC browser screen.
. The
to save changes manually, or to
ICC Menu
Configuration Data Options
, and click
screen
Configuration Data Options
Save the configuration to flash memory
Save
Clear the configuration and reset the system
Clear and Reset
Step 2 Click
Step 3 When you click
Save
to save the current configuration database to flash memory, or
Clear and Reset
click
factory defaults) and reset the system.
Click
Yes
to clear the configuration and reset the system, or click No to
cancel.
to erase your entire configuration database (in favor of
Clear and Reset
, you will be asked to confirm your decision.
Configuration Options
Do you want to continue?
Yes No
User Guide for AIR-104/AIR-204 6-1
Page 39

Chapter 6 Management
How to restart the AIR-104/204
Besides toggling the power switch on the back panel of the AIR-104/204, you can also
restart the system from the ICC Menu.
Step 1 Log onto the ICC. Find the System Tools heading on the
on Reset System
the ICC browser screen.
. The
Reset System
screen appears in the main window of
Reset System
Do you really want to reset the system?
Yes No
ICC Menu
, and click
Step 2 Click
Yes
to reset the system, or click No to cancel.
Note: Resetting the AcerRouter disconnects any active calls, and may disrupt
current user operations. You may also lose recent configuration changes (those that
have been made within the last 30 minutes), unless they have been saved manually
(see the relevant section above for the procedure).
How to change the ICC password
For added security, you should frequently change the ICC password saved in the AIR104/204. In particular, once you have successfully installed and configured the AIR-104/
204 for the first time, you should change the factory default ICC password to one of your
own choosing.
Step 1 Log onto the ICC. Find the System Tools heading on the
. The
on Change Password
main window of the ICC browser screen.
Password Configuration
Current Password
New Password
Confirm Password
(Forget your password? - see the User’s Guide for instructions.)
Password Configuration
ICC Menu
screen appears in the
SUBMIT
, and click
Step 2 Enter the following information:
Current Password:
New Password:
Confirm Password:
Note: If you are changing the password for the first time, the
the factory default: “
6-2 User Guide for AIR-104/AIR-204
the password that you just used to log onto the ICC.
the new ICC password that you wish to implement
enter the new ICC again, to avoid any error.
Current Password
password
”.
is
Page 40

Chapter 6 Management
Step3
When you are finished, click
Submit
.
What if I forget the ICC password?
For your security, a password is REQUIRED to log onto the AIR-104/204. If you forget
the ICC password, the only way to recover is to clear the entire configuration manually
and return the unit to its original state as shipped from the factory. Unfortunately, this will
also result in the loss of your entire configuration database; all settings will need to be reentered. To clear the configuration manually and restore the password to the default,
follow these steps:
Step 1 Connect a PC to the
outlined in
Chapter 2
Step 2 Run the terminal emulation software (e.g. HyperTerminal) on the console PC.
Chapter 7
See
Step 3 Toggle the power switch on the rear panel of the AIR-104/204 to
toggle it back it
“Loading firmware...” will be displayed.
Step 4 When the "Ready" message is displayed in the console PC’s terminal
window,
PC’s keyboard.
immediately
Step 5 The AIR-104/204 will undergo a system reset. After the system reset has
been completed, all settings stored in the AIR-104/204 will return to the
factory defaults. In particular, the ICC password once again will become
“
password
”.
CONSOLE
.
for details on the proper settings for the terminal software.
on
again. In the console PC’s terminal window, the message
(within one second) press Control-C on the console
port of the AIR-104/204. The procedure is
off
, and then
Note: Keep in mind that anyone can perform this procedure and seriously
compromise security in your network. Make sure physical access to the AIR-104/
204 is consistent with your security requirements.
How to upgrade the AIR-104/204 software
Periodically, you may need to upgrade the AIR-104/204’s firmware (firmware is the
software that controls the AIR-104/204’s operations). Normally, this is done when you
discover a problem that is resolved in a newer version of the firmware, or when Acer
produces an updated version of the firmware which includes new features that you need.
Otherwise, if you are happy with your current situation, you may not want to upgrade
even if a new version is available. Please check the Acer Netxus website for information
about the latest firmware upgrades (the software can be downloaded directly from the
website):
www.acernetxus.com.tw
The upgrade procedure follows:
Step 1 Using a web browser, connect to the Internet and acess the Acer Netxus
website at:
www.acernetxus.com.tw
Following the directions on the website, download the desired version of the
software and install it in your local PC environment.
Step 2 Log onto the ICC. Find the System Tools heading on the
on System Upgrade
window of the ICC browser screen.
. The
System Upgrade
screen appears in the main
ICC Menu
, and click
User Guide for AIR-104/AIR-204 6-3
Page 41

Chapter 6 Management
Step 3 Enter the path or filename where you installed the software in
(e.g.,
a200v101.sig)
ready, click the
new firmware will begin loading across the network. After the operation is
complete, be sure to reset the AIR-104/204, and the new firmware will take
effect.
, or click
Upgrade
Browse
to select a path to the software. When
button, and follow the onscreen instructions. The
Step 1
above
6-4 User Guide for AIR-104/AIR-204
Page 42

CAIR-104/204
Chapter 7 The Command Line Interface
What is the Command Line Interface?
Although the AIR-104/204 is most conveniently configured and managed via the Internet
Configuration Console (described in
router using the Command Line Interface (CLI). In fact, certain feature of the AIR-104/
204 are ONLY accessible by means of the CLI. The CLI is a text-based user interface,
unlike the graphic interface of the ICC, and it MUST be used to control the AIR-104/204
from a directly-connected console PC.
Using the Command Line Interface
There are two ways to access the AIR-104/204’s CLI:
• Telnet
• console (direct PC connection running terminal emulation software)
Connecting to the CLI via Telnet
Chapter 4
), it is also possible to interface with the
The AIR-104/204 can be accessed via Telnet from any PC that is connected to the
network. You may use any telnet program that complies with the standard TCP/IP
protocols; the most simple procedure is to click on the Windows 95/98
Run
, and type in “telnet” followed by the IP address when the
(please recall that the AIR-104/204’s default IP address is
Run
192.168.168.230
Connecting to the CLI through the console port
Another way to invoke the command line interface is to connect a PC running terminal
emulation software directly into the
cable is supplied to make this connection; see Chapter 2 for more details on the
installation procedure.
Your console PC will require terminal emulation software, such as the Hyperterminal
program that comes bundled with Windows 95/98. The instructions given here are for
Hyperterminal; for any other software, consult the user’s guide on the best way to enter
the same parameters.
Step 1 Run the Hyperterminal program: click on the Windows 95/98
Programs
select
the version of Hyperterminal that you wish to use. The Hyperterminal window
appears.
Step 2 On the Hyperterminal tool bar, click on
the menu that appears. The
Step 3 On the
Step 4 On the
Connection Properties
Emulation
Emulation
the
bar, and click on the down arrow for its drop-down menu. Set
to
Connection Properties
Configure
VT-100
button. The
, then
CONSOLE
Accessories
Connection Properties
window, click on the
.
window, click on the
COM1/2 Properties
port on the AIR-104/204. A null modem
, then
Hyperterminal
File
, and then select
window appears.
Settings
Connect To
window appears.
Start
window appears
, and finally click on
button, click
).
Start
Button,
Properties
tab. Find the
from
tab. Click on
Step 5 On the
7-1 User Guide for AIR-104/AIR-204
COM1/2 Properties
values:
window, for the
Port Settings
enter the following
Page 43

Chapter 7 Command Line Interface
Bits per second
Data bits
Parity
Stop Bits
Flow Control
Note: If your terminal emulation software does not allow you to set flow control
options, then you should set the flow control manually. Click the Win95/98
button, select
appears; click on the
Choose either
to the AIR-104/204. Under
Hardware
Note that after configuring these settings, some programs require you to
close the application and then re-open it.
Step 6 Enter a carriage return to start your session.
General guidelines
When logging on to the AIR-104/204, the user will see a system sign-on message,
followed by a password prompt:
Acer Router Manager Console Version: rev_no build_date_time
Please enter your password: ********
As outlined in
system for the first time, key in the default password; you may change the password later
to one of your own choosing. At all times, the password for the CLI is identical to the
password for the ICC; if you change one, then you will also change the other at the same
time. Please note that the password is case-sensitive. As you type in the password,
your keystrokes will be echoed as asterisks (*). When you hit the Carriage Return, the
password you have entered will be tested against the current password. If the password
string is validated, the command prompt will be displayed:
Command>
The user may now begin to issue commands. Most of the commands are single-line
commands, and no commands are context-sensitive: each command is independent of
other commands before or after it.
While entering commands with the CLI, please make a note of the following general
guidelines:
• At any time, the user may type a “ ?” (preceded by a space) to request for help
concerning what the user can enter next. If the CLI is expecting a keyword when the
user types “?”, then all valid keywords will be displayed for selection, and the
unfinished command will be re-displayed withe cursor at the end for the user to finish
the input.
• Instead of entering a full keyword, the user may simply enter the first part of the
keyword and then hit
keyword, unless the characters entered thus far do not uniquely identify a keyword,
in which case nothing will happen. If the user is unsure how to complete the
keyword, she may simply type as many characters as she knows, followed by a “?”;
the system will then display all valid keywords which match the partial input.
• At any time, the user can type control-p (^p, by pressing both the Ctrl key and the
^p key at the same time) to repeat the previous command, or control-n to return to
: 8
: None
: 1
Settings
COM1
.
Chapter 4
(baud): 19200
: Hardware
, and click on the
System
icon. Select
or
COM2
, depending on which port you are using to connect
Settings
, the default password is “
tab
or
space
Control Panel
Device Manager
, you will fill find
; the system will automatically complete the
password
Start
. The
Control Panel
, and then
Flow Control
”. If you are logging onto the
; set it to
window
COM Ports
.
User Guide for AIR-104/AIR-204 7-2
Page 44

Chapter 7 Command Line Interface
the next command in the sequence. At startup, typing ^p or ^n will not cause
anything to happen, since no sequence of commands exists yet. In normal
operation, typing ^p will cause the previous command to show, and the cursor will
sit at the end of the command. At this point, the user can either type a carriage
return to accept the command, or type backspaces to edit the command from the
end, or ^p to display the nextmost previous command in the sequence, or ^n
display the command that comes after it in the sequence (if applicable). The CLI
stores a total of up to 15 previously-entered commands in a sequence that can be
invoked through ^p’s and ^n’s.
Conventions
The following notations will be used:
• lan means the LAN port;
• <> specifies the arguments of the command, <1-4> means a number between 1 to
4;
• [ ] indicates a required or optional parameter, or choice of parameters; Interface
Name or ifName represents a profile interface, which can be the LAN port (lan), or a
modem profile.
• Profile Name means an Internet profile, not the LAN port.
• xxx/yyy means xxx, or yyy;
• num means any integer number (such as 19200, 9600, ...);
• MacAddr, or nn-nn-nn-nn-nn-nn means any MAC address in hexadecimal format,
where each nn can be 00, 01, ... 09, 0A, 0B, 0C, 0D, 0E, 0F, 10, 11,… FF;
• ipAddr, netMask, or xxx.xxx.xxx.xxx means any ip address or network mask, where
xxx is a decimal integer between 0 and 255
• the term string means a string of characters up to the specified length, which may be
enclosed in double quotes (“) (required if the string contains embedded blanks
Command Categories
From a functional point of view, commands can be grouped into the following functional
categories:
(1) Diagnostics (2) IP (3) Port
(4) Profile (5) Security (6) Statistics
(7) System
This list may vary depending upon the model of AIR-104/204 and the installed features.
For convenience, the section Command List summarizes all commands using the
following categories:
• DHCP
• Diagnostics
• IP
• Port Commands
• Profile Commands
• Security
• Statistics
• System
7-3 User Guide for AIR-104/AIR-204
Page 45

Chapter 7 Command Line Interface
Command List
DHCP Commands
The Dynamic Host Control Protocol (DHCP) is a client/server protocol1 that defines an
efficient and convenient means of dynamically assigning IP addresses and other
networking parameters for a period of time upon request. In an AIR-104/204
environment, this means either the dynamic assignment of private IP addresses to PCs
co-residing on the LAN segment with the AIR-104/204, or a static assignment of these
addresses according to the station identification (the MAC address) of the requesting
client.
Since the SOHO Router is configured with a private IPaddress for its LAN connection,
the DHCP server is automatically enabled. (The DHCP function is disabled if the router
discovers another DHCP server at initialization time, or if the user has explicitly disabled
this function.) DHCP clients residing in LAN-resident machines, such as those running
Windows 95/98, may then request a lease on an IP address from a DHCP server. As the
term implies, the assignment of the address is temporary. The default lease period in a
AIR-104/204 DHCP server is ten hours. The DHCP client is responsible for the renewal of
the lease.
Both static and dynamic DHCP assignments are supported. The range of IP addresses
in the dynamic pool from which the server selects an address to satisfy a request is fixed
and extends from 192.168.168.1 to 192.168.168.229, with the highest available address
being assigned first. Statically assigned addresses must be within this range as well
to 20 static DHCP assignments may be configured and saved.
2
. Up
disable dhcp
Description
within the router. The router will no longer respond to lease requests. Existing
leaseholders will not be able to renew their leases after the lease term expires, unless
another DHCP server resides within the network.
: This command disables the Dynamic Host Control Protocol server functions
enable dhcp
Description
functionality within the router. When enabled, the router will service a client request for IP
address and net mask assignment, as well as assignments of default gateway, and DNS
server addresses. The pool of addresses from which the router selects is between
192.168.xxx.1 and 192.168.xxx.229, inclusive. The default value of xxx is 168, unless re-
configured with the set ip private… command (or its HTTP equivalent). The term of the
lease is 10 hours. The factory default is enabled.
: This command enables the Dynamic Host Control Protocol server
1.The Internet Engineering Task Force (IETF) defines DHCP in RFC-2131 and RFC-
2132.
2. In certain cases, statically assigned addresses may be above this address. Some
AIR-104/204 models may not require this entire range and therefore, static DHCP
assignments from this range may be used.
User Guide for AIR-104/AIR-204 7-4
Page 46

Chapter 7 Command Line Interface
show dhcp
Description
Protocol server.
Example
: This command displays the current status of the Dynamic Host Control
:
Command> show dhcp
Admin Status: Enable Default Lease: 10 hours
Network address: 192.168.168.0 Netmask: 255.255.255.0
Default gateway: 192.168.168.207
Primary DNS: 199.191.129.139Secondary DNS: 199.191.144.75
IP-Address Mac-Addr Lease-Expires Entry Type
------------------------------------------------------------------------------------------------------------
192.168.167.134 00400535db4f 06-15-99 14:24:5 Static
192.168.167.229 222222222222 06-15-99 16:43:7 Dynamic
show dhcp table
Description
Assignment Table
Example
: This command displays the entries currently configured in the Static DHCP
:
Command> show dhcp table
Static Dhcp Assignments
Name IP-Address Mac-Address
--------------------------------------------------------------------------------------------------------- daniel 192.168.168.134 00-40-05-35-DB-4F
Diagnostic Commands
connect profile isp 1
connect profile isp 2
Description
trigger occurred.
disconnect profile isp 1
disconnect profile isp 2
Description
if an idle timeout occurred.
enable/disable trace
Description:
enabled, all log messages entered into the system log will appear in the console session
from which this command is issued.
: For Internet profiles, this command activates the specified profile as if a
: For active Internet connections, this command terminates the connection as
This command enables or disables the debug trace messages. When
7-5 User Guide for AIR-104/AIR-204
Page 47

Chapter 7 Command Line Interface
ping ipaddr [<n_times> < n_size>]
Description
message to be echoed by the receiving device). If n_times and n_size are optionally
specified, the ping will be performed n_times times, and each time with size equal to
n_size. Otherwise, ping will only be executed once with the packet size equal to 56 bytes.
The maximum value of n_times is 100: any value larger than this will be set to 100.
The maximum value of n_size is 1932: any value larger than this will be set to 1932.
Example:
: This command allows the user to ping an IP device (send a diagnostic
Command> ping 10.0.0.2 100 1000
repeating times = 100, data length = 1000
Ping packets -- total: 100 sent: 100 received: 100
Command> ping 10.0.0.2
repeating times = 1, data length = 56
Ping packets -- total: 1 sent: 1 received: 1
set log level <1-10>
Description:
Commands.
For a description of this command, see set log level <1-10> under System
test modem <port #> <telephone number>
Description
call is cleared immediately after a connection is established.
: This command causes a modem call to the specified telephone number. The
IP Commands
ping ipaddr [<n_times> < n_size>]
Description
set ip private <ip_addr> <netmask>
Description
LAN interface.
The IP network corresponding to the set ip private command becomes the private
network. Private addresses are not legal for use on the Internet and therefore, devices in
this network are no longer accessible from public devices on the Internet side. All devices
within this private network are represented by one single IP address: the IP address
received from an Internet Service Provider at connect time. Note that 192.168.168.230 is
the default private address used for the AIR-104/204, and the private network address is
192.168.168.0, and therefore all private devices should have IP addresses within the
range of 192.168.168.1 to 192.168.168.254. Private IP addresses may be any Class C
address with the range 192.168.xxx.0, where xxx is between 0 and 255.
Example:
Command> set ip private 192.168.168.168 255.255.255.0
: See description under Diagnostics.
: This command is used to modify the private address on the AIR-104/204’s
User Guide for AIR-104/AIR-204 7-6
Page 48

Chapter 7 Command Line Interface
show arp table
Example:
Command> show arp table
110.0.0.1 at 00:60:20:00:00:15 permanent
110.0.0.2 at 00:40:33:3D:D5:DB
Description:
which contains up to 16 most recent MAC-to-IP-address mappings that have not been
aged out.
This command displays the ARP (Address Resolution Protocol) cache table,
show icmp statistics
Description
Control Message Protocol (ICMP).
: This command displays statistical information associated with the Internet
Received Transmitted
-----------------------------------------------------------------------------------------------------------Dest Unreachable: 0 0
Time Exceeded: 0 0
IP Header Error: 0 0
Source Quench: 0 0
Redirect: 0 0
Echo Request: 0 0
Echo Reply: 0 0
Timestamp Request: 0 0
Timestamp Reply: 0 0
Address Mask Request: 0 0
Address Mask Reply: 0 0
Calls to icmp error: 0
Messages Reflected: 0
show ip
Description:
Example:
This command displays all interfaces on which IP routing has been enabled.
AIR101> show ip
Admin. Oper. Destination/
Ifname State State IP Address Netmask Broadcast Addr
-----------------------------------------------------------------------------------------------------------lan Enabled Up 192.168.168.13 255.255.255.0 255.255.255.0
isp1 Enabled Inactive (Unnumbered)
MIP1 Enabled Inactive (Unnumbered)
show ip isp1
show ip isp2
7-7 User Guide for AIR-104/AIR-204
Page 49

Chapter 7 Command Line Interface
show ip lan
Description:
Example:
Command> show ip lan
Interface: lan
-----------------------------------------------------------------------------------------------------------IP Address: 192.168.168.92
Netmask: 255.255.255.0
Dest. IPAddress: 255.255.255.0
Opr./Admin. State: Up
RIP State: Active Ver.1
IP Multicast: Disabled
RIP Spoofing: Disabled
This command displays the IP configuration over the specified interface.
show ip statistics
Description:
Example:
AIR 101> show ip statistics
Received Transmitted
----------------------------------------------------------------------------------------------------------- Packets Received 32424
Datagrams Generated Locally 1133
Packets Forwarded 0
Datagrams Delivered to Upper Layer 1714
Raw Packets Sent 0
Redirects Sent 0
This command displays IP routing related statistics
Packet drops:
IP Header Errors 3
Unknown Protocols 0
Not Forwardable 1819
DONT_FRAGMENT Bit ON: 0
No Buffers: 0
No Route: 0
Fragmentation:
Total Fragments 0 0
Datagrams Reassembled 0
Datagrams Fragmented for Output 0
Fragments Dropped after Timeout 0
Fragments Dropped (Duplicates/No Space)
User Guide for AIR-104/AIR-204 7-8
0
Page 50

Chapter 7 Command Line Interface
show tcp statistics
Example:
AIR 101> show tcp statistics
Received Sent
--------------------------------------------------------------------------------------------------------- Total Packets 508 577
Show udp statistics
Example:
AIR 101> show udp statistics
Received Delivered
-----------------------------------------------------------------------------------------------------------
Total datagrams 9 0
Datagrams with checksum error 0
Datagrams with incorrect length 0
Datagrams dropped due to buffer full 0
Datagrams with dest. port unreachable 0
Note:
technology used to combine two Internet accounts to work together to provide increased
bandwidth to the Internet. These commands allow the user to display information about
the MIP group.
Multi-connection IP (MIP) Commands:
show mip
Description
along with the current operational setting of the MIP group.
: The profiles associated with the multi-connection IP group are displayed,
show mip statistics
Description
: The statistics associated with the multi-connection IP group are displayed.
Port Commands
Port related commands are available for clearing statistical counters, enabling/disabling
ports, and displaying port configuration and statistics.
clear port statistics port 1
clear port statistics port 2
Description:
counters on all ports are cleared.
enable/disable port 1
This command clears port statistics. If a port is not specified, the statistics
Multi-connection IP (MIP) is the
enable/disable port 2
Description:
7-9 User Guide for AIR-104/AIR-204
This command enables or disables a port.
Page 51

Chapter 7 Command Line Interface
show port
Description
Example:
: This command displays the configuration information for all ports.
AcerRouter> show port
Port Name : 1 Port Type : MODEM
Admin Status: No call
Port speed: auto-115200 Init String: unspecified
Port Name : 2 Port Type : MODEM
Admin Status: No modem
Port speed: auto-115200 Init String: unspecified
show port 1
show port 2
Description:
Example:
This command displays the configuration of a modem port.
AcerRouter> show port 1
Port Name : 1 Port Type : MODEM
Admin State : Enabled
Admin Status: No call
Port speed: auto-115200 Init String: unspecified
show port statistics 1
show port statistics 2
Example
:
Command> show portstatistics 1
-----------------------------------------------------------------------------------------------------------Total packets 0 0
Total bytes 0 0
Total errors 0 0
Profile Commands
This section details the commands used to display information about Internet profiles.
Internet profiles contain all the information needed for connections with an ISP.
clear profile statistics
Description:
values with this command.
clear profile statistics isp1
The statistics fields in all configured Internet profiles are reset to their initial
Received Transmitted
User Guide for AIR-104/AIR-204 7-10
Page 52

Chapter 7 Command Line Interface
clear profile statistics isp2
Description:
values with this command. If no profile name is specified, the statistics of both profiles are
cleared.
The statistics fields in the specified Internet profile are reset to their initial
connect profile isp1
connect profile isp2
Description:
This command activates the profile as if a trigger occurred.
disconnect profile isp1
disconnect profile isp2
Description:
idle timeout occurred.
For active Internet profiles, this command terminates the connection as if an
show profile
This command displays a summary of all configured Internet profiles.
Example:
Command> show profile
Prof Name Type AdminState Remote DN Call Action
----------------------------------------------------------------------------------------------------------- isp1 Modems Enabled 5559357 Dial only
isp2 Modems Enabled 5559357 Dial only
show profile isp1
show profile isp2
Description:
Example:
AcerRouter> show profile isp1
Profile type: Modems Admin. State: Enabled
Call Action: Dial only Remote DN: 5553500
Clid Auth: No Caller ID:
Call Back: No Call Back #:
PPP Oper. State: Down
Max Receive Unit : 1524
User Account Name : account1
Remote System Name:
Send Auth. Type: Either Recv Auth. Type: None
TCP/IP VJ Compression: Disabled Inactivity Timeout: 300
Multilink Type: Disabled
The details of a configured Internet profile are displayed.
7-11 User Guide for AIR-104/AIR-204
Page 53

Chapter 7 Command Line Interface
Show profile statistics
Example:
Command> show profile statistics
Prof Oper. Packets Packets Errors Errors Q-full
Name State Sent Rcv'd Sent Rcv'd Discar
----------------------------------------------------------------------------------------------------------- isp1 Down 0 0 0 0 0
isp2 Up 4332 561 0 0 0
show profile statistics isp1
show profile statistics isp2
Example:
Command> show profile statistics isp1
isp1 Received Transmitted
-------------------------------------------------------------------------------------------------------- Total octets: 0 0
Total packets: 0 0
Total errors: 0 0
PPP Statistics
Total control packets: 0 0
Total data packets: 0 0
IP packets 0 0
PPP Error Statistics
Unsupported protocols: 0 Code rejects: 0
Bad addresses: 0 Bad controls: 0
Bad FCSs: 0 Packets too long: 0
Statistics Commands
clear port statistics
Description
clear port statistics port 1
clear port statistics port 2
Description
clear profile statistics
Description:
clear profile statistics isp1
User Guide for AIR-104/AIR-204 7-12
: Refer to this command under
: Refer to this command under
Refer to this command under
Port Commands
Port Commands
Profile Commands
.
.
.
Page 54

Chapter 7 Command Line Interface
clear profile statistics isp2
Description:
Refer to this command under
show icmp statistics
Description
: Refer to this command under
show ip statistics
Description
: Refer to this command under
show mip statistics
Description
: Refer to this command under
show port statistics 1
show port statistics 2
Description
: Refer to this command under
show profile statistics
Description:
Refer to this command under
show profile statistics isp1
Profile Commands
IP Commands
IP Commands
IP Commands
Port Commands
Profile Commands
.
.
.
.
.
.
show profile statistics isp2
Description: Refer to this command under
show tcp statistics
Description
: Refer to this command under
show isp1 statistics
show isp2 statistics
Profile Commands
IP Commands
.
.
7-13 User Guide for AIR-104/AIR-204
Page 55

Chapter 7 Command Line Interface
show lan statistics
Description:
profile or the LAN.
Examples:
AcerRouter> show isp1 statistics
interface: isp1
------------------------------------------------------------------------------------------------------- Received Transmitted
--------------------------------------- --------------------------------------------------------------- Total packets 0 0
Total octets 0 0
Multicast packets 0 0
Errors on interface 0 0
Packets dropped 0
Packets with unsupported protocol 0
Last update time (sec) 0
AcerRouter> show lan statistics
interface: lan
-------------------------------------------------------------------------------------------------
--------------------------------------------------------------------------------------------------------- Total packets 825 456
Total octets 75425 104293
Multicast packets 0 0
Errors on interface 0 0
CSMA collisions 0
Packets dropped 0
Packets with unsupported protocol 0
Last update time (sec) 1599
This command displays statistical information associated with the specified
Received Transmitted
System Commands
change password
Description
the Command Line Interface or the Internet Configuration Console utility. A password is a
character string that starts with a letter and contains at least 6 and up to a total of 15
alphanumeric characters. The password is case sensitive. The default factory setting is
“password”.
If you forget the Internet Configuration Console password, the only way to recover is clear
the entire configuration and return the unit to its original state as shipped from the factory.
Unfortunately, this means that you have to re-enter all of your configuration data.
To clear the configuration and restore the password to the default, follow these steps:
Connect a console to the AIR-104/204 Aux/Console port. Turn off the AIR-104/204, then
turn it on again. In the console window, youll see the message Loading firmware...
When you see the message "Ready",
The AIR-104/204 will now reset. When this is complete, the AIR-104/204 will return all
settings to the factory default. The password will once again be “password”.
User Guide for AIR-104/AIR-204 7-14
: This command allows the user to change the password used to log on to
immediately
(within one second) press Control-C.
Page 56

Chapter 7 Command Line Interface
Example
:
Command> change password
Please enter the old password: ********
Please enter the new password: ********
Please re-enter the new password: ********
Password has been successfully changed
clear config
Description:
After clearing, the system will reboot. All user-configured data are lost. The configuration
will return to the factory default settings.
This command is used to clear the configuration data in the flash memory.
disable/enable remote-mgt
Description:
and telnet management connections. Only a direct console connection is supported if
remote management is disabled.
This command allows the administrator to lock out or enable both browser
download config <filename> from <ipaddr>
Description:
to the system from a tftp server with the specified IP address.
Example:
This command causes the configuration file
Command> download config ar104.cfg from 205.51.23.12
<fileName>
to be downloaded
download firmware
Description
system from a directly attached PC running the terminal emulation software (one with zmodem file download capability). Note that this command cannot be used from a telnet
session. This is an alternative to downloading the software using the Internet
Configuration Console browser utility.
Since the router will reset after this operation is complete, the system will first prompt for
the confirmation. The system will ask the user to select the download speed. The user
may then change the terminal baud rate for a faster download and press enter to
continue (some terminal emulators require a disconnect followed by a connect in order
for the changed parameters to take effect). Select the Z-modem protocol for use in
downloading the firmware. The user then selects (opens) the firmware file for actual
downloading.
Upon completion of the download, the router will reset and is therefore intrusive to any
active Internet session.
: This command causes the product firmware to be downloaded to the
help
(This list may differ depending upon the AIR-104/204 model):
Example:
Command> help
Commands are categorized as follows:
(1) Diagnostics (2) IP (3) Port
(4) Profile (5) Security (6) Statistics
(7) System
7-15 User Guide for AIR-104/AIR-204
Page 57

Chapter 7 Command Line Interface
Please enter a selection number [1...7] for more detail information: 1
connect profile <profile name>
disable trace
disconnect profile <profile name>
enable trace
ping <ip addr>
ping <ip addr> <integer >=1> <packet length, >=56>
test modem <port number> <dial number>
Please enter a selection number [1..7] for more detail information:
logout
Description:
This command logs the user out of the system.
reset system
Description:
displayed.
This command allows the user to reset the system. A confirmation will be
save config
Description:
In the background, the system is already periodically checking to see if any configuration
changes have been made. If so, the entire configuration will be automatically saved to the
flash memory. However, this command can also be used to execute the save operation
immediately after some configuration changes, e.g., when the user intends to power
down the system.
This command saves any configuration changes to the flash memory.
set console baud <baudrate>
Description:
The default baud rate is 19200 bits per second. After the baud rate is changed, the
console will no longer work properly until the terminal baud rate is changed accordingly.
Other allowed speeds include 115.2K, 57.6K, 38.4K, 28.8K, 19.2K, 14.4K, 9.6K, 4.8K,
2.4K, and 1.2K.
Example:
This command is used to set the baud rate for the auxiliary (console) port.
Command> set console baud 19200
set console timeout <1-60>
Description:
default value is 10 minutes. That means if the user does not type anything on the console
for 10 minutes, the console session will automatically be terminated.
This timeout value also applies to telnet sessions.
Example:
This command is used to set the console time-out value (in minutes). The
Command> set console timeout 20
set date <mm-dd-yy>
Description:
Example:
User Guide for AIR-104/AIR-204 7-16
This command sets the current date in the AIR-104/204.
Command> set date 4-12-96
Page 58

Chapter 7 Command Line Interface
Set log level <1-10>
Description: This command changes the system log level, causing different events to be
logged into the system log table. It is often used for debugging purposes. The default log
level is 2, which means all events belonging to log level 2 or below will be logged into the
system log.
set prompt <prompt>
Description: This command defines a new command prompt. A prompt of up to 15
characters may be entered. The default prompt is Command>.
Example:
Command> set prompt "Yes, Master"
Yes, Master>
set time <hh:mm:ss>
Description:
the time will normally be set automatically when a browser first connects to the router
using the Internet Configuration Console utility.
Example:
This command sets the time of the day (24-hour clock). Note that
Command> set time 20:33:00
set timezone <-12- +12>
Description:
offset from Greenwich Mean Time (GMT). The time zone is normally set automatically
when an HTTP browser first connects to the router using the Internet Configuration
Console utility.
Example:
This command specifies the time zone for the AIR-104/204 location as an
Command> set timezone -8
Time Zone is set to GMT-8 hours.
show config
Description:
Example:
A concise summary of the AIR-104/204 configuration is displayed.
AcerRouter> show config
IP Addr: 192.168.168.13 NetMask: 255.255.255.0 IP/IPX RIP: D/D
Port 1: MODEM PPP ENABLED Speed = Auto detect
Port 2: MODEM PPP ENABLED Speed = Auto detect
show connection log
Description:
maintained by the router in wraparound fashion. For a complete description of these
entries, see
Example:
Command> show connection log
1 9/14/99 22:15:38 N/A(N/A): Triggered Detail: IP/TCP 192.168.168.229->63.192.
151.44 1905->139
2 9/14/99 22:16:28 Modem 1(isp1): Connected Detail: Outgoing Call to 14085553456
7-17 User Guide for AIR-104/AIR-204
The connection log is displayed by the system. Up to 128 entries are
Chapter 5
, Advanced Configuration.
Page 59

Chapter 7 Command Line Interface
show interface list
Description: This command displays the status of all interfaces in the system.
AcerRouter> show interface list
Oper. IP Comp.
Ifname Type State MTU Status Status
----------------------------------------------------------------------------------------------------------lo LOOPBACK Up 1536 Enable Disable
lan ETHERNET Up 1500 Enable Disable
isp1 PPP Down 1500 Enable Disable
MIP1 UNKNOWN Up 2048 Enable Disable
show internet access time
Description: The current setting of the Internet time restriction is displayed. See set
internet access time for details.
Example
:
Command> show internet access time
Day-of-the-week : Mon-Sat
Time-of-day : 13:30- 5:00
show system
Description:
Example:
This command displays system-related configuration.
AcerRouter> show system
System Name: Acer Router Up Time: 0 months 0 days 01:08:00
----------------------------------------------------------------------------------------------------------- system description: Internet Access Device
system contact: Unknown
system location: Unknown
Total Serial Ports: 2 S/W Version: 1.01a H/W Version: 1.0
MAC Address: 00-60-20-01-00-00
Console Baud Rate : 19200
Console Timeout: 10(min)
Remote Management State: Enabled
DHCP State: Enabled
Private IP address: 192.168.168.13 network mask:255.255.255.0
PAT IP address: 192.168.168.13 network mask:255.255.255.0
User Guide for AIR-104/AIR-204 7-18
Page 60

Chapter 7 Command Line Interface
Show system log
Description:
log level set at the time. Common events include login, an Internet connection goes up or
down (log level 2), … as well as certain protocol progress messages for debugging
purposes.
This command shows the next 22 entries of the system log. For example, if there are 60
entries in the log, the first show system log command will show log entries 1 through 23,
the next command will show entries 24 through 46, and the next command will show
entries 47 through 60, followed by 1 through 9. When the system powers up, the log is
re-initialized and contains no entries. As time passes, when the 128-entry log table
becomes full, new entries will simply replace the oldest entries, thus a first-in, first-out
scheme is used.
Example:
The system log contains logs of various events of interest, depending on the
AcerRouter> show system log
1 12/13/99 20:38:20 Modem: port 1 start to autobaud
2 12/13/99 20:38:20 Modem: port 2 start to autobaud
3 12/13/99 20:38:20 IP RIP: Set IP rip mode to: 0x3
4 12/13/99 20:38:20 Modem: port 1 autobaud successfully
5 12/13/99 20:38:21 Modem: port 1 has been initialized
6 12/13/99 20:38:22 Modem: port 2 autobaud successfully
7 12/13/99 20:38:23 Modem: port 2 has been initialized
8 12/13/99 20:38:42 Console Port: login from tty0 (telnet)
9 12/13/99 20:40:02 Modem: port 1 dial
10 12/13/99 20:40:35 KERNEL: modem link is up
11 12/13/99 20:40:35 ASYNPPP: Event 6, ppp3073 input:
12 12/13/99 20:40:35 ASYNPPP: Event 6, 42 49 53 0d 0a
13 12/13/99 20:40:35 PPP: PPP Link Up: isp1
show telnet session
Description:
Example:
This command is used to display all existing telnet sessions.
AcerRouter> show telnet session
Session Id Remote Ip Remote Port
-----------------------------------------------------------------------------------------------------------1 192.168.168.120 1221
show time
Description:
time of the day. For AIR-104/204 systems, the time is only correct after an HTTP session
has accessed this system or the time has been manually set using the set time
command.
Example:
This command shows the time zone, daylight savings time setting, date and
AcerRouter> show time
Time (GMT-8) (Standard Time) : Mon Dec 06 17:07:21 1999
upload config <filename> to <ipaddr>
Description:
the specified tftp server (whose IP address is 205.51.23.12) as a file called <fileName>.
Example:
This command causes the system configuration to be uploaded to
Command> upload config ar204.cfg to 205.51.23.1
7-19 User Guide for AIR-104/AIR-204
Page 61

6
Appendix A Messages
This appendix lists the messages that may appear in the Internet Configuration Console
Message Window or in the Command Line Interface.
System messages
"Account name and/or password not accepted"
User name or password failed authentication by the ISP.
"Browser passing command failed. Please try again."
A transient error occurred during the communication between the browser running on the
management PC and the router. Re-try the operation.
"Call operation in progress. Request ignored"
An "Apply and Test" is pressed when a call is already connected or the modem is in use.
"Cannot perform operation. Port or profile is currently disabled"
An outgoing call was attempted on a port that is disabled.
"Clear system configuration and restart, please wait..."
This message is displayed when router is in the process of clearing all system
configuration and then resetting.
"Connection successful"
A successful connection has been established.
"Destination not currently reachable"
Either the phone line is not operational, or the destination is busy or doesn’t answer.
"Disconnecting... Please wait"
This message is displayed whenever the link is in the process of disconnecting.
"Download firmware, please wait (2 minutes)..."
System is downloading new firmware. It takes about two minutes to complete the
operation.
User Guide for AIR-104/AIR-204 A-1
Page 62

Appendix A Messages
"Embedded HTTP server has been disabled. Only console can
configure the system"
The message is displayed when remote management has been disabled in the command
line interface. You will not be able to configure or view configuration from the HTTP
interface until remote management is once again enabled. You can only use a directly
connected console (PC running Hyperterminal) to run the Command Line Interface.
"Error: File Invalid"
The firmware file specified is either missing or invalid.
"Link is disconnected"
This message is displayed after disconnecting modem link operation is completed.
"Link is already disconnected"
This message is displayed when an attempt is made to disconnect an inactive modem
port.
"IP Address is invalid."
The IP address entered as the private address was not valid.
"Management session time out"
The message is displayed when HTTP or telnet management session is idle for more than
the default time out of 10 minutes, or the configured time out.
"Phone number limits characters to [0123456789,;-0]"
An invalid character has been entered in the phone number field. The acceptable phone
number characters are numbers from 0 to 9, and the characters "[" "]" "," ";" "-".
"Phone number seems to be incorrect"
The destination phone number is not correct or can’t be reached.
"Placing modem call. Please wait..."
The router is now in the process of contacting the remote site.
"Resetting system, please wait..."
The message is displayed when the router is in the process of resetting. You can logon to
the router after about 30 seconds.
"Save configuration succeeded"
The configuration was saved to flash memory successfully.
"Search fail"
An internal error has occurred.
A-2 User Guide for AIR-104/AIR-204
Page 63

Appendix A Messages
"Sorry, the router is already being managed by "xxx.xxx.xxx.xxx".
Concurrent management is not allowed!"
Another session is active on the PC with the specified address. The system only allows
one HTTP management session at any given time.
"Parameters Accepted" / "Applied Parameter Accepted"
All parameters on the page were acceptable for use by the router.
"Statistics Cleared"
The AcerRouter has completed a clear statistics operation on the link selected in the
System Status Monitoring Window.
"Syntax error, IP address should be xxx.xxx.xxx.xxx"
An invalid IP address is entered. A valid IP address should consist of a set of four threedigit numbers. Each three-digit number should be a number between 0 and 255,
inclusive.
"Test successful"
The "Apply and Test" operation is successful.
"The Internet access time is configured successful"
This message is displayed when the Internet access time configuration is accepted by
the router.
"The new password does not match the confirmed password"
The confirmation password entered is not the same as the new password entered during
the password operation.
"The new password is the same as the old password"
The new password is the same as the old password.
"The password has been changed"
The new password is configured. Your new password will take effect the next time you
logon.
"There is an active window monitoring the system status on
'xx.xxx.xxx.xxx'."
A system status monitoring window is opened on the PC with the indicated IP address
(xxx.xxx.xxx.xxx). Only one system status monitoring window is allowed at a given time.
"The system is disconnecting"
A "disconnect" button is pressed, while the system is in the process of disconnecting an
active modem link.
User Guide for AIR-104/AIR-204 A-3
Page 64

Appendix A Messages
"The system time has been configured successfully"
The time has been configured successfully.
"Value for idle time is invalid - choose between [0, 3600]"
The value for the idle time parameter was entered incorrectly. The correct values are 0 if
no idle timeout is desired, or one to 3600 indicating the number of seconds since the link
has not carried any data traffic before it is automatically disconnected.
Connection log messages
These messages inform you of the time and date associated with an application trigger, a
modem connect or a disconnect event.
mm-dd-yy hh:mm:ss Triggered
mm-dd-yy hh:mm:ss Connected
mm-dd-yy hh:mm:ss Disconnected
[protocol - IP Addresses - Ports]
[Outgoing Call to <number>][ConnSpeed][Assigned IP Address]
Embedded HTTP server messages
These are messages which the HTTP browser will generate should problems occur
during configuration. Their appearance may differ from browser to browser.
HTTP/1.0 404 File Not Found
The server has not found anything matching the Request-URL. No indication is given of
whether the condition is temporary or permanent.
HTTP/1.0 500 Internal Server Error
The server encountered an unexpected condition which prevented it from fulfilling the
request.
A-4 User Guide for AIR-104/AIR-204
Page 65

B
Appendix B Glossary
This section provides some common networking terms you may find in this user guide.
DHCP
DHCP is a protocol for automatic IP configuration. Client side computer can get one IP
address from a DHCP server automatically. Using DHCP can save the effort of setting IP
addresses for every LAN computer.
domain name
A name that identifies one or more IP addresses. For example, the domain name
microsoft.com represents about a dozen IP addresses. Domain names are used in URLs
to identify particular Web pages. For example, in the URL
http://www.pcwebopedia.com/index.html, the domain name is pcwebopedia.com.
IEEE
Abbreviation of Institute of Electrical and Electronics Engineers, pronounced I-triple-E.
Founded in 1884, the IEEE is an organization composed of engineers, scientists, and
students. The IEEE is best known for developing standards for the computer and
electronics industry. In particular, the IEEE 802 standards for local-area networks are
widely followed.
Internet
A global network connecting millions of computers. As of 1998, the Internet has more
than 100 million users worldwide, and that number is growing rapidly. More than 100
countries are linked into exchanges of data, news and opinions.
intranet
A network based on TCP/IP protocols belonging to an organization, usually a
corporation, accessible only by the organization's members, employees, or others with
authorization.
IP address
An identifier for a computer or device on a TCP/IP network. Networks using the TCP/IP
protocol route messages based on the IP address of the destination. The format of an IP
address is a 32-bit numeric address written as four numbers separated by periods. Each
number can be zero to 255. For example, 1.160.10.240 could be an IP address.
ISP
Short for Internet Service Provider, a company that provides access to the Internet. For a
monthly fee, the service provider gives you a software package, username, password
and access phone number. Equipped with a modem, you can then log on to the Internet
and browse the World Wide Web and USENET, for example, and send and receive email worldwide.
User Guide for AIR-104/AIR-204 B-1
Page 66

Appendix B Glossary
local area network (LAN)
A computer network that spans a relatively small area. Most LANs are confined to a
single building or group of buildings. However, one LAN can be connected to other LANs
over any distance via telephone lines and radio waves. A system of LANs connected in
this way is called a wide-area network (WAN)
MAC address
Short for Media Access Control address, a hardware address that uniquely identifies
each node of a network. In IEEE 802 networks, the Data Link Control (DLC) layer of the
OSI Reference Model is divided into two sublayers: the Logical Link Control (LLC) layer
and the Media Access Control (MAC) layer. The MAC layer interfaces directly with the
network media. Consequently, each different type of network media requires a different
MAC layer.
ping
A utility that can be used to send a packet to a remote device (expecting the same
packet to be echoed back if the destination is functioning properly). This is often used to
check if a remote device is reachable or not, and what the round trip delay is. Some
variation of the utility also provide detailed routing information such as which intermediate
routers the packet goes through, so that if the echo packet does not come back, the
break in the path can easily be identified.
PPP
PPP (Point-to-Point protocol) is a communications protocol for transmitting information
over standard telephone lines. A PPP account is a dial-up account used to connect to
the Internet. It is a dial-up account that actually communicates with another computer to
gain Internet access.
router
An intelligent, multi-network interface device that will forward a packet received from one
interface to another. When a packet is received, its destination network address is
checked against the routing table. Then the router determines where to forward the
packet. This next destination should, in theory, be one hop closer to the final destination.
TCP/IP
Acronym for Transmission Control Protocol/Internet Protocol, the suite of
communications protocols used to connect computers on the Internet. TCP/IP uses
several protocols, the two main ones being TCP and IP.
Telnet
A terminal emulation program for TCP/IP networks such as the Internet. A Telnet client
program runs on your computer and connects your PC to a Telnet server elsewhere in
the network. You can then enter commands through the Telnet program and they will be
executed as if you were entering them directly on the server console. This enables you to
control the server and communicate with other servers on the network. To start a Telnet
session, you must log in to a server by entering a valid username and password.
B-2 User Guide for AIR-104/AIR-204
Page 67

A
Appendix C Specifications
Hardware configuration
• Four-port 10/100Base-T Ethernet repeater hub
• One RJ-45 RS-232 connector for management console
• Two RJ-45 asynchronous RS-232 ports (AIR-104)
or
One RJ-45 asynchronous RS-232 port, two RJ-11 ports for Phone / Line (AIR-204)
• 12VDC/1.5A input - External Power Adapter
• Six set of LEDs (20 LEDs) to indicate the COM, LAN, Collision of LAN, Diagnostic
and Power status
Applications
• Dial-up Internet access using the industry standard Point-to-Point Protocol
- Automatic acquisition of ISP-assigned public IP address
- One or two Internet Accounts shared by multiple users on the LAN through Port
Address Translation and Multiconnection IP technology
- Dial-on-Demand
- Bandwidth-on-Demand using MIP (Multiconnection IP) technology to maximize
the performance of multiple WAN connections
Management
• Web-based Manager – Internet Connection Console (ICC) for easy network
management
• Command Line Interface via Telnet or directly attached console terminal (or PC
running terminal emulator)
• Dynamic Host Configuration Protocol (DHCP) automatically assigns private IP
addresses, Gateway and DNS addresses to client computers on the LAN
- Static DHCP assignments (up to 20)
• Connection Log provides detailed records of dialup usage
• System Date/Time setting and Internet access control via day and time ranges
• Flash EPROM for easy firmware upgrade and non-volatile configuration storage
• Extensive troubleshooting and diagnostic capability through the Command Line
Interface
Security
• Private IP addresses not accessible from the Internet
• Password protection for management tools
• Remote Management lockout capability
User Guide for AIR-104/AIR-204 C-1
Page 68

Appendix C Specifications
General
PPP, IP, TCP, UDP, ICMP, telnet
IP level load sharing (Multilink IP) - Proprietary
Relevant IETF standards
Dimension
215 x 149 x 33.6 (L x W x H, mm)
Weight
AIR-104 : 978g
AIR-204 : 1013g
Environment
Operating Temperature : 0¢X~ 50¢XF
Storage Temperature : -20 ¢X~ 70¢XF
Relative Humidity : 20% ~ 80%
Electrical
External 12V DC power supply
C-2 User Guide for AIR-104/AIR-204
Page 69

DAIR-104/204
Appendix D Warranty, Copyrights, EMI
Warranty
Acer Netxus Incorported’s networking products are provided with a limited 2 year
Warranty. Details of the warranty and return process are explained in the Warranty Policy
below. Warranty service is subject to the terms and conditions of the Acer Netxus
Warranty Policy.
1. WARRANTY:
Acer Netxus Incorporated (“ANI”) provides the AIR-104/204 (the "Product") with a two (2)
year limited warranty, except for the power supply unit, which carries a one (1) year
limited warranty (collectively the Warranty).
The Warranty covers:
(1) Defects in materials and workmanship of the Product under normal use and service
(Product Defects).
(2) Failure of the Product to perform in accordance with product specifications published
by ANI (Product Performance).
This Warranty is in lieu of all other express warranties that might otherwise arise with
respect to the Product. No individual or organization of whatever form, connected to Acer
Netxus or not, has authority to change or add to this Warranty.
This Warranty does not apply to any failure of the Product which results from accident,
abuse, misapplication, alteration, or failure due to attached equipment, and Acer Netxus
assumes no liability as a consequence of such events under the terms of this Warranty.
While Acer Netxus has made every effort to provide clear and accurate technical
information about the application of the Product, ANI assumes no liability for any event
arising out of the use of this technical information.
INCIDENTAL AND CONSEQUENTIAL DAMAGES CAUSED BY MALFUNCTION, DESIGN
DEFECT, OR OTHERWISE WITH RESPECT TO BREACH OF THIS WARRANTY, OR ANY
OTHER EXPRESS OR IMPLIED WARRANTY, ARE NOT THE RESPONSIBILITY OF ACER
NETXUS AND ARE HEREBY EXCLUDED BOTH FOR PROPERTY AND FOR PERSONAL
INJURY DAMAGE.
2. PERIOD OF WARRANTY COVERAGE:
The period of coverage is two (2) years from the date the equipment is purchased. There
shall be no warranty after expiration of the period of coverage. ANY AND ALL IMPLIED
WARRANTIES OF MERCHANTABILITY OR FITNESS FOR PARTICULAR USE SHALL
HAVE NO GREATER DURATION THAN THE PERIOD O F COVERAGE STATED HEREIN
AND SHALL TERMINATE AUTOMATICALLY UPON THE EXPIRATION OF SUCH
PERIOD.
3. HARDWARE SERVICE:
To obtain hardware service, contact the dealer from whom you purchased the Product.
Product under warranty will be repaired or replaced according to the terms of the Acer
Netxus Warranty Policy. After expiration of the warranty, you may elect to have the
Product repaired by ANI, in accordance with the terms of this Warranty, except that you
shall be responsible for all costs of repair, replacement and shipping and handling.
D-1 User Guide for AIR-104/AIR-204
Page 70

Appendix D Legal
4. SHIPPING AND HANDLING:
For equipment covered by warranty, Customers are responsible for shipping of products
requiring repair or replacement to and from the ANI Service Center, and for all shipping
and handling charges incurred.
Copyrights and trademarks
A number of trademarks and registered trademarks appear in this manual. Acer Netxus
Incorporated acknowledges all trademarks and the rights of the trademarks owned by
the companies referred to herein. The following list of trademarks may not include all
trademarks referenced in this manual.
Windows, Windows 95, Windows NT, Windows NT Server, and Windows NT
Workstation are registered trademarks of Microsoft Corporation. All other trademarks,
service marks, registered trademarks, or registered service marks mentioned in this
manual are the property of their respective owners.
This product includes software derived from third party sources to which the following
copyright statements apply:
„Hi/fn, Inc. 1993, including one or more U.S. patents: 4701745, 5016009, 5126739,
5146221, and other patents pending.
„Copyright 1989 Carnegie Mellon University. All Rights Reserved.
WIDE Project DHCP Implementation
Copyright „ 1995 Akihiro Tominaga
Copyright „ 1995 WIDE Project
All Rights Reserved.
Copyright „ 1988, 1989, 1993 The Regents of the University of California. All Rights
Reserved.
This product includes software developed by the University of California, Berkeley and its
contributors.
This product includes software developed at the Information Technology Division, US
Naval Research Laboratory.
Copyright „ 1996 The University of Southern California. All Rights Reserved.
Copyright „ 1998 by the Board of Trustees of Leland Stanford Junior University. All Rights
Reserved.
FCC Part 15 Notice
This equipment has been tested and found to comply with the limits for a Class A digital
device, pursuant to Part 15 of the FCC rules. These limits are designed to provide
reasonable protection against harmful interference when the equipment is operated in a
commercial environment. This equipment generates, uses, and can radiate radio
frequency energy, and, if not installed and used in accordance with the instruction
manual, may cause harmful interference to radio communications. Operation of this
equipment in a residential area is likely to cause harmful interference in which case the
user will be required to correct the interference at their own expense.
The authority to operate this equipment is conditioned by the requirement that no
modifications will be made to the equipment unless the changes or modifications are
expressly approved by Acer Netxus Incorporated.
User Guide for AIR-104/AIR-204 D-2
 Loading...