

Page 1
English
Trademarks
VGA & 8514/A are registered trademarks of the IBM Corporation.
Super VGA is a registered trademark of VESA.
Edition A
Page 2

CONTENTS
FCC warning ..........................................................E-1
DOC notice .............................................................E-1
Safety precautions ..................................................E-1
Packing contents .....................................................E-2
Unpacking procedure..............................................E-2
Repacking ...............................................................E-2
Introduction ............................................................E-2
Power saving ..........................................................E-2
Install the monitor ...................................................E-3
Power cord ..............................................................E-3
User controls and indicators ...................................E-4
Using the on-screen menu ......................................E-5
Individual adjustment .............................................E-6
Troubleshooting......................................................E-8
Servicing.................................................................E-8
Signal connector information .................................E-8
Technical specifications .........................................E-9
Preset modes .........................................................E-10
English
Page 3

F
EDERAL COMMUNICATIONS
C
OMMISSION
nstruction to Users
This equipment has been tested and found to comply
with the limits for a Class B digital device, pursuant
to part 15 of the FCC rules. These limits are designed
to provide reasonable protection against harmful
interference in a residential installation. This
equipment generates, uses and can radiate radio
frequency energy and, if not installed and used in
accordance with the instructions, may cause harmful
interference to radio communications. However, there
is no guarantee that interference will not occur in a
particular installation. If this equipment does cause
harmful interference to radio and television reception,
which can be determined by turning the equipment
off and on, the user is encouraged to try to correct the
interference by one or more of the following measures.
- Reorient or relocate the receiving antenna.
- Increase the separation between the equipment
and the receiver.
- Connect the equipment into an outlet on a circuit
different from that to which the receiver is
connected.
- Consult the dealer or an experienced radio/ TV
technician for help.
This equipment has been certified to comply with the
limits for a Class B computing device, pursuant to
part 15 of the FCC rules. Only peripherals (computer
input / output devices, terminals, printers etc.) certified
to comply to the Class B limits may be attached to
this computer. Operation with non-certified
peripherals is likely to result in interference to radio
and TV reception.
Remarks
To meet FCC requirement, shielded cables are required
to connect the device to a personal computer or other
Class B certified device.
(FCC) W
ARNING
English
E-1
DOC N
This product conforms to Canadian Class B emissions
regulations.
Ce produit est conforme aux réglements d’émission
Canadienne class B.
SS
Power InputPower Input
Refer to the section about "Connecting the Power
Cord".
• Do not modify the three-prong grounding type
InstallationInstallation
• Do not place the monitor on an unstable cart,
• Route power cords so that if cannot be walked
• Do not install the monitor where there is
VentilationVentilation
• Do not block or cover ventilation openings on
• Do not place the monitor near a radiator or
• Do not push objects of any kind through cabinet
OTICE
AFETYAFETY
P P
RECAUTIONSRECAUTIONS
power plug in any way.
stand, or shelf where it may fall and injure
personnel or damage equipment.
upon or tripped over.
Do not allow anything to rest on the power cord.
dampness, or where it may be exposed to rain or
water. Avoid spilling liquid of any kind on the
unit.
the back or bottom of the monitor cabinet.
heating vent.
openings. This may result in fire or electric shock.
Information to Users
Any change or modifications expressly approved by
the party responsible for compliance could void the
user's authority to operate this equipment.
Page 4
E-2
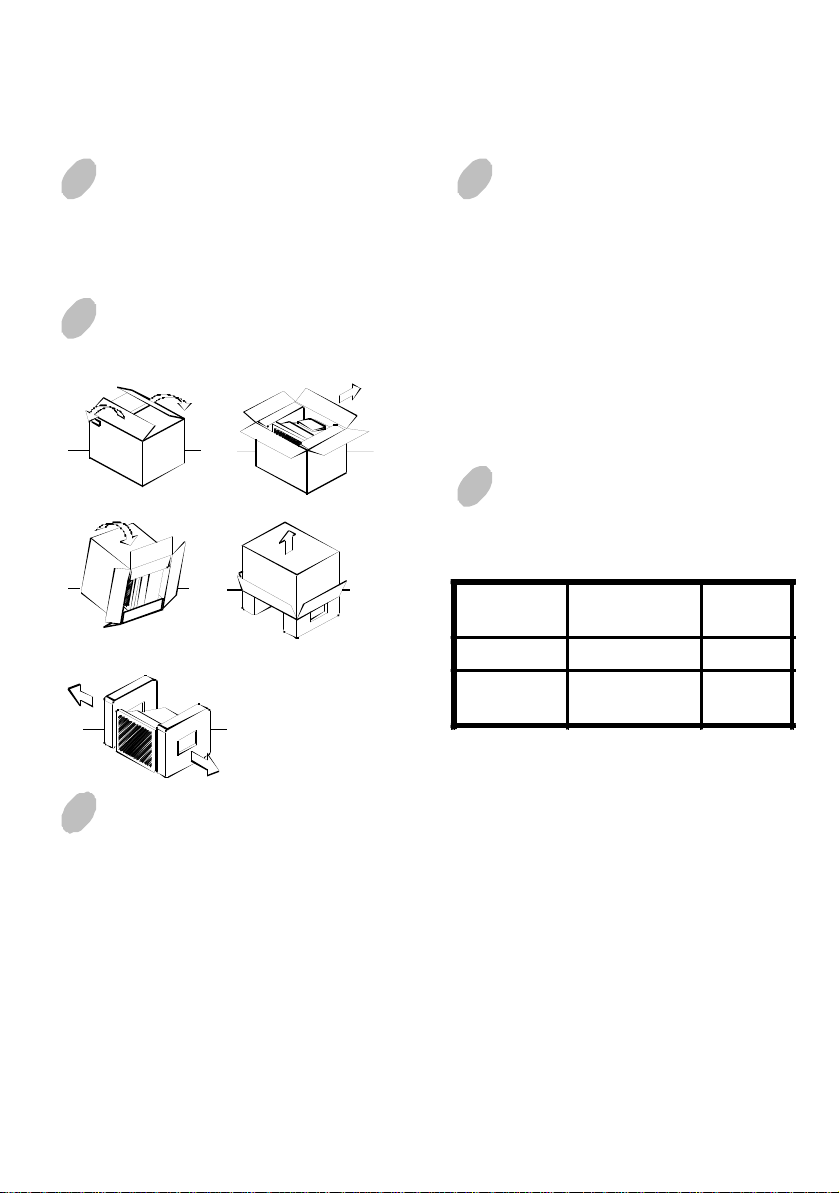
PACKING CONTENTS
The package contains:
• CRT monitor
• AC power cord
• User manual
UNPACKING
PROCEDURE
1 2
43
5
REPACKING
Save the origional box and all packing material for
future shipping needs.
INTRODUCTION
This microprocessor-based, digital control 17” color
monitor is a high performance and easy to use product.
It employs the latest on-screen-menu technology. The
microprocessor capability offers 13 most commonly
used VESA timing modes preset in the factory, and 6
modes for user to adjust to the special timings that
user might have.
We hope that you will find this manual is helpful in
obtaining the fullest use of your monitor, and in
ensuring your personal safety during operation.
POWER SAVING
The monitor will be driven into “Power Saving” mode
by the control signal from the display controller,
as indicated by the amber-color power LED.
State
ON Normal Green
Active
OFF
The power saving states will be kept until a control
signal has been detected or the keyboard or mouse is
activated. The recovery time from Active OFF state
back to ON state is around 10 seconds.
Power
Consumption
< 5W Amber
LED
Light
* Packing materials and product are recyclable.
Page 5

English
E-3
INSTALL THE
MONITOR
• To connect the tilt/swivel base to the monitor, align
hooks with the sockets on bottom side of the
monitor, and gently push the base towards the front
of the monitor.
• The 15-pin D-shell signal connector on the signal
cable will connect easily to the video adapter
output on your personal computer. Lock both
screws on the connector to ensure a firm
connection.
• Turn the PC power switch ON. Then turn the
monitor power switch ON, by pressing the switch
inward. The green power indicator will light up.
• Allow about 30 seconds for the CRT tube to warm
up. Data will be displayed on the screen.
• If your display fails to function properly, please
first refer to the section "Troubleshooting" in this
manual.
POWER CORD
• Check first to make sure that the power cord you
use is the correct type required for your area.
• This monitor has a universal power supply that
allows operation in either 100/120V AC or 220/
240V AC voltage area. No user-adjustment is required.
• First connect the power cord into your monitor’s
power input socket, and then plug the other end
into a 3-pin AC outlet. The power cord may be
connected to either a wall socket or the power output socket on your PC, depending on the type of
power cord supplied with your monitor.
• For units to be used at 120V AC:
Use a UL Listed Cord Set consisting of a min.
No. 18 AWG, Type SVT or SJT three-conductor
a maximum of 10 ft. in length and a parallel blade,
grounding type attachment plug rated 10A, 125V.
• For units to be used at 240V AC (domestic use):
Use a UL Listed Cord Set consisting of a min. No.
18 AWG, Type SVT or SJT three-conductor cord
a maximum of 10 ft. in length and a tandem blade,
grounding type attachment plug rated 10A, 250V.
• For units to be used at 220/240V AC (outside of
U.S.):
Use a Cord Set consisting of a min.
0.75mm2,3G,Type H05VV-F cord and grounding
type attachment plug rated 16A, 250V. The cord
set should have the appropriate safety approvals
for the country in which the equipment will be
installed and marked HAR.
Page 6
E-4
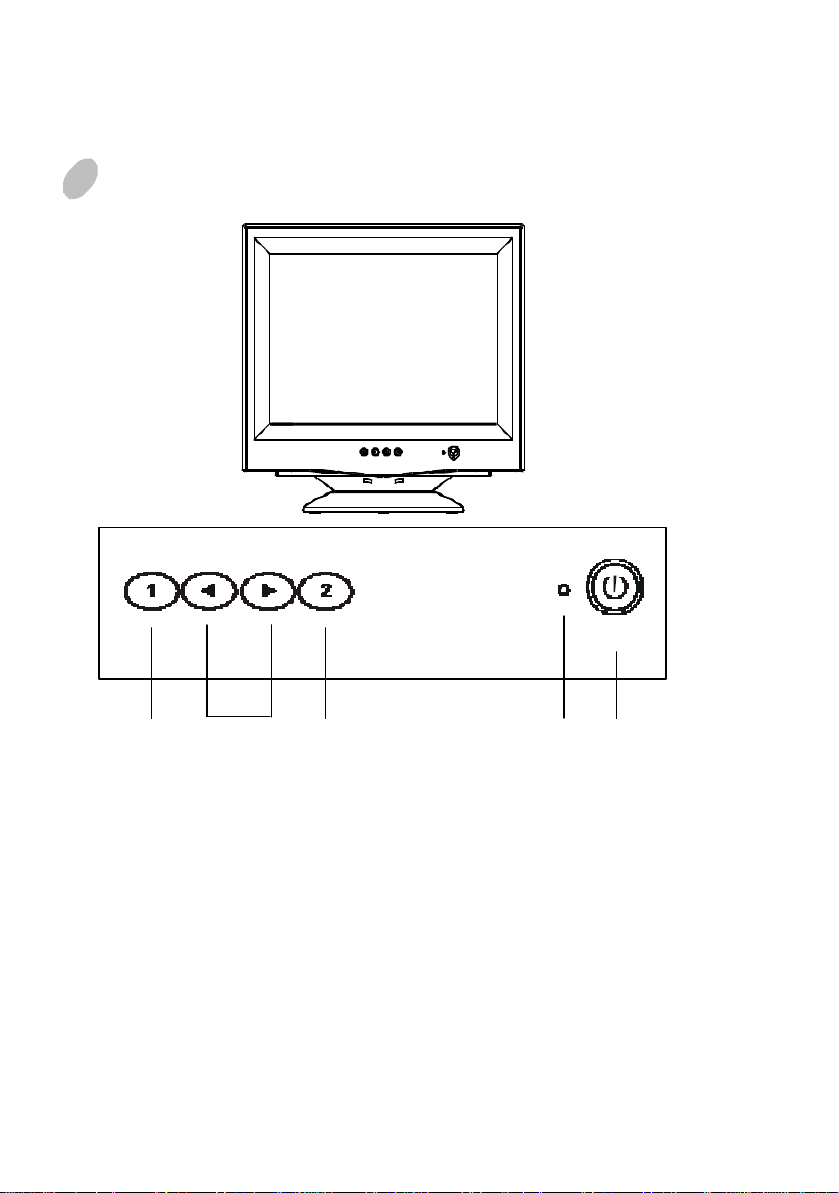
USER CONTROLS AND INDICATORS
a c 21
a. Displays menu & exits menu
b. Scrolls through menu to choose an icon
for adjustment /
Adjusts level of selected icon
c. Confirms menu selection
b
1. Power LED
2. Power ON/OFF switch
Page 7
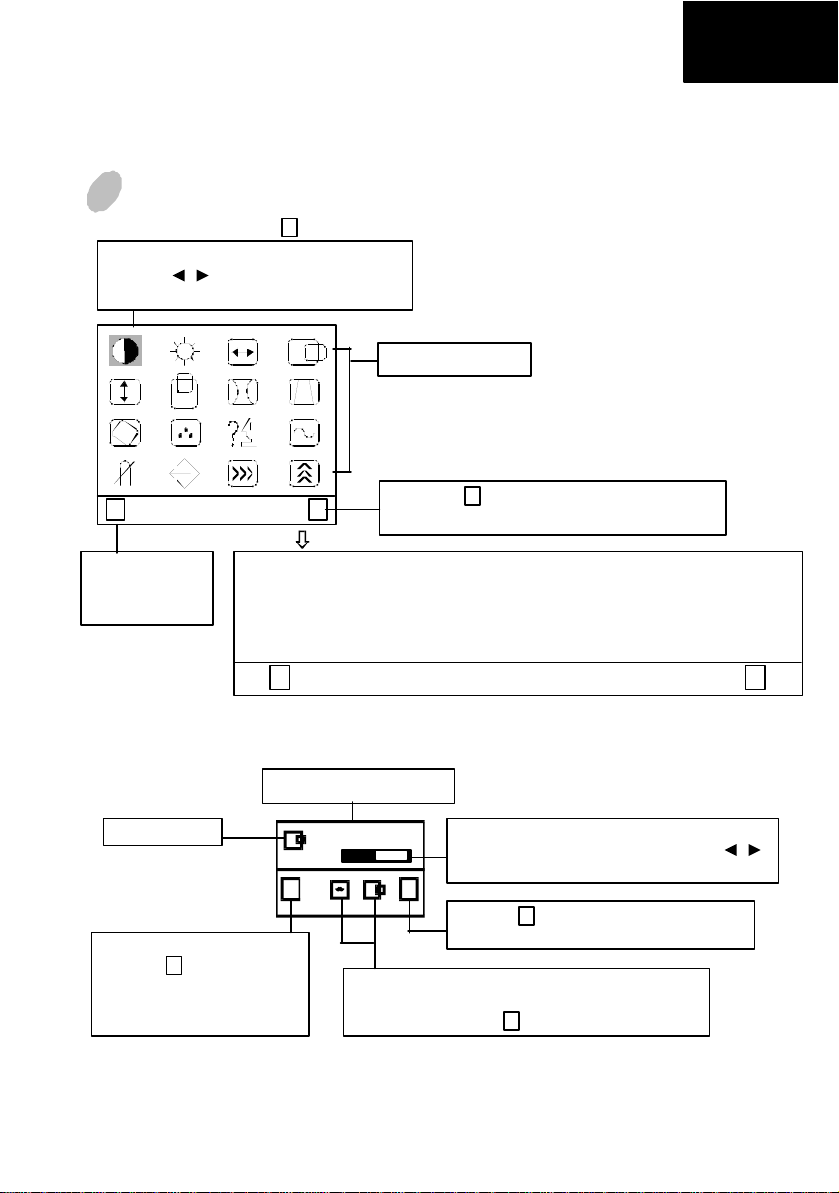
USING THE ON-SCREEN DISPLAY
1) Menu screen-press the button to display the menu below and exit menus
Select mark
Press the button to move the selection
mark to the desired location.
1
Adjustment icons
English
E-5
1 : CONTRAST : 2
The item presently
being adjusted is
shown.
When the button is pressed.
The selected adjustment screen appears.
CONTRAST BRIGHTNESS H.SIZE H.POSITION
V.SIZE V.POSITION V.PINCUSHION TRAPEZOID
ROTATION COLOR LANGUAGE DISP.FREQ
DEGAUSS RECALL H.MOIRE V.MOIRE
2
1 : CONTRAST : 2
2) Adjustment screen (example: horizontal position adjustment)
Name of adjustment screen
Adjustment icon
End Button
When the button is pressed,
the adjustment level is stored,
the adjustment screen is ended
and the menu screen returns.
NOTE: The amount of adjustment depends upon how long you depress the adjustment button. You may have to
1
tap the button to obtain the desired results.
H.POSITION
50
1 : : /2
On the adjustment screen where these two adjustment
icons appear, it is possible to switch between the two
screens by pressing the button.
The adjustment level is shown by both a number
and a bar. It can be varied with the front
buttons.
When the button is pressed, the horizontal
size adjustment screen appears.
2
2
Page 8

E-6
INDIVIDUAL
ADJUSTMENT
CONTRAST adjustment
Adjust the screen contrast to match your
personal perference.
Press the button to decrease contrast and
press the button to increase it.
Direct operation: You can access the
Press the key toggles between CONTRAST
and BRIGHTNESS.
BRIGHTNESS adjustment
Adjusts the brightness to get the desired
background level.
Press the button to make the background
lighter, the button to make it darker.
Press the key toggles between CONTRAST
and BRIGHTNESS.
HORIZONTAL SIZE adjustment
Fills the viewable area horizontally.
Press the button to make the image narrower,
or press the button to make it wider.
Press the key toggles between
HORIZONTAL SIZE and HORIZONTAL
POSITION.
HORIZONTAL POSITION adjustment
Shifts the image on the screen horizontally.
Press the button to move the screen image
to the left, or press the button to move it to
the right.
Press the key toggles between
HORIZONTAL SIZE and HORIZONTAL
POSITION.
CONTRAST adjustment
screen by pressing the or
before entering the menu
screen.
2
2
2
2
VERTICAL SIZE adjustment
Fills the viewable area vertically.
Press the button to make the image smaller,
or press the button to make it larger. Press
the key toggles between VERTICAL SIZE
2
and VERTICAL POSITION.
VERTICAL POSITION adjustment
Shifts the image on the screen vertically.
Press the button to move it downward, or
press the button to move it upward.
Press the key toggles between VERTICAL
SIZE and VERTICAL POSITION
PINCUSHION adjustment
The image can be corrected for barrel
distortion.
Press the button or the button to eliminate
curved vertical lines.
Press the key toggles between
PINCUSHION and TRAPEZOID correction.
TRAPEZOID adjustment
The image can be corrected for the trapezoidal
distortion.
Press the button to narrow the top edge, or
press the button to make the top edge wider.
Press the key toggles between
PINCUSHION and TRAPEZOID correction.
ROTATION adjustment
The image can be corrected for tilted picture.
Press the button to tilt the image to the left,
or press the button to tilt the image to the
right.
2
2
2
Page 9

English
E-7
COLOR selection
The white of the image can be adjusted.
1) Use the button to select: (1)9300OK,
(2)6500OK or (3)User color.
2) If the (3):the user’s color is selected, “2”
appears in the lower right of the On-Screen
Menu.
Press the button to display the USER
COLOR adjustment screen.
USER COLOR
The white of the video image can be adjusted
to the user’s preferred color.
1) Use the button to select R (red), G
(green) or B (blue).
2) Use the button to adjust the color as
desired.
IMPORTANT-Memory recall of the user’s
color is not possible, so take note of the initial
setting before adjusting.
When the monitor is turned OFF, user color
keeps the last adjustment.
LANGUAGE selection
The language of the On-Screen Menu can be
selected among English, French, German,
Italian and Spanish. Select with the
DISP. FREQ (Input frequency display)
This displays the input synchronization signal
frequency.
It identifies the horizontal and vertical
frequency sent to the monitor from the video
card currently in use.
2
2
buttons.
MANUAL DEGAUSSING
After moving the selector to the degauss icon,
press the button. The degaussing action
takes place a few seconds later.
Note: A sharp snap noise may be heard when
degaussing occurs. This is normal.
MEMORY RECALL
It is possible to restore adjustments to the
original factory settings. If the monitor is
operating in a user defined mode, this control
has no effect.
HORIZONTAL MOIRE
Reduce the dark wavy line Moire pattern on
the screen.
Press the or button to minimize the
horizontal moire image on the screen.
VERTICAL MOIRE
Reduce the dark wavy line Moire pattern on
the screen.
Press the or button to minimize the
vertical moire image on the screen.
2
Page 10

E-8
1
5
15
TROUBLESHOOTING
If your monitor fails to operate functionally, it may
be possible to correct the problem by making simple
checks as follows:
Problem Check & Adjust
Blank screen
(*NOTE)
Display position
off-center
Display too small
or too large
Display too bright
or too dim
Refer to the operation instructions for your computer/
video adapter to ensure that you have the correct signal
output source for the monitor. Ensure that the switches
on the video adapter are set correctly for operation
with this monitor.
If the above steps fail to correct the problem contact
your dealer for servicing by qualified service
personnel.
Please remember that the monitor should be returned
for servicing together with the power cord.
* NOTE: You can easily distinguish if the problem
is on the monitor or on the computer by
using the monitor’s built-in selftest
function.
With the monitor power ON, disconnect
the signal cable from monitor. If you see a
“NO SIGNAL” image on the screen, the
monitor is functioning properly, and the
problem is with the PC side or signal cable.
·
Monitor power switch,
power cord, signal cable,
or connector
·
PC power switch
·
Brightness & contrast
controls
· Vertical centering &
horizontal phase controls
· Vertical & horizontal size
controls
· Brightness & contrast
controls
SERVICING
Refer all servicing to qualified service personnel.
Serious shock hazards exist within the covers
of this monitor.
Do not open the covers under any
circumstances- there are no user serviceable
parts inside.
SIGNAL CONNECTOR
INFORMATION
Pin Function Pin Function
1 Red signal 9 **NOTE
2 Green signal 10 Digital ground
3 Blue signal 11 Ground
4 Ground 12 SDA (DDC2B)
5 *NOTE 13
6 Red return 14
Green
7
return
8 Blue return
*NOTE: This pin is used for self test detection; at
PC side, this pin has to be connected to
ground.
**NOTE: This pin is used for PC99, at PC side, this
pin will supply +5VDC.
Horizontal
Synchronization
Vertical synchronization
& VCLK
15 SCL (DDC 2B)
Page 11

TECHNICAL SPECIFICATIONS
English
E-9
17" visual diagonal
Screen Size
Dot Pitch 0.27mm
Display Area
Default
Full Scan
(H x W)
Display Colors Infinite
Max.
Resolution
Compatibility
Synchronization
Horizontal:
Vertical:
Viewable screen size
15.98"
Anti-Glare Coating**
230 x 306 (mm),
typical
245 x 327 (mm),
depends on signal
timing
1600 Dots x 1200
Lines
All graphic modes
with horizontal
frequencies between
30 KHz to 86 KHz
30 to 86 KHz
50 to 120Hz
Power Input
Voltage/
Frequency
Current
Rating
Power
Consumption
Dimension
(W x H x D)
Weight 14.5 ± 1 kg
Operating
Temperature
Storage
Temperature
100 to 240V AC
50 - 60 Hz
1.5 A
75 W (MAX.)
404 x 407.4 x 422.6
mm (approximate)
10°C to 35°C
-40°C to 65°C
Bandwidth 135 MHz Humidity
Input Signal
Signal Cable
* Specifications are subject to change without notice.
** TCO version has a different surface treatment.
*** This product is ERGONOMICS APPROVED.
Video RGB Analog
Sync. TTL Separate
15-pin D-sub
connector
Altitude Up to7000ft
TCO
(optional)
20% to 80%
(non-condensing)
Meet TCO99
Page 12

E-10
PRESET MODES
Mode
1 720 x 400 31.4 70 8 1024 x 768 60 75
2 640 x 480 31.4 60 9 1280 x 1024 64.3 60
3 800 x 600 37.9 60 10 1024 x 768 68.6 85
4 640 x 480 43.3 85 11 1600 x 1200 75 60
5 800 x 600 46.8 75 12 1280 x 1024 80 75
6 1024 x 768 48.3 60 13 1280 x 960 85.9 85
7 800 x 600 53.6 85
Resolution
(H x V)
H. Freq.
(KHz)
V. Freq.
(Hz)
Mode
Resolution
(H x V)
H. Freq.
(KHz)
V. Freq.
(Hz)
Page 13

F
EDERAL COMMUNICATIONS
C
OMMISSION
nstruction to Users
This equipment has been tested and found to comply
with the limits for a Class B digital device, pursuant
to part 15 of the FCC rules. These limits are designed
to provide reasonable protection against harmful
interference in a residential installation. This
equipment generates, uses and can radiate radio
frequency energy and, if not installed and used in
accordance with the instructions, may cause harmful
interference to radio communications. However, there
is no guarantee that interference will not occur in a
particular installation. If this equipment does cause
harmful interference to radio and television reception,
which can be determined by turning the equipment
off and on, the user is encouraged to try to correct the
interference by one or more of the following measures.
- Reorient or relocate the receiving antenna.
- Increase the separation between the equipment
and the receiver.
- Connect the equipment into an outlet on a circuit
different from that to which the receiver is
connected.
- Consult the dealer or an experienced radio/ TV
technician for help.
This equipment has been certified to comply with the
limits for a Class B computing device, pursuant to
part 15 of the FCC rules. Only peripherals (computer
input / output devices, terminals, printers etc.) certified
to comply to the Class B limits may be attached to
this computer. Operation with non-certified
peripherals is likely to result in interference to radio
and TV reception.
Remarks
To meet FCC requirement, shielded cables are required
to connect the device to a personal computer or other
Class B certified device.
(FCC) W
ARNING
English
E-1
DOC N
This product conforms to Canadian Class B emissions
regulations.
Ce produit est conforme aux réglements d’émission
Canadienne class B.
SS
Power InputPower Input
Refer to the section about "Connecting the Power
Cord".
• Do not modify the three-prong grounding type
InstallationInstallation
• Do not place the monitor on an unstable cart,
• Route power cords so that if cannot be walked
• Do not install the monitor where there is
VentilationVentilation
• Do not block or cover ventilation openings on
• Do not place the monitor near a radiator or
• Do not push objects of any kind through cabinet
OTICE
AFETYAFETY
P P
RECAUTIONSRECAUTIONS
power plug in any way.
stand, or shelf where it may fall and injure
personnel or damage equipment.
upon or tripped over.
Do not allow anything to rest on the power cord.
dampness, or where it may be exposed to rain or
water. Avoid spilling liquid of any kind on the
unit.
the back or bottom of the monitor cabinet.
heating vent.
openings. This may result in fire or electric shock.
Information to Users
Any change or modifications expressly approved by
the party responsible for compliance could void the
user's authority to operate this equipment.
Page 14

E-2
PACKING CONTENTS
The package contains:
• CRT monitor
• AC power cord
• User manual
UNPACKING
PROCEDURE
1 2
43
5
REPACKING
Save the origional box and all packing material for
future shipping needs.
INTRODUCTION
This microprocessor-based, digital control 17” color
monitor is a high performance and easy to use product.
It employs the latest on-screen-menu technology. The
microprocessor capability offers 13 most commonly
used VESA timing modes preset in the factory, and 6
modes for user to adjust to the special timings that
user might have.
We hope that you will find this manual is helpful in
obtaining the fullest use of your monitor, and in
ensuring your personal safety during operation.
POWER SAVING
The monitor will be driven into “Power Saving” mode
by the control signal from the display controller,
as indicated by the amber-color power LED.
State
ON Normal Green
Active
OFF
The power saving states will be kept until a control
signal has been detected or the keyboard or mouse is
activated. The recovery time from Active OFF state
back to ON state is around 10 seconds.
Power
Consumption
< 5W Amber
LED
Light
* Packing materials and product are recyclable.
Page 15

English
E-3
INSTALL THE
MONITOR
• To connect the tilt/swivel base to the monitor, align
hooks with the sockets on bottom side of the
monitor, and gently push the base towards the front
of the monitor.
• The 15-pin D-shell signal connector on the signal
cable will connect easily to the video adapter
output on your personal computer. Lock both
screws on the connector to ensure a firm
connection.
• Turn the PC power switch ON. Then turn the
monitor power switch ON, by pressing the switch
inward. The green power indicator will light up.
• Allow about 30 seconds for the CRT tube to warm
up. Data will be displayed on the screen.
• If your display fails to function properly, please
first refer to the section "Troubleshooting" in this
manual.
POWER CORD
• Check first to make sure that the power cord you
use is the correct type required for your area.
• This monitor has a universal power supply that
allows operation in either 100/120V AC or 220/
240V AC voltage area. No user-adjustment is required.
• First connect the power cord into your monitor’s
power input socket, and then plug the other end
into a 3-pin AC outlet. The power cord may be
connected to either a wall socket or the power output socket on your PC, depending on the type of
power cord supplied with your monitor.
• For units to be used at 120V AC:
Use a UL Listed Cord Set consisting of a min.
No. 18 AWG, Type SVT or SJT three-conductor
a maximum of 10 ft. in length and a parallel blade,
grounding type attachment plug rated 10A, 125V.
• For units to be used at 240V AC (domestic use):
Use a UL Listed Cord Set consisting of a min. No.
18 AWG, Type SVT or SJT three-conductor cord
a maximum of 10 ft. in length and a tandem blade,
grounding type attachment plug rated 10A, 250V.
• For units to be used at 220/240V AC (outside of
U.S.):
Use a Cord Set consisting of a min.
0.75mm2,3G,Type H05VV-F cord and grounding
type attachment plug rated 16A, 250V. The cord
set should have the appropriate safety approvals
for the country in which the equipment will be
installed and marked HAR.
Page 16

E-4
USER CONTROLS AND INDICATORS
a c 21
a. Displays menu & exits menu
b. Scrolls through menu to choose an icon
for adjustment /
Adjusts level of selected icon
c. Confirms menu selection
b
1. Power LED
2. Power ON/OFF switch
Page 17

USING THE ON-SCREEN DISPLAY
1) Menu screen-press the button to display the menu below and exit menus
Select mark
Press the button to move the selection
mark to the desired location.
1
Adjustment icons
English
E-5
1 : CONTRAST : 2
The item presently
being adjusted is
shown.
When the button is pressed.
The selected adjustment screen appears.
CONTRAST BRIGHTNESS H.SIZE H.POSITION
V.SIZE V.POSITION V.PINCUSHION TRAPEZOID
ROTATION COLOR LANGUAGE DISP.FREQ
DEGAUSS RECALL H.MOIRE V.MOIRE
2
1 : CONTRAST : 2
2) Adjustment screen (example: horizontal position adjustment)
Name of adjustment screen
Adjustment icon
End Button
When the button is pressed,
the adjustment level is stored,
the adjustment screen is ended
and the menu screen returns.
NOTE: The amount of adjustment depends upon how long you depress the adjustment button. You may have to
1
tap the button to obtain the desired results.
H.POSITION
50
1 : : /2
On the adjustment screen where these two adjustment
icons appear, it is possible to switch between the two
screens by pressing the button.
The adjustment level is shown by both a number
and a bar. It can be varied with the front
buttons.
When the button is pressed, the horizontal
size adjustment screen appears.
2
2
Page 18

E-6
INDIVIDUAL
ADJUSTMENT
CONTRAST adjustment
Adjust the screen contrast to match your
personal perference.
Press the button to decrease contrast and
press the button to increase it.
Direct operation: You can access the
Press the key toggles between CONTRAST
and BRIGHTNESS.
BRIGHTNESS adjustment
Adjusts the brightness to get the desired
background level.
Press the button to make the background
lighter, the button to make it darker.
Press the key toggles between CONTRAST
and BRIGHTNESS.
HORIZONTAL SIZE adjustment
Fills the viewable area horizontally.
Press the button to make the image narrower,
or press the button to make it wider.
Press the key toggles between
HORIZONTAL SIZE and HORIZONTAL
POSITION.
HORIZONTAL POSITION adjustment
Shifts the image on the screen horizontally.
Press the button to move the screen image
to the left, or press the button to move it to
the right.
Press the key toggles between
HORIZONTAL SIZE and HORIZONTAL
POSITION.
CONTRAST adjustment
screen by pressing the or
before entering the menu
screen.
2
2
2
2
VERTICAL SIZE adjustment
Fills the viewable area vertically.
Press the button to make the image smaller,
or press the button to make it larger. Press
the key toggles between VERTICAL SIZE
2
and VERTICAL POSITION.
VERTICAL POSITION adjustment
Shifts the image on the screen vertically.
Press the button to move it downward, or
press the button to move it upward.
Press the key toggles between VERTICAL
SIZE and VERTICAL POSITION
PINCUSHION adjustment
The image can be corrected for barrel
distortion.
Press the button or the button to eliminate
curved vertical lines.
Press the key toggles between
PINCUSHION and TRAPEZOID correction.
TRAPEZOID adjustment
The image can be corrected for the trapezoidal
distortion.
Press the button to narrow the top edge, or
press the button to make the top edge wider.
Press the key toggles between
PINCUSHION and TRAPEZOID correction.
ROTATION adjustment
The image can be corrected for tilted picture.
Press the button to tilt the image to the left,
or press the button to tilt the image to the
right.
2
2
2
Page 19

English
E-7
COLOR selection
The white of the image can be adjusted.
1) Use the button to select: (1)9300OK,
(2)6500OK or (3)User color.
2) If the (3):the user’s color is selected, “2”
appears in the lower right of the On-Screen
Menu.
Press the button to display the USER
COLOR adjustment screen.
USER COLOR
The white of the video image can be adjusted
to the user’s preferred color.
1) Use the button to select R (red), G
(green) or B (blue).
2) Use the button to adjust the color as
desired.
IMPORTANT-Memory recall of the user’s
color is not possible, so take note of the initial
setting before adjusting.
When the monitor is turned OFF, user color
keeps the last adjustment.
LANGUAGE selection
The language of the On-Screen Menu can be
selected among English, French, German,
Italian and Spanish. Select with the
DISP. FREQ (Input frequency display)
This displays the input synchronization signal
frequency.
It identifies the horizontal and vertical
frequency sent to the monitor from the video
card currently in use.
2
2
buttons.
MANUAL DEGAUSSING
After moving the selector to the degauss icon,
press the button. The degaussing action
takes place a few seconds later.
Note: A sharp snap noise may be heard when
degaussing occurs. This is normal.
MEMORY RECALL
It is possible to restore adjustments to the
original factory settings. If the monitor is
operating in a user defined mode, this control
has no effect.
HORIZONTAL MOIRE
Reduce the dark wavy line Moire pattern on
the screen.
Press the or button to minimize the
horizontal moire image on the screen.
VERTICAL MOIRE
Reduce the dark wavy line Moire pattern on
the screen.
Press the or button to minimize the
vertical moire image on the screen.
2
Page 20

E-8
1
5
15
TROUBLESHOOTING
If your monitor fails to operate functionally, it may
be possible to correct the problem by making simple
checks as follows:
Problem Check & Adjust
Blank screen
(*NOTE)
Display position
off-center
Display too small
or too large
Display too bright
or too dim
Refer to the operation instructions for your computer/
video adapter to ensure that you have the correct signal
output source for the monitor. Ensure that the switches
on the video adapter are set correctly for operation
with this monitor.
If the above steps fail to correct the problem contact
your dealer for servicing by qualified service
personnel.
Please remember that the monitor should be returned
for servicing together with the power cord.
* NOTE: You can easily distinguish if the problem
is on the monitor or on the computer by
using the monitor’s built-in selftest
function.
With the monitor power ON, disconnect
the signal cable from monitor. If you see a
“NO SIGNAL” image on the screen, the
monitor is functioning properly, and the
problem is with the PC side or signal cable.
·
Monitor power switch,
power cord, signal cable,
or connector
·
PC power switch
·
Brightness & contrast
controls
· Vertical centering &
horizontal phase controls
· Vertical & horizontal size
controls
· Brightness & contrast
controls
SERVICING
Refer all servicing to qualified service personnel.
Serious shock hazards exist within the covers
of this monitor.
Do not open the covers under any
circumstances- there are no user serviceable
parts inside.
SIGNAL CONNECTOR
INFORMATION
Pin Function Pin Function
1 Red signal 9 **NOTE
2 Green signal 10 Digital ground
3 Blue signal 11 Ground
4 Ground 12 SDA (DDC2B)
5 *NOTE 13
6 Red return 14
Green
7
return
8 Blue return
*NOTE: This pin is used for self test detection; at
PC side, this pin has to be connected to
ground.
**NOTE: This pin is used for PC99, at PC side, this
pin will supply +5VDC.
Horizontal
Synchronization
Vertical synchronization
& VCLK
15 SCL (DDC 2B)
Page 21

TECHNICAL SPECIFICATIONS
English
E-9
17" visual diagonal
Screen Size
Dot Pitch 0.27mm
Display Area
Default
Full Scan
(H x W)
Display Colors Infinite
Max.
Resolution
Compatibility
Synchronization
Horizontal:
Vertical:
Viewable screen size
15.98"
Anti-Glare Coating**
230 x 306 (mm),
typical
245 x 327 (mm),
depends on signal
timing
1600 Dots x 1200
Lines
All graphic modes
with horizontal
frequencies between
30 KHz to 86 KHz
30 to 86 KHz
50 to 120Hz
Power Input
Voltage/
Frequency
Current
Rating
Power
Consumption
Dimension
(W x H x D)
Weight 14.5 ± 1 kg
Operating
Temperature
Storage
Temperature
100 to 240V AC
50 - 60 Hz
1.5 A
75 W (MAX.)
404 x 407.4 x 422.6
mm (approximate)
10°C to 35°C
-40°C to 65°C
Bandwidth 135 MHz Humidity
Input Signal
Signal Cable
* Specifications are subject to change without notice.
** TCO version has a different surface treatment.
*** This product is ERGONOMICS APPROVED.
Video RGB Analog
Sync. TTL Separate
15-pin D-sub
connector
Altitude Up to7000ft
TCO
(optional)
20% to 80%
(non-condensing)
Meet TCO99
Page 22

E-10
PRESET MODES
Mode
1 720 x 400 31.4 70 8 1024 x 768 60 75
2 640 x 480 31.4 60 9 1280 x 1024 64.3 60
3 800 x 600 37.9 60 10 1024 x 768 68.6 85
4 640 x 480 43.3 85 11 1600 x 1200 75 60
5 800 x 600 46.8 75 12 1280 x 1024 80 75
6 1024 x 768 48.3 60 13 1280 x 960 85.9 85
7 800 x 600 53.6 85
Resolution
(H x V)
H. Freq.
(KHz)
V. Freq.
(Hz)
Mode
Resolution
(H x V)
H. Freq.
(KHz)
V. Freq.
(Hz)
 Loading...