

Page 1

Altos R720 Installation
Configuration Guide
Abstract
This document provides you a quick OS installation guide on Altos R720, including Windows
Server 2003, Windows Server 2003 x64 Edition, Windows 2000, Red Hat Enterprise Linux 4.0
(32-bit & 64-bit), SuSE Linux Enterprise Server 9 (32-bit & 64-bit), SuSE Linux Enterprise Server
10 (32-bit & 64-bit) and NetWare 6.5.
Version: 1.1
June 2007
Page 2

© 2006 Acer Incorporation. All rights reserved.
This paper is for informational purposes only. ACER MAKES NO WARRANTIES,
EXPRESS OR IMPLIED, IN THIS DOCUMENT.
Acer, Acer Altos are registered trademarks or trademarks of Acer Incorporation.
Other product or company names mentioned herein may be the trademarks of
their respective owners.
Page 3

CONTENTS
INTRODUCTION.................................................................................... 1
Where Can I Download the Latest Altos R720 Installation Configuration
Guide 1
HARDWARE SPECIFICATION ............................................................... 1
BOARD LAYOUT .................................................................................. 4
System Block Diagram 4
DIMM POPULATION GUIDELINE ......................................................... 5
Memory population 5
Memory population with mirroring 5
Memory population with Sparing 5
OS INSTALLATION TIPS ....................................................................... 6
Windows Server 2003 x64 Enterprise Edition Installation (with integrated
SAS RAID) 6
Drivers Required 6
Software Required 7
Configuring integrated SAS RAID 7
Installation Tips 7
Chipset Driver Installation 7
Gigabit Ethernet Driver Installation 8
IOAT Driver Installation 9
Hot-swap Backplane Driver Installation 9
ATI ES1000 Installation 9
Microsoft Scalable Networking Pack Installation 10
Intel RAID Web Console Installation 10
Intel PROSet Utility Installation 10
Windows Server 2003 Enterprise Edition SP1 Installation (with integrated
SAS RAID) 10
Drivers Required 10
Software Required 11
Configuring integrated SAS RAID 11
Installation Tips 11
Chipset Driver Installation 12
Gigabit Ethernet Driver Installation 12
IOAT Driver Installation 13
Hot-swap Backplane Driver Installation 13
ATI ES1000 Installation 14
Microsoft Scalable Networking Pack Installation 14
Intel RAID Web Console Installation 14
Intel PROSet Utility Installation 14
Windows 2000 Advanced Server SP4 Installation (with integrated SAS RAID) 14
Drivers Required 15
Software Required 15
Page 4

Configuring integrated SAS RAID 15
Installation Tips 15
Chipset Driver Installation 16
Gigabit Ethernet Driver Installation 16
IOAT Driver Installation 17
Hot-swap Backplane Driver Installation 17
ATI ES1000 Installation 17
Intel RAID Web Console Installation 18
Intel PROSet Utility Installation 18
Red Hat Enterprise Linux 4.0 EM64T Update 2 Installation (with integrated
SAS RAID) 18
Drivers Required 18
Software Required 19
Configuring integrated SAS RAID 19
Installation Tips 19
Gigabit Ethernet Driver Installation 19
Intel RAID Web Console Installation 20
Red Hat Enterprise Linux 4.0 Update 2 Installation (with integrated SAS
RAID) 20
Drivers Required 20
Software Required 21
Configuring integrated SAS RAID 21
Installation Tips 21
Gigabit Ethernet Driver Installation 21
Intel RAID Web Console Installation 22
SUSE Linux Enterprise Server 10 EM64T Installation (with integrated SAS
RAID) 22
Drivers Required 22
Software Required 23
Configuring integrated SAS RAID 23
Installation Tips 23
Gigabit Ethernet Driver Installation 24
Intel RAID Web Console Installation 25
SUSE Linux Enterprise Server 10 Installation (with integrated SAS RAID)25
Drivers Required 25
Software Required 26
Configuring integrated SAS RAID 26
Installation Tips 26
Gigabit Ethernet Driver Installation 27
Intel RAID Web Console Installation 28
SUSE Linux Enterprise Server 9 EM64T Service Pack 3 Installation (with
integrated SAS RAID) 28
Drivers Required 28
Software Required 28
Configuring integrated SAS RAID 29
Installation Tips 29
Page 5

Gigabit Ethernet Driver Installation 29
Intel RAID Web Console Installation 30
SUSE Linux Enterprise Server 9 Service Pack 3 Installation (with integrated
SAS RAID) 30
Drivers Required 30
Software Required 31
Configuring integrated SAS RAID 31
Installation Tips 31
Gigabit Ethernet Driver Installation 31
Intel RAID Web Console Installation 32
NetWare 6.5 SP5 Installation (with integrated SAS RAID) 32
Drivers Required 32
Installation Tips 33
APPENDIX A: INTEGRATED SAS RAID CREATION ............................ 35
Configuring integrated SAS RAID 35
Starting Integrated SAS RAID Configuration Utility 35
Loading Factory Default Setting 35
Creating and Initialing a RAID Volume 35
Assigning a Hot Spare Disk 35
Page 6

Page 7

INTRODUCTION
This article describes the Altos R720 Installation Configuration guide:
• Hardware parts give you a briefly and quick hardware information about
Altos R720
• The operating system installation tips.
Where Can I Download the Latest Altos R720 Installation
Configuration Guide
The Altos R910 Installation Configuration Guide would be updated on a
monthly basis. Please download the latest release from the Support Website
http://support.acer-euro.com
1 Altos R720 Installation Configuration Guide
Page 8

HARDWARE
SPECIFICATION
Model Altos R720
Processor Dual-Core Intel Xeon processors 5000 sequence
(Dempsey or Woodcrest) at 2.66Hz or above
Frequency
Front Side Bus
Cache
Chipset Intel chipset
Memory
Storage Interface
Expansion Slots
VGA
SAS Controller
• 667MHz
• 1066MHz
• 1333MHz
• 2 x 2MB L2 cache
• 4MB L2 cache
• North Bridge: Intel 5000P (Blackford)
• South Bridge: Intel 6321ESB
• Quad FB-DIMM memory channels
• 8 x DIMM sockets support 512MB/1GB/2GB FB-
DIMM 533 or FB-DIMM 667
• Maximum memory of 32GB (when 4GB DIMM
is available)
• Up to 17 GB/s maximum b/w for FB-DIMM 533
• Up to 21 GB/s maximum b/w for FB-DIMM 677
• Support memory sparing and memory
mirroring (2006 Q3)
• LSI SAS 1068 3Gb/s SAS controller
• One ATA-100 port
Total 5 slots (three full height slots, two low
profile slots)
Low profile riser slot
• Two x8 PCI-Express slots (with x4 throughput)
Full height riser slot
• Option 1: One 64-bits/133MHz/3.3V PCI-X slot
+ Two x8 PCI-Express slots (with x4
throughput)
• Option 2: Three 64-bits/133MHz/3.3V PCI-X
slots
• Option 3: Three 64-bits
66MHz/100MHz/133MHz PCI-X slots
Onboard ATI ES1000 video controller w/ 16MB
SDRAM
• Integrated SAS RAID with RAID 0, 1, 5, 10 and
50 support
• 128MB of cache (DDR2 400 registered, 244 pin
Mini DIMM)
• BBU support
Altos R720 Installation Configuration Guide 2
Page 9

LAN Controller
BMC BMC (Baseboard Management Controller)
Availability sub-system
System Power Supply
Storage Subsystem
Drive Bays
Hard Disks
• Onboard Intel 82563EB dual-channel gigabit
network interface controller
• Supporting Intel I/O Acceleration Technology
• IPMI 2.0 compliant
Option
• Can be upgraded to Intel Remote
Management Module with Virtual Media and
remote KVM support
• 1+1 redundant 750W power supply
• Hot Swap
• Five 1” front accessible drive bay for 3.5”
SAS/SATA HDD
• One 3.5” front accessible half-height device
bay space that shared with 6th HDD bay or
Tape backup device
• Up to 6 SAS/SATA HDD (without FDD and
tape drive, additional 6th Hard Drive Upgrade
Kit is required)
• Only support 5 SAS/SATA HDD when Slim
optical drive and FDD installed simultaneously
• Only support 4 SAS/SATA HDD when Slim
optical drive, FDD and tape drive installed
simultaneously
3 Altos R720 Installation Configuration Guide
Page 10
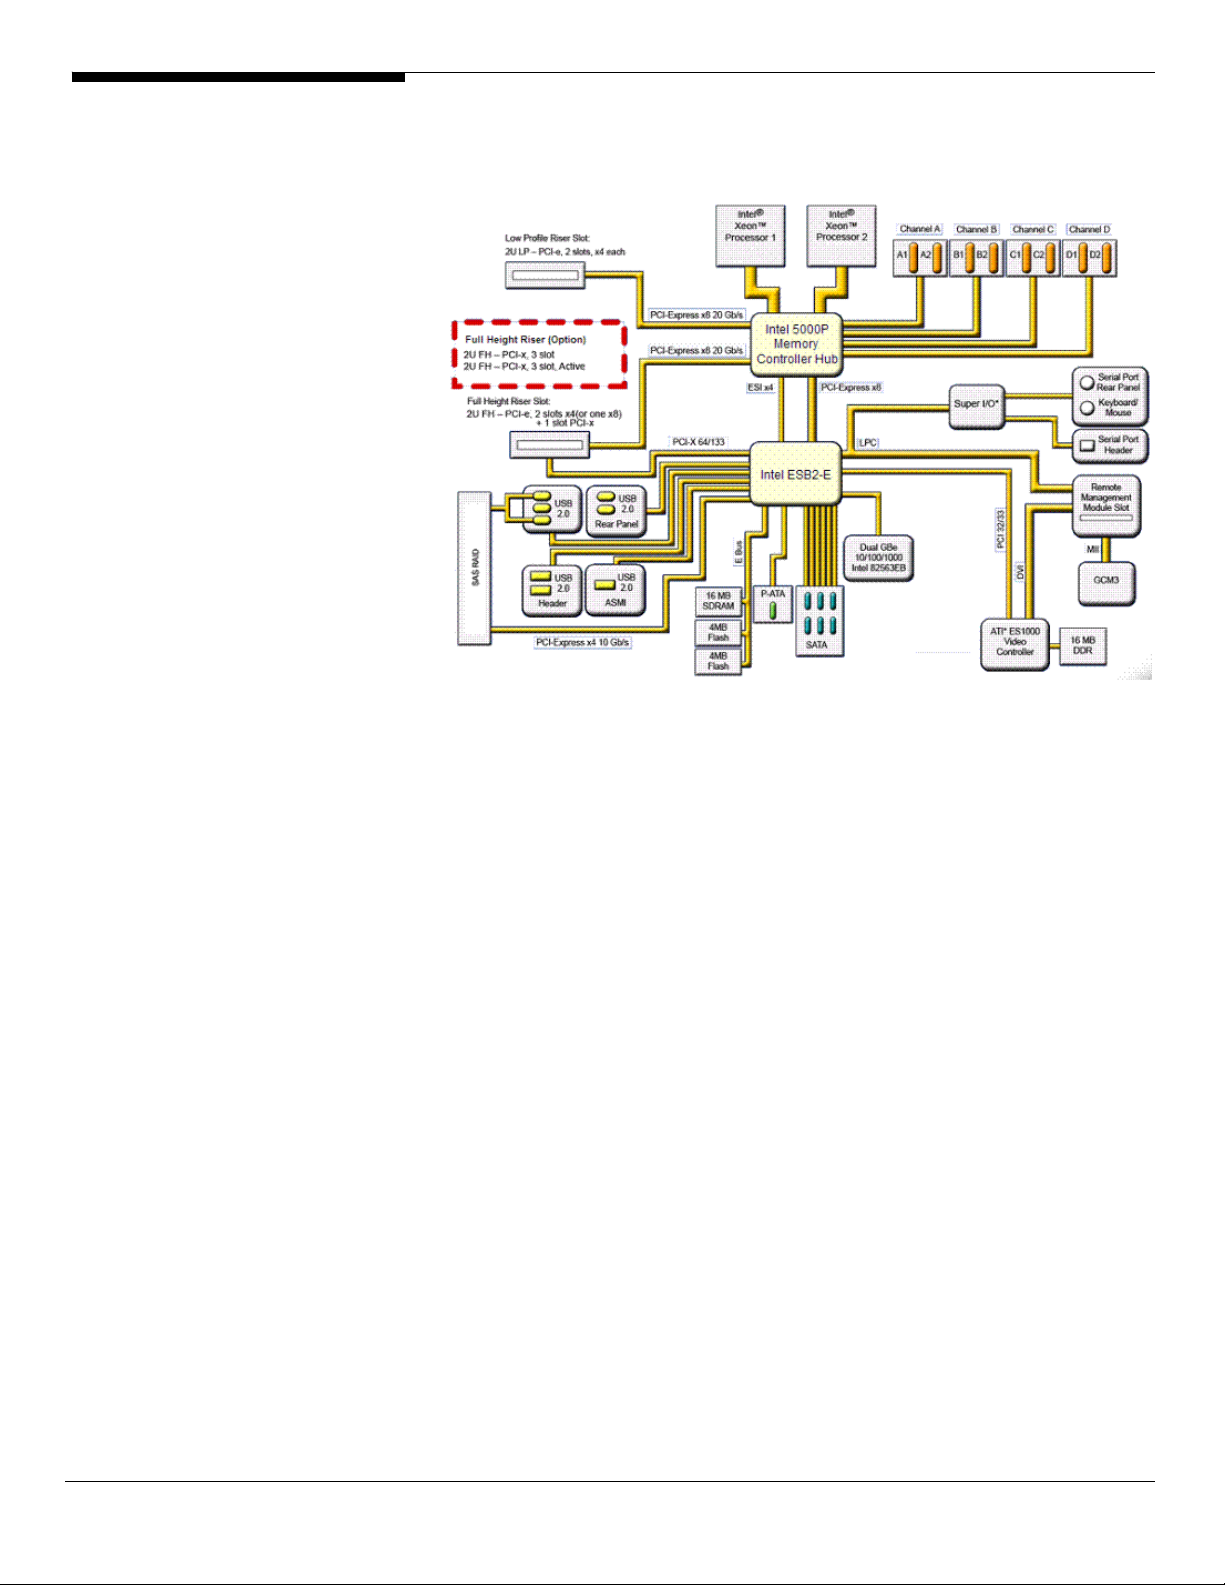
BOARD LAYOUT
System Block Diagram
Altos R720 Installation Configuration Guide 4
Page 11

DIMM POPULATION
GUIDELINE
Memory population
Branch 0 Branch 1
# DIMM A1 DIMM A2 DIMM B1 DIMM B2 DIMM C1 DIMM C2 DIMM D1 DIMM D2
1 512 MB
2 512 MB 512 MB
3 512 MB 512 MB 512 MB 512 MB
4 512 MB 512 MB 512 MB 512 MB 512 MB 512 MB
5 512 MB 512 MB 512 MB 512 MB 512 MB 512 MB 512 MB 512 MB
6 1 GB
7 1 GB 1 GB
8 1 GB 1 GB 1 GB 1 GB
9 1 GB 1 GB 1 GB 1 GB 1 GB 1 GB
10 1 GB 1 GB 1 GB 1 GB 1 GB 1 GB 1 GB 1 GB
11 2 GB
12 2 GB 2 GB
13 2 GB 2 GB 2 GB 2 GB
14 2 GB 2 GB 2 GB 2 GB 2 GB 2 GB
15 2 GB 2 GB 2 GB 2 GB 2 GB 2 GB 2 GB 2 GB
Memory population with mirroring
# DIMM A1 DIMM A2 DIMM B1 DIMM B2 DIMM C1 DIMM C2 DIMM D1 DIMM D2
1 512 MB 512 MB
2 512 MB 512 MB 512 MB 512 MB
3 1 GB 1 GB
4 1 GB 1 GB 1 GB 1 GB
5 2 GB 2 GB
6 2 GB 2 GB 2 GB 2 GB
Branch 0 Branch 1 Total Memory
512 MB
(Mirror)
512 MB
(Mirror)
1 GB
(Mirror)
1 GB
(Mirror)
2 GB
(Mirror)
2 GB
(Mirror)
512 MB
(Mirror)
1 GB
(Mirror)
2 GB
(Mirror)
512 MB
(Mirror)
512 MB
(Mirror)
1 GB
(Mirror)
1 GB
(Mirror)
2 GB
(Mirror)
2 GB
(Mirror)
Physical
Memory
2 GB 1 GB
512 MB
(Mirror)
4 GB 2 MB
1 GB
(Mirror)
8 GB 4 GB
2 GB
(Mirror)
4 GB 2 GB
8 GB 4 GB
16 GB 8 GB
Detected by
OS
Memory population with Sparing
Branch 0 Branch 1 Total Memory
# DIMM A1 DIMM A2 DIMM B1 DIMM B2 DIMM C1 DIMM C2 DIMM D1 DIMM D2
512 MB
1
2
3
4
5
6
7
8
9
(Sparing)
512 MB
(Sparing)
512 MB
(Sparing)
1 GB
(Sparing)
1 GB
(Sparing)
1 GB
(Sparing)
2 GB
(Sparing)
2 GB
(Sparing)
2 GB
(Sparing)
512 MB 1 GB 512 MB
512 MB
512 MB
1 GB 2 GB 1 GB
1 GB
1 GB
2 GB 4 GB 2 GB
2 GB
2 GB
512 MB
(Sparing)
512 MB
(Sparing)
1 GB
(Sparing)
1 GB
(Sparing)
2 GB
(Sparing)
2 GB
(Sparing)
512 MB 2 GB 1 GB
512 MB
1 GB 4 GB 2 GB
1 GB
2 GB 8 GB 4 GB
2 GB
512 MB
(Sparing)
1 GB
(Sparing)
2 GB
(Sparing)
512 MB
1 GB
2 GB
512 MB
(Sparing)
1 GB
(Sparing)
2 GB
(Sparing)
512 MB 4 GB 2 GB
1 GB 8 GB 4 GB
2 GB 16 GB 8 GB
Physical
Memory
Detected by
OS
5 Altos R720 Installation Configuration Guide
Page 12

OS INSTALLATION TIPS
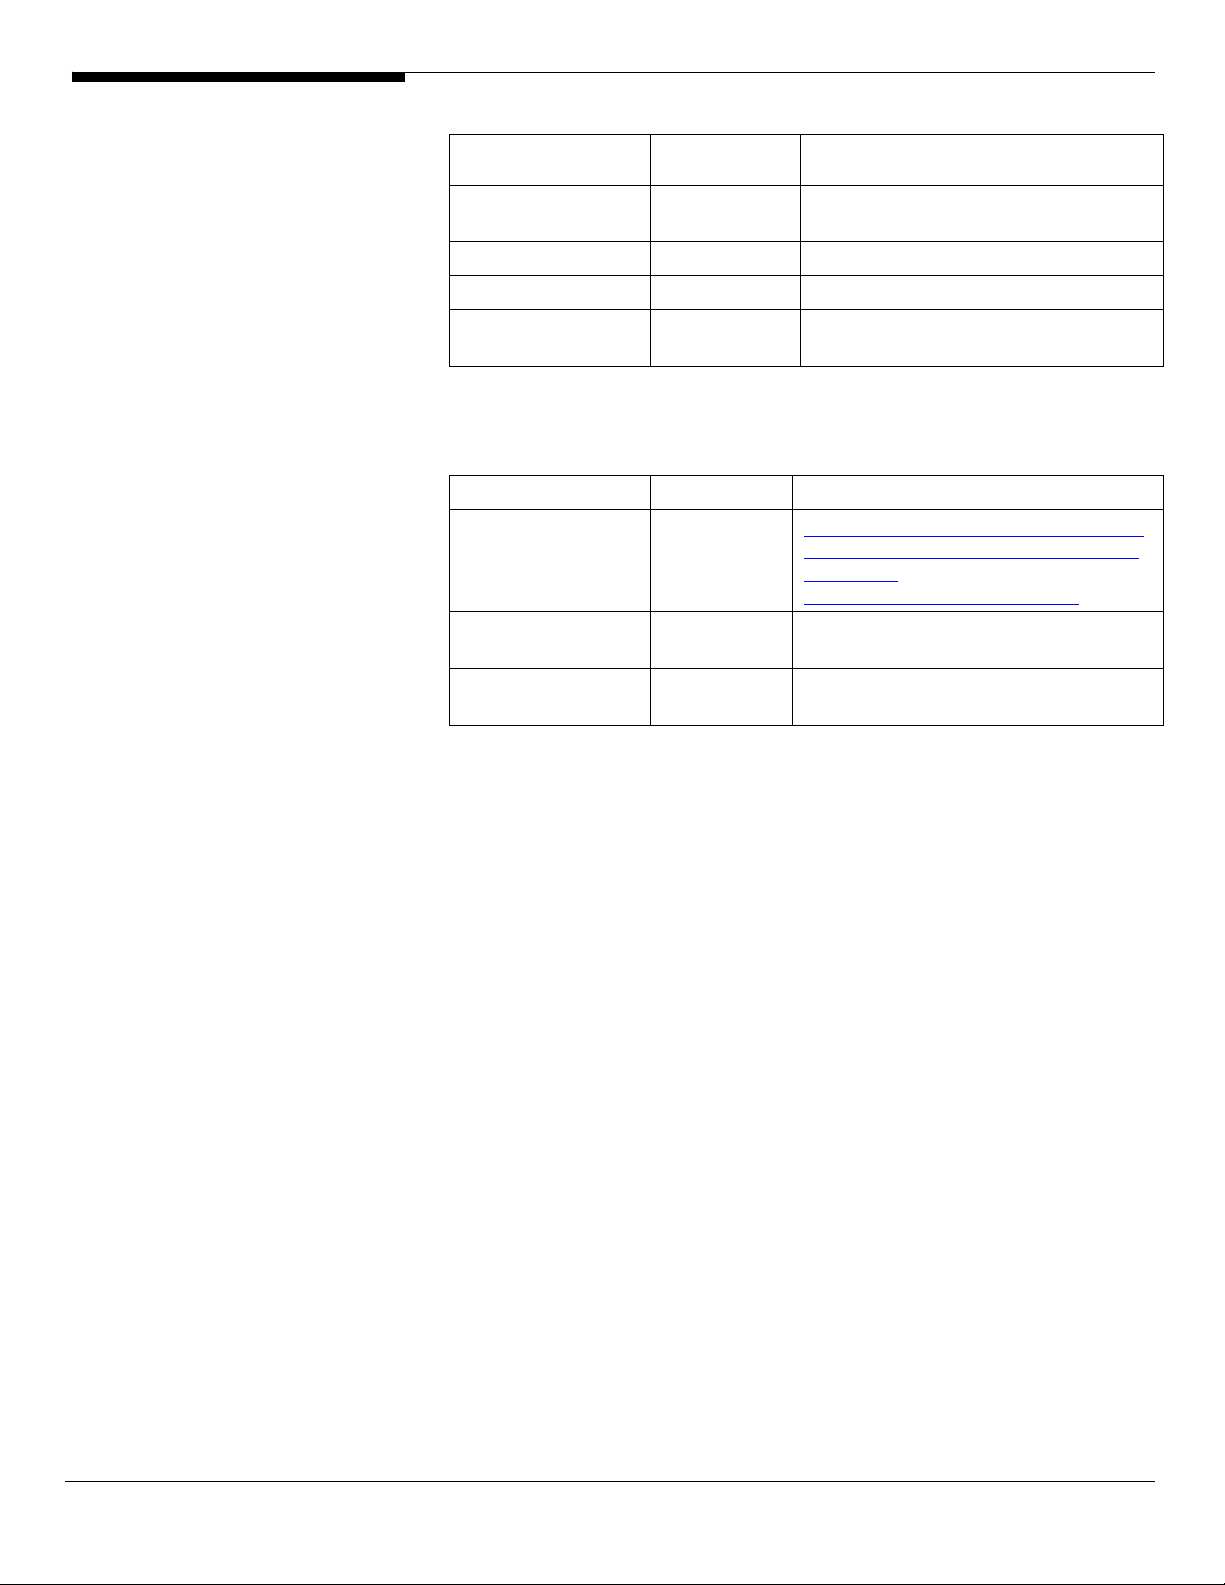
Below is Altos R720 OS certification matrix:
Operating System Status Note
Windows 2000 Advanced Server,
Service Pack 4
Windows Server 2003 x64 Enterprise
Edition
Windows Server 2003 Enterprise
Edition SP1
Red Hat Enterprise Linux 4.0 EM64T
Update 2
Red Hat Enterprise Linux 4.0 Update 2 Tested
SUSE Linux Enterprise Server 9 EM64T
SP3
SUSE Linux Enterprise Server 9 SP3 Certified
NetWare 6.5 Support Pack5 Tested
The drivers required for the OS installation can be found on the EasyBUILD 7.1
build 100 (or later). We suggest that you use the drivers contained in the
EasyBUILD 7.1 build 100 (or later), as these drivers are tested and qualified by
Acer.
Tested
Tested
Tested
Tested
Certified
There are two ways you can get the drivers. You can either make diskettes
from EasyBUILD 7.1 build 100 (or later), or put it in the optical drive and search
the driver directly.
NOTE. In this section, we assume the OS is installed on the HDD connected to
the onboard SAS or integrated SAS RAID.
NOTE. The internal USB floppy drive is an option. If you do not have this option
and you need to apply the driver during the OS installation, you need an
external USB floppy drive.
Windows Server 2003 x64 Enterprise Edition Installation (with
integrated SAS RAID)
Below information describes how to manually install Windows Server 2003 x64
Enterprise Edition on Altos R720.
Drivers Required
For Windows 2003 x64 Installation, the following device drivers are required.
Device Version Directory on EasyBUILD
Integrated SAS
RAID
Onboard Intel
5000P Chipset
Onboard Intel 9.3.39 \Disk\R720\NIC\Intel\pro1000.net\ws03
1.17.0.64 \Disk\R720\RAID\Integrated_SAS\WS2K
3X64
7.3.0.1011 \Disk\R720\onboard\Chipset\
Altos R720 Installation Configuration Guide 6
Page 13
82563EB Gigabit
Ethernet
Onboard ATI
ES1000
Onboard USB 2.0 5.2.3790.1380 OS built-in
IOAT 1.2.52.0 \Disk\R720\onboard\IOAT\WS2K3X64
Hot-swap
backplane
Software Required
The management utility of integrated SAS RAID and NIC can be found in the
EasyBUILD 7.1 build 100 (or later).
Software Version Directory on EasyBUILD
Microsoft Scalable
Networking Pack
Intel RAID Web
Console
Intel PROSet Utility 10.4.4.2 \APP\R720\NIC\PROSETDX\WS2003XPx6
8.243.0 \Disk\R720\onboard\VGA\W2K3\
5.0.6055.2 \Disk\R720\onboard\Backplane\Windo
N/A http://www.microsoft.com/downloads/
1.13-00 \APP\R720\RAID\Integrated_SAS\Windo
x64\
ws
details.aspx?FamilyID=778ee6fe-53594c2f-b89df35f2b1b83cd&DisplayLang=en
ws
4\
Configuring integrated SAS RAID
Please refer to the Appendix A. for the integrated SAS RAID configuration.
Installation Tips
NOTE. There is no built-in driver Integrated SAS RAID in the Windows Server
2003 x64. If you do not have the optional internal USB floppy drive, you need
an external USB floppy drive for applying driver during the OS installation.
1. As Windows Server 2003 x64 can’t recognize the integrated SAS RAID, you
need to make a driver diskette from the EasyBUILD 7.1 build 100 first
before the installation.
2. Press F6 at the beginning of installation for providing the driver diskette
for the integrated SAS RAID.
3. Select “Intel(R) SAS RAID Controller Driver (Server 2003 for x64)” as target
driver
4. After loading the RAID driver from diskette, follow the normal procedure
to finish the installation.
Chipset Driver Installation
1. After the installation completes, you would see the following devices
with yellow mark in Device Manager.
7 Altos R720 Installation Configuration Guide
Page 14

2. Please insert the EasyBUILD 7.1 build 100 into the optical drive
3. Expand Drivers -> Altos R720 -> Chipset, select Windows Server 2003 x64
and click on Setup.
4. Follow the instruction to install the driver and reboot the server after the
chipset driver is installed.
Gigabit Ethernet Driver Installation
1. There are two Ethernet Controller listed under Other device in Windows
Device Manager. It should be the onboard Intel 82563EB Gigabit Ethernet
controller. You could find the driver in EasyBUILD 7.1 build 100. Please do
the same on both of the devices.
2. Right-click on the Ethernet Controller and select Update Driver.
3. Select No, not this time. Do not connect to Windows Update to search the
driver.
4. Select Install from a list or specific location (Advanced).
5. Select Search the best driver these locations and check Include this
location in the search.
6. Click on Browse and specify the path for the driver. Please refer to the
Directory on EasyBUILD 7.1 build 100 for NIC driver in Driver required
section.
7. Click on Next and follow the instruction to finish the driver update.
Altos R720 Installation Configuration Guide 8
Page 15

8. After installing the driver, you would see Intel(R) PRO/1000 EB Network
Connection with I/O Acceleration listed in Network adapters.
IOAT Driver Installation
1. For Base System Device, it should be the onboard IOAT device. You could
find the driver in EasyBUILD 7.1 build 100.
2. Right-click on the Base System Device and select Update Driver.
3. Select No, not this time. Do not connect to Windows Update to search the
driver.
4. Select Install from a list or specific location (Advanced).
5. Select Search the best driver these locations and check Include this
location in the search.
6. Click on Browse and specify the path for the driver. Please refer to the
Directory on EasyBUILD 7.1 build 100 for IOAT driver in Driver required
section.
7. Click on Next and follow the instruction to finish the driver update.
8. After installing the driver, you would see Intel(R) 5000 Series Chipsets
Integrated Device – 1A38 listed in System devices.
Hot-swap Backplane Driver Installation
1. There is a ESG-SHV SCA HSBP M11.... SCSI Enclosure Device listed under
Other device in Windows Device Manager. It is the hot-swap SAS
backplane for R720.
2. Right-click on the ESG-SHV SCA HSBP M11.... SCSI Enclosure Device and
select Update Driver.
3. Select No, not this time. Do not connect to Windows Update to search the
driver.
4. Select Install from a list or specific location (Advanced).
5. Select Search the best driver these locations and check Include this
location in the search.
6. Click on Browse and specify the path for the driver. Please refer to the
Directory on EasyBUILD 7.1 build 100 for Hot-swap backplane driver in
Driver required section.
7. Click on Next and follow the instruction to finish the driver update.
8. After installing the driver, you would see Intel (r) SCA Hotswap Backplane
listed in System devices.
ATI ES1000 Installation
1. Windows will treat onboard VGA as Standard VGA device. You can find
9 Altos R720 Installation Configuration Guide
Page 16

the ATI ES1000 driver in EasyBUILD 7.1 build 100. Please insert the
EasyBUILD 7.1 build 100 into the optical drive.
2. Expand Drivers -> Altos R720 -> Graphics adapters -> ATI ES1000, select
Windows Server 2003 x64 and click on Setup.
3. Follow the instruction to install the VGA driver and reboot the server
after the driver is installed.
4. After installing the driver, you would see ATI ES1000 listed in Display
adapters.
Microsoft Scalable Networking Pack Installation
You can find the Microsoft Scalable Networking Pack for Windows Server 2003
x64 in the Microsoft website:
http://www.microsoft.com/downloads/details.aspx?FamilyID=778ee6fe-53594c2f-b89d-f35f2b1b83cd&DisplayLang=en
1. Download the SNP from Microsoft website.
2. Double-click on the downloaded file to run the installation program.
3. Follow the instruction to install the SNP and reboot the server after the
SNP is installed.
Intel RAID Web Console Installation
1. Please insert the EasyBUILD 7.1 build 100 into the optical drive.
2. Expand Utilities -> Altos R720 -> Integrated SAS RAID, select Intel RAID
WebConsole (Windows) and click on Setup.
3. Follow the instruction and use the default setting to complete the Intel
RAID WebConsole installation.
Intel PROSet Utility Installation
1. Please insert the EasyBUILD 7.1 build 100 into the optical drive.
2. Expand Utilities -> Altos R720 -> Intel 82563EB Gigabit Controller, select
PROSet Utility (Windows Server 2003 x64) and click on Setup.
3. Follow the instruction and use the default setting to complete the Intel
PROSet utility installation.
Windows Server 2003 Enterprise Edition SP1 Installation (with
integrated SAS RAID)
Below information describes how to manually install Windows Server 2003
Enterprise Edition on Altos R720.
Drivers Required
For Windows 2003 Installation, the following device drivers are required.
Altos R720 Installation Configuration Guide 10
Page 17

Device Version Directory on EasyBUILD
Integrated SAS
RAID
Onboard Intel
5000P Chipset
Onboard Intel
82563EB Gigabit
Ethernet
Onboard ATI
ES1000
Onboard USB 2.0 5.2.3790.1380 OS built-in
IOAT 1.2.52.0 \Disk\R720\onboard\IOAT\WS2K3
Hot-swap
backplane
Software Required
The management utility of integrated SAS RAID can be found in the EasyBUILD
7.1 build 100 (or later).
Software Version Directory on EasyBUILD
Microsoft Scalable
Networking Pack
Intel RAID Web
Console
Intel PROSet Utility 10.4.4.2 \APP\R720\NIC\PROSETDX\2KXWS03\
1.17.0.32 \Disk\R720\RAID\Integrated_SAS\WS2K
3
7.3.0.1011 \Disk\R720\onboard\Chipset\
9.3.39.0 \Disk\R720\NIC\Intel\pro1000.net\ws03
2k\
8.24.3 \Disk\R720\onboard\VGA\W2K3\
5.0.6055.2 \Disk\R720\onboard\Backplane\Windo
ws
N/A http://www.microsoft.com/downloads/
details.aspx?FamilyID=c65f4a89-f4da463e-a4964b5abd660bf9&DisplayLang=en
1.13-00 \APP\R720\RAID\Integrated_SAS\Windo
ws
Configuring integrated SAS RAID
Please refer to the Appendix A. for the integrated SAS RAID configuration.
Installation Tips
NOTE. There is no built-in driver Integrated SAS RAID in the Windows Server
2003. If you do not have the optional internal USB floppy drive, you need an
external USB floppy drive for applying driver during the OS installation.
1. As Windows Server 2003 can’t recognize the integrated SAS RAID, you
need to make a driver diskette from the EasyBUILD 7.1 build 100 first
before the installation.
2. Press F6 at the start of installation to provide the driver disk for the
integrated SAS RAID.
3. Select “Intel(R) SAS RAID Controller Driver (Server 2003 32-bit)” as target
driver
4. After loading the RAID driver from diskette, follow the normal procedure
to finish the installation.
11 Altos R720 Installation Configuration Guide
Page 18

Chipset Driver Installation
1. After the installation completes, you would see the following devices
with yellow mark in Device Manager.
2. Please insert the EasyBUILD 7.1 build 100 into the optical drive
3. Expand Drivers -> Altos R720 -> Chipset, select Windows Server 2003 and
click on Setup.
4. Follow the instruction to install the driver and reboot the server after the
chipset driver is installed.
Gigabit Ethernet Driver Installation
1. There are two Ethernet Controller listed under Other device in Windows
Device Manager. It should be the onboard Intel 82563EB Gigabit Ethernet
controller. You could find the driver in EasyBUILD 7.1 build 100. Please do
the same on both of the devices.
2. Right-click on the Ethernet Controller and select Update Driver.
3. Select No, not this time. Do not connect to Windows Update to search the
driver.
4. Select Install from a list or specific location (Advanced).
5. Select Search the best driver these locations and check Include this
location in the search.
Altos R720 Installation Configuration Guide 12
Page 19

6. Click on Browse and specify the path for the driver. Please refer to the
Directory on EasyBUILD 7.1 build 100 for NIC driver in Driver required
section.
7. Click on Next and follow the instruction to finish the driver update.
8. After installing the driver, you would see Intel(R) PRO/1000 EB Network
Connection with I/O Acceleration listed in Network adapters.
IOAT Driver Installation
1. For Base System Device, it should be the onboard IOAT device. You could
find the driver in EasyBUILD 7.1 build 100.
2. Right-click on the Base System Device and select Update Driver.
3. Select No, not this time. Do not connect to Windows Update to search the
driver.
4. Select Install from a list or specific location (Advanced).
5. Select Search the best driver these locations and check Include this
location in the search.
6. Click on Browse and specify the path for the driver. Please refer to the
Directory on EasyBUILD 7.1 build 100 for IOAT driver in Driver required
section.
7. Click on Next and follow the instruction to finish the driver update.
8. After installing the driver, you would see Intel(R) 5000 Series Chipsets
Integrated Device – 1A38 listed in System devices.
Hot-swap Backplane Driver Installation
1. There is a ESG-SHV SCA HSBP M11.... SCSI Enclosure Device listed under
Other device in Windows Device Manager. It is the hot-swap SAS
backplane for R720.
2. Right-click on the ESG-SHV SCA HSBP M11.... SCSI Enclosure Device and
select Update Driver.
3. Select No, not this time. Do not connect to Windows Update to search the
driver.
4. Select Install from a list or specific location (Advanced).
5. Select Search the best driver these locations and check Include this
location in the search.
6. Click on Browse and specify the path for the driver. Please refer to the
Directory on EasyBUILD 7.1 build 100 for Hot-swap backplane driver in
Driver required section.
7. Click on Next and follow the instruction to finish the driver update.
13 Altos R720 Installation Configuration Guide
Page 20

8. After installing the driver, you would see Intel (r) SCA Hotswap Backplane
listed in System devices.
ATI ES1000 Installation
1. Windows will treat onboard VGA as Standard VGA device. You can find
the ATI ES1000 driver in EasyBUILD 7.1 build 100. Please insert the
EasyBUILD 7.1 build 100 into the optical drive.
2. Expand Drivers -> Altos R720 -> Graphics adapters -> ATI ES1000, select
Windows Server 2003 and click on Setup.
3. Follow the instruction to install the VGA driver and reboot the server
after the driver is installed.
4. After installing the driver, you would see ATI ES1000 listed in Display
adapters.
Microsoft Scalable Networking Pack Installation
You can find the Microsoft Scalable Networking Pack for Windows Server 2003
in the Microsoft website:
http://www.microsoft.com/downloads/details.aspx?FamilyID=c65f4a89-f4da463e-a496-4b5abd660bf9&DisplayLang=en
1. Download the SNP from Microsoft website.
2. Double-click on the downloaded file to run the installation program.
3. Follow the instruction to install the SNP and reboot the server after the
SNP is installed.
Intel RAID Web Console Installation
1. Please insert the EasyBUILD 7.1 build 100 into the optical drive.
2. Expand Utilities -> Altos R720 -> Integrated SAS RAID, select Intel RAID
WebConsole (Windows) and click on Setup.
3. Follow the instruction and use the default setting to complete the Intel
RAID WebConsole installation.
Intel PROSet Utility Installation
1. Please insert the EasyBUILD 7.1 build 100 into the optical drive.
2. Expand Utilities -> Altos R720 -> Intel 82563EB Gigabit Controller, select
PROSet Utility (Windows Server 2003) and click on Setup.
3. Follow the instruction and use the default setting to complete the Intel
PROSet utility installation.
Windows 2000 Advanced Server SP4 Installation (with
integrated SAS RAID)
Below information describes how to manually install Microsoft Windows 2000
Altos R720 Installation Configuration Guide 14
Page 21

Advanced Server SP4 on Altos R720 with integrated SAS RAID.
Drivers Required
For Windows 2000 Installation, the following device drivers are required.
Device Version Directory on EasyBUILD
Integrated SAS
RAID
Onboard Intel
5000P Chipset
Onboard Intel
82563EB Gigabit
Ethernet
Onboard ATI
ES1000
Onboard USB 2.0 5.0.2195.6717 OS built-in
IOAT 1.2.52.0 \Disk\R720\onboard\IOAT\WS2K3
Hot-swap
backplane
1.17.0.32 \Disk\R720\RAID\Integrated_SAS\W2K
7.3.0.1011 \Disk\R720\onboard\Chipset\
9.3.39 \Disk\R720\NIC\Intel\pro1000.net\ws03
2k\
8.24.3 \Disk\R720\onboard\VGA\W2K\
5.0.6055.2 \Disk\R720\onboard\Backplane\Windo
ws
Software Required
The management utility of integrated SAS RAID can be found in the EasyBUILD
7.1 build 100 (or later).
Software Version Directory on EasyBUILD
Intel RAID Web
Console
Intel PROSet Utility 10.4.4.2 \APP\R720\NIC\PROSETDX\2KXWS03\
Configuring integrated SAS RAID
Please refer to the Appendix A. for the integrated SAS RAID configuration.
Installation Tips
NOTE. There is no built-in driver Integrated SAS RAID in the Windows Server
2003. If you do not have the optional internal USB floppy drive, you need an
external USB floppy drive for applying driver during the OS installation.
1. As Windows 2000 can’t recognize the integrated SAS RAID, you need to
make a driver diskette from the EasyBUILD 7.1 build 100 first before the
installation.
2. Press F6 at the start of installation to provide the driver disk for the
onboard ROMB.
1.13-00 \APP\R720\RAID\Integrated_SAS\Windo
ws
3. Select “Intel(R) SAS RAID Controller Driver (Windows 2000)” as target
driver
4. After loading the driver from diskette, follow the normal procedure to
finish the installation.
15 Altos R720 Installation Configuration Guide
Page 22

Chipset Driver Installation
1. After the installation completes, you would see the following other
devices listed in Device Manager.
2. Please insert the EasyBUILD 7.1 build 100 into the optical drive
3. Expand Drivers -> Altos R720 -> Chipset and double-click on Windows
2000.
4. Follow the instruction to install the driver and reboot the server after the
chipset driver is installed.
Gigabit Ethernet Driver Installation
1. There are two Ethernet Controller listed under Other device in Windows
Device Manager. It should be the onboard Intel 82563EB Gigabit Ethernet
controller. You could find the driver in EasyBUILD 7.1 build 100. Please do
the same on the both of the devices.
2. Right-click on the Ethernet Controller and select Properties.
3. Select Driver tab and click on Update Driver.
4. Follow the instructions. Select Search for a suitable driver for my device
(Recommended) and click on Next.
5. Check on the Specify a location and click on Next to specify the path for
the driver. Please refer to the Directory on EasyBUILD 7.1 build 100 for
NIC driver in Driver required section.
Altos R720 Installation Configuration Guide 16
Page 23

6. Follow the instructions to finish the installation.
7. After installing the driver, you would see Intel(R) PRO/1000 EB Network
Connection with I/O Acceleration listed in Network adapters.
IOAT Driver Installation
1. For Base System Device, it should be the onboard IOAT device. You could
find the driver in Resource CD.
2. Right-click on the Base System Device and select Properties.
3. Select Driver tab and click on Update Driver.
4. Follow the instructions. Select Search for a suitable driver for my device
(Recommended) and click on Next.
5. Check on the Specify a location and click on Next to specify the path for
the driver. Please refer to the Directory on EasyBUILD 7.1 build 100 for
IOAT driver in Driver required section.
6. Follow the instruction to finish the driver update.
7. After installing the driver, you would see Intel(R) 5000 Series Chipsets
Integrated Device – 1A38 listed in System devices.
Hot-swap Backplane Driver Installation
1. There is a ESG-SHV SCA HSBP M11.... SCSI Enclosure Device listed under
Other device in Windows Device Manager. It is the hot-swap SAS
backplane for R720.
2. Right-click on the ESG-SHV SCA HSBP M11.... SCSI Enclosure Device and
select Properties.
3. Select Driver tab and click on Update Driver.
4. Follow the instructions. Select Search for a suitable driver for my device
(Recommended) and click on Next.
5. Check on the Specify a location and click on Next to specify the path for
the driver. Please refer to the Directory on EasyBUILD 7.1 build 100 for
IOAT driver in Driver required section.
6. Follow the instruction to finish the driver update.
7. After installing the driver, you would see Intel (r) SCA Hotswap Backplane
listed in System devices.
ATI ES1000 Installation
1. There is a VGA controller (VGA Compatible) listed under Other devices in
Windows Device Manager. It is the ATI ES1000 for R720.
2. Insert the EasyBUILD 7.1 build 100 into the optical drive.
3. Expand Drivers -> Altos R720 -> Graphics adapters -> ATI ES1000 and
17 Altos R720 Installation Configuration Guide
Page 24

double-click on Windows 2000.
4. Follow the instruction to install the VGA driver and reboot the server
after the driver is installed.
5. After installing the driver, you would see ATI ES1000 listed in Display
adapters.
Intel RAID Web Console Installation
1. Please insert the EasyBUILD 7.1 build 100 into the optical drive.
2. Expand Utilities -> Altos R720 -> Integrated SAS RAID, select Intel RAID
WebConsole (Windows) and click on Setup.
3. Follow the instruction and use the default setting to complete the Intel
RAID WebConsole installation.
Intel PROSet Utility Installation
1. Please insert the EasyBUILD 7.1 build 100 into the optical drive.
2. Expand Utilities -> Altos R720 -> Intel 82563EB Gigabit Controller, select
PROSet Utility (Windows 2000) and click on Setup.
3. Follow the instruction and use the default setting to complete the Intel
PROSet utility installation.
Red Hat Enterprise Linux 4.0 EM64T Update 2 Installation (with
integrated SAS RAID)
Below information describes how to manually install Red Hat Enterprise Linux
4.0 EM64T Update 2 on Altos R720 with integrated SAS RAID.
Drivers Required
For Red Hat Enterprise Linux 4.0 Update 2 Installation, the following device
drivers are required.
Device Version Directory on EasyBUILD
Integrated SAS
RAID
Onboard Intel
5000P Chipset
Onboard Intel
82563EB Gigabit
Ethernet
Onboard ATI
ES1000
Onboard USB 2.0 N/A OS built-in
IOAT N/A OS built-in
00.00.02.00-4 \Disk\R720\RAID\Integrated_SAS\RHEL
4\
N/A OS built-in
7.0.38-NAPI \Disk\R720\NIC\Intel\pro1000.lx
N/A OS built-in
Altos R720 Installation Configuration Guide 18
Page 25

Software Required
The management utility of integrated SAS RAID can be found in the EasyBUILD
7.0 build 100 (or later).
Software Version Directory on EasyBUILD
Intel RAID Web
Console
Configuring integrated SAS RAID
Please refer to the Appendix A. for the integrated SAS RAID configuration.
Installation Tips
NOTE. There is no built-in driver Integrated SAS RAID in the Red Hat Enterprise
Linux 4.0 EM64T Update2. If you do not have the optional internal USB floppy
drive, you need an external USB floppy drive for applying driver during the OS
installation.
1. Since Red Hat Enterprise Linux 4.0 EM64T Update2 cannot recognize the
integrated SAS RAID, you need to make a driver diskette from the
EasyBUILD 7.1 build 100 first before the installation.
1.13-00 \app\r720\raid\Integrated_SAS\Linux\
2. Type linux dd when the prompt boot: appears at the start.
3. Please select the sda as the Driver Disk Source.
4. Follow the instruction to load the integrated SAS RAID driver from the
driver diskette.
5. At the Package Installation Defaults, select Customize software packages
to be installed.
6. At the Package Group Selection step, select Development Tools under
Development.
7. Follow the normal procedure to finish the installation.
Gigabit Ethernet Driver Installation
1. You can find the Intel 82546EB driver in EasyBUILD 7.1 build 100. Please
refer to directory of the 82546EB driver in Driver Required section and
copy the driver from the EasyBUILD 7.1 build 100 to HDD first.
# mount /media/cdrecorder
# cp –R /media/cdrecorder/Disk/R720/NIC/Intel/pro1000.lx/. /tmp
2. Change the directory to the driver source and install the driver
# cd /tmp/src/
# make install
# insmod e1000.ko
3. Run the kudzu utility, it will auto detect the Intel 82563EB network
19 Altos R720 Installation Configuration Guide
Page 26

controller and help you to configure it.
# kudzu
4. Restart the network service to bring up both of the network interfaces.
# service network restart
Intel RAID Web Console Installation
1. You can find the Intel RAID Web Console in EasyBUILD 7.1 build 100.
Please refer to directory of the Intel RAID Web Console in Software
Required section and copy the utility from the EasyBUILD 7.1 build 100 to
HDD first.
# mount /media/cdrecorder
# cp –R /media/cdrecorder/app/r720/raid/Integrated_SAS/Linux/. /tmp
2. Install Intel RAID Web Console utility
# cd /tmp/
# unzip ir3_Linux_RWC2_v1.13-00.zip
# chmod 755 install.sh
# chmod 755 RunRPM.sh
# ./install.sh
3. Type y to accept the license agreen and select 1 for full installation.
4. To start Intel RAID Web Console on, select applications -> System Tools ->
RAID Web Console 2 Startup UI
Red Hat Enterprise Linux 4.0 Update 2 Installation (with
integrated SAS RAID)
Below information describes how to manually install Red Hat Enterprise Linux
4.0 Update 2 on Altos R720 with integrated SAS RAID.
Drivers Required
For Red Hat Enterprise Linux 4.0 Update 2 Installation, the following device
drivers are required.
Device Version Directory on EasyBUILD
Integrated SAS
RAID
Onboard Intel
5000P Chipset
Onboard Intel
82563EB Gigabit
Ethernet
Onboard ATI N/A OS built-in
00.00.02.00-4 \Disk\R720\RAID\Integrated_SAS\RHEL
4\
N/A OS built-in
7.0.38-NAPI \Disk\R720\NIC\Intel\pro1000.lx
Altos R720 Installation Configuration Guide 20
Page 27

ES1000
Onboard USB 2.0 N/A OS built-in
IOAT N/A OS built-in
Software Required
The management utility of integrated SAS RAID can be found in the EasyBUILD
7.1 build 100 (or later).
Software Version Directory on EasyBUILD
Intel RAID Web
Console
Configuring integrated SAS RAID
Please refer to the Appendix A. for the integrated SAS RAID configuration.
Installation Tips
NOTE. There is no built-in driver Integrated SAS RAID in the Red Hat Enterprise
Linux 4.0 Update2. If you do not have the optional internal USB floppy drive,
you need an external USB floppy drive for applying driver during the OS
installation.
1.13-00 \app\r720\raid\Integrated_SAS\Linux\
1. Since Red Hat Enterprise Linux 4.0 Update2 cannot recognize the
integrated SAS RAID, you need to make a driver diskette from the
EasyBUILD 7.1 build 100 first before the installation.
2. Type linux dd when the prompt boot: appears at the start.
3. Please select the sda as the Driver Disk Source.
4. Follow the instruction to load the integrated SAS RAID driver from the
driver diskette.
5. At the Package Installation Defaults, select Customize software packages
to be installed.
6. At the Package Group Selection step, select Development Tools under
Development.
7. Follow the normal procedure to finish the installation.
Gigabit Ethernet Driver Installation
1. You can find the Intel 82546EB driver in EasyBUILD 7.1 build 100. Please
refer to directory of the 82546EB driver in Driver Required section and
copy the driver from the EasyBUILD 7.1 build 100 to HDD first.
# mount /media/cdrecorder
# cp –R /media/cdrecorder/Disk/R720/NIC/Intel/pro1000.lx/. /tmp
2. Change the directory to the driver source and install the driver
# cd /tmp/src/
21 Altos R720 Installation Configuration Guide
Page 28

# make install
# insmod e1000.ko
3. Run the kudzu utility, it will auto detect the Intel 82563EB network
controller and help you to configure it.
# kudzu
4. Restart the network service to bring up both of the network interfaces.
# service network restart
Intel RAID Web Console Installation
1. You can find the Intel RAID Web Console in EasyBUILD 7.1 build 100.
Please refer to directory of the Intel RAID Web Console in Software
Required section and copy the utility from the EasyBUILD 7.1 build 100 to
HDD first.
# mount /media/cdrecorder
# cp –R /media/cdrecorder/app/r720/raid/Integrated_SAS/Linux/. /tmp
2. Install Intel RAID Web Console utility
# cd /tmp/
# unzip ir3_Linux_RWC2_v1.13-00.zip
# chmod 755 install.sh
# chmod 755 RunRPM.sh
# ./install.sh
3. Type y to accept the license agreen and select 1 for full installation.
4. To start Intel RAID Web Console, select applications -> System Tools ->
RAID Web Console 2 Startup UI
SUSE Linux Enterprise Server 10 EM64T Installation (with
integrated SAS RAID)
Below information describes how to manually install SUSE Linux Enterprise
Server 10 EM64T on Altos R720 with integrated SAS RAID.
Drivers Required
For SUSE Linux Enterprise Server 10 EM64T Installation, the following device
drivers are required. The drivers can be found in the EasyBUILD 7.1 build 600
(or later).
Device Version Directory on EasyBUILD
Integrated SAS
RAID
Onboard Intel N/A OS built-in
00.00.03.07 \Disk\r720\raid\Integrated_SAS\slel10\
Altos R720 Installation Configuration Guide 22
Page 29

5000P Chipset
Onboard Intel
82563EB Gigabit
Ethernet
Onboard ATI
ES1000
Onboard USB 2.0 N/A OS built-in
Software Required
The management utility of integrated SAS RAID can be found in the EasyBUILD
7.1 build 600 (or later).
Software Version Directory on EasyBUILD
Intel RAID Web
Console
Configuring integrated SAS RAID
Please refer to the Appendix A. for the integrated SAS RAID configuration.
Installation Tips
7.3.15-NAPI \Disk\R720\NIC\Intel\pro1000.lx
N/A OS built-in
1.19-00 \app\r720\raid\Integrated_SAS\Linux\
NOTE. The driver of Integrated SAS RAID is required for the SUSE Linux
Enterprise Server 10 EM64T installation. If you do not have the optional
internal USB floppy drive, you need an external USB floppy drive for applying
driver during the OS installation.
1. Since SUSE Linux Enterprise Server 10 EM64T cannot recognize the
integrated SAS RAID, you need to make a driver diskette from the
EasyBUILD 7.1 build 600 first before the installation.
2. Boot the system with SUSE Linux Enterprise Server 10 EM64T CD #1.
3. When you see the boot menu on the screen, select Installation. Then press
F5 and select YES for the driver loading in the installation. Press Enter to
continue.
4. Follow the instruction to load the integrated SAS RAID driver from the
driver diskette.
5. At the Installation Settings, select the Software and click on Details. Select
“Package Groups” in the Filter drop-down menu, then click Development
-> sources to add kernel package. Select “Patterns” in the Filter dropdown menu, then add C/C++ Compiler and Tools packages.
6. Follow the instruction to complete the installation of CD #1.
7. Remove the driver diskette when system automatically reboot at the end
of the installation process with CD #1.
NOTE: If the driver diskette is kept in the FDD, you would see below message
even though you’ve inserted the installation CD #2. In this case, please press
23 Altos R720 Installation Configuration Guide
Page 30

“Ctrl+Alt+F2” to switch to another terminal. Issue the “reboot“ command to
reboot the system. Then, remove the driver diskette and continue the
installation.
8. Follow the instruction to complete the installation with remained
installation CDs.
Gigabit Ethernet Driver Installation
1. You can find the Intel 82546EB driver in EasyBUILD 7.1. Please refer to
directory of the 82546EB driver in Driver Required section above and copy
the driver from the EasyBUILD 7.1 to HDD first.
# mount /media/dvdram
# cp –R /media/dvdram/Disk/R720/NIC/Intel/pro1000.lx/. /tmp
2. Change the directory to the driver source and install the driver
# cd /tmp/src/
# make install
# insmod e1000.ko
3. Run the YaST2 utility.
Altos R720 Installation Configuration Guide 24
Page 31

# YaST2
4. Select Network Devices -> Network Card, it will auto detect the Intel
82563EB network controller and help you to configure it.
Intel RAID Web Console Installation
9. You can find the Intel RAID Web Console in EasyBUILD 7.1. Please refer to
the directory of the Intel RAID Web Console in Software Required section
above and copy the utility from the EasyBUILD 7.1 to HDD first.
# mount /media/dvdram
# cp –R /media/dvdram/app/r720/raid/Integrated_SAS/Linux/. /tmp
10. Install Intel RAID Web Console utility
# cd /tmp/
# chmod 755 install.sh
# chmod 755 RunRPM.sh
# ./install.sh
11. Type y to accept the license agreen and select 1 for full installation.
12. To start Intel RAID Web Console, click on start button, select System ->
More Programs -> RAID Web Console 2 Startup UI
SUSE Linux Enterprise Server 10 Installation (with integrated
SAS RAID)
Below information describes how to manually install SUSE Linux Enterprise
Server 10 on Altos R720 with integrated SAS RAID.
Drivers Required
For SUSE Linux Enterprise Server 10 Installation, the following device drivers are
required. The drivers can be found in the EasyBUILD 7.1 build 600 (or later).
Device Version Directory on EasyBUILD
Integrated SAS
RAID
Onboard Intel
5000P Chipset
Onboard Intel
82563EB Gigabit
Ethernet
Onboard ATI
ES1000
Onboard USB 2.0 N/A OS built-in
00.00.03.07 \Disk\r720\raid\Integrated_SAS\slel10\
N/A OS built-in
7.3.15-NAPI \Disk\R720\NIC\Intel\pro1000.lx
N/A OS built-in
25 Altos R720 Installation Configuration Guide
Page 32

Software Required
The management utility of integrated SAS RAID can be found in the EasyBUILD
7.1 build 600 (or later).
Software Version Directory on EasyBUILD
Intel RAID Web
Console
Configuring integrated SAS RAID
Please refer to the Appendix A. for the integrated SAS RAID configuration.
Installation Tips
NOTE. The driver of Integrated SAS RAID is required for the SUSE Linux
Enterprise Server 10 installation. If you do not have the optional internal USB
floppy drive, you need an external USB floppy drive for applying driver during
the OS installation.
1. Since SUSE Linux Enterprise Server 10 cannot recognize the integrated
SAS RAID, you need to make a driver diskette from the EasyBUILD 7.1
build 600 first before the installation.
1.19-00 \app\r720\raid\Integrated_SAS\Linux\
2. Boot the system with SUSE Linux Enterprise Server 10 CD #1.
3. When you see the boot menu on the screen, select Installation. Then press
F5 and select YES for the driver loading in the installation. Press Enter to
continue.
4. Follow the instruction to load the integrated SAS RAID driver from the
driver diskette.
5. At the Installation Settings, select the Software and click on Details. Select
“Package Groups” in the Filter drop-down menu, then click Development
-> sources to add kernel package. Select “Patterns” in the Filter dropdown menu, then add C/C++ Compiler and Tools packages.
6. Follow the instruction to complete the installation of CD #1.
7. Remove the driver diskette when system automatically reboot at the end
of the installation process with CD #1.
NOTE: If the driver diskette is kept in the FDD, you would see below message
even though you’ve inserted the installation CD #2. In this case, please press
“Ctrl+Alt+F2” to switch to another terminal. Issue the “reboot“ command to
reboot the system. Then, remove the driver diskette and continue the
installation.
Altos R720 Installation Configuration Guide 26
Page 33

8. Follow the instruction to complete the installation with remained
installation CDs.
Gigabit Ethernet Driver Installation
1. You can find the Intel 82546EB driver in EasyBUILD 7.1. Please refer to
directory of the 82546EB driver in Driver Required section above and copy
the driver from the EasyBUILD 7.1 to HDD first.
# mount /media/dvdram
# cp –R /media/dvdram/Disk/R720/NIC/Intel/pro1000.lx/. /tmp
2. Change the directory to the driver source and install the driver
# cd /tmp/src/
# make install
# insmod e1000.ko
3. Run the YaST2 utility.
# YaST2
4. Select Network Devices -> Network Card, it will auto detect the Intel
82563EB network controller and help you to configure it.
27 Altos R720 Installation Configuration Guide
Page 34

Intel RAID Web Console Installation
1. You can find the Intel RAID Web Console in EasyBUILD 7.1. Please refer to
the directory of the Intel RAID Web Console in Software Required section
above and copy the utility from the EasyBUILD 7.1 to HDD first.
# mount /media/dvdram
# cp –R /media/dvdram/app/r720/raid/Integrated_SAS/Linux/. /tmp
2. Install Intel RAID Web Console utility
# cd /tmp/
# chmod 755 install.sh
# chmod 755 RunRPM.sh
# ./install.sh
3. Type y to accept the license agreen and select 1 for full installation.
4. To start Intel RAID Web Console, click on start button, select System ->
More Programs -> RAID Web Console 2 Startup UI
SUSE Linux Enterprise Server 9 EM64T Service Pack 3 Installation
(with integrated SAS RAID)
Below information describes how to manually install SUSE Linux Enterprise
Server 9 EM64T Service Pack 3 on Altos R720 with integrated SAS RAID.
Drivers Required
For SUSE Linux Enterprise Server 9 EM64T Service Pack 3 Installation, the
following device drivers are required.
Device Version Directory on EasyBUILD
Integrated SAS
RAID
Onboard Intel
5000P Chipset
Onboard Intel
82563EB Gigabit
Ethernet
Onboard ATI
ES1000
Onboard USB 2.0 N/A OS built-in
Software Required
00.00.02.03-1 \Disk\R720\RAID\Integrated_SAS\SLES9
X64\
N/A OS built-in
7.0.38-NAPI \Disk\R720\NIC\Intel\pro1000.lx
N/A OS built-in
The management utility of integrated SAS RAID can be found in the EasyBUILD
7.1 build 100 (or later).
Software Version Directory on EasyBUILD
Intel RAID Web 1.13-00 \app\r720\raid\Integrated_SAS\Linux\
Altos R720 Installation Configuration Guide 28
Page 35

Console
Configuring integrated SAS RAID
Please refer to the Appendix A. for the integrated SAS RAID configuration.
Installation Tips
NOTE. There is no built-in driver Integrated SAS RAID in the SUSE Linux
Enterprise Server 9 EM64T Service Pack 3. If you do not have the optional
internal USB floppy drive, you need an external USB floppy drive for applying
driver during the OS installation.
1. Since SUSE Linux Enterprise Server 9 EM64T Service Pack 3 cannot
recognize the integrated SAS RAID, you need to make a driver diskette
from the EasyBUILD 7.1 build 100 first before the installation.
2. Boot the system form SUSE Linux Enterprise Server 9 EM64T Service Pack3
bootable CD.
3. When you see the boot menu on the screen, select Installation, press F6
then press Enter to continue.
4. Follow the instruction to load the integrated SAS RAID driver from the
driver diskette.
5. Follow the instruction to change the CD to SUSE Linux Enterprise Server 9
EM64T CD #1.
6. At the Installation Settings, select the Software and click on Detailed
selection to add kernel-source and C/C++ Compiler and Tools to install.
7. To add C/C++ compiler tools, please check C/C++ Compiler and Tools in
the left window.
8. To add kernel-source, please select Various Linux Tools in the left window
and check kernel-source in the right window.
9. After you add the kernel-source and C/C++ Compiler and Tools, please
click on Accept and follow the instruction to complete the installation.
Gigabit Ethernet Driver Installation
1. You can find the Intel 82546EB driver in EasyBUILD 7.1 build 100. Please
refer to directory of the 82546EB driver in Driver Required section and
copy the driver from the EasyBUILD 7.1 build 100 to HDD first.
# mount /media/dvdram
# cp –R /media/dvdram/Disk/R720/NIC/Intel/pro1000.lx/. /tmp
2. Change the directory to the driver source and install the driver
# cd /tmp/src/
# make install
29 Altos R720 Installation Configuration Guide
Page 36

# insmod e1000.ko
3. Run the YaST2 utility.
# YaST2
4. Select Network Devices -> Network Card, it will auto detect the Intel
82563EB network controller and help you to configure it.
Intel RAID Web Console Installation
1. You can find the Intel RAID Web Console in EasyBUILD 7.1 build 100.
Please refer to directory of the Intel RAID Web Console in Software
Required section and copy the utility from the EasyBUILD 7.1 build 100 to
HDD first.
# mount /media/dvdram
# cp –R /media/dvdram/app/r720/raid/Integrated_SAS/Linux/. /tmp
2. Install Intel RAID Web Console utility
# cd /tmp/
# unzip ir3_Linux_RWC2_v1.13-00.zip
# chmod 755 install.sh
# chmod 755 RunRPM.sh
# ./install.sh
3. Type y to accept the license agreen and select 1 for full installation.
4. To start Intel RAID Web Console, click on start button, select System ->
More Programs -> RAID Web Console 2 Startup UI
SUSE Linux Enterprise Server 9 Service Pack 3 Installation (with
integrated SAS RAID)
Below information describes how to manually install SUSE Linux Enterprise
Server 9 Service Pack 3 on Altos R720 with integrated SAS RAID.
Drivers Required
For SUSE Linux Enterprise Server 9 Service Pack 3 Installation, the following
device drivers are required.
Device Version Directory on EasyBUILD
Integrated SAS
RAID
Onboard Intel
5000P Chipset
Onboard Intel
82563EB Gigabit
Ethernet
00.00.02.03-1 \Disk\R720\RAID\Integrated_SAS\SLES9
\
N/A OS built-in
7.0.38-NAPI \Disk\R720\NIC\Intel\pro1000.lx
Altos R720 Installation Configuration Guide 30
Page 37

Onboard ATI
ES1000
Onboard USB 2.0 N/A OS built-in
Software Required
The management utility of integrated SAS RAID can be found in the EasyBUILD
7.1 build 100 (or later).
Software Version Directory on EasyBUILD
Intel RAID Web
Console
Configuring integrated SAS RAID
Please refer to the Appendix A. for the integrated SAS RAID configuration.
Installation Tips
NOTE. There is no built-in driver Integrated SAS RAID in the SUSE Linux
Enterprise Server 9 Service Pack 3. If you do not have the optional internal USB
floppy drive, you need an external USB floppy drive for applying driver during
the OS installation.
1. Since SUSE Linux Enterprise Server 9 Service Pack 3 cannot recognize the
integrated SAS RAID, you need to make a driver diskette from the
EasyBUILD 7.1 build 100 first before the installation.
N/A OS built-in
1.13-00 \app\r720\raid\Integrated_SAS\Linux\
2. Boot the system form SUSE Linux Enterprise Server 9 Service Pack3
bootable CD.
3. When you see the boot menu on the screen, select Installation, press F6
then press Enter to continue.
4. Follow the instruction to load the integrated SAS RAID driver from the
driver diskette.
5. Follow the instruction to change the CD to SUSE Linux Enterprise Server 9
CD #1.
6. At the Installation Settings, select the Software and click on Detailed
selection to add kernel-source and C/C++ Compiler and Tools to install.
7. To add C/C++ compiler tools, please check C/C++ Compiler and Tools in
the left window.
8. To add kernel-source, please select Various Linux Tools in the left window
and check kernel-source in the right window.
9. After you add the kernel-source and C/C++ Compiler and Tools, please
click on Accept and follow the instruction to complete the installation.
Gigabit Ethernet Driver Installation
1. You can find the Intel 82546EB driver in EasyBUILD 7.1 build 100. Please
31 Altos R720 Installation Configuration Guide
Page 38

refer to directory of the 82546EB driver in Driver Required section and
copy the driver from the EasyBUILD 7.1 build 100 to HDD first.
# mount /media/dvdram
# cp –R /media/dvdram/Disk/R720/NIC/Intel/pro1000.lx/. /tmp
2. Change the directory to the driver source and install the driver
# cd /tmp/src/
# make install
# insmod e1000.ko
3. Run the YaST2 utility.
# YaST2
4. Select Network Devices -> Network Card, it will auto detect the Intel
82563EB network controller and help you to configure it.
Intel RAID Web Console Installation
1. You can find the Intel RAID Web Console in EasyBUILD 7.1 build 100.
Please refer to directory of the Intel RAID Web Console in Software
Required section and copy the utility from the EasyBUILD 7.1 build 100 to
HDD first.
# mount /media/dvdram
# cp –R /media/dvdram/app/r720/raid/Integrated_SAS/Linux/. /tmp
2. Install Intel RAID Web Console utility
# cd /tmp/
# unzip ir3_Linux_RWC2_v1.13-00.zip
# chmod 755 install.sh
# chmod 755 RunRPM.sh
# ./install.sh
3. Type y to accept the license agreen and select 1 for full installation.
4. To start Intel RAID Web Console, click on start button, select System ->
More Programs -> RAID Web Console 2 Startup UI
NetWare 6.5 SP5 Installation (with integrated SAS RAID)
Below information describes how to manually install NetWare 6.5 (Support
Pack 5 overlay CD) on Altos R720 with integrated SAS RAID.
Drivers Required
For NetWare 6.5 SP5 installation with integrated SAS RAID, the following
device drivers are required.
Altos R720 Installation Configuration Guide 32
Page 39

Device Version Directory on EasyBUILD
Integrated SAS
RAID
Onboard Intel
5000P Chipset
Onboard Intel
82563EB Gigabit
Ethernet
Onboard ATI
ES1000
Onboard USB 2.0 N/A OS built-in
Installation Tips
NOTE. You need to apply the integrated SAS RAID and NIC driver during the
installation. If you do not have the optional internal USB floppy drive, you
need an external USB floppy drive.
1. Make a driver diskette for integrated SAS RAID and onboard Intel
82563EB Gigabit Ethernet from EasyBUILD 7.1 build 100.
1.00.07 \Disk\R720\RAID\Integrated_SAS\NW6.
5\
N/A OS built-in
9.22 \Disk\R720\NIC\Intel\pro1000.nw
N/A OS built-in
2. Boot the system from the NetWare 6.5 SP5 OS CD.
3. At Welcome to the NetWare 6.5 server installation page, select Manual to
install.
4. At Prepare boot partition page, create one 500 MB DOS partition.
5. When you see the following message, please select Modify. Then, move
the cursor to Storage adapters and press Enter.
The following device drivers were detected for this
server. Add, change, or delete device drivers as
needed.
Device types Driver names
----------------------- -------------Storage adapters: IDEATA, IDEATA, MEGA_SAS
6. Please press Delete to delete MEGA_SAS.HAM modules
7. Then, press INSERT key to insert the integrated SAS RAID driver. After the
drivers are successfully loaded, please select Return to driver summary.
8. Continue the installation.
9. When you see the following message, please select Modify. Then, move
the cursor to Network boards and press Enter.
The following device drivers were detected for this
server. Add, change, or delete device drivers as
33 Altos R720 Installation Configuration Guide
Page 40

needed.
Device types Driver names
------------------------- -------------Network boards:
NetWare Loadable Modules: (optional)
10. Please press INSERT key to insert the onboard Intel 82563EB Gigabit
Ethernet driver. After the drivers are successfully loaded, please select
Return to driver summary.
11. Then, you would see the following message. Please select Continue.
The following device drivers were detected for this
server. Add, change, or delete device drivers as
needed.
Device types Driver names
------------------------- -------------Network boards: E1000E, E1000E
Network Loadable Modules: (optional)
12. Please follow the normal procedures to complete the NetWare 6.5
installation.
Altos R720 Installation Configuration Guide 34
Page 41

APPENDIX A: INTEGRATED
SAS RAID CREATION
Configuring integrated SAS RAID
This section briefly shows how to create RAID with integrated SAS RAID.
Starting Integrated SAS RAID Configuration Utility
Please press ESC to show the detail POST information first when you power on
the system. When you see the RAID BIOS during POST, please press CTRL-G to
launch the SAS RAID configuration utility. After POST finished, the Adapter
Selection page will show on the screen. Please click on Start to launch the
configuration menu.
Loading Factory Default Setting
1. In the Configuration menu, select Adapter Properties. The current
adapter settings appear. Please click on Next to change the setting.
2. Change the setting of Set Factory Defaults from No to Yes then click on
submit.
3. Press Ctrl+Alt+Del to reboot the server.
Creating and Initialing a RAID Volume
1. Launch the configuration menu.
2. Select Configuration Wizard
3. Select Add Configuration (default) and click on Next.
4. Select Custom Configuration (default) and click on Next.
5. Select the drives that you want to add into the array with Ctrl key. After
you select the drives, click on Accept DG then Next.
6. Select the RAID Level you want to use, create the logical volume by
specify the size at Select Size and click on Accept to create the logical
volume.
7. After you create the logical volumes on all of the RAID volume, click on
Accept and Yes to save the configuration.
8. Click on Yes to initialize the new logical drives. You will see all the logical
drives listed.
9. Click on Home to go back to the configuration menu.
10. Now you can reboot the system and install the Operating System. Select
Exit, click on Yes and press Ctrl+Alt+Del to reboot the system.
Assigning a Hot Spare Disk
1. Launch the configuration menu.
2. Select a free disk marked as UNCONF GOOD and listed under Physical
Drives.
35 Altos R720 Installation Configuration Guide
Page 42

3. Select Make Global Dedicated HSP or Make Dedicated DSP and click on
Go.
4. Click on Home to go back to the configuration menu. You will see the
disk marked as Hotsapare in pink and listed under Physical Drives.
Altos R720 Installation Configuration Guide 36
 Loading...