

Page 1

Aspire 9810/9800 Series
User's Guide
Page 2

Copyright © 2006. Acer Incorporated.
All Rights Reserved.
Aspire 9810/9800 Series User's Guide
Original Issue: 12/2006
Changes may be made periodically to the information in this publication without obligation
to notify any person of such revisions or changes. Such changes will be incorporated in new
editions of this manual or supplementary documents and publications. This company makes
no representations or warranties, either expressed or implied, with respect to the contents
hereof and specifically disclaims the implied warranties of merchantability or fitness for a
particular purpose.
Record the model number, serial number, purchase date and place of purchase information in
the space provided below. The serial number and model number are recorded on the label
affixed to your computer. All correspondence concerning your unit should include the serial
number, model number and purchase information.
No part of this publication may be reproduced, stored in a retrieval system, or transmitted, in
any form or by any means, electronically, mechanically, by photocopy, recording or otherwise,
without the prior written permission of Acer Incorporated.
Aspire 9810/9800 Series Notebook PC
Model number: __________________________________
Serial number: ___________________________________
Date of purchase: ________________________________
Place of purchase: ________________________________
Acer and the Acer logo are registered trademarks of Acer Incorporated. Other companies'
product names or trademarks are used herein for identification purposes only and belong to
their respective companies.
Page 3

Information for your safety and comfort
Safety instructions
Read these instructions carefully. Keep this document for future reference.
Follow all warnings and instructions marked on the product.
Turning the product off before cleaning
Unplug this product from the wall outlet before cleaning. Do not use liquid
cleaners or aerosol cleaners. Use a damp cloth for cleaning.
CAUTION for plug as disconnecting device
Observe the following guidelines when connecting and disconnecting power to
the power supply unit:
Install the power supply unit before connecting the power cord to the AC
power outlet.
Unplug the power cord before removing the power supply unit from the
computer.
If the system has multiple sources of power, disconnect power from the system
by unplugging all power cords from the power supplies.
iii
CAUTION for Accessibility
Be sure that the power outlet you plug the power cord into is easily accessible
and located as close to the equipment operator as possible. When you need to
disconnect power to the equipment, be sure to unplug the power cord from the
electrical outlet.
CAUTION for Dummy Card of PCMCIA & Express Slot
Your computer shipped with plastic dummies installed in the PCMCIA & Express
slot. Dummies protect unused slots from dust, metal object, or other particles.
Save the dummy for use when no PCMCIA or Express Card is installed in the slot.
CAUTION for Listening
To protect your hearing, follow these instructions.
• Increase the volume gradually until you can hear clearly and comfortably.
• Do not increase the volume level after your ears have adjusted.
• Do not listen to music at high volumes for extended periods.
• Do not increase the volume to block out noisy surroundings.
• Decrease the volume if you can't hear people speaking near you.
Page 4

iv
Warnings
• Do not use this product near water.
• Do not place this product on an unstable cart, stand or table. If the product
falls, it could be seriously damaged.
• Slots and openings are provided for ventilation to ensure reliable
operation of the product and to protect it from overheating. These
openings must not be blocked or covered. The openings should never be
blocked by placing the product on a bed, sofa, rug or other similar surface.
This product should never be placed near or over a radiator or heat
register, or in a built-in installation unless proper ventilation is provided.
• Never push objects of any kind into this product through cabinet slots as
they may touch dangerous voltage points or short-out parts that could
result in a fire or electric shock. Never spill liquid of any kind onto or into
the product.
• To avoid damage of internal components and to prevent battery leakage,
do not place the product on a vibrating surface.
• Never use it under sporting, exercising, or any vibrating environment
which will probably cause unexpected short current or damage rotor
devices, HDD, Optical drive, and even exposure risk from lithium battery
pack.
Using electrical power
• This product should be operated from the type of power indicated on the
marking label. If you are not sure of the type of power available, consult
your dealer or local power company.
• Do not allow anything to rest on the power cord. Do not locate this
product where people will walk on the cord.
• If an extension cord is used with this product, make sure that the total
ampere rating of the equipment plugged into the extension cord does not
exceed the extension cord ampere rating. Also, make sure that the total
rating of all products plugged into the wall outlet does not exceed the fuse
rating.
• Do not overload a power outlet, strip or receptacle by plugging in too
many devices. The overall system load must not exceed 80% of the branch
circuit rating. If power strips are used, the load should not exceed 80% of
the power strip's input rating.
• This product's AC adapter is equipped with a three-wire grounded plug.
The plug only fits in a grounded power outlet. Make sure the power outlet
is properly grounded before inserting the AC adapter plug. Do not insert
the plug into a non-grounded power outlet. Contact your electrician for
details.
Warning! The grounding pin is a safety feature. Using a power
outlet that is not properly grounded may result in electric shock
and/or injury.
Page 5

Note: The grounding pin also provides good protection from
unexpected noise produced by other nearby electrical devices that
may interfere with the performance of this product.
• Use the product only with the supplied power supply cord set. If you need
to replace the power cord set, make sure that the new power cord meets
the following requirements: detachable type, UL listed/CSA certified, type
SPT-2, rated 7 A 125 V minimum, VDE approved or its equivalent, 4.6
meters (15 feet) maximum length.
Product servicing
Do not attempt to service this product yourself, as opening or removing covers
may expose you to dangerous voltage points or other risks. Refer all servicing to
qualified service personnel.
Unplug this product from the wall outlet and refer servicing to qualified service
personnel when:
• the power cord or plug is damaged, cut or frayed
• liquid was spilled into the product
• the product was exposed to rain or water
• the product has been dropped or the case has been damaged
• the product exhibits a distinct change in performance, indicating a need
for service
• the product does not operate normally after following the operating
instructions
v
Note: Adjust only those controls that are covered by the operating
instructions, since improper adjustment of other controls may
result in damage and will often require extensive work by a
qualified technician to restore the product to normal condition.
Replacing the battery pack
The notebook uses lithium batteries. Replace the battery with the same type as
that which came bundled with your product. Use of another battery may
present a risk of fire or explosion.
Warning! Batteries may explode if not handled properly. Do not
disassemble or dispose of them in fire. Keep them away from
children. Follow local regulations when disposing of used
batteries.
Page 6

vi
Telephone line safety
• Disconnect all telephone lines from the equipment when not in use and/or
before servicing.
• To avoid the remote risk of electric shock from lightning, do not connect
the telephone line to this equipment during lightning or thunderstorms.
Warning! For safety reasons, do not use non-compliant parts
when adding or changing components. Consult your reseller for
purchase options.
Additional safety information
Your device and its enhancements may contain small parts. Keep them out of
the reach of small children.
Operating environment
Warning! For safety reasons, turn off all wireless or radio
transmitting devices when using your laptop under the following
conditions. These devices may include, but are not limited to:
wireless lan (WLAN), Bluetooth and/or 3G.
Remember to follow any special regulations in force in any area, and always
switch off your device when its use is prohibited or when it may cause
interference or danger. Use the device only in its normal operating positions.
This device meets RF exposure guidelines when used normally, and it and its
antenna are positioned at least 1.5 centimeters (5/8 inches) away from your
body (refer to the figure below). It should not contain metal and you should
position the device the above-stated distance from your body. To successfully
transmit data files or messages, this device requires a good quality connection
to the network. In some cases, transmission of data files or messages may be
delayed until such a connection is available. Ensure that the above separation
distance instructions are followed until the transmission is completed. Parts of
the device are magnetic. Metallic materials may be attracted to the device, and
persons with hearing aids should not hold the device to the ear with the
hearing aid. Do not place credit cards or other magnetic storage media near the
device, because information stored on them may be erased.
Medical devices
Operation of any radio transmitting equipment, including wireless phones, may
interfere with the functionality of inadequately protected medical devices.
Consult a physician or the manufacturer of the medical device to determine if
they are adequately shielded from external RF energy or if you have any
questions. Switch off your device in health care facilities when any regulations
posted in these areas instruct you to do so. Hospitals or health care facilities
may be using equipment that could be sensitive to external RF transmissions..
Page 7

vii
Pacemakers. Pacemaker manufacturers recommend that a minimum separation
of 15.3 centimeters (6 inches) be maintained between wireless devices and a
pacemaker to avoid potential interference with the pacemaker. These
recommendations are consistent with the independent research by and
recommendations of Wireless Technology Research. Persons with pacemakers
should do the following:
• Always keep the device more than 15.3 centimeters (6 inches) from the
pacemaker
• Not carry the device near your pacemaker when the device is switched o. If
you suspect interference, switch off your device, and move it
Hearing aids. Some digital wireless devices may interfere with some hearing
aids. If interference occurs, consult your service provider.
.
Vehicles
RF signals may affect improperly installed or inadequately shielded electronic
systems in motor vehicles such as electronic fuel injection systems, electronic
antiskid (antilock) braking systems, electronic speed control systems, and air bag
systems. For more information, check with the manufacturer, or its
representative, of your vehicle or any equipment that has been added. Only
qualified personnel should service the device, or install the device in a vehicle.
Faulty installation or service may be dangerous and may invalidate any
warranty that may apply to the device. Check regularly that all wireless
equipment in your vehicle is mounted and operating properly. Do not store or
carry flammable liquids, gases, or explosive materials in the same compartment
as the device, its parts, or enhancements. For vehicles equipped with an air bag,
remember that air bags inflate with great force. Do not place objects, including
installed or portable wireless equipment in the area over the air bag or in the
air bag deployment area. If in-vehicle wireless equipment is improperly
installed, and the air bag inflates, serious injury could result. Using your device
while flying in aircraft is prohibited. Switch off your device before boarding an
aircraft. The use of wireless teledevices in an aircraft may be dangerous to the
operation of the aircraft, disrupt the wireless telephone network, and may be
illegal.
Potentially explosive environments
Switch off your device when in any area with a potentially explosive
atmosphere and obey all signs and instructions. Potentially explosive
atmospheres include areas where you would normally be advised to turn off
your vehicle engine. Sparks in such areas could cause an explosion or fire
resulting in bodily injury or even death. Switch off the device at refueling points
such as near gas pumps at service stations. Observe restrictions on the use of
radio equipment in fuel depots, storage, and distribution areas; chemical plants;
or where blasting operations are in progress. Areas with a potentially explosive
atmosphere are often, but not always, clearly marked. They include below deck
on boats, chemical transfer or storage facilities, vehicles using liquefied
petroleum gas (such as propane or butane), and areas where the air contains
chemicals or particles such as grain, dust or metal powders.
Page 8
viii
Emergency calls
Warning: You cannot make emergency calls through this device. To make an
emergency call you shall dial out through your mobile phone or other
telephone call system.
Disposal instructions
Do not throw this electronic device into the trash when discarding.
To minimize pollution and ensure utmost protection of the global environment,
please recycle. For more information on the Waste from Electrical and
Electronics Equipment (WEEE) regulations, visit
http://global.acer.com/about/sustainability.htm
Mercury advisory
For projectors or electronic products containing an LCD/CRT monitor or display:
Lamp(s) inside this product contain mercury and must be recycled or disposed of
according to local, state or federal laws. For more information, contact the
Electronic Industries Alliance at www.eiae.org
information, check www.lamprecycle.org
. For lamp-specific disposal
.
Page 9

ENERGY STAR is a government program (public/private partnership) that gives
people the power to protect the environment in a cost effective way and
without sacrificing quality or product features. Products that earn the ENERGY
STAR prevent greenhouse gas emissions by meeting strict energy efficiency
guidelines set by the US Environmental Protection Agency (EPA) and the US
Department of Energy (DOE). In the average home, 75% of all electricity used
to power home electronics is consumed while the products are turned off.
ENERGY STAR qualified home electronic products in the off position use up to
50% less energy than conventional equipment. More information refers to
http://www.energystar.gov
As an ENERGY STAR partner, Acer Inc. has determined that this product meets
the ENERGY STAR guidelines for energy efficiency.
This product has been shipped enabled for power management:
and http://www.energystar.gov/powermangement.
• Activate display’ Sleep mode within 15 minutes of user inactivity.
• Activate computer’s Sleep mode within 30 minutes of user inactivity.
• Wake the computer from Sleep mode by pushing power button.
• More power management settings can be done through Acer ePower
Management.
ix
Tips and information for comfortable use
Computer users may complain of eyestrain and headaches after prolonged use.
Users are also at risk of physical injury after long hours of working in front of a
computer. Long work periods, bad posture, poor work habits, stress,
inadequate working conditions, personal health and other factors greatly
increase the risk of physical injury.
Incorrect computer usage may lead to carpal tunnel syndrome, tendonitis,
tenosynovitis or other musculoskeletal disorders. The following symptoms may
appear in the hands, wrists, arms, shoulders, neck or back:
• numbness, or a burning or tingling sensation
• aching, soreness or tenderness
• pain, swelling or throbbing
• stiffness or tightness
• coldness or weakness
If you have these symptoms, or any other recurring or persistent discomfort
and/or pain related to computer use, consult a physician immediately and
inform your company's health and safety department.
The following section provides tips for more comfortable computer use.
Page 10

x
Finding your comfort zone
Find your comfort zone by adjusting the viewing angle of the monitor, using a
footrest, or raising your sitting height to achieve maximum comfort. Observe
the following tips:
• refrain from staying too long in one fixed posture
• avoid slouching forward and/or leaning backward
• stand up and walk around regularly to remove the strain on your leg
muscles
• take short rests to relax your neck and shoulders
• avoid tensing your muscles or shrugging your shoulders
• install the external display, keyboard and mouse properly and within
comfortable reach
• if you view your monitor more than your documents, place the display at
the center of your desk to minimize neck strain
Taking care of your vision
Long viewing hours, wearing incorrect glasses or contact lenses, glare, excessive
room lighting, poorly focused screens, very small typefaces and low-contrast
displays could stress your eyes. The following sections provide suggestions on
how to reduce eyestrain.
Eyes
• Rest your eyes frequently.
• Give your eyes regular breaks by looking away from the monitor and
focusing on a distant point.
• Blink frequently to keep your eyes from drying out.
Display
• Keep your display clean.
• Keep your head at a higher level than the top edge of the display so your
eyes point downward when looking at the middle of the display.
• Adjust the display brightness and/or contrast to a comfortable level for
enhanced text readability and graphics clarity.
• Eliminate glare and reflections by:
• placing your display in such a way that the side faces the window or
any light source
• minimizing room light by using drapes, shades or blinds
• using a task light
• changing the display's viewing angle
• using a glare-reduction filter
• using a display visor, such as a piece of cardboard extended from the
display's top front edge
• Avoid adjusting your display to an awkward viewing angle.
• Avoid looking at bright light sources, such as open windows, for extended
periods of time.
Page 11

Developing good work habits
Develop the following work habits to make your computer use more relaxing
and productive:
• Take short breaks regularly and often.
• Perform some stretching exercises.
• Breathe fresh air as often as possible.
• Exercise regularly and maintain a healthy body.
Warning! We do not recommend using the computer on a couch
or bed. If this is unavoidable, work for only short periods, take
breaks regularly, and do some stretching exercises.
Note: For more information, please refer to "Regulations and
safety notices" on page 96 in the AcerSystem User's Guide.
xi
Page 12
xii
First things first
We would like to thank you for making an Acer notebook your choice for
meeting your mobile computing needs.
Your guides
To help you use your Acer notebook, we have designed a set of guides:
First off, the Just for Starters... poster helps you get started with
setting up your computer.
The printed User's Guide introduces you to the basic features and
functions of your new computer. For more on how your computer
can help you to be more productive, please refer to the
AcerSystem User's Guide. This guide contains detailed
information on such subjects as system utilities, data recovery,
expansion options and troubleshooting. In addition it contains
warranty information and the general regulations and safety
notices for your notebook. It is available in Portable Document
Format (PDF) and comes preloaded on your notebook. Follow
these steps to access it:
1 Click on Start, All Programs, AcerSystem.
2 Click on AcerSystem User's Guide.
Note: Viewing the file requires Adobe Reader. If Adobe Reader is
not installed on your computer, clicking on AcerSystem User's
Guide will run the Adobe Reader setup program first. Follow the
instructions on the screen to complete the installation. For
instructions on how to use Adobe Reader, access the Help and
Support menu.
Basic care and tips for using your computer
Turning your computer on and off
To turn on the computer, simply press and release the power button below the
LCD screen beside the easy-launch buttons. See "Front view" on page 15 for the
location of the power button.
Page 13

xiii
To turn the power off, do any of the following:
• Use the Windows shutdown command Click on Start then click on
Shut Down.
• Use the power button
You can also shut down the computer by closing the display cover, or by
pressing the sleep hotkey <Fn> + <F4>.
Note: If you cannot power off the computer normally, press and
hold the power button for more than four seconds to shut down
the computer. If you turn off the computer and want to turn it on
again, wait at least two seconds before powering up.
Taking care of your computer
Your computer will serve you well if you take care of it.
• Do not expose the computer to direct sunlight. Do not place it near sources
of heat, such as a radiator.
• Do not expose the computer to temperatures below 0 ºC (32 ºF) or above
50 ºC (122 ºF).
• Do not subject the computer to magnetic fields.
• Do not expose the computer to rain or moisture.
• Do not spill water or any liquid on the computer.
• Do not subject the computer to heavy shock or vibration.
• Do not expose the computer to dust or dirt.
• Never place objects on top of the computer.
• Do not slam the computer display when you close it.
• Never place the computer on uneven surfaces.
Taking care of your AC adapter
Here are some ways to take care of your AC adapter:
• Do not connect the adapter to any other device.
• Do not step on the power cord or place heavy objects on top of it.
Carefully route the power cord and any cables away from foot traffic.
• When unplugging the power cord, do not pull on the cord itself but pull
on the plug.
• The total ampere ratings of the equipment plugged in should not exceed
the ampere rating of the cord if you are using an extension cord. Also, the
total current rating of all equipment plugged into a single wall outlet
should not exceed the fuse rating.
Page 14

xiv
Taking care of your battery pack
Here are some ways to take care of your battery pack:
• Use only batteries of the same kind as replacements. Turn the power off
before removing or replacing batteries.
• Do not tamper with batteries. Keep them away from children.
• Dispose of used batteries according to local regulations. Recycle if possible.
Cleaning and servicing
When cleaning the computer, follow these steps:
1 Turn off the computer and remove the battery pack.
2 Disconnect the AC adapter.
3 Use a soft, moist cloth. Do not use liquid or aerosol cleaners.
If either of the following occurs:
• the computer has been dropped or the body has been damaged;
• the computer does not operate normally
please refer to "Frequently asked questions" on page 47.
Page 15

Information for your safety and comfort iii
Safety instructions iii
Additional safety information vi
Operating environment vi
Medical devices vi
Vehicles vii
Potentially explosive environments vii
Emergency calls viii
Disposal instructions viii
Tips and information for comfortable use ix
First things first xii
Your guides xii
Basic care and tips for using your computer xii
Turning your computer on and off xii
Taking care of your computer xiii
Taking care of your AC adapter xiii
Taking care of your battery pack xiv
Cleaning and servicing xiv
Acer Empowering Technology 1
Empowering Technology password 1
Acer eNet Management 2
Acer ePower Management 4
Acer ePresentation Management 6
Acer eDataSecurity Management 7
Acer eLock Management 8
Acer eRecovery Management 10
Acer eSettings Management 12
Windows Mobility Center 13
Your Acer notebook tour 15
Front view 15
Closed front view 16
Left view 18
Right view 19
Rear view 20
Base view 21
Specifications 22
Indicators 28
Easy-launch buttons 29
Touchpad 30
Touchpad basics 30
Using the keyboard 32
Lock keys and embedded numeric keypad 32
Windows keys 33
Hotkeys 34
Special keys 36
Contents
Page 16

Ejecting the optical (CD or DVD) drive tray 37
Using a computer security lock 37
Audio 38
Adjusting the volume 38
Using surround/multi-channel sound 39
Dolby Digital Live 39
DTS Connect 40
Using RAID 41
What is RAID? 41
RAID 0 41
RAID 1 41
Intel Matrix RAID 41
Before enabling RAID on your system 42
Enabling RAID on your system 42
After enabling RAID on your system 43
Using the system utilities 44
Acer GridVista (dual-display compatible) 44
Launch Manager 45
Norton Internet Security 46
Frequently asked questions 47
Requesting service 50
International Travelers Warranty (ITW) 50
Before you call 50
Battery pack 51
Battery pack characteristics 51
Maximizing the battery's life 51
Installing and removing the battery pack 52
Charging the battery 53
Checking the battery level 53
Optimising battery life 53
Battery-low warning 54
Acer Arcade (for selected models) 55
Remote control (for selected models) 56
Remote functions 57
Finding and playing content 58
Settings 58
Arcade controls 59
Navigation controls 59
Player controls 59
Virtual keyboard 60
Background mode 60
Cinema 61
Settings 61
Album 62
Editing Pictures 62
Page 17

Slide Show settings 62
Video 63
Playing a video file 63
Capturing video (TV models only) 63
Snapshot 63
Editing video 64
Music 64
TV (for selected models) 65
Time-shift functionality 65
Recorded TV 66
Scheduling recordings 66
Program guide 66
Find program 66
TV settings 66
Using TeleText functions 67
Make DVDs 68
Authoring CD/DVDs 68
Acer Arcade Deluxe
(for selected models) 69
69
Remote control (for selected models) 70
Remote functions 71
Starting Acer Arcade Deluxe 72
VideoMagician 72
TV Joy (selected models only) 72
SportsCap (selected models only) 72
DV Wizard 73
DVDivine 73
Taking your notebook PC with you 74
Disconnecting from the desktop 74
Moving around 74
Preparing the computer 74
What to bring to meetings 75
Taking the computer home 75
Preparing the computer 75
What to take with you 75
Special considerations 76
Setting up a home office 76
Traveling with the computer 76
Preparing the computer 76
What to take with you 76
Special considerations 77
Traveling internationally with the computer 77
Preparing the computer 77
What to bring with you 77
Special considerations 77
Page 18

Securing your computer 78
Using a computer security lock 78
Using passwords 78
Entering passwords 79
Setting passwords 79
Expanding through options 80
Connectivity options 80
Fax/data modem 80
Built-in network feature 81
Fast Infrared (FIR) 81
Universal Serial Bus (USB) 82
IEEE 1394 port 82
PC Card slot 83
ExpressCard 84
Installing memory 85
Connecting your TV and AV-in cables 86
BIOS utility 89
Boot sequence 89
Enable disk-to-disk recovery 89
Password 89
Using software 90
Playing DVD movies 90
Power management 91
Acer eRecovery Management 92
Create backup 92
Burn backup disc 93
Restore and recovery 93
Troubleshooting 94
Troubleshooting tips 94
Error messages 94
Regulations and safety notices 96
FCC notice 96
Modem notices 97
Laser compliance statement 100
LCD pixel statement 100
Macrovision copyright protection notice 100
Radio device regulatory notice 101
General 101
European Union (EU) 101
The FCC RF safety requirement 103
Canada — Low-power license-exempt radio
communication devices (RSS-210) 104
Federal Communications Comission
Declaration of Conformity 105
106
Page 19

LCD panel ergonomic specifications 107
Index 108
Page 20

Page 21
1
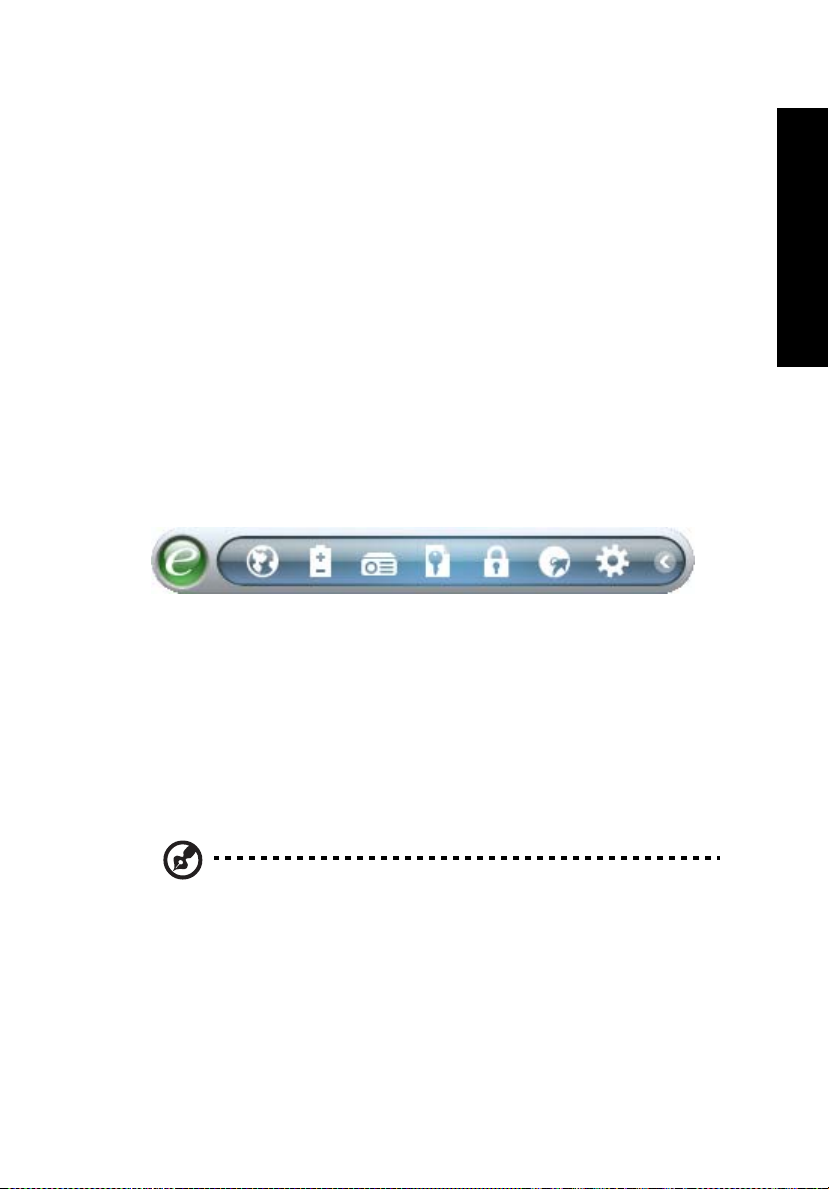
Acer Empowering Technology
The Empowering Technology toolbar makes it easy for you to access frequently
used functions and manage your new Acer system. Displayed by default in the
upper half of your screen, it provides access to the following utilities:
• Acer eNet Management hooks up to location-based networks intelligently.
• Acer ePower Management optimizes battery usage via customizable
power plans.
• Acer ePresentation Management connects to a projector and adjusts
display settings.
• Acer eDataSecurity Management protects data with passwords and
encryption.
• Acer eLock Management limits access to external storage media.
• Acer eRecovery Management backs up and recovers data flexibly, reliably
and completely.
• Acer eSettings Management accesses system information and adjusts
settings easily.
For more information, right click on the Empowering Technology toolbar, then
select the "Help" or "Tutorial" function.
Empowering Technology
Empowering Technology password
Before using Acer eLock Management and Acer eRecovery Management, you
must initialize the Empowering Technology password. Right-click on the
Empowering Technology toolbar and select "Password Setup" to do so. If you
have not initialized the Empowering Technology password and run Acer eLock
Management or Acer eRecovery Management, you will be asked to create it.
Note: If you lose the Empowering Technology password, there is
no way to reset it except by reformatting your system. Make sure
to remember or write down your password!
Page 22
2
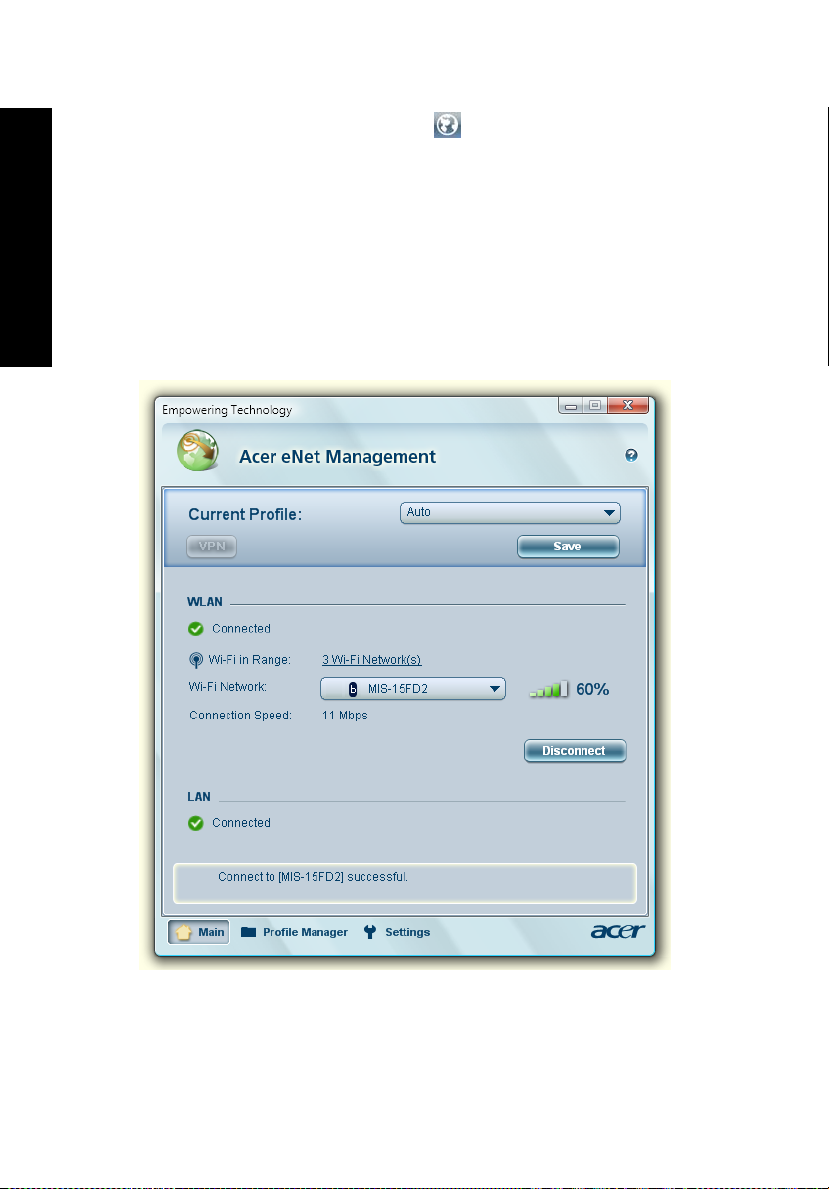
Acer eNet Management
Acer eNet Management helps you quickly connect to both wired and wireless
networks in a variety of locations. To access this utility, select "Acer eNet
Management" from the Empowering Technology toolbar or run the program
from the Acer Empowering Technology program group in Start menu. You can
also set Acer eNet Management to start automatically when you boot up your
PC.
Acer eNet Management automatically detects the best settings for a new
location, while offering you the option to manually adjust the settings to match
Empowering Technology
your needs.
Page 23

3
Acer eNet Management can save network settings for a location to a profile,
and automatically switch to the appropriate profile when you move from one
location to another. Settings stored include network connection settings (IP and
DNS settings, wireless AP details, etc.), as well as default printer settings.
Security and safety concerns mean that Acer eNet Management does not store
username and password information.
Empowering Technology
Page 24

4
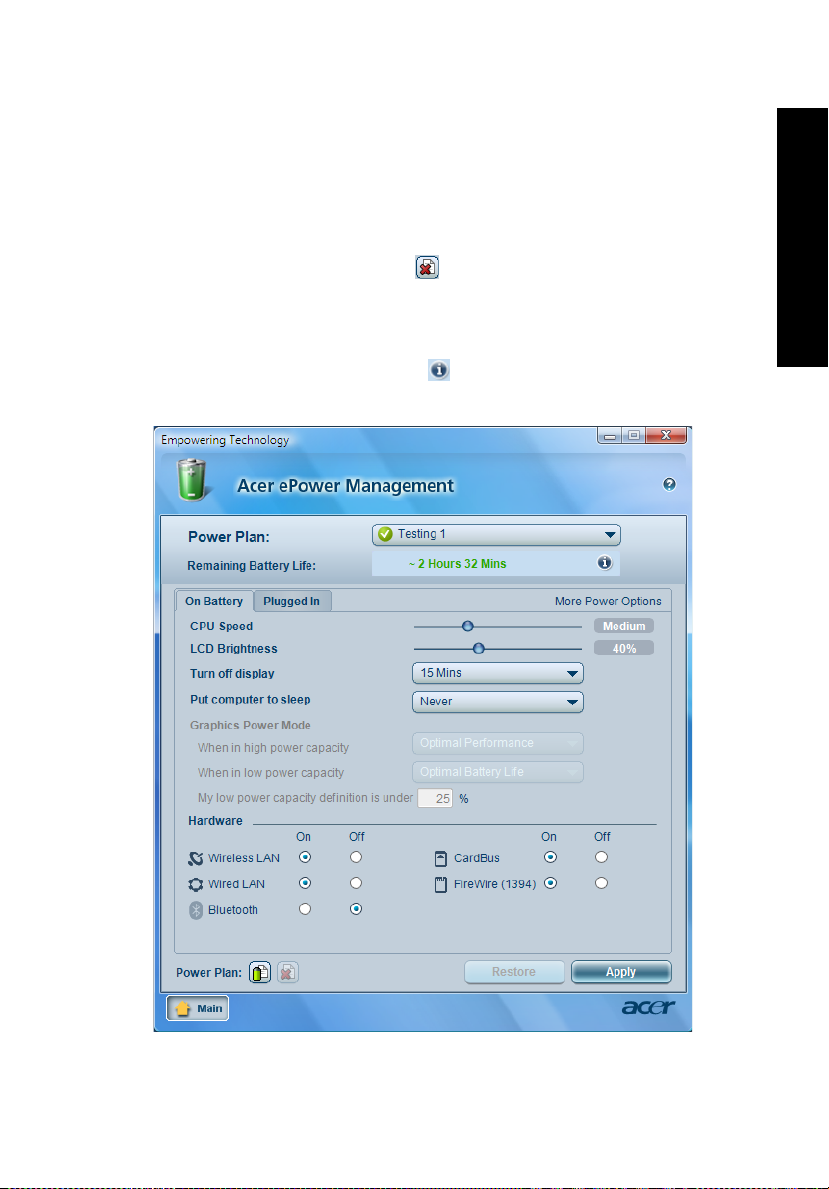
Acer ePower Management
Acer ePower Management features a straightforward user interface for
configuring your power management options. To access this utility, select "Acer
ePower Management" from the Empowering Technology toolbar, run the
program from the Acer Empowering Technology program group in Start menu,
or right-click the Windows power icon in the system tray and select "Acer
ePower Management".
Using power plans
Empowering Technology
Acer ePower Management comes with three predefined power plans: Balanced,
High performance and Power saver. You can also create customized power
plans. You can create, switch between, edit, delete and restore power plans, as
described below.
View and adjust settings for On Battery and Plugged In modes by clicking the
appropriate tabs. You can open Windows power options by clicking "More
Power Options".
Note: You cannot delete the predefined power plans.
To create a new power plan:
Creating customized power plans allows you to save and quickly switch to a
personalized set of power options.
1 Click the Create Power Plan icon.
2 Enter a name for your new power plan.
3 Choose a predefined power plan to base your customized plan on.
4 If necessary, change the display and sleep settings you want your computer
to use.
5 Click "OK" to save your new power plan.
To switch between power plans:
1 Select the power plan you wish to switch to from the drop-down list.
2 Click "Apply".
To edit a power plan:
Editing a power plan allows you to adjust system settings like LCD brightness
and CPU speed. You can also turn on/off system components to extend battery
life.
1 Switch to the power plan you wish to edit
2 Adjust settings as required.
Page 25
5
3 Click "Apply" to save your new settings.
To delete a power plan:
You cannot delete the power plan you are currently using. If you want to delete
the active power plan, switch to another one first.
1 Select the power plan you wish to delete from the drop-down list.
2 Click the Delete Power Plan icon.
Battery status
For real-time battery life estimates based on current usage, refer to the panel in
the upper half of the window. Click the to view estimated battery life in
sleep and hibernate modes.
Empowering Technology
Page 26
6
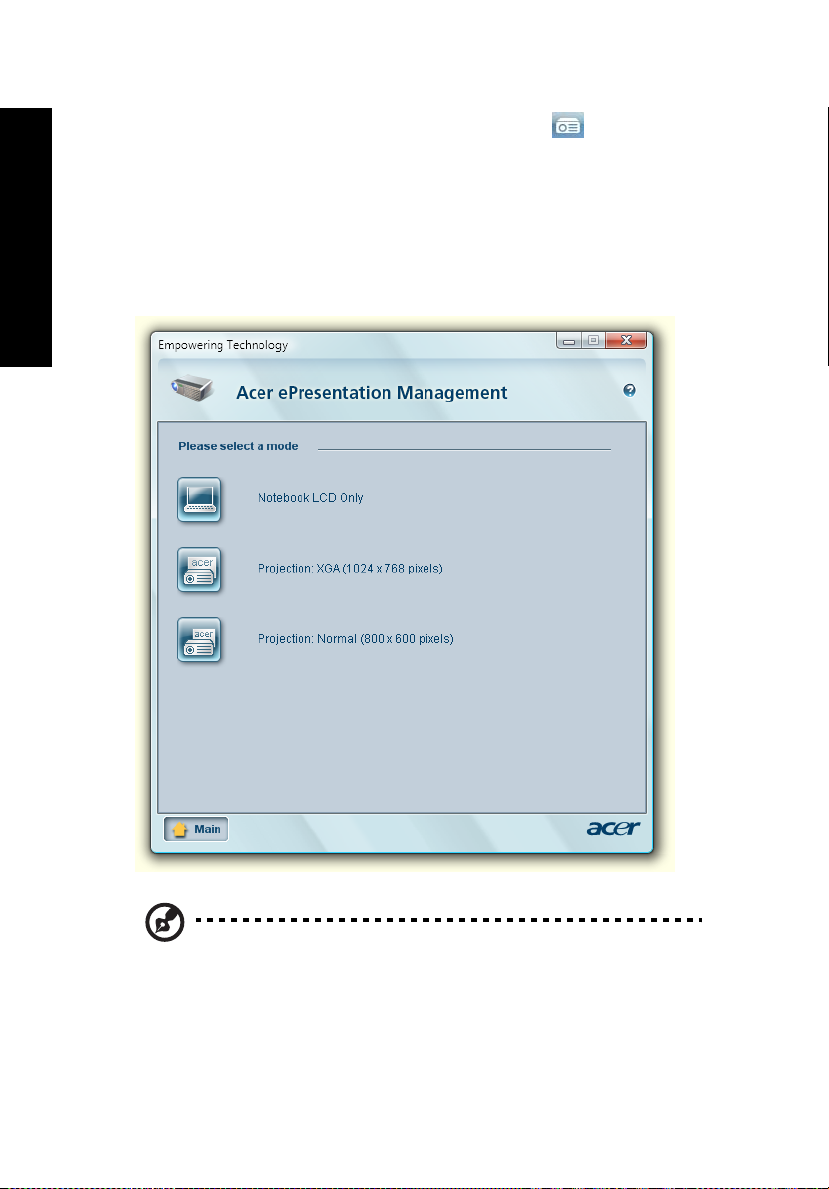
Acer ePresentation Management
Acer ePresentation Management lets you project your computer's display to an
external display device or projector using the hotkey: <Fn> + <F5>. If autodetection hardware is implemented in the system and the external display
supports it, your system display will be automatically switched out when an
external display is connected to the system. For projectors and external devices
that are not auto-detected, launch Acer ePresentation Management to choose
an appropriate display setting.
Empowering Technology
Note: If the restored resolution is not correct after disconnecting a
projector, or you need to use an external resolution that is not
supported by Acer ePresentation Management, adjust your
display settings using Display Properties or the utility provided by
the graphics vendor.
Page 27
7
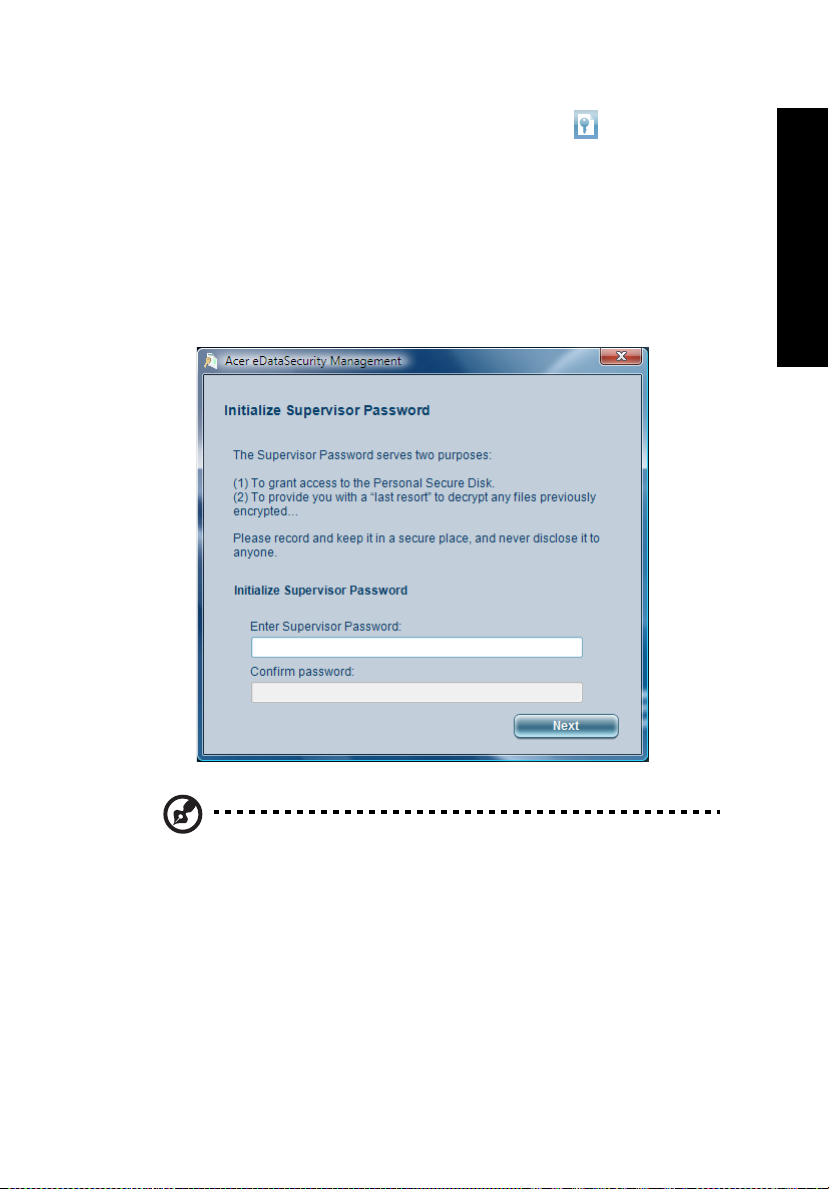
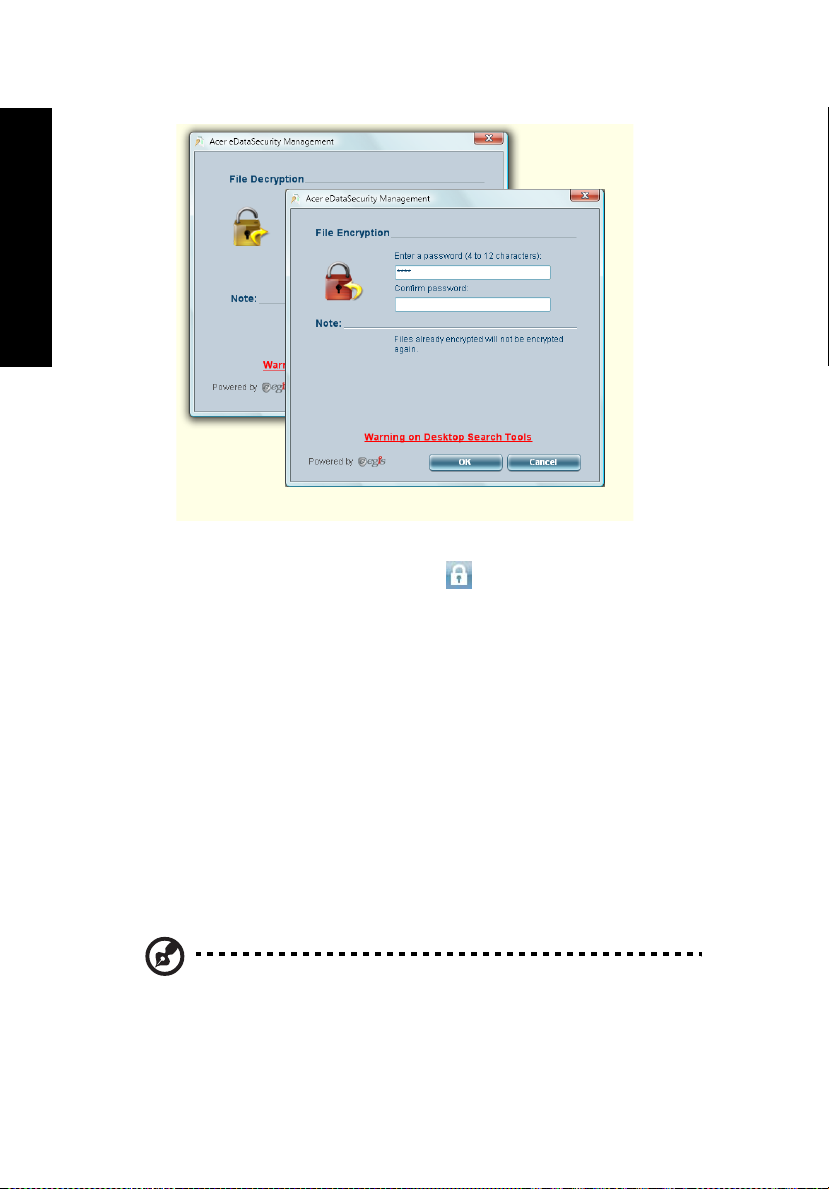
Acer eDataSecurity Management
Acer eDataSecurity Management is an encryption utility that protects your files
from being accessed by unauthorized persons. It is conveniently integrated with
Windows Explorer as a shell extension for quick data encryption/decryption and
also supports on-the-fly file encryption for Lotus Notes and Microsoft Outlook.
The Acer eDataSecurity Management setup wizard will prompt you for a
supervisor password and default encryption password. This password will be
used to encrypt files by default, or you can choose to enter your own password
when encrypting a file.
Empowering Technology
Note: The password used to encrypt a file is the unique key that
the system needs to decrypt it. If you lose the password, the
supervisor password is the only other key capable of decrypting
the file. If you lose both passwords, there will be no way to
decrypt your encrypted file! Be sure to safeguard all related
passwords!
Page 28
8
Empowering Technology
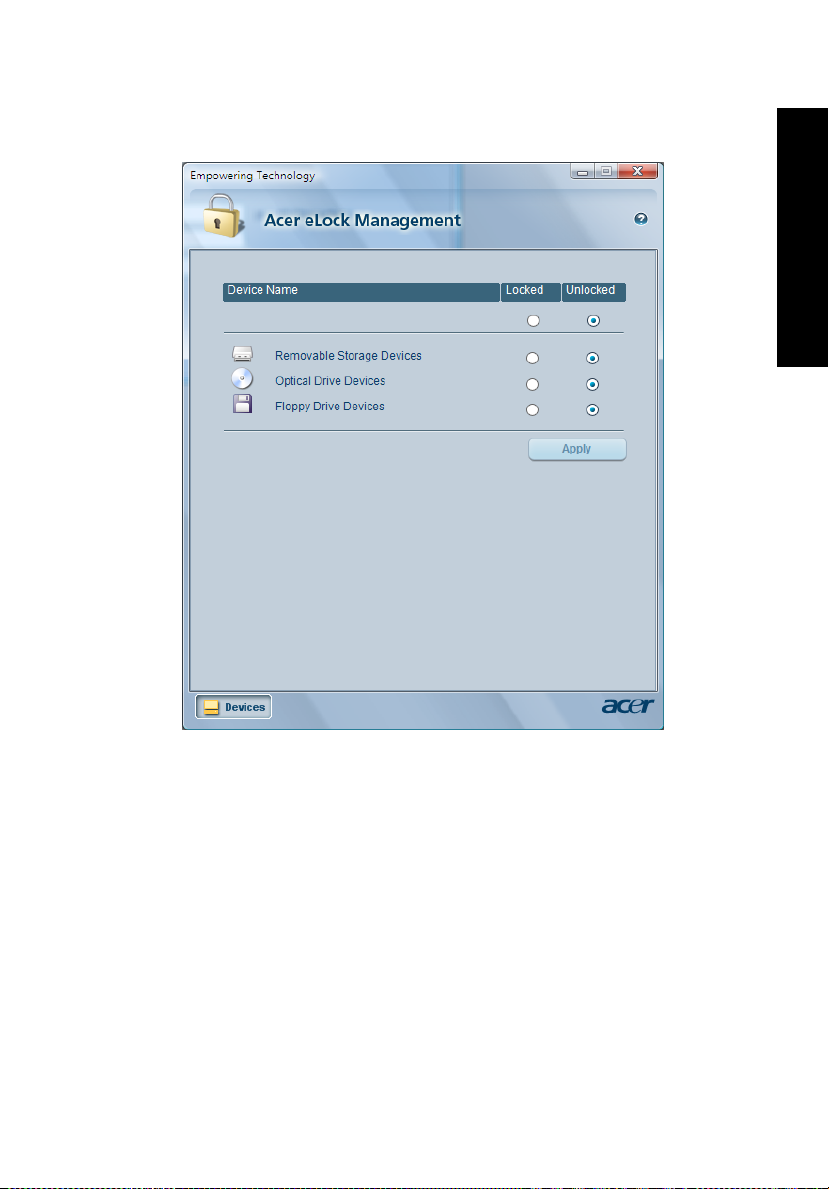
Acer eLock Management
Acer eLock Management is simple yet effective utility that allows you to lock
removable storage, optical and floppy drive devices to ensure that data can't be
stolen while your system is unattended.
• Removable Storage Devices — includes USB disk drives, USB pen drives, USB
flash drives, USB MP3 drives, USB memory card readers, IEEE 1394 disk
drives, and any other removable storage devices that can be mounted as a
file system when plugged into the system.
• Optical Drive Devices — includes any kind of CD-ROM, DVD-ROM, HD-DVD
or Blu-ray drive devices.
• Floppy Drive Devices — 3.5-inch floppy drives only.
To use Acer eLock Management, the Empowering Technology password must
be set first. Once set, you can apply locks to any of the devices types. Lock(s) will
immediately be set without any reboot necessary, and will remain after
rebooting, until removed.
Note: If you lose the Empowering Technology password, there is
no method to reset it except by reformatting your system. Make
sure to remember or write down your password.
Page 29
9
Empowering Technology
Page 30

10
Acer eRecovery Management
Acer eRecovery Management is a versatile backup utility. It allows you to create
full or incremental backups, burn the factory default image to optical disc, and
restore from previously created backups or reinstall applications and drivers. By
default, user-created backups are stored to the D:\ drive.
Acer eRecovery Management provides you with:
• Password protection (Empowering Technology password)
• Full and incremental backups to hard disk or optical disc
Empowering Technology
• Creation of backups:
• Factory default image
• User backup image
• Current system configuration
• Application backup
• Restore and recovery:
• Factory default image
• User backup image
• From previously-created CD/DVD
• Reinstall applications/drivers
Page 31

11
Empowering Technology
For more information, please refer to "Acer eRecovery Management" on page
92 in the AcerSystem User's Guide.
Note: If your computer did not come with a Recovery CD or
System CD, please use Acer eRecovery Management's "System
backup to optical disc" feature to burn a backup image to CD or
DVD. To ensure the best results when recovering your system
using a CD or Acer eRecovery Management, detach all peripherals
(except the external Acer ODD, if your computer has one),
including your Acer ezDock.
Page 32

12
Acer eSettings Management
Acer eSettings Management allows you to inspect hardware specifications, set
BIOS passwords and modify boot options.
Acer eSettings Management also:
• Provides a simple graphical user interface for navigation.
• Prints and saves hardware specifications.
• Lets you set an asset tag for your system.
Empowering Technology
Page 33

13
Windows Mobility Center
The Windows Mobility Center collects key mobile-related system settings in one
easy-to-find place, so you can quickly configure your Acer system to fit the
situation as you change locations, networks or activities. Settings include display
brightness, power plan, volume, wireless networking on/off, external display
settings, display orientation and synchronization status.
Windows Mobility Center also includes Acer-specific settings like Bluetooth Add
Device (if applicable), sharing folders overview/sharing service on or off, and a
shortcut to the Acer user guide, drivers and utilities.
To launch Windows Mobility Center:
Empowering Technology
• Use the shortcut key < > + <X>
• Start Windows Mobility Center from the Control panel
• Start Windows Mobility Center from the Accessories program group in the
Start menu
Page 34

14
Empowering Technology
Page 35

15
Your Acer notebook tour
After setting up your computer as illustrated in the Just for Starters... poster,
let us show you around your new Acer notebook.
Front view
English
# Item Description
1 Built-in camera 1.3 megapixel web camera for video
communication.
2 Display screen Also called Liquid-Crystal Display (LCD), displays
computer output.
Page 36

English
16
# Item Description
3Media/
volume buttons
4/8 Microphone Internal microphone for sound recording.
5 Touchpad Touch-sensitive pointing device which functions
6 Click buttons (left,
center and right)
7 Palmrest Comfortable support area for your hands when
9 Keyboard For entering data into your computer.
10/11 Easy-launch buttons Buttons for launching frequently used
12 Power button Turns the computer on and off.
For use with Acer Arcade and other media
playing programs.
like a computer mouse.
The left and right buttons function like the left
and right mouse buttons; the center button
serves as a 4-way scroll button.
you use the computer.
programs.
See "Easy-launch buttons" on page 29 for more
details.
Closed front view
# Icon Item Description
1 Speakers Left and right speakers deliver stereo
audio output.
2 Infrared port/
CIR receiver
3 Line-in jack Accepts audio line-in devices (e.g., audio
4 Microphone-in jack Accepts input from external
Interfaces with infrared devices (e.g.,
infrared printer and IR-aware computer)/
Receives signals from a remote control.
CD player, stereo walkman).
microphones.
Page 37

17
# Icon Item Description
5 Headphones/speaker/
line-out jack with
S/PDIF support
6 Power indicator Indicates the computer's power status.
7 Battery indicator Indicates the computer's batttery status.
8Bluetooth
communication
switch/indicator
9 Wireless
communication
switch/indicator
Connects to audio line-out devices (e.g.,
speakers, headphones).
Enables/disables the Bluetooth function.
Indicates the status of Bluetooth
communication.
Enables/disables the wireless function.
Indicates the status of wireless LAN
communication.
English
Page 38

English
18
Left view
# Icon Item Description
1 USB 2.0 port Connect to USB 2.0 devices (e.g., USB
mouse, USB camera).
2 Modem (RJ-11)
port
Connects to a phone line.
3 Optical drive Internal optical drive; accepts CDs or DVDs
4 Optical disk access
indicator
5 Optical drive eject
button
6 Emergency eject
hole
7 Latch Locks and releases the lid.
(slot-load or tray-load depending on
model).
Lights up when the optical drive is active.
Ejects the optical disk from the drive.
Ejects the optical drive tray when the
computer is turned off.
Page 39

19
Right view
# Item Description
1 Latch Locks and releases the lid.
2 5-in-1 card reader Accepts Secure Digital (SD),
MultiMediaCard (MMC), Memory Stick
(MS), Memory Stick PRO (MS PRO), xDPicture Card (xD).
3 3 USB 2.0 ports Connect to USB 2.0 devices (e.g., USB
4 4-pin IEEE 1394 port Connects to IEEE 1394 devices.
5 PC Card slot eject
button
6 PC Card slot Accepts one Type II PC Card.
mouse, USB camera).
Ejects the PC Card from the slot.
English
7 ExpressCard/54 slot Accepts one ExpressCard/54 module.
Page 40

English
20
Rear view
# Icon Item Description
1 DC-in jack Connects to an AC adapter.
2 TV-in port Accepts input signals from analog/digital
3 AV-in port Accepts input signals from audio/video (AV)
4 Kensington lock slot Connects to a Kensington-compatible
5 Ventilation slots Enable the computer to stay cool, even after
6 S-video/TV-out
(NTSC/PAL) port
7 External display
(VGA) port
8 DVI-D port Supports digital video connections.
9 Ethernet (RJ-45)
port
10 Parallel port Connects to a printer.
11 Serial port Connects to a serial device.
TV-tuner devices (for selected models).
devices (manufacturing option).
computer security lock.
prolonged use.
Connects to a television or display device
with S-video input.
Connects to a display device
(e.g., external monitor, LCD projector).
Connects to an Ethernet 10/100/1000-based
network (for selected models).
Page 41

21
Base view
# Item Description
1 Ventilation slots and
cooling fan
2 Memory compartment Houses the computer's main memory.
3 Battery lock Locks the battery in position.
4 Battery release latch Releases the battery for removal.
5 Battery bay Houses the computer's battery pack.
6 Hard disk bay Houses the computer's hard disk (secured with
7 Sub woofer Emits low frequency sound output.
Enable the computer to stay cool, even after
prolonged use.
Note: Do not cover or obstruct the opening of
the fan.
screws).
English
Page 42

22
Specifications
English
Operating
system
Platform
• Windows Vista
• Windows Vista
• Windows Vista
• Intel
®
Centrino® Duo mobile technology, featuring:
•Intel
™
Home Basic
™
Home Premium
™
Ultimate
®
Core™ 2 Duo processor T7200/T7400/
T7600 (4MB L2 cache, 2.0/2.16/2.33 GHz, 667
MHz FSB) and T5500/T5600 (2 MB L2 cache, 1.66/
1.83 GHz, 667 MHz FSB), supporting Intel
®
EM64T
•Intel
®
Core™ Duo processor T2300/T2400/T2500/
T2600 ( 2 MB L2 cache, 1.66/1.83/2/2.16 GHz, 667
MHz FSB)
•Intel
•Intel
®
945PM Express chipset
®
PRO/Wireless 3945ABG network
connection (dual-band tri-mode 802.11a/b/g)
Wi-Fi CERTIFIED
SignalUp
™
™
solution, supporting Acer
wireless technology
System memory Up to 2 GB of DDR2 667 MHz memory, upgradeable to 4
GB using two soDIMM modules (dual-channel support)
Display
• 20.1" WSXGA+ high-brightness (300 nit) Acer
™
CrystalBrite
TFT LCD, 1680 x 1050 pixel resolution, 6
lamps
• 16 ms typical on/off and 8 ms average gray-to-gray
response time
• Simultaneous multi-window viewing via Acer
GridVista
™
supported
Page 43

23
TV-tuner Acer TV-tuner options:
• Analog TV-tuner supporting hardware MPEG-2
stream encoding
• Digital and analog hybrid TV-tuner supporting
hardware MPEG-2 stream encoding
• Digital and analog hybrid TV-tuner supporting
software MPEG-2 stream encoding
Analog TV-tuner supporting international analog TV
standards (NTSC/PAL/SECAM)
Digital TV-tuner supporting DVB-T (Digital Video
Broadcasting Terrestrial) standard (6 MHz to 8 MHz)
TV-tuner I/O:
• RF jack for digital/analog TV antenna cable input
• AV-in port for composite/S-video/line-in audio/
video input
TV-tuner cables:
• PAL cable for digital/analog TV input, PAL/
SECAM to NTSC port converter
• Mini DIN cable: RCA jack and S-video port for
audio/video input
Acer DVB-T antenna (UHF/VHF reception) supporting Acer
™
wireless technology
®
GeForce® Go 7600 with up to 256 MB
Graphics
SignalUp
• NVIDIA
GDDR2 VRAM, or NVIDIA
128MB dedicated GDDR2 VRAM, supporting NVIDIA
™
TurboCache
, PureVideo™ technology (WMV HD,
High-Definition MPEG-2 Hardware Acceleration,
integrated HDTV encoder) dual-link DVI, Microsoft
®
DirectX
9.0, Shader Model 3.0, OpenEXR High
Dynamic Range (HDR) technology, NVIDIA
™
PowerMizer
6.0 and PCI Express
• Dual independent display
• 16.7 million colors (20.1" LCD model)
• MPEG-2/DVD hardware-assisted capability
• S-video/TV-out (NTSC/PAL) support
• DVI-D (true digital video interface) with HDCP (High-
bandwidth Digital Content Protection) support
• Acer Arcade
Acer ClearVision
™
featuring Acer CinemaVision™ and
®
™
technologies
GeForce® Go 7300 with
®
®
English
®
®
Page 44

24
English
Storage
subsystem
Audio
Communication
• One or two 80/100/120/160 GB (or larger) Serial ATA
®
hard disk drives RAID 0, 1 and Intel
Matrix RAID
supported
• Optical drive options:
• DVD-Super Multi double-layer drive (slot-load)
• HD-DVD
• 5-in-1 card reader, supporting Secure Digital (SD),
®
MultiMediaCard (MMC), Memory Stick
™
Memory Stick PRO
(MS PRO), xD-Picture Card™ (xD)
(MS),
• Two built-in Acer 3DSonic (1.5 W ) stereo speakers
and one Acer BasSonic subwoofer
• Dolby
• DTS CONNECT
• Intel
®
Digital Live support
™
support featuring DTS
™
INTERACTIVE
®
High Definition audio support
and DTS NEO:PC technologies
• S/PDIF (Sony/Philips Digital Interface) support for
digital speakers
• MS Sound compatible
• Two built-in stereo microphones
• Acer Video Conference, featuring Voice and Video
over Internet Protocol (VVoIP) support via Acer
OrbiCam
• Acer OrbiCam
featuring:
• 30 degree ergonomic rotation
• WLAN: Intel
connection (dual-band tri-mode 802.11a/b/g) Wi-Fi
CERTIFIED
wireless technology
• WPAN: Bluetooth
™
and optional Acer Bluetooth® VoIP phone
™
1.3 megapixel CMOS camera,
®
PRO/Wireless 3945ABG network
™
solution supporting Acer SignalUp™
®
2.0+EDR (Enhanced Data Rate)
• LAN: gigabit Ethernet; Wake-on-LAN ready
• Modem: 56K ITU V.92 with PTT approval;
Wake-on-Ring ready
Page 45

25
Dimensions
and weight
Power
subsystem
Special keys and
controls
• 475 (W) x 352 (D) x 61.8 (H) mm (18.7 x 13.9 x 2.4
inches)
• 20.1" LCD model:
• 7.8 kg (17.19 lbs.) with TV-tuner and 2nd hard
disk drive
• 7.7 kg (16.9 lbs.) without TV-tuner and 2nd hard
disk drive
• 19" LCD model:
• 7.5 kg (16.5 lbs.) with TV-tuner and 2nd hard
disk drive
• 7.4 kg (16.3 lbs.) without TV-tuner and 2nd hard
disk drive
• ACPI 3.0 CPU power management standard: supports
Standby and Hibernation power-saving modes
• 71 W 4800 mAh Li-ion battery pack (8-cell)
• Acer QuicCharge
• 80% charge in 1 hour
• 2-hour rapid charge system-off
• 2.5-hour charge-in-use
™
technology:
• 3-pin 135 W AC adapter ( 811 g with power cord)
• 105-/106-key keyboard, with inverted "T" cursor
layout; 2.5 mm (minimum) key travel
• Touchpad with 4-way scroll button
• 12 function keys, four cursor keys, two Windows
keys, hotkey controls, embedded numeric keypad,
international language support
®
• Four easy-launch buttons: Empowering Key, email,
Internet, user-programmable button
• Seven media keys: Acer Arcade, volume up/down,
previous, next, play/pause, stop
• Four front-panel LED indicators: power, battery,
WLAN, Bluetooth
®
• Two communication LED switches: WLAN,
Bluetooth
®
• Acer remote controls:
™
• Acer Arcade
• Multi-Media remote controller (uses an external
USB CIR receiver)
(48 keys)
English
Page 46

26
English
I/O interface
Options and
accessories
• ExpressCard
™
/54 slot
• PC Card slot (one Type II)
• 5-in-1 card reader (SD/MMC/MS/MS PRO/xD)
• Four USB 2.0 ports
• DVI-D port with HDCP support
• IEEE 1394 port
• Consumer infrared (CIR) port
• Fast infrared (FIR) port
• External display (VGA) port
• S-video/TV-out (NTSC/PAL) port
• AV-in port
• TV-tuner antenna-in port
• Headphones/speaker/line-out port with S/PDIF
support
• Microphone-in jack
• Line-in jack
• Parallel port
• Serial port
• Ethernet (RJ-45) port
• Modem (RJ-11) port
• DC-in jack for AC adapter
• Acer Bluetooth
®
VoIP phone
• 512 MB, 1 or 2GB DDR2 667 MHz soDIMM modules
• 8-cell Li-ion battery pack
• 3-pin 135 W AC adapter
• External USB floppy disk drive
Page 47

27
Software
• Acer Empowering Technology
• Acer eNet Management
• Acer ePower Management
• Acer ePresentation Management
• Acer eDataSecurity Management
• Acer eLock Management
• Acer eRecovery Management
• Acer eSettings Management
• Acer GridVista
• Acer Arcade
• Acer Arcade Deluxe
™
™
™
• Acer Launch Manager
™
®
®
Environment
• Norton Internet Security
• Adobe
®
• CyberLink
• CyberLink
• NTI CD-Maker
Note: Software listed above is for reference
only. The exact configuration of your PC
depends on the model purchased.
®
Reader
®
PowerDVD
®
PowerProducer
™
• Temperature:
• Operating: 5 °C to 35 °C
• Non-operating: -20 °C to 65 °C
• Humidity (non-condensing):
• Operating: 20% to 80%
• Non-operating: 20% to 80%
System
compliance
• Wi-Fi
• ACPI
®
• Mobile PC 2002
• DMI 2.0
Warranty One-year International Travelers Warranty (ITW)
English
Note: The specifications listed above are for reference only. The
exact configuration of your PC depends on the model purchased.
Page 48

English
28
Indicators
The computer has serveral easy-to-read status indicators.
The front panel indicators are visible even when the computer cover is closed
up.
Icon Function Description
HDD Indicates when the hard disk drive is active.
Caps Lock Lights up when Caps Lock is activated.
Num Lock Lights up when Num Lock is activated.
Power Indicates the computer's power status.
Battery Indicates the computer's batttery status.
Bluetooth Indicates the status of Bluetooth communication.
Wireless LAN Indicates the status of wireless LAN communication.
1. Charging: The light shows amber when the battery is charging.
2. Fully charged: The light shows green when in AC mode.
Page 49

29
Easy-launch buttons
Located above the keyboard are four buttons. These buttons are called
easy-launch buttons. They are: mail, Web browser, Empowering Key < > and
one user-programmable button.
Press < > to run the Acer Empowering Technology. Please see "Acer
Empowering Technology" on page 1. The mail and Web browser buttons are
pre-set to email and Internet programs, but can be reset by users. To set the
Web browser, mail and programmable buttons, run the Acer Launch Manager.
See "Launch Manager" on page 45.
English
Easy-launch button Default application
Acer Empowering Technology (user-programmable)
Puts the computer in Sleep mode.
P
Web browser Internet browser (user-programmable)
Mail Email application (user-programmable)
User-programmable
Page 50

30
Touchpad
English
The built-in touchpad is a pointing device that senses movement on its surface.
This means the cursor responds as you move your finger across the surface of
the touchpad. The central location on the palmrest provides optimum comfort
and support.
Touchpad basics
The following items show you how to use the touchpad:
• Move your finger across the touchpad (2) to move the cursor.
• Press the left (1) and right (4) buttons located beneath the touchpad to
perform selection and execution functions. These two buttons are similar
to the left and right buttons on a mouse. Tapping on the touchpad is the
same as clicking the left button.
• Use the 4-way scroll (3) button to scroll up or down and move left or right
a page. This button mimics your cursor pressing on the right scroll bar of
Windows applications.
Page 51

Function Left button (1)
Execute Quickly click
twice.
Select Click once. Tap once.
Drag Click and hold,
then use
finger on the
touchpad to
drag the
cursor.
Access
context
menu
Scroll Click and
Right
button (4)
Click
once.
Main touchpad (2)
Tap twice (at the same
speed as double-clicking
a mouse button).
Tap twice (at the same
speed as double-clicking
a mouse button); rest
your finger on the
touchpad on the second
tap and drag the cursor.
Center
button (3)
hold to
move up/
down/left/
right.
31
English
Note: When using the touchpad, keep it — and your fingers — dry
and clean. The touchpad is sensitive to finger movement; hence,
the lighter the touch, the better the response. Tapping harder will
not increase the touchpad's responsiveness.
Note: By default, vertical and horizontal scrolling is enabled on
your touchpad. It can be disabled under Mouse settings in
Windows Control Panel.
Page 52

32
Using the keyboard
English
The keyboard has full-sized keys and an embedded numeric keypad, separate
cursor, lock, Windows, function and special keys.
Lock keys and embedded numeric keypad
The keyboard has three lock keys which you can toggle on and off.
Lock key Description
Caps Lock When Caps Lock is on, all alphabetic characters typed are
Num Lock
<Fn> + <F11>
Scroll Lock
<Fn> + <F12>
in uppercase.
When Num Lock is on, the embedded keypad is in numeric
mode. The keys function as a calculator (complete with the
arithmetic operators +, -, *, and /). Use this mode when you
need to do a lot of numeric data entry. A better solution
would be to connect an external keypad.
When Scroll Lock is on, the screen moves one line up or down
when you press the up or down arrow keys respectively.
Scroll Lock does not work with some applications.
The embedded numeric keypad functions like a desktop numeric keypad. It is
indicated by small characters located on the upper right corner of the keycaps.
To simplify the keyboard legend, cursor-control key symbols are not printed on
the keys.
Desired access Num Lock on Num Lock off
Number keys on
embedded keypad
Cursor-control keys
on embedded keypad
Main keyboard keys Hold <Fn> while typing
Type numbers in a normal
manner.
Hold <Shift> while using
cursor-control keys.
letters on embedded keypad.
Hold <Fn> while using
cursor-control keys.
Type the letters in a
normal manner.
Page 53

33
Windows keys
The keyboard has two keys that perform Windows-specific functions.
Key Description
Windows key
Pressed alone, this key has the same effect as clicking on the
Windows Start button; it launches the Start menu.
It can also be used with other keys to provide a variety of
functions:
<> : Open or close the Start menu
< > + <D>: Display the desktop
< > + <E>: Open Windows Explore
< > + <F>: Search for a file or folder
< > + <G>: Cycle through Sidebar gadgets
< > + <L>: Lock your computer (if you are connected to a
network domain), or switch users (if you're not connected to a
network domain)
< > + <M>: Minimizes all windows
< > + <R>: Open the Run dialog box
< > + <T>: Cycle through programs on the taskbar
< > + <U>: Open Ease of Access Center
< > + <X>: Open Windows Mobility Center
< > + <BREAK>: Display the System Properties dialog box
< > + <SHIFT+M>: Restore minimized windows to the
desktop
< > + <TAB>: Cycle through programs on the taskbar by
using Windows Flip 3-D
< > + <SPACEBAR>: Bring all gadgets to the front and select
Windows Sidebar
<CTRL> + < > + <F>: Search for computers (if you are on a
network)
<CTRL> + < > + <TAB>: Use the arrow keys to cycle through
programs on the taskbar by using Windows Flip 3-D
English
Application
key
Note: Depending on your edition of Windows
Vista, some shortcuts may not function as
described.
This key has the same effect as clicking the right mouse button;
it opens the application's context menu.
Page 54

English
34
Hotkeys
The computer employs hotkeys or key combinations to access most of the
computer's controls like screen brightness, volume output and the BIOS utility.
To activate hotkeys, press and hold the <Fn> key before pressing the other key
in the hotkey combination.
Hotkey Icon Function Description
<Fn> + <F1> Hotkey help Displays help on hotkeys.
<Fn> + <F2> Acer eSettings Launches Acer eSettings in Acer
Empowering Technology. See
"Acer Empowering
Technology" on page 1.
<Fn> + <F3> Acer ePower
Management
<Fn> + <F4> Sleep Puts the computer in Sleep
<Fn> + <F5> Display toggle Switches display output
<Fn> + <F6> Screen blank Turns the display screen
<Fn> + <F7> Touchpad toggle Turns the internal touchpad on
<Fn> + <F8> Speaker toggle Turns the speakers on and off.
Launches Acer ePower
Management in Acer
Empowering Technology. See
"Acer Empowering
Technology" on page 1.
mode.
between the display screen,
external monitor (if connected)
and both.
backlight off to save power.
Press any key to return.
and off.
Page 55

35
Hotkey Icon Function Description
<Fn> + <↑> Volume up Increases the sound volume.
<Fn> + <↓> Volume down Decreases the sound volume.
<Fn> + <→> Brightness up Increases the screen brightness.
<Fn> + <←> Brightness down Decreases the screen brightness.
English
Page 56

English
36
Special keys
You can locate the Euro symbol and the US dollar sign at the upper-center
and/or bottom-right of your keyboard.
The Euro symbol
1 Open a text editor or word processor.
2 Either press < > at the bottom-right of the keyboard, or hold <Alt Gr>
and then press the <5> key at the upper-center of the keyboard.
Note: Some fonts and software do not support the Euro symbol.
Please refer to www.microsoft.com/typography/faq/faq12.htm
more information.
for
The US dollar sign
1 Open a text editor or word processor.
2 Either press < > at the bottom-right of the keyboard, or hold <Shift>
and then press the <4> key at the upper-center of the keyboard.
Note: This function varies according to the language settings.
Page 57

37
Ejecting the optical (CD or DVD) drive tray
Press the drive eject button to eject the optical drive tray when the computer is
on.
Insert a paper clip to the emergency eject hole to eject the optical drive tray
when the computer is off.
Using a computer security lock
The notebook comes with a Kensington-compatible security slot for a security
lock.
Note: Slot-load or tray-load depending on model.
English
Wrap the computer security lock cable around an immovable object such as a
table or handle of a locked drawer. Insert the lock into the notch and turn the
key to secure the lock. Some keyless models are also available.
Page 58

38
Audio
English
The computer comes with 32-bit Intel High-Definition audio, and built-in stereo
speakers.
Adjusting the volume
Adjusting the volume on the computer is as easy as pressing some buttons. See
"Hotkeys" on page 34 for more information on adjusting the speaker volume.
Page 59

39
Using surround/multi-channel sound
Your Acer notebook comes with the following two features to give you
high-quality digital surround sound for enjoying movies, games and music in a
realistic, multi-channel audio environment:
• Dolby Digital Live
• DTS Connect
To set up surround sound, run the Realtek HD Audio Manager by
double-clicking the Realtek HD Audio Manager icon in the system tray of
your Windows system. The Realtek HD Audio Manager dialog box will pop up.
Click the Digital Output tab, and then click the Default Format tab. Click the dts
Interactive or Dolby Digital Live icon to set the digital output format.
English
Dolby Digital Live
Dolby Digital Live encodes audio signals into a Dolby Digital 5.1 bitstream for
multi-channel playback through a surround sound system.
To take advantage of Dolby Digital Live, you need a Dolby Digital-equipped
audio/video receiver or digital speaker system.
1 Connect your computer to your audio system using a S/PDIF cable via the
S/PDIF-out port
Page 60

English
40
2Open the Realtek HD Audio Manager
3 Click the Dolby Digital Live icon to convert audio signals into Dolby
Digital bitstream and begin Dolby Digital output
Note: When the Dolby Digital Live icon is enabled, only the digital
audio (S/PDIF) port of your computer will be active. You will not
hear any sound from the computer's built-in speakers. To use your
computer's built-in speakers, disable Dolby Digital Live by clicking
the Dolby Digital Live icon.
DTS Connect
DTS Connect consists of DTS Interactive and Neo:PC, for both multi-channel and
stereo content. DTS Interactive encodes audio signals into a DTS-compatible
bitstream for multi-channel playback through a surround sound system. Neo:PC
transforms stereo content, such as MP3, WMA or CD audio, into 7.1-channel
surround sound.
To take advantage of DTS Connect, you need a DTS-equipped audio/video
receiver or digital speaker system.
1 Connect your computer to your audio system using a S/PDIF cable via the
S/PDIF-out port
2Open the Realtek HD Audio Manager
3 Click the DTS Interactive icon to convert audio signals into
multi-channel DTS Digital Surround
®
and begin DTS output
Note: When DTS Interactive is enabled, only the digital audio (
S/PDIF) port of your computer will be active. You will not hear any
sound from the computer's built-in speakers. To use your
computer's built-in speakers, disable DTS Interactive by clicking
the DTS Interactive icon.
Note: "DTS CONNECT", "DTS INTERACTIVE", and "DTS NEO:PC"
are trademarks of DTS, Inc. "DTS" is a registered trademark of
DTS, Inc.
Page 61

41
Using RAID
What is RAID?
RAID stands for Redundant Array of Independent Disks, a system in which
multiple hard disk drives share or replicate data among the drives. Depending
on the version of RAID you choose to use, benefits include enhanced data
integrity (backup), better throughput (speed) or increased storage (capacity),
compared to single drives.
Your Acer computer with two Serial ATA hard disk drives supports RAID 0, RAID
1 and Intel Matrix RAID.
RAID 0
RAID 0 (also known as a striped set) splits data evenly across two or more disks
with no parity information for redundancy. RAID 0 is normally used to increase
performance, although it can also be used as a way to create a small number of
large virtual disks out of a large number of small physical ones. A RAID 0 can be
created with disks of differing sizes, but the storage space added to the array by
each disk is limited to the size of the smallest disk — for example, if a 120 GB
disk is striped together with a 100 GB disk, the size of the array will be 200 GB.
RAID 0 is useful for increasing performance for systems in which there is a high
amount of disk usage, such as those involved in intensive database work. It is
also a popular choice for gaming systems where performance is desired.
However, since data is shared between drives without redundancy, hard drives
cannot be swapped out as all disks are dependent upon each other.
English
RAID 1
RAID 1 creates an exact copy (or mirror) of a set of data on two or more disks.
The array can only be as big as the smallest member disk, however. A classic
RAID 1 mirrored pair contains two disks, which increases reliability by a factor of
two over a single disk, but it is possible to have many more than two copies.
Since each member can be addressed independently if the other fails, reliability
is a linear multiple of the number of members.
Intel Matrix RAID
Intel Matrix RAID utilizes two physical hard disk drives. It assigns part of each
disk to a RAID 0 array, and the other part to a RAID 1 array, allowing users to
enjoy the advantages of both RAID levels. Matrix RAID provides users with a
safe area (RAID 1) for documents and other important data that must be
protected, as well as a faster area (RAID 0) for the operating system and other
applications.
Page 62

English
42
Before enabling RAID on your system
Before enabling RAID on your system, please read the following warnings and
reminders:
1 If you plan to enable RAID 0 or Matrix RAID on your system, you
cannot return your system to a non-RAID state without
reformatting your system.
2 Enabling RAID on your system is a time-intensive process and it is
important that your computer stay on during the whole process,
or you will be at risk for data loss. Disable your screen saver and
power management options such as auto-shutdown, auto-
hibernate and auto-standby. Plug your system into an AC adapter
before attempting to enable RAID on your system.
3 Before enabling RAID on your system, back up important data and
applications using Acer eRecovery Management or another
appropriate backup tool.
4 Enabling RAID may change how your hard disk drives are ordered,
and Acer eRecovery Management may not function properly if
your system does not have the needed drive ordering.
5 You cannot use Acer eRecovery Management to revert your system
to a non-RAID configuration after enabling RAID.
6 Using the Intel Matrix Storage Manager option ROM (accessed by
pressing Ctrl-I when starting your computer) is not recommended.
Use the Intel Matrix Storage Console in Windows for most RAID
functions.
7 Please contact an Acer Customer Service Center if you have further
questions about enabling RAID on your Acer computer.
Enabling RAID on your system
To enable RAID 0, 1 or Intel Matrix RAID on your system:
1Run the Intel Matrix Storage Console from Start > Programs > Intel
Matrix Storage Manager.
2 Select Advanced Mode from the View menu. This will display a list of the
hard disk drives installed on your system.
3 Select the hard disk drive you want to enable RAID on.
4 Select Create RAID Volume from Existing Hard Drive from the
Actions menu.
Page 63

43
5The Create RAID Volume from Existing Hard Drive wizard will
start.
6 Follow the onscreen instructions to create a RAID 0, RAID 1 or
Matrix RAID array.
7 After the process is complete, you will need to reboot your system.
8 Congratulations! You have successfully enabled RAID on your
system.
After enabling RAID on your system
After enabling RAID on your system, use your computer as you normally would,
but enjoy the benefits of increased performance, enhanced reliability, or a
combination of both, depending on the version of RAID that you chose to
implement.
The Intel Matrix Storage Manager option ROM
After you have enabled RAID, you will see a new option when you boot up your
computer. This is the Intel Matrix Storage Manager option ROM.
Press Ctrl-I to enter this program when booting up your system. Otherwise, wait
or press ESC to continue your normal boot process.
Warning: Acer is not responsible for the loss of data resulting
from the misuse of the Intel Matrix Storage Manager option ROM.
To view or create a RAID volume, use the Intel Matrix Storage
Console from Windows.
English
Page 64

44
Using the system utilities
English
Acer GridVista (dual-display compatible)
Note: This feature is only available on certain models.
To enable the dual display feature of your notebook, first ensure that a second
display is connected, then, open the Display Settings properties box using the
Control Panel or by right-clicking the Windows desktop and selecting
Personalize. Select the secondary monitor (2) icon in the display box and then
click the check box Extend the desktop onto this monitor. Finally, click Apply to
confirm the new settings and click OK to complete the process.
Acer GridVista is a handy utility that offers four pre-defined display settings so
you can view multiple windows on the same screen. To access this function,
please go to Start, All Programs and click on Acer GridVista. You may choose
any one of the four display settings indicated below:
12
Double (vertical), Triple (primary at left), Triple (primary at right), or Quad
Acer Gridvista is dual-display compatible, allowing two displays to be
partitioned independently.
Acer GridVista is simple to set up:
1
3
2
1
3
2
3
1
4
2
Page 65

45
1 Run Acer GridVista and select your preferred screen configuration for each
display from the taskbar.
2 Drag and drop each window into the appropriate grid.
3 Enjoy the convenience of a well-organized desktop.
Note: Please ensure that the resolution setting of your second
monitor is set to the manufacturer's recommended value.
Launch Manager
English
Launch Manager allows you to set the four easy-launch buttons located above
the keyboard. "Easy-launch buttons" on page 29 for the location of the easylaunch buttons.
You can access the Launch Manager by clicking on Start, All Programs, and then
Launch Manager to start the application.
Page 66

English
46
Norton Internet Security
Norton Internet Security is an anti-virus utility that can protect against viruses,
keeping your data safe and secure.
How do I check for viruses?
1 Double-click the Norton Internet Security icon on the Windows desktop.
2Select Tasks & Scans.
3Select Run Scan to scan your system.
4 When the scan is complete, review the results of the scan.
Note: For optimal security, run a Full System Scan when scanning
your computer for the first time.
You can schedule customized virus scans that run unattended on specific dates
and times or at periodic intervals. If you are using the computer when the
scheduled scan begins, it runs in the background so that you do not have to
stop working.
For more information refer to the Norton Internet Security help files.
Page 67

47
Frequently asked questions
The following is a list of possible situations that may arise during the use of
your computer. Easy solutions are provided for each one.
I turned on the power, but the computer does not start or
boot up.
Look at the power indicator:
• If it is not lit, no power is being supplied to the computer. Check the
following:
• If you are using on the battery, it may be low and unable to power
the computer. Connect the AC adapter to recharge the battery pack.
• Make sure that the AC adapter is properly plugged into the computer
and to the power outlet.
• If it is lit, check the following:
• Is a non-bootable (non-system) disk in the external USB floppy drive?
Remove or replace it with a system disk and press <Ctrl> + <Alt> +
<Del> to restart the system.
Nothing appears on the screen.
The computer's power management system automatically blanks the screen to
save power. Press any key to turn the display back on.
If pressing a key does not turn the display back on, three things might be
the cause:
• The brightness level might be too low. Press <Fn> + <→> (increase) to
adjust the brightness level.
• The display device might be set to an external monitor. Press the display
toggle hotkey <Fn> + <F5> to toggle the display back to the computer.
• If the Sleep indicator is lit, the computer is in Sleep mode. Press and release
the power button to resume.
English
Image is not full-screen.
Each computer display has a different native resolution depending on the
screen. If you set the resolution lower than this native resoution, the screen
expands to fill the computer display. Right-click on your Windows desktop and
select Properties to bring up the "Display Properties" dialog box. Then click on
the Settings tab to make sure that the resolution is set to the appropriate
resolution. Resolutions lower than the specified resolution are not full-screen
on the computer or on an external monitor.
Page 68

English
48
No audio is heard from the computer.
Check the following:
• The volume may be muted. In Windows, look at the volume control
(speaker) icon on the taskbar. If it is crossed-out, click on the icon and
deselect the Mute all option.
• The volume level may be too low. In Windows, look at the volume control
icon on the taskbar. You can also use the volume control buttons to adjust
the volume. See "Hotkeys" on page 34 for more detail.
• If headphones, earphones or external speakers are connected to the line-
out port on the computer, the internal speakers automatically turn off.
I want to eject the optical drive tray without turning on the
power.
There is a mechanical eject hole on the optical drive. Simply insert the tip of a
pen or paperclip into the hole and push to eject the tray. (If your computer's
optical drive is a slot-load model, it will not have an eject hole.)
The keyboard does not respond.
Try attaching an external keyboard to a USB port on the computer. If it works,
contact your dealer or an authorized service center as the internal keyboard
cable may be loose.
The infrared port does not work.
Check the following:
• Make sure that the infrared ports of the two devices are facing each other
(+/- 15 degrees) a maximum of 1 meter apart.
• Make sure there is a clear path between the two infrared ports. Nothing
should be blocking the ports.
• Make sure you have the appropriate software running on both devices (for
file transfers) or you have the appropriate drivers (for printing to an
infrared printer).
• During the POST, press <F2> to access the BIOS utility and verify that the
infrared port is enabled.
• Make sure both devices are IrDA-compliant.
The printer does not work.
Check the following:
Page 69

49
• Make sure that the printer is connected to a power outlet and that it is
turned on.
• Make sure that the printer cable is connected securely to the computer's
parallel port or a USB port and the corresponding port on the printer.
I want to set up my location to use the internal modem.
To properly use your communication software (e.g. HyperTerminal), you need
to set up your location:
1 Click on Start, Settings, Control Panel.
2 Double-click on Phone and Modem Options.
3 Click on Dialing Rules and begin setting up your location.
Refer to the Windows manual.
Note: Please note, on first booting your notebook, that you can
skip the Internet Connection setup, as it is not necessary to
complete the installation of your Operating System. After the
Operating System is set up, you can proceed with the Internet
Connection setup.
I want to restore my computer to its original settings without
recovery CDs.
Note: If your system is the multilingual version, the operating
system and language you choose when you first turn on the
system will be the only option for future recovery operations.
English
This recovery process helps you restore the C: drive with the original software
content that is installed when you purchase your notebook. Follow the steps
below to rebuild your C: drive. (Your C: drive will be reformatted and all data
will be erased.) It is important to back up all data files before using this option.
Before performing a restore operation, please check the BIOS settings.
1 Check to see if Acer disk-to-disk recovery is enabled or not.
2 Make sure the D2D Recovery setting in Main is Enabled.
3 Exit the BIOS utility and save changes. The system will reboot.
Note: To activate the BIOS utility, press <F2> during POST.
Page 70

English
50
To start the recovery process:
1 Restart the system.
2 While the Acer logo is showing, press <Alt> + <F10> at the same time to
enter the recovery process.
3 Refer to the onscreen instructions to perform system recovery.
Important! This feature occupies 10 GB in a hidden partition on
your hard disk.
Requesting service
International Travelers Warranty (ITW)
Your computer is backed by an International Travelers Warranty (ITW) that
gives you security and peace of mind when traveling. Our worldwide network
of service centers are there to give you a helping hand.
An ITW passport comes with your computer. This passport contains all you need
to know about the ITW program. A list of available, authorized service centers is
in this handy booklet. Read this passport thoroughly.
Always have your ITW passport on hand, especially when you travel, to receive
the benefits from our support centers. Place your proof-of-purchase in the flap
located inside the front cover of the ITW passport.
If the country you are traveling in does not have an Acer-authorized ITW service
site, you can still get in contact with our offices worldwide. Please consult
http://global.acer.com
.
Before you call
Please have the following information available when you call Acer for online
service, and please be at your computer when you call. With your support, we
can reduce the amount of time a call takes and help solve your problems
efficiently. If there are error messages or beeps reported by your computer,
write them down as they appear on the screen (or the number and sequence in
the case of beeps).
You are required to provide the following information:
Name: _____________________________________________
Address: ___________________________________________
Telephone number: _________________________________
Machine and model type: ____________________________
Serial number: ______________________________________
Date of purchase: ___________________________________
Page 71

51
Battery pack
The computer uses a battery pack that gives you long use between
charges.
Battery pack characteristics
The battery pack has the following characteristics:
• Employs current battery technology standards.
• Delivers a battery-low warning.
The battery is recharged whenever you connect the computer to the
AC adapter. Your computer supports charge-in-use, enabling you to
recharge the battery while you continue to operate the computer.
However, recharging with the computer turned off results in a
significantly faster charge time.
The battery will come in handy when you travel or during a power
failure. It is advisable to have an extra fully charged battery pack
available as backup. Contact your dealer for details on ordering a spare
battery pack.
Maximizing the battery's life
Like all other batteries, your computer's battery will degrade over
time. This means that the battery's performance will diminish with
time and use. To maximize your battery's life, you are advised to
adhere to the recommendations set out below.
English
English
Conditioning a new battery pack
Before you use a battery pack for the first time, there is a
"conditioning" process that you should follow:
1 Insert the new battery without turning the computer on.
2 Connect the AC adapter and fully charge the battery.
3 Disconnect the AC adapter.
4 Turn on the computer and operate using battery power.
5 Fully deplete the battery until the battery-low warning appears.
6 Reconnect the AC adapter and fully charge the battery again.
Page 72

52
Follow these steps again until the battery has been charged and
discharged three times.
English
Use this conditioning process for all new batteries, or if a battery hasn't
been used for a long time. If the computer is to be stored for more
than two weeks, you are advised to remove the battery pack from the
unit.
Warning: Do not expose battery packs to temperatures below 0°C
(32°F) or above 45°C (113°F). Extreme temperatures may adversely
affect the battery pack.
By following the battery conditioning process you condition your
battery to accept the maximum possible charge. Failure to follow this
procedure will prevent you from obtaining the maximum battery
charge, and will also shorten the effective lifespan of the battery.
In addition, the useful lifespan of the battery is adversely affected by
the following usage patterns:
• Using the computer on constant AC power with the battery
inserted. If you want to use constant AC power, you are advised to
remove the battery pack after it is fully charged.
• Not discharging and recharging the battery to its extremes, as
described above.
• Frequent use; the more you use the battery, the faster it will reach
the end of its effective life. A standard computer battery has a life
span of about 300 charges.
Installing and removing the battery pack
Important! Before removing the battery from the unit, connect
the AC adapter if you want to continue using your computer.
Otherwise, turn off the computer first.
To install a battery pack:
1 Align the battery with the open battery bay; make sure that the
end with the contacts will enter first, and that the top surface of
the battery is facing up.
2 Slide the battery into the battery bay and gently push until the
battery locks in place.
Page 73

53
To remove a battery pack:
1 Slide the battery release latch to release the battery.
2 Pull the battery from the battery bay.
Charging the battery
To charge the battery, first make sure that it is correctly installed in the
battery bay. Plug the AC adapter into the computer, and connect to a
mains power outlet. You can continue to operate your computer on AC
power while your battery is charging. However, charging the battery
with the computer turned off results in a significantly faster charge
time.
Note: You are advised to charge the battery before retiring for
the day. Charging the battery overnight before traveling enables
you to start the next day with a fully charged battery.
Checking the battery level
The Windows power meter indicates the current battery level. Rest the
cursor over the battery/power icon on the taskbar to see the battery's
present charge level.
Optimising battery life
Optimizing battery life helps you get the most out of battery
operation, prolonging the charge/recharge cycle and improving
recharging efficiency. You are advised to follow the suggestions set
out below:
• Purchase an extra battery pack.
• Use AC power whenever possible, reserving battery for on-the-go
use.
• Eject a PC Card if it is not being used, as it will continue to draw
power (for selected model).
• Store the battery pack in a cool, dry place. The recommended
temperature is 10°C to 30°C. Higher temperatures cause the
battery to self-discharge faster.
• Excessive recharging decreases the battery life.
• Look after your AC adapter and battery.
English
English
Page 74

54
Battery-low warning
When using battery power pay attention to the Windows power
English
meter.
Warning: Connect the AC adapter as soon as possible after the
battery-low warning appears. Data will be lost if the battery to
become fully depleted and the computer shuts down.
When the battery-low warning appears, the recommended course of
action depends on your situation:
Situation Recommended Action
The AC adapter
and a power
outlet are
available.
An extra fully
charged battery
pack is available.
The AC adapter or
a power outlet is
unavailable. You
have no spare
battery pack.
1. Plug the AC adapter into the computer, and then
connect to the mains power supply.
2. Save all necessary files.
3. Resume work.
Turn off the computer if you want to recharge the
battery rapidly.
1. Save all necessary files.
2. Close all applications.
3. Shut down the operating system to turn off the
computer.
4. Replace the battery pack.
5. Turn on the computer and resume work.
1. Save all necessary files.
2. Close all applications.
3. Shut down the operating system to turn off the
computer.
Page 75

55
Acer Arcade (for selected models)
Acer Arcade is an integrated player for music, photos, TV, DVD movies and
videos. It can be operated using your pointing device or remote control.
To watch or listen, click or select a content button (e.g., Music, Video, etc.)
on the Arcade home page.
• Music — listen to music files in a variety of formats
• TV — watch and record digital or analog TV programs (for selected
models)
• Cinema — watch DVDs or VCDs
• Video — watch and/or edit video clips
• Album — view photos stored on your hard disk or removable media
English
Note: While watching videos, DVDs or slide shows, your
screensaver and power-saving features are unavailable.
Page 76

English
56
Remote control (for selected models)
If your Aspire is bundled with a TV-tuner card, a 48-button remote control is
included for use with the Acer Arcade software. The table below explains the
functions for this controller.
Warning! The Arcade and Power buttons have different functions
depending on the current mode. See below for details. Button
functions may change depending on your power option settings.
To access Arcade in Windows mode, push the Arcade button to start Arcade.
Push it again at any time to return to the main menu. Pushing the Arcade
button again will close Arcade mode. Pushing the Power button will put your
notebook into Standby mode. Push it again to resume.
Page 77

57
Remote functions
# Item Description
1 Live TV Launch Live TV mode
2 Power Turn off; sleep (depending on mode)
3 Menu Launch DVD menu screen
4 Language Open DVD language menu**
5 Record Record TV
6 Rewind Rewind through media
7 Play Play selection
8 Previous Skip back one music track, DVD chapter, or photo
9 Pause Pause audio, video, slide shows, live or recorded TV
10 SAP Toggle between sound modes (mono, stereo, etc.)
11 Full Screen Toggle between full screen and window view
12 Back Back to previous page
13 Navigation/
OK buttons
14 Mute Toggle audio on/off
15 VOL + / - Increase or decrease the audio playback level
16 0-9 buttons Enter TV channel numbers
17 TeleText/CC Launch TeleText*/ closed captions
18 Color buttons Teletext shortcut functions*
19 TV/AV Toggle between TV-in and AV-in
20 Arcade Launch/quit Acer Arcade; return to Arcade main page
21 Angle Toggle between different viewing angles**
22 Subtitle Open subtitles menu**
23 Stop Stop current playing or recording operation
24 Fast Forward Fast forward through media
25 Next Skip ahead one music track, DVD chapter, or photo
26 Capture Capture the current TV/Video screen
27 Info/EPG Show DVD or TV listings information
28 Last Ch Return to previous channel
29 Channel Change channels up and down
30 Ch scan Shortcut to scan channel page; scan TV channels
Navigate between selections and menu items, OK to
select option, enter, play and pause.
English
*TeleText regions only. **Dependent on individual DVD content.
Page 78

English
58
Finding and playing content
Clicking a button on the Arcade home page opens the corresponding feature's
home page. The content pages have buttons on the left and a content browsing
area on the right. If a button shows one of several choices, such as sort order,
the current setting is shown by a brightly colored ball on the button.
To pick content, click an item in the content area. When there is more than one
CD or DVD drive, all drives will be shown. Pictures and videos are shown as files
(with thumbnails) and organized into folders.
To browse a folder, click to open it. To go back up to the folder above it, click
the Up one level button. If there is more content than will fit on a page, use the
buttons at the lower right to scroll through the pages.
Note: For more detailed information on the features of Acer
Arcade, please refer to the Arcade Help menu. This can be
accessed from the Arcade home page by selecting Help .
Settings
There are settings in Acer Arcade that allow you to fine-tune its performance to
suit your machine and your personal preferences. To access Settings, click on
this icon located on the upper-right hand corner of the main page.
Click Acer Arcade Help for comprehensive help on each Arcade mode.
In Display Settings:
Use the "Screen Ratio" option to choose between standard (4:3) or
widescreen (16:9) display when watching movies.
The "4:3 Movie Display Type" option allows you to select between
"CinemaVision
• Acer CinemaVision
produces minimal distortion in the center of the picture.
• The Letterbox option displays widescreen movie content in its original
aspect ratio and adds black bars at the top and bottom of the screen.
"Color profile" allows you to choose between "Original" or "ClearVision
• Acer ClearVision
content and dynamically adjusts the brightness/contrast/saturation levels
so that you do not need to change the color settings if the movie you are
watching contains scenes that are overly dark or too bright.
™
" or "Letterbox" mode.
™
is a nonlinear video stretching technology that
™
is a video enhancement technology that detects video
™
."
Page 79

59
In Audio Settings:
Use "Speaker Environment" to choose between "Headphones," "SPDIF," "2" or
more speakers depending on your audio equipment.
"Output Mode" should be set to "Stereo" if you are listening to speakers,
"Dolby Surround," or "Virtual Surround Sound" if you are using headphones.
Note: If your speakers are not capable of outputting
low-frequency signals, it is recommended that you do not select
Virtual Surround Sound, in order to avoid damaging your
speakers.
Click Run Setup Wizard to change your original startup settings.
Click About Acer Arcade to open a page with version and copyright
information.
Click Restore Default Settings to return the Acer Arcade settings to their
default values.
Arcade controls
When watching video clips, movies or slide shows at full screen, two pop-up
control panels are shown when you move the pointer. They automatically
disappear after several seconds. The "Navigation Controls" panel appears at the
top and the "Player Controls" panel appears at the bottom of the screen.
Navigation controls
To return to the Arcade home page, click the Home button in the upper-left
corner of the window. To go up one folder level while searching for content,
click Up one level. To return to the previous screen, click the red arrow. The
buttons in the upper right (minimize, maximize, close) have standard PC
behaviors.
To quit Arcade, click the Close button in the upper right corner of the window.
Player controls
At the bottom of the window, the player controls — used for video, slide shows,
TV, movies and music — are shown. The group on the left provides standard
playback controls (play, pause, stop, etc.). The group on the right controls
volume (mute and volume up/down).
English
Note: When playing DVDs and watching TV, there are additional
controls added to the right of the volume controls. These are
discussed in more detail in the Cinema and TV sections of this
guide.
Page 80

English
60
Virtual keyboard
Whenever you are required to enter search information, or name a file, DVD or
folder, you can use the onscreen virtual keyboard. You can quickly enter the
information you need using the mouse, cursor keys or keyboard.
Background mode
With Acer Arcade you can continue listening to music or watching Live TV
while you perform certain other functions. TV, video and music will continue
playing in a small window located in the bottom left-hand corner of the screen.
You can press the stop button on the remote or click the onscreen stop icon to
stop the playback at anytime.
Page 81

61
Cinema
If your computer came with a DVD drive, you can play movies from DVDs and
video CDs (VCDs) with the Cinema function of Acer Arcade. This player has the
features and controls of a typical DVD player.
When you insert a disk into the DVD drive, the movie begins playing
automatically. To control the movie, the pop-up player control panel appears at
the bottom of the window when you move the pointer.
If more than one optical drive contains a playable disk, click the Cinema button
on the Home page to open the Cinema content page, then select the disk you'd
like to watch from the list on the right.
When viewing DVDs, the following special controls are added to the pop-up
panel:
• DVD Menu
• Subtitles
• Language
• Snapshot
• Angle
The disk currently playing will be shown in the area above the list of drives. This
page is also displayed when you press the Stop button during a movie. The
buttons on the left side allow you to resume the movie from the point it was
stopped, restart the movie from the beginning, jump to the DVD menu, eject
the disk, or go to the "DVD Settings" page.
Settings
To access the settings for Cinema, first click the "Settings" button on the main
menu, and then click on Cinema. This allows you to change "Video" and
"Language"settings.
The "Settings" control the audio and subtitle output of DVDs.
"Subtitles" selects the default subtitle language for DVDs when available. The
factory setting is "Off."
"Closed Captions" turns on the closed captions on DVDs. This function displays
captions encoded in the video signal that describe onscreen action and dialog
for the hearing impaired. The factory setting is "Off."
"Audio" selects the default language for DVD titles.
"Display Upon Mute" lets you choose whether to turn on the subtitles or
captions when you mute the sound for any reason.
English
Page 82

English
62
Album
Acer Arcade lets you view digital photos individually or as a slide show, from
any available drive on your computer. Click the Album button on the Arcade
Home page to show the Album main page.
The content area on the right shows both individual pictures and folders.
Click on a folder to open it.
To view a slide show, open the folder containing the pictures you wish to view,
then click Play Slide Show. The slide show is played at full screen. Use the
pop-up control panel to control the slide show.
You can also view a single picture by clicking on it. This opens the picture at
full screen.
You can then use the onscreen player controls to zoom in and out, and to pan
in four directions.
Editing Pictures
Choose "Edit," and you can "Rotate," "Remove Red Eye," and "Auto Fix"
(optimize the brightness and contrast) pictures to improve the appearance of
your images.
Slide Show settings
To change Slide Show settings, click the Advanced button on the Album page
and select "Settings."
"Slide Duration" determines how long each slide is shown before automatically
advancing to the next picture in the slide show.
"Slide Show Transition" sets the style of transition used between pictures; you
can choose between Motion, Cell, Fade, Random, Wipe, Slide, Page and None
modes.
Page 83

63
To add background music to a slide show, click on the "Slide Show Music"
option. The Slide Show Music page will ask you to choose music from your
personal music library.
Click Load Default Settings to return your settings to their default values.
Video
To open the Video function, click Video on the Arcade Home page.
Note: The Video feature is designed to play back many different
kinds of video formats. Refer to the Video help section for a full
list of compatible formats. If you want to watch a DVD or VCD, use
the "Cinema" function.
Playing a video file
Click Play to watch video files. The Video page shows the video files in the
content area on the right side. They are organized by folders and a thumbnail
image shows the first frame of each video.
To play a video file, click on it. The video will play at full screen. The pop-up
control panel will appear at the bottom of the screen when you move the
mouse. To return to the Video page, click Stop.
Capturing video (TV models only)
Acer Arcade allows you to capture and record video clips from other external
devices, such as a DVD player or camcorder.
Click Capture Device on the video page and then select the source you are using
for your video input. There is a choice between "S-video" and "Composite."
To capture a video clip, you then need to click the red record button in the
onscreen controls.
The destination folder can be set from the "Settings" menu.
Clicking on Advanced and selecting Settings allows you to set the quality of the
video captured. You can choose from "Good," "Better" or "Best." Selecting a
higher quality results in a larger file when capturing video clips.
English
Snapshot
Snapshot mode is available in Cinema, Video and TV modes. This function can
be used to capture the onscreen image at any time.
A single frame image will be captured and stored in a user designated directory.
The destination directory can be changed from the "Settings"menu.
Page 84

English
64
Editing video
Acer Arcade offers the capability to edit captured video clips, photos and
footage from a camcorder into a movie. You can also select a movie style, and
add special transition effects and music to create the perfect home movie.
To edit a movie, click Advanced, and then select "Edit Video." Then select the
clips you wish to edit from your folders. To complete your movie, you may also
choose a "Movie Style," "Background Music," the perfect ratio of music and
audio, as well as the length of the movie.
"Select Scenes" can be used to include your favorite or the most important
scenes, or the editing decisions can be left to the editing program.
Once compiled, the final movie can then be burned to disk to share with family
and friends.
Note: For more details on editing video and all the associated
features, please refer to the Acer Arcade help menu.
Music
For convenient access to your music collection, click Music on the Arcade
homepage to open the Music homepage.
Select the folder, CD or category that contains the music you want to listen to.
Click Play to listen to the entire content from the beginning, or select the song
that you want to hear from the list in the content area.
The songs in the folder are shown in the content area, while the left side has
controls for "Play," "Shuffle" and "Repeat All." The "Visualize" option allows
you to watch computer-generated visuals while you listen to music. When
playing music, the control panel at the bottom of the page makes it easy to
adjust the volume and control playback.
To rip music from an audio CD, after you have inserted the CD, click Rip CD. In
the page that opens, select the songs you would like to rip (or click Select or
Clear All), then click Start Ripping.
The progress of the ripping operation will be displayed on screen.
You can change the file quality of the ripped tracks by clicking Settings.
Page 85

65
TV (for selected models)
Arcade allows you to watch TV from your computer. Click the TV button on the
home page to show the TV main page.
The Live TV option plays TV on screen. Press Escape at any time to return to
Arcade.
When you watch TV, additional buttons appear on the playback controls:
Channel Up (switches up one channel), Channel Down (switches down one
channel), Snapshot (takes a snapshot of the current frame of video), TeleText
(opens the TeleText function), and Record (records TV content as a video file).
The Recorded TV option allows you to view files that you have recorded from
the TV. See Recorded TV.
The Schedule option lets you set TV recording schedules for later viewing. See
Scheduling Recordings.
The Program Guide option lets you view program information for all channels.
See Program Guide.
The Find Program option enables you to search for a specific kind of program.
The Settings button opens a page containing TV settings. See TV settings for
more information.
Note: For information on setting up and operating the TV mode
of Arcade please refer to the separate TV booklet.
Time-shift functionality
Arcade also has a time-shift function that can be enabled. To create an instant
replay, Arcade records the TV broadcast as a file, creating a slight lag between
the live broadcast and the TV content that you watch. (The instant replay file
cannot be saved, however, and you cannot watch this file in the Recorded TV
window.) You can navigate forward and backward within the file to create an
instant replay or to skip over commercials.
English
Note: One of your local drives must contain at least 2 GB of free
space in order to enable the instant replay function.
Click " " to pause playback or " " to continue watching. Click " " to
rewind or " " to fast forward. Click " " to go to the start of the instant
replay recording or click " " to go to the end of the instant replay recording.
Page 86

English
66
Note: Since the TV content you watch always lags slightly behind
the live TV broadcast, going to the end of the instant replay
recording is as close to watching live TV as Arcade permits.
Recorded TV
The "Recorded TV" page shows recorded TV files. A thumbnail image shows the
first frame of each file. To play a recorded TV file, click it. The video will play at
full screen. To return to the TV page, click Stop.
For a description of the options on this page, see Videos.
Scheduling recordings
To set a TV recording schedule, click Schedule, then New Schedule. In the page
that opens, select the Channel you want to record and the scheduling Interval.
Set the Starting Date, Starting Time, and Ending Time of the program you want
to record. Click Confirm Schedule to activate the recording schedule, or Cancel
to quit without accepting the schedule. Select Delete Schedule to remove a
recording schedule you have previously created.
Click an existing recording schedule to open it for modification. To change the
order in which schedules are displayed, click Sort by Channel or Sort by Date.
Program guide
Click the Program Guide button to view program listing details for each
channel. These listings and information are provided by the Electronic Program
Guide.
Find program
Clicking the Find Program button allows you to search for programs by channel
number or category.
TV settings
To change picture settings, click the TV button on the "Settings" page or the
Settings button on the main TV page. There are four types of TV settings:
"Signal," "Channel," "Recording" and "Guide" settings.
Page 87

67
Signal settings
Click on Capture Device to select between an analog or digital input for your TV
signal.
Select TV Source to choose the source of the signal.
The Region option allows you to select the country or region where your cable
provider is located.
You can also enable and disable the time-shift function.
Channel settings
If no channel list exists, click Scan Channels. Your computer will scan and list the
available TV channels. Click Scan Channels to rescan and replace your existing
channel line-up.
Recording settings
The Recording Quality option allows you to set the quality of video recorded
from the TV. Selecting a higher quality results in a larger recorded file when
recording TV shows.
You can also select the destination for any recorded TV.
Guide settings
Click on EPG Source to select the source for your EPG program listings. This will
differ depending on your region.
Click Restore Default Settings to return your settings to their default values.
English
Using TeleText functions
For regions with the TeleText service, TeleText can be activated by using the
onscreen controller or the remote control.
Pressing the TeleText button on the remote will bring up TeleText; press again
to bring up transparent mode (the text will have TV pictures in the
background), and press once more to return to TV only.
To navigate within the TeleText function, you can:
• Click the color buttons to follow the onscreen color shortcuts.
• Click an onscreen page number to jump to that page.
• Use the number buttons to enter a page number directly.
• Use the up/down buttons on the remote to navigate page numbers,
followed by OK to select.
• Use the left and right buttons to browse sub-pages.
Page 88

English
68
Note: The snapshot function is available when TeleText is running.
Make DVDs
Acer Arcade provides an easy and complete solution for recording data, audio,
photos or videos. You can burn and share any combination of data, music,
photos or videos onto a CD or DVD — direct from Make DVD mode or some of
the other Acer Arcade media modes.
Authoring CD/DVDs
With Acer Arcade it is possible to create CD or DVDs directly from the main
menu, or from whichever media mode you may be using. The burn DVD option
can be found in the "Advanced" or "Main" menu of Video, Album and Music
media modes.
You can burn your favorite songs to a CD or convert songs from your music
collection to MP3 and other popular audio formats. You can even create MP3
CDs with over 100 of your favorite songs and listen to them on your PC or MP3
CD player.
With Arcade, you can also turn digital photos into a slide show with
background music, or burn TV and film clips into an amateur movie. You can
share any event with your friends and family for playback on most DVD players.
You can even add customized theme menus and menu music.
It is also possible to burn combo CD/DVDs with music, photos, film and TV clips
all in one. The possibilities are endless!
For specific details about each of these options, click the Help button to open
the Arcade help menu.
File type compatibility
For details on file compatibility, please refer to the first page of the Arcade
online help menu for each media mode.
Page 89

69
Acer Arcade Deluxe (for selected models)
Note: Acer Arcade Deluxe is available for systems with Windows
Media Center.
Acer Arcade Deluxe extends the capabilities of your Windows Media Centerequipped system with a set of Acer utilities designed to make it easy to manage
your multimedia files, create your own customized content, and more.
Arcade Deluxe includes the following utilities:
• VideoMagician
• TV Joy (selected models only)
• SportsCap (selected models only)
• DV Wizard
• DVDivine
English
Page 90

English
70
Remote control (for selected models)
The table below explains the functions of the remote control bundled with your
Acer system (if included).
Page 91

71
Remote control functions
# Item Description
1 Play Play selection
2 Record Record TV
3 Rewind Reverse playback or go to previous picture
4 Skip Backward Skip a section backward
5 Pause Pause playback
6 Recorded TV Display Recorded TV page
7 Guide Display the Guide
8 Navigation/
OK buttons
9 Mute Toggle audio on/off
10 Back Move up one level in the UI
11 Volume + / - Increase or decrease the audio playback level
12 Start Open or close Media Center
13 Color buttons Teletext shortcut functions*
14 TeleText* Turn teletext on or off
15 Enter Make the current input active
16 Power Put in or wake from Standby mode
17 DVD Menu Display DVD menu
18 Stop Stop current playing or recording operation
19 Fast Forward Speed up playback or go to next picture
20 Skip Forward Skip a section forward
21 Live TV Show live TV on current channel
22 Information Provide information for current selection
23 Channel + / - Change the current channel
24 0-9 buttons Enter TV channel or other input
25 Clear Clear current input
26 CIR receiver
Navigate and confirm selections
Receives signals from the remote control
**
English
*TeleText regions only.
** Insert the CIR receiver into an available USB port on your PC before use.
*** Remote control functions may be enabled or disabled to suit the system's
configuration.
Page 92

72
Starting Acer Arcade Deluxe
English
You can run the Acer Arcade Deluxe utilities directly from Windows Media
Center. To do this, scroll up/down from the Main page to view the Acer Arcade
Deluxe utilities list and left/right to select a utility.
To run the Acer Arcade Deluxe utilities outside of Windows Media Center,
double-click the Acer Arcade Deluxe icon from the Windows desktop.
Note: For detailed information about specific Acer Arcade Deluxe
utiltiies, use the built-in help files.
VideoMagician
VideoMagician allows you to edit video files (in DAT, DVR-MS, MPG, MPE, AVI,
ASF, MPEG, WMV, VOB, MPEG1, and MPEG2 formats) on your computer.
VideoMagician offers multiple themes to create exciting movies in just a few
simple steps. When you launch VideoMagician to edit a video, the Select Videos
page opens.
TV Joy (selected models only)
TV Joy enriches the TV watching experience on your computer. You can enjoy
live TV programs, schedule recordings and watch recorded TV shows. When TV
Joy is launched, the last channel viewed will be displayed full screen.
SportsCap (selected models only)
SportsCap is a revolutionary way of watching your sports videos. It
automatically detects highlights of the most memorable moments in sports
from your recorded games.
Note: The sports types available in your version of SportsCap
depend on the version and modules installed on your computer.
Page 93

73
DV Wizard
DV Wizard provides real-time preview and capture from DV camcorders and
webcams to your computer's hard drive or directly burned to DVD. DV Wizard
also supports the capture of High Definition video to your computer's hard disk
in the DVD format. Attach your DV camcorder or web cam to your computer
and then start DV Wizard to begin.
DVDivine
DVDivine is a handy utility for quickly creating DVDs or other discs containing
video, pictures, or music. In just a few easy steps, you can design, organize, then
burn your disc. When you start DVDivine, the Select Media page appears,
allowing you to select the kind of media that you want to include on your disc.
You can select Videos, Pictures or Music.
English
Page 94

74
Taking your notebook PC with you
English
This section gives you tips and hints to consider when moving around or
traveling with your computer.
Disconnecting from the desktop
Follow these steps to disconnect your computer from external accessories:
1 Save any open files.
2 Remove any media, floppy disks or compact disks from the drive(s).
3 Shut down the computer.
4 Close the display cover.
5 Disconnect the cord from the AC adapter.
6 Disconnect the keyboard, pointing device, printer, external monitor and
other external devices.
7 Disconnect the Kensington lock if you are using one to secure the
computer.
Moving around
When you are just moving within short distances, for example, from your office
desk to a meeting room.
Preparing the computer
Before moving the computer, close and latch the display cover to place it in
Sleep mode. You can now safely take the computer anywhere you go within
the building. To bring the computer out of Sleep mode, open the display; then
press and release the power button.
If you are taking the computer to a client's office or a different building, you
may choose to shut down the computer:
Click on Start, Turn Off Computer, then click on Turn Off (Windows XP).
Or:
You can put the computer in Sleep mode by pressing <Fn> + <F4>. Then close
and latch the display.
When you are ready to use the computer again, unlatch and open the display;
then press and release the power button.
Page 95

75
Note: If the Sleep indicator is off, the computer has entered
Hibernation mode and is turned off. If the power indicator is off
but the Sleep indicator is on, the computer has entered Sleep
mode. In both cases, press and release the power button to turn
the computer back on. Note that the computer may enter
Hibernation mode after being in Sleep mode for a period of time.
What to bring to meetings
If your meeting is relatively short, you probably do not need to bring anything
with you other than your computer. If your meeting will be longer, or if your
battery is not fully charged, you may want to bring the AC adapter with you to
plug in your computer in the meeting room.
If the meeting room does not have an electrical outlet, reduce the drain on the
battery by putting the computer in Sleep mode. Press <Fn> + <F4> or close the
display cover whenever you are not actively using the computer. To resume,
open the display (if closed), then press and release the power button.
Taking the computer home
When you are moving from your office to your home or vice versa.
English
Preparing the computer
After disconnecting the computer from your desktop, follow these steps to
prepare the computer for the trip home:
• Check that you have removed all media and compact disks from the
drive(s). Failure to remove the media can damage the drive head.
• Pack the computer in a protective case that can prevent the computer from
sliding around and cushion it if it should fall.
Caution: Avoid packing items next to the top cover of the
computer. Pressure against the top cover can damage the screen.
What to take with you
Unless you have some items at home, take the following items with you:
• AC adapter and power cord
• The printed User's Guide
Page 96

English
76
Special considerations
Follow these guidelines to protect your computer while traveling to and
from work:
• Minimize the effects of temperature changes by keeping the computer
with you.
• If you need to stop for an extended period of time and cannot carry the
computer with you, leave the computer in the trunk of the car to avoid
exposing the computer to excessive heat.
• Changes in temperature and humidity can cause condensation. Allow the
computer to return to room temperature, and inspect the screen for
condensation before turning on the computer. If the temperature change
is greater than 10 °C (18 °F), allow the computer to come to room
temperature slowly. If possible, leave the computer for 30 minutes in an
environment with a temperature between outside and room temperature.
Setting up a home office
If you frequently work on your computer at home, you may want to purchase a
second AC adapter for use at home. With a second AC adapter, you can avoid
carrying the extra weight to and from home.
If you use your computer at home for significant periods of time, you might also
want to add an external keyboard, monitor or mouse.
Traveling with the computer
When you are moving within a larger distance, for instance, from your office
building to a client's office building or traveling locally.
Preparing the computer
Prepare the computer as if you were taking it home. Make sure that the battery
in the computer is charged. Airport security may require you to turn on your
computer when carrying it into the gate area.
What to take with you
Take the following items with you:
• AC adapter
• Spare, fully-charged battery pack(s)
• Additional printer driver files if you plan to use another printer
Page 97

77
Special considerations
In addition to the guidelines for taking the computer home, follow these
guidelines to protect your computer while traveling:
• Always take the computer as carry-on luggage.
• If possible, have the computer inspected by hand. Airport security X-ray
machines are safe, but do not put the computer through a metal detector.
• Avoid exposing floppy disks to hand-held metal detectors.
Traveling internationally with the computer
When you are moving from country to country.
Preparing the computer
Prepare the computer as you would normally prepare it for traveling.
What to bring with you
Bring the following items with you:
• AC adapter
• Power cords that are appropriate for the country to which you
are traveling
• Spare, fully-charged battery packs
• Additional printer driver files if you plan to use another printer
• Proof of purchase, in case you need to show it to customs officials
• International Travelers Warranty passport
English
Special considerations
Follow the same special considerations as when traveling with the computer. In
addition, these tips are useful when traveling internationally:
• When traveling in another country, check that the local AC voltage and the
AC adapter power cord specifications are compatible. If not, purchase a
power cord that is compatible with the local AC voltage. Do not use
converter kits sold for appliances to power the computer.
• If you are using the modem, check if the modem and connector is
compatible with the telecommunications system of the country you are
traveling in.
Page 98

78
Securing your computer
English
Your computer is a valuable investment that you need to take care of. Learn
how to protect and take care of your computer.
Security features include hardware and software locks — a security notch
and passwords.
Using a computer security lock
The notebook comes with a Kensington-compatible security slot for a security
lock.
Wrap a computer security lock cable around an immovable object such as a
table or handle of a locked drawer. Insert the lock into the notch and turn the
key to secure the lock. Some keyless models are also available.
Using passwords
Passwords protect your computer from unauthorized access. Setting these
passwords creates several different levels of protection for your computer
and data:
• Supervisor Password prevents unauthorized entry into the BIOS utility.
Once set, you must enter this password to gain access to the BIOS utility.
See "BIOS utility" on page 89.
• User Password secures your computer against unauthorized use. Combine
the use of this password with password checkpoints on boot-up and
resume from Hibernation for maximum security.
• Password on Boot secures your computer against unauthorized use.
Combine the use of this password with password checkpoints on boot-up
and resume from Hibernation for maximum security.
Important! Do not forget your Supervisor Password! If you forget
your password, please get in touch with your dealer or an
authorized service center.
Page 99

79
Entering passwords
When a password is set, a password prompt appears in the center of the
display screen.
• When the Supervisor Password is set, a prompt appears when you press
<F2> to enter the BIOS utility at boot-up.
• Type the Supervisor Password and press <Enter> to access the BIOS utility.
If you enter the password incorrectly, a warning message appears. Try
again and press <Enter>.
• When the User Password is set and the password on boot parameter is
enabled, a prompt appears at boot-up.
• Type the User Password and press <Enter> to use the computer. If you
enter the password incorrectly, a warning message appears. Try again and
press <Enter>.
Important! You have three chances to enter a password. If you fail
to enter the password correctly after three tries, the system halts.
Press and hold the power button for four seconds to shut down
the computer. Then turn on the computer again, and try again.
Setting passwords
You can set passwords using the BIOS utility.
English
Page 100

80
Expanding through options
English
Your notebook PC offers you a complete mobile computing experience.
Connectivity options
Ports allow you to connect peripheral devices to your computer as you would
with a desktop PC. For instructions on how to connect different external devices
to the computer, read the following section.
Fax/data modem
Your computer has a built-in V.92 56 Kbps fax/data modem.
Warning! This modem port is not compatible with digital phone
lines. Plugging this modem into a digital phone line will damage
the modem.
To use the fax/data modem port, connect a phone cable from the modem port
to a telephone jack.
Warning! Please make sure that the cable you use is appropriate
for the country in which you are working.
 Loading...