

Page 1

Aspire 8930 Series
Quick Guide
Page 2

Copyright © 2008. Acer Incorporated.
All Rights Reserved.
Aspire 8930 Series Quick Guide
Original Issue: 07/2008
This company makes no representations or warranties, either express or implied, with respect
to the contents hereof and specifically disclaims the implied warranties of merchantability or
fitness for a particular purpose. Although care has been taken to ensure accuracy, this
company shall not be liable for any errors (including, but not limited to, typos, factual errors,
etc.) contained in this publication.
Changes may be made periodically to the information in this publication without obligation
to notify any person of such revisions or changes. Such changes will be incorporated in new
editions of this manual or supplementary documents and publications. This company makes
no representations or warranties, either expressed or implied, with respect to the contents
hereof and specifically disclaims the implied warranties of merchantability or fitness for a
particular purpose.
Record the model number, serial number, purchase date and place of purchase information in
the space provided below. The serial number and model number are recorded on the label
affixed to your computer. All correspondence concerning your unit should include the serial
number, model number and purchase information.
No part of this publication may be reproduced, stored in a retrieval system, or transmitted, in
any form or by any means, electronically, mechanically, by photocopy, recording or otherwise,
without the prior written permission of Acer Incorporated.
Aspire 8930 Series Notebook PC
Model number: __________________________________
Serial number: ___________________________________
Date of purchase: ________________________________
Place of purchase: ________________________________
Acer and the Acer logo are registered trademarks of Acer Incorporated. Other companies'
product names or trademarks are used herein for identification purposes only and belong to
their respective companies.
Page 3

First things first
We would like to thank you for making an Acer notebook your choice for
meeting your mobile computing needs.
Your guides
To help you use your Acer notebook, we have designed a set of guides:
First off, the Just for Starters... poster helps you get started with setting up your
computer.
The Aspire Series Generic User Guide contains useful information applying to all
models in the Aspire product series. It covers basic topics such as Acer's
Empowering Technology, using the keyboard, audio, etc. Please understand
that due to its nature, the Generic User Guide as well as the AcerSystem User
Guide mentioned below will occasionally refer to functions or features which
are only contained in certain models of the series, but not necessarily in the
model you purchased. Such instances are marked in the text with language such
as "only for certain models".
The Quick Guide introduces you to the basic features and functions of your new
computer. For more on how your computer can help you to be more productive,
please refer to the AcerSystem User Guide. This guide contains detailed
information on such subjects as system utilities, data recovery, expansion
options and troubleshooting. In addition it contains warranty information and
the general regulations and safety notices for your notebook. It is available in
Portable Document Format (PDF) and comes preloaded on your notebook.
Follow these steps to access it:
1 Click on Start, All Programs, AcerSystem.
2 Click on AcerSystem User Guide.
3
Note: Viewing the file requires Adobe Reader. If Adobe Reader is not
installed on your computer, clicking on AcerSystem User Guide will run the
Adobe Reader setup program first. Follow the instructions on the screen to
complete the installation. For instructions on how to use Adobe Reader,
access the Help and Support menu.
Page 4
4
English
Your Acer notebook tour
After setting up your computer as illustrated in the poster, let us show you
around your new Acer notebook.
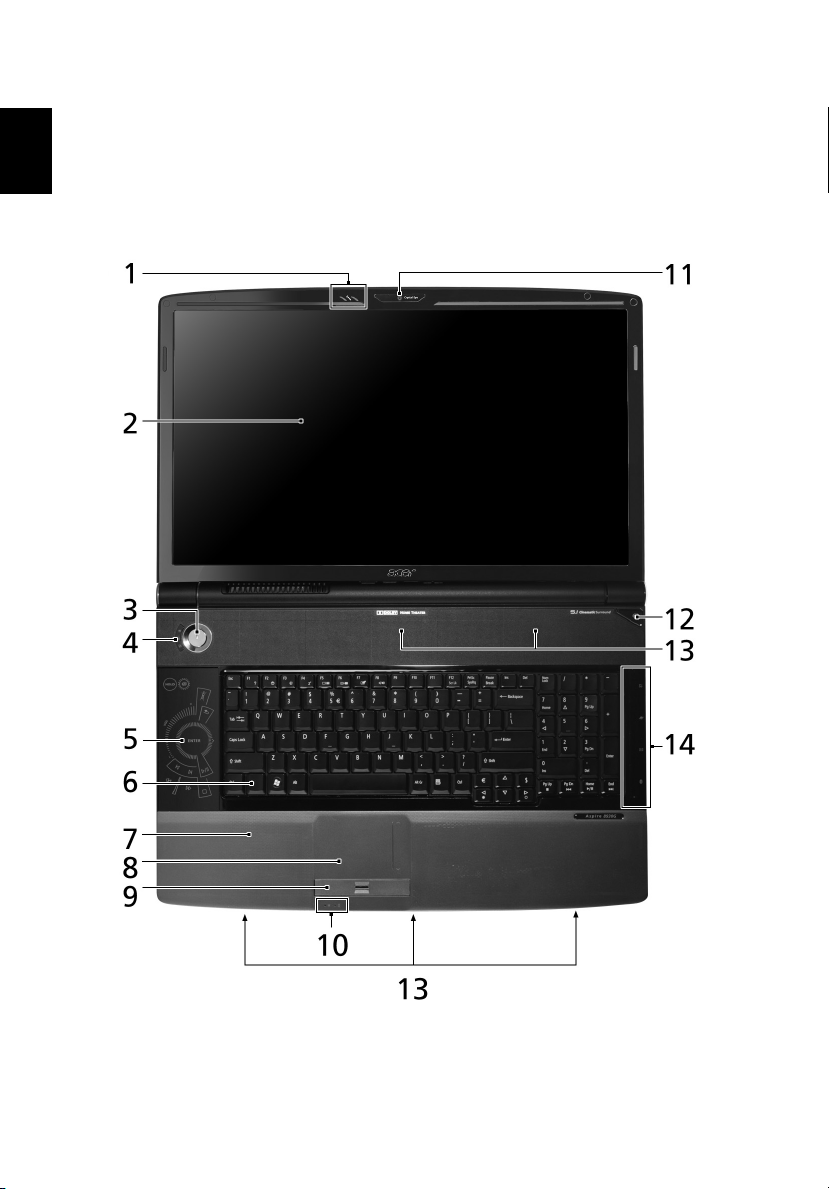
Top view
Page 5

English
# Icon Item Description
1 Acer PureZone Two internal stereo microphones for sound
recording.
2 Display screen Also called Liquid-Crystal Display (LCD),
displays computer output.
3 Power button Turns the computer on and off.
5
4 Status indicators Light-Emitting Diodes (LEDs) that light up to
5 CineDash media
console
6 Keyboard For entering data into your computer.
7 Palmrest Comfortable support area for your hands
8 Touchpad Touch-sensitive pointing device which
9 Click buttons
(left, center* and
right)
10 Status indicators Light-Emitting Diodes (LEDs) that light up to
11 Acer Crystal Eye Web camera for video communication.
12 Empowering key Launch Acer Empowering Technology
13 Speakers Dolby 5.1 speakers deliver stereo audio
14 Easy-launch
button
show the status of the computer's functions
and components.
The CineDash media console is a touchsensitive entertainment interface
when you use the computer.
functions like a computer mouse.
The left and right buttons function like the
left and right mouse buttons. *The center
button serves as Acer Bio-Protection
fingerprint reader supporting Acer FingerNav
4-way control function
(only for certain models).
show the status of the computer's functions
and components.
(only for certain models)
output.
Buttons for launching frequently used
program.
Page 6

6
English
Closed front view
# Icon Item Description
1 Speakers Front left, center and front right speakers
deliver stereo audio output.
2 6-in-1 card reader Accepts Secure Digital (SD),
MultiMediaCard (MMC),MultiMediaCard
Plus (MMCplus), Memory Stick (MS),
Memory Stick PRO (MS PRO), xD-Picture
Card (xD).
3 CIR receiver Receives signals from a remote control.
Rear view
# Item Description
1 Tuba The dedicated Tuba CineBass subwoofer pumps out
earthshaking movie-house audio.
2 Ventilation slots Enable the computer to stay cool, even after
prolonged use.
Page 7

English
Left view
# Icon Item Description
1 DC-in jack Connects to an AC adapter.
7
2 Modem (RJ-11)
port
3 Ethernet (RJ-45)
port
4 External display
(VGA) port
5 HDMI HDMI port Supports high definition digital video
6 DISPLAY DISPLAY port Supports high definition digital video
7 USB 2.0 port Connects to USB 2.0 devices (e.g., USB
8 USB 2.0 / e SATA
port
9 Headphones/
speaker/line-out
jack with S/PDIF
support
10 Microphone-in
jack
11 Line-in jack Accepts audio line-in devices (e.g., audio
Connects to a phone line.
Connects to an Ethernet 10/100/1000based network.
Connects to a display device
(e.g., external monitor, LCD projector).
connections.
connections.
mouse, USB camera).
Connects to USB 2.0 or eSATA devices
(only for certain models).
If you plug an eSATA device you
Note:
will have three USB ports available in the
mean time
Connects to audio line-out devices (e.g.,
speakers, headphones).
Accepts input from external
microphones.
CD player, stereo walkman).
.
Page 8

8
English
Right view
# Icon Item Description
1 ExpressCard/54 slot Accepts one ExpressCard/54 module.
2 Optical drive Internal optical drive; accepts CDs or
DVDs.
3 Optical disk access
indicator
4 Optical drive eject
button
5 Emergency eject
hole
6 2 USB 2.0 ports Connect to USB 2.0 devices (e.g., USB
7 TV-in port Accepts input signals from analog/
8 Kensington lock slot Connects to a Kensington-
Lights up when the optical drive is
active.
Ejects the optical disk from the drive.
Ejects the optical drive tray when the
computer is turned off.
mouse, USB camera).
digital TV-tuner devices
(only for certain models).
compatible computer security lock.
Page 9

English
Base view
# Icon Item Description
1 Hard disk bay Houses the computer's hard disk (secured
with screws).
2Memory
compartment
3 Ventilation slots and
cooling fan
4 Battery bay Houses the computer's battery pack.
Houses the computer's main memory.
Enable the computer to stay cool, even after
prolonged use.
Note: Do not cover or obstruct the opening
of the fan.
9
5 Battery release latch Releases the battery for removal.
6 Battery lock Locks the battery in position.
Page 10

10
English
Acer CineDash media console
Acer CineDash media console is a touch-sensitive entertainment interface that
features an ultra-smooth surface, inviting to the touch. Total media control -
including instant access to Acer Arcade
to launch and control entertainment. Functions are activated by simply tapping
the function with your finger, while you can adjust volume by sliding your
finger around the volume meter.
™
Deluxe - provides a new, exciting way
3
16
14
1
2
4
6
8
5
9
7
15
10
12
11
13
Page 11

English
# Item Album Video Play Movie Music
1 Hold N/A N/A N/A N/A
2 Mute Mute/unmute audio
3 Arcade Return to Main page
4 Back Go back one step
5 Enter 1. Function button: Perform selected function
2. View image
fullscreen
6 Slide
counter
clockwise
from top
7 Slide
clockwise
from
bottom
8 Left arrow Select previous item Select previous
9 Right
arrow
10 Play/Pause Play/pause
11 Stop 1. Stop
12 Next Jump to next
13 Forward N/A Fast forward*
14 Rewind N/A Rewind*
15 Previous Jump to
16 Vol Up/
down
Select previous item Select previous
Select next item Select next
Select next item Select next
slideshow
slideshow
2. Stop playing
music
image in
slideshow
previous image
in slideshow
2. Watch video
fullscreen
Play/pause
video
1. Stop playing
video fullscreen
2. Stop playing
music
Jump to next
video and play
fullscreen
1.2x, 1.4x, 2x, 4x, 8x, 16x, 32x
1x, 2x, 4x, 8x, 16x, 32x
Jump to
previous video
and play
fullscreen
Increase/decrease volume
2. Perform
movie menu
function
menu item
menu item
menu item
menu item
Play/pause
movie
Stop movie Stop playing
Jump to next
chapter/title
and play
fullscreen
Jump to
previous
chapter/title
and play
fullscreen
2. Play
highlighted
track
Select previous
item
Select next item
Select previous
item
Select next item
Play/pause
music
music
Jump to and
play next track
Jump forward 5
sec and keep
playing
Jump back 5 sec
and keep
playing
Jump to and
play previous
track
11
Note: * depends on file format
Page 12

12
English
Power subsystem & environment
Power
subsystem
Environment
• ACPI 3.0
• 71 W 4800 mAh
• 3-pin 90 W AC adapter
• ENERGY STAR
• Temperature:
• Operating: 5 °C to 35 °C
• Non-operating: -20 °C to 65 °C
• Humidity (non-condensing):
• Operating: 20% to 80%
• Non-operating: 20% to 80%
®
4.0
Page 13

13
English
 Loading...