

Page 1

Users Manual
Radio Frequency Interference Notice
The Federal Communications Commission Radio Frequency Interface Statement includes the
following warning:
This equipment has been tested and found to comply with the limits for a Class B digital device, pursuant
to Part 15 of the FCC Rules. These limits are designed to provide reasonable protection against harmful
interference in a residential installation. This equipment generates, uses, and can radiate radio
frequency energy and, if not installed and used in accordance with the instructions, may cause harmful
interference to radio communications. However, there is no guarantee that interference will not occur
in a particular installation. If this equipment does cause harmful interference to radio or television
reception, which can be determined by turning the equipment off and on, the user is encouraged to
try to correct the interference by one or more of the following measures:
Reorient or relocate the receiving antenna.
Increase the separation between the equipment and receiver.
Connect the equipment to an outlet on a circuit different from that to
which the receiver is connected.
Consult the dealer or an experienced radio/TV technician for help.
The user should not modify or change this device without written approval from ACE CAD Enterprise
Co., Ltd. Modification could void authority to use this equipment.
Trademarks
ACECAD and ACECAT are registered trademarks of ACE CAD Enterprise Co., Ltd.
IBM, PS/2 and OS/2 are registered trademarks of International Business Machines Corporation. The
OS/2 Compatibility mark is a registered trademark of International Business Machines Corporation and
is used by LICENSEE under license. International Business Machines Corporation is not responsible
in any way for and does not warrant the operation of this Hardware.
Microsoft, Microsoft Mouse and Windows are registered trademarks of Microsoft Corporation.
Autodesk, ADI, and AutoCAD are registered trademarks of Autodesk, Inc. Products carrying the
AutoCAD Release 14 Compatible Logo are not necessarily Autodesk products and as such are not
warranted by Autodesk.
Mouse Systems Mouse is a registered trademark of Mouse Systems Corporation.
All trademarks may be registered by their respective companies.
Copyright Notice
©1998 by ACE CAD Enterprise Co., Ltd. All rights reserved. No part of this publication may be
reproduced, stored in a retrieval system, or transmitted, in any form or by any means (electronic,
mechanical, photocopying, recording, or otherwise), without the prior written permission of the
publisher.
Version 1.01 Page 1
Page 2

Users Manual
CONTENTS
Introduction .................................................................................. 4
Information about Your Pen and Tablet ................................................ 4
Pen .............................................................................................. 4
Tablets Active Area ..................................................................... 5
Reading Height ............................................................................. 5
Positioning (Tracking Mode) ......................................................... 6
Equipment Checklist ................................................................... 7
Installing the Hardware ............................................................... 8
Using the Pen and Tablet with Windows................................. 10
Installing the Tablet Driver Software for Windows ............................... 10
Customizing the Pen and Tablet in Windows 3.x and 95 ................... 11
Customizing the Pen and Tablet in Windows NT ............................... 15
Adjusting Tip Feel ...................................................................... 15
Adjusting the Other Settings ...................................................... 16
Uninstalling the Tablet Driver Software for Windows .......................... 19
Using the Pen and Tablet with OS/2 ........................................ 21
Installing the Tablet Driver Software for OS/2 ..................................... 21
Customizing the Pen and Tablet in OS/2 .................................... 22
Installing the Tablet Driver Software for Pen for OS/2 ......................... 24
Using the Pen and Tablet with DOS Applications .................. 25
Installing the ATABLET Driver Software ............................................. 25
Loading the ATABLET Driver Software .............................................. 26
Changing Parameters Once ATABLET Is Loaded ....................... 30
Using the Pen and Tablet with Autodesk Applications .......... 31
Installing the Protected Mode ADI Driver Software ............................. 31
Loading the Real Mode ADI Driver Software ...................................... 32
Appendix A: Testing the Pen and Tablet................................. 35
Appendix B: Replacing the Battery and Tip of the Pen ......... 40
Appendix C: Caring for the Pen and Tablet ............................ 41
Appendix D: Troubleshooting .................................................. 42
General Problems ............................................................................. 42
Page 2 Version 1.01
Page 3

Users Manual
Problems in Windows ....................................................................... 42
Specific Problems in Windows 3.x .................................................... 44
Specific Problems in Windows NT .................................................... 44
Problems in OS/2 ............................................................................. 45
Problems in Pen for OS/2 ................................................................. 46
Problems in DOS .............................................................................. 47
Appendix E: Specifications ....................................................... 48
Version 1.01 Page 3
Page 4

Users Manual
Introduction
With this pressure-sensitive pen, paint your computer world in tones of
precision and ease that you only dreamed of before.
The pressure-sensitive pen is an ultimate mouse replacement that does
better than a mouse can do. The pen buttons can be customized to any
mouse button or to invoke Windows commands such as Undo, Copy,
Paste, ...etc. It allows you to easily and naturally point, click, draw
freehand, write, sign, sketch, trace pictures, clip arts and edit photos
without constantly double-checking your cursor location.
You can use the pen to freehand draw or trace pictures upon the tablet
within almost 0.27" thick. The clear overlay is also provided to hold
pictures in place, allowing you to trace them more easily.
In Windows, you can adjust the amount of pressure needed to click with
the pen tip for the way you like to work. Moreover, the adjustable
pressure sensitivity (512 levels) of the pen tip offers you natural
response and feel while drawing, writing, signing, ...etc. Many Windows
graphics applications have drawing tools that respond to this pressure
sensitivity function. With these applications, you can easily use the
pen to vary line width, change opacity, and blend colors by exerting
different pressure upon the pen.
In Windows or OS/2, your new pen can be used alone or together with
another pointing device such as a mouse or trackball. Your new tablet
is also fully WinTab compatible.
The pen gives you the ability to work in powerful, time-saving new ways
with your:
q Windows system and all Windows applications
q OS/2 system and all OS/2 applications
q DOS applications which support, Microsoft Mouse, or Mouse
Systems Mouse.
Information about Your Pen and Tablet
Pen
The pressure-sensitive pen gives you the familiar feel of a pencil or pen.
The adjustable pressure sensitivity (512 levels) of the pen tip offers
natural response and feel. It provides you with the freedom to draw,
Page 4 Version 1.01
Page 5
Users Manual
write, point and click. The pen has 3 buttons. To activate the tip button
on the pen, gently press the tip downward. To activate either of the
barrel buttons, simply press them.
Tablets Active Area
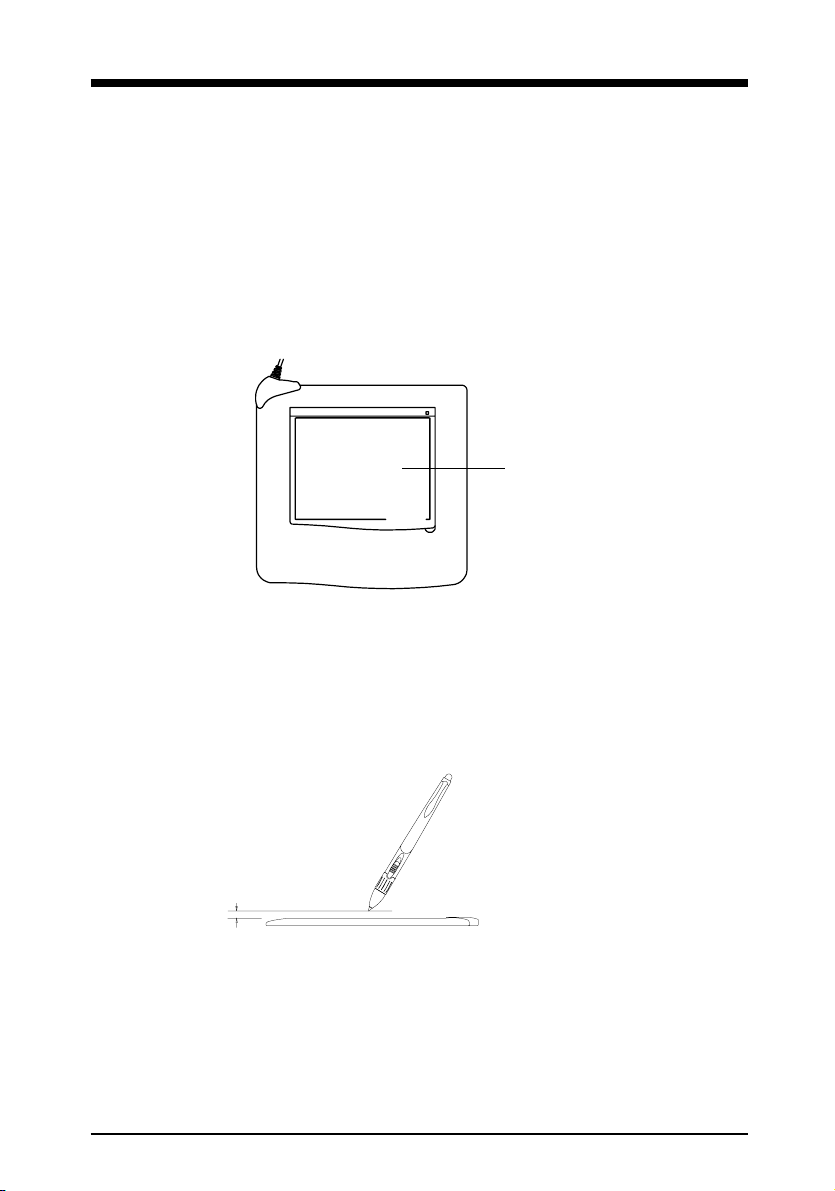
The active area is the area on your tablet that responds to tablets
pointing devices such as pen (stylus-pen) or cursor-puck. The active
area is the surface area within the rectangle on the transparent overlay.
The active area on the tablet is 5" x 3.75" (127mm x 95.25mm).
Active Area
Reading Height
Reading height refers to the maximum distance above the active area
in which the pen will still respond. The reading height is about 0.27"
(6.9mm) for the pen. The active area and reading height constitute the
reading range.
Reading Height
0.27"
Since the pen does not need to be in direct contact with the tablet, you
can use the pen to trace drawings, maps, pictures, or illustrations on
the tablet within 0.27" thick. You also can trace objects placed under
the clear overlay.
Version 1.01 Page 5
Page 6

Users Manual
You can still place application specific templates under the transparent
overlay on the tablet for easier menu picking.
Note! Do not try to trace or work through any conductive material
(i.e. metals). Working with such materials will yield
inconsistent results and may damage your tablet.
Positioning (Tracking Mode)
The tablet provides two way for positioning: absolute positioning and
relative positioning. Absolute positioning is one powerful feature of the
tablet. With absolute positioning, the position of the pen on the active
area corresponds directly to the position of the cursor on the screen.
For example, if you put the pen in the upper-left corner of the active
area, the cursor appears in the upper-left corner of the screen. Absolute
positioning let you complete your work in record time. You can easily
point, click, draw, write, or trace without constantly double-checking
the cursor location.
Relative positioning, an outdated technology employed by the mouse
or trackball, is much less efficient in that you must constantly move
the pen to properly position the screen cursor.
Page 6 Version 1.01
Page 7
Users Manual
Equipment Checklist
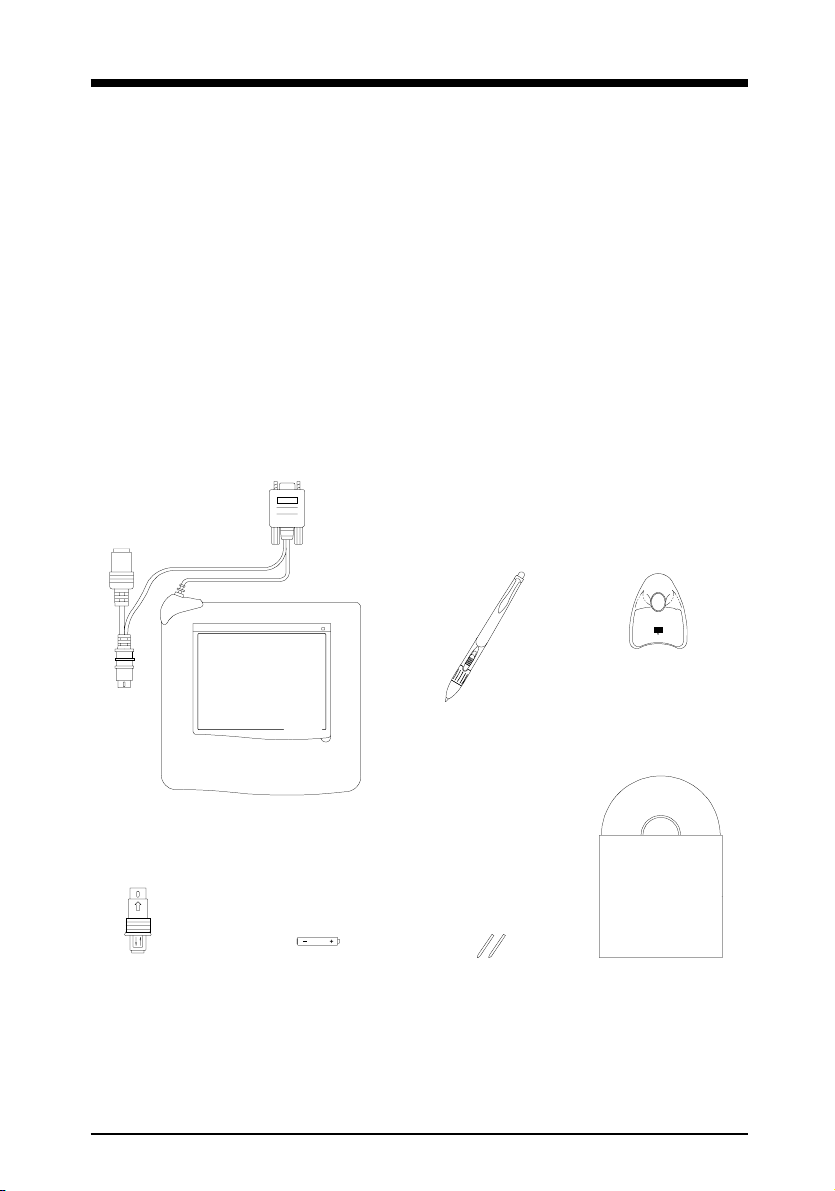
The following items are included in the package:
1. Graphics tablet with the RS-232C cable
2. Pressure-sensitive pen with 3 buttons
3. Pen holder with pen tip case
4. PS/2-PC keyboard adaptor (female 6-pin mini-DIN connector to
male 5-pin DIN connector)
5. Battery (1.5 volt, size AAAA)
6. Spare pen tips
7. Tablet CD
8. Users Guide
Graphics Tablet with the
RS-232C Cable
PS/2-PC
Keyboard
Adaptor
Battery (1.5 Volt,
Size AAAA)
Pressure-Sensitive
Pen with 3 Buttons
Spare Pen
Tips
Pen Holder with
Pen Tip Case
Tablet
CD
Version 1.01 Page 7
Page 8
Users Manual
Installing the Hardware
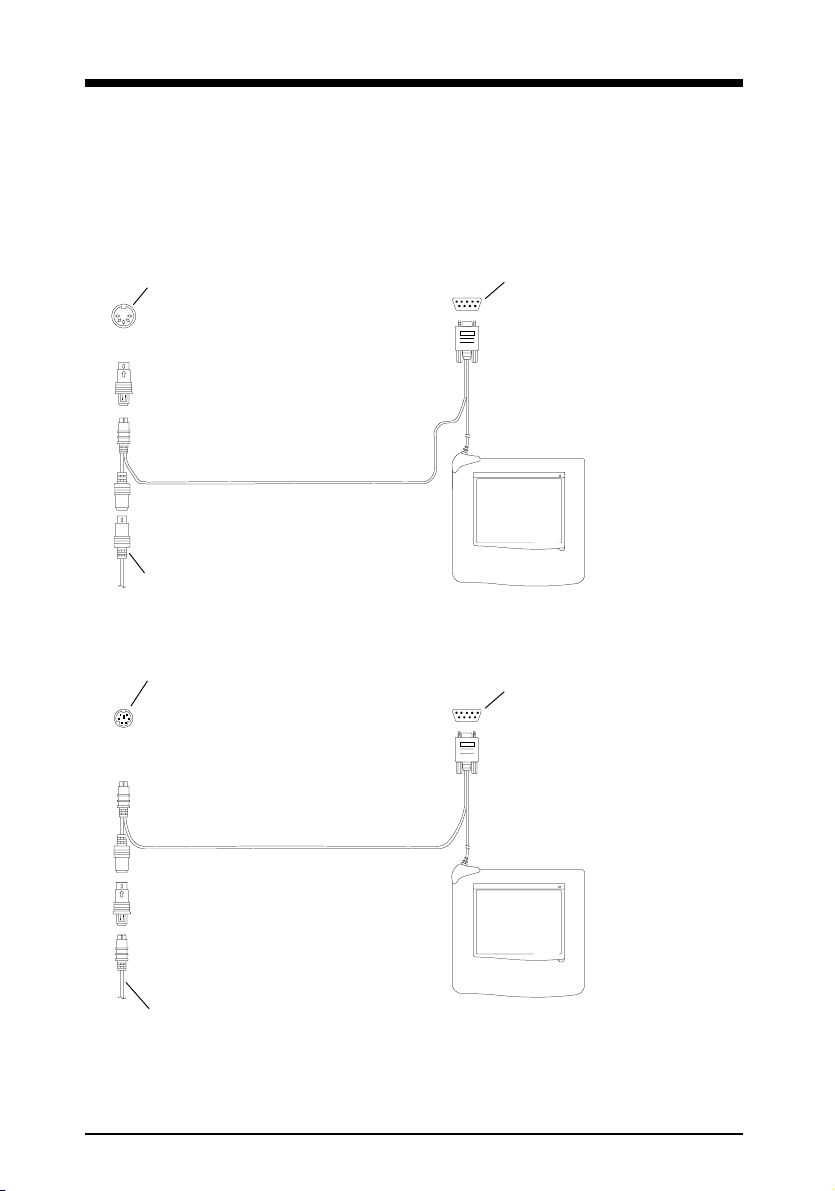
1. Turn off the computer before you begin. Leave the computer off until
you completely connect the tablet.
2. If your keyboard port is 5-pin DIN connector, please refer to the
following illustration.
Keyboard Port on the Computer
Serial Port on the Computer
Disconnect your Keyboard.
Plug the PS/2-PC adaptor
into the Keyboard port.
Plug the male 6-pin mini-DIN
connector on the cable of the
tablet into the adaptor.
Connect the female 9-pin
connector to a serial port
on your computer. (If your
computer only has a 25-
pin serial port, an optional
9-to-25 pin adapter cable
will be needed.)
Plug your keyboard into the
female 5-pin DIN connector.
Keyboard Cable
If your keyboard port is 6-pin mini-DIN connector (PS/2 port),
please refer to the following illustration.
Keyboard Port (PS/2 Port) on
the Computer
Disconnect your Keyboard or
PS/2 mouse.
Plug the male 6-pin mini-DIN
connector on the cable of the
tablet into that port.
Serial Port on the Computer
Connect the female 9-pin
connector to a serial port
on your computer. (If your
computer only has a 25-
pin serial port, an optional
9-to-25 pin adapter cable
will be needed.)
Attach the PS/2-PC adaptor.
Plug your keyboard or mouse
into the female 6-pin mini-
DIN connector of the adaptor.
Keyboard or Mouse Cable
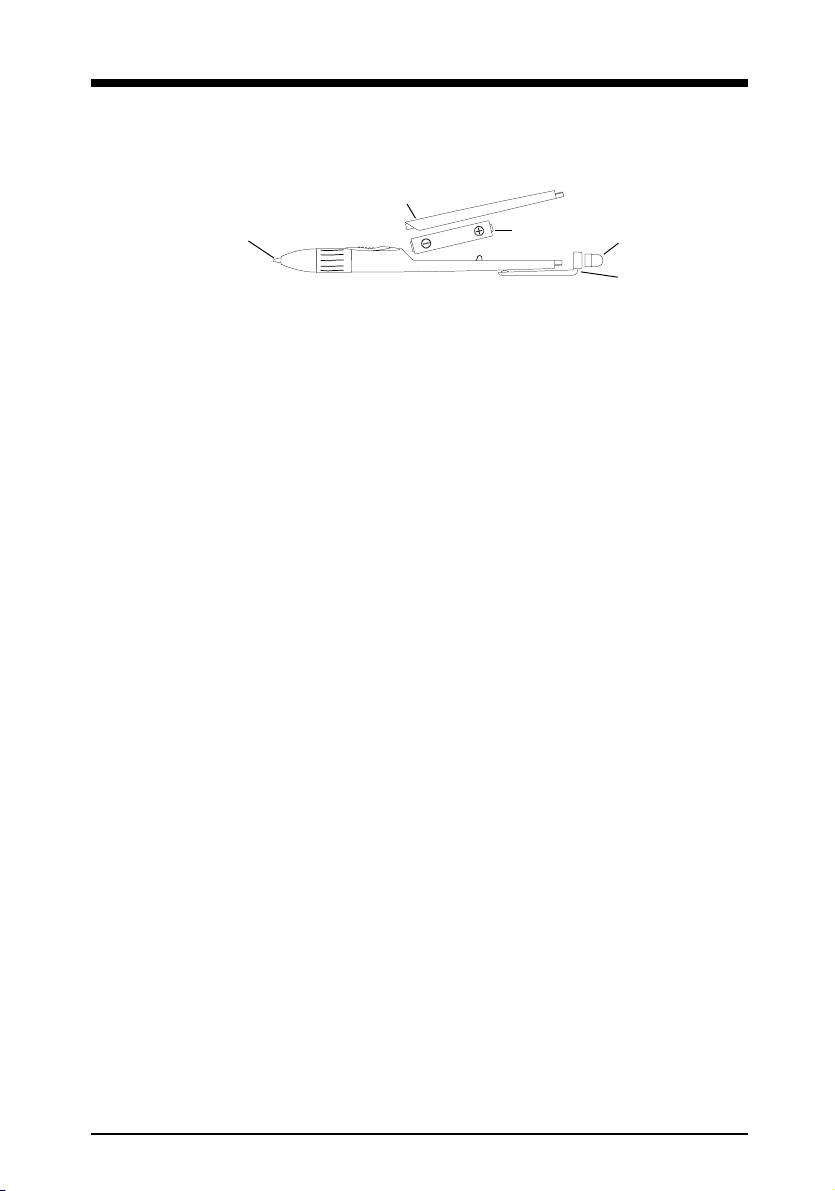
3. Unscrew the end cap of the pen. Slide off the pen clip and cover.
Insert the battery (1.5 volt, size AAAA) with the minus (-) side of the
Page 8 Version 1.01
Page 9
Users Manual
battery facing toward the pen tip. Replace the pen cover and clip.
Screw the end cap.
Pen Cover
Pen Tip
Battery
End Cap
Pen Clip
4. Turn on your computer. The power to the tablet automatically
comes on along with your computer. The LED on the tablet should
come on.
Note! To turn on the pen, use the pen tip to quickly click
anywhere. The LED on the tablet shows green when the pen
turns on and is within reading range.
The pen operates on one battery. If the pen tip clicking or
pressing has not occurred for about three minutes, the pen
automatically turns off to save the life of battery. The LED
on the tablet shows red when the pen turns off even within
reading range.
Whether the pen turns on or off, the LED shows red when
the pen is out of reading range.
Note! If you place this pen in a container where the pen rests on
the tip, the pen remains active and battery life is shortened.
We recommend you to place the pen in the provided pen
holder or horizontally on the table.
Version 1.01 Page 9
Page 10

Users Manual
Using the Pen and Tablet with Windows
In Windows, your new pen can be used alone or together with another
pointing device such as a mouse or trackball. Actually you do not need
a mouse at all because the pen does everything a mouse can do and
even more.
Installing the Tablet Driver Software for Windows
1. Make sure the hardware installation is properly completed. Turn on
your computer. The LED on the tablet should come on.
2. Start your Windows. Insert the tablet CD into your CD drive.
For Windows 95, if the New Hardware Found dialog box appears,
select Driver from disk provided by hardware manufacture and
press ENTER. Type E:\ (where E is the letter designating your CD
drive). Then press ENTER and follow the screen prompts.
3. If the Plug and Play dialog does not appear for Windows 95 or NT
4.0, click the Start button to open the Start menu (or press CTRL
+ ESC).
Or
For Windows 3.x or NT 3.x, from the Program Manager window click
File to open the File menu (or press ALT + F).
4. Then click Run (or type R). In the dialog box, type E:\WINSETUP.EXE
(where E is the letter designating your CD drive). Then click OK (or
press ENTER).
5. Follow the instructions on the screen. This installation program will
install the WinTab driver of the tablet for Windows.
6. When finished, restart your Windows. Then the pen is a Windows
system pointing device for all Windows applications. Use the pen
tip to quickly click anywhere to turn on the pen. Then you can use
the pen on the tablet to control the screen cursor.
The default tracking area is the whole active area (5"x3.75") of the
tablet. I.E. the whole active area of the tablet corresponds to the
Windows screen. The default settings of the pen and tablet should be
satisfied for the major applications. You also can customize the pen
and tablet for the way you like to work. For example, you can adjust the
button functions and the tip feel of the pen, and the size of the tracking
area which corresponds to the entire Windows screen.
Page 10 Version 1.01
Page 11

Users Manual
Note! In Windows NT4.0, before logon progress is finished or after
you start shutdown process, the tablet can not work. After
logon progress is finished, you can use the pen on the tablet
to control the screen cursor in Windows NT4.0.
Note! If the pen tip clicking or pressing has not occurred for about
three minutes, the pen automatically turns off to save the
life of battery and then you can not use the pen to move the
screen cursor. To turn on the pen, use the pen tip to quickly
click anywhere. Then you can use the pen to move the
screen cursor again.
The tablet is also fully WinTab compatible. If your Windows application
also supports a WinTab compatible tablet, you can configure the
digitizer options of your Windows application as a WinTab compatible
tablet. Not only can it be used as a Windows system pointing device
with all Windows applications, but will also allow you to pick commands
from templates provided by application packages (such as AutoCAD
for Windows) which take advantage of the powerful WinTab standards.
Customizing the Pen and Tablet in Windows 3.x and 95
If you use Windows NT, please refer to the next section Customizing
the Pen and Tablet in Windows NT.
In Windows 3.x and 95, open the ACECAD Tablet icon from the Control
Panel window. The Wintab Control Panel dialog box appears.
In this Wintab Control Panel dialog box, each of the buttons (Info,
Tracking, Pointer, Buttons, Pressure) on the left selects one category
of features. The remainder of the dialog box allows you to view or
change the following settings.
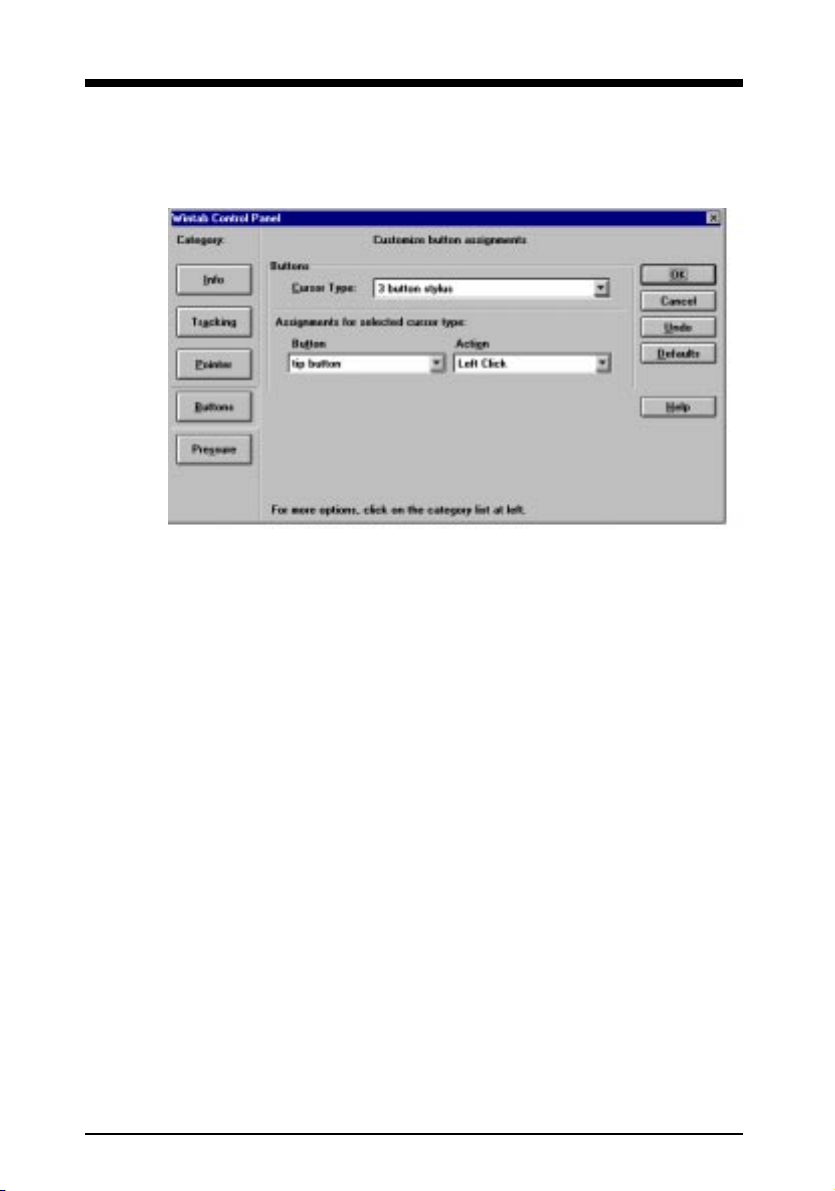
q Button Functions
The default button functions for the 3-button pressure-sensitive pen
are as follows:
Pen Tip Left Mouse Button
Lower Barrel Button Right Mouse Button
Upper Barrel Button Left Double Click Mouse Button
To change the button functions of the pen, choose the Buttons
button on the left in this dialog box. From the drop-down list boxes
Version 1.01 Page 11
Page 12
Users Manual
of the Buttons and Actions, you can redefine the button functions
to any mouse button or to invoke Windows commands such as
Undo, Copy, Paste, ...etc.
Note! In the Cursor Type drop-down list box, the current
choice of tablets pointing device must be the one which
you are using with the tablet. It insures proper button
number, button functions and pressure-sensitivity
function. In other words, if you use the 3-button pressure-
sensitive pen offered in this package, please make sure
that the current choice in the drop-down list box is 3-
button stylus.
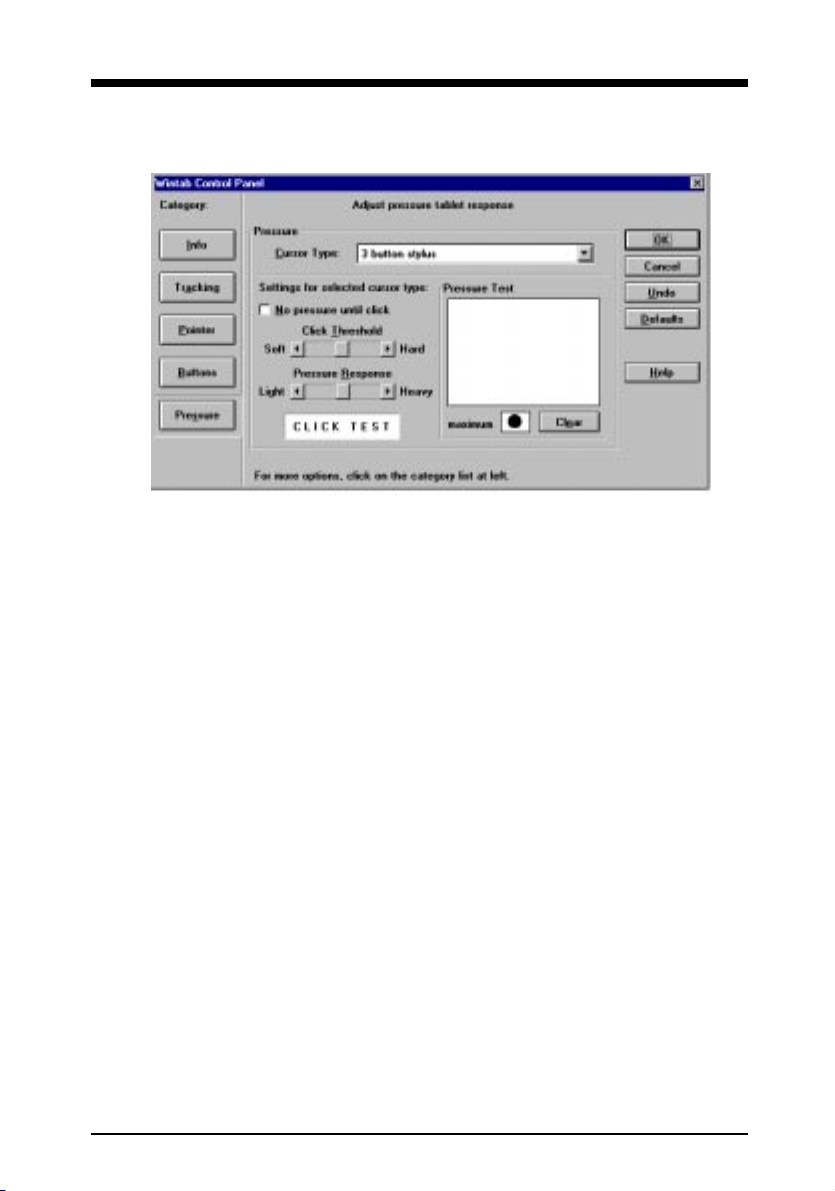
q Tip Feel
You can adjust the tip feel you prefer when clicking or drawing.
To adjust the amount of pressure needed to click with the pen tip
or to draw non pressure-sensitive lines, choose the Pressure
button on the left and then drag the Click Threshold slider toward
Soft or Hard.
Note! You can use a softer Click Threshold for easier clicking
or drawing. However, in some applications, a softer
Click Threshold may make the pen tip overreact. If you
experience this, try a harder setting.
To adjust the pressure response (such as line width or opacity) to
drawing pressure sensitive lines with the pen tip, drag the Pressure
Response slider toward Light or Heavy. When drawing pressure
sensitive lines, a heavier Pressure Response can produce a larger
Page 12 Version 1.01
Page 13
Users Manual
pressure value (such as thicker lines or denser color) with less
force you exert upon the pen.
The Pressure Test area lets you experiment with the pressure-
sensitive pen to see the effect of your adjustment. Press hard for
thick lines and press gently for thin lines.
Note! You can use a heavier Pressure Response for easier
drawing. However, in some applications, a heavier
Pressure Response may make the pen tip overreact. If
you experience this, try a lighter setting.
Note! In the Cursor Type drop-down list box, the current
choice of tablets pointing device must be the one which
you are using with the tablet. It insures proper button
number, button functions and pressure-sensitivity
function. In other words, if you use the 3-button pressure-
sensitive pen offered in this package, please make sure
that the current choice in the drop-down list box is 3-
button stylus.
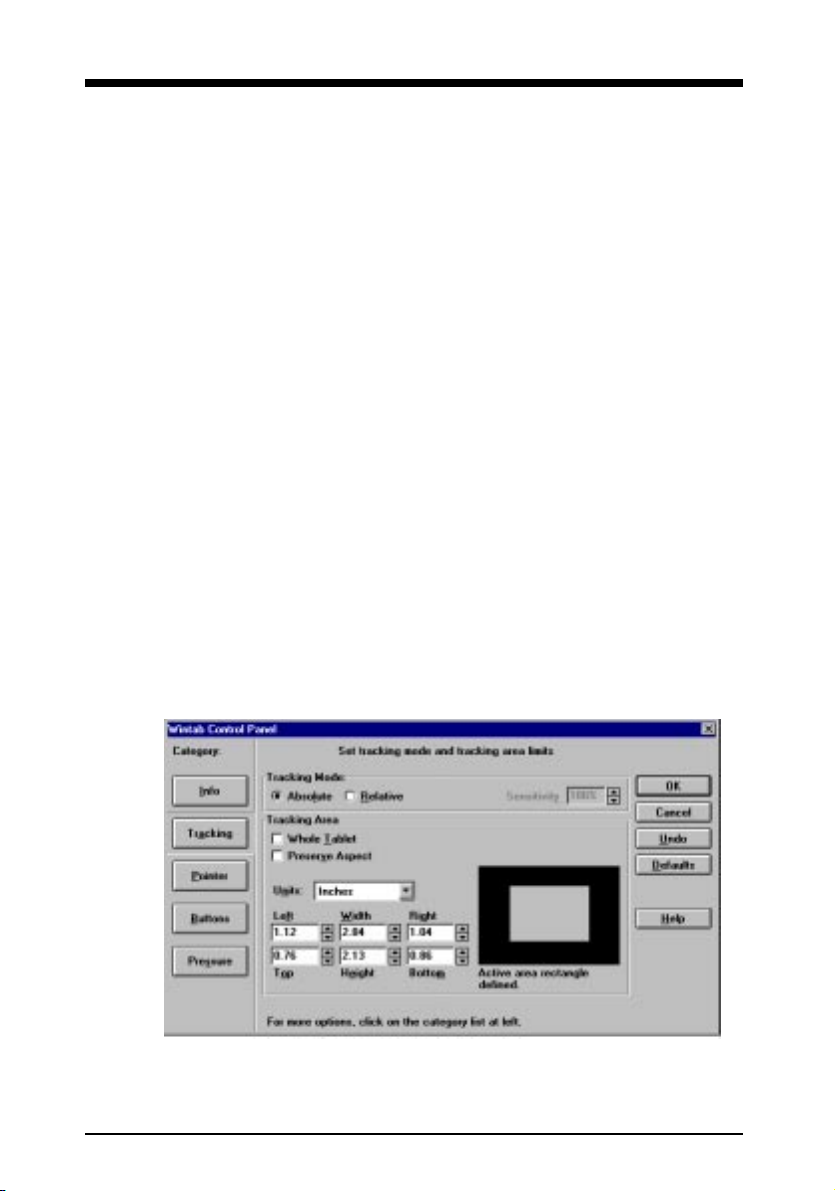
q Tracking Mode (Absolute or Relative Mode)
The absolute mode performs more efficiently than the relative mode
does. In absolute mode, you can adjust the tracking area
corresponding to the Windows screen. By reducing the size of the
tracking area while in absolute mode, it will also increase the speed
of your pointer movements.
If needed for a specific application, you can change the tracking
mode from absolute mode to relative mode. To select the relative
mode, choose the Tracking button on the left and then select the
Version 1.01 Page 13
Page 14
Users Manual
Relative option button. To adjust the tracking speed of the screen
pointer for relative mode, change the percentage for the Sensitivity
parameter. Increasing or decreasing the Sensitivity percentage will
increase or decrease the response of the screen pointer.
q Tracking Area
The default tracking area is the whole 5"x3.75" active area within
the rectangle on the transparent overlay. Under absolute mode, the
tracking area corresponds directly to the Windows screen. If you
are using the pen primarily for menu picking and pointer movement,
you may wish to reduce the size of the tracking area. With a smaller
tracking area, you can move the screen cursor from one corner of
the Windows screen to the other within a short distance on the
tablet. This can substantially increase the speed at which you will
work. The pen will respond only within the new tracking area on the
tablet, not the full active area.
To specify a new tracking area:
1. Choose the Tracking button on the left.
2. Clear the Whole Tablet check box.
3. Click anywhere in the gray rectangular image indicating the
active area in the lower-right section of the dialog box. The
screen pointer will change from an arrow to a cross. Click the
lower-left corner and then the upper-right corner of the new
tracking area you wish to use.
Page 14 Version 1.01
Page 15

Users Manual
Or
Enter new values in the Width, Height and Margin text boxes or
click the up or down scroll arrow to adjust the size and position
of the new tracking area you wish to use.
4. For tracing or precise drawing, if you want to adjust the new
tracking area to retain the shape of your screen, select the
Preserve Aspect check box.
q Pointer
The standard pointer is a small white arrow. In some applications,
you may wish to change the default pointer appearance. On high
resolution screens, it is usually easier to find the pointer if it is
larger than normal. If the screen background is always dark, a light
pointer may be easier to see than a dark one.
You may select a light, dark or transparent pointer in one of three
sizes. To change the pointer appearance, choose the Pointer
button on the left and then select one pointer appearance you wish
to use.
q Command Buttons
The buttons on the right OK , Cancel, Undo, Defaults and Help
are always available.
OK Accept your changes and close the dialog box.
Cancel Ignore all changes and close the dialog box.
Undo Undo any changes you made on the current page in the
dialog box, except the Cursor Type.
Defaults Restore the options to the factory default settings in all
pages or the current page (your choice).
Help Bring up the help file.
Customizing the Pen and Tablet in Windows NT
Adjusting Tip Feel
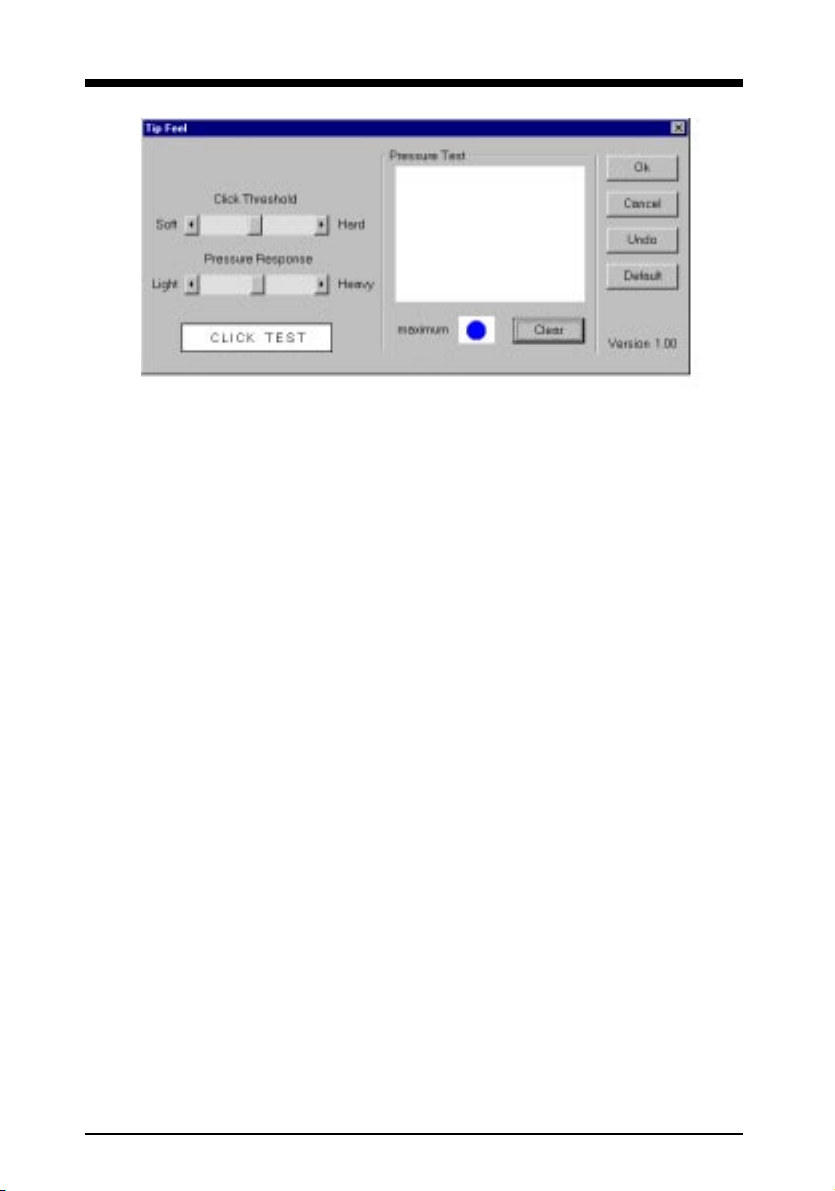
You can adjust the tip feel you prefer when clicking or drawing.
In Windows NT4.0, click the Tip Feel icon on the ACECAD folder of the
Program menu. (In Windows NT3.x, choose the Tip Feel icon from the
ACECAD window.) The Tip Feel dialog box will appear.
Version 1.01 Page 15
Page 16
Users Manual
To adjust the amount of pressure needed to click with the pen tip or to
draw non pressure-sensitive lines, drag the Click Threshold slider
toward Soft or Hard.
Note! You can use a softer Click Threshold for easier clicking or
drawing. However, in some applications, a softer Click
Threshold may make the pen tip overreact. If you experience
this, try a harder setting.
To adjust the pressure response (such as line width or opacity) to
drawing pressure sensitive lines with the pen tip, drag the Pressure
Response slider toward Light or Heavy. When drawing pressure
sensitive lines, a heavier Pressure Response can produce a larger
pressure value (such as thicker lines or denser color) with less force
you exert upon the pen.
The Pressure Test area lets you experiment with the pressure-sensitive
pen to see the effect of your adjustment. Press hard for thick lines and
press gently for thin lines.
Note! You can use a heavier Pressure Response for easier
drawing. However, in some applications, a heavier Pressure
Response may make the pen tip overreact. If you experience
this, try a lighter setting.
Adjusting the Other Settings
In Windows NT4.0, click the ACECAD Tablet icon on the ACECAD
folder of the Program menu. (In Windows NT3.x, choose the ACECAD
Tablet icon from the ACECAD window.)
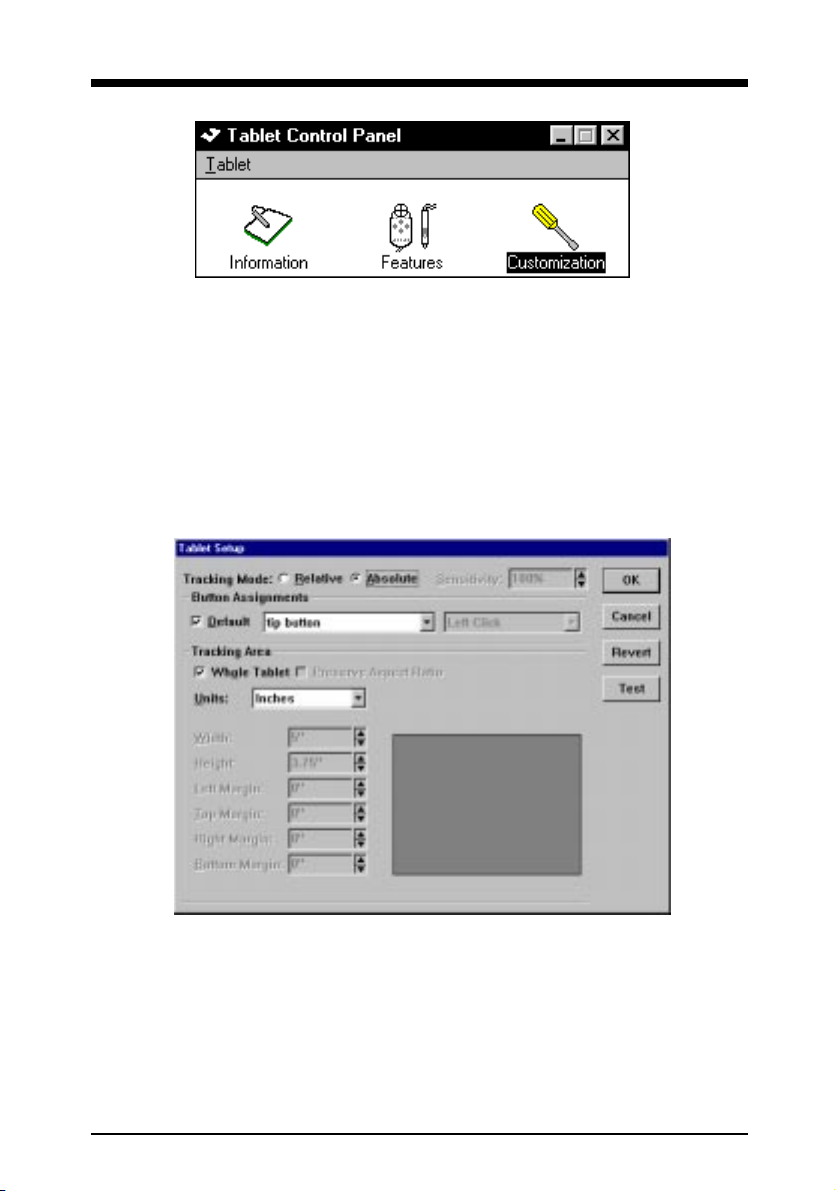
The Tablet Control Panel window appears and displays three icons
Information, Features, and Customization.
Page 16 Version 1.01
Page 17
Users Manual
Choose the Features icon from the Tablet Control Panel window. In the
Cursor Type drop-down list box, the current choice of tablets pointing
device must be the one which you are using with the tablet. It insures
proper button number, button functions and pressure-sensitivity function.
In other words, if you use the 3-button pressure-sensitive pen offered in
this package, please make sure that the current choice in the drop-
down list box is 3-button stylus.
In the Tablet Control Panel window, choose the Customization icon.
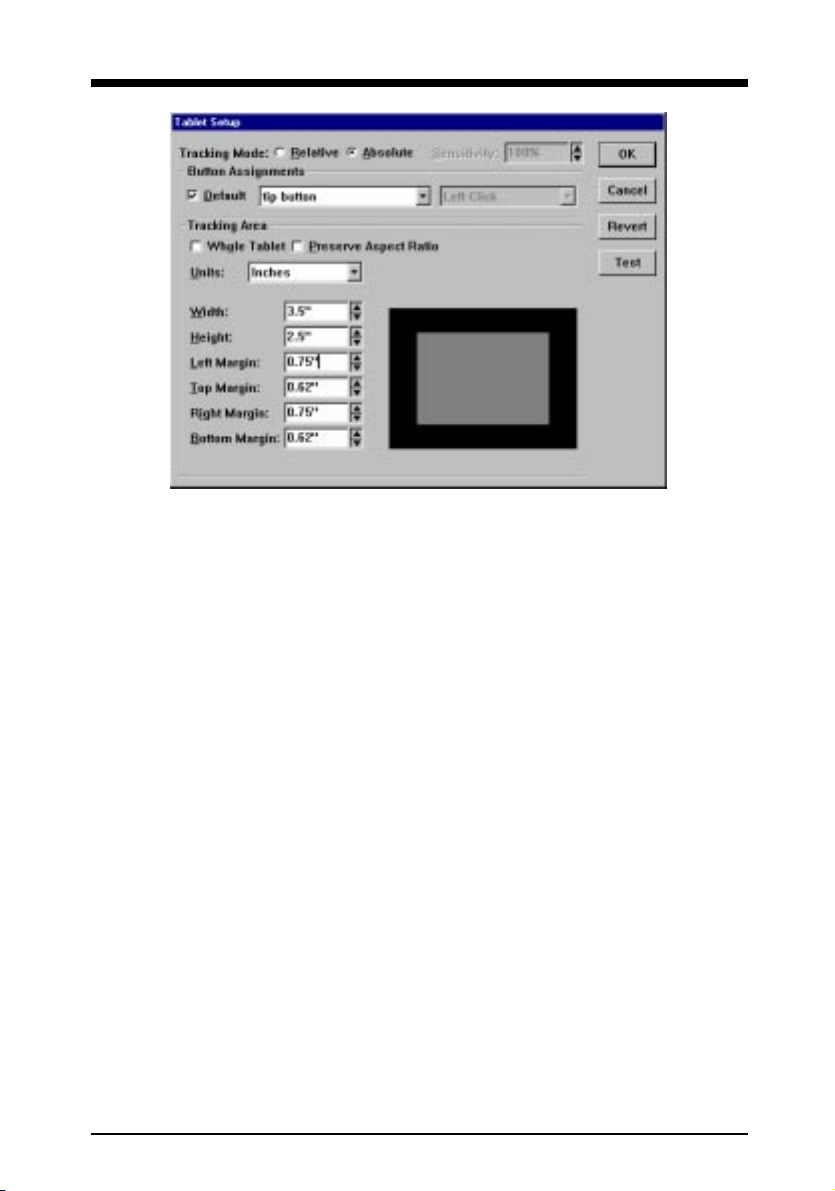
The Tablet Setup dialog box will appear.
In the Tablet Setup dialog box, you can adjust the following settings:
q Button Functions
The default button functions for the 3-button pressure-sensitive pen
are as follows:
Version 1.01 Page 17
Page 18

Users Manual
Pen Tip Left Mouse Button
Lower Barrel Button Right Mouse Button
Upper Barrel Button Left Double Click Mouse Button
To change the button functions of the pen, clear the Default check
box in the Button Assignments box. From the drop-down list boxes,
you can redefine the button functions to any mouse button such as
left click, left double click, left drag, right click, ...etc.
q Tracking Mode (Absolute or Relative Mode)
The absolute mode performs more efficiently than the relative mode
does. In absolute mode, you can adjust the tracking area
corresponding to the Windows screen. By reducing the size of the
tracking area while in absolute mode, it will also increase the speed
of your pointer movements.
If needed for a specific application, you can change the tracking
mode from absolute mode to relative mode by selecting the Relative
option button. To adjust the tracking speed of the screen pointer for
relative mode, change the percentage for the Sensitivity parameter.
Increasing or decreasing the Sensitivity percentage will increase or
decrease the response of the screen pointer.
q Tracking Area
The default tracking area is the whole 5"x3.75" active area within
the rectangle on the transparent overlay. Under absolute mode, the
tracking area corresponds directly to the Windows screen. If you
are using the pen primarily for menu picking and pointer movement,
you may wish to reduce the size of the tracking area. With a smaller
tracking area, you can move the screen cursor from one corner of
the Windows screen to the other within a short distance on the
tablet. This can substantially increase the speed at which you will
work. The pen will respond only within the new tracking area on the
tablet, not the full active area.
To specify a new tracking area:
1. Clear the Whole Tablet check box.
2. Click anywhere in the gray rectangular image indicating the
active area in the lower-middle section of the dialog box. The
screen pointer will change from an arrow to a cross. Click the
lower-left corner and then the upper-right corner of the new
tracking area you wish to use.
Page 18 Version 1.01
Page 19
Users Manual
Or
Enter new values in the Width, Height and Margin text boxes or
click the up or down scroll arrow to adjust the size and position
of the new tracking area you wish to use.
3. For tracing or precise drawing, if you want to adjust the new
tracking area to retain the shape of your screen, select the
Preserve Aspect Ratio check box.
q Command Buttons
OK Accept your changes and close the dialog box.
Cancel Ignore all changes and close the dialog box.
Revert Undo any changes you made.
Test Test and try to use the new settings.
Uninstalling the Tablet Driver Software for Windows
1. Insert the tablet CD into your CD drive.
2. In Windows 95 or NT 4.0, click the Start button to open the Start
menu (or press CTRL + ESC).
Or
In Windows 3.x or NT 3.x, from the Program Manager window click
File to open the File menu (or press ALT + F).
Version 1.01 Page 19
Page 20

Users Manual
3. Then click Run (or type R). In the dialog box, type
E:\WTREMOVE.EXE (where E is the letter designating your CD
drive). Then click OK (or press ENTER).
4. Follow the instructions to remove the tablet driver software from
Windows.
5. When restarting your Windows, you can not use the pen with your
Windows.
Page 20 Version 1.01
Page 21

Users Manual
Using the Pen and Tablet with OS/2
Your new pen really brings the OS/2 environment to life! The power of
absolute positioning and a wide range of customization options lend
even greater ease of use to your OS/2 desktop and all OS/2 applications.
Now you can work the way you like!
Installing the Tablet Driver Software for OS/2
If you want to use the pen with Pen for OS/2, please skip to the following
section Installing the Tablet Driver Software for Pen for OS/2 in this
chapter.
You can use the pen only as the system pointing device for OS/2. Or
you can use the pen as the secondary system pointing device for OS/
2 but you must have already installed another pointing device such as
a mouse for OS/2 before you install the tablet driver software for OS/2.
Then the pen and a mouse (or trackball) can be used together with OS/
2.
To install the tablet driver software for your OS/2, please complete the
following steps:
1. Make sure the hardware installation is properly completed. Turn on
your computer and start your OS/2. The LED on the tablet should
come on.
2. Insert the tablet CD into your CD drive.
3. Select the object Drive E (where E is the letter designating your CD
drive) and press ENTER.
4. In the Drive window, select the object OS2SETUP and press
ENTER.
5. In the main menu, select the item Install Tablet Driver for OS/2.
Follow the instructions on the screen.
6. After installation, please close all opened applications and shut
down your OS/2. Restart your OS/2. Then the pen is a OS/2 system
pointing device for all OS/2 applications. Use the pen tip to quickly
click anywhere to turn on the pen. Then you can use the pen on the
tablet to control the screen cursor.
The default tracking area is the whole active area (5"x3.75") of the
tablet. I.E. the whole active area of the tablet corresponds to the OS/
2 screen. The default settings of the pen and tablet should be satisfied
Version 1.01 Page 21
Page 22
Users Manual
for the major applications. You also can customize the pen and tablet
for the way you like to work. For example, you can adjust the button
functions and the size of the tracking area which corresponds to the
entire OS/2 screen.
Note! If the pen tip clicking or pressing has not occurred for about
three minutes, the pen automatically turns off to save the
life of battery and then you can not use the pen to move the
screen cursor. To turn on the pen, use the pen tip to quickly
click anywhere. Then you can use the pen to move the
screen cursor again.
Customizing the Pen and Tablet in OS/2
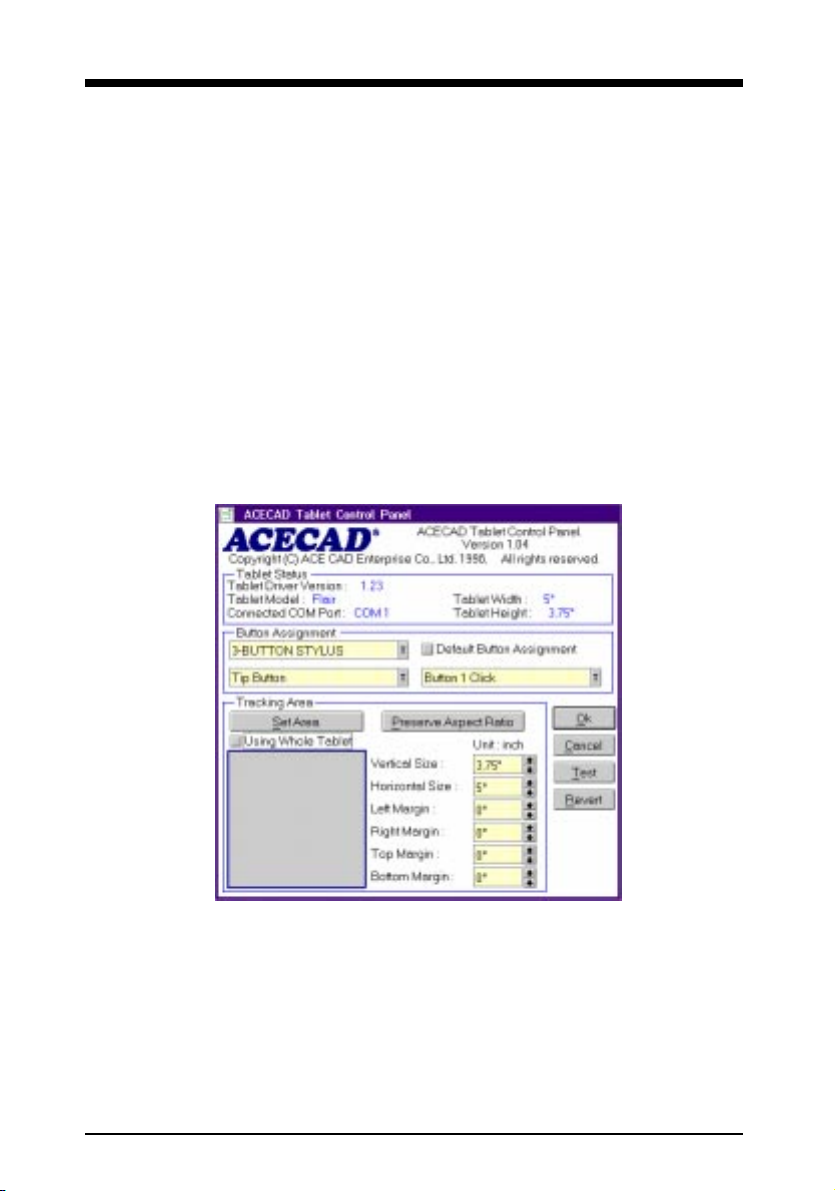
To customize the pen and tablet, choose the ACECAD Tablet Control
Panel icon on the OS/2 desktop. The ACECAD Tablet Control Panel
dialog box appears.
In ACECAD Tablet Control Panel dialog box, you can change the
following settings:
q Button Functions
In the Button Assignment box, the current choice of tablets
pointing device must be the one which you are using with the tablet.
It insures proper button number and button functions. In other
words, If you use the 3-button pressure-sensitive pen offered in this
Page 22 Version 1.01
Page 23

Users Manual
package, please make sure that the current choice in the drop-
down list box is 3-button stylus.
When the Default check box in this Button Assignments box is
selected, from the drop-down list boxes, you can see the default
button functions for the tablets pointing device you chose. You also
can clear the Default Button Assignment check box and use the
list boxes to redefine the button functions such as button 1 click,
button 1 double click, button 2 click, ...and so on.
q Tracking Area
The default tracking area is the whole 5"x3.75" active area within
the rectangle on the transparent overlay. The tracking area
corresponds directly to the OS/2 screen. If you are using the pen
primarily for menu picking and pointer movement, you may wish to
reduce the size of the tracking area. With a smaller tracking area,
you can move the screen cursor from one corner of the OS/2 screen
to the other within a short distance on the tablet. This can
substantially increase the speed at which you will work. The pen
will respond only within the new tracking area on the tablet, not the
full active area.
To specify a new tracking area:
1. Clear the Using Whole Tablet check box.
2. Click the Set Area button. The screen pointer will change to a
cross inside the rectangular image indicating the whole active
area in the lower-left corner of the dialog box. Click two points
to specify the new tracking area you wish to use.
Or
Enter new values in the Size and Margin text boxes or click the
up or down scroll arrow to adjust the size and position of the
new tracking area you wish to use.
3. For tracing or precise drawing, if you want to adjust the new
tracking area to retain the shape of your screen, select the
Preserve Aspect Ratio check box.
q Command Buttons
OK Accept your changes and close the dialog box.
Cancel Ignore all changes and close the dialog box.
Test Test and try to use the new settings.
Revert Undo any changes you made.
Version 1.01 Page 23
Page 24

Users Manual
Installing the Tablet Driver Software for Pen for OS/2
Before you install the tablet driver software for your Pen for OS/2, you
must have installed Pen for OS/2. Then complete the following steps:
1. Make sure the hardware installation is properly completed. Turn on
your computer and start your OS/2. The LED on the tablet should
come on.
2. Insert the tablet CD into your CD drive.
3. Select the object Drive E (where E is the letter designating your CD
drive) and press ENTER.
4. In the Drive window, select the object OS2SETUP and press
ENTER.
5. In the main menu, select the item Install Tablet Driver for Pen for
OS/2. Follow the instructions on the screen.
6. After installation, please close all opened applications and shut
down your OS/2. Restart your OS/2. Use the pen tip to quickly click
anywhere to turn on the pen. Then you can use the pen as the pen
device and control the screen cursor for Pen for OS/2 and all OS/2
applications.
An object named ACECAD Pen Device will be added in the folder Device
which is in the folder Pen for OS/2 on the desktop. You can use the
object ACECAD Pen Device to customize your pen and tablet such as
the Pause time before select, Double-tap rate, Button Assignments of
barrel button for the way you like to work.
Note! Once you install the tablet driver software for Pen for OS/2,
you only can use the ACECAD Pen Device to customize
your pen and tablet, and you can not use the ACECAD
Tablet Control Panel.
Once you install the tablet driver software for OS/2, you
only can use the ACECAD Tablet Control Panel to customize
your pen and tablet, and you can not use ACECAD Pen
Device.
Page 24 Version 1.01
Page 25

Users Manual
Using the Pen and Tablet with DOS
Applications
The pen can be used as a mouse emulator with your DOS applications
which support a Microsoft Mouse or Mouse Systems Mouse. The tablet
CD includes a mouse emulator driver software ATABLET.COM. This
breakthrough DOS driver also provides the look and feel of absolute
positioning with many advanced applications which allow a mouse
device to work under absolute positioning.
Refer to the manual of your DOS application(s) to configure the input device
by choosing either Microsoft Mouse or Mouse Systems Mouse in the setup
procedure of each application. Load ATABLET.COM (see below) before you
start your DOS application. For some DOS applications, you will now be
able to use the pen as a mouse emulator with the superior look and feel of
absolute positioning.
Note! Some DOS applications do not support absolute positioning
and force relative positioning as their default setting. With
this in mind the default installation setting for
ATABLET.COM is relative positioning.
Once you load the ATABLET driver, it remains in memory until you
reboot your computer or turn it off. If you load another mouse driver after
loading ATABLET.COM, ATABLET.COM will be invalid.
Installing the ATABLET Driver Software
To install the ATABLET driver software, complete the following steps:
1. Insert the tablet CD in your CD drive.
2. If you are in Windows 3.x, exit Windows. If you are in Windows 95
or NT, restart the computer in DOS mode.
3. At the DOS prompt, type E: (where E is the letter designating your
CD drive) and press ENTER. Then change to the root directory by
typing CD\ and pressing ENTER.
4. Type INSTALL and press ENTER.
5. When the menu is shown on the screen, please select the item
Install ATABLET Mouse driver for DOS and then follow the
directions on the screen.
Version 1.01 Page 25
Page 26

Users Manual
6. After the installation is completed, please press ESC to quit the
program.
Note! For your convenience in running our ATABLET mouse
driver software, we suggest you to allow our installation
program to modify your AUTOEXEC.BAT file when you
are prompted to do so.
Loading the ATABLET Driver Software
To load the ATABLET driver, type the following command at the DOS
prompt and press ENTER.
ATABLET [/n] [/n] [...
where /n is an optional parameter(s) described below.
Or
Use a batch file, such as your AUTOEXEC.BAT to execute
ATABLET.COM and load the mouse driver. Insert the above command
into your batch file.
ATABLET displays sign-on and status messages indicating the current
parameter settings for mouse mode, transducer type, button
assignments, COM port and coordinate mode each time it is executed.
Parameter Descriptions
q Serial Port Assignment /#
This parameter assigns the port where the tablet is connected to.
/1 Selects COM1
/2 Selects COM2
/3 Selects COM3
/4 Selects COM4
If a COM port is not specified, the driver will attempt to automatically
detect which COM port your tablet is connected to. We recommend
you setting the port assignment explicitly by using this parameter.
q IRQ Number Setting /I#
This parameter allows you to specify the IRQ number. The IRQ
number is generally standard for each COM port (COM1 to COM4)
for most serial I/O cards, so the user normally does not need to
select the IRQ number. If necessary, please refer to the manual of
Page 26 Version 1.01
Page 27

Users Manual
your serial I/O card to select the exact IRQ number with the serial
port assignment. The IRQ number (#) is a decimal number in the
range of 2 to 5.
q Coordinate Mode Setting /A or /R
This specifies whether the driver communicates in Absolute or
Relative mode.
/A Specifies Absolute mode
/R Specifies Relative mode (default)
If your DOS application does not support Absolute mode, the cursor
movement will still be in Relative mode even though the coordinate
mode in the driver is set to Absolute mode.
q Mouse Mode /MS or /PC
This specifies whether the driver is set to be compatible with
Microsoft Mouse (2-button Mouse) or Mouse Systems Mouse (3-
button Mouse).
/MS Sets the driver to Microsoft Mouse. (default)
/PC Sets the driver to Mouse Systems Mouse.
If necessary, select the same Mouse device in the setup of your
DOS application by referring to the manual of the application. If your
DOS application supports only a Microsoft Mouse device, you must
set the driver to Microsoft Mouse (default). However, the Middle
button in the button assignments only applies to Mouse Systems
Mouse mode.
q Button Functions /B
The /B parameter allows you to select the transducer type you use
and the set of button functions you want. When you load the driver
with the /B option, the following table will appear on the screen.
1. 2-button Stylus-Pen (default)
2. 3-button Stylus-Pen
3. 4-button Cursor-Puck
4. 16-button Cursor-Puck
(Press <Esc> to cancel)
Enter your transducer type (1): _
Version 1.01 Page 27
Page 28

Users Manual
Enter the number (1 to 4) to select the transducer type you use and
press ENTER. Then follow the directions on the screen to enter a
letter to select the new set of button assignments you want and
press ENTER.
Note! The selected transducer type and new set of button
assignments will be saved to the driver for future use, so
you do not need to load the driver with the /B option
every time. The factory default set of button assignments
in the driver is set A for 2-button Stylus-Pen (Tip button
is left click; Barrel button is right button).
q Tracking Area /C
The /C parameter allows you to change the tracking area within the
whole active area of your tablet. The default tracking area is the
whole active area of your tablet (5"x3.75"). If you use the driver with
your application software under relative mode, we recommend that
you use the whole active area as the tracking area.
If you can use the driver with your application software under
absolute mode, the tracking area corresponds directly to the
screen. If you are using the pen primarily for menu picking and
cursor movement, you may wish to reduce the size of the tracking
area. With a smaller tracking area, you can move from one corner
of the screen to the other with a shorter distance on the tablet,
substantially increasing your speed and ease of work.
To specify a new tracking area:
1. When you load the driver with /C option, the configuration menu
will appear on the screen, which shows the active area rectangle,
message area and five command buttons.
2. Use the left button to choose the CONFIG button. A dash-lined
rectangle will appear in the lower-left corner of the whole active
area rectangle, and the position of the tablets pointing device
(the X and Y coordinates) on the tablet will appear on the lower-
right corner of the screen.
3. Use the left button to click the lower-left corner of the new
tracking area which you wish to use, within the dash-lined
rectangle. Then click the upper-right corner of the new tracking
area.
4. Choose any one of the following command buttons:
Page 28 Version 1.01
Page 29

Users Manual
OK Save the new tracking area to the driver and then
load the driver.
CANCEL Cancel the new tracking area you chose. Load the
driver with the preset tracking area.
RESET Restore the tracking area to the whole active area
of the tablet.
TEST Test and try to use the new tracking area on the
screen of the configuration menu.
q LCD Screen Update Skip Setting /N#
This parameter is useful for some slower display systems. For
example, LAPTOP Systems or NOTEBOOK Systems which
incorporate an LCD display.
The # is a decimal number in the range of 0 - 100 that specifies the
threshold value for cursor drawing. The cursor is drawn on screen
once the accumulated count value of transducer movement reaches
the threshold value. Larger values will reduce the sensitivity of the
driver. Default is /N0/.
q Text Cursor Lock Function /O#
This parameter allows the user to inhibit application programs from
modifying the cursor attribute on the screen when in text mode.
When enabled, the cursor is locked to the default text cursor.
/O1 Enable the cursor locked function
/O0/ Disable the cursor locked function (default)
q Sensitivity Setting /S#, /H# or /V#
This allows the user to change the tracking response in relative
mode. You may want to experiment to find a comfortable setting.
/S Specifies both Horizontal & Vertical Sensitivity in one
parameter
/H Specifies Horizontal Sensitivity
/V Specifies Vertical Sensitivity
The # is a decimal number in the range of 1 - 100. Default value is
50. Larger values result in a faster response and lower values are
slower, great for highly accurate cursor pointing.
Version 1.01 Page 29
Page 30

Users Manual
q Disable/Remove Driver /OFF
This parameter removes the resident portion of the driver from
system memory if possible, and disables driver functionality until it
is reloaded again.
Note! The driver cannot be physically removed from memory
if another memory resident program has been loaded
after ATABLET. However, ATABLET is still disabled
(turned off) with the /OFF parameter.
Command Examples
q C:\>ATABLET /1 /A
This command loads the ATABLET driver and sets it to communicate
with COM1 in Absolute mode.
q C:\>ATABLET /2 /N10
ATABLET is loaded for COM2 in Relative mode (default), Sensitivity
of 50 (default), and a skip value of 10.
q C:\>ATABLET /OFF
This disables ATABLET and removes it from resident memory, if
possible.
q C:\>ATABLET /3 /I5
ATABLET is loaded for COM3 with IRQ number 5.
Changing Parameters Once ATABLET Is Loaded
Parameters may be changed after loading ATABLET by issuing another
ATABLET command. For example, you may want to experiment with
several different /S or /N values to determine the value you like best. The
parameters can be combined in any order, except that Sensitivity
parameters only work in Relative Mode and /OFF should be issued
alone.
Page 30 Version 1.01
Page 31

Users Manual
Using the Pen and Tablet with Autodesk
Applications
After you install the tablet driver software for Windows, you can use the
pen with your Windows environment and all Windows applications
which of course include Autodesk applications for Windows. If your
Autodesk application for Windows also supports a WinTab compatible
tablet, you can configure the digitizer option of the application as a
WinTab compatible tablet. In this situation, not only can it be used as
a Windows system pointing device with all Windows applications, but
will also allow you to pick commands from templates provided by
application packages such as AutoCAD for Windows. Please refer to
the chapter Using the Pen and Tablet with Windows for more
information.
You can use the pen with Autodesk applications for DOS which support
Microsoft Mouse or Mouse Systems Mouse. Please refer to the chapter
Using the Pen and Tablet with DOS Applications.
For Autodesk applications on the DOS platform, the tablet CD also
provides two kinds of ADI drivers which are as follows:
q Protected Mode ADI Driver DGPACECD.EXP provides an
interface that allows the pen to be used as a input device for many
of the 80386 (or above) based software applications of Autodesk,
Inc. For best performance, we recommend using the Protected
Mode ADI driver.
q Real Mode ADI Driver ATABLET.COM is not only an enhanced
DOS mouse emulator driver but also a Real Mode ADI driver that
allows the pen to be used as an input device for many of the software
applications of Autodesk, Inc. If your Autodesk application does
not support Protected Mode ADI, you may use the Real Mode ADI
driver with the application.
Installing the Protected Mode ADI Driver Software
The following assumes that you are installing the driver for AutoCAD
386 for DOS including R11 or later version. If you are using an AutoCAD
older version, rather than R11 or later version, or a different Autodesk
product, refer to the documentation for that product for installation
details.
To install the DGPACECD.EXP Protected Mode ADI driver into AutoCAD
R11 or later versions, complete the following steps:
Version 1.01 Page 31
Page 32

Users Manual
1. Insert the tablet CD into your CD drive.
2. If you are in Windows 3.x, exit Windows. If you are in Windows 95
or NT, restart the computer in DOS mode.
3. At the DOS prompt, type E: (where E is the letter designating your
CD drive) and press ENTER. Then change to the root directory by
typing CD\ and pressing ENTER.
4. Type INSTALL and press ENTER.
5. When the menu is shown on the screen, please select the item
Install Protected Mode ADI driver and then follow the directions
on the screen.
6. After the needed files have been copied to your hard drive, the
INSTALL program will launch AutoCAD automatically and provide
you the Available digitizer list menu on screen.
7. Please select the item ACECAD ADI Ver 4.2 from the screen
menu.
8. You will now be asked for some details for your tablet. Follow the
directions to select or enter the 5"x3.75" tablet, the transducer type
and COM port which the tablet is connected to. Please notice when
you enter the name of the COM port, enter COM1 or COM2. Do not
enter 1 or 2.
9. When the configuration menu appears, enter 0. Then answer Y to
the Keep configuration changes? question. Then quit the AutoCAD
program.
10. The menu will be brought back to ready for installing another driver/
utility, press ESC to quit the INSTALL program. Then the pen is
ready for your AutoCAD for DOS.
Loading the Real Mode ADI Driver Software
We also provide the Real Mode ADI driver which is included in the
ATABLET Mouse driver. This feature is very helpful for users who
frequently switch working environments between DOS applications
needing the Mouse driver and Autodesk DOS applications needing the
Real Mode ADI driver. Before you begin to load the Real Mode ADI
driver, you must first install the ATABLET driver. Please refer to the
section Installing the ATABLET Driver Software in the chapter
Using the Pen and Tablet with DOS Applications.
Page 32 Version 1.01
Page 33

Users Manual
Once you load the Real Mode ADI driver, it remains in memory until you
reboot your computer or turn it off. Within Autodesk applications,
select the Real Mode ADI driver option for the digitizer options. The Real
Mode ADI driver is always installed on interrupt 79H, which is the
application default.
To load the ADI driver, type the following command at the DOS prompt
and press ENTER:
ATABLET [/prm] [/prm][...
where /prm is an optional parameter(s) described below.
Or
Use a batch file to execute ATABLET.COM and your application in
sequence. Insert the above command at the position before the
command line that launches your Autodesk DOS application in
your batch command file.
The driver will display some messages on the screen which show the
installation status and the aspect ratio value.
Note! The /prm could be combined together with other parameters
for the DOS mouse driver function on the same command
line. I.E. you can load the DOS mouse driver and the Real
Mode ADI driver at the same time.
Parameter Descriptions
q Enable the ADI Function /ADION
This parameter will install the DOS mouse driver with the Real Mode
ADI driver function.
q Disable the ADI Function /ADIOFF
This parameter will disable the Real Mode ADI driver function but
the DOS mouse emulator driver is still active.
q Set the Aspect Ratio for ADI /X## or /Y##
These two parameters provide you with a method to preserve the
aspect ratio of the tracking area to the screen. The default tracking
area is the whole active area of the tablet. You can use the /C
parameter to change the tracking area within the whole active area.
Please refer to the parameter descriptions about ATABLET driver in
the chapter Using the Pen and Tablet with DOS Applications.
This Aspect Ratio setting feature is designed for users who need to
trace a precise drawing. For selecting menu options or simple
Version 1.01 Page 33
Page 34

Users Manual
pointer movements, this setting is not required. The new aspect
ratio will be formed by the ratio of the two numbers specified by /
X## and /Y##.
The ## is a decimal number in the range of 20 - 80. Default value is
50. Please refer to the command examples for the use of these two
parameters.
Command Examples
q C:\>ATABLET /1 /ADION
This command loads the ATABLET driver with the Real Mode ADI
driver function enabled and sets it to communicate with COM1.
q C:\>ATABLET /ADIOFF
This command disables Real Mode ADI driver function but the DOS
mouse emulator driver is still active.
q C:\>ATABLET /ADION /X64 /Y48
This example shows how to set the aspect ratio for the standard
VGA resolution (640 x 480). When this command is executed, you
will find the following message lines on the screen.
Real Mode ADI Driver installed on INT 79h
Screen Aspect Ratio = 0.75
Page 34 Version 1.01
Page 35

Users Manual
Appendix A: Testing the Pen and Tablet
The tablet CD includes a test program ATEST.COM that lets you verify
and test the following items:
q The pen and tablet are functioning properly.
q The cables of the tablet are properly connected.
q The communication between your tablet and computer is proper.
For greater convenience, you may consider installing the ATEST
program on your hard disk. To install the ATEST program, please
complete the following steps:
1. In Windows, insert the tablet CD into your CD drive.
2. In Windows 95 or NT 4.0, click the Start button to open the Start
menu (or press CTRL + ESC).
Or
In Windows 3.x or NT 3.x, from the Program Manager window click
File to open the File menu (or press ALT + F).
4. Then click Run (or type R). In the dialog box, type E:\INSTALL.EXE
(where E is the letter designating your CD drive). Then click OK (or
press ENTER).
5. When the menu is shown on the screen, please select the item
Install Utilities and then follow the directions on the screen.
6. The program will copy the ATEST.COM test program to the directory
C:\ACECAD. After the installation is completed, please press ESC
to quit the program.
To test the pen and tablet, please complete the following steps:
Note! The ATEST test program can not run in an OS/2 session.
1. Exit Windows and restart your computer in DOS real mode.
· In Windows 95, click the Start button, click Shut Down, and
select the option Restart the computer in MS-DOS mode.
Then press ENTER.
· In Windows NT, shut down NT and restart the computer again.
Select MS-DOS at the boot screen. If the option MS-DOS is not
available, use a DOS boot diskette to restart the computer.
· In Windows 3.x, exit Windows.
Version 1.01 Page 35
Page 36
Users Manual
2. At the DOS prompt, type C: and press ENTER. Type CD\ACECAD
and press ENTER. Then type the following command and press
ENTER.
ATEST #
where: # = 1 for serial port COM1
= 2 for serial port COM2
If you omit this argument #, the test program will automatically
detect whether the tablet is properly installed on COM1 or
COM2.
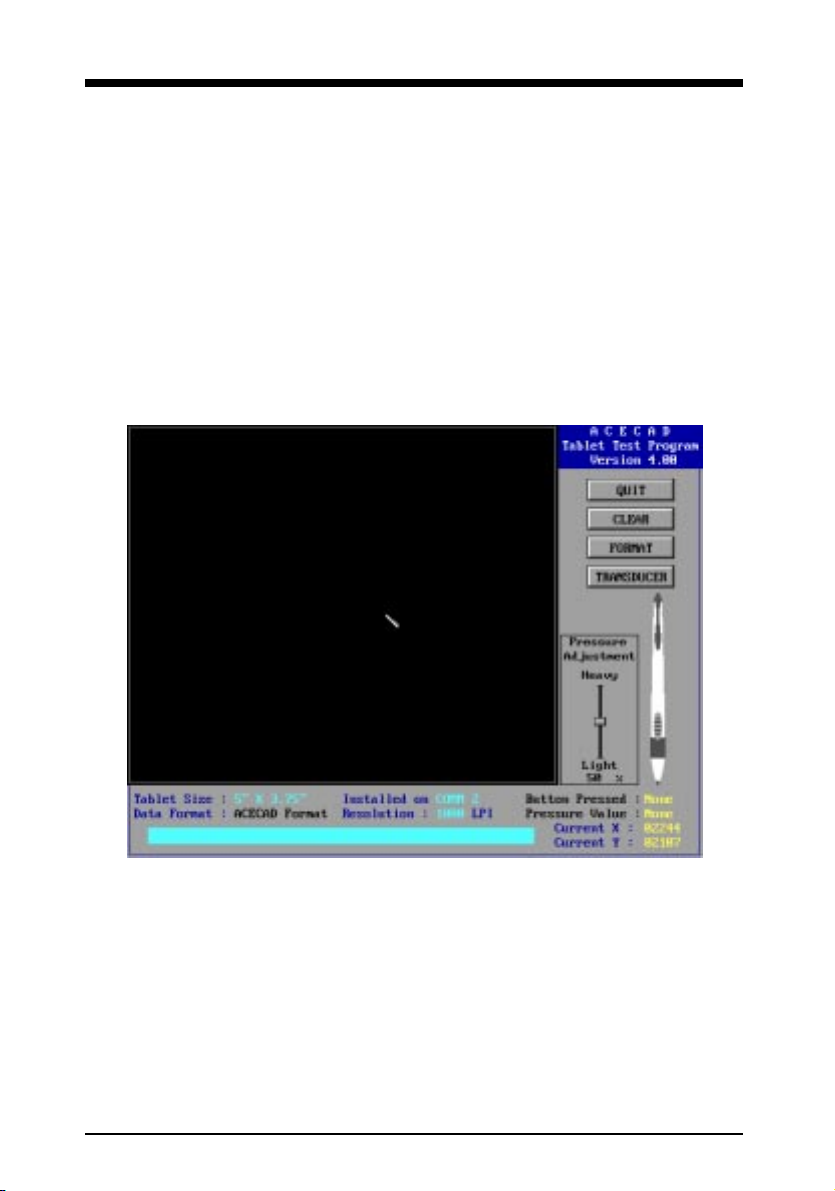
3. If the ATEST program successfully finds the tablet, the following
display will appear.
Note! IF the ATEST program can not find the tablet, please
check the following:
q Verify that the LED on the tablet is on.
q Turn your computer off and verify that all cables of
the tablet are properly connected.
q Make sure that you specified the proper COM port
which the tablet is connected to.
q Verify that the COM port is working.
Page 36 Version 1.01
Page 37

Users Manual
q Verify that you do not have another device configured
to the IRQ settings you are testing for. You should
never have the tablet and another device share the
same IRQ settings. Sometimes fax/modem cards,
network cards or other RS232 devices will already
be preassigned these port settings. Check with
your I/O, FAX or network card dealer or the
documentation accompanying the device for default
settings for your additional serial devices.
4. Use the pen tip to quickly click anywhere to turn on the pen. The
LED shows green when the pen is within the reading range. Then
you can use the pen on the tablet to control the screen cursor. The
coordinate data (X and Y coordinates on the lower-right corner of
the screen) shows the position of your pen within the active area.
When the pen is out of the reading range, the message Out of
Proximity will display on the message bar.
Note! If you can not turn on the pen to control the screen
cursor, please check the following:
q Make sure that you have properly installed the
battery into the pen.
q Take off the battery from the pen and reinstall it
back properly.
q If you have already used the battery inside the pen
for long time, please replace a new battery.
5. Please check if the Data Format information in the lower part
shows ACECAD Format. If not, please click the Format button on
the right to switch it to ACECAD Format.
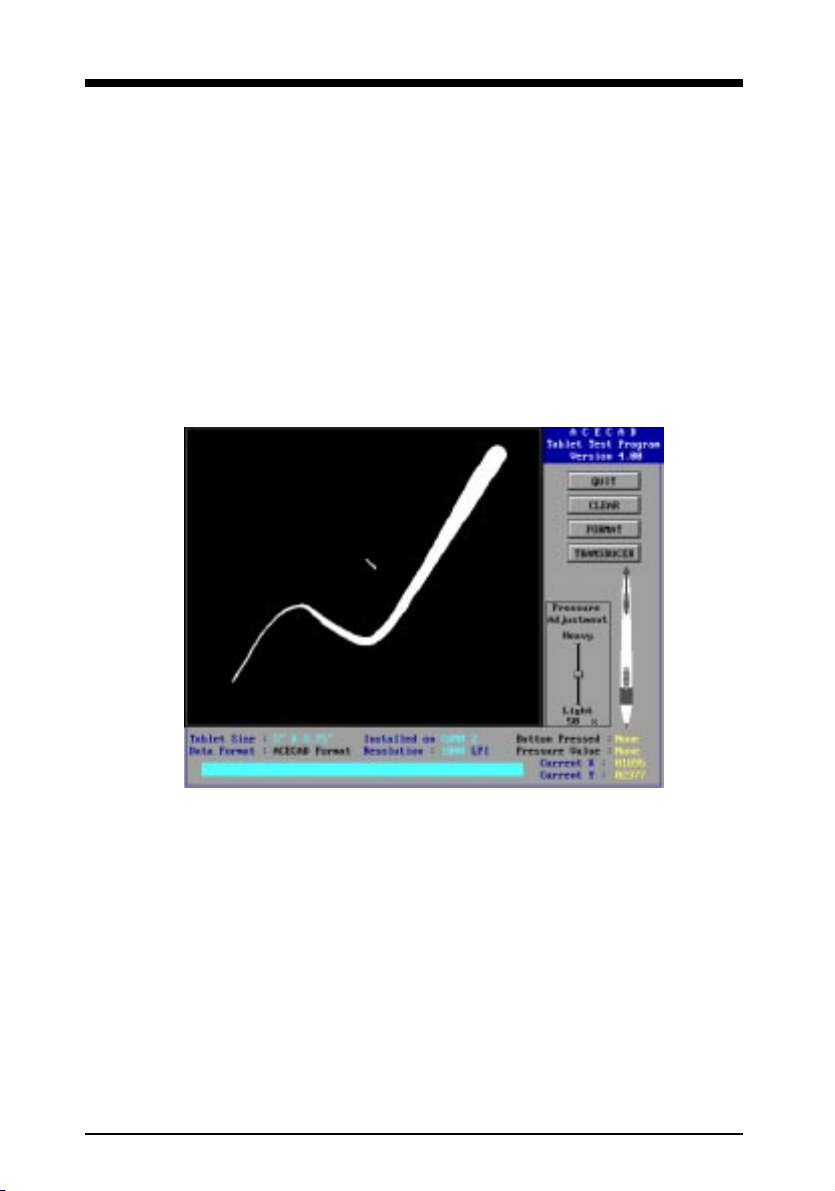
6. Click the TRANSDUCER button and then select the type of pointing
device which you are using with the tablet. For the 3-button
pressure-sensitive pen in this package, please select the option
Flair Stylus. The illustration of the 3-button pressure-sensitive
pen will be shown on the right.
Note! The following steps show how to test tip button and two
barrel buttons of the pen. While testing one button, just
press this button without pressing another button. By
pressing one button and moving the screen cursor in the
testing area, a trace line will appear consistently as long
as you continue to press the button. To clear the trace
lines, simply click the CLEAR button.
Version 1.01 Page 37
Page 38
Users Manual
7. Test the pen tip by pressing the tip to the tablet. The Button
Pressed information should show 1 which represents the button
code. The Pressure Value information will change between None
and 512 according to the pressure you exert on the pen.
8. Within the reading range, press the lower barrel button. The Button
Pressed information should show 2.
9. Within the reading range, press the upper barrel button. The Button
Pressed information should show 4.
10. To test the tip feel and function, simply use the pen tip to draw lines
on the black testing area. You can change the line width by varying
the pressure you exert on the pen.
If the following testing results come up, you can drag the Pressure
Adjustment slider to adjust.
Note! The following adjustments will effect the tip feel in
Windows.
q The pen tip overreact. I.E. the pen tip automatically draws on
the testing area even you do not press the pen tip to the tablet.
If it happens, please drag the slider toward Heavy a little. You
may repeat this action until the pen tip does not overreact.
q The change of line width is not constant. I.E. the line width
suddenly changes from very thin to very thick or from very thick
Page 38 Version 1.01
Page 39

Users Manual
to very thin. Please drag the slider toward Heavy a little. You
may repeat this action until the situation is improved.
q If you feel the tip is too hard to draw, please drag the slider
toward Light a little. You may repeat this action until you feel
comfortable to draw. However, a lighter setting may make the
pen tip overreact. If you experience this, try a harder setting.
11. Choose the QUIT button or press ESC to exit the test program.
Version 1.01 Page 39
Page 40
Users Manual
Appendix B: Replacing the Battery and
Tip of the Pen
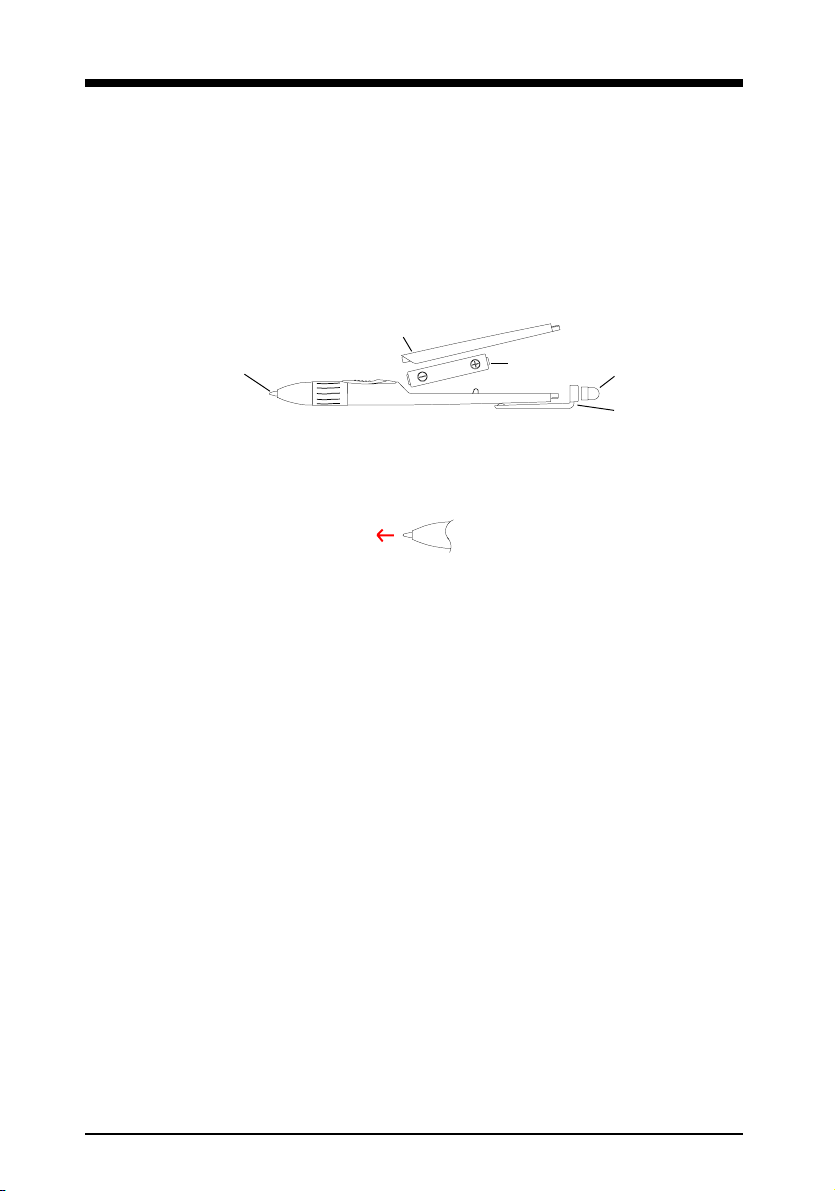
q If you can not turn on the pen (i.e. after you use the pen tip to click
everywhere, the LED still shows red when the pen is within the
active area.), the battery inside the pen should be running low.
Please replace the battery (1.5 volt, size AAAA).
Pen Cover
Pen Tip
Battery
End Cap
Pen Clip
q With extended use, the pen tip may become worn. To replace the
pen tip, you may use a small clip to gently pull it out and replace
a new one.
Page 40 Version 1.01
Page 41

Users Manual
Appendix C: Caring for the Pen and Tablet
To assure proper functioning of the pen and tablet, please take the
following precautions:
q Avoid placing diskettes or other magnetic media on the tablet
surface.
q Avoid placing hot or heavy items on the tablet.
q Clean the pen and tablet with a soft cloth lightly dampened with
water or a neutral detergent.
q Never drop the pen and tablet.
q Avoid cutting or scratching the transparent overlay or tablet surface.
q Never immerse the pen and tablet in liquid.
q Avoid operating or storing the pen and tablet in extremely hot or
cold temperatures, or where the relative humidity is high.
q Never take the tablet or pen apart.
Version 1.01 Page 41
Page 42

Users Manual
Appendix D: Troubleshooting
Generally the pen and tablet are easy to setup and use. However, if the
pen and tablet do not work properly with your system or software
application, the checklist and solutions discussed below will help you
resolve most difficulties.
General Problems
Problem: When you turn on your computer, the LED on the tablet is
not on.
Solution: Turn off your computer. Verify all cables of the tablet are
properly connected. Then turn on your computer again.
Problem: You already install the tablet driver software, but the screen
cursor does not respond at all to the pen movements on the
tablet.
Solution: q Make sure you already turn on the pen.
q Please refer to the chapter Testing the pen and
Tablet to run the ATEST program.
q Verify that you do not have the tablet and another device
share the same IRQ settings. Sometimes fax/modem
cards, network cards or other RS232 devices will already
be preassigned these port settings. Check with your I/
O, FAX or network card dealer or the documentation
accompanying the device for default settings for your
additional serial devices.
Problem: When you want to turn on the pen by clicking the pen tip,
the pen also make a selection or action on the screen (for
example, select a icon).
Solution: To turn on the pen, use the pen tip to quickly click (i.e. to
quickly press and release) within the active area. If you still
have this problem or want to click slowly, click out of the
active area to turn on the pen.
Problems in Windows
Problem: You do not press the pen tip to the tablet, but the pen
continues to select everything or draw.
Page 42 Version 1.01
Page 43

Users Manual
Solution: q Please refer to the section Customizing the Pen and
Tablet in Windows 3.x and 95 or Customizing the Pen
and Tablet in Windows NT to adjust the tip feel.
q Please refer to the chapter Testing the pen and
Tablet to run the ATEST program to test the pen.
Problem: The system pointer responds to the pen movements
sometimes, but not always.
Solution: Check to see if the tracking area is set for the full active area
within the transparent overlay.
Problem: Clicking or double-clicking is difficult to work.
Solution: q Open the Mouse icon from Windows Control Panel.
Make sure that the double-click speed is not set too
fast.
q In Windows 3.1 or 95, open the ACECAD Tablet icon
from Windows Control Panel. Then adjust the Click
Threshold slider to a softer setting.
q In Windows NT, open the Tip Feel icon to adjust the
Click Threshold slider to a softer setting.
Problem: You feel the pen tip is too hard to draw.
Solution: q In Windows 3.1 or 95, open the ACECAD Tablet icon
from Windows Control Panel. Then adjust the Pressure
Response slider to a heavier setting.
q In Windows NT, open the Tip Feel icon to adjust
Pressure Response slider to a heavier setting.
Problem: The system pointer is too sensitive or not sensitive enough
to the pen motion, while working under Windows.
Solution: If you are in absolute mode, you may adjust the response
speed by adjusting the size of the tracking area. If you are
in relative mode, you need to adjust the sensitivity parameter.
Problem: Some buttons of stylus-pen or cursor-puck do not work.
Solution: While you customize the pen and tablet, make sure that
you select the correct tablets pointing device. If you use
the 3-button pressure-sensitive pen offered in this package,
please select 3-button stylus.
Problem: The button functions of the pen are not correct.
Version 1.01 Page 43
Page 44

Users Manual
Solution: q Open the Mouse icon from Windows Control Panel.
Make sure that the mouse is configured for right-handed
operation.
q In Windows 3.1 or 95, open the ACECAD Tablet icon
from Windows Control Panel. Check the button function
settings.
q In Windows NT4.0, click the ACECAD Tablet icon on
the ACECAD folder of the Program menu. (In Windows
NT3.x, choose the ACECAD Tablet icon from the
ACECAD window.) Open the Customization icon from
the Tablet Control Panel window. Check the button
function settings.
Specific Problems in Windows 3.x
Problem: You have installed the tablet and a mouse (or trackball)
used together with Windows 3.x. When you do not want to
use the mouse (or trackball) or disconnect the mouse (or
trackball) with your computer, the tablet does not work with
Windows 3.x.
Solution: You need to reinstall the tablet driver software for Windows
3.x.
Specific Problems in Windows NT
Problem: After installing the tablet driver software for Windows NT,
you change the installed mouse driver through Windows NT
Setup. The tablets Wintab driver becomes disabled.
Solution: You may either run WINSETUP.EXE again to install the
tablet driver software. Or use the Windows NT Control
Panel to enable the driver. Open the Devices icon and find
the items wtACECAD and WTClass on the list. Select
one item each time, click the Startup button, and select
System. Finally, restart your system.
Problem: In Windows NT4.0, before logon progress is finished or after
you start shutdown process, you can not use the pen with
Windows NT4.0.
Page 44 Version 1.01
Page 45

Users Manual
Solution: It is normal. After logon progress is finished, you can use
the pen with Windows NT4.0.
Problem: In Windows NT4.0, some Serial Device error messages
appear in the event viewer.
Solution: Please disregard these messages. They are normal and the
pen can still work properly.
Problem: In Windows NT4.0, you can not use the pen to clear the
screen saver.
Solution: It is normal. Just move your mouse or press any key to clear
the screen saver. After clearing the screen saver, the pen
still work properly.
Problems in OS/2
Problem: You do not press the pen tip to the tablet, but the pen
continues to select everything or draw.
Solution: Please refer to the chapter Testing the pen and Tablet
to run the ATEST program to test the pen.
Problem: You have not used any mouse with OS/2. After installing the
tablet driver software for OS/2, the tablet does not work with
OS/2.
Solution: Use the selective installation to install any mouse driver.
Then reinstall the tablet driver software for OS/2. Of course,
you do not need to connect a mouse to your computer.
Problem: You have installed the tablet and a mouse (or trackball)
used together with OS/2. When you do not want to use the
mouse (or trackball) or disconnect the mouse (or trackball)
with your computer, the tablet does not work with OS/2.
Solution: You need to reinstall the tablet driver software for OS/2. But
you can not remove the mouse driver from the selective
installation of OS/2.
Problem: You have installed the tablet only with OS/2. When you
want to use the mouse (or trackball) and the tablet with OS/
2, the tablet does not work with OS/2.
Solution: You need to reinstall the tablet driver software for OS/2.
Version 1.01 Page 45
Page 46

Users Manual
Problem: The system pointer responds to the pen movements on the
tablet sometimes, but not always.
Solution: Check to see if the tracking area is set for using the whole
tablet within the transparent overlay. The tracking area is
defined through the ACECAD Tablet Control Panel.
Problem: Double-clicking is difficult to work.
Solution: Open Mouse object from System Setup. Make sure that the
double-click speed in the Mouse-Settings is not set too
fast.
Problem: The system pointer is not sensitive enough to the pen
motion.
Solution: You may adjust the response speed by adjusting the size
of the tracking area. The tracking area is defined through
the ACECAD Tablet Control Panel.
Problem: Some buttons of stylus-pen or cursor-puck do not work.
Solution: Open the ACECAD Tablet Control Panel. Make sure you
selected the proper type of the pointing device. If you use
the 3-button pressure-sensitive pen offered in this package,
please select 3-button stylus.
Problem: When drawing on the tablet, the image on the screen
appears stretched.
Solution: Open the ACECAD Tablet Control Panel. Click the Preserve
Aspect Ratio button.
Problems in Pen for OS/2
Problem: After installing the tablet driver software for Pen for OS/2,
the tablet does not work with OS/2.
Solution: Use the selective installation of OS/2 to install any mouse
driver. Then reinstall the tablet driver software for Pen for
OS/2. Of course, you do not need to connect a mouse to
your computer.
Problem: Once you install the tablet for Pen for OS/2, you can not use
the ACECAD Tablet Control Panel.
Page 46 Version 1.01
Page 47

Users Manual
Solution: Once you install the tablet for Pen for OS/2, you only can
use the ACECAD Pen Device to customize your pen and
tablet settings.
Problems in DOS
Problem: You do not press the pen tip to the tablet, but the pen
continues to select everything or draw.
Solution: Please refer to the chapter Testing the pen and Tablet
to run the ATEST program to test the pen.
Problem: You configure the input device options of your DOS
application for Microsoft Mouse or Mouse Systems Mouse,
but the tablet cannot work with your DOS application.
Solution: Please verify you already load the ATABLET mouse driver
into your computer properly before you start your DOS
application.
Problem: You cannot load the ATABLET mouse driver and an error
message appears.
Solution: If the tablet is connected to COM3 or COM4, please also
check whether the COM port and its IRQ number on your
serial card are the same as the parameters used for the
ATABLET driver.
Problem: You use the pen as a mouse with your DOS application. The
screen cursor responds to the movement of the pen on the
tablet sometimes, but not always.
Solution: Check to see if the tracking area is set for the full active
area. The tracking area is defined through the driver with the
/C parameter of the ATABLET mouse driver.
Problem: You use the pen as a mouse with your DOS application.
Button functions are not correct in your application software.
Solution: Please check that the set of button assignments loaded
with the ATABLET mouse driver is what you want. Also,
make sure that you select the same mouse device in the
setup program of your application as the mouse mode
(Microsoft Mouse or Mouse Systems Mouse) of the driver.
Version 1.01 Page 47
Page 48

Users Manual
Appendix E: Specifications
Active Area 5.0"x3.75" (127mmx95.25mm)
Tablet Size 7.87" (width) x 7.68" (depth)
200mm (width) x 195mm (depth)
Tablet Thickness 0.27" (6.0mm)
Tablet Weight 1.1Lbs (0.50kgs)
Resolution 2540 Lines Per Inch (LPI)
Accuracy +/-0.01" (+/-0.254mm)
Pressure Sensitivity 512 levels
Reading Height 0.27" (6.0mm)
Interface RS-232C
Battery Used in Pen 1.5 volt, size AAAA
Power Requirements DC 5V 95mA, from keyboard port or PS/2 port
Operating Temperature 41° to 122° F (5° to 50° C)
Storage Temperature 14° to 122° F (-10° to 50° C)
Humidity 20% to 95% (Non-Condensing)
Page 48 Version 1.01
 Loading...