

Page 1
ExaRAID SYSTEM
USER'S GUIDE
A12/16/24R/U-SS
A12/16/24R/U-FS
Hardware User Manual
Page 2
ExaRAID SYSTEM
A12/16/24R/U-SS
A12/16/24R/U-FS
Hardware User Manual
Page 3

Table of Contents
Copyright ..................................................................................................................... i
CE Statement ............................................................................................................... i
BSMI............................................................................................................................ i
C-Tick .......................................................................................................................... i
FCC Statement............................................................................................................. i
CB Statement ............................................................................................................... i
Symbols used in this manual ....................................................................................... ii
Important Safety Instructions, Care and Handling ...................................................... ii
Chapter 1: Product Overview ............................................................................................. 1
1.1 Package Contents.................................................................................................... 1
1.2 System Requirements ............................................................................................. 3
1.3 Panel View.............................................................................................................. 4
1.4 Disk Tray ................................................................................................................ 7
1.5 Fiber Controller Rear View .................................................................................... 8
A12-FS ............................................................................................................. 8
A16-FS ............................................................................................................. 9
A24-FS ............................................................................................................. 10
1.6 SAS Controller Rear View ..................................................................................... 12
A12-SS ............................................................................................................. 12
A16-SS ............................................................................................................. 13
A24-SS ............................................................................................................. 14
1.7 Switch ID ................................................................................................................ 15
Chapter 2: Hardware Installation ...................................................................................... 16
1.8 Installing the Hard Disks ........................................................................................ 16
SAS hard disks.................................................................................................. 16
SATA hard disks .............................................................................................. 18
1.9 Mounting the RAID system.................................................................................... 21
Installing the Rail Extenders............................................................................. 22
Chapter 3: System Connections .......................................................................................... 23
1.10 Connecting to the Host ......................................................................................... 23
Connecting Fiber RAID System Controller to the Host................................... 23
Connecting SAS RAID System Controller to the Host.................................... 24
1.11 Connecting the GUI Management Port ................................................................ 24
1.12 Connecting the CLI Management Port ................................................................. 25
1.13 Connecting JBOD Enclosure ................................................................................ 25
1.14 Connecting and Turning On the Power ................................................................ 26
Chapter 4: Maintenance ...................................................................................................... 28
1.15 Replacing a Disk................................................................................................... 28
1.16 Replacing a Controller.......................................................................................... 29
1.17 Replacing a Power Supply.................................................................................... 31
1.18 Upgrading Memory............................................................................................... 33
1.19 Replacing a Fan Module ....................................................................................... 35
1.20 Installing Battery Backup Module........................................................................ 37
A12R/U-FS&SS BBM Installation .................................................................. 37
Page 4

A16R/U-FS&SS BBM Installation .................................................................. 38
A24R/U-FS&SS BBM Installation .................................................................. 39
Appendix A: Specifications ................................................................................................. 41
Technical Specifications .............................................................................................. 41
Controller Specifications ............................................................................................. 42
Functional Specifications............................................................................................. 42
RAID Management...................................................................................................... 43
Appendix B: Accessories...................................................................................................... 44
Appendix C: Company Contact.......................................................................................... 45
Page 5
Copyright
Copyright © 2008 by Accusys. All rights reserved. No part of this
publication may be reproduced or transmitted in any form without prior
written permission of Accusys.
CE Statement
This device is in conformity with the EMC.
BSMI
The symbol indicates that this device has been reviewed by
the Bureau of Standards, Metrology and Inspection (BSMI)
and found to be in compliance with all related regulations.
C−Tick
The product complies with the Australian EMC standard "Limits
and methods of measurement of radio disturbance
characteristics of information technology equipment, AS/NZS
3548:1995 Class B."
Preface
FCC Statement
This equipment has been tested and found to comply with the
limits for a Class A digital device, pursuant to Part 15 of the
FCC Rules. These limits are designed to provide reasonable
protection against harmful interference when the equipment is operated
in a commercial environment. This equipment generates, uses, and can
radiate radio frequency engery and, if not installed and used in
accordance with the instruction manual, may cause harmful interference
to radio communications. Operation of this equipment in a residential
area is likely to cause harmful interference in which case the user will be
required to correct the interference at his own expense.
CB Statement
This device meets the requirements of the CB standard for electrical
equipment with regard to establishing a satisfactory level of safety for
persons using the device and for the area surrounding the equipment.
This standard covers only safety aspects of the above equipment; it does
not cover other matters, such as style or performance.
i
Page 6
Preface
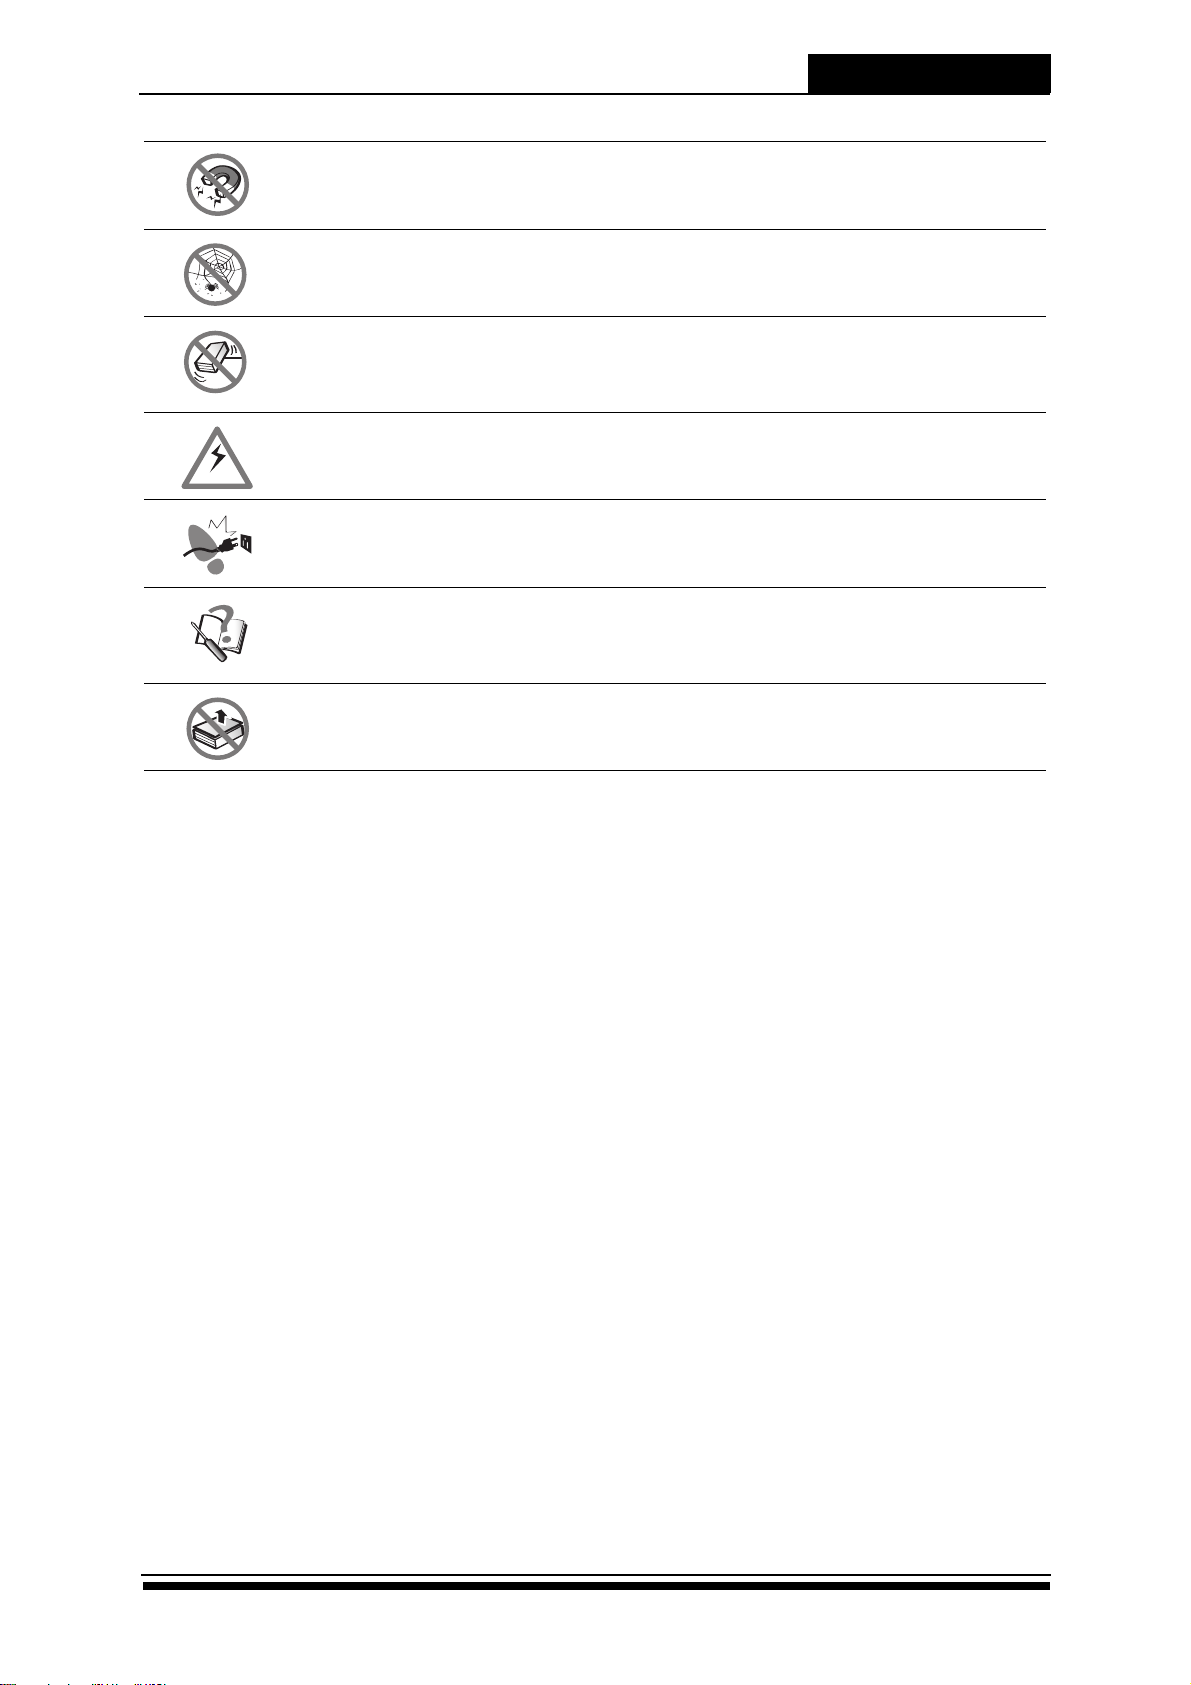
Symbols used in this manual
This manual highlights important information with the following icons:
Caution
This icon indicates the existence of a potential hazard that could
result in personal injury, damage to your equipment or loss of data if
the safety instruction is not observed.
Note
This icon indicates useful tips on getting the most from your RAID
system.
Important Safety Instructions, Care and Handling
Before starting with the RAID installation, read this user manual carefully
and save it for later reference.
Do not place the RAID system near a radiator or other heat source.
If an extension cord or power center is used with the RAID system,
make sure that the total current consumption plugged into the wall
outlet does not exceed the ampere rating.
This power cord will only fit into a grounded type of power outlet.
Unplug the power cord from the wall outlet before cleaning or
servicing.
Unplug the power cord from the wall outlet and refer to qualified
service personnel under the following conditions:
• If the RAID system has been exposed to water or any liquid.
• If the RAID system has been dropped or the casing damaged.
Never push any kind of object through the slots and openings.
Slots and opening are for ventilation. Never block or cover them.
Never place the RAID system on a bed, sofa, rug or other similar
surfaces.
Do not place the RAID system near water or any liquid.
H
L
ii
Protect the RAID system from extremely high or low temperatures.
Page 7
v
Preface
Keep the RAID system away from magnetic objects.
Keep the RAID system away from dust, sand, or dirt.
Place the RAID system on a stable area. Protect the RAID system
from being dropped or mishandled, any of this may cause damage to
the product.
Ensure that the RAID system voltage corresponds to the supply
voltage.
Do not place the RAID system where the power cord may be stepped
on.
Do not attempt to service the RAID system yourself. Opening or
removing the cover may expose you to dangerous voltage or other
risks.
Do not remove the cover.
iii
Page 8
Product Overview
Chapter 1: Product Overview
Congratulations on your purchase of this RAID system. Aiming at serving
versatile applications, this RAID system ensures not only data reliability but
also improves system availability. Supported with cutting-edge IO
processing technologies, the RAID system delivers outstanding
performance and helps to build dependable systems for heavy-duty
computing, workgroup file sharing, service-oriented enterprise
applications, online transaction processing, uncompressed video editing,
or digital content provisioning. With its advanced storage management
capabilities, the RAID system is an excellent choice for both on-line and
near-line storage applications. The following sections in this chapter will
present an overview of the features of this RAID system.
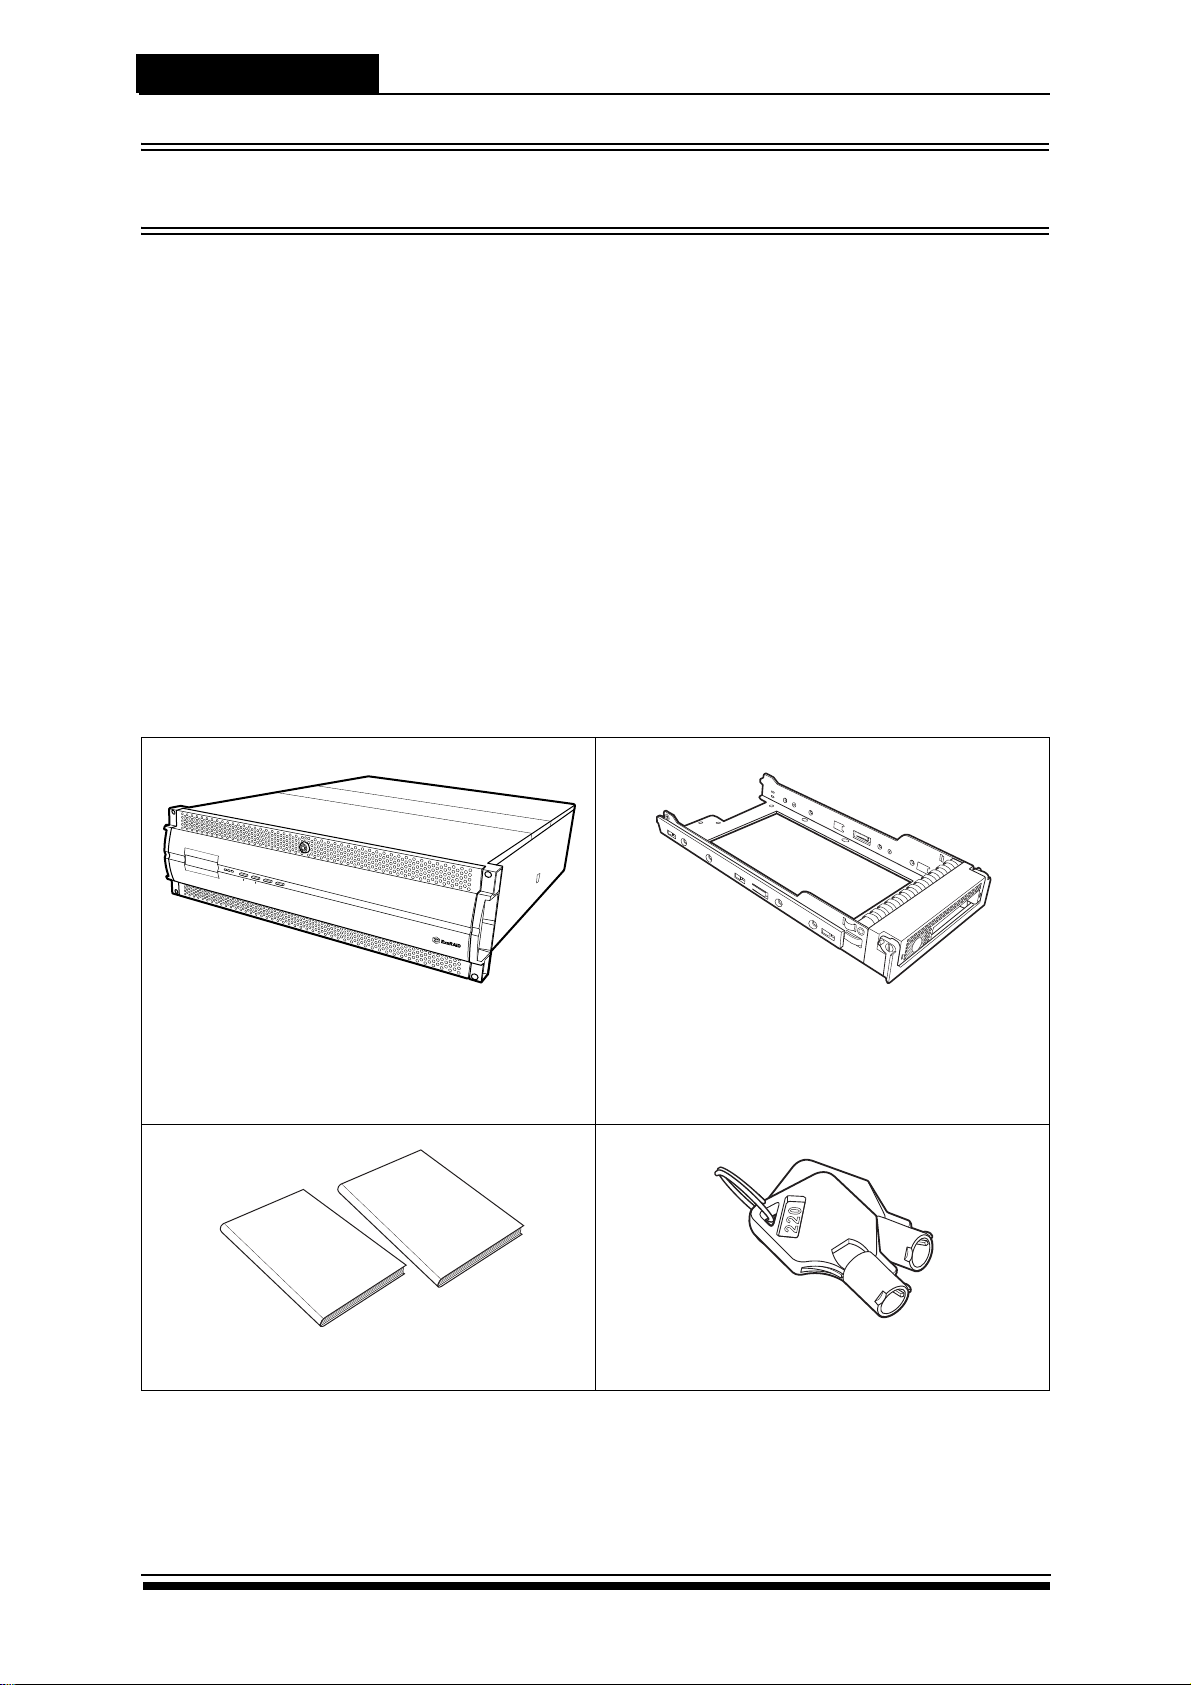
1.1 Package Contents
The following items come with your RAID system package, if any of them
is missing or damaged, please contact your supplier.
P
o
w
e
r
P
/S
F
a
i
l
A
c
c
e
s
s
Enter
ESC
RAID system: A12R/U-FS/SS
A16R/U-FS/SS
A24R/U-FS/SS
Hardward User Manual
Hard disk tray x 12 (A12R/U-FS/SS)
x 16 (A16R/U-FS/SS)
x 24 (A24R/U-FS/SS)
Softward User Manual
User manuals Front panel key x 2
1
Page 9
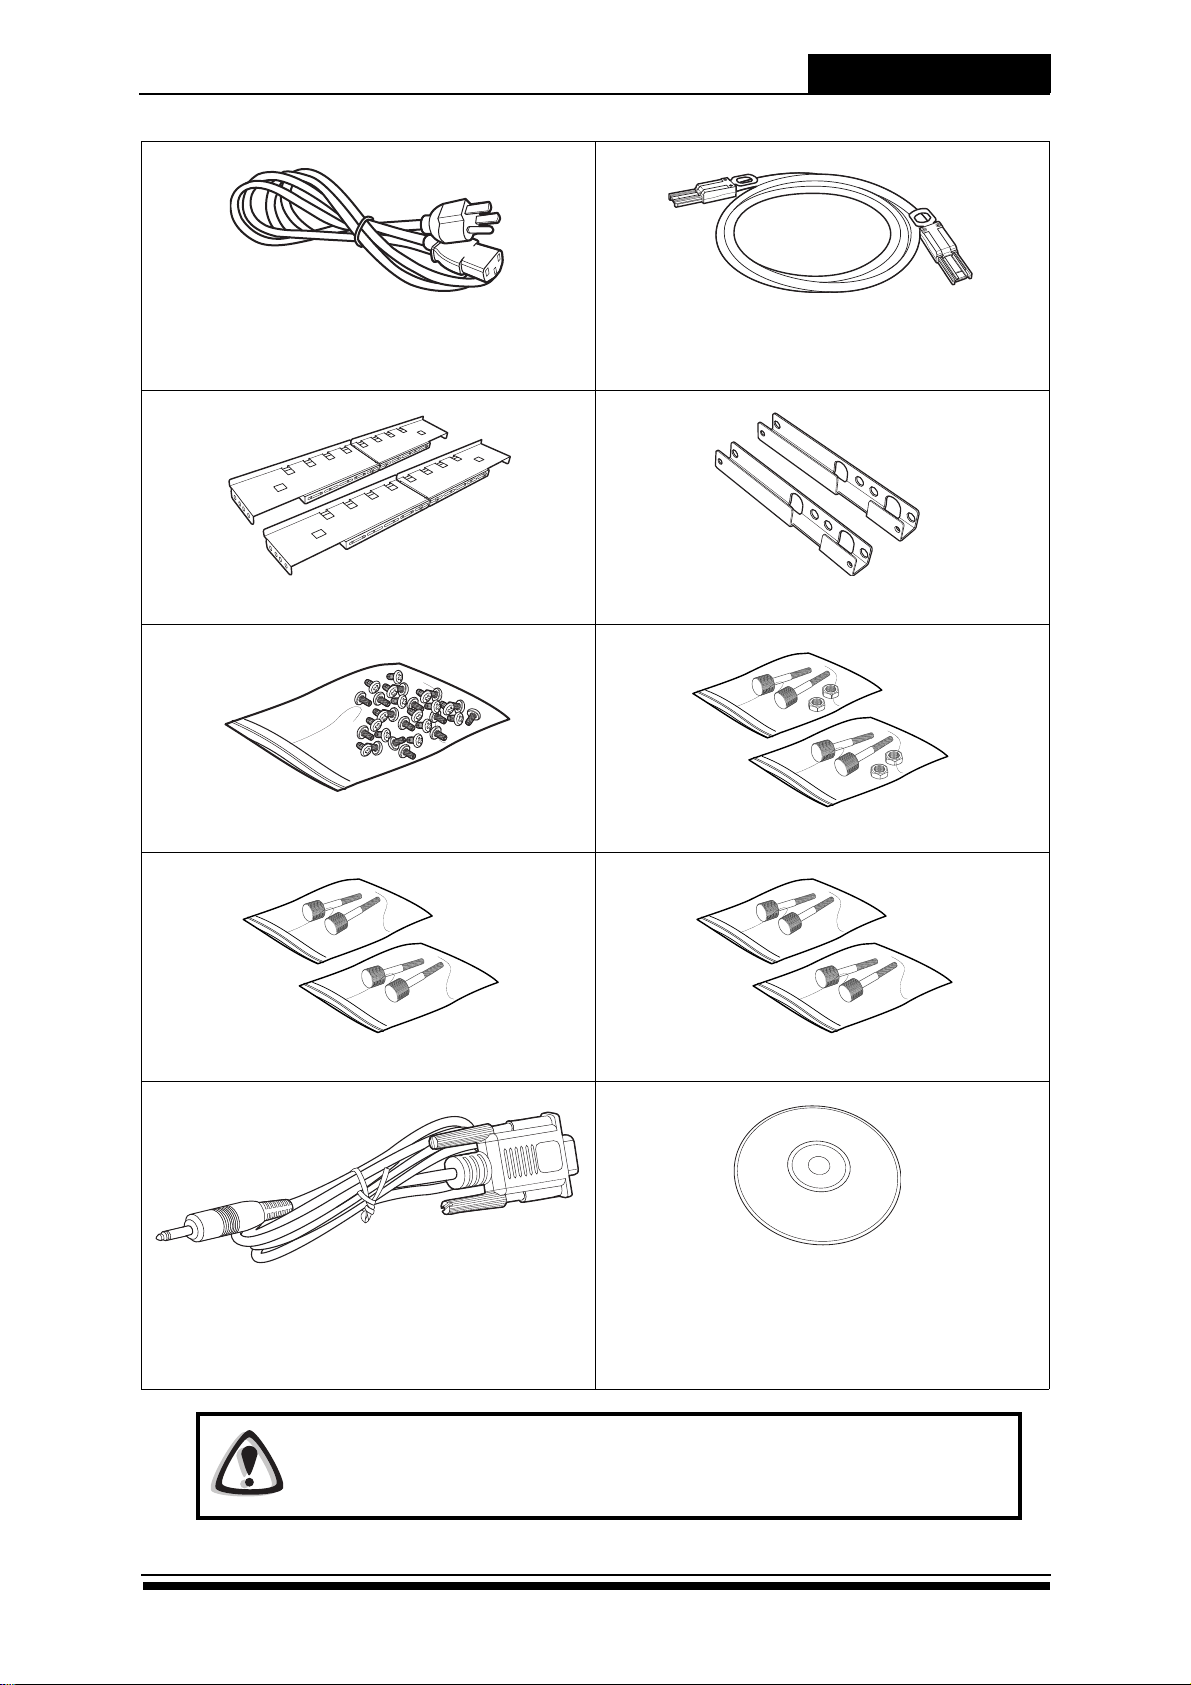
Product Overview
Power cable: A12/A16R/U-FS/SS x 2
A24R/U-FS/SS x 3
Rail x 1 set
Screw pack M5 fix screw x 2 packs
External SAS: A12/A16/A24R-SS x 2
A12/A16/A24U-SS x 1
Rail extender x 1 set
M6 fix screw x 2 packs UNC # 10-32 fix screw x 2 packs
RS-232 cable
CD-ROM with Software User Manual
A12/A16/A24R-FS/SS x 2
A12/A16/A24U-FS/SS x 1
Caution
The RAID system is heavey, be careful when lifting or moving it.
2
Page 10

Product Overview
1.2 System Requirements
Operating Environment
• Ambient temperature of 5º C to 40º C
• Ambient non-operating temperature of -25º C to 60º C
• Non-condesing relative humidity of 20% to 80%
• Dust, smoke, and oil free environment
• No direct sunlight
• Flat and stable surface capable of supporting the RAID system
Ethernet Settings
The RAID system supports DHCP (Dynamic Host Configuration Protocol) to
establish an IP address. Or use the default IP address as follows:
• Controller A = 192.168.1.1
• Controller B = 192.168.0.1
Ethernet settings can be set using the LCD or CLI (Command Line
Interface). Please refer to the software manual for more information.
3
Page 11
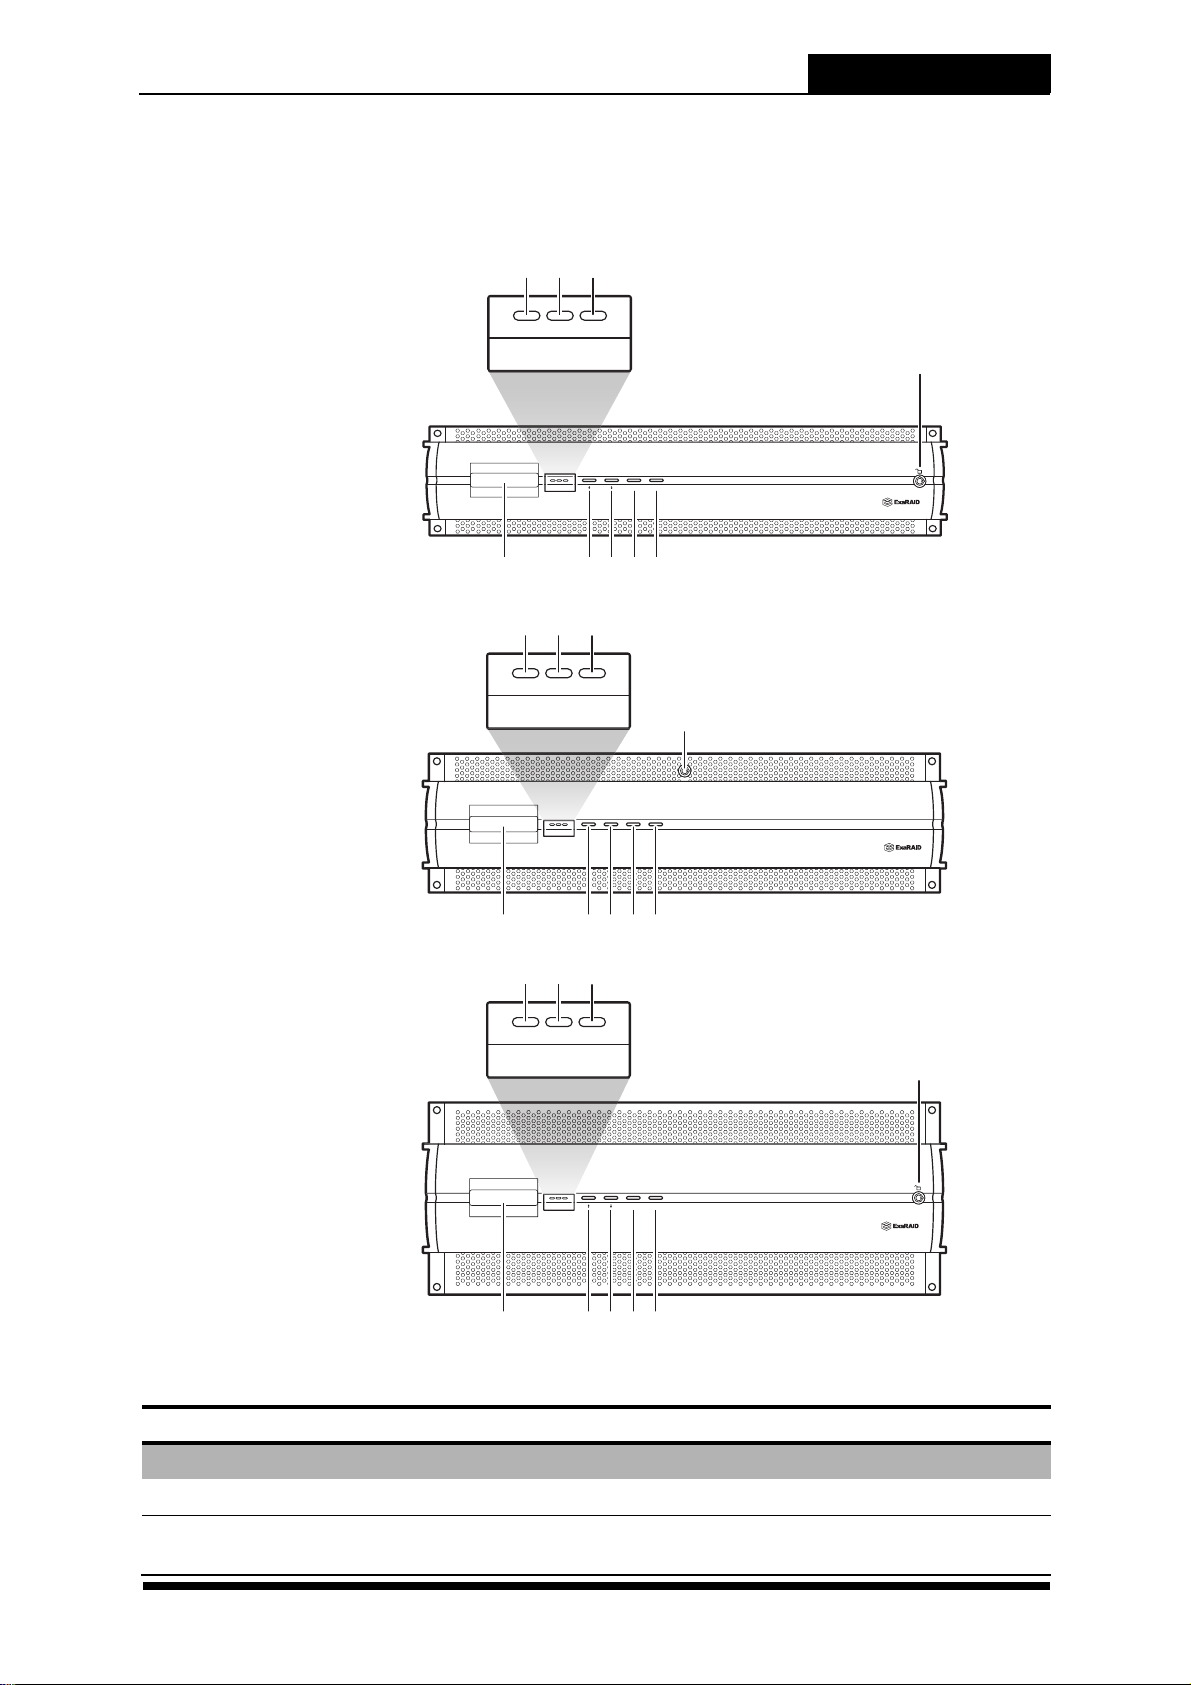
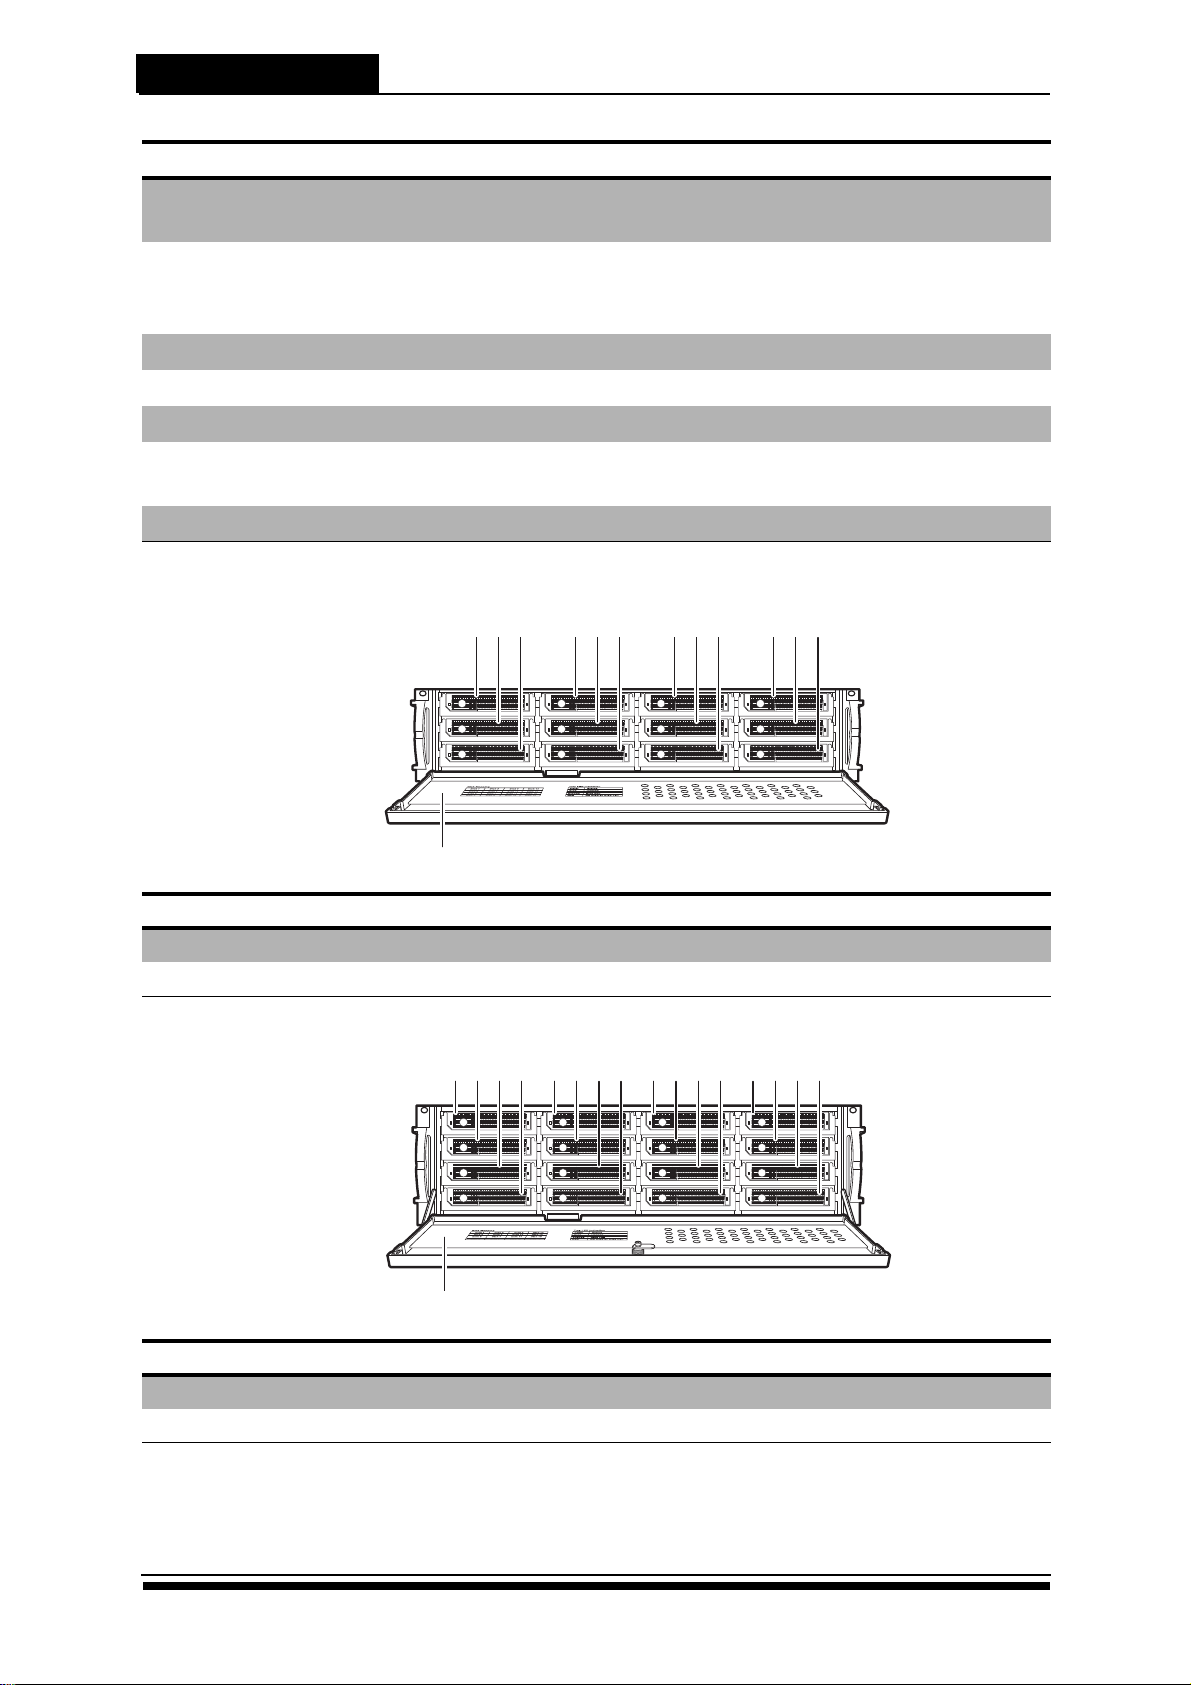
1.3 Panel View
A16R/U-FS&SS
A24R/U-FS&SS
Note: Panel size may vary depending on the model.
A12R/U-FS&SS
Closed Front Panel
Product Overview
2 3 4
Power P/S Fail Access
Power P/S Fail Access
1
Enter ESC
5 6 7 8
2 3 4
Power P/S Fail Access
Power P/S Fail Access
1
Enter ESC
5 6 7 8
9
9
No. Item Description
2 3 4
Power P/S Fail Access
Power P/S Fail Access
1
Enter ESC
5 6 7 8
9
1 LCD panel Displays RAID system information.
2 Power LED Indicates RAID system is powered on.
4
Page 12
Product Overview
13
1 2 3 4 5 6 7 8 9 10 11 12
A12R/U-FS&SS
A16R/U-FS&SS
No. Item Description
3 Power supply failed
Indicates a failed power supply.
indicator
4 Host computer access
indicator
Indicates data activity is in progress
between the RAID system and the host
computer.
5 Up button Use to move up the LCD menu.
6 Down button Use to move down the LCD menu.
7 Enter button Use to confirm or select an item.
8 Escape button Use to return to the previous LCD
menu.
9 Lock Locks the front cover.
Open Front Panel
No. Item Description
1-12 Disk trays 1-12 Hot-swappable disk trays. Holds the disk drives.
13 Front panel door Protects the disk drives.
No. Item Description
1-16 Disk trays 1-16 Hot-swappable disk trays. Holds the disk drives.
17 Front panel door Protects the disk drives.
1172 3 4 5 6 7 8 9 10 11 12 13 14 15 16
5
Page 13
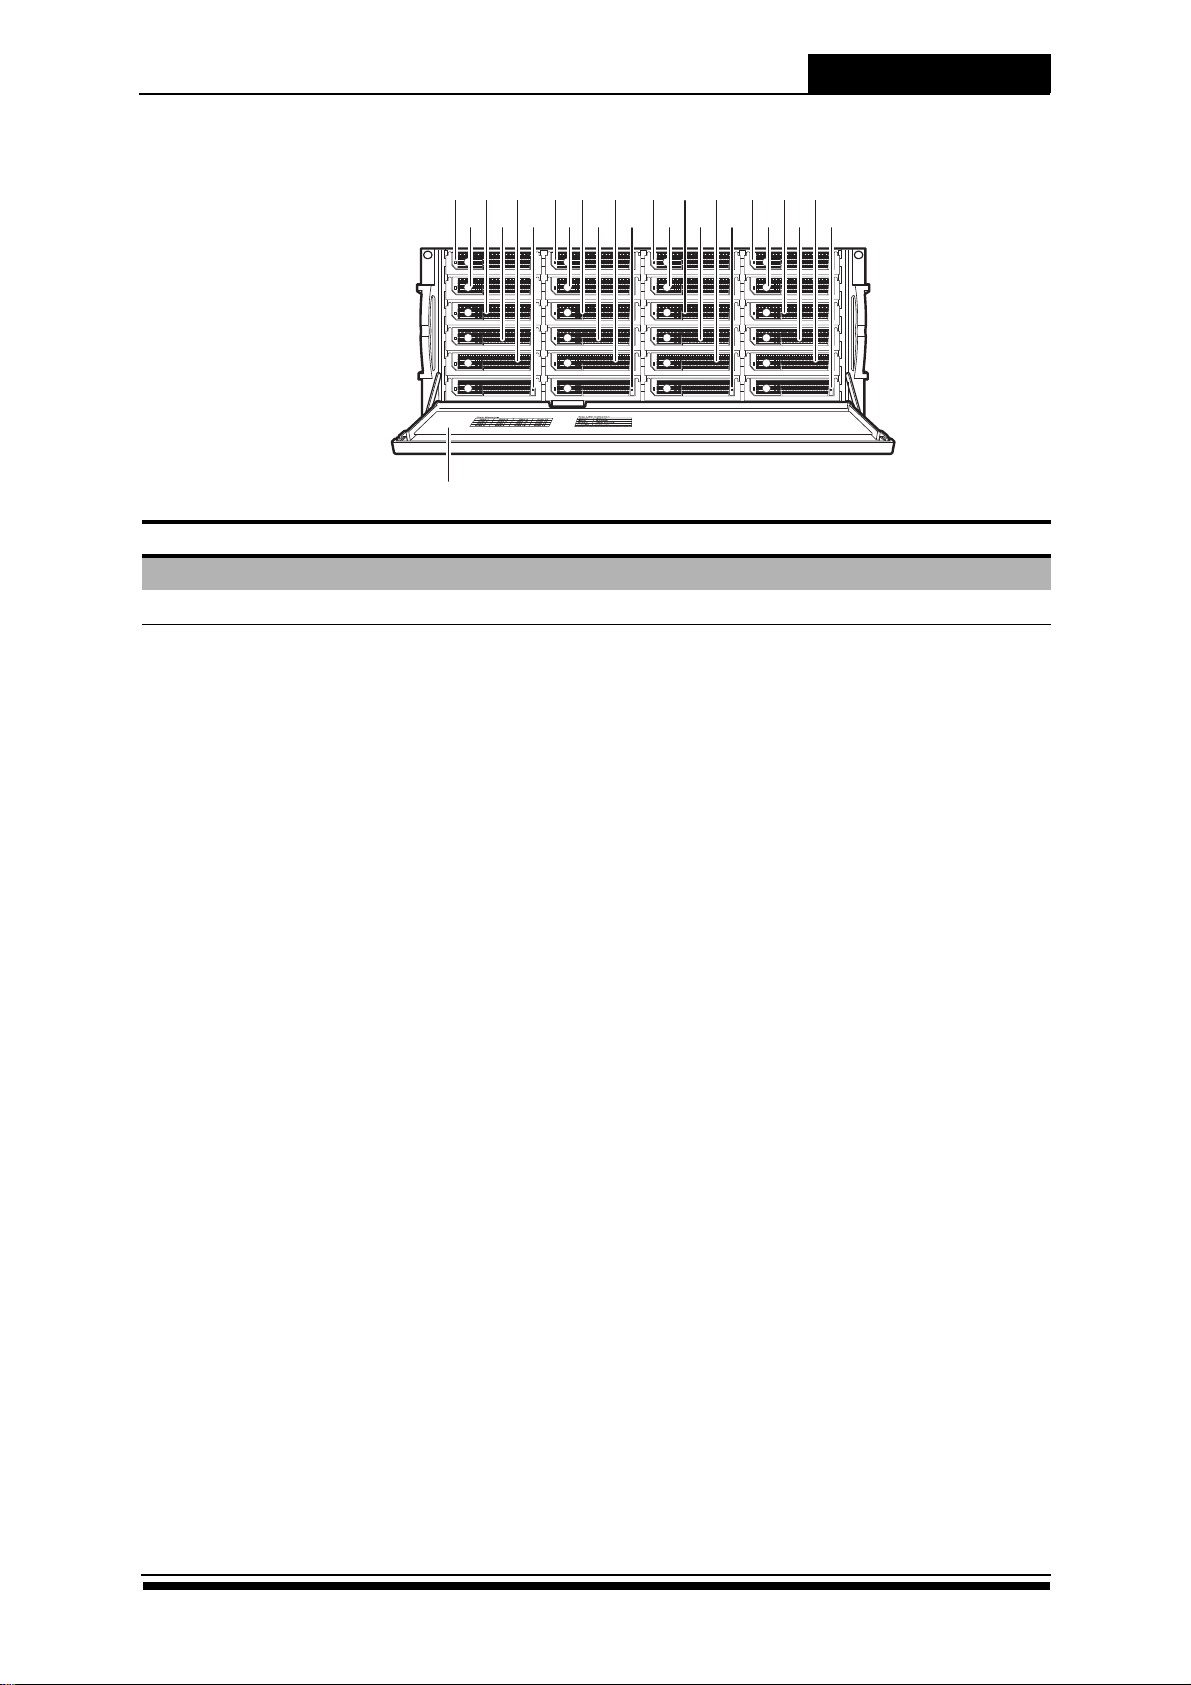
Product Overview
A24R/U-FS&SS
1
23456789101112131415161718192021222324
25
No. Item Description
1-24 Disk trays 1-24 Hot-swappable disk trays. Holds the disk drives.
25 Front panel door Protects the disk drives.
6
Page 14
Product Overview
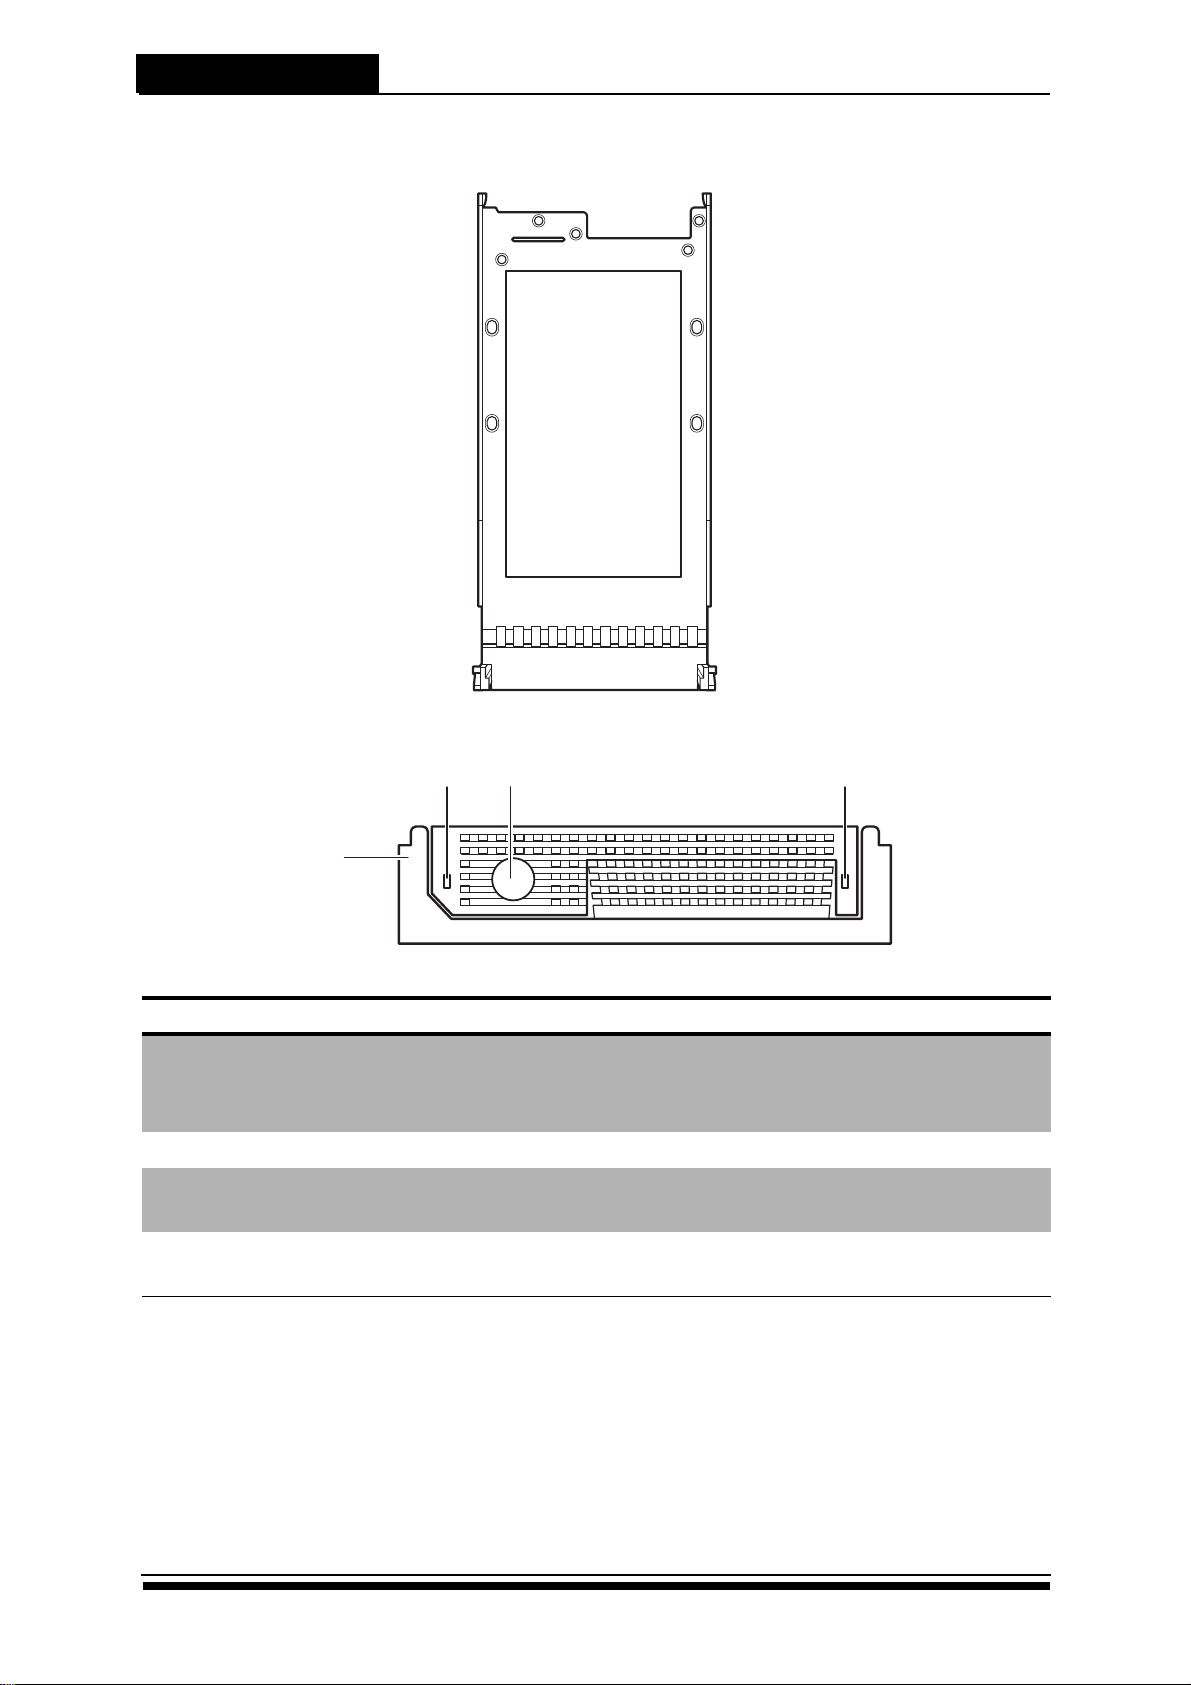
Front View
1.4 Disk Tray
13 2
4
No. Item Description
1 Disk LED indicator Indicates the disk status:
• Green - Disk is online
• Red - No disk or disk fail
2 Tray button Press to release the tray handle.
3 Access LED indicator Lights blue when the disk is being
accessed.
4 Tray handle Use to pull out or lock the disk tray into
place.
7
Page 15

Product Overview
A
1
B
2
15
ON DIP
432
U
P
S
COM LAN
CH 2
EXP
EXP Access
EXP Link CTRL Ready
CH 1
COM LAN
CH 2
EXP
EXP Access
EXP Link CTRL Ready
CH 1
1
12 13 14 15 1611
2 3 4 75 6
18 19 20 21 2217
8 9 10
A12R-FS A12U-FS
1.5 Fiber Controller Rear View
A12-FS
1
2 3 4 75 6 8 9 10
ON DIP
15
1
COM LAN
CH 2
A
EXP Access
EXP Link CTRL Ready
CH 1
EXP
12 13 14 15 1611
No. Item Description
1 AC power port Connects to the power source.
2 Power supply handle Use to pull out the power supply.
3 Power supply switch Use to switch the power on or off.
4 Cooling fan 1 System cooling fan.
432
U
P
S
2
B
5 Chassis ID Use for JBOD enclosure only. See 1.7
Switch ID on page 15.
6 UPS port Provides UPS powered data
connection.
7 AC power port Connects to the power source.
8 Power supply handle Use to pull out the power supply.
9 Power supply switch Use to switch the power on or off.
10 Cooling fan 2 System cooling fan.
11 Controller A RAID system controller A (Primary
controller).
12 Expansion port (Controller A) Use for JBOD expansion. (A12R-SJ)
13 Host channel 2 (Controller A) Connects to the host server.
14 Host channel 1 (Controller A) Connects to the host server.
15 RS-232 port Connects to external terminal for CLI
management.
16 Ethernet port Connects to LAN for GUI
management.
17 Controller B RAID system controller B (Secondary
controller).
18 Expansion port (Controller B) Use for JBOD expansion. (A12R-SJ)
19 Host channel 2 (Controller B) Connects to the host server.
20 Host channel 1 (Controller B) Connects to the host server.
21 RS-232 port Connects to external terminal for CLI
22 Ethernet port Connects to LAN for GUI
management.
management.
8
Page 16
Product Overview
Fan 1 Fan 3
Contraller A
Fan 2
Contraller B
P/S 1 P/S 2
VER 1.0
P/S
UPS
Chassis
ID
5
6
7
8
9
0
1
2
3
4
COM LAN
CH 2
EXP
EXP Access
EXP Link CTRL Ready
CH 1
COM LAN
CH 2
EXP
EXP Access
EXP Link CTRL Ready
CH 1
1 8
17 18 19 20 2116 24 2523
2 4 5 6 73 159 11 12 13 1410
22
A16R-FS A16U-FS
A16-FS
1 8
2 4 5 6 73 15
Fan 1 Fan 3
Contraller A
COM LAN
CH 2
EXP Access
EXP Link CTRL Ready
P/S 1 P/S 2
CH 1
EXP
P/S
Chassis
ID
UPS
5
6
4
7
3
8
2
9
1
0
Fan 2
Contraller B
VER 1.0
17 18 19 20 2116 24 2523
22
No. Item Description
1 Cooling fan 1 System cooling fan.
2 Controller A RAID system controller A (Primary
controller)
3 Expansion port (Controller A) Use for JBOD expansion. (A16R-SJ)
4 Host channel 2 (Controller A) Connects to the host server.
5 Host channel 1 (Controller A) Connects to the host server.
6 RS-232 port Connects to external terminal for CLI
management.
7 Ethernet port Connects to LAN for GUI
management.
8 Cooling fan 3 System cooling fan.
Controller B RAID system controller B (Secondary
controller)
10 Expansion port (Controller B) Use for JBOD expansion. (A16R-SJ)
11 Host channel 2 (Controller B) Connects to the host server.
12 Host channel 1 (Controller B) Connects to the host server.
13 RS-232 port Connects to external terminal for CLI
14 Ethernet port Connects to LAN for GUI
15 Cooling fan 2 System cooling fan.
16 AC power port Connects to the power source.
17 Power supply 1 Removable power supply.
18 Power supply handle Use to pull out the power supply.
19 Power supply switch Use to switch the power on or off.
20 Chasis ID Use for JBOD enclosure only.
21 UPS port Provides UPS powered data
22 IO tray Holds the IO board and BBMs.
23 AC power port Connects to the power source.
9
management.
management.
connection.
Page 17

Product Overview
Contraller A Contraller B
UPS
COM LAN
CH 2 CH 1
EXP
EXP Access
EXP Link CTRL Ready
COM LAN
CH 2 CH 1
EXP
EXP Access
EXP Link CTRL Ready
P/S 1 P/S 3 P/S 2
Fan 1 Fan 3 Fan 4 Fan 2Fan 1
1 82 3 4 5 6 7 9 1610 11 12 13 14 15
18 19 2017 22 2321 24 26 2725
A24R-FS A24U-FS
No. Item Description
24 Power supply 2 Removable power supply.
25 Power supply handle Use to pull out the power supply.
A24-FS
1 82 3 4 5 6 7 9 16
Fan 1 Fan 3 Fan 4 Fan 2Fan 1
CH 2 CH 1
EXP Access
EXP
EXP Link CTRL Ready
P/S 1 P/S 3 P/S 2
18 19 2017 22 2321 24 26 2725
No. Item Description
COM LAN
Contraller A Contraller B
UPS
1 Cooling fan 1 System cooling fan.
2 Controller A RAID system controller A (Primary
controller).
3 Expansion port (Controller A) Use for JBOD expansion. (A24R-SJ)
4 Host channel 2 (Controller A) Connects to the host server.
5 Host channel 1 (Controller A) Connects to the host server.
6 RS-232 port Connects to external terminal for CLI
management.
7 Ethernet port Connects to LAN for GUI
management.
8 Cooling fan 3 System cooling fan.
9 Cooling fan 4 System cooling fan.
10 Controller B RAID system controller B (Secondary
controller).
11 Expansion port (Controller B) Use for JBOD expansion. (A24R-SJ)
12 Host channel 2 (Controller B) Connects to the host server.
13 Host channel 1 (Controller B) Connects to the host server.
14 RS-232 port Connects to external terminal for CLI
15 Ethernet port Connects to LAN for GUI
16 Cooling fan 2 System cooling fan.
17 AC power port Connects to the power source.
18 Power supply 1 Removable power supply.
19 Power supply handle Use to pull out the power supply.
management.
management.
10
Page 18

Product Overview
No. Item Description
20 Power supply switch Use to switch the power on or off.
21 AC power port Connects to the power source.
22 Power supply 3 Removable power supply.
23 Power supply handle Use to pull out the power supply.
24 UPS port Provides UPS powered data
connection.
25 AC power port Connects to the power source.
26 Power supply 2 Removable power supply.
27 Power supply handle Use to pull out the power supply.
11
Page 19

Product Overview
A
1
B
2
15
ON DIP
432
U
P
S
COM LAN
CH 2
EXP
EXP Access
EXP Link CTRL Ready
CH 1
COM LAN
CH 2
EXP
EXP Access
EXP Link CTRL Ready
CH 1
1
1312 14 15 1611
2 3 4 75 6
1918 20 21 2217
8 9 10
A12R-SS A12U-SS
1.6 SAS Controller Rear View
A12-SS
1
2 3 4 75 6 8 9 10
ON DIP
15
1
CH 2
CH 1
A
EXP Access
EXP Link CTRL Ready
EXP
1312 14 15 1611
COM LAN
No. Item Description
1 AC power port Connects to the power source.
2 Power supply handle Use to pull out the power supply.
3 Power supply switch Use to switch the power on or off.
4 Cooling fan 1 System cooling fan.
432
U
P
S
2
B
5 Chassis ID Use for JBOD enclosure only. See 1.7
Switch ID on page 15.
6 UPS port Provides UPS powered data
connection.
7 AC power port Connects to the power source.
8 Power supply handle Use to pull out the power supply.
9 Power supply switch Use to switch the power on or off.
10 Cooling fan 2 System cooling fan.
11 Controller A RAID system controller A (Primary
controller),
12 Host channel 2 (Controller A) Connects to the host server.
13 Expansion port (Controller A) Use for JBOD expansion. (A12R-SJ)
14 Host channel 1 (Controller A) Connects to the host server.
15 RS-232 port Connects to external terminal for CLI
management.
16 Ethernet port Connects to LAN for GUI
management.
17 Controller B RAID system controller B (Secondary
controller).
18 Host channel 2 (Controller B) Connects to the host server.
19 Expansion port (Controller B) Use for JBOD expansion. (A12R-SJ)
20 Host channel 1 (Controller B) Connects to the host server.
21 RS-232 port Connects to external terminal for CLI
22 Ethernet port Connects to LAN for GUI
management.
management.
12
Page 20

Product Overview
A16R-SS A16U-SS
A16-SS
1 8
2 3 105 6 74 159 12 13 1411
Fan 1 Fan 3
Contraller A
CH 1
CH 2
EXP Access
EXP
EXP Link CTRL Ready
P/S 1 P/S 2
COM LAN
P/S
Chassis
ID
UPS
5
6
4
7
3
8
2
9
1
0
Fan 2
Contraller B
CH 1
CH 2
EXP Access
EXP
EXP Link CTRL Ready
COM LAN
1 8
2 3 5 6 74 15
Fan 1 Fan 3
Contraller A
CH 1
CH 2
EXP Access
EXP
EXP Link CTRL Ready
P/S 1 P/S 2
VER 1.0
COM LAN
P/S
Chassis
ID
UPS
5
6
4
7
3
8
2
9
1
0
Fan 2
Contraller B
VER 1.0
17 18 19 20 2116
24 252322
17 18 19 20 2116 24 2523
22
No. Item Description
1 Cooling fan 1 System cooling fan.
2 Controller A RAID system controller A (Primary
controller).
3 Expansion port (Controller A) Use for JBOD expansion. (A16R-SJ)
4 Host channel 2 (Controller A) Connects to the host server.
5 Host channel 1 (Controller A) Connects to the host server.
6 RS-232 port Connects to external terminal for CLI
management.
7 Ethernet port Connects to LAN for GUI
management.
8 Cooling fan 3 System cooling fan.
9 Controller B RAID system controller B (Secondary
controller).
10 Expansion port (Controller B) Use for JBOD expansion. (A16R-SJ)
11 Host channel 2 (Controller B) Connects to the host server.
12 Host channel 1 (Controller B) Connects to the host server.
13 RS-232 port Connects to external terminal for CLI
14 Ethernet port Connects to LAN for GUI
15 Cooling fan 2 System cooling fan.
16 AC power port Connects to the power source.
17 Power supply 1 Removable power supply.
18 Power supply handle Use to pull out the power supply.
19 Power supply switch Use to switch the power on or off.
20 Chasis ID Use for JBOD enclosure only.
21 UPS port Provides UPS powered data
22 IO tray Holds the IO board and BBMs.
23 AC power port Connects to the power source.
13
management.
management.
connection.
Page 21

Product Overview
A24R-SS A24U-SS
No. Item Description
24 Power supply 2 Removable power supply.
25 Power supply handle Use to pull out the power supply.
A24-SS
1 82 3 4 5 11 12 136 7 9 1610 14 15
Fan 1 Fan 3 Fan 4 Fan 2Fan 1
CH 2 CH 1
EXP Access
EXP
EXP Link CTRL Ready
P/S 1 P/S 3 P/S 2
18 19 2017 22 2321 24 26 2725
COM LAN
Contraller A Contraller B
CH 2 CH 1
EXP Access
EXP
EXP Link CTRL Ready
UPS
COM LAN
1 82 3 4 5 6 7 9 16
Fan 1 Fan 3 Fan 4 Fan 2Fan 1
CH 2 CH 1
EXP Access
EXP
EXP Link CTRL Ready
P/S 1 P/S 3 P/S 2
18 19 2017 22 2321 24 26 2725
COM LAN
Contraller A Contraller B
UPS
No. Item Description
1 Cooling fan 1 System cooling fan.
2 Controller A RAID system controller A (Primary
controller)
3 Expansion port (Controller A) Use for JBOD expansion. (A24R-SJ)
4 Host channel 2 (Controller A) Connects to the host server.
5 Host channel 1 (Controller A) Connects to the host server.
6 RS-232 port Connects to external terminal for CLI
management.
7 Ethernet port Connects to LAN for GUI
8 Cooling fan 3 System cooling fan.
9 Cooling fan 4 System cooling fan.
10 Controller B RAID system controller B (Secondary
11 Expansion port (Controller B) Use for JBOD expansion. (A24R-SJ)
12 Host channel 2 (Controller B) Connects to the host server.
13 Host channel 1 (Controller B) Connects to the host server.
14 RS-232 port Connects to external terminal for CLI
15 Ethernet port Connects to LAN for GUI
16 Cooling fan 2 System cooling fan.
17 AC power port Connects to the power source.
18 Power supply 1 Removable power supply.
management.
controller)
management.
management.
14
Page 22

Product Overview
No. Item Description
19 Power supply handle Use to pull out the power supply.
20 Power supply switch Use to switch the power on or off.
21 AC power port Connects to the power source.
22 Power supply 3 Removable power supply.
23 Power supply handle Use to pull out the power supply.
24 UPS port Provides UPS powered data
connection.
25 AC power port Connects to the power source.
26 Power supply 2 Removable power supply.
27 Power supply handle Use to pull out the power supply.
1.7 Switch ID
See table below on how to set the Chassis ID.
2U-12R/U Chassis ID
ID1(A3) ID2(A2) ID3(A1) ID4(A0) ID5
02G
14G
0000 0
0001 1
0010 2
0011 3
0100 4
0101 5
0110 6
0111 7
1000 8 N/A
1001 9 N/A
Chassis ID
FC-HDD Speed Remark
15
ON(1)
OFF(0)
1
ID12ID23ID34ID45ID5
Page 23

Hardware Installation
P
o
w
e
r
P
/
S
F
a
i
l
A
c
c
e
s
s
E
n
t
e
r
E
S
C
2
2
0
220
A16R-FS&SS A12/24R-FS&SS
Chapter 2: Hardware Installation
This section describes the process in installing different types of hard disk
drives, and mounting the RAID system.
2.1 Installing the Hard Disks
All A12R-FS&SS, A16R-FS&SS, and A24R-FS&SS RAID systems support SAS or
SATA interface hard drives.
Caution
It is recommended to mount the RAID system to the rack cabinet
first before installing the hard drives and the drive trays. If the hard
drives are installed first, the RAID system may be too heavy to lift or
handle. And the possible impact during installation may damage the
drives. See 2.2 Mounting the RAID system on page 2-21 for
more information.
2.1.1 SAS hard disks
Follow the procedures below to install SAS hard drives:
1. Insert the SAS hard drive into the hard disk tray. Screw the sides to secure the hard disk. Repeat this procedure to install more hard disks.
2. Insert the key to the key slot and turn to unlock the front panel door.
P
o
w
e
r
P
/S
F
a
il
A
c
c
e
s
s
E
n
t
e
r
E
S
C
0
2
2
220
16
Page 24

Hardware Installation
3. Pull open the front panel door.
4. Insert the hard disk trays into the empty slots.
5. Push down the tray handle to secure the hard disk tray into place.
6. Repeat steps 4 to 5 until all the required disks have been installed.
7. Close the front panel door, then lock it.
17
Page 25

Hardware Installation
SAS connector
SATA connector
2.1.2 SATA hard disks
SATA hard drive installation requires an AA-MUX adapter to be installed
on the hard disk tray first before installing the SATA hard disk.
AA-MUX Adapter
Because of the relatively high prices of SAS hard drives, SATA hard drives
are more widely used at the moment. AA-MUX adapter is equipped with
SATA connector on one end and SAS connector on the other end to
enable RAID system connetions.
Note
AA-MUX is an optional accessory and is sold separately. Contact your
supplier to purchase one.
Follow the procedures below to install SATA hard disks:
1. Place the AA-MUX adapter on the hard disk tray and attach the four screws as shown.
18
Page 26

Hardware Installation
2. Place the hard disk into the hard disk tray with the drive connectors facing the AA-MUX adapter.
3. Slide the hard disk towards the AA-MUX adapter and connect the power and data connectors.
4. Attach the screws to secure the hard disk.
19
Page 27

Hardware Installation
5. Insert the hard disk tray into an empty slot.
6. Push down the tray handle to secure the hard disk tray into place.
7. Repeat steps 1 to 6 until all the required disks have been installed.
8. Close the front panel door, then lock it.
20
Page 28

Hardware Installation
2.2 Mounting the RAID system
The RAID system can be installed in a standard 19-inch rack. Follow the
procedures below:
1. Attack eight rack nuts into the rack, making sure that they correspond with the mounting points on the rails.
2. Adjust the length of the rails as needed.
3. Secure the rails using two nuts and bolts on both the front and back posts of the rack.
4. Tighten the locking screws.
5. Slide the RAID system into the rack and secure it into place using the fixing screws.
Power P/S Fail Access
Enter ESC
21
Page 29

Hardware Installation
2.2.1 Installing the Rail Extenders
Follow the procedures below to install the rail extenders:
1. Install the rail extenders and attach the screws to secure them.
2. Slide the RAID system into the rack and secure it into place using the fixing screws.
Power P/S Fail Access
Enter ESC
22
Page 30

System Connections
1
2
Chapter 3: System Connections
This chapter outlines the procedures in connecting the RAID system to the
host computer, and to the GUI and CLI management ports. Setting up
JBOD expansions is also covered. The procedures in powering on and off
the RAID system is mentioned in this chapter.
3.1 Connecting to the Host
3.1.1 Connecting Fiber RAID System Controller to the Host
A12R-FS, A16R-FS, and A24R-FS have dual 4G fiber channel interfaces on
each controller. Each channel interface can be connected using an
optical or copper transceivers and cables.
To connect an optical cable, simply insert the cable to the CH1 port.
To connect an LC optical SFC transceiver, follow the procedures below:
Note
The illustration below shows A16R-FS RAID system. The same
procudures apply for A12R-FS and A24R-FS.
1. Insert the SFP transceiver into the CH1 port.
2. Then connect the optical cable to the SFP transceiver.
3. Connect the other end of the optical cable to the HBA connector of the host server.
23
Page 31

System Connections
Figure 3-1 Connecting A16R-FS to LAN
3.1.2 Connecting SAS RAID System Controller to the Host
Note
The illustration below shows A16R-SS RAID system. The same
procudures apply for A12R-SS and A24R-SS.
1. Insert the SAS cable into the CH1 port.
2. Insert the other end to the HBA connector of the host server.
3.2 Connecting the GUI Management Port
To easily monitor and configure the RAID system, use the Graphical User
Interface (GUI). To manage the GUI, a LAN/WAN connection is required.
Follow the procedures below:
1. Insert the ethernet cable to the LAN port of the controller.
2. Connect the other end to the LAN switch.
Note
• The illustration above shows A16R-SS. The same procedures apply
to A12R-FS&SS, A16R-FS, and A24R-FS&SS.
• Please refer to the software user manual to configure IP address to
access the GUI.
24
Page 32

System Connections
Figure 3-2 A16R-FS COM port connection
Figure 3-3 JBOD expansion on A16R-FS
3.3 Connecting the CLI Management Port
The RAID system can be managed using the CLI.
To connect the CLI port, follow the procedures below:
1. Insert the RS-232 cable into the COM port.
2. Insert the other end to an external terminal.
Note
• The illustration above shows A16R-FS. The same procedures apply
to A12R-FS&SS, A16R-SS, and A24R-FS&SS.
• Please refer to the software user manual for more information on
CLI management.
3.4 Connecting JBOD Enclosure
Follow the procedures below to connect to A12R-SJ, A16R-SJ, or A24-RSJ
(JBOD) .
1. Insert a SAS connector to the EXP port on the controller.
25
Page 33

System Connections
A12R/U
A16R/U
A24R/U
2. Connect the other end to the CH1 port of the JBOD system.
Note
The illustration above shows A16R-FS RAID system. The same
procudures apply for A12R-FS&SS, A16R-SS and A24R-FS&SS.
3.5 Connecting and Turning On the Power
Once all of the components have been installed into the RAID system,
and the management interfaces have been connected, the RAID system
can now be powered on.
1. Plug one power cable into the AC power port.
1
P/S 1
Contraller A
26
Page 34

System Connections
2. Plug the second power cable into the other AC power port.
3. Turn on the power switch.
27
Page 35

Chapter 4: Maintenance
This chapter describes the procedures in maintening the RAID system
components to ensure performance quality and stability.
4.1 Replacing a Disk
When a hard disk fails, the Disk LED indicator lights red and the audible
alert sounds.
Note
To turn off the audible alert, simultaneously press the Up and Down
buttons on the front panel twice.
Hard disks are hot-swappable, which means they can be installed and
removed even when the RAID system is powered on and functioning.
Maintenance
To replace a disk, follow the procedures below:
1. Unlock and open the front panel door.
2. Push the button to release the tray handle.
3. Grab the handle and gently pull out the disk tray.
28
Page 36

Maintenance
4. Unscrew the hard disk to detach it from the disk tray.
5. Replace with a new hard disk. To install the hard disk, see also 2.1 Installing the Hard Disks on page 2-16 for more details.
6. Slide the disk tray back into the empty slot then push down the tray handle.
7. Close and lock the front panel door..
Note
Replace the hard disk with the same or greater capacity than the
faulty disk. If the disk is smaller, the audible alert will sound and the
auto-rebuild function will not start.
4.2 Replacing a Controller
The RAID controller monitors and manages the logical drives. When the
controller is replaced, all the logical drive data remains intact because
the logical drive information is stored on the disk drives.
When a controller fails, you can replace the controller with a new one.
The controllers are hot-swappable, which means they can be replaced
even when the RAID system is powered on and functioning.
Note
Before replacing the controller, be sure the replacement controller is
greater or has the same memory capacity as the original controller.
To replace a faulty controller, follow the procedures below:
Note
The following illustrations show A16R-FS RAID system, however the
same procedures apply to A12R-FS&SS, A16R-SS, and A24R-FS&SS
RAID systems.
1. Disconnect the fiber or SAS cables, mananagement, and serial power cables connected to the faulty controller.
2. Loosen the screws of the controller.
29
Page 37

3. Lift the handle to eject the controller.
4. Gently pull out the controller.
5. Insert the new controller into the slot with the handle lifted.
6. Push down the handle to lock the controller into place.
Maintenance
7. Tighten the screws to secure the controller.
8. Connect the fiber or SAS cables, management and serial cables.
30
Page 38

Maintenance
4.3 Replacing a Power Supply
A failed power supply is indicated when:
• the Power Supply (P/S Fail) LED indicator turns red
• the audible alert sounds
• the LCD displays “Power X failure”, where X indicates the power
supply 1 or 2.
Note
To turn off the audible alert, simultaneously press the Up and Down
buttons on the front panel twice.
Power supplies are hot-swappable, which means they can be installed
and removed even while the RAID system is powered on and functioning.
Follow the procedures below to replace a faulty power supply:
Note
The following illustrations show A16R-FS RAID system, however the
same procedures apply to A12R-FS&SS, A16R-SS, and A24R-FS&SS
RAID systems.
1. Identify the faulty power supply.
2. Detach the power cable from the power supply.
3. Loosen the screws of the faulty power supply.
4. To remove the power supply, press the release catch and pull the handle at the same time.
31
Page 39

Maintenance
A16R
A24R
A12R
5. Press the release catch and push with the handle at the same time to insert the new power supply into the slot.
1
O
NDIP
2
43
5
U
P
S
Contraller B
UPS
P/S 2
6. Tighten the screws back to secure the power supply.
32
Page 40

Maintenance
4.4 Upgrading Memory
For faster and more efficient performance, you can upgrade the memory
of the RAID controller. Follow the procedures below::
Note
The following illustrations show A16R-FS RAID controllers, however
the same procedures apply to A12R-FS&SS, A16R-SS, and A24RFS&SS RAID systems.
1. Loosen the screws of the controller.
2. Forcefully lift up the handle to eject the controller, then gently pull it out.
33
Page 41

Maintenance
3. To remove the memory card, release the retaining clips to eject the memory from the socket.
4. Gently push the new memory card into the socket.
5. Push the corners of the memory until the retaining clips click into place.
6. Insert the controller back into the slot, then push down the handle to loc.
7. Tighten the screws to secure the controller.
34
Page 42

Maintenance
A12R/U
A16R/U
Contrall
A24R/U
4.5 Replacing a Fan Module
A faulty fan module is indicated with a message on the LCD panel and
the audible alert sounds. Follow the procedure below to replace the
faulty fan module.
Note
• To turn off the audible alert, simultaneously press the Up and
Down buttons on the front panel twice.
• The following illustrations show A16R-FS RAID controllers,
however the same procedures apply to A12R-FS&SS, A16R-SS,
and A24R-FS&SS RAID systems.
1. Loosen the screws then pull out the faulty fan module.
2
B
Fan 2
35
Page 43

Maintenance
2. Insert the new fan module into the slot and tighten the screw(s) back into place.
36
Page 44

Maintenance
4.6 Installing Battery Backup Module
In case of a power failure, the Battery Backup Module (BBM) can sustain
cache memory. BBM is highly recommended in order to avoid data loss
or inconsistency. However, BBM is an optional accessory which can be
purchased separately from your supplier.
Caution
Install only BBMs which are manufactured by Accusys. Use of battery
cells provided from another source may cause incompatibility
problems and void your warranty.
4.6.1 A12R/U-FS&SS BBM Installation
To install the BBM on A12R/U-FS&SS, follow the procedures below:
1. Loosen the screws and pull out the cooling fan tray.
2
B
2. Place the BBM on the allocated slot (A).
B
A
3. Secure the BBM by fastening 4 screws on the bottom of the cooling fan tray (B).
37
Page 45

Maintenance
4. Connect the small end of the cable to the connector port of the BBM. Then connect the other end to the cooling fan tray.
For A12R controllers, follow the same procedures to install the second
BBM on the allocated slot in the other cooling fan.
4.6.2 A16R/U-FS&SS BBM Installation
To install the BBM on A16R/U-FS&SS, follow the procedures below:
1. Loosen the screws and pull out the IO tray.
2. Place the BBM on the allocated slot with the connector port facing the IO board (A).
B
BBM 2
A
BBM 1
38
Page 46

Maintenance
3. Secure the BBM by fastening 4 screws on the bottom of the IO tray (B).
4. Connect the small end of the cable to the connector port of the BBM. Then connect the other end to the IO board.
BBM 2
BBM 1
A16R controller supports installation of 2 BBMs. To install another BBM,
follow the same procedures and install the second BBM on the allocated
BBM-2 slot. With the IO board facing you, as the above illustration, BBM-1
slot is on the right while BBM-2 slot is on the left.
4.6.3 A24R/U-FS&SS BBM Installation
To install the BBM on A16R/U-FS&SS, follow the procedures below:
1. Loosen the screws and pull out the controller.
P/S 3
Contraller B
UPS
P/S 2
2. Place the BBM on the allocated slot (A).
A
B
39
Page 47

Maintenance
3. Secure the BBM by fastening 4 screws on both sides of the controller(B).
4. Connect the small end of the cable to the connector port of the BBM. Then connect the other end to the controller.
For A24R controllers, follow the same procedures to install the second
BBM on the allocated slot in the other controller.
40
Page 48

Specifications
Appendix A: Specifications
Technical Specifications
Environmental Specification
Humidity 20 % to 80 % Non-condensing
Temperature Operating: 5ºC to 40ºC
Non- Operating: -25ºC to 60ºC
Noise Boot up dB: < 60dB
Stable (Operating) dB: < 45 dB
Power Requirements
Input Voltage 100 to 240V (+/- 10%), 47 to 63 Hz
Output Voltage DC: 3.3V, 5V, 12V
Frequency 47 to 63 Hz
Power Consumption Depends on HDD
(estimated max. <460W)
Dimensions
Physical Dimensions 485 (W) x 565 (D) x 132 (H) mm
Physical Weight 24 kgs (without drives)
Packed Dimensions 610 (W) x 790 (D) x 450 (H) mm
Packed Weight 33 kgs (without drives)
Certifications
Safety Regulatory UL, CUL, CB
EMC Standard FCC, CD, C-Tick, BSMI
RoHS compliant
41
Page 49

Controller Specifications
CPU Intel IOP341 1200MHz IO processor
Memory Up to 4GB DDR2-667 cache memory, with
EEC and BBM protection
Firmware ROM ECC Dual Flash support (each 16 MB)
Boot ROM 512K bytes
Host Interface Two 4Gb/s Fiber channel ports (A16R-FS)
Two 3Gb/s Serial Attached SCSI (SAS) wide
(x4) ports (A16R-SS)
Disk Interface 3Gb/s SAS/SATA (with AA-MUX)
SAS Expansion Port Yes (Up to 120 disks including local chassis)
Ethernet On-board 10/100 Ethernet port
Terminal RS-232 connect by phone jact cable
Functional Specifications
Specifications
Configuration Specification
• Multiple RAID Levels: 0, 1, 3, 5, 6, 10, 30, 50, 60
• Support stripe sizes (KB): 4, 8, 16, 32, 64, 128, 256, 512
• Online disk group expansion
• Concurrent disk group expansion and level/stripe size
migration
• Online volume management, support striping and
concatenating
• Online LUN capacity expansion and shrink
• Online manual or event-triggered disk cloning
• Online manual or periodic disk scrubbing with parity check
and rebuild
• Disk health monitoring and self tests by S.M.A.R.T technology
• Online drive traveling and array roaming
• Online array recovery, protection against multiple disk
failures
• Online bad block data recovery and reallocation with overthreshold alert
• NVRAM-based transaction log and auto parity
resynchronization
• Redundant on-disk RAID meta data
• Hot spare with local and global spare, support spare restore
• Flexible storage presentation for SAN, MPIO, and DAS
42
Page 50

Specifications
• Independent LUN caching policies with dynamic optimiztion
algorithms
• Support over 2TB volume by 64-bit LBA and selective sector
size
• Up to 32 hosts, 32 host groups, and 32 storage groups
• Up to 128 LUNs per host with dynamic LUN masking
• Support up to 1024 LUNs totally
• Multiple RAID levels and stripe sizes disk group
• Support battery backup module (BBM) and smart UPS
• Enclosure component monitoring and control
RAID Management
• Local management via RS-232 port and LCD panel
• Web-based GUI, RAIDGuard™ via embedded web server
• Web-based multiple RAID system viewer with auto-system
discovery
• Support multiple languages and on-line help
• Command Line Interface (CLI) via local console, SSH, and
telnet
• Support SSL for protecting management sessions over the
Internet
• NVRAM-based event logging with security level
• Event notification via email (SMTP), SNMP, and beeper
• Scheduled or periodic maintenance tasks with priority
control
43
Page 51

Appendix B: Accessories
The following lists other components and accessories that can be used
with the RAID system and are purchased separetely:
• SAS JBOD A12R-SJ, SAS JBOD A16R-SJ, SAS JBOD A24R-SJ, SAS JBOD
A12U-SJ, SAS JBOD A16U-SJ, SAS JBOD A24U-SJ
• AA-MUX tray board (for SATA Hard Disk)
• Battery Backup Module (BBM) ACS-1164
Accessories
44
Page 52

Contact Us
Appendix C: Company Contact
Accusys, Inc.
• 5F., No.38, Taiyuan St., Jhubei City, Hsinchu County 30265, Taiwan(R.O.C)
• Tel: +886-3-560-0288
• Fax: +886-3-560-0299
• http://www.accusys.com.tw/
• E-mail: sales@accusys.com.tw
Accusys U.S.A., Inc.
• 1321 W. Foothill Blvd. Azusa, CA91702
• Tel: +1-510-661-0800
• Fax: +1-510-661-9800
• http://www.accusys.com.tw
• E-mail: Maggie@accusys.com.tw
Accusys Korea, Inc.
• Baegang B/D 5F Shinsa-Dong 666-14 Kangnam-Gu, Seoul, Korea
• Tel: +82 (02) 6245-9050
• Fax: +82 (02) 3443-9050
• http://www.accusys.co.kr/
• E-mail: sales@accusys.co.kr
Accusys China(Beijing), Inc.
• No. 9A, Tower B, Yingdu Mansion, No. 48 Zhichunlu Street, Haidian
District, Beijing, China (100098)
• Ftp://ftp.accusys.com.cn
• E-mail: sales@accusys.com.cn
• Tel: +86-10-58734580/81/82/83
• Fax: +86-10-58734585
• E-mail: sales@accusys.com.cn
• http://www.accusys.com.tw
Accusys China(Shanghai), Inc.
• Room 701, No. 666, Kirin Tower, Gubei Road, Changning Area Shanghai,
ZIP: 200336, China
• Tel: +86-21-6270-8599
• Fax: +86-21-6270-8580
• E-mail: stone@accusys.com.cn
45
Page 53

Accusys EU B.V
• Orionweg 6, 4782 SC Moerdijk, The Netherlands
• Tel: +31 (0) 102995758
• Fax: +31 (0) 168358621
• http://www.accusys.com.tw
• E-mail: sales@accusyseu.com, support@accusyseu.com
Contact Us
46
 Loading...