


AB5000 

because your money cou
user’s guide
professional
user’s guidepg.
manual de págusua.
WARNING
Before turning the power on, please make sure that there are no objects obstructing the operation of the rollers and wheels. When operating this unit, please wait 5 minutes to allow the UV system reach its maximum detection capability
AccuBANKER and its logo are registered trademarks or trademarks of Hilton Trading Corp. All Rights Reserved.
2

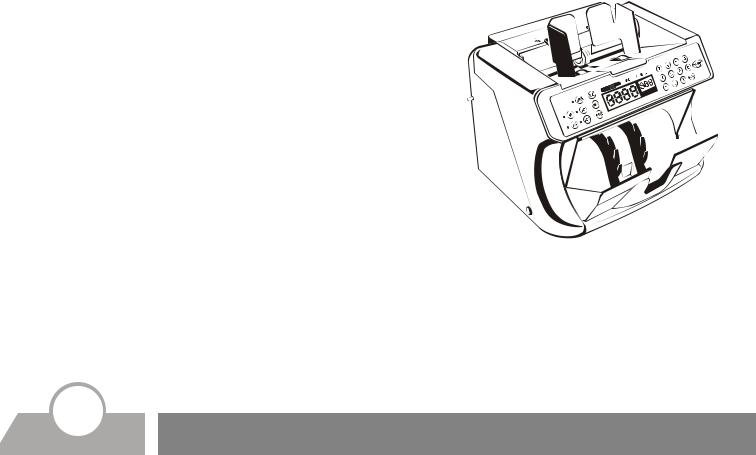
Thank you for purchasing this Professional Bill Counter. This User’s Guide compiles all the relevant instructions about the use and operation of the AB5000 PLUS.
We recommend the new user to read this manual thoroughly, in order to get familiarized with the controls and operation of the unit.
AB5000 PLUS PROFESSIONAL BILL COUNTER
Getting Started |
4-8 |
Table of Contents |
9 |
Parts |
10-11 |
Function Controls |
12-14 |
Operation |
15-18 |
UV Lamp Replacement |
19-24 |
Error Message Display |
25 |
Specifications |
26 |
|
3 |
GettingAB5000 PLUS FeaturesStarted
One of the most advanced bill counters available today, the AB5000 PLUS has been the talk of the industry since we first introduced it in the market. Equipped with a fully computerized mechanism, the AB5000 PLUS boosts variable counting speeds, digital task programming and dual means of counterfeit detection. It is also equipped with an acrylic molded cover to protect the user from the dust generated by the fast counting action. Stylish yet affordable, the AB5000 PLUS will make the most efficient and cost-effective device to help in counting, sorting and detecting counterfeit currency in any environment where moneys are used.
! Convenient and easy to operate
!Fast and accurate counting
!Two starting modes (Auto/Manual)
!Three counting speeds (fast, normal and slow)
!Three changeable banknote condition levels
!Batch and free counting mode
!Addition counting mode
!Detection of paper bill size
!Counterfeit bill detection systems (magnetic and UV)
!Dust proof cover
!Error/trouble message display
4 Features
GettingImportant Safety InstructionsStarted
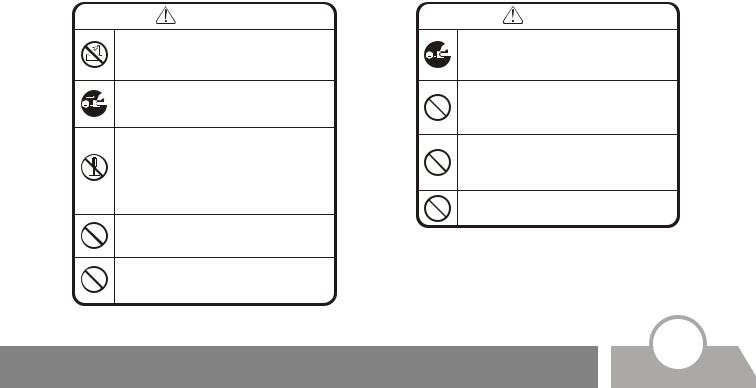
When using the bill counter, basic safety precautions should always be followed to reduce the risk of fire, electric shock or injury to persons, including the following:
Warning |
Caution |
Do not use this product in areas where it may be exposed to water or other liquids.
Unplug this product from the wall outlet before cleaning. Do not use liquid or aerosol cleaners. Use a damp cloth for cleaning.
To reduce the risk of electric shock, do not disassemble this product. Take it to qualified service personnel when service or repair work is required. Opening or removing covers may expose you to dangerous voltages or other risks. Incorrect re-assembly can cause electric shock when the appliance is subsequently used.
Only use the cable provided with the unit. The use of other cables may result in electric shock, fire or cause serious damage to the unit.
Do not operate the unit in areas with high temperature or high humidity since it may prevent it from working correctly.
When unplugging the power plug, do not pull it by the cord but rather grip the plug to pull it out. Not following these instructions may result in electric shock, fire or damage to the unit.
Do not use the unit if the power cord is damaged or if the plug socket contact is loose. Not following these instructions may result in electric shock, fire or other hazards.
Do not place heavy objects over the cord and do not bend it excessively since it could get damaged. Not following these instructions may result in electric shock, fire or other hazards.
When not using the unit for a long period of time, remove the power plug from the wall outlet.
Safety Instructions |
5 |

GettingOther Safety ConsiderationsStarted
1Read and understand all of the instructions.
2Follow all warnings and instructions marked on the unit.
3The slots and openings in the back or bottom of the case, are provided for ventilation, to protect the unit from overheating. These openings should never be blocked or covered by placing the product on the bed, sofa, rug, or similar surfaces. This product should never be placed near or over a radiator or heat register. This product should not be placed in a built-in installation unless proper ventilation is provided.
4This product should be operated only from the type of power source indicated in the user guide. If you are not sure of the type of power supply in your location, consult your dealer or local power company.
5This product is equipped with a three wire grounding type plug, a plug having a third (grounding) pin. This plug will only fit into a grounding type power outlet. This is a safety feature. If you are unable to insert the plug into the outlet, contact your electrician to replace the outlet. Do not try to defeat the safety purpose of the grounding type plug.
6Never push objects of any kind into the unit through case slots, since they may touch dangerous voltage points or shortcut parts, resulting in a risk of fire or electric shock. Never spill liquids of any kind on the product.
7Unplug this product from the wall outlet and refer servicing to qualified service personnel under the following conditions:
!When the power supply cord or plug is damaged or frayed.
!If liquid has been spilled into the unit.
!If the unit has been exposed to rain or water.
!If the unit does not operate normally by following the operating instructions. Adjust only those controls that are covered by the operating instructions. Improper adjustment of other controls may result in damage and will often require extensive work by a qualified technician to restore the product to normal operation.
!If the product has been dropped or the case has been damaged.
!If the product shows a noticeable change in performance.
6 |
Safety Considerations |
GettingBox Contents Started
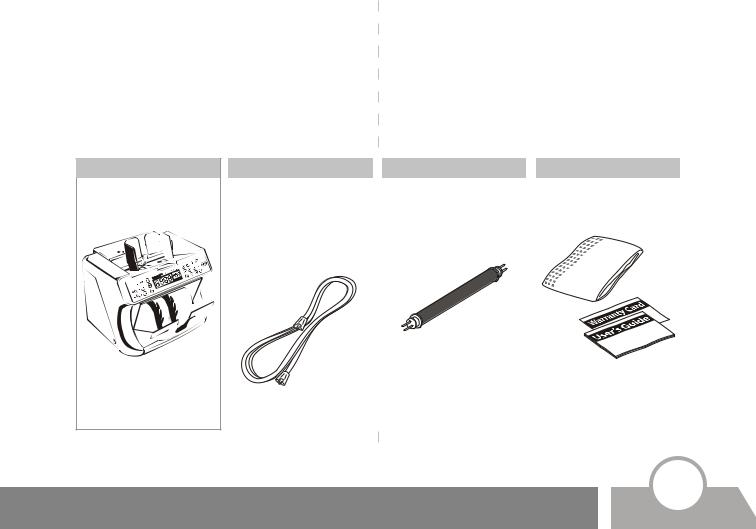
When opening the box verify that all the items described below have been included. If any item is missing or damaged, contact the dealer where you purchased the unit.
Bill Counter Unit |
Power Cable |
|
|
UV Lamp |
|
Other Items |
|
|
|
|||
Only use the cable |
|
|
A box containing one (1) UV |
|
Plastic cover, manual and |
|
|
|
|||
|
|
|
|||
provided with the product. |
|
|
lamp replacement. (For |
|
Warranty Card |
|
|
|
|||
The use of other cables |
|
|
directions about changing |
|
|
|
|
|
|
||
may result in electric |
|
|
the UV lamp go to page 19) |
|
|
|
|
|
|
||
shock, fire or cause serious |
|
|
|
|
|
|
|
|
|
|
|
damage to the unit. |
|
|
|
|
|
|
|
|
|
|
|
|
|
|
|
|
|
|
|
|
|
|
|
|
|
|
|
|
|
|
|
|
|
|
|
|
|
|
|
|
|
|
|
|
|
|
|
|
|
|
|
|
|
|
|
|
|
|
|
|
|
|
|
|
|
|
|
|
|
|
|
|
|
|
|
|
|
|
|
|
|
|
|
|
|
|
|
|
|
|
|
|
|
|
|
|
|
|
|
|
|
|
|
|
|
|
|
Box Contents |
|
7 |
|
||
|
||
|
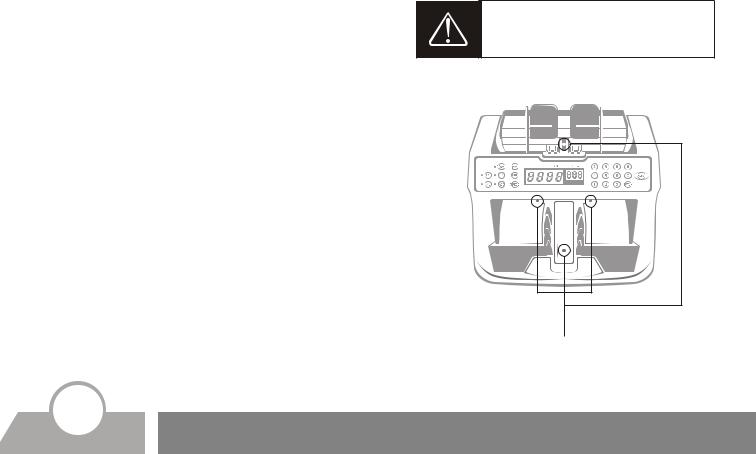
GettingCleaning and MaintenanceStarted
1Since the sensors in this unit are of the optical type, counting errors may be caused by paper particles, dust, dirt, stain, and other materials that get stuck or clutter the counting sensors. Also, it may be difficult to start the counting operation if the repeat and/or the auto-start sensor are cluttered with dust, paper particles, etc.
2For effective operation of the unit, it is necessary to clean all the sensors shown in the picture on the right with a dry brush, periodically or as needed.
3Due to the optical nature of the sensors in the unit, exposure to any direct light source should be avoided.
4Since the machine uses a roller friction system, keep small objects such as pins, clips, necklaces or hair away from it to prevent them to get stuck in the mechanism. Clean the hopper and stacker with a dry brush or cloth, periodically or as needed. Keep the UV lamp clean by pulling and pushing the UV lamp cleaning-shaft.
Attention!
Clean the unit only when the power is OFF. Do not use chemicals/abrasives to clean the unit.
SENSORS
8 Cleaning and Maintenance

ContentsTable of Contents
Parts |
10 |
Function Controls |
12 |
Operation |
15 |
Turning the power ON |
15 |
Bill physical condition selector |
15 |
Counting mode |
15 |
Addition mode |
16 |
Halting and resuming mode |
16 |
Auto/MNL (manual) starting mode |
16 |
Thickness adjustment control |
16 |
Dust proof cover function |
16 |
Size of currency detection function |
17 |
Counterfeit bill detection |
17 |
- UV detection function |
17 |
- Magnetic detection function |
18 |
UV Lamp Replacement |
19 |
Error Message Display |
25 |
Specifications |
26 |
Table of Contents |
9 |

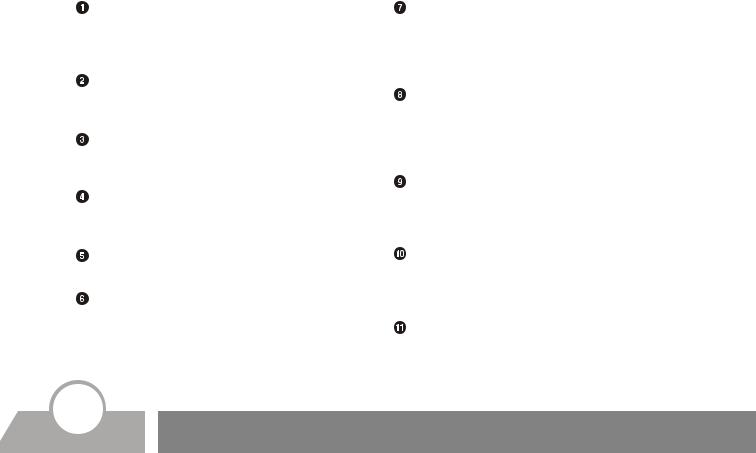
PartsParts
Hopper
Place the bills to be counted in this compartment.
Counting Guides
Aid to help position the bills correctly to be fed into the unit.
UV Lamp Cleaning Shaft
Built-in device that cleans the UV lamp.
Thickness Adjustment Screw
Used to make the counting operation smooth. The thickness adjustment is factory defaulted (for more information, refer to the Operation section, point 7 on page 16).
Stacker
The counted bills are stacked in this compartment.
Power Switch
Used to turn the power on or off.
Power Inlet
The supplied power cord should be connected to the power inlet first. The other end should be connected to the AC power outlet.
Fluorescent Detection Sensitivity Adjustment Lever
The fluorescent detection sensitivity can be adjusted by sliding this lever up or down (for more information refer to the Operation section, point 10 a on page 17).
10 Parts

Parts
 Hopper
UV Lamp |
Cleaning Shaft |
Counting |
Thickness |
Guides |
Adjustment Screw |
 Power Inlet
 Power Switch
 Fluorescent Detection
Sensitivity Adjustment
Lever
 Stacker
Parts |
11 |
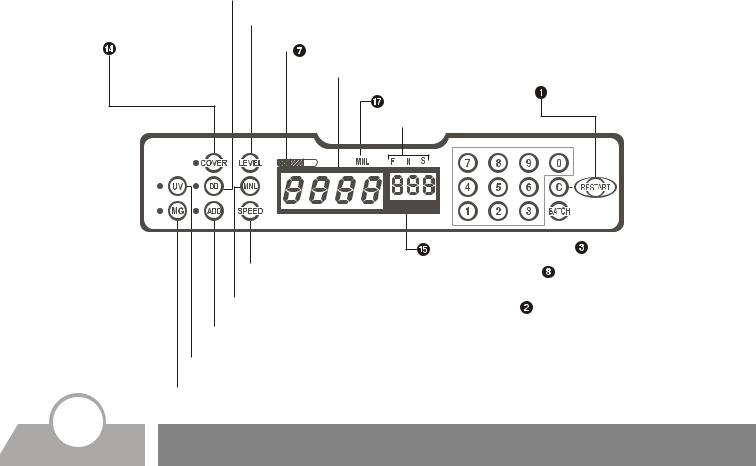
FunctionFunction Controls
Restart Button
Used to initiate or reinitiate the counting operation, or to clear an error message shown on the display.
Keypad
This is a set of numerical keys (0-9) used to preset optional batch groups (up to 3 digits).
Clear Button
Used to remove the selected batch quantity on the Batch Number Display.
MNL (manual) Button
Used to select the auto starting or the MNL (manual) starting mode.
Add (addition) Button
Used to select or clear the Add function.
Banknote Physical Condition Selector
This button sets the bill counter sensors to three different levels, according to how dark or light is the ink on the bills to be counted. (For more information, refer to the Operation section, point 2 on page 15).
Banknote Physical Condition Level Indicator Bar
A fixed bar indicates the three available levels in the Bill Physical Condition Selector.
Batch Function Button
Every time this button is pressed, one of the preset quantities (10, 20, 25, 50, 100, “blank”) will be indicated rotationally on the Batch Number Display.
DD Key (Different Denomination)
This button activates a function that detects any change in the size of the bills and selects the detection sensitivity.
UV Detection Button (ultraviolet)
This button activates the UV detection mechanism. This system detects counterfeit bills by means of UV fluorescence.
MG Detection Button (magnetic)
This button activates the magnetic detection mechanism. This system detects counterfeit bills by verifying magnetic features embedded in the notes.
12 Function Controls

FunctionFunction Controls
Counting Speed Button
By pressing this key you can select the desired counting speed setting (fast, normal and slow).
Counting Speed Indicator
Indicates the current counting speed.
Dust Proof Cover Function Button
Activates or deactivates the dust proof cover.
Batch Number Display
This screen displays batch settings and other messages (up to three digits/characters).
Counting Display
This screen displays the bill counting results (up to four digits).
Auto/MNL (manual) Indicator
The indicator will be lit when the machine is set in the MNL (manual) start mode.
Function Controls |
13 |
 DD Key (Different Denomination)
 Bill Physical Condition Selector
Dust Proof Cover |
|
Bill Physical Condition Level Indicator Bar |
|
||
Function Button |
|
|
 Counting Number Display
Restart Button
Auto/MNL Indicator
 Counting Speed Indicator
 Counting Speed Button
 MNL (manual) Button
 Add Button
 UV detection Button (ultraviolet)
 MG detection Button (magnetic)
Batch Number |
|
|
|
|
|
Clear Button |
|
|
|
|
|
||
|
|
|
|
|
||
|
|
|
|
|
||
Display |
|
|
Batch Function Button |
|||
|
|
|
||||
|
|
Keypad |
||||
|
|
|||||
14 Function Controls

OperationOperation
Turning the Power ON
To start operating the unit, turn it on by pressing the power switch located in the back.
Bill Physical Condition Selector
The Physical Condition level indicator should be lit in the middle position when the power is on. Change the level of this function by pressing the Bill Physical Condition Selector as follows (in case the error message “Ed” is displayed frequently).
a)For bills that are stained or printed dark, set the level indicator in the darker position.
b)For bills that are new or printed light, set the indicator in the lighter position.
Counting Mode
The unit can work in two modes, free counting mode and batch counting mode.
Free Counting Mode
In this mode, the machine counts all the bills in the hopper. This mode will be set when the “blank” option is selected on the Batch Number display, by pressing the Batch Function button.
Batch Counting Mode
In this mode, the machine counts the batch of bills assigned by the user. This counting mode may be set by entering a quantity (any number up to 999 except “blank”) on the Batch Number Display. Before beginning the counting function, use the Batch Function button or keypad to set the desired quantity or the “blank”, and then begin counting normally.
Note:
In the auto starting mode, the next counting operation will start automatically by only removing the counted bills from the stacker. In case the counting stops before the preset number has been reached, refill the hopper. The machine will continue counting automatically.
Operation |
15 |

Operation
Addition Mode
While working under the addition mode, the cumulative total is shown on the Counting Display. Press the ADD button to select this function (the Addition Indicator must be lit). To clear this function, press the Add button again. This will clear the Addition indicator.
Halting and Resuming Mode
To halt the machine during the counting operation, just press the Restart button. To resume the counting operation, press the Restart button again.
Auto/MNL (manual) Starting Mode
When the MNL (manual) button is pressed, the machine is under the MNL starting mode. In this mode, the machine will start counting, only, when the Restart key is pressed. When the MNL button is off, the machine is set to the AUTO starting mode. The machine will start the counting operation automatically when the hopper is filled with bills.
Thickness Adjustment Control
The Thickness Adjustment Control is factory defaulted. However it must be changed in the following two cases: 1) If the EC (chain) error occurs frequently, turn the Adjustment Control counterclockwise toward “-“ (thin). 2) If the feeding operation does not go smoothly due to new bills or thick paper sheets, turn the Adjustment Control clockwise toward “+” (thick).
Dust Proof Cover Function
Press the Dust Proof Cover Function button to select this function (the Dust Proof Cover indicator must be lit). When this function is selected, the Dust Proof Cover will close automatically before the counting operation begins. The cover automatically opens, in case the counting stops. To clear this function, press the Cover button until the indicator turns off.
16 Operation
 Loading...