

Page 1

User’s Manual
Wireless LAN 802.11b/g Device
July, 2004
Version 2.0
Page 2

Information in this document is subject to change without notice.
Microsoft, Encarta, MSN, and Windows are either registered trademarks or trademarks of
Microsoft Corporation in the United States and/or other countries.
SoftAP™ is the registered trademark of PCTel.
Other trademarks and trade names may be used in this document to refer to either the entities
claiming the marks and names or their products.
PART NUMBER 5991-0114
Wireless LAN 802.11b/g Device
2
Page 3

Table Of Contents
1 Introduction.......................................................................................................7
1.1 Inventory Checklist ......................................................................................7
1.2 Supported Security.......................................................................................8
2 Antenna Attachment...........................................................................................9
3 Verifying your Service Pack............................................................................... 10
4 Security Settings..............................................................................................12
5 Service Pack 2: Windows XP Wireless Zero Configuration.................................13
5.1 Launching Microsoft Windows XP Wireless Network Configuration .............. 13
5.2 Setting the Network Key Automatically........................................................14
5.3 Setting the Network Key Manually............................................................... 16
5.3.1 WEP: Setting the Network Key (Network Security)................................... 19
5.3.2 WPA: Setting the Network Key (Network Security)...................................21
6 Service Pack 1: Windows XP Wireless Zero Configuration.................................24
6.1 Launching Microsoft Windows XP Wireless Network Configuration .............. 24
6.2 Setting the Network name and Network Security ......................................... 25
6.2.1 WEP: Setting the Network Key (Network Security)................................... 28
6.2.2 WPA: Setting the Network Key (Network Security)...................................30
6.3 Verifying your Wireless Network Connection................................................ 32
6.4 Ad-Hoc Network......................................................................................... 33
7 Activating Access Point Mode............................................................................34
7.1 Installation ................................................................................................35
7.2 Verifying your Wireless Network Connection................................................ 37
8 Access Point Mode ...........................................................................................38
8.1 Launching the SoftAP™ .............................................................................. 38
8.2 The Wireless SoftAP™ Dialog Box ..............................................................40
8.2.1 File Menu ...............................................................................................41
8.2.1.1 Minimize to System Tray ................................................................41
8.2.1.2 Exit...............................................................................................41
8.2.2 Tools Menu............................................................................................. 42
8.2.2.1 Switch to Station Mode...................................................................42
8.2.2.2 Disable / Enable Wireless ...............................................................45
8.2.2.3 Change Admin Password… .............................................................47
8.2.2.4 Options… ......................................................................................49
8.2.2.5 Status….........................................................................................59
8.2.3 Help Menu.............................................................................................. 62
8.3 Setting Security .........................................................................................63
8.3.1 WEP Security Settings ............................................................................. 63
Wireless LAN 802.11b/g Device
3
Page 4

8.3.2 WPA Security Settings.............................................................................66
9 Station Mode ...................................................................................................68
9.1 Launching the SoftAP™ .............................................................................. 68
9.2 The Wireless SoftAP™ Dialog Box ..............................................................69
9.2.1 File Menu ...............................................................................................70
9.2.1.1 Minimize to System Tray ................................................................70
9.2.1.2 Exit...............................................................................................70
9.2.2 Tools Menu............................................................................................. 71
9.2.2.1 Switch to Access Point Mode...........................................................71
9.2.2.2 Disable / Enable Wireless ...............................................................74
9.2.2.3 Change Admin Password… .............................................................76
9.2.2.4 Options… ......................................................................................77
9.2.2.5 Status….........................................................................................78
9.2.3 Help Menu.............................................................................................. 80
9.3 Setting Security .........................................................................................80
10 Uninstalling the SoftAP™ .................................................................................. 81
Appendix A: Troubleshooting .................................................................................. 85
Appendix B: Regulatory Notices ............................................................................88
Appendix C: Product Specifications........................................................................92
Index 97
Wireless LAN 802.11b/g Device
4
Page 5

Table of Figures
Figure 1: Antenna Attachment ............................................................................................................................9
Figure 2: Accessing Systems Information............................................................................................................ 10
Figure 3: Verification of Service Pack ................................................................................................................11
Figure 4: Wireless Network Icon ......................................................................................................................13
Figure 5: Wireless Network Connection dialog box............................................................................................ 14
Figure 6: Wireless Network Connection dialog box............................................................................................ 15
Figure 7: Connecting to Wireless......................................................................................................................15
Figure 8: Wireless Network Connection dialog box............................................................................................ 16
Figure 9: Wireless Network Connection dialog box............................................................................................ 17
Figure 10: Wireless Network Connection Properties dialog box........................................................................... 17
Figure 11: Internet Protocol (TCP/IP) Properties dialog box .................................................................................. 18
Figure 12: Manually adding a Wireless Network ...............................................................................................20
Figure 13: Wireless network properties dialog box.............................................................................................20
Figure 14: Wireless Network Connection Properties dialog box........................................................................... 22
Figure 15: Wireless network properties dialog box.............................................................................................22
Figure 16: Wireless Network icon ....................................................................................................................24
Figure 17: Wireless Network Connection dialog box.......................................................................................... 25
Figure 18: Wireless Network Connection Properties dialog box........................................................................... 26
Figure 19: Internet Protocol (TCP/IP) Properties dialog box .................................................................................. 27
Figure 20: Wireless Network Connection Properties dialog box........................................................................... 28
Figure 21: Wireless network properties dialog box.............................................................................................29
Figure 22: Wireless Network Connection Properties dialog box........................................................................... 30
Figure 23: Wireless network properties dialog box.............................................................................................31
Figure 24: Wireless Network Connection Status dialog box................................................................................. 32
Figure 25: Conversion to Access Point Mode .....................................................................................................35
Figure 26: Preparing to Install ..........................................................................................................................36
Figure 27: Wireless SoftAP™ icon ...................................................................................................................36
Figure 28: Software Access Point icon...............................................................................................................37
Figure 29: Launching; Software Access Point icon .............................................................................................. 38
Figure 30: Launching; Software Access Point icon menu...................................................................................... 39
Figure 31: Wireless SoftAP™ dialog box.......................................................................................................... 39
Figure 32: Wireless SoftAP™ menus ................................................................................................................ 40
Figure 33: Wireless SoftAP™ File menu............................................................................................................ 41
Figure 34: AP Mode Tools menu....................................................................................................................... 42
Figure 35: AP Mode Tools menu....................................................................................................................... 43
Figure 36: Switch to Station Mode.................................................................................................................... 43
Figure 37: Station Mode switch successful .........................................................................................................44
Figure 38: SoftAP™ in Station Mode................................................................................................................ 44
Figure 39: Wireless SoftAP™ dialog box. Tools menu....................................................................................... 45
Figure 40: Wireless SoftAP™ dialog box; Wireless Disabled..............................................................................45
Figure 41: Tools menu; Enable Wireless............................................................................................................ 46
Figure 42: Tools menu; Change Admin Password…............................................................................................ 47
Figure 43: Change Password dialog box........................................................................................................... 48
Figure 44: Prompt dialog box for Admin Password .............................................................................................49
Figure 45: Tools menu; Options Selection..........................................................................................................49
Figure 46: Options; General Settings tab........................................................................................................... 50
Figure 47: Options; Wireless AP tab................................................................................................................. 51
Figure 48: Types of Security............................................................................................................................. 52
Figure 49: Advanced Wireless AP tab............................................................................................................... 54
Wireless LAN 802.11b/g Device
5
Page 6

Figure 50: Options; Devices tab .......................................................................................................................54
Figure 51: Microsoft® Modes ..........................................................................................................................55
Figure 52: Mode Switch selections.................................................................................................................... 56
Figure 53: Options; MAC Filtering tab ..............................................................................................................57
Figure 54: MAC Filtering Enabled ....................................................................................................................58
Figure 55: MAC Address input.........................................................................................................................58
Figure 56: Tools menu; Status…. ......................................................................................................................59
Figure 57: Status of Wireless AP....................................................................................................................... 60
Figure 58: Status of Devices............................................................................................................................. 61
Figure 59: Status of Stations............................................................................................................................. 61
Figure 60: Wireless SoftAP™ Help menu.......................................................................................................... 62
Figure 61: Software Access Point icon...............................................................................................................63
Figure 62: Wireless SoftAP™ dialog box.......................................................................................................... 63
Figure 63: WEP Security choices ......................................................................................................................64
Figure 64: Software Access Point icon...............................................................................................................66
Figure 65: Wireless SoftAP™ dialog box.......................................................................................................... 66
Figure 66: Wireless AP tab; WPA Personal TKIP & AES selected ..........................................................................67
Figure 67: Launching; Software Access Point icon .............................................................................................. 68
Figure 68: Launching; Software Access Point icon menu...................................................................................... 68
Figure 69: Wireless SoftAP™ dialog box.......................................................................................................... 69
Figure 70: Wireless SoftAP™ ; Station Mode .....................................................................................................69
Figure 71: Wireless SoftAP™ File menu............................................................................................................ 70
Figure 72: AP Mode Tools menu....................................................................................................................... 71
Figure 73: Station Mode Tools menu................................................................................................................. 72
Figure 74: Switch to Access Point Mode ............................................................................................................72
Figure 75: Access Point Mode switch successful ................................................................................................. 73
Figure 76: SoftAP™ in Access Point Mode ........................................................................................................73
Figure 77: Wireless SoftAP™ dialog box. Tools menu....................................................................................... 74
Figure 78: Wireless SoftAP™ dialog box; Wireless Disabled..............................................................................74
Figure 79: Tools menu; Enable Wireless............................................................................................................ 75
Figure 80: Tools menu; Change Admin Password…............................................................................................ 76
Figure 81: Change Password dialog box........................................................................................................... 77
Figure 82: Tools menu; Options Selection..........................................................................................................77
Figure 83: Tools menu; Status…. ......................................................................................................................78
Figure 84: Status of Wireless AP....................................................................................................................... 78
Figure 85: Status of Devices...................................................................................................
Figure 86: Wireless SoftAP™ Help menu.......................................................................................................... 80
Figure 87: InstallShield Wizard ........................................................................................................................81
Figure 88: NetCfgWizard dialog box............................................................................................................... 82
Figure 89: InstallShield Wizard complete ..........................................................................................................82
..........................79
Wireless LAN 802.11b/g Device
6
Page 7

1 Introduction
Welcome!
Your HP PC includes a Wireless LAN 802.11b/g Device. This device allows you to establish a
wireless network using your HP PC as a Wireless Access Point or as a Wireless Client (Station
Mode) if you already have a wireless network running.
Today, millions of people are installing 802.11 Access Points (Gateways) for wireless networking.
Your HP PC is communicating wirelessly via an embedded Wireless LAN 802.11b/g Device. The
Wireless Software Access Point (SoftAP™ ) available on your HP PC is capable of turning your HP
PC into a wireless Access Point (Gateway) enabling other wireless LAN products to connect to the
internet through your HP PC securely with high-speed access.
The main purpose of the SoftAP™ , once activated, is to provide two modes of accessing the
internet: Station Mode (Client Mode) or Access Point Mode (AP Mode).
Important
It is required that you already have internet access established through an ISP prior to using the
SoftAP™ . For further information, please consult your ISP.
If you have already established a wireless network with access to the internet and you would like
to wirelessly connect this HP PC to your wireless network, use Station Mode.
If your HP PC is connected to the internet and you would like instructions on how to configure for
other machines to share the internet connection through this HP PC please refer to Chapter 7,
Activating Access Point Mode for information on initiating AP Mode.
1.1 Inventory Checklist
Included with your HP PC should be the following items for your Wireless LAN 802.11b/g
Device:
CD-ROM (Contains full User’s Manual)
Antenna (Screws to the connector on the back of your HP PC. See Chapter 2)
Printed Quick Install Guide
Wireless LAN 802.11b/g Device
7
Page 8

1.2 Supported Security
In order to secure your network from passive or active intrusion four key features are enabled on
the Software Access Point:
WPA personal security
WEP encryption
MAC filtering
Please see Chapter 4 for information on security settings for your Wireless LAN 802.11b/g
Device or refer to the chapters on
or Station Mode for detailed information regarding the set up of either WEP or WPA security and
the use of MAC Filtering.
Windows XP Wireless Zero Configuration
, Access Point Mode
Wireless LAN 802.11b/g Device
8
Page 9

A
A
2 Antenna Attachment
This chapter contains instructions for antenna installation.
Important
It is assumed that there is an existing wireless LAN network with an internet connection that has
been set up on your computer prior to using the Software Access Point. Please consult your ISP for
further information.
If you have already attached the antenna to your HP PC, please skip to Chapter 3.
1. Screw the antenna connector (A) to the antenna jack (B) located on the back of the HP PC.
B
OR
Figure 1: Antenna Attachment
2. Place the HP PC on a table or place the antenna in an elevated and open area to achieve the
best wireless performance.
B
Wireless LAN 802.11b/g Device
9
Page 10
3 Verifying your Service Pack
Your system is running the Microsoft XP Operating System with either Service Pack 1(SP1) or
Service Pack 2 (SP2).
Due to differences in appearance between SP1 and SP2 it is important to check which you are
running prior to using this User’s Manual.
In order to verify the level of Microsoft XP being used proceed with the steps shown below.
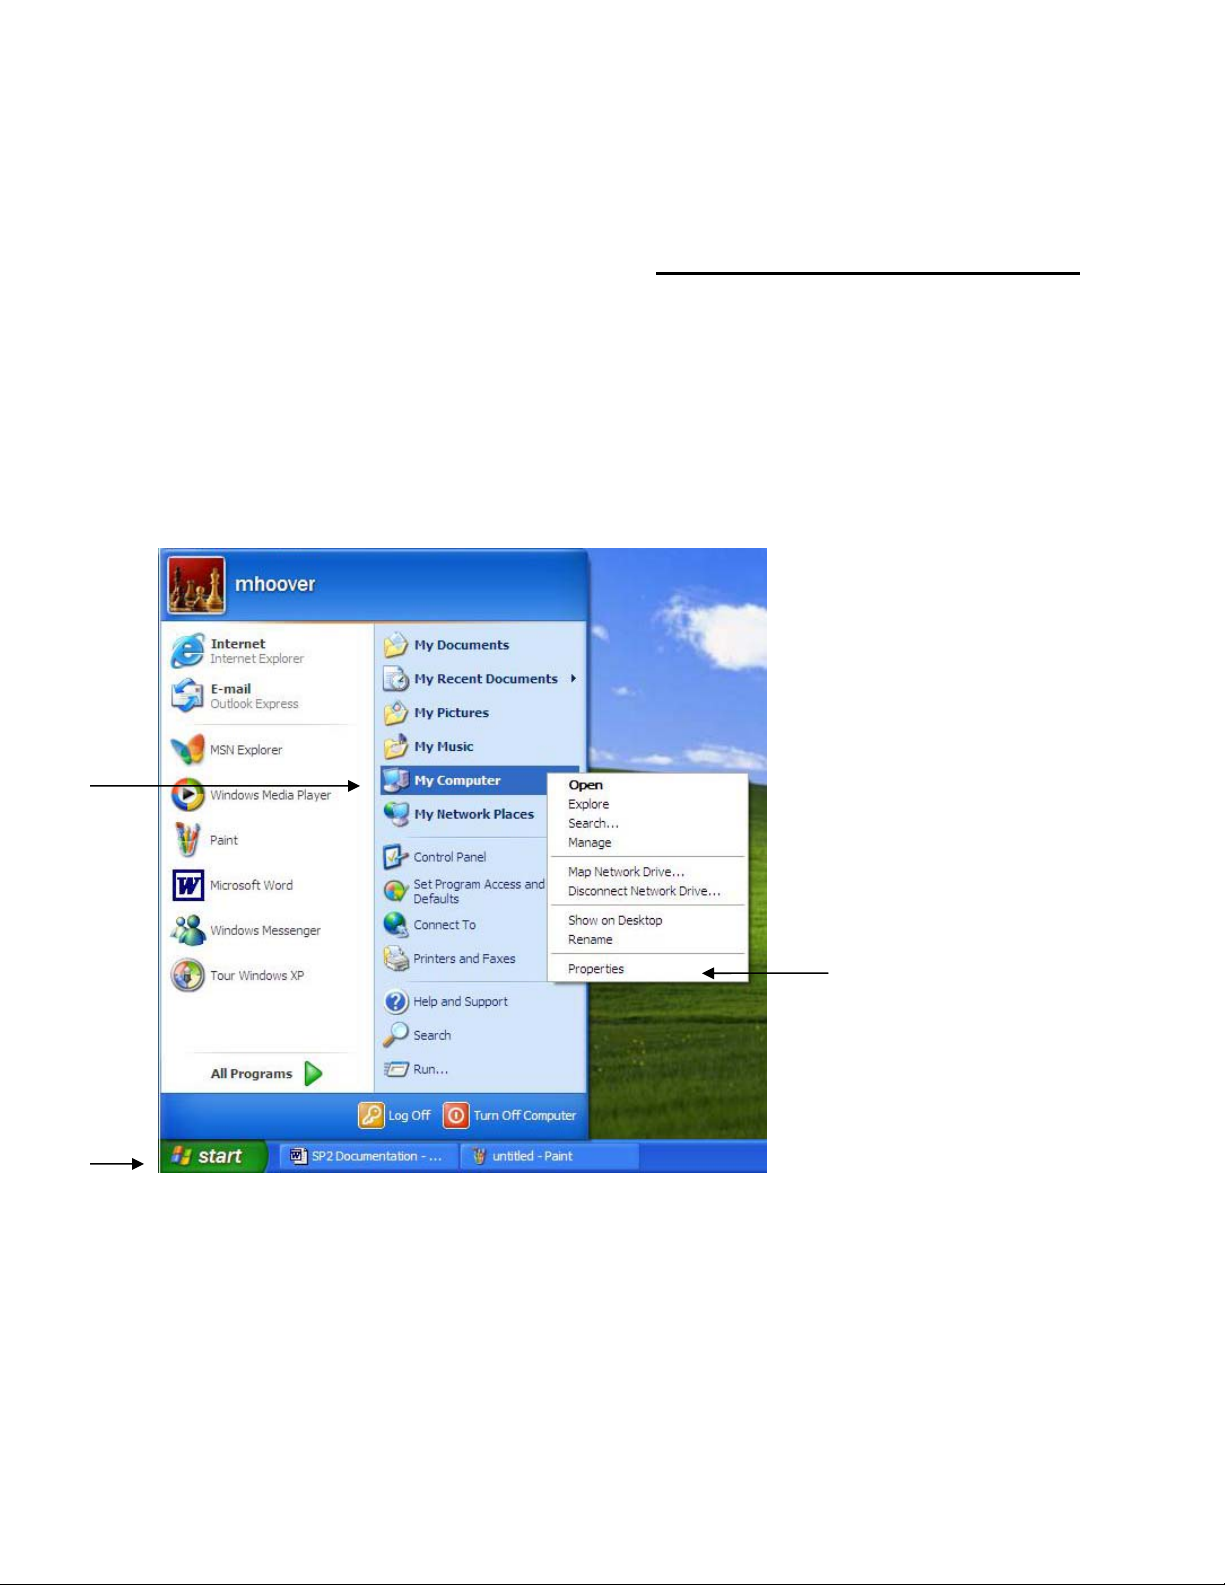
2
1
3
Figure 2: Accessing Systems Information
1. Select Start in the lower left of your display.
The Start menu will appear.
2. Right click on My Computer to access a menu of options for your computer.
3. Select Properties
The system properties dialog box will appear as shown.
Wireless LAN 802.11b/g Device
10
Page 11
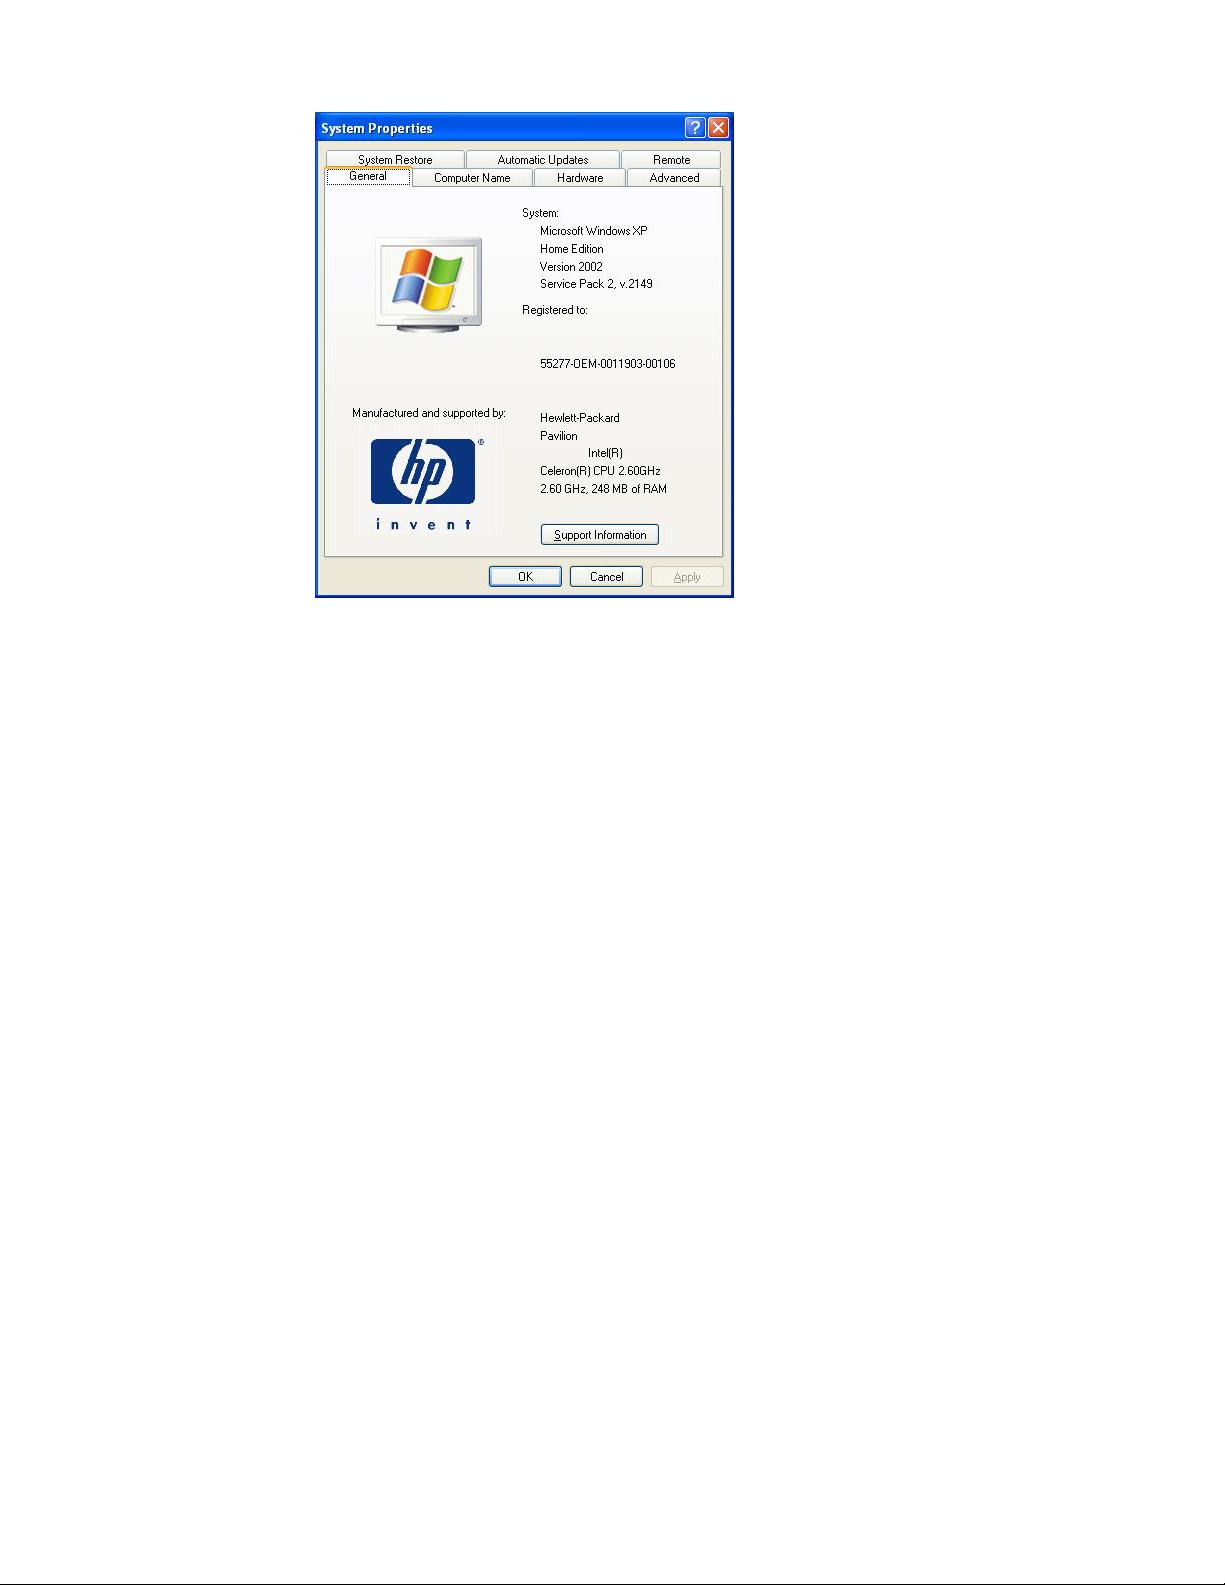
Figure 3: Verification of Service Pack
Under the General tab check System information. The Service Pack will be listed as shown above.
Service Pack 1
If your system lists “Service Pack 1” then begin with Chapter 6, Service Pack 1:
Windows XP Wireless Zero Configuration.
Service Pack 2
If your system lists “Service Pack 2” then begin with Chapter 5, Service Pack 2:
Windows XP Wireless Zero Configuration.
Wireless LAN 802.11b/g Device
11
Page 12

4 Security Settings
Security can be set up using WEP (Wired Equivalency Protocol) or WPA (Wi-Fi Protected Access).
It is important to set up matching security types between 802.11 devices. Be certain to check the
type of security on your other wireless 802.11b/g device(s ) in order to decide which type of
security needs to be set up on your HP PC.
WEP security was the original security standard provided for wireless 802.11 devices. WPA
security is a more recent standard of security available, yet all 802.11b/g devices are not yet
compatible with the WPA standard.
Note:
After deciding which type of security you need to use with your Wireless LAN 802.11b/g Device
refer to the Chapters about individual Modes for information on establishing either WEP or WPA
security:
WPA security can either be “WPA Personal TKIP” or “WPA Personal AES”. There is no
noticeable difference between these types of WPA nor is there a difference when
establishing either in the SoftAP™ . It is only necessary to ensure WPA TKIP and AES
compliance with the other 802.11b/g devices you are connecting if you wish to set up
WPA security. If your other 802.11b/g devices do not list either TKIP or AES they are most
likely compliant with both.
Windows XP Wireless Zero Configuration
To verify your Service Pack see Chapter 3.
o Service Pack 1: Windows XP Wireless Zero Configuration.
For information on establishing either WEP or WPA security see Chapter 6, section
6.2.
o Service Pack 2: Windows XP Wireless Zero Configuration.
For information on establishing security see Chapter 5.
:
Access Point Mode (AP Mode):
For information on establishing either WEP or WPA security see Chapter 8, section 8.3.
Note
: In order to use Access Point Mode (AP Mode) you must first activate your HP PC to
AP Mode (See Chapter 7).
Station Mode:
For information on establishing either WEP or WPA security see Chapter 3, to verify your
Service Pack.
For information on using Station Mode after converting to AP Mode see Chapter 9.
Wireless LAN 802.11b/g Device
12
Page 13

w
5 Service Pack 2: Windows XP Wireless Zero
Configuration
This chapter contains information on configuring your HP PC for Station Mode (as a client) if you
do not wish to convert to Access Point Mode (AP Mode). The pictures and instructions refer to
those using Windows XP Service Pack 2. If you are using Windows XP Service Pack 1 please
refer to Chapter 6 for instructions.
It is necessary to complete the steps in Chapter 2, Antenna Attachment and Chapter 3, Verifying
your Service Pack, prior to using Windows XP
Note:
It is assumed that there is an existing wireless network with connection to the internet. If
not, please consult your ISP for further information on establishing an internet connection.
If you have already established a wireless network with access to the internet and you would like
to wirelessly connect this HP PC to your wireless network, use Station Mode. Due to Windows
XP
Zero Configuration
running the SoftAP™ in Station or Client Mode. To continue using your HP PC in Station Mode
you will need only to set-up the security (See Chapter 6 for Windows
Chapter 5 for Windows
If your HP PC is connected to the internet and you would like instructions on how to configure for
other machines to share the internet connection through this HP PC please refer to Chapter 7,
Activating Access Point Mode, for information on AP Mode.
(Windows XP Wireless Network Configuration) your HP PC is currently
XP Service Pack 2).
Wireless Network Configuration.
XP Service Pack 1 or
5.1 Launching Microsoft Windows XP Wireless Network Configuration
To launch Windows XP Wireless Network Configuration:
1. In the Systems Tray find the Wireless Networking icon.
Figure 4: Wireless Network Icon
2. Select View Available Wireless Networks and the Wireless Network Connection dialog
box will appear.
Wireless LAN 802.11b/g Device
Note: There may be multiple
Network icons in the system
tray. Choose the one for
Wireless Network Connection
as sho
n.
13
Page 14
5.2 Setting the Network Key Automatically
The PC will begin functioning in Station Mode (as a Client) with your Wireless LAN Network as
soon as the Network Key is set-up.
Important
If you do not have an existing wireless network you will need to set up your Gateway prior to using
your PC in Station Mode.
If you are attempting to set your PC up to function as an Access Point please see Chapter 7.
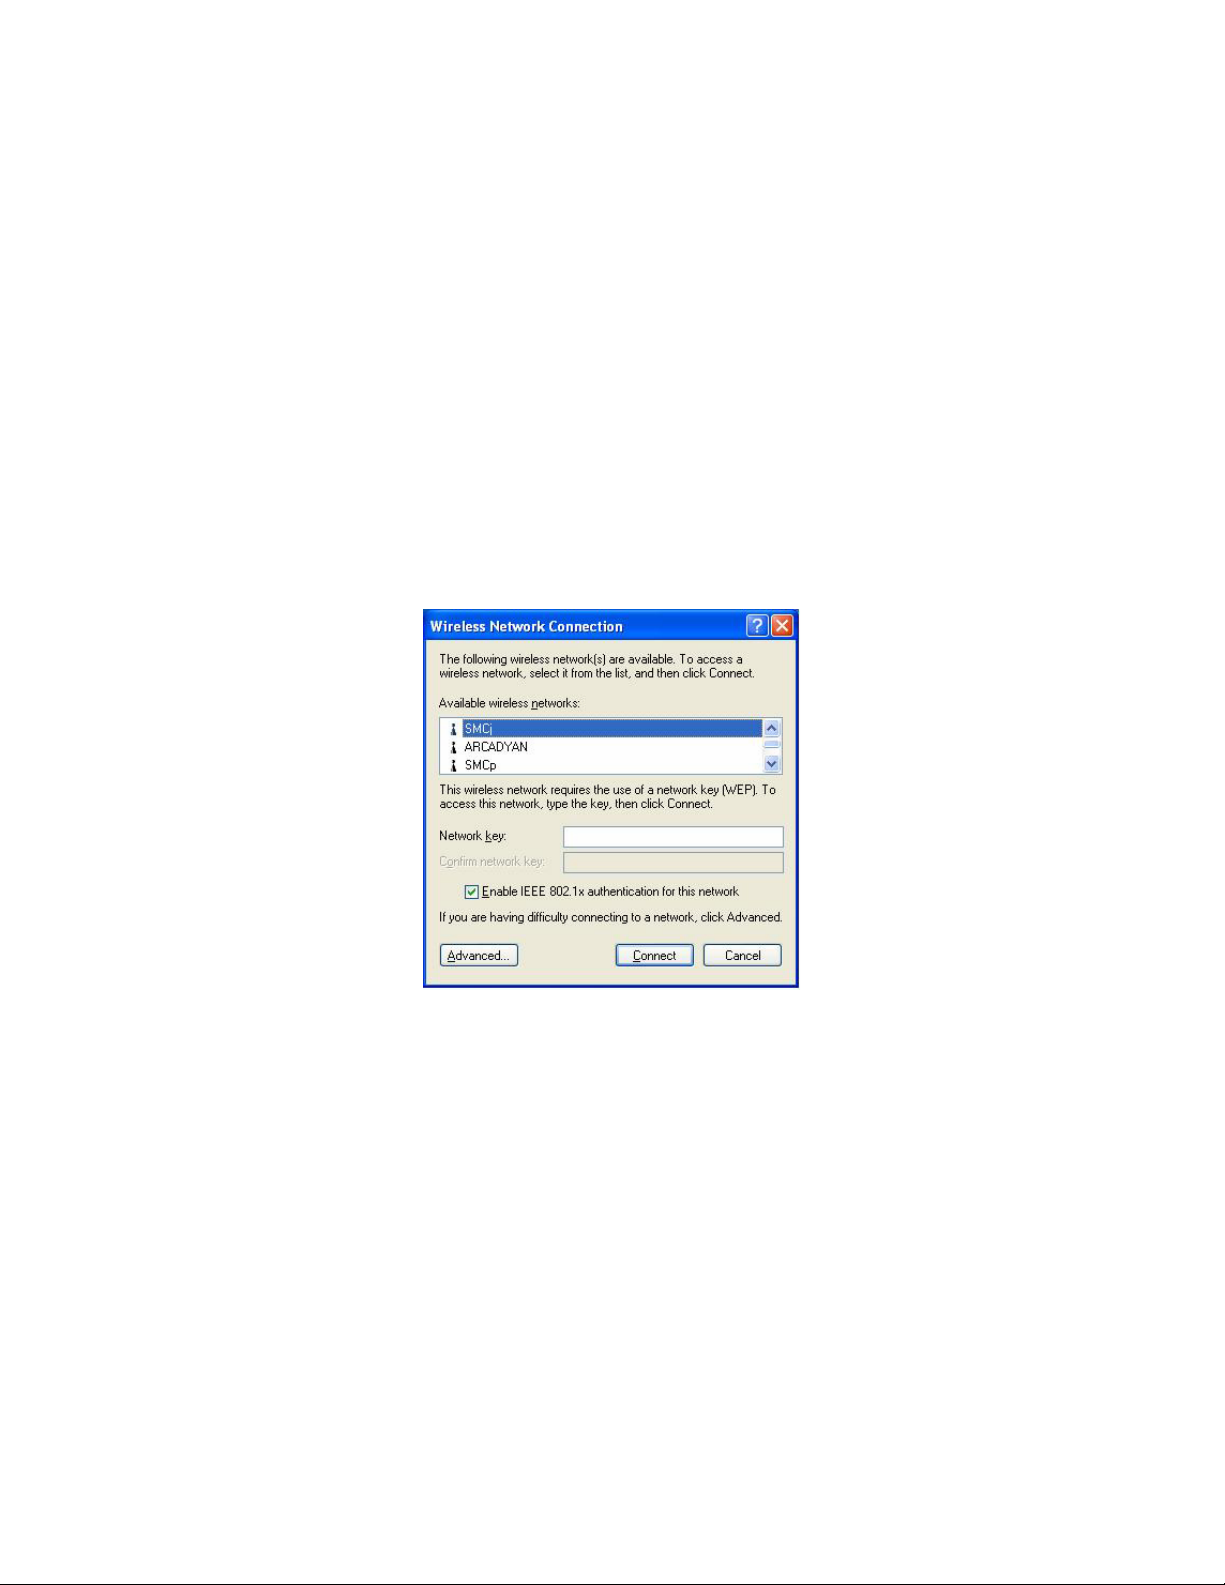
1. Find the Network Key (WEP Key or WPA Key) for your Wireless Network.
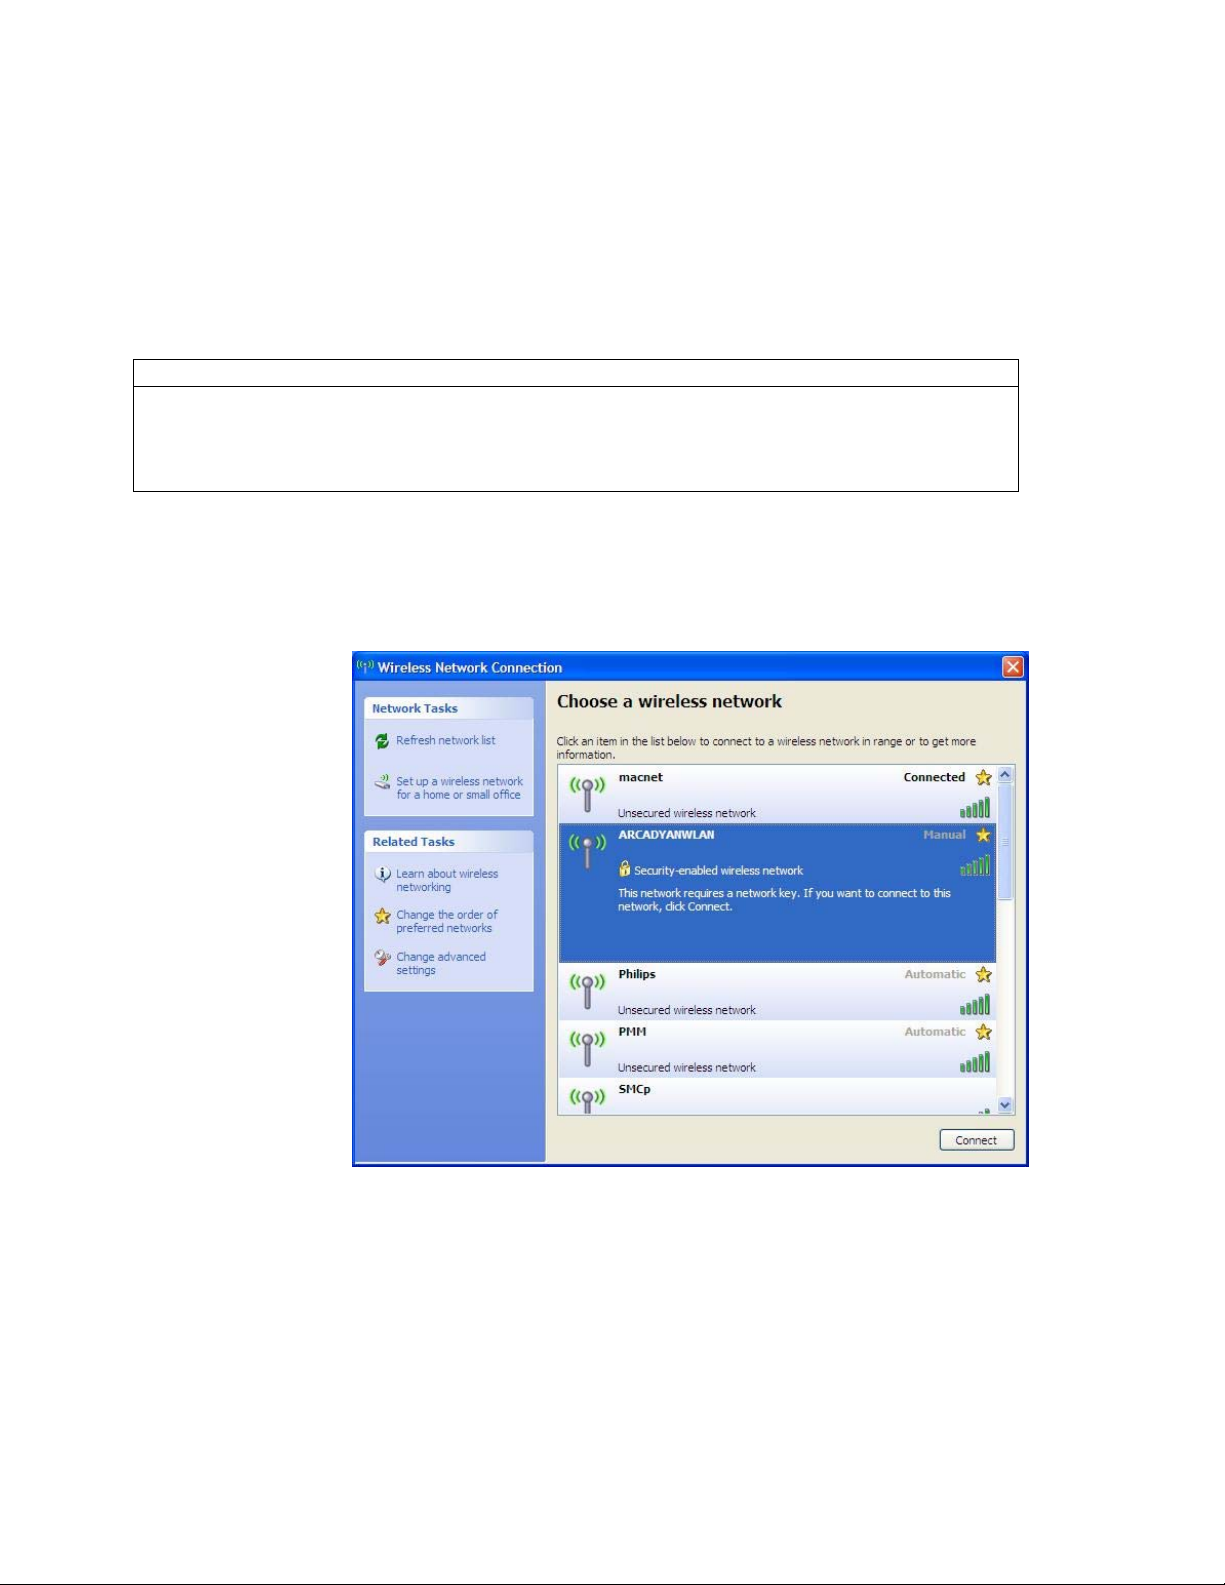
2. Select View Available Wireless Networks from the Wireless Network icon menu.
The Wireless Network Connection dialog box will appear.
Figure 5: Wireless Network Connection dialog box
3. Select the Wireless Network of your choice by clicking on its name and the entire block will
become highlighted
4. Select Connect in the lower right corner
The Wireless Network Connection dialog box will appear as shown below.
Wireless LAN 802.11b/g Device
14
Page 15

Figure 6: Wireless Network Connection dialog box
5. Enter your Network Key (WEP Key or WPA Key) for your Wireless Network.
6. Input the Network Key a second time into the “Confirm network key” box.
Note:
If your network is using WEP encryption, then a HEX or an ASCII format is necessary
when entering your Network Key:
o
HEX: 10 Characters in HEX notation for 40 bit or 26 characters for 128 bit encryption.
o
ASCII: 5 characters for 40 bit or 13 characters for 128 bit encryption.
If your network is using WPA it is necessary to enter an 8 – 63 character alphanumeric
key-phrase.
The Network Key will accept any of these as it supports both WEP and WPA.
7. Select Connect
The Wireless Network Connection dialog box appears as you are being connected.
Figure 7: Connecting to Wireless
After connection to the network the Wireless Network Connection dialog box will reappear
showing the connection as shown in Figure 8.
Wireless LAN 802.11b/g Device
15
Page 16

p
Figure 8: Wireless Network Connection dialog box
5.3 Setting the Network Key Manually
Your HP PC is functioning in Station or Client Mode by default. After launching the application
(See Section 5.1, Launching the application) you will need to input the Network name and
Network Key. The Network name and Network Key must both be set up for your HP PC to
function with your current network in Station Mode.
Before manually setting up the Network name and Network Key on your HP PC you must identify
this information on your current wireless network:
Network name (SSID)
Security WPA-PSK Key OR Security WEP Key
The Wireless Network Connection dialog box appears when you have launched Windows XP
Wireless Zero Configuration:
Figure : Wireless Network Connection dialog box
:
Your Network
Note
name will appear in
the Available wireless
networks box. Any
other listed available
wireless networks
represent the wireless
networks established
within range of your
HP PC. These will
vary and do not
rovide secured
access to the internet.
Wireless LAN 802.11b/g Device
16
Page 17
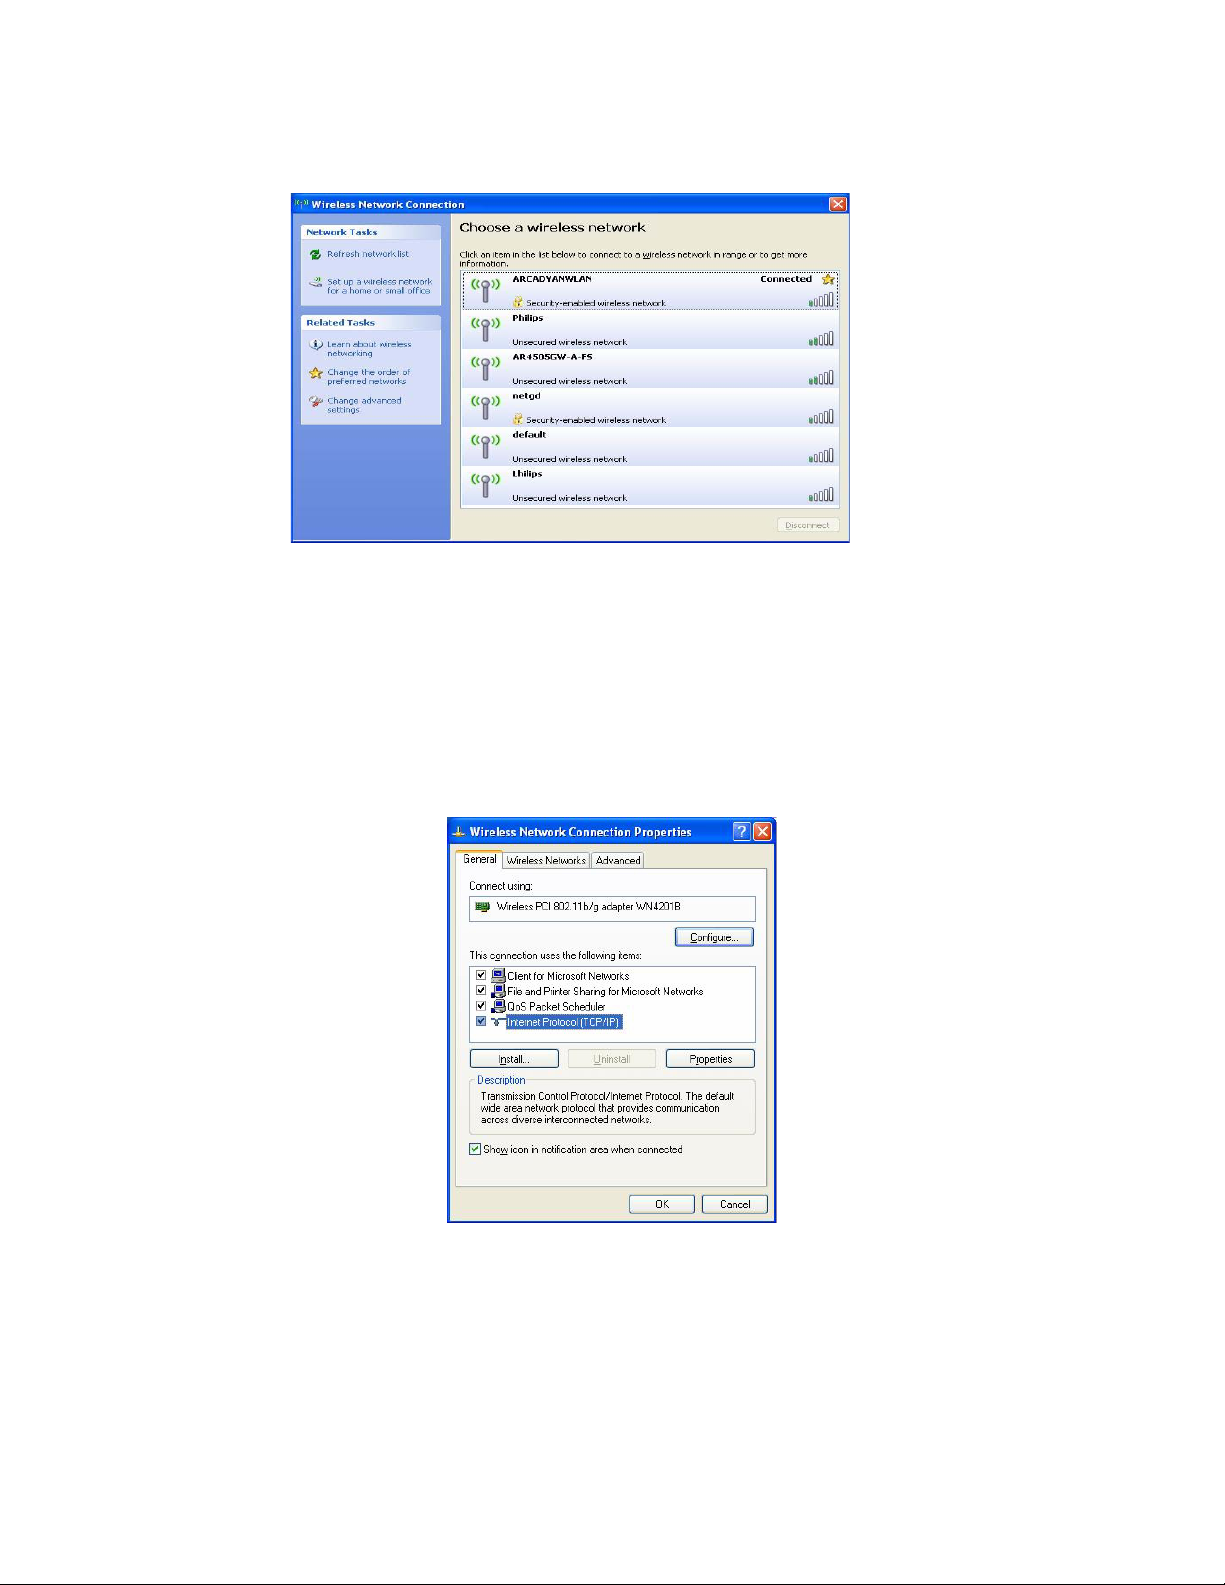
Figure 9: Wireless Network Connection dialog box
1. Choose your Wireless Network in the Available wireless networks selection box. Your
network will become highlighted as shown in figure 9.
2. Select Change advanced settings found on the left side of the dialog box.
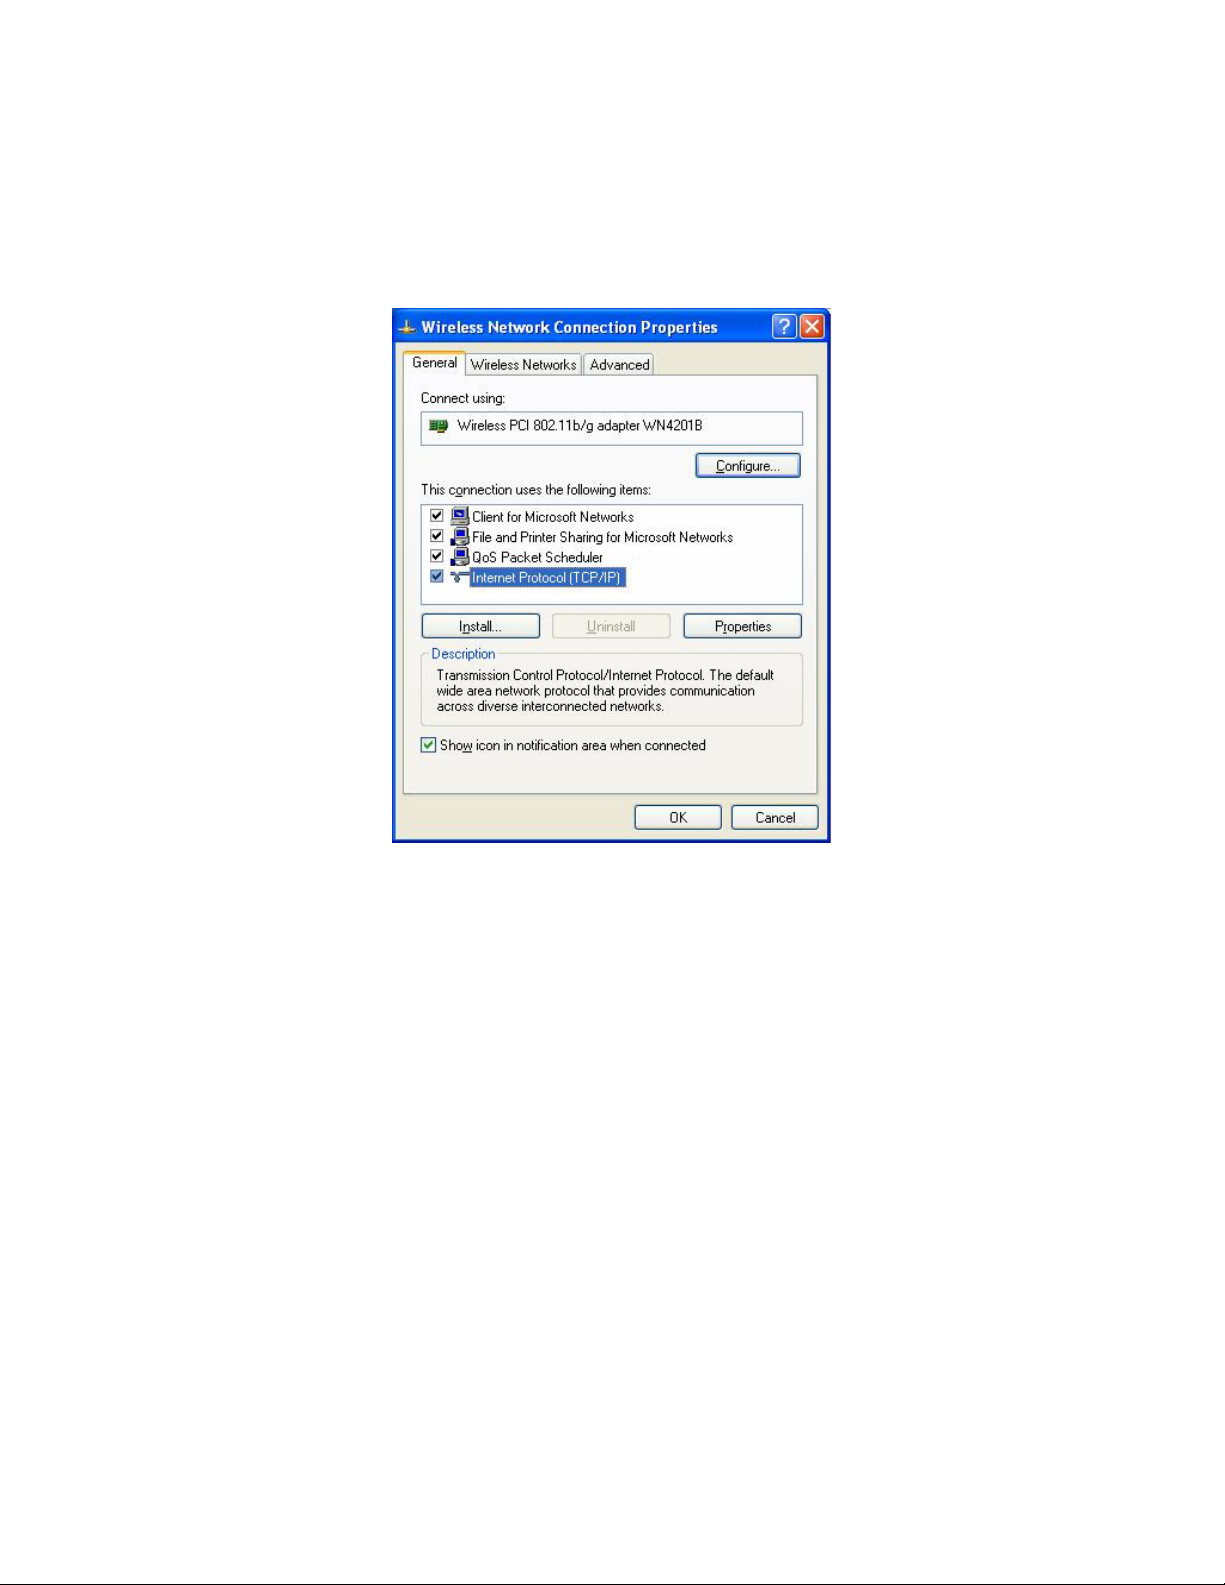
The Wireless Network Connection Properties dialog box appears.
Figure 10: Wireless Network Connection Properties dialog box
3. Select the General tab in the Wireless Network Connection Properties dialog box.
4. Highlight Internet Protocol (TCP/IP) in the “This connection uses the following items:”
selection box.
5. Select Properties.
The Internet Protocol (TCP/IP) Properties dialog box appears with the General tab displayed.
Wireless LAN 802.11b/g Device
17
Page 18

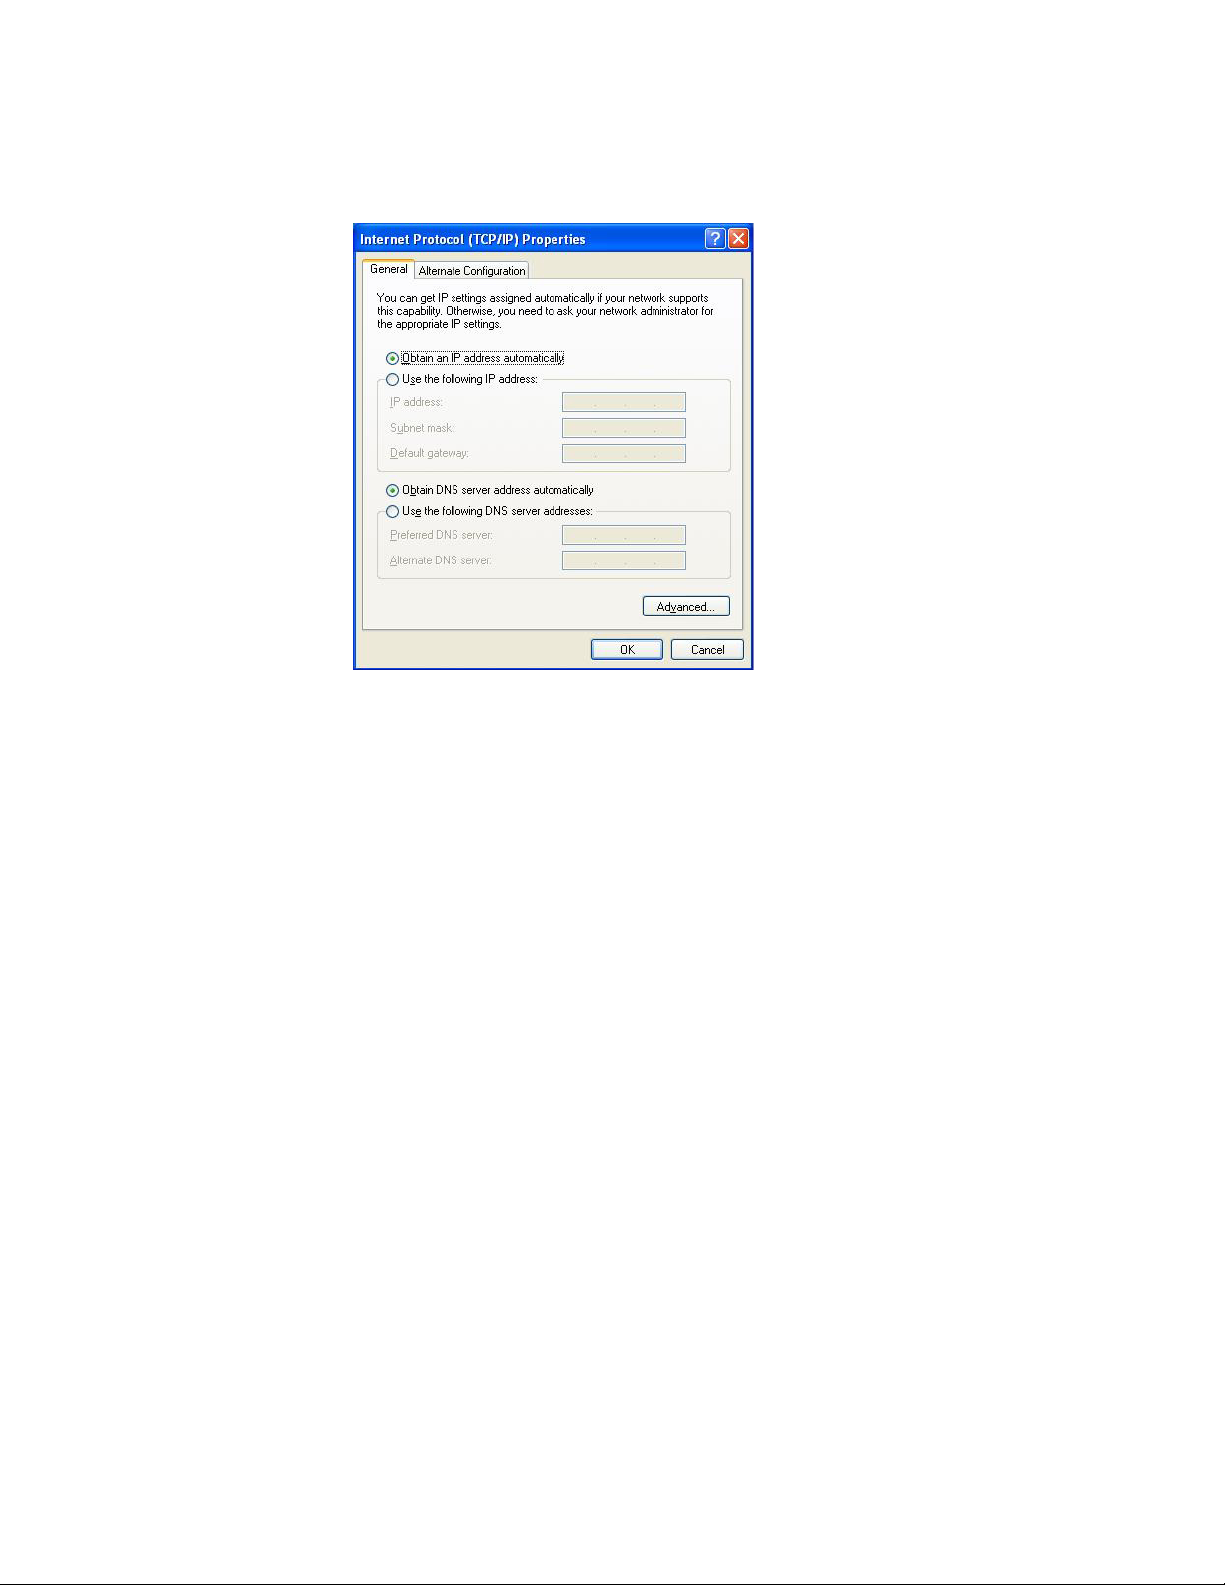
Figure 11: Internet Protocol (TCP/IP) Properties dialog box
6. Verify that the following choices are selected:
Obtain an IP address automatically
Obtain DNS server address automatically
Note: Obtaining an IP address automatically is recommended. If static IP address settings
are preferred, refer to your own wireless network settings.
7. Select OK.
You are returned to the Wireless Network Connection Properties dialog box.
For instructions on how to set WEP security refer to Section 5.3.1. For instructions on how to set
WPA security refer to Section 5.3.2.
Wireless LAN 802.11b/g Device
18
Page 19

5.3.1 WEP: Setting the Network Key (Network Security)
Securing your Software Access Point enabled network is essential in a wireless network
environment. Security for the Software Access Point is maintained through the following features:
Support for WPA (WPA-Personal Security (Wi-Fi protected access) AES and TKIP)
Support for the WEP (Wired Equivalency Protocol)
Support for MAC address filtering
This section gives instruction on how to correctly set up WEP security on your HP PC. If you are
currently running a WPA enabled device, skip to Section 5.3.2, WPA: Setting the Network Key
(Network Security).
In order to set up your Network Key (WEP security feature) you will need to do the following:
1. Open the Wireless Network Connection Properties dialog box:
Right click on the Wireless Networks icon in the system tray.
Select View Available Wireless Networks from the Wireless Networks icon menu.
The Wireless Network Connection dialog box appears.
Select Change advanced settings on the left side of the dialog box.
The Wireless Network Connection Properties dialog box appears.
Select the Wireless Networks tab as shown in figure 12 below.
Wireless LAN 802.11b/g Device
19
Page 20

Figure 12: Manually adding a Wireless Network
2. Select Add under the Preferred networks selection box.
The Wireless Network Properties dialog box appears.
Figure 13: Wireless network properties dialog box
3. Input your Network name (SSID).
4. Uncheck the box “The key is provided for me automatically”.
5. Verify that the Network Authentication is set to Open.
Wireless LAN 802.11b/g Device
20
Page 21

6. Verify that the Data Encryption is set to WEP.
7. Input the Network Key of your Access Point, Wireless Broadband Router or Wireless
Gateway.
Note:
Either a HEX or ASCII format is necessary when using the WEP interface. Your WEP
enabled device should already have either HEX or ASCII format pass-phrase
associated. Consult the information asked for in section 5.2.
HEX: 10 characters in HEX notation for 40 bit, or 26 characters for 128 bit.
ASCII: 5 characters for 40 bit, 13 characters for 128 bit.
8. Input the Network Key a second time into the “Confirm network key” box.
9. Select OK.
You are returned to the Wireless Network Connection Properties dialog box and are able to
verify your connection.
5.3.2 WPA: Setting the Network Key (Network Security)
Securing your Software Access Point enabled network is essential in a wireless network
environment. Security for the Software Access Point is maintained through the following features:
Support for WPA (WPA-Personal Security (Wi-Fi protected access) AES and TKIP)
Support for the WEP (Wired Equivalency Protocol)
Support for MAC address filtering
This section gives instruction on how to correctly set up WPA security on your HP PC. If you are
currently running a WEP enabled device, return to Section 5.3.1, WEP: Setting the Network Key
(Network Security).
In order to set up your Network Key (WPA security feature) you will need to do the following:
1. Open the Wireless Network Connection Properties dialog box:
Right click on the Wireless Networks icon in the system tray.
Select View Available Wireless Networks from the Wireless Networks icon menu.
The Wireless Network Connection dialog box appears.
Select Change advanced settings on the left side of the dialog box.
The Wireless Network Connection Properties dialog box appears.
Select the Wireless Networks tab as shown in figure 14 below.
Wireless LAN 802.11b/g Device
21
Page 22

Figure 14: Wireless Network Connection Properties dialog box
2. Select Add under the Preferred networks selection box.
The Wireless Network Properties dialog box appears as shown in Figure 15.
Figure 15: Wireless network properties dialog box
Wireless LAN 802.11b/g Device
22
Page 23

3. Uncheck the box “The key is provided for me automatically”.
4. Verify that the Network Authentication is set to WPA-PSK.
5. Verify that the Data Encryption is set to TKIP.
6. Input the Network Key of your Access Point, Wireless Broadband Router or Wireless
Gateway.
Note:
A 8 – 63 character alphanumeric key-phrase is necessary when using the WPA interface.
WPA does not require HEX or ASCII notation common with WEP keys. Your WPA
enabled device should already have a 8 – 63 character alphanumeric key-phrase.
Consult the information asked for in section 5.2 .
7. Input the Network Key a second time into the “Confirm network key” box.
8. Select OK.
You are returned to the Wireless Network Connection Properties dialog box and are able to
verify your connection.
Wireless LAN 802.11b/g Device
23
Page 24

w
6 Service Pack 1: Windows XP Wireless Zero
Configuration
This chapter contains information on configuring your HP PC for Station Mode (as a client) if you
do not wish to convert to Access Point Mode (AP Mode).
It is necessary to complete the steps in Chapter 2, Antenna Attachment and Chapter 3, Veryfying
your Service Pack prior to using Windows XP
Note:
It is assumed that there is an existing wireless network with connection to the internet. If
not, please consult your ISP for further information on establishing an internet connection.
If you have already established a wireless network with access to the internet and you would like
to wirelessly connect this HP PC to your wireless network, use Station Mode. Due to Windows
Zero Configuration
XP
running the SoftAP™ in Station or Client Mode. To continue using your HP PC in Station Mode
you will need only to set-up the Network name and network security (Chapter 3).
If your HP PC is connected to the internet and you would like instructions on how to configure for
other machines to share the internet connection through this HP PC please refer to Chapter 7,
Activating Access Point Mode, for information on AP Mode.
(Windows XP Wireless Network Configuration) your HP PC is currently
Wireless Network Configuration.
6.1 Launching Microsoft Windows XP Wireless Network Configuration
To launch Windows XP Wireless Network Configuration:
1. In the Systems Tray find the Wireless Networking icon.
Note: There may be multiple
Network icons in the system
Figure 16: Wireless Network icon
2. Select View Available Wireless Networks from the Wireless Network icon menu.
The Wireless Network Connection dialog box will appear.
tray. Choose the one for
Wireless Network Connection
as sho
n.
Wireless LAN 802.11b/g Device
24
Page 25
6.2 Setting the Network name and Network Security
Your HP PC is functioning in Station or Client Mode by default. After launching the application
(See Section 6.1, Launching the application) you will need to input the Network name and
Network Key. The Network name and Network Key must both be set up for your HP PC to
function with your current network in Station Mode.
Before setting up the Network name and Network Key on your HP PC you must identify this
information on your current wireless network:
Network name (SSID)
Security WPA-PSK Key OR Security WEP Key
The Wireless Network Connection dialog box appears when you have launched Windows XP
Wireless Zero Configuration:
Note:
Your Network
name will appear in
the Available wireless
networks box. Any
other listed available
wireless networks
represent the wireless
networks established
within range of your
HP PC. These will
vary and do not
provide secured
access to the internet.
Figure 17: Wireless Network Connection dialog box
Wireless LAN 802.11b/g Device
25
Page 26
1. Choose your Wireless Network in the Available wireless networks selection box.
2. Select Advanced.
The Wireless Network Connection Properties dialog box appears.
Figure 18: Wireless Network Connection Properties dialog box
3. Select the General tab in the Wireless Network Connection Properties dialog box.
4. Highlight Internet Protocol (TCP/IP) in the “This connection uses the following items:”
selection box.
5. Select Properties.
Wireless LAN 802.11b/g Device
26
Page 27
The Internet Protocol (TCP/IP) Properties dialog box appears with the General tab displayed.
Figure 19: Internet Protocol (TCP/IP) Properties dialog box
6. Verify that the following choices are selected:
Obtain an IP address automatically
Obtain DNS server address automatically
Note: Obtaining an IP address automatically is recommended. If static IP address settings
are preferred, refer to your own wireless network settings.
7. Select OK.
You are returned to the Wireless Network Connection Properties dialog box.
For instructions on how to set WEP security refer to Section 6.2.1. For instructions on how to set
WPA security refer to Section 6.2.2.
Wireless LAN 802.11b/g Device
27
Page 28

6.2.1 WEP: Setting the Network Key (Network Security)
Securing your Software Access Point enabled network is essential in a wireless network
environment. Security for the Software Access Point is maintained through the following features:
Support for WPA (WPA-Personal Security (Wi-Fi protected access) AES and TKIP)
Support for the WEP (Wired Equivalency Protocol)
Support for MAC address filtering
This section gives instruction on how to correctly set up WEP security on your HP PC. If you are
currently running a WPA enabled device, skip to Section 6.2.2, WPA: Setting the Network Key
(Network Security).
In order to set up your Network Key (WEP security feature) you will need to do the following:
1. Open the Wireless Network Connection Properties dialog box:
Right click on the Wireless Networks icon in the system tray.
Select View Available Wireless Networks from the Wireless Networks icon menu.
Verify that the wireless network you wish to set up security for is highlighted in the
“Available wireless networks” selection box.
Select Advanced.
Figure 20: Wireless Network Connection Properties dialog box
Wireless LAN 802.11b/g Device
28
Page 29

2. Select Refresh to the right of the Available networks selection box.
3. Highlight the Network name (SSID) of your Access Point, Wireless Broadband Router or
Wireless Gateway in the “Available networks” selection box.
4. Select Configure
The Wireless Network Properties dialog box appears.
Figure 21: Wireless network properties dialog box
5. Verify that the Network name (SSID) is the same as the one selected in step 3 of this
section.
6. Uncheck the box “The key is provided for me automatically”.
7. Verify that the Network Authentication is set to Open.
8. Verify that the Data Encryption is set to WEP.
9. Input the Network Key of your Access Point, Wireless Broadband Router or Wireless
Gateway.
Note:
Either a HEX or ASCII format is necessary when using the WEP interface. Your WEP
enabled device should already have either HEX or ASCII format pass-phrase
associated. Consult the information asked for in section 6.2.
HEX: 10 characters in HEX notation for 40 bit, or 26 characters for 128 bit.
ASCII: 5 characters for 40 bit, 13 characters for 128 bit.
10. Input the Network Key a second time into the “Confirm network key” box.
11. Select OK.
You are returned to the Wireless Network Connection Properties dialog box.
In order to verify your wireless connection see section 6.3, Verifying your Wireless Connection.
Wireless LAN 802.11b/g Device
29
Page 30

6.2.2 WPA: Setting the Network Key (Network Security)
Securing your Software Access Point enabled network is essential in a wireless network
environment. Security for the Software Access Point is maintained through the following features:
Support for WPA (WPA-Personal Security (Wi-Fi protected access) AES and TKIP)
Support for the WEP (Wired Equivalency Protocol)
Support for MAC address filtering
This section gives instruction on how to correctly set up WPA security on your HP PC. If you are
currently running a WEP enabled device, return to Section 6.2.1, WEP: Setting the Network Key
(Network Security).
In order to set up your Network Key (WPA security feature) you will need to do the following:
1. Open the Wireless Network Connection Properties dialog box:
Right click on the Wireless Networks icon in the system tray.
Select View Available Wireless Networks from the Wireless Networks icon menu.
Verify that the wireless network you wish to set up security for is highlighted in the
“Available wireless networks” selection box.
Select Advanced.
Figure 22: Wireless Network Connection Properties dialog box
2. Select Refresh to the right of the Available networks selection box.
Wireless LAN 802.11b/g Device
30
Page 31

3. Highlight the Network name (SSID) of your Access Point, Wireless Broadband Router or
Wireless Gateway in the “Available networks” selection box.
4. Select Configure
The Wireless Network Properties dialog box appears.
Figure 23: Wireless network properties dialog box
5. Verify that the Network name (SSID) is the same as the one selected in step 3 of this
section.
6. Uncheck the box “The key is provided for me automatically”.
7. Verify that the Network Authentication is set to WPA-PSK.
8. Verify that the Data Encryption is set to TKIP.
9. Input the Network Key of your Access Point, Wireless Broadband Router or Wireless
Gateway.
Note:
A 8 – 63 character alphanumeric key-phrase is necessary when using the WPA interface.
WPA does not require HEX or ASCII notation common with WEP keys. Your WPA
enabled device should already have a 8 – 63 character alphanumeric key-phrase.
Consult the information asked for in section 6.2.
10. Input the Network Key a second time into the “Confirm network key” box.
11. Select OK.
You are returned to the Wireless Network Connection Properties dialog box.
In order to verify your wireless connection see section 6.3, Verifying your Wireless Connection.
Wireless LAN 802.11b/g Device
31
Page 32

6.3 Verifying your Wireless Network Connection
Once you have input the Network name and Network Key you should be connected wirelessly in
Station Mode, as a Client (See Section 6.2.1 or Section 6.2.2 for further information). It is now
possible to verify your wireless connection using the HP PC.
In order to verify your wireless connection:
1. Right click on the Wireless Network Connection icon in the system tray on your desktop.
The Wireless Network Connection Status dialog box appears.
Figure 24: Wireless Network Connection Status dialog box
2. Select the Support tab.
3. Verify that the IP address is shown as 192.168.x.x. (eg; 192.168.0.2).
If the information shown verifies a correct IP address and you are still unable to connect to the
internet, please consult your ISP.
Note:
If the IP address is shown as 169.254.Y.Y (eg; 169.254.149.168) then the address
assigned by your HP PC is not associate with your wireless Access Point, Wireless
Broadband Router or Wireless Gateway. Please check the Network name (SSID) and
Network Key to ensure that they have been entered correctly. If this information is
entered and you are still unable to connect, refer to the Appendix A, Troubleshooting.
Wireless LAN 802.11b/g Device
32
Page 33

6.4 Ad-Hoc Network
Ad-hoc networks allow users to create a simple wireless network without the use of an access
point. There are several drawbacks when relying on ad-hoc networks for wireless networking.
Most notably ad-hoc networks are susceptible to network breakdown due to their decentralized
nature.
Please see Microsoft® XP help for further instructions about setting your system up as an ad-hoc
network.
Wireless LAN 802.11b/g Device
33
Page 34

r
7 Activating Access Point Mode
It is necessary to complete the steps in Chapter 2, Antenna Attachment prior to installing the
SoftAP™ to activate Access Point Mode.
Your HP PC, by default, functions in Station Mode (as a Client) which is necessary in situations
when there is already a wireless network running. If you would like to establish a wireless
network using your HP PC as an Access Point then you will need to install Access Point Mode (AP
Mode).
Note:
Before using AP Mode the first time it is necessary to install SoftAP™ on your HP PC. For all
future uses of SoftAP™ Mode this is not necessary. If you have already installed the SoftAP™
please see chapter 8, Access Point Mode.
If your HP PC is connected to the internet and you would like instructions on how to wirelessly
connect other machines to this HP PC, proceed with this conversion to Access Point Mode.
If another machine is connected to the internet and you would like to wirelessly connect this HP
PC to the other connected machine, refer to Chapter 9 on Station Mode.
It is assumed that there is an existing internet connection in order to establish Access Point
Mode. Please consult your ISP for further information.
Warning:
HP PC. It is highly recommended that you change the power scheme to “always on”
when the Software Access Point is enabled.
In order to change the power scheme to “Always on”:
1. Right click on your desktop.
2. Select Properties.
The Display Properties dialog box appears.
3. Select the tab labeled Screensaver.
4. Select the button labeled Power.
5. Select Never in the drop box next to System standby.
6. Select Apply.
7. Select OK.
You will be returned to the Display Properties dialog box.
8. Select OK.
Wireless LAN 802.11b/g Device
Access Point Mode (AP Mode) may not support the Standby mode on you
34
Page 35

7.1 Installation
In order to install the SoftAP™ (first use only. For future uses see Chapter 8, Access Point Mode).
Refer to the Figure below:
1. Go to the Start menu on your desktop
2. Select All Programs
3
4
2
1
Figure 25: Conversion to Access Point Mode
3. Select Wireless Software Access Point
4. Select Install Wireless Software Access Point
The Software Access Point will activate on your HP PC with assistance from the InstallShield
Wizard.
No action is required through this process.
Warning:
SoftAP™ to function.
Interruption of the activation process may result in the inability of the
Wireless LAN 802.11b/g Device
35
Page 36

The InstallShield Wizard will display several screens during self-installation:
Note:
No action is required during the installation process. This process may take a few moments
to complete.
The InstallShield
Wizard prepares to
install……
Figure 26: Preparing to Install
When the installation through InstallShield Wizard is complete you should see the wireless
SoftAP™ icon in the system tray of your HP PC as shown.
Figure 27: Wireless SoftAP™ icon
Wireless LAN 802.11b/g Device
36
Page 37

7.2 Verifying your Wireless Network Connection
After completing the software activation for conversion into Access Point Mode there will be an
additional icon in the system tray of your HP PC. This icon will remain present now that the
SoftAP™ has been installed.
The SoftAP™ icon is a green pie-shaped icon with an arrow in the center.
Software
Access Point
icon.
Figure 28: Software Access Point icon
When the arrow in the center of the Software Access Point icon is pointing in the right hand
direction your HP PC is functioning in Access Point Mode. When the arrow is pointing in the left
hand direction, your HP PC is functioning in Station Mode (Client Mode).
When the pointer is first rolled over the Software Access Point icon after AP activation the
message shown in figure 28 will appear. The Wireless SoftAP™ icon shown in figure 28 above
is not connected as there are zero clients associated.
Wireless LAN 802.11b/g Device
37
Page 38

8 Access Point Mode
Prior to using your HP PC in Access Point Mode you must attach the antenna (See Chapter 2). It is
also necessary to convert to Access Point Mode (See Chapter 7) as the HP PC functions in Station
Mode by default.
If another machine is connected to the internet and you would like to wirelessly connect this HP
PC to the other connected machine, refer to Chapter 9 on Station Mode.
Note:
It is assumed that there is an existing internet connection in order to establish Access Point
Mode. Please consult your ISP for further information.
Warning:
PC. It is highly recommended that you change the power scheme to “always on”
when the Software Access Point is enabled. Please refer to Microsoft ®XP help for
further information.
Software Access Point Mode may not support Standby mode on your HP
8.1 Launching the SoftAP™
There are two ways to launch the Software Access Point: Through the SoftAP™ icon in the
system tray of your desktop or through the SoftAP™ icon menu. Either method will bring up the
Wireless SoftAP™ dialog box.
To launch the Software Access Point by using the icon in the System Tray simply left click the icon
once.
Figure 29: Launching; Software Access Point icon
Software Access Point
System Tray icon.
The arrow in the center
is pointing to the right
indicating that Access
Point Mode is active.
OR
Wireless LAN 802.11b/g Device
38
Page 39

It is possible to launch the SoftAP™ with a right click on the SoftAP™ icon. When a right click is
made on the icon the SoftAP™ icon menu appears. Select Show from this menu to bring up the
Wireless SoftAP™ dialog box.
Figure 30: Launching; Software Access Point icon menu
The Wireless SoftAP™ dialog box appears as shown in figure 31.
Figure 31: Wireless SoftAP™ dialog box
For a detailed explanation of the Wireless SoftAP™ dialog box refer to Section 8.2.
Wireless LAN 802.11b/g Device
39
Page 40

e
Menu
s
Menu
8.2 The Wireless SoftAP™ Dialog Box
The Wireless SoftAP™ dialog box as shown in figure 32, is the primary hub of the SoftAP™ .
From this box all of the major functions (security, device viewing and mode switching) can be
accomplished.
Figure 32 represents the Wireless SoftAP™ dialog box when AP Mode is active. For information
on the Wireless SoftAP™ dialog box when Station Mode is active see section 9.2.
Fil
Tool
Help Menu
Figure 32: Wireless SoftAP™ menus
The Wireless SoftAP™ dialog box consists of three drop-down menus: File, Tools and Help.
Wireless LAN 802.11b/g Device
40
Page 41

8.2.1 File Menu
Figure 33: Wireless SoftAP™ File menu
There are two File menu choices:
Minimize to System Tray (section 8.2.1.1)
Exit (section 8.2.1.2)
8.2.1.1 Minimize to System Tray
minimizes the Wireless SoftAP™ dialog box to the SoftAP™ icon in your system tray. It is
necessary to open it again when desired by clicking the icon.
8.2.1.2 Exit
Exits you from the SoftAP™ application altogether. The SoftAP™ icon will no longer be
present in the system tray of your HP PC and you will need to reboot the HP PC in order to
regain the icon.
Wireless LAN 802.11b/g Device
41
Page 42

8.2.2 Tools Menu
Figure 34: AP Mode Tools menu
There are five Tools menu choices:
Switch to Station Mode (Section 8.2.2.1)
Disable Wireless (Section 8.2.2.2)
Change Admin Password…. (Section 8.2.2.3)
Options…. (Section 8.2.2.4)
Status…. (Section 8.2.2.5)
8.2.2.1 Switch to Station Mode
Switching to Station Mode is necessary when there is already an Access Point, gateway,
or wireless broadband router and you wish to connect this HP PC to the other machine. If
circumstances change and it becomes necessary to use your HP PC in Station Mode (as a
client) after converting to Access Point Mode this can be easily achieved by selecting the
Wireless SoftAP™ Tools menu selection Switch to Station Mode.
Wireless LAN 802.11b/g Device
42
Page 43

Note:
Any settings applied to Station Mode in Windows® XP Wireless Zero Configuration will
remain in effect when Station Mode is applied.
Figure 35: AP Mode Tools menu
Once Switch to Station Mode has been selected from the Tools menu the following screens will
appear while the Wireless SoftAP™ initiates changes in your Wireless connection settings:
Figure 36: Switch to Station Mode
As your HP PC switches wireless connection settings you will be asked to wait (See figure 36
above).
Wireless LAN 802.11b/g Device
43
Page 44

Figure 37: Station Mode switch successful
You will be prompted to select OK when the switch to Station Mode is complete.
Figure 38: SoftAP™ in Station Mode
Once the Wireless SoftAP™ has finished switching to Station Mode the status will read “Station
mode – Adapter Enabled” and no text will appear under “Number of Clients” as shown in figure
38).
Wireless LAN 802.11b/g Device
44
Page 45

Important
The most recent Station Mode settings entered either in Windows XP Wireless Zero
Configuration or in Chapter 9, Station Mode, will be enabled. If you have not entered settings
for Station Mode, refer to Chapter 3.
8.2.2.2 Disable / Enable Wireless
Figure 39: Wireless SoftAP™ dialog box. Tools menu
From the Tools menu it is possible to disable the Wireless SoftAP™ by selecting Disable Wireless
(See figure 39). Once disabled the Wireless SoftAP™ dialog box will display “AP mode –
Adapter Disabled” under Status as shown in figure 40 below.
Figure 40: Wireless SoftAP™ dialog box; Wireless Disabled
Note:
When wireless is disabled on your HP PC wireless connections will not be functioning nor
can they be established. Wireless must be enabled again in order to connect with other
wireless devices or to re-establish pre-set wireless connections.
Wireless LAN 802.11b/g Device
45
Page 46

Once disabled your Wireless LAN 802.11b/g Device can be re-activated through use of the
same menu as seen in Figure 41 below.
Figure 41: Tools menu; Enable Wireless
In order to enable the Wireless LAN 802.11b/g Device to begin functioning again select Enable
Wireless from the Tools menu (figure 41).
Wireless LAN 802.11b/g Device
46
Page 47

8.2.2.3 Change Admin Password…
SoftAP™ allows setting of an Admin password through the Tools menu as shown in figure 42
below.
By setting the Admin password any settings saved in the Tools menu under the options selection
become locked. It is necessary to enter the specified password in order to go to the options
selection in the Tools menu.
Note:
It is not necessary to enter the Admin Password to view Status or to change from AP Mode
to Station Mode.
Figure 42: Tools menu; Change Admin Password…
Important
If you loose your Admin Password refer to Appendix A: Troubleshooting.
Wireless LAN 802.11b/g Device
47
Page 48

Figure 43: Change Password dialog box
In order to set an Admin Password:
1. Leave the space for Current Password empty if you have not already set an admin
password.
Note:
The Admin Password must be 8 – 16 alphanumeric characters.
2. Enter the desired password into the space for New Password.
3. Enter the desired password a second time into the space for Confirm New Password.
4. Select OK.
The Admin Password dialog box will disappear.
5. Exit the Wireless SoftAP™ application (See section 8.2.1.2)
6. Re-start your HP PC. (This is necessary for the admin password to take effect.)
Note:
The admin password will not effect Station Mode as Options is not an available menu
selection while running in Station Mode.
Wireless LAN 802.11b/g Device
48
Page 49

After completing steps 1 – 5 above you will be prompted to enter your password when attempting
to access Options in the Tools menu.
Figure 44: Prompt dialog box for Admin Password
After entering the password and selecting OK, Options on the Tools menu will be available in
Access Point Mode.
8.2.2.4 Options…
The Options menu selection allows you to alter regional settings for the SoftAP™ , establish
security settings and set up MAC Filtering.
Figure 45: Tools menu; Options Selection
Wireless LAN 802.11b/g Device
49
Page 50

Figure 46: Options; General Settings tab
The General tab displays the available language packs. By default the language should be set to
the region representing the location where the HP PC was purchased, yet it is easy to select
another language by selecting the down arrow and highlighting the chosen language.
Note:
The language settings effect only the SoftAP™ interface and are not applicable to your
®
Microsoft
operating system.
Wireless LAN 802.11b/g Device
50
Page 51

Figure 47: Options; Wireless AP tab
The Wireless AP tab, as shown above in figure 47, provides the SSID (Network name) of your HP
PC along with the Encryption type, Region, and Channel. There is also an Advanced selection
available at the bottom of the dialog box which makes more advanced functions available.
The SSID (Network name) of your HP PC is the name that other wireless 802.11b/g devices see
when they discover your HP PC. The SSID can be changed to one of your choosing or can be left
as the default name; WIRELESS-NETWORK.
Encryption Type refers to the type of security you wish to set up on your HP PC. Once a type of
security is selected you will be asked to enter applicable security key. Refer to figure 48 to view
the security options available.
Wireless LAN 802.11b/g Device
51
Page 52

Figure 48: Types of Security
There are three types of security available for use with the SoftAP™ : WEP Open Key, WPA
Personal TKIP and WPA Personal AES.
It is important to set up matching security types between 802.11 devices. It is necessary to check
the type of security on your other wireless network prior to establishing security on your HP PC.
Instructions for setting security for AP Mode are located in section 8.3.
WEP (Wired Equivalency Protocol): Open Key is an encryption standard for 802.11 devices that
provides security for wireless LANs. The “key” used is the “password” should be the same for all
802.11b/g devices you wish to connect, including your HP PC.
If you are choosing a WEP security key it is necessary to enter:
1. ASCII (allows letters ranging from a – z and numbers from 0 – 9)
o 5 characters for 40 bit encryption
o 13 characters for 128 bit encryption (stronger form of security)
2. HEX (allows letters ranging from a – f and numbers from 0 – 9)
o 10 characters for 40 bit encryption
o 26 characters for 128 bit encryption (stronger form of security)
Wireless LAN 802.11b/g Device
52
Page 53

WPA Personal TKIP (Temporal Key Integrity Protocol) and WPA Personal AES (Advanced
Encryption Standard):
Note:
WPA security can either be “WPA Personal TKIP” or “WPA Personal AES”. There is no
noticeable difference between these types of WPA nor is there a difference when
establishing either in the SoftAP™ . It is only necessary to ensure WPA TKIP and AES
compliance with the other 802.11b/g devices you are connecting if you wish to set up
WPA security. If your other 802.11b/g devices do not list either TKIP or AES they are most
likely compliant with both.
WPA (Wi-Fi Protected Access) is a more recent encryption standard for 802.11 devices providing
security for wireless LANs. The “key” used for WPA, like that used in WEP, is the “password”
and should be the same for all 802.11b/g devices you wish to connect, including your HP PC.
Since WPA is a more recent standard all 802.11 devices may not have the option to use WPA
security. It will be necessary to use WEP Open Key on your HP PC if this is the case.
If you are choosing a WPA security key:
3. ASCII (allows letters ranging from a – z and numbers from 0 – 9)
o 8 characters for 40 bit encryption
o 63 characters for 128 bit encryption (stronger form of security)
4. HEX (allows letters ranging from a – f and numbers from 0 – 9)
o 64 characters for 40 bit encryption
Region (See figure 49) refers to the geographic region where you are currently using your HP PC.
By default this should be set to your local region.
Regional settings are required in order for your HP PC to operate on channels in accordance to
regional regulations and specifications of use required by law. The regional settings should not
be altered unless your HP PC has been relocated to another region listed.
Note: Altering the region without physically locating your HP PC in the selected region may effect
the performance of your wireless LAN 802.11b/g device as the available channels per
region differ.
Channel (See figure 49) refers to the wireless channel used to communicate with access points /
gateways / clients (wireless networks). By default this is set to your local regional requirements.
Wireless LAN 802.11b/g Device
53
Page 54

Advanced (See figure 49): refers to the settings button available at the bottom of the dialog box.
The advanced settings are primarily used for network engineers or expert users.
Warning:
Adjustments made could adversely affect your wireless network performance.
Figure 49: Advanced Wireless AP tab
The Advanced options are for network qualified users only.
When Advanced is selected (See figure 49) the advanced settings show and the button reads
Basic. Select the Basic button in order to restore the basic settings view of the Wireless AP tab.
Figure 50: Options; Devices tab
Wireless LAN 802.11b/g Device
54
Page 55

The Devices tab as shown in figure 50 is an advanced feature allowing modification of the
SoftAP™ due to changing network conditions.
The Wireless LAN 802.11b/g Device was automatically configured based on current network
conditions during set up of your HP PC and should not require changing.
Share My Network Connection, as shown in figure 50, allows your HP PC to share the network
connection wirelessly with other 802.11b/g devices. By default this box should be checked.
Available Connections (see figure 50) shows the available connections on your HP PC.
Figure 51: Microsoft® Modes
Mode (see figure 51) displays the current Microsoft
® Mode. There are two Microsoft® modes
available: MS Internet Connection Sharing (ICS) mode and Network Bridge mode.
MS ICS (Microsoft
® Internet Connection Sharing) mode provides wireless connectivity to SoftAP™
clients and Internet Connection Sharing to an existing LAN through the SoftAP™ hosts LAN
adapter. When MS ICS mode is selected, SoftAP™ clients are leased IP addresses using DHCP
Wireless LAN 802.11b/g Device
55
Page 56

services from the SoftAP™ host (your HP PC). The range of IP addresses assigned to clients in this
mode are 192.168.0.2. – 192.168.0.253.
MS ICS mode should be used when you have been provided a single IP address from an Internet
Service Provider (contact your ISP for further information) and multiple computers need to share a
single network connection through the ISP. The maximum number of concurrent users in MS ICS
mode when using the SoftAP™ is 10.
The SoftAP™ will provide wireless AP functionality, DHCP service, and NAT services to SoftAP™
clients when MS ICS is the chosen mode.
Network Bridge mode (see figure 51) bridges existing LAN segment(s). Typically a bridge is used
to interconnect LAN segments on a network that already provides DHCP and routing services.
The SoftAP™ should be configured in Network Bridge mode if the LAN or any LAN segment
other than this HP PC uses DHCP. The maximum number of concurrent users in Network Bridge
mode when using the SoftAP™ is 254.
Figure 52: Mode Switch selections
Auto Scan (see figure 52) scans your system by default and locates the best wireless LAN
connections for best network performance.
Mode Switch Options (see figure 52) allows three methods for automatically selecting wireless
devices / networks to connect with when you switch between AP Mode and Station Mode or vice
versa:
Wireless LAN 802.11b/g Device
56
Page 57

Prompt for Connection Settings
Use Previous Settings if Available
AutoScan for Best Available Settings
Selecting “Prompt for Connection Settings” ensures that the settings you have chosen will be the
ones connected with your HP PC. “Use Previous Settings if Available” will cause your HP PC to
attempt connecting to the previously set devices and “AutoScan for Best Available Settings” will
scan for the best configuration.
Figure 53: Options; MAC Filtering tab
The MAC address is used by networks for associating an IP address to your HP PC or other
wireless devices. Every piece of hardware on a network has a MAC address. Because each
MAC address is unique, it is suitable to use a MAC address for filtering purposes.
The MAC Filtering tab allows the capability to explicitly allow or deny a client device access to
your computer through SoftAP™ wireless connection. This is a security feature used to ensure
that your network remains inaccessible to unknown or unwanted devices.
When the “Enable MAC Filtering” box is checked it is possible to choose either “Allow Access by
MAC Address” or “Deny Access by MAC Address” as shown in figure 54.
Note:
If you have chosen to deny access to a MAC address or have not allowed access from a
specific MAC address then that device will not be allowed connection to your HP PC,
even with a correct security key.
Wireless LAN 802.11b/g Device
57
Page 58

Figure 54: MAC Filtering Enabled
Figure 55: MAC Address input
To enable MAC Filtering and select addresses for entry:
Wireless LAN 802.11b/g Device
58
Page 59

1. Check the box at Enable MAC Filtering
2. Choose the desired Filter Method (either “Deny Access by MAC Address” or “Allow
Access by MAC Address”
3. Select Add
The Add MAC Address dialog box appears as seen in figure 55.
4. Enter a known MAC address in the spaces provide or select “Scan” to scan the area for
currently connected device MAC addresses.
5. Use the Alias box to add a name that you are able to remember to the MAC Addresses
selected if desired.
Note:
Adding an alias to a MAC address makes users easier to identify when viewing the
connected station list.
6. Select OK on the MAC Address dialog box.
The Add MAC Address dialog box will disappear.
7. Select Apply on the MAC Filtering tab.
8.2.2.5 Status…
Figure 56: Tools menu; Status….
Select Status from the Options menu to display status of the SoftAP™ , Devices and Stations.
Wireless LAN 802.11b/g Device
59
Page 60

Figure 57: Status of Wireless AP
The Wireless AP tab is displayed when Status is selected in the Tools menu. The Wireless AP tab
shown in figure 57 shows the following:
Status: The SoftAP™ is enabled and running in Access Point Mode
SSID: The SSID has been left at default (WIRELESS-NETWORK)
Encryption Type: No security has been set up between the two wirelessly connected
devices
Note:
It is not recommended to connect wireless devices of any kind without establishing security
settings. See section 8.3 for instructions on how to establish either WEP or WPA security
while in AP Mode
.
MAC Filtering: MAC Filtering has not been established
Broadcast SSID: The HP PC is broadcasting the SSID (other devices are able to view this
HP PC when they search for Wireless LAN 802.11b/g Devices)
Number of Clients: There is one client associated (connected) to this HP PC
Running Time: Time Connected
Wireless LAN 802.11b/g Device
60
Page 61

Figure 58: Status of Devices
Select the Devices tab to display Device status. The Devices tab shown in figure 58 shows
properties of the network configuration.
Figure 59: Status of Stations
Wireless LAN 802.11b/g Device
61
Page 62

The Stations tab displays Status of Stations (Clients) associated with your HP PC when your HP PC
is in Access Point Mode. The Stations tab shown in figure 59 shows that the HP PC was
connected to a Linksys device with no Alias assigned. MAC address information and idle time
are also displayed.
8.2.3 Help Menu
Figure 60: Wireless SoftAP™ Help menu
The Wireless SoftAP™ Help menu provides information on the SoftAP™ .
Wireless LAN 802.11b/g Device
62
Page 63

8.3 Setting Security
After launching the SoftAP™ it is highly recommended that wireless security is set-up. Choose the
type of security encryption (WEP or WPA) consistent with your other wireless equipment and
follow the instructions given in either Section 8.3.1 (WEP Security Settings) or in Section 8.3.2
(WPA Security Settings).
8.3.1 WEP Security Settings
WEP (Wired Equivalency Protocol) Open Key is an encryption standard for 802.11 devices that
provides security for wireless LANs. The “key” used is the “password” should be the same for all
802.11b/g devices you wish to connect, including your HP PC.
Important
Security can be set up using either WEP (Wired Equivalency Protocol) or WPA (Wi-Fi Protected
Access). It is important to set up matching security types between 802.11 devices. Be certain to
check the type of security on your other wireless 802.11b/g device(s) in order to decide which
type of security needs to be set up on your HP PC.
To set WEP security on your HP PC:
1. Left click on the SoftAP™ icon in the system tray (shown in figure 61) to open the
Wireless SoftAP™ dialog box.
Software Access Point
System Tray icon.
Figure 61: Software Access Point icon
The Wireless SoftAP™ dialog box will appear.
Figure 62: Wireless SoftAP™ dialog box
Wireless LAN 802.11b/g Device
63
Page 64

2. From the Tools menu select Options….
The Options dialog box will appear.
3. Select the Wireless AP tab
The Options box will display the Wireless AP tab.
Figure 63: WEP Security choices
4. From the Encryption Type drop box select WEP Open Key
The Key boxes appear as shown in figure 63. It is possible to save up to four keys for use, yet
only one at any given time can be active.
5. In the Use Key drop box select key 1
Note:
If you have already saved other keys you may select the one that applies to your wireless
network.
6. Enter your key into the box for Key 1
Wireless LAN 802.11b/g Device
64
Page 65

Note:
In order to enter the key it is necessary to use the following format:
ASCII (allows letters ranging from a – z and numbers from 0 – 9)
o
5 characters for 40 bit encryption
o
13 characters for 128 bit encryption (stronger form of security)
HEX (allows letters ranging from a – f and numbers from 0 – 9)
o
10 characters for 40 bit encryption
o
26 characters for 128 bit encryption (stronger form of security)
7. Select Apply
WEP security is now established and your HP PC should be able to communicate with your
wireless network.
To check the status of your connection refer to section 8.2.2.5.
Wireless LAN 802.11b/g Device
65
Page 66

8.3.2 WPA Security Settings
Important
Security can be set up using either WEP (Wired Equivalency Protocol) or WPA (Wi-Fi Protected
Access). It is important to set up matching security types between 802.11 devices. Be certain to
check the type of security on your other wireless 802.11b/g device(s) in order to decide which
type of security needs to be set up on your HP PC.
To set WEP security on your HP PC:
1. Left click on the SoftAP™ icon in the system tray (shown in figure 64) to open the
Wireless SoftAP™ dialog box.
Software Access Point
System Tray icon.
Figure 64: Software Access Point icon
The Wireless SoftAP™ dialog box will appear.
Figure 65: Wireless SoftAP™ dialog box
2. From the Tools menu select Options….
The Options dialog box will appear.
3. Select the Wireless AP tab
Wireless LAN 802.11b/g Device
66
Page 67

The Options box will display the Wireless AP tab.
Figure 66: Wireless AP tab; WPA Personal TKIP & AES selected
4. From the Encryption Type drop box select either WPA Personal TKIP or WPA Personal AES.
The Key boxes appear as shown in figure 66.
Note:
If you have already saved other keys you may select the one that applies to your wireless
network.
5. Enter your passcode (key).
Note:
In order to enter the key it is necessary to use the following format:
ASCII (allows letters ranging from a – z and numbers from 0 – 9)
o
8 characters for 40 bit encryption
o
63 characters for 128 bit encryption (stronger form of security)
HEX (allows letters ranging from a – f and numbers from 0 – 9)
o
64 characters for 40 bit encryption
6. Select Apply
WPA security is now established and your HP PC should be able to communicate with your
wireless network.
Note: If you experience difficulties using WPA security on your HP PC configure your wireless
network and the SoftAP™ settings to WEP security.
To check the status of your connection refer to section 8.2.2.5.
Wireless LAN 802.11b/g Device
67
Page 68

9 Station Mode
Note that if Station Mode settings were applied in Windows XP Wireless Zero Configuration
those settings are still in effect while functioning in Station Mode after Access Point Mode has
been activated.
9.1 Launching the SoftAP™
There are two ways to launch the Software Access Point: Through the SoftAP™ icon in the
system tray of your desktop or through the SoftAP™ icon menu. Either method will bring up the
Wireless SoftAP™ dialog box.
To launch the Software Access Point by using the icon in the System Tray simply left click the icon
once.
Software Access Point
System Tray icon.
Figure 67: Launching; Software Access Point icon
OR
It is possible to launch the SoftAP™ with a right click on the SoftAP™ icon. When a right click is
made on the icon the SoftAP™ icon menu appears. Select Show from this menu to bring up the
Wireless SoftAP™ dialog box.
Figure 68: Launching; Software Access Point icon menu
The Wireless SoftAP™ dialog box appears as shown in figure 69.
Wireless LAN 802.11b/g Device
68
Page 69

e
Menu
s
Menu
Figure 69: Wireless SoftAP™ dialog box
For a detailed explanation of the Wireless SoftAP™ dialog box in Station Mode refer to Section
9.2.
9.2 The Wireless SoftAP™ Dialog Box
The Wireless SoftAP™ dialog box as shown in figure 70 (Station Mode) is the primary hub of the
SoftAP™ application. From this box all of the major functions (security, device viewing and
mode switching) can be accomplished.
Fil
Tool
Help Menu
Figure 70: Wireless SoftAP™ ; Station Mode
The Wireless SoftAP™ dialog box consists of three drop-down menus: File, Tools and Help.
Wireless LAN 802.11b/g Device
69
Page 70

9.2.1 File Menu
Figure 71: Wireless SoftAP™ File menu
There are two File menu choices:
Minimize to System Tray (section 9.2.1.1)
Exit (section 9.2.1.2)
9.2.1.1 Minimize to System Tray
minimizes the Wireless SoftAP™ dialog box to the SoftAP™ icon in your system tray. It
is necessary to open it again when desired by clicking the icon.
9.2.1.2 Exit
exits you from the SoftAP™ application altogether. The SoftAP™ icon will no longer be
present in the system tray of your HP PC and you will need to reboot the HP PC in order to
regain the icon.
Wireless LAN 802.11b/g Device
70
Page 71

9.2.2 Tools Menu
Figure 72: AP Mode Tools menu
There are four Tools menu choices:
Switch to AP Mode (Section 9.2.2.1)
Disable Wireless (Section 9.2.2.2)
Change Admin Password…. (Section 9.2.2.3)
Options…. (Section 9.2.2.4)
: The Options…. Menu item does not function while in Station Mode as contents pertain to
Note
Access Point Mode (AP Mode).
Status…. (Section 9.2.2.5)
9.2.2.1 Switch to Access Point Mode
Switching to Access Point Mode (AP Mode) is necessary when your HP PC needs to be used as
an access point instead of as a client (Station Mode). Switching between Modes is easy through
the SoftAP™ tools menu selection Switch to AP Mode (See figure 72).
Note:
If you have switched between modes before any settings applied to previously will remain
in effect when AP Mode is again applied.
Wireless LAN 802.11b/g Device
71
Page 72

Figure 73: Station Mode Tools menu
Select Switch to AP Mode in order to begin the operation. Once selected from the Tools menu the
following screens will appear while the Wireless SoftAP™ applies the SoftAP™ network settings:
Figure 74: Switch to Access Point Mode
As your HP PC switches wireless connection settings you will be asked to wait (see figure 74).
Wireless LAN 802.11b/g Device
72
Page 73

Figure 75: Access Point Mode switch successful
You will be prompted to select OK when the switch to Access Point Mode is complete.
Figure 76: SoftAP™ in Access Point Mode
Once the Wireless SoftAP™ has finished switching to Access Point Mode the status will read “AP
mode – Adapter Enabled – Running” and the number of clients associated will appear under
“Number of Clients” as shown in figure 76.
Wireless LAN 802.11b/g Device
73
Page 74

9.2.2.2 Disable / Enable Wireless
Figure 77: Wireless SoftAP™ dialog box. Tools menu
From the Tools menu it is possible to disable the Wireless SoftAP™ by selecting Disable Wireless
(See figure 77). Once disabled the Wireless SoftAP™ dialog box will display “Station Mode –
Adapter Disabled” under Status as shown in figure 78 below.
Figure 78: Wireless SoftAP™ dialog box; Wireless Disabled
When wireless is disabled on your HP PC wireless connections will not be functioning nor
Note:
can they be established. Wireless must be enabled again in order to connect with other
wireless devices or to re-establish pre-set wireless connections.
Once disabled your Wireless LAN 802.11b/g Device can be re-activated through use of the
same menu as seen in Figure 79 below.
Wireless LAN 802.11b/g Device
74
Page 75

Figure 79: Tools menu; Enable Wireless
In order to enable the Wireless LAN 802.11b/g Device to begin functioning again select Enable
Wireless from the Tools menu (figure 79).
Wireless LAN 802.11b/g Device
75
Page 76

9.2.2.3 Change Admin Password…
SoftAP™ allows setting of an Admin password through the Tools menu when in AP Mode. The
SoftAP™ does NOT allow setting or changing the Admin Password while in Station Mode as the
Admin Password locks Options… in the Tools menu, a selection that is not applicable to Station
Mode.
The Tools menu displays the choice to Change Admin Password, yet the Change Password dialog
box will NOT accept passwords, even if entered in the “correct” format.
Refer to section 8.2.2.3 for instructions on how to set an admin password in AP Mode.
Figure 80: Tools menu; Change Admin Password…
Wireless LAN 802.11b/g Device
76
Page 77

Figure 81: Change Password dialog box
Note:
9.2.2.4 Options…
The Options menu selection is not applicable while in Station Mode and is displayed in grey on
the Tools menu as it is not an available selection.
The admin password is not applicable in Station Mode as Options is not an available
menu selection while running in Station Mode.
Figure 82: Tools menu; Options Selection
Wireless LAN 802.11b/g Device
77
Page 78

9.2.2.5 Status…
Figure 83: Tools menu; Status….
Select Status from the Options menu to display status of the SoftAP™ or Devices.
Figure 84: Status of Wireless AP
Wireless LAN 802.11b/g Device
78
Page 79

The Wireless AP tab is displayed when Status is selected in the Tools menu. The Wireless AP tab
shown in figure 84 shows the following:
Status: The SoftAP™ is enabled and running in Station Mode
SSID: The SSID is not applicable because an SSID is not broadcast while in Station Mode
Encryption Type: No security has been set up between the wirelessly connected devices
Note:
It is not recommended to connect wireless devices of any kind without establishing security
settings. See Chapter 4 for instructions on how to establish either WEP or WPA security
while in Station Mode
.
Number of Clients: “Not Applicable” is displayed as it is only possible to have clients
while in AP Mode
Running Time: “Not Applicable” is displayed as it is not possible to have clients connected
while in Station Mode
Select the Devices tab to display Device status. The Devices tab shown in figure 85 shows
properties of the network configuration.
Figure 85: Status of Devices
Wireless LAN 802.11b/g Device
79
Page 80

9.2.3 Help Menu
Figure 86: Wireless SoftAP™ Help menu
The Wireless SoftAP™ Help menu provides help with the application and information on the
SoftAP™ .
9.3 Setting Security
Security settings while in Station Mode are not available through the SoftAP™ interface. For
complete instructions on how to set up security in Station Mode refer to Chapter 4.
Wireless LAN 802.11b/g Device
80
Page 81

10 Uninstalling the SoftAP™
In order to uninstall the SoftAP™ :
1. Right click on soft AP icon in your system tray
2. Select Exit from the SoftAP™ menu to exit the software
On the desktop:
3. Go to start
4. Select Control panel
5. Select Add or remove programs
6. Scroll to “Wireless SoftAP™ ……”
7. Highlight “Wireless SoftAP™ ….”
8. Select Change/Remove
The InstallShield Wizard appears
Figure 87: InstallShield Wizard
Repair will be selected by default on the InstallShield wizard (see figure 87).
9. Select Remove
10. Select Next
11. Select OK when the Uninstall dialog box appears to confirm
Wireless LAN 802.11b/g Device
81
Page 82

Figure 88: NetCfgWizard dialog box
The NetCfgWizard dialog box appears.
12. Select Yes in the Netcfg wizard dialog box
You will be asked to wait while InstallShield completes the uninstall. Once the uninstall is
complete:
Figure 89: InstallShield Wizard complete
13. Select Finish
14. Close all dialog boxes and applications
15. Restart your HP PC
Wireless LAN 802.11b/g Device
82
Page 83

g
Access Point (AP)
ASCII (American Standard Code for
Information Interchange)
Broadband Router
Client
DNS Server
Encryption
Gateway
HEX
IP Address
ISP (Internet Service Provider)
Terms
A hardware device (possibly a PC) that can act
as a communication hub for wireless devices
enabling them to connect to a wired LAN (Local
Area Network) or to one another.
A code used for encryption that represents
letters with numbers.
A device which lets multiple client devices share
a single internet connection (like DSL, Cable
modem or T1). Generally Broadband Routers
offer rudimentary network address translations
and firewall features.
A device that acquires networking services from
another device like another PC or access point.
Domain Name System / Service / Server is a
service available on the internet that translates
domain names into IP addresses.
The most efficient way to achieve data security
online. Encryption is a method of codin
Generally it is necessary to provide a secret key
or password in order to receive decoded
information when encrypted.
A gate or entrance into a network. The ISP
connecting a home to the internet is generally
the gateway in a residence.
A numbering system used in encryption. HEX is
a 16 symbol system consisting of the numbers 0
– 9 and A – F.
An address that identifies devices on a TCP/IP
network (eg; 192.168.0.2).
A company that provides access to the internet.
data.
Wireless LAN 802.11b/g Device
83
Page 84

MAC Address
Network Name
Network Key
SoftAP™
SSID (Service Set Identifier)
Station
WEP
Wireless LAN
Wireless Network
WPA
WPA Personal AES
WPA Personal TKIP
Terms
Continued
Media Access Control Address. On an 802.11
network the MAC address is used to identify
each node of the network.
See SSID
Network password.
Software application on your HP PC which
allows you to establish a wireless network using
your PC as a wireless access point or as a
wireless client (station mode).
The unique identifier attached to the header of
packets sent over a Wireless Local Area
Network (WLAN). The SSID differentiates
Wireless LANs from one another. For this
reason an SSID must be entered on each
wireless device attempting to connect on the
WLAN.
See Client.
Wired Equivalency Protocol. WEP is an
802.11 encryption standard that provides
security for wireless LANs.
A wireless version of Ethernet, the Wireless
Local Area Network enables wireless internet
access through your SoftAP™ or broadband
router.
See Wireless LAN.
Wi-Fi Protected Access. WPA is an addition to
the security in the 802.11 standard. It is an
enhancement to the original security
implementation for 802.11 devices.
(Advanced Encryption Standard). See WPA.
(Temporal Key Integrity Protocol) See WPA.
Wireless LAN 802.11b/g Device
84
Page 85

Problem Recommended Solution
I have installed the SoftAP™ , yet am not
able to see the system tray SoftAP™ icon
The SoftAP™ icon used to be in my system
tray, yet is no longer there.
I have set up my wireless connection in AP
Mode, yet am unable to connect a Station
(Client machine).
CONTINUED
Appendix A: Troubleshooting
First restart your system.
If the problem persists……
Uninstall the SoftAP™ (see Chapter 8)
and Activate it again (see Chapter 5).
If the problem persists……
Contact customer support.
Restart your system. The icon should
appear again in the system tray.
If the problem persists……
Uninstall the SoftAP™ (see Chapter 8)
and Activate it again (see Chapter 5).
It is possible that the wireless mode has
been disabled. In the Wireless
SoftAP™ dialog box select the Tools
menu. If the second menu item reads
“Enable Wireless”, then select “Enable
Wireless to activate the wireless
connection.
Verify that the Security (Network Key)
matches that of the machine you are
attempting to connect. For AP Mode
see sections 6.3.1 and 6.3.2. For
Station Mode see sections 4.2.1 and
4.2.2.
Wireless LAN 802.11b/g Device
85
Page 86

I have set up my wireless connection in AP
Mode, yet am unable to connect a Station
(Client machine).
After activating the SoftAP™ application I
am unable to access my settings for Station
Mode / the settings input during
Windows XP Wireless Zero
Configuration.
After installing the Wireless SoftAP™ I am
able to connect from my laptop (client), yet
am unable to browse the internet.
My WPA security settings are not working
properly.
Verify that the MAC address has not
been filtered.
>>Wireless SoftAP™ dialog box
>>Tools menu
>>Options
>>MAC Filtering tab
>>verify that if “Enable MAC Filtering” is
enabled AND “Deny Access by MAC
Address” is selected as the Filter Method,
then the Station MAC address of the
machine you are attempting to connect
should not be listed and selected.
>>IF “Enable MAC Filtering” is enabled
AND “Allow Access by MAC Address” is
selected as the Filter Method, then the
Station MAC address of the machine you
are attempting to connect should be listed
and selected.
In the Wireless SoftAP™ dialog box
select the Tools menu. If the second
menu item reads “Disable Wireless”,
then contact customer support.
The SoftAP™ application is initialized
in Access Point Mode by default. From
the Wireless SoftAP™ dialog box select
the Tools menu and select Switch to
Station Mode (See Section 6.2.2.1for
instructions on switching to Station
Mode).
Check that your network is set up to be
shared. From the Wireless SoftAP™
dialog box select the Tools menu and
select Options. Select the Devices tab.
Verify that the check box at “Share my
network connection” is selected.
If the problem still persists……….
Verify your internet connection with
your ISP.
Verify that your Network Keys are
entered correctly.
If the problem persists…………
Switch to WEP security on both
SoftAP™ applicataion. For AP Mode
see section 6.3.2. For Station Mode
see section 4.2.2.
Wireless LAN 802.11b/g Device
86
Page 87

I am unable to see my Network name in the
Available wireless networks section of the
Wireless Network Connection dialog box
in Station Mode on my HP PC.
What happens if I forget my Admin
Password for the SoftAP™ ?
Refer to the CD that came with this
I am having diffuculty with my VPN
connection.
Internet Gaming issues For assistance with internet gaming
Verify your Network name and Security
settings.
If the problem persists………
Consult the user’s manual for your
Wireless Gateway or Access Point.
Uninstall the SoftAP™ (see Chapter 8)
and Activate it again (see Chapter 5).
If the problem persists……
product. This CD contains the full
User’s Manual as well as a file called
“password_reset.rgs”. Double click this
file to reset your password only after
attempting to uninstall and reinstall.
Check your VPN server for related
problems.
issues please refer to Microsoft’s internet
gaming site.
Wireless LAN 802.11b/g Device
87
Page 88

Appendix B: Regulatory Notices
Regulatory Notices
To identify this product refer to the part or model number on the product label
Federal Communication Commission Notices
Federal Communication Commission Interference Statement
This equipment has been tested and found to comply with the limits for
a Class B digital device, pursuant to Part 15 of the FCC Rules. These
limits are designed to provide reasonable protection against harmful
interference in a residential installation. This equipment generates,
uses and can radiate radio frequency energy and, if not installed and
used in accordance with the instructions, may cause harmful
interference to radio communications. However, there is no guarantee
that interference will not occur in a particular installation. If this
equipment does cause harmful interference to radio or television
reception, which can be determined by turning the equipment off and
on, the user is encouraged to try to correct the interference by one of
the following measures:
- Reorient or relocate the receiving antenna.
- Increase the separation between the equipment and receiver.
- Connect the equipment into an outlet on a circuit different from that
to which the receiver is connected.
- Consult the dealer or an experienced radio/TV technician for help.
This device complies with Part 15 of the FCC Rules. Operation is
subject to the following two conditions: (1) This device may not cause
harmful interference, and (2) this device must accept any interference
received, including interference that may cause undesired operation.
FCC Caution: Any changes or modifications not expressly approved by
the party responsible for compliance could void the user's authority to
operate this equipment.
IMPORTANT NOTE:
FCC Radiation Exposure Statement:
This equipment complies with FCC radiation exposure limits set forth
for an uncontrolled environment. This equipment should be installed
and operated with minimum distance 20cm between the radiator & your
body.
This transmitter must not be co-located or operating in conjunction with
any other antenna or transmitter.
Wireless LAN 802.11b/g Device
88
Page 89

European Notices
EC Conformance Declaration
This device compliance with the Essential Requirements of the R&TTE Directive of
the European Union (1999/5/EC). This equipment meets the following conformance
standards:
EN 60950 (IEC 60950) - Product Safety
EN 300 328 - Technical requirements for 2.4 GHz radio equipment
EN 301 489-1 / EN 301 489-17 - EMC requirements for radio equipment
Declaration of Conformity in Languages of the European Community
English Hereby, Arcadyan Technology Corp, declares that this Radio LAN
device is in compliance with the essential requirements and other
relevant provisions of Directive 1999/5/EC.
Finnish Valmistaja Arcadyan Technology Corp vakuuttaa täten että Radio LAN
device tyyppinen laite on direktiivin 1999/5/EY oleellisten vaatimusten
ja sitä koskevien direktiivin muiden ehtojen mukainen.
Dutch Hierbij verklaart Arcadyan Technology Corp dat het toestel Radio LAN
device in overeenstemming is met de essentiële eisen en de andere
relevante bepalingen van richtlijn 1999/5/EG
Bij deze Arcadyan Technology Corp dat deze Radio LAN device
voldoet aan de essentiële eisen en aan de overige
relevante bepalingen van Richtlijn 1999/5/EC.
French Par la présente Arcadyan Technology Corp déclare que
l'appareil Radio LAN device est conforme aux
exigences essentielles et aux autres dispositions
pertinentes de la directive 1999/5/CE
Swedish Härmed intygar Arcadyan Technology Corp att denna Radio
LAN device står I överensstämmelse med de
väsentliga egenskapskrav och övriga relevanta
bestämmelser som framgår av direktiv 1999/5/EG.
Danish Undertegnede Arcadyan Technology Corp erklærer herved, at
følgende udstyr Radio LAN device overholder de
væsentlige krav og øvrige relevante krav i direktiv
1999/5/EF
Wireless LAN 802.11b/g Device
89
Page 90

German Hiermit erklärt Arcadyan Technology Corp, dass sich dieser/
diese/dieses Radio LAN device in
Übereinstimmung mit den grundlegenden
Anforderungen und den anderen relevanten
Vorschriften der Richtlinie 1999/5/EG befindet".
(BMWi)
Hiermit erklärt Arcadyan Technology Corp die Übereinstimmung des Gerätes Radio
LAN device
mit den grundlegenden Anforderungen und den
anderen relevanten Festlegungen der Richtlinie
1999/5/EG. (Wien)
Greek
European Notices
Continued
Italian Con la presente Arcadyan Technology Corp dichiara che questo
Radio LAN device è conforme ai requisiti essenziali
ed alle altre disposizioni pertinenti stabilite dalla
direttiva 1999/5/CE.
Spanish Por medio de la presente Arcadyan Technology Corp declara
que el Radio LAN device cumple con los requisitos
esenciales y cualesquiera otras disposiciones
aplicables o exigibles de la Directiva 1999/5/CE
Portuguese Arcadyan Technology Corp declara que este Radio LAN device
está conforme com os requisitos essenciais e
outras disposições da Directiva 1999/5/CE.
Canadian Notice
Industry Canada - Class B
This digital apparatus does not exceed the Class B limits for radio noise emissions from
digital apparatus as set out in the interference-causing equipment standard entitled “Digital
Apparatus,” ICES-003 of Industry Canada.
Cet appareil numérique respecte les limites de bruits radioélectriques applicables aux appareils
numériques de Classe B prescrites dans la norme sur le matérial brouilleur: “Appareils
Numériques,” NMB-003 édictée par l’Industrie.
Wireless LAN 802.11b/g Device
90
Page 91

Korean Notice
제품명(모델 번호): WN4201B
신청자 이름: Accton
제조날짜: 2004년 5월 31일
제조업체/국가: Accton/대만 또는 중국
제품명(모델 번호): WN4501F
신청자 이름: Arcadyan
제조날짜: 2004년 5월 31일
제조업체/국가: Accton/대만 또는 중국
Wireless LAN 802.11b/g Device
91
Page 92

Appendix C: Product Specifications
Functional Criteria
Data Rate Up to 54 Mbps
Operating Range Up to 30 m (100 ft) at 11 Mbps
Up to 100 m (300 ft) at 5.5 Mbps or lower
Radio Signal
Modulation Orthogonal Frequency Division Multiplexing
Operating Frequency USA (FCC), Canada (IC): 2412~2462 MHz
Ch 1~ Ch 11
Europe (ETSI): 2412~2472 MHz
Ch 1 ~ Ch 13
Japan: 2412~2484 MHz
Ch 1 ~ Ch 14
Operating Channel USA, Canada: 11 Channels
ETSI: 13 Channels
Japan: 14 Channels
Physical Charactaristics
Power Consumption TX: 450 mA, RX: 360 mA
Dimensions 12 x12 x 1.8cm (4.72 x 4.72 x 0.07 in.)
Antenna External Antenna
LED Indicator Power, Link, Activity
Host Interface
Specifications: Model Number WN4201B
indoors
(OFDM)
PCI specification v.2.2
Wireless LAN 802.11b/g Device
92
Page 93

Continued
Standards Conformance
Wireless Standard IEEE 802.11g, Wi-Fi, WPA
Environmental
Temperature Operating: 0 to 55 C (32 to 131 F)
Storage: -20 to 75 C (-4 to 167 F)
Humidity 5 to 90% (non-condensing)
Certification
Emissions EN 55022 Class B
EN 61000-4-2/3/4/6/11
FCC Part 15 (B)
Safety EN60950
ETSI EN300328, EN301489
Software Drivers
NDIS Drivers Windows XP
Antenna Specification
Antenna Type External Antenna
Frequency Band 2.4 ~ 2.5GHz
Polarization Vertical
Connector Reverse SMA Connector
Specifications: Model Number WN4201B
Wireless LAN 802.11b/g Device
93
Page 94

Functional Criteria
Data Rate Up to 54 Mbps
Operating Range Up to 30 m (100 ft) at 11 Mbps
Up to 100 m (300 ft) at 5.5 Mbps or lower
Radio Signal
Modulation Orthogonal Frequency Division Multiplexing
Complementary Code Keying (CCK)
Operating Frequency USA (FCC), Canada (IC): 2412~2462 MHz
Ch1~Ch11
Europe (ETSI): 2412~2472 MHz
Ch1~Ch13
Japan: 2412~2484 MHz
Ch 1~ 14
Canada: 2412 ~ 2462 MHz
Ch 1~11
Operating Channel USA, Canada: 11 Channels
ETSI: 13 Channels
Japan: 14 Channels
Physical Characteristics
Power Consumption TX: 485 mA Max; RX: 330 mA
Antenna External antenna and internal antenna
LED Indicator One Power / Link, ACT
Host Interface
Specifications: Model Number WN4501F
indoors
(OFDM)
USB 2.0
Wireless LAN 802.11b/g Device
94
Page 95

Continued
Standards Conformance
Wireless Standard IEEE 802.11g, Wi-Fi, WPA
Environmental
Temperature Operating: 0 to 55 C (32 to 131 F)
Storage: -20 to 70 C (-4 to 157 F)
Humidity 5 ~ 90% (non-condensing)
Certification
Emissions EN 55022
EN 50024
FCC Part 15 (B)
ICES-003
AS/NZS 3548
Safety EN60950
ETSI EN300328, EN301489
Software
Operating System Windows ME, Windows 2000, Windows XP
Antenna Specification
Antenna Type External Antenna
Frequency Band 2.4 ~ 2.5GHz
Polarization Vertical
Impedance 50 Ohms nominal
Specifications: Model Number WN4501F
Wireless LAN 802.11b/g Device
95
Page 96

Specifications: Model Number WN4501F
Continued
Gain Max gain: 1.43 dbi
Avg gain: 1.19 dbi
Radiation Omni-directional
Max. Power Rating 2W
Wireless LAN 802.11b/g Device
96
Page 97

Index
802.11 ...........................................................................1, 7, 8, 12, 46, 51, 52, 53, 55, 60, 63, 66, 74, 75, 84
Access Point. 7, 8, 9, 12, 13, 19, 21, 23, 24, 28, 29, 30, 31, 32, 34, 35, 37, 38, 39, 40, 42, 43, 45, 47, 49, 51,
52, 53, 54, 56, 60, 62, 63, 64, 66, 67, 68, 71, 72, 73, 76, 78, 79, 81, 83, 85, 86, 87
Access Point Mode.... 7, 8, 9, 12, 13, 19, 21, 23, 24, 28, 29, 30, 31, 32, 34, 35, 37, 38, 39, 40, 42, 43, 45, 47,
49, 51, 52, 53, 54, 56, 60, 62, 63, 64, 66, 67, 68, 71, 72, 73, 76, 78, 79, 81, 83, 85, 86, 87
Ad-Hoc.......................................................................................................................................................... 33
Ad-hoc Mode .................................................................................................................................................33
Admin Password...................................................................................................42, 47, 48, 49, 71, 76, 77, 87
AES...............................................................................................................12, 19, 21, 28, 30, 52, 53, 67, 84
Antenna.........................................................................................................................7, 9, 13, 24, 34, 38, 88
ASCII ............................................................................................................21, 23, 29, 31, 52, 53, 65, 67, 83
Broadband Router.................................................................................................21, 23, 29, 31, 32, 42, 83, 84
Channel................................................................................................................................................... 51, 53
Client .. 7, 8, 12, 13, 16, 24, 25, 32, 34, 37, 38, 40, 42, 43, 44, 45, 47, 48, 56, 57, 60, 68, 69, 71, 72, 74, 76,
77, 79, 80, 83, 84, 85, 86, 87
Disable..................................................................................................................................42, 45, 71, 74, 86
Encryption..................................... 8, 16, 20, 21, 23, 25, 29, 31, 32, 51, 52, 53, 60, 63, 64, 65, 67, 79, 83, 84
File Menu................................................................................................................................................. 41, 70
Gateway .........................................................................................................7, 21, 23, 29, 31, 32, 42, 83, 87
Help Menu...............................................................................................................................................62, 80
HEX...............................................................................................................21, 23, 29, 31, 52, 53, 65, 67, 83
Installation .................................................................................7, 9, 12, 13, 24, 34, 35, 36, 37, 38, 85, 86, 88
ISP ..............................................................................................................7, 9, 13, 24, 32, 34, 38, 56, 83, 86
Key .................................. 8, 16, 19, 20, 21, 23, 25, 28, 29, 30, 31, 32, 52, 53, 63, 64, 65, 67, 83, 84, 85, 86
MAC Filtering...........................................................................8, 19, 21, 28, 30, 49, 57, 58, 59, 60, 62, 84, 86
Microsoft Internet Connection Sharing .........................................................................................................55, 56
Network 7, 8, 9, 13, 14, 16, 17, 18, 19, 20, 21, 22, 23, 24, 25, 26, 27, 28, 29, 30, 31, 32, 33, 34, 37, 51, 54,
55, 56, 57, 61, 72, 79, 83, 84, 85, 86, 87
Network Bridge ........................................................................................................................................55, 56
Network Key........................................................................................................21, 23, 29, 31, 51, 52, 53, 57
Network Name ........................................................................................16, 20, 24, 25, 29, 31, 32, 51, 84, 87
Network Security ..................................................................................................14, 16, 19, 21, 24, 25, 28, 30
Options ............................................ 42, 47, 48, 49, 50, 51, 53, 54, 56, 57, 59, 64, 66, 67, 71, 76, 77, 78, 86
Region............................................................................................................................................... 50, 51, 53
Security ... 8, 10, 12, 14, 16, 18, 19, 21, 23, 25, 27, 28, 29, 30, 31, 40, 49, 51, 52, 53, 57, 60, 63, 64, 65, 66,
67, 69, 79, 80, 83, 84, 85, 86, 87
SoftAP7, 12, 13, 24, 34, 35, 36, 37, 38, 39, 40, 41, 42, 43, 44, 45, 47, 48, 49, 50, 52, 53, 55, 56, 57, 59, 60,
62, 63, 66, 67, 68, 69, 70, 71, 72, 73, 74, 76, 78, 79, 80, 81, 84, 85, 86, 87
SSID............................................. 8, 16, 20, 21, 23, 25, 29, 31, 32, 51, 52, 53, 60, 63, 64, 65, 67, 79, 83, 84
Station. 7, 8, 12, 13, 16, 24, 25, 32, 34, 37, 38, 40, 42, 43, 44, 45, 47, 48, 56, 57, 60, 68, 69, 71, 72, 74, 76,
77, 79, 80, 83, 84, 85, 86, 87
Station Mode ... 7, 8, 12, 13, 16, 24, 25, 32, 34, 37, 38, 40, 42, 43, 44, 45, 47, 48, 56, 68, 69, 71, 72, 74, 76,
77, 79, 80, 86, 87
Status ..............................................................................32, 42, 44, 45, 47, 59, 60, 61, 62, 71, 73, 74, 78, 79
TKIP ..................................................................................................12, 19, 21, 23, 28, 30, 31, 52, 53, 67, 84
Tools Menu ................................. 42, 43, 45, 46, 47, 49, 59, 60, 64, 66, 71, 72, 74, 75, 76, 77, 78, 79, 85, 86
WEP .................... 8, 12, 16, 18, 19, 21, 23, 25, 27, 28, 29, 30, 31, 52, 53, 60, 63, 64, 65, 66, 67, 79, 84, 86
Wireless Network . 1, 7, 8, 9, 12, 13, 16, 17, 18, 19, 20, 21, 22, 23, 24, 25, 26, 27, 28, 29, 30, 31, 32, 33, 34,
37, 46, 52, 53, 54, 55, 56, 60, 63, 64, 65, 67, 74, 75, 84, 87
WLAN1, 7, 8, 9, 12, 13, 16, 17, 18, 19, 20, 21, 22, 23, 24, 25, 26, 27, 28, 29, 30, 31, 32, 37, 46, 52, 53, 55,
56, 60, 63, 74, 75, 84, 87
WPA...................................... 8, 12, 16, 18, 19, 21, 23, 25, 27, 28, 30, 31, 52, 53, 60, 63, 66, 67, 79, 84, 86
WPA-PSK.....................................................................................................................................16, 23, 25, 31
Wireless LAN 802.11b/g Device
97
 Loading...