

Page 1
TVAC80010B
User manual
Instrukcja obsługi
Brugerhåndbog
E Manual del usuario
You can find important information and FAQs about
this and other products on the website
www.abus.com/plug-and-play
Version 04/2013
Page 2

English
Polski
Español
This user guide contains important information on starting operation and using the device.
Make sure that this user guide is handed over when the product is given to other persons.
Keep this user guide to consult later!
For a list of contents with the corresponding page numbers, see page 5.
Niniejsza instrukcja obsługi zawiera ważne wskazówki dotyczące uruchamiania i obsługi.
Pamiętaj o tym, także przekazując produkt osobie trzeciej.
Zachowaj instrukcję do wykorzystania w przyszłości!
Wykaz treści znajdziesz w spisie treści z podaniem odpowiednich liczb stron na
stronie 21.
Denne betjeningsvejledning indeholder vigtige henvisninger til idriftsættelse og håndtering.
Vær også opmærksom på dette, hvis produktet gives videre til en tredje person.
Opbevar derfor denne betjeningsvejledning til senere brug!
I indholdsfortegnelsen på side 37 findes der en liste over indholdet med angivelse af de pågældende sidetal.
Este manual de instrucciones contiene indicaciones importantes para la puesta en funcionamiento y
para la utilización.
Tenga esto en cuenta, también cuando transfiera este aparato a terceras personas.
Por este motivo, guarde este manual para poder consultarlo cuando lo necesite.
El listado de los contenidos figura en el índice junto a las páginas correspondientes en la página 53.
Page 3
TVAC80010B
User guide
Version 04/2013
Original user guide in English.
Retain for future reference!
Page 4
English
Introduction
Dear customer,
Thank you for purchasing this product.
This device complies with the requirements of the applicable EU directives. The declaration of conformity can
be ordered from:
ABUS Security-Center GmbH & Co. KG
Linker Kreuthweg 5
86444 Affing
GERMANY
To ensure this condition is maintained and that safe operation is guaranteed, it is your obligation to observe
these operating instructions!
Read the entire user guide carefully before starting operation of the product, and pay attention to all operating
instructions and safety information!
All company names and product descriptions are trademarks of the corresponding owner. All rights
reserved.
In the event of questions, please contact your local maintenance specialist or dealer.
Warning as required by §201 StGB (German Criminal Code):
Whosoever unlawfully makes an audio recording of the privately spoken words of another; or uses, or makes
a recording thus produced accessible to a third party, shall be liable to imprisonment or a fine.
Whosoever unlawfully overhears with an eavesdropping device the privately spoken words of another not
intended for his attention; or publicly communicates, verbatim or the essential content of, the privately spoken
words of another, recorded or overheard, shall incur the same penalty.
Disclaimer
This user guide has been produced with the greatest of care. Should you discover any missing information or
inaccuracies, please contact us under the address shown on the back of the manual.
ABUS Security-Center GmbH does not accept any liability for technical and typographical errors, and
reserves the right to make changes to the product and user guide at any time and without prior warning.
ABUS Security-Center GmbH is not liable or responsible for direct or indirect damage resulting from the
equipment, performance and use of this product. No forms of guarantee are accepted for the contents of this
document.
2
Page 5
English
The triangular high voltage symbol is used to warn of the risk of
injury or health hazards (e.g. caused by electric shock).
The triangular warning symbol indicates important notes in these operating instructions
which must be observed.
This symbol indicates special tips and notes on the operation of the unit.
All guarantee claims are invalid in the event of damage caused by non-compliance with
this user guide. We cannot be held liable for resulting damages.
In the event of material or personal damage caused by improper operation or noncompliance with the safety information, we cannot be held liable. All guarantee claims
are voided in such cases.
Explanation of symbols
Important safety information
This device has been manufactured in accordance with international safety standards.
Please read the following safety instructions carefully.
Safety information
1. Cleaning
Only use a damp cloth to clean the device. Do not use corrosive cleaning materials.
2. Installation position
This device is intended for protected outdoor areas as well as indoors.
The product may be damaged if it is dropped, even from a low height.
Install the device so that the image sensor is not subjected to direct sunlight.
Pay attention to the installation instructions in the corresponding section of this user guide.
Never place the device close to heaters, stoves, other sources of heat, or in direct sunlight.
Only operate the device at locations with temperatures within the permitted ambient temperature
range of -5 °C to +55°C.
3. Information on handling batteries
Make sure that batteries are kept away from small children. Children may put batteries in their mouths
and swallow them. This can cause serious harm to their health. If this happens, consult a doctor
immediately.
Do not charge normal batteries, heat them up or throw them into naked flames (they may explode).
The battery must not be directly exposed to heat or sunlight, and must not be stored in a place with a
very high temperature.
The battery must not come into contact with water.
The battery must not be dismantled, pierced or otherwise damaged.
The battery contacts must not be short-circuited.
Change low batteries in good time.
Always change all the batteries at the same time and use batteries of the same type.
Leaky or damaged batteries can cause chemical burns on contact with the skin. In this case, wear
protective gloves. Clean the battery compartment with a dry cloth.
3
Page 6
English
If the original packaging has been damaged, inspect the device. If the device shows signs of
damage, return it in the original packaging and inform the delivery service.
Warnings
Observe all safety and operating instructions before putting the device into operation for the first time.
Avoid the following adverse conditions during operation:
Temperatures outside the permitted range
Direct sunlight
Dust or flammable gases, vapors, or solvents
Strong vibrations
Strong magnetic fields (e.g. next to machines or loudspeakers)
The camera must not be directed toward the sun, as otherwise the sensor may be destroyed.
The time lapse/motion detector outdoor camera must not be installed on unstable surfaces
Unpacking the device
Handle the device with extreme care when unpacking it.
4
Page 7

English
Contents
1. Intended use ............................................................................................................................................... 6
2. Scope of delivery ....................................................................................................................................... 6
3. Features and functions .............................................................................................................................. 6
4. Information and FAQs ............................................................................................................................... 6
5. Device description ..................................................................................................................................... 7
6. Installing the camera ................................................................................................................................. 8
7. Operation .................................................................................................................................................. 10
8. Settings ..................................................................................................................................................... 13
9. Maintenance and cleaning ...................................................................................................................... 14
9.1 Maintenance .......................................................................................................................................... 14
9.2 Cleaning ................................................................................................................................................ 14
10. Disposal .................................................................................................................................................... 14
11. Tips for troubleshooting .......................................................................................................................... 15
12. Technical data .......................................................................................................................................... 15
5
Page 8
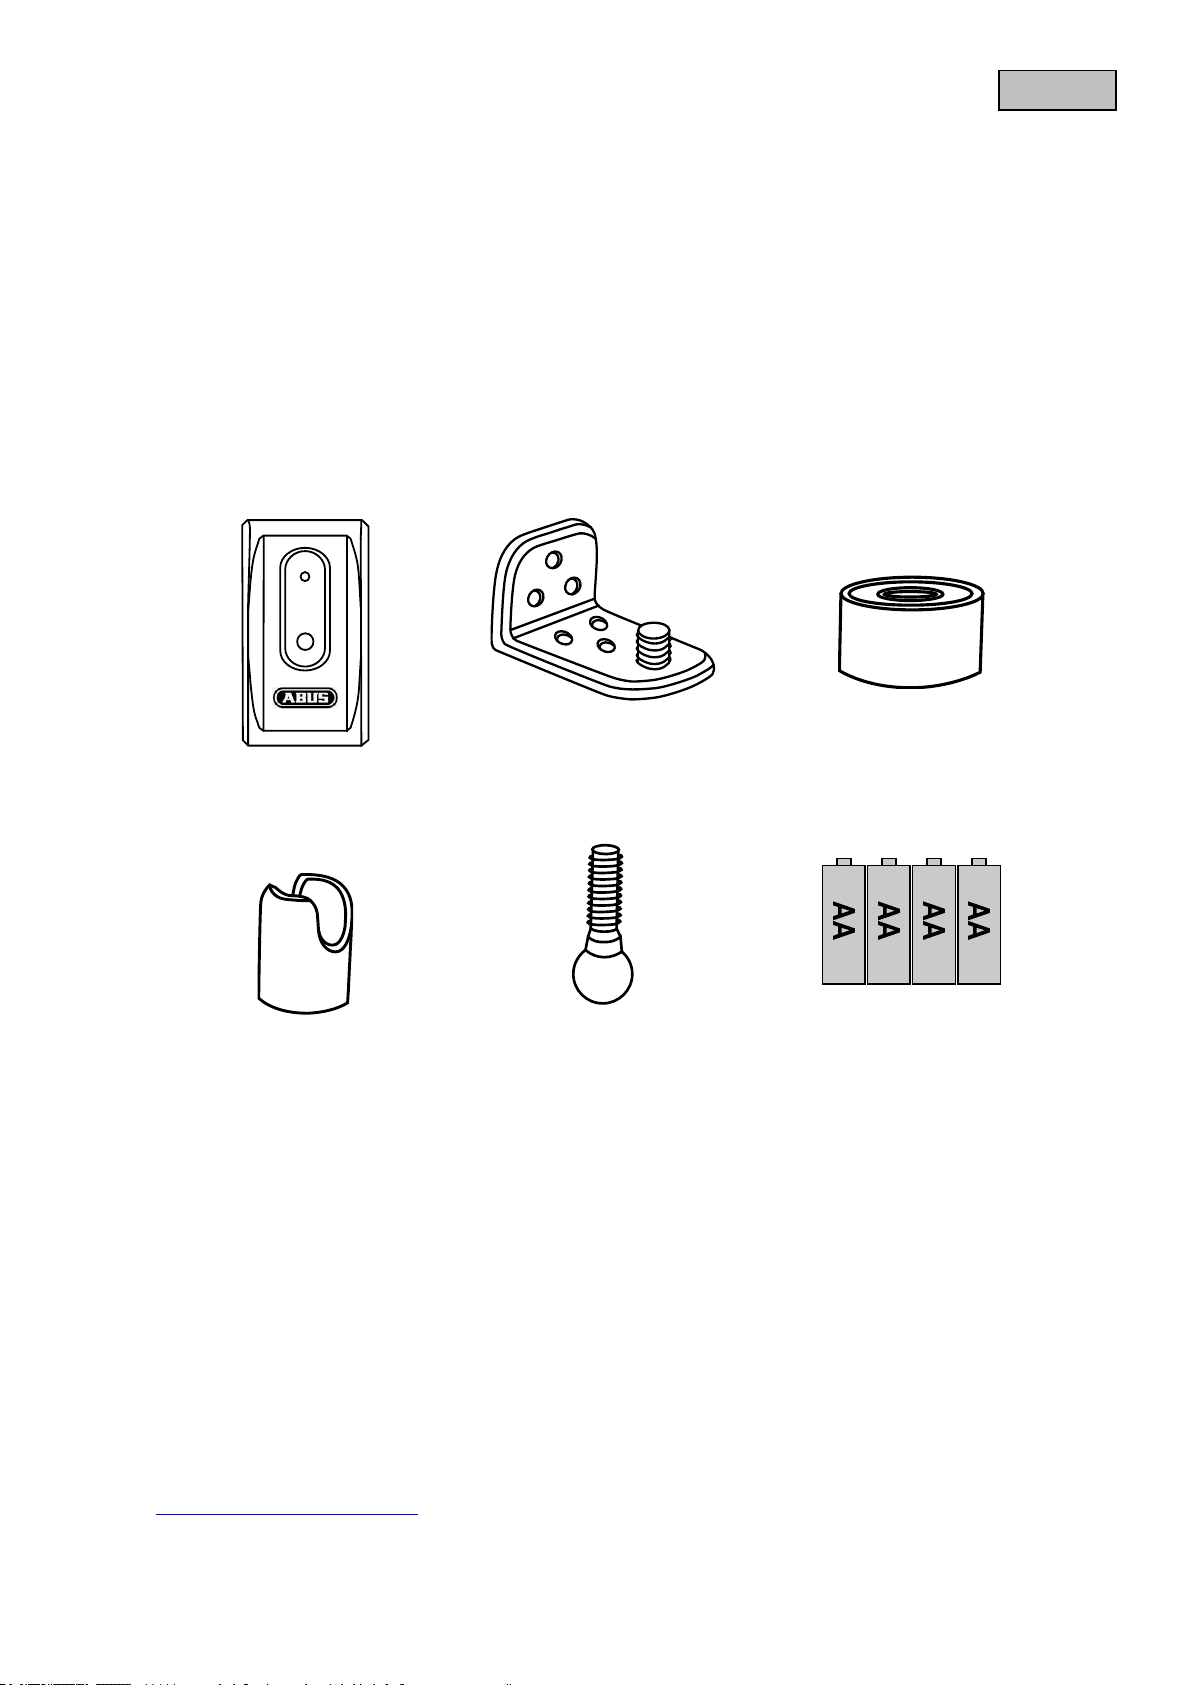
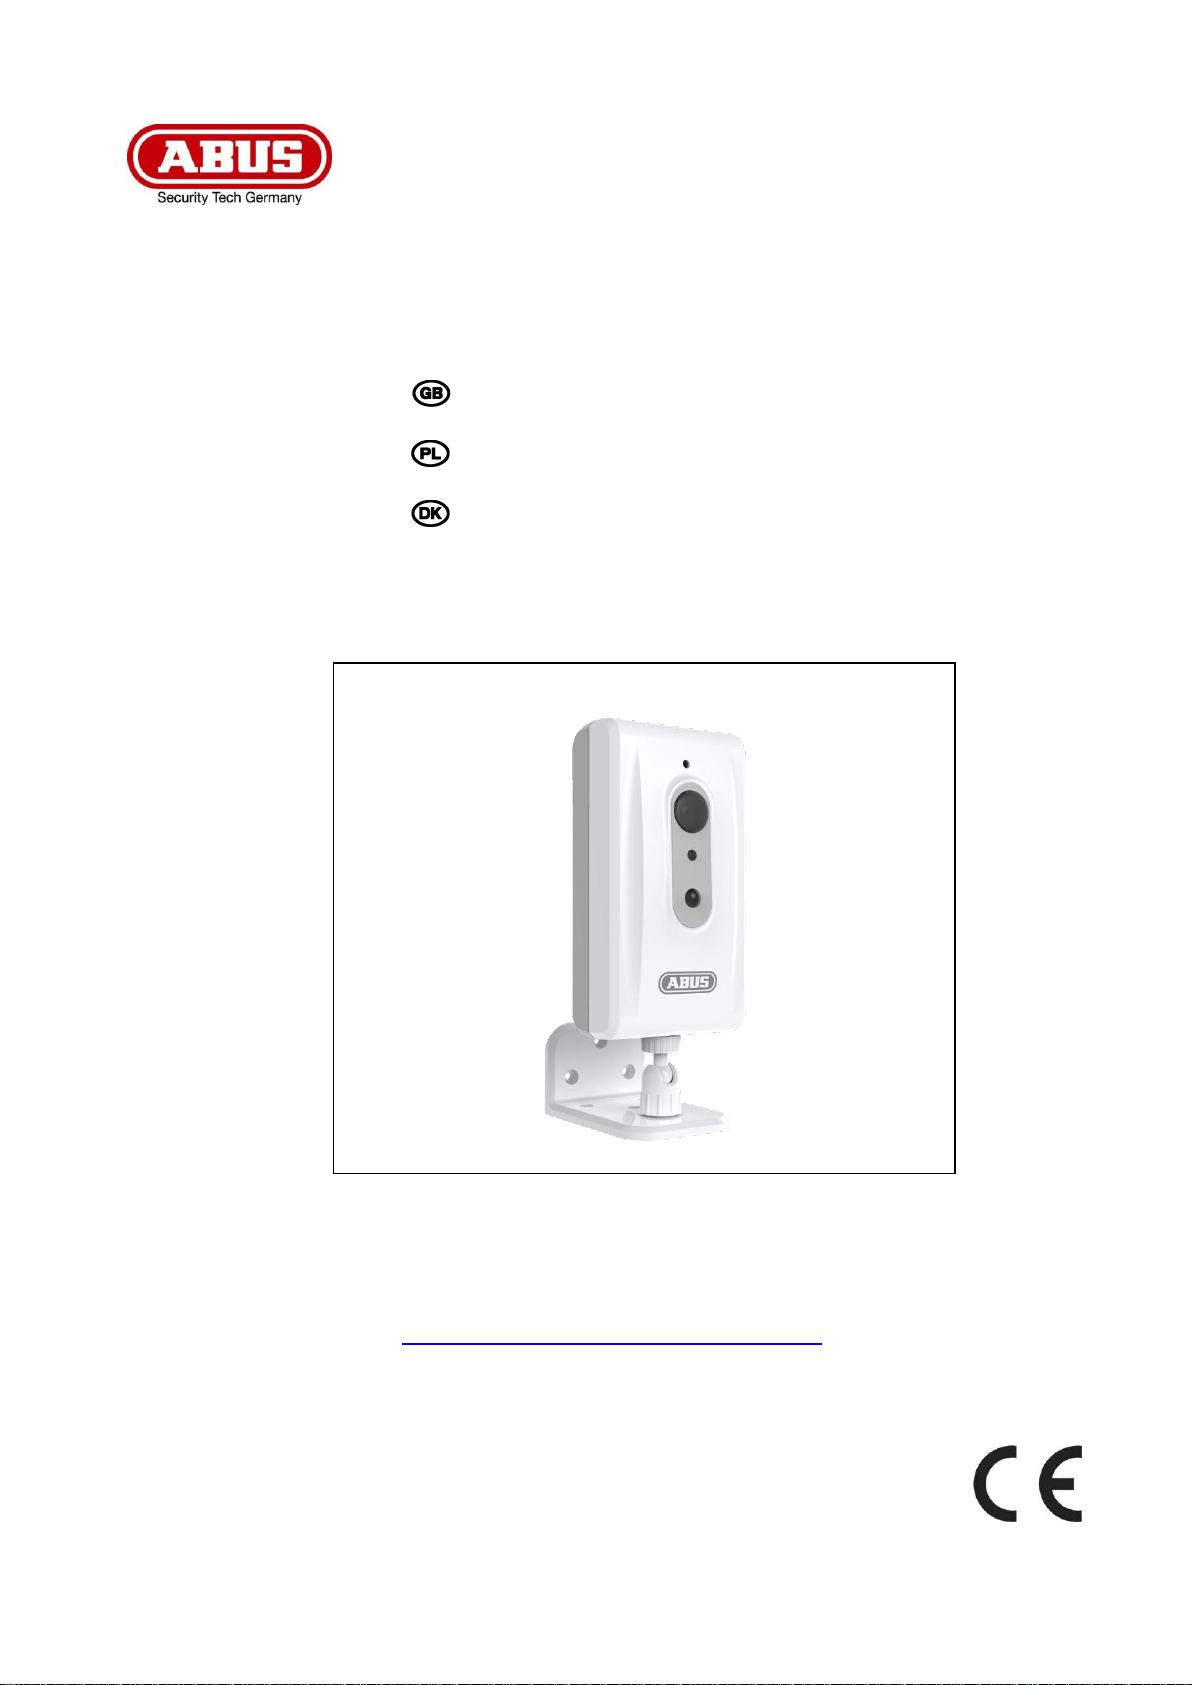
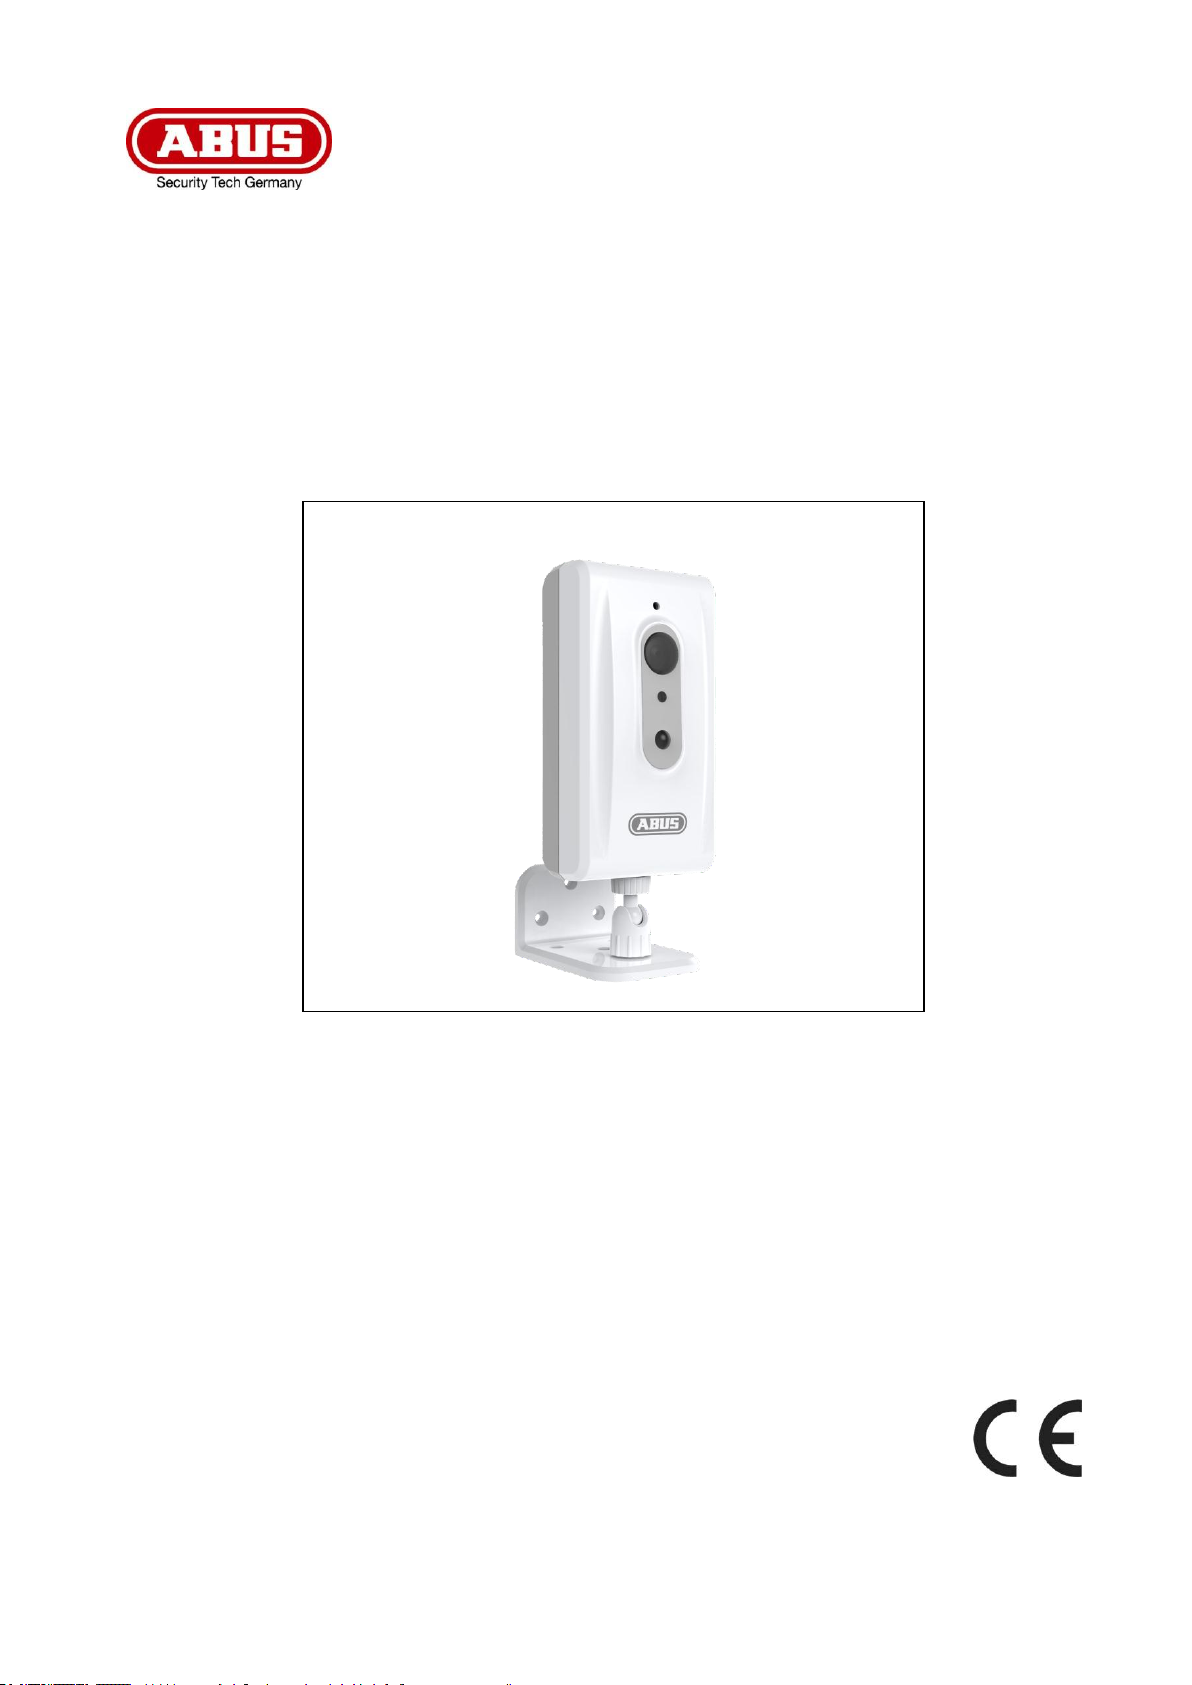
English
Time-lapse/motion-triggered
outdoor camera
Camera mount including
mounting material
Fastening nut
Hinge sleeve
Hinge screw
4 x 1.5 V batteries
1. Intended use
The time-lapse/motion-triggered outdoor camera has two functions in one. It can be used as a time-lapse
camera or for motion-triggered recordings indoors or outdoors.
The weatherproof time-lapse camera is ideal for long-term surveillance. At intervals determined by you
from 1 second to 24 hours, it saves an image on a micro SD card which you can then conveniently play as
an AVI film on your PC.
The camera has a PIR sensor for motion detection. As soon as the camera's PIR sensor detects body
heat, the recording starts on the micro SD card. The recording can then be watched conveniently on a PC.
For a detailed description of functions, refer to Section 3, “Features and functions”.
2. Scope of delivery
3. Features and functions
Two functions in one device: time-lapse camera and motion-triggered outdoor camera
Time-lapse camera with recordings at various intervals: ideal for long-term surveillance
Motion detector: intelligent motion detection thanks to its integrated PIR sensor
Integrated 2.4" LCD monitor
Videos are saved to a micro SD card (not included)
AVI video format makes playback on a PC easy
Wireless and uncomplicated installation thanks to battery power (4 x AA batteries included)
Weatherproof housing (protection class IP 65)
4. Information and FAQs
You can find important information and FAQs about this and other products on the website
www.abus.com/plug-and-play. You will find information for troubleshooting under item 11 of these
instructions.
6
Page 9
English
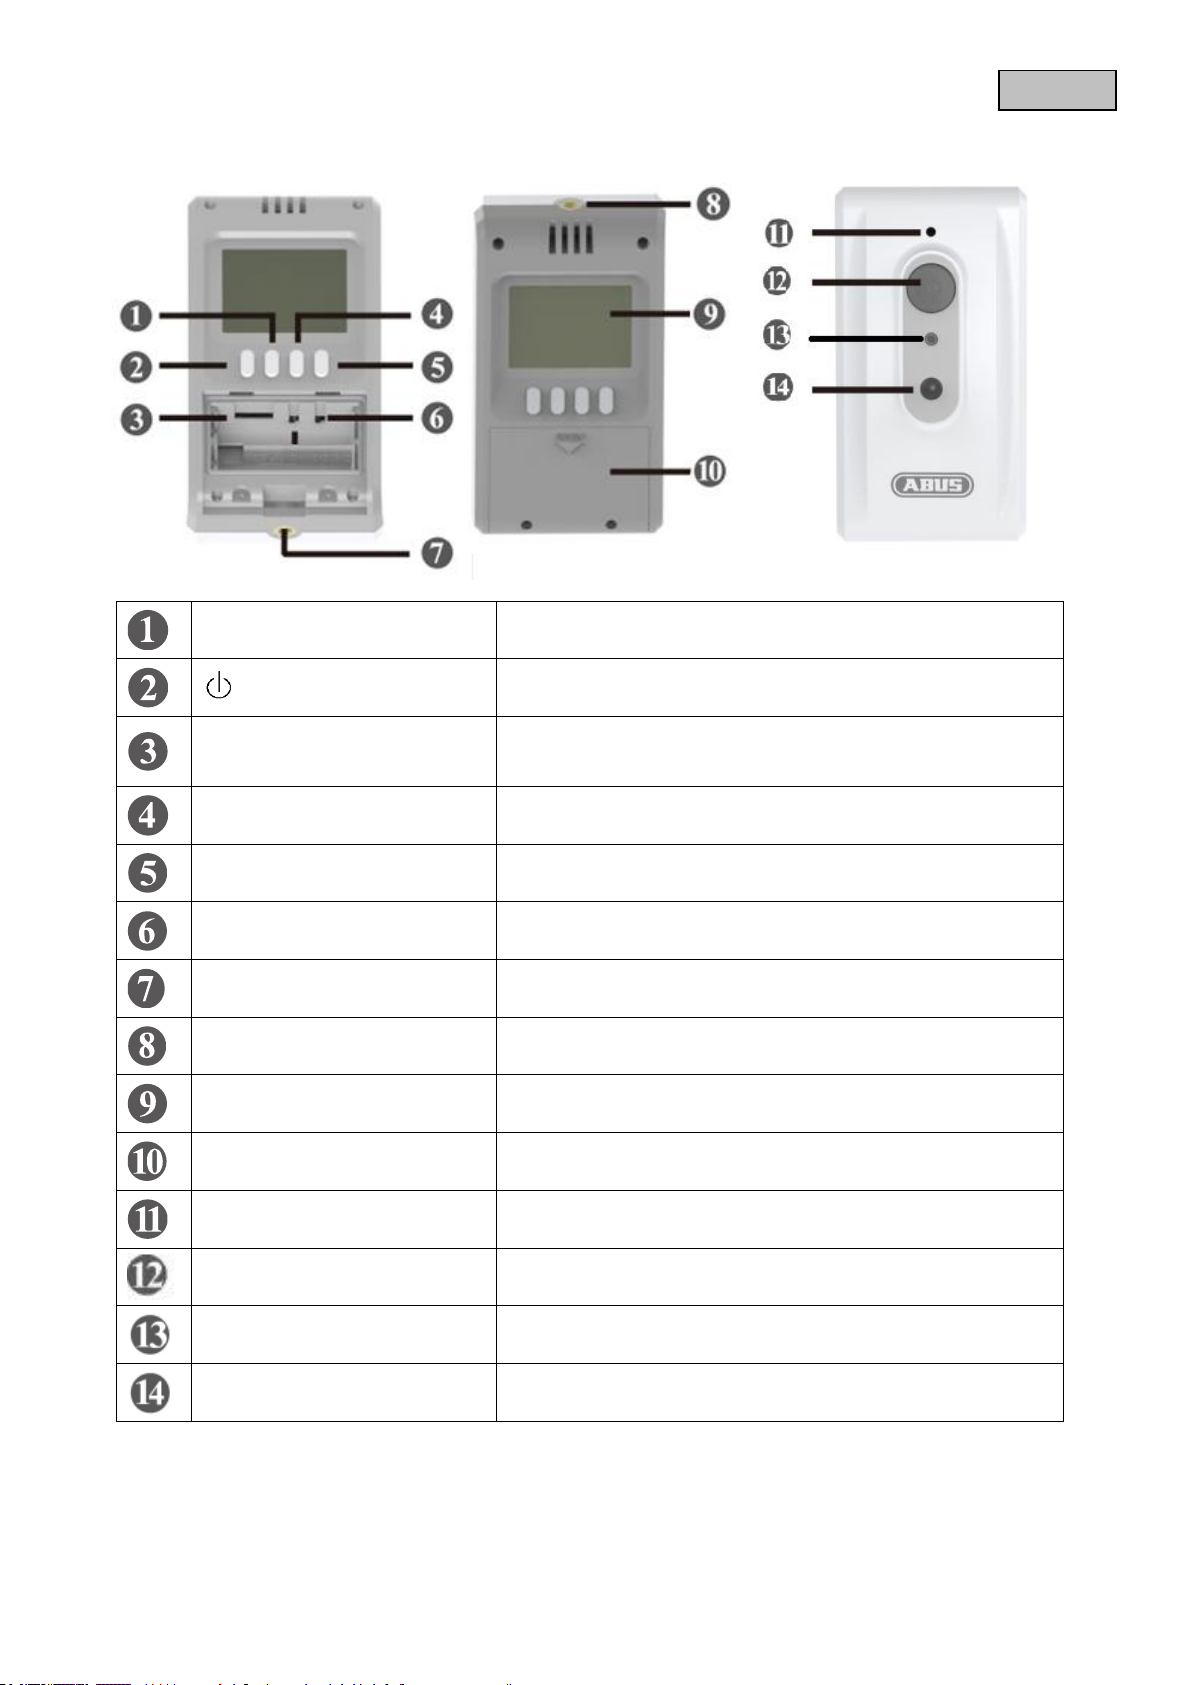
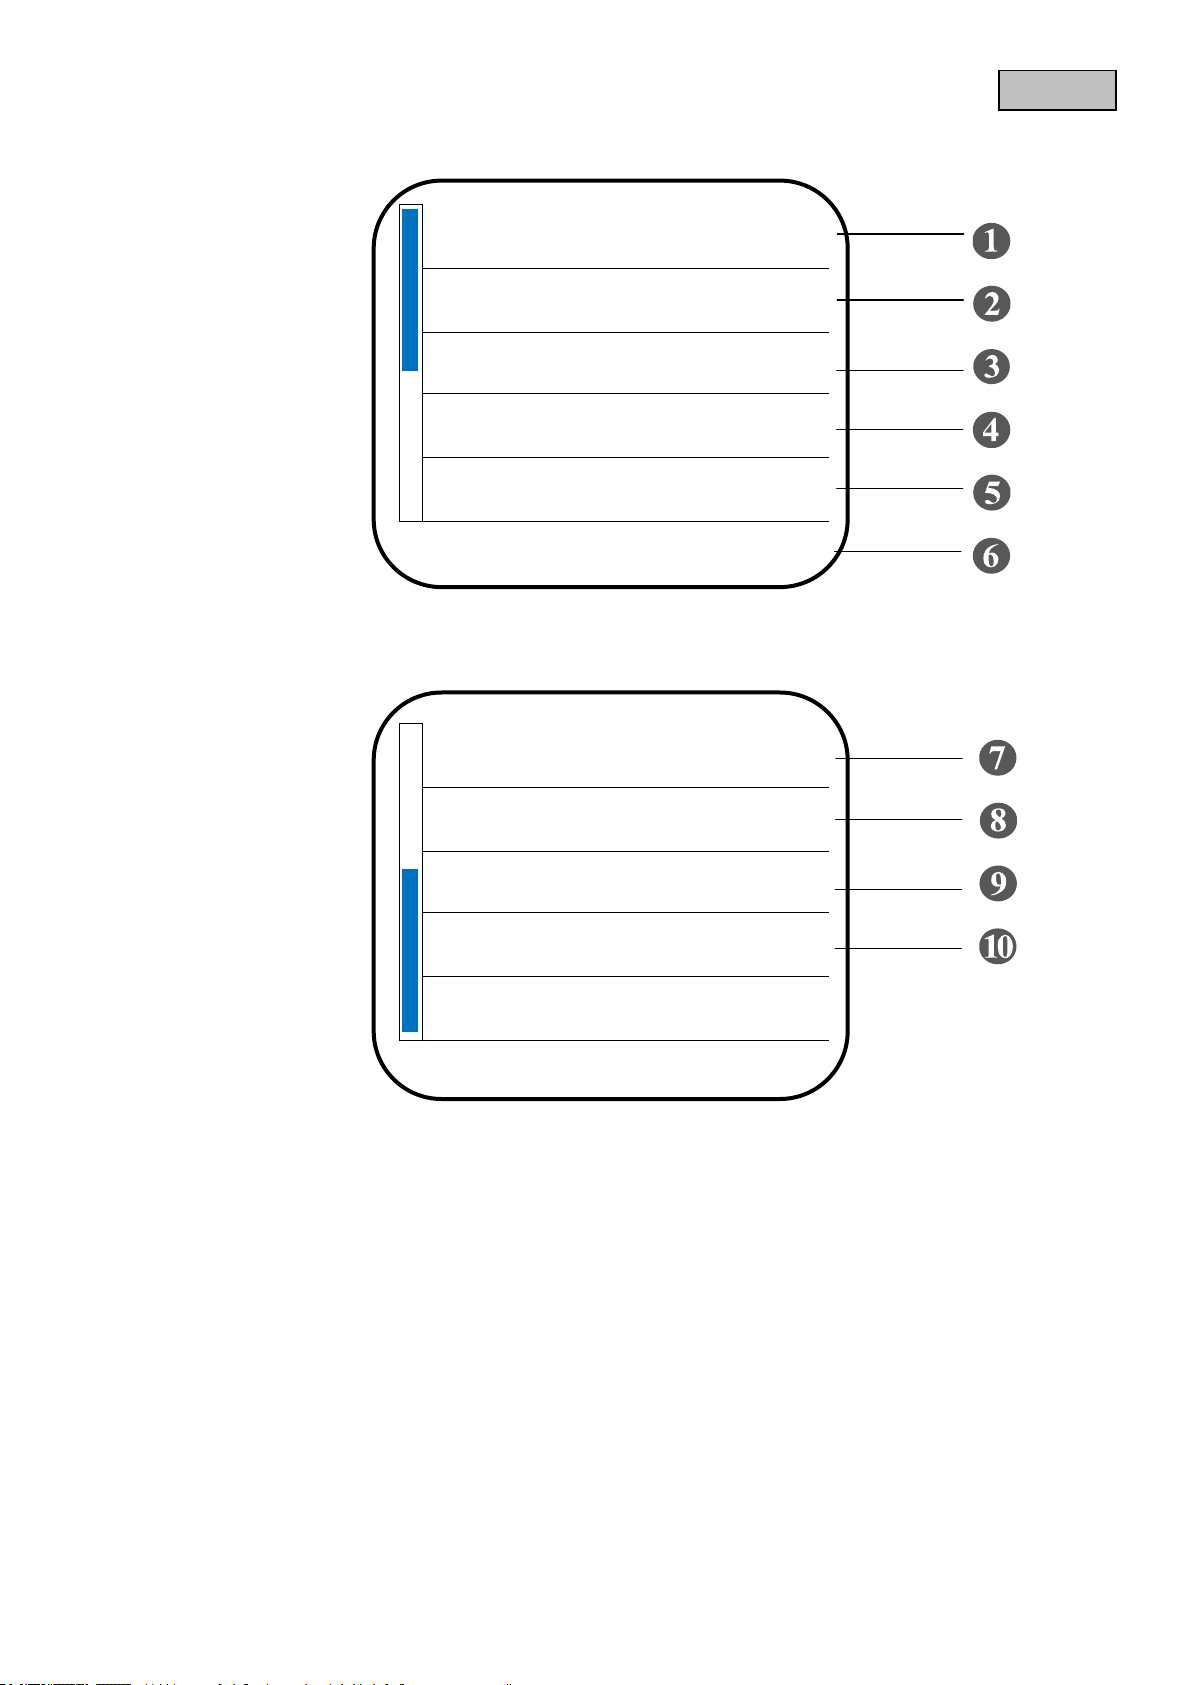
Menu / Set
Menu: Open the menu
Set: Change/confirm settings
/ OK
Power: Switch on the camera
OK: Save the settings
Micro SD card slot
Up to max. 32 GB
The device does not have an internal memory. A micro SD
card is required to save the recording.
Navigate between menu items
Navigate between menu items
Switch for
Motion detector/time-lapse
Left (PIR ON): Motion detection
Right (PIR OFF): Time-lapse camera
1/4” thread
Attachment on the camera mount
1/4” thread
Attachment on the camera mount
Monitor
2.4" LCD screen
Battery compartment
4 x 1.5 AA batteries
Microphone
For recording sound
Image sensor
¼" CMOS sensor
LED
On: Recording
Off: Not recording
PIR sensor
For motion detection
5. Device description
7
Page 10
English
Use a screwdriver to open the
battery compartment.
Insert a micro SD card (max. 32
GB, not included). Press the right
switch to select between timelapse and motion detection
recording (please see device
description, no. 6).
Insert four 1.5 V AA batteries.
Make sure the polarity is correct.
Close up the battery compartment
again using the screwdriver.
Put the hinge sleeve on the hinge
screw.
Now screw both parts together
with the fastening nut.
Do this by turning the cap
clockwise.
To attach the camera to a wall or
ceiling, first use the mount as a
drill template. Drill the holes and
use the wall plugs and screws
supplied to attach the mount.
Then screw the mount onto the
fixing plate.
6. Installing the camera
8
Page 11

English
Then screw the camera onto the mount.
Adjust the camera into the required position and tighten the screw.
Please note:
Mount the camera making sure that the ABUS logo can be seen and it is not the wrong way up.
If it is mounted incorrectly, the recordings will be reversed horizontally!
9
Page 12
English
Select motiontriggered recording /
time-lapse recording
First select the required mode by ensuring the switch in the battery compartment
is in the correct position.
Left (PIR ON): Motion-triggered recording
Right (PIR OFF): Time-lapse recording
Switching on the
device / opening the
menu
Press the power button for three seconds and then release. You will receive the
live picture. Press the Menu/Set button to open the menu.
Setting the date and
time
Set the time when starting the device for the first time:
Press the menu button to open the submenu.
You can change the digits using the arrow buttons.
Use the Power/OK button to move to the next entry.
Once the setting has been successfully made, return to the main menu with the
Menu/Set button.
Menu guidance
Use the ▼▲ buttons to navigate between the menu items.
Press the Menu/Set button again to change the settings.
You can change the values using the arrow buttons and press the Power/OK
button to save the setting.
Return to the main menu with the Menu/Set button.
After exiting the menu the settings are displayed again, the screen then switches
itself off, the camera returns to normal operating mode and records again.
Stopping recording
Press the Power/OK button for 5 seconds to stop a recording.
In the time-lapse mode, you receive the following message: “Complete Power
Off”. The camera is now switched off.
In the motion-triggered recording mode, you receive the following message:
“Complete power off. Please turn off PIR switch”.
Set the switch (6) to time-lapse function to switch off the device completely.
Now the device is turned off and you can remove the batteries and micro SD
card.
Playing back
recordings
To watch the recordings, remove the micro SD card and use a suitable card
reader to play back on the PC.
A TIME-LAPSE folder is created for recordings in the time-lapse mode and a
folder named “DCIM saved on the micro SD card” for motion-triggered
recordings.
Please note:
The device begins recording as soon as the batteries are inserted.
Please note:
After exiting the menu, the LCD screen switches off after 10 seconds.
If no buttons are pressed in live picture after switching on, the monitor switches off again after 20
seconds.
Please note:
To go to the menu, the LED must not light up red.
7. Operation
To operate the device, proceed as follows:
10
Page 13
English
Set Time
2012/12/01 12:02:15
Timelapse Interval
1,5 sec
AVI Frame Rate
30 FPS
Motion Record Life
30 sec
Video Resolution
1280 x 720
2012/ 12/ 01 12: 02: 15
Band Filter
60 Hz
Firmware Version
S1 T0.12
Reset Setting
No
Exit
60 Hz
Menu
11
Page 14

English
SD Full…
Storage capacity
Once your micro SD card is full, the “SD Full” message appears every
3 seconds on your screen.
If an SD card has not been inserted “No SD” appears.
Check the storage capacity of the card regularly!
No SD…
Low Battery…
Battery life
As soon as the battery is running low, the “Low Battery” message
appears.
Check the batteries regularly!
PIR recording (Picture / Video)
Recording mode
If the “PIR recording (Picture / Video)” message appears, the camera is
recording.
Set Time
Adjusting date and time.
Time-lapse Interval
Defining the time-lapse interviews.
You can choose between the following values:
1,5 seconds
5 seconds
10 seconds
30 seconds
1 minute
5 minutes
10 minutes
30 minutes
1 hour
5 hours
10 hours
24 hours
AVI Frame Rate
Here you can set the frame rate for the video recording in AVI
format.
You can choose between the following frame rates:
1FPS, 10FPS, 30FPS
Motion Record Live
Defining the recording duration for motion detection.
You can choose between 10 frames or 30 seconds.
10 images = 10 images (1 image/ second) are recorded and saved as
an AVI file.
30 seconds = a 30 second long video is saved in AVI format.
Video Resolution
Defining the resolution.
Here you can choose between the following video resolutions:
1280 x 720, 640 x 480
Settings
Here the current settings of the menu items are displayed.
Band Filter
Defining the network frequency
Here you can make adjustments to the network frequency in your
country to prevent flickering in the picture.
You can choose between the following frequencies.
50Hz / 60Hz
Firmware Version
In the “Firmware Version”menu item, you can see the current version
of the firmware.
Reset Setting
Restore default parameters.
This function lets you reset the camera to the default settings and all
the previous settings are deleted. To do so, select “Yes”, confirm with
“OK” and then “Set”.
Exit
After exiting the menu the camera returns to normal operating mode
and records again.
Explanation of terms
Display information
12
Page 15
English
Please note:
During motion-triggered recording, you cannot open the menu!
After pressing a button, the “PIR recording (Picture / Video)” message appears in your display.
Wait until the recording has finished (max. 30 seconds) before opening the menu.
Please note:
Motion-triggered recording is extremely sensitive to motion. Position the camera so that no
unnecessary movement is detected.
Please note:
An audio recording is only made when motion detection is in the AVI format (30 seconds
recording duration, the LED must not light up red).
TimeLapse Mode Enable
TimeLapse Interval: 1,5 sec
AVI Frame Rate: 30 FPS
Video Resolution: 1280 x 720
Band Filter: 60 Hz
PIR-Video Mode Enable
Motion Record Live: 30 sec
Video Resolution: 1280 x 720
Band Filter: 60 Hz
8. Settings
Once the time-lapse setting has been made, the live picture appears after exiting the menu and the following
message with your setting values.
For the motion detection settings, the following screen appears after the settings have been made.
To save the battery, the screen switches off after 10 seconds and starts with the recording.
13
Page 16
English
Do not allow any liquids to enter the device.
Do not use any chemical cleaning agent, as they could damage the surface of the housing
(discoloration).
Important information on device disposal
The EU Directive 2002/96/EG regulates the proper return, treatment and recycling of used
electronic devices. This symbol means that in the interest of environmental protection the
device must be disposed of separately from household or industrial waste at the end of its
service life in accordance with applicable local legal guidelines. Disposing of used devices
can be done at official recycling centers in your country. Obey local regulations when
disposing of material. Further details on returns (also for non-European countries) can be
obtained at your local authority. Separate collection and recycling saves natural resources
and ensures that all the provisions for protecting health and environment are observed
when recycling the product.
Important information on battery disposal
Batteries with this label do not contain harmful substances such as cadmium, lead and
mercury. However, used batteries must not be disposed of along with household waste in
accordance with the battery directive. To protect natural resources and promote the
recycling of materials, separate the batteries from other waste and deposit them at a local
recycling center. An additional label with the chemical symbols for Hg, Cd or Pb means
that the batteries contain quantities of mercury, cadmium or lead which exceed the
restrictions set by the EU Directive 2006/66. If batteries are not disposed of properly,
these substances can cause harm to human health or the environment.
Please note:
You do not need to perform any maintenance on this product. There are no components to
service or anything inside the product to check. Never open it.
9. Maintenance and cleaning
9.1 Maintenance
Examine the technical safety of the product regularly, e.g. check the housing for damage.
If it seems that it may no longer be possible to operate the device safety, stop using the product and protect it
from unintentional use.
It is likely that safe operation is no longer possible in the event that:
The device shows signs of visible damage.
The device no longer works correctly
9.2 Cleaning
Clean the device with a clean, dry cloth. The cloth can be dampened with lukewarm water if the dirt on the
monitor is hard to remove.
10. Disposal
14
Page 17
English
No.
Question
Answer
1
Can I switch off the camera
temporarily?
No, the device begins recording as soon as the batteries
are inserted.
2
Is the camera wind- and weatherproof?
Yes, the camera has protection class IP65 and is
intended for use both indoors and outdoors.
3
Which brightness will provide the best
image?
10 lux and more are the best light conditions.
4
Does the camera have a night vision
function?
Because this is a battery-operated camera, night vision
was not integrated.
For the best images, good light conditions or, at night,
sufficient illumination are needed.
5
What could be the reasons why the
device does not record?
If your device does not record, please check the
following:
1. Have you inserted a microSD card?
2. Is the microSD card locked? (Lock/Unlock)
3. Have you formatted the microSD card? It must be
formatted before it is first used.
Model number
TVAC80010B
Monitor
2.4" LCD monitor
Picture resolution
640 x 480 / 1280 x 720
Video resolution
640 x 480 @ 30fps / 1280 x 720 @ 30fps
Sensor
2 megapixel CMOS
PIR range
Max. 3 m
Video format
MJPEG
Storage medium
Micro SD card, max. 32 GB (not included)
Audio
Yes, for motion detection
Power supply
4 x AA batteries
IP protection class
IP65
Dimensions
80 x 48 x 150 mm
Weight
350 g incl. batteries
Max. operating temperature
-5°C to +55°C
11. Tips for troubleshooting
12. Technical data
15
Page 18
English
Time interval
Image
recordings
Battery lifetime
1,5 second
43200
14 hours
5 seconds
12960
14 hours
10 seconds
8640
24 hours
30 seconds
4320
2 days
1 minute
2880
3 days
5 minutes
1152
4 days
10 minutes
1152
8 days
30 minutes
768
16 days
1 hour
768
32 days
5 hours
312
65 days
10 hours
312
130 days
24 hours
270
270 days
Recording duration
PIR // 640 x 480 //
30 seconds
Recording duration
PIR // 1280 x 720 //
30 seconds
Image recordings
Time-lapse camera //
640 x 480
Image recordings
Time-lapse camera //
1280 x 720
1GB
51 minutes
17 minutes
13.185
4.395
2GB
102 minutes
34 minutes
26.370
8.790
8GB
408 minutes
136 minutes
105.480
35.160
16GB
816 minutes
272 minutes
210.960
70.320
32GB
1.632 minutes
544 minutes
421.920
140.640
Battery lifetime
Storage capacity
16
Page 19
TVAC80010B
Instrukcja obsługi
Wersja 04/2013
Traduction française du manuel utilisateur (original en allemand).
À conserver pour utilisation ultérieure.
Page 20
Polski
Wprowadzenie
Szanowna Klientko, Szanowny Kliencie!
Dziękujemy za zakup naszego produktu.
To urządzenie spełnia wymogi obowiązujących dyrektyw UE. Deklarację zgodności można otrzymać pod
adresem:
ABUS Security-Center GmbH & Co. KG
Linker Kreuthweg 5
86444 Affing
GERMANY
Aby zachować ten stan i zapewnić bezpieczną eksploatację, użytkownik musi przestrzegać niniejszej
instrukcji obsługi!
Przed uruchomieniem produktu przeczytaj całą instrukcję obsługi i przestrzegaj wszystkich zasad
bezpieczeństwa!
Wszystkie zawarte w niej nazwy firm i oznaczenia produktów są zarejestrowanymi znakami
towarowymi odnośnych właścicieli. Wszystkie prawa zastrzeżone.
W razie wątpliwości zwracaj się do instalatora lub sprzedawcy!
Ostrzeżenie w rozumieniu § 201 Kodeksu Karnego (niemieckiego):
Kto bez upoważnienia nagrywa teksty wypowiedziane niepublicznie przez inną osobę na nośniku audio,
używa wykonanych w ten sposób nagrań lub udostępnia je osobom trzecim, podlega karze pozbawienia
wolności lub grzywny!
Sankcjom karnym podlega także ten, kto bez upoważnienia podsłuchuje za pomocą aparatu
podsłuchowego nie przeznaczone do jego wiadomości teksty, wypowiedziane niepublicznie przez inną
osobę lub udostępnia osobom trzecim taką nagraną lub upublicznia podsłuchaną odpowiedź, w pełnym
brzmieniu lub istotną treść tej niepublicznej wypowiedzi.
Wyłączenie odpowiedzialności cywilnej
Niniejsza instrukcja obsługi została opracowana z najwyższą starannością. Jeżeli mimo to zauważysz w niej
braki lub niedokładności, prosimy o ich zgłaszanie na adres podany na odwrocie niniejszego podręcznika.
ABUS Security-Center GmbH nie odpowiada za błędy techniczne i typograficzne oraz zastrzega sobie
prawo do wprowadzania w każdej chwili bez wcześniejszej zapowiedzi zmian w produkcie i w instrukcjach
obsługi.
ABUS Security-Center nie odpowiada za bezpośrednie i pośrednie szkody następcze, powstałe w związku z
wyposażeniem, wydajnością i zastosowaniem produktu. Zawartość niniejszego dokumentu nie jest objęta
gwarancją.
18
Page 21
Polski
Symbol błyskawicy w trójkącie jest stosowany w celu wskazania na zagrożenie
dla zdrowia, np. porażeniem elektrycznym.
Wykrzyknik w trójkącie oznacza w niniejszej instrukcji obsługi ważne wskazówki, które
muszą być bezwzględnie przestrzegane.
Tym symbolem oznaczane są specjalne rady i wskazówki dotyczące obsługi.
Szkody spowodowane nieprzestrzeganiem niniejszej instrukcji obsługi powodują
wygaśnięcie roszczeń gwarancyjnych. Nie odpowiadamy za szkody następcze!
Nie odpowiadamy za szkody materialne lub osobowe, spowodowane nieprawidłową
obsługą lub nieprzestrzeganiem zasad bezpieczeństwa. W takich przypadkach wygasają
wszelkie roszczenia gwarancyjne!
Objaśnienie symboli
Ważne zasady bezpieczeństwa
Urządzenie zostało wyprodukowane zgodnie z międzynarodowymi standardami bezpieczeństwa.
Przeczytaj uważnie poniższe informacje dotyczące zasad bezpieczeństwa.
Zasady bezpieczeństwa
1. Czyszczenie
Czyść urządzenie tylko wilgotną ściereczką bez silnych środków czyszczących.
2. Miejsce ustawienia
Urządzenie jest przewidziane do eksploatacji na zabezpieczonym terenie zewnętrznym oraz we
wnętrzach.
Upadek nawet z niewielkiej wysokości może spowodować uszkodzenie produktu.
Zamontuj produkt tak, aby światło słoneczne nie padało bezpośrednio na czujnik obrazowy
urządzenia.
Przestrzegaj wskazówek montażowych zawartych w odpowiednim rozdziale niniejszej instrukcji
obsługi.
Nie umieszczaj urządzenia w bezpośrednim sąsiedztwie ogrzewania, pieca i innych źródeł ciepła
bądź w miejscu bezpośredniego oddziaływania promieni słonecznych.
Używaj urządzenia tylko w miejscach, w których temperatura otoczenia mieści się w dozwolonym
zakresie -5° - +55°C.
3. Zasady obchodzenia się z bateriami
Przechowuj baterie w miejscach niedostępnych dla dzieci. Dziecko może włożyć baterię do ust i
połknąć. Może to spowodować poważne szkody dla zdrowia. W takim przypadku należy natychmiast
udać się do lekarza!
Normalnych baterii nie wolno ładować, ogrzewać ani wrzucać do otwartego ognia (niebezpieczeństwo
wybuchu!).
Baterie nie mogą być narażone na bezpośrednie działanie źródeł ciepła lub światła słonecznego ani
przechowywane w miejscach o bardzo wysokiej temperaturze.
Bateria nie może mieć kontaktu z wodą.
Baterii nie wolno rozbierać, nakłuwać ani uszkadzać.
Nie wolno zwierać styków baterii.
Wyczerpujące się baterie należy w porę wymieniać.
Wymieniaj zawsze komplet baterii i używaj baterii tego samego typu.
Baterie uszkodzone lub z których wycieka elektrolit w kontakcie ze skórą mogą spowodować
poparzenia. W takiej sytuacji należy użyć rękawic ochronnych. Pojemnik na baterie czyść suchą
ściereczką.
19
Page 22

Polski
W razie stwierdzenia uszkodzenia oryginalnego opakowania, sprawdź najpierw urządzenie. W
razie stwierdzenia uszkodzeń urządzenia, odeślij je wraz z opakowaniem, informując
jednocześnie przewoźnika.
Ostrzeżenia
Przed pierwszym uruchomieniem należy spełnić wszystkie wymagania określone w zasadach
bezpieczeństwa i instrukcji obsługi!
Unikaj wymienionych niżej niekorzystnych warunków otoczenia w czasie eksploatacji urządzenia.
Temperatury poza dozwolonym obszarem
Bezpośrednie nasłonecznienie
Zapylenie, palne gazy, opary lub rozpuszczalniki
Silne wibracje
Silne pola magnetyczne, występujące np. w pobliżu maszyn lub głośników
Kamery nie wolno kierować na słońce, ponieważ może to doprowadzić do zniszczenia czujnika
obrazowego
Kamera zewnętrzna z aparatem do zdjęć przyspieszonych/czujką ruchu nie może być instalowana na
niestabilnych powierzchniach
Rozpakowanie
Rozpakowując urządzenie, należy zachować szczególną ostrożność.
20
Page 23

Polski
Spis treści
1. Użycie zgodne z przeznaczeniem ........................................................................................................... 22
2. Zakres dostawy ........................................................................................................................................ 22
3. Cechy i funkcje ......................................................................................................................................... 22
4. Wskazówki i często zadawane ................................................................................................................ 22
5. Opis urządzenia ........................................................................................................................................ 23
6. Montaż kamery ......................................................................................................................................... 24
7. Obsługa ..................................................................................................................................................... 26
8. Ustawienia................................................................................................................................................. 29
9. Konserwacja i czyszczenie ..................................................................................................................... 30
9.1 Konserwacja .......................................................................................................................................... 30
9.2 Czyszczenie .......................................................................................................................................... 30
10. Utylizacja ................................................................................................................................................... 30
11. Wskazówki dotyczące usuwania błędów ............................................................................................... 31
12. Dane techniczne ....................................................................................................................................... 31
21
Page 24

Polski
Kamera zewnętrzna do zdjęć
przyspieszonych/do rejestracji
sterowanej ruchem
Uchwyt kamery łącznie z
materiałem montażowym
Nakrętka mocująca
Tuleja przegubowa
Śruba przegubowa
4 x baterie 1,5 V
1. Użycie zgodne z przeznaczeniem
Kamera zewnętrzna do zdjęć przyspieszonych/rejestracji sterowanej ruchem ma dwie funkcje w jednym
urządzeniu. Może służyć jako kamera do zdjęć przyspieszonych lub do rejestracji sterowanej ruchem w
pomieszczeniach wewnętrznych lub na zewnątrz.
Odporna na warunki pogodowe kamera do zdjęć przyspieszonych jest idealna do długich obserwacji. W
określonym przez użytkownika przedziale (od 1 sekundy do 24 godzin) zapisuje ona po jednym obrazie na
karcie micro SD, a zarejestrowany plik można później wygodnie odczytać na swoim komputerze PC w
postaci filmu AVI.
Kamera ma czujkę PIR do rozpoznawania ruchu. Gdy czujka PIR kamery wykryje ruch ciepła, rozpoczyna
zapis na karcie micro SD. Zapis można później wygodnie obejrzeć na komputerze PC.
Szczegółowy opis działania znajduje się w rozdziale „3. Cechy i funkcje“.
2. Zakres dostawy
3. Cechy i funkcje
Dwie funkcje w jednym urządzeniu Kamera do zdjęć przyspieszonych i kamera zewnętrzna
sterowana ruchem
Kamera do zdjęć przyspieszonych z zapisami interwałowymi: idealna do długich obserwacji
Czujka ruchu: Inteligentne wykrywanie ruchu dzięki wbudowanej czujce PIR
Wbudowany monitor LCD 2,4"
Nagrania wideo są zapisywane na karcie micro SD (nie jest zawarta w zestawie)
Zapis wideo w formacie AVI do prostego odtwarzania na PC
Bezprzewodowa i nieskomplikowana instalacja dzięki zasilaniu z baterii (w zestawie 4 baterie AA)
Obudowa odporna na warunki atmosferyczne (klasa ochrony IP65)
4. Wskazówki i często zadawane
Ważne wskazówki i często zadawane pytania dotyczące tego produktu, jak również innych produktów
znaleźć można na stronie internetowej www.abus.com/plug-and-play. Informacje dotyczące usuwania
błędów znajdują się w punkcie 11 niniejszej instrukcji.
22
Page 25

Polski
Menu / Set
Menu: Wywołanie menu
Set: Zmiana/potwierdzenie ustawień
/ OK
Power: Włączanie kamery
OK: Zapamiętywanie ustawień
Gniazdo karty micro SD
Maks. do 32 GB.
Urządzenie nie ma pamięci wewnętrznej. Do zapisywania
nagrań wymagana jest karta pamięci micro SD.
Przełączanie pomiędzy opcjami menu
Przełączanie pomiędzy opcjami menu
Przełącznik do
czujki ruchu/kamery do zdjęć
przyspieszonych
Lewa strona (PIR ON): Wykrywanie ruchu
Prawa strona (PIR OFF): Kamera do zdjęć przyspieszonych
Gwint 1/4‘‘
Mocowanie na uchwycie kamery
Gwint 1/4‘‘
Mocowanie na uchwycie kamery
Monitor
Ekran LCD 2,4‘‘
Pojemnik na baterie
4 x baterie 1,5 AA
Mikrofon
Do rejestracji dźwięku
Czujnik obrazowy
CMOS ¼‘‘
LED
Wł.: Zapis
Wył.: Brak zapisu
Czujka PIR
Do wykrywania ruchu
5. Opis urządzenia
23
Page 26

Polski
Do otwarcia schowka na baterię
użyj wkrętaka.
Włóż kartę micro SD (maks. 32
GB, nie jest zawarta w zestawie)
Za pomocą prawego przełącznika
można wybrać zapis kamery do
zdjęć przyspieszonych i zapis
sterowany ruchem (patrz opis
urządzenia nr 6).
Włóż cztery baterie 1,5 V AA,
pamiętając przy tym o
prawidłowym położeniu biegunów.
Zamknij z powrotem pojemnik na
baterie za pomocą wkrętaka.
Załóż tuleję przegubową na śrubę
przegubową.
Przykręć obie części używając
nakrętki mocującej.
Zaślepkę należy przykręcać w
kierunku zgodnym z ruchem
wskazówek zegara.
Aby zamontować kamerę na
ścianie lub suficie, należy najpierw
użyć uchwytu jako szablonu do
wiercenia. Wywierć dziury i użyj
kołków rozporowych oraz śrub, by
zamontować uchwyt.
Przykręć uchwyt do płyty
montażowej.
6. Montaż kamery
24
Page 27

Polski
Przykręć kamerę do uchwytu.
Ustaw kamerę w żądanej pozycji i dokręć gwint.
Pamiętaj:
Zamontuj kamerę tak, by logo ABUS było widoczne i nie było odwrócone.
W przypadku nieprawidłowego montażu obrazy będą zapisywane w odbiciu lustrzanym osi
poziomej!
25
Page 28

Polski
Wybierz zapis
sterowany
wykrywaniem ruchu /
zapis przyspieszony
Wybierz najpierw pożądany tryb, odpowiednio ustawiając przełącznik w schowku
na baterię.
Lewy (PIR ON): Zapis sterowany wykrywaniem ruchu
Prawy (PIR OFF): Zapis przyspieszony
Włączanie urządzenia
/ Wywołanie menu
Przytrzymaj wciśnięty przycisk Power przez trzy sekundy i puść go. Zostanie
wyświetlony obraz na żywo. Aby wywołać menu, naciśnij przycisk Menu/Set.
Ustawianie daty i
godziny
Przy pierwszym uruchomieniu urządzenia należy ustawić godzinę:
W tym celu naciśnij przycisk menu, aby wywołać submenu.
Za pomocą przycisków ze strzałkami można zmieniać liczby.
W celu przejścia do następnego punktu należy użyć przycisku Power/OK.
Po pomyślnym ustawieniu wróć do menu głównego, używając przycisku
Menu/Set.
Obsługa w systemie
menu
Nawigację między opcjami menu umożliwiają przyciski ▼▲.
Aby zmienić ustawienia, naciśnij ponownie przycisk Menu/Start.
Za pomocą przycisków ze strzałkami można zmieniać wartości. Aby zapamiętać
ustawioną wartość, należy nacisnąć przycisk Power/OK.
Przycisk Menu/Set umożliwia powrót do głównego menu
Przy wychodzeniu z menu ponownie wyświetlane są ustawienia, następnie
ekran wyłącza się, kamera powraca do normalnego trybu pracy i kontynuuje
nagrywanie.
Zatrzymanie zapisu
Aby zatrzymać zapis, przytrzymaj przycisk Power/OK naciśnięty przez 5 sekund.
W trybie zdjęć przyspieszonych pojawia się komunikat: „Complete Power Off“.
Kamera jest teraz wyłączona.
W trybie rejestracji sterowanej ruchem pojawia się komunikat:
„Complete power off. Please turn off PIR switch“.
Ustaw przełącznik (6) na funkcję zapisu przyspieszonego, aby całkowicie
wyłączyć urządzenie.
Wówczas urządzenie wyłączy się i można z niego wyjąć baterie oraz kartę micro
SD.
Odtwarzanie zapisu
Aby przejrzeć zarejestrowane obrazy, wyjmij kartę micro SD i użyj
odpowiedniego czytnika kart, aby odtworzyć je na komputerze PC.
Zapisy w trybie zdjęć przyspieszonych są zachowywane w folderze
„TIMELAPSE“, a zapisy sterowane ruchem - w folderze „DCIM na karcie micro
SD“.
Pamiętaj:
Po wożeniu baterii urządzenie uruchamia zapisywanie.
Pamiętaj:
Po opuszczeniu menu ekran LCD wyłącza się po 10 sekundach.
Jeśli na obrazie w trybie live nie będą używane żadne przyciski, monitor ponownie wyłączy się
po 20 sekundach.
Pamiętaj:
Wejście do menu jest niemożliwe, gdy świeci czerwona dioda LED.
7. Obsługa
Obsługa urządzenia:
26
Page 29

Polski
Set Time
2012/12/01 12:02:15
Timelapse Interval
1,5 sec
AVI Frame Rate
30 FPS
Motion Record Life
30 sec
Video Resolution
1280 x 720
2012/ 12/ 01 12: 02: 15
Band Filter
60 Hz
Firmware Version
S1 T0.12
Reset Setting
No
Exit
60 Hz
Menu
27
Page 30

Polski
SD Full…
Pojemność pamięci:
Jeżeli karta micro SD jest pełna, na ekranie co 3 sekundy pojawia się
napis „SD Full…“.
Jeżeli karta SD nie jest włożona, pojawia się napis „No SD…“.
Proszę regularnie kontrolować pojemność pamięci karty
bezpośrednio na ekranie kamery!
No SD…
Low Battery…
Żywotność baterii
Jeżeli baterie się wyczerpują, pojawia się napis „Low Battery…“
Proszę regularnie kontrolować baterie bezpośrednio na ekranie
kamery!
PIR recording (Picture / Video)
Tryb zapisu
Jeśli pojawia się napis „PIR recording (Picture / Video)“, oznacza to, że
kamera rejestruje obraz.
Set Time
Ustawianie daty i czasu.
Timelapse Interval
Ustalanie interwału do zapisu przyspieszonego.
Istnieje możliwość wyboru następujących wartości:
1,5 sekund
5 sekund
10 sekund
30 sekund
1 minuta
5 minut
10 minut
30 minut
1 godzina
5 godzin
10 godzin
24 godziny
AVI Frame Rate
Tu można ustalić częstotliwość odświeżania obrazu dla zapisu wideo
w formacie AVI.
Istnieje możliwość wyboru następujących częstotliwości odświeżania
obrazu:
1FPS, 10FPS, 30FPS
Motion Record Life
Ustalanie czasu zapisu po wykryciu ruchu.
Można wybrać 10 obrazów lub 30 sekund.
10 obrazów = zostanie nagrane 10 obrazów (1 obraz/sekundę) i
zapisane w formacie AVI.
30 sekund = zostanie zapisane 30-sekundowe wideo w formacie AVI.
Video Resolution
Tu można wybrać następujące rozdzielczości obrazów wideo:
1280 x 720, 640 x 480
Ustawienia
Tu wyświetlane są aktualne ustawienia opcji menu.
Band Filter
Ustalanie częstotliwości sieciowej
Tu można dostosować częstotliwość sieciową do częstotliwości
obowiązującej w kraju, co pozwoli uniknąć migotania obrazu.
Istnieje możliwość wyboru następujących częstotliwości:
50Hz / 60Hz
Firmware Version
Opcja menu „Firmware Version” umożliwia sprawdzenie aktualnej
wersji oprogramowania firmware.
Reset Setting
Przywrócenie ustawień fabrycznych
Ta funkcja służy do usunięcia wszystkich wykonanych ustawień i
przywrócenia ustawień fabrycznych kamery. Wybierz w tym celu
„Yes“, potwierdź „OK“ a następnie „Set“.
Exit
Po wyjściu z menu kamera powraca do normalnego trybu pracy i
kontynuuje nagrywanie.
Objaśnienie pojęć
Wskazówki dot. wyświetlania
28
Page 31

Polski
Pamiętaj:
Podczas rejestracji sterowanej ruchem nie można wywołać menu!
Po naciśnięciu dowolnego przycisku na monitorze pojawia się komunikat „PIR recording
(Picture / Video)”. Aby wejść do menu, należy poczekać, aż rejestracja się zakończy (maks. 30
sekund).
Pamiętaj:
W trybie rejestracji sterowanej ruchem kamera wykazuje dużą wrażliwość na ruch. Należy tak
ustawić kamerę, aby nie wykrywała niepotrzebnego ruchu.
Pamiętaj:
Zapis audio (w formacie AVI) następuje tylko w razie wykrycia ruchu (czas trwania zapisu 30
sekund, nie może świecić czerwona dioda LED).
TimeLapse Mode Enable
TimeLapse Interval: 1,5 sec
AVI Frame Rate: 30 FPS
Video Resolution: 1280 x 720
Band Filter: 60 Hz
PIR-Video Mode Enable
Motion Record Life: 30 sec
Video Resolution: 1280 x 720
Band Filter: 60 Hz
8. Ustawienia
Po pomyślnym ustawieniu funkcji zdjęć przyspieszonych i po opuszczeniu menu pojawia się obraz na żywo
oraz następujący komunikat z wartościami ustawionymi przez użytkownika.
Po pomyślnym ustawieniu wyświetla się następujący ekran umożliwiający ustawienie wykrywania ruchu.
W celu zaoszczędzenia baterii ekran wyłącza się po 10 sekundach i rozpoczyna się zapis.
29
Page 32

Polski
Uważaj, aby do wnętrza urządzenia nie dostała się jakakolwiek ciecz.
Nie używaj chemicznych środków czyszczących, ponieważ mogą one uszkodzić
powierzchnię obudowy (spowodować odbarwienia).
Ważna wskazówka dot. utylizacji urządzenia
Dyrektywa UE 2002/96/WE reguluje kwestię prawidłowego wycofania z użycia i utylizacji
urządzeń elektronicznych oraz obchodzenia się z nimi. Ten symbol oznacza, że w
związku ochroną środowiska urządzenie należy zutylizować po okresie jego żywotności
zgodnie z obowiązującymi przepisami prawnymi, w separacji od odpadów z gospodarstw
domowych oraz odpadów przemysłowych. Utylizacja może być przeprowadzona przez
autoryzowane punkty zbiorcze w kraju użytkownika. Należy przestrzegać lokalnych
przepisów w zakresie utylizacji materiałów. Dalsze informacje dotyczące wycofania z
użytku (obejmujące również kraje spoza UE) można uzyskać od organów administracji
lokalnej. Selektywna zbiórka i recykling umożliwiają oszczędność zasobów naturalnych, a
sam recykling, o ile jest realizowany zgodnie z przepisami, zapewnia ochronę zdrowia i
środowiska.
Ważna informacja dot. utylizacji baterii
Baterie oznakowane w ten sposób zawierają szkodliwe substancje, takie jak kadm, ołów i
rtęć. Zużytych baterii, zgodnie z rozporządzeniem w sprawie baterii, nie wolno utylizować
łącznie z odpadami z gospodarstw domowych. W celu ochrony zasobów naturalnych i
wspierania działań mających na celu umożliwienie ponownego użycia materiałów baterie
należy oddzielać od innych odpadów i przekazywać do lokalnego systemu
recyklingowego. Dodatkowe oznakowanie symbolami Hg, Cd lub Pb oznacza, że baterie
zawierają rtęć, kadm lub ołów w ilościach wykraczających poza wartości graniczne
Dyrektywy UE 2006/66. Nieprawidłowa utylizacja baterii może spowodować zagrożenie
dla zdrowia ludzi i środowiska, wywołane oddziaływaniem tych substancji.
Pamiętaj:
Produkt nie wymaga konserwacji. Nie posiada on części, które powinno się sprawdzać lub
konserwować, dlatego nie należy go nigdy otwierać.
9. Konserwacja i czyszczenie
9.1 Konserwacja
Sprawdzaj regularnie bezpieczeństwo techniczne produktu, np. czy obudowa nie jest uszkodzona.
Jeżeli są powody do przypuszczenia, że bezpieczna eksploatacja jest niemożliwa, należy wycofać produkt z
eksploatacji i zabezpieczyć przed przypadkowym uruchomieniem.
Należy przyjąć, że bezpieczna eksploatacja nie jest możliwa, jeżeli:
urządzenie ma widoczne uszkodzenia,
urządzenie nie działa.
9.2 Czyszczenie
Czyść produkt czystą, suchą ściereczką. W razie większych zabrudzeń ściereczkę można zwilżyć letnią
wodą.
10. Utylizacja
30
Page 33

Polski
No.
Pytania
Odpowiedź
1
Czy można tymczasowo wyłączyć
kamerę?
Nie. Tuż po włożeniu baterii urządzenie rozpoczyna
rejestrowanie.
2
Czy kamera jest odporna na wiatr i
działanie czynników atmosferycznych?
Tak. Kamera ma stopień ochrony IP65 i jest
przeznaczona do zastosowania zarówno wewnątrz
budynku, jak i na zewnątrz.
3
Przy jakiej jasności powstaje optymalny
obraz?
Jasność min. 10 lux zapewnia idealne warunki
oświetlenia dla uzyskania optymalnego obrazu.
4
Czy kamera ma funkcję noktowizora?
Ponieważ kamera jest urządzeniem zasilanym z
baterii, nie zintegrowano funkcji noktowizora.
Warunkiem uzyskania optymalnego zapisu są dobre
warunki oświetlenia lub w przypadku nocy wystarczające podświetlenie.
5
Co może być przyczyną nie rejestrowania
obrazu przez urządzenie?
Jeśli urządzenie nie rejestruje obrazu, należy
sprawdzić poniższe punkty:
1. Czy włożono kartę micro SD?
2. Czy karta microSD jest odblokowana?
(Lock/Unlock?)
3. Czy sformatowano kartę micro SD? Kartę należy
sformatować przed użyciem po raz pierwszy.
Numer typu
TVAC80010B
Monitor
Monitor LCD 2,4"
Rozdzielczość obrazu
640 x 480 / 1280 x 720
Rozdzielczość obrazów wideo
640 x 480 @ 30fps / 1280 x 720 @ 30fps
Czujnik
CMOS 2 megapikseli
Zasięg czujnika PIR
Maks. 3 m
Format obrazów wideo
MJPEG
Nośnik pamięci
Karta micro SD, maks. 32 GB (nie jest zawarta w zestawie)
Audio
Tak, przy wykrywaniu ruchu
Zasilanie napięciowe
4 x baterie AA
Stopień ochrony IP
IP65
Wymiary
80 x 48 x 150 mm
Masa
350 g z bateriami
Maks. temperatura pracy
od -5°C do +55°C
11. Wskazówki dotyczące usuwania błędów
12. Dane techniczne
31
Page 34

Polski
Przedział
czasu
Zapisy obrazu
Żywotność baterii
1,5 sekunda
43200
14 godzin
5 sekund
12960
14 godzin
10 sekund
8640
24 godzin
30 sekund
4320
2 dni
1 minuta
2880
3 dni
5 minut
1152
4 dni
10 minut
1152
8 dni
30 minut
768
16 dni
1 godzina
768
32 dni
5 godzin
312
65 dni
10 godzin
312
130 dni
24 godziny
270
270 dni
czas zapisu
PIR // 640 x 480 //
30 sekund
czas zapisu
PIR // 1280 x 720 //
30 sekund
Zapisy obrazu
Kamera do zdjęć
przyspieszonych //
640 x 480
Zapisy obrazu
Kamera do zdjęć
przyspieszonych //
1280 x 720
1GB
51 minut
17 minut
13.185
4.395
2GB
102 minut
34 minut
26.370
8.790
8GB
408 minut
136 minut
105.480
35.160
16GB
816 minut
272 minut
210.960
70.320
32GB
1.632 minut
544 minut
421.920
140.640
Żywotność baterii
Pojemność pamięci:
32
Page 35

TVAC80010B
Gebruikershandleiding
Versie 04/2013
Original betjeningsvejledning på tysk. Opbevares til fremtidig anvendelse
Page 36

Dansk
Indledning
Kære kunde.
Tak, fordi du har valgt at købe dette produkt.
Dette apparat opfylder kravene i gældende EU-direktiver. Overensstemmelseserklæringen kan rekvireres
hos:
ABUS Security-Center GmbH & Co. KG
Linker Kreuthweg 5
86444 Affing
GERMANY
Som bruger er du forpligtet til at følge denne betjeningsvejledning for at bevare denne tilstand og sikre en
farefri brug!
Læs hele betjeningsvejledningen igennem før idrifttagning af produktet og overhold alle betjenings- og
sikkerhedshenvisninger!
Alle nævnte firmanavne og produktbetegnelser er de pågældende ejeres varemærker. Alle rettigheder
forbeholdt.
I tilfælde af spørgsmål bedes du henvende dig til din installatør eller forhandler!
Advarselshenvisning iht. § 201 StGB:
Den, der uden tilladelse optager en anden persons ikke-offentligt udtalte udtalelse på et lydmedium eller
anvender en optagelse, der er fremstillet på denne måde, eller lader tredjeperson få adgang til den, kan
straffes med frihedsstraf eller bøde!
Den, der uden tilladelse aflytter en anden persons ikke-offentligt udtalte udtalelse, der ikke er tiltænkt
vedkommende, med et lytteapparat eller offentligt gengiver en anden persons optagede eller aflyttede ikkeoffentligt udtalte udtalelse ordret eller det væsentlige indhold, kan også straffes.
Ansvarsfritagelse
Denne betjeningsvejledning er udarbejdet meget omhyggeligt. Hvis du alligevel finder udeladelser eller
unøjagtigheder, bedes du meddele os dette på adressen, der er anført på bagsiden af håndbogen.
ABUS Security-Center GmbH påtager sig intet ansvar for tekniske og typografiske fejl og forbeholder sig
retten til på ethvert tidspunkt uden forudgående varsel at ændre produktet og betjeningsvejledningerne.
ABUS Security-Center er ikke ansvarlig for direkte og indirekte følgeskader, der opstår i forbindelse med
dette produkts udstyr, funktion og anvendelse. Der gælder ingen garanti for indholdet i dette dokument.
34
Page 37

Dansk
Symbolet med lynet i trekanten anvendes, når der er fare for
helbredet, f.eks. på grund af elektrisk stød.
Et udråbstegn, der befinder sig i trekanten, gør opmærksom på vigtige henvisninger i
betjeningsvejledningen, som ubetinget skal overholdes.
Dette symbol vises, når du skal have særlige tips og henvisninger vedr. betjeningen.
Ved skader, der skyldes manglende overholdelse af denne betjeningsvejledning,
bortfalder garantien. Vi påtager os intet ansvar for følgeskader!
Vi påtager os intet ansvar i forbindelse med materielle skader og/eller personskader, der
skyldes ukorrekt håndtering eller manglende overholdelse af sikkerhedshenvisningerne.
I sådanne tilfælde bortfalder enhver form for garanti!
Symbolforklaring
Vigtige sikkerhedshenvisninger
Dette apparat blev produceret under overholdelse af internationale sikkerhedsstandarder.
Læs de efterfølgende sikkerhedshenvisninger omhyggeligt igennem.
Sikkerhedshenvisninger
1. Rengøring
Rengør kun apparatet med en fugtig klud uden skarpe rengøringsmidler.
2. Opstillingssted
Dette apparat er beregnet både til beskyttet udendørs brug og til indendørs brug.
Produktet kan også beskadiges, hvis det falder fra lav højde.
Montér produktet, så direkte sollys ikke kan falde på apparatets billedoptager.
Vær opmærksom på monteringshenvisningerne i det pågældende kapitel i denne
betjeningsvejledning.
Placér ikke apparatet direkte i nærheden af varmeapparater, ovne, andre varmekilder eller i direkte
sollys.
Anvend kun apparatet på steder med temperaturer i det tilladte omgivelsesstemperaturområde -5 °C
til +55 °C.
3. Henvisning vedr. håndteringen af batterier
Pas på, at batterierne må ikke komme i hænderne på små børn. Børn kan tage batterierne i munden
og sluge dem. Dette kan føre til alvorlige helbredsskader. Søg i dette tilfælde læge med det samme!
Normale batterier må ikke oplades, opvarmes eller kastes i åben ild (fare for eksplosion!).
Batteriet må ikke udsættes direkte for en varmekilde eller solindstråling og må ikke opbevares på et
sted med meget høj temperatur.
Batteriet må ikke komme i berøring med vand.
Batteriet må ikke skilles ad, stikkes i eller beskadiges.
Batterikontakterne må ikke kortsluttes.
Skift næsten afladede batterier rettidigt ud.
Skift altid alle batterier samtidigt, og brug altid samme batterityper.
Udløbne eller beskadigede batterier kan forårsage ætsninger på huden i tilfælde af berøring. Brug i
dette tilfælde egnede beskyttelseshandsker. Rengør batterirummet med en tør klud.
35
Page 38

Dansk
Kontrollér først apparatet, hvis den originale emballage er beskadiget. Hvis apparatet har
skader, skal du sende det tilbage med emballagen og informere leveringstjenesten.
Advarsler
Før den første idriftsættelse skal alle sikkerheds- og betjeningshenvisninger læses!
Undgå følgende vanskelige omgivelsesbetingelser ved drift:
Temperaturer uden for det tilladte område
Direkte solindstråling
Støv eller brændbare gasser, dampe eller opløsningsmidler
Kraftige vibrationer
Kraftige magnetfelter som i nærheden af maskiner eller højttalere
Kameraet må ikke rettes mod solen. Det kan medføre ødelæggelse af billedoptagerens sensor.
Udendørskameraet med tidsforkortet optagelse/bevægelsesføler må ikke installeres på ustabile flader
Udpakning
Håndtér apparatet meget forsigtigt, når du pakker det ud.
36
Page 39

Dansk
Indholdsfortegnelse
1. Korrekt anvendelse .................................................................................................................................. 38
2. Leveringsomfang ..................................................................................................................................... 38
3. Særlige kendetegn og funktioner ........................................................................................................... 38
4. Henvisninger og FAQs ............................................................................................................................ 38
5. Apparatbeskrivelse .................................................................................................................................. 39
6. Installation af kameraet ........................................................................................................................... 40
7. Betjening ................................................................................................................................................... 42
8. Indstillinger ............................................................................................................................................... 45
9. Vedligeholdelse og rengøring................................................................................................................. 46
8.1 Vedligeholdelse ..................................................................................................................................... 46
8.2 Rengøring .............................................................................................................................................. 46
10. Bortskaffelse ............................................................................................................................................ 46
11. Tips vedrørende fejlafhjælpning ............................................................................................................ 47
12. Tekniske data ........................................................................................................................................... 47
37
Page 40

Dansk
Udendørskamera med tidsforkortet
optagelse/bevægelsesstyret
kamera
Kameraholder inkl.
monteringsmateriale
Fastgørelsesmøtrik
Ledmuffe
Ledskrue
4 x 1,5 V batterier
1. Korrekt anvendelse
Udendørskameraet med tidsforkortet optagelse/det bevægelsesstyrede udendørskamera har to funktioner
i et apparat. Det kan anvendes som kamera med tidsforkortet optagelse eller til bevægelsesstyret
optagelse indendørs og udendørs.
Det vejrfaste kamera med tidsforkortet optagelse er ideelt til langtidsovervågninger. Det gemmer et billede
på et micro SD-kort, som du bagefter nemt kan afspille som AVI-film på din pc, i et interval, som du
bestemmer, på 1 sekund til 24 timer.
Kameraet har en PIR-sensor til bevægelsesgenkendelse. Så snart kameraets PIR-sensor detekterer en
varmebevægelse, starter optagelsen på micro SD-kortet. Optagelsen kan derefter nemt vises på pc'en.
Der findes en udførlig funktionsbeskrivelse i kapitel „3. Særlige kendetegn og funktioner“.
2. Leveringsomfang
3. Særlige kendetegn og funktioner
To funktioner i et apparat: Udendørskamera med tidsforkortet optagelse og bevægelsesstyret kamera
Kamera med tidsforkortet optagelse med interval-optagelser: Ideelt til langtidsovervågninger
Bevægelsesføler: Intelligent bevægelsesgenkendelse takket være integreret PIR-sensor
Integreret 2,4‘‘ LCD-monitor
Videoer gemmes på micro SD-kort (ikke indeholdt i leveringsomfanget)
AVI-videoformat til enkel afspilning på pc'en
Trådløs og ukompliceret installation takket være batteridrift (4 x AA-batterier inkl.)
Vejrfast hus (kapslingsklasse IP65)
4. Henvisninger og FAQs
Vigtige henvisninger og FAQs vedrørende dette produkt og andre produkter findes på internetsiden
www.abus.com/plug-and-play. Informationer om fejlafhjælpningen findes under punkt 11 i denne
vejledning.
38
Page 41

Dansk
Menu/set
Menu: Hentning af menuen
Set: Ændring/bekræftelse af indstillinger
/ OK
Power: Tilkobling af kameraet
OK: Lagring af indstillinger
Micro SD-kort-slot
Op til maks. 32 GB.
Apparatet har ikke en intern hukommelse. For at gemme
optagelsen er et micro SD-kort derfor nødvendigt.
Skift mellem menupunkterne
Skift mellem menupunkterne
Kontakt for
Bevægelsesføler/tidsforkortet
optagelse
Til venstre (PIR ON): Bevægelsesgenkendelse
Til højre (PIR OFF): Kamera med tidsforkortet optagelse
1/4‘‘ gevind
Fastgørelse på kameraholderen
1/4‘‘ gevind
Fastgørelse på kameraholderen
Monitor
2,4‘‘ LCD-skærm
Batterirum
4 x 1,5 AA-batterier
Mikrofon
Til lydoptagelse
Billedoptager
¼‘‘ CMOS
LED
On: Optagelse
Off: Ingen optagelse
PIR-sensor
Til bevægelsesgenkendelse
5. Apparatbeskrivelse
39
Page 42

Dansk
Anvend en skruetrækker til at
åbne batterirummet.
Sæt et micro SD-kort i (maks. 32
GB, ikke indeholdt i
leveringsomfanget). Ved at trykke
på den højre kontakt kan du
vælge mellem tidsforkortelses- og
bevægelsesstyret optagelse (se
apparatbeskrivelse, nr. 6).
Læg fire 1,5 V AA-batterier i. Sørg
i den forbindelse for, at polerne
vender rigtigt.
Luk batterirummet igen ved hjælp
af en skruetrækker.
Sæt ledmuffen på ledskruen.
Skru nu de to dele sammen med
fastgørelsesmøtrikken.
Drej hertil dækslet med uret.
For at fastgøre kameraet på en
væg eller loftet skal du først
anvende holderen som
boreskabelon. Bor hullerne, og
anvend de medfølgende dyvler og
skruer til at fastgøre holderen.
Skru nu holderen på
fastgørelsespladen.
6. Installation af kameraet
40
Page 43

Dansk
Skru derefter kameraet på holderen.
Placér nu kameraet i den ønskede position, og spænd gevindet
fast.
Vær opmærksom på:
Montér kun kameraet, så ABUS-logoet kan læses og ikke vender på hovedet.
Ved forkert montering er optagelserne horisontalt spejlvendte!
41
Page 44

Dansk
Valg af
bevægelsesstyret
optagelse/tidskortet
optagelse
Vælg først den ønskede modus ved at placere kontakten i batterirummet på den
rigtige position.
Venstre (PIR ON): Bevægelsesstyret optagelse
Højre (PIR OFF): Tidsforkortet optagelse
Tilkobling af
apparatet/hentning af
menuen
Tryk på Power-tasten i tre sekunder, og slip den. Derefter vises live-billedet.
Tryk på tasten Menu/Set for at hente menuen.
Indstilling af
dato/klokkeslæt
Indstil klokkeslættet, når apparatet startes første gang:
Tryk hertil på menutasten for at hente undermenuen.
Med piletasterne kan du ændre tallene.
Anvend tasten Power /OK til at skifte til den næste indtastning.
Når indstillingen er afsluttet, skal du vende tilbage til hovedmenuen med tasten
Menu/Set.
Menustyring
Anvend tasterne ▼▲til at navigere mellem menupunkterne.
Tryk igen på tasten Menu/Set for at ændre indstillingerne.
Med piletasterne kan du ændre værdierne. Tryk på tasten Power/OK for at
gemme den indstillede værdi.
Med tasten Menu/Set kommer du tilbage til hovedmenuen.
Når du forlader menuen, vises indstillingerne igen, derefter slukker skærmen,
kameraet vender tilbage til normal driftsmodus og optager igen.
Standsning af
optagelse
Tryk på tasten Power/OK i 5 sekunder for at standse en optagelse.
I modus med tidsforkortet optagelse vises der derefter følgende melding:
„Complete Power Off“. Kameraet er nu frakoblet.
I den bevægelsesstyrede optagelsesmodus vises der følgende melding:
„Complete power off. Please turn off PIR switch“.
Stil kontakten (6) på tidskortet funktion for at slukke apparatet fuldstændigt.
Dermed er apparatet frakoblet, og du kan tage batterierne og micro SD-kortet
ud.
Afspilning af
optagelser
For at vise optagelserne skal du tage micro SD-kortet ud og anvende et egnet
kortlæseapparat for at afspille det på pc'en.
Til optagelser i tidsforkortet modus oprettes der en mappe „TIMELAPSE“, til
bevægelsesstyrede optagelser oprettes der en mappe med navnet „DCIM“ på
micro SD-kortet.
Vær opmærksom på:
Så snart du har lagt batterierne i, starter apparatet optagelsen.
Vær opmærksom på:
Når menuen forlades, frakobles LCD-skærmen efter 10 sekunder.
Hvis der ikke trykkes på en tast på live-billedet efter tilkoblingen, slukkes monitoren igen efter 20
sekunder.
Vær opmærksom på:
For at komme til menuen må LED'en ikke lyse rødt.
7. Betjening
Gå frem på følgende måde for at betjene apparatet:
42
Page 45

Dansk
Set Time
2012/12/01 12:02:15
Timelapse Interval
1,5 sec
AVI Frame Rate
30 FPS
Motion Record Life
30 sec
Video Resolution
1280 x 720
2012/ 12/ 01 12: 02: 15
Band Filter
60 Hz
Firmware Version
S1 T0.12
Reset Setting
No
Exit
60 Hz
Menu
43
Page 46

Dansk
SD Full…
Lagerkapacitet:
Så snart dit micro SD-kort er fuld, vises henvisningen „SD Full…“ hvert
3. sekund på dit skærm.
Hvis der ikke sat et SD-kort i, vises „No SD…“
Kontrollér regelmæssigt kortets lagerkapacitet direkte på
kameraets skærm!
No SD…
Low Battery…
Batterilevetid
Så snart batterierne aflades, vises henvisningen „Low Battery…“
Kontrollér regelmæssigt batterierne direkte på kameraets skærm!
PIR recording (Picture / Video)
Optagelsesmodus
Hvis henvisningen „PIR recording (Picture / Video“ vises, optager
kameraet.
Set Time
Indstilling af dato og klokkeslæt.
Timelapse Interval
Fastlæggelse af det tidsforkortede interval.
Du kan vælge mellem følgende værdier:
1,5 sekund
5 sekunder
10 sekunder
30 sekunder
1 minut
5 minutter
10 minutter
30 minutter
1 time
5 timer
10 timer
24 timer
AVI Frame Rate
Her kan du fastlægge billedraten for videooptagelsen i AVI-format.
Du kan vælge mellem følgende billedrater:
1FPS, 10FPS, 30FPS
Motion Record Life
Fastlæggelse af optagelsesvarigheden ved en
bevægelsesgenkendelse.
Du kan vælge mellem 10 billeder eller 30 sekunder.
10 billeder = der optages 10 billeder (1 billede/sekund) og gemmes
som AVI-fil.
30 sekunder = der gemmes en 30 sekunders video i AVI-format.
Video Resolution
Her kan du vælge mellem følgende videoopløsninger:
1280 x 720, 640 x 480
Indstillinger
Her vises de aktuelle indstillinger under menupunktet.
Band Filter
Fastlæggelse af netfrekvensen.
Her kan du tilpasse til netfrekvensen i dit land, den forhindrer, at
billedet flimrer.
Du kan vælge mellem følgende frekvenser.
50 Hz/60 Hz
Firmware Version
Under menupunktet “Firmware Version” vises firmwarens aktuelle
version.
Reset Setting
Genoprettelse af fabriksindstillinger.
Med denne funktion kan kameraet resettes til fabriksindstillingerne, og
alle indstillinger slettes. Vælg hertil „Yes“, bekræft med „OK“ og
derefter med „Set“.
Exit
Når du forlader menuen, vender kameraet tilbage til den normale
driftsmodus og optager igen.
Begrebsforklaring
Displayhenvisninger
44
Page 47

Dansk
Vær opmærksom på:
Under en bevægelsesstyret optagelse kan menuen ikke hentes!
Når der trykkes på en tast, vises meldingen „PIR recording (Picture / Video)” på dit display.
Vent, indtil optagelsen er afsluttet (maks. 30 sekunder), for at komme til menuen.
Vær opmærksom på:
Den bevægelsesstyrede optagelse reagerer meget sensibelt på bevægelser. Placér kameraet,
så unødige bevægelser ikke detekteres.
Vær opmærksom på:
En audiooptagelse foretages kun ved bevægelsesgenkendelse i AVI-format (30 sek.
Optagelsesvarighed, LED'en må ikke lyse rødt).
TimeLapse Mode Enable
TimeLapse Interval: 1,5 sec
AVI Frame Rate: 30 FPS
Video Resolution: 1280 x 720
Band Filter: 60 Hz
PIR-Video Mode Enable
Motion Record Life: 30 sec
Video Resolution: 1280 x 720
Band Filter: 60 Hz
8. Indstillinger
Efter afsluttet indstilling af funktionen for tidsforkortet optagelse vises live-billedet og følgende melding med
dine indstillingsværdier, når menuen forlades.
For indstillingen af bevægelsesgenkendelsen vises følgende skærm efter afsluttet indstilling.
For at spare batteri slukkes skærmen efterfølgende efter 10 sekunder og starter med optagelsen.
45
Page 48

Dansk
Sørg for, at der ikke kommer væsker ind i apparatet.
Anvend ikke kemiske rengøringsmidler. Derved kan husets overflade blive beskadiget
(misfarvninger).
Vigtig henvisning vedr. bortskaffelse af apparatet
EU-direktiv 2002/96/EF regulerer den korrekte tilbagetagning, behandling og anvendelse
af brugte elektronikapparater. Dette symbol betyder, at med henblik på miljøbeskyttelse
skal apparatet efter sin levetid bortskaffes i overensstemmelse med de gældende
lovmæssige forskrifter og adskilt fra husholdningsaffald og erhvervsaffald. Bortskaffelsen
af det brugte apparat kan foretages på de respektive officielle tilbagetagningssteder. Følg
de lokale forskrifter, når materialerne bortskaffes. Yderligere enkeltheder om
tilbagetagningen (også for lande uden for EU) får du hos dine lokale myndigheder. Ved
hjælp af den separate indsamling og recycling skånes de naturlige ressourcer, og det
sikres, at alle bestemmelser vedrørende beskyttelse af sundhed og miljø overholdes ved
recycling af produktet.
Vigtigt henvisning vedr. bortskaffelse af batterier
Batterier med dette kendetegn indeholder ikke skadelige stoffer som cadmium, bly og
kviksølv. Gamle batterier må dog i henhold til batteriforskriften ikke længere bortskaffes
med husholdningsaffaldet. Til at beskytte de naturlige ressourcer og at fremme
genanvendelsen af materialer skal adskillle batterierne fra andet affald og aflevere dem til
det lokale recyclingsystem. En ekstra mærkning med de kemiske symboler for Hg, Cd
eller Pb betyder, at batteriet indeholder kviksølv, cadmium eller bly i mængder, der
overskrider grænseværdierne i EU-direktiv 2006/66. Hvis batterier ikke bortskaffes korrekt,
kan disse substanser bringe menneskers sundhed og miljøet i fare.
Vær opmærksom på:
Produktet er vedligeholdelsesfrit for dig. Der er ingen bestanddele inde i produktet, som du
skal kontrollere eller vedligeholde: åbn det aldrig.
9. Vedligeholdelse og rengøring
9.1 Vedligeholdelse
Kontrollér regelmæssigt produktets tekniske sikkerhed, f.eks. beskadigelse af huset.
Hvis det antages, at drift ikke længere er mulig uden farer, skal produktet tages ud af drift og sikres mod
utilsigtet drift.
Det antages, at drift ikke længere er mulig uden fare, hvis
apparatet har synlige beskadigelser
apparatet ikke længere fungerer
9.2 Rengøring
Rengør produktet med en ren, tør klud. Ved kraftigere tilsmudsninger kan kluden fugtes let med lunkent vand.
10. Bortskaffelse
46
Page 49

Dansk
Nr.
Spørgsmål
Svar
1
Kan jeg slukke kameraet
midlertidigt?
Nej, så snart du har lagt batterierne i, starter apparatet
optagelsen.
2
Er kameraet vind- og vejrfast?
Ja, kameraet har beskyttelsesklassen IP65 og er beregnet
både til indendørs og udendørs brug.
3
Ved hvilken lysstyrke opstår der
et optimalt billede?
Fra 10 lux har du ideelle lysforhold til et optimalt billede.
4
Har kameraet en natsigtfunktion?
Da dette kamera er et batteridrevet apparat, har ABUS valgt at
dette kamera ikke har en integreret natsigtfunktion.
Gode lysforhold eller en tilstrækkelig belysning om natten er
forudsætning for optimale optagelser.
5
Hvad kan være årsagerne til, at
apparatet ikke optager?
Kontrollér følgende punkter, hvis dit apparatet ikke optager:
1. Har du sat et mikro-SD-kort i?
2. Er mikro-SD-kortet spærret? (Lock/Unlock?)
3. Har du formateret mikro-SD-kortet? Det skal formateres før
det tages i brug.
Typenummer
TVAC80010B
Monitor
2,4‘‘ LCD-monitor
Billedopløsning
640 x 480 / 1280 x 720
Videoopløsning
640 x 480 @ 30fps / 1280 x 720 @ 30fps
Sensor
2 megapixel CMOS
PIR-rækkevidde
Maks. 3 m
Videoformat
MJPEG
Lagermedium
microSD-kort, maks. 32 GB (ikke indeholdt i leveringsomfanget)
Audio
Ja, ved bevægelsesgenkendelse
Spændingsforsyning
4 x AA-batteri
Kapslingsklasse IP
IP65
Mål
80 x 48 x 150 mm
Vægt
350 g inkl. batterier
Maks. driftstemperatur
-5 °C til +55 °C
11. Tips vedrørende fejlafhjælpning
12. Tekniske data
47
Page 50

Dansk
Tidsinterval
Billedoptagelser
Batterilevetid
1,5 sekunder
43200
14 timer
5 sekunder
12960
14 timer
10 sekunder
8640
24 timer
30 sekunder
4320
2 dage
1 minut
2880
3 dage
5 minutter
1152
4 dage
10 minutter
1152
8 dage
30 minutter
768
16 dage
1 time
768
32 dage
5 timer
312
65 dage
10 timer
312
13 dage
24 timer
270
270 dage
Optagelsesvarighed
PIR // 640 x 480 //
30 sekunder
Optagelsesvarighed
PIR // 1280 x 720 //
30 sekunder
Billedoptagelser
Kamera med
tidsforkortet optagelse
640 x 480
Billedoptagelser
Kamera med
tidsforkortet optagelse
1280 x 720
1GB
51 minutes
17 minutter
13.185
4.395
2GB
102 minutes
34 minutter
26.370
8.790
8GB
408 minutes
136 minutter
105.480
35.160
16GB
816 minutes
272 minutter
210.960
70.320
32GB
1.632 minutes
544 minutter
421.920
140.640
Batterilevetid
Lagerkapacitet
48
Page 51

TVAC80010B
Manual de instrucciones
Versión 04/2013
Manual de instrucciones original en alemán.
Guardar para futuras consultas.
Page 52

Español
Introducción
Estimado cliente:
Le agradecemos la compra de este artículo.
Este aparato cumple los requisitos establecidos en las directivas vigentes de la UE. Si desea solicitar la
declaración de conformidad, diríjase a:
ABUS Security-Center GmbH & Co. KG
Linker Kreuthweg 5
86444 Affing
GERMANY
Para conservar este estado y garantizar un funcionamiento exento de peligros, debe tener en cuenta lo
expuesto en este manual de instrucciones.
Antes de poner en funcionamiento el producto, lea todo el manual y respete todas las indicaciones de
utilización y seguridad.
Todos los nombres de empresas y denominaciones de producto son marcas registradas del
correspondiente propietario. Todos los derechos reservados.
Si tiene alguna pregunta, diríjase a su instalador o a su distribuidor especializado.
Advertencia conforme al artículo 201 del Código Penal Alemán:
La grabación no autorizada de conversaciones privadas o el uso no autorizado de tales grabaciones o su
entrega a terceras personas se puede sancionar con la privación de libertad o con una multa.
Igualmente se puede sancionar a quien escuche de forma no autorizada conversaciones privadas no
destinadas a sus oídos con un aparato de escuchas o a quien divulgue públicamente grabaciones no
autorizadas o el contenido de conversaciones interceptadas.
Exención de responsabilidad
Este manual de instrucciones ha sido elaborado muy detalladamente. Si a pesar de ello usted advirtiera
omisiones o imprecisiones, comuníquenoslo a la dirección indicada al dorso de este manual.
ABUS Security-Center GmbH no asume ningún tipo de responsabilidad por los fallos técnicos ni tipográficos
y se reserva el derecho a realizar modificaciones en el producto y en los manuales de instrucciones sin
previo aviso.
ABUS Security-Center no se hace responsable de los daños que deriven directa o indirectamente del
equipamiento, las prestaciones y el empleo de este producto. No se otorga ninguna garantía por el contenido
de esta documentación.
50
Page 53

Español
El símbolo con un rayo dentro de un triángulo se utiliza para advertir de un peligro para
la integridad física debido, por ejemplo, a una descarga eléctrica.
Un signo de admiración dentro de un triángulo señaliza una indicación importante que
es imprescindible tener en cuenta.
Este símbolo señaliza consejos e indicaciones útiles para la utilización.
En el caso de daños provocados por no haber respetado las indicaciones expuestas en
el manual, se extingue el derecho de garantía. No nos hacemos responsables de los
daños resultantes.
No nos hacemos responsables de los daños personales o materiales provocados por
una utilización incorrecta o por no haber respetado las indicaciones de seguridad. En
tales casos se extingue el derecho de garantía.
Explicación de los símbolos
Indicaciones importantes de seguridad
Este aparato ha sido fabricado en cumplimiento de los estándares internacionales de seguridad.
Lea detenidamente las siguientes indicaciones de seguridad.
Indicaciones de seguridad
1. Limpieza
Limpie el aparato únicamente con un paño húmedo y no utilice agentes de limpieza abrasivos.
2. Lugar de instalación
Este aparato está previsto tanto para zonas exteriores protegidas como para interiores.
Si se cae, aunque sea desde poca altura, se pueden producir daños en el aparato.
Monte el aparato de forma que el sol no incida directamente sobre el sensor de imagen.
Siga las instrucciones de montaje contenidas en el capítulo correspondiente de este manual de
instrucciones.
No coloque el aparato muy cerca de calefacciones, hornos u otras fuentes de calor ni bajo la
incidencia directa del sol.
Utilice el aparato solo en lugares con una temperatura ambiente dentro del margen permitido entre -
5° y +55°C.
3. Indicaciones respecto a la manipulación de pilas
Preste atención a que las pilas no lleguen a manos de los niños, pues se las podrían meter en la
boca y atragantarse. Esto podría provocar una situación peligrosa. En tal caso, acuda
inmediatamente a un médico.
Las pilas normales no se pueden recargar, calentar ni echar al fuego (peligro de explosión).
La pila no se debe exponer directamente a ninguna fuente de calor ni a la radición solar, ni se debe
guardar en un lugar con una temperatura elevada.
La pila no debe entrar en contacto con agua.
La pila no se debe desarmar, pinchar, ni dañar.
Los contactos de la pila no se deben poner en cortocircuito.
Cambie a tiempo las pilas cuando se empiecen a gastar.
Cambie siempre todas las pilas al mismo tiempo y utilice pilas del mismo tipo.
Las pilas dañadas o que hayan derramado líquido pueden producir abrasión al entrar en contacto con
la piel. Utilice en este caso guantes de protección adecuados. Limpie el compartimento de las pilas
con un paño seco.
51
Page 54

Español
Si el embalaje original presenta algún desperfecto, compruebe el aparato. En caso de que este
presente algún daño, devuélvalo en el embalaje e informe al servicio de reparto.
Advertencias
Tenga en cuenta las indicaciones de seguridad y de utilización antes de la primera puesta en funcionamiento.
Evite las siguientes condiciones ambientales perjudiciales durante el funcionamiento:
Temperaturas fuera del margen permitido
Radiación directa del sol
Polvo o gases, vapores o disolventes inflamables
Fuertes vibraciones
Campos magnéticos de gran intensidad, como ocurre cerca de máquinas o altavoces
Orientación de la cámara en dirección al sol, pues se podría estropear el sensor de imagen.
La cámara rápida / la cámara exterior con sensor de movimiento no se puede instalar sobre superficies
inestables.
Desembalaje
Manipule el aparato con extremo cuidado al desembalarlo.
52
Page 55

Español
Índice
1. Uso adecuado ........................................................................................................................................... 54
2. Volumen de entrega ................................................................................................................................. 54
3. Características y funciones .................................................................................................................... 54
4. Indicaciones y FAQs ................................................................................................................................ 54
5. Descripción del aparato .......................................................................................................................... 55
6. Instalación de la cámara .......................................................................................................................... 56
7. Utilización ................................................................................................................................................. 58
8. Configuración ........................................................................................................................................... 61
9. Mantenimiento y limpieza........................................................................................................................ 62
9.1 Mantenimiento ....................................................................................................................................... 62
9.2 Limpieza ................................................................................................................................................ 62
10. Gestión de residuos ................................................................................................................................. 62
11. Consejos para la solución de averías .................................................................................................... 63
12. Datos técnicos .......................................................................................................................................... 63
53
Page 56

Español
Cámara rápida / cámara exterior
controlada por sensor de
movimiento
Soporte de la cámara,
inclusive material de
montaje
Tuerca de fijación
Manguito articulado
Tornillo articulado
4 pilas de 1,5 V
1. Uso adecuado
La cámara rápida / cámara exterior controlada por sensor de movimiento aúna dos funciones en un solo
aparato. Se puede utilizar como cámara rápida o para realizar grabaciones activadas por un movimiento
detectado en el interior o en el exterior.
La cámara rápida, resistente a la intemperie, resulta ideal para la vigilancia a largo plazo. Guarda en una
tarjeta Micro SD imágenes tomadas a los intervalos que usted desee, entre un segundo y 24 horas.
Posteriormente usted puede reproducir cómodamente las imágenes tomadas como película AVI en su
PC.
La cámara tiene un sensor PIR para detectar el movimiento. Tan pronto como el sensor PIR de la cámara
detecte un movimiento térmico, comienza la grabación en la tarjeta Micro SD. Una vez finalizada, la
grabación se puede ver cómodamente en el PC.
Encontrará una descripción detallada del funcionamiento en el capítulo 3 “Características y funciones”.
2. Volumen de entrega
3. Características y funciones
Dos funciones en un aparato: cámara rápida y cámara exterior controlada por sensor de movimiento
Cámara rápida con grabaciones a intervalos: ideal para vigilancia a largo plazo
Sensor de movimiento: detección de movimiento inteligente gracias al sensor PIR integrado
Monitor LCD de 2,4" integrado
Los vídeos se guardan en la tarjeta Micro SD (no incluida en el volumen de entrega)
Formato de vídeo AVI para reproducir de forma sencilla en un ordenador personal
Instalación inalámbrica y sencilla gracias a su funcionamiento con pilas (4 pilas AA incluidas)
Carcasa resistente a la intemperie (clase de protección IP65)
4. Indicaciones y FAQs
En la página de Internet www.abus.com/plug-and-play encontrará indicaciones importantes y FAQs sobre
éste y muchos otros productos. En el punto 11 de estas instrucciones encontrará información para
solucionar averías.
54
Page 57

Español
Menu / Set
Menu: abrir el menú
Set: cambiar / confirmar los ajustes
/ OK
Power: encender la cámara
OK: guardar los ajustes
Ranura para tarjetas Micro SD
Hasta un máximo de 32 GB
Cambiar entre puntos de menú
Cambiar entre puntos de menú
Interruptor para
sensor de movimiento / cámara
rápida
A la izquierda (PIR ON): detección de movimiento
A la derecha (PIR OFF): cámara rápida
Rosca de 1/4‘‘
Fijación al soporte de la cámara
Rosca de 1/4‘‘
Fijación al soporte de la cámara
Monitor
Pantalla LCD de 2,4‘‘
Compartimento de pilas
4 pilas AA de 1,5
Micrófono
Grabación de sonido
Sensor de imagen
¼‘‘ CMOS
LED
Encendido: la cámara está grabando
Apagado: la cámara no está grabando
Sensor PIR
Detección de movimiento
5. Descripción del aparato
55
Page 58

Español
Para abrir el compartimento de las
pilas, utilice un destornillador.
Inserte una tarjeta Micro SD (máx.
32 GB, no incluida en el volumen
de entrega). Accionando el
interruptor derecho se puede
seleccionar entre grabación a
cámara rápida o activada por
sensor de movimiento (véase la
descripción del aparato, n.° 6).
Inserte 4 pilas AA de 1,5 V.
Asegúrese de colocar
correctamente los polos de las
pilas.
Vuelva a cerrar el compartimento
de las pilas con un destornillador.
Coloque el manguito articulado en
el tornillo articulado.
Una ahora ambas piezas con la
tuerca de fijación.
Para ello gire la tuerca de fijación
en el sentido de las agujas del
reloj.
Para fijar la cámara a una pared o
al techo, utilice primero el soporte
como plantilla de perforación.
Perfore los agujeros y utilice los
tacos y tornillos para fijar el
soporte.
Atornille ahora el soporte a la
placa de fijación.
6. Instalación de la cámara
56
Page 59

Español
Seguidamente enrosque la cámara en
el soporte.
Coloque ahora la cámara en la posición que desee y apriete la
rosca.
Tenga en cuenta lo siguiente:
Monte la cámara de tal forma que el logo ABUS no quede al revés, sino que se pueda leer bien.
Si el montaje es incorrecto, las grabaciones quedarian invertidas en el plano horizontal.
57
Page 60

Español
Seleccionar grabación
activada por un
sensor de
movimiento/cámara
rápida
Primero seleccione el modo que desee colocando en la posición adecuada el
interruptor en el compartimento de las pilas.
A la izquierda (PIR ON): Grabación activada por un sensor de movimiento
A la derecha (PIR OFF): Cámara rápida
Encender aparato /
abrir menú
Pulse durante tres segundos la tecla de encendido y apagado. A continuación
obtendrá la imagen en directo. Pulse la tecla Menu/Set para abrir el menú.
Ajuste de fecha y hora
Ajuste la hora la primera vez que ponga en marcha el aparato.
Pulse la tecla de menú para abrir el submenú.
Con las teclas de flecha se pueden modificar los números.
Utilice la tecla Power/OK para cambiar a la siguiente entrada.
Una vez realizado el ajuste, vuelva al menú principal con la tecla Menu/Set.
Manejo del menú
Utilice las teclas ▼▲ para navegar entre los puntos de menú.
Vuelva a pulsar la tecla Menu/Set para cambiar los ajustes.
Con las teclas de flecha se pueden cambiar valores. Para guardar el valor
ajustado pulse la tecla Power/OK.
Con la tecla Menu/Set se vuelve al menú principal.
Una vez que haya salido del menú se vuelven a mostrar los ajustes: a
continuación, se apaga la pantalla, la máquina vuelve al modo de
funcionamiento normal y vuelve a grabar.
Detener la grabación
Para detener la grabación pulse la tecla Power/OK durante 5 segundos.
En el modo de cámara rápida se emite seguidamente el siguiente mensaje:
“Complete Power Off”. La cámara está ahora apagada.
En el modo de grabación activada por sensor de movimiento se emite el
siguiente mensaje:
“Complete Power Off. Please turn off PIR switch”.
Coloque el interruptor (6) en la función de cámara rápida para desconectar
completamente el aparato.
De esta forma se ha apagado el aparato y se pueden extraer las pilas y la
tarjeta Micro SD.
Reproducir las
grabaciones
Para ver las grabaciones se ha de extraer la tarjeta Micro SD y utilizar un lector
de tarjetas adecuado para poder reproducir las grabaciones en el PC.
Para las grabaciones en modo de cámara rápida se crea una carpeta
“TIMELAPSE” y para las grabaciones activadas por sensor de movimiento, una
carpeta con el nombre “DCIM” en la tarjeta Micro SD.
Tenga en cuenta lo siguiente:
En cuanto haya colocado las pilas, el aparato inicia la grabación.
Tenga en cuenta lo siguiente:
Cuando se sale del menú, la pantalla LCD se apaga transcurridos 10 segundos.
Si en imagen en directo no se acciona ninguna tecla después de encender la cámara, el monitor
se apaga transcurridos 20 segundos.
Tenga en cuenta lo siguiente:
Para acceder al menú, el LED no puede estar iluminado en rojo.
7. Utilización
Proceda de la siguiente manera para manejar el aparato:
58
Page 61

Español
Set Time
2012/12/01 12:02:15
Timelapse Interval
1,5 sec
AVI Frame Rate
30 FPS
Motion Record Life
30 sec
Video Resolution
1280 x 720
2012/ 12/ 01 12: 02: 15
Band Filter
60 Hz
Firmware Version
S1 T0.12
Reset Setting
No
Exit
60 Hz
Menú
59
Page 62

Español
SD Full…
Capacidad de memoria:
Cuando la tarjeta Micro SD está llena aparece la indicación “SD Full...”
cada 3 segundos en la pantalla.
Si no se ha insertado ninguna tarjeta SD aparece la indicación “No
SD...”
Controle con regularidad la capacidad de memoria de la tarjeta
directamente en la pantalla de la cámara.
No SD…
Low Battery…
Duración de las pilas
Cuando las pilas empiezan a gastarse aparece la indicación “Low
Battery...”.
Controle con regularidad la carga de las pilas directamente en la
pantalla de la cámara.
PIR recording (Picture / Video)
Modo de grabación
La indicación “PIR recording (Picture / Video)” significa que la cámara
está grabando.
Set Time
Ajustar la hora y la fecha.
Timelapse Interval
Definir el intervalo de cámara rápida.
Se puede seleccionar entre los siguientes valores:
1,5 segundos
5 segundos
10 segundos
30 segundos
1 minuto
5 minutos
10 minutos
30 minutos
1 hora
5 horas
10 horas
24 horas
AVI Frame Rate
Aquí se puede fijar la tasa de imágenes para la grabación de vídeo en
formato AVI.
Puede seleccionar entre las siguientes tasas de imágenes:
1FPS, 10FPS, 30FPS
Motion Record Life
Definir la duración de la grabación con detección de movimiento.
Se puede elegir entre 10 imágenes o 30 segundos.
10 imágenes = se graban 10 imágenes (1 imagen/segundo) y se
guardan como archivo AVI.
30 segundos = se guarda un vídeo de 30 segundos en formato AVI.
Video Resolution
Aquí se puede elegir entre las siguientes resoluciones de vídeo:
1280 x 720, 640 x 480
Ajustes
Aquí se visualizan los ajustes actuales del punto del menú.
Band Filter
Definir la frecuencia de red
Aquí se ajusta la frecuencia de red a la del país en el que se
encuentre para evitar que la imagen centellee.
Puede seleccionar entre las siguientes tasas de imágenes:
50Hz / 60Hz
Firmware Version
Bajo el punto de menú “Firmware Version” se puede ver la versión
actual del Firmware.
Reset Setting
Restaurar la configuración de fábrica.
Con esta función se restablecen los ajustes por defecto de la cámara,
con lo que se eliminan todos los ajustes realizados. Para ello
seleccione “Yes”, confirme con “OK” y, a continuación, pulse “Set”.
Exit
Una vez que haya salido del menú, la cámara vuelve al modo de
funcionamiento normal y vuelve a grabar.
Explicación de términos
Indicaciones sobre el display
60
Page 63

Español
Tenga en cuenta lo siguiente:
Durante una grabación activada por sensor de movimiento no se puede abrir el menú.
Cuando se activa una tecla aparece el mensaje “PIR recording (Picture / Video)” en el display.
Espere hasta que finalice la grabación (máx. 30 segundos) para acceder al menú.
Tenga en cuenta lo siguiente:
La grabación activada por un sensor de movimiento reacciona con mucha sensibilidad al
movimiento. Coloque la cámara de tal forma que no detecte movimientos irrelevantes.
Tenga en cuenta lo siguiente:
Una grabación de audio solo tiene lugar en el caso grabaciones activadas por sensor de
movimiento en formato AVI (duración de la grabación: 30 segundos, el LED no puede estar
iluminado en rojo).
TimeLapse Mode Enable
TimeLapse Interval: 1,5 sec
AVI Frame Rate: 30 FPS
Video Resolution: 1280 x 720
Band Filter: 60 Hz
PIR-Video Mode Enable
Motion Record Life: 30 sec
Video Resolution: 1280 x 720
Band Filter: 60 Hz
8. Configuración
Una vez configurada la función de cámara rápida, al salir del menú obtendrá la imagen en directo y el
siguiente mensaje con los valores de configuración.
Cuando se configura el sensor de movimiento se visualiza la siguiente pantalla después de haber realizado la
configuración.
Para no gastar las pilas, la pantalla se desconecta seguidamente durante 10 segundos y comienza la
grabación.
61
Page 64

Español
Evite que entren líquidos en el aparato.
No utilice limpiadores químicos; estos pueden dañar (desteñir) la superficie de la carcasa.
Indicación relativa a la eliminación del aparato
La directiva UE 2002/96/CE regula la recogida, tratamiento y reciclaje de los aparatos
electrónicos al finalizar su vida útil. Este símbolo significa que, para proteger el medio
ambiente, al final de su vida útil el aparato debe eliminarse conforme a las normas
establecidas en la ley, separado de la basura doméstica y de la basura industrial. La
eliminación del aparato usado se puede realizar a través de distintos puntos de recogida
oficiales disponibles en su país. Siga las normas locales relativas a la gestión de
materiales. El ayuntamiento de su localidad le podrá ofrecer otros detalles relativos a la
recogida (también en los países no miembros de la UE). La separación y reciclaje de
materiales protegen los recursos naturales y garantizan que durante el reciclaje del
producto se respeten todas las disposiciones relativas a la protección de la salud y el
medio ambiente.
Indicación importante relativa a la gestión de pilas
Las pilas con este distintivo no contienen sustancias perjudiciales, como cadmio, plomo o
mercurio. A pesar de ello, conforme a la normativa sobre pilas, éstas no se pueden
depositar en la basura doméstica. Para proteger los recursos naturales y favorecer el
reciclaje de materiales, separe las pilas del resto de la basura y deposítelas en un punto
de recogida previsto para ello en su localidad. Un distintivo adicional con los símbolos
químicos Hg, Cd o Pb significa que la pila contiene mercurio, cadmio o plomo en una
cantidad que supera el valor límite establecido en la directiva UE 2006/66. Si las pilas no
se gestionan debidamente, estas sustancias pueden perjudicar la salud de personas o el
medio ambiente.
Tenga en cuenta lo siguiente:
El producto no requiere ningún mantenimiento por su parte. No hay ningún componente que
deba controlar o mantener en el interior del aparato; no lo abra nunca.
9. Mantenimiento y limpieza
9.1 Mantenimiento
Compruebe regularmente la seguridad técnica del producto, por ejemplo, si está dañada la carcasa.
Cuando no esté garantizado un funcionamiento seguro, ponga fuera de funcionamiento el aparato y evite que
pueda ponerse en marcha de nuevo involuntariamente.
El funcionamiento seguro no está garantizado si:
El aparato presenta daños visibles.
El aparato no funciona.
9.2 Limpieza
Limpie el producto con un paño limpio y húmedo. En caso de estar muy sucio, el paño se puede humedecer
con agua templada.
10. Gestión de residuos
62
Page 65

Español
N.°
Pregunta
Respuesta
1
¿Puedo desconectar temporalmente la
cámara?
No. En cuanto coloque las pilas, el aparato
empezará a grabar.
2
¿La cámara es resistente al viento y a la
intemperie?
Sí. La cámara cuenta con la clase de protección
IP65 y es adecuada tanto para interiores como para
exteriores.
3
¿Con qué luminosidad se obtiene una
imagen óptima?
A partir de 10 lux contará con las condiciones
ideales de luminosidad para una imagen óptima.
4
¿Cuenta la cámara con una función de
visión nocturna?
Puesto que esta cámara es un aparato que funciona
con pilas, no se ha integrado ninguna función de
visión nocturna.
Para obtener grabaciones óptimas es necesario
contar con buenas condiciones de luminosidad o con
suficiente iluminación cuando es de noche.
5
¿Cuáles pueden ser los motivos por los
que el aparato no graba?
Compruebe los siguientes puntos si su aparato no
graba:
1. ¿Ha introducido una tarjeta micro SD?
2. ¿La tarjeta micro SD está bloqueada?
(Lock/Unlock?)
3. ¿Ha formateado la tarjeta micro SD? Ésta debe
formatearse antes de usarla por primera vez.
Código de referencia
TVAC80010B
Monitor
Monitor LCD de 2,4"
Resolución de imagen
640 x 480 / 1280 x 720
Resolución de vídeo
640 x 480, 30fps / 1280 x 720, 30fps
Sensor
2 megapíxeles CMOS
Rango PIR
Máx. 3 m
Formato de vídeo
MJPEG
Soporte de memoria
Tarjeta Micro SD, máx. 32 GB (no incluida en el volumen de entrega)
Audio
Sí, con sensor de movimiento
Alimentación de tensión
4 pilas AA
Clase de protección IP
IP65
Dimensiones
80 x 48 x 150 mm
Peso
350 g, incluidas las pilas
Temperatura máx. de
servicio
-5°C a +55°C
11. Consejos para la solución de averías
12. Datos técnicos
63
Page 66

Español
Intervalo
Grabaciones
de imagen
Vida útil de las pilas
1,5 segundos
43200
14 horas
5 segundos
12960
14 horas
10 segundos
8640
24 horas
30 segundos
4320
2 dias
1 minuto
2880
3 dias
5 minutos
1152
4 dias
10 minutos
1152
8 dias
30 minutos
768
16 días
1 hora
768
32 días
5 horas
312
65 días
10 horas
312
130 días
24 horas
270
270 días
Duración de la
grabación PIR //
640 x 480 //
30 segundos
Duración de la
grabación PIR //
640 x 480 //
30 segundos
Grabaciones de imagen
cámara rápida //
1280 x 720
Grabaciones de imagen
cámara rápida //
1280 x 720
1GB
51 minutos
17 minutos
13.185
4.395
2GB
102 minutos
34 minutos
26.370
8.790
8GB
408 minutos
136 minutos
105.480
35.160
16GB
816 minutos
272 minutos
210.960
70.320
32GB
1.632 minutos
544 minutos
421.920
140.640
Vida útil de las pilas
Capacidad de memoria
64
Page 67

Page 68

Imprint
These operating instructions are published by ABUS Security-Center GmbH & Co.KG, Linker
Kreuthweg 5, 86444 Affing, Germany. No reproduction (including translation) is permitted in whole or
part e.g. photocopy, microfilming or storage in electronic data processing equipment, without the
express written consent of the publisher.
The operating instructions reflect the current technical specifications at the time of print.
We reserve the right to change the technical or physical specifications.
Nota redakcyjna
Niniejsza instrukcja obsługi jest publikacją ABUS Security-Center GmbH & Co. KG, Linker Kreuthweg
5, 86444 Affing. Wszystkie prawa, także do tłumaczenia, zastrzeżone. Reprodukcje wszelkiego
rodzaju, np. fotokopia mikrofilm oraz zapis w elektronicznych systemach przetwarzania danych
wymagają pisemnej zgody wydawcy. Przedruk, także we fragmentach, zabroniony.
Niniejsza instrukcja obsługi odzwierciedla stan faktyczny w dacie złożenia do druku.
Zmiany techniczne i zmiany wyposażenia zastrzeżone
Redaktionel note
Denne betjeningsvejledning er publiceret af ABUS Security-Center GmbH & Co. KG, Linker
Kreuthweg 5, 86444 Affing, Germany. Der må ikke foretages kopiering, inklusive oversættelser,
fotokopierng, mikrofilms optagelse af proces udstyr uden forudgående tilladelse fra udgiveren.
Denne brugervejledning reflekterer de kendte til dato tekniske specifikationer. Vi forbeholder os retten
til at ændre frit og uden forudgående advisering.
E Pie de imprenta
Este manual es una publicación de la Seguridad ABUS-Center GmbH & Co. KG, enlazador
Kreuthweg 5, 86444 Affing. Todos los derechos reservados, incluyendo traducciones. Queda
prohibida la reproducción, por ejemplo, Fotocopia, microfilm, o en los datos de los equipos
electrónicos de procesamiento, sin la autorización por escrito de la editorial. No puede ser
reproducido en cualquier forma. Este derecho para cambiar el estado de la técnica de la impresión.
Los cambios en la tecnología y el equipo.
© Copyright 04/2013 by ABUS Security-Center
 Loading...