

Page 1
TVAC80000B
User manual
Instrukcja obsługi
Brugerhåndbog
E Manual del usuario
You can find important information and FAQs about
this and other products on the website
www.abus.com/plug-and-play
Version 04/2013
Page 2

English
Polski
Dansk
Español
This user guide contains important information on starting operation and using the
device.
Make sure that this user guide is handed over when the product is given to other
persons.
Keep this user guide to consult later!
For a list of contents with the corresponding page numbers, see page 4.
Niniejsza instrukcja obsługi zawiera ważne wskazówki dotyczące uruchamiania i
obsługi.
Pamiętaj o tym, także przekazując produkt osobie trzeciej.
Zachowaj instrukcję do wykorzystania w przyszłości!
Wykaz treści znajdziesz w spisie treści z podaniem odpowiednich liczb stron na
stronie 15.
Denne betjeningsvejledning indeholder vigtige henvisninger til idriftsættelse og
håndtering.
Vær også opmærksom på dette, hvis produktet gives videre til en tredje person.
Opbevar derfor denne betjeningsvejledning til senere brug!
I indholdsfortegnelsen på side 26 findes der en liste over indholdet med angivelse af de
pågældende sidetal.
Este manual de instrucciones contiene indicaciones importantes para la puesta en
funcionamiento y para la utilización.
Tenga esto en cuenta, también cuando transfiera este aparato a terceras personas.
Por este motivo, guarde este manual para poder consultarlo cuando lo necesite.
El listado de los contenidos figura en el índice junto a las páginas correspondientes en la
página 37.
Page 3

TVAC80000B
User manual
Version 04/2013
Original user guide in English.
Retain for future reference.
Page 4
English
Introduction
Dear customer,
Thank you for purchasing this product.
This device complies with the requirements of the applicable EU directives. The declaration of conformity can
be ordered from:
ABUS Security-Center GmbH & Co. KG
Linker Kreuthweg 5
86444 Affing
GERMANY
To maintain this status and to guarantee safe operation, it is your obligation to observe this user guide.
Read the entire user guide carefully before starting operation of the product, and pay attention to all
operating instructions and safety information.
All company names and product descriptions are trademarks of the corresponding owner.
All rights reserved.
In the event of questions, please contact your local maintenance specialist or dealer.
Data storage is subject to national data privacy guidelines.
Disclaimer
This user guide has been produced with the greatest of care. Should you discover any missing
information or inaccuracies, please contact us under the address shown on the back of the manual.
ABUS Security-Center GmbH does not accept any liability for technical and typographical errors, and
reserves the right to make changes to the product and user guide at any time and without prior warning.
ABUS Security-Center GmbH is not liable or responsible for direct or indirect damage resulting from the
equipment, performance and use of this product. No forms of guarantee are accepted for the contents
of this document.
2
Page 5
English
The triangular warning symbol indicates important notes in this user guide which must
be observed.
This symbol indicates special tips and notes on the operation of the unit.
All guarantee claims are invalid in the event of damage caused by non-compliance
with this user guide. We cannot be held liable for resulting damage.
In the event of material or personal damage caused by improper operation
or non-compliance with the safety information, we cannot be held liable.
All guarantee claims are voided in such cases.
If the original packaging has been damaged, inspect the device. If the device shows
signs of damage, return it in the original packaging and inform the delivery service.
Explanation of symbols
Important safety information
This device has been manufactured in accordance with international safety standards.
Please read the following safety instructions carefully.
Safety information
1. Liquids
Make sure that no liquids of any type are able to enter the device.
2. Cleaning
Only use a damp cloth to clean the device. Do not use corrosive cleaning materials.
Disconnect the device from the power supply while doing so.
3. Installation position
This device is designed for indoor use only.
The product may be damaged if it is dropped, even from a low height.
Pay attention to the installation instructions in the corresponding section of this user guide.
4. Data storage
The use of surveillance equipment may be forbidden or regulated by law in some countries.
Before using this equipment, make sure that all your surveillance activities are completely legal.
It is prohibited to make images of people public without the consent of the people filmed.
Pay attention to the special regulations for video surveillance in commercial and public areas.
Video surveillance is not a substitute for your duty to exercise due care, foresight, and supervision.
Warnings
Observe all safety and operating instructions before putting the device into operation for the first time.
Avoid the following adverse conditions during operation:
Moisture or excess humidity
Temperatures outside the permitted range
Direct sunlight
Dust or flammable gases, vapors, or solvents
Strong vibrations
Strong magnetic fields (e.g. next to machines or loudspeakers)
Unpacking the device
Handle the device with extreme care when unpacking it.
3
Page 6

English
Contents
1. Intended use ............................................................................................................................................... 5
2. Scope of delivery ........................................................................................................................................ 5
3. Features and functions .............................................................................................................................. 5
4. Information and FAQs ................................................................................................................................ 5
5. Device description ..................................................................................................................................... 6
6. Installation................................................................................................................................................... 6
6.1 Inserting a micro SD card ..................................................................................................................... 6
6.2 Inserting the batteries ........................................................................................................................... 6
6.3 Installation ............................................................................................................................................ 7
7. Operation..................................................................................................................................................... 8
7.1 Live view............................................................................................................................................... 8
7.2 Setting the date and time ..................................................................................................................... 8
7.3 Zooming ............................................................................................................................................... 9
7.4 Taking photos on the micro SD card .................................................................................................... 9
7.5 Viewing micro SD card photos ............................................................................................................. 9
8. Maintenance and cleaning ....................................................................................................................... 10
8.1 Maintenance ....................................................................................................................................... 10
8.2 Cleaning ............................................................................................................................................. 10
9. Disposal ..................................................................................................................................................... 10
10. Tips for troubleshooting .......................................................................................................................... 11
11. Technical data .......................................................................................................................................... 11
4
Page 7
English
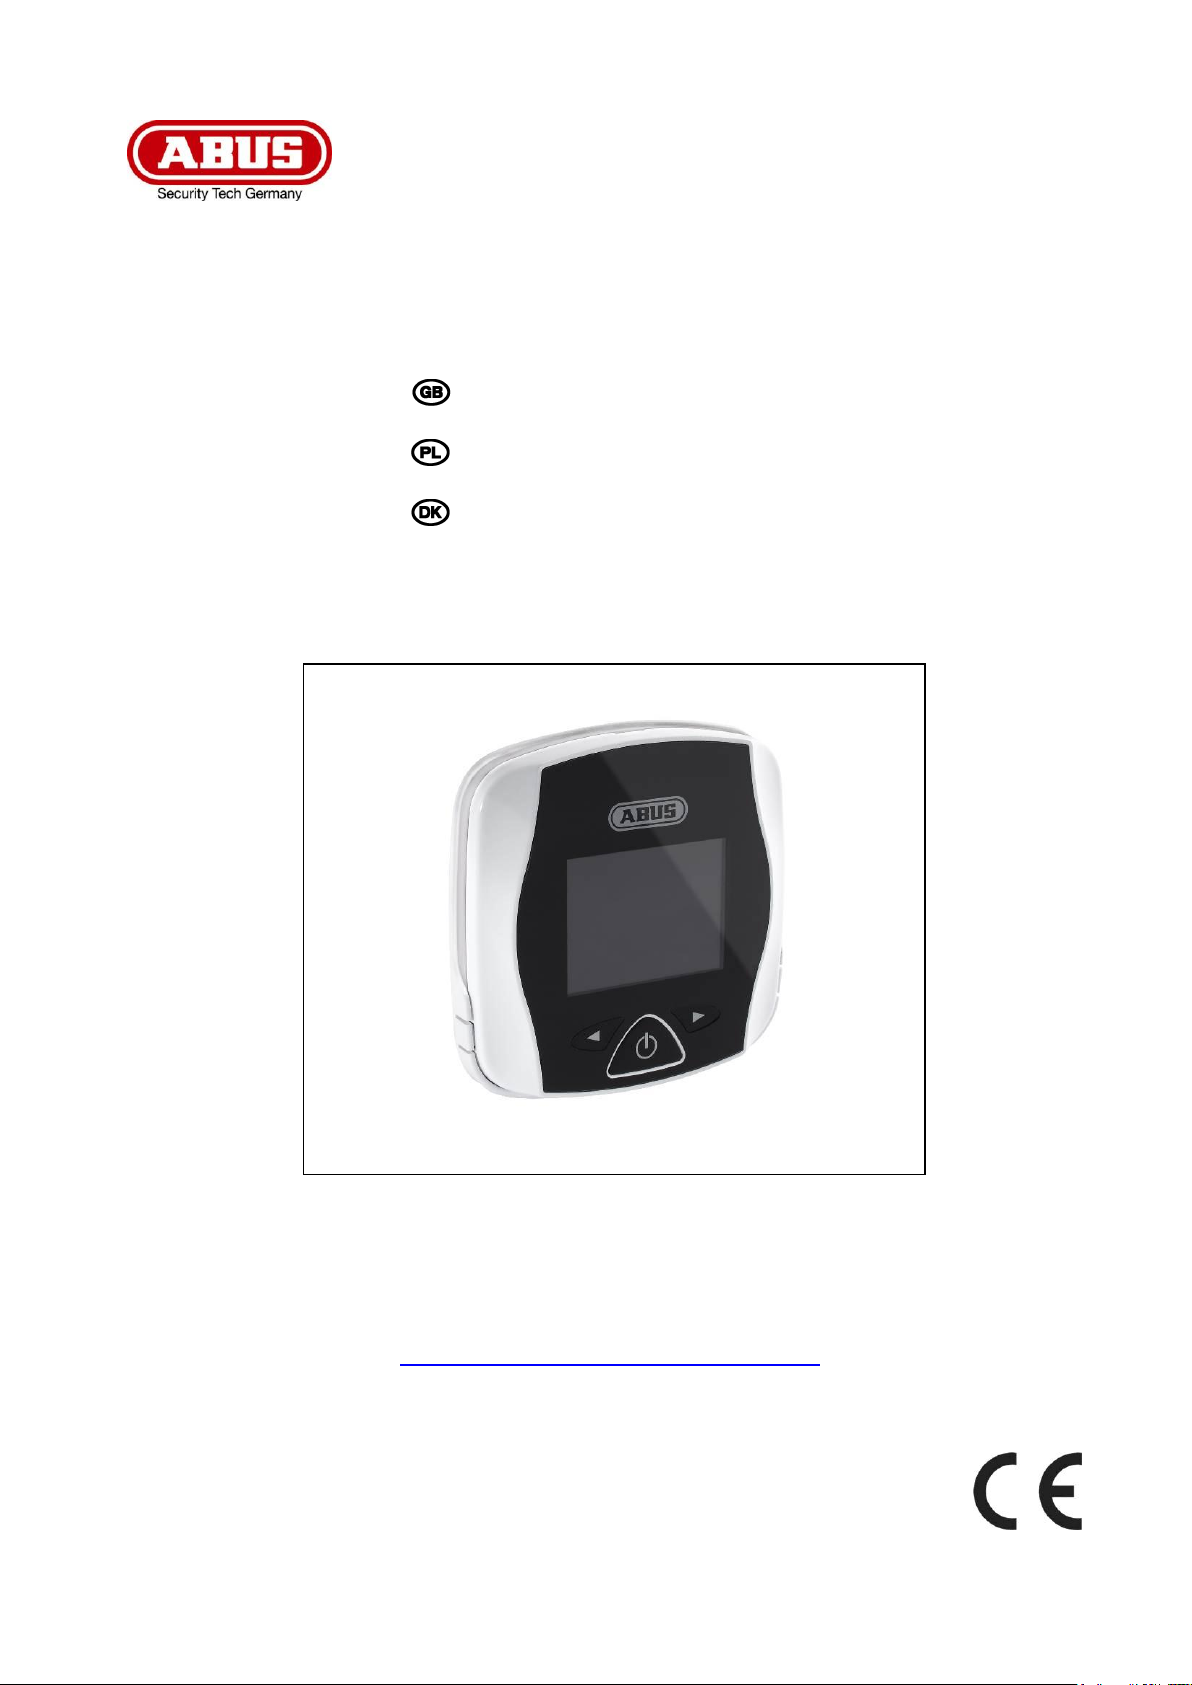
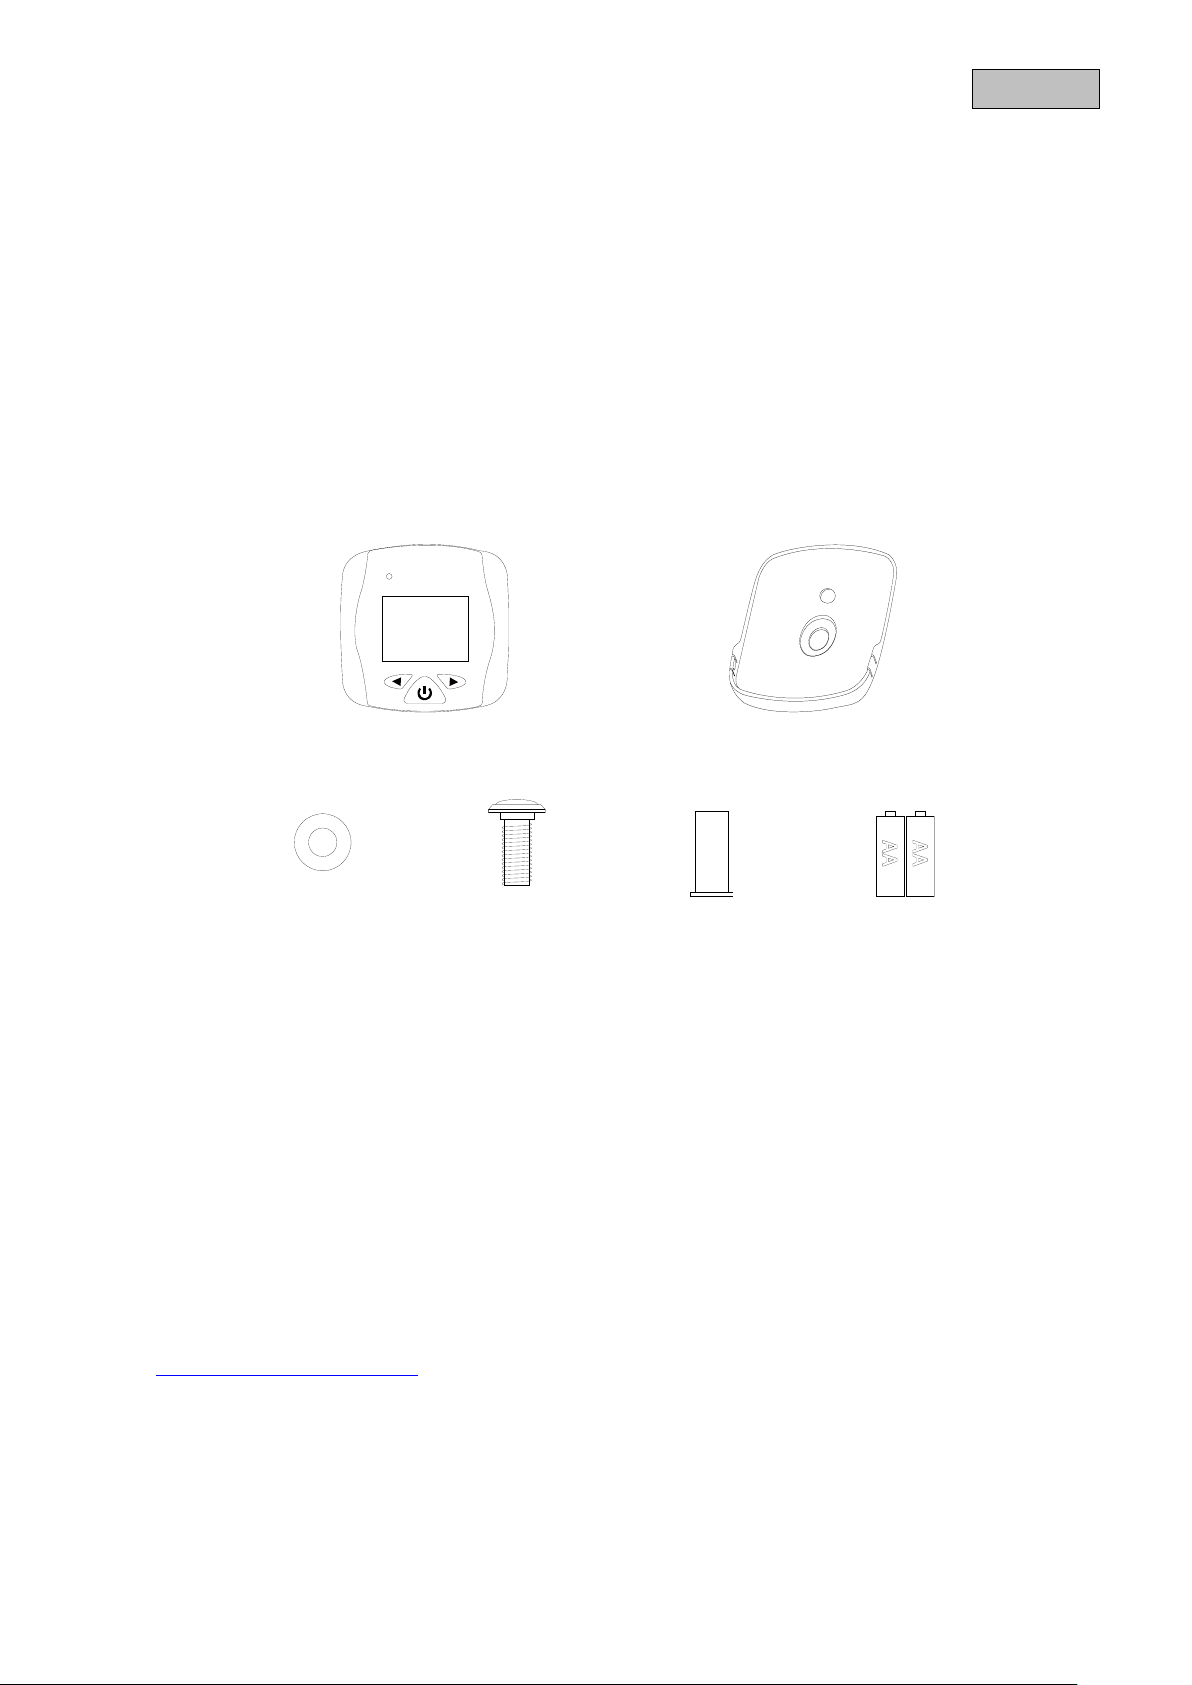
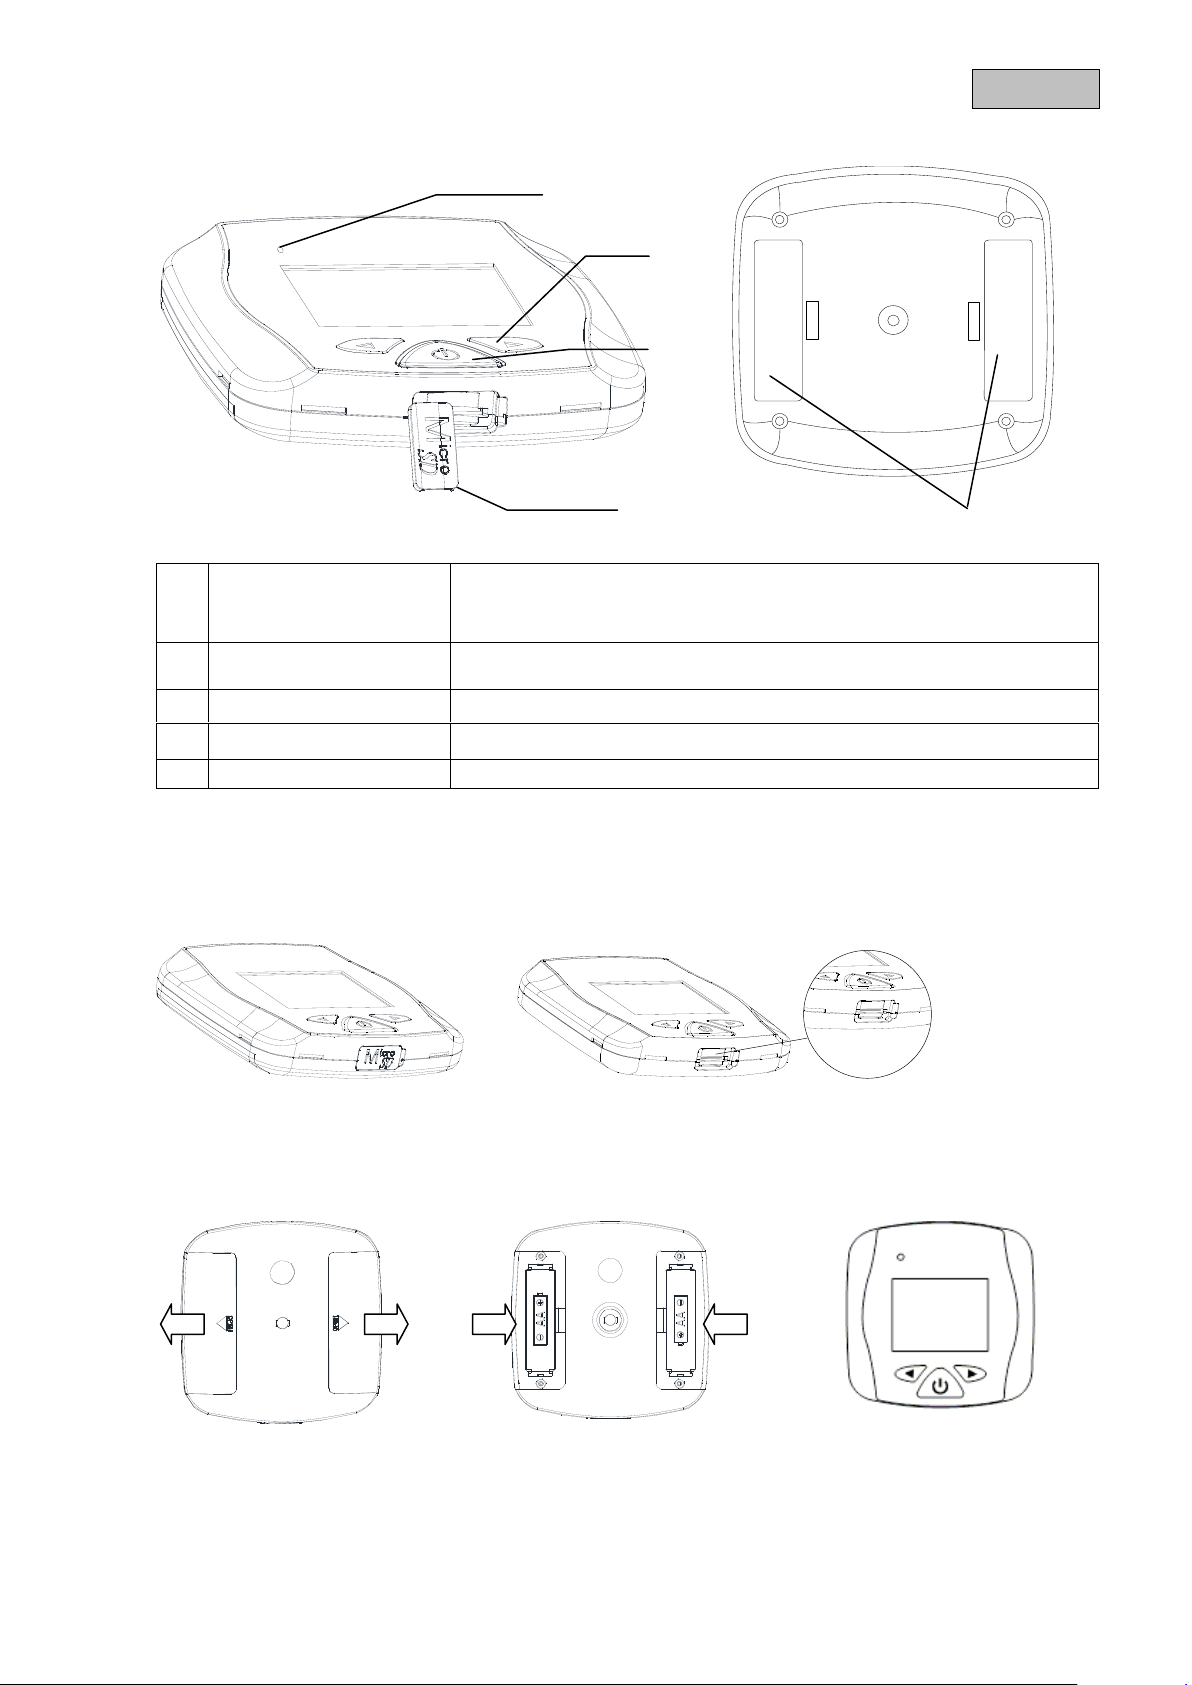
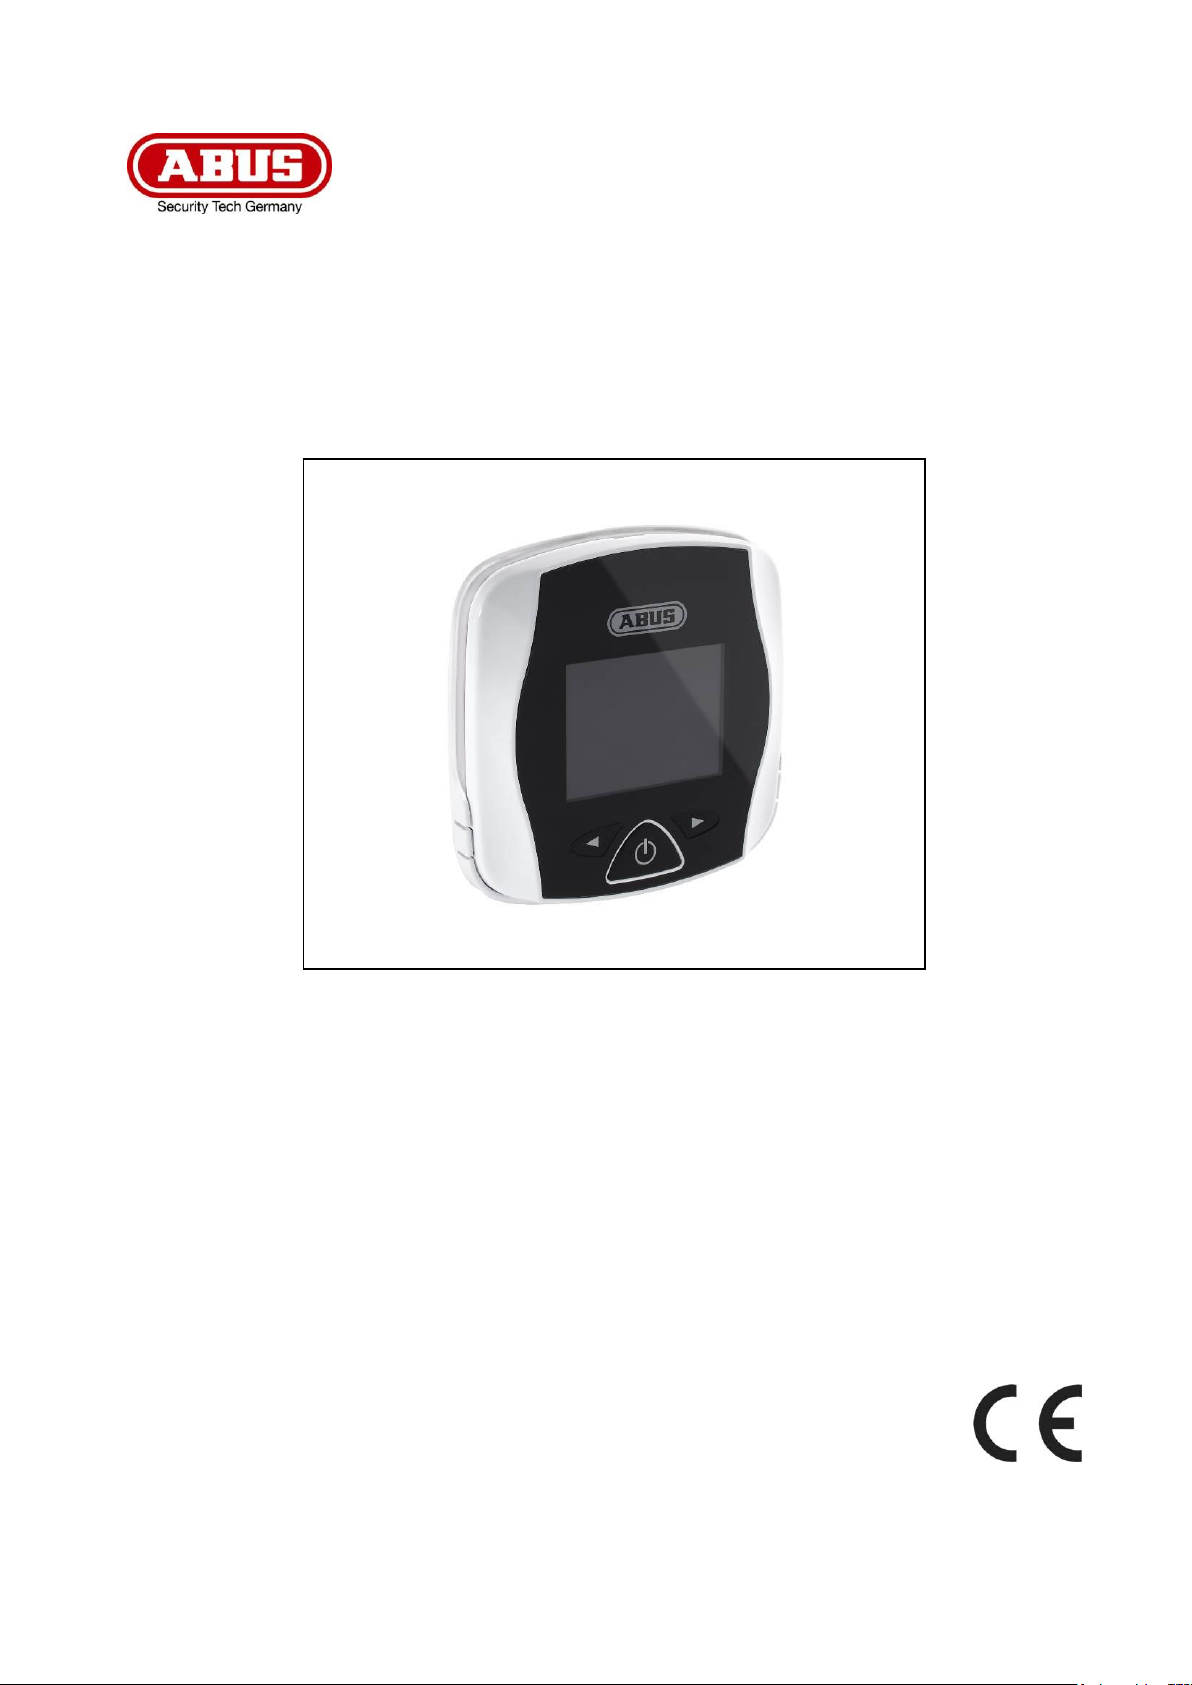
Digital door viewer
Fixing bracket
Tightening device
(washer)
Door viewer lens
Door viewer
cylinder
2 AA batteries
1. Intended use
The digital door viewer is a modern enhancement of the classic door viewer model. It is easily fitted to the
existing 12 to 14 mm door viewer. Alternatively, a 14 mm door viewer is also supplied which is suitable for
all doors with a thickness of between 35 and 53 mm.
At just the press of a button, you can see who is at your door and what is going on there at a viewing angle
of approximately 180 degrees. The door viewer also has a recording function: press the power button to
save three photos on a micro SD card. After 20 seconds the camera switches off to save energy. Press
the power button to activate the camera once again.
Above all, the view to the outside is also ideal for people wearing glasses, children and smaller people as
the internal display can also be seen from below.
For a detailed description of functions, refer to Section 3, “Features and functions”.
2. Scope of delivery
3. Features and functions
Convenient 2.4" TFT LCD color monitor and door viewer
A modern enhancement for the classic door viewer
Suitable for all doors between 35 and 53 mm in thickness and viewer bores of 12 to 14 mm
Wireless and uncomplicated installation thanks to battery power (2 x AA batteries included)
When activated, three photos are recorded on a micro SD card (not included) in HD quality
Zoom function
2 megapixel CMOS image sensor
4. Information and FAQs
You can find important information and FAQs about this and other products on the website
www.abus.com/plug-and-play. You will find information for troubleshooting under item 10 of these
instructions.
5
Page 8
English
Power LED
Device status display
Light, illumination
No light
Device switched on
Device switched off
◄►
Navigate between recordings
Zoom function
Power button
Switch on monitor
Micro SD card slot
Slot for using a micro SD card with a max. capacity of 32 GB
Battery compartment
2 AA batteries
5. Device description
6. Installation
6.1 Inserting a micro SD card
1. Open the rubber cover.
2. Insert a micro SD card.
6.2 Inserting the batteries
1. First remove the battery covers.
2. Insert two AA batteries. Make sure the polarity is correct when you do this.
3. Change the batteries as soon as you get the information on the display.
6
Page 9

English
Remove your existing door peephole from the
peephole bore or drill a new hole if required.
The included peephole requires a 14 mm hole.
Please note: According to DIN 68706, the
standard height for a peephole (spy hole) in
apartment doors is 1,400 mm (measured from the
bottom edge of the door leaf).
Then insert the door peephole lens from the
outside.
For 14 mm drill holes:
Push the door peephole cylinder through the fixing
bracket and then through the hole on the inside of
the door.
Tighten the door peephole by hand.
For 12 mm drill holes:
If you want to use a smaller peephole, you can
use the existing tightening device as a washer for
stabilization.
Push the door peephole cylinder through the
washer and then through the hole on the inside of
the door.
Tighten the door peephole by hand.
Then tighten the peephole with the included
tightening device (washer).
If you have already used the tightening device as
a washer for a small peephole, you need to
tighten it with a suitable object.
Now place the digital door peephole onto the
bracket.
You can now use the door peephole.
6.3 Installation
7
Page 10
English
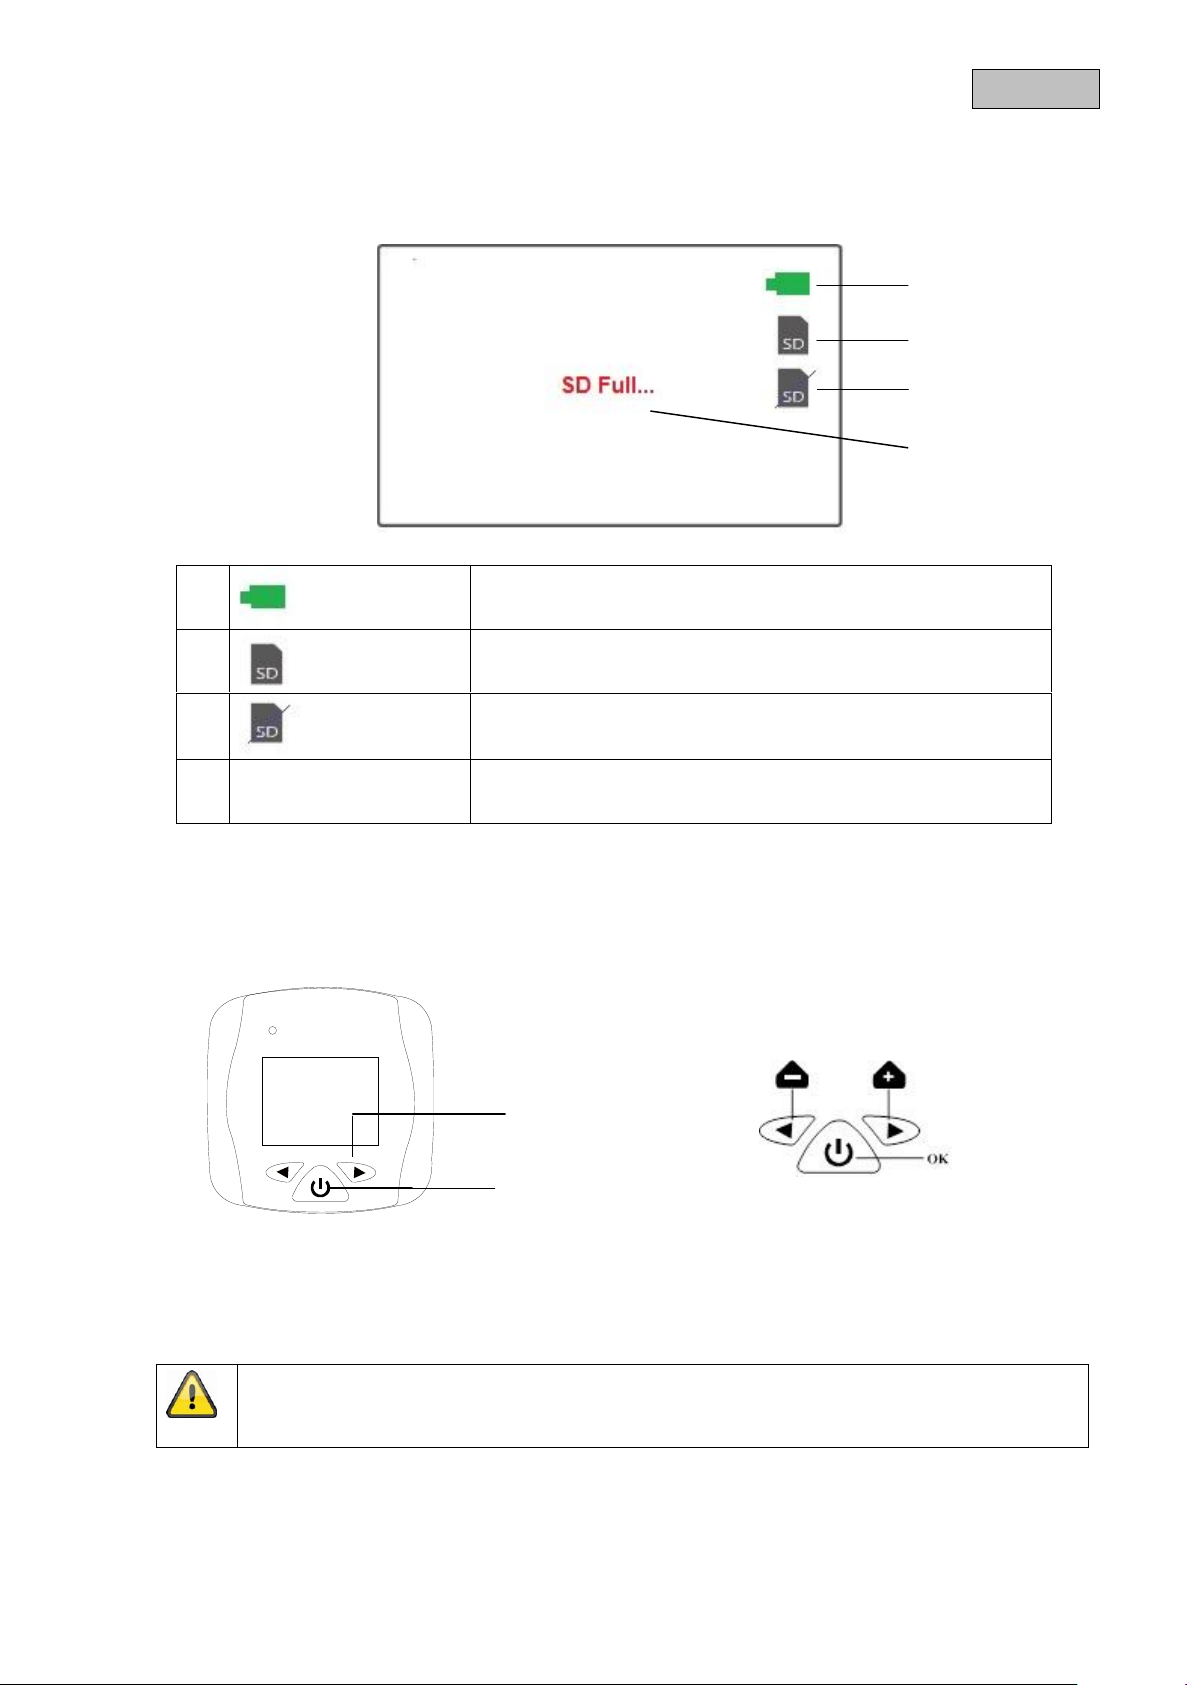
Battery display
Micro SD card recognized
No micro SD card available
SD Full…
Micro SD card full
Please note:
The screen switches off automatically after 20 seconds if no further changes are made.
7. Operation
7.1 Live view
7.2 Setting the date and time
1. To set the date and time, hold down the “>” button for three seconds when switched off.
2. Then press the power button as well until you get to the
“Date & Time” menu item.
3. Set the date and time using the arrow buttons. Confirm your input with the power button.
Your photos are now saved with the correct date and time on the micro SD card.
8
Page 11
English
Please note:
This feature only works if a micro SD card is inserted.
Please note:
The microSD card cannot be formatted on the device. You need to delete the files on your
PC.
Please note:
The screen switches off automatically after 20 seconds if no further changes are made.
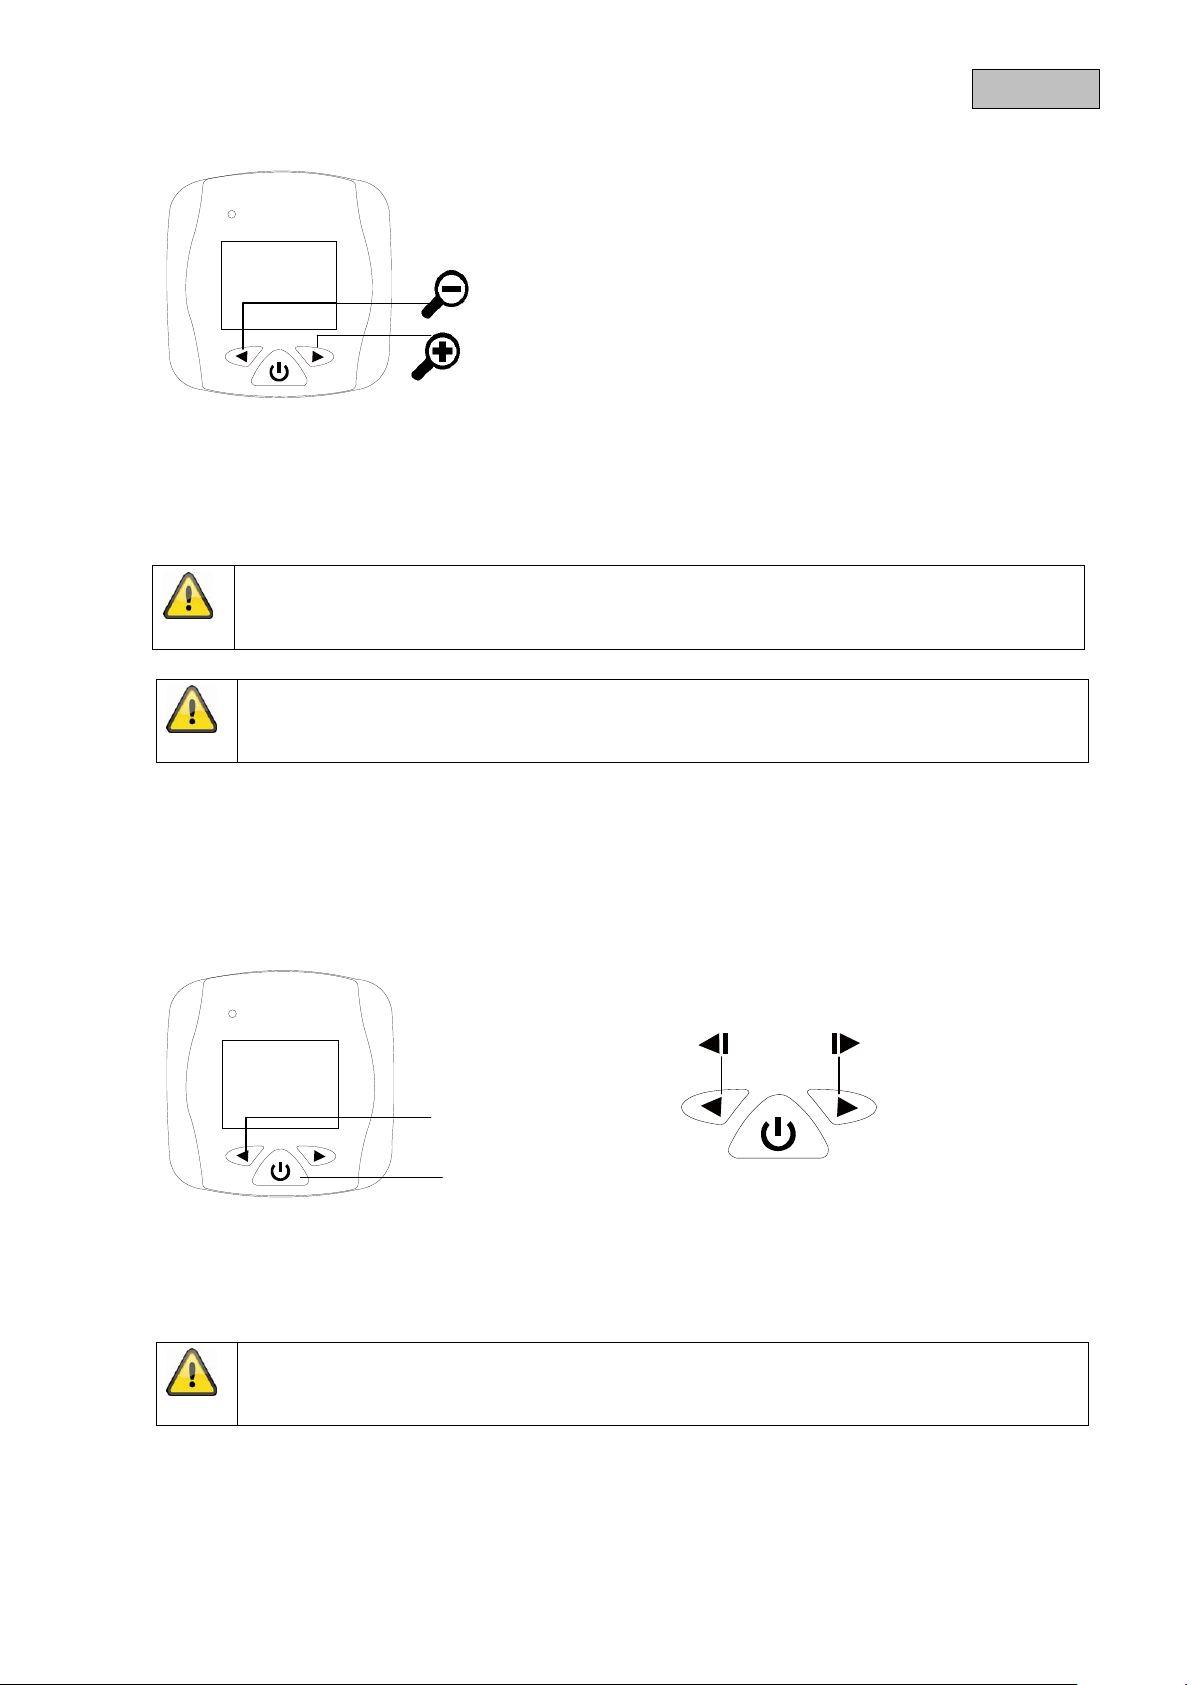
7.3 Zooming
Press the “>” button if you want to zoom closer into the photo.
7.4 Taking photos on the micro SD card
Three photos are taken every time you press the power button.
7.5 Viewing micro SD card photos
You have the option of viewing the photos on the computer when you remove the micro SD card or you
can look at them directly on the door viewer. To do so, please proceed as follows:
1. Hold down the “<” button for three seconds when switched off.
2. Then press the power button as well until you get to the photo view.
3. You can now select a photo using the arrow buttons.
9
Page 12
English
Do not allow any liquids to enter the device.
Do not use any chemical cleaning agent, as they could damage the surface of the housing
(discoloration).
Important information on device disposal
The EU Directive 2002/96/EG regulates the proper return, treatment and recycling of used
electronic devices. This symbol means that in the interest of environmental protection the
device must be disposed of separately from household or industrial waste at the end of its
service life in accordance with applicable local legal guidelines. Disposing of used devices
can be done at official recycling centers in your country. Obey local regulations when
disposing of material. Further details on returns (also for non-European countries) can be
obtained at your local authority. Separate collection and recycling saves natural resources
and ensures that all the provisions for protecting health and environment are observed
when recycling the product.
Important information on battery disposal
Batteries with this label do not contain harmful substances such as cadmium, lead and
mercury. However, used batteries must not be disposed of along with household waste in
accordance with the battery directive. To protect natural resources and promote the
recycling of materials, separate the batteries from other waste and deposit them at a local
recycling center. An additional label with the chemical symbols for Hg, Cd or Pb means
that the batteries contain quantities of mercury, cadmium or lead which exceed the
restrictions set by the EU Directive 2006/66. If batteries are not disposed of properly,
these substances can cause harm to human health or the environment.
Please note:
You do not need to perform any maintenance on this product. There are no components
to service or anything inside the product to check. Never open it.
8. Maintenance and cleaning
8.1 Maintenance
Regularly check the technical safety of the product, e.g. check the housing for damage.
If it seems that it may no longer be possible to operate the device safely, stop using the product and
protect it from unintentional use.
It is likely that safe operation is no longer possible in the event that:
The device shows signs of visible damage.
The device no longer works correctly.
8.2 Cleaning
Clean the device with a clean, dry cloth. The cloth can be dampened with lukewarm water if the dirt
on the monitor is hard to remove.
9. Disposal
10
Page 13
English
No.
Question
Answer
1
What resolution is the display?
The resolution is 320 x 240 pixels.
2
When does the image appear on the
display after pressing the power button?
The image appears on the display around 4 seconds
after you press the power button.
3
Does the door viewer record
continuously?
This product does not record continuously. Three
images are recorded after the power button is
activated.
4
Can it be used with doors over 53mm?
Yes, although a suitable peephole cylinder must be
used. This is not included in the scope of delivery.
5
How long is the battery life?
The batteries will provide power for approx. 1,300
activations.
6
When does the door viewer record?
As soon as the power button is pressed, it records a
total of 3 images in the first 3 seconds.
7
Which brightness will provide the best
image.
10 lux and more are the best light conditions.
8
What could be the reasons why the
device does not record?
If your device does not record, please check the
following:
1. Have you inserted a microSD card?
2. Is the microSD card locked? (Lock/Unlock)
3. Have you formatted the microSD card? It must be
formatted before it is first used.
Model number
TVAC80000B
Battery type
2 AA batteries
Resolution modes
1280 x 720 pixels
Dimensions
105 x 105 x 25 mm
Image sensor
1/4" progressive scan CMOS sensor
Battery operating time
Approx. 1300 armings
Net weight
0.12 kg
Monitor
2.4" TFT LCD
Storage medium
Micro SD card, max. 32 GB
Certifications
CE
Horizontal angle of view
60°
10. Tips for troubleshooting
11. Technical data
11
Page 14
TVAC80000B
Instrukcja obsługi
Wersja 04/2013
Instrukcja obsługi przetłumaczona z języka niemieckiego.
Przechować do wykorzystania w przyszłości!
Page 15
Polski
Wprowadzenie
Szanowna Klientko, Szanowny Kliencie.
Dziękujemy za zakup naszego produktu.
To urządzenie spełnia wymogi obowiązujących dyrektyw UE. Deklarację zgodności można otrzymać pod
adresem:
ABUS Security-Center GmbH & Co. KG
Linker Kreuthweg 5
86444 Affing
GERMANY
Aby zachować ten stan i zapewnić bezpieczną eksploatację, użytkownik musi przestrzegać niniejszej
instrukcji obsługi!
Przed uruchomieniem produktu przeczytaj całą instrukcję obsługi i przestrzegaj wszystkich zasad
bezpieczeństwa!
Wszystkie zawarte w niej nazwy firm i oznaczenia produktów są zarejestrowanymi znakami
towarowymi odnośnych właścicieli. Wszystkie prawa zastrzeżone.
W razie wątpliwości zwróć się do instalatora lub sprzedawcy!
Zapis danych jest objęty przepisami w zakresie ochrony danych, obowiązującymi w poszczególnych krajach.
Wyłączenie odpowiedzialności cywilnej
Niniejsza instrukcja obsługi została opracowana z najwyższą starannością. Jeżeli mimo to zauważysz w niej
braki lub niedokładności, prosimy o ich zgłaszanie na adres podany na odwrocie niniejszego podręcznika.
ABUS Security-Center GmbH nie odpowiada za błędy techniczne i typograficzne oraz zastrzega sobie
prawo do wprowadzania w każdej chwili bez wcześniejszej zapowiedzi zmian w produkcie i w instrukcjach
obsługi.
ABUS Security-Center nie odpowiada za bezpośrednie i pośrednie szkody następcze , powstałe w związku
z wyposażeniem, osiągami i zastosowaniem produktu. Zawartość niniejszego dokumentu nie jest objęta
gwarancją.
13
Page 16

Polski
Wykrzyknik w trójkącie oznacza w niniejszej instrukcji obsługi ważne wskazówki, które
muszą być bezwzględnie przestrzegane.
Tym symbolem oznaczane są specjalne rady i wskazówki dotyczące obsługi.
Szkody spowodowane nieprzestrzeganiem niniejszej instrukcji obsługi powodują
wygaśnięcie roszczeń gwarancyjnych. Nie odpowiadamy za szkody następcze!
Nie odpowiadamy za szkody materialne lub osobowe, spowodowane nieprawidłową
obsługą lub nieprzestrzeganiem zasad bezpieczeństwa. W takich przypadkach wygasają
wszelkie roszczenia gwarancyjne!
W razie stwierdzenia uszkodzenia oryginalnego opakowania, sprawdź najpierw urządzenie. W
razie stwierdzenia uszkodzeń urządzenia, odeślij je wraz z opakowaniem, informując
jednocześnie przewoźnika.
Objaśnienie symboli
Ważne zasady bezpieczeństwa
Urządzenie zostało wyprodukowane zgodnie z międzynarodowymi standardami bezpieczeństwa.
Przeczytaj uważnie poniższe informacje dotyczące zasad bezpieczeństwa.
Zasady bezpieczeństwa
1. Ciecze
Chroń urządzenie przed wniknięciem do niego wszelkiego rodzaju cieczy.
2. Czyszczenie
Czyść urządzenie tylko wilgotną ściereczką bez ostro działających środków czyszczących.
Przed czyszczeniem odłącz urządzenie od sieci.
3. Miejsce ustawienia
Urządzenie jest przewidziane tylko do użytku we wnętrzach.
Upadek nawet z niewielkiej wysokości może spowodować uszkodzenie produktu.
Przestrzegaj wskazówek montażowych zawartych w odpowiednim rozdziale niniejszej instrukcji
obsługi.
4. Zapis danych
W niektórych krajach uruchamianie systemów monitorowania może być ustawowo zabronione lub
ograniczone.
Przed uruchomieniem systemu użytkownik powinien upewnić się, czy monitorowanie jest zgodne z
obowiązującym prawem.
Publikowanie materiału obrazowego, na którym znajdują się osoby, jest zabronione bez zgody tych
osób.
Przestrzegaj specjalnych przepisów dotyczących monitorowania wideo na obszarach przemysłowych
i publicznych.
Monitorowanie wideo nie zwalnia z obowiązku zachowania staranności, prewencji i nadzoru.
Ostrzeżenia
Przed pierwszym uruchomieniem należy spełnić wszystkie wymagania określone w zasadach
bezpieczeństwa i instrukcji obsługi!
Unikaj wymienionych niżej niekorzystnych warunków otoczenia w czasie eksploatacji urządzenia.
Wilgoć lub za wysoka wilgotność powietrza.
Temperatury poza dozwolonym obszarem
Bezpośrednie nasłonecznienie.
Zapylenie, palne gazy, opary lub rozpuszczalniki.
Silne wibracje.
Silne pola magnetyczne, występujące np. w pobliżu maszyn lub głośników.
Rozpakowanie
Rozpakowując urządzenie, należy zachować szczególną ostrożność.
14
Page 17

Polski
Spis treści
1. Użycie zgodne z przeznaczeniem ........................................................................................................... 16
2. Zakres dostawy ........................................................................................................................................ 16
3. Cechy i funkcje ......................................................................................................................................... 16
4. Wskazówki i często zadawane ................................................................................................................ 16
5. Opis urządzenia ........................................................................................................................................ 17
6. Instalacja ................................................................................................................................................... 17
6.1 Zakładanie karty micro SD ................................................................................................................. 17
6.2 Zakładanie baterii ............................................................................................................................... 17
6.3 Montaż ................................................................................................................................................ 18
7. Obsługa ..................................................................................................................................................... 19
7.1 Widok na żywo ................................................................................................................................... 19
7.2 Ustawianie daty i czasu ...................................................................................................................... 19
7.3 Funkcja Zoom .................................................................................................................................... 20
7.4 Zapis zdjęć na karcie micro SD ......................................................................................................... 20
7.5 Przeglądanie zdjęć zapisanych na karcie micro SD .......................................................................... 20
8. Konserwacja i czyszczenie ...................................................................................................................... 21
8.1 Konserwacja ....................................................................................................................................... 21
8.2 Czyszczenie ....................................................................................................................................... 21
9. Utylizacja ................................................................................................................................................... 21
10. Wskazówki dotyczące usuwania błędów ............................................................................................... 22
11. Dane techniczne ....................................................................................................................................... 22
15
Page 18

Polski
Cyfrowy wizjer do drzwi
Uchwyt
Klucz do
dokręcania
(podkładka
okrągła)
Soczewka wizjera
do drzwi
Cylinder wizjera do
drzwi
2 baterie AA
1. Użycie zgodne z przeznaczeniem
Cyfrowy wizjer do drzwi to nowoczesne rozszerzenie klasycznego wizjera. W łatwy i prosty sposób
nakłada się go na istniejący wizjer 12-14 mm. Alternatywnie dołączany jest także wizjer 14 mm, nadający
się do wszystkich drzwi o grubości 35-53 mm.
Wystarczy naciśnięcie guzika, aby zobaczyć z kątem widzenia ok. 180 stopni, kto stoi pod drzwiami i co
się tam dzieje. Poza tym wizjer do drzwi ma funkcję wykonywania zdjęć: n naciśnięciu przycisku Power
można zapisać trzy zdjęcia na karcie micro-SD. Po 20 sekundach kamera wyłącza się w celu
oszczędzania energii. Naciśnięcie przycisku ponownie uruchamia kamerę.
Możliwość spojrzenia na zewnątrz jest też idealna dla osób noszących okulary, dzieci i niskich osób,
ponieważ wyświetlacz wewnętrzny można oglądać także od dołu.
Szczegółowy opis działania znajduje się w rozdziale „3. Cechy i funkcje“.
2. Zakres dostawy
3. Cechy i funkcje
Komfortowy monitor kolorowy 2,4" TFT LCD i wizjer
Nowoczesna wersja klasycznego wizjera do drzwi
Do wszystkich drzwi o grubości od 35 do 53 mm i od 12 do 14 mm; wizjer do drzwi z otworami do
Bezprzewodowa i nieskomplikowana instalacja dzięki zasilaniu z baterii (w zestawie 2 baterie AA)
W przypadku aktywacji na karcie pamięci micro SD (nie znajduje się w zestawie) zapisywane są 3
Funkcja zoom
Czujnik obrazowy CMOS 2 megapikseli
4. Wskazówki i często zadawane
Ważne wskazówki i często zadawane pytania dotyczące tego produktu, jak również innych produktów
znaleźć można na stronie internetowej www.abus.com/plug-and-play. Informacje dotyczące usuwania
błędów znajdują się w punkcie 10 niniejszej instrukcji.
zamocowania
zdjęcia w jakości HD
16
Page 19

Polski
Dioda zasilania LED
Wyświetlanie stanu urządzenia
Światło
Brak światła
Urządzenie włączone
Urządzenie wyłączone
◄►
Przełączanie pomiędzy zdjęciami
Funkcja Zoom
Przycisk Power
Włączanie monitora
Gniazdo karty micro SD
Gniazdo umożliwiające użycie karty micro SD do maks. 32 GB
Pojemniki na baterie
2 x bateria AA
5. Opis urządzenia
6. Instalacja
6.1 Zakładanie karty micro SD
1. Otwórz gumowaną osłonę.
2. Włóż kartę micro SD.
6.2 Zakładanie baterii
1. Najpierw zdejmij osłony baterii
2. Włóż 2 baterie AA. Pamiętaj przy tym o prawidłowym położeniu biegunów.
17
Page 20

Polski
Wyjmij istniejący wizjer drzwiowy z otworu lub
w razie potrzeby wywierć nowy otwór.
Do dostarczonego w komplecie wizjera potrzebny
jest otwór 14 mm.
Pamiętaj: wg DIN 68706 normatywna wysokość
otworu wizjera w drzwiach mieszkania wynosi
1400 mm (mierzone od dolnej krawędzi skrzydła
drzwi).
Włóż od zewnątrz soczewkę wizjera.
Do otworów 14 mm
Włóż cylinder wizjera w uchwyt a następnie w
otwór po wewnętrznej stronie drzwi.
Dokręć wizjer palcami.
Do otworów 12 mm
Aby użyć mniejszego wizjera, możesz użyć
istniejącego klucza do stabilizacji jako podkładki
okrągłej.
Włóż cylinder wizjera przez podkładkę i uchwyt a
następnie w otwór po wewnętrznej stronie drzwi.
Dokręć wizjer palcami.
Następnie dokręć mocno wizjer dołączonym
w komplecie kluczem (podkładka okrągła).
Jeżeli klucz został już wykorzystany jako
podkładka okrągła do mniejszego wizjera, należy
go dokręcić innym przedmiotem.
Załóż na uchwyt wizjer cyfrowy.
Wizjer jest gotowy do użycia.
6.3 Montaż
18
Page 21

Polski
Wyświetlacz stanu baterii
Została wykryta karta micro SD
Brak karty micro SD
SD Full…
Karta micro SD pełna
Pamiętaj!
Ekran wyłącza się po 20 sekundach, jeżeli nie zostanie wprowadzona żadna zmiana.
7. Obsługa
7.1 Widok na żywo
7.2 Ustawianie daty i czasu
1. Aby ustawić datę i czas, przytrzymaj wciśnięty przycisk „>“ w stanie wyłączonym przez trzy sekundy.
2. Następnie naciśnij dodatkowo przycisk Power aż do automatycznego wejścia do punktu menu
„Date & Time“.
3. Ustaw datę i czas przyciskami strzałkowymi. Potwierdź wprowadzone dane przyciskiem Power.
Zdjęcia będą teraz zapisywane na karcie micro SD z prawidłową datą i czasem.
19
Page 22

Polski
Pamiętaj!
Ta funkcja działa tylko, gdy jest włożona karta micro SD.
Pamiętaj!
W urządzeniu nie można formatować karty micro SD. Kasowanie plików należy
przeprowadzić na komputerze PC.
Pamiętaj!
Ekran wyłącza się po 20 sekundach, jeżeli nie zostanie wprowadzona żadna zmiana.
7.3 Funkcja Zoom
Naciśnij przycisk ">" aby uzyskać większe powiększenie.
7.4 Zapis zdjęć na karcie micro SD
Po przyciśnięciu przycisku Power wykonywane są zawsze 3 zdjęcia.
7.5 Przeglądanie zdjęć zapisanych na karcie micro SD
Zapisane zdjęcia można przeglądać na komputerze PC, po wyjęciu karty micro SD albo bezpośrednio w
wizjerze drzwiowym. Aby tego dokonać, postępuj w następujący sposób.
1. Przytrzymaj wciśnięty przycisk „<“ w stanie wyłączonym przez trzy sekundy.
2. Następnie naciśnij dodatkowo przycisk Power aż do automatycznego wejścia do ekranu przeglądania
zdjęć.
3. Teraz możesz wybrać jedno ze zdjęć za przycisku strzałkowego.
20
Page 23

Polski
Uważaj, aby do wnętrza urządzenia nie dostała się jakakolwiek ciecz.
Nie używaj chemicznych środków czyszczących, ponieważ mogą one uszkodzić
powierzchnię obudowy (spowodować odbarwienia).
Ważna wskazówka dot. utylizacji urządzenia
Dyrektywa UE 2002/96/WE reguluje kwestię prawidłowego wycofania z użycia i utylizacji
urządzeń elektronicznych oraz obchodzenia się z nimi. Ten symbol oznacza, że w
związku ochroną środowiska urządzenie należy zutylizować po okresie jego żywotności
zgodnie z obowiązującymi przepisami prawnymi, w separacji od odpadów z gospodarstw
domowych oraz odpadów przemysłowych. Utylizacja może być przeprowadzona przez
autoryzowane punkty zbiorcze w kraju użytkownika. Należy przestrzegać lokalnych
przepisów w zakresie utylizacji materiałów. Dalsze informacje dotyczące wycofania z
użytku (obejmujące również kraje spoza UE) można uzyskać od organów administracji
lokalnej. Selektywna zbiórka i recykling umożliwiają oszczędność zasobów naturalnych, a
sam recykling, o ile jest realizowany zgodnie z przepisami, zapewnia ochronę zdrowia i
środowiska.
Ważna informacja dot. utylizacji baterii
Baterie oznakowane w ten sposób zawierają szkodliwe substancje, takie jak kadm, ołów i
rtęć. Zużytych baterii, zgodnie z rozporządzeniem w sprawie baterii, nie wolno utylizować
łącznie z odpadami z gospodarstw domowych. W celu ochrony zasobów naturalnych i
wspierania działań mających na celu umożliwienie ponownego użycia materiałów baterie
należy oddzielać od innych odpadów i przekazywać do lokalnego systemu
recyklingowego. Dodatkowe oznakowanie symbolami Hg, Cd lub Pb oznacza, że baterie
zawierają rtęć, kadm lub ołów w ilościach wykraczających poza wartości graniczne
Dyrektywy UE 2006/66. Nieprawidłowa utylizacja baterii może spowodować zagrożenie
dla zdrowia ludzi i środowiska, wywołane oddziaływaniem tych substancji.
Pamiętaj!
Produkt nie wymaga konserwacji. Nie posiada on części, które powinno się sprawdzać lub
konserwować, dlatego nie należy go nigdy otwierać.
8. Konserwacja i czyszczenie
8.1 Konserwacja
Sprawdzaj regularnie bezpieczeństwo techniczne produktu, np. czy obudowa nie jest uszkodzona.
Jeżeli są powody do przypuszczenia, że bezpieczna eksploatacja jest niemożliwa, należy wycofać produkt
z eksploatacji i zabezpieczyć przed przypadkowym uruchomieniem.
Należy przyjąć, że bezpieczna eksploatacja nie jest możliwa, jeżeli:
urządzenie ma widoczne uszkodzenia,
urządzenie nie działa.
8.2 Czyszczenie
Czyść produkt czystą, suchą ściereczką. W razie większych zabrudzeń ściereczkę można zwilżyć letnią
wodą.
9. Utylizacja
21
Page 24

Polski
No.
Pytania
Odpowiedź
1
Jaką rozdzielczość ma wyświetlacz?
Rozdzielczość wynosi 320 x 240 piksele.
2
Kiedy pojawia się obraz na wyświetlaczu
po naciśnięciu przycisku zasilania?
Obraz pojawia się na wyświetlaczu po ok. 4
sekundach, od momentu naciśnięcia przycisku
zasilania.
3
Czy wizjer rejestruje obraz w sposób
ciągły?
Ten produkt nie rejestruje obrazu w sposób ciagły. Po
aktywacji przycisku zasilania zapisywane są trzy
obrazy.
4
Czy możliwe jest zastosowanie
urządzenia przy drzwiach powyżej 53
mm?
Tak, jednak konieczne jest użycie pasującego
cylindra wizjera. Nie jest on zawarty w zestawie.
5
Jaka jest żywotność baterii?
Baterie wytrzymują ok. 1300 aktywacji.
6
Kiedy wizjer zaczyna rejestrowanie?
Po naciśnięciu przycisku zasilania wizjer rejestruje
przez pierwsze 3 sekundy łącznie 3 obrazy.
7
Przy jakiej jasności powstaje optymalny
obraz?
Jasność min. 10 lux zapewnia idealne warunki
oświetlenia dla uzyskania optymalnego obrazu.
8
Co może być przyczyną nie zapisywania
danych przez urządzenie?
Jeśli urządzenie nie zapisuje danych, należy
sprawdzić poniższe punkty:
1. Czy włożono kartę micro SD?
2. Czy karta microSD jest odblokowana?
(Lock/Unlock?)
3. Czy sformatowano kartę micro SD? Kartę micro
SD należy sformatować przed użyciem po raz
pierwszy.
Numer typu
TVAC80000B
Typ baterii
2 x bateria AA
Tryby rozdzielczości
1280 x 720 pikseli
Wymiary
105 x 105 x 25 mm
Czujnik obrazowy
1/4" Progressive Scan CMOS-Sensor
Czas pracy baterii
ok. 1300 aktywacji
Ciężar netto
0,12 kg
Monitor
2,4” TFT LCD
Nośnik pamięci
Karta micro SD, maks. 32 GB
Certyfikaty
CE
Kąt widzenia w poziomie
60°
10. Wskazówki dotyczące usuwania błędów
11. Dane techniczne
22
Page 25

TVAC80000B
Betjeningsvejledning
Version 04/2013
Original betjeningsvejledning på tysk.
Opbevares til fremtidig anvendelse!
Page 26

Dansk
Indledning
Kære kunde.
Tak, fordi du har valgt at købe dette produkt.
Dette apparat opfylder kravene i gældende EU-direktiver. Overensstemmelseserklæringen kan rekvireres
hos:
ABUS Security-Center GmbH & Co. KG
Linker Kreuthweg 5
86444 Affing
GERMANY
Som bruger skal du følge denne betjeningsvejledning for at bevare denne tilstand og sikre en farefri brug!
Læs hele betjeningsvejledningen igennem før idrifttagning af produktet, og overhold alle betjenings- og
sikkerhedshenvisninger!
Alle nævnte firmanavne og produktbetegnelser er de pågældende ejeres varemærker. Alle rettigheder
forbeholdt.
I tilfælde af spørgsmål bedes du henvende dig til din installatør eller forhandler!
Datalagringen er underlagt de nationale retningslinjer om beskyttelse af persondata.
Ansvarsfritagelse
Denne betjeningsvejledning er udarbejdet meget omhyggeligt. Hvis du alligevel finder udeladelser eller
unøjagtigheder, bedes du meddele os dette på adressen, der er anført på bagsiden af håndbogen.
ABUS Security-Center GmbH påtager sig intet ansvar for tekniske og typografiske fejl og forbeholder sig
retten til på ethvert tidspunkt uden forudgående varsel at ændre produktet og betjeningsvejledningerne.
ABUS Security-Center er ikke ansvarlig for direkte og indirekte følgeskader, der opstår i forbindelse med
dette produkts udstyr, funktion og anvendelse. Der gælder ingen garanti for indholdet i dette dokument.
24
Page 27

Dansk
Et udråbstegn, der befinder sig i trekanten, gør opmærksom på vigtige henvisninger i
betjeningsvejledningen, som ubetinget skal overholdes.
Dette symbol vises, når du skal have særlige tips og henvisninger vedr. betjeningen.
Ved skader, der skyldes manglende overholdelse af denne betjeningsvejledning,
bortfalder garantien. Vi påtager os intet ansvar for følgeskader!
Vi påtager os intet ansvar i forbindelse med materielle skader og/eller personskader, der
skyldes ukorrekt håndtering eller manglende overholdelse af sikkerhedshenvisningerne.
I sådanne tilfælde bortfalder enhver form for garanti!
Kontrollér apparatet, hvis den originale emballage er beskadiget. Hvis apparatet er beskadiget,
skal du sende det tilbage sammen med emballagen og informere leveringsfirmaet.
Symbolforklaring
Vigtige sikkerhedshenvisninger
Dette apparat blev produceret under overholdelse af internationale sikkerhedsstandarder.
Læs de efterfølgende sikkerhedshenvisninger omhyggeligt igennem.
Sikkerhedshenvisninger
1. Væsker
Beskyt apparatet mod enhver form for væskeindtrængen.
2. Rengøring
Rengør kun apparatet med en fugtig klud uden skarpe rengøringsmidler.
Apparatet skal i den forbindelse afbrydes fra nettet.
3. Placering
Dette apparat er udelukkende beregnet til indendørs anvendelse.
Produktet kan også blive beskadiget, hvis det falder ned fra lav højde.
Vær opmærksom på monteringshenvisningerne i det pågældende kapitel i denne
betjeningsvejledning.
4. Datalagring
Idrifttagningen af overvågningsanlæg kan i bestemte lande være forbudt eller reguleret ved lov.
Ejeren skal før idrifttagning af anlægget sørge for, at overvågningen er i overensstemmelse med de
lovmæssige rammebetingelser.
Offentliggørelse af personrelateret billedmateriale er forbudt uden de optagede personers tilladelse.
Overhold de særlige forskrifter vedrørende videoovervågning i erhvervsmæssige og offentlige
områder.
En videoovervågning erstatter ikke din pligt til omhu, omsorg og opsyn.
Advarsler
Før den første idrifttagning skal alle sikkerheds- og betjeningshenvisninger læses!
Undgå følgende ugunstige omgivelsesbetingelser ved drift:
Væde eller for høj luftfugtighed
Temperaturer uden for det tilladte område
Direkte sollys
Støv eller brændbare gasser, dampe eller opløsningsmidler
Kraftige vibrationer
Kraftige magnetfelter f.eks. i nærheden af maskiner eller højttalere
Udpakning
Håndtér apparatet meget forsigtigt, når du pakker det ud.
25
Page 28

Dansk
Indholdsfortegnelse
1. Korrekt anvendelse .................................................................................................................................. 27
2. Leveringsomfang ..................................................................................................................................... 27
3. Særlige kendetegn og funktioner ........................................................................................................... 27
4. Henvisninger og FAQs ............................................................................................................................. 27
5. Apparatbeskrivelse .................................................................................................................................. 28
6. Installation................................................................................................................................................. 28
6.1 Isættelse af micro SD-kort .................................................................................................................. 28
6.2 Isættelse af batterier .......................................................................................................................... 28
6.3 Montering ........................................................................................................................................... 29
7. Betjening ................................................................................................................................................... 30
7.1 Live-visning ........................................................................................................................................ 30
7.2 Indstilling af dato og klokkeslæt ......................................................................................................... 30
7.3 Zoom .................................................................................................................................................. 31
7.4 Optagelser på micro-SD-kort ............................................................................................................. 31
7.5 Visning af optagelser på micro-SD-kort ............................................................................................. 31
8. Vedligeholdelse og rengøring ................................................................................................................. 32
8.1 Vedligeholdelse .................................................................................................................................. 32
8.2 Rengøring........................................................................................................................................... 32
9. Bortskaffelse ............................................................................................................................................. 32
10. Tips vedrørende fejlafhjælpning ............................................................................................................. 33
11. Tekniske data ............................................................................................................................................ 33
26
Page 29

Dansk
Digital dørspion
Holder
Fastspændingsnøgle
(spændeskive)
Dørspionlinse
Dørspion-cylinder
2 AA-batterier
1. Korrekt anvendelse
Den digitale dørspion er en moderne udvidelse af den klassiske dørspion. Den sættes enkelt og
ukompliceret på den eksisterende 12-14 mm dørspion. Som alternativ er der også vedlagt en 14 mm
dørspion, der er egnet til alle døre med en dørtykkelse på 35-53 mm.
Et tryk på en knap er tilstrækkeligt, og du ser med en synsvinkel på ca. 180 grader, hvem der står foran
dine døre, og hvad der sker. Derudover har dørspionen en optagelsesfunktion: Når man trykker på powertasten, kan der gemmes tre billeder på et mikro-SD-kort. Efter 20 sekunder slukkes kameraet for at spare
energi. Ved at trykke på power-knappen aktiveres kameraet igen.
Frem for alt er blikket udenfor også ideelt til brillebærere, børn og mindre personer, da den indvendige
display også kan ses nedefra.
Der findes en udførlig funktionsbeskrivelse i kapitel "3. Særlige kendetegn og funktioner".
2. Leveringsomfang
3. Særlige kendetegn og funktioner
Komfortabel 2,4" TFT LCD-farvemonitor og dørspion
Moderne udvidelse af den klassiske dørspion
Egnet til alle døre med en tykkelse på 35-53 mm og dørspionboringer på 12-14 mm
Trådløs og ukompliceret installation takket være batteridrift (2 x AA-batterier inkl.)
Ved aktivering foretages fotooptagelse at tre billeder på micro-SD-kort (ikke indeholdt i
leveringsomfanget) i HD-kvalitet
Zoomfunktion
2 megapixel CMOS billedoptager
4. Henvisninger og FAQs
Vigtige henvisninger og FAQs vedrørende dette produkt og andre produkter findes på internetsiden
www.abus.com/plug-and-play. Informationer om fejlafhjælpningen findes under punkt 10 i denne
vejledning.
27
Page 30

Dansk
Power LED
Visning af apparatstatus
Lys
Intet lys
Apparat tændt
Apparat slukket
◄►
Skift mellem optagelserne
Zoom-funktion
Power-tast
Tænder monitoren
Micro-SD-kort-slot
Slot til anvendelse af et micro-SD-kort indtil maks. 32 GB
Batterirum
2 x AA-batterier
5. Apparatbeskrivelse
6. Installation
6.1 Isættelse af micro SD-kort
1. Åbn den gummibelagte afdækning.
2. Før et micro-SD-kort ind.
6.2 Isættelse af batterier
1. Fjern først batteriafdækningerne.
2. Sæt 2 AA-batterier i. Sørg i den forbindelse for, at polerne vender rigtigt
28
Page 31

Dansk
Tag din eksisterende dørspion ud af
dørspionboringen, eller bor evt. et nyt hul.
Til den vedlagte dørspion er en 14 mm boring
nødvendig.
Vær opmærksom på: Iht. DIN 68706 er
standardhøjden for kikhul (dørspion) i
lejlighedsdøre 1400 mm (målt fra dørpladens
nederste kant).
Sæt derefter dørspionlinsen i udefra.
Ved 14 mm boringer:
Stik dørspioncylinderen gennem holderen og
derefter gennem hullet på dørenes inderside.
Spænd dørspionen manuelt fast.
Ved 12 mm boringer:
Hvis du ønsker at anvende en mindre dørspion,
kan du anvende den eksisterende
fastspændingsnøgle til stabilisering som
spændeskive.
Stik dørspioncylinderen gennem spændeskiven
og holderen og derefter gennem hullet på dørenes
inderside.
Spænd dørspionen manuelt fast.
Spænd derefter dørspionen fast med den
vedlagte fastspændingsnøgle (spændeskive).
Hvis du allerede har anvendt
fastspændingsnøglen som spændeskive til en
mindre dørspion, skal du spænde den fast med en
anden egnet genstand.
Sæt nu den digitale dørspion på holderen.
Du kan nu anvende dørspionen.
6.3 Montering
29
Page 32

Dansk
Batterivisning
Micro-SD-kort registreret
Der findes ikke et micro-SD-kort
SD Full…
Micro-SD-kort fuldt
Vær opmærksom på:
Skærmen slukkes automatisk efter 20 sekunder, hvis der ikke længere foretages ændringer.
7. Betjening
7.1 Live-visning
7.2 Indstilling af dato og klokkeslæt
1. For at kunne indstille dato og klokkeslæt skal du holde tasten „>“ trykket i tre sekunder i slukket
tilstand.
2. Tryk derefter også på power-tasten, indtil du automatisk kommer til menupunktet
„Date & Time“.
3. Indstil datoen og klokkeslættet ved hjælp af piletasterne. Bekræft indtastningen med power-tasten.
Dine billeder gemmes nu med den rigtige dato og det rigtige klokkeslæt på micro-SD-kortet.
30
Page 33

Dansk
Vær opmærksom på:
Denne funktion fungerer kun, når der er sat et micro-SD-kort i.
Vær opmærksom på:
Micro SD-kortet kan ikke formateres på apparatet. Du skal slette filerne på din pc.
Vær opmærksom på:
Skærmen slukkes automatisk efter 20 sekunder, hvis der ikke længere foretages ændringer.
7.3 Zoom
Tryk ">" tasten, hvis du vil zoome ind på billedet.
7.4 Optagelser på micro-SD-kort
Der laves altid tre optagelser, når der trykkes på power-tasten.
7.5 Visning af optagelser på micro-SD-kort
Du har mulighed for at vise de optagede billeder på pc'en ved at tage micro-SD-kortet ud, eller du kan vise
dem direkte på dørspionen. Gå i den forbindelse frem på følgende måde:
1. Hold tasten „<“ trykket ind i tre sekunder i frakoblet tilstand.
2. Tryk derefter også på power-tasten, indtil du automatisk kommer til billedvisningen.
3. Du kan nu vælge mellem billederne med piletasten.
31
Page 34

Dansk
Sørg for, at der ikke kommer væsker ind i apparatet.
Anvend ikke kemiske rengøringsmidler. Derved kan husets overflade blive beskadiget
(misfarvninger).
Vigtig henvisning vedr. bortskaffelse af apparatet
EU-direktiv 2002/96/EF regulerer den korrekte tilbagetagning, behandling og anvendelse
af brugte elektronikapparater. Dette symbol betyder, at med henblik på miljøbeskyttelse
skal apparatet efter sin levetid bortskaffes i overensstemmelse med de gældende
lovmæssige forskrifter og adskilt fra husholdningsaffald og erhvervsaffald. Bortskaffelsen
af det brugte apparat kan foretages på de respektive officielle tilbagetagningssteder. Følg
de lokale forskrifter, når materialerne bortskaffes. Yderligere enkeltheder om
tilbagetagningen (også for lande uden for EU) får du hos dine lokale myndigheder. Ved
hjælp af den separate indsamling og recycling skånes de naturlige ressourcer, og det
sikres, at alle bestemmelser vedrørende beskyttelse af sundhed og miljø overholdes ved
recycling af produktet.
Vigtigt henvisning vedr. bortskaffelse af batterier
Batterier med dette kendetegn indeholder ikke skadelige stoffer som cadmium, bly og
kviksølv. Gamle batterier må dog i henhold til batteriforskriften ikke længere bortskaffes
med husholdningsaffaldet. Til at beskytte de naturlige ressourcer og at fremme
genanvendelsen af materialer skal adskillle batterierne fra andet affald og aflevere dem til
det lokale recyclingsystem. En ekstra mærkning med de kemiske symboler for Hg, Cd
eller Pb betyder, at batteriet indeholder kviksølv, cadmium eller bly i mængder, der
overskrider grænseværdierne i EU-direktiv 2006/66. Hvis batterier ikke bortskaffes korrekt,
kan disse substanser bringe menneskers sundhed og miljøet i fare.
Vær opmærksom på:
Produktet er vedligeholdelsesfrit for dig. Der er ingen bestanddele inde i produktet, som du
skal kontrollere eller vedligeholde: åbn det aldrig.
8. Vedligeholdelse og rengøring
8.1 Vedligeholdelse
Kontrollér regelmæssigt produktets tekniske sikkerhed, f.eks. beskadigelse af huset.
Hvis det antages, at drift ikke længere er mulig uden farer, skal produktet tages ud af drift og sikres mod
utilsigtet drift.
Det antages, at drift ikke længere er mulig uden fare, hvis
apparatet har synlige beskadigelser
apparatet ikke længere fungerer
8.2 Rengøring
Rengør produktet med en ren, tør klud. Ved kraftigere tilsmudsninger kan kluden fugtes let med lunkent
vand.
9. Bortskaffelse
32
Page 35

Dansk
Nr.
Spørgsmål
Svar
1
Hvilken opløsning har displayet?
Opløsningen er 320 x 240 pixel
2
Hvornår vises billedet på displayet, når
der trykkes på Power-knappen?
Billedet på displayet vises efter ca. 4 sekunder, så
snart du har trykket på Power-knappen.
3
Optager dørspionen konstant?
Dette produkt optager ikke konstant. Efter aktivering af
Power-knappen optages der tre billeder.
4
Er anvendelsen mulig ved døre over 53
mm?
Ja, men der skal anvendes en passende
dørspioncylinder. Den er ikke indeholdt i leveringen.
5
Hvor lang er batteriets levetid?
Batterierne holder ca. 1.300 aktiveringer.
6
Hvornår optager dørspionen?
Så snart der trykkes på Power-knappen, optager den i
alt 3 billeder i de første 3 sekunder.
7
Ved hvilken lysstyrke opstår der et
optimalt billede?
Fra 10 lux har du ideelle lysforhold til et optimalt
billede.
8
Hvad kan være årsagerne til, at apparatet
ikke optager?
Kontrollér følgende punkter, hvis dit apparatet ikke
optager:
1. Har du sat et mikro-SD-kort i?
2. Er mikro-SD-kortet spærret? (Lock/Unlock?)
3. Har du formateret mikro-SD-kortet? Det skal
formateres før det tages i brug.
Typenummer
TVAC80000B
Batteritype
2 x AA-batterier
Opløsningsmodi
1280 x 720 pixel
Mål
105 x 105 x 25 mm
Billedoptager
1/4" Progressive Scan CMOS-sensor
Batterilevetid
Ca. 1300 aktiveringer
Nettovægt
0,12 kg
Monitor
2,4'' TFT LCD
Lagermedium
Micro-SD-kort, maks. 32 GB
Certificeringer
CE
Horisontal synsvinkel
60°
10. Tips vedrørende fejlafhjælpning
11. Tekniske data
33
Page 36

TVAC80000B
Manual de instrucciones
Versión 04/2013
Manual de instrucciones original en alemán.
Guardar para futuras consultas.
Page 37

Español
Introducción
Estimado cliente:
Le agradecemos la compra de este artículo.
Este aparato cumple los requisitos establecidos en las directivas vigentes de la UE. Si desea solicitar la
declaración de conformidad, diríjase a:
ABUS Security-Center GmbH & Co. KG
Linker Kreuthweg 5
86444 Affing
GERMANY
Para conservar este estado y garantizar un funcionamiento exento de peligros, debe tener en cuenta lo
expuesto en este manual de instrucciones.
Antes de poner en funcionamiento el producto, lea todo el manual de instrucciones y respete todas las
indicaciones de utilización y seguridad.
Todos los nombres de empresas y denominaciones de producto son marcas registradas del
correspondiente propietario. Todos los derechos reservados.
Si tiene alguna pregunta, diríjase a su instalador o a su distribuidor especializado.
El almacenamiento de datos está sujeto a las directivas de protección de datos específicas de cada país.
Exención de responsabilidad
Este manual de instrucciones ha sido elaborado muy detalladamente. Si a pesar de ello usted advirtiera
omisiones o imprecisiones, comuníquenoslo a la dirección indicada al dorso de este manual.
ABUS Security-Center GmbH no asume ningún tipo de responsabilidad por los fallos técnicos ni tipográficos
y se reserva el derecho a realizar modificaciones en el producto y en los manuales de instrucciones sin
previo aviso.
ABUS Security-Center no se hace responsable de los daños que deriven directa o indirectamente del
equipamiento, las prestaciones y el empleo de este producto. No se otorga ninguna garantía por el
contenido de esta documentación.
35
Page 38

Español
Un signo de admiración dentro de un triángulo señaliza una indicación importante del
manual de instrucciones, la cual es imprescindible tener en cuenta.
Este símbolo señaliza consejos e indicaciones útiles para la utilización.
En el caso de daños provocados por no haber respetado las indicaciones expuestas en
el manual de instrucciones, se extingue el derecho de garantía. No nos hacemos
responsables de los daños resultantes.
No nos hacemos responsables de los daños personales o materiales provocados por
una utilización incorrecta o por no haber respetado las indicaciones de seguridad. En
tales casos se extingue el derecho de garantía.
Si el embalaje original presenta algún desperfecto, compruebe el aparato. En caso de que este
presente algún daño, devuélvalo en el embalaje e informe al servicio de reparto.
Explicación de los símbolos
Indicaciones importantes de seguridad
Este aparato ha sido fabricado en cumplimiento de los estándares internacionales de seguridad.
Lea detenidamente las siguientes indicaciones de seguridad.
Indicaciones de seguridad
1. Líquidos
Proteja el aparato para que no pueda penetrar ningún líquido.
2. Limpieza
Limpie el aparato únicamente con un paño húmedo y no utilice agentes de limpieza abrasivos.
Para ello se ha de desenchufar el aparato.
3. Lugar de instalación
Este aparato está previsto exclusivamente para interiores.
Al caer, aunque sea desde poca altura, el aparato puede resultar dañado.
Siga las instrucciones de montaje contenidas en el capítulo correspondiente de este manual de
instrucciones.
4. Almacenamiento de datos
La puesta en funcionamiento de equipos de vigilancia puede estar prohibida por ley o reglamentada
en ciertos países.
Antes de la puesta en funcionamiento del equipo, el usuario debe asegurarse de que la vigilancia se
lleve a cabo dentro del marco legal correspondiente.
La publicación de imágenes personales está prohibida sin el consentimiento de las personas
filmadas.
Tenga en cuenta las normas especiales en relación con la videovigilancia en áreas comerciales o
públicas.
La videovigilancia no reemplaza sus obligaciones de diligencia, previsión y control.
Advertencias
Tenga en cuenta las indicaciones de seguridad y de utilización antes de la primera puesta en funcionamiento.
Evite las siguientes condiciones ambientales perjudiciales durante el funcionamiento:
Agua o humedad excesiva del aire
Temperaturas fuera del margen permitido
Radiación directa del sol
Polvo o gases, vapores o disolventes inflamables
Fuertes vibraciones
Campos magnéticos de gran intensidad, como cerca de máquinas o altavoces
Desembalaje
Manipule el aparato con extremo cuidado al desembalarlo.
36
Page 39

Español
Índice
1. Uso adecuado ........................................................................................................................................... 38
2. Volumen de entrega ................................................................................................................................. 38
3. Características y funciones..................................................................................................................... 38
4. Indicaciones y FAQs ................................................................................................................................ 38
5. Descripción del aparato ........................................................................................................................... 39
6. Instalación ................................................................................................................................................. 39
6.1 Inserción de la tarjeta micro SD ......................................................................................................... 39
6.2 Inserción de las pilas .......................................................................................................................... 39
6.3 Montaje ............................................................................................................................................... 40
7. Utilización.................................................................................................................................................. 41
7.1 Imagen en directo .............................................................................................................................. 41
7.2 Ajuste de fecha y hora ....................................................................................................................... 41
7.3 Zoom .................................................................................................................................................. 42
7.4 Grabaciones en la tarjeta micro SD ................................................................................................... 42
7.5 Visualización de las grabaciones de la tarjeta micro SD ................................................................... 42
8. Mantenimiento y limpieza ........................................................................................................................ 43
8.1 Mantenimiento .................................................................................................................................... 43
8.2 Limpieza ............................................................................................................................................. 43
9. Gestión de residuos ................................................................................................................................. 43
10. Consejos para la solución de averías .................................................................................................... 44
11. Datos técnicos .......................................................................................................................................... 44
37
Page 40

Español
Mirilla digital
Soporte
Llave de apriete
(arandela)
Lente de la mirilla
Cilindro de la
mirilla
2 pilas AA
1. Uso adecuado
La mirilla digital es una ampliación moderna de la mirilla clásica. Se inserta sencillamente y sin
complicaciones en la mirilla de 12-14 mm existente. Alternativamente también hay disponible una mirilla
de 14 mm, adecuada para todas las puertas con un grosor de 35-53 mm.
Pulse el botón y verá en un ángulo de aprox. 180 grados quién está delante de la puerta y lo que pasa
delante de esta. Por lo demás, las mirillas disponen de una función de grabación: pulsando la tecla Power
pueden guardarse tres imágenes en una tarjeta micro-SD. Tras 20 segundos se desconecta la cámara
para ahorrar energía. Pulsando el botón Power se vuelve a activar la cámara.
La visión del exterior es ideal especialmente para los usuarios de gafas, los niños y personas de baja
estatura, ya que la pantalla interior también se puede ver desde abajo.
Encontrará una descripción detallada del funcionamiento en el capítulo 3 “Características y funciones”.
2. Volumen de entrega
3. Características y funciones
Cómodo monitor de color TFT LCD de 2,4" y mirilla
Moderna ampliación de las mirillas clásicas
Adecuado para todas las puertas con un grosor de 35-53mm y perforaciones para mirillas de 12-14mm
Instalación inalámbrica y sencilla gracias a su funcionamiento con pilas (2 pilas AA incluidas)
Al activarlo, se realiza una fotografía de tres imágenes en la tarjeta micro SD (no está incluida en el
volumen de entrega) en calidad HD
Función zoom
Sensor de imagen CMOS de 2 megapíxeles
4. Indicaciones y FAQs
En la página de Internet www.abus.com/plug-and-play encontrará indicaciones importantes y FAQs
sobre éste y muchos otros productos. En el punto 10 de estas instrucciones encontrará información para
solucionar averías.
38
Page 41

Español
LED de encendido
Muestra el estado del aparato
Luz
Sin luz
Aparato conectado
Aparato desconectado
◄►
Cambiar entre las grabaciones
Función zoom
Tecla Power
Encender el monitor
Ranura para tarjetas
micro SD
Ranura para utilizar una tarjeta de memoria SD de hasta 32 GB
Compartimentos de
pilas
2 pilas AA
5. Descripción del aparato
6. Instalación
6.1 Inserción de la tarjeta micro SD
1. Abra la cubierta de goma.
2. Introduzca una tarjeta micro SD.
6.2 Inserción de las pilas
1. Retire primero las cubiertas de las pilas.
2. Inserte 2 pilas AA. Asegúrese de colocar los polos en el lado correcto.
39
Page 42

Español
Retire la mirilla existente del agujero de la misma
o realice un agujero nuevo si fuera necesario.
La mirilla adjunta requiere un agujero de 14 mm.
Tenga en cuenta lo siguiente: Según DIN 68706,
la altura estándar de una mirilla en puertas de
apartamentos es de 1400 mm (medida desde el
canto inferior de la hoja de la puerta).
Seguidamente, inserte la lente de la mirilla desde
el exterior.
Para agujeros de 14 mm:
Inserte el cilindro de la mirilla a través del soporte
y a continuación a través del agujero situado en la
cara interior de la puerta.
Apriete la mirilla con la mano.
Para agujeros de 12 mm:
Si desea utilizar una mirilla pequeña, puede
utilizar la llave de apriete como arandela para
obtener una mayor estabilidad.
Inserte el cilindro de la mirilla a través de la
arandela y a continuación a través del agujero
situado en la cara interior de la puerta.
Apriete la mirilla con la mano.
Finalmente apriete la mirilla con la llave de apriete
(arandela) adjunta.
Si ya se ha utilizado la llave de apriete como
arandela para una mirilla pequeña, ésta deberá
apretarse con otro elemento adecuado.
Ahora, inserte la mirilla digital en el soporte.
Ya puede utilizar la mirilla.
6.3 Montaje
40
Page 43

Español
Estado de la batería
Tarjeta micro SD reconocida
Ninguna tarjeta micro SD disponible
SD Full…
Tarjeta micro SD llena
Tenga en cuenta lo siguiente:
La pantalla se desconecta automáticamente tras 20 segundos si ya no se realizan más
cambios.
7. Utilización
7.1 Imagen en directo
7.2 Ajuste de fecha y hora
1. Para poder ajustar la fecha y la hora, mantenga la tecla ">" pulsada durante tres segundos en estado
desconectado.
2. Seguidamente, pulse también la tecla Power hasta que acceda automáticamente al punto de menú
"Date & Time".
3. Ajuste la fecha y la hora con ayuda de las teclas de flecha. Confirme la entrada con la tecla Power.
Sus imágenes se guardarán ahora con la fecha y la hora correctas en la tarjeta micro SD.
41
Page 44

Español
Tenga en cuenta lo siguiente:
Esta función solo funciona cuando hay una tarjeta micro SD insertada.
Tenga en cuenta lo siguiente:
La tarjeta Micro SD no puede formatearse en el aparato. Si desea eliminar archivos deberá
hacerlo en su PC.
Tenga en cuenta lo siguiente:
La pantalla se desconecta automáticamente tras 20 segundos si ya no se realizan más
cambios.
7.3 Zoom
Vuelva a pulsar la tecla ">", si desea aumentar más el zoom.
7.4 Grabaciones en la tarjeta micro SD
Después de accionar la tecla Power se realizan siempre tres grabaciones.
7.5 Visualización de las grabaciones de la tarjeta micro SD
Tiene la posibilidad de visualizar las imágenes grabadas en el PC, extrayendo la tarjeta micro SD,
también puede visualizarlas directamente en la mirilla. Para ello, proceda como sigue:
1. Mantenga la tecla ">" pulsada durante tres segundos en estado desconectado.
2. Seguidamente, pulse también la tecla Power hasta que acceda automáticamente al la visualización
de imágenes.
3. Ahora, con la ayuda de la tecla de flecha puede seleccionar entre las imágenes.
42
Page 45

Español
Evite que entren líquidos en el aparato.
No utilice limpiadores químicos; estos pueden dañar (desteñir) la superficie de la carcasa.
Indicación relativa a la eliminación del aparato
La directiva UE 2002/96/CE regula la recogida, tratamiento y reciclaje de los aparatos
electrónicos al finalizar su vida útil. Este símbolo significa que, para proteger el medio
ambiente, al final de su vida útil el aparato debe eliminarse conforme a las normas
establecidas en la ley, separado de la basura doméstica y de la basura industrial. La
eliminación del aparato usado se puede realizar a través de distintos puntos de recogida
oficiales disponibles en su país. Siga las normas locales relativas a la gestión de
materiales. El ayuntamiento de su localidad le podrá ofrecer otros detalles relativos a la
recogida (también en los países no miembros de la UE). La separación y reciclaje de
materiales protegen los recursos naturales y garantizan que durante el reciclaje del
producto se respeten todas las disposiciones relativas a la protección de la salud y el
medio ambiente.
Indicación importante relativa a la gestión de pilas
Las pilas con este distintivo no contienen sustancias perjudiciales, como cadmio, plomo o
mercurio. A pesar de ello, conforme a la normativa sobre pilas, éstas no se pueden
depositar en la basura doméstica. Para proteger los recursos naturales y favorecer el
reciclaje de materiales, separe las pilas del resto de la basura y deposítelas en un punto
de recogida previsto para ello en su localidad. Un distintivo adicional con los símbolos
químicos Hg, Cd o Pb significa que la pila contiene mercurio, cadmio o plomo en una
cantidad que supera el valor límite establecido en la directiva UE 2006/66. Si las pilas no
se gestionan debidamente, estas sustancias pueden perjudicar la salud de personas o el
medio ambiente.
Tenga en cuenta lo siguiente:
El producto no requiere ningún mantenimiento por su parte. No hay ningún componente que
deba controlar o mantener en el interior del aparato; no lo abra nunca.
8. Mantenimiento y limpieza
8.1 Mantenimiento
Compruebe regularmente la seguridad técnica del producto, por ejemplo, si está dañada la carcasa.
Cuando no esté garantizado un funcionamiento seguro, ponga fuera de funcionamiento el aparato y evite
que pueda ponerse en marcha de nuevo involuntariamente.
El funcionamiento seguro no está garantizado si:
el aparato muestra daños visibles.
El aparato no funciona.
8.2 Limpieza
Limpie el producto con un paño limpio y húmedo. En caso de estar muy sucio, el paño se puede
humedecer con agua templada.
9. Gestión de residuos
43
Page 46

Español
N.°
Pregunta
Respuesta
1
¿Qué resolución tiene la mirilla?
La resolución es de 320 x 240 píxeles.
2
¿Cuándo aparece la imagen en el
monitor de la mirilla una vez pulsada la
tecla de encendido y apagado?
La imagen en el display aparece pasados unos 4
segundos, siempre que mantenga pulsada la tecla
de encendido y apagado.
3
¿La mirilla graba constantemente?
Este producto no graba constantemente. Una vez
accionada la tecla de encendido y apagado, se
graban tres imágenes.
4
¿Es posible usarla en puertas de más de
53 mm?
Sí. En realidad deberá usarse un cilindro para mirilla
adecuado. Éste no está incluido en el volumen de
suministro.
5
¿Cuánto duran las pilas?
Las pilas aguantan unas 1.300 activaciones.
6
¿Cuándo graba la mirilla?
En cuanto se acciona la tecla de encendido y
apagado, graba en total 3 imágenes durante los
primeros 3 segundos.
7
¿Con qué luminosidad se obtiene una
imagen óptima?
A partir de 10 lux contará con las condiciones
ideales de luminosidad para una imagen óptima.
8
¿Cuáles pueden ser los motivos por los
que el aparato no grabe?
Compruebe los siguientes puntos si su aparato no
graba:
1. ¿Ha introducido una tarjeta micro SD?
2. ¿La tarjeta micro SD está bloqueada?
(Lock/Unlock?)
3. ¿Ha formateado la tarjeta micro SD? Ésta debe
formatearse antes de usarla por primera vez.
Código de referencia
TVAC80000B
Tipo de batería
2 pilas AA
Modos de resolución
1280 x 720 píxeles
Dimensiones
105 x 105 x 25 mm
Sensor de imagen
Sensor CMOS 1/4" Progressive Scan
Duración de la pila
aprox. 1.300 activaciones
Peso neto
0,12 kg
Monitor
2,4'' TFT LCD
Soporte de memoria
Tarjeta micro SD, máx. 32 GB
Homologaciones
CE
Ángulo de visión horizontal
60°
10. Consejos para la solución de averías
11. Datos técnicos
44
Page 47

Page 48

Imprint
These operating instructions are published by ABUS Security-Center GmbH & Co.KG, Linker
Kreuthweg 5, 86444 Affing, Germany. No reproduction (including translation) is permitted in whole or
part e.g. photocopy, microfilming or storage in electronic data processing equipment, without the
express written consent of the publisher.
The operating instructions reflect the current technical specifications at the time of print.
We reserve the right to change the technical or physical specifications.
Nota redakcyjna
Niniejsza instrukcja obsługi jest publikacją ABUS Security-Center GmbH & Co. KG, Linker Kreuthweg
5, 86444 Affing. Wszystkie prawa, także do tłumaczenia, zastrzeżone. Reprodukcje wszelkiego
rodzaju, np. fotokopia mikrofilm oraz zapis w elektronicznych systemach przetwarzania danych
wymagają pisemnej zgody wydawcy. Przedruk, także we fragmentach, zabroniony.
Niniejsza instrukcja obsługi odzwierciedla stan faktyczny w dacie złożenia do druku.
Zmiany techniczne i zmiany wyposażenia zastrzeżone
Redaktionel note
Denne betjeningsvejledning er publiceret af ABUS Security-Center GmbH & Co. KG, Linker
Kreuthweg 5, 86444 Affing, Germany. Der må ikke foretages kopiering, inklusive oversættelser,
fotokopierng, mikrofilms optagelse af proces udstyr uden forudgående tilladelse fra udgiveren.
Denne brugervejledning reflekterer de kendte til dato tekniske specifikationer. Vi forbeholder os retten
til at ændre frit og uden forudgående advisering.
E Pie de imprenta
Este manual es una publicación de la Seguridad ABUS-Center GmbH & Co. KG, enlazador
Kreuthweg 5, 86444 Affing. Todos los derechos reservados, incluyendo traducciones. Queda
prohibida la reproducción, por ejemplo, Fotocopia, microfilm, o en los datos de los equipos
electrónicos de procesamiento, sin la autorización por escrito de la editorial. No puede ser
reproducido en cualquier forma. Este derecho para cambiar el estado de la técnica de la impresión.
Los cambios en la tecnología y el equipo.
© Copyright 04/2013 by ABUS Security-Center
 Loading...