

Page 1
TVAC15000B
User manual
Brugerhåndbog
Instrukcja obsługi
E Manual del usuario
You can find important information and FAQs about
this and other products on the website
www.abus.com/plug-and-play
Version 04/2013
Page 2

English
Dansk
Polski
Español
These user manual contains important information for installation and operation. This
should be also noted when this product is passed on to a third party. Therefore look after
these operating instructions for future reference!
A list of contents with the corresponding page number can be found in the index on page 5.
Denne manual hører sammen med dette produkt. Den indeholder vigtig information som
skal bruges under opsætning og efterfølgende ved service. Dette skal huskes også når
produkter gives videre til anden part. Læs derfor denne manual grundigt igennem også
for fremtiden.
Indholdet kan ses med sideanvisninger kan findes i indekset på side 26.
Niniejsza instrukcja obsługi zawiera ważne wskazówki dotyczące uruchamiania i obsługi.
Pamiętaj o tym, także przekazując produkt osobie trzeciej. Zachowaj instrukcję do
wykorzystania w przyszłości!
Wykaz treści znajdziesz w spisie treści z podaniem odpowiednich liczb stron na stronie 47.
Este manual de instrucciones contiene indicaciones importantes para la puesta en
funcionamiento y para el manejo. Por este motivo, guarde este manual para poder
consultarlo cuando lo necesite y entréguelo junto con el aparato cuando lo transfiera a
terceras personas.
Un listado de contenidos con la página correspondiente aparece en el índice d la página
side 68.
Page 3
TVAC15000B
User manual
Version 04/2013
Original English user manual. Keep for future use.
Page 4
English
Introduction
Dear Customer,
Thank you for purchasing this product.
This device complies with the requirements of the applicable EU directives. The declaration of conformity can
be ordered from:
ABUS Security-Center GmbH & Co. KG
Linker Kreuthweg 5
86444 Affing
GERMANY
To maintain this condition and to ensure risk-free operation, you as the user must observe these operation
instructions!
Before initial start-up, read through the complete operating instructions observing operating and safety
instructions.
All company and product names mentioned in this document are registered trademarks.
All rights reserved.
If you have any questions, please contact your installer or your local dealer!
Warnings
Please note: Whosoever unlawfully makes an audio recording of the privately spoken words of another; or
uses, or makes a recording thus produced accessible to a third party, could be liable to imprisonment or a
fine!
Whosoever unlawfully overhears with an eavesdropping device the privately spoken words of another not
intended for his attention; or publicly communicates, verbatim or the essential content of, the privately
spoken words of another recorded or overheard above could incur the same penalty.
Disclaimer
This user manual was prepared with greatest care. If you should notice omissions or inaccuracies, please
inform us about these on the back of this manual given address.
The ABUS Security-Center GmbH assumes no liability for technical and typographical faults and reserves
the right to make at any time modifications to the product or user manual without a previous announcement.
The company is not liable or responsible for direct and indirect subsequent damages which are caused in
connection with the equipment, the performance and the use of this product.
No guarantee for the content of this document is taken.
4
Page 5
English
A flash in the triangle is used if there is danger for the health, e.g. by an electric shock.
An exclamation mark in the triangle points to an important note in this user manual which
must be minded.
This symbol can be found when you are to be given tips and information on operation.
The warranty will expire for damage due to non-compliance with these operating
instructions. ABUS will not be liable for any consequential loss!
ABUS will not accept liability for damage to property or personal injury caused by
incorrect handling or non-compliance with the safety-instructions.
In such cases the warranty will expire.
Icon explanation
Important safety advice
The device has been manufactured in compliance with international safety standards. Please read these
safety advices carefully.
Safety advice
1. Power supply
100–240 V AC, 50–60 Hz (via power adapter plug to 5 V DC)
Operate this product only from the type of power supply indicated on the marking label. If you are not sure
of the type of power supplied to your home, consult your local power company. Disconnect the product
from the mains before you start any maintenance or installation procedures.
2. Overloading
Do not overload a wall outlet, extension cord or adapter as this may result in electric fire or shock.
3. Liquids
Protect the device from any kind of liquids entering.
4. Cleaning
Disconnect the product from the wall outlet before cleaning. Use a light damp cloth (no solvents) to dust
the product.
5. Accessories
Do not use any unsupported accessories as these may be hazardous or cause damage the product.
6. Location
This device can be used in inside as well as outside.
The product will be damaged even it falls from a low height.
During the installation of the camera please take care that direct sunlight cannot fall onto the
image sensor of the device. Please follow the installation instructions in the corresponding
chapter of this user manual.
Do not place the device near a radiator or heat register.
Setup the device only in areas with the advised operating temperatures of -10° ~ 50°C.
5
Page 6
English
During the installation into an existing video surveillance system make sure that all devices are
disconnected from the low and supply voltage circuit.
If in doubt allow a professional electrician to mount, install and wire-up your device. Improper
electrical connection to the mains does not only represent at threat to you but also to other
persons.
Wire-up the entire system making sure that the mains and low voltage circuit remain separated
and cannot come into contact with each other in normal use or due to any malfunctioning.
If you notice any damage of the original packaging, please check at first the device.
If the device shows damages, please contact your local dealer.
7. Wireless transmission
The range of wireless transmission depends on various environmental factors. The local conditions at the
installation location can have a negative impact on the range. For this reason, if there is a clear line of
sight between the receiver and the transmitter, the range can be as much as 200 m, but in buildings it is
significantly less.
The following environmental factors impair both the range and the frame rate:
Mobile phone masts, high-tension electricity pylons, power lines, ceiling and walls, devices with the same
or similar radio frequency.
Warnings
Follow all safety and operating advises before starting-up the device!
1. Follow these directions in order to avoid damage of the power cord or plug:
Do not modify or process the power cord or plug arbitrarily.
Make sure to disconnect the power cord holding the plug.
Keep heating appliances as far as possible from the power cord in order to prevent the cover
vinyl from melting.
The outdoor camera’s power supply unit must be protected against humidity and damp.
2. Follow these directions. Failure to follow any of them may cause electrical shock:
Do not open the main body or the power supply.
Do not insert metal or inflammable objects inside the product.
In order to avoid any damage during lighting use a surge protection.
3. Do not use the product when it is out of order. If you continue to use the product when defective, serious
damage can be caused to it. Make sure to contact your local product distributor if the product is out of
order.
Avoid using the device under the following unfavorable ambient conditions:
wetness or excessive air humidity
extreme cold or heat
direct sunlight
dust or combustible gases, vapors or solvents
strong vibration
strong magnetic fields, such as those found in the vicinity of machinery or loudspeakers
the camera must not be directed into the sun as this can destroy the sensor.
the camera may not be installed on unstable surfaces
Unpacking
While you are unpacking the device please handle it with utmost care.
6
Page 7

English
Table of contents
1. Intended Use ........................................................................................................................................... 8
2. Scope of delivery .................................................................................................................................... 8
3. Features and functions .......................................................................................................................... 8
4. Information and FAQs ............................................................................................................................ 8
5. Device description ................................................................................................................................. 9
5.1 Front of the monitor ........................................................................................................................ 9
5.2 Rear of the monitor....................................................................................................................... 10
5.3 Monitor connections ..................................................................................................................... 10
5.4 Camera description ...................................................................................................................... 11
5.5 Cable connections ........................................................................................................................ 11
6. Installation ............................................................................................................................................. 12
6.1 Pairing the camera and monitor ................................................................................................... 12
6.2 Installing the camera .................................................................................................................... 12
6.3 Installing the monitor .................................................................................................................... 13
7. Operation ............................................................................................................................................... 14
7.1 Live view ....................................................................................................................................... 14
7.2 Main menu .................................................................................................................................... 15
7.3 Camera settings ........................................................................................................................... 16
7.4 Record settings ............................................................................................................................ 17
7.5 Event list ....................................................................................................................................... 18
7.6 System settings ............................................................................................................................ 19
8. Maintenance and cleaning ................................................................................................................... 21
8.1 Maintenance ................................................................................................................................. 21
8.2 Cleaning ....................................................................................................................................... 21
9. Disposal ................................................................................................................................................. 21
10. Tips for troubleshooting ...................................................................................................................... 22
11. Technical data....................................................................................................................................... 23
7
Page 8

English
3.5" TFT monitor
1 × IR wireless external 2.4 GHz camera,
including camera mount and
installation material
4 GB SD card
2 x power supply units including EU,
AU and UK adapters
5 V DC/1 A
AV cable
1 × antenna
1. Intended Use
You can use this 2.4 GHz wireless monitor and the IR wireless outdoor camera with PIR for easy wireless
transmission and displaying of video signals across middle to long distances.
Wireless signal transmission is an advantage in all locations where cables cannot be laid: the camera
transmits the video signal to the wireless monitor without the need for wires. Faults and interference can
be avoided due to the conversion into digital signals.
As soon as the camera’s PIR sensor detects movement, it starts recording to the SD card. You have the
option of connecting up to 4 cameras (TVAC15010B) to the monitor and showing then in a quadruple
display.
A detailed function description can be found in chapter 3 (“Description and functions”).
2. Scope of delivery
3. Features and functions
Complete set consists of 3.5" TFT monitor and IR wireless outdoor camera, 2.4 GHz
Compact IP66 outdoor camera with infrared night vision function and 400 TVL resolution
3.5" colour TFT with integrated loudspeaker
Digital encrypted audio and video transmission
User-friendly OSD (on-screen display)
4. Information and FAQs
You can find important information and FAQs about this and other products on the website
www.abus.com/plug-and-play. You will find information for troubleshooting under item 10 of these
instructions.
8
Page 9
English
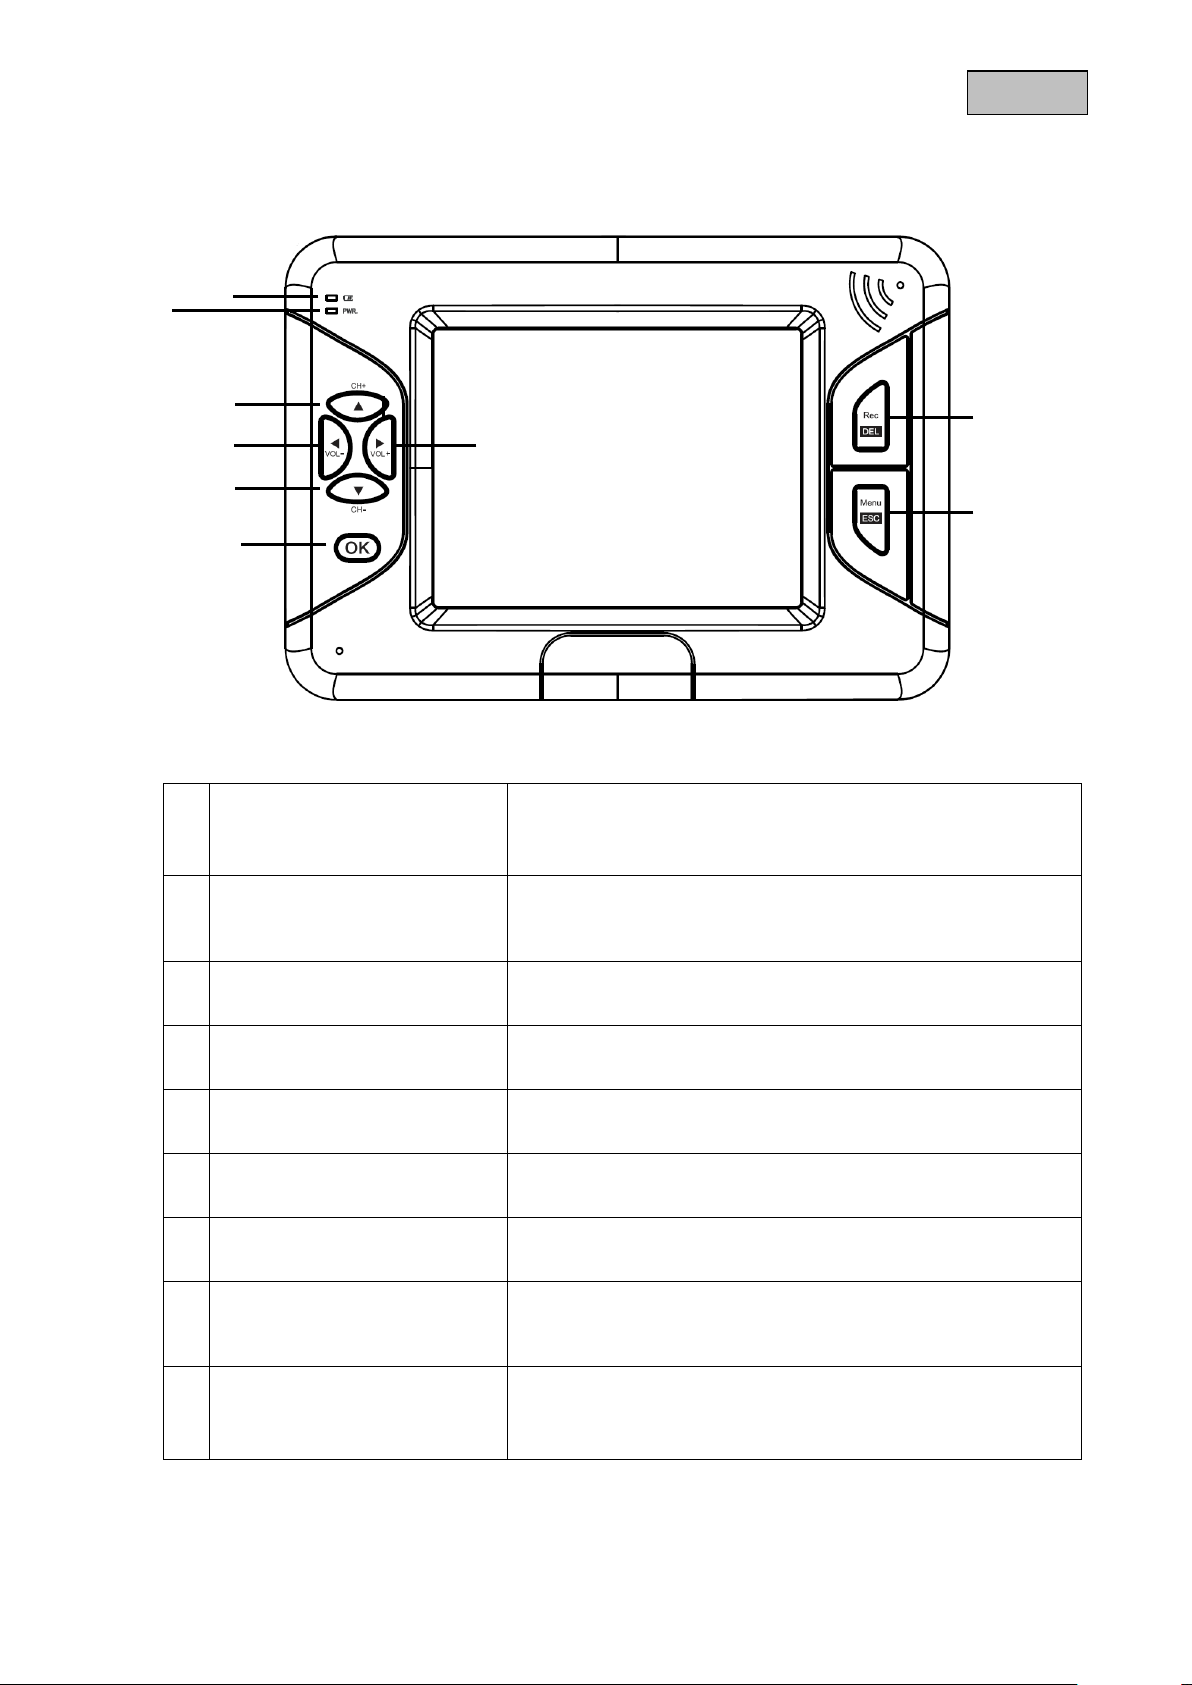
Battery display
Displays the current charge level
Red: Battery low
Green: Charging
Off: Battery completely charged
Power LED
Device status display
Blue: Device switched on
Off: Device switched off
▲
CH +
Live view: channel change
In the menu: switch between menu items
◄
Vol-
Live view: reduce volume
In the menu: switch between menu items
►
Vol+
Live view: increase volume
In the menu: switch between menu items
CH -
▼
Live view: channel change
In the menu: switch between menu items
OK key
Live view: open the events list
In the menu: confirm the settings and changes
Rec/Del
Live view: start/stop recording
In the menu: delete the recording
Only possible with SD card!
Menu/ESC
Live view: open/exit the menu
In the menu: exit submenu
The system automatically exits the menu after a wait time of
one minute.
5. Device description
5.1 Front of the monitor
9
Page 10
English
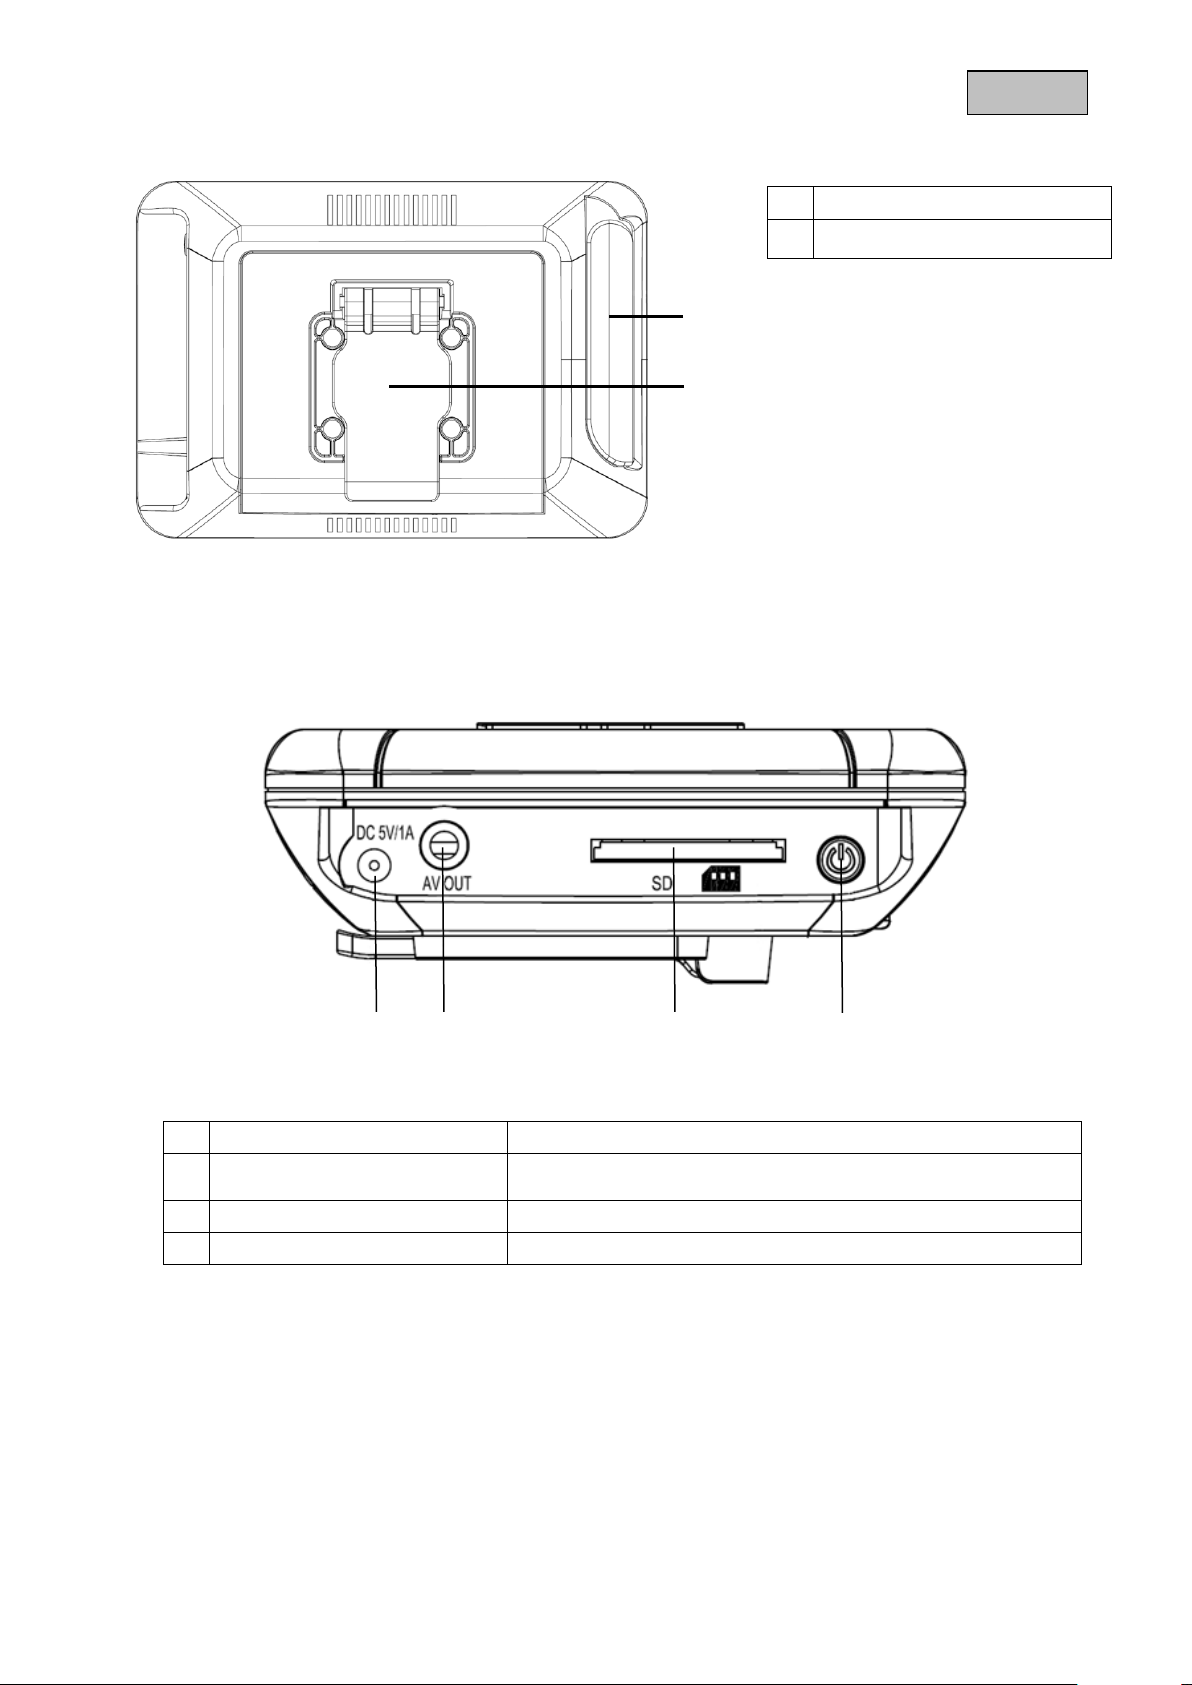
Antenna
Stand
Power supply
5 V DC/1 A (DC, 14.5 × 4.8 mm)
AV output
Output for representing the on-screen display, use the AV
cable supplied
SD card slot
Slot for using an SD card of up to 32 GB
Power switch
Switch monitor on or off
5.2 Rear of the monitor
5.3 Monitor connections
10
Page 11
English
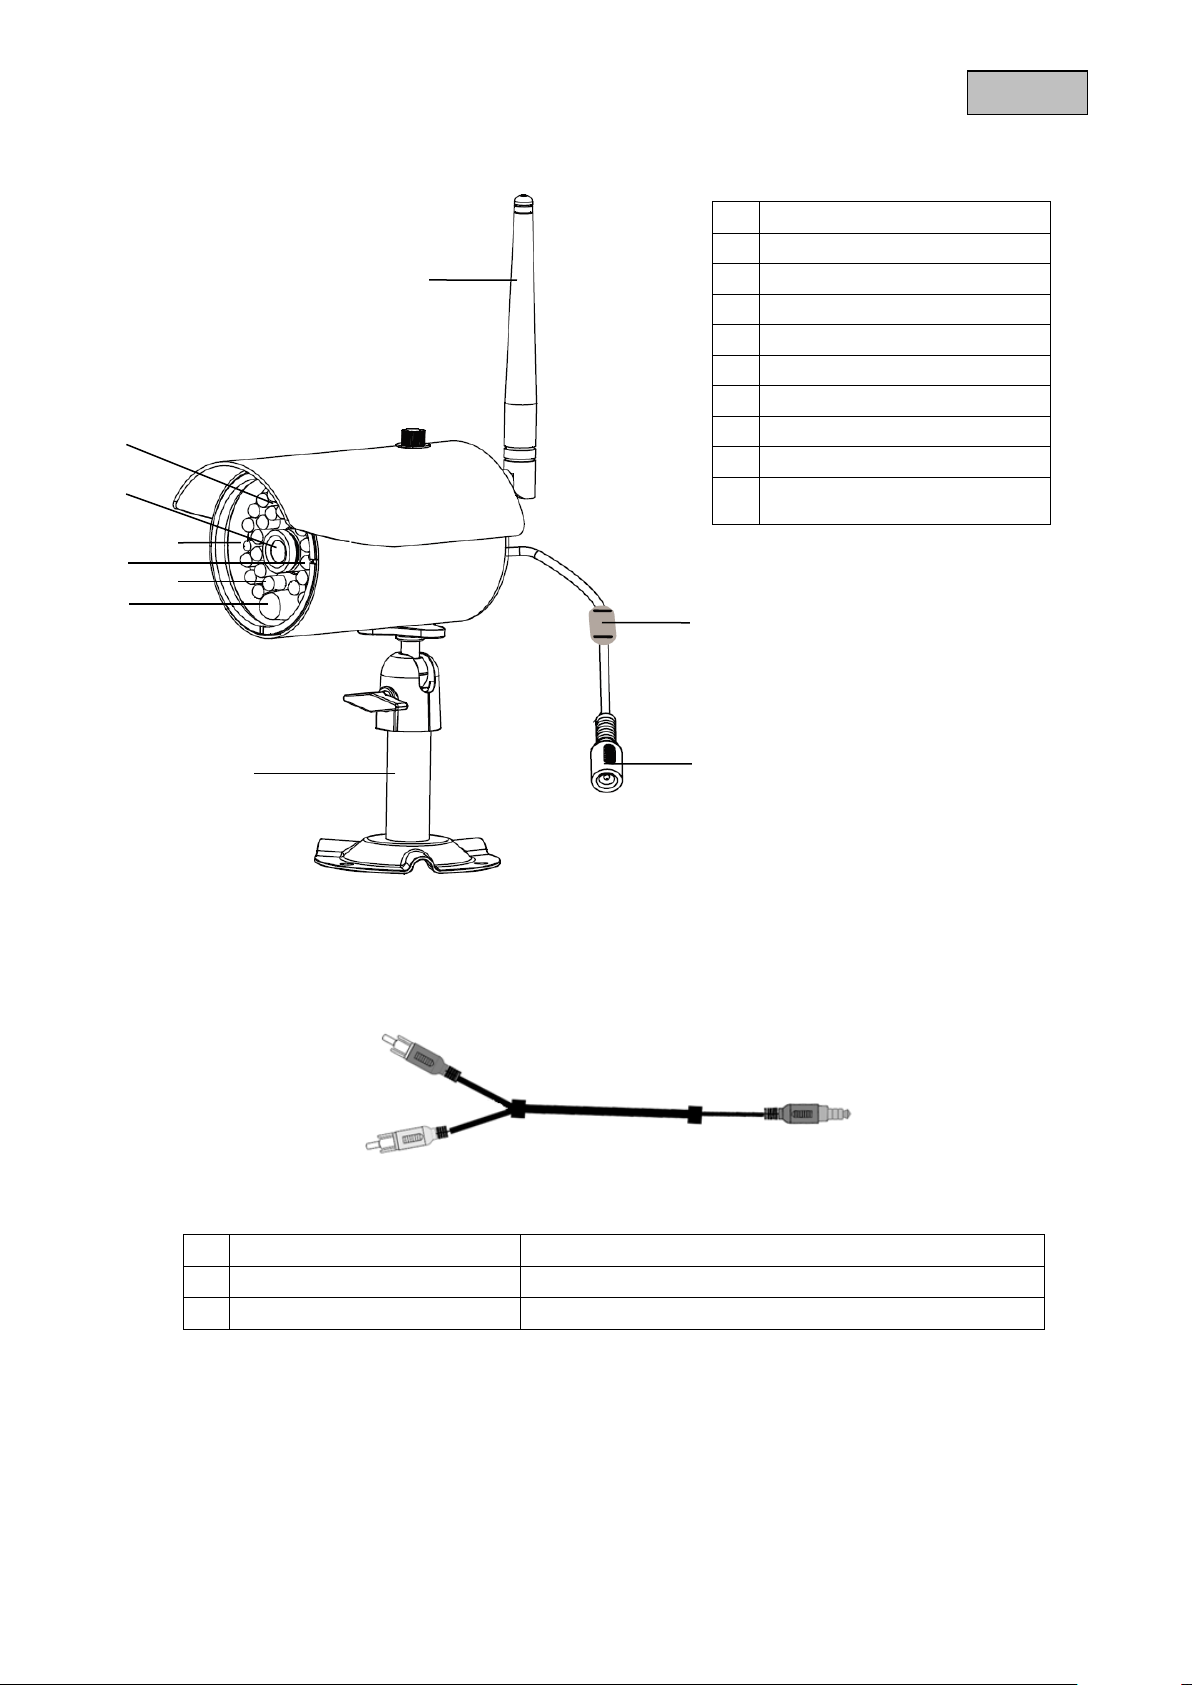
Antenna
Light sensor
Fixed lens
Power LED
LINK LED
IR LED
PIR sensor
Camera mount
Pairing button
Power supply connection
5 V DC/1 A
Yellow RCA plug (video)
Connection for transmitting the video signal
White RCA plug (audio)
Connection for transmitting the audio signal
Jack plug
Plug for connecting to the monitor
5.4 Camera description
5.5 Cable connections
To connect the video RCA plug to a BNC input on a monitor or recorder, attach the BNC-RCA adapter to the
yellow RCA plug.
11
Page 12
English
Warning:
Please note that connection can take up to 60 seconds.
Warning:
Before you start with the installation, make sure that the wireless transmission range reaches
your desired installation location.
6. Installation
6.1 Pairing the camera and monitor
To connect a camera with the monitor, proceed as follows:
1. Connect the power supply to the cameras and monitor.
2. In the TFT monitor’s menu “Camera Setup -> Pairing” select the camera you require (1–4) and
confirm your choice with OK. The systems starts a 60 second countdown.
3. During the 60 seconds, press the PAIRING button on the camera cable until the green LINK LED on
the front of the camera starts to flash.
4. Bei erfolgreicher Verbindung leuchtet die LINK-LED der Kamera dauerhaft.
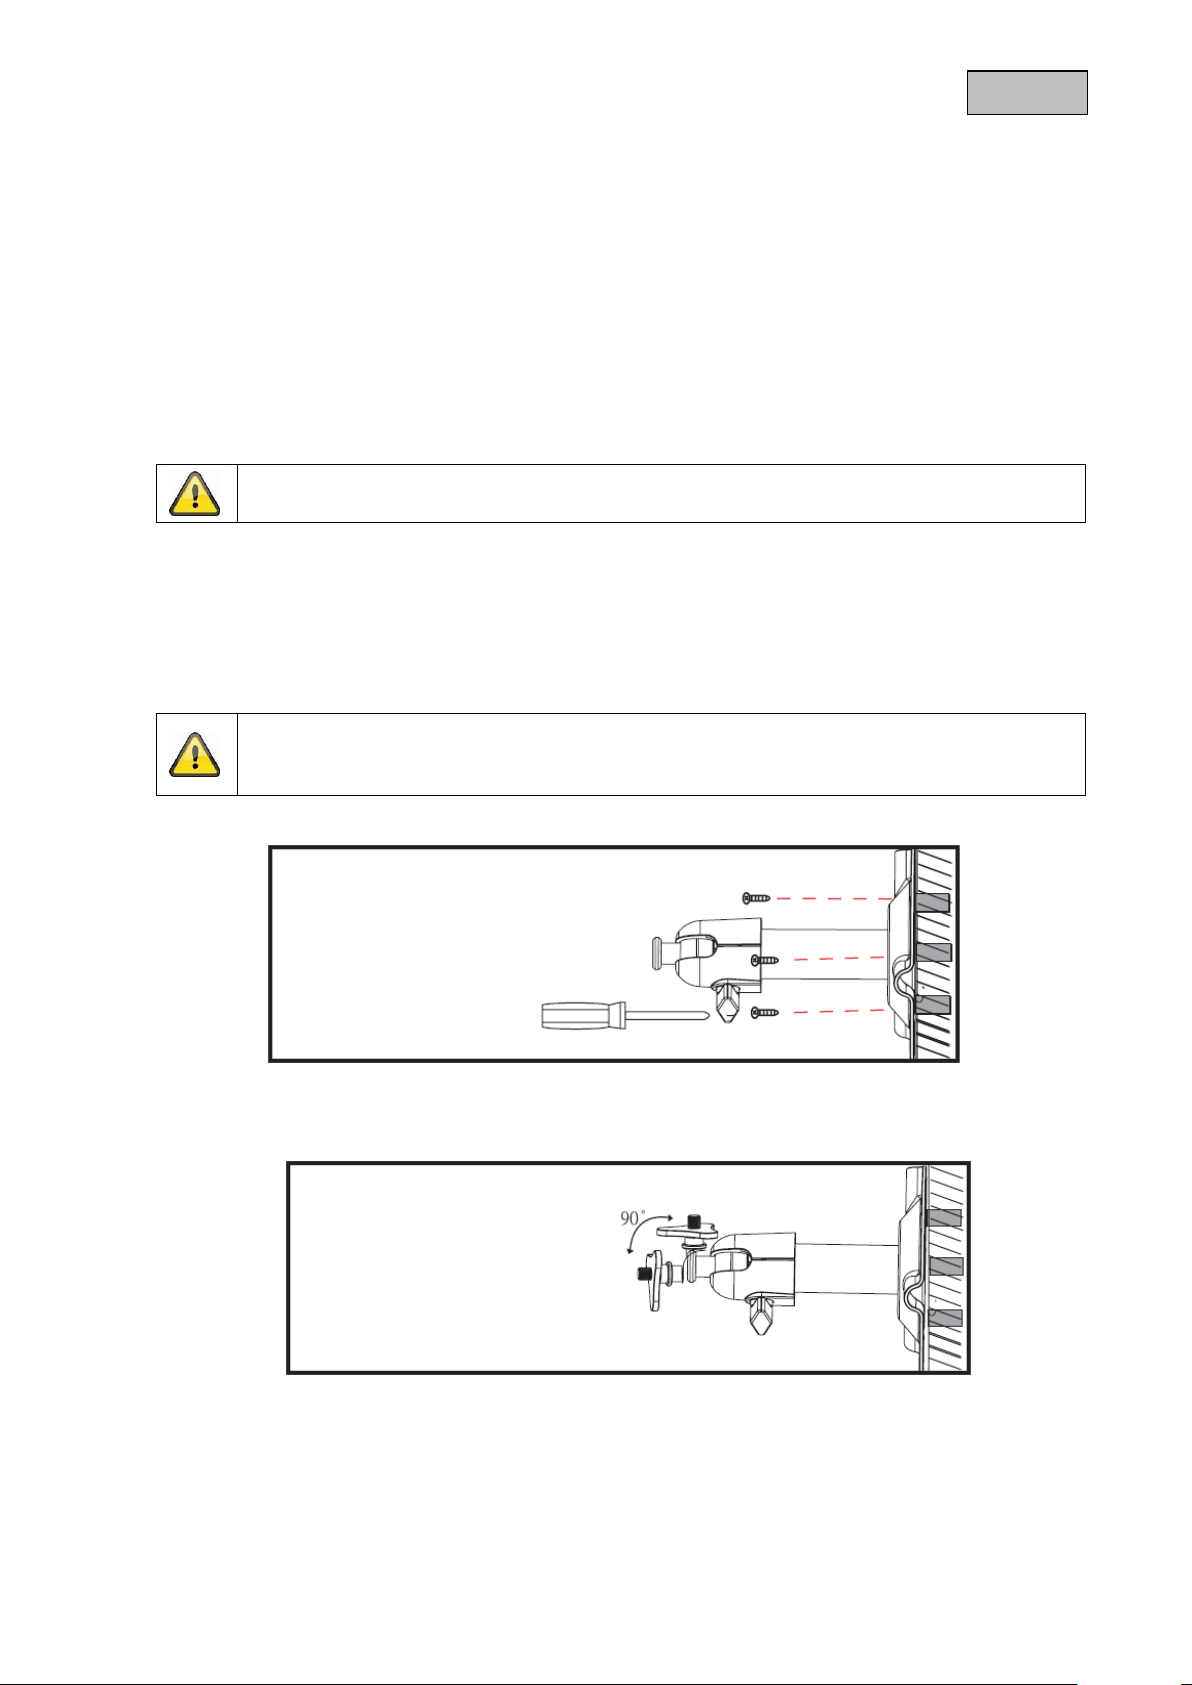
6.2 Installing the camera
Select a suitable place for installing the camera using the camera mount. Mark the drill holes on the base
and pre-drill them. Insert the wall plugs provided and attach the mount with the screws.
You now have the option of swivelling the mount by 90° to position it where you want it. Loosen the screw
at the side and set the angle of view required. Then tighten the screw in the required position to fasten.
12
Page 13
English
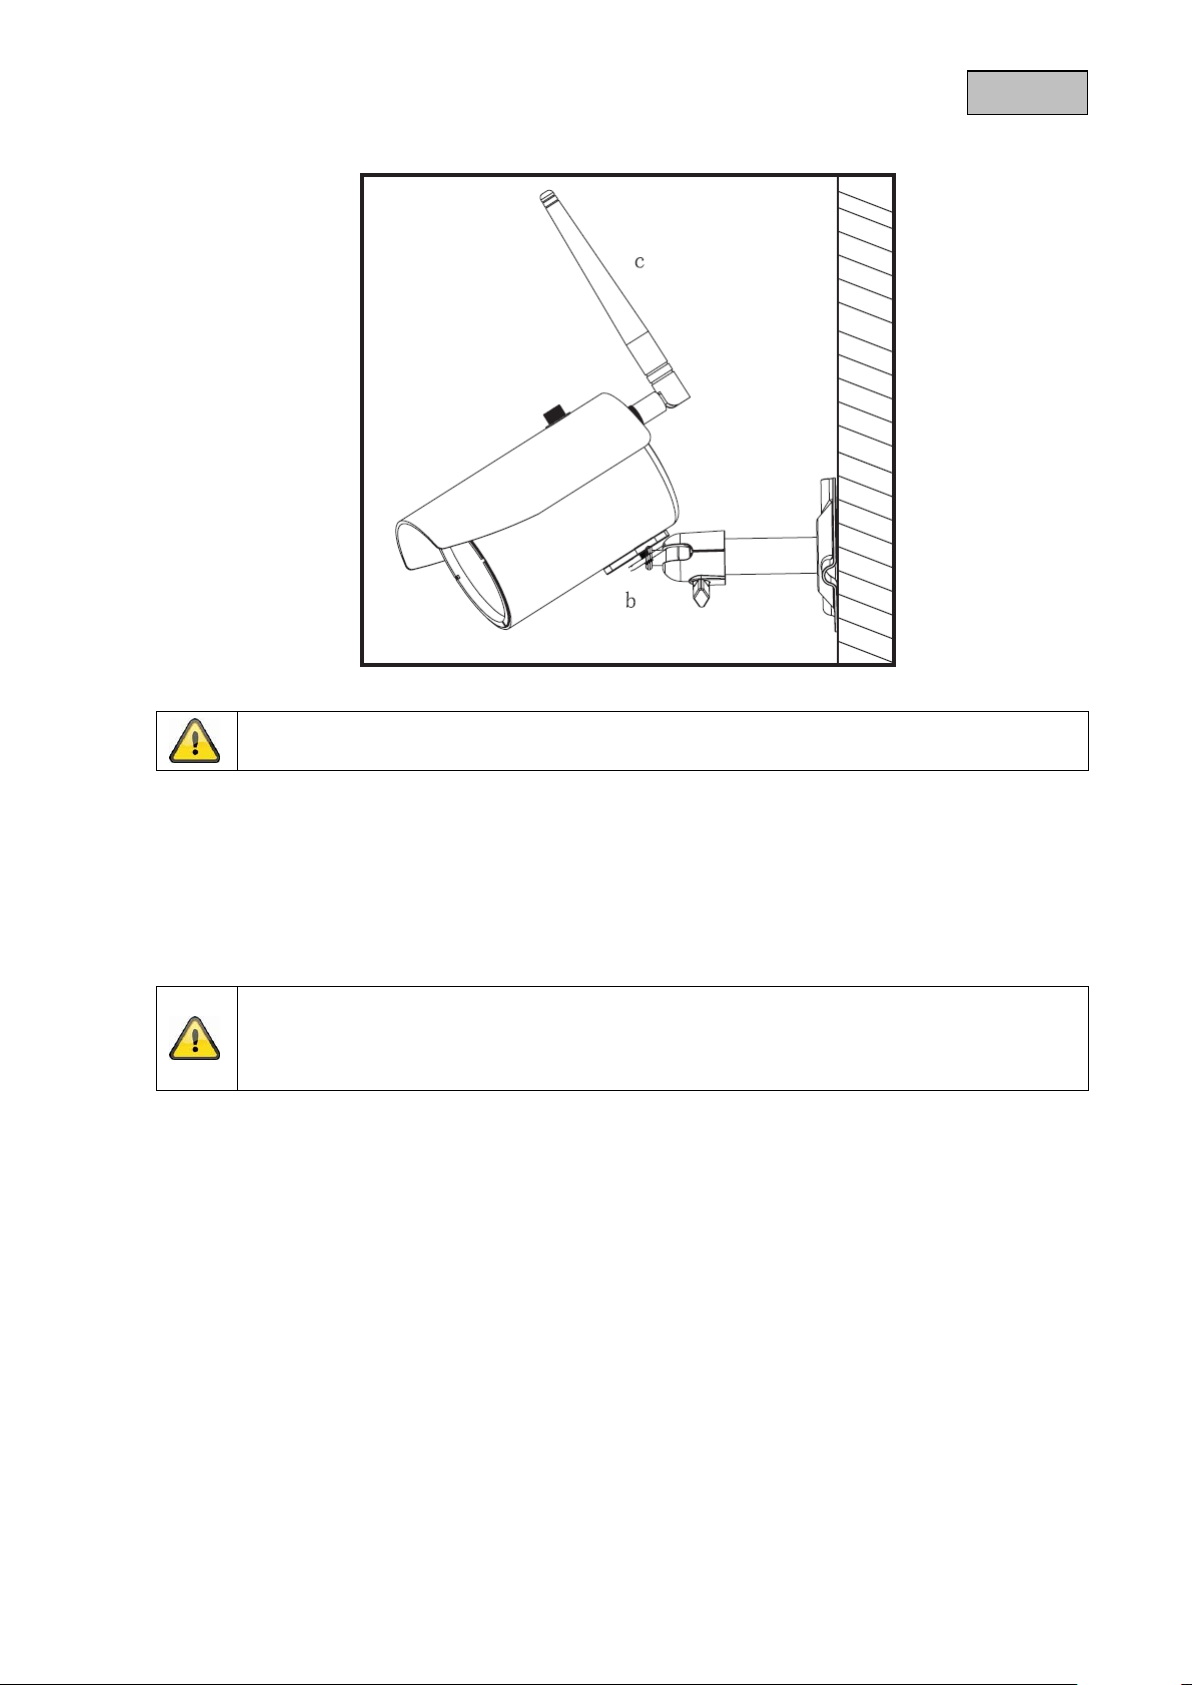
Warning:
Only use the antenna provided for the installation.
Warning:
Note that the monitor has to be charged for at least 8 hours before it is used without an
external power supply for the first time.
The battery life is about 3.5 hours.
Then screw the camera onto the mount and the power supply unit with the camera.
6.3 Installing the monitor
The installed battery gives you the option of using the TFT monitor flexibly.
When the battery LED lights up red, the battery needs charging Make sure that the battery is always
sufficiently charged in order to guarantee no loss of recording.
To do this, unfold the stand and position the monitor on the desired location.
13
Page 14
English
01:12:45
2011 05 01
14:30:11
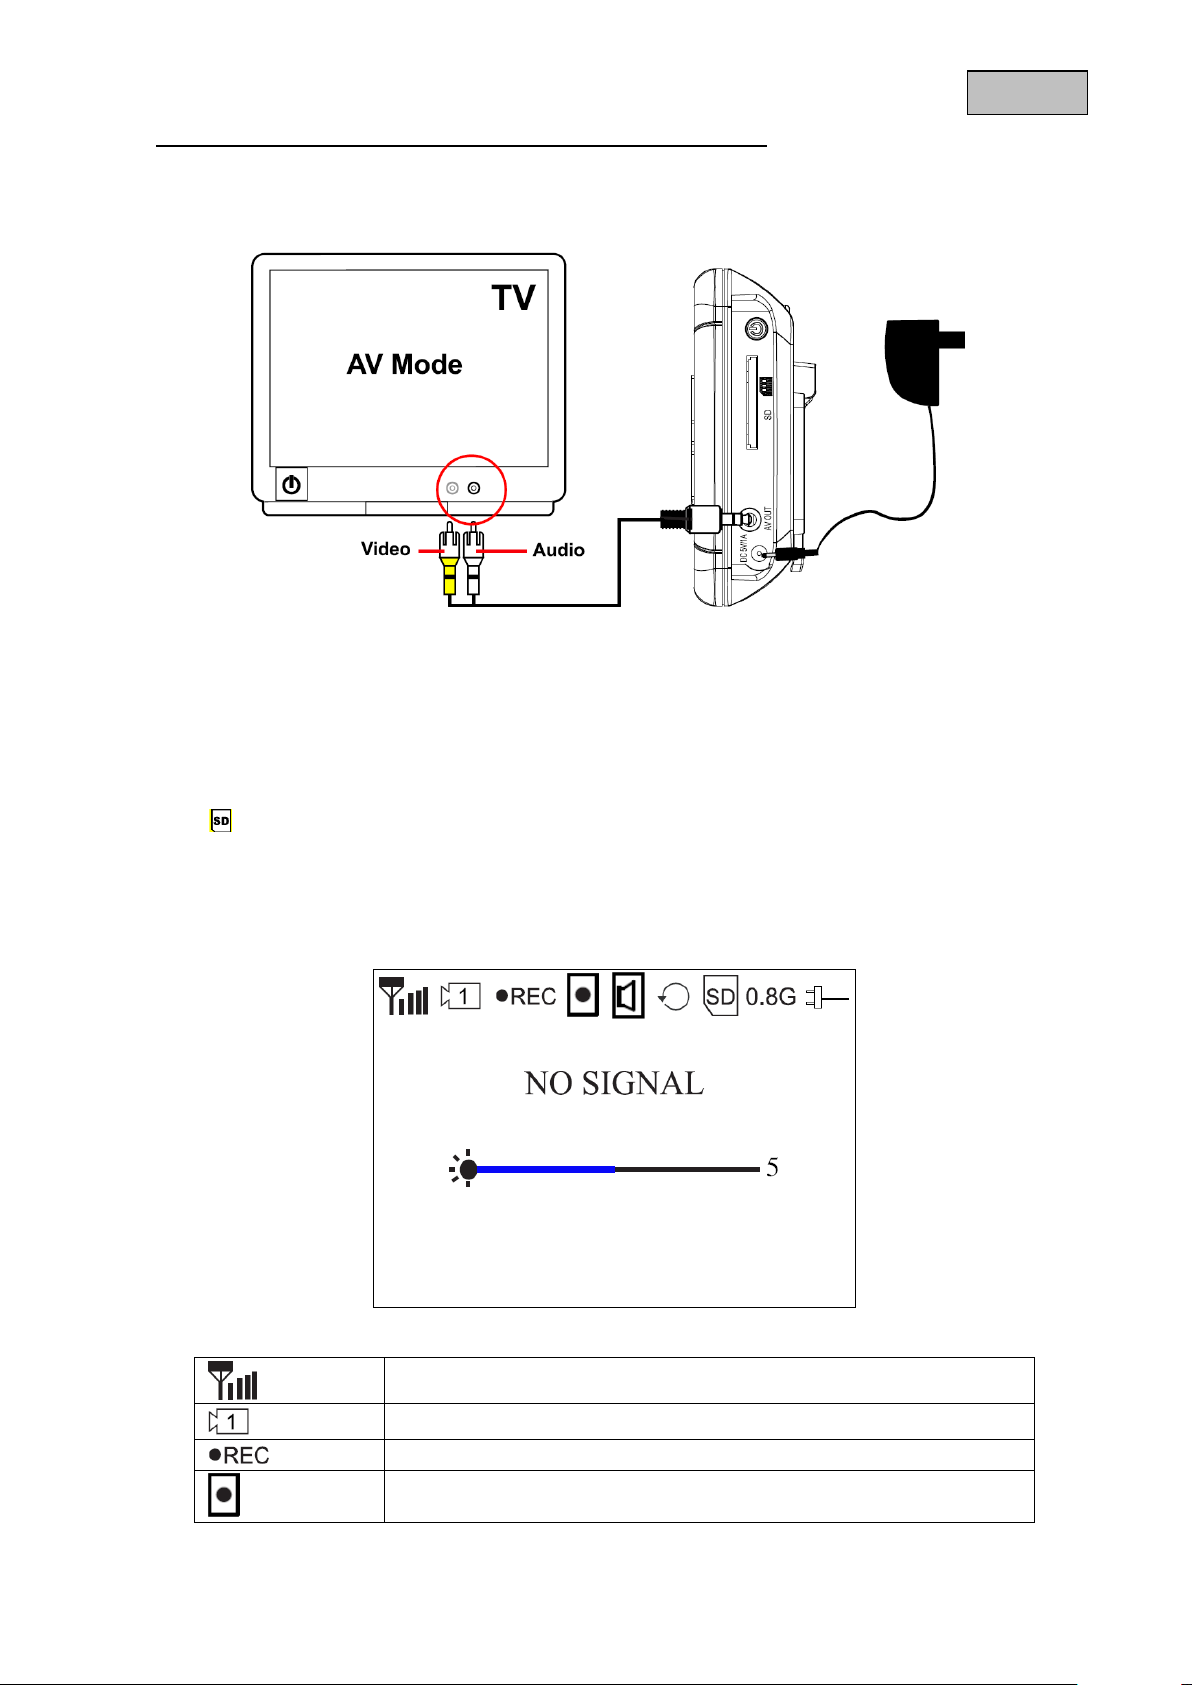
Signal display
Channel display
Recording display: flashes during recording
Motion detection recording activated
To display the monitor display on another device, proceed as follows:
1. Connect the jack plug to the monitor’s AV OUT.
2. Connect the RCA plug to the monitor as shown in the drawing.
7. Operation
To switch the monitor ON/OFF, press and hold the power button for at least 2 seconds.
Each time it is started, the monitor switches to live view and it selects the last view that was set.
If the icon is displayed, the monitor has correctly identified the SD card and it is working normally.
7.1 Live view
14
Page 15
English
Motion detection alarm activated
No SD card inserted
Full SD
SD card full
Err SD
SD card was not identified
SD card locked
SD card is overwritten when it reaches capacity
SD card display
SD card capacity
Power supply display
Camera brightness display
01:12:45
Recording time
2011 05 01
14:30:11
Date/time display
Please note:
The icons disappear automatically after being displayed for ten seconds.
7.2 Main menu
Press MENU to open the main menu. You can use the arrow buttons to switch between menu items.
You can choose between the following
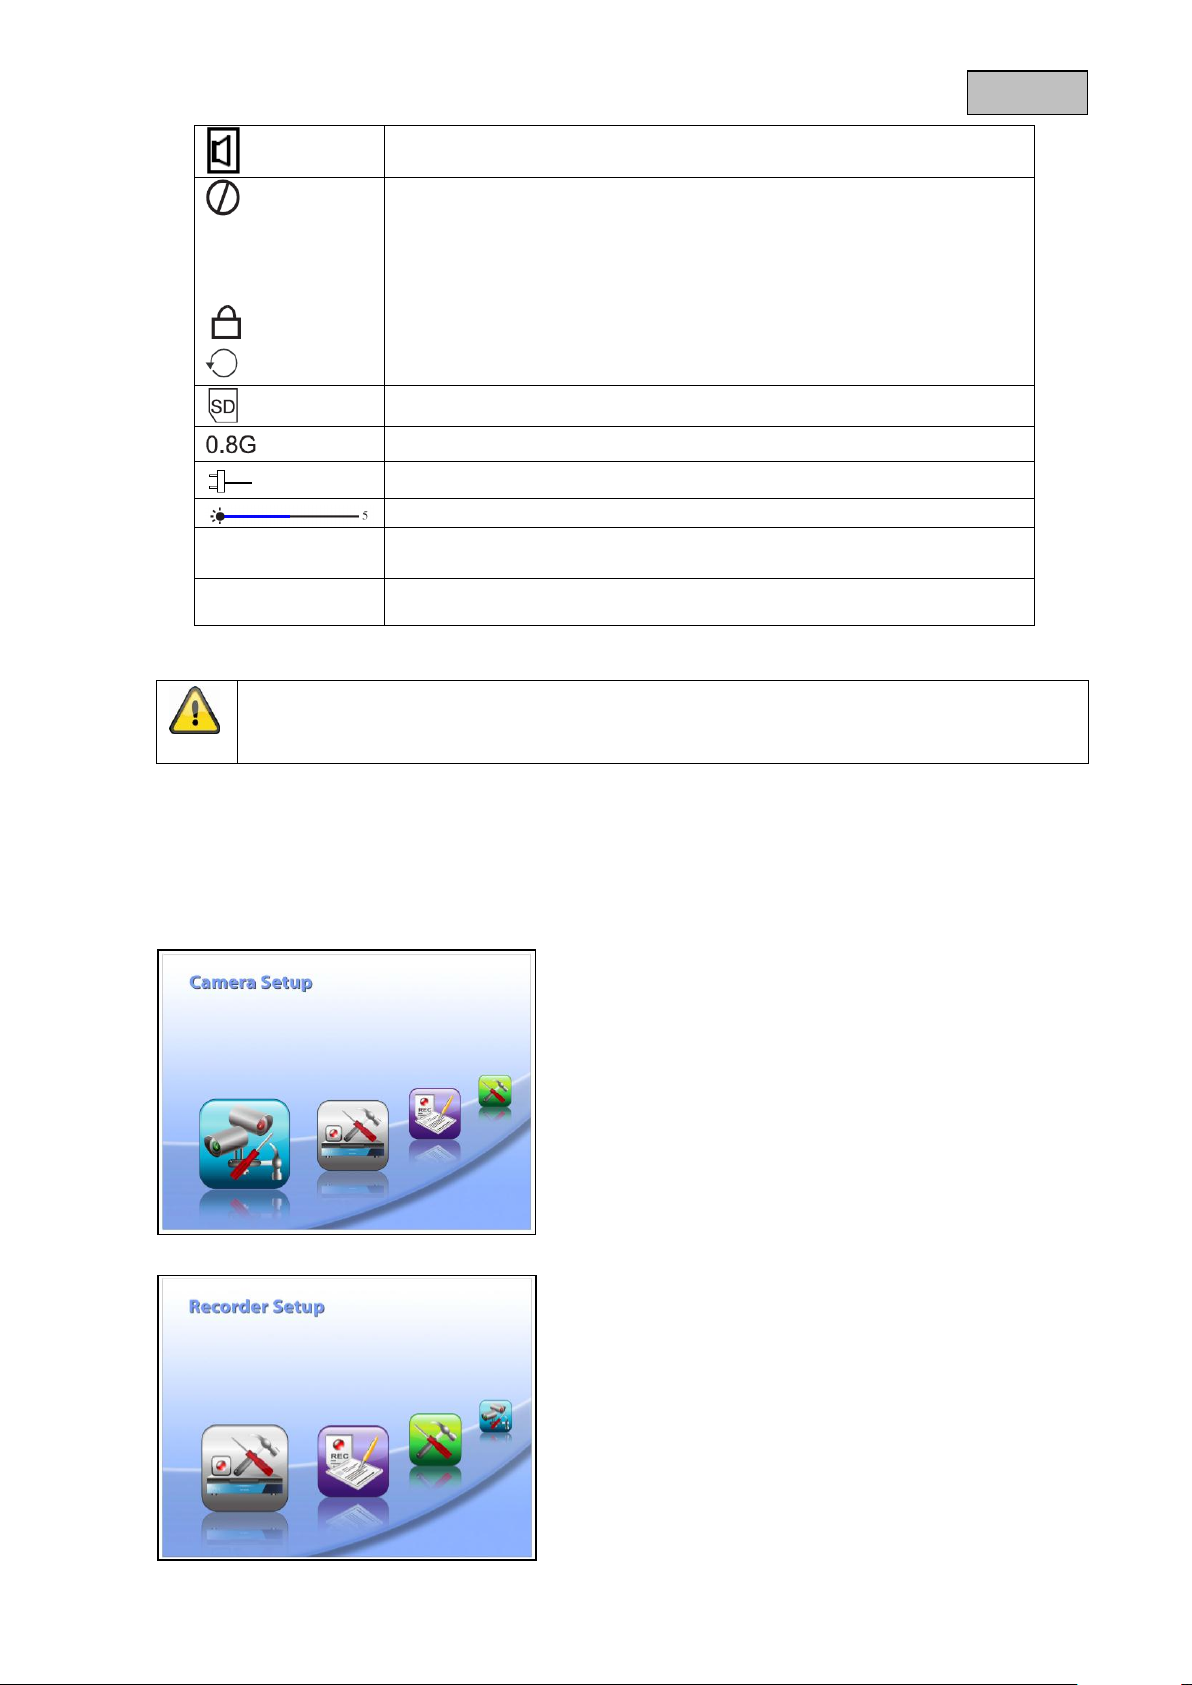
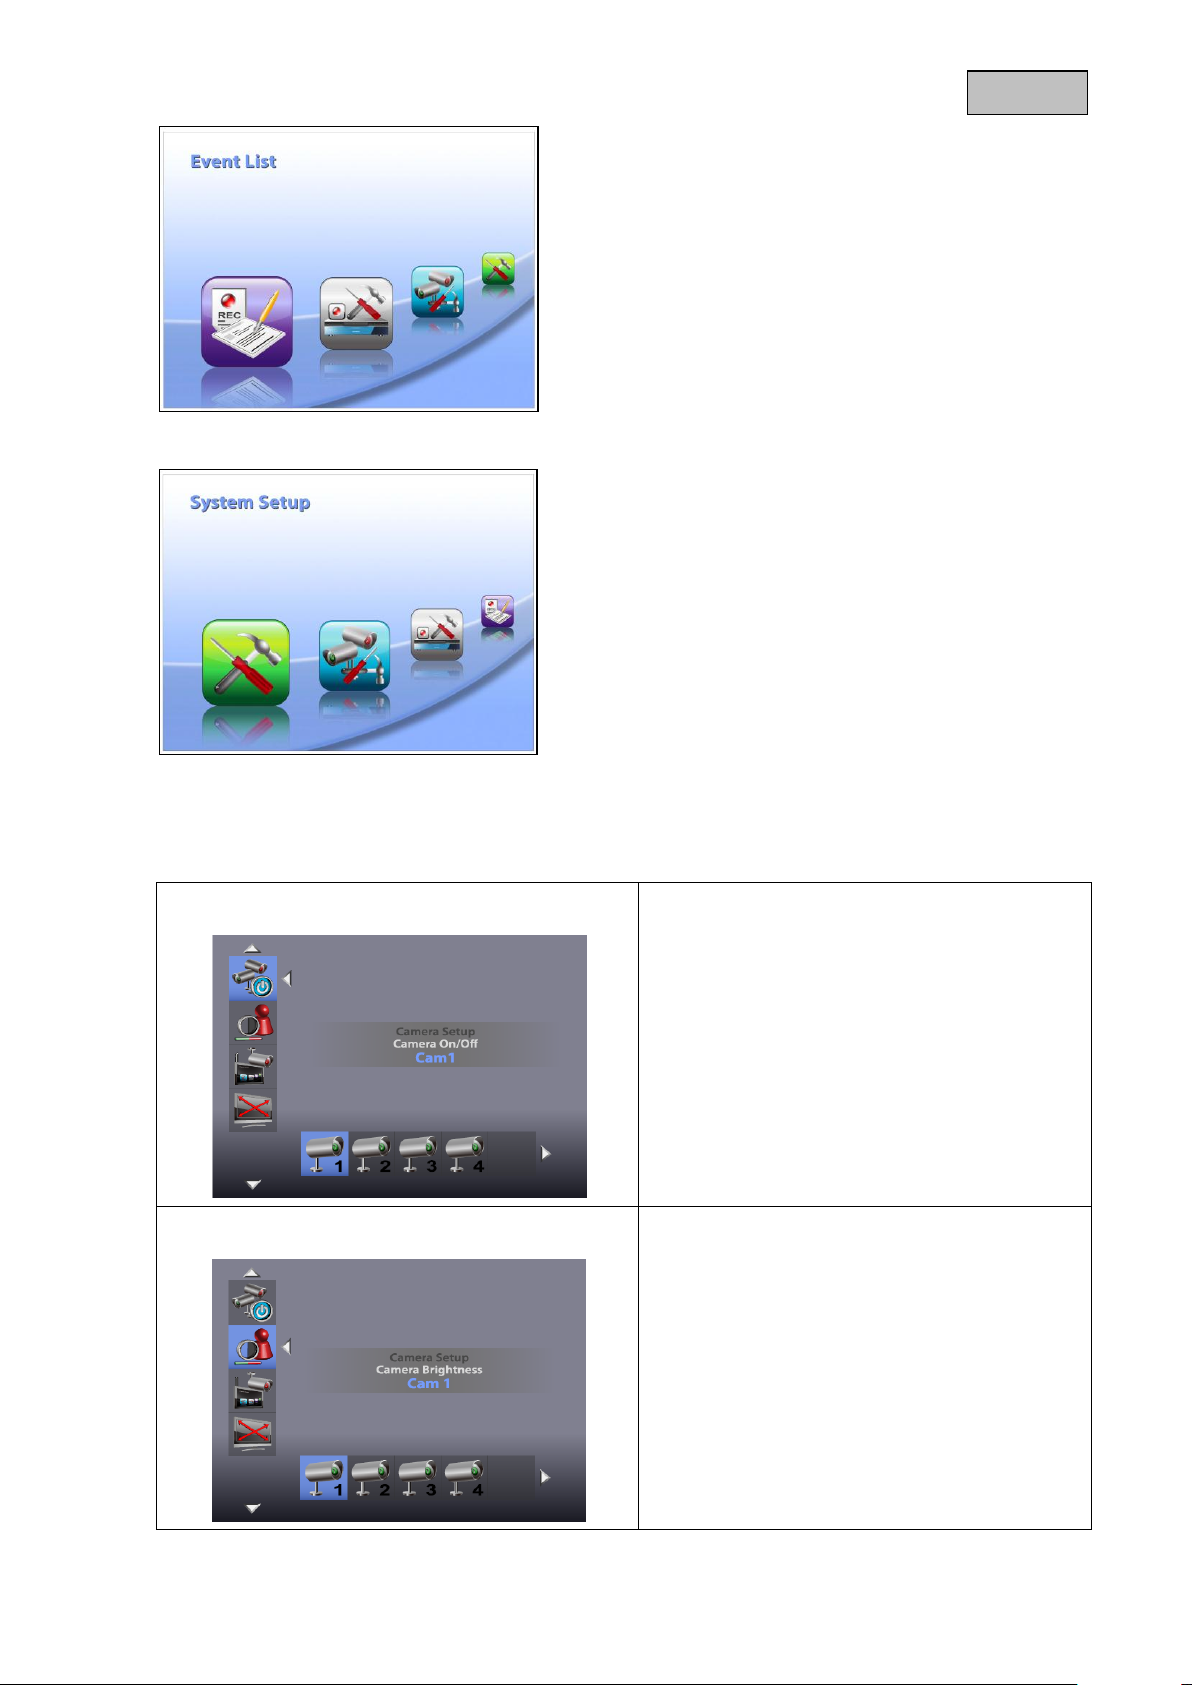
Camera-Setup:
Camera on/off = show/hide camera
Camera Brightness = brightness of camera
Pairing = add camera
Resolution = image resolution
Recorder Setup:
Alarm Period = length of alarm when motion is detected
Motion Detection = motion detection
SD Card Overwrite = SD card circular buffer
15
Page 16
English
Camera on/off = show/hide camera
Use the ◄► buttons to select a camera. Press
OK to switch between ON and OFF.
If you switch the camera OFF, it is no longer
shown.
Camera Brightness = brightness of camera
Use the ◄► buttons to select the desired
camera and confirm your choice with OK.
The relevant camera image is shown with a
selection bar with the options 0–9. You can use
the ◄► buttons to change the setting and
confirm with OK.
Event list:
The recordings are stored in sub-folders named after the
recording date.
The recordings are stored as individual files with the time of
recording as the file name.
System setup:
Quad Display = four-way display
Scan Period = dwell time for sequence display
Time setting = Date/time settings
SD Card Format = format SD card
Power Saving = energy-saving mode
TV-Format = TV output resolution
Set to factory Default = reset to factory defaults
System Version = software version of the monitor and
camera
7.3 Camera settings
16
Page 17
English
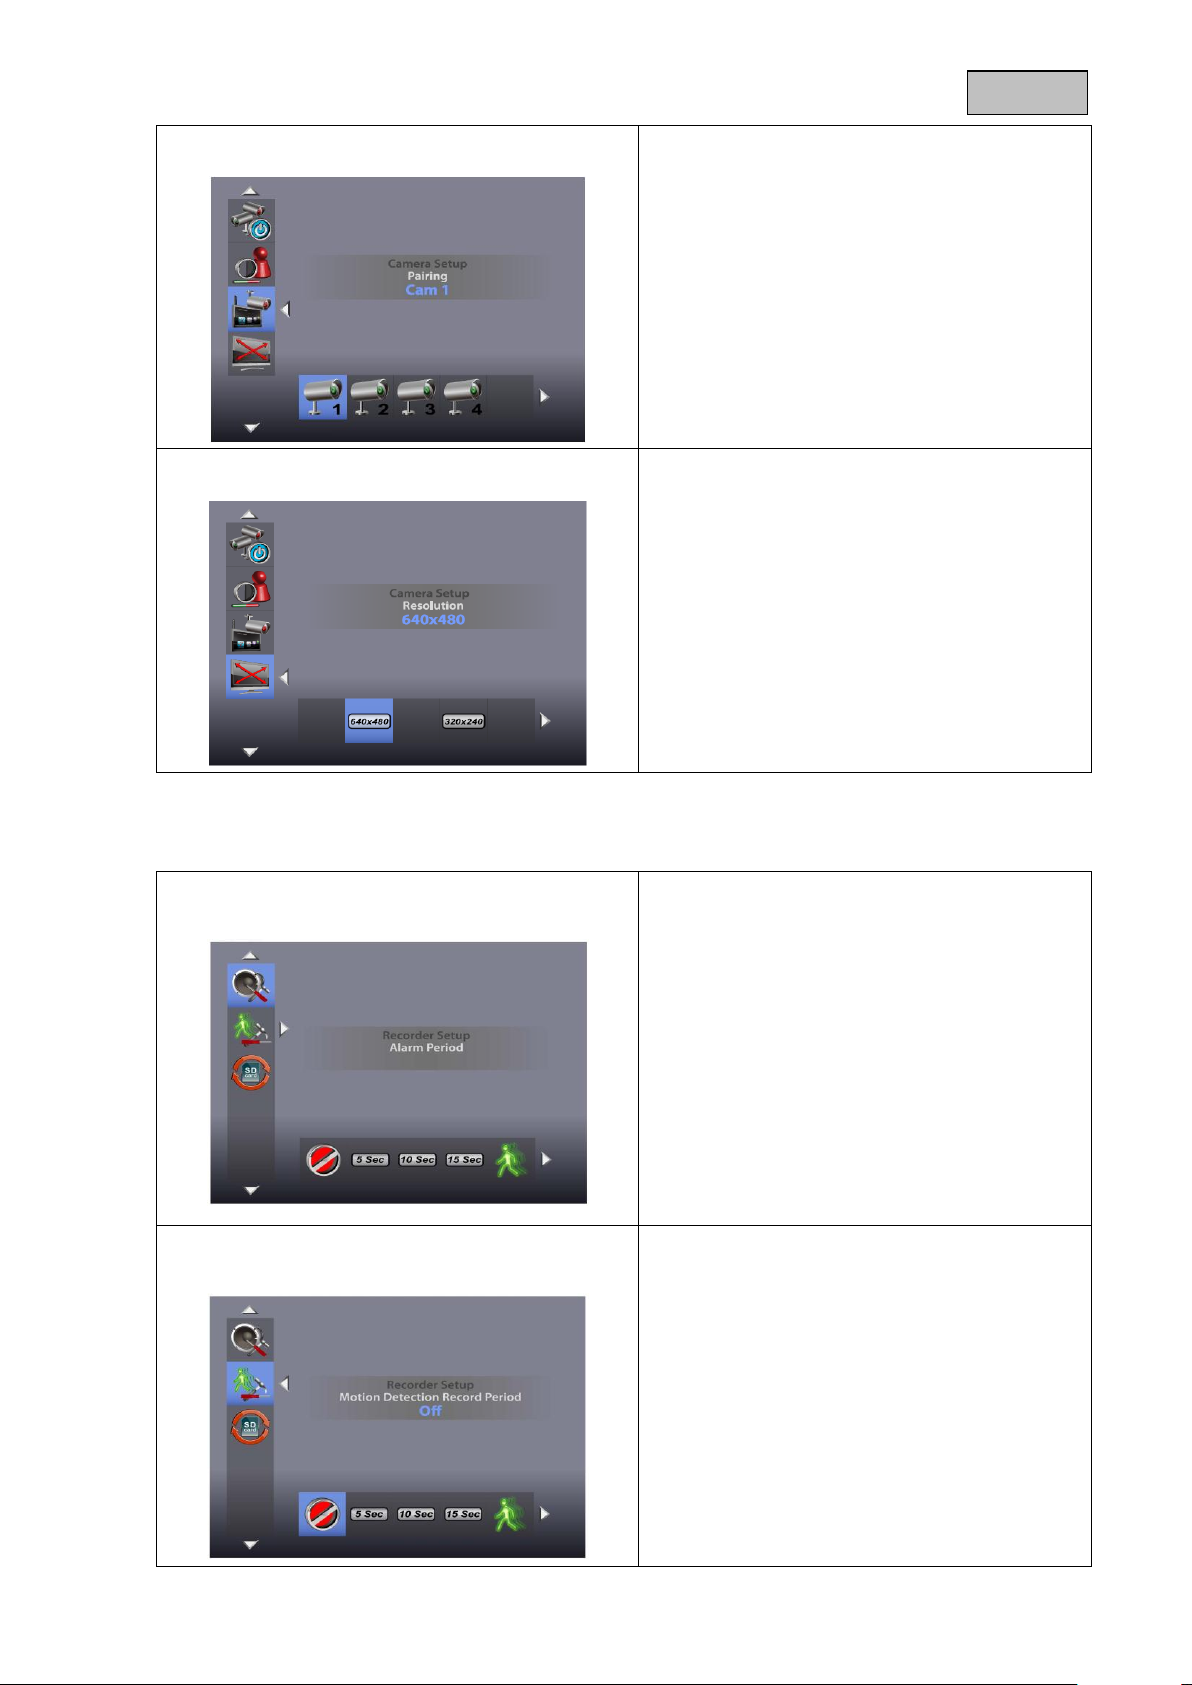
Pairing = add camera
Use the ◄► buttons to select the desired
camera and confirm your choice with OK. The
systems starts a 60 second countdown.
During the 60 seconds, press the PAIRING
button on the camera cable until the green LINK
LED on the front of the camera starts to flash.
Once the connection is successful, the LINK
LED on the camera lights up continuously
and the monitor switches to live view.
Resolution = image resolution
Use the ◄► buttons to select between the
resolutions
640 × 480 and 320 × 240. Confirm your input
with OK.
Note that the recording time changes for the
different resolutions.
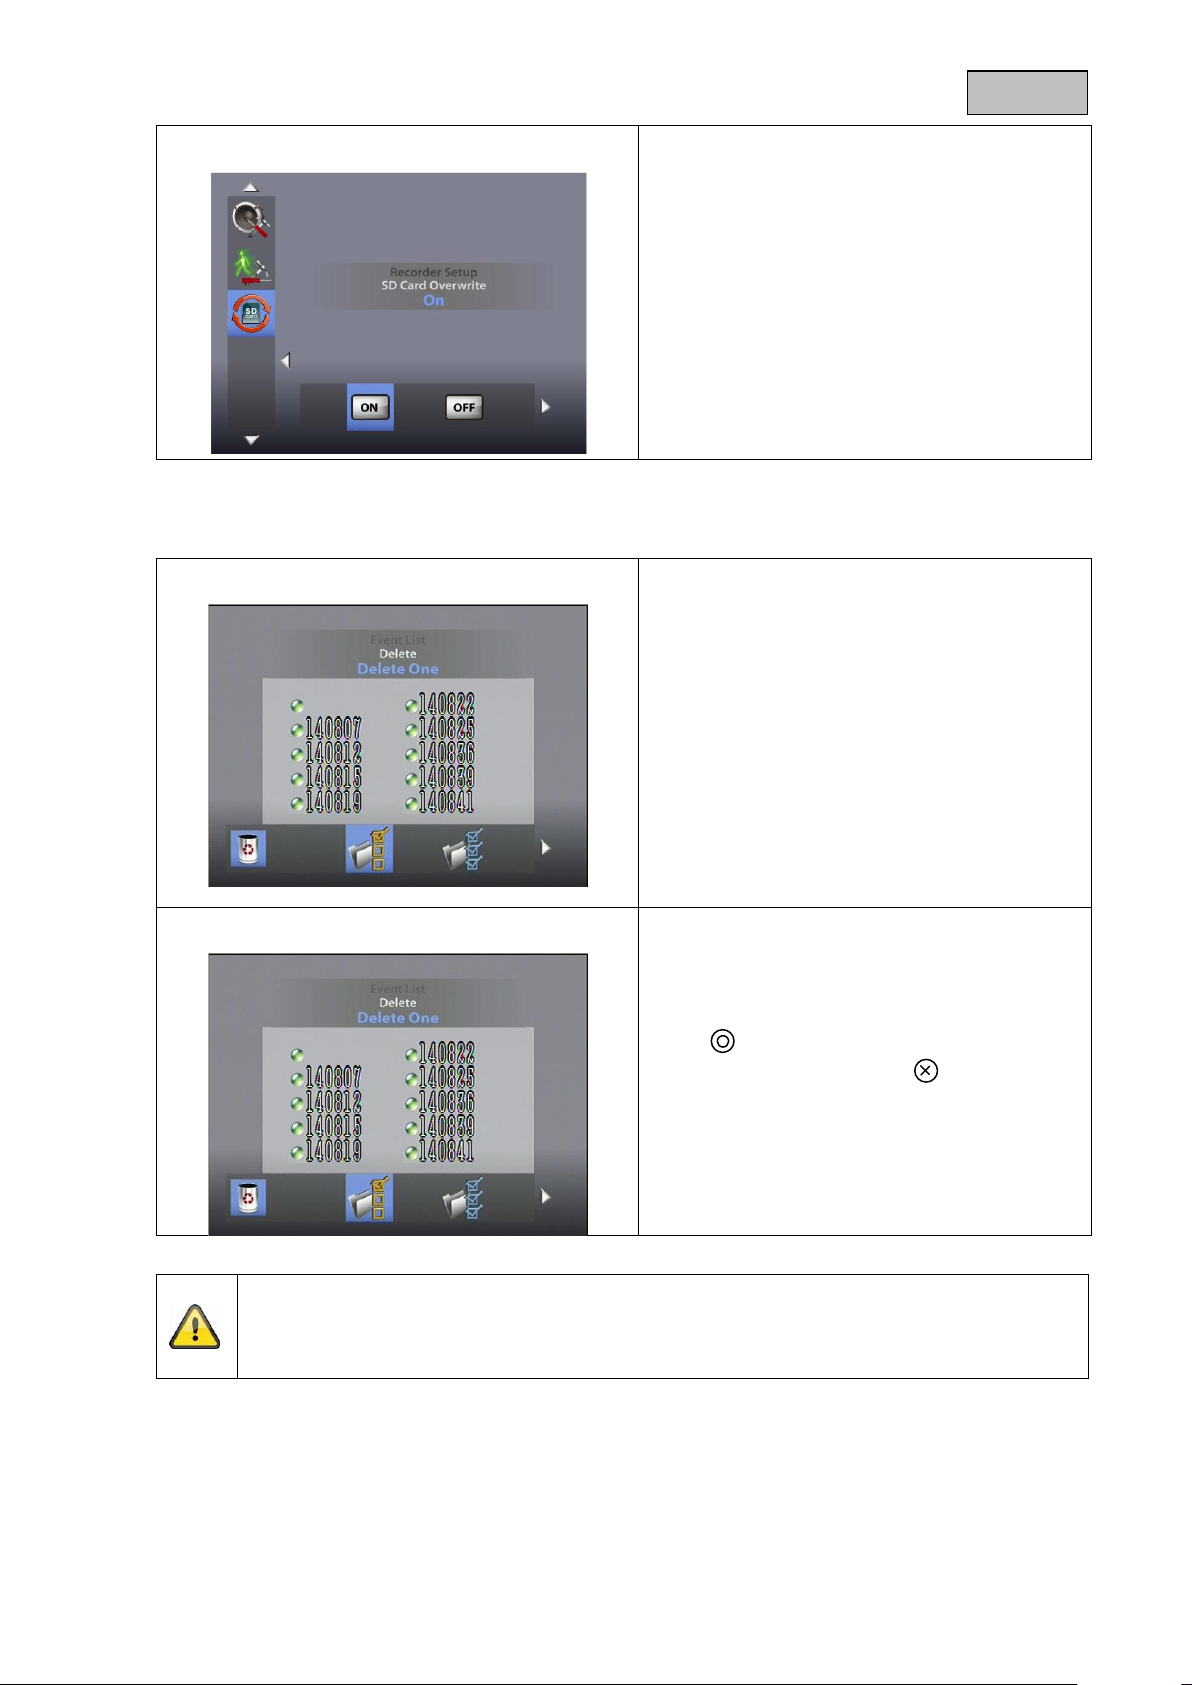
Alarm Period =
length of alarm when motion is detected
Use the ◄► buttons to select the desired alarm
duration.
You can choose between OFF/5 sec/10 sec/15
sec. Confirm your selection with OK.
The alarm duration is set to 5 seconds by
default.
Press any button to switch off the alarm when it
sounds.
Motion Detection =
recording duration for motion detection
Use the ◄► buttons to select the recording
duration for motion detection.
You can choose between OFF/5 sec/10 sec/15
sec.
Confirm your input with OK.
The recording duration is set to 5 seconds by
default.
Motion detection is deactivated for 5 seconds
after an alarm.
7.4 Record settings
17
Page 18
English
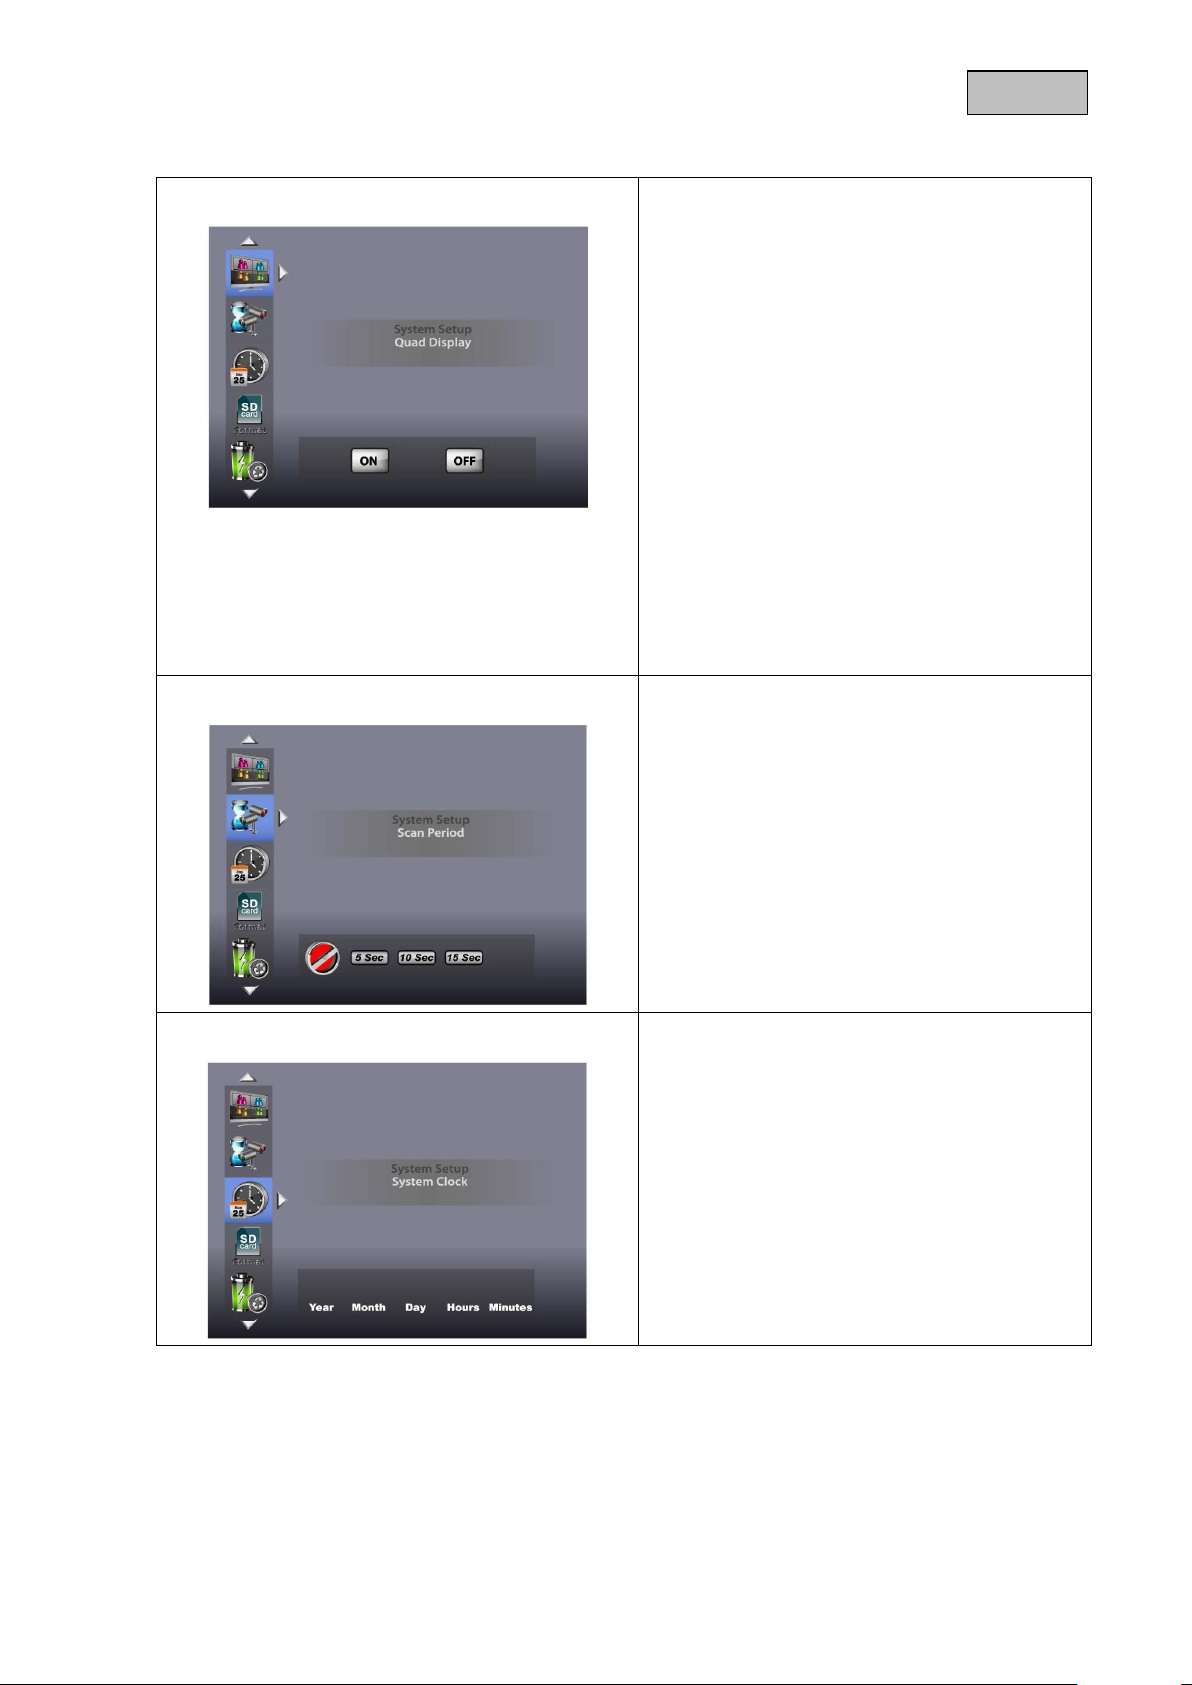
SD Card Overwrite = SD card circular buffer
Use the ◄► buttons to activate (ON) or
deactivate (OFF) the SD card circular buffer.
Confirm your selection with OK.
The circular buffer is activated by default.
Warning:
When the memory capacity is reached, the
monitor continues to record, deleting the
oldest recordings on the SD card.
The SD card capacity display flashes with 0.0
G in red.
Event List = event list
Use the arrow buttons to navigate between
folders. Press the OK button to select the
desired folder.
In the sub-folder, choose the relevant recording
file and play it by pressing OK.
Press ▲ or ▼ to fast-forward or rewind at the
speeds 2×/4×/8×/16×.
Note that the maximum recording time for a
manual recording is 10 minutes. Once this time
elapses, a new file is created.
Deleting files
Press DEL to enter deletion mode.
The current file or folder flashes. You can use
the ◄► buttons to select all or one file.
Press OK to confirm your choice.
Select to delete the selection.
To cancel the deletion, select .
Warning:
Your records are always recorded with audio. Please have a look at page 2 for prevent you or
other people to navigate in an illegal situation. For changing the volume by viewing your
records please use the buttons „Vol -“ for quieter or „Vol +“ for louder.
7.5 Event list
18
Page 19
English
Quad Display = four-way display
Use the ◄► buttons to switch the quad display
on (ON) or off.
To activate quad mode, all the cameras have to
be activated.
When in quad display, you can use the arrow
buttons to switch directly to full-screen view for
individual cameras.
▲ = camera1;
▼ = camera2;
◄ = camera3;
► = camera4
Note that the cameras that are hidden are not
shown in the quad display.
Warning:
Only the full screen of the triggering channel
is recorded.
To record from all 4 cameras using motion
detection, quad display has to be activated.
Scan Period = dwell time for sequence display
You can define the dwell time for sequence
display here. Use the ◄► buttons to choose
between OFF/5 sec/10 sec/15 sec.
If you are not using cameras, hide them in order
to display only the occupied channel.
To switch off sequence display, press the
CH+/CH button. If you want to start manual
recording, press REC.
Warning:
Note that motion detection is only activated
for the channel that is currently displayed.
Time Setting = Date/time settings
Press the ► button to switch between
year/month/day/hours/minutes.
Use the ▲▼ buttons to change the values.
Confirm your input with OK.
7.6 System settings
19
Page 20
English
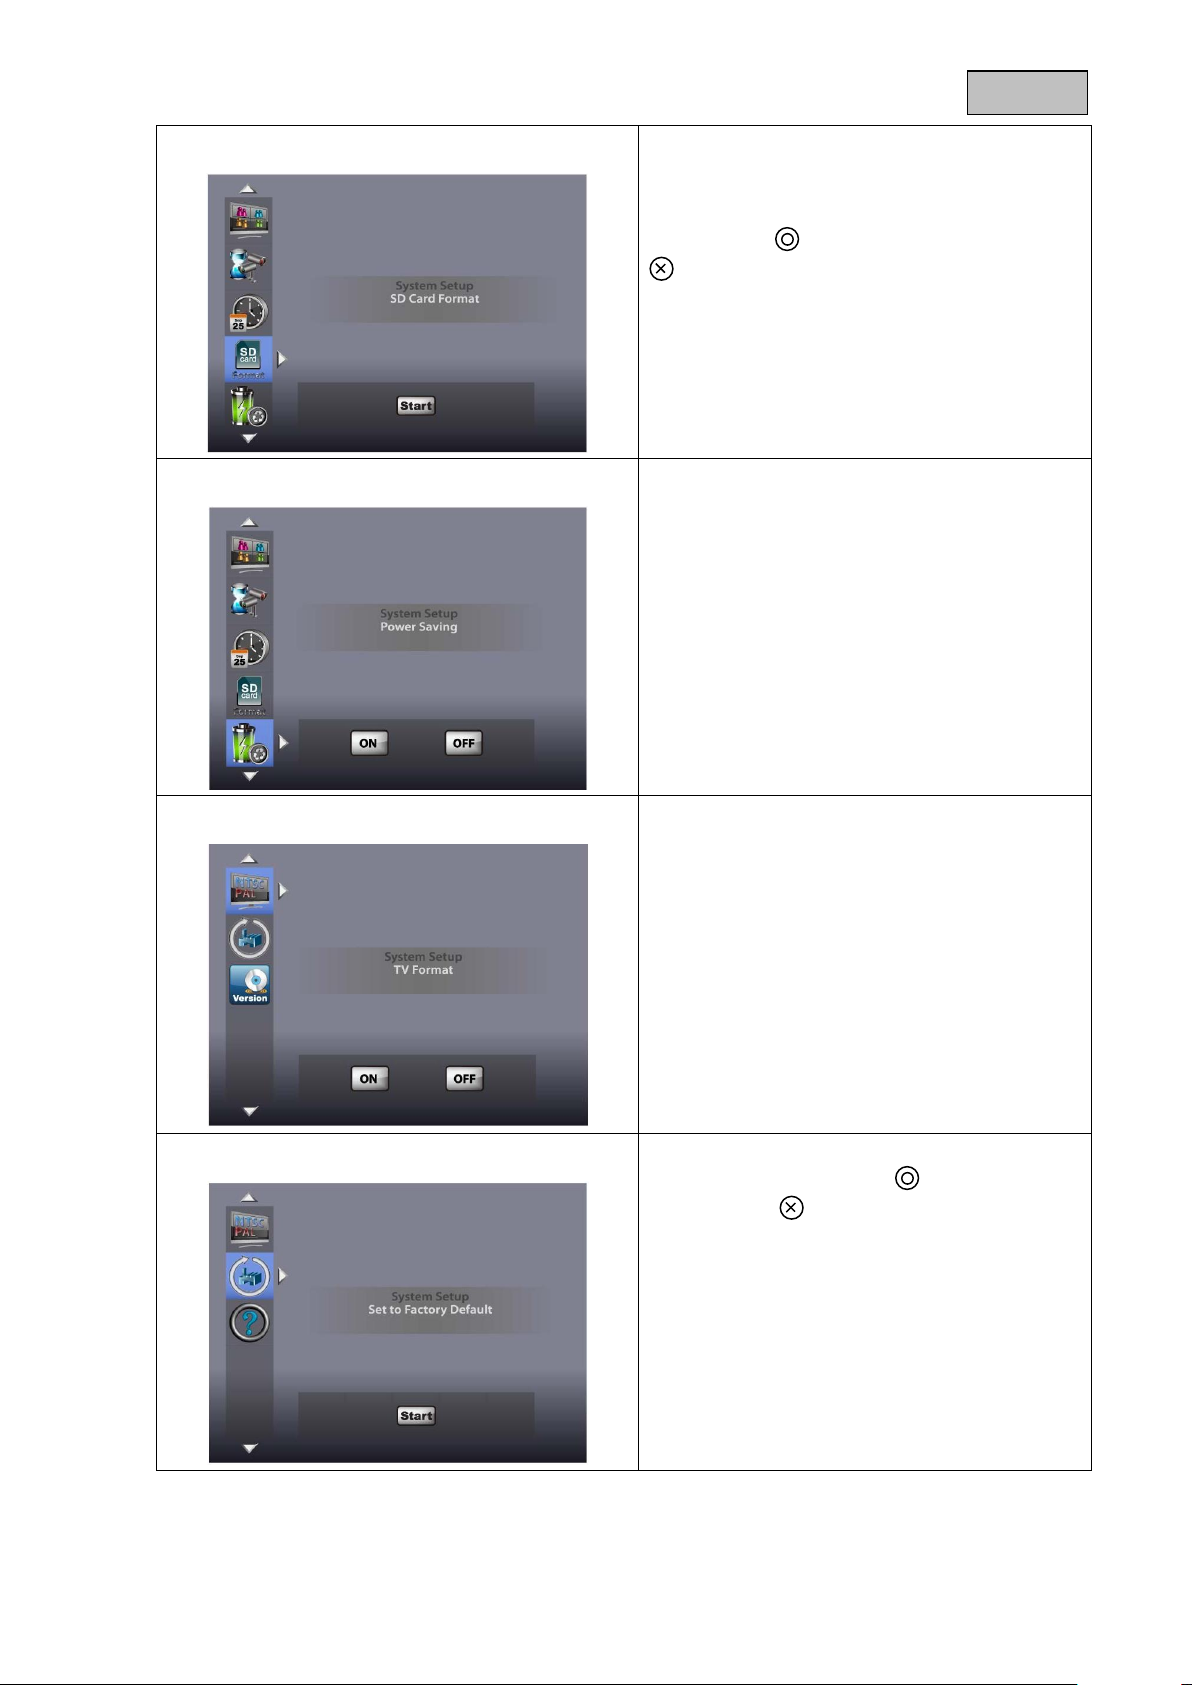
SD Card Format = format SD card
You can use this to format the SD card. The
system displays the memory that is currently
available (Free) and the total memory (Total).
Press OK to start formatting. Confirm your
selection with and cancel the operation with
.
Warning:
Format the SD card before using it for the
first time.
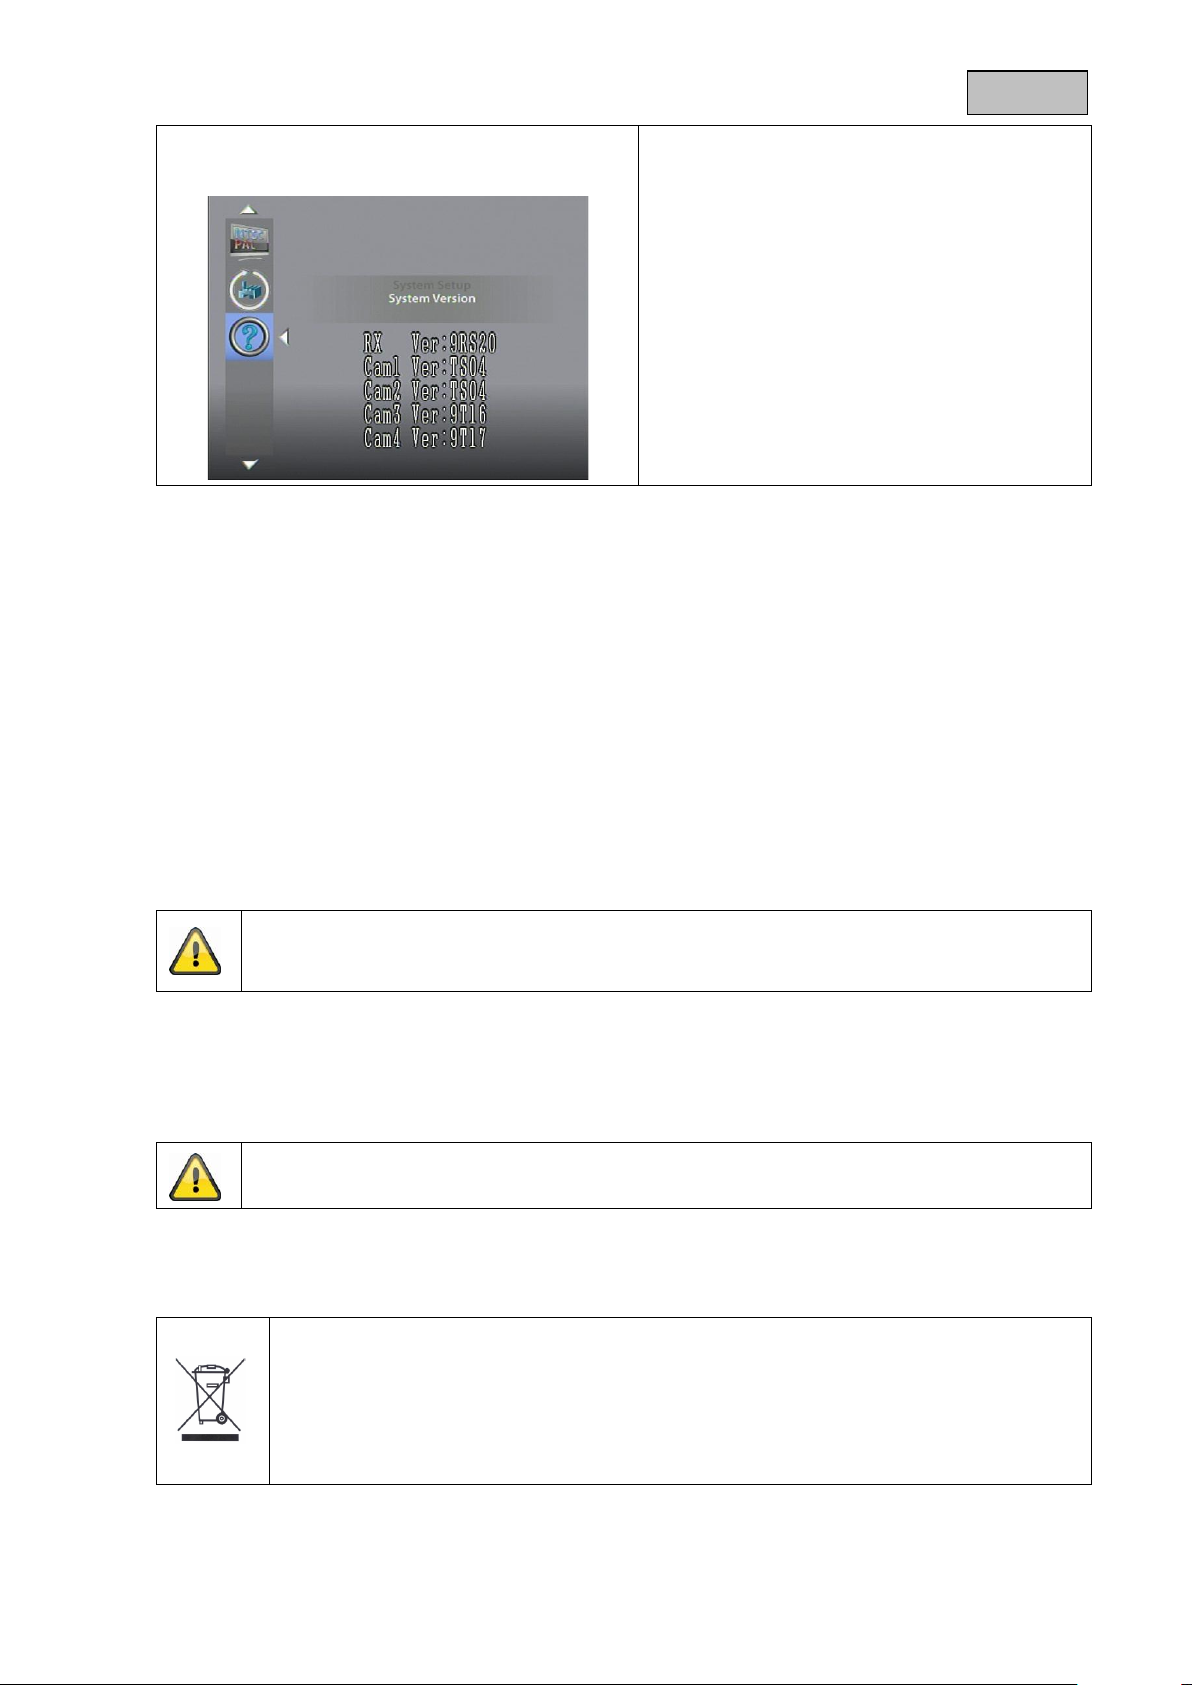
Power Saving = energy-saving mode
Use the ◄► buttons to switch the energysaving mode ON or OFF.
This function is activated by default.
This function switches the screen to standby
mode after two minutes. The loudspeakers
continue to operate at the same volume.
Press any button to exit energy-saving mode.
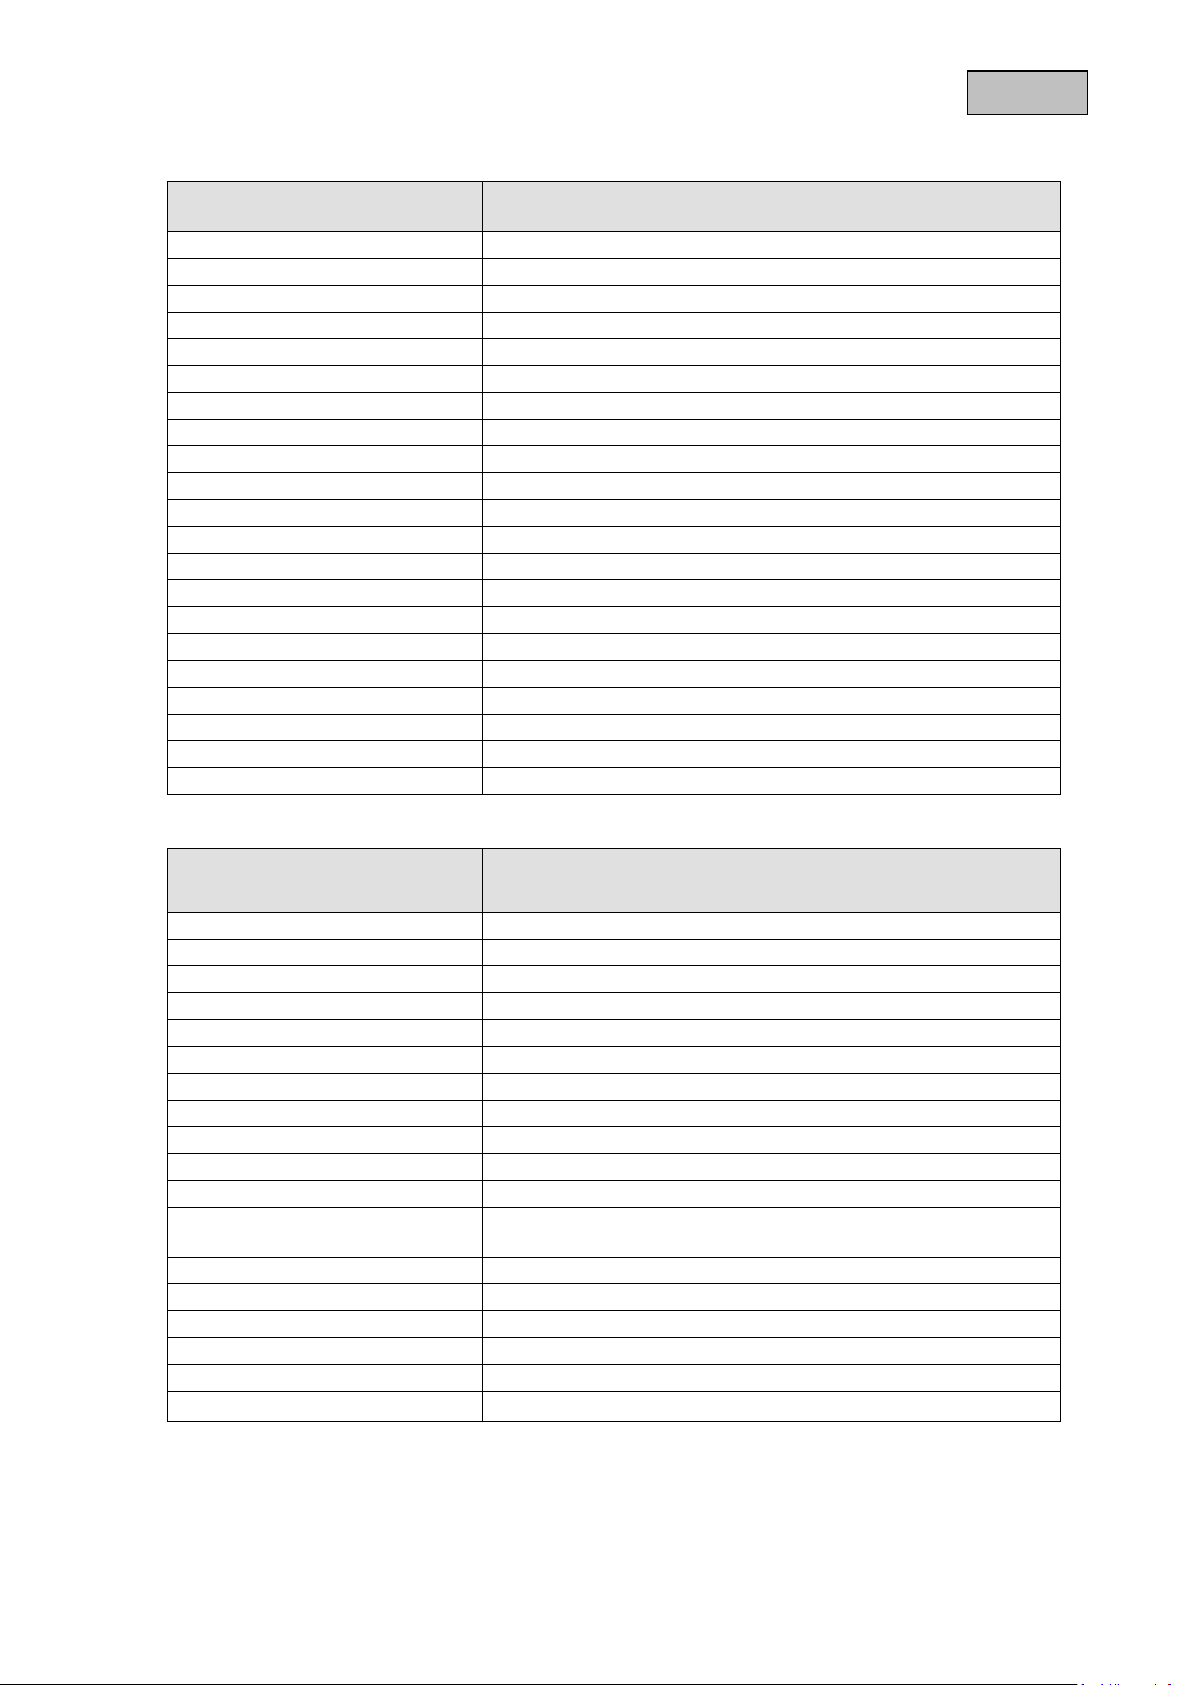
TV-Format = TV output resolution
Use the ◄► buttons to select the desired TV
format.
You can choose between NTSC and PAL.
Confirm your input with OK.
Note that the format selected can affect the
resolution.
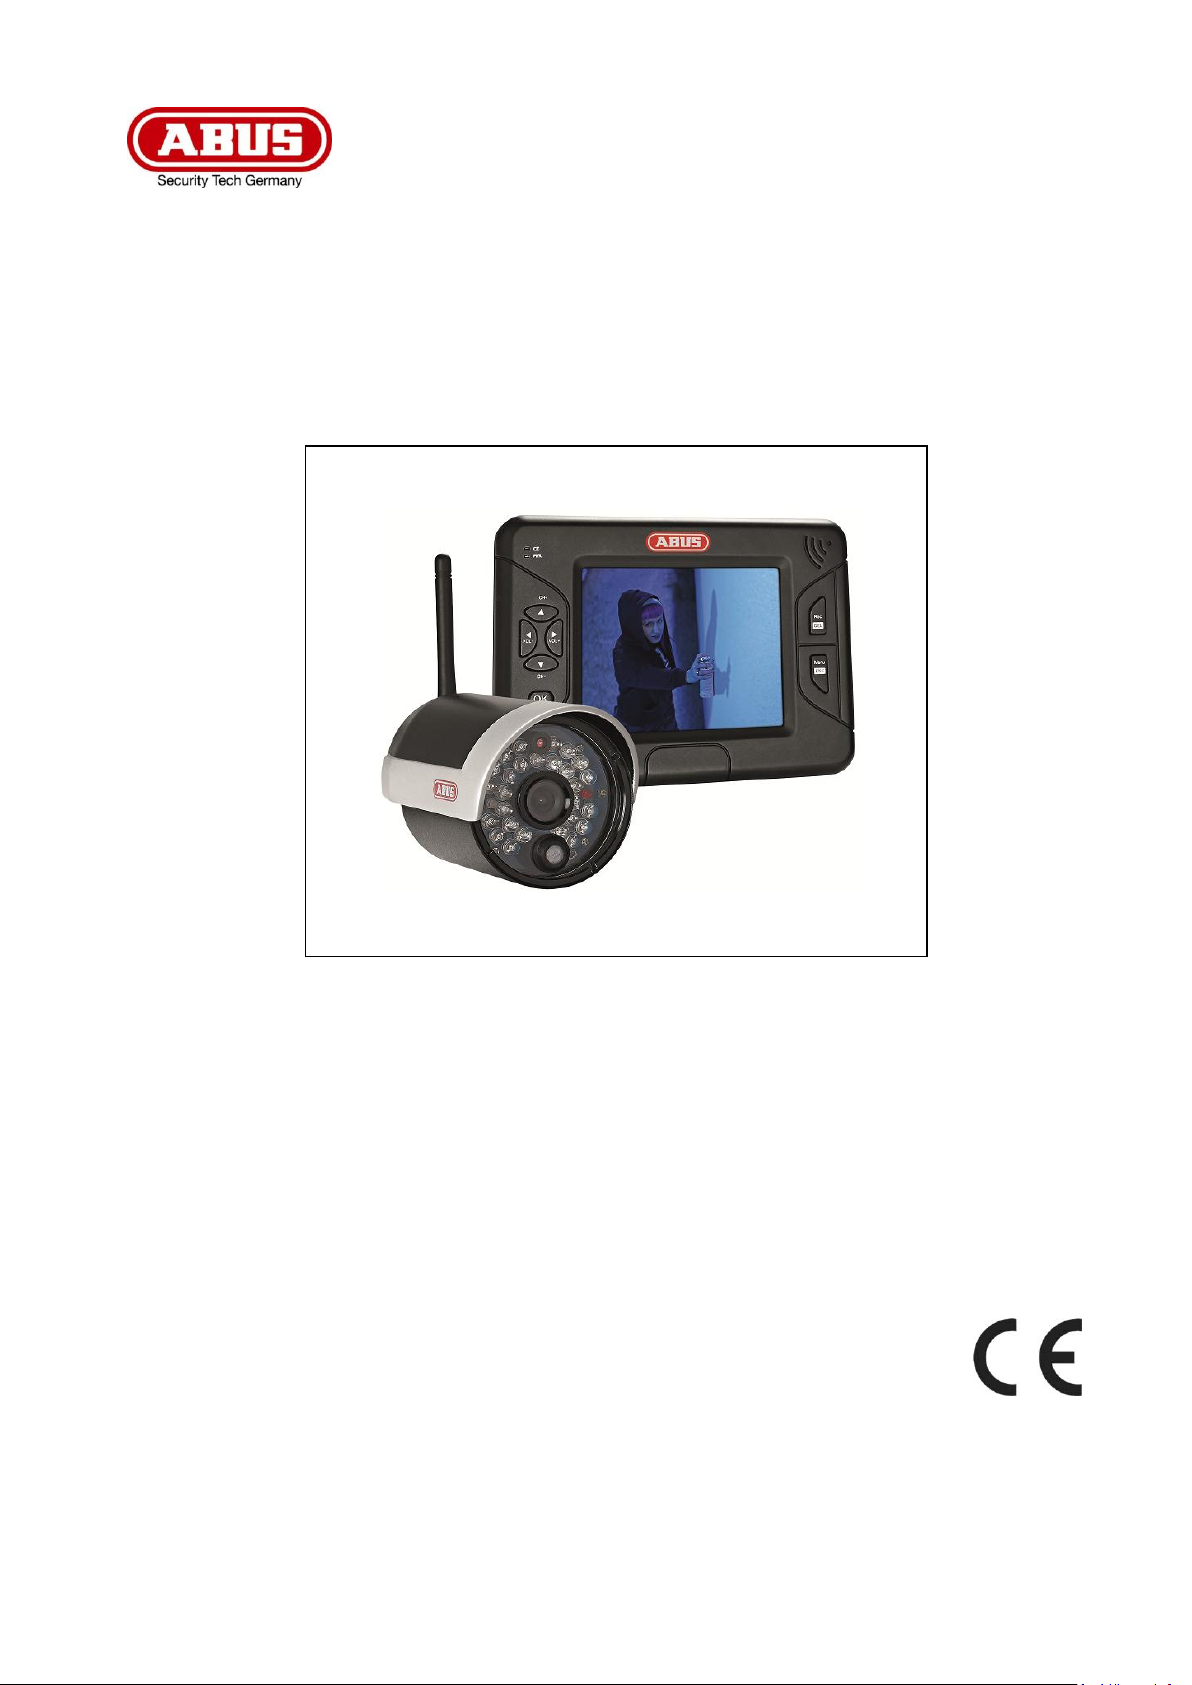
Set to Factory Default = reset to factory defaults
Press OK to start the factory settings.
Confirm your selection with and cancel the
operation with .
Please note:
Note that this operation does not format the
SD card.
20
Page 21
English
System Version =
software version of the monitor and camera
This function shows you the software versions of
the monitor and all the connected cameras.
Please note:
The product is maintenance free for you. Inside the product are no parts that can be checked
or repaired, so do not ever open it.
Make sure that no liquids can enter the equipment as the device can be destroyed. Never use
chemical detergents as they could attack the surface of the device
Important: The EU Directive 2002/96/EG regulates the proper return, treatment and recycling of
used electronic devices. This symbol means that in the interest of environmental protection the
device must be disposed of separately from household or industrial waste at the end of its service
life in accordance with applicable local legal guidelines. Disposing of used devices can be done at
official recycling centers in your country. Obey local regulations when disposing of material. Further
details on returns (also for non-European countries) can be obtained at your local authority.
Separate collection and recycling saves natural resources and ensures that all the provisions for
protecting health and environment are observed when recycling the product.
8. Maintenance and cleaning
8.1 Maintenance
Regularly check the product's physical state, e.g. check for damage of the housing.
If you suspect that safe operation cannot be guaranteed anymore, disconnect the product and ensure that
it cannot be used by mistake.
You can assume that safe operation is not possible anymore when
the device shows visible damage,
the device does not function anymore
8.2 Cleaning
Wipe the product with a clean, dry cloth. If the device is very dirty, you can moisten the cloth with
lukewarm water.
9. Disposal
21
Page 22

English
No.
Question
Answer
1
What does pairing the
monitor and camera mean
and how does this work?
Pairing creates the exclusive, encrypted wireless connection
between the monitor and camera.
To connect a camera to the monitor, proceed as follows:
1. Connect the power supply units to the cameras and the
monitor.
2. In the “Camera Setup -> Pairing” menu of the TFT monitor,
select a camera (1-4) and confirm the selection with OK.
The system counts down from 60 seconds.
3. During the 60 seconds, press the PAIRING button on the
camera cable until the green LINK LED on the front of the
camera starts flashing.
4. Once the connection is established, the LINK LED on the
camera is lit up continuously and the monitor switches to
live view.
Please note that connection can take up to 60 seconds.
2
What could be the reasons
why the monitor displays
“NO SIGNAL” instead of a
picture?
If you do not have a picture signal, please check the following:
1. Is the camera connected to the power supply (does the
LED light up red)?
2. Are the camera and monitor paired with each other?
3. Is the camera within range of the monitor?
4. Is the signal between the camera and monitor disrupted?
3
What could be the reasons
why the device does not
record?
If your device does not record, please check the following:
1. Have you inserted an SD card?
2. Is the SD card locked? (Lock/Unlock?)
3. Have you formatted the SD card? It must be formatted
before it is first used.
4
What could be the reasons
why the device does not
record when there is
movement?
The “motion detection” function may be switched off. Please
go into the “Recorder Setup / Motion Detection / ON/OFF”
menu and set the function to “ON”.
5
What should I do if, in night
mode, half of the image
shows nothing and remains
black?
The camera has an integrated infrared swivel filter which
ensures the camera switches to night mode when it is dark. If
part of the image is black, it is possible that the swivel filter has
got stuck mechanically. Tapping the camera lightly can solve
this problem.
6
Is a standby mode possible?
You can switch the device to an energy saving mode. If the
camera detects a movement during this time, the image is
automatically displayed.
7
Can the sound for the
motion detection be
adjusted?
Yes, in the menu item “Record Settings” you can turn off the
alarm tone. You will find this under “Alarm Period”.
8
Can more than one monitor
be used at the same time?
No, for technical reasons this is not possible because a
camera can only be paired directly with one monitor
(camera(s) and monitor form a pair).
10. Tips for troubleshooting
22
Page 23
English
Model number
TVAC15000B
Camera
Frequency
2.4 GHz
Modulation
GFSK
Transmission power
16 dBm
Sensitivity
-82 dBm
TV lines
400 TVL
Image sensor
1/4" CMOS
Resolution
640 × 480 pixel (VGA)
No. of IR LEDs
27 IR LEDs
Lens
3.6 mm
Angle of view
56° (H)/43° (V)
PIR angle of view
60° (H)/50° (V)
PIR range
Max. 5 m
Night vision function range
approx. 10 m
IR swivel filter
Yes
IP protection class
IP66
Wireless range
approx. 100 m (clear sight line)*
Power supply
5 V DC/1 A
Power consumption
Max. 550 mA
Operating temperature
-10 °C–50 °C
Dimensions (L × W × H)
120 × 71 × 68 (without antenna and mount)
Weight
320 g
Model number
TVAC15000B
3.5" TFT monitor
Frequency
2.4 GHz
Modulation
GFSK
Transmission power
16 dBm
Sensitivity
-82 dBm
Transmission cable
4
Resolution
640 × 480 pixels (VGA)/320 × 240 pixels (QVGA)
Video signal
1.0 V p-p, 75 Ohm
Audio signal
1.0 V p-p, 600 Ohm
Storage medium
SDHC card, max. 32 GB
Outputs
3.5 mm jack (video)
Wireless range
approx. 100 m (clear sight line)*
Battery type
Li ion polymer battery,
3.7 V / 1800 mAh
Battery life
approx. 3.5 hours
Power supply
5 V DC/1 A
Power consumption
Max. 650 mA
Operating temperature
-10 °C–50 °C
Dimensions
130 × 90 × 27 mm
Weight
200 g
11. Technical data
*The range depends on the ambient conditions (e.g. mobile phone masts, high-tension electricity pylons,
power lines, ceiling and walls, etc.).
If the conditions are unfavourable, the range may be very restricted.
23
Page 24
TVAC15000B
Brugerhåndbog
Version 04/2013
Original betjeningsmanual på dansk.
Opbevares til fremtidige formål!
Page 25
Dansk
Indføring
Kære kunde,
vi takker Dem fordi du har købt dette produkt.
Dette apparat opfylder kravene i gældende EU-direktiver. Overensstemmelseserklæringen kan rekvireres
hos:
ABUS Security-Center GmbH & Co. KG
Linker Kreuthweg 5
86444 Affing
GERMANY
For at opnå denne tilstand og sikre en idriftsætning uden farer må du som bruger sætte dig ind i denne
betjeningsvejledning!
Inden idriftsætning af produktet læs da hele betjeningsvejledningen, og se her om betjening og
sikkerhedsforskrifter!
Alle indeholdte firmanavne og produktbeskrivelser er varemærker hos den aktuelle producent og
der tages forbehold for alle rettigheder.
Ved spørgsmål henvend Dem da til din forhandler eller installatør!
Advarsler
Bemærk: Den, der uden tilladelse optager en anden persons ikke-offentligt udtalte udtalelse på et
lydmedium eller anvender en optagelse, der er fremstillet på denne måde, eller lader tredjeperson få adgang
til den, kan straffes med frihedsstraf eller bøde!
Den, der uden tilladelse aflytter en anden persons ikke-offentligt udtalte udtalelse, der ikke er tiltænkt
vedkommende, med et lytteapparat eller offentligt gengiver en anden persons optagede eller aflyttede ikkeoffentligt udtalte udtalelse ordret eller det væsentlige indhold, kan også straffes.
Hæftelses udelukning
Denne betjeningsvejledning er lavet med den største omhu. Skulle der alligevel være udslag eller
unøjagtigheder så meddel os det venligst via den adresse der står på bagsiden af vejledningen.
ABUS Security-Center GmbH tager ikke ansvar for teknisk eller typografiske fejl, og forbeholder sig retten til
at til enhver tid og uden forudgående advisering at foretage ændringer ved produktet og
betjeningsvejledningen.
ABUS Security-Center kan ikke stilles til ansvar eller hæftelse for følgeskader ved brug af produktet såvel i
drift som ibrugtagning. Der gives ingen garanti for indholdet af dette dokument.
25
Page 26
Dansk
Et lyn i en trekant betyder at der er en helbredsrisiko forbundet med elektrisk stød.
Et udråbstegn I en trekant, betyder at man skal kigge i manualen efter vigtige
henvisninger..
Dette symbol findes når der bliver gives vigtige oplysninger.
Garantien forsvinder hvis anbefalinger I manualen ikke følges nøjagtigt. ABUS er ikke
ansvarlig for konsekvenserne af dette!
ABUS vil ikke et ansvar for skader af egendom eller personlige skader forsaget af forkert
behandling eller uoverensstemmelse af sikkerhedsinstruktionerne.
I sådanne tilfælde ophører garantien.
Ikon forklaring
Vigtige sikkerhedsinformationer
Denne enhed er lavet efter internationale sikkerhedsstandarter, læs venligst sikkerheds instruktionerne
omhyggeligt.
Sikkerhedsinstruktioner
1. Strømforsyning
100–240 V AC vekselspænding, 50–60 Hz (via strømforsyning til 5 V DC)
Forsyn dette produkt med en strømforsyningstype af typen der star på mærkaten. Hvis du ikke er sikker
på hvilken forsyning der findes i dit hjem, kontakt derfor dit lokale elforsyningsfirma. Fjern produktet fra
hovedforsyningen før du starter installationen.
2. Overbelastning
Lad vær med at overbelaste en vægkontakt, en forlænger eller en adapter. Dette kan resultere i elektrisk
ild eller stød.
3. Væsker
Installer kun enheden i tørre og støvbeskyttede rum, beskyt enheden imod alle slags former for væsker.
4. Rensning
Fjern enheden fra hovedforsyningen. Brug en let dampet klud(Ingen opløsningsmidler) til at støve af
produktet.
5. Tilbehør
Lad vær med at bruge tilbehør som ikke er godkendt, dette kan give skader på produktet.
6. Placering
Dette apparat er både udviklet til anvendelse i beskyttede udendørsområder og til anvendelse
indendørs.
Et fald selv fra lav højde kan beskadige produktet.
Monter produktet på en sådan måde, at apparatets billedoptager ikke udsættes for direkte sollys.
Vær opmærksom på monteringsoplysningerne i det pågældende kapitel i denne
betjeningsvejledning.
Beskyt enheden med alle former for væsker.
Placer ikke enheden nær radiatorer ikke varmeblæsere.
Placer enheden i miljøer med temperaturer imellem -10° ~ 50°C.
26
Page 27
Dansk
Under installationen i et eksisterende videoovervågnings system, vær da sikker på at alle
enheder er fjerne fra lav og 230 VAC strømforsyninger.
I tvivl, brug derfor en professionel elinstallatør til at installere og opsætte elektricitet til produktet.
Forkert installation er til fare for dig og andre.
Installer det således at ingen frie strømkabler kan komme I kontakt med personer under brug og
ved problemer.
Ved en eventuel beskadigelse på forpakningen da tjek venligst om enheden også har synlige
tegn på skade. Såfremt at dette er tilfældet skal du hurtigst muligt returnere/ gøre opmærksom
på dette overfor leverandøren.
7. Trådløs overførsel
Den trådløse overførsels rækkevidde afhænger af forskellige miljøpåvirkninger. De lokale forhold på
monteringsstedet kan påvirke rækkevidden negativt. Derfor kan ved frit udsyn opnås en strækning på
indtil 200 m mellem modtageren og senderen, men i bygninger betydeligt mindre.
Følgende miljøpåvirkninger begrænser både rækkevidden og billedhastigheden:
Mobiltelefonantenner, højspændingsmaster, elektriske ledninger, lofter og vægge, apparater med den
samme eller tilstødende trådløse frekvens.
Advarsler
Følg alle sikkerheds instruktioner før at installationen begynder!
1. Følg alle disse bestemmelser for at undgå skader af strømledningen og stikket.
Lad vær med at ændre strømledningen eller stikket vilkårligt.
Vær sikker på at afkoble ledningen når du holder i stikket.
Hold varme enheder så langt væk fra ledningen, for at undgå at vinyl kappen kan smelte.
Udendørskameraets strømforsyning skal beskyttes mod fugt og væde.
2. Følg disse instruktioner. Hvis ikke, kan det forsage elektrisk stød:
Åben ikke hovedenheden eller strømforsyningen.
Lad vær med at indsætte metal eller brandfarlige ting i enheden.
For at undgå skade ved lyn, brug derfor an overspændings beskytter.
3. Lad vær med at bruge produktet hvis det er gået i stykker. Hvis dette gøres, kan der ske større skade..
Kontakt den lokale leverandør hvis produktet er gået i stykker.
Undgå følgende problematiske omgivelser ved betjeningen:
Våde omgivelser eller for høj luftfugtighed
Ekstrem kulde eller varme.
Direkte sollys
Støv eller brændbare gasser, dampe eller opløsningsmidler
kraftige rystelser
kraftige magnetfelter, som f.eks. i nærheden af maskiner eller højtalere.
Kameraet må ikke rettes mod solen. Det kan medføre ødelæggelse af sensoren.
Kameraet må ikke installeres på ujævne flader.
Udpakning
Når du pakker apparatet ud skal dette gøres med forsigtighed.
27
Page 28

Dansk
Indholdsfortegnelse
1. Korrekt anvendelse .............................................................................................................................. 29
2. Leveringsomfang ................................................................................................................................. 29
3. Kendetegn og funktioner ..................................................................................................................... 29
4. Henvisninger og FAQs ......................................................................................................................... 29
5. Apparatbeskrivelse .............................................................................................................................. 30
5.1 Beskrivelse af monitorens forside ................................................................................................ 30
5.2 Beskrivelse af monitorens bagside .............................................................................................. 31
5.3 Beskrivelse af monitorens tilslutninger ......................................................................................... 31
5.4 Beskrivelse af kameraet ............................................................................................................... 32
5.5 Beskrivelse af kabeltilslutningerne ............................................................................................... 32
6. Installation ............................................................................................................................................. 33
6.1 Forbindelse af kameraerne og monitoren .................................................................................... 33
6.2 Kameramontering ......................................................................................................................... 33
6.3 Monitorinstallation ........................................................................................................................ 34
7. Betjening ............................................................................................................................................... 35
7.1 Live-visning .................................................................................................................................. 35
7.2 Hovedmenu .................................................................................................................................. 36
7.3 Kameraindstillinger ....................................................................................................................... 37
7.4 Optagelsesindstillinger ................................................................................................................. 38
7.4 Hændelsesliste ............................................................................................................................. 39
7.5 Systemopsætning......................................................................................................................... 40
8. Vedligeholdelse og rengøring ............................................................................................................. 42
8.1 Vedligeholdelse ............................................................................................................................ 42
8.2 Rengøring ..................................................................................................................................... 42
9. Vækanskaffelse .................................................................................................................................... 42
10. Tips vedrørende fejlafhjælpning ......................................................................................................... 43
11. Tekniske data ........................................................................................................................................ 44
28
Page 29

Dansk
3,5" TFT-monitor
1 × trådløst IR-udendørskamera 2,4 GHz
inkl. kameraholder og monteringsmateriale
SD-kort 4 GB
2 × strømforsyning
inkl. EU-, AU- og UK-adapter
5 V DC/1 A
AV-kabel
1 × antenne
1. Korrekt anvendelse
Med denne 2,4 GHz trådløse monitor og det trådløse IR-udendørskamera med PIR kan du uden
problemer overføre og vise videosignaler trådløst over mellestore til store afstande.
Den trådløse signaloverførsel er en fordel over alt, hvor det ikke er muligt at trække kabler: Kameraet
overfører videosignalet trådløst til den trådløse monitor. På grund af omformningen til digitale signaler kan
forstyrrelser og interferenser dermed undgås.
Så snart kameraets PIR-sensor registrerer en bevægelse, starter optagelsen på SD-kortet. Du har
mulighed for at forbinde indtil 4 kameraer (TVAC15010B) med monitoren og at vise dem i den 4-dobbelte
visning.
En udførlig funktionsbeskrivelse finder du i kapitel „3. Kendetegn og funktioner“.
2. Leveringsomfang
3. Kendetegn og funktioner
Komplet sæt bestående af 3,5“ TFT-monitor og trådløst IR-udendørskamera 2,4 GHz
Kompakt IP66 udendørskamera med infrarød natsigtfunktion og 400 TVL opløsning
3,5“ farve-TFT med integrerede højttalere
Digital kodet audio- og videooverførsel
Brugervenligt OSD (on-screen-menu)
4. Henvisninger og FAQs
Vigtige henvisninger og FAQs vedrørende dette produkt og andre produkter findes på internetsiden
www.abus.com/plug-and-play. Informationer om fejlafhjælpningen findes under punkt 10 i denne
vejledning.
29
Page 30

Dansk
Batterivisning
Visning af den aktuelle ladetilstand
Rød: Batteri lavt
Grøn: Opladning
Slukket: Batteri fuldstændigt opladet
Power LED
Visning af apparatstatus
Blå: Apparat tændt
Slukket: Apparat slukket
▲
CH +
Live-visning: Kanalskift
I menuen: Skift mellem menupunkterne
◄
Vol-
Live-visning: Reducerer lydstyrken
I menuen: Skift mellem menupunkterne
►
Vol+
Live-visning: Forøger lydstyrken
I menuen: Skift mellem menupunkterne
CH -
▼
Live-visning: Kanalskift
I menuen: Skift mellem menupunkterne
OK-tast
Live-visning: Henter hændelseslisten
I menuen: Bekræfter indstillingerne og ændringerne
Rec/Del
Live-visning: Starter/standser optagelsen
I menuen: Sletter optagelsen
Kun mulig med SD-kort!
Menu/ESC
Live-visning: Henter/forlader menuen
I menuen: Forlader undermenuen
Systemet forlader automatisk menuen efter et minuts ventetid.
5. Apparatbeskrivelse
5.1 Beskrivelse af monitorens forside
30
Page 31

Dansk
Antenne
Fod
Spændingsforsyning
5 V DC/1 A (DC, 14,5 × 4,8 mm)
AV-udgang
Udgang for visningen af skærmvisningen, anvend hertil det
vedlagte AV-kabel.
SD-kort-slot
Slot til anvendelse af et SD-kort indtil 32 GB
Power-tast
Tænder og slukker monitoren
5.2 Beskrivelse af monitorens bagside
5.3 Beskrivelse af monitorens tilslutninger
31
Page 32

Dansk
Antenne
Lyssensor
Fast objektiv
Power LED
Link LED
IR-LED
PIR-sensor
Kameraholder
Pairing-tast
Tilslutning spændingsforsyning
5 V DC/1 A
Gult chinch-stik (video)
Tilslutning til overførslen af videosignalet
Hvidt chinch-stik (audio)
Tilslutning til overførslen af audiosignalet
Jack-stik
Stik til tilslutningen til monitoren
5.4 Beskrivelse af kameraet
5.5 Beskrivelse af kabeltilslutningerne
For at kunne forbinde video-chinch-stikket med en BNC-indgang på en monitor eller optager skal BNC-RCAadapteren sættes på det gule chinch-stik.
32
Page 33

Dansk
Vigtigt:
Vær opmærksom på, at forbindelsesvarigheden kan vare indtil 60 sekunder.
Vigtigt:
Før du påbegynder installationen, skal du sikre dig, at den trådløse overførsels rækkevidde
findes på stedet for den ønskede installation.
6. Installation
6.1 Forbindelse af kameraerne og monitoren
Gå frem på følgende måde for at forbinde et kamera med monitoren:
1. Tilslut strømforsyningerne til kameraerne og monitoren.
2. Vælg det ønskede kamera (1-4) i TFT-monitorens menu “Camera Setup -> Pairing”, og bekræft valget
med OK. Systemet tæller nedad fra 60 sekunder.
3. Tryk på PAIRING-tasten på kameraets kabel i de 60 sekunder, indtil den grønne LINK LED på
forsiden af kameraet begynder at blinke.
4. Når forbindelsen er etableret, lyser LINK-LED på kameraet konstant.
6.2 Kameramontering
Vælg et egnet sted til installationen ved hjælp af kameraholderen. Tegn nu boringshullerne på underlaget,
og bor dem. Sæt de vedlagte dyvler i, og fastgør nu holderen med skruerne.
Du har mulighed for at dreje holderen 90° for at vælge en ønsket position. Løsn først skruen på siden, og
indstil den ønskede synsnvinkel. Fastgør derefter skruen for at fastgøre den ønskede position.
33
Page 34

Dansk
Vigtigt:
Anvend kun de vedlagte antenner til installationen.
Vigtigt:
Vær opmærksom på, at monitoren skal oplades i mindst 8 timer, før den anvendes første
gang uden ekstern spændingsforsyning!
Batteriets funktionstid er ca. 3,5 timer.
Skru derefter kameraet på holderen, og forbind strømforsyningen med kameraet.
6.3 Monitorinstallation
Med den indbyggede batteri har du mulighed for at anvende TFT-monitoren fleksibelt.
Når batteri-LED'en lyser rødt, skal batteriet oplades. Sørg for, at batteriet altid er tilstrækkeligt opladet, så
der sikres en optagelse uden tab.
Vip hertil foden ud, og placér monitoren på det ønskede sted.
34
Page 35

Dansk
01:12:45
2011 05 01
14:30:11
Signalvisning
Kanalvisning
Optagelsesvisning: Blinker under optagelsen
Bevægelsesgenkendelse-optagelse aktiveret
Gå frem på følgende måde for at vise monitorvisningen på endnu et visningsapparat:
1. Forbind jack-stikket med AV OUT på monitoren.
2. Tilslut jack-stikket til monitoren som på tegningen.
7. Betjening
Hold Power-tasten trykket ind i min. 2 sekunder for at slå monitoren TIL/FRA.
Efter hver start skifter monitoren til live-visningen og vælger den sidste indstillede visning.
Hvis symbolet vises, blev SD-kortet registreret rigtigt af monitoren og fungerer normalt.
7.1 Live-visning
35
Page 36

Dansk
Bevægelsesgenkendelse-alarmering aktiveret
Intet SD-kort sat i
Full SD
SD-kort fuldt
Err SD
SD-kort kan ikke registreres
SD-kort spærret
SD-kort overskrives, når kapaciteten nås
SD-kort-visning
SD-kort kapacitet
Spændingsforsyningsvisning
Kamera-lysstyrkevisning
01:12:45
Optagelsestid
2011 05 01
14:30:11
Visning af dato/klokkeslæt
Vær opmærksom på:
Symbolerne skjules automatisk efter ti sekunders visningstid.
7.2 Hovedmenu
Tryk på MENU-tasten for at åbne hovedmenuen. Med piletasterne kan du skifte mellem menupunkterne.
Du kan vælge mellem følgende punkter:
Kameraindstillinger:
Camera on/off = viser/skjuler kamera
Camera Brightness = kameraets lysstyrke
Pairing = tilføjer kamera
Resolution = opløsning
Optagelsesindstillinger:
Alarm Period = alarmens varighed ved
bevægelsesgenkendelse
Motion Detection = bevægelsesgenkendelse
SD Card Overwrite = SD-kort-ringlager
36
Page 37

Dansk
Camera on/off = viser/skjuler kamera
Anvend tasterne ◄► til at vælge et kamera.
Tryk på OK-tasten for at skifte mellem ON (TIL)
eller OFF (FRA).
Når du stiller et kamera på OFF, skjules det.
Camera brightness = kameraets lysstyrke
Vælg det ønskede kamera med tasterne ◄►,
og bekræft det med OK-tasten.
Det pågældende kamerabillede vises med en
udvalgslinje fra 0 til 9. Med tasterne ◄► kan du
ændre indstillingerne og bekræfte dem med OKtasten.
Hændelsesliste:
Optagelserne gemmes i undermapper, der betegnes efter
optagelsesdatoen.
Optagelserne gemmes som enkeltfil med optagelsestiden
som filnavn.
Systemopsætning:
Quad Display = quad-visning
Scan Period = varighed sekvensvisning
Time setting = dato-/klokkeslætindstillinger
SD Card Format = formaterer SD-kortet
Power Saving = energibesparelsesmodus
TV-Format = tv-gengivelsesopløsning
Set to factory Default = genopretter fabriksindstillingerne
System Version = monitorens og kameraernes
softwareversion
7.3 Kameraindstillinger
37
Page 38

Dansk
Pairing = tilføjer kamera
Vælg det ønskede kamera med tasterne ◄►,
og bekræft valget med OK-tasten. Systemet
tæller nu nedad fra 60 sekunder.
Tryk på PAIRING-tasten på kameraets kabel i
de 60 sekunder, indtil den grønne LINK LED på
forsiden af kameraet begynder at blinke.
Når forbindelsen er etableret, lyser LINK-LED
på kameraet konstant, og monitoren skifter
til live-visningen
Resolution = opløsning
Anvend tasterne ◄► til at vælge mellem
opløsningern 640 × 480 og 320 × 240. Bekræft
valget med OK-tasten.
Vær opmærksom på, at optagelsestiden ændres
ved de forskellige opløsninger.
Alarm Period = alarmeringens varighed ved
bevægelsesgenkendelse
Anvend tasterne ◄► til at vælge den ønskede
varighed for alarmeringen.
Du kan vælge mellem OFF/5 Sec/10
Sec/15 Sec. Bekræft valget med OK-tasten.
Alarmeringens varighed er som standard
indstillet på 5 Sec.
Tryk på en vilkårlig tast for at slå alarmtonen fra i
tilfælde af alarm.
Motion Detection =
optagelsesvarighed bevægelsesgenkendelse
Vælg optagelsesvarigheden ved
bevægelsesgenkendelse med tasterne ◄►.
Du kan vælge mellem OFF/5 Sec/10 Sec/15
Sec.
Bekræft valget med OK-tasten.
Optagelsesvarigheden er som standard indstillet
på 5 Sec.
Bevægelsesgenkendelsen er deaktiveret i 5
sekunder efter en alarm.
7.4 Optagelsesindstillinger
38
Page 39

Dansk
SD Card Overwrite = SD-kort-ringlager
Anvend tasterne ◄► til at aktivere SD-kortringlageret (ON) eller deaktivere det (OFF).
Bekræft valget ved at trykke på OK-tasten.
Ringlageret er som standard aktiveret.
Vigtigt:
Når lagerkapaciteten er nået, fortsætter
monitoren med at optage og sletter i den
forbindelse de ældste optagelser på SDkortet.
SD-kortets kapacitetsvisning blinker med 0.0
G med rødt.
Event List = hændelsesliste
Anvend piletasterne til at navigere mellem
mapperne. Tryk på OK-tasterne for at vælge den
ønskede mappe.
Vælg den pågældende optagelsesfil i
undermappen, og afspil den ved at trykke på
OK-tasten.
Tryk på tasterne ▲ eller ▼ for at spole frem eller
tilbage med trinene 2x/4x/8x/16x.
Sørg for, at den maks. optagelsesvarighed er 10
minutter ved en manuel optagelse. Ved
overskridelse oprettes der en ny fil.
Sletning af filer
Tryk på DEL-tasten for at komme til
slettemodusen.
Den aktuelle fil eller den aktuelle mappe blinker.
Med tasterne ◄► kan du vælge mellem alle
eller en fil.
Tryk på OK-tasten for at bekræfte valget.
Vælg for at slette valget.
Vælg for at afbryde sletningen.
Advarsler:
Dine registreringer er altid optaget med lyd. Du bedes have et kig på side 24 for at forhindre
dig eller andre mennesker til at navigere i en ulovlig situation. For at ændre lydstyrken ved at
se dine optegnelser kan du bruge knapperne "VOL -" for støjende eller "VOL +" for højere.
7.4 Hændelsesliste
39
Page 40

Dansk
Quad Display = quad-visning
Anvend tasterne ◄► til at slå quad-visningen til
(ON) eller fra.
For at aktivere quad-modusen skal alle
kameraer være aktiveret.
Med piletasterne kan du skifte direkte fra quadvisningen til full screen for de enkelte kameraer.
▲ = kamera 1
▼ = kamera 2
◄ = kamera 3
► = kamera 4
Vær opmærksom på, at kameraer, der er skjult,
ikke vises i quad-visningen.
Vigtigt:
Kun full screen for den udløsende kanal
optages.
For at realisere en optagelse af alle 4
kameraer ved hjælp af
bevægelsesgenkendelsen skal quadvisningen være aktiveret.
Scan Period = varighed sekvensvisning
Her kan du definere sekvensvisningens
varighed. Du kan vælge mellem værdierne
OFF/5 Sec/10 Sec/15 Sec med tasterne ◄►.
Hvis der er kameraer, som du ikke anvender,
skal du skjule dem for kun at vise de optagede
kanaler.
Tryk på tasterne CH+/CH- for at frakoble
sekvensvisningen. Tryk på REC-tasten, hvis du
ønsker at starte en manuel optagelse.
Vigtigt:
Vær opmærksom på, at
bevægelsesgenkendelsen kun er atkiveret
ved den aktuelt viste kanal.
Time Setting = dato-/ klokkeslætindstillinger
Tryk på tasten ► for at skifte mellem
år/måned/dag/timer/minutter.
Anvend tasterne ▲▼ til at tilpasse værdierne.
Bekræft indtastningen med OK-tasten.
7.5 Systemopsætning
40
Page 41

Dansk
SD Card Format = formaterer SD-kortet
Hermed kan du formatere SD-kortet. Der vises
både den aktuelt frie lagerplads (Free) og den
samlede lagerplads (Total).
Tryk på OK-tasten for at starte formateringen.
Bekræft dit valg med , vælg for at afbryde
processen.
Vigtigt:
Formatér SD-kortet før den første
anvendelse.
Power Saving = energibesparelsesmodus
Anvend tasterne ◄► til at slå
energibesparelsesmodusen til (ON) eller fra
(OFF).
Som standard er denne funktion aktiveret.
Skærmen skifter med denne funktion til standbymodus efter to minutter. Højttalerne fortsætter
med at fungere med samme lydstyrke i dette
tidsrum.
Tryk på en vilkårlig tast for at forlade
energibesparelsesmodusen.
TV-Format = tv-gengivelsesopløsning
Vælg det ønskede tv-format med tasterne ◄►.
Du kan vælge mellem NTSC og PAL. Bekræft
valget med OK-tasten.
Vær opmærksom på, at det valgte format kan
påvirke opløsningen.
Set to Factory Default =
genopretter fabriksindstillingerne
Tryk på OK-tasten for at starte
fabriksindstillingerne.
Bekræft dit valg med , vælg for at afbryde
processen.
Bemærk:
Vær opmærksom på, at SD-kortet ikke
formateres under denne proces.
41
Page 42

Dansk
System Version =
monitorens og kameraernes softwareversion
Denne funktion viser monitorens og alle
tilsluttede kameraers softwareversioner.
Vær venligst opmærksom på:
Produktet er vedligeholdelsesfrit for dig. Der er ingen dele i den indvendige del produktet,
som kræver kontrol eller vedligeholdelse. Du må aldrig åbne det (bortset fra det
akkumulatorskift, der bliver beskrevet i denne betjeningsvejledning).
Vær opmærksom på, at der ikke kommer væsker ind i apparatet
Anvend ikke kemiske rengøringsmidler, og vær sikker på at der ikke kommer vand ind i
kameraet.
Vigtigt: EU-direktiv 2002/96/EF regulerer den korrekte tilbagetagning, behandling og anvendelse af
brugte elektronikapparater. Dette symbol betyder, at med henblik på miljøbeskyttelse skal
apparatet efter sin levetid bortskaffes i overensstemmelse med de gældende lovmæssige
forskrifter og adskilt fra husholdningsaffald og erhvervsaffald. Bortskaffelsen af det brugte apparat
kan foretages på de respektive officielle tilbagetagningssteder. Følg de lokale forskrifter, når
materialerne bortskaffes. Yderligere enkeltheder om tilbagetagningen (også for lande uden for EU)
får du hos dine lokale myndigheder. Ved hjælp af den separate indsamling og recycling skånes de
naturlige ressourcer, og det sikres, at alle bestemmelser vedrørende beskyttelse af sundhed og
miljø overholdes ved recycling af produktet.
8. Vedligeholdelse og rengøring
8.1 Vedligeholdelse
Kontroller regelmæssigt produktets tekniske sikkerhed, f.eks. skader på kabinettet.
Hvis man har en formodning om, at en risikofri drift ikke længere er muligt, skal produktet sættes ud af
drift og sikres mod utilsigtet betjening. Fjern akkumulatorerne.
Det kan antages, at en risikofri drift ikke længere er mulig, når
apparatet har tydelige beskadigelser,
apparatet ikke længere fungerer
8.2 Rengøring
Rengør produktet med en ren og tør klud. Ved kraftig tilsmudsning brug en let fugtig klud med lunkent
vand.
9. Vækanskaffelse
42
Page 43

Dansk
Nr.
Spørgsmål
Svar
1
Hvad betyder det at forbinde
monitor og kamera, og
hvordan fungerer det?
Med forbindelsen etableres den eksklusive, kodede trådløse
forbindelse mellem kamera og monitor.
Gå frem på følgende måde for at forbinde et kamera med
monitoren:
1. Tilslut strømforsyningerne til kameraerne og monitoren.
2. Vælg det ønskede kamera (1-4) i TFT-monitorens menu
„Camera Setup -> Pairing“, og bekræft valget med OK.
Systemet tæller nedad fra 60 sekunder.
3. Tryk på PAIRING-tasten på kameraets kabel i de 60
sekunder, indtil den grønne LINK LED på forsiden af
kameraet begynder at blinke.
4. Når forbindelsen er etableret, lyser LINK-LED på kameraet
konstant, og monitoren skifter til live-visningen
Vær opmærksom på, at forbindelsesvarigheden kan vare indtil
60 sekunder.
2
Hvad kan være årsagerne til,
at monitoren ikke viser, men
"NO SIGNAL"?
Kontrollér følgende, hvis du ikke har et billedsignal:
1. Er kameraet tilsluttet strømnettet (lyser LED'en rødt?)
2. Er kameraet og monitoren forbundet med hinanden?
3. Er kameraet inden for monitorens rækkevidde?
4. Er der fejl ved signalet mellem kamera og monitor?
3
Hvad kan være årsagerne til,
at apparatet ikke optager?
Kontrollér følgende punkter, hvis dit apparatet ikke optager:
1. Har du sat et SD-kort i?
2. Er SD-kortet spærret? (Lock/Unlock?)
3. Har du formateret SD-kortet? Det skal formateres før det
tages i brug.
4
Hvad kan være årsagerne til,
at apparatet ikke optager ved
bevægelse?
Funktionen "bevægelsesregistrering" er evt. frakoblet. Gå til
menuen "Recorder Setup / Motion Detection / ON/OFF", og
indstil funktionen på "ON".
5
Hvad skal man gøre, hvis en
halvdel af billedet ikke vises i
natfunktionen, men forbliver
sort?
Kameraet har et integreret infrarødt drejefilter, som i mørke
sørger for, at kameraet skifter til natmodus. Hvis en del af
billedet er sort, er det muligt, at drejefilteret sidder mekanisk
fast. Det kan løsnes ved at banke let på kameraet.
6
Er en standby-modus mulig?
Du kan indstille apparatet på en energibesparelsesmodus.
Hvis kameraet registrerer en bevægelse i dette tidsrum, vises
billedet automatisk.
7
Kan lyden indstilles ved
bevægelsesregistreringen?
Ja, i menupunktet „Record Settings“ kan du frakoble
alarmtonen. Det finder du under „Alarm Period“.
8
Kan flere monitorer
anvendes samtidigt?
Nej, det er af tekniske grunde ikke muligt, da et kamera kun
kan forbindes med en monitor (kamera(er) og monitor udgør
et par).
10. Tips vedrørende fejlafhjælpning
43
Page 44

Dansk
Typenummer
TVAC15000B
Kamera
Frekvens
2,4 GHz
Modulation
GFSK
Sendeeffekt
16 dBm
Følsomhed
-82 dBm
Tv-linjer
400 TVL
Billedoptager
1/4" CMOS
Opløsning
640 × 480 pixel (VGA)
Antal IR LED'er
27 IR LED’er
Objektiv
3,6 mm
Synsvinkel
56° (H)/43° (V)
PIR-synsvinkel
60° (H)/50° (V)
PIR-rækkevidde
Maks. 5 m
Rækkevidde natsigtfunktion
Ca. 10 m
IR-drejefilter
Ja
IP-kapslingsklasse
IP66
Trådløs rækkevidde
Ca. 100 m (frit udsyn)*
Spændingsforsyning
5 V DC/1 A
Strømforbrug
Maks. 550 mA
Driftstemperatur
-10 °C–50 °C
Mål (L × B × H)
120 × 71 × 68 (uden antenne og holder)
Vægt
320 g
Typenummer
TVAC15000B
3,5" TFT-monitor
Frekvens
2,4 GHz
Modulation
GFSK
Sendeeffekt
16 dBm
Følsomhed
-82 dBm
Overførselskanaler
4
Opløsning
640 × 480 pixel (VGA)/320 × 240 pixel (QVGA)
Videosignal
1,0 V p-p, 75 ohm
Audiosignal
1,0 V p-p, 600 ohm
Lagermedium
SDHC-kort, maks. 32 GB
Udgange
3,5 mm jack (video)
Trådløs rækkevidde
Ca. 100 m (frit udsyn)*
Batteritype
Li-ion polymer batteri,
3,7 V / 1800 mAh
Batteriets funktionstid
Ca. 3,5 timer
Spændingsforsyning
5 V DC/1 A
Strømforbrug
Maks. 650 mA
Driftstemperatur
-10 °C–50 °C
Mål
130 × 90 × 27 mm
Vægt
200 g
11. Tekniske data
* Rækkevidden afhænger af omgivelsesbetingelserne (f.eks. mobiltelefonantenner,
højspændingsmaster, elektriske ledninger, lofter og vægge osv.).
Under ugunstige betingelser kan der også kun opnås mindre rækkevidder!
44
Page 45

Polski
TVAC15000B
Podręcznik użytkowania
Wersja 04/2013
Niniejszy podręcznik użytkownika zawiera ważne informacje dotyczące instalacji i obsługi.
Należy zwrócić uwagę na ten fakt przy przekazywaniu niniejszego produktu osobom trzecim.
Instrukcję obsługi należy zachować do późniejszego wglądu!
101
Page 46

Polski
Wprowadzenie
Drogi Kliencie,
Dziękujemy za zakup naszego produktu.
To urządzenie spełnia wymogi obowiązujących dyrektyw UE. Deklarację zgodności można otrzymać pod
adresem:
ABUS Security-Center GmbH & Co. KG
Linker Kreuthweg 5
86444 Affing
GERMANY
Aby utrzymać ten stan i zapewnić bezpieczną obsługę urządzenia, użytkownik musi postępować zgodnie
z niniejszą instrukcją obsługi!
Przed pierwszym uruchomieniem należy przeczytać całą instrukcję zwracając uwagę na wskazówki
dotyczące obsługi urządzenia i bezpieczeństwa.
Wszystkie nazwy firm i produktów wymienione w niniejszym dokumencie są zastrzeżonymi znakami
firmowymi.
Wszelkie prawa zastrzeżone.
W przypadku jakichkolwiek pytań, prosimy o kontakt z instalatorem lub lokalnym dealerem!
Ostrzeżenia
Kto bez upoważnienia nagrywa teksty wypowiedziane niepublicznie przez inną osobę na nośniku audio,
używa wykonanych w ten sposób nagrań lub udostępnia je osobom trzecim, podlega karze pozbawienia
wolności lub grzywny!
Sankcjom karnym podlega także ten, kto bez upoważnienia podsłuchuje za pomocą aparatu
podsłuchowego nie przeznaczone do jego wiadomości teksty, wypowiedziane niepublicznie przez inną
osobę lub udostępnia osobom trzecim taką nagraną lub upublicznia podsłuchaną odpowiedź, w pełnym
brzmieniu lub istotną treść tej niepublicznej wypowiedzi.
Wyłączenie odpowiedzialności
Niniejszy podręcznik użytkownika został przygotowany z najwyższą starannością. W przypadku
stwierdzenia jakichkolwiek pominięć lub nieścisłości, prosimy o poinformowanie nas o nich korzystając
z adresu podanego na odwrocie niniejszego podręcznika.
ABUS Security-Center GmbH nie ponosi żadnej odpowiedzialności za błędy techniczne i drukarskie
i zastrzega sobie prawo do wprowadzania w każdej chwili zmian w produkcie lub w podręczniku
użytkownika bez uprzedniego powiadomienia.
Firma nie jest odpowiedzialna za uszkodzenia, bezpośrednie i pośrednie, spowodowane niewłaściwym
działaniem lub złym użytkowaniem sprzętu.Nie udziela się żadnej gwarancji dla treści niniejszego
dokumentu.
45
Page 47

Polski
Błyskawica w trójkącie wskazuje na zagrożenie zdrowia, np. poprzez porażenie prądem.
Znak wykrzyknika w trójkącie wskazuje na ważną informację w niniejszym podręczniku
użytkownika, na którą trzeba zwrócić uwagę.
Ten symbol znajduje się przy wskazówkach i informacjach związanych z obsługą.
Gwarancja wygasa w przypadku uszkodzeń spowodowanych nieprzestrzeganiem
niniejszej instrukcji obsługi. Firma ABUS nie ponosi odpowiedzialności za jakiekolwiek
straty poniesione na skutek nieprzestrzegania instrukcji!
Firma ABUS nie odpowiada za szkody majątkowe lub uszkodzenia ciała spowodowane
nieodpowiednią obsługą lub nieprzestrzeganiem przepisów bezpieczeństwa.
W takich przypadkach gwarancja wygasa.
Objaśnienie symboli
Ważne porady bezpieczeństwa
Urządzenie zostało wyprodukowane zgodnie z międzynarodowymi standardami bezpieczeństwa. Prosimy o
uważne przeczytanie poniższych wskazówek dotyczących bezpieczeństwa.
Porady bezpieczeństwa
1. Źródło zasilania
100–240 V AC, 50–60 Hz (wtyczka zasilacza sieciowego 5 V DC)
Niniejszy produkt może być zasilany wyłącznie typem zasilania wskazanym na etykiecie. W przypadku
wątpliwości co do rodzaju zasilania doprowadzanego do domu należy skontaktować się z lokalną firmą
dostarczającą prąd. Należy odłączyć produkt od sieci przed przystąpieniem do konserwacji lub instalacji.
2. Przeciążenie
Nie wolno dopuścić do przeciążenia gniazdka ściennego, przedłużacza ani złącza, ponieważ może to
doprowadzić do oparzenia lub porażenia prądem elektrycznym.
3. Ciecze
Należy chronić urządzenie przed przedostaniem się jakiejkolwiek cieczy.
4. Czyszczenie
Należy odłączyć produkt od gniazdka ściennego przed przystąpieniem do czyszczenia. Należy używać
wilgotnej szmatki (bez rozpuszczalnika) do starcia kurzu z produktu.
5. Akcesoria
Nie należy używać żadnych nieobsługiwanych akcesoriów, ponieważ mogą być one niebezpieczne lub
powodować uszkodzenia produktu.
6. Położenie
Urządzenie może być stosowane wewnątrz i na zewnątrz.
Produkt ulegnie uszkodzeniu nawet jeśli spadnie z niskiej wysokości.
Podczas instalacji kamery należy upewnić się, że światło słoneczne nie pada bezpośrednio na
czujnik obrazu urządzenia. Prosimy postępować zgodnie z instrukcją instalacji w odpowiednim
rozdziale niniejszego podręcznika użytkownika.
Nie należy umieszczać urządzenia w pobliżu grzejników czy kratek nawiewu ciepłego powietrza.
Urządzenie należy ustawiać wyłącznie w miejscach o zalecanych temperaturach pracy
wynoszących -10° ~ 50°C.
46
Page 48

Polski
Podczas instalacji w istniejącym systemie monitoringu należy upewnić się, że wszystkie
urządzenia są odłączone od obwodu niskiego napięcia i obwodu napięcia zasilania.
W razie wątpliwości należy pozwolić profesjonalnemu elektrykowi zamontować, zainstalować i
okablować urządzenie. Niewłaściwe podpięcie do sieci stanowi zagrożenie dla użytkownika i
innych osób.
Należy okablować cały system upewniając się, że sieć zasilająca i obwód niskiego napięcia
pozostaną rozdzielone i nie zetkną się ze sobą przy normalnym użytkowaniu lub w wyniku
awarii.
W przypadku zauważenia jakiegokolwiek uszkodzenia oryginalnego opakowania, prosimy
najpierw sprawdzić urządzenie.
Jeżeli urządzenie jest uszkodzone, prosimy o kontakt z lokalnym dealerem.
7. Bezprzewodowa transmisja danych
Zasięg działania bezprzewodowej transmisji danych zależy od różnych czynników środowiskowych.
Warunki lokalne w miejscu instalacji mogą mieć negatywny wpływ na zasięg. Dlatego też, jeżeli istnieje
bezpośrednia widoczność pomiędzy nadajnikiem a odbiornikiem, zasięg może wynosić 200 m, natomiast
w budynkach zdecydowanie mniej.
Następujące czynniki środowiskowe pogarszają zarówno zasięg, jak i szybkość klatek: maszty telefonii
komórkowej, słupy wysokiego napięcia, linie energetyczne, sufit i ściany, urządzenia o tej samej lub
podobnej częstotliwości radiowej.
Ostrzeżenia
Przed uruchomieniem urządzenia należy postępować zgodnie z zaleceniami dotyczącymi bezpieczeństwa
i obsługi!
1. W celu uniknięcia uszkodzeń przewodu zasilającego lub wtyczki należy postępować zgodnie
z następującymi wskazówkami:
Nie wolno dowolnie modyfikować ani przerabiać przewodu zasilającego ani wtyczki.
Przewód zasilający należy odłączać trzymając za wtyczkę.
Urządzenia grzewcze należy przechowywać jak najdalej od przewodu zasilającego aby
zapobiec stopieniu się warstwy winylowej.
Zasilacz kamery zewnętrznej musi być chroniony przed wilgocią.
2. Należy postępować zgodnie z poniższymi wskazówkami. Nieprzestrzeganie którejkolwiek z nich może
spowodować porażenie prądem:
Nie należy otwierać głównej obudowy ani zasilacza.
Nie należy wkładać metalowych lub łatwopalnych przedmiotów do produktu.
W celu uniknięcia uszkodzeń podczas burzy z piorunami należy stosować ochronę
przeciwprzepięciową.
3. Nie należy używać produktu kiedy jest niesprawny. W przypadku kontynuowania korzystania z wadliwego
produktu, można doprowadzić do jego poważnego uszkodzenia. Należy skontaktować się z lokalnym
dystrybutorem produktu jeżeli produkt jest niesprawny.
Należy unikać korzystania z urządzenia w następujących niesprzyjających warunkach otoczenia:
wilgoć lub nadmierna wilgotność powietrza
ekstremalnie niska lub wysoka temperatura
bezpośrednie światło słoneczne
kurz lub gazy palne, opary lub rozpuszczalniki
silne wibracje
silne pola magnetyczne, jak np. w pobliżu maszyn i urządzeń lub głośników
kamera nie może być skierowana w stronę słońca, ponieważ może to zniszczyć czujnik
kamera nie może być instalowana na niestabilnych powierzchniach
Rozpakowywanie
Prosimy o najwyższą ostrożność podczas rozpakowywania urządzenia.
47
Page 49

Polski
Spis treści
1. Przeznaczenie ....................................................................................................................................... 49
2. Zakres dostawy..................................................................................................................................... 49
3. Właściwości i funkcje .......................................................................................................................... 49
4. Wskazówki i często zadawane ............................................................................................................ 49
5. Opis urządzenia .................................................................................................................................... 50
5.1 Przód monitora ............................................................................................................................. 50
5.2 Tył monitora .................................................................................................................................. 50
5.3 Złącza monitora ............................................................................................................................ 51
5.4 Opis kamery ................................................................................................................................. 52
5.5 Złącza kablowe ............................................................................................................................. 52
6. Instalacja ............................................................................................................................................... 53
6.1 Łączenie kamery z monitorem ..................................................................................................... 53
6.2 Instalowanie kamery .................................................................................................................... 53
6.3 Instalowanie monitora .................................................................................................................. 54
7. Obsługa ................................................................................................................................................. 55
7.1 Podgląd na żywo .......................................................................................................................... 55
7.2 Menu główne ................................................................................................................................ 55
7.3 Ustawienia kamery ....................................................................................................................... 56
7.4 Ustawienia nagrywania ................................................................................................................ 57
7.5 Lista zarejestrowanych zdarzeń ................................................................................................... 58
7.6 Ustawienia systemu ..................................................................................................................... 59
8. Konserwacja i czyszczenie .................................................................................................................. 61
8.1 Konserwacja ................................................................................................................................. 61
8.2 Czyszczenie ................................................................................................................................. 61
9. Pozbywanie się produktu .................................................................................................................... 61
10. Wskazówki dotyczące usuwania błędów ........................................................................................... 62
11. Dane techniczne ................................................................................................................................... 63
48
Page 50

Polski
monitor 3,5" TFT
1 bezprzewodowa kamera zewnętrzna IR
2,4 GHz, w tym materiał do montażu
i instalacji kamery
karta 4 GB SD
2 zasilacze, w tym EU,
złącza AU i UK
5 V DC/1 A
kabel AV
1 antena
1. Przeznaczenie
Monitor 2,4 GHz i bezprzewodowa kamera zewnętrzna IR z czujnikiem PIR mogą być używane do łatwej
bezprzewodowej transmisji danych i wyświetlania sygnałów wideo, począwszy od średnich aż do dalekich
odległości.
Bezprzewodowa transmisja sygnału jest nieoceniona wszędzie tam, gdzie nie można położyć kabli:
kamera ta przekazuje sygnał wideo do bezprzewodowego monitora bez konieczności użycia przewodów.
Dzięki konwersji na sygnały cyfrowe można uniknąć zakłóceń.
Gdy tylko czujnik PIR wychwyci ruch, kamera rozpoczyna zapis na karcie SD. Istnieje możliwość
podłączenia aż 4 kamer (TVAC15010B) do monitora i obserwowania czterech obrazów.
Szczegółowy opis funkcji można znaleźć w rozdziale 3 (“Opis i funkcje”).
2. Zakres dostawy
3. Właściwości i funkcje
Kompletny zestaw składa się z monitora 3,5" TFT oraz bezprzewodowej kamery zewnętrznej IR, 2,4
GHz
Kompaktowa kamera zewnętrzna IP66 o rozdzielczości 400 TVL z oświetlaczem podczerwieni dla
pracy w warunkach nocnych
Kolorowy wyświetlacz 3,5" TFT z wbudowanym głośnikiem
Cyfrowo kodowany przekaz audio-wideo
Intuicyjne OSD (menu na ekranie)
4. Wskazówki i często zadawane
Ważne wskazówki i często zadawane pytania dotyczące tego produktu, jak również innych produktów
znaleźć można na stronie internetowej www.abus.com/plug-and-play. Informacje dotyczące usuwania
błędów znajdują się w punkcie 10 niniejszej instrukcji.
49
Page 51

Polski
Wyświetlacz stanu baterii
Wskazuje poziom naładowania baterii
Czerwony: Niski stan baterii
Zielony: Ładowanie
Nie świeci: Bateria w pełni naładowana
Dioda zasilania LED
Wyświetlanie stanu urządzenia
Niebieski: Urządzenie włączone
Nie świeci: Urządzenie wyłączone
▲
CH +
Podgląd na żywo: zmiana kanału
W menu: zmiana pozycji menu
◄
Vol-
Podgląd na żywo: zmniejszenie głośności
W menu: zmiana pozycji menu
►
Vol+
Podgląd na żywo: zwiększenie głośności
W menu: zmiana pozycji menu
CH -
▼
Podgląd na żywo: zmiana kanału
W menu: zmiana pozycji menu
Przycisk OK
Podgląd na żywo: otwieranie listy zarejestrowanych zdarzeń
W menu: zatwierdzanie ustawień i zmian
Rec/Del
Podgląd na żywo: rozpoczęcie/zatrzymanie nagrywania
W menu: usunięcie nagrania
Możliwe tylko z kartą SD!
Menu/ESC
Podgląd na żywo: otwarcie/wyjście z menu
W menu: wyjście z podmenu
System automatycznie wychodzi z menu po czasie
oczekiwania wynoszącym jedną minutę.
5. Opis urządzenia
9B5.1 Przód monitora
10B
50
Page 52

Polski
Antena
Statyw
Źródło zasilania
5 V DC/1 A (DC, 14,5x4,8 mm)
Wyjście AV
Wyjście do podłączenia monitora, należy użyć dostarczonego
kabla AV
Miejsce na kartę SD
Miejsce na włożenie karty SD o pojemności do 32 GB
Wyłącznik zasilania
Włączanie i wyłączanie monitora
5.2 Tył monitora
11B5.3 Złącza monitora
12B
51
Page 53

Polski
Antena
Czujnik światła
Obiektyw stały
Power LED
LINK LED
IR LED
Czujnik PIR
Uchwyt mocowania kamery
Przycisk Pairing (Parowanie)
Złącze dla źródła zasilania
5 V DC/1 A
Żółta wtyczka RCA (wideo)
Złącze do przekazu sygnału wideo
Biała wtyczka RCA (audio)
Złącze do przekazu sygnału audio
Wtyczka typu jack
Należy podłączyć do monitora
5.4 Opis kamery
13B5.5 Złącza kablowe
Aby podłączyć wtyczkę wideo RCA do wejścia BNC na monitorze lub rejestratorze, należy przyłączyć
złącze BNC-RCA do żółtej wtyczki RCA.
52
Page 54

Polski
Ostrzeżenie:
Prosimy pamiętać, że proces podłączenia może trwać do 60 sekund.
Ostrzeżenie:
Przed rozpoczęciem instalacji należy upewnić się, że w wybranej lokalizacji bezprzewodowa
transmisja danych ma zasięg.
6. Instalacja
14B6.1 Łączenie kamery z monitorem
Aby podłączyć kamerę do monitora należy postępować w następujący sposób:
1. Należy podłączyć zasilacz do kamer i monitora
2. W menu “Camera Setup -> Pairing” monitora TFT należy wybrać kamerę, z której chcemy korzystać
(1-4) i zatwierdzić wybór przyciskając OK. System uruchomi 60-sekundowe odliczanie.
3. W ciągu tych 60 sekund należy wcisnąć i trzymać przycisk PAIRING na kablu kamery do momentu aż
zielona dioda LINK LED z przodu kamery zacznie migać.
4. Przy właściwym połączeniu dioda LINK LED świeci nieprzerwanie, a monitor przechodzi w tryb
podglądu na żywo.
15B6.2 Instalowanie kamery
Należy wybrać odpowiednie miejsce instalacji kamery za pomocą uchwytu. Należy zaznaczyć na
podstawie otwory do wywiercenia i wstępnie je wywiercić, a następnie włożyć dostarczone kołki rozporowe
i przymocować uchwyt wkrętami.
Można teraz obracać uchwyt do kąta 90° w celu ustawienia go w pożądanej pozycji. Należy poluzować
śrubę z boku i ustawić uchwyt pod żądanym kątem. Następnie należy dokręcić śrubę.
53
Page 55

Polski
Ostrzeżenie:
Do instalacji należy używać wyłącznie dostarczonej anteny.
Ostrzeżenie:
Należy pamiętać aby przed pierwszym użyciem BEZ zewnętrznego źródła zasilania dokonać
ładowania baterii monitora co najmniej przez 8 godzin.
Czas pracy na baterii wynosi ok. 3,5 godziny.
Następnie należy przykręcić kamerę do uchwytu oraz połączyć zasilacz z kamerą.
16B6.3 Instalowanie monitora
Zainstalowana bateria daje możliwość swobodnego korzystania z monitora TFT w każdej sytuacji.
Kiedy dioda LED baterii zaświeci się na czwerwono oznacza to, że bateria wymaga ładowania. Należy
upewnić się, że bateria jest zawsze wystarczająco naładowana, aby zagwarantować nagrywanie bez
utraty jakości.
Do użycia, należy rozłożyć podstawę i umieścić monitor w pożądanym miejscu.
54
Page 56

Polski
01:12:45
2011 05 01
14:30:11
Wyświetlacz siły sygnału
Wyświetlacz numeru kanału
Wyświetlacz nagrywania: miga podczas nagrywania
Nagrywanie z detekcją ruchu włączone
UAby wyświetlić obraz z monitora na innym urządzeniu, należy postępować następująco:
1. Podłączyć wtyczkę typu jack do wyjścia AV OUT monitora.
2. Podłączyć wtyczkę RCA do monitora, tak jak pokazano na rysunku.
7. Obsługa
Aby włączyć/wyłączyć monitor, należy nacisnąć i trzymać przycisk zasilania przez co najmniej 2 sekundy.
Przy każdym uruchomieniu monitor przełącza się w tryb podglądu na żywo i wybiera ostatni widok, jaki
został ustawiony.
Jeżeli wyświetla się ikona , znaczy to, że monitor poprawnie odczytał kartę SD i pracuje normalnie.
17B7.1 Podgląd na żywo
55
Page 57

Polski
Alarm z detekcją ruchu włączony
Brak karty SD
Full SD
Karta SD pełna
Err SD
Nie rozpoznano karty SD
Zablokowana karta SD
Po zapełnieniu karty SD dane na niej zostają nadpisane
Wyświetlacz karty SD
Pojemność karty SD
Wyświetlacz zasilania
Wyświetlacz jasności kamery
01:12:45
Czas nagrywania
2011 05 01
14:30:11
Wyświetlacz daty/czasu
Uwaga:
Ikony znikają automatycznie po dziesięciu sekundach wyświetlania.
18B7.2 Menu główne
Należy wcisnąć MENU aby otworzyć menu główne. Można używać przycisków ze strzałkami do zmian
pozycji menu.
Można wybrać spośród następujących funkcji:
Ustawienia kamery:
Camera on/off = pokazywanie/ukrywanie kamery
Camera Brightness = jasność kamery
Pairing = dodawanie kamery
Resolution = rozdzielczość obrazu
Ustawienia rejestratora:
Alarm Period = czas trwania alarmu w przypadku wykrycia
ruchu
Motion Detection = wykrywanie ruchu
SD Card Overwrite = bufor cykliczny karty SD
55
Page 58

Polski
Camera on/off = pokazywanie/ukrywanie kamery
Należy używać przycisków ◄► do wyboru
kamery. Należy nacisnąć OK, aby przełączać
pozycje pomiędzy ON i OFF.
W przypadku ustawienia kamery w pozycji OFF,
nie będzie ona dłużej widoczna.
Camera Brightness = jasność kamery
Należy używać przycisków◄► do wybierania
żądanej kamery i zatwierdzić przyciskając OK.
Na pasku wyboru widoczny jest obrazek
odpowiedniej kamery z opcjami 0-9. Należy
używać przycisków ◄► do zmiany ustawień i
zatwierdzić przyciskając OK.
Lista zarejestrowanych zdarzeń:
Nagrania są przechowywane w podfolderach, których nazwy
pochodzą od daty nagrania.
Nagrania są przechowywane w postaci pojedynczych plików,
których nazwa pochodzi od czasu nagrania.
Ustawienia systemu:
Quad Display = widok poczwórny
Scan Period = wyświetlacz czasu przełączania sekwencji
Time setting = ustawienia daty/czasu
SD Card Format = formatowanie karty SD
Power Saving = tryb oszczędzania energii
TV-Format = rozdzielczość wyjścia TV
Set to factory Default = przywracanie domyślnych ustawień
fabrycznych
System Version = wersja oprogramowania monitora i kamery
19B7.3 Ustawienia kamery
56
Page 59

Polski
Alarm Period =
czas trwania alarmu w przypadku wykrycia ruchu
Należy używać przycisków ◄► do wyboru
żądanego czasu trwania alarmu.
Można wybrać spośród OFF/5 sec/10 sec/15
sec. Należy zatwierdzić wybraną opcję
przyciskając OK.
Czas trwania alarmu jest domyślnie ustawiony
na 5 sekund.
Należy wcisnąć jakikolwiek przycisk, aby
wyłączyć uruchomiony alarm.
Motion Detection =
czas nagrywania z detekcją ruchu
Należy używać przycisków ◄► do wyboru
czasu nagrywania z detekcją ruchu.
Można wybrać spośród OFF/5 sec/10 sec/15
sec.
Należy zatwierdzić wejście przyciskając OK.
Czas nagrywania jest domyślnie ustawiony na 5
sekund.
Funkcja detekcji ruchu jest dezaktywowana na 5
sekund po alarmie.
Pairing = dodawanie kamery
Należy używać przycisków◄► do wybierania
żądanej kamery i zatwierdzić przyciskając OK.
System uruchamia 60-sekundowe odliczanie.
W ciągu tych 60 sekund należy wcisnąć i
trzymać przycisk PAIRING na kablu kamery do
momentu aż zielona dioda LINK LED z przodu
kamery zacznie migać.
Kiedy uda się połączyć, dioda LINK LED na
kamerze świeci się nieprzerwanie, a monitor
przełącza się w tryb podglądu na żywo.
Resolution = rozdzielczość obrazu
Należy używać przycisków ◄► do wyboru
rozdzielczości między
640x480 a 320x240. Należy zatwierdzić wejście
przyciskając OK.
Należy pamiętać, że czas nagrywania zmienia
się w zależności od rozdzielczości.
20B7.4 Ustawienia nagrywania
57
Page 60

Polski
SD Card Overwrite = bufor cykliczny karty SD
Należy używać przycisków ◄► do włączania
(ON) lub wyłączania (OFF) bufora cyklicznego
karty SD.
Należy zatwierdzić wybraną opcję przyciskając
OK.
Bufor cykliczny jest domyślnie włączony.
Ostrzeżenie:
Kiedy pamięć zapełni się, monitor
kontynuuje nagrywanie, usuwając najstarsze
nagrania na karcie SD.
Wyświetlacz pojemności karty SD miga na
czerwono pokazując wartość 0.0 G.
Event List = lista zarejestrowanych zdarzeń
Należy używać przycisków ze strzałkami do
nawigacji między folderami. Należy wcisnąć OK,
aby wybrać żądany folder.
W podfolderze należy wybrać stosowny plik
nagrania i odtworzyć go przyciskając OK.
Należy nacisnąć ▲ lub ▼, aby przewinąć do
przodu lub do tyłu z prędkością 2×/4×/8×/16×.
Należy zauważyć, że maksymalny czas
nagrywania dla nagrywania ręcznego wynosi 10
minut. Po tym czasie tworzony jest nowy plik.
Usuwanie plików
Należy wcisnąć przycisk DEL, aby wejść w tryb
usuwania.
Bieżący plik lub folder miga. Można używać
przycisków ◄► do wyboru wszystkich lub
pojedynczego pliku.
Należy wcisnąć OK, aby zatwierdzić wybór.
Należy wybrać , aby usunąć wybór.
Aby anulować usuwanie, należy wybrać .
Porady bezpieczeństwa :
Twoje rekordy są zawsze rejestrowane z dźwiękiem. Proszę rzucić okiem na stronie 44 dla
uniemożliwić lub inne osoby do poruszania się w sytuacji sprzecznej z prawem. Aby zmienić
głośność, wyświetlając rekordy użyj przycisków "Vol-" dla ciszej lub "Vol +" dla głośniej.
21B7.5 Lista zarejestrowanych zdarzeń
58
Page 61

Polski
Quad Display = widok poczwórny
Należy używać przycisków ◄► w celu
włączenia (ON) lub wyłączenia (off) widoku
Quad (podział na ekranu na cztery części).
Aby uruchomić tryb Quad, wszystkie kamery
muszą być włączone.
W trybie widoku Quad można używać
przycisków ze strzałkami do przełączenia
bezpośrednio na widok pełnoekranowy dla
poszczególnych kamer.
▲ = kamera1;
▼ = kamera2;
◄ = kamera3;
► = kamera4
Należy pamiętać, że ukryte kamery nie są
pokazywane w widoku Quad.
Ostrzeżenie:
Nagrywany jest tylko obraz kanału
wyświetlanego. Aby nagrywać obrazy ze
wszystkich 4 kamer wykorzystując funkcję
wykrywania ruchu, funkcja widoku Quad
musi być włączona.
Scan Period = wyświetlacz czasu przełączania
sekwencji
Tutaj można zdefiniować wyświetlacz czasu
przełączania sekwencji. Należy używać
przycisków ◄► do wyboru pomiędzy OFF/5
sec/10 sec/15 sec.
W przypadku niekorzystania z kamer należy je
ukryć, aby wyświetlany był wyłącznie używany
kanał.
Aby wyłączyć wyświetlanie sekwencji, należy
wcisnąć przycisk CH+/CH. Chcąc rozpocząć
ręczne nagrywanie, należy wcisnąć przycisk
REC.
Ostrzeżenie:
Należy pamiętać, że funkcja detekcji ruchu
jest aktywowana wyłącznie dla obecnie
wyświetlanego kanału.
Time Setting = ustawienia daty/czasu
Należy wcisnąć przycisk ►, aby wybrać
rok/miesiąc/dzień/godziny/minuty.
Należy używać przycisków ▲▼ do zmiany
wartości. Należy zatwierdzić wejście
przyciskając OK.
7.6 Ustawienia systemu
59
Page 62

Polski
SD Card Format = formatowanie karty SD
Można używać tej funkcji do formatowania karty
SD. System wyświetla obecnie dostępną pamięć
(Free) oraz całkowitą pamięć (Total).
Należy wcisnąć OK, aby rozpocząć
formatowanie. Aby zatwierdzić wybór, należy
wcisnąć , a żeby anulować operację, należy
wcisnąć .
Ostrzeżenie:
Kartę SD przed użyciem jej po raz pierwszy
należy sformatować.
Power Saving = tryb oszczędzania energii
Należy używać przycisków ◄► w celu
włączenia (ON) lub wyłączenia (OFF) trybu
oszczędzania energii.
Funkcja ta jest domyślnie włączona.
Funkcja ta przełącza ekran w tryb czuwania po
dwóch minutach. Głośniki w dalszym ciągu
pracują na takim samym poziomie głośności.
Należy wcisnąć jakikolwiek przycisk, aby wyjść z
trybu oszczędzania energii.
TV-Format = rozdzielczość wyjścia TV
Należy używać przycisków ◄► do wyboru
żądanego formatu TV.
Można wybrać między NTSC a PAL. Należy
zatwierdzić wejście przyciskając OK.
Należy zauważyć, że wybrany format może
wpływać na rozdzielczość.
Set to Factory Default = przywracanie
domyślnych ustawień fabrycznych
Należy nacisnąć OK, aby przywrócić ustawienia
fabryczne.
Aby zatwierdzić wybór, należy nacisnąć , a
żeby anulować operację, należy nacisnąć .
Uwaga:
Należy pamiętać, że ta operacja nie
powoduje sformatowania karty SD.
60
Page 63

Polski
System Version =
wersja oprogramowania monitora i kamery
Funkcja ta pokazuje wersje oprogramowania
monitora i wszystkich podłączonych kamer.
Uwaga:
Niniejszy produkt nie wymaga konserwacji. Wewnątrz produktu nie ma części, które można
sprawdzić albo naprawić, więc nigdy nie należy go otwierać.
Należy upewnić się, że żadne płyny nie przedostają się do urządzenia, gdyż może ono wtedy
ulec zniszczeniu. Nigdy nie należy stosować chemicznych środków czyszczących, ponieważ
mogłyby uszkodzić powierzchnię urządzenia.
Uwaga: Dyrektywa UE 2002/96/WE reguluje kwestię prawidłowego wycofania z użycia i utylizacji
urządzeń elektronicznych oraz obchodzenia się z nimi. Ten symbol oznacza, że w związku ochroną
środowiska urządzenie należy zutylizować po okresie jego żywotności zgodnie z obowiązującymi
przepisami prawnymi, w separacji od odpadów z gospodarstw domowych oraz odpadów
przemysłowych. Utylizacja może być przeprowadzona przez autoryzowane punkty zbiorcze w kraju
użytkownika. Przestrzegaj lokalnych przepisów w zakresie utylizacji materiałów. Dalsze informacje
dotyczące wycofania z użytku (obejmujące również kraje spoza UE) można uzyskać od organów
administracji lokalnej. Selektywna zbiórka i recykling umożliwiają oszczędność zasobów
naturalnych, a sam recykling, o ile jest realizowany zgodnie z przepisami, zapewnia ochronę
zdrowia i środowiska.
8. Konserwacja i czyszczenie
23B8.1 Konserwacja
Należy regularnie kontrolować stan fizyczny produktu, np. sprawdzać, czy nie ma uszkodzeń obudowy.
Jeżeli powstanie obawa, że nie można zagwarantować bezpiecznego działania urządzenia, należy
odłączyć produkt i uniemożliwić jego przypadkowe włączenie.
Można przyjąć, że bezpieczne działanie urządzenia jest niemożliwe, gdy:
na urządzeniu widoczne są uszkodzenia,
urządzenie przestało funkcjonować
24B8.2 Czyszczenie
Produkt należy przecierać czystą, suchą szmatką. Jeżeli urządzenie jest bardzo brudne, można zwilżyć
szmatkę zanurzająć ją w letniej wodzie.
9. Pozbywanie się produktu
61
Page 64

Polski
Nr.
Pytania
Odpowiedź
1
Co oznacza sparowanie
monitora i kamery i jak to
działa?
W wyniku sparowania tworzone jest wyłączne, zaszyfrowane
połączenie radiowe pomiędzy kamerą i monitorem.
Aby podłączyć kamerę do monitora, należy wykonać
następujące czynności:
1. Podłącz zasilacze sieciowe do kamer i monitora.
2. Wybierz w menu monitora TFT „Camera Setup -> Pairing“
żądaną kamerę (1-4) i potwierdź wybór przyciskiem OK.
System zacznie odliczać od 60 sekund do 0 sekund.
3. Podczas tych 60 sekund naciskaj przycisk PAIRING
znajdujący się na kablu kamery do momentu, aż zielona
dioda LED stanu łącza z przodu kamery zacznie migać.
4. W przypadku nawiązania połączenia dioda LED stanu
łącza kamery świeci w sposób ciągły i na monitorze widok
zmienia się na obraz na monitorze widok zmienia się na
zywo.
Należy pamiętać, że nawiązywanie połączenia może trwać do
60 sekund.
2
Co może być przyczyną
tego, że na monitorze nie
pojawia się żaden obraz, a
jedynie komunikat "NO
SIGNAL"?
W przypadku braku sygnału obrazu należy sprawdzić co
następuje:
1. Czy kamera jest podłączona do sieci elektrycznej (czy
dioda LED świeci światłem czerwonym)?
2. Czy kamera i monitor są ze sobą sparowane?
3. Czy kamera znajduje się w zasiegu radiowym monitora?
4. Czy sygnał pomiędzy kamerą i monitorem jest zakłócony?
3
Co może być przyczyną
niezapisywania danych przez
urządzenie?
Jeśli urządzenie nie zapisuje danych, należy sprawdzić
poniższe punkty:
1. Czy włożono kartę SD?
2. Czy karta micro SD jest odblokowana? (Lock/Unlock?)
3. Czy sformatowano kartę SD? Kartę SD należy
sformatować przed użyciem po raz pierwszy.
4
Co może być przyczyną nie
rejestrowania ruchu przez
urządzenie?
Być może funkcja "wykrywania ruchu" jest wyłączona. Przejdź
do menu "Recorder Setup / Motion Detection / ON/OFF" i
ustaw funkcję na "ON".
5
Co należy zrobić, gdy nie
wyświetla się połowa obrazu
w trybie nocnym, lecz
pozostaje czarny ekran.
Kamera ma wbudowany filtr światła IR, który w ciemności
zapewnia przełączenie się kamery na tryb nocny. Jeśli część
obrazu jest czarna możliwe, że nastąpiło mechaniczne
zawieszenie filtra światła IR . Problem ten można rozwiązać
poprzez lekkie puknięcie w kamerę.
6
Czy możliwy jest tryb
czuwania?
Urządzenie można przełączyć na tryb oszczędzania energii.
Jeśli w tym czasie kamera zarejestruje ruch, automatycznie
pojawi się obraz.
7
Czy można regulować dźwięk
przy wykrywaniu ruchu?
Tak. W opcji menu „Record Settings“ można wyłączyć dźwięk
alarmu. Można go znaleźć pod opcją „Alarm Period“.
8
Czy można używać
równocześnie kilku
monitorów monitorze
TVAC15000B?
Nie. Jest to niemożliwe z przyczyn technicznych, ponieważ
jedna kamera może być sparowana tylko bezpośrednio z
jednym monitorem TVAC15000. Kamera /kamery i monitor
tworzą zamknięty system.
10. Wskazówki dotyczące usuwania błędów
62
Page 65

Polski
Numer modelu
TVAC15000B
Kamera
Częstotliwość
2,4 GHz
Modulacja
GFSK
Moc transmisji
16 dBm
Czułość
-82 dBm
Linie TV
400 TVL
Czujnik obrazu
1/4" CMOS
Rozdzielczość
640×480 pikseli (VGA)
Liczba diod IR LED
27 diod IR LED
Obiektyw
3,6 mm
Kąt widzenia
56° (H)/43° (V)
Kąt widzenia czujnika PIR
60° (H)/50° (V)
Zasięg czujnika PIR
Maks. 5 m
Zasięg działania oświetlacza
podczerwieni
ok. 10 m
Obrotowy filtr IR
Tak
Klasa ochrony IP
IP66
Zasięg łączności
bezprzewodowej
ok. 100 m (brak przeszkód)*
Źródło zasilania
5 V DC/1 A
Pobór mocy
Maks. 550 mA
Temperatura pracy
-10 °C–50 °C
Wymiary (D × S × W)
120 × 71 × 68 (bez anteny i uchwytu)
Waga
320 g
Numer modelu
TVAC15000B
monitor 3,5" TFT
Częstotliwość
2,4 GHz
Modulacja
GFSK
Moc transmisji
16 dBm
Czułość
-82 dBm
Kabel przesyłowy
4
Rozdzielczość
640×480 pikseli (VGA)/320×240 pikseli (QVGA)
Sygnał wideo
1.0 V p-p, 75 Ohm
Sygnał audio
1.0 V p-p, 600 Ohm
Nośnik danych
Karta SDHC, maks. 32 GB
Wyjścia
Gniazdo jack 3,5 mm (wideo)
Zasięg łączności bezprzewodowej
ok. 100 m (brak przeszkód)*
Typ baterii
Bateria polimerowa Li-ion,
3,7 V / 1800 mAh
Czas pracy na baterii
ok. 3,5 godziny
Źródło zasilania
5 V DC/1 A
Pobór mocy
Maks. 650 mA
Temperatura pracy
-10 °C–50 °C
Wymiary
130×90×27 mm
Waga
200 g
11. Dane techniczne
* Zasięg zależy od warunków otoczenia (np. maszty telefonii komórkowej, słupy wysokiego napięcia, linie
energetyczne, sufit i ściany, itd.).
W niesprzyjających warunkach zasięg może być znacznie ograniczony.
63
Page 66

Espanol
TVAC15000B
Versión 04/2013
Manual del
usuario
Manual del usuario original en Español.
Guardar para uso posterior.
64
Page 67

Espanol
Introducción
Estimado cliente,
Gracias por comprar este producto.
Este aparato cumple los requisitos establecidos en las directivas vigentes de la UE. Si desea solicitar la
declaración de conformidad, diríjase a:
ABUS Security-Center GmbH & Co. KG
Linker Kreuthweg 5
86444 Affing
GERMANY
Para conservar el producto en buen estado y garantizar un funcionamiento sin problemas, los usuarios
deben seguir estas instrucciones de operación.
Antes de poner en marcha el aparato se deben leer completamente estas instrucciones de
funcionamiento y seguir las instrucciones de operación y seguridad.
Todos los nombres de la empresa y de los productos mencionados en este documento
son marcas registradas. Todos los derechos reservados.
Para cualquier aclaración, ponerse en contacto con el instalador o distribuidor local.
Advertencia conforme al artículo 201 del Código Penal Alemán
La grabación no autorizada de conversaciones privadas o el uso no autorizado de tales grabaciones o su
entrega a terceras personas se puede sancionar con la privación de libertad o con una multa. Igualmente se
puede sancionar a quien escuche de forma no autorizada conversaciones privadas no destinadas a sus
oídos con un aparato de escuchas o a quien divulgue públicamente grabaciones no autorizadas o el
contenido de conversaciones interceptadas.
Limitación de responsabilidad
Este manual de usuario se ha elaborado con el mayor esmero. Agradeceremos el envío de cualquier
omisión o inexactitud detectada a la dirección que se especifica en el anverso del manual.
ABUS Security-Center GmbH declina toda responsabilidad por errores técnicos y tipográficos y se reserva
el derecho de introducir en cualquier momento modificaciones en el producto o en el manual sin previo
aviso. La empresa declina toda responsabilidad por daños y perjuicios directos o indirectos producidos en
relación con el equipo, funcionamiento y uso de este producto.
No se garantiza el contenido de este documento.
65
Page 68

Espanol
Un rayo en el triángulo indica que hay peligro para la salud, Ej. sacudida eléctrica .
Un signo de exclamación en el triángulo indica que se debe tener en cuenta un aviso
importante de este manual.
Este símbolo indica que se dan consejos e información sobre el funcionamiento.
La garantía quedará anulada en caso de daños debidos al no cumplimiento de
estas instrucciones de operación. ABUS declina toda responsabilidad por daños
indirectos.
ABUS declina toda responsabilidad por daños a la propiedad o lesiones personales
causados por un manejo incorrecto o el no cumplimiento con las instrucciones de
seguridad.
En estos casos queda anulada la garantía.
Aclaración de iconos
Aviso importante de seguridad
El aparato ha sido fabricado siguiendo normas de seguridad internacionales.
Leer detenidamente estas recomendaciones de seguridad.
Recomendaciones de seguridad
1. Alimentación de corriente
100–240 V AC, 50–60 Hz (con adaptador de 5 V CC)
El producto solamente debe funcionar con el tipo de corriente que se indica en la etiqueta de
características. Si no se tiene seguridad sobre el tipo de corriente de la casa, se debe consultar con la
empresa eléctrica. Desconectar el producto de la red antes de llevar a cabo cualquier mantenimiento o
procedimiento de montaje.
2. Sobrecarga
No sobrecargar nunca un enchufe, prolongador o adaptador ya que podría provocar un incendio o
sacudida eléctrica .
3. Líquidos
Proteger el aparato de la entrada de líquidos.
4. Limpieza
Desconectar el aparato del enchufe antes de limpiarlo. Utilizar un paño ligeramente húmedo (sin
disolventes) para quitar el polvo.
5. Accesorios
No utilizar nunca accesorios sin soporte ya que puede acarrear peligros o causar daños en el producto.
6. Situación
Este aparato se puede usar tanto en interiores como en exteriores. El producto puede dañarse incluso
por caída desde muy poca altura. Durante el montaje de la cámara se debe tener cuidado de no
exponer el sensor de imagen del aparato directamente al sol. Se deben seguir las instrucciones de
montaje del capítulo correspondiente del manual. No colocar el aparato cerca de radiadores o fuentes
de calor. Montar el aparato solamente en lugares con las temperaturas recomendadas de -10° ~ 50°C.
66
Page 69

Espanol
Durante la instalación en un sistema de vigilancia existente, asegurarse de desconectar todos
los aparatos de la red y del circuito de baja tensión.
En case de duda, llamar a un electricista profesional para el montaje, instalación y cableado
del aparato. Una inadecuada conexión eléctrica a la red no solo representa un peligro
individual sino también para otras personas.
Cablear todo el sistema asegurándose de que los circuitos de red y de baja tensión
permanecen separados, sin contacto mutuo, en funcionamiento normal o durante averías.
7. Transmisión inalámbrica
El alcance de la transmisión inalámbrica depende de varios factores del entorno. Las condiciones
locales del lugar de la instalación pueden tener un impacto negativo sobre el alcance. Por esta razón, si
existe una línea de visión clara entre el receptor y el transmisor, el alcance puede llegar hasta 200 m,
pero en edificios, es significativamente inferior.
Los siguientes factores del entorno afectan tanto al alcance como a la frecuencia de imagen:
Mástiles de telefonía móvil, torres de alta tensión, líneas de transmisión eléctrica, techos y paredes,
aparatos con la misma o similar radiofrecuencia.
Advertencia
Antes de poner en marcha el aparato se deben seguir las siguientes recomendaciones de seguridad y
operación
1. Seguir estas instrucciones para evitar dañar el cable de alimentación o la clavija:
No modificar de forma arbitraria el cable de alimentación o la clavija.
Asegurarse de desconectar el cable de alimentación sujetándolo por la clavija.
Mantener el cable de alimentación alejado de aparatos de calefacción para evitar el
ablandamiento del revestimiento vinílico.
La fuente de alimentación de las cámaras exteriores debe protegerse contra la humedad y las
mojaduras.
2. Seguir estas instrucciones. El no cumplimento de cualquiera de ellas puede acarrear sacudidas
eléctricas :
No abrir nunca la cámara o la fuente de alimentación.
No introducir nunca objetos metálicos o inflamables en el aparato.
Para evitar daños producidos por tormentas, utilizar protección contra sobretensiones.
3. No utilizar el aparato cuando no funcione correctamente. Si se sigue utilizando el aparato en estas
condiciones, se pueden producir daños irreparables. En caso de funcionamiento incorrecto, ponerse
en contacto con el distribuidor.
Evitar el uso del aparato en condiciones ambientales desfavorables, como son:
Ambientes escesivamente húmedos
extremado frío o calor
exposición directa al sol
polvo o gases, vapores o disolventes combustibles
fuerte vibración
campos magnéticos intensos, como los que existen en la proximidad de máquinas o altavoces
la cámara no debe ser expuesta al sol por peligro de destrucción del sensor.
la cámara no debe montarse sobre superficies inestables
Desembalado
Durante el desembalado, manejar el aparato con sumo cuidado.
Si se detecta cualquier daño en el embalaje original, comprobar inmediatamente el
aparato. Si éste presenta daños, ponerse en contacto con el distribuidor.
67
Page 70

Espanol
Índice
1. Uso previsto .......................................................................................................................................... 69
2. Alcance de suministro ......................................................................................................................... 69
3. Características y funciones ................................................................................................................. 69
4. Indicaciones y FAQs ............................................................................................................................ 69
5. Descripción del aparato ....................................................................................................................... 70
5.1 Parte frontal de la pantalla ........................................................................................................... 70
5.2 Parte posterior de la pantalla ....................................................................................................... 71
5.3 Conexiones de pantalla ................................................................................................................ 71
5.4 Descripción de la cámara ............................................................................................................. 72
5.5 Cables de conexión ...................................................................................................................... 72
6. Instalación ............................................................................................................................................. 73
6.1 Emparejamiento de cámara y pantalla ......................................................................................... 73
6.2 Instalación de la cámara .............................................................................................................. 73
6.3 Instalación de la pantalla .............................................................................................................. 74
7. Operación .............................................................................................................................................. 75
7.1 Imagen en vivo ............................................................................................................................. 75
7.2 Menú principal .............................................................................................................................. 76
7.3 Configuración cámara .................................................................................................................. 77
7.4 Configuración de grabación ......................................................................................................... 78
7.5 Listado de sucesos ....................................................................................................................... 79
8. Mantenimiento y limpieza .................................................................................................................... 82
8.1 Mantenimiento .............................................................................................................................. 82
8.2 Limpieza ....................................................................................................................................... 82
9. Eliminación ........................................................................................................................................... 82
10. Consejos para la solución de averías ................................................................................................ 83
11. Datos técnicos ...................................................................................................................................... 84
68
Page 71

Espanol
Pantalla TFT de 3,5
Cámara IR inalámbrica para exteriores, de
2,4 GHz, incluyendo soporte y material de
instalación
Tarjeta SD de 4 GB
2 fuentes de alimentación 5 V CC/1 A
incluyendo adaptadores EU, AU y RU
Cable AV
1 antena
1. Uso previsto
Esta pantalla inalámbrica de 2,4 GHz y la cámara IR inalámbrica para exteriores con detector PIR se
utilizan para la transmisión inalámbrica y visualización de señales de vídeo a media o larga distancia.
La transmisión inalámbrica de señales es una ventaja en lugares donde no sea posible tender
cableados: La cámara transmite la señal de vídeo a la pantalla inalámbrica sin necesidad de cables. Se
evitan fallos e interferencias por medio de la conversión a señales digitales.
Cuando el sensor PIR de la cámara detecta movimiento, comienza a grabar en la tarjeta SD. Se pueden
conectar hasta 4 cámaras (TVAC15010B) a la pantalla con presentación de cuatro imágenes.
En el capítulo 3 se da una descripción detallada del funcionamiento (“Descripción y funcionamiento”).
2. Alcance de suministro
3. Características y funciones
Un juego completo consta de una pantalla TFT de 3,5" y una cámara IR inalámbrica para exteriores de
2,4 GHz
Cámara compacta para exteriores IP66 con visión nocturna por infrarrojos y resolución de 400 TVL
Pantalla TFT de 3,5" con altavoz integrado
Transmisión digital encriptada de audio y vídeo
Cómodo menú en pantalla, OSD
4. Indicaciones y FAQs
En la página de Internet www.abus.com/plug-and-play encontrará indicaciones importantes y FAQs sobre
éste y muchos otros productos. En el punto 10 de estas instrucciones encontrará información para
solucionar averías.
69
Page 72

Espanol
Estado de la batería
Muestra la carga de la batería
Rojo: Batería baja
Verde: Carga
Apagado: Batería cargada
LED de encendido
Muestra el estado del aparato
Azul: Aparato conectado
Apagado: Aparato desconectado
▲
CH +
Imagen: cambio de canal
Menú: cambio de opciones del menú
◄
Vol+
Imagen: aumenta el volumen
Menú: cambio de opciones del menú
►
Vol-
Imagen: reduce el volumen
Menú: cambio de opciones del menú
CH -
▼
Imagen: cambio de canal
Menú: cambio de opciones del menú
Tecla OK
Imagen: apertura de listado de sucesos
Menú: confirmación de ajustes y cambios
Rec/Del
Imagen: comenzar/detener grabación
Menú: eliminar grabación solamente posible con tarjeta SD
Menu/ESC
Imagen: abrir/cerrar menú
Menú: salir del submenú
El sistema sale del menú automáticamente después de un minuto de
espera.
5. Descripción del aparato
5.1 Parte frontal de la pantalla
70
Page 73

Espanol
Antena
Pie rebatible
Alimentación
5 V CC/1 A (CC, 14,5 × 4,8 mm)
Salida AV
Salida para presentación de la imagen de la pantalla, utilizar el
cable AV suministrado
Ranura tarjeta SD
Ranura para tarjeta SD de hasta 32 GB
Interruptor
Interruptor de encendido / apagado de pantalla
5.2 Parte posterior de la pantalla
5.3 Conexiones de pantalla
71
Page 74

Espanol
Clavija RCA amarilla (vídeo)
Conexión para la transmisión de la señal de vídeo
Clavija RCA blanca (audio)
Conexión para la transmisión de la señal de audio
Clavija jack
Clavija para conectar a la pantalla
Antena
Sensor de luz
Lente fija
LED de encendido
LED de enlace
LED IR
Sensor PIR
Soporte de la cámara
Botón de emparejamiento
Alimentación
5 V CC/1 A
5.4 Descripción de la cámara
5.5 Cables de conexión
Para conectar una clavija RCA de vídeo a una entrada BNC de pantalla o grabador, unir el adaptador BNCRCA a la clavija RCA amarilla.
72
Page 75

Espanol
6. Instalación
6.1 Emparejamiento de cámara y pantalla
Para conectar una cámara a la pantalla, proceder como sigue:
1. Conectar la fuente de alimentación a las cámaras y a la pantalla.
2. En el menú de la pantalla TFT “Cámara Setup -> Pairing” seleccionar la cámara requerida (1–
4) y confirmar la elección con OK. Los sistemas comienzan una cuenta atrás de 60 segundos.
3. Dentro de los 60 segundos, pulsar el botón de emparejamiento del cable de la cámara hasta que el
LED de enlace verde del frente de la cámara comience a parpadear
4. Una vez realizada la conexión, el LED de enlace permanece encendido.
Advertencia:
Téngase en cuenta que la conexión puede tardar hasta 60 segundos.
6.2 Instalación de la cámara
.
Elegir un lugar adecuado para instalar la cámara utilizando el soporte de la misma. Marcar los agujeros de
anclaje de la base y efectuar los taladros. Introducir los tacos de pared suministrados y colocar el soporte
por medio de los tornillos.
Advertencia:
Antes de comenzar el montaje, comprobar el alcance de la transmisión inalámbrica.
Ahora se puede girar el soporte hasta 90º para situarlo en la posición requerida. Aflojar el tornillo lateral y
ajustar el ángulo de visión. A continuación, apretar el tornillo para fijar la posición.
73
Page 76

Espanol
A continuación, atornillar la cámara en el soporte y conectar la fuente de alimentación a la cámara.
Advertencia:
Utilizar solamente la antena suministrada para la instalación.
6.3 Instalación de la pantalla
Las baterías instaladas contribuyen a flexibilizar la utilización de la pantalla TFT.
Cuando se enciende el LED rojo de la batería, se debe cargar. Asegurarse de que la batería tenga
siempre carga suficiente para garantizar que no se pierda grabación.
Advertencia:
Téngase en cuenta que la pantalla se debe cargar por lo menos durante 8 horas antes
de utilizarla por primera vez sin fuente de alimentación externa.
La duración de la batería es de aproximadamente 3,5 horas.
Para esto, desplegar el pie abatible y situar la pantalla en la posición deseada.
74
Page 77

Espanol
Indicador de señal
Indicador de canal
Indicador de grabación: parpadea durante la grabación
Grabación por detección de movimiento activada
Para visualizar la imagen de la pantalla en otro aparato, proceder de la forma siguiente:
1. Conectar la clavija jack a la salida AV OUT de la pantalla.
2. Conectar la clavija RCA a la pantalla como se muestra en la figura.
7. Operación
Para conectar / desconectar la pantalla, mantener pulsado el botón de conexión durante más de 2
segundos.
En cada arranque, la pantalla cambia a imagen en vivo y selecciona la última imagen establecida.
Si se muestra el icono , la pantalla ha identificado correctamente la tarjeta SD y funciona
normalmente.
7.1 Imagen en vivo
01:12:45 2011 05 01
14:30:11
75
Page 78

Espanol
Alarma de detección de movimiento activada
Full SD
Err SD
No hay tarjeta SD
Tarjeta SD llena
Tarjeta SD no identificada
Tarjeta SD bloqueada
Sobreescritura de la tarjeta SD al alcanzar capacidad máxima
Indicador de tarjeta SD
Capacidad de tarjeta SD
Indicador de fuente de alimentación eléctrica
Indicador de brillo de cámara
01:12:45
Tiempo de grabación
2011 05 01
14:30:11
Indicador de Fecha / Hora
Observación:
Los iconos desaparecen automáticamente después de diez segundos de exposición.
7.2 Menú principal
Pulsar MENU para abrir el menú principal. Se pueden utilizar las flechas para elegir elementos del menú.
Se pueden elegir los siguientes elementos:
Configuración Cámara:
Cámara on/off = mostrar/ocultar cámara
Brillo Cámara = brillo de la cámara
Emparejamiento = añadir cámara
Resolución = resolución de imagen
Configuración Grabador:
Duración Alarma = duración de la alarma al detectar
movimiento
Detección Movimiento = detección de movimiento
Sobreescritura de Tarjeta SD = Búfer circular de tarjeta SD
76
Page 79

Espanol
Cámara on/off = mostrar / ocultar cámara
Utilizar los botones ◄► para seleccionar una
cámara. Pulsar OK para cambiar entre ON y OFF.
Si se pone la cámara en OFF, no se
muestra.
Brillo Cámara= brillo de la cámara
Utilizar los botones ◄► para seleccionar la
cámara deseada y confirmar la elección
con OK. La imagen de la cámara pertinente
se muestra por medio de una barra de
selección con las opciones
0–9. Se pueden utilizar los botones ◄► para
cambiar el ajuste y confirmar con OK.
7.3 Configuración cámara
Listado de sucesos:
Las grabaciones se guardan en subcarpetas con el nombre
de la fecha de grabación.
Las grabaciones se guardan como archivos individuales con
el nombre de la hora de grabación.
Configuración del sistema:
Presentación Cuádruple = cuatro vistas
Intervalo secuenciador = tiempo de permanencia para
presentaciones secuenciales
Configuración de Fecha/Hora= Ajustes de Fecha/Hora
Formato de Tarjeta SD = formato de tarjeta SD
Ahorro de Energía = modo de ahorro de energía
Formato TV = resolución de salida de TV
Configuración por defecto de fábrica = resetear a
valores de fábrica
Versión Sistema= versión del software de pantalla y
cámara
77
Page 80

Espanol
Emparejamiento= añadir cámara
Utilizar los botones ◄► para seleccionar la
cámara deseada y confirmar la elección con
OK. Los sistemas comienzan una cuenta
atrás de 60 segundos. En los 60 segundos,
pulsar el botón de EMPAREJAMIENTO del
cable de la cámara hasta que el LED verde
de ENLACE del frente de la cámara comience
a parpadear. Una vez establecida la
conexión, el LED de ENLACE de la cámara
queda encendido y la pantalla cambia a
imagen en vivo.
Resolución= resolución de la imagen
Utilizar los botones ◄► para cambiar
entre resoluciones de 640 × 480 y 320 ×
240. Confirmar selección con OK.
Téngase en cuenta que el tiempo de
grabación cambia para las diferentes
resoluciones.
Duración Alarma = Duración de la alarma
cuando se detecta movimiento
Utilizar los botones ◄► para seleccionar la
duración de alarma deseada.
Se puede elegir entre OFF / 5 seg / 10 seg /
15 seg. Confirmar selección con OK.
La duración de la alarma está
configurada en 5 segundos por defecto.
Pulsar cualquier botón para apagar la alarma.
Detección Movimiento = Tiempo de
grabación por detección de movimiento
Utilizar los botones ◄► para seleccionar
el tiempo de grabación por detección de
movimiento.
Se puede elegir entre OFF / 5 seg / 10 seg /
15 seg.
Confirmar selección con OK.
El tiempo de grabación está configurado en
5 segundos por defecto.
La detección de movimiento se desactiva
durante 5 segundos después de una
alarma.
7.4 Configuración de grabación
78
Page 81

Espanol
Listado Sucesos = listado de sucesos
Utilizar los botones con flechas para
navegar entre carpetas. Pulsar el botón OK
para seleccionar la carpeta deseada.
En la subcarpeta, elegir el archivo de grabación
pertinente y reproducir pulsando OK.
Pulsar ▲ o ▼ para avance o rebobinado
rápido a velocidad 2× / 4× / 8× / 16×.
Téngase en cuenta que el tiempo máximo de
grabación para grabación manual es de 10
minutos. Una vez acabado este tiempo, se crea
un nuevo archivo.
Eliminación de archivos
Pulsar DEL para ir al modo de eliminación.
El archivo o carpeta actual parpadea. Se
pueden utilizar los botones ◄► para
seleccionar todos o un archivo.
Pulsar OK para confirmar selección.
Pulsar para eliminar la selección. Pulsar
para cancelar la eliminación.
Precaución:
Sus disparos son siempre grabados con audio, tenga en cuenta no la cláusula en la
página 64 o de otras personas para llevar una posición ilegal. Para cambiar el volumen
durante la reproducción, utilice los botones "Vol -" para disminuir el volumen o "Vol +" de
alto.
Sobreescritura Tarjeta SD = búfer
circular de tarjeta SD
7.5 Listado de sucesos
Utilizar los botones ◄► para activar (ON) o
desactivar (OFF) el búfer circular de la
tarjeta SD. Confirmar selección con OK.
El búfer circular está activado por defecto.
Advertencia:
Al alcanzar la capacidad de la memoria, la
pantalla sigue grabando, eliminando las
grabaciones más antiguas de la tarjeta SD.
La ventana de capacidad de la tarjeta SD
parpadea con 0.0 G en rojo.
79
Page 82

Espanol
Presentación Cuádruple = cuatro pantallas
Utilizar los botones ◄► para cambiar la
presentación cuádruple entre on (ON) y off.
Para activar la presentación cuádruple, todas
las cámaras tiene que estar activadas.
En presentación cuádruple, se pueden utilizar
los botones con flechas para cambiar
directamente a pantalla completa las cámaras
individuales.
▲ = cámara1;
▼ = cámara2;
◄ = cámara3;
► = cámara4
Téngase en cuenta que las cámaras ocultas
no se muestran en la presentación cuádruple.
Advertencia:
Solamente se graba la pantalla completa del
canal activado. Para grabar las 4 cámaras
utilizando detección de movimiento, debe
estar activada la presentación cuádruple.
Intervalo Secuenciador = tiempo de
permanencia para presentaciones secuenciales
Aquí, se puede definir el tiempo de
permanencia para presentaciones
secuenciales. Utilizar los botones ◄► Para
seleccionar entre OFF / 5 seg / 10 seg / 15
seg.
Ocultar las cámaras que no se utilizan para
mostrar solamente el canal ocupado.
Para desconectar la presentación secuencial,
pulsar el botón CH+/CH. Si se desea comenzar la
grabación manual, pulsar REC.
Advertencia:
Téngase en cuenta que la detección de
movimiento está solamente activada para el
canal mostrado en ese momento.
Configuración Fecha/Hora = ajustes de Fecha /
Hora
Pulsar el botón ► para cambiar entre
año / mes / día / hora / minutos.
Utilizar los botones ▲▼ para cambiar los
valores. Confirmar selección con OK.
7.6 Configuración del sistema
80
Page 83

Espanol
Formateo Tarjeta SD = formateo de la tarjeta SD
Se puede utilizar para formatear la tarjeta SD.
El sistema muestra la memoria actualmente
disponible (Libre) y la memoria total (Total).
Pulsar OK para comenzar a formatear.
Confirmar la selección con __
y cancelar la operación con __.
Advertencia:
Formatear la tarjeta SD antes de utilizarla
por primera vez.
Ahorro Energía = modo ahorro de energía
Utilizar los botones ◄► para cambiar el
modo ahorro entre ON y OFF.
Esta función está activada por defecto.
Esta función hace pasar la pantalla a modo
de espera después de dos minutos. Los
altavoces siguen funcionando al mismo
volumen.
Pulsar cualquier botón para salir del modo ahorro.
Formato TV = resolución de salida de TV
Utilizar los botones ◄► para seleccionar el
formato deseado de TV.
Se puede elegir entre NTSC y PAL.
Confirmar la selección con OK.
Téngase en cuenta que el formato
seleccionado puede afectar a la resolución.
Configuración de Fábrica por Defecto= resetear a
valores por defecto de fábrica
Pulsar OK para comenzar con los ajustes de
fábrica.
Confirmar la selección con __ y anular la
operación con __ .
Téngase en cuenta que esta operación no
formatea la tarjeta SD.
81
Page 84

Espanol
Atención: La directiva UE 2002/96/CE regula la recogida, tratamiento y reciclaje de los aparatos
electrónicos al finalizar su vida útil. Este símbolo significa que, para proteger el medio ambiente, al final de
su vida útil el aparato debe eliminarse conforme a las normas establecidas en la ley, separado de la
basura doméstica y de la basura industrial. La eliminación del aparato usado se puede realizar a través de
distintos puntos de recogida oficiales disponibles en su país. Siga las normas locales relativas a la gestión
de materiales. El ayuntamiento de su localidad le podrá ofrecer otros detalles relativos a la recogida
(también en los países no miembros de la UE). La separación y reciclaje de materiales protegen los
recursos naturales y garantizan que durante el reciclaje del producto se respeten todas las disposiciones
relativas a la protección de la salud y el medio ambiente.
Versión Sistema=
Versión del software de la pantalla y la cámara
Esta función muestra las versiones del software
de la pantalla y todas las cámaras conectadas.
8. Mantenimiento y limpieza
8.1 Mantenimiento
Comprobar periódicamente el estado del aparato, Ej. comprobar daños externos.
Si hay indicios suficientes como para no poder garantizar un funcionamiento sin problemas, desconectar
el aparato y asegurarse de que no se utiliza por error.
Se puede asumir que el funcionamiento no es seguro cuando
el aparato presenta daños externos,
el aparato no funciona
Téngase en cuenta que:
El aparato no necesita mantenimiento. Nunca se debe abrir, puesto que no hay piezas que
deban ser inspeccionadas ni reparadas en su interior.
8.2 Limpieza
Limpiar el aparato con un paño limpio y seco. Si está muy sucio, se puede humedecer el paño
con agua tibia.
Asegurarse de que no entren líquidos en el interior ya que el aparato puede resultar
inservible. No utilizar nunca productos químicos que pueden atacar las superficies del
aparato.
9. Eliminación
82
Page 85

Espanol
N.°
Pregunta
Respuesta
1
¿Qué significa “emparejar” el
monitor y la cámara y cómo
funciona?
A través del emparejamiento se establece una comunicación
por radio cifrada y exclusiva entre la cámara y el monitor.
Para conectar una cámara a un monitor proceda como sigue:
1. Conecte las fuentes de alimentación a la cámara y al
monitor.
2. Seleccione en el menú del monitor TFT “Camera Setup ->
Pairing” la cámara que desee (1-4) y confirme la selección
con OK. El sistema comienza una cuenta atrás de 60
segundos.
3. Durante los 60 segundos pulse la tecla PAIRING en el
cable de la cámara hasta que el LED verde DE
CONEXIÓN en la parte delantera de la cámara empiece a
parpadear.
4. Cuando la conexión se establece con éxito, se ilumina el
LED DE CONEXIÓN de la cámara de forma permanente y
el monitor cambia a la vista en directo.
Tenga en cuenta que la conexión puede tardar hasta 60
segundos en establecerse.
2
¿Cuál podría ser la causa
cuando el monitor muestra
“NO SIGNAL” en vez de la
imagen?
Compruebe lo siguiente si no hay ninguna señal de imagen:
1. ¿La cámara está conectada a la red eléctrica (LED rojo
encendido)?
2. ¿Están emparejadas entre sí la cámara y el monitor?
3. ¿La cámara está dentro del alcance del monitor?
4. ¿La señal entre la cámara y el monitor está averiada?
3
¿Cuáles pueden ser los
motivos por los que el
aparato no graba?
Compruebe los siguientes puntos si su aparato no graba:
1. ¿Ha introducido una tarjeta SD?
2. ¿La tarjeta SD está bloqueada? (Lock/Unlock?)
3. ¿Ha formateado la tarjeta SD? Ésta debe formatearse
antes de usarla por primera vez.
4
¿Cuáles pueden ser las
causas para que el aparato
no grabe en caso de detectar
movimiento?
La función “Detección de movimiento” está posiblemente
desconectada. Vaya al menú “Recorder Setup / Motion
Detection / ON/OFF” y ponga la función en “ON”.
5
¿Qué debo hacer si la mitad
de la imagen no se muestra
durante el funcionamiento
por la noche, sino que
aparece en negro?
La cámara dispone de un filtro oscilante de infrarrojos
integrado que conecta el modo nocturno en la cámara cuando
se detecta oscuridad. Si una parte de la imagen aparece en
negro, es posible que el filtro oscilante haya quedado
bloqueado. Esto puede solucionarse golpeando suavemente la
cámara.
6
¿Es posible un
funcionamiento en stand-by?
El aparato puede funcionar en modo de ahorro de energía. Si
la cámara detecta algún movimiento durante este periodo de
tiempo, la imagen se mostrará de inmediato.
7
¿Puede ajustarse el sonido
durante la detección de
movimiento?
Sí. En el punto de menú “Record Settings” puede ajustar el
sonido de alarma. Éste lo encontrará en “Alarm Period”.
8
¿Pueden utilizarse varios
monitores al mismo tiempo?
No. Esto no es posible por motivos técnicos ya que la cámara
solo puede emparejarse directamente con un monitor (la/s
cámara/s y el monitor forman una pareja).
10. Consejos para la solución de averías
83
Page 86

Espanol
Número de modelo
Cámara
TVAC15000B
Frecuencia
2,4 GHz
Modulación
GFSK
Potencia de transmisión
16 dBm
Sensibilidad
-82 dBm
Líneas de TV
400 TVL
Sensor de imagen
1/4" CMOS
Resolución
640 × 480 píxeles (VGA)
No. de LEDs IR
27 LEDs IR
Lente
3,6 mm
Ángulo de visión
56° (H)/43° (V)
Ángulo de visión PIR
60° (H)/50° (V)
Rango PIR
Máx. 5 m
Rango en visión nocturna
aprox. 10 m
Filtro IR giratorio
Sí
Clase protección IP
IP66
Alcance inalámbrico
aprox. 100 m (línea visión clara)*
Alimentación eléctrica
5 V CC/1 A
Consumo eléctrico
Máx. 550 mA
Temperatura funcionamiento
-10 °C–50 °C
Dimensiones
120 × 71 × 68 (sin antena ni soporte)
Peso
320 g
Número de modelo
TVAC15000B
Pantalla TFT de 3.5"
Frecuencia
2,4 GHz
Modulación
GFSK
Potencia de transmisión
16 dBm
Sensibilidad
-82 dBm
Cable de transmisión
4
Resolución
640 × 480 píxeles (VGA)/320 × 240 píxeles (QVGA)
Señal de vídeo
1,0 V p-p, 75 Ohm
Señal de audio
1,0 V p-p, 600 Ohm
Medio de almacenamiento
Tarjeta SDHC, máx. 32 GB
Salidas
Jack 3,5 mm (vídeo)
Alcance inalámbrico
aprox. 100 m (línea visión clara)*
Tipo de batería
Batería de polímero de Li,
3,7 V/1.250 mA
Vida de batería
aprox. 3,5 horas
Alimentación eléctrica
5 V CC/1 A
Consumo eléctrico
Máx. 650 mA
Temperatura de funcionamiento
-10 °C–50 °C
Dimensiones
130 × 90 × 27 mm
Peso
200 g
11. Datos técnicos
* El alcance depende de las condiciones del entorno (Ej. mástiles de telefonía móvil, torres metálicas
de alta tensión, líneas de transmisión eléctrica, techos y paredes, etc.).
Si las condiciones son desfavorables, el alcance puede estar muy restringido.
84
Page 87

Imprint
These operating instructions are published by ABUS Security-Center GmbH & Co.KG, Linker
Kreuthweg 5, 86444 Affing, Germany. No reproduction (including translation) is permitted in whole or
part e.g. photocopy, microfilming or storage in electronic data processing equipment, without the
express written consent of the publisher.
The operating instructions reflect the current technical specifications at the time of print.
We reserve the right to change the technical or physical specifications.
Redaktionel note
Denne betjeningsvejledning er publiceret af ABUS Security-Center GmbH & Co. KG, Linker
Kreuthweg 5, 86444 Affing, Germany. Der må ikke foretages kopiering, inklusive oversættelser,
fotokopierng, mikrofilms optagelse af proces udstyr uden forudgående tilladelse fra udgiveren.
Denne brugervejledning reflekterer de kendte til dato tekniske specifikationer. Vi forbeholder os retten
til at ændre frit og uden forudgående advisering.
Nota redakcyjna
Niniejsza instrukcja obsługi jest publikacją ABUS Security-Center GmbH & Co. KG, Linker Kreuthweg
5, 86444 Affing. Wszystkie prawa, także do tłumaczenia, zastrzeżone. Reprodukcje wszelkiego
rodzaju, np. fotokopia mikrofilm oraz zapis w elektronicznych systemach przetwarzania danych
wymagają pisemnej zgody wydawcy. Przedruk, także we fragmentach, zabroniony.
Niniejsza instrukcja obsługi odzwierciedla stan faktyczny w dacie złożenia do druku.
Zmiany techniczne i zmiany wyposażenia zastrzeżone
E Pie de imprenta
Este manual es una publicación de la Seguridad ABUS-Center GmbH & Co. KG, enlazador
Kreuthweg 5, 86444 Affing. Todos los derechos reservados, incluyendo traducciones. Queda
prohibida la reproducción, por ejemplo, Fotocopia, microfilm, o en los datos de los equipos
electrónicos de procesamiento, sin la autorización por escrito de la editorial. No puede ser
reproducido en cualquier forma. Este derecho para cambiar el estado de la técnica de la impresión.
Los cambios en la tecnología y el equipo.
© Copyright 04/2013 by ABUS Security-Center
101
 Loading...