

Page 1
7010 / 7025 / 7030 / 7035
(7010 + 7025)
Tür-Zusatzschloss Additional door lock
Bitte lesen Sie diese Anleitung vor der
Montage und Inbetriebnahme sorgfältig
durch. Bewahren Sie die Anleitung auf
und weisen Sie jeden Nutzer auf die Bedienung des Produktes hin.
Inhalt
1. Einsatzbereich und wichtige Hinweise
2. Lieferumfang
3. Montagewerkzeug
4. Montage
5. Bedienung
6. Gewährleistung
1.
Einsatzbereich und wichtige
Hinweise
Das Tür-Zusatzschloss eignet sich für nach
innen önende einügelige Falz– und
Stumpüren, DIN-rechts und DIN-links
angeschlagen, für Türstärken von 38
bis 90 mm und Falzstärken von 0 bis 29
mm. Montiert wird das Tür-Zusatzschloss
innen zur Sicherung der Griseite. Bei
stabilen Türen ist die Montageposition
entweder unter– oder oberhalb des
Einsteckschlosses (Abb. 1). Bei weniger
stabilen Türen oder bei erhöhten
Sicherheitsanforderungen empfehlen
wir die Montage von zwei Stück. Es wird
dann eines unter– und eines oberhalb des
Einsteckschlosses montiert.
Der Schließkasten muss auf festem,
stabilem Untergrund befestigt werden.
Bitte auf bequeme Bedienung achten.
Um den Außenzylinder zusätzlich gegen
Manipulationen zu schützen, empfehlen
wir den Einsatz der ABUS Panzerplatte
PZS70. Das in Abb. 1 genannte ABUS Produkt
TAS zur Sicherung der Scharnierseite ist im
Handel erhältlich.
Die Tür-Zusatzschlösser 7010 und 7025
mit VdS Anerkennung sind unter der
Nummer M 110346 VdS registriert. Die VdSAnerkennung gilt nur mit der Verwendung
eines VdS-Klasse Home oder höher
anerkanntem Türzylinder.
Vor der Montage prüfen Sie bitte die
Einstellung der Tür. Stellen Sie sicher,
dass sich die Tür einwandfrei önen
und schließen lässt. Die Bohrlochtiefen
bzw. Schraubenlängen müssen auf die
örtlichen Gegebenheiten abgestimmt
werden. Austreten des Bohrers bzw. der
Schrauben auf der Rückseite vermeiden!
Ggf. mit Bohranschlag arbeiten oder die
vorhandenen Schrauben kürzen.
Symbolerklärung
Please read this guide carefully before installation and use. Keep these instructions
and provide all users with instruction on
how to use it.
Content
1.
Possible uses and important information
2. Scope of delivery
3. Tools re quired
4. Installation instructions
5. Operation
6. Warranty
Possible uses and important
1.
information
The additional door lock is suitable for
single rebated and non-rebated le hand
doors and right hand doors that open
inwards, for door thicknesses of between
38 and 90 mm and folded thicknesses of
between 0 and 29 mm. The additional
door lock is mounted inside to secure
the handle side. With sturdy doors the
tting position is either below or above
the mortise lock (g. 1). With less sturdy
doors or if higher standards of security are
required we recommend that you t two
units, i.e. one below and one above the
mortise lock.
The striking plate must be xed on a
stable surface. Make sure that it is easy to
operate. In order to additionally protect
the rim cylinder against manipulation,
we recommend the use of ABUS armoured
plate PZS70. The ABUS product TAS
mentioned in Fig. 1 for securing the hinge
side is available from retail stores.
Additional door locks 7010 and 7025 which
are VdS approved are registered under VdS
number M 110346. VdS approval applies
only to the use of a VdS Class Home or
higher certied door cylinder.
Before installation, please check the
setting of the door. If necessary, readjust
the ttings so that the door opens and
closes perfectly. The depths of the drilled
holes and screw lenghts must be adjusted
to the local conditions. Avoid the drill
or screws from coming out at the back!
Possibly work with drill stopper or shorten
existing screws.
Icon explanation
Verrou de porte supplémentaire
Veuillez lire cette notice attentivement
avant le montage et la mise en service.
Conservez ces instructions. Tous les utilisateurs doivent en prendre connaissance.
Teneur
1. Application et indications importantes
2. Étendue de la livraison
3. Outillage
4. Instructions de montage
5. Utilisation
6. Garantie
Application et indications
1.
importantes
Le verrou de porte supplémentaire
convient pour les portes à un seul battant
à recouvrement et à eur s‘ouvrant vers
l‘intérieur, à droite et à gauche, épaisseur
de porte de 38 à 90 mm et épaisseur de
recouvrement de 0 à 29 mm. Le verrou est
monté à l‘intérieur du côté de la poignée.
Sur les portes stables, le montage
s‘eectue soit sous soit sur la serrure à
mortaiser (schéma 1). Sur les portes moins
stables ou en cas d‘exigences de sécurité
accrues, il est recommandé de procéder
à un double montage, au-dessous et au-
dessus de la serrure à mortaiser.
La gâche doit être xé sur une surface
stable. S‘assurer que les serrures soient
faciles à utiliser. Pour protéger le cylindre
extérieur des manipulations, nous vous
recommandons l‘utilisation de la plaque
de blindage ABUS PZS70. Le produit ABUS
TAS pour la xation du côté de la charnière
illustrée en schéma 1 est disponible dans
le commerce.
Les verrous de porte supplémentaires 7010
et 7025 avec la certication VdS portent
le numéro d‘enregistrement M 110346
VdS. L‘homologation VdS est valable
uniquement avec l‘utilisation d‘une classe
VdS Home ou du cylindre de porte reconnu
plus haut.
Avant le montage contrôlez le réglage de
la porte. Assurez vous que la porte s‘ouvre
et se ferme sans aucun problème. Le
profondeurs de perçage ou les longueurs
des vis doivent être adaptées aux
conditions locales. Evitez le dépassement
de perçage ou des vis sur la face arrière!
Utilisez le cas échéant une butée de
perçage ou raccourcissez les vis de xation.
Explanation des symbols
Deur-Oplegslot
Lees voorafgaand aan de montage
en ingebruikname deze handleiding
zorgvuldig door. Bewaar deze handleiding
en informeer iedere gebruiker omtrent de
bediening.
Inhoud
1. Toepassing en belangrijke instructies
2. Leveringsomvang
3. Gereedschap
4. Montageaanwijzing
5. Bediening
6. Garantie
Toepassing en belangrijke
1.
instructies
Het deur-oplegslot is geschikt voor naar
binnen draaiende enkele opdek en
stompe deuren, DIN-rechts en DIN-links,
deurdiktes van 38 tot 90 mm en tot 29 mm
opdek. De deur-oplegslot wordt binnen
gemonteerd aan de sluitzijde. Bij stabiele
deuren is de montagepositie ofwel onder
of boven het insteekslot (a. 1). Bij
minder stabiele deuren of bij verhoogde
eisen aan de veiligheid is de montage van
2 stuks aan te bevelen. Er wordt er dan
één onder en één boven het insteekslot
gemonteerd.
De sluitkast moet worden vastgesteld op
een stabiele ondergrond. Gelieve erop te
letten, dat er een comfortabele bediening
mogelijk is. Om de buitencilinder extra
tegen ingrepen te beschermen, adviseren
wij het gebruik van een ABUS pantserplaat
PZS70. De ABUS product TAS (a. 1) voor het
beveiligen van de scharnierzijde is in de
handel verkrijgbaar.
De deur-oplegsloten 7010 en 7025 met VdSerkenning zijn onder nummer M 110346
VdS geregistreerd. Het VdS-keurmerk is
enkel van toepassing bij gebruik van
een deurcilinder van VdS-klasse Home of
hoger.
Voor de montage dient u de afstelling
van de deur te controleren. Zorg dat
deze correct functioneert. De boordieptes
en schroeengtes moeten aan het
gevelelement aangepast worden. Voorkom
doorboren en/of –schroeven! Eventueel
met booraanslag werken of de schroeven
inkorten.
Uitleg van de symbolen
Serratura supplementare
Si raccomanda di leggere con attenzione le
istruzioni prima di eseguire il montaggio
e la messa in servizio. Conservare le
istruzioni e istruire ogni utente sulle
modalità di funzionamento.
Contenuto
1. Possibilità d‘impiego e avvertenza
importante
2. Dotazione
3. Utensili di montaggio
4. Istruzioni di montaggio
5. Uso
6. Garanzia
Possibilità d‘impiego e avvertenza
1.
importante
La serratura e adatta per porte con o senza
incassatura che si aprono verso l‘interno
e verso destra o sinistra, spessori da 38
a 90 mm e incassature da 0 a 29 mm. La
serratura è montata all‘interno sul lato
maniglia. Nelle porte robuste la posizione
di montaggio si trova sotto o sopra la
serratura ad incasso (ill. 1). Nelle porte
meno robuste o, qualora fossero richiesti
die requisiti di sicurezza maggiori, si
consiglia il montaggio di 2 unità. In questo
caso occorre montare un‘ unità sotto e
l‘altra sopra alla serratura ad incasso.
La contropiastra deve essere ssata su una
supercie stabile. Osservare che sia sempre
garantita una comoda possibilità di
azionamento. Per proteggere ulteriormente
il cilindro esterno contro manipolazioni,
consigliamo il montaggio della piastra
corazzata ABUS PZS70. Il prodotto ABUS TAS
per ssare il lato della cerniera ragurato
nell‘ill. 1 è disponibile in commercio.
Le serrature supplementari per porte
7010 e 7025 con l‘approvazione VdS sono
registrate sotto il numero M 110346 VdS.
L‘approvazione VdS è valida esclusivamente
con l‘impiego di una categoria VdS Home
oppure di un cilindro superiore approvato.
Prima del montaggio vericare per favore
la regolazione della porta che si apri
e chiudi con facilità. Le profondità per
trapanare i fori, risp. le lunghezze delle
viti devono essere adatte alle condizioni
particolari. Evitare che la punta del trapano
risp. la vite fuoriesca dall‘altra parte! Se
necessario lavorare con arresto del trapano
o accorciare le viti.
Descrizione dei simboli
Cerradura adicional de puerta
Lea estas instrucciones con atención antes
del montaje y de la puesta en servicio. Guarde las instrucciones y enseñe a todos los
usuarios cómo manejarlo.
Contenuto
1. Aplicaciones e información importante
2. Contenido del paquete
3. Herramientas necesarias
4. Instrucciones de montaje
5. Funcionamiento
6. Garantía
Aplicaciones e información
1.
importante
La cerradura adicional de puerta es apta
para puertas de una hoya que se abren
hacia el interior, a la derecha o la izquierda,
espesores de puerta entre 38 y 90 mm
y espesores de rebajo de 0 y 29 mm. La
cerradura adicional de puerta se monta en
la parte interior para asegurar el lado de la
manilla. En el caso de puertas estables la
posición de montaje es por debajo o por
encima de la cerradura empotrable (g. 1).
En el caso de puertas menos estables o en
caso de mayores exigencias de seguridad,
se recomienda el montaje de 2 unidades.
En ese modo, una unidad se monta por
debajo y otra se monta por encima de la
cerradura empotrable.
La caja de la cerradura debe jarse sobre
una supercie rme y estable. Asegúrese
de que pueda realizarse un manejo
cómodo. Para proteger adicionalmente
el cilindro exterior contra agresiones y
manipulaciones, recomendamos utilizar la
placa de blindaje ABUS PZS70. El producto
de ABUS TAS indicado en la g. 1 para
asegurar el lado de las bisagras está a la
venta en los comercios especializados.
Las cerraduras adicionales de puerta 7010,
7025 con homologación VdS están registradas
con el número M 110346 VdS. La aprobación de
VdS solo se aplica al uso de un clase VdS Home
o un cilindro de puerta certicado superior.
Antes del montaje, comprobar el ajuste
de la puerta. Ha de garantizarse que la
puertase pueda abrir y cerrar sin problemas.
Las profundidades de los taladros o las
longitudes de los tornillos deben adaptarse
a las condiciones locales. Evítese la salida
de la broca o del tornillo por la parte trasera.
En caso necesario, trabajar con tope de
taladrado o acortar los tornillos existentes.
Descripción de los símbolos
Přídavný dveřní zámek
Před montáží a uvedením do provozu
si přečtěte prosím pečlivě tento návod.
Uchovejte tento návod po dobu použití
výrobku a seznamte každého uživatele s
obsluhou.
Conteúdo
1. Všeobecná upozornění a důležitá
upozornění
2. Obsah balení
3. Potřebné nářadí
4. Montážní návod
5. Obsluha
6. Záruka
Všeobecná upozornění a důležitá
1.
upozornění
Přídavný dveřní zámek se hodí pro
dovnitř otevírané jednokřídlové dveře
s polodrážkou nebo bez polodrážky,
nasazené dle DIN vpravo a vlevo, pro
tloušťky dveří od 38 do 90 mm a tloušťky
polodrážky od 0 do 29 mm. Přídavný dveřní
zámek se montuje uvnitř k zajištění strany
rukojeti. U stabilních dveří je montážní
poloha buď pod zapuštěným zámkem,
nebo nad ním (obr. 1). U méně stabilních
dveří nebo při zvýšených požadavcích na
bezpečnost se doporučuje montáž 2 kusů.
Potom je namontován jeden zámek pod
zapuštěným zámkem a jeden nad ním.
Uzavírací blok musí být upevněn na
pevném, stabilním podkladu. Dejte
prosím pozor na to, aby byla možná
pohodlná obsluha. Pro dodatečnou
ochranu venkovní části cylindrické vložky
proti manipulacím doporučujeme použití
pancéřové desky ABUS PZS70. Výrobek TAS
od ABUS uvedený na obr. 1 k zajištění
strany závěsu je k dostání v obchodech.
Přídavné dveřní zámky 7010, 7025 s
certikátem VdS jsou registrovány pod
číslem M 110346 VdS. Potvrzení VdS platí
pouze s použitím VdSKlasse Home nebo s
výše osvědčeným dveřním válečkem.
Před montáží zkontrolujte prosím seřízení
dveří. Musí být zajištěno, že lze dveře
bezvadně otevírat a zavírat. Hloubky
vrtaných otvorů popř. délky šroubů musí
být sladěny s místními okolnostmi. Musí
se vyloučit průchod vrtáku, popř. šroubů
na zadní straně. Pracujte eventuálně s
dorazem vrtačky nebo šrouby, které jsou k
dispozici, zkraťte.
Vysvětlení symbolů
Vorsicht!
Hinweis zur Montage /
Bedienung
Caution!
Further tting / using details
Attention!
Instructions de montage /
utilisation
Voorzichtig!
Instructies voor de montage
/ bediening
Attenzione!
Note per l‘installazione / uso
¡Posibles daños materiales!
Instrucciones de montaje
Pozor!
Upozornění k montáži /
obsluze
Page 2
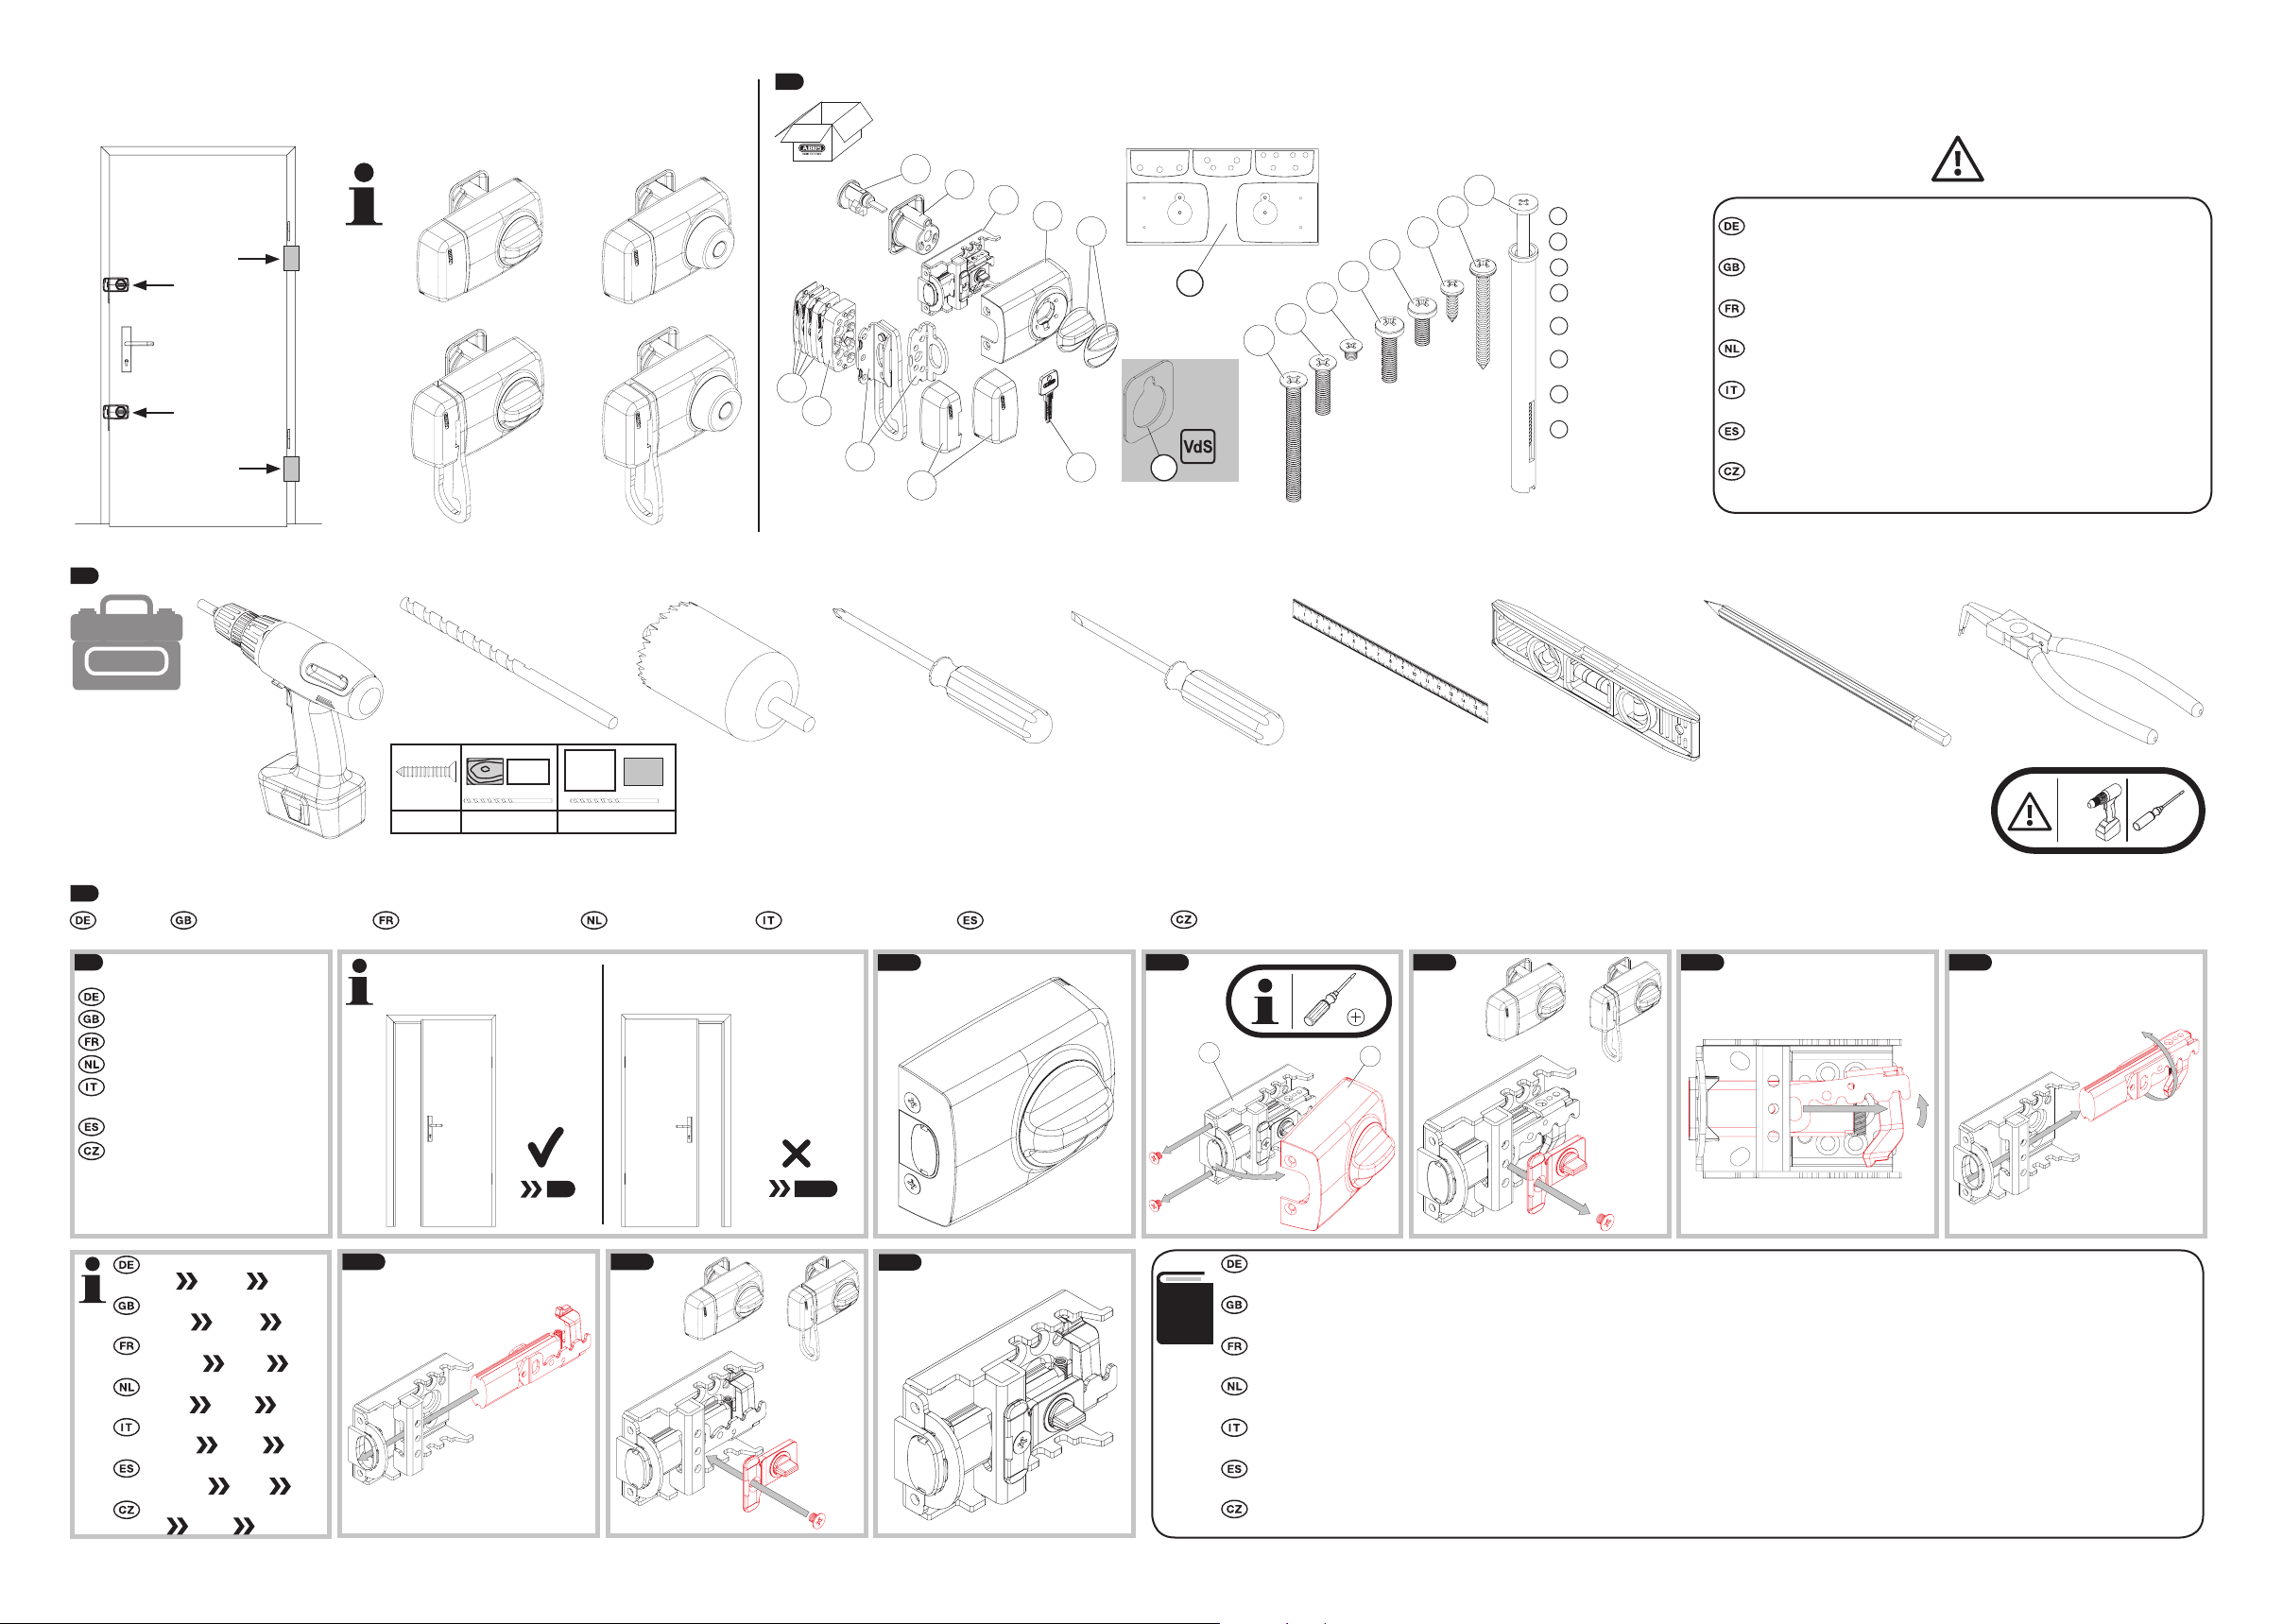
Abb. | fig. | schéma | afb. | ill. | fig. | obr. 1
S6
S7
S8
%1
K
L
S1S2S3
S4
S5
*
TAS
7010/7025
7030/7035*
7010/7025
7030/7035*
TAS
3.
TOOLS
2.
7010
7030
ø 3 mm, 4 mm, ø 34-37 mm
4,5 mm, 10 mm,
13 mm
7025
7035
F
F
E
E
D
D
C
C
B
B
A
A
S5
S5
S4
S4
S3
S3
S2
S2
S1
S1
nur | only |
seulement |
alleen |
G
G
*
H
H
*
I
I
J
J
solo | sólo |
pouze
S6
S6
S7
S7
S8
S8
2x M6 x 80 mm
2x M6 x 27 mm
2x M5 x 8 mm
2x M6 x 25 mm
2x M6 x 16 mm
2x 4,8 x 16 mm
4x 5,5 x 50 mm
1x 10 x 120 mm
Schablone K nicht geeignet für ABUS PZS70! Zur Montage von ABUS
7010E oder 7025E auch beiliegende separate Anleitung beachten!
Gauge K not suitable for ABUS PZS70! For installing of ABUS 7010E or
7025E, also see the separately enclosed instructions!
Gabarit K non appropié pour ABUS PZS70! Pour le montage de ABUS
7010E ou 7025E, voir également la notice de montage ci-jointe!
Sjabloon K niet geschikt voor ABUS PZS70! Voor de montage van de
ABUS 7010E of 7025E zie ook bijgevoegde aparte handleiding!
Dima K non adatta per ABUS PZS70! Per il montaggio di ABUS 7010E
o 7025E si veda anche alle presenti istruzioni per il montaggio!
Plantilla K no es adecuada para ABUS PZS70! Para el montaje de
ABUS 7010 E o 7025 E, consúltense las instrucciones separadas.
Šablona K není vhodná pro ABUS PZS70! Pro instalaci zařízení ABUS
7010E nebo 7025E viz přiložený samostatný montážní návod!
4.2
PVC +
FE
AL
7010
4.1 a
7030
4.1 a
4.1 h
4.1 b 4.1 c 4 .1 d 4.1 e
C
*
A-Z
Dornmaß: Das Dornmaß wird von der Türkante bis zur Mitte des Bohrlochs für den Außenzylinder gemessen. Sie können das Dornmaß
von 60 mm (Werkseinstellung) auf 72 mm vergrößern, wenn die Tür einen Doppelfalz hat!
Backset: The backset is measured from the edge of the door to the centre of the hole for the rim cylinder. You can increase the backset
from 60 mm (factory setting) to 72 mm if the door has a double rebate!
Entraxe: L‘entraxe est mesurée du bord de la porte au centre du trou pour le cylindre extérieur. Vous pouvez augmenter l‘entraxe de
60mm (réglage d‘usine) à 72mm si la porte est dotée d‘un recouvrement double!
Doornmaat: De doornmaat wordt vanaf de deurkant tot aan het midden van het boorgat voor de buitencilinder gemeten. U kunt de
doornmaat van 60 mm (fabrieksinstelling) tot 72 mm vergroten als de deur een dubbele opdekmaat hee!
Entrata: L‘entrata si misura dal bordo della porta no a metà del foro per il cilindro esterno. Potete avere la serratura nella misura da 60
cm (impostazione di fabbrica) no a 72 cm, se la porta è a doppia incassatura!
Medida del macho: La medida del macho se calcula desde el borde de la puerta hasta el centro del oricio para el cilindro exterior.
¡Puede aumentar la medida del macho de 60 mm (conguración de fábrica) a 72 mm si la puerta tiene un doble rebajo!
Velikosti trnu: Velikosti trnu se měří od hrany dveří ke středu vrtaného otvoru pro vnější váleček. Můžete zvětšit velikosti trnu ze 60 mm
(tovární nastavení) na 72 mm, pokud mají dveře dvojitou polodrážku!
PVC
ø 5,5 mm ø 4,0 mm ø 4,5 mm
4.
Montage | Installation instructions | Instructions de montage | Montageaanwijzing | Istruzioni di montaggio | Instrucciones de montaje | Montážní návod
4.1
Umstellen der Schließrichtung
Changing the locking direction
Permuter le sens de fermeture
Omstelling van de sluitrichting
Cambio della direzione di
chiusura
Cambiar el sentido de cierre
Přestavení směru zamykání
Wenn Dornmaß* umgestellt
wird 4.2 a-f 4.1 f-h
If the backset* is changed
4.2 a-f 4.1 f-h
En cas de modication de
l‘entraxe* 4.2 a-f 4.1 f-h
Als de doornmaat* wordt veranderd 4.2 a-f 4.1 f-h
Per il cambiamento dell‘
entrata* 4.2 a-f 4.1 f-h
Cuando se cambie la medida
del macho* 4.2 a-f 4.1 f-h
Pokud je velikosti trnu* přestavěn 4.2 a-f 4.1
f-h
DIN rechts | right | droite DIN links | le | gauche
rechts | destra | derecho links | sinistra | izquierda
pravé (R) levé (L)
4.1 f 4.1 g
1.
90
BCB
7010
7030
2.
1.
2.
0 %
180°
Page 3

H
K
K
4.2
Dornmaß* umstellen
Changing the backset*
Permuter l‘entraxe*
Doornmaat* instellen
Modica della misura dell‘
entrata*
Cambiar la medida del macho*
Přestavení velikosti trnu*
4.3
7030
Sperrbügel umstellen
Changing the door guard
Permuter l‘entrebâilleur
Grendelbeugel instellen
Cambio della staa d‘arresto
Cambiar el estrido de bloqueo
Zajišťovací oko přestavte
7035
4.2 a
Riegelwerk entnehmen
4.1 c,d
Remove the locking unit
4.1 c,d
Retirer le verrou 4.1 c,d
D
Grendeleenheid demonteren
4.1 c,d
Rimuovere il dispositivo di
chiusura 4.1 c,d
Retirar el mecanismo del cerrojo
D = 60 mm D = 72 mm
4.3
4.2 a
4.1 c,d
Vyjměte rozvorový mechanismus
4.1 c,d
DIN rechts | right | droite DIN links | le | gauche
rechts | destra | derecho links | sinistra | izquierda
pravé (R) levé (L)
4.4
4.3 a
4.2 b
4.3 a 4.3 b 4.3 c 4.3 d
4.2 c 4.2 d 4.2 e 4.2 f
1.
3.
2.
2.
1.
4.4
Montage des Schließkastens
Fitting the striking plate
Montage de la gâche
Monteren van de sluitkast
Montaggio della contropiastra
Montaje de la caja de la
cerradura
Montáž uzavírací blok
4.4 c
F
F
G
G
4.4 g
Stumpür*
Non-rebated door*
Porte aeur*
Stompe deur*
Porte senza
incassatura*
Puerta de batiente*
Dveří bez polodrážky*
4.4 a
Schablonenseite laut Dornmaß* 60 mm oder 72 mm verwenden! Bohrlöcher A, D oder F laut Schlosstyp 7010, 7025,
4.4 b
7030 oder 7035 und Türart (Falztür* / Stumpür*) anzeichnen). Das Dornmaß kann umgestellt werden 4.2
F F
F
Use gauge side according to 60 mm or 72 mm backset*! Mark holes A, D or F according to lock type 7010, 7025,
7030 or 7035 and door type (rebate door* / ush door*). The backset can be changed 4.2
Utiliser le côté gabarit selon l‘entraxe* de 60mm ou de 72mm! Repérer les trous A, D ou F selon le type de serrure 7010,
4x, ø 3.
7025, 7030 ou 7035 et le type de porte (porte à recouvrement* / porte aeur*). Il est possible de modier l‘entraxe 4.2
7010 7025
A A
D D
60 mm
Sjabloonzijde aankelijk van doornmaat* 60 mm of 72 mm gebruiken! Boorgaten A, D of F volgens het slottype 7010,
F F
F
4.4 d
7030
A A
7035
D D
72 mm
Unterlagen F und G müssen bündig mit Türoberäche abschließen. Bei
Stumpüren* entfallen die Schritte 4.4c-4.4e!
Plastic bases F and G must end ush with the surface of the door. Steps
4.4c-4.4e are omitted for non-rebated doors*!
S7
S7
Les cales en plastique F et G doivent aeure la surface de la porte. Les étapes 4.4c- 4.4e ne sont pas applicables dans le cas de portes aeurantes*!
Opvulplaten F en G moeten met de deur gelijk komen te liggen. Bij stompe
deuren* vervallen de stappen 4.4c-4.4e!
Spessori di plastica F e G devono terminare a lo con la supercie della porta.
Per porte senza incassatura non sono necessari i passaggi
4.4c-4.4e!
Bases de plástico F y G deben terminar a ras con la supercie de la puerta. ¡En
el caso de las puertas batientes, se omiten los pasos
4.4c-4.4e!
7025, 7030 of 7035 en soort deur (opdekdeur*/stompe deur*) aekenen. De doornmaat kan worden veranderd 4.2
Modicare la dima anco a seconda dell‘entrata* 60 mm o 72 mm! Contrassegnare i fori A, D o F a seconda del tipo di serra-
tura 7010, 7025, 7030 o 7035 e del tipo di porta (porta ad incasso* / porta a bandiera). L‘entrata può essere cambiata 4.2
¡Utilizar el lado del plantilla según la medida del macho* 60 mm o 72 mm! Taladre los oricios A, D o F según el tipo de cierre
7010, 7025, 7030 o 7035 y el tipo de puerta (puerta plegable*/puerta batiente*). La medida del macho se puede cambiar 4.2
Použijte šablonovou stranu podle velikosti trnu* 60 mm nebo 72 mm! Označte vrtané otvory A, D nebo F podle typu zámku
7010, 7025, 7030 nebo 7035 a typu dveří (dveře s polodrážkou* / dveře bez polodrážky*). Velikosti trnu se může přestavit 4.2
4.4 e
Option
ø 10 mm
~ 15°
S8S8
4.4 f
Falztür*
Rebate door*
7010
H
H
S5
S5
I
I
Porte à recouvrement*
Opdekdeur*
Porte con incassatura*
7025
Puerta en plegable*
Dveří s polodrážkou*
7030
7035
H
H
S5
S5
I
I
Plastové podložky F a G musí být vyrovnané s povrchem dveří. U dveří bez
polodrážky odpadají kroky 4.4c-4.4e!
7010
4.4 h
H
H
H
S7
S7
I
I
7030
H
S7
S7
I
I
7010
7030
*
A-Z
Falztür / Stumpür: Falz bezeichnet den Absatz an der Türkante; das Türblatt liegt auf dem Rahmen
auf. Höhenunterschied = Falzhöhe. Bei einer Stumpür liegen Türblatt und Rahmen auf gleicher Höhe.
Rebate door/non rebated door: Rebate refers to the section at the door edge; the door panel rests on the frame.
Height dierence = rebate height. In a non-rebated door, the door panel and the frame are the same height.
Porte à recouvrement/aeur: le recouvrement caractérise le palier au niveau du bord de la porte; le vantail se trouve sur le cadre.
Di. de hauteur = hauteur de recouvrement. Dans le cas d‘une porte aeurante, le vantail et le cadre sont à la même hauteur.
Opdekdeur/stompe deur: opdekrand hee betrekking op de sponning aan de deurkant; het deurblad ligt op het
kozijn. Hoogteverschil = hoogte van de opdekrand. Bij een stompe deur zijn het deurblad en kozijn even hoog.
7025
7035
7025
7035
Porta con/senza incassatura: L’incassatura descrive la sporgenza sul bordo della porta; il pannello è poggiato nella cornice.
Di. di altezza = altezza dell’incassatura. Nella porta senza incasso il pannello e la cornice si trovano alla stessa altezza.
Puerta en plegable/de batiente: El encaje designa el tramo en el borde de la puerta; la hoja de la puerta se encuentra en
el marco. Dif. de altura = altura del encaje. En el caso de una puerta batiente, la hoja y el marco tienen la misma altura.
Dveří s polodrážkou / bez polodrážky: Polodrážka označuje výstupek na hraně dveří; křídlo dveří dosedá k
rámu. Výškový rozdíl = výška polodrážky. U dveří bez polodrážky jsou křídlo dveří a rám ve stejné výšce.
Page 4

4.5
K
D
E
7010
Drehknopf wechseln
Exchanging the rotary knob
Echange du bouton tournant
Draaiknop vervangen
Cambio della manopola
Cambiar el botón giratorio
Výměna otočného knoíku
Montage des Schlosskastens
Fitting the lock case
Montage du boîtier de verrou
Monteren van de slotkast
Montaggio della serratura a
scatola
Montaje de la caja de cerradura
Montáž blok zámku
4.6 e
G / L: ø 34-37 mm
4.6 j
S1/S2
4.7
Funktionen von innen und außen prüfen und ggf. korrigieren. Beim Schlosstyp 7010 / 7030 muss der
Drehknopf nach jeder Betätigung wieder waagerecht stehen!
Check functionality inside and out and correct if necessary. For lock type 7010 / 7030, the rotary knob
must be level again aer each use!
Contrôler les fonctions de l‘intérieur et de l‘extérieur; les corriger, le cas échéant. Pour les types de serrure
7010 / 7030, le bouton tournant doit être de nouveau en position horizontal après chaque actionnement!
Werking van binnen en buiten controleren en eventueel corrigeren. Bij slottype 7010 / 7030 moet de
draaiknop na elke bediening weer horizontaal staan!
Controllare ed eventualmente correggere le funzioni interne ed esterne. Nel tipo di serratura 7010 / 7030
rimettere la manopola in posizione orizzontale dopo ogni azionamento!
Comprobar las funciones internas y externas y corregirlas en caso necesario. ¡En el caso del tipo de cerradura 7010 / 7030, el botón giratorio debe volver a colocarse en horizontal después de utilizarlo!
Zkontrolujte funkce zevnitř a zvenku a v případě potřeby opravte. U typu zámku 7010 / 7030 musí stát
otočný knoík po každé aktivaci opět vodorovně!
Optional, zur individuellen
4.5 a 4.5 b 4.5 c
optimalen Bedienung
Optional, for individual
optimum operation
7030
En option, pour une utilisation
individuelle optimale
BB
Optie, voor een individuele en
optimale bediening
Opzionale, per garantire un‘
attivazione individuale ottimale
3.
1.2.
Opcional, para el manejo
óptimo individual
Volitelně, pro individuálně
optimální ovládání
4.6 a4.6
Schablonenseite laut Dornmaß* 60 mm oder 72 mm und Lage des Türscharniers rechts oder links verwenden!
Schablonenausschnitt mittig zum Schließkasten ausrichten und Bohrungen M, H + G bzw. M, K + L anzeichnen.
Use gauge side according to 60 mm or 72 mm backset* and the position of the door hinge on the right or le!
Align the template cut-out with the centre of the striking plate and mark holes M, H + G or M, K + L.
Utiliser le côté gabarit selon l‘entraxe* de 60mm ou de 72mm et la position de la charnière à droite ou à
gauche! Centrer le gabarit par rapport à la gâche et marquer les trous M, H + G ou M, K + L.
H
M
G
M
M
K
L
M
Sjabloonzijde aankelijk van doornmaat* 60 mm of 72 mm en de positie van het deurscharnier rechts of links ge- bruiken! Sjabloonuitsnede in het midden van de sluitkast uitlijnen en de boringen M, H + G resp. M, K + L uittekenen.
Modicare la dima lati a seconda dell‘entrata* 60 cm o 72 cm e della posizione della cerniera a destra o a sinistra! Allineare il taglio della forma al centro della contropiastra e selezionare i fori M, H + G così come M, K + L.
¡Utilice el lado del plantilla según la medida del macho* de 60 mm o 72 mm y la posición de la bisagra a la izquierda o
a la derecha! Alinee el recorte del patrón en el centro de la caja de cerradura y marque los oricios M, H + G o M, K + L.
Použijte šablonovou stranu podle velikosti trnu* 60 mm nebo 72 mm a pozice závěsů dveří vpravo nebo vlevo!
Zarovnejte výřez šablony na střed k uzavíracímu bloku zámku otvory M, H + G nebo M, K + L.
4.6 f 4.6 g
E
E
D
D
VdS-Version mit Schutzblech
VdS version with protective plate
Version VdS avec tôle de protection
VdS-versie met beschermafdekking
Versione VdS con lamiera protettiva
Versión VdS con chapa protectora
Verze VdS s plechovým krytem
S4
S4
4.6 k 4.6 l 4.6 m
S6S6
S3S3
außen
outside
extérieur
buiten
esterno
afuera
vně
4.6 h
4.6 n
1.
2.
4.6 b
4.6 c
4.6 d
M: ø 3 mm
H / K: ø 3 mm
H / K: ø 13 mm
G / L: ø 3 mm
4.6 i
3-5 mm!
Riegelwerk hinten anheben und Riegel ganz nach vorne schieben.
Türblattstärke: 38-42 mm = S2, 43-90 mm = S1, ggf. kürzen
Li the locking unit backwards and fully slide the bolt forwards.
Door leaf thickness: 38-42 mm = S2, 43-90 mm = S1, possibly shorten
Soulever le pêne vers l’arrière et le pousser entièrement vers l‘avant.
Épaisseur de battant de porte: 38-42 mm = S2, 43-90 mm = S1, raccourcir
De grendeleenheid achter optillen en grendel geheel naar voren schui-
ven. Deurbladdikte: 38-42 mm = S2 ,43-90 mm = S1, evt. inkorten
Sollevare il dispositivo di chiusura posteriore e spingere completamente in avanti il
S1 / S2S1 / S2
catenaccio. Spessore del pannello porta: 38-42 mm = S2, 43-90 mm = S1, accorciare
Elevar el mecanismo del pasador debajo y desplazar completamente hacia
delante el pasador. Hojas de puerta: 38-42 mm = S2, 43-90 mm = S1, acortar
Rozvorový mechanismus vzadu zvedněte a rozvoru posuňte zcela dopředu. Tloušť-
ka dveřního křídla: 38-42 mm = S2, 43-90 mm = S1, v případě potřeby zkraťte
Zur besseren Übersichtlichkeit wurde bei den Abbildungen zu 4.6 ausschließlich der montierte Schließkasten des Schlosstyps 7030 und bei 4.6m + 4.6n die Abdeckung des Schlosstyps 7010 / 7030 gezeigt.
For the sake of clarity, only the mounted striking plate of the lock type 7030 is shown in the gures for
4.6 and the cover for lock types 7010 / 7030 in 4.6m + 4.6n.
Pour plus de clarté, seule la gâche montée du type de serrure 7030 est représentée sur les gures de 4.6
et seul le couvercle du type de serrure 7010 / 7030 est représenté dans le cas de 4.6m + 4.6n.
Voor de duidelijkheid is bij de aeeldingen van 4.6 uitsluitend de gemonteerde sluitkast van het slot-
type 7030 en bij 4.6m + 4.6n de afdekking van het slottype 7010 / 7030 afgebeeld.
Per una migliore trasparenza, nelle gure no alla 4.6 è stata mostrata solo la contropiastra montata del
tipo 7030, e nelle gure 4.6m + 4.6n la copertura dei tipi di serratura 7010 / 7030.
Para mayor claridad, en las guras de 4.6 solo se muestra la caja de la cerradura montada del tipo de
cierre 7030 y en el caso de 4.6m + 4.6n, la tapa del tipo de cierre 7010 / 7030.
Z důvodu lepší přehlednosti byl u obrázků k 4.6 zobrazen výhradně namontovaný uzavírací blok typu
zámku 7030 a u 4.6m + 4.6n kryt typu zámku 7010 / 7030.
Page 5

5.
?
Bedienung | Operation | Utilisation | Bediening | Uso | Funcionamiento | Obsluha
5.1
5.3
außen
outside
extérieur
buiten
esterno
afuera
vně
7010
7030
Beim Schlosstyp 7010 / 7030 muss der Drehknopf nach jeder
Betätigung wieder waagerecht stehen!
For lock type 7010 / 7030, the rotary knob must be level again
aer each use!
Pour les types de serrure 7010 / 7030, le bouton tournant doit être
de nouveau en position horizontal après chaque actionnement!
2x
Bij slottype 7010 / 7030 moet de draaiknop na elke bediening
weer horizontaal staan!
Nel tipo di serratura 7010 / 7030 rimettere la manopola in
posizione orizzontale dopo ogni azionamento!
¡En el caso del tipo de cerradura 7010 / 7030, el botón giratorio
debe volver a colocarse en horizontal después de utilizarlo!
U typu zámku 7010 / 7030 musí stát otočný knoík po každé
aktivaci opět vodorovně!
7025 7030
7035
5.2
Sperrbügelfunktion: Tür kann spaltbreit geönet werden.
Zum Önen der Tür: Sperrbügel anheben, Tür schließen, Riegel ganz zurückschließen.
Door guard feature: the door can be opened ajar.
7035
Ihr ABUS Tür-Zusatzschloss ist wartungsfrei und sollte mit keinem scharfen Putzmittel gereinigt
werden. Es wird empfohlen, den Zylinder mit ABUS Pege-Spray PS88 zu behandeln.
Your ABUS additional door lock does not need servicing. It should not be cleaned with caustic/abrasive
cleaning agents. It is recommended that you treat the cylinder with ABUS PS88 lubricant spray.
Votre verrou de porte supplémentaire ABUS ne nécessite aucun entretien; ne pas le nettoyer avec un
détergent agressif. Il est conseillé de traiter le cylindre avec un spray ABUS PS88.
Uw deur-oplegslot van ABUS is onderhoudsvrij en mag niet met een agressief reinigingsmiddel worden
schoongemaakt. Aanbevolen wordt om de cilinder met ABUS onderhoud-spray PS88 te behandelen.
La serratura supplementare per porte ABUS non richiede manutenzione né deve essere pulita con dei
mezzi abrasivi. Si consiglia di sottoporre il cilindro ad un trattamento con spray di cura ABUS PS88.
La cerradura adicional de puerta ABUS no requiere mantenimiento y no debe limpiarse con medio de
limpieza alados. Se recomienda tratar el cilindro con espray de conservación ABUS PS 88.
Váš přídavný dveřní zámek ABUS nevyžaduje údržbu a neměl by se čistit žádnými agresivními čisticími
prostředky. Doporučuje se ošetření cylindru přípravkem ABUS Pege-Spray PS88.
To open the door: raise door guard, close door, retract bolt fully.
Fonctionnement de l’entrebâilleur: la porte s’ouvre alors de la largeur d’une fente.
Pour ouvrir la porte: soulever l’entrebâilleur, fermer la porte et ouvrir le verrou.
Kierstandbeugelfunctie: de deur kan dan tot een kierstand geopend worden.
Voor het openen van de deur: de kierstandbeugel even optillen, de deur sluiten en de schoot geheel terugdraaien.
Funzione della staa di sicurezza: la porta puo essere aperta ad un spiraglio.
Per aprire la porta: aumentare la staa di sicurezza, richiudere la porta ed inserire il perno.
Función del estribo de bloqueo: la puerta puede abrirse levemente.
Para abrir la puerta: elevar el estribo de bloqueo, cerrar la puerta y retroceder completamente el cerrojo.
Funkce zajišťovacího oka: dveře lze otevřít pouze částečně.
Pro otevření dveří: zajišťovací oko zvedněte, dveře zavřete, rozvoru zcela odemkněte.
Year
OIL
2x
6.
Gewährleistung ABUS Produkte sind
mit größter Sorgfalt konzipiert, hergestellt
und nach geltenden Vorschrien geprü.
Die Gewährleistung erstreckt sich aus-
schließlich auf Mängel, die auf Material-
oder Herstellungsfehler zurückzuführen
sind. Falls nachweislich ein Material- oder
Herstellungsfehler vorliegt, wird das Pro-
dukt nach Ermessen von ABUS repariert
oder ersetzt. Die Gewährleistung endet in
diesen Fällen mit dem Ablauf der ursprünglichen Gewährleistungslaufzeit. Weitergehende Ansprüche sind ausdrücklich ausgeschlossen.
ABUS haet nicht für Mängel und Schäden,
die durch äußere Einwirkungen (z.B. Trans-
port, Gewalteinwirkung), unsachgemäße
Bedienung, normalen Verschleiß und Nicht-
beachtung dieser Anleitung entstanden
sind. Bei Geltendmachung eines Gewährleistungsanspruchs ist dem zu beanstan-
denden Produkt der originale Kaueleg
mit Kaufdatum und eine kurze schriliche
Fehlerbeschreibung beizufügen.
Technische Änderungen vorbehalten. Für
Druckfehler und Irrtümer keine Haung.
Warranty ABUS products are designed,
manufactured and tested in accordance with applicable regulations with great
care. The warranty exclusively covers faults
that are caused by material or manufacturing defects. If a material or manufacturing
defect can be proven, the product will be
repaired or replaced at the discretion of
the warrantor. In such cases, the warranty
ends with the termination of the original
warranty period. Any further claims are expressly excluded.
ABUS assumes no liability for defects or
damage that has been caused by external inuences (e.g. transport, external
forces), improper use, normal wear and
tear or non-compliance with this operating
and installation instructions document. If
a warranty claim is asserted, the product
must be returned with the original receipt
with date of purchase and a brief written
description of the fault.
Subject to technical alterations. No liability
for mistakes and printing errors.
Garantie Les produits ABUS sont con-
çus, fabriqués et testés avec beaucoup de
soin et selon la réglementation applicable.
La garantie couvre uniquement les vices
résultant de défauts matériels ou de fabrication présents au moment de la vente.
En présence d‘un défaut matériel ou de fa-
brication prouvé, le produit est réparé ou
remplacé au gré du donneur de garantie.
La garantie se termine, dans de tels cas, à
expiration de la durée d‘origine de la ga-
rantie. Toute revendication au-delà de cet-
te date est explicitement exclue.
ABUS décline toute responsabilité pour des
vices et dommages résultant des inuences
extérieures (p.ex. avaries de transport, emploi de la force), d‘une utilisation inappropriée, de l‘usure normale ou de la non-ob-
servation des présentes instructions. En cas
d‘une demande dans le cadre de la garan-
tie, l‘article réclamé doit être accompagné
du justicatif mentionnant la date d‘achat
et d‘une description du défaut.
Nous nous réservons le droit de toutes mo-
dications techniques. Nous n‘assumons
aucune responsabilité pour des erreurs ou
défauts d‘impression éventuels.
Garantie ABUS producten zijn met de
grootste zorg- vuldigheid ontworpen,
geproduceerd en op basis van de geldende
voorschrien getest. De garantie hee
uitsluitend betrekking op gebreken die op
materiaal- of fabrieksfouten duiden op het
moment van verkoop. Bij bewijs van een
materiaal- of fabrieksfout wordt de product
na beoordeling van de garantiegever
gerepareerd of vervangen. De garantie
eindigt in dit geval met het aopen
van de oorspronkelijke garantieperiode.
Verdergaande aanspraken zijn uitdrukkelijk
uitgesloten.
ABUS is niet aansprakelijk voor gebreken en
schade die zijn veroorzaakt door inwerkin
gen van buitenaf (bijvoorbeeld door trans-
port, inwerking van geweld), onjuist gebruik, normale slijtage of het niet in acht nemen
van deze handleiding. Bij het indienen van
een garantieclaim moet bij de product het
originele aankoopbewijs met datum van de
aankoop en een korte schrielijke beschrijving van de fout worden gevoegd.
Technische wijzigingen voorbehouden. Geen
aansprakelijkheid voor vergissingen en drukfouten.
-
Garanzia I prodotti ABUS sono pro-
gettati con la massima cura, construito e
collaudato in conformità alle direttive vigenti in materia. La garanzia copre esclusivamente gli inconvenienti a difetti di materiale o di fabbricazione. Nel caso in cui
sia comprovato un difetto di materiale o di
fabbricazione il prodotto verrà riparato o
sostituito a discrezione del garante. La garanzia di qualità termina in questi casi alla
scadenza del periodo originario di garanzia. Si escludono espressamente ulteriori
pretese.
ABUS non è responsabile per difetti o danni causati da fattori esterni (ad esempio
trasporto, uso forzato), da un utilizzo non
appropriato, dal normale logoramento o
dalle mancata osservanza delle presenti istruzioni. Qualora si faccia valere una
pretesa di garanzia, allegare al prodotto
d‘acquisto originale contente la data d‘ac-
quisto, e una breve descrizione scritta del
difetto.
Ci si riservano modiche tecniche. Per errori e refusi di stampa non ci si assume alcuna responsabilità.
Garantía Productos ABUS están di-
señados y producidos con gran cuidado y
comprobado atendiendo a las disposiciones vigentes. La garantía cubrirá exclusivamente los defectos que estén originados
por errores en los materiales o en la fabricación. En caso de que se pueda demostrar
un error en los materiales o la fabricación,
ABUS decidirá si reparar o reemplazar el
producto. La garantía nalizará en dichos
caso con la nalización del tiempo de vigencia original de la garantía. Quedan
excluidas expresamente las reclamaciones
que vayan más allá de lo indicado.
ABUS no se hace responsable por defectos
y daños ocasionados por inuencias externas (p. ej., el transporte, uso de la fuerza), manejo incorrecto, desgaste normal y
la inobservancia del presente manual. Al
efectuar una reclamación de garantía se
deberá adjuntar al producto en cuestión la
facture de compra con la fecha de compra y
una descripción breve por escrito del fallo.
Sujeto a modicaciones técnicas. No se
aceptan responsabilidades por equivocaciones o errores de imprenta.
Záruka Výrobky ABUS jsou koncipo-
vány a vyráběny s maximální péčí a kontrolovány dle platných předpisů. Záruka se
vztahuje výlučně na nedostatky, které lze
odvodit z materiálových nebo výrobních
vad. V případě prokazatelné materiálové
nebo výrobní vady je produkt po posouzení
společností ABUS opraven nebo vyměněn.
Záruka končí v těchto případech uplynutím
původní záruční doby. Nároky nad tento rámec jsou výslovně vyloučeny.
ABUS neručí za závady a škody vzniklé vnějšími vlivy (např. přeprava, použití násilí),
nesprávnou obsluhou, normálním opotřebením a nerespektováním tohoto návodu.
Při uplatnění nároků na záruční plnění se
musí k reklamovanému výrobku přiložit
originální doklad o koupi s datem koupě a
stručný popis závady.
Technické změny vyhrazeny. Za tiskové chyby a omyly se neručí.
© ABUS 2018 | ABUS August Bremicker Söhne KG | D 58292 Wetter | Germany.
Tel.: +49 (0) 23 35 63 40 | |
T390362 | V2 | C18
 Loading...