

Page 1

Ableton Live 7 LE
Reference Manual
Page 2

Live LE for Windows and Mac OS
Created by Bernd Roggendorf, Gerhard Behles, Robert Henke, Awi, Reiner Rudolph, Stefan Haller, Stefan Franke,
Frank Hoffmann, Andreas Zapf, Ralf Suckow, Gregor Klinke, Matthias Mayrock, Friedemann Schautz, Ingo Koehne,
Jakob Rang, Pablo Sara, Nicholas Allen, Henrik Lafrenz, Jan Buchholz, Kevin Haywood, Dominik Wilms, Christian
Kleine, Amaury Groc, Daniel Büttner, Alex Koch, Henrik Hahn, Simon Frontzek, Torsten Wendland, Torsten Slama,
Eduard Müller, Jeremy Bernstein, Bernard Chavonnet, Carl Seleborg, Claes Johanson, Bernhard Bockelbrink, Nico
Starke, Jörg Kluÿmann.
Reference Manual by Dennis DeSantis, Kevin Haywood, Rose Knudsen, Gerhard Behles, Jakob Rang, Robert
Henke, Torsten Slama.
Content provided by:
SONiVOX www.sonivoxrocks.com
Big Fish Audio www.bigshaudio.com
Chocolate Audio www.chocolateaudio.com
Puremagnetik www.puremagnetik.com
Physical Modeling technology provided by:
Applied Acoustics Systems www.applied-acoustics.com
Copyright 2008 Ableton AG. All rights reserved.
This manual, as well as the software described in it, is furnished under license and may be used or copied only in accordance with
the terms of such license. The content of this manual is furnished for informational use only, is subject to change without notice,
and should not be construed as a commitment by Ableton. Every effort has been made to ensure that the information in this
manual is accurate. Ableton assumes no responsibility or liability for any errors or inaccuracies that may appear in this book.
Except as permitted by such license, no part of this publication may be reproduced, edited, stored in a retrieval system or
transmitted, in any form or by any means, electronic, mechanical, recording or otherwise, without the prior written permission of
Ableton.
Ableton, Live and Live Pack are trademarks of Ableton AG. Apple, the Apple Logo, Mac, the Universal Logo, Mac OS, the
Audio Units Logo, the QuickTime Logo and QuickTime are trademarks of Apple, Inc. Windows, Windows XP and Windows Vista
are registered trademarks of Microsoft Corporation in the United States and other countries. Intel is a registered trademark of
Intel Corporation or its subsidiaries in the United States and other countries. SONiVOX is the brand name trademark of Sonic
Network, Inc. VST and ASIO are trademarks and software of Steinberg Media Technologies GmbH. ReWire, ReCycle, REX and
REX2 are trademarks of Propellerhead Software AB. AAS is a trademark of Applied Acoustics Systems DVM Inc. Mackie Control is
a trademark of LOUD Technologies, Inc. OggVorbis and FLAC are trademarks of Xiph Org. All other product and company names
are trademarks or registered trademarks of their respective holders.
Page 3

Chapter 1
Welcome to Live
1.1 The Ableton Team Says: Thank You
Live is the result of musicians wanting a better way to create, produce and perform music
using a computer. A great deal of effort has been put into making Live easy and fun to
use, yet at the same time capable of helping you create music with unlimited depth and
sophistication. This effort continues even as you read these lines... in fact, a new, improved
Live version might already be available for download! Please check on our website now1,
or choose the Check for Updates command from the Help menu.
1
We hope you enjoy using Live and that it enhances your creative process. Should you have
suggestions about how we can improve Live, please let us know2.
Your Ableton Team.
1
http://www.ableton.com/downloads
2
contact@ableton.com
Page 4

CHAPTER 1. WELCOME TO LIVE 2
1.2 What's New in Live 7?
1.2.1 Multiple Time Signatures
Work with multiple time signatures in both Arrangement and Session view
1.2.2 Multiple Automation Editor Lanes
View and edit multiple automation envelopes for a track simultaneously in the Arrangement View
1.2.3 Better Tempo Control
Map song tempo to multiple controllers for coarse and ne adjustments
1.2.4 Ableton Effects and Instruments
Drum Racks expand the Rack family with integrated return chains, choke groups, and
other functions optimized for building drum kits
Compressor replaces the former Compressor I and II devices with three compression
models, feedback, sidechaining and more.
Spectrum performs realtime frequency analysis of incoming audio signals.
1.2.5 Device Improvements
Sidechaining is available in the new Compressor effect, as well as the Gate and Auto
Filter
EQ Eight is updated with a larger display, a new notch lter, larger parameter ranges
and an optional 64-bit hi-quality mode
Page 5

CHAPTER 1. WELCOME TO LIVE 3
Hi-Quality modes have also been added to the Dynamic Tube and Saturator effects
Page 6

Chapter 2
First Steps
Note: This manual has been adapted for Live LE. Specically, this means that features which
are not available in Live LE have not been included. To learn more about the differences
between Live LE and the full version of Live, please see the feature comparison chart or
download the full Ableton Reference Manual from the Ableton website1. The full-version
reference manual also contains information about all of Ableton's add-on instruments.
When you install Live and run it for the rst time, you will be presented with a dialog asking
for your Live serial number. Please see the chapter on unlocking Live should you have
questions or concerns during the authorization process.
4
If you do not (yet) own Live, you can still try out all of Live's features, but you will not be able
to save or export your work.
2.1 Learn About Live
Live comes with a set of interactive lessons to take you step by step through the key features
of the program. The lessons are organized in a table of contents, which can be opened
1
http://www.ableton.com/downloads
Page 7
CHAPTER 2. FIRST STEPS 5
directly in the program via the Help menu. We highly recommend following the lessons.
Many users have told us that the lessons helped them become familiar with the program
very quickly.
We also recommend that you read the Live Concepts chapter, which encapsulates everything that Live is and can do, and is therefore a worthwhile read for both beginners and
experienced users. The remaining chapters of this manual serve as in-depth reference for
the material introduced in Live Concepts.
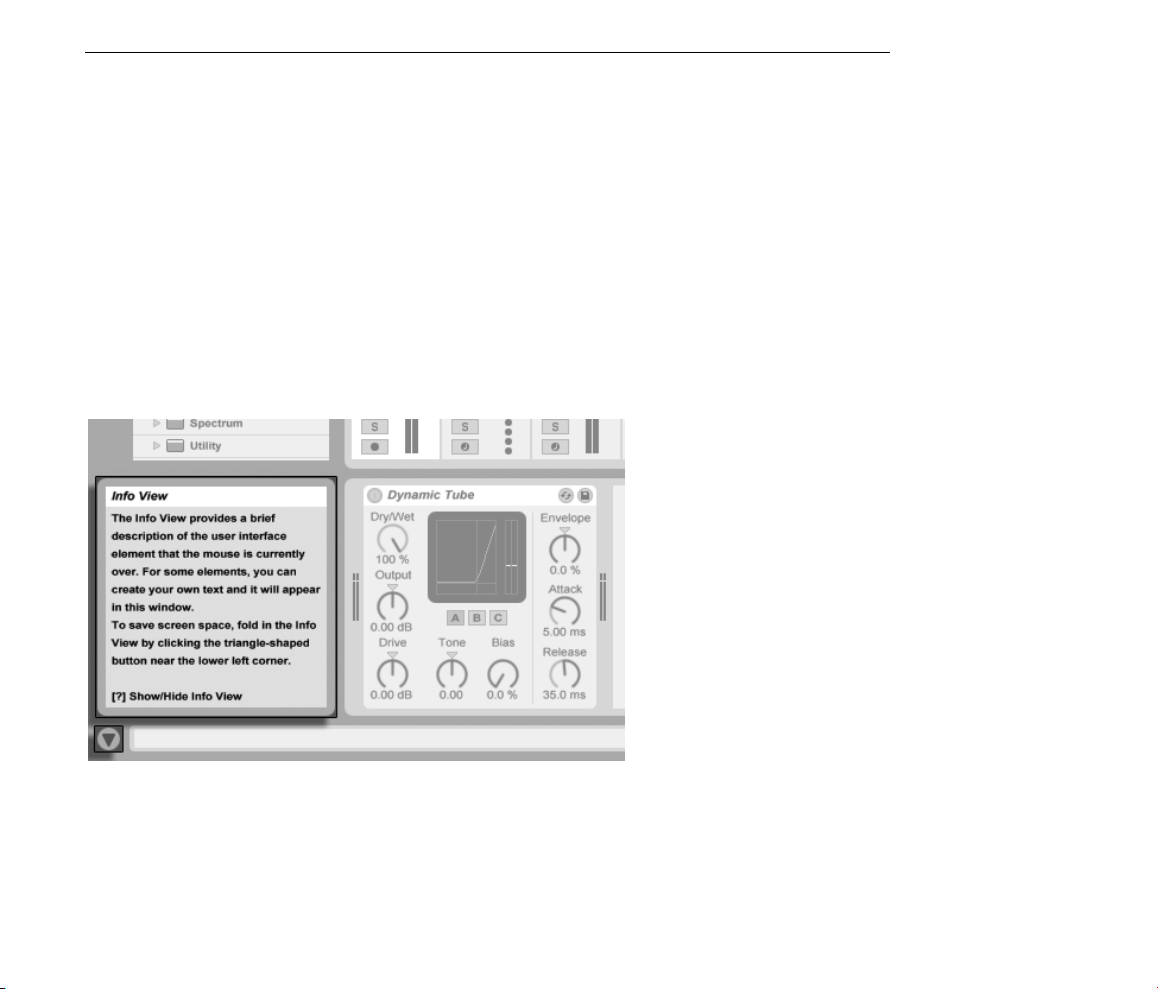
2.1.1 Using the Info View and Index
Live's Info View tells you the name and function of whatever you place the mouse over. For
certain items, you can create your own text and it will appear in this window.
If you require more information on a specic user interface element or topic, please consult
this reference manual. The index, found at the end of the manual, contains the names of all
user interface elements and will lead you to the relevant section.
The Info View and its
Show/Hide Button.
Page 8
CHAPTER 2. FIRST STEPS 6
Ctrl
,
,
2.2 Setting up Preferences
Live's Preferences window is where you can nd various settings that determine how Live
looks, behaves and interfaces with the outside world. This window is accessed from the
Preferences command, which in Windows is available in the Options menu and in OS X
is available in the Live menu. Preferences can also be accessed with the
(Mac) shortcut.
Live's Preferences are distributed over several tabs:
In the Look/Feel tab, you can make various settings, including the language used for
text display and the color scheme, or skin, for the Live user interface.
The Audio Preferences are used to set up Live's audio connections with the outside
world via an audio interface. Please take the time to follow the program's built-in
Setting up Audio I/O lesson, which will walk you through all the steps required to
set up and optimize the settings for any given system. To access the lesson, use the
Lessons Table of Contents command from the Help menu.
The MIDI/Sync Preferences are used to help Live recognize MIDI devices for two
separate and distinct purposes:
Playing MIDI notes. To lear n how to route an external device into Live for MIDI
input, please see the Routing and I/O chapter.
(PC) /
Controlling parts of the interface remotely. This subject is covered in detail in the
MIDI and Key Remote Control chapter.
The File/Folder Preferences pertain to Live's le management and the location of
plug-in devices.
The Record/Warp/Launch Preferences allow customizing the default state for new Live
Sets and their components, as well as selecting options for new recordings.
The CPU Preferences include options for managing the processing load, including
multicore/multiprocessor support.
The Authorizations/Trial Preferences are used to manage licensing and installation of
the Live platform, and add-on components like the Operator instrument.
Page 9
CHAPTER 2. FIRST STEPS 7
F11
2.3 The Main Live Screen
Most of your work in Live happens in the main Live screen. This screen consists of a number
of views, and each view manages a specic aspect of your Live Set, which is the type of
document that you create and work on in Live. Since screen space is usually limited, the
Live views can't all be displayed at the same time.
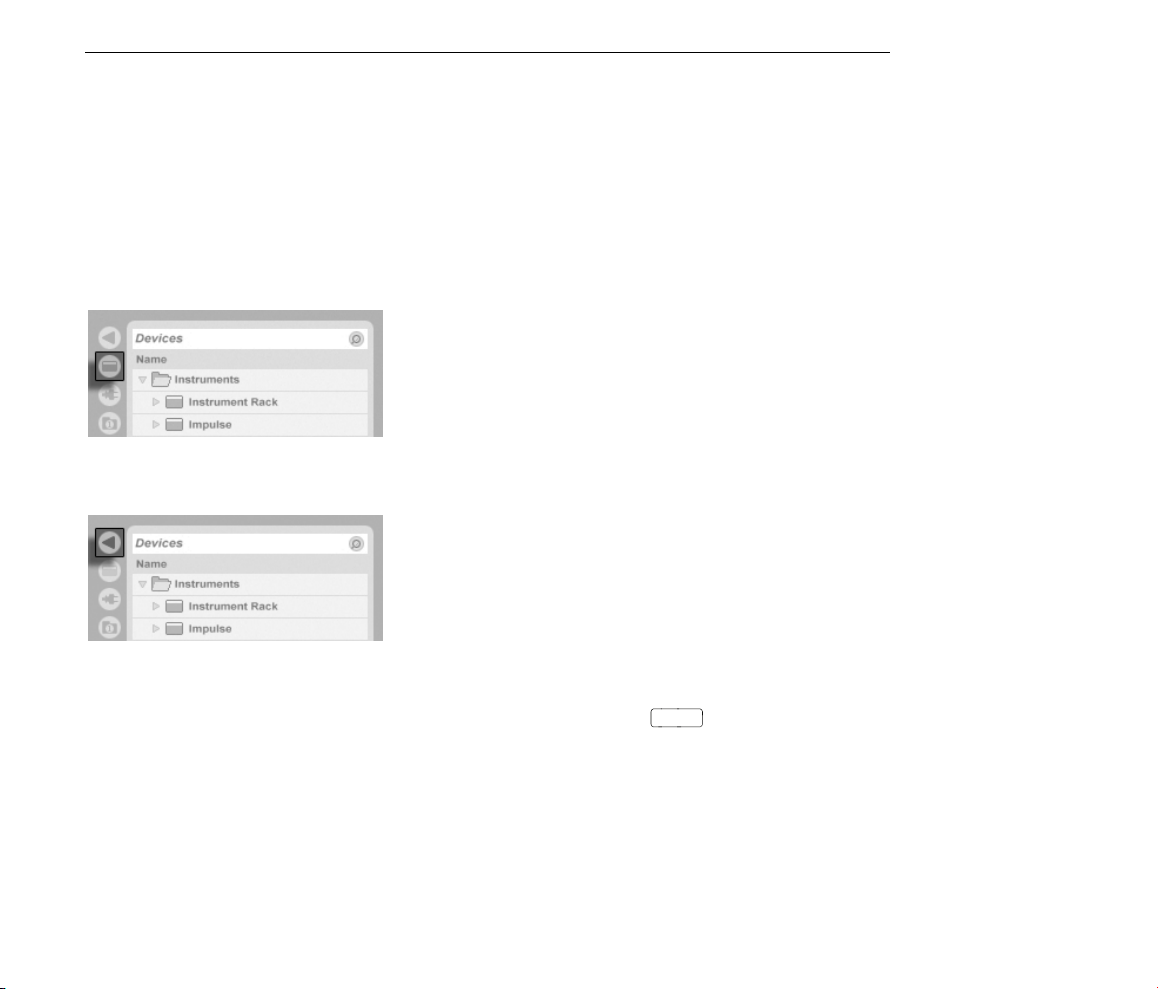
Each one of the selector buttons at the screen borders calls up a specic view; clicking this
one, for instance, opens Live's Device Browser:
To hide one of Live's views and free up screen space, click on the triangle-shaped button
next to it. To restore the view, click the button again.
The Device Browser
Selector.
A View Show/Hide
Button.
You can run Live in Full Screen Mode by selecting the Full Screen command from the View
menu. To leave Full Screen Mode, click the button that appears in the lower right corner of
the screen. Full Screen Mode can also be toggled by pressing
. (Note: On Mac OS
X, this key is assigned by default to Exposé, and will not toggle Full Screen Mode unless
Exposé has been deactivated or assigned to a different key in OS X's System Preferences.)
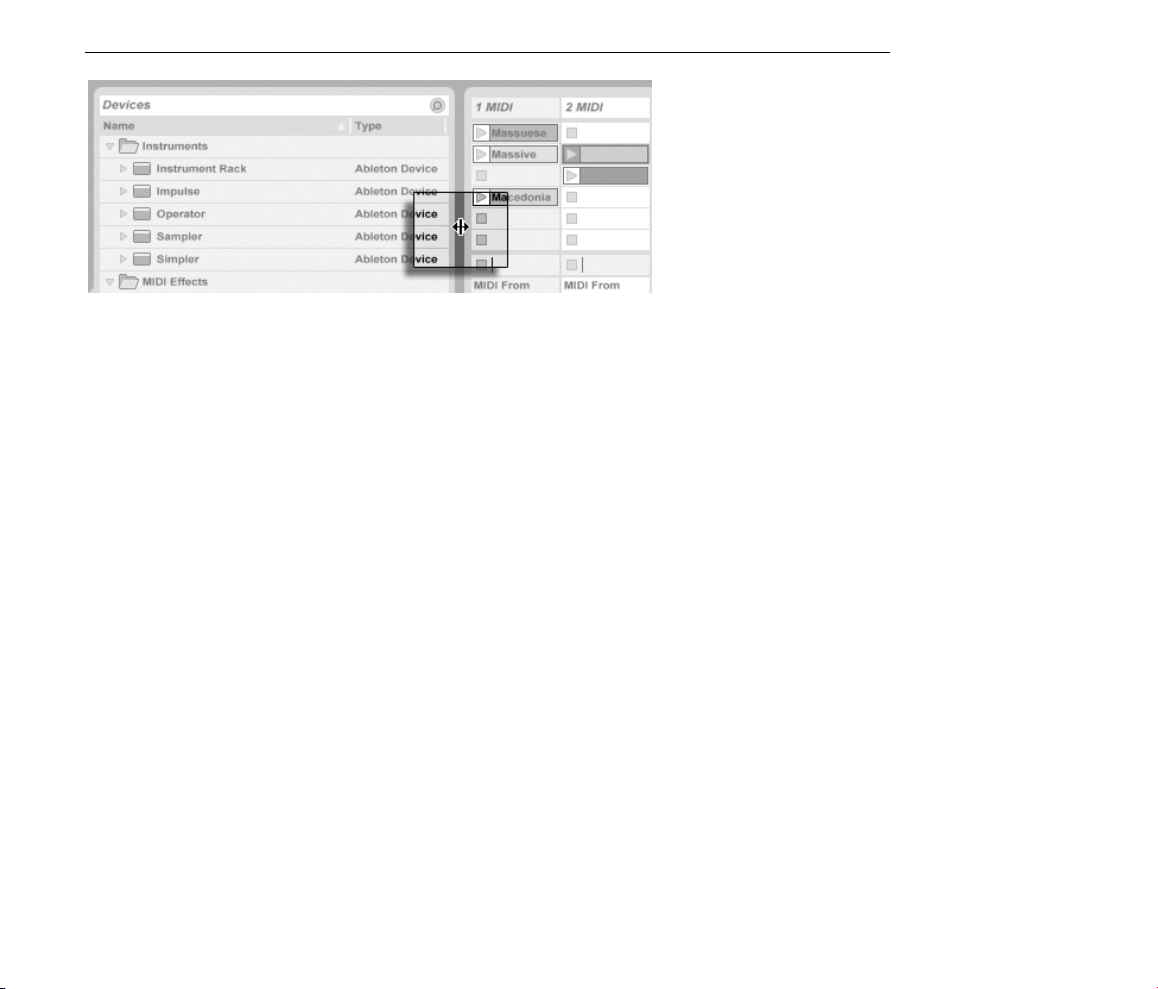
If one of the browser views is open, you can adjust the main window's horizontal split by
dragging.
Page 10
CHAPTER 2. FIRST STEPS 8
Adjusting the Main
Window Split.
Page 11

Chapter 3
Unlocking Live
Live is protected against illegal use by a copy protection scheme. This scheme has been
designed to meet the highest security standards while avoiding hassles for our customers. If
you nd this procedure to be an inconvenience, please understand that the copy protection
secures your investment: It allows Ableton to provide you with support and to continue
developing Live.
9
3.1 Step 1: Entering Your Serial Number
The rst time you run Live, you will be prompted to enter your serial number.
As an owner of Live LE, you have received a serial number from Ableton, either via e-mail (if
you ordered directly from Ableton), or on a card as part of the Live LE package.
The serial number is composed of numbers 0..9 and letters A..F. If you accidentally type
the wrong string into a eld, the eld will turn red. When you have successfully entered
the serial number, you can choose to either unlock online or from a le. Both options are
explained below.
Page 12

CHAPTER 3. UNLOCKING LIVE 10
Please note that products such as Operator and Sampler are sold separately from Live but
are unlocked using the same procedure described here. You can always enter any new serial
numbers and unlock additional products in the Authorizations/Trial tab in the Preferences
window. Live's Preferences are available via the Options menu (or the Live menu in Mac OS
X).
The serial number identies your ownership of Live. Because your serial number is a valuable
good, you should keep it in a safe place and out of reach of unauthorized hands. Please
be aware that sharing your serial number will render it unusable. The only way for Ableton
technical support to help you get back your serial number if you lose it is via your registration
data. Therefore, please register your product1, as otherwise you might lose your property!
3.2 Step 2: Unlocking Live
The second step of authorizing Live is called unlocking. Unlocking means associating your
serial number with a specic computer. Please be aware that the standard Live license grants
you the right to use Live on only one computer at a time. You can, however, unlock Live
with your serial number more than once under the legal and technical conditions described
later.
3.2.1 The Unlock Key
For unlocking, you require an unlock key that can only be created by the Ableton server.
Unlocking therefore requires access to the Internet. The computer from which you connect
to the Internet does not have to be the same computer for which you wish to unlock Live,
but it does make things easier.
3.2.2 The Challenge Code
The Ableton server creates the unlock key from your serial number and a so-called challenge
code. The challenge code is a ngerprint that Live takes of your computer's components.
1
http://www.ableton.com/register
Page 13
CHAPTER 3. UNLOCKING LIVE 11
For details, please see the corresponding section.
3.2.3 Unlocking Online
If the computer you want to unlock Live for is connected to the Internet, the only thing you
need to do is press the Unlock Online button. Live will then create a connection to the
Ableton server, send your serial number and challenge code, and receive the unlock key
from the server. No information other than this is exchanged between your computer and
the Ableton server.
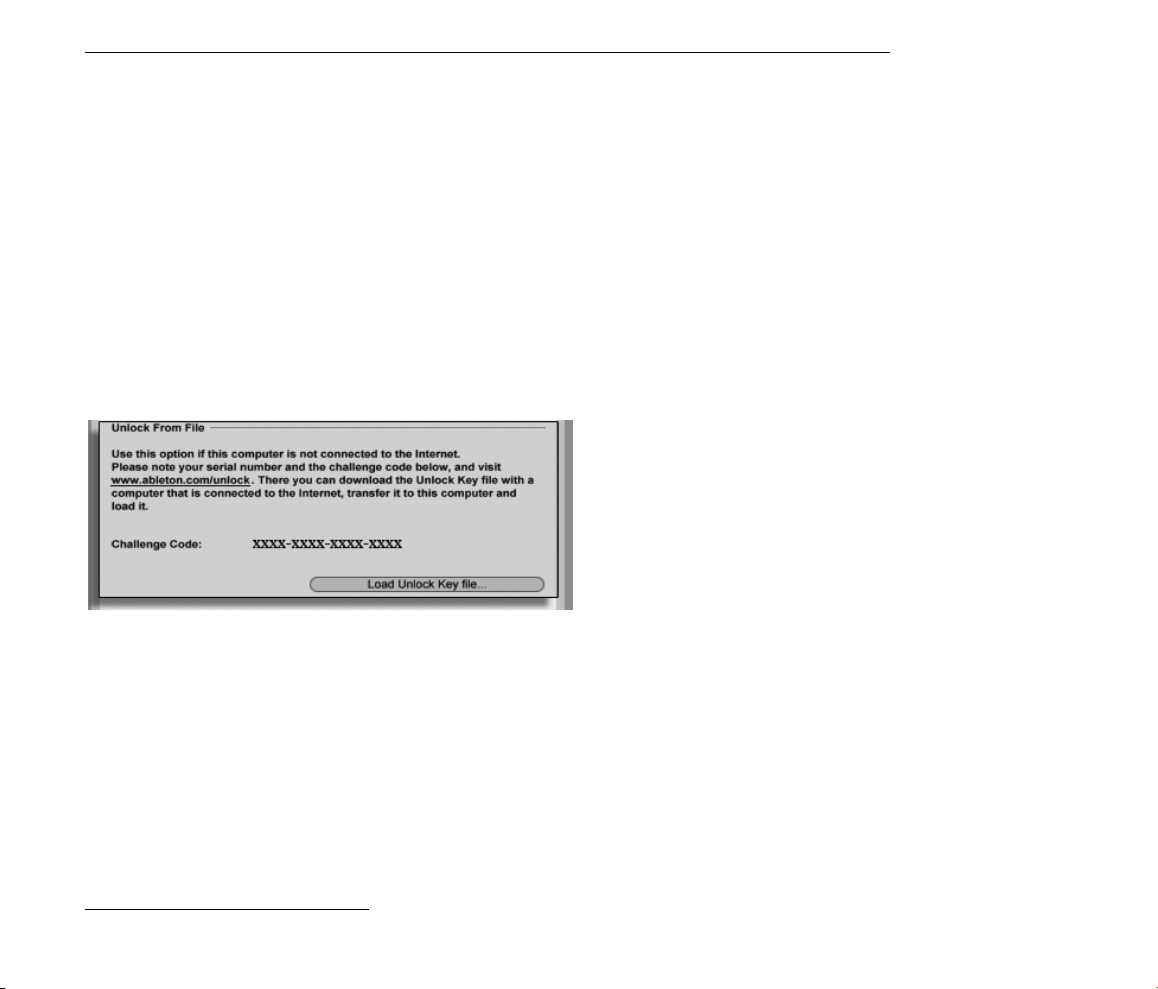
3.2.4 Unlocking Ofine
Unlocking Live Ofine.
If the computer you want to unlock Live for is not connected to the Internet, you can use
any other computer to access the Ableton server's web interface2. This is a website with
elds for entering your serial number and the challenge code, which you can copy from
Live's Unlock dialog.
If you have entered your serial number and challenge code correctly, another website will
appear to provide you with the unlock key. Follow the weblink to download the unlock key
as a le. Transfer the le to the target computer via some form of storage media, such as a
USB drive or CD-ROM. Then, press the Unlock dialog's Load Unlock Key button to load the
unlock key le.
2
http://www.ableton.com/unlock
Page 14

CHAPTER 3. UNLOCKING LIVE 12
3.3 Copy Protection FAQs
3.3.1 Can I Use Live or Other Ableton Products Without a Serial Num-
ber?
If you do not (yet) own Live or its add-on products, you can still try them out, but saving and
exporting will be disabled.
If trying Live or another product raises your interest in purchasing it, please visit the Ableton
webshop3. This site contains information about Ableton's distributor and dealer network. It
also offers you the opportunity to buy Ableton products online.
3.3.2 What if I Change My Computer's Components?
If the challenge code of your computer changes for some reason, Live will indeed ask
you to unlock the software another time. The challenge code does not change, however,
when computer peripherals are replaced (audio or MIDI hardware, printers, modems). The
challenge code may change if the motherboard, processor or network card is replaced. On
some computers, reformatting a hard drive also changes the challenge code.
3.3.3 Can I Unlock Live More than Once?
The standard Live license allows you to use Live on only one computer at a time. However,
if you have registered your product4, the Ableton server will provide you with two unlock
keys in good faith that you will use Live on only one machine at a time. Just proceed as
described in the corresponding section.
You can therefore run Live on both a studio desktop computer and a tour laptop, but not at
the same time.
Should the Ableton server reject your demand for another unlock key, please contact Ableton's technical support.
3
http://www.ableton.com/shop
4
http://www.ableton.com/register
Page 15

CHAPTER 3. UNLOCKING LIVE 13
They can be reached by:
E-mail5;
Telephone: +49 (0)30 - 288 763 151 (available Monday to Friday 11 to 15hrs CET);
Fax: +49 (0)30 - 288 763 11.
To speed up the process, please:
Register your copy of Live6;
Include a brief explanation of the circumstances.
To use Live on more than one computer at a time, you require a secondary license or a site
license. Ableton offers these licenses at special rates. Please contact the sales team7for
details.
3.3.4 Can I Play my Set from a Computer That Is Not Unlocked?
Even if Live is not unlocked, you can still load and perform a Live Set with no time limitation.
You cannot, however, save or export your work. When you go on tour, consider taking
along your Live program CD and a CD with the last state of your Live Set(s). In case of an
emergency, you can install and run Live on any computer available and play your backup
Live Set(s).
3.3.5 What Do I Do About Problems or Questions Regarding Copy Pro-
tection?
Please contact technical support8. They are happy to help!
5
support@ableton.com
6
http://www.ableton.com/register
7
orders@ableton.com
8
support@ableton.com
Page 16
14
Chapter 4
Live Concepts
This chapter introduces the essential concepts of Live. We advise you to read this chapter
early in your Live career, as a solid understanding of the program's basic principles will help
you fully exploit Live's potential for your music-making.
4.1 Live Sets
The type of document that you create and work on in Live is called a Live Set. Live Sets
reside in a Live Project a folder that collects related materials and can be opened either
through the File menu's Open command or via the built-in File Browsers.
A Live Set in the File
Browser.
Page 17

CHAPTER 4. LIVE CONCEPTS 15
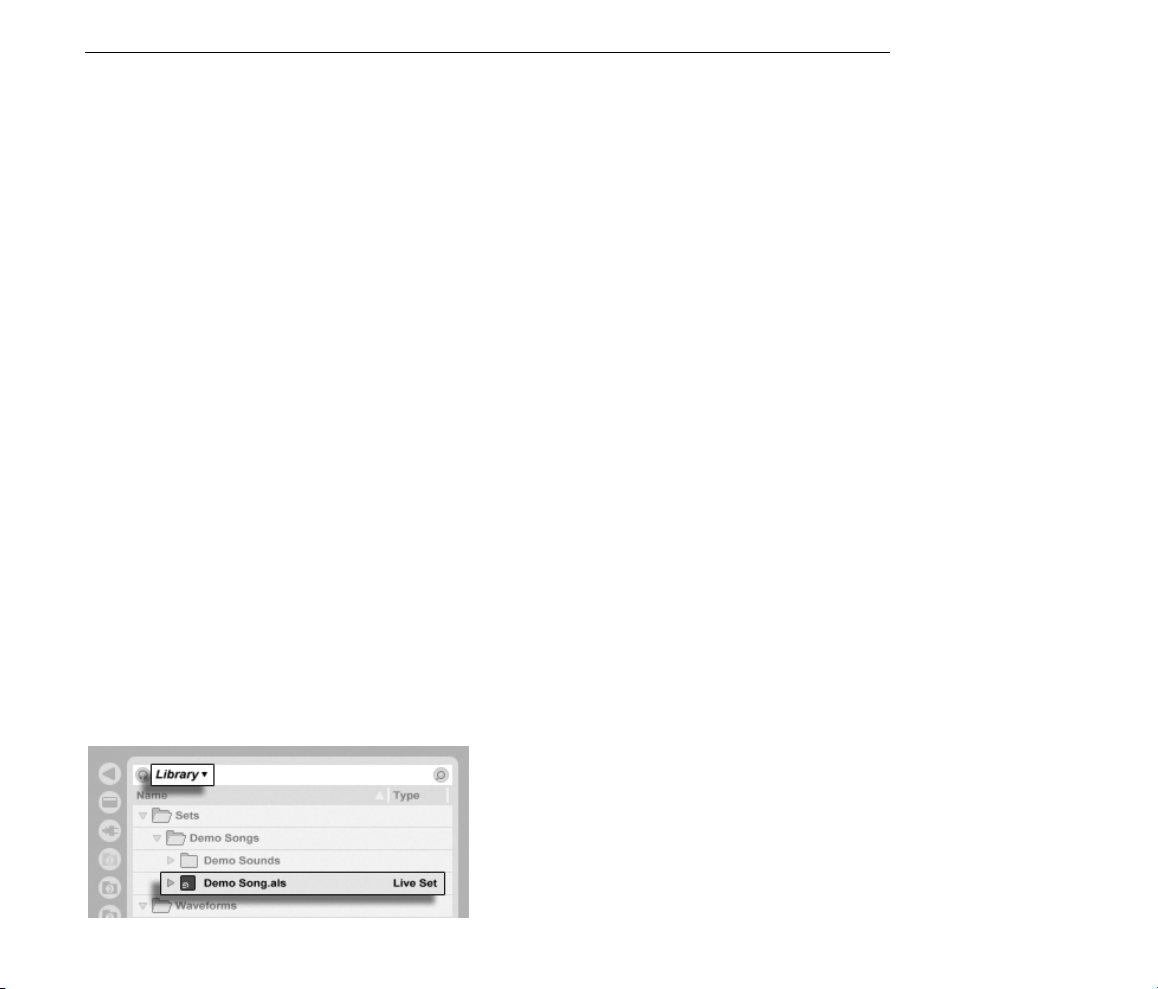
Selecting the Library bookmark in Live's File Browser will take you to the Live Library of
creative tools. There are a number of Demo Sets here, and double-clicking a Live Set's
name in the Browser will open that Live Set.
4.2 Arrangement and Session
The basic musical building blocks of Live are called clips. A clip is a piece of musical material:
a melody, a drum pattern, a bassline or a complete song. Live allows you to record and alter
clips, and to create larger musical structures from them: songs, scores, remixes, DJ sets or
stage shows.
A Live Set consists of two environments that can hold clips: The Arrangement is a layout of
clips along a musical timeline; the Session is a real-time-oriented launching base for clips.
Every Session clip has its own play button that allows launching the clip at any time and in
any order. Each clip's behavior upon launch can be precisely specied through a number of
settings.
Clips in the Session View
(Left) and in the
Arrangement View
(Right).
The Arrangement is accessed via the Arrangement View and the Session via the Session
View; you can toggle between the two views using the computer's Tab key or their respective
selectors. Because the two views have distinct applications, they each hold individual
collections of clips. However, it is important to understand that ipping the views simply
changes the appearance of the Live Set and does not switch modes, alter what you hear or
change what is stored.
The Arrangement and
Session View Selectors.
Page 18
CHAPTER 4. LIVE CONCEPTS 16
The Arrangement View and the Session View interact in useful (though potentially confusing)
ways. One can, for instance, improvise with Session clips and record a log of the improvi-
sation into the Arrangement for further renement. This works because Arrangement and
Session are connected via tracks.
4.3 Tracks
Tracks host clips and also manage the ow of signals, as well as the creation of new clips
through recording, sound synthesis, effects processing and mixing.
The Session and Arrangement share the same set of tracks. In the Session View, the tracks
are laid out vertically from left to right, while in the Arrangement View they are horizontal
from top to bottom. A simple rule governs the cohabitation of clips in a track:
A Track in the
Arrangement View.
A track can only play one clip at a time.
Therefore, one usually puts clips that should play alternatively in the same Session View
column, and spreads out clips that should play together across tracks in rows, or what we
call scenes.
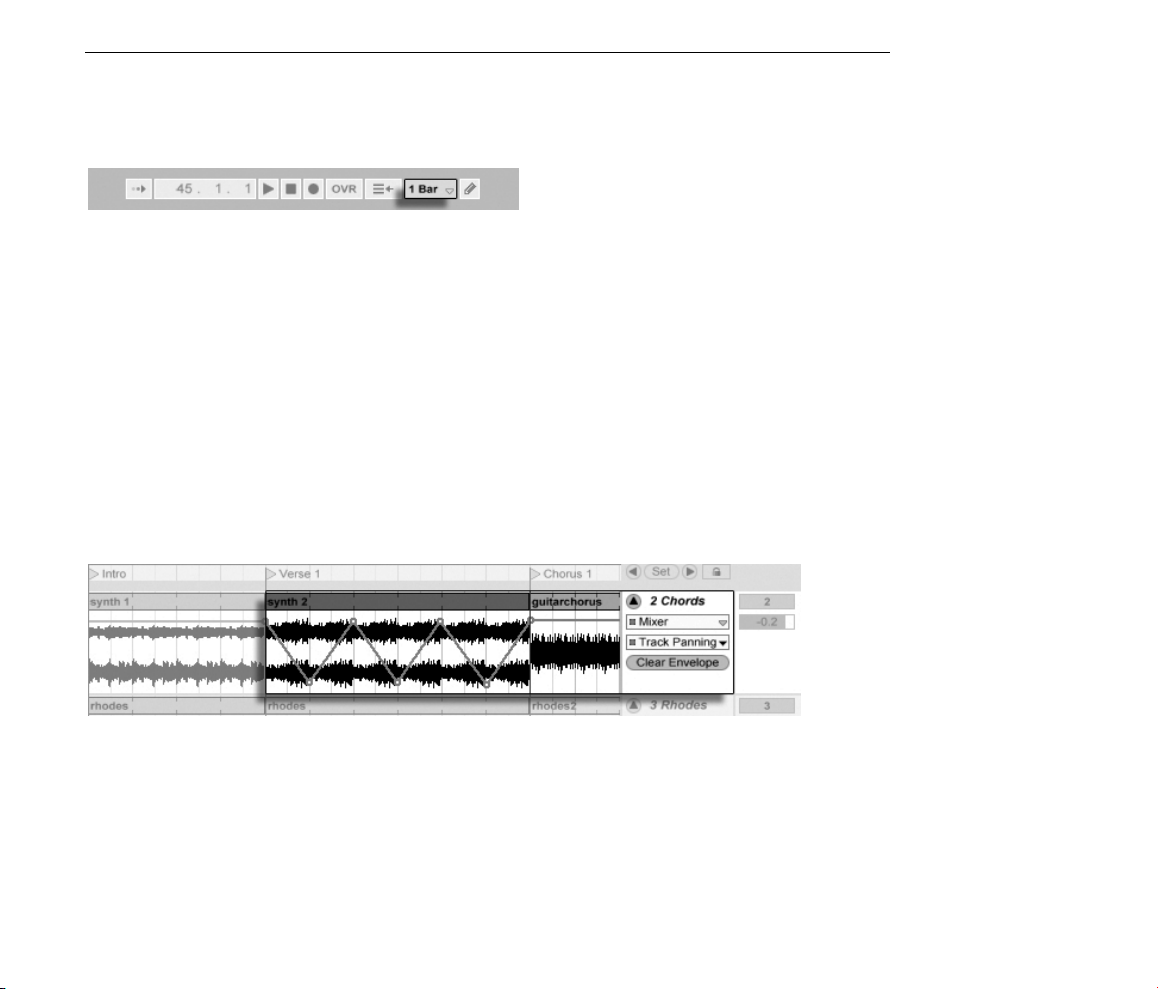
A Scene in the Session
View.
Page 19
CHAPTER 4. LIVE CONCEPTS 17
The exclusivity of clips in a track also implies that, at any on time, a track will either play a
Session clip or an Arrangement clip, but never both. So, who wins? When a Session clip
is launched, the respective track stops whatever it is doing to play that clip. In particular, if
the track was playing an Arrangement clip, it will stop it in favor of the Session clip even
as the other tracks continue to play what is in the Arrangement. The track will not resume
Arrangement playback until explicitly told to do so.
This is what the Back to Arrangement button, found in the Control Bar at the top of the
Live screen, is for. This button lights up to indicate that one or more tracks are currently not
playing the Arrangement, but are playing a clip from the Session instead.
We can click this button to make all tracks go back to the Arrangement. Or, if we like what
we hear, we can capture the current state into the Arrangement by activating the Record
button. Disengaging Record Mode or stopping Live using the Stop button leaves us with
an altered Arrangement.
4.4 Audio and MIDI
Clips represent recorded signals. Live deals with two types of signals: audio and MIDI. In the
digital world, an audio signal is a series of numbers that approximates a continuous signal
as generated by a microphone or delivered to a loudspeaker. A MIDI signal is a sequence
of commands, such as now play a C4 at mezzo piano. MIDI is a symbolic representation
of musical material, one that is closer to a written score than to an audio recording. MIDI
signals are generated by input devices such as MIDI or USB keyboards1.
The Back to
Arrangement Button.
It takes an
instrument to convert MIDI signals into audio signals that can actually be heard.
Some instruments, such as Live's Simpler, are for chromatic playing of one sound via the
keyboard. Other instruments, such as Live's Impulse, have a different percussion sound
assigned to each keyboard key.
1
For an introduction to digital audio and MIDI, please see http://img.uoregon.edu/emi/emi.php and
http://www.midi.org/
Page 20
CHAPTER 4. LIVE CONCEPTS 18
Audio signals are recorded and played back using audio tracks, and MIDI signals are
recorded and played back using MIDI tracks. The two track types have their own corresponding clip types. Audio clips cannot live on MIDI tracks and vice versa.
Information about inserting, reordering and deleting audio and MIDI tracks is found here.
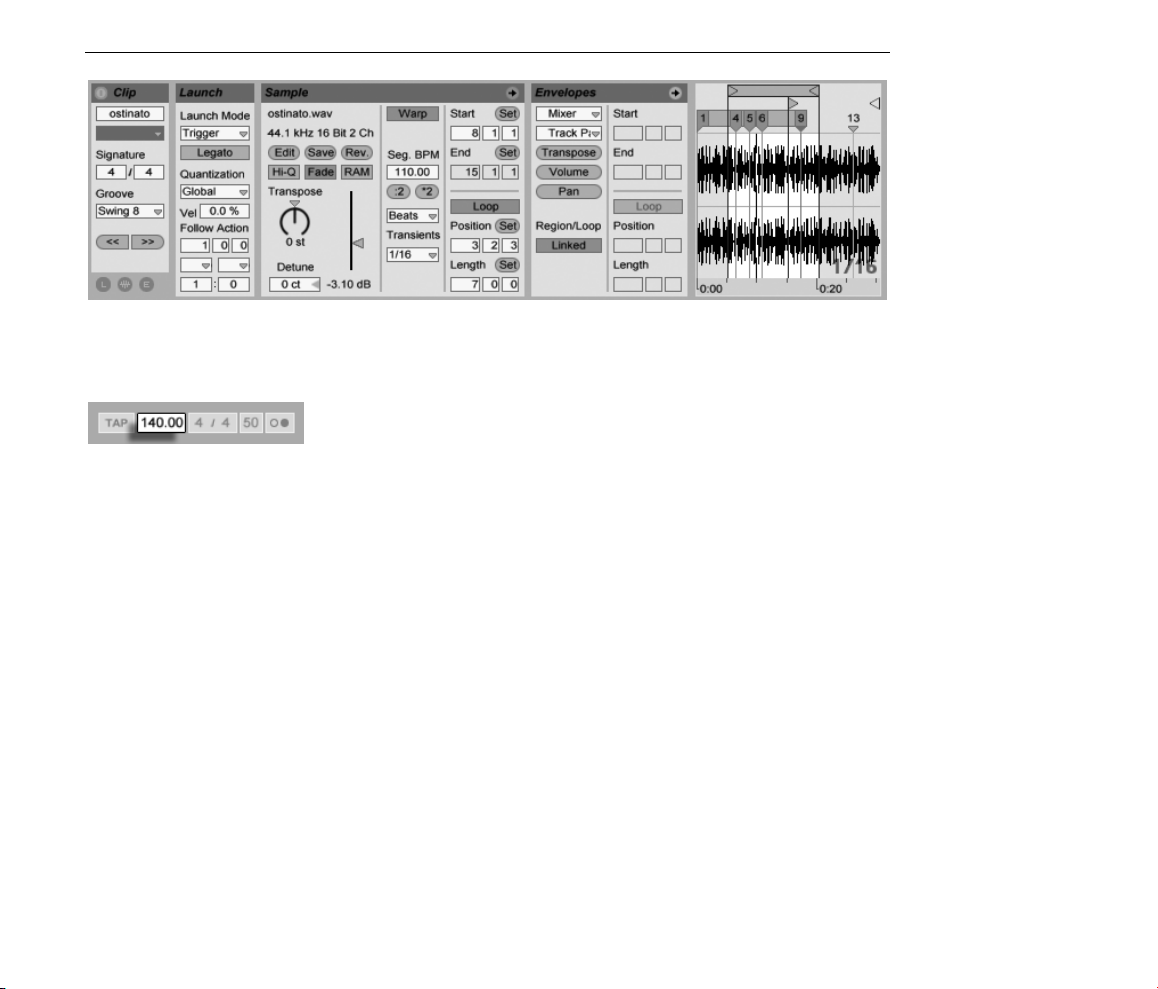
4.5 Audio Clips and Samples
An audio clip contains a reference to a sample (also known as a sound le or audio le)
or a compressed sample (such as an MP3 le). The clip tells Live where on the computer's
drives to nd the sample, what part of the sample to play and how to play it.
When a sample is dragged in from one of Live's built-in File Browsers, Live automatically
creates a clip to play that sample. Prior to dragging in a sample, one can audition or
preview it directly in the Browser; the switch in the Browser with the headphone icon
activates previewing.
Live offers many options for playing samples in exciting new ways, allowing you to create an
abundance of new sounds without actually changing the original sample all the changes
are computed in real time, while the sample is played. The respective settings are made in
the Clip View, which appears on screen when a clip is double-clicked.
Samples Are Dragged in
from Live's File Browsers.
Page 21
CHAPTER 4. LIVE CONCEPTS 19
An Audio Clip's
Properties as Displayed
in the Clip View.
Many powerful manipulations arise from Live's
warping capabilities. Warping means chang-
ing the speed of sample playback independently from the pitch so as to match the song
tempo. The tempo can be adjusted on the y in the Control Bar's Tempo eld.
The most elementary use of this technique, and one that usually requires no manual setup,
is synchronizing sample loops to the chosen tempo. Live's Auto-Warp algorithm actually
makes it easy to line up any sample with the song tempo, such as a recording of a drunken
jazz band's performance. It is also possible to radically change the sonic signature of a
sound using extreme warp settings.
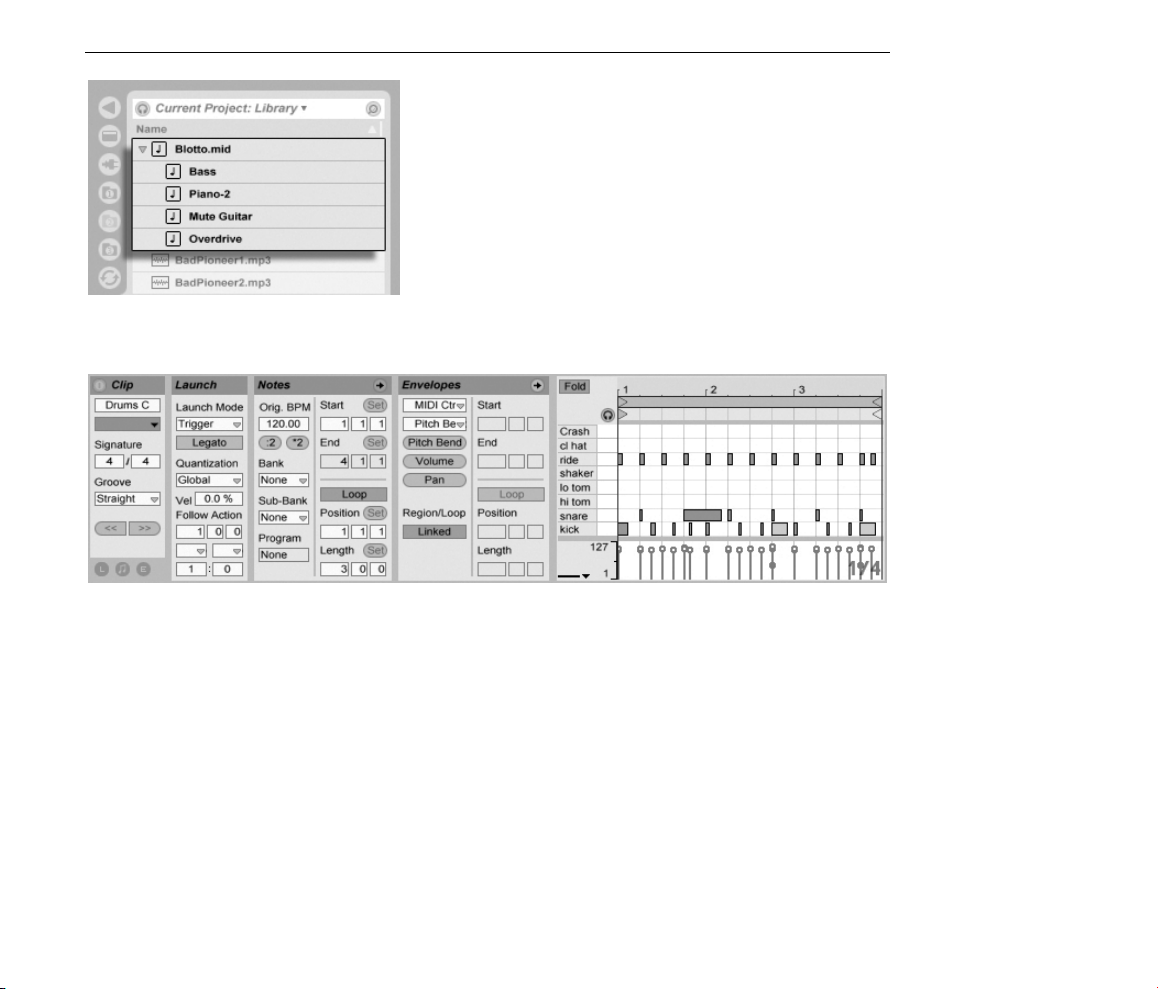
4.6 MIDI Clips and MIDI Files
A MIDI clip contains musical material in the form of MIDI notes and controller envelopes.
When MIDI is imported from a MIDI le, the data gets incorporated into the Live Set, and
the original le is not referenced thereafter. In the Live File Browsers, a MIDI le appears
as a folder that can be opened to reveal its individual component tracks, which can be
selectively dragged into the Live Set.
The Control Bar's Tempo
Field.
Page 22
CHAPTER 4. LIVE CONCEPTS 20
As you'd expect, a MIDI clip's contents can be accessed and edited via the Clip View, for
instance to change a melody or paint a drum pattern.
MIDI Files Are Dragged
in from Live's File
Browsers.
A MIDI Clip's Properties
as Displayed in the Clip
View.
4.7 Devices and the Mixer
A track can have not only clips but also a chain of devices for processing signals. Doubleclicking a track's title bar brings up the Track View, which shows the track's device chain.
Page 23
CHAPTER 4. LIVE CONCEPTS 21
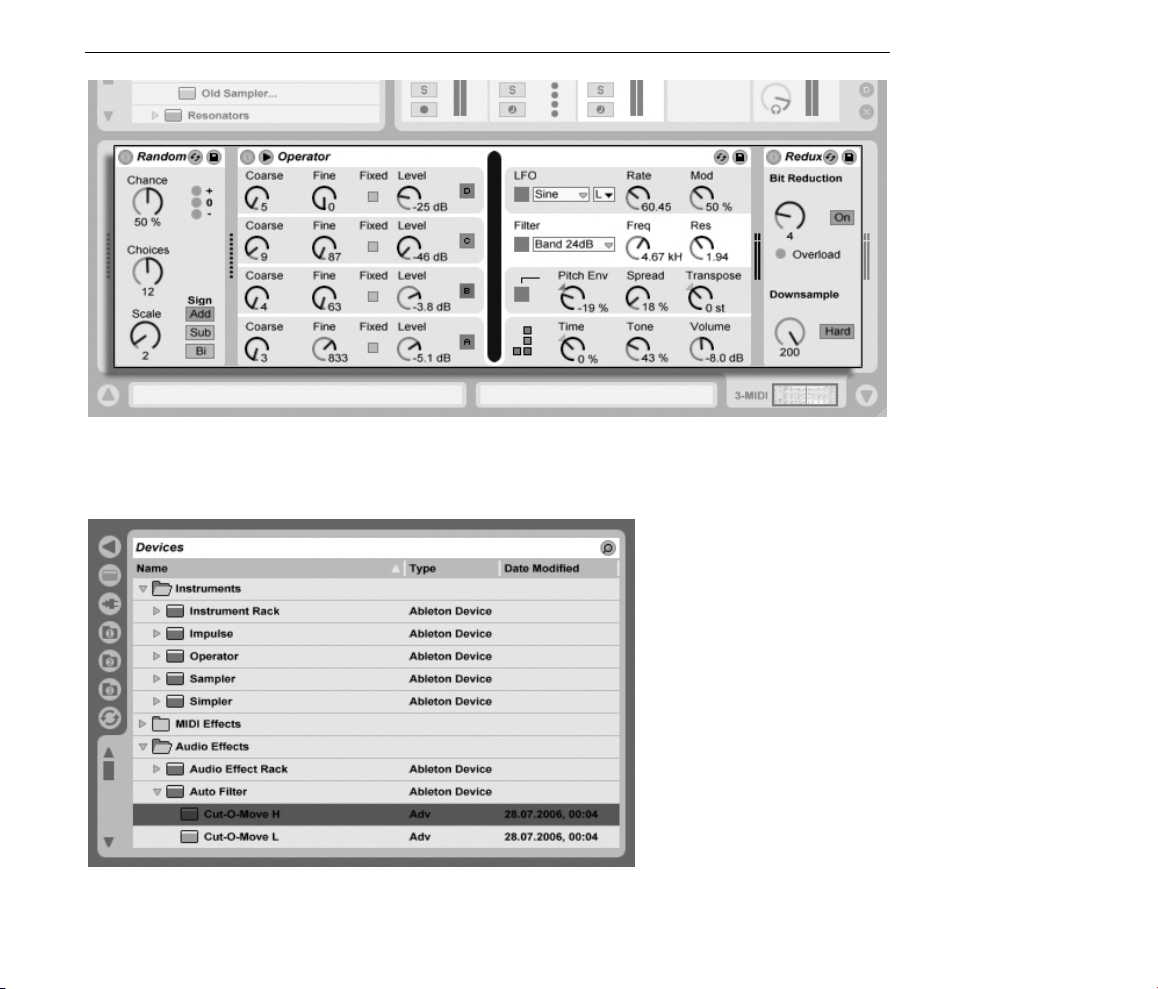
Live's built-in audio effects, MIDI effects and instruments are available from the Device
Browser and can be added to tracks by dragging them from there into the Track View, or
into a Session or Arrangement track.
The Track View
Displaying a MIDI Track's
Device Chain.
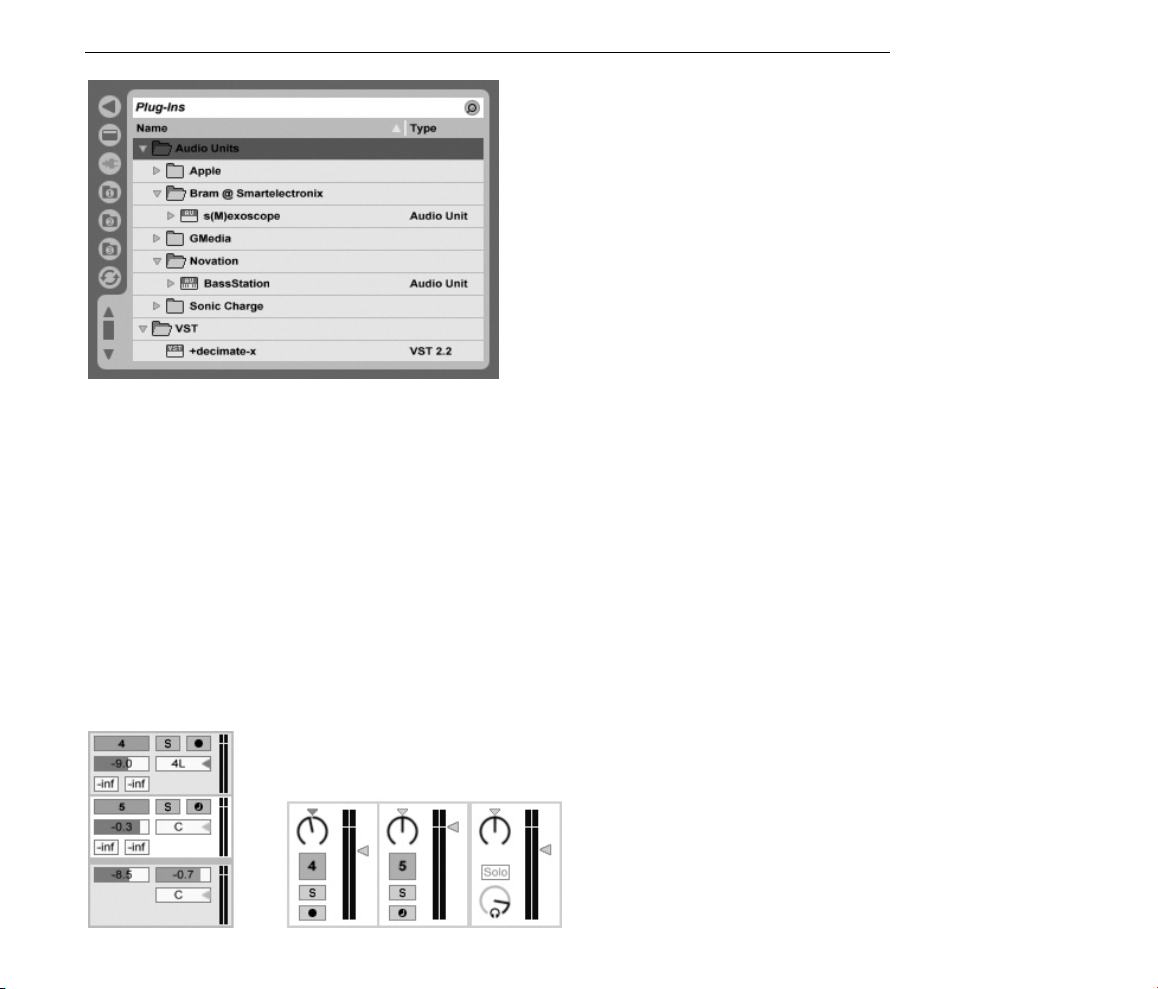
You can also use plug-in devices in Live. VST and Audio Units (Mac OS X only) Plug-ins are
available from the Plug-In Device Browser.
Live's Built-in Devices
Are Available from the
Device Browser.
Page 24
CHAPTER 4. LIVE CONCEPTS 22
Consider an audio clip playing in an audio track. The audio signal from the clip reaches
the leftmost device in the chain. This device processes (changes) the signal and feeds the
result into the next device, and so on. The number of devices per track is theoretically
unlimited, (although there is a limit of eight instruments and twelve audio effects within a
single set when using Live LE). In practice, the computer's processor speed also imposes a
limit on the number of devices you can use at the same time, a topic that deserves separate
discussion. Note that the signal connections between audio devices are always stereo, but
the software's inputs and outputs can be congured to be mono in the Audio Preferences.
Plug-In Devices Are
Available from the
Plug-In Device Browser.
When the signal has passed through the device chain, it ends up in Live's mixer. As the
Session and Arrangement share the same set of tracks, they also share the mixer. The mixer
can be shown in both views for convenience. To optimize the screen layout, the individual
mixer sections can be shown or hidden using the View menu's entries.
The Live Mixer in the
Arrangement View (Left)
and Session View (Right).
Page 25
CHAPTER 4. LIVE CONCEPTS 23
The mixer has controls for volume, pan position and sends, which adjust the contribution
each track makes to the input of any return tracks. Return tracks only host effects, and not
clips. Via their sends, all tracks can feed a part of their signal into a return track and share
its effects.
The mixer also includes a crossfader, which can create smooth transitions between clips
playing on different tracks. Live's crossfader works like a typical DJ mixer crossfader, except
that it allows crossfading not only two but any number of tracks including the returns.
Devices that receive and deliver audio signals are called audio effects. Audio effects are the
only type of device that t in an audio track or a return track. However, two more types of
devices are available for use in MIDI tracks: MIDI effects and instruments.
Consider a MIDItrack playing a clip. The MIDI signal from the clip is fed into the track's device
chain. There, it is rst processed by any number of MIDI effects. A MIDI effect receives
and delivers MIDI signals. One example is the Scale effect, which maps the incoming
notes onto a user-dened musical scale. The last MIDI effect in the chain is followed by an
instrument. Instruments, for instance Live's Simpler and Impulse, receive MIDI and deliver
audio. Following the instrument, the signal can be additionally processed by audio effects
as in an audio track.
Live's Crossfader.
If a MIDI track has no instrument (and no audio effects), then the track's output is a plain
MIDI signal, which has to be sent somewhere else to be converted into audio. In this case,
A MIDI Effect, an
Instrument and an Audio
Effect in a MIDI Track.
Page 26
CHAPTER 4. LIVE CONCEPTS 24
the track's mix and Send controls disappear from the mixer.
4.8 Presets and Racks
Every Live device can store and retrieve particular sets of parameter values as presets. As
presets are stored independently from Live Sets, new presets become part of a library that
any project can draw from.
Live's Instrument, Drum and Effect Racks allow saving combinations of devices and their
settings as a single preset. This feature allows for the creation of powerful multi-device
creations and effectively adds all the capabilities of Live's MIDI and audio effects to the
built-in instruments.
The Mixer for a MIDI
Track without an
Instrument.
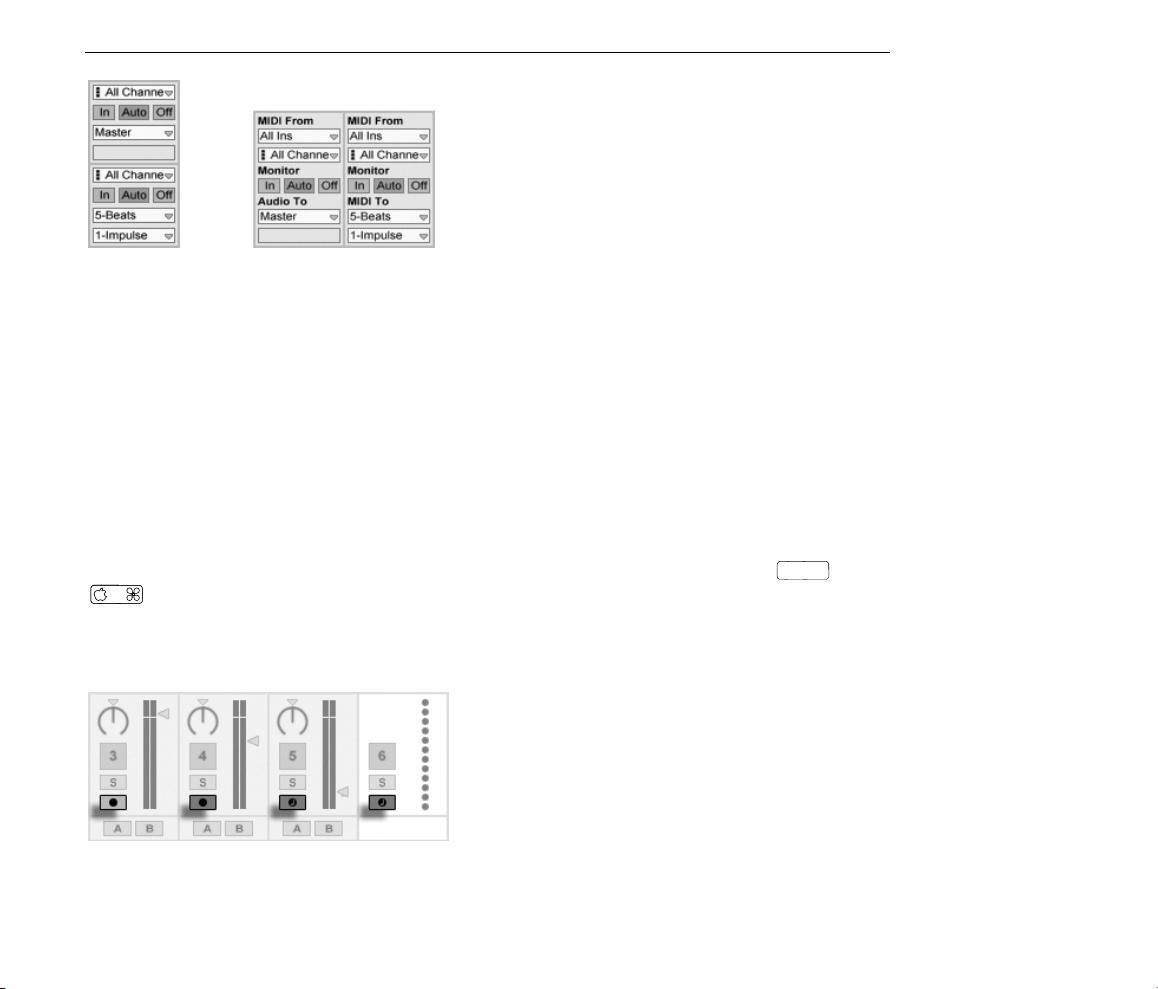
4.9 Routing
As we have seen, all tracks deliver signals, either audio or MIDI. Where do these signals
go? This is set up in the mixer's In/Out section, which offers, for every track, choosers to
select a signal source and destination. The In/Out section, accessible through the View
menu's In/Out option, is Live's patchbay. Its routing options enable valuable creative and
technical methods such as resampling, submixing, layering of synths, complex effects setups
and more.
Page 27
CHAPTER 4. LIVE CONCEPTS 25
Ctrl
Signals from the tracks can be sent to the outside world via the computer's audio and MIDI
interfaces or to other tracks or devices within Live.
Likewise, a track can be set up to receive an input signal to be played through the track's
devices. Again, tracks can receive their input from the outside or from another track or
device in Live. The Monitor controls regulate the conditions under which the input signal is
heard through the track.
4.10 Recording New Clips
Audio tracks and MIDI tracks can record their input signal and thereby create new clips.
Recording is enabled on a track by pressing its Arm button (Hold down the
(Mac) modier to arm several tracks at once). If the Exclusive Arm option is enabled
in the Record Preferences, inserting an instrument into a new or empty MIDI track will
automatically arm the track. When the Control Bar's Record button is on, every armed track
records its input signal into the Arrangement. Every take yields a new clip per track.
(PC) /
Track Routing Is Set up
Using the In/Out Section
in the Arrangement (Left)
or Session View (Right).
Track Arm Buttons, as
They Appear in the
Session View.
It is also possible to record into Session View slots on the y. This technique is very
useful for the jamming musician, as Session recording does not require stopping the music.
When a track is armed, its Session slots exhibit Clip Record buttons, and clicking one of
Page 28
CHAPTER 4. LIVE CONCEPTS 26
these commences recording. Clicking the Clip Record button again denes the end of
the recording and launches the new clip. As these actions are subject to real-time launch
quantization, the resulting clips can be automatically cut to the beat.
Session recording in conjunction with the Overdub option and Record Quantization is the
method of choice for creating drum patterns, which are built up by successively adding
notes to the pattern while it plays in a loop. It only takes a MIDI keyboard (or the computer
keyboard) and a MIDI track with Live's Impulse percussion instrument to do this.
4.11 Automation Envelopes
Often, when working with Live's mixer and effects, you will want the controls' movements
to become part of the Arrangement. The movement of a control across the Arrangement
timeline is called automation; a control whose value changes in the course of this timeline is
automated. Automation is represented in the Arrangement View by breakpoint envelopes,
which can be edited and drawn.
The Control Bar's
Quantization Chooser.
Practically all mixer and effect controls in Live can be automated, even the song tempo.
Creating automation is straightforward: All changes of a control that occur while the Control
Bar's Record switch is on become automation.
Changing an automated control's value while not in Record Mode is similar to launching a
Session clip while the Arrangement is playing: It deactivates the control's automation (in
favor of the new control setting). The control will stop tracking its automation and rest
with the new value until the Back to Arrangement button is pressed, which will resume
Arrangement playback.
The Automated Pan
Control and its
Envelope.
Page 29
CHAPTER 4. LIVE CONCEPTS 27
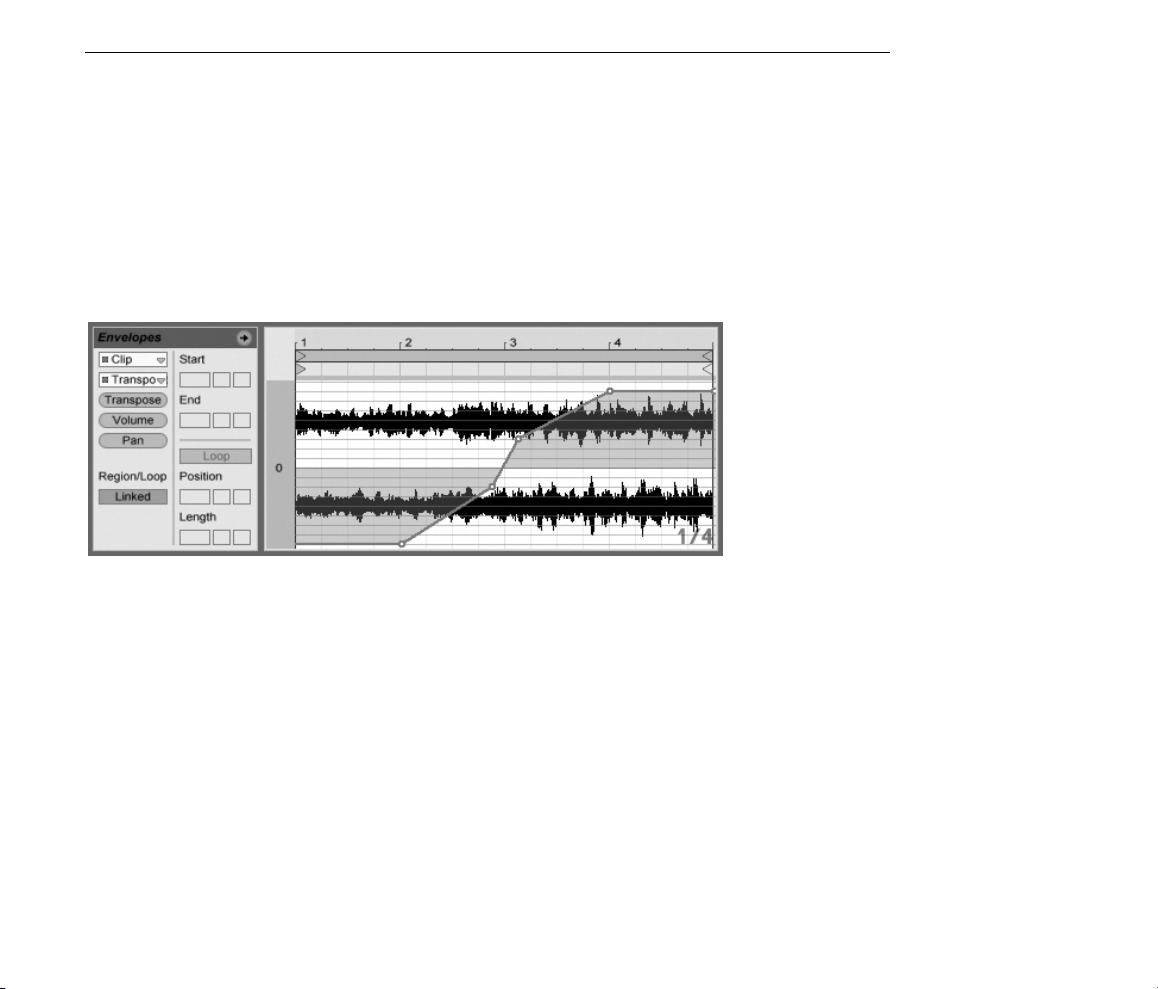
4.12 Clip Envelopes
Envelopes are found not only in tracks but also in clips. Clip envelopes are used to modulate
device and mixer controls. Audio clips have, in addition, clip envelopes to inuence the
clip's pitch, volume and more; these can be used to change the melody and rhythm of
recorded audio. MIDI clips have additional clip envelopes to represent MIDI controller
data. Clip envelopes can be unlinked from the clip to give them independent loop settings,
so that larger movements (like fade-outs) or smaller gestures (like an arpeggio) can be
superimposed onto the clip's material.
An Envelope for Clip
Transposition.
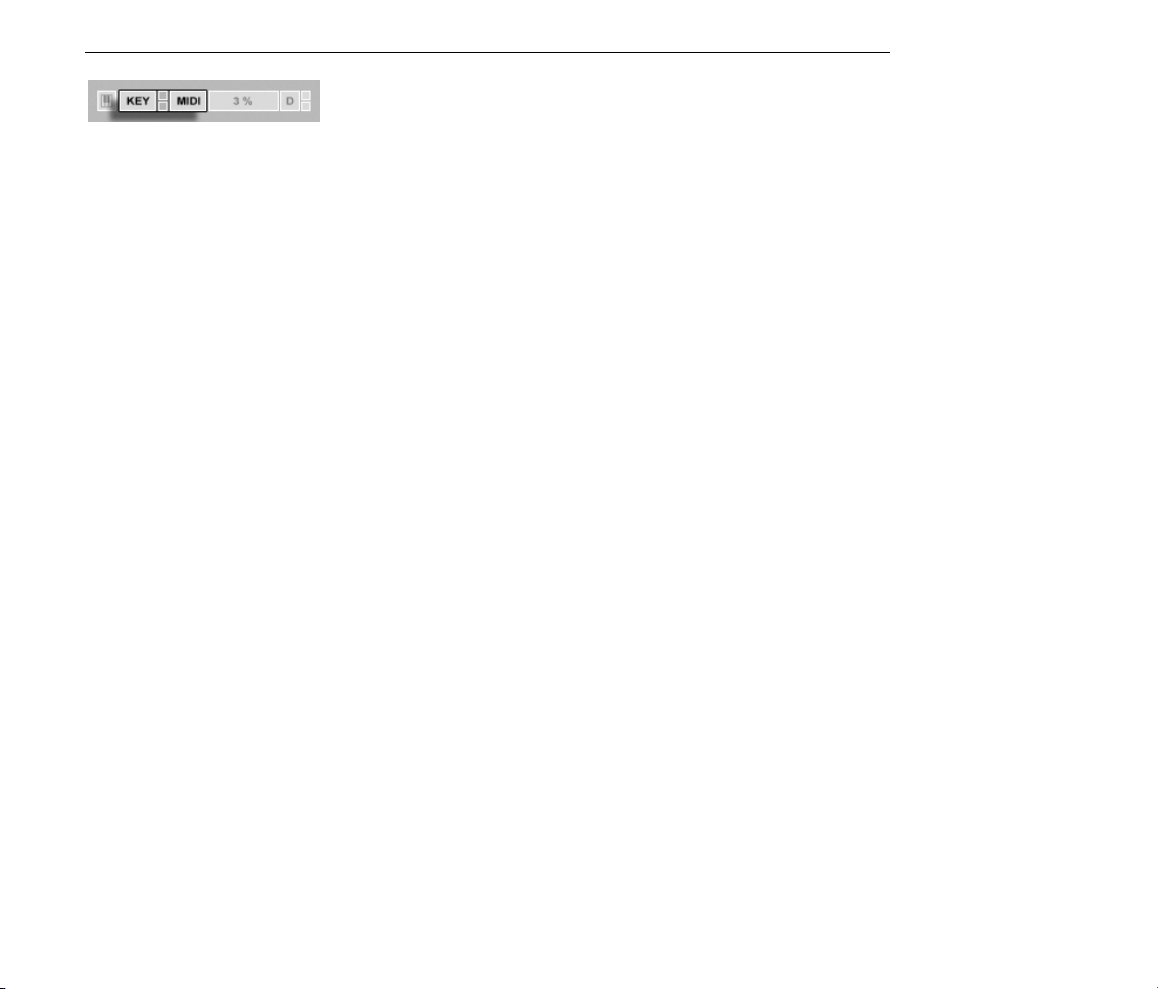
4.13 MIDI and Key Remote
To liberate the musician from the mouse, most of Live's controls can be remote-controlled
via an external MIDI controller. Remote mappings are established in MIDI Map Mode, which
is engaged by pressing the MIDI switch in the Control Bar.
In this mode, you can click on any mixer or effect control, and then assign it to a controller
simply by sending the desired MIDI message (for example, by turning a knob on your MIDI
control box). Your assignments take effect immediately after you leave MIDI Map Mode.
Session clips can be mapped to a MIDI key or even a keyboard range for chromatic playing.
MIDI keys and controllers that have been mapped to Live's controls are not available for
recording via MIDI tracks. These messages are ltered out before the incoming MIDI is
passed on to the MIDI tracks.
Page 30
CHAPTER 4. LIVE CONCEPTS 28
Session clips, switches, buttons and radio buttons can be mapped to computer keyboard
keys as well. This happens in Key Map Mode, which works just like MIDI Map Mode.
Live offers, in addition to this general purpose mapping technique, dedicated support for
Mackie Control-compatible mixer surfaces, which allows for mouse-free operation of the
program.
4.14 Saving and Exporting
Saving a Live Set saves everything it contains, including all clips, their positions and settings,
and settings for devices and controls. An audio clip can, however, lose the reference to its
corresponding sample if it is moved or deleted from disk. The links between samples and
their clips can be preserved with a special command, Collect and Save, which makes a copy
of each sample and stores it in a project folder along with the Live Set.
A separate Save button in the Clip View saves a set of default clip settings along with the
sample, so that each time the sample is dragged into the program, it will automatically
appear with these settings. This is especially useful if you have made warp settings for a clip
and want to use it in multiple Live Sets.
The Key/MIDI Map
Controls.
Exporting audio from Live can be done from both the Session and Arrangement Views.
Live will export the audio coming through on the Master output as an audio le of your
specications via Export Audio.
Live can also export individual MIDI clips as MIDI les.
Exporting and saving material for later use in Live can be done very conveniently with the
Live Clip format. Session View clips can be dragged back out of a Live Set to the File
Browsers, and thereby exported to disk as Live Clips.
Page 31

CHAPTER 4. LIVE CONCEPTS 29
Live Clips are a very powerful way of storing ideas, as they save not only the clip's Clip View
settings, but also the corresponding track's instruments and effects chain. Live Clips in the
Browser can be previewed and added to any open Live Set just like sample les. In the Live
Set, they restore the original clip's creative options.
Using Live Clips, you can build your own personalized library of:
MIDI sequences with matching instruments and effects, e.g., a MIDI drum pattern with
the associated Impulse and effects settings;
Different regions or loops referencing the same source le;
Variations of a sample loop created by applying Warp Markers, clip envelopes and
effects;
Ideas that may not t your current project but could be useful in the future.
A Live Clip in the File
Browser.
4.15 The Library
The Live Library acts as a repository of sounds that are available to all projects. In Live's
File Browsers, the Library is accessible through a bookmark. Bookmarks can be selected by
clicking the Browser's title bar to open the Bookmark menu:
Page 32

CHAPTER 4. LIVE CONCEPTS 30
The rst time you run Live, it will automatically install its Library to your standard user folder.
You can, of course, move it to a new location. After installation the Library will already
contain a few sound ideas, courtesy of Ableton. We encourage you to experiment with this
material to get a sense of what the program can do, but we do not recommend removing
or changing the contents of the factory Library.
Ableton provides additional Library content in the form of Live Packs which are available
from installation CDs, DVDs or the Ableton website2. Owners of a boxed version of Live can
enjoy the Essential Instrument Collection, a multi-gigabyte library of meticulously sampled
and selected instruments.
Choosing the Library
Bookmark.
2
http://www.ableton.com/downloads
Page 33

31
Chapter 5
Managing Files and Sets
Various types of les are used in making music with Live, from those containing MIDI and
audio, to more program-specic les such as Live Clips and Live Sets. This chapter will
explain everything you need to know about working with each of these le types in Live.
However, we should rst take a look at Live's File Browsers, through which most les arrive
in the program.
5.1 Working with the File Browsers
Live offers three File Browsers which can be accessed via their selector buttons.
Page 34

CHAPTER 5. MANAGING FILES AND SETS 32
Ctrl
Each Browser can point to a different disk location, which Live will remember across sessions.
The Browser display is divided into columns corresponding to Name, Date, etc., which
you can show and hide using the (PC) /
(Mac) context menu options.
Columns can be reordered by drag and drop. To resize the columns, drag their divider lines
horizontally.
The File Browser
Selector Buttons.
Showing/Hiding Browser
Columns.
Resizing Browser
Columns.
5.1.1 Browsing the Folder Hierarchy
Each of the three File Browsers has its own root directory, shown at the top of the Browser,
the contents of which are available for browsing below.
Page 35

CHAPTER 5. MANAGING FILES AND SETS 33
Ctrl
Return
Ctrl
Alt
Alt
Ctrl
The Browser root can easily be changed: The topmost Browser item, called Parent Folder,
will move the Browser root up one step up in the disk hierarchy when double-clicked.
You can also set the Browser root to any folder in the Browser via the (PC) /
(Mac) context menu, by double-clicking the folder, or by selecting it and pressing
.
Library Is this
Browser's Root.
The File Browser's
Parent Folder Item.
Moving through theles in Live's Browser can be done with either the mouse or the computer
keyboard:
Scroll up and down in the Browser with and , the mousewheel, or by clicking
and dragging while holding the
Close and open folders with and .
Jump to the parent folder of any closed folder using . (Hint: If executed on a
(PC) /
(Mac) modier.
top-level folder, this is an alternative to selecting the Parent Folder item, and will
move the Browser root up one level.)
To clean up the Browser, use (PC) /
(Mac) to access the context menu, and
A Folder in the Browser.
Page 36

CHAPTER 5. MANAGING FILES AND SETS 34
Ctrl
F
F
then select the Close All Folders option to show only top-level folders. Double-clicking a
File Browser's selector button will do the same.
5.1.2 Browser Bookmarks
Using bookmarks, you can quickly save and recall frequently used folder locations in the
Browser. Clicking in the Browser's title bar will open the Bookmark menu.
The Bookmark menu lists a number of preset bookmarks such as Desktop and Library.
Selecting the latter will bring you to the Live Library. To bookmark the current Browser root,
choose the Bookmark menu's topmost item, the Bookmark Current Folder command. Note
that if the current Browser root is already bookmarked, the topmost option in the Bookmark
menu will remove the bookmark. All File Browsers share the same set of bookmarks; a
bookmark stored in one Browser can be accessed from another.
The Bookmark Menu.
5.1.3 Searching for Files
Live's File Browsers are equipped with a search function for nding les. Clicking the
Search button in the upper right cor ner of the Browser or using the
(Mac) shortcut will open the Browser's Search Mode.
(PC) /
Page 37

CHAPTER 5. MANAGING FILES AND SETS 35
Return
Return
After entering your search terms, begin the search by clicking the Go button or pressing
on your computer keyboard.
Live will search the entire Browser root for your search terms. The results will include les
that match all search terms, as opposed to any. For example, if you search for acoustic
bass, the search will yield all acoustic bass sounds not all acoustic sounds and all bass
sounds.
By default, the search function matches the entered criteria not only to any part of a le's
name and sufx (e.g., .wav) but also to any part of its le path. This means that a search
for bass, for example, will yield not only les with names containing the word bass
but also those located in folders with names containing the word bass. Compressed
sample metadata tags are also included in the search, making it possible to search for
songs from a specic album or artist, for example. Searching le paths and metadata can
be deactivated with the Search In Path and Search In Metadata settings, available in the
Preferences' File/Folder tab. The names of MIDI tracks within multitrack MIDI les are also
included in searches.
Activating Browser
Search Mode.
The Search Field and Go
Button.
Live maintains an index of the hard disk so that it can deliver search results instantly. The
index is kept up to date as you create, install, delete, rename and move les within Live
it has no way of knowing, however, what you are doing outside of Live. If you have
subsequently moved les using programs other than Live, the initial results of a search
might be incomplete. The Go button's label will change to Rescan. If you can't nd a le
in the search results, or need to be sure that the results are comprehensive, click the Rescan
button (or
once more), and Live will rebuild its index for the current Browser root.
Page 38

CHAPTER 5. MANAGING FILES AND SETS 36
Automatic rescanning for new searches can be activated and deactivated in the File/Folder
Preferences.
While a search/rescan is going on, the adjacent search button is labeled Stop. Rescanning
happens in the background, and you can keep making music while Live does its work, but
you can also abort the search with this button if the disk trafc is bothering you.
You can go back to the Browser's folder view at any time by closing the search eld.
If you select a le from the search results and then close the search eld, Live makes sure
that le remains selected in the folder view, opening folders as required:
The Rescan Button.
Closing the Search
Field...
If a search is in progress, closing the eld immediately stops the search, although navigating
to other Browsers does not. In fact, while you're waiting for a search to nish in one Browser,
you can initiate separate searches in the others. A Browser that is in an active search will
... Locates the File Last
Selected Among the
Search Results.
Page 39

CHAPTER 5. MANAGING FILES AND SETS 37
Ctrl
F
F
Return
Ctrl
F
F
Return
indicate this via a small rotating ring on the Browser button.
For mouse-free searching, we suggest the following sequence of shortcuts:
The Rotating Ring
Means That a Search is
in Progress.
1)
(PC) /
(Mac) to open the search eld;
2) Type your search terms;
3)
to Go;
4) to jump to the search results;
5) and to scroll the search results;
6)
(PC) /
(Mac) to close the search eld and go
back to the folder view.
5.1.4 Previewing Files
Live allows you topreview les in the File Browser before they are imported into the program.
Previewing is activated using the Browser's Preview switch.
Hint: You can preview les even when the Preview switch is not activated by pressing
.
The Preview Switch.
Page 40
CHAPTER 5. MANAGING FILES AND SETS 38
Click on the les (or use and ) to select and listen to them. If the transport is running,
Live tries to preview les in sync with the current Live Set, so that you can better judge
which samples will work for you. If the transport is stopped, les will preview at their original
tempo.
The previewing volume can be adjusted using the mixer's Preview Volume knob.
If your audio hardware offers multiple audio outs, you can privately audition, or cue, les
via headphones connected to a separate pair of outs while the music continues to play.
To learn how to set up Live for cueing, please refer to the relevant section of the Mixing
chapter.
5.1.5 Adding Clips from the Browser
There are several ways to add clips to a Live Set:
The Preview Volume
Knob.
Files can be dragged and dropped from the File Browsers into tracks in the Session or
Arrangement View. Dragging and dropping material from the Browser into the space
to the right of Session View tracks or below Arrangement View tracks will create a new
track and place the new clip(s) there.
Page 41

CHAPTER 5. MANAGING FILES AND SETS 39
Return
Ctrl
R
R
Esc
Ctrl
Delete
In the Session View, double-clicking or pressing
on a le in the Browser will
automatically create a new track to the right of the other tracks and load it with the
clip.
Files can be dropped directly into Live from the Explorer (Windows)/Finder (Mac).
5.1.6 File Maintenance in the Browser
You can use Live's File Browsers for all of the le maintenance activities that you are familiar
with on your operating system.
Move les and folders by dragging and dropping, or by copying/cutting and pasting.
Copying, cutting and pasting can be done with either Edit menu commands or key-
board shortcuts. A le can be moved from one File Browser to another by dragging it
over the target Browser's button.
Dropping a Clip to
Create a New Track.
Rename les and folders using the Edit menu's Rename command or the
(PC) /
Create folders by opening the context menu with (PC) /
(Mac) shortcut. Cancel renaming with the
key.
(Mac), and then
selecting the Create Folder command.
Delete les and folders using the Edit menu's Delete command or your computer's
or
key. Deleting items within Live moves them to the system trash; if
necessary, you can recover items from the system trash via your computer's operating
system.
Page 42

CHAPTER 5. MANAGING FILES AND SETS 40
Return
Return
5.1.7 Hot-Swap Mode
In addition to the drag-and-drop method of loading les from the Browser, Live offers a
Hot-Swap Mode to save you mouse travel. Hot-Swap Mode establishes a temporary link
between the Browser and, for example, a virtual instrument. While in Hot-Swap Mode,
you can step through samples or presets to audition them in place, that is, within the
instrument. Hot-swapping for presets is covered in the Live Device Presets section. Let's go
through an example of hot-swapping samples:
Live's built-in Impulse instrument features eight sample-player slots that can be lled by
dropping samples into them. Alternatively, we can click the Hot-Swap button that appears
as we move the mouse over a slot.
Clicking the Hot-Swap button engages Hot-Swap Mode: Live's Hot-Swap Browser opens,
and the Hot-Swap icon appears next to one of the les shown.
The Hot-Swap Button in
an Impulse Slot.
While in Hot-Swap Mode, pressing the
(presumably while Impulse is playing incoming MIDI notes); pressing , then
key loads that le into the Impulse slot
loads
the next sample, and so on. Instead of using the keys, we can also double-click on a sample
to load it. The link between the Browser and the instrument will be broken if a different view
The Hot-Swap Browser.
Page 43

CHAPTER 5. MANAGING FILES AND SETS 41
Esc
is selected, or if the Hot-Swap button is pressed again. Hot-swapping can also be cancelled
with a press of the
key.
When Hot-Swap Mode is re-entered, the Hot-Swap Browser will try to reconstruct what you
saw when you loaded the current le into the Impulse slot. If, for instance, the current
le was found by searching for gretsch kick, the Hot-Swap Browser will come up with
that search string in the search eld. In our example, we were hot-swapping for an empty
Impulse slot, so Live came up with something appropriate: a search for Drum Kick in
Library/Samples/Waveforms.
5.2 Sample Files
A sample is a le that contains audio data. Live can play both uncompressed le formats
(WAV, AIF and Sound Designer II for Mac) and compressed le formats (MP3, AAC, Ogg
Vorbis, Ogg FLAC and FLAC).
A note on using Variable Bit Rate (VBR) les: Please install QuickTime for decoding purposes
if you do not already have it on your system. It can be downloaded from the Apple website1.
As Live plays the samples directly from disk, you can work with a large number of (large)
samples without running into RAM memory limitations. Please note, however, that you may
run into disk throughput problems if your disk is nearly full, and/or (on Windows systems)
highly fragmented. Hard drive rotation speed can also affect disk performance. Refer to
the section on managing the disk load for more infor mation.
Live can combine uncompressed mono or stereo samples of any length, sample rate or bit
depth without prior conversion. To play a compressed sample, Live decodes the sample and
writes the result to a temporary, uncompressed sample le. This usually happens quickly
enough that you will be able to play the sample right away, without waiting for the decoding
process to nish.
Note: When adding a long sample to a project, Live might tell you that it cannot play the
sample before it has been analyzed. Please see the section on analysis for an explanation.
1
http://www.apple.com/quicktime/download
Page 44

CHAPTER 5. MANAGING FILES AND SETS 42
5.2.1 The Decoding Cache
To save computational resources, Live keeps the decoded sample les of compressed
samples in the decoding cache. Maintenance of the cache is normally not required, as Live
automatically deletes older les to make room for those that are new. You can, however,
impose limits on the cache size using the File/Folder Preferences' Decoding Cache section.
The cache will not grow larger than the Maximum Cache Size setting, and it will always leave
the Minimum Free Space on the hard disk. Pressing the nearby Cleanup button will delete
all les not being used by the current Live Set.
5.2.2 Analysis Files (.asd)
An analysis le is a little le that Live creates when a sample le is brought into the program
for the rst time. The analysis le contains data gathered by Live to help optimize the
stretching quality, speed up the waveform display and automatically detect the tempo of
long samples.
Preferences for the
Decoding Cache.
When adding a long sample to a project, Live might tell you that it cannot play the sample
before it has been analyzed. This will not happen if the sample has already been analyzed
(i.e., Live nds an analysis le for this sample), or if the Record/Warp/Launch Preferences'
Auto-Warp Long Samples preference has been deactivated. To prevent waiting for analysis
of longer samples, you can pre-analyze them via the Browser, as we will see in a moment.
An analysis le can also store default clip settings for the sample:
Clicking the Clip View's Save button will store the current clip's settings with the sample's
analysis le. The next time the sample is dragged into Live, it will appear with all its clip
settings intact. This is particularly useful for retaining Warp Marker settings with the sample.
Page 45

CHAPTER 5. MANAGING FILES AND SETS 43
Ctrl
Storing default clip settings with the analysis le is different from saving the clip as a Live
Clip.
While analysis les are a handy way to store default information about a particular sample's
settings, keep in mind that you can use different settings for each clip within a Live Set
even if those clips refer to the same sample on disk. But if you drag a new version of the
sample into a Live Set, Live will use the settings stored in the analysis le for the newly
created clip.
The analysis le's name is the same as that of the associated sample, with an added .asd
extension. Live puts this analysis le in the same folder as the sample.
Samples that have an .asd le are displayed like this in the Browser.
Samples without an .asd le look like this.
The analysis les themselves do not appear in Live's Browsers.
Note that you can suppress the creation of .asd les by turning off the Create Analysis Files
option in the File/Folder Preferences. All data (except for the default clip settings) can be
recreated by Live if the .asd le is missing, however this will take some time for longer
samples.
5.2.3 File Pre-Analysis
To avoid waiting for longer samples to be analyzed the rst time they are imported into Live,
you may want to pre-analyze them.
To pre-analyze all the les contained in any folder in the Browser, use the (PC) /
(Mac) context menu's Analyze Audio command. This process can also be cancelled via the
context menu.
5.2.4 Exporting Audio
The File menu's Export Audio command allows you to export Live's audio output as new
samples. The resulting les can be used to burn an audio CD for listening purposes or a
Page 46

CHAPTER 5. MANAGING FILES AND SETS 44
data CD, which could serve as a backup of your work or be used with other digital audio
applications.
Which Signal Will Be Rendered?
The Export dialog's Rendered Track chooser offers several options for which audio signal to
render:
Master the post-fader signal at Live's Master output. If you are monitoring the Master
output, you can be sure that the rendered le will contain exactly what you hear.
All tracks the post-fader signal at the output of each individual track, including return
tracks and MIDI tracks with instruments. Live will create a separate sample for each
track. All samples will have the same length, making it easy to align them in other
multitrack programs.
The Rendered Track
Chooser.
Individual tracks the post-fader signal at the output of the selected track.
When Export Audio is invoked while the Arrangement View is up, Live will render the
selected time range.
If you would like to render the current Arrangement loop, choose the Select Loop command
from the Edit menu prior to choosing Export Audio. If you choose Export Audio while the
Session View is up, Live will ask you to specify the length of the sample to be rendered.
The Export Audio dialog will come up with a bars-beats-sixteenths eld where you can type
in the desired length. Live will capture audio starting at the current play start position for
whichever duration you have specied.
Page 47

CHAPTER 5. MANAGING FILES AND SETS 45
Remember a rendered audio le contains only what you heard prior to rendering. So, for
example, if you're playing back some combination of Session View clips and Arrangement
material, then that is what will be captured in your rendered le regardless of which view
is active when you render.
Audio Rendering Options
The Export dialog offers several audio rendering options:
Normalize If this is activated, the sample resulting from the render process will be
normalized (i.e., the le will be amplied so that the highest peak attains the maximum
available headroom).
Render as Loop If this is activated, Live will create a sample that can be used as a
loop. For example, suppose your Live Set uses a delay effect. If Render as Loop is on,
Live will go through the rendering process twice: The rst pass will not actually write
samples to disk, but add the specied delay effect. As the second pass starts writing
audio to disk, it will include the delay tail resulting from the rst pass.
Audio Rendering
Options.
Page 48

CHAPTER 5. MANAGING FILES AND SETS 46
File Type, Bit Depth, Sample Rate These options specify the type of sample to be
created.
Convert to Mono If this is activated, Live will create a mono le instead of a stereo
le.
Dither Options If you are rendering at a bit depth lower than 32-bit, choose one of
the dither modes. Dithering adds a small amount of noise to rendered audio, but minimizes artifacts when reducing the bit depth. By default, Triangular is selected, which
is the safest mode to use if there is any possibility of doing additional processing
on your le. Rectangular mode introduces an even smaller amount of dither noise,
but at the expense of additional quantization error. Note that dithering is a procedure
that should only be applied once to any given audio le. If you plan to do further
processing on your rendered le, it's best to render to 32-bit to avoid the need for
dithering at this stage.
Create Analysis File If this is activated, Live will create an .asd le that contains
analysis information about the rendered sample. If you intend to use the new sample
in Live, check this option.
5.3 MIDI Files
A MIDI le contains commands that prompt MIDI compatible synthesizers or instruments,
such as Live's Simpler, to create specic musical output. MIDI les are exported by hardware
and software MIDI sequencers. Importing MIDI les into Live works differently than with
samples: MIDI le data is incorporated into the Live Set, and the resulting MIDI clips lose all
reference to the original le. MIDI les appear as folders in the File Browser; opening the
folders gives you access to the le's individual tracks (also called voices or instruments).
Page 49

CHAPTER 5. MANAGING FILES AND SETS 47
Return
Note that while you can rename or delete entire MIDI les via the Browser, this is not
possible with the individual MIDI tracks contained within them. This is also the case with the
individual components of Live Sets.
5.3.1 Exporting MIDI Files
Live MIDI clips can be exported as Standard MIDI les. To export a MIDI clip, use the File
menu's Export Selected MIDI Clip command. This command will open a le-save dialog,
allowing you to choose the location for your new MIDI le.
Exporting a MIDI le is different from saving the clip as a Live Clip.
A MIDI File and its
Tracks in the Browser.
5.4 Live Clips
Individual clips can be exported to disk in the Live Clip format for easy retrieval and reuse in
any project. Because they only contain references to samples on disk (rather than the audio
data itself), Live Clips are very small, which makes it easy to develop and maintain your own
collection.
To save a clip from the open Live Set to disk, simply drag it to the File Browser and drop it
into any folder. You can then type in a new name for the clip or conrm the one suggested
by Live with
.
Page 50

CHAPTER 5. MANAGING FILES AND SETS 48
Live Clips are a great way of storing your ideas for later use or development, as they save
not only the original clip, including all its clip and envelope settings, but also the original
track's devices. In order to recreate a Live Clip's device chain, either import it into a track
containing no clips or devices, or drag it into the space in the Session or Arrangement View
containing no tracks. Note that Live Clips that are imported into tracks already containing
devices or clips will appear with their clip settings but not their devices. You could, for
instance, drop a bassline Live Clip on an existing track that drives a bass instrument, rather
than creating a new track.
Clips belonging to any Live Sets already on disk are also Live Clips. Please see the section
on merging Sets for more on this topic.
Note that storing default clip settings with a sample's analysis le is different from saving a
Live Clip. The default clip in the .asd le annotates the sample with sensible default values
(warp, gain and pitch settings) so that it will play in a dened way when it is added to a Set.
Live Clips, on the other hand, are stored on disk as separate musical ideas. For example, you
could create a number of variations from the same audio clip by using different warp, pitch,
envelope and effect settings, and store them all as separate Live Clips. In the Browser, you
could then independently sort and preview these clips, even though they are all referring to
the same source sample.
A Live Clip in the
Browser.
5.5 Live Sets
The type of document that you create and work on in Live is called a Live Set. Think of
this as a single song. Sets must be saved inside projects, so that Live can keep track of
Page 51

CHAPTER 5. MANAGING FILES AND SETS 49
Return
and manage all of the various components of the Live Set: Live Clips, device presets, any
samples used, etc.
5.5.1 Creating, Opening and Saving Sets
Use the File menu's New Live Set command to create new Live Sets, and the Open or Open
Recent command to open existing ones. In the File Browser, you can double-click or press
on a Live Set to open it.
The File menu's Save command saves the current Live Set exactly as it is, including all clips
and settings.
You can also use the Save As command to save the current Live Set under a different name
and/or in a different directory location, or the Save a Copy command to create a copy of
the current Live Set with a new name and/or new directory location.
5.5.2 Merging Sets
Live makes it easy to merge Sets, which can come in handy when combining work from
different versions or pieces. To add all tracks (except the return tracks) from one Live Set
into another, drag the Set from the File Browser into the current Set, and drop it onto any
track title bar or into the drop area next to or below the tracks. The tracks from the dropped
Set will be completely reconstructed, including their clips in the Session and Arrangement
View, their devices, and their automation.
Session View Drop Area
for Importing Live Sets.
Page 52

CHAPTER 5. MANAGING FILES AND SETS 50
If you prefer to import individual tracks from a Set, you can unfold the Live Set in the File
Browser just as if it were a folder.
Arrangement View Drop
Area for Importing Live
Sets.
Unfolding a Set to
Reveal its Tracks.
You can now drag the individual tracks and drop them as described at the beginning of this
section.
Of the three tracks contained in the Tango Set shown in the following gure, two contain
Session View clips. These can be accessed by unfolding the tracks:
Revealing the Session
View Clips Contained in
a Set.
Page 53

CHAPTER 5. MANAGING FILES AND SETS 51
Ctrl
You can browse, preview and import Session View clips from the Set as if they had been
stored as individual Live Clips. This, basically, means that any Live Set can serve as a pool
of sounds for any other, suggesting creative reuse and crossover.
5.5.3 Exporting Session Clips as New Sets
You can export a selection of Session View clips as a new Live Set by dragging them to the
File Browser. To export a Set, rst click and drag, or use the or
(Mac) modiers, to select more than one Session View clip. Then, simply drag the clips to
a folder in the File Browser, where you can either conrm Live's suggested name or type in
one of your own.
(PC) /
5.5.4 Template Sets
Use the File/Folder Preferences' Template Save button to save the current Live Set as a
template. Live will use these settings as the initialized, default state for new Live Sets. You
can use this to pre-congure:
Your multichannel input/output setup.
Preset devices, like EQs and Compressors, in every track.
Computer key mappings.
MIDI mappings.
The template Live Set, Template.als, is located in Live's Preferences folder and can be
copied or deleted from there. The easiest way to locate this folder is to search your disk for
Template.als.
5.5.5 Viewing and Changing a Live Set's Sample References
To view a list of the samples referenced by the current Live Set, choose the Manage Files
command from the File menu, click the Manage Set button, and then click the V iew Samples
button. Live will display one line for each sample used by the Live Set, regardless of how
Page 54

CHAPTER 5. MANAGING FILES AND SETS 52
many clips or instruments within the Live Set are using that sample. Here is what you can
do:
Replace a sample Dragging a sample from the File Browser and dropping it on a
line in the list makes the Live Set reference the new sample instead of the old one. For
samples used in audio clips, Live retains the clip properties; the Warp Markers are kept
if the new sample has the same or a greater length as the old sample and discarded
otherwise. Please note that replacing a sample will change all clips in your set that
reference this sample.
Hot-swap samples Using the Hot-Swap button at the left-hand side of each line,
you can quickly browse through alternatives for the sample that is currently being
referenced. This is like dragging samples here, only quicker.
Every Line in the Sample
Reference List is a Drop
Target for Samples.
The Sample Reference
List's Hot-Swap Button.
Edit a referenced sample using an external application (which can be chosen in the
Preferences' File/Folder tab). Clicking the Edit button will open the referenced sample
in the external application. The sample will remain ofine as long as the Edit switch is
engaged. For samples used in audio clips, the current set of Warp Markers is retained
only if the sample length remains the same as before.
View a sample's location The Location column states if a sample is missing, or if it
resides in the Live Library, a Project or somewhere else (external).
The Sample Reference
List's Edit Switch.
Page 55

CHAPTER 5. MANAGING FILES AND SETS 53
Ctrl
5.6 Live Projects
A Live Project is a folder containing Live-related les that belong together. Consider, for
example, work on a piece of music: You start out with an empty Live Set; you record audio
and thereby create new sample les; you drag in samples from collections; you save different
versions of the Live Set along the way so that you can go back and compare. Perhaps you
also save Live Clips or device presets that belong to this particular musical piece. The
project folder for this Live Project will maintain all the les related to this piece of music
and Live's File Manager will provide the tools you need to manage them.
5.6.1 Projects and Live Sets
The Sample Reference
List's Location Column.
You can manually create a Project by clicking (PC) /
selecting Create Project from the context menu. Usually, Live takes care of this automatically.
When you save a Live Set under a new name or in a new folder location, Live will create a
new project folder and store the Live Set there unless you are saving the Live Set into an
existing Live Project. Let's look at an example to illustrate this process:
We have recorded some audio into a new Live Set. We now save the Live Set under the
name Tango on the Desktop. Here is the result as displayed by the Live Browser:
(Mac) in the Browser and
Page 56

CHAPTER 5. MANAGING FILES AND SETS 54
The project folder (Tango Project) contains the Live Set (Tango.als) and a Samples folder,
which in turn contains a Recorded folder with two samples in it. Note that the current Project
is also indicated in the title bar of Live's application window.
Next, we record another track into our Project. We save the modied version of the Live
Set under a new name so that we do not lose the previous version. Accepting the Save As
command's default suggestion, we store the new version of the song in the Tango Project
folder.
A Live Set and its
Recordings in a Live
Project Folder.
The Tango Project now contains two Live Sets, and its Samples/Recorded folder contains
the samples used by both of them.
And now for something completely different: We choose the File menu's New command
and record a samba tune. As this has nothing to do with our tango dabblings, we decide
A Second Version of the
Live Set Has Been
Added to the Project.
Page 57

CHAPTER 5. MANAGING FILES AND SETS 55
to save it outside the Tango Project folder, say on the Desktop. Live creates a new project
folder named Samba Project next to Tango Project.
So far we have seen how to create Live Projects and save versions of Live Sets into them.
How do we open a Project? Simply by opening any of its contained Live Sets. Doubleclicking Tango with Piano.als opens that Set and the associated Project as displayed in
Live's title bar.
Let's suppose that, in the course of our work on Tango with Piano.als, we get sidetracked:
The piece evolves towards something entirely different, and we feel that it should live in a
Project of its own. So, we Save As... under a new name and in some location outside the
current Project, say the Desktop:
A New Project Was
Added Next to Tango
Project.
Page 58

CHAPTER 5. MANAGING FILES AND SETS 56
Note that the new project folder has no Samples folder (yet). Electro with Piano.als is
still referencing the piano sample from the original Tango Project. There is nothing wrong
with this except for when the Tango Project is moved away or deleted; then Tango with
Piano.als will be missing samples. You can prevent this by collecting samples. Even after
the fact, Live's tools for searching missing samples can help solve this problem.
There is actually no need to keep a Project's Live Set exactly one level below the Project
itself. Within a project folder, you can create any number of sub-folders and move les
around to organize them as desired, although you many need to use the File Manager to
teach the Project about the changes you've made.
A New Project Was
Added by Saving a Live
Set Outside its Original
Project.
In general, Live will do what it can to prevent situations such as orphaned (Project-less) Live
Sets (and Live Clips and presets), which have the potential of confusing both the user and
Live's le management tools. It cannot, however, control situations in which Sets or les are
moved out of order and become disorganized via the Explorer (Windows)/Finder (Mac).
A note for users of older Live versions: Live 7 does not allow overwriting Live Sets that were
created by older versions to prevent compatibility problems. Instead, you will be requested
to Save As.... Doing this will insure that the newly saved Live Sets reside in project folders.
Page 59

CHAPTER 5. MANAGING FILES AND SETS 57
5.6.2 Projects and Presets
By default, new instrument and effect presets are stored in the Live Library, making them
available to any project. At times however, it may make more sense to save a preset with
the current Project. You might, for example, want to keep a number of alternative master
EQ settings for a given piece. These EQ presets are specic to the piece and of little use
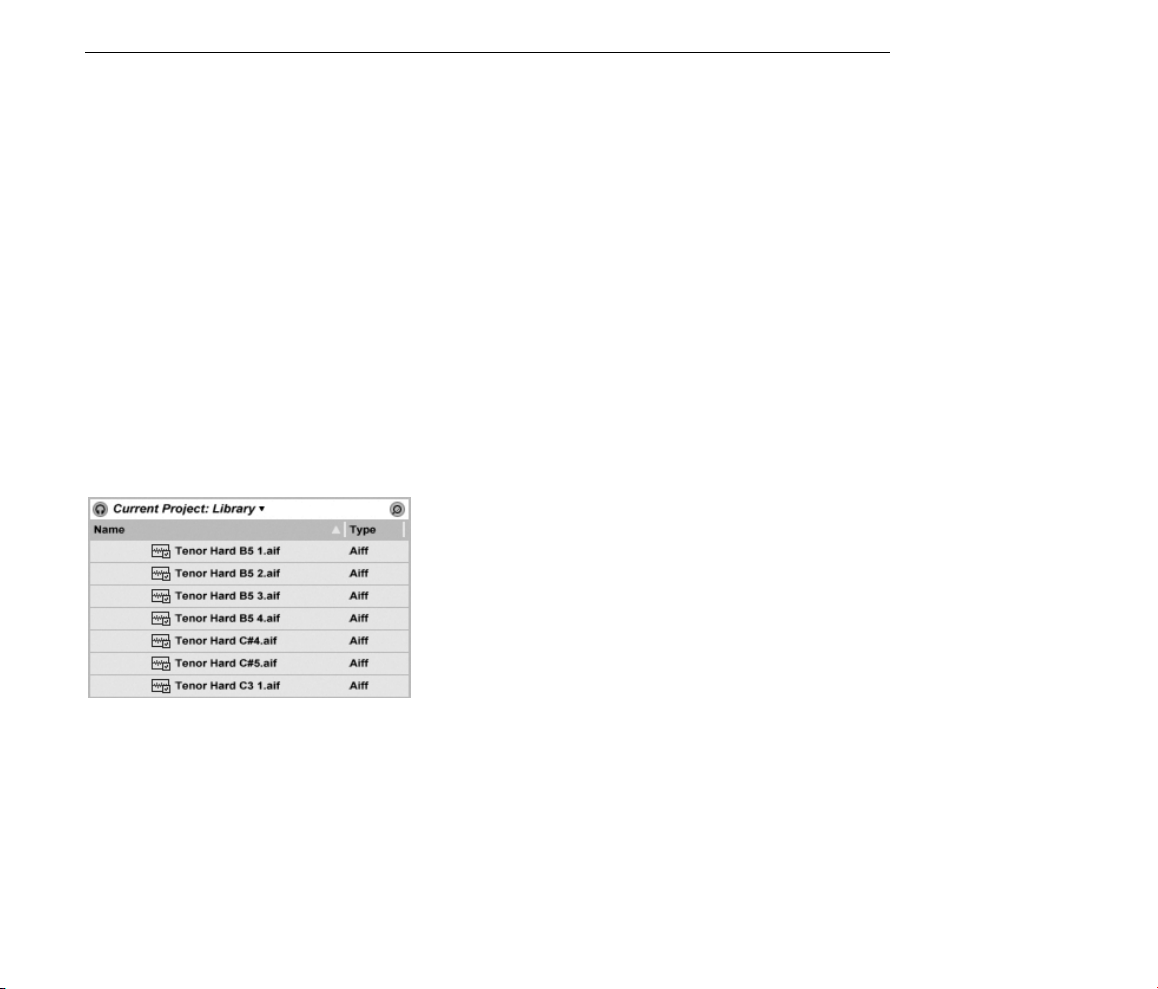
to other Projects. For this reason, every device in the Device Browser has a Current Project
sub-folder. You can drag a preset to this folder after
the device and drop it there directly.
saving it, or simply drag the title bar of
Project-Specic Presets
Appear Under Current
Project in the Device
Browser.
5.6.3 Managing Files in a Project
Live's File Manager offers several convenient tools for managing Projects. Once you've
opened a Live Set that is part of the Project you wish to manage, choose the Manage Files
command from the File menu, and then click the Manage Project button. The File Manager
will present you with an overview of the Project's contents and tools for:
locating samples that the Project is missing;
collecting external samples into the Project;
Page 60

CHAPTER 5. MANAGING FILES AND SETS 58
listing unused samples in the Project;
packing a Project in Live Pack format;
exporting the Project's contents to the Library.
5.7 The Live Library
The Live Library acts as a repository of commonly used les, such as samples, clips and Live
Device Presets, that are available to all Live Projects. In Live's File Browsers, the Library is
accessible through a bookmark:
Choosing the Library
Bookmark.
Clips can be conveniently saved in Live Clip format for later reuse by dragging them from
the open Live Set into the desired folder in the Library. Device presets are saved in the
Library by default (but you can also save them with a Project).
Ableton delivers Library content that can serve as a starting point for creative exploration.
Content is shipped in the form of Factory Live Packs. Factory Live Packs are available from
installation CDs, DVDs or the Ableton website2. To install a Factory Live Pack in the Library,
double-click the Live Pack le (.alp), drag it into the Live main window, or locate it via the
File menu's Install Live Pack command.
A list of the currently installed Factory Live Packs is available from the Preferences' Live Packs
tab. Here you can select individual Live Packs from the list and click the Uninstall button to
remove them.
2
http://www.ableton.com/downloads
Page 61

CHAPTER 5. MANAGING FILES AND SETS 59
By default, the Live 7 Library contains the following sub-folders:
Ableton Project Info contains les that Live uses to identify the Library as a Project,
which allows it to be manageable using the File Manager. It also contains logs that
keep track of what Live Packs have been installed.
Clips contains the Live Clips that are installed as part of the Live 7 Basics pack.
Defaults presets placed into the default device folders will load in place of Live's
generic device settings. Additionally, the Defaults folder contains special folders
corresponding to user actions such as sample dropping. Presets placed in these
folders dene what Live will do when you perform the action.
Lessons all of Live's built-in lessons, as well as any additional images and Live Sets
that the lessons refer to. You should not change anything in this sub-folder.
Presets contains all of the factory presets for Live's devices.
Samples contains all of the samples that are used by Live's presets.
Sets all of the demo songs and the samples that are used by them.
After you've been using Live for a while, you'll probably nd that there are additional
folders in your Library. This is normal. Installing Live Packs, recording your own samples, or
performing other common procedures will change the folder structure over time.
5.7.1 Changing the Library Location, Upgrading an Old Library
The Library can reside in the hard drive location of your choice. In the Preferences'
File/Folder tab, you will nd the Library Location chooser, which contains a list of Library
locations that you've used in the past:
Page 62

CHAPTER 5. MANAGING FILES AND SETS 60
If any of these previous Library locations are now unavailable (perhaps because of an
unattached external drive, a moved or renamed folder, or an angry roommate) these will
appear greyed-out in the list. If you know that these unavailable locations are gone for
good, you can remove them by using the Clear Unavailable Locations option at the bottom
of the chooser:
The Library Location
Chooser.
Unavailable Library
Locations can be
Cleared from the List.
You can also use the Browse button next to this chooser to create a new Library by pointing
to an empty folder or creating a new one. Once you've selected a Library path, one of
several possibilities will occur, depending on the new location:
If the target location is an empty folder on a different hard drive, you will be given the
option to copy your current Library to this new location. Live will then offer to open a
Explorer (Windows)/Finder (Mac) window so that you can delete the Library from the
old location.
If the target location is an empty folder on the same hard drive, you will be given the
option to move your current Library to this new location.
If the target location is not empty but does not contain a Library, Live will create a
subfolder called Library at this location, and then offer to copy/move the old Library
Page 63

CHAPTER 5. MANAGING FILES AND SETS 61
Ctrl
contents.
In all three of these cases, you may also choose to create a new Library, without copying
or moving any content from the previous location. Live will then offer to install any default
packages to the new location.
If the target location is a Library that was made with an older version of Live, you will
be warned about possible compatibility issues. It is generally not a good idea to try
to share a single Library between two different versions of Live.
Note: Live will not allow you to create a Library inside an existing Project.
5.7.2 Importing Projects into the Library
You can merge the contents of a Live Project into the Library to make them available to any
Project. To do this, (PC) /
select the Manage Project command.
(Mac) on a Project folder in the File Browser and
5.8 Locating Missing Samples
If you load a Live Set, Live Clip or preset that references samples which are missing from their
referenced locations, Live's Status Bar (located at the bottom of the main screen) will display
a warning message. Clips and instrument sample slots that reference missing samples will
appear marked Ofine, and Live will play silence instead of the missing samples.
Live's File Manager offers tools for repairing these missing links. Click on the Status Bar
message to access these. (This is actually a shortcut for choosing the Manage Files command
from the File menu, clicking the Manage Set button, and then clicking the Locate button
found in the Missing Files section.) The File Manager will present you with a list of the
missing les and associated controls.
Page 64

CHAPTER 5. MANAGING FILES AND SETS 62
5.8.1 Manual Repair
To manually x a broken sample reference, locate the missing sample in the File Browser,
drag it over to the File Manager and drop it on the respective line in the list of missing les.
Note that Live will not care if the sample you offer is really the sample that was missing.
5.8.2 Automatic Repair
Live offers a convenient automatic search function for repairing sample references. To send
Live on a search, click the Automatic Search section's Go button. To reveal detailed options
for guiding the automatic search function, click the neighboring triangular-shaped button.
The File Manager's List
of Missing Samples.
Page 65

CHAPTER 5. MANAGING FILES AND SETS 63
Search Folder includes a user-dened folder, as well as any sub-folders, in the search.
To select the folder, click the associated Set Folder button.
Search Project includes this Set's project folder in the search.
Automatic Repair
Options in the File
Manager.
Search Library includes the Live Library in the search.
For each missing sample, the automatic search function may nd any number of candidates.
Let's consider the following cases:
No candidate found you can choose another folder and try again, or locate the
sample manually.
One candidate found Live accepts the candidate and considers the problem solved.
Several candidates found Live requires your assistance: Click the Hot-Swap button
(i.e., the leftmost item in every line of the list of missing samples) to have the File
Browser present the candidates in Hot-Swap Mode. You can now double-click the
candidates in the File Browser to load them, as the music plays if you like.
Page 66

CHAPTER 5. MANAGING FILES AND SETS 64
5.9 Collecting External Samples
To prevent a Live Set from containing broken sample references, Live provides the option
of collecting (i.e., copying) them into the Set's project folder. This is accomplished via the
File Manager:
Choose the Manage Files command from the File menu
Click the Manage Set button
Unfold the triangular-shaped fold button in the External Samples section.
Options for Collecting
External Samples.
Page 67

CHAPTER 5. MANAGING FILES AND SETS 65
Ctrl
Ctrl
Separated by location (the Library, installed by factory Live Packs, other Projects and elsewhere sample collections from external drives, for example), the File Manager provides:
A sample count and the associated disk space used;
A Show button that will list the samples in the File Browser;
A Yes/No toggle for engaging or disengaging collection.
Note: Make sure to conrm your choices by clicking the File Manager's Collect and Save
button!
The File menu's Collect All and Save command is a shortcut that collects and saves all
external samples referenced by the current Set, including those from the Library. Note that
this can cause a lot of copying, especially if your Live Set uses large multisample collections!
5.10 Aggregated Locating and Collecting
Instead of having to deal with problems while you are in a creative mode, you might prefer
putting aside some dedicated housekeeping time to solve all the problems in one go. Using
Live's File Manager, you can nd missing samples and collect external samples not only for
the current Live Set but also for:
The File Manager's
Collect and Save Button.
The Library choose the Manage Files command from the File menu; then click the
Manage Library button.
The current Live Project choose the Manage Files command from the File menu;
then click the Manage Project button.
Any Live Project (PC) /
(Mac) on a Project in the Live Browser, and
choose the Manage Project option.
All Projects found in a specic folder (and its sub-folders) (PC) /
on a folder in the File Browser, and choose the Manage Projects command.
(Mac)
Page 68

CHAPTER 5. MANAGING FILES AND SETS 66
Ctrl
Ctrl
Any selection of Live Sets, Live Clips, Live Presets (PC) /
(Mac) on the
respective items in the File Browser, and choose the Manage Files command.
Remember to click the Collect and Save button at the bottom of the File Manager when
you are nished. Otherwise your changes will be discarded.
5.11 Finding Unused Samples
Live's File Manager can nd the unused samples in a Project for you. You can then review
them and decide to delete them individually or collectively. When searching for unused
samples, Live will inspect each sample in a project folder, checking if it is referenced by any
of the Live Sets, Live Clips or device presets in the Project. If not, the sample is regarded as
unused even if other Projects or programs still use it.
To nd the unused samples for the currently open Project, choose the Manage Files command from the File menu, click the Manage Project button, and then click on the triangularshaped fold button next to Unused Samples to access a summary and the Show button.
Clicking the Show button makes the File Browser list the unused samples; there, you can
preview the samples and delete them if you like.
Note you can also nd the unused samples from the Library: choose the Manage Files
command from the File menu, then click the Manage Library button, and then see the
Unused Samples section.
Last but not least, you can nd the unused samples for all Projects found in a specic folder
(and its sub-folders): (PC) /
(Mac) on a folder in the File Browser and choose
the Manage Projects command, then see the Unused Samples section. Live inspects each
Project individually and labels a sample unused even if another Projects in the same folder
does use that sample. To prevent losses, you may want to rst collect the samples into their
respective Projects and then purge the Projects of unused samples.
Page 69

CHAPTER 5. MANAGING FILES AND SETS 67
Ctrl
Ctrl
Alt
5.12 Packing Projects into Live Packs
Live's File Manager provides the option of packing a Live Project in Live Pack format for
convenient archiving and transfer. To do this, choose the Manage Files command from the
File menu, click the Manage Project button, and then click on the triangular-shaped fold
button next to Packing. Click the Create Live Pack button to bring up a le-select dialog
where you can specify the name and location of a new Live Pack le. Creating a new Live
Pack from a Project does not affect the Project. If you want the Project deleted, you can
delete it using the File Browser.
Live employs lossless compression techniques to minimize the le size of Live Packs. Depending on the audio materials in a Project, this saves up to 50 percent in le size.
To unpack a Live Pack (i.e., to restore the original Live Project), double-click the Live Pack
le (.alp), drag it into the Live main window, or locate it via the File menu's Install Live Pack
command. Live will then request that you choose a location for the new Project. Note:
Factory Live Packs (those provided by Ableton) will automatically be installed in the Live
Library.
5.13 File Management FAQs
5.13.1 How Do I Create a Project?
A Project is automatically created whenever you save a Live Set, except when you save it into
the Library or a preexisting Project. You can also manually create a Project by clicking
(PC) /
(Mac) in the Browser and selecting Create Project from the context menu.
5.13.2 How Can I Save Presets Into My Current Project?
As long as you're working in a Project (meaning that you've saved your current Live Set),
every device in the Device Browser will show a Current Project sub-folder. You can copy
presets from other Browser locations to the current project by
dragging them. You can also save presets directly to the current project by dragging from
(PC) /
(Mac)-
Page 70

CHAPTER 5. MANAGING FILES AND SETS 68
the device's title bar and dropping into the Current Project. You can then use the File
Management tools, collect any referenced samples, etc.
5.13.3 Can I Work On Multiple Versions of a Set?
If you'd like to work on different versions of the same Live Set, save them into the same
Project. This will usually be the Project that was created when you saved the rst version
of the Live Set. If a Project contains multiple Live Sets it will only collect one copy of any
samples used by the various versions, which can save disk space and help with organization.
5.13.4 Where Should I Save My Live Sets?
You can save Live Sets anywhere you want, but saving to the Library or pre-existing Project
folders can cause problems, and should be reserved for special cases. You should only save
Live Sets in the Library if you intend to use them as templates for other Live Sets. Likewise,
you should only save a Live Set to an existing Project if it is somehow related to the Project
for example, an alternate version of a song that's already in the Project.
5.13.5 Where Should I Save My Live Clips?
If you'd like to have your Live Clips available in all of your Projects, create a Library sub-folder
and save your clips there. You can also save clips anywhere else on your computer.
5.13.6 Can I Use My Own Folder Structure Within a Project Folder?
You can organize your les any way you want within a Project, but you'll need to use the File
Manager to relink the les that you've moved around:
1) In Live's Browser or via your operating system, reorganize the les and folders
within your Project folder.
Page 71

CHAPTER 5. MANAGING FILES AND SETS 69
Ctrl
2) Navigate to the Project folder in the Browser and choose Manage Project via the
(PC) /
(Mac) context menu.
3) If you've changed the original location of any samples used in the Project, the
Missing Samples section of the File Manager will indicate this. Click the Locate
button to search for the samples.
4) Since you know that your samples are all in the Project folder, unfold Automatic
Search. Then enable the Search Project and Fully Rescan Folders options. Finally,
click Go to initiate the search.
5) When searching is complete, click Collect and Save at the bottom of the File
Manager to update the Project.
5.13.7 How Do I Export A Project to the Library and Maintain My Ow n Folder Structure?
If you export a Project to the Library, Live will look in the Library to see if the folder names
there match those in your Project, and will create any missing folders as necessary. For
example, if your Project folder contains samples in Samples/My Samples, Live will look in
the Library for a Samples folder (which it will nd, because it's part of the standard Library)
and then for a My Samples sub-folder (which it will not nd, but will then create).
Page 72

70
Chapter 6
Arrangement View
The Arrangement View displays the Arrangement, which contains music laid out along a
song timeline, like a multitrack tape.
The Arrangement View is a powerful editing tool that easily lets you combine and arrange
MIDI, loops, sound effects and complete pieces of music.
A Piece of Music in the
Arrangement View.
Page 73

CHAPTER 6. ARRANGEMENT VIEW 71
1
3
45
62
Ctrl
Alt
Alt
6.1 Navigation
Live offers several fast methods for zooming and scrolling the Arrangement display:
1. To smoothly change the zoom level, click and drag vertically in the beat-time
ruler at the top of the Arrangement View (you can also drag horizontally to scroll
the display).
2. To zoom in and out around the current selection, use the computer keyboard's +
and - keys. To pan the display, click and drag while holding the
(PC) /
(Mac) modier.
Navigating the
Arrangement View.
3. The Arrangement Overview is like a bird's-eye view of your music. It always
shows the complete piece, from start to end. The black rectangular outline represents the part of the Arrangement that is currently displayed in the Arrangement
display below. To scroll the display, click within the outline and drag left or right;
to zoom out and in, drag up and down.
4. To change the displayed part of the Arrangement, drag the outline's left and
right edges.
5. To see a specic part of the Arrangement in more detail, click on itin the Overview
and drag downwards to zoom in around that part. Note that you can also drag
Page 74

CHAPTER 6. ARRANGEMENT VIEW 72
horizontally to scroll the display. Using this method, you can zoom and scroll to
focus around any part of the Arrangement with just one mouse motion.
6. To have the Arrangement display follow the song position and scroll automatically, turn on the Follow switch, or use the Follow command from the Options
menu.
6.2 Transport
There are a number of ways to control Live's transport with the computer keyboard and
mouse:
1. You can start Arrangement playback by clicking the Control Bar's Play button,
and stop playback by clicking the Stop button. Arrangement playback can also
be toggled on and off by pressing the keyboard's space bar.
2. You can set the Arrangement playback position by clicking anywhere along the
Arrangement to place the ashing insert marker. Double-clicking the Stop button
will return the Arrangement play position to 1.1.1.
The Play and Stop
Buttons in the Control
Bar.
To continue playback from the position where it last stopped, rather than from
the insert marker, hold down the modier while pressing the space bar.
3. Clicking in the scrub area above the tracks will make playback jump to that point.
The size of these jumps is quantized according to the Control Bar's Quantization
menu setting. While the mouse is held down over the scrub area, a portion of
Arrangement Playback
Begins from the Insert
Marker.
Page 75

CHAPTER 6. ARRANGEMENT VIEW 73
Return
the Arrangement the size of the chosen quantization setting will be repeatedly
played. With small quantization settings, or a setting of None, this allows you
to scrub through the music.
4. The song position can be adjusted numerically using the Control Bar's Arrangement Position elds.
The Arrangement Position elds show the song position in bars-beats-sixteenths.
To change the values:
Click and drag up or down in any of these elds.
Click and type a number, then hit
Click and decrement or increment the value with and .
.
5. Arrangement playback can be started at a particular point in one of your clips
using the scrub area in the Clip View.
Scrubbing Arrangement
Playback.
Setting the Play Position
in the Arrangement
Position Fields.
6. Several Arrangement playback positions can be set using launchable locators.
Note that any computer keyboard key or MIDI message can be mapped to the transport
controls, as described in the respective chapter.
Page 76
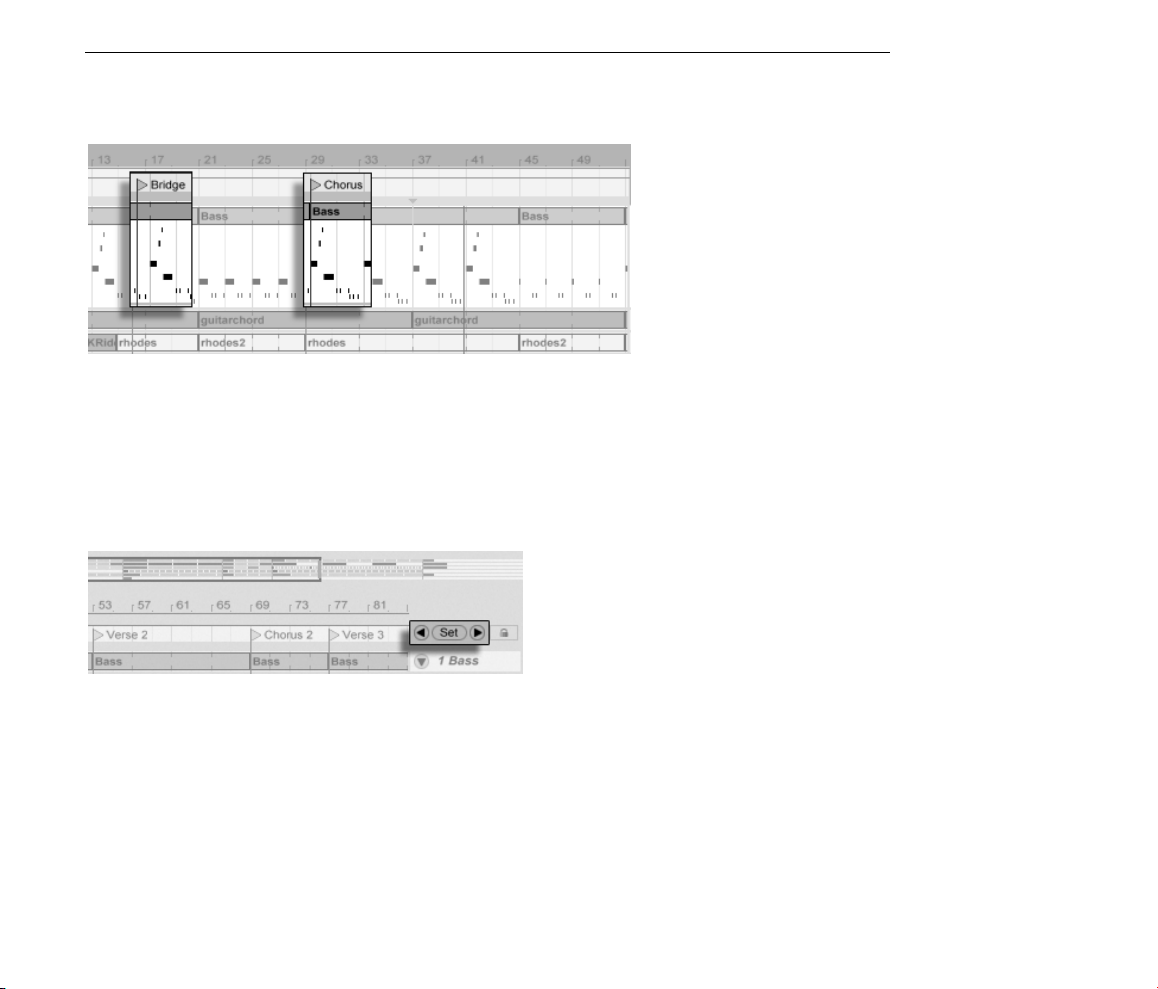
CHAPTER 6. ARRANGEMENT VIEW 74
6.3 Launching the Arrangement with Locators
Locators can be set at any point in the Arrangement. This can be done in real time during
playback or recording with the Set Locator button, and will be quantized according to the
global quantization value set in the Control Bar. Clicking the Set Locator button when the
Arrangement is not playing will create a locator at the insert marker or selection start. You
can also create a locator using the context menu in the scrub area above the tracks or via the
Insert menu. Note that the position of a new locator is quantized according to the Control
Bar's Quantization menu setting.
Using Locators to
Launch Play in the
Arrangement.
You can recall (jump to) locators by clicking on them, or with the Previous and Next Locator
buttons on either side of the Set button. Locators can also be recalled using MIDI/key
mapping. Note that locator recall is subject to quantization. Double-clicking a locator will
select it and start Arrangement playback from that point.
After jumping to the rst or last locator in the Arrangement, the Previous and Next Locator
buttons will jump to the Arrangement start or end, respectively.
Locators can be moved by clicking and dragging, or with the arrow keys on your computer
keyboard.
The Locator Controls.
Page 77

CHAPTER 6. ARRANGEMENT VIEW 75
Ctrl
R
R
Ctrl
Delete
Ctrl
Ctrl
Ctrl
Ctrl
R
R
Delete
Ctrl
To name a locator, select it by clicking its triangular marker, and choose the Rename Edit
menu command (or use the
(PC) /
(Mac) shortcut). You can also enter
your own info text for a locator via the Edit Info Text command in the Edit menu or in
the locator's (PC) /
computer's or
(Mac) context menu. Locators can be removed with your
key, the Insert menu, or the Delete Locator button.
Note that the locator (PC) /
(Mac) context menu offers a quick way of looping
playback between two locators with its Loop To Next Locator command.
The locator (PC) /
(Mac) context menu's Set Song Start Time Here command
can be used to overrule the default play starts at selection rule: when this command is
checked, play starts at the locator.
6.4 Time Signature Changes
Live's time signature can be changed at any point in the Arrangement by using time signature
markers. These can be added at the locator position via the Insert menu, or anywhere in
the scrub area using the (PC) /
appear just below the beat time ruler, but this marker area is hidden if a set contains no
meter changes, freeing up additional space at the top of the scrub area.
In many ways, time signature markers look and function like locators; they can be moved with
the mouse or with your computer keyboard's arrow keys, and their value can be changed
using the Edit menu's Edit Value command (or with the
shortcut). They can be also be deleted using the or
commands in the Edit and Insert menus.
(Mac) context menu. Time signature markers
(PC) /
(Mac)
key, or via delete
Time Signature
Changes.
The time signature marker (PC) /
(Mac) context menu offers a number of
features, including a Delete All Time Signature Changes command and options to loop or
Page 78
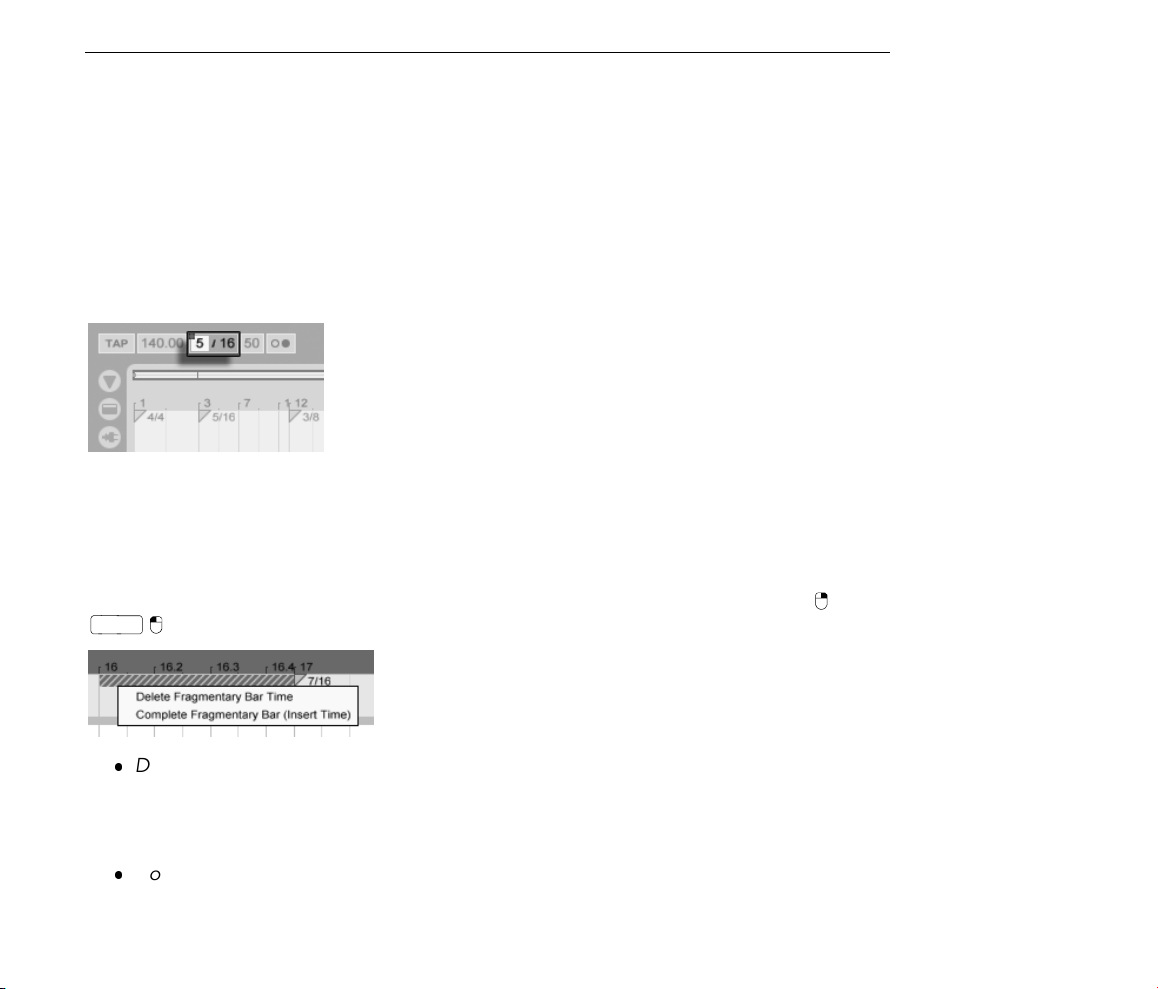
CHAPTER 6. ARRANGEMENT VIEW 76
Ctrl
select the area up to the next time signature marker.
Any time signature with a one- or two-digit numerator and a denominator of 1, 2, 4, 8 or
16 can be used as a time signature marker value. The numbers must be separated by a
delimiter such as a slash, comma, period, or any number of spaces. These marker values
can also be set by adjusting the time signature elds in the Control Bar, either by typing
in values or dragging the numerator and denominator sliders. This will change the time
signature marker value at the current play location, and works either with the transport
stopped or during playback. When the Arrangement contains time signature changes, the
time signature editor displays an automation LED in the upper left cor ner.
Time signature markers are not quantized; they may be placed anywhere in the timeline,
and their positioning is only constrained by the editing grid. This means that it is possible
to place meter changes in impossible places - such as before the end of the previous
measure. This creates a fragmentary bar, which is represented in the scrub area by a
crosshatched region. Live is happy to leave these incomplete measures as they are, but if
you'd like your Set to conform to the rules of music theory, you can use the two (PC) /
(Mac) context menu options to correct incomplete bars.
The Time Signature
Editor Can Change Time
Signature Marker Values,
and Shows an
Automation LED.
Delete Fragmentary Bar Time deletes the duration of the fragmentary bar from the
Arrangement, thereby moving any audio or MIDI on either side of the deleted area
closer together in the timeline. The next time signature marker will now fall on a
legal barline.
Complete Fragmentary Bar inserts time at the beginning of the fragmentary bar, so
that it becomes complete. The next time signature marker will now fall on a legal
barline.
A Fragmentary Bar and
its Resolution Options.
Page 79

CHAPTER 6. ARRANGEMENT VIEW 77
Please note that these resolution options affect all tracks - deleting and inserting time
changes the length of the entire Arrangement.
If you import a MIDI le into the Arrangement, you'll be given an option to import any
time signature information that was saved with the le. If you choose to do this, Live will
automatically create time signature markers in the correct places. This makes it very easy to
work with complex music created in other sequencer or notation software.
6.5 The Arrangement Loop
For Live to repeatedly play a section of the Arrangement, activate the Arrangement loop by
clicking on the Control Bar's Loop switch.
You can set loop length numerically using the Control Bar elds: The left-hand set of elds
determines the loop start position, while the right-hand set determines loop length.
The Edit menu's Loop Selection command accomplishes all of the above at once: It turns
the Arrangement loop on and sets the Arrangement loop brace to whatever timespan is
selected in the Arrangement.
The Control Bar's Loop
Switch.
The Loop Start Fields
(Left) and the Loop
Length Fields (Right).
The loop brace can be selected with the mouse and manipulated with commands from the
computer keyboard:
The Arrangement's Loop
Brace.
Page 80

CHAPTER 6. ARRANGEMENT VIEW 78
Ctrl
Ctrl
Ctrl
and nudge the loop brace to the left/right by the current grid setting.
and shift the loop brace left/right in steps the size of its length.
The
(PC) / (Mac) modier used with the arrow left and right keysshortens
or lengthens the loop by the current grid setting.
The
(PC) / (Mac) modier with the arrow up and down keys doubles or
halves the loop length.
You can also drag the Arrangement's loop brace: Dragging the left and right ends sets the
loop start and end points; dragging between the ends moves the loop without changing its
length.
The loop's (PC) /
(Mac) context menu's Set Song Start Time Here command
can be used to overrule the default play starts at selection rule: when this command is
checked, play starts at the loop start.
6.6 Moving and Resizing Clips
A piece of audio or MIDI is represented in the Arrangement View by a clip sitting at some
song position in one of Live's tracks.
Dragging a clip moves it to another song position or track.
Dragging a clip's left or right edge changes the clip's length.
Moving a Clip.
Changing a Clip's
Length.
Page 81
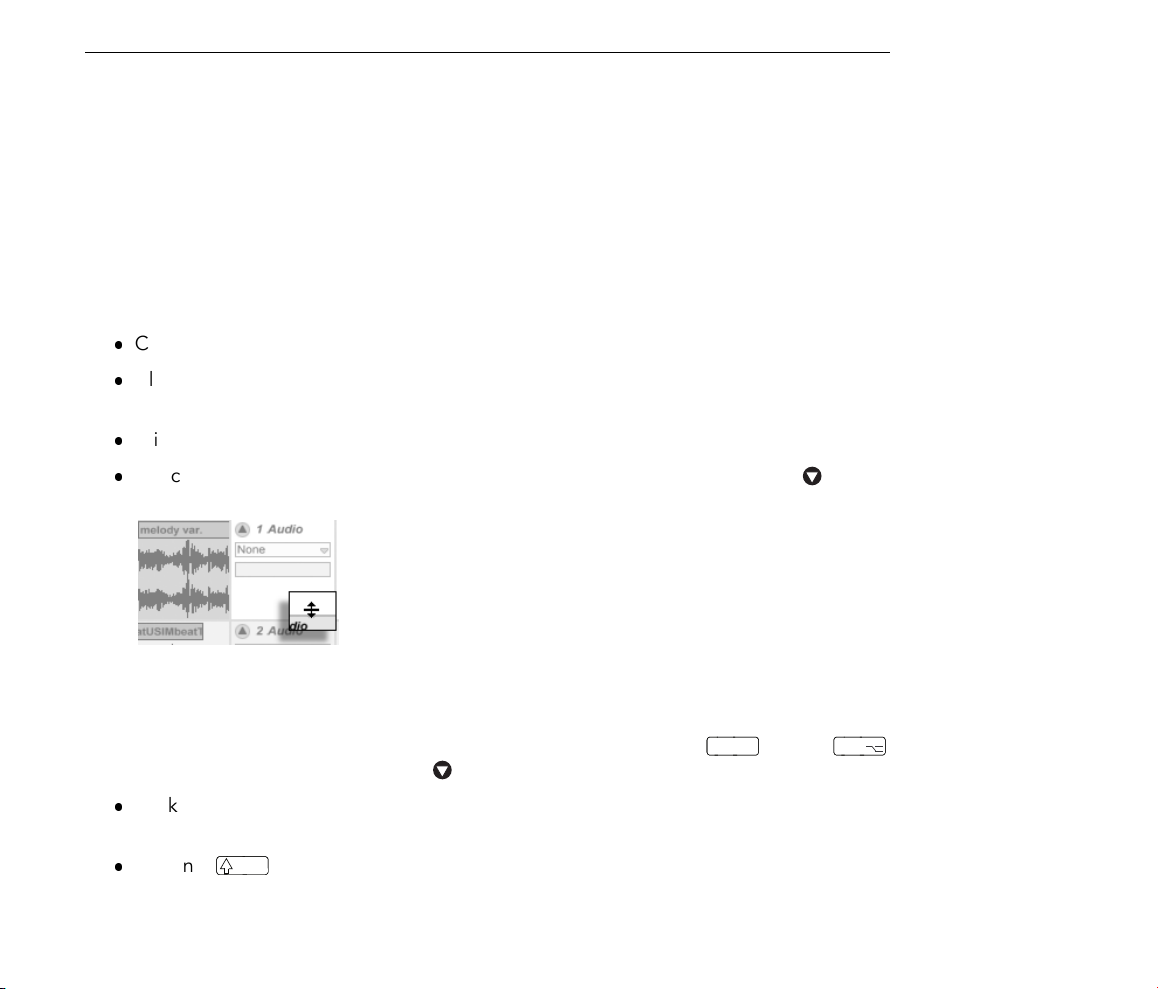
CHAPTER 6. ARRANGEMENT VIEW 79
Alt
Alt
6.7 Selecting Clips and Time
With the exception of moving and resizing clips, Arrangement editing in Live is selectionbased: You select something using the mouse, then execute a menu command (e.g., Cut,
Copy, Paste, Duplicate) on the selection. This editing method lends itself to an efcient
division of labor between the two hands: One hand operates the mouse or trackpad, while
the other hand issues the keyboard shortcuts for the menu commands. The menu eventually
is only used as a reference for looking up the keyboard shortcuts.
Here is how selection works:
Clicking a clip selects the clip;
Clicking into the Arrangement background selects a point in time, represented by a
ashing insert mark;
Clicking and dragging selects a timespan.
To access the time within a clip for editing, unfold its track by clicking the button
next to the track name.
Adjusting an Unfolded
Track's Height.
Notice that you can adjust the height of the unfolded track by dragging the split line
below the Unfold Track button. Clicking and dragging in the waveform display below
the clip's horizontal strip allows you to select time within the clip. Note that you can
actually unfold all of your tracks at once by holding down the
(PC) /
(Mac) modier when clicking the button.
Clicking on the loop brace is a shortcut for executing the Edit menu's Select Loop
command, which selects all material included within the loop.
Holding while clicking extends an existing selection in the same track or across
tracks.
Page 82

CHAPTER 6. ARRANGEMENT VIEW 80
Ctrl
Ctrl
1
1
Ctrl
2
2
Ctrl
3
3
Ctrl
4
4
Ctrl
5
5
6.8 Using the Editing Grid
To ease editing, the cursor will snap to grid lines that represent the meter subdivisions of
the song tempo. The grid can be set to be either zoom-adaptive or xed.
You can set the width of both zoom-adaptive and xed grid lines using the (PC) /
(Mac) context menu available in either the Arrangement View track area or the
Clip View display.
The following shortcuts to Options menu commands allow quickly working with the grid:
Use
grid lines (e.g., from eighth notes to sixteenth notes).
(PC) /
(Mac) to narrow the grid, doubling the density of the
Clicking the Loop Brace
to Select the Loop for
Editing.
Use
(PC) /
(Mac) to widen the grid, halving the density of the grid
lines (e.g., from eighth notes to quarter notes).
Use
(PC) /
(Mac) to toggle triplets mode; this would, for instance,
change the grid from eighth notes to eighth note triplets.
Use
(PC) /
(Mac) to tur n grid snapping on or off. When the grid is
off, the cursor does not snap to meter subdivisions.
Use
(PC) /
(Mac) to toggle xed and adaptive grid modes.
The current spacing between adjacent grid lines is displayed in the lower right corner of the
Arrangement View or Clip View.
Page 83

CHAPTER 6. ARRANGEMENT VIEW 81
6.9 Using the ...Time Commands
Whereas the standard commands like Cut, Copy and Paste only affect the current selection,
their ... Time counterparts act upon all tracks by inserting and deleting time. Any time
signature markers within the selected region will also be affected.
Cut Time cuts a selection of time from the Arrangement, thereby moving any audio
or MIDI on either side of the cut area closer together in the timeline. This command
reduces the length of your Arrangement by whatever amount of time you have cut.
Note that the Cut Time command affects all tracks, not only the selected ones.
Paste Time places copied time into the Arrangement, thereby increasing its overall
duration by the length of time you have copied.
Duplicate Time places a copy of the selected timespan into the Arrangement, thereby
increasing its overall duration by the length of the selection.
A Gap Between Clips
Has Been Deleted by
First Selecting It, Then
Executing the Delete
Time Command.
Delete Time deletes a selection of time from the Arrangement, thereby moving any
audio or MIDI on either side of the deleted area closer together in the timeline. This
command reduces the length of your Arrangement by the amount of time you have
deleted. Note that the Delete Time command affects all tracks, not only the selected
ones.
Insert Silence inserts as much empty time as is currently selected into the Arrangement,
before the selection.
Page 84

CHAPTER 6. ARRANGEMENT VIEW 82
6.10 Splitting Clips
The Split command can divide a clip or isolate part of it.
To split a clip in two halves, do the following:
1. Unfold the track;
2. In the waveform or MIDI display, click at the position where you want the clip to
be split;
3. Execute the Split command.
To isolate a part of a clip, do the following:
1. Unfold the track;
2. In the waveform or MIDI display, drag a selection over the part of the clip you
want to isolate;
3. Execute the Split command to divide the original clip into three pieces.
The Result of Splitting a
Clip.
6.11 Consolidating Clips
The Consolidate command replaces the material in the Arrangement View selection with
one new clip per track. This is very useful for creating structure.
Page 85

CHAPTER 6. ARRANGEMENT VIEW 83
Suppose you have, by editing or improvising, come up with a layout of clips that sound
good in Arrangement Loop mode. Selecting that part of the Arrangement, for instance by
using the Edit menu's Select Loop command, and then executing the Consolidate command
creates a new clip that can be treated as a loop. You can now, for instance, drag the clip
edges to create more repetitions. You might also want to drag the new loop via the Session
View selector into a Session View slot for real-time arrangement purposes.
Consolidating Several
Clips Into a New Clip.
When operating on audio clips, Consolidate actually creates a new sample for every track
in the selection. The new samples are essentially recordings of the time-warping engine's
audio output, prior to processing in the track's effects chain and mixer. Hence, the new
sample incorporates the effects of in-clip attenuation, time-warping and pitch shifting, and
of the respective clip envelopes; however, it does not incorporate the effects. To create a
new sample from the post-effects signal, please use the Export Audio command.
The new samples can be found in the current Set's Project folder, under Samples/Processed/
Consolidate. Until the Set is saved, they remain at the location specied by the Temporary
Folder.
Page 86

84
Chapter 7
Session View
In Live's Arrangement View, as in all traditional sequencing programs, everything happens
along a xed song timeline. For a number of applications, this is a limiting paradigm:
When playing live, or when DJing, the order of pieces, the length of each piece and
the order of parts within each piece is generally not known in advance.
In the theatre, sound has to react to what happens on stage.
When working along with a piece of music or a lm score, it can be more efcient and
inspirational to start with an improvisation, which is later rened into the nal product.
This is exactly what Live's unique Session View is for.
Page 87

CHAPTER 7. SESSION VIEW 85
Return
7.1 Session View Clips
1. Each clip in the Session View has a triangular button at the left edge. Click the
button with the mouse to launch clip playback at any time, or pre-select a
clip by clicking on its name, and launch it using the computer's
can then move on to the neighboring clips using the arrow keys. Please refer
the manual section on clip launch settings for details on how to customize this
behavior.
2. Click on a square Clip Stop button to stop a running clip, either in one of the
track's slots, or in the Track Status eld below the Session grid.
key. You
The Controls for a
Session View Clip.
Clips can be controlled remotely with the computer keyboard or a MIDI controller. They can
even be mapped to MIDI note ranges so that they play chromatically.
Clips can be played at any time and in any order. The layout of clips does not predetermine
their temporal succession; the Session grid offers random access to the clips it contains.
Notice that, even if you stop playback for a Session View clip, the Play button in the Control
Bar will remain highlighted, and the Arrangement Position elds will continue running.
These elds keep a continuous ow of musical time going, so that you can always know your
position in song time during a live performance or while recording into the Arrangement,
regardless of what your individual Session clips are doing.
You can always return the Arrangement Position elds to 1.1.1 and stop playback for the
entire Live Set by pressing the Control Bar's Stop button twice.
Page 88

CHAPTER 7. SESSION VIEW 86
7.2 Tracks and Scenes
Each vertical column, or track, can play only one clip at a time. It therefore makes sense to
put a set of clips that are supposed to be played alternatively in the same columns: parts of
a song, variations of a drum loop, etc.
For convenient access to more clips at once, you can resize Session View tracks by clicking
and dragging at the edges of their title bars. Tracks can be narrowed this way so that only
Clip Launch buttons and essential track controls are visibile.
The Arrangement
Position Fields and the
Stop Button.
Resized Session View
Tracks.
The horizontal rows are called scenes. The Scene Launch buttons are located in the rightmost
column, which represents the Master track. To launch every clip in a row simultaneously,
click on the associated Scene Launch button. This can be very useful in organizing the live
performance of a song with multiple parts.
A Scene in the Session
View.
Page 89

CHAPTER 7. SESSION VIEW 87
Ctrl
Ctrl
The scene below a launched scene will automatically be selected as the next to be launched
unless the Select Next Scene on Launch option in the Launch Preferences is set to Off.
This allows you to trigger scenes from top to bottom without having to select them rst.
Computer keys or a MIDI controller can be used to launch scenes and scroll between them.
Scenes can be renamed using the Rename command in the Edit menu or the (PC) /
(Mac) context menu. One can quickly rename several scenes by executing the
Rename command and using the computer's Tab key to move from one scene to the next.
You can also enter your own info text for a scene via the Edit Info Text command in the Edit
menu or in the scene's (PC) /
(Mac) context menu.
Scene names can be both descriptive and functional; if Live detects a viable tempo and/or
time signature as part of a scene name, the project will automatically adjust to these parameters when the scene is launched. To assign a tempo to a scene, select the scene and
rename it with a viable tempo (e.g., 96 BPM). Any tempo can be used, as long as it is
within the range allowed by Live's Tempo control (20999 BPM). To assign a time signature
to a scene, rename the scene with a meter in the form of x/y (e.g., 4/4). Any time
signature can be used, provided it has a numerator between 1 and 99 and a denominator
with a beat value of 1, 2, 4, 8 or 16.
Tempo and time signature changes can coexist within a single scene name, and can appear
in any position as long as they are separated from each other by at least one character. For
example, 2/4+108 BPM, 72 BPM;7/8 and 60 BPM Chorus 3/4 are all scene names
that will cause simultaneous meter and tempo changes.
These Scenes Will
Change the Tempo and
Time Signature.
Page 90

CHAPTER 7. SESSION VIEW 88
7.3 The Track Status Fields
You can tell a track's status by looking at the Track Status eld just above the active track's
mixer controls:
The pie-chart icon represents a looping Session clip. The number to the right of the circle
is the loop length in beats, and the number at the left represents how many times the loop
has been played since its launch.
The progress-bar icon represents a one-shot (non-looping) Session clip. The value displays
the remaining play time in minutes:seconds.
A Track Playing a
Looping Session Clip...
... A One-shot Session
Clip...
... Monitoring the
Input...
A microphone icon appears in an audio track that is set to monitor its input. A keyboard
icon appears in a MIDI track under these same circumstances.
If the track is playing clips from the Arrangement, a miniature display representing the
Arrangement clips being played appears.
... Playing the
Arrangement.
Page 91

CHAPTER 7. SESSION VIEW 89
Ctrl
Ctrl
7.4 Setting Up the Session View Grid
Clips arrive in the Session View by being imported from the File Browsers or through
recording.
If you are dragging multiple clips into the Session View, Live defaults to arrange them
vertically, in one track. Hold down
to lay the clips out in one scene.
Clips can be moved around the Session grid by drag-and-drop. To move several clips
at once, select them by using the - or
dragging. You can also click into an empty slot and rubber-band select from there. Scenes
can be reordered by drag-and-drop as well.
(PC) / (Mac) prior to dropping them so as
(PC) / (Mac)-modier before
Dropping Multiple Clips
Into the Session View.
7.4.1 Select on Launch
By default, clicking a Session View clip's Launch button also selects the clip, since you will
typically want the Clip View to show the newly launched clip. However, some power-users
don't want the current focus (e.g., a return track's devices) to disappear just because a clip
has been launched, especially when starting a clip in order to try it with the return track
device settings. Turn off the Select on Launch option from the Launch Preferences if you
prefer the view to remain as is when you launch clips or scenes.
Page 92

CHAPTER 7. SESSION VIEW 90
7.4.2 Removing Clip Stop Buttons
You can add and remove Clip Stop buttons from the grid using the Edit menu's Add/Remove
Stop Button command. This is useful for pre-conguring the scene launch behavior: If, for
instance, you don't want scene 3 to affect track 4, remove the scene 3/track 4 Stop button.
7.4.3 Editing Scenes
In addition to the standard Edit menu commands such as cut, copy, paste and duplicate,
there are two useful commands in the Insert menu that apply specically to scenes:
Insert Scene inserts an empty scene below the current selection.
Capture and Insert Scene inserts a new scene below the current selection, places
copies of the clips that are currently running in the new scene and launches the new
scene immediately with no audible interruption. This command is very helpful when
developing materials in the Session View. You can capture an interesting moment as
a new scene and move on, changing clip properties and trying clip combinations.
Slots Without Clip Stop
Buttons.
Please note that the number of scenes is limited to eight in Live LE.
7.5 Recording Sessions into the Arrangement
Your Session View playing can be recorded into the Arrangement, allowing for an improvisational approach to composing songs and scores.
Page 93

CHAPTER 7. SESSION VIEW 91
When the Record button is on, Live logs all of your actions into the Arrangement:
the clips launched;
changes of those clips' properties;
changes of the mixer and the devices' controls, also known as automation;
tempos and time signature changes, if they are included in the names of launched
scenes.
To nish recording, press the Record button again, or stop playback.
To view the results of your recording, bring up the Arrangement View. As you can see, Live
has copied the clips you launched during recording into the Arrangement, in the appropriate
tracks and the correct song positions. Notice that your recording has not created new audio
data, only clips.
The Control Bar's Record
Button.
The Arrangement
Selector.
The Session clips and the Arrangement clips in one track are mutually exclusive: Only one
can play at a time. When a Session clip is launched, Live stops playing back the Arrangement
in favor of the Session clip. Clicking a Clip Stop button causes the Arrangement playback
to stop, which produces silence.
Arrangement playback does not resume until you explicitly tell Live to resume by clicking
the Back to Arrangement button, which lights up to remind you that what you hear differs
from the Arrangement.
The Back to
Arrangement Button.
Page 94

CHAPTER 7. SESSION VIEW 92
To disable all Arrangement clips simultaneously, click on the Stop All Clips button in the
Master Track Status eld. The clips in the Arrangement and in the Session View exist
independently from one another, which makes it easy to improvise into the Arrangement
over and over again until it's right.
Furthermore, you can move clips not only within the Session grid, but also from the Session
View to the Arrangement and vice versa by using Copy and Paste, or by dragging clips over
the or selectors.
When pasting material from the Arrangement into the Session View, Live attempts to preserve the temporal structure of the clips by laying them out in a matching top-to-bottom
order. Moving through the scenes from the top down, you can reconstruct the original arrangement. This is useful for taking a composed piece of music back to the improvisational
stage.
The Stop All Clips
Button.
Page 95

Chapter 8
Clip View
The Clip View is where clip properties can be set and adjusted.
93
The Clip View is opened by clicking on the Clip Overview or double-clicking a clip in the
Session or Arrangement View.
The Clip View.
Page 96

CHAPTER 8. CLIP VIEW 94
Ctrl
In the Session View, clicking on a Track Status Field opens the Clip View for editing the clip
that is currently running in the track.
The properties of more than one clip can be edited collectively in the Clip View as a multiselection. To create a multi-selection, click and drag to highlight the clips, or select one clip
and use the
(PC) / (Mac) or modiers to add to your selection. The
properties available in the Clip View for a multi-selection depend on the contents of the
clips; generally only properties which the clips have in common are shown.
Clicking the Clip
Overview Opens the
Clip View.
Clicking a Session View
Track Status Field Opens
the Clip View.
Creating a Clip
Multi-Selection.
Controls such as sliders and knobs behave slightly differently when they are part of a multiselection. If the clips in a multi-selection have differing values for any particular knob or
slider parameter (clip transposition, for example), the range of these values will be displayed
and can be adjusted with the control. Dragging the knob or slider to its absolute maximum
or minimum value will make the clips' settings thereafter identical, adjustable as a single
value.
MIDI clips and audio clips in Live have different sets of properties and, consequently, do
not share the same set of Clip View controls. The two types of clips do have the following
Page 97

CHAPTER 8. CLIP VIEW 95
in common:
The Clip box contains basic clip settings.
The Envelopes box and the Envelope Editor manage the clip's envelopes, which are
used to modulate the effects, mixer, and clip or MIDI controls. Clip envelopes and
their associated Clip View components are covered in detail in a separate manual
chapter.
The Launch box controls clip launch behavior and, as such, only appears for Session
View clips. Setting Session View clip launch properties is covered in detail in a separate
manual chapter.
Audio clips have these additional Clip View controls:
The Sample Display toggles with the Envelope Editor on the right-hand side of the
Clip View, and controls Live's sample-warping capabilities and clip playback settings.
The Sample box contains settings pertaining to how the clip plays its sample and
displays it in the Sample Display.
MIDI clips have these additional Clip View controls:
The MIDI Editor toggles with the Envelope Editor on the right-hand side of the Clip
View, and allows editing and creating MIDI notes and velocities.
The Notes box contains settings pertaining to how Live plays a MIDI clip and what it
displays in the MIDI Editor.
The Clip View for an
Audio Clip.
Page 98

CHAPTER 8. CLIP VIEW 96
To make best use of the screen real estate, you can show or hide the Launch, Envelopes,
and Sample or MIDI boxes using the Clip View Box selector in the Clips box. You can also
toggle between the Sample Display/MIDI Editor and the Envelope Editor by clicking in the
title bars of the Sample/Notes box and the Envelopes box, respectively.
The Clip View for a MIDI
Clip.
The Clip View Box
Selector Shows and
Hides Various Clip View
Components.
Page 99

CHAPTER 8. CLIP VIEW 97
Ctrl
Ctrl
8.1 The Clip Box
8.1.1 Clip Activator Switch
Using this switch, you can deactivate a clip so that it does not play when launched in the
Session View or during Arrangement playback. Clips can also be activated/deactivated
directly from the Session or Arrangement V iew with their (PC) /
menus.
(Mac) context
The Clip Box.
8.1.2 Clip Name and Color
The Clip Name eld allows naming the clip. By default, a clip's name matches the name of
the le it references but, in general, the clip name is independent from the le name.
You can also rename a clip by selecting it in the Session grid or Arrangement View and
using the Rename command in the Edit menu or the clip's (PC) /
menu. This method also allows you to create your own info text for the clip via the Edit Info
Text command.
Renaming an audio clip does not rename the referenced sample le. To rename a le, select
it in Live's File Browsers, and then choose the Edit menu's Rename command.
(Mac) context
Page 100

CHAPTER 8. CLIP VIEW 98
The Clip Color chooser allows choosing a clip color.
8.1.3 Clip Signature
Using the Clip Signature elds, you can specify the time signature of a MIDI or audio
clip. This setting is relevant only for display; it does not affect playback. Please note that
Clip Signature is completely separate from the project's time signature, and can be set
independently for each clip. This makes it easy to create complex polymetric textures by
simultaneously triggering clips with different meters and/or loop lengths.
8.1.4 Groove
The Clip Groove chooser selects the type of groove used for the clip. Swing 8, for
example, applies an 8th-note groove.
The Global Groove control denes the amount of the groove for every clip in the Live Set.
So, how does it work? Imagine a simple one-bar MIDI clip that has a time signature of 4/4.
Our MIDI clip is made up of 8th notes eight of them that play either on or between each
of the four beats. With a Clip Groove setting of Swing 8, the timing of our one-bar clip
becomes a bit like a rubber-band that is pinned down at each beat but exible in between.
The 8th notes that fall between beats can shift slightly forward. With a Global Groove setting
of 50, for example, the notes will wait until 2/3 of the way through the beat to play, where
an 8th-note triplet would normally fall.
The Control Bar's Global
Groove Control.
16th- and 32nd-note swing works similarly, but on a smaller scale: Every other note shifts
forward, toward the nearest 16th- or 32nd-note triplet position.
Returning to our rubber-band analogy, we can see that Swing 8 can actually affect more
than just 8th notes. Actually, any notes that do not lie directly on a beat will be affected
when the rubber-band is stretched including 16th and 32nd notes. By the same token,
Swing 16 (where our rubber-band is anchored to positions just an 8th note apart) can affect
32nd notes.
 Loading...