

Page 1
1
Page 2

Live Version 5.2 for Windows and Mac OS
Created by Bernd Roggendorf, Gerhard Behles, Robert Henke, awi, Reiner Rudolph, Stefan
Haller, Torsten Slama, Eduard Mueller, Stefan Franke, Frank Hoffmann, Andreas Zapf, HansThomas Mueller, Henrik Hahn, Ralf Suckow, Gregor Klinke, Matthias Mayrock, Friedemann
Schautz, Ingo Koehne.
Reference Manual by Rose Knudsen, Gerhard Behles, Jakob Rang, Robert Henke, Torsten
Slama.
Loops and samples provided by Big Fish Audio.
Web: www.bigshaudio.com
E-mail: info@bigshaudio.com
Address: 11003 Penrose Street, Suite C, Los Angeles, CA 91352
Copyright 2006 Ableton AG. All rights reserved.
This manual, as well as the software described in it, is furnished under license and may be used or copied only in accordance with
the terms of such license. The content of this manual is furnished for informational use only, is subject to change without notice and
should not be construed as a commitment by Ableton. Ableton assumes no responsibility or liability for any errors or inaccuracies
that may appear in this book.
Except as permitted by such license, no part of this publication may be reproduced, stored in a retrieval system or transmitted, in
any form or by any means, electronic, mechanical, recording or otherwise, without the prior written permission of Ableton.
Macintosh, Audio Units and QuickTime are registered trademarks of Apple Computer, Inc. Windows is a registered trademark
of Microsoft Corporation. VST is a trademark of Steinberg Media Technologies GmbH. ReWire is a trademark of Propellerhead
Software AB. Mackie Control is a trademark of LOUD Technologies Inc. Ogg Vorbis and FLAC are trademarks of Xiph.Org. Ableton
is a trademark of Ableton AG. All other product and company names are trademarks or registered trademarks of their respective
holders.
Page 3

Chapter 1
Welcome to Live
1.1 The Ableton Team Says: Thank You
Live is the result of musicians wanting a better way to create, produce and perform music
using a computer. A great deal of effort has been put into making Live easy and fun to
use, yet at the same time capable of helping you create music with unlimited depth and
sophistication. This effort continues even as you read these lines... in fact, a new, improved
Live version might already be available for download! Please check on our website now1,
or choose Check for Updates from the Help menu.
We hope you enjoy using Live and that it enhances your creative process. Should you have
suggestions about how we can improve Live, please let us know2.
1
http://www.ableton.com/downloads
2
contact@ableton.com
1
Page 4

1.2. WHAT'S NEW IN LIVE 5? 2
Your Ableton Team.
1.2 What's New in Live 5?
1.2.1 Remix Features
Support for MP3, Ogg Vorbis, Ogg FLAC and FLAC compressed audio les
Auto-Warp
Complex Warp Mode for warping music containing beats, tones and textures
Clip scrub, nudge and improved transport controls
1.2.2 Organizational Tools for Files and Sets
File search function
Better browsing for les and folders
Live Clip format for easy storage and retrieval of clip and device settings
Import and export of Live Sets and their components directly from the Browser
Open Recent Set command
1.2.3 Clip and Track Enhancements
Track Freeze for conserving CPU resources and simplifying project sharing
Page 5

1.2. WHAT'S NEW IN LIVE 5? 3
Track Delay controls to control for human, acoustic and hardware delays
Multi-selection clip editing
Clip deactivation option
1.2.4 Working with Arrangements
Launchable Arrangement Locators
New Arrangement Transport
Track I/O in the Arrangement View
1.2.5 Editing MIDI
Detailed and adaptive MIDI quantization options
Preview in the MIDI Editor
MIDI note deactivation option
1.2.6 MIDI and Key Remote Control
Mackie Control support
Improved mapping for the crossfader
Page 6

1.2. WHAT'S NEW IN LIVE 5? 4
1.2.7 Resources
Valuable library of clips, device presets and Live Sets
Library expansion and customization with Live Packs
New interactive built-in program lessons
1.2.8 Live Effects and Instruments
Beat Repeat for reorganizing and shredding beats and vocals
Phaser and Flanger
Auto Pan for LFO-driven manipulation of amplitude and panning
Saturator for subtle-to-drastic distortion effects
Arpeggiator
New features for Simpler and Operator
1.2.9 Using Devices
Browser-based device preset management
Device groups for saving multi-effect combinations together with instruments
Device delay compensation for Live and plug-in instruments and effects
Live can receive MIDI messages from plug-ins
VST Plug-ins can be stored in various directories
Page 7

1.2. WHAT'S NEW IN LIVE 5? 5
Ctrl
1.2.10 Miscellaneous
(PC) /
Zoom-adaptive or xed grid options
Count-in recording
Monitoring status easily visible when the In/Out section is hidden
Files, Sets and presets can be dragged into Live from the Explorer (Windows) / Finder
(Mac)
(Mac) context menus for many commands and settings
Page 8

Chapter 2
First Steps
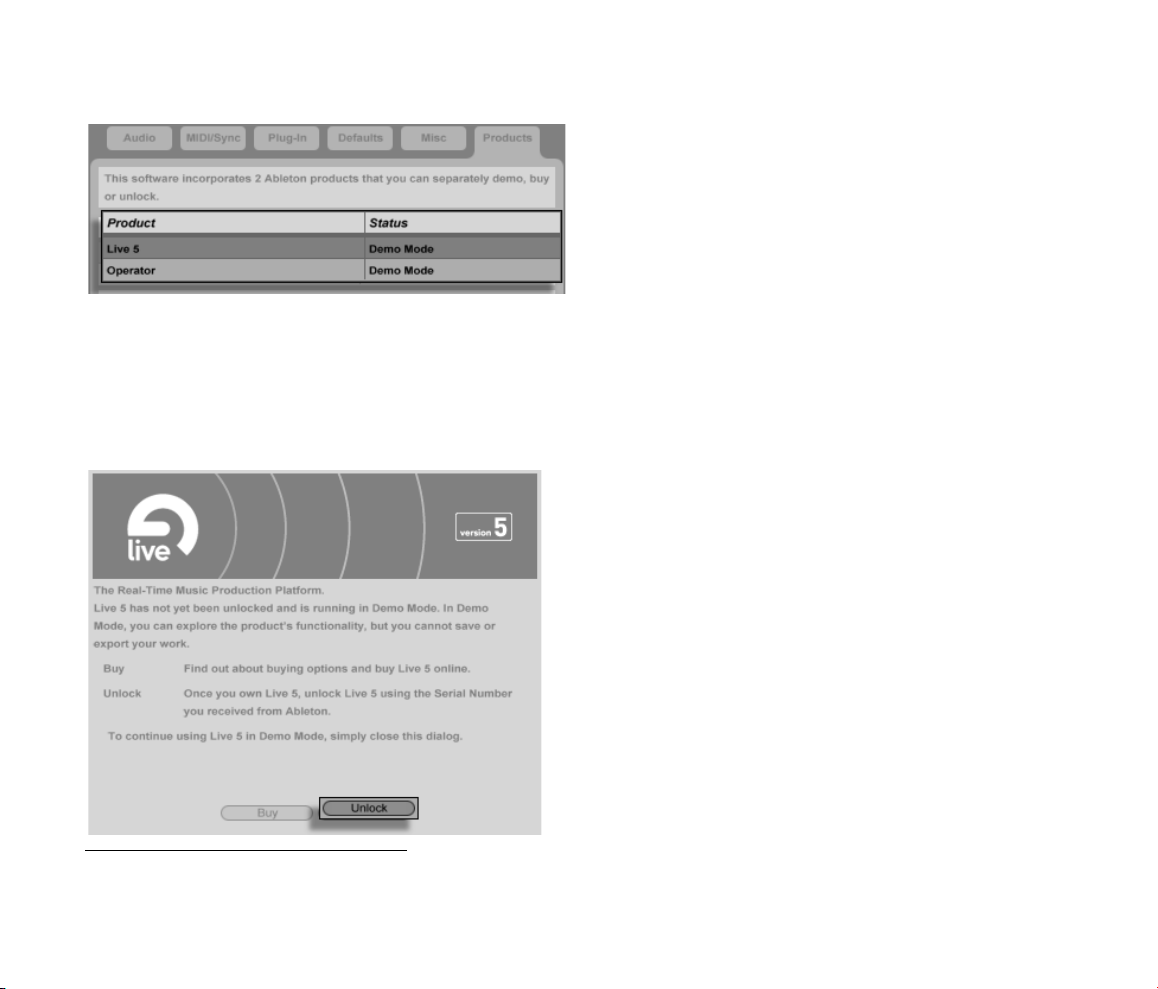
When you install Live and run it for the rst time, you will be presented with the Products
Preferences tab.
If you own Live, you can authorize your copy of the software by selecting it from the listed
products and clicking the Unlock button at the bottom of the window. Please see the chapter
on unlocking Live should you have questions or concerns that arise during the unlocking
process.
If you do not (yet) own Live, you can close the Preferences and proceed, as Live will run in
Demo Mode by default. In Demo Mode, you will be able to work with all of Live's features
with the exception of saving and exporting.
6
Page 9

2.1. LEARN ABOUT LIVE 7
2.1 Learn About Live
Live comes with a set of interactive lessons to take you step by step through the key features
of the program. The lessons are organized in a table of contents, which can be opened
directly in the program via the Help menu. We highly recommend following the lessons.
Many users have told us that the lessons helped them get familiar with the program very
quickly.
We also recommend that you read the Live Basics chapter, which encapsulates everything
that Live is and can do, and is therefore a worthwhile read for both beginners and experienced users. The remaining chapters of this manual serve as in-depth reference for the
material introduced in Live Basics.
2.1.1 Using the Info View and Index
Live's Info View tells you the name and function of the user interface element currently under
the mouse.
Page 10
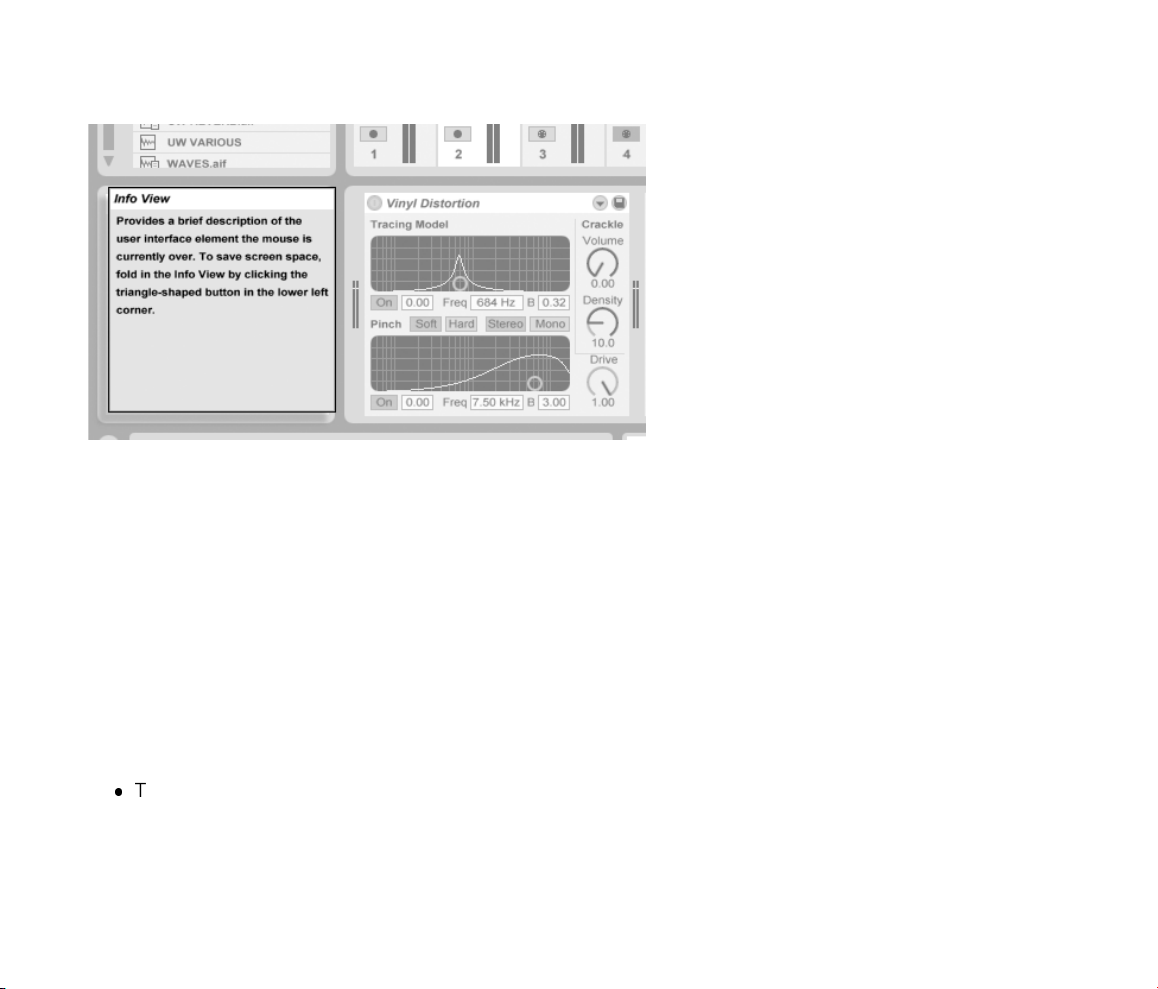
2.2. SETTING UP PREFERENCES 8
If you require more information on a specic user interface element or topic, please consult
this reference manual. The index, found at the end of the manual, contains the names of all
user interface elements and will lead you to the relevant section.
2.2 Setting up Preferences
The Info View.
Live's Preferences dialog is where you can nd various settings that govern how Live looks,
behaves and interfaces with the outside world. This dialog is accessed with the Options
menu's (Windows) / Live menu's (Mac OS X) Preferences entry.
Live's Preferences are distributed over several tabs:
The Audio Preferences are used to set up Live's audio connections with the outside
world via an audio interface. Please take the time to follow the program's built-in
Setting up Audio I/O lesson, which will walk you through all the steps required to
set up and optimize the settings for any given system. To access the lesson, choose
Page 11

2.3. THE MAIN LIVE SCREEN 9
Lessons Table of Contents from the Help menu.
The MIDI/Sync Preferences are used to help Live recognize MIDI devices for three
separate and distinct purposes:
Playing MIDI notes. To learn how to route an external device into Live for MIDI
input, or how to send MIDI to an external device, please see the chapter on
routing.
Controlling parts of the interface remotely. This subject is covered in detail in the
chapter on remote control.
Syncing the program with an external sequencer or drum machine, either as a
master or a slave. Please see the manual section on sync for details.
The Plug-In Preferences pertain to the use of plug-in virtual instruments and effects,
as described in the chapter on using plug-ins.
The Default Preferences allow customizing the default state for new projects and their
components, as well as selecting options for new recordings.
The Misc(ellaneous) Preferences include various options. Here, you can select Live's
system language and a color scheme, or skin, for the Live user interface.
The Products Preferences are used to manage licensing and installation of the Live
platform, and add-on components like the Operator instrument and Live Pack library
packages.
2.3 The Main Live Screen
Most of your work in Live happens in the main Live screen. This screen consists of a number
of views. Each view manages a specic aspect of your project. As screen space is limited,
the Live views cannot all be up at the same time.
Page 12

2.3. THE MAIN LIVE SCREEN 10
Each one of the selector buttons at the screen borders calls up a specic view; click this one,
for instance, to access the Live devices:
To hide one of Live's views and free up screen space, click on the triangle-shaped button
next to it. To restore the view, click the button again.
A View Selector.
A View Show/Hide
Button.
You can run Live in Full Screen Mode by selecting Full Screen from the View menu. To
leave Full Screen Mode, click the button that appears in the lower right corner of the screen.
Full Screen Mode can also be toggled by pressing the F11 key.
You can adjust the main window's horizontal split by dragging.
Page 13
2.3. THE MAIN LIVE SCREEN 11
Adjusting the Main
Window Split.
Page 14

Chapter 3
Unlocking Live
Live is protected against illegal use by a copy protection scheme. This scheme has been
designed to meet the highest security standards while avoiding hassles for the customer. If
you nd this procedure to be an inconvenience, please understand that the copy protection
secures your investment: It allows Ableton to provide you with support and to continue
developing Live.
Authorization of Ableton products takes place in the Preferences' Products tab, which will
appear when you start Live for the rst time.
Here you can choose to authorize (unlock) or purchase any Ableton products available to
you, for example the Operator instrument.
Please note that products such as Operator are sold separately from Live but are unlocked
using the same procedure described in the following sections. They can also be individually
set to Demo Mode in the Products tab so that you can try them out.
12
Page 15
13
Clicking on any product listed in the Products tab will give you the option of unlocking or
buying that product. Please click the Unlock button here to complete the unlocking process
in two steps. If you have not yet purchased the product, you can do so online by clicking the
Buy button. You can always return to the Products Preferences tab later or visit the Ableton
webshop1to make a purchase. Live's Preferences are available via the Options menu (or
the Live menu in Mac OS X).
The Products Tab in the
Preferences.
1
http://www.ableton.com/shop
Selecting the Unlock
Button in the Products
Tab.
Page 16
3.1. STEP 1: ENTERING YOUR SERIAL NUMBER 14
3.1 Step 1: Entering Your Serial Number
As an owner of Live, you have received a Serial Number from Ableton, either via e-mail (if
you ordered Live directly from Ableton), or on a card as part of the Live package.
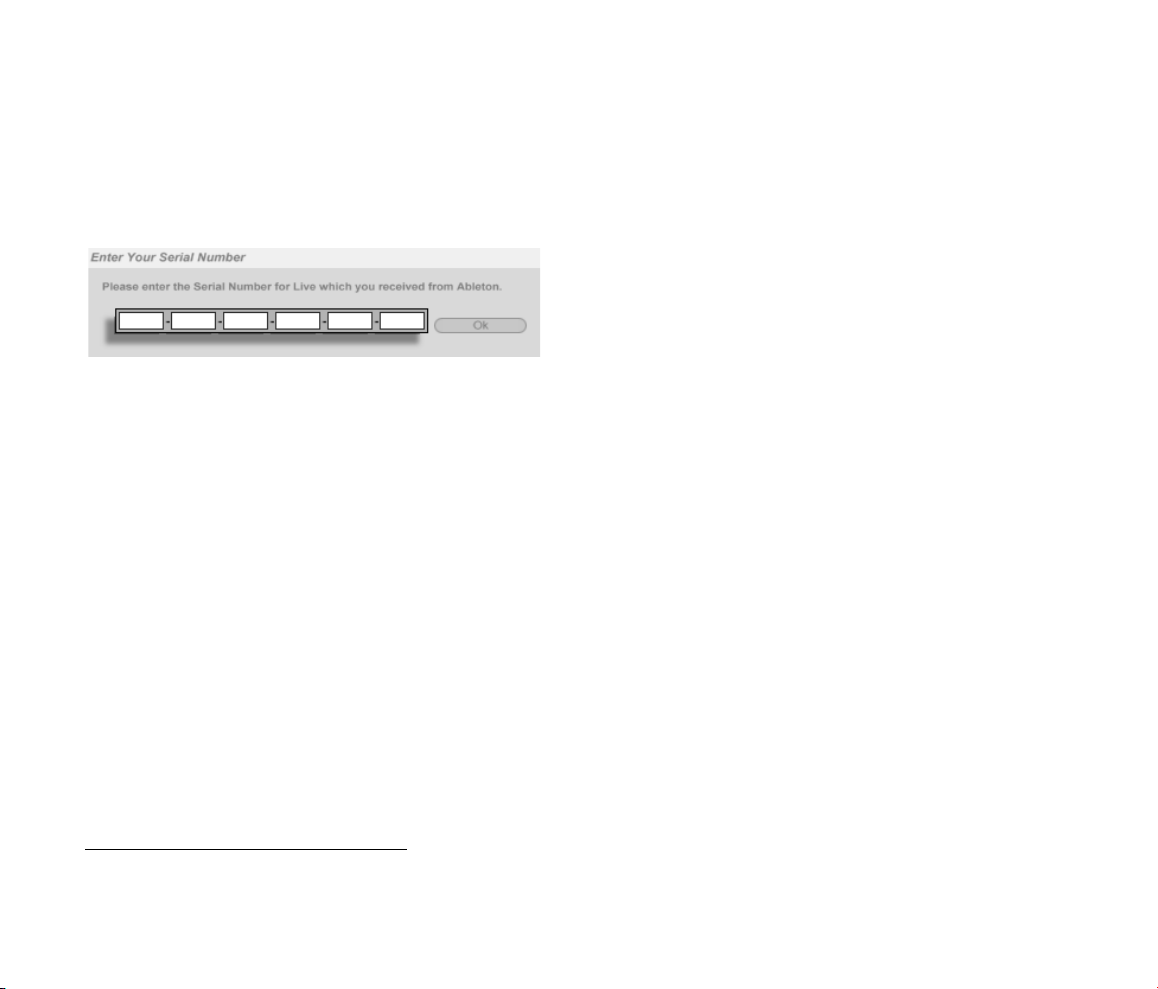
After selecting Unlock in the Products tab, you will be presented with six elds for typing
in your Serial Number. Each eld holds four characters. The Serial Number is composed of
numbers 0..9 and letters A..F. If you accidentally type the wrong string into a eld, the eld
will turn red. When you have successfully entered the Serial Number, click the Ok button
to proceed.
The Serial Number identies your ownership of Live. Because your Serial Number is a
valuable good, you should keep it in a safe place and out of reach of unauthorized hands.
Please be aware that sharing your Serial Number will render it unusable. The only way for
Ableton technical support to help you get back your Serial Number if you lose it is via your
registration data. Therefore, please register your product2, as otherwise you might lose
your property!
The Fields for Entering
Your Serial Number.
3.2 Step 2: Unlocking Live
The second step of authorizing Live is called unlocking. Unlocking means associating
your Serial Number with a specic computer. Please be aware that the standard Live license
grants you the right to use Live on only one computer at a time. You can, however, unlock
2
http://www.ableton.com/register
Page 17
3.2. STEP 2: UNLOCKING LIVE 15
Live with your Serial Number more than once under the legal and technical conditions
described later.
3.2.1 The Unlock Key
For unlocking, you require an Unlock Key that can only be created by the Ableton server.
Unlocking therefore requires access to the Internet. The computer from which you connect
to the Internet does not have to be the same computer for which you wish to unlock Live,
but it does make things easier.
3.2.2 The Challenge Code
The Ableton server creates the Unlock Key from your Serial Number and a so-called Challenge Code. The Challenge Code is a ngerprint that Live takes of your computer's
components. For details, please see the corresponding section.
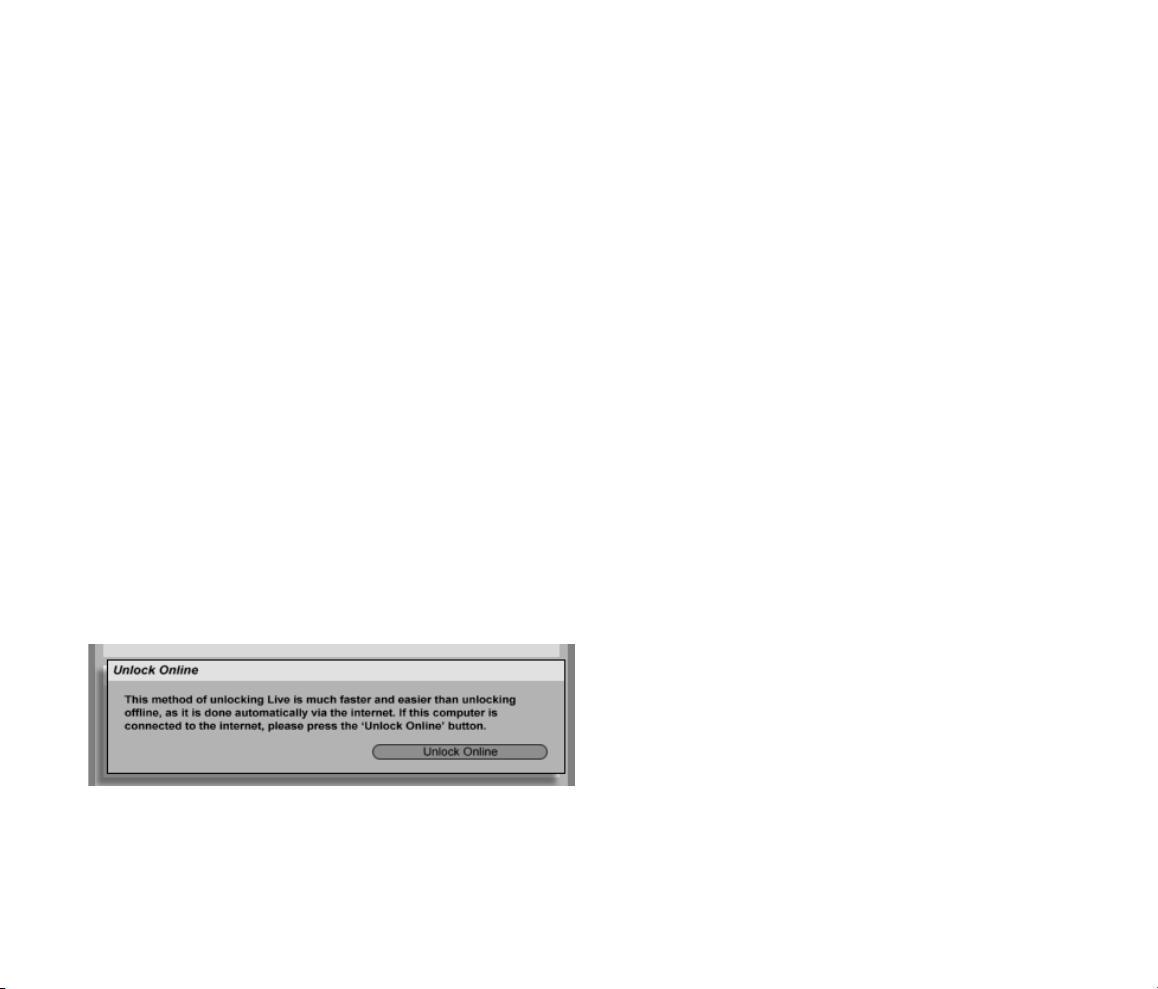
3.2.3 Unlocking Online
If the computer you want to unlock Live for is connected to the Internet, the only thing you
need to do is press the Unlock Online button. Live will then create a connection to the
Ableton server, send your Serial Number and Challenge Code, and receive the Unlock Key
Unlocking Live Online.
Page 18
3.2. STEP 2: UNLOCKING LIVE 16
from the server. No information other than this is exchanged between your computer and
the Ableton server.
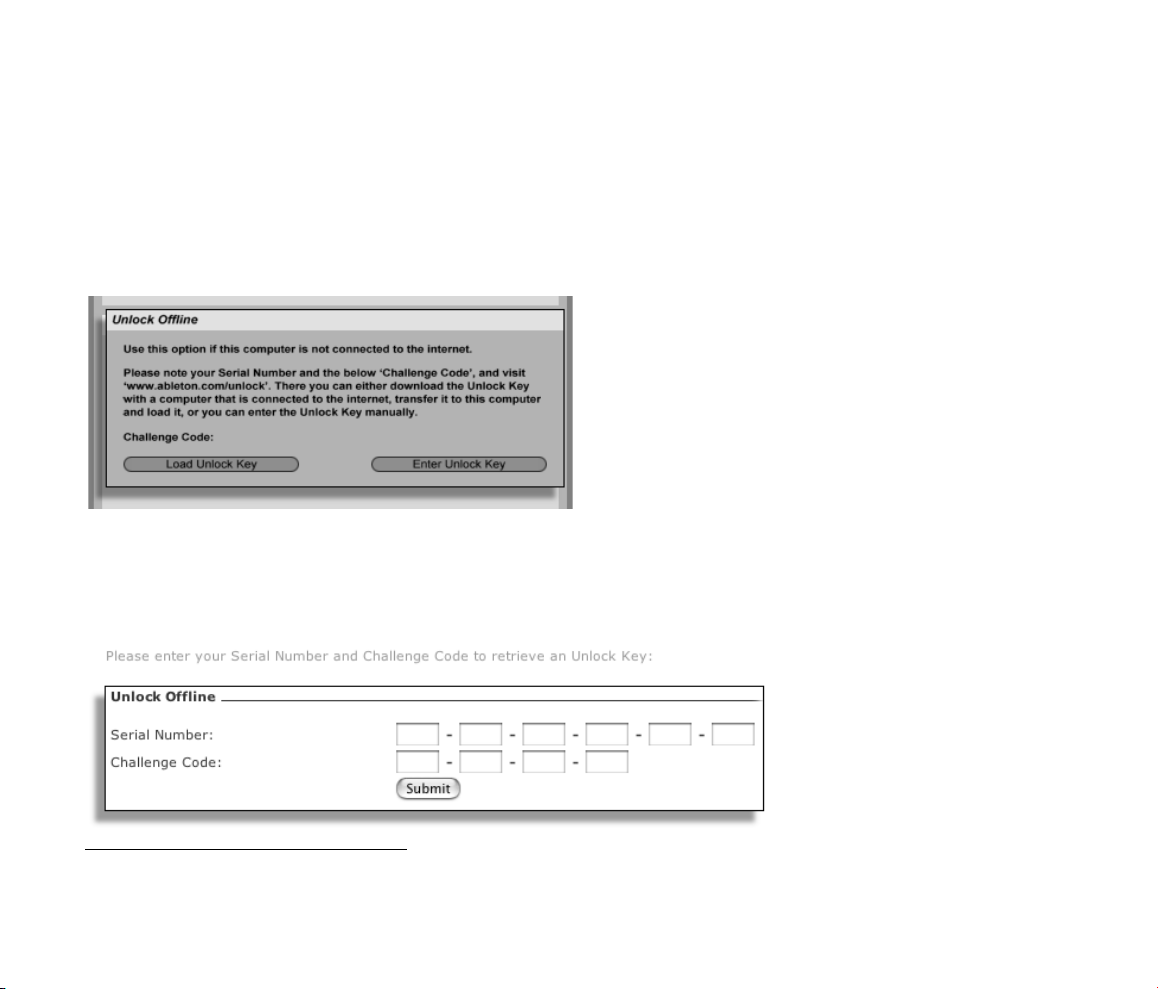
3.2.4 Unlocking Ofine
If the computer you want to unlock Live for is not connected to the Internet, you can use
any other computer to access the Ableton server's web interface3. This is a website with
elds for entering your Serial Number and the Challenge Code, which you can copy from
Live's Unlock dialog.
Unlocking Live Ofine.
3
http://www.ableton.com/unlock
The Live Unlocking Web
Site.
Page 19
3.2. STEP 2: UNLOCKING LIVE 17
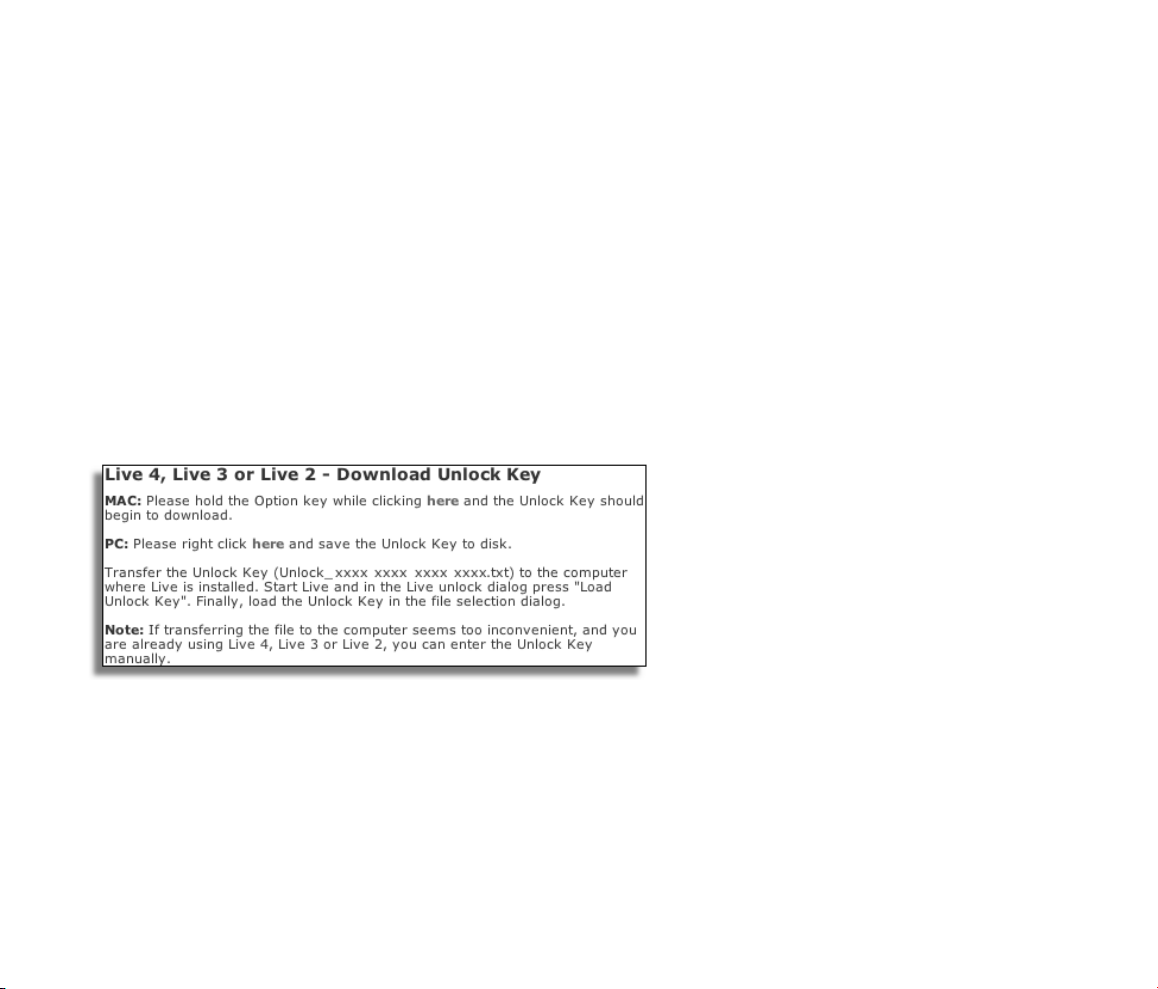
If you have entered your Serial Number and Challenge Code correctly, another website will
appear to provide you with the Unlock Key. There now are two options for transferring the
Unlock Key to the computer that is to be unlocked:
Follow the weblink to download the Unlock Key as a le. Transfer the le to the target
computer via a diskette or CD-ROM. Then, press the Unlock dialog's Load Unlock Key
button to load the Unlock Key le.
The Unlock Key Can Be
Downloaded as a Text
File.
OR it might be more convenient to print the webpage with the Unlock Key on it. On the
target computer, press the Enter Unlock Key button to open a dialog with elds for typing
in the Unlock Key. Typing it in is easier than it rst appears, because the elds will turn red
if you type the wrong string.
Page 20
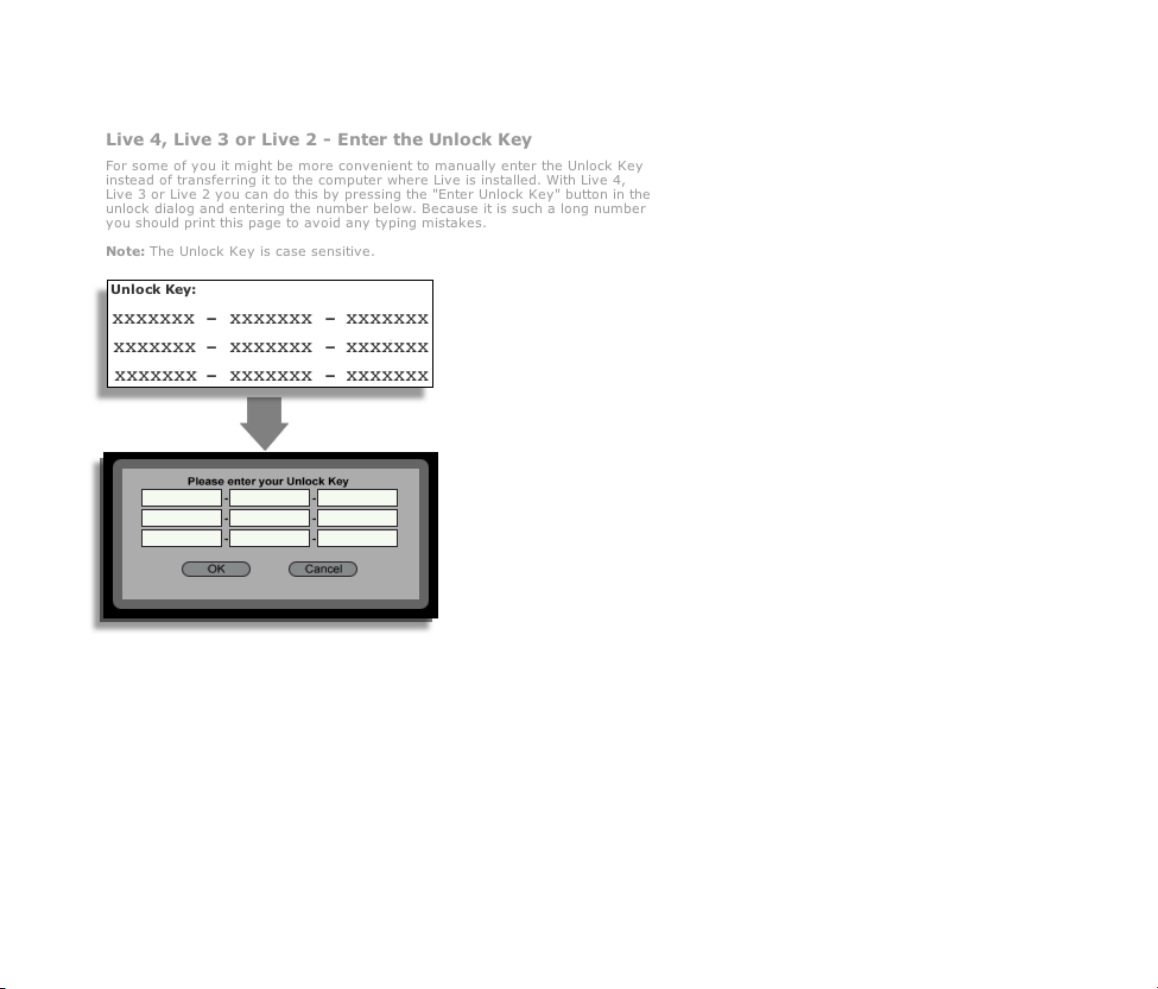
3.2. STEP 2: UNLOCKING LIVE 18
Manually Enter Your
Unlock Key.
Page 21

3.3. COPY PROTECTION FAQS 19
3.3 Copy Protection FAQs
3.3.1 Can I Use Live or Other Ableton Products Without a Serial Number?
If you do not (yet) own Live, you can work with Live in Demo Mode. Demo Mode offers
Live's complete functionality, but saving and exporting are disabled.
Live will run in Demo Mode by default if it has not been authorized. You can try out other
Ableton products, such as the Operator instrument, by individually switching them to Demo
Mode in the Products tab of the Preferences.
Demo Mode can also be deactivated on a product-by-product basis in the Product Preferences.
If running Live or another product in Demo Mode raises your interest in purchasing it, please
select it from the Products Preferences tab and then click the Buy button, or visit the Ableton
webshop4. This site contains information about Ableton's distributor and dealer network.
It also offers you the opportunity to buy Ableton products online. Live's Preferences are
available via the Options menu (or the Live menu in Mac OS X).
4
http://www.ableton.com/shop
Page 22

3.3. COPY PROTECTION FAQS 20
3.3.2 What if I Change My Computer's Components?
If the Challenge Code of your computer changes for some reason, Live will indeed ask
you to unlock the software another time. The Challenge Code does not change, however,
when computer peripherals are replaced (audio or MIDI hardware, printers, modems). The
Challenge Code may change if the motherboard, processor or network card is replaced. On
some computers, reformatting a hard drive also changes the Challenge Code.
Click Here if You Are
Interested in Buying
Live.
3.3.3 Can I Unlock Live More than Once?
The standard Live license allows you to use Live on only one computer at a time. However,
if you have registered your product5, the Ableton server will provide you with two Unlock
5
http://www.ableton.com/register
Page 23

3.3. COPY PROTECTION FAQS 21
Keys in good faith that you will use Live on only one machine at a time. Just proceed as
described in the corresponding section.
You can therefore run Live on both a studio desktop computer and a tour laptop, but not at
the same time.
Should the Ableton server reject your demand for another Unlock Key, please contact
Ableton's technical support.
They can be reached by:
E-mail6;
Telephone: +49 (0)30 - 288 763 151 (available Monday to Friday 11 to 15hrs CET);
Fax: +49 (0)30 - 288 763 11.
To speed up the process, please:
Register your copy of Live7;
Include a brief explanation of the circumstances.
To use Live on more than one computer at a time, you require a secondary license or a site
license. Ableton offers these licenses at special rates. Please contact the sales team8for
details.
3.3.4 Can I Play my Set from a Computer That Is Not Unlocked?
In Demo Mode, you can load and perform a Live Set with no time limitation. You cannot,
however, save or export your work. When you go on tour, consider taking along your Live
6
support@ableton.com
7
http://www.ableton.com/register
8
orders@ableton.com
Page 24
3.3. COPY PROTECTION FAQS 22
program CD and a CD with the last state of your Live Set(s). In case of an emergency, you
can install and run Live on any computer available and play your backup Live Set(s).
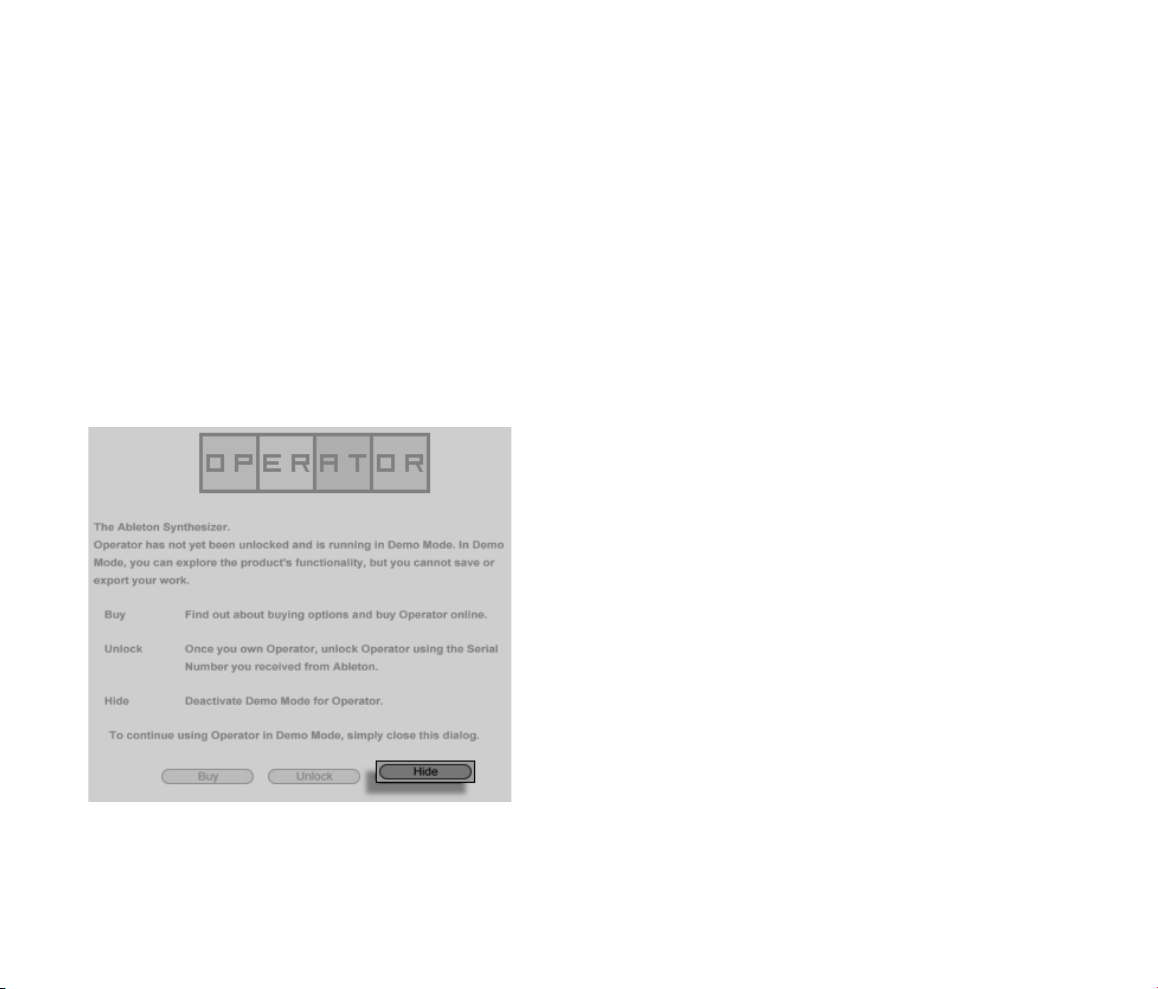
3.3.5 How Can I Turn Demo Mode Off?
If Live is unlocked but other products are set to Demo Mode, Live will also run in Demo
Mode, and you will not be allowed to save or export your work. To turn Demo Mode off
in this case, activate the Hide option for each additional product in its respective Product
Preference page.
You can always choose to show a product again later, and then try out its features by using
them in Demo Mode.
Click Here to Hide a
Product's Features.
Page 25

3.3. COPY PROTECTION FAQS 23
3.3.6 What Do I Do About Problems or Questions Regarding Copy Protection?
Please contact technical support9. They are happy to help!
9
support@ableton.com
Page 26

Chapter 4
Live Basics
This chapter introduces the essential concepts of Live. We advise you to read this chapter
early in your Live career, as a solid understanding of the program's basic principles will help
you fully exploit Live's potential for your music-making.
4.1 Live Sets
The type of document that you create and work on in Live is called a Live Set. Live Sets can
be opened either through the File menu's Open command or via the built-in File Browsers.
24
Page 27

4.2. ARRANGEMENT AND SESSION 25
Pressing the Library button in Live's Browser will take you to Live's library of creative tools.
There are a number of starter Sets here; double-clicking a Live Set's name in the Browser
will open that Live Set.
4.2 Arrangement and Session
The basic musical building blocks of Live are called clips. A clip is a piece of musical material:
a melody, a drum pattern, a bass line or a complete song. Live allows you to record and
alter clips, and to create larger musical structures from them: songs, remixes, DJ sets or
stage shows.
A Live Set consists of two environments that can hold clips: The Arrangement is a layout of
clips along a musical timeline; the Session is a real-time-oriented launching base for clips.
Every Session clip has its own play button that allows launching the clip at any time and in
any order. Each clip's behavior upon launch can be precisely specied through a number of
settings.
A Live Set in the
Browser, Accessed via
the Library Button.
The Arrangement is accessed via the Arrangement View and the Session via the Session
Clips in the Session View
(Left) and in the
Arrangement View
(Right).
Page 28
4.3. TRACKS 26
View; you can toggle between the two views using the computer's Tab key or their respective
selectors. Because the two views have distinct applications, they each hold individual
collections of clips. However, it is important to understand that ipping the views simply
changes the appearance of the Live Set and does not switch modes, alter what you hear or
change what is stored.
Arrangement and Session interact in useful (though potentially confusing) ways. One can,
for instance, improvise with Session clips and record a log of the improvisation into the
Arrangement for further renement. This works because Arrangement and Session are
connected via tracks.
The Arrangement and
Session View Selectors.
4.3 Tracks
Tracks host clips and also manage the ow of signals, the creation of new clips through
recording, sound synthesis, effects processing and mixing.
Page 29
4.3. TRACKS 27
Session and Arrangement share the same set of tracks. The tracks are vertically laid out from
left to right in the Session View, and horizontally from top to bottom in the Arrangement
View. A simple rule governs the cohabitation of clips in a track:
A track can only play one clip at a time.
Therefore, one usually puts clips that should play alternatively in the same Session View
column, and spreads out clips that should play together across tracks in rows, or so-called
scenes.
A Track in the
Arrangement View.
The exclusivity of clips in a track also implies that, at any on time, a track will either play a
Session clip or an Arrangement clip, but never both. So, who wins? When a Session clip
is launched, the respective track stops whatever it is doing to play that clip. In particular, if
the track was playing an Arrangement clip, it will stop it in favor of the Session clip even
as the other tracks continue to play what is in the Arrangement. The track will not resume
A Scene in the Session
View.
Page 30
4.4. AUDIO AND MIDI 28
Arrangement playback until explicitly told to do so.
This is what the Back to Arrangement button, found in the Control Bar at the top of the
Live screen, is for. This button lights up to indicate that one or more tracks are currently not
playing the Arrangement, but are playing a clip from the Session instead.
We can click this button to make all tracks go back to the Arrangement. Or, if we like what
we hear, we can capture the current state into the Arrangement by activating the Record
button. Disengaging Record Mode or stopping Live using the Stop button leaves us with
an altered Arrangement.
4.4 Audio and MIDI
Clips represent recorded signals. Live deals with two types of signals: audio and MIDI. In the
digital world, an audio signal is a series of numbers that approximates a continuous signal
as generated by a microphone or delivered to a loudspeaker. A MIDI signal is a sequence
of commands, such as now play a C4 at mezzo piano. MIDI is a symbolic representation
of musical material, one that is closer to a written score than to an audio recording. MIDI
signals are generated by input devices such as MIDI or USB keyboards1.
It takes an instrument to convert MIDI signals into audio signals that can actually be heard.
Some instruments, such as Live's Simpler, are for chromatic playing of one sound via the
keyboard. Other instruments, such as Live's Impulse, have a different percussion sound
assigned to each keyboard key.
The Play, Stop, Record
and Back to
Arrangement Buttons.
Audio signals are recorded and played back using audio tracks, and MIDI signals are
1
For an introduction to digital audio and MIDI, please see http://img.uoregon.edu/emi/emi.php and
http://www.midi.org/
Page 31

4.5. AUDIO CLIPS AND SAMPLES 29
recorded and played back using MIDI tracks. The two track types have their own corresponding clip types. Audio clips cannot live on MIDI tracks and vice versa.
Information about inserting, reordering and deleting audio and MIDI tracks is found here.
4.5 Audio Clips and Samples
An audio clip contains a reference to a sample (also known as a sound le or audio le)
or a compressed sample (such as an MP3 le). The clip tells Live where on the computer's
drives to nd the sample, what part of the sample to play and how to play it.
When a sample is dragged in from one of Live's built-in File Browsers, Live automatically
creates a clip to play that sample. Prior to dragging in a sample, one can audition or
preview it directly in the Browser; the switch in the Browser with the headphone icon
activates previewing.
Live offers many options for playing samples in exciting new ways, allowing you to create an
abundance of new sounds without actually changing the original sample all the changes
Samples Are Dragged in
from Live's File Browsers.
Page 32

4.6. MIDI CLIPS AND MIDI FILES 30
are computed in real time, while the sample is played. The respective settings are made in
the Clip View, which appears on screen when a clip is double-clicked.
Many powerful manipulations arise from Live's warping capabilities. Warping means changing the speed of sample playback independently from the pitch so as to match the project
tempo as adjusted in the Control Bar's Tempo Field.
The most elementary use of this technique, and one that usually requires no manual setup,
is synchronizing sample loops to the chosen tempo. Live's Auto-Warp algorithm actually
makes it easy to line up any sample with the project tempo, such as a recording of a drunk
jazz band's performance. It is also possible to radically change the sonic signature of a
sound using extreme warp settings.
An Audio Clip's
Properties as Displayed
in the Clip View.
The Control Bar's Tempo
Field.
4.6 MIDI Clips and MIDI Files
A MIDI clip contains musical material in the form of MIDI notes and controller envelopes.
When MIDI is imported from a MIDI le, the data gets incorporated into the Live Set, and
Page 33

4.6. MIDI CLIPS AND MIDI FILES 31
the original le is not referenced thereafter. In the Live File Browsers, a MIDI le appears
as a folder that can be opened to reveal its individual component tracks, which can be
selectively dragged into the Live Set.
As expected, a MIDI clip's contents can be accessed and edited via the Clip View, for
instance to change a melody or paint a drum pattern.
MIDI Files Are Dragged
in from Live's File
Browsers.
A MIDI Clip's Properties
as Displayed in the Clip
View.
Page 34

4.7. DEVICES AND THE MIXER 32
4.7 Devices and the Mixer
A track can have not only clips but also a chain of devices for processing signals. Doubleclicking a track's title bar brings up the Track View, which shows the track's device chain.
Live's built-in audio effects, MIDI effects and instruments are available from the Device
Browser and can be dragged from there into the Track View or onto a track title bar.
The Track View
Displaying an Audio
Track's Device Chain.
Page 35

4.7. DEVICES AND THE MIXER 33
You can also use plug-in devices in Live. VST and Audio Units (Mac OS X only) Plug-ins are
available from the Plug-In Device Browser.
Live's Built-in Devices
Are Available from the
Device Browser.
Consider an audio clip playing in an audio track. The audio signal from the clip reaches the
leftmost device in the chain. This device processes (changes) the signal and feeds the result
into the next device, and so on. The number of devices per track is theoretically unlimited.
Plug-In Devices Are
Available from the
Plug-In Device Browser.
Page 36

4.7. DEVICES AND THE MIXER 34
In practice, the computer's processor speed does impose a limit on the number of devices
you can use at the same time, a topic that deserves separate discussion. Note that the
signal connections between audio devices are always stereo, but the software's inputs and
outputs can be congured to be mono in the Audio Preferences.
When the signal has passed through the device chain, it ends up in Live's mixer . As Session
and Arrangement share the same set of tracks, so they share the mixer. The mixer can be
shown in both views for convenience. To optimize the screen layout, the individual mixer
sections can be shown or hidden using the View menu's entries.
Page 37

4.7. DEVICES AND THE MIXER 35
The Live Mixer in the
Arrangement View (Top)
and Session View
(Bottom).
The mixer has controls for volume, pan position and sends, which adjust the contribution
each clip track makes to each return track's input. Return tracks cannot host clips, only
effects. Via their sends, all tracks can feed a part of their signal into a return track and share
its effects.
The mixer also includes a crossfader, which can create smooth transitions between clips
playing on different tracks. Live's crossfader works like a typical DJ mixer crossfader, except
that it allows crossfading not only two but any number of tracks including the returns.
Page 38

4.7. DEVICES AND THE MIXER 36
Devices that receive and deliver audio signals are called audio effects. Audio effects are the
only type of device that t in an audio track or a return track. However, two more types of
devices are available for use in MIDI tracks: MIDI effects and instruments.
Consider a MIDI track playing a clip. The MIDI signal from the clip is fed into the track'sdevice
chain. There, it is rst processed by any number of MIDI effects. A MIDI effect receives
and delivers MIDI signals. One example is the Scale effect, which maps the incoming
notes onto a user-dened musical scale. The last MIDI effect in the chain is followed by an
instrument. Instruments, for instance Live's Simpler and Impulse, receive MIDI and deliver
audio. Following the instrument, there can be any number of audio effects as in an audio
track.
Live's Crossfader.
If a MIDI track has no instrument (and no audio effects), then the track's output is a plain
MIDI signal, which has to be sent somewhere else to be converted into audio. In this case,
MIDI Effects, an
Instrument and Audio
Effects in a MIDI Track.
Page 39

4.8. PRESETS AND DEVICE GROUPS 37
the track's mix and Send controls disappear from the mixer.
4.8 Presets and Device Groups
Every Live device can store and retrieve particular sets of parameter values as presets. As
presets are stored independently from Live Sets, new presets become part of a library that
any project can draw from.
Live's Device Groups allow saving combinations of devices and their settings as a single
preset. This feature allows for the creation of powerful multi-device creations and effectively
adds all the capabilities of Live's MIDI and audio effects to the built-in instruments.
The Mixer for a MIDI
Track without an
Instrument.
4.9 Routing
As we have seen, all tracks deliver signals, either audio or MIDI. Where do these signals
go? This is set up in the mixer's In/Out section, which offers, for every track, choosers to
Page 40

4.9. ROUTING 38
select a signal source and destination. The In/Out section, accessible through the View
menu's In/Out entry, is Live's patchbay. Its routing options enable valuable creative
and technical methods such as resampling, submixing, layering of synths, complex effects
setups and more.
Track Routing Is Set up
Using the In/Out Section
in the Arrangement
(Top) or Session View
(Bottom).
Signals from the tracks can be sent to the outside world via the computer's audio and MIDI
interfaces, to other programs that are connected to Live via ReWire or to other tracks or
devices within Live.
Likewise, a track can be set up to receive an input signal to be played through the track's
devices. Again, tracks can receive their input from the outside, from a ReWire program or
Page 41

4.10. RECORDING NEW CLIPS 39
Ctrl
from another track or device in Live. The Monitor controls regulate the conditions under
which the input signal is heard through the track.
4.10 Recording New Clips
Audio tracks and MIDI tracks can record their input signal and thereby create new clips.
Recording is enabled on a track by pressing its Arm button (Hold down the
(Mac) modier to arm several tracks at once). When the Control Bar's Record button
is on, every armed track records its input signal into the Arrangement. Every take yields a
new clip per track.
It is also possible to record into Session View slots on the y. This technique is very
useful for the jamming musician, as Session recording does not require stopping the music.
When a track is armed, its Session slots exhibit Clip Record buttons, and clicking one of
these commences recording. Clicking the Clip Record button again denes the end of
the recording and launches the new clip. As these actions are subject to real-time launch
quantization, the resulting clips can be automatically cut to the beat.
(PC) /
A Track Arm Button, as
Appears in the Session
View.
The Control Bar's
Quantization Chooser.
Session recording in conjunction with the Overdub option and Record Quantization is the
Page 42

4.11. AUTOMATION ENVELOPES 40
method of choice for creating drum patterns, which are built up by successively adding
notes to the pattern while it plays in a loop. It only takes a MIDI keyboard (or the computer
keyboard) and a MIDI track with Live's Impulse percussion instrument to do this.
4.11 Automation Envelopes
Often, when working with Live's mixer and effects, you will want the controls' movements
to become part of the Arrangement. The movement of a control across the Arrangement
timeline is called automation; a control whose value changes in the course of this timeline is
automated. Automation is represented in the Arrangement View by breakpoint envelopes,
which can be edited and drawn.
The Automated Pan
Control and its
Envelope.
Practically all mixer and effect controls in Live can be automated, even the song tempo.
Creating automation is straightforward: All changes of a control that occur while the Control
Bar's Record switch is on become automation.
Changing an automated control's value while not in Record Mode is similar to launching a
Session clip while the Arrangement is playing: It deactivates the control's automation (in
favor of the new control setting). The control will stop tracking its automation and rest
with the new value until the Back to Arrangement button is pressed, which will resume
Arrangement playback.
Page 43

4.12. CLIP ENVELOPES 41
4.12 Clip Envelopes
Envelopes can be found not only in tracks but also in clips. Clip envelopes are used
to modulate device and mixer controls. Audio clips have, in addition, clip envelopes to
inuence the clip's pitch, volume and more; these can be used to change the melody and
rhythm of recorded audio. MIDI clips have additional clip envelopes to represent MIDIcontroller data. Clip envelopes can be unlinked from the clip to give them independent
loop settings, so that larger movements (like fade-outs) or smaller gestures (like an arpeggio)
can be superimposed onto the clip's material.
An Envelope for Clip
Transposition.
4.13 MIDI and Key Remote
To liberate the musician from the mouse, most of Live's controls can be remote-controlled
via an external MIDI controller. Remote mappings are established in MIDI Map Mode, which
is engaged by pressing the MIDI switch in the Control Bar.
Page 44

4.14. SAVING AND EXPORTING 42
In this mode, you can click on any mixer or effect control, and then assign it to a controller
simply by sending the desired MIDI message (for example, by turning a knob on your MIDI
control box). Your assignments take effect immediately after you leave MIDI Map Mode.
Session clips can be mapped to a MIDI key or even a keyboard range for chromatic playing.
MIDI keys and controllers that have been mapped to Live's controls are not available for
recording via MIDI tracks. These messages are ltered out before the incoming MIDI is
passed on to the MIDI tracks.
Session clips, switches, buttons and radio buttons can be mapped to computer keyboard
keys as well. This happens in Key Map Mode, which works just like MIDI Map mode.
Live offers, in addition to this general purpose mapping technique, dedicated support for
Mackie Control-compatible mixer surfaces, which allows for mouse-free operation of the
program.
4.14 Saving and Exporting
The Key/MIDI Map
Controls.
Saving a Live Set saves everything it contains, including all clips, their positions and settings,
and settings for devices and controls. An audio clip can, however, lose the reference to its
corresponding sample if it is moved or deleted from disk. The links between samples and
their clips can be preserved with a special command, the Save Set Self-Contained command,
which makes a copy of each sample and stores it in a Sounds folder along with the Live
Set.
A separate Save button in the Clip View saves a set of default clip settings along with the
sample, so that each time the sample is dragged into the program, it will automatically
Page 45

4.14. SAVING AND EXPORTING 43
appear with these settings. This is especially useful if you have made warp settings for a clip
and want to use it in multiple Live Sets.
Exporting audio from Live can be done from both the Session and Arrangement Views.
Live will export the audio coming through on the Master output as an audio le of your
specications via Render to Disk.
Live can also export individual MIDI clips as MIDI les.
Exporting and saving material for later use in Live can be done very conveniently with the
Live Clip format. Session View clips can be dragged back out of a Live Set to the File
Browsers, and thereby exported to disk as Live Clips.
A Live Clip in the File
Browser.
Live Clips are a very powerful way of storing ideas, as they save not only the clip's Clip View
settings, but also the corresponding track's instruments and effects chain. Live Clips in the
Browser can be previewed and added to any open Live Set just like sample les. In the Live
Set, they restore the original clip's creative options.
Using Live Clips, you can build your own personalized library of:
MIDI sequences with matching instruments and effects, e.g., a MIDI drum pattern with
the associated Impulse and effects settings;
Different regions or loops referencing the same source le;
Page 46

4.15. THE LIBRARY 44
Variations of a sample loop created by applying Warp Markers, clip envelopes and
effects;
Ideas that may not t your current project but could be useful in the future.
4.15 The Library
Live comes with a library of sound ideas that can serve as a starting point for your own
creations.
The rst part of the library is a large preset collection for Live instruments and effects,
accessible through the Live Device Browser.
The second part of the library is accessed via the Library button in the upper right corner of
the File Browser.
There are three folders:
Browsing the Library's
Creative Options.
Clips is a collection of Live Clips that offer a broad stylistic variety of sound ideas. Live
Clips have a very open format and can serve both as a starting point for your own
creations and as a resource for learning new sound design tricks.
Sets is the default location for Live Sets.
Waveforms is a repository of samples such as one-shot drum hits and single-cycle
waveforms to be used for sound design purposes, particularly in conjunction with
Live's built-in Simpler and Impulse instruments.
Page 47

4.15. THE LIBRARY 45
The library is built from several Live Packs, which can be separately downloaded, installed
and uninstalled. Live Packs are available from installation CDs or the Ableton website2.
2
http://www.ableton.com/downloads
Page 48

Chapter 5
Managing Files and Sets
Various types of les are used in making music with Live, from those containing MIDI and
audio, to more program-specic les such as Live Clips and Live Sets. This chapter will
explain everything you need to know about working with each of these le types in Live.
However, we should rst take a look at Live's File Browsers, through which most les arrive
in the program.
5.1 Working with the File Browsers
5.1.1 Browsing the Folder Hierarchy
Files are browsed and imported from disk using Live's on-board Browsers, which can be
pointed to any folder location on the computer. The Browsers can also be searched based
46
Page 49

5.1. WORKING WITH THE FILE BROWSERS 47
Return
Ctrl
on specic criteria, a topic that we will cover in the next section.
Each File Browser can have its own root directory, shown at the top of the Browser, the
contents of which are available for browsing below.
The Browser root can easily be changed: The Folder-Up button moves the Browser root one
step up in the disk hierarchy.
You can also set the Browser root to any folder in the Browser by selecting the folder and
clicking the Root button, double-clicking the folder, or pressing
. Note that there are
three File Browsers that you can set up to point to commonly used folders.
To set the root of the Browser to Live's library of clips, Sets and presets, use the Library
button just to the right of the Root button, or the Set Root To Library (PC) /
(Mac) context menu command.
Library Is this
Browser's Root.
The File Browser's
Folder-Up Button.
The File Browser's Root
Button.
Moving through the les in Live's Browser can be done with either the mouse or the computer
keyboard:
Scroll up and down in the Browser with and .
The Library Button.
Page 50

5.1. WORKING WITH THE FILE BROWSERS 48
Ctrl
Ctrl
Ctrl
F
F
Close and open folders with and .
Jump to the parent folder of any closed folder using . (Hint: If executed on a
top-level folder, this is an alternative to pressing the Folder-Up button, and will move
the Browser root up one level.)
To clean up the Browser, use (PC) /
(Mac) to access the context menu, and
then select the Close All Folders option to show only top-level folders. Double-clicking any
of the three File Browser icons will also close all sub-level folders.
Note that you may occasionally want to refresh the Browser if you are working on a network.
To do so, (PC) /
(Mac) to open the context menu, and then select the Refresh
command.
5.1.2 Searching for Files
Live's File Browsers are equipped with a search function for nding les. Clicking the
Search button in the upper right corner of the Browser or using the
(Mac) shortcut will open the Browser's Search Mode.
(PC) /
Double-Click These
Icons to Clean up the
Browser.
Activating Browser
Search Mode.
Page 51

5.1. WORKING WITH THE FILE BROWSERS 49
Ctrl
Return
Live will search for the contents typed in the Search eld throughout the entire Browser
root. Alternatively, you can search within a single folder in the Browser with the (PC) /
(Mac) context menu's Search In Folder command.
After entering search criteria, begin the search by pressing
on your computer key-
board. Live will nd les that contain the search criteria in their name or sufx (e.g., .wav).
The search results will also include les that contain the entered criteria in any part of their le
path. This means that a search for bass, for example, will yield not only les with names
containing the word bass but also those located in folders with names containing the
word bass. Compressed sample metadata tags are also included in the search, making it
possible to search for songs from a specic album or artist, for example. Searching le paths
and metadata can be deactivated with the Search In Path and Search In Metadata settings,
available in Live's Options menu or via the context menu. The names of MIDI tracks within
multitrack MIDI les are also included in searches.
Note that the rst search of any folder will always take longer than subsequent searches, as
Live creates an index of the folder's contents to facilitate efcient searching.
You can abort an in-progress search with the Exit Search button located to the right of the
Search eld. A second click on this button closes Search Mode, returning the Browser to
Browse Mode. Beginning a new search aborts any current searches by default.
A useful feature of Live's Browser search function is the Locate In Browser button, found to
the right of the Search eld. After nding a particular le in Search Mode, you can select
the le and click this button to open the le in Browse Mode, where its location in the folder
hierarchy will be displayed.
Exiting Search Mode.
Page 52

5.1. WORKING WITH THE FILE BROWSERS 50
5.1.3 Previewing Files
Live allows you to preview les in the File Browser before they are imported into the program.
Previewing is activated using the Browser's Preview switch.
Click on the les (or use and ) to select and listen to them.
You can adjust the previewing volume using the Preview Volume knob in the mixer.
The Locate In Browser
Button.
The Preview Switch.
If your audio hardware offers multiple audio outs, you can privately audition, or cue, les via
headphones connected to a separate pair of outs while the music continues to play. To
learn how to set up Live for cueing, please refer to the appropriate manual section.
Hint: You can preview les even when the Preview switch is not activated by pressing .
The Preview Volume
Knob.
Page 53

5.1. WORKING WITH THE FILE BROWSERS 51
Return
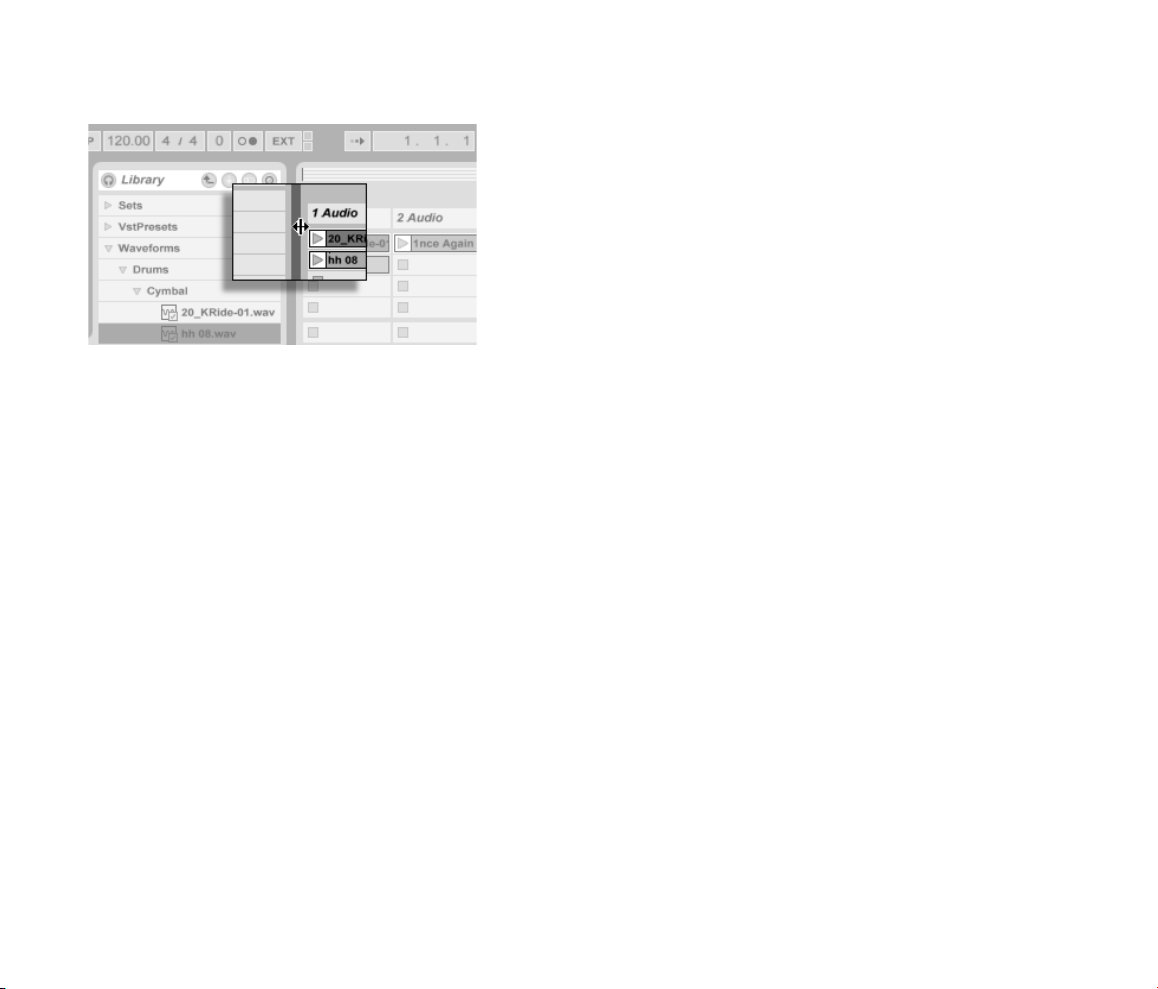
5.1.4 Adding Clips from the Browser
There are several ways to add clips to a Live Set:
Files can be dragged and dropped from the File Browsers into tracks in the Session or
Arrangement View. Dragging and dropping material from the Browser into the space
to the right of Session View tracks or below Arrangement View tracks will create a new
track and place the new clip(s) there.
In the Session View, double-clicking or pressing
automatically create a new track to the right of the other tracks and load it with the
clip.
Files can be dropped directly into Live from the Explorer (Windows) / Finder (Mac).
on a le in the Browser will
Dropping a Clip to
Create a New Track.
5.1.5 File Maintenance in the Browser
You can use Live's File Browsers for all of the le maintenance activities that you are familiar
with on your operating system.
Move les and folders by dragging and dropping, or by copying/cutting and pasting.
Copying, cutting and pasting can be done with either Edit menu commands or key-
board shortcuts. A le can be moved from one File Browser to another by dragging it
Page 54

5.2. SAMPLE FILES 52
Ctrl
R
R
Esc
Ctrl
over the target Browser's button.
Rename les and folders using the Edit menu's Rename command or the
(PC) /
Create folders by opening the context menu with (PC) /
(Mac) shortcut. Cancel renaming with the
key.
(Mac), and then
selecting the Create Folder command.
Delete les and folders using the Edit menu's Delete command or your computer's
Backspace or Delete key. Deleting items within Live moves them to the system trash; if
necessary, you can recover items from the system trash via your computer's operating
system.
Note that, while you can rename or delete entire MIDI les via the Browser, this is not
possible with the individual MIDI tracks contained within them. This is also the case with the
individual components of Live Sets.
5.2 Sample Files
A sample is a le that contains audio data. Live can play both uncompressed le formats
(WAV, AIF and Sound Designer II for Mac) and compressed le formats (MP3, Ogg Vorbis,
Ogg FLAC and FLAC).
A note on using Variable Bit Rate (VBR) les: Please install QuickTime for decoding purposes
if you do not already have it on your system. It can be downloaded from the Apple website1.
As Live plays the samples directly from disk, you can work with a large number of (large)
samples without running into RAM memory limitations.
Live can combine uncompressed mono or stereo samples of any length, sample rate or bit
depth without prior conversion. To play a compressed sample, Live decodes the sample and
1
http://www.apple.com/quicktime/download/mac.html
Page 55

5.2. SAMPLE FILES 53
writes the result to a temporary, uncompressed sample le. This usually happens quickly
enough that you will be able to play the sample right away, without waiting for the decoding
process to nish.
Note: When adding a long sample to a project, Live might tell you that it cannot play the
sample before it has been analyzed. Please see the section on analysis for an explanation.
5.2.1 The Decoding Cache
To save computational resources, Live keeps the decoded sample les of compressed
samples in the decoding cache, a sub-directory of the Audio Record Folder. Maintenance
of the cache is normally not required, as Live automatically deletes older les to make room
for those that are new. You can, however, impose limits on the cache size using the Misc
Preferences' Decoding Cache section. The cache will not grow larger than the Maximum
Cache Size setting, and it will always leave the Minimum Free Space on the hard disk.
Pressing the Cleanup button in the Decoding Cache preferences will delete all les not
being used by the current Live Set.
Preferences for the
Decoding Cache.
Page 56

5.2. SAMPLE FILES 54
5.2.2 Analysis Files (.asd)
An analysis le is a little le that Live creates when a sample le is brought into the program
for the rst time. The analysis le contains data gathered by the program to help optimize
the stretching quality, speed up the waveform display and automatically detect the tempo
of long samples.
When adding a long sample to a project, Live might tell you that it cannot play the sample
before it has been analyzed. This will not happen if the sample has already been analyzed
(i.e., Live nds an analysis le for this sample), or if the Default Preferences Auto-Warp
Long Samples preference has been deactivated. To prevent waiting for analysis of longer
samples, you can pre-analyze them via the Browser, as we will see in a moment.
An analysis le can also store default clip settings for the sample:
Clicking the Clip View's Save button will store the current clip's settings with the sample's
analysis le. The next time the sample is dragged into Live, it will appear with all its clip
settings intact. This is particularly useful for retaining Warp Marker settings with the sample.
Storing default clip settings with the analysis le is different from saving the clip as a Live
Clip, as described in the relevant section.
The analysis le's name is the same as that of the associated sample, with an added .asd
extension. Live puts this analysis le in the same folder as the sample.
Samples that have an .asd le are displayed like this in the Browser.
Samples without an .asd le look like this.
The analysis les themselves do not appear in Live's Browsers.
Note that you can suppress the creation of .asd les by turning off the Create Analysis Files
option in the Misc Preferences. All data (except for the default clip settings) can be recreated
by Live if the .asd le is missing, however this will take some time for longer samples.
Page 57

5.2. SAMPLE FILES 55
Ctrl
5.2.3 File Pre-Analysis
To avoid waiting for longer samples to be analyzed the rst time they are imported into Live,
you may want to pre-analyze them.
To pre-analyze all the les contained in any folder in the Browser, use the (PC) /
(Mac) context menu's Analyze Audio command. This process can also be cancelled via the
context menu.
Pre-Analyzing Audio
Files.
5.2.4 Exporting Audio
The File menu's Render to Disk command allows exporting Live's Master audio output as a
new sample. The resulting le can be used to burn an audio CD for listening purposes or
a data CD, which could serve as a backup of your work or be used with other digital audio
applications.
Page 58

5.2. SAMPLE FILES 56
Which Signal Will Be Rendered?
Render to Disk will always render the signal at Live's Master output. If you are monitoring
the Master output, you can be sure that the rendered le will contain exactly what you hear.
To export individual tracks, deactivate all tracks other than the ones you want to export by
turning off their Track Activator switches in the mixer.
When Render to Disk is invoked while the Arrangement View is up, Live will render the
selected time range.
If you would like to render the current Arrangement loop, choose the Select Loop command
from the Edit menu prior to choosing Render to Disk. Keep in mind that the selection of
tracks is irrelevant: The signal to be rendered is the Master output.
If you choose Render to Disk while the Session View is up, Live will ask you to specify the
length of the sample to be rendered. The Render to Disk dialog will come up with a barsbeats-sixteenths eld where you can type in the desired length. Live will capture audio from
the Master output starting at the current play start position for whichever duration you have
specied.
Rendering Options
The Render to Disk command opens a dialog that offers several rendering options:
Normalize. If this is activated, the sample resulting from the render process will be
normalized (i.e., the le will be amplied so that the highest peak attains the maximum
available headroom).
Render as Loop. If this is activated, Live will create a sample that can be used as a
loop. For example, suppose your Live Set uses a delay effect. If Render as Loop is on,
Live will go through the rendering process twice: The rst pass will not actually write
Page 59

5.3. MIDI FILES 57
samples to disk, but add the specied delay effect. As the second pass starts writing
audio to disk, it will include the delay tail resulting from the rst pass.
File Type, Bit Depth, Sample Rate. These options specify the type of sample to be
created.
Create Analysis File. If this is activated, Live will create an .asd le that contains analysis
information about the rendered sample. If you intend to use the new sample in Live,
check this option.
Convert to Mono. If this is activated, Live will create a mono le instead of a stereo
le.
5.3 MIDI Files
A MIDI le contains commands that prompt MIDI-compatible synthesizers or instruments,
such as Live's Simpler, to create specic musical output. MIDI les are exported by hardware
and software MIDI sequencers. Importing MIDI les into Live works differently than with
samples: MIDI le data is incorporated into the Live Set, and the resulting MIDI clips lose all
reference to the original le. MIDI les appear as folders in the File Browser; opening the
folders gives you access to the le's individual tracks (also called voices or instruments).
Page 60

5.4. LIVE CLIPS 58
5.3.1 Exporting MIDI Files
Live MIDI clips can be exported as Standard MIDI les. To export a MIDI clip, use the File
menu's Export Selected MIDI Clip command. This command will open a le-save dialog,
allowing you to choose the location for your new MIDI le.
A MIDI File and Its
Tracks in the Browser.
Exporting a MIDI le is different from saving the clip as a Live Clip, as described in the
relevant section.
5.4 Live Clips
Individual Session View clips can be exported to disk in the Live Clip format for easy retrieval
and reuse in any project.
Page 61

5.4. LIVE CLIPS 59
Return
To save a clip from the open Live Set to disk, simply drag it from the Session View to the File
Browser and drop it into any folder. You can then type in a new name for the clip or conrm
the one suggested by Live with
.
Live Clips are a great way of storing your ideas for later use or development, as they save
not only the original clip, including all its clip and envelope settings, but also the original
track's devices. In order to recreate a Live Clip's device chain, either import it into a track
containing no clips or devices, or drag it into the space in the Session or Arrangement View
containing no tracks. Note that Live Clips that are imported into tracks already containing
devices or clips will appear with their clip settings but not their devices. You could, for
instance, drop a bass line Live Clip on an existing track that drives a bass instrument rather
than creating a new track.
A Live Clip in the
Browser.
Clips belonging to any Live Sets already on disk are also Live Clips. Please see the section
on importing and exporting Sets for more on this topic.
Note that storing default clip settings with a sample's analysis le is different from saving a
Live Clip. The default clip in the .asd le annotates the sample with sensible default values
(warp, gain and pitch settings) so that it will play in a dened way when it is added to a Set.
Live Clips, on the other hand, are stored on disk as separate musical ideas. For example, you
could create a number of variations from the same audio clip by using different warp, pitch,
envelope and effect settings, and store them all as separate Live Clips. In the Browser, you
could then independently sort and preview these clips, even though they are all referring to
Page 62

5.5. LIVE SETS 60
Return
the same source sample.
5.5 Live Sets
The type of document that you create and work on in Live is called a Live Set.
5.5.1 Creating, Opening and Saving Sets
Use the File menu's New command to create new Live Sets, and the Open or Open Recent
command to open existing ones. In the File Browser, you can double-click or press
on a Live Set to open it.
The File menu's Save command saves the current Live Set exactly as it is, including all clips
and settings.
You can also use the Save As command to save the current Live Set under a different name
and/or in a different directory location, or the Save a Copy command to create a copy of
the current Live Set with a new name and/or new directory location.
Saving a Live Set leaves the samples referenced by that Live Set's clips in their current
locations. If these les are later moved, Live will attempt to help you nd them when next
you open that particular Live Set. The File menu's Save Set Self-Contained command can
help you avoid missing les altogether.
5.5.2 Importing and Exporting Sets with the Browser
Live Sets can now be opened in the File Browsers, just like standard disk folders, to reveal
their component tracks and clips. Each of the clips belonging to a Live Set is a Live Clip.
Page 63

5.5. LIVE SETS 61
Ctrl
These tracks and clips can be selectively previewed and dragged into the current Set, or
the entire Live Set can be dragged in to merge the two. Dragging a Set into the space to
the right of Session View tracks or below Arrangement View tracks will create new tracks to
host the new content, whereas dragging a Set into existing tracks will replace any current
clips. Note that, if a Set is dragged into existing tracks containing clips or devices, its tracks'
corresponding device chains will not be loaded.
You can export a selection of Session View clips as a new Live Set by dragging them to the
File Browser. To export a Set, rst click and drag, or use the or
(PC) /
(Mac) modiers, to select more than one Session View clip. Then, simply drag the clips to
a folder in the File Browser, where you can either conrm Live's suggested name or type in
one of your own.
A Live Set in the
Browser.
5.5.3 Template Sets
Use the Default Preferences' Template Save button to save the current Live Set as a template.
Live will use these settings as the initialized, default state for new Live Sets. You can use this
to pre-congure:
Your multichannel input/output setup.
Preset devices, like EQs and Compressors, in every track.
Page 64

5.6. OFFLINE AND LOST FILES 62
Computer key mappings.
MIDI mappings.
The template Live Set Template.als is located in Live's Preferences folder and can be
copied or deleted from there. The easiest way to locate this folder is to search your disk for
Template.als.
5.6 Ofine and Lost Files
If you load a Live Set or Live Clip that references samples missing from their referenced
locations, Live will issue a warning message and ask whether you want to locate the missing
les.
If you do not, the Live Set or Live Clip will open anyway, with the clips that reference missing
les marked Ofine. Live will play silence in place of the ofine clips.
You can nd the missing les by selecting ofine clips and clicking the Clip View's Replace
button.
5.7 The Sounds Folder and Self-Containing
The Sounds folder is a Live Set's private location for storing samples. All samples that are
recorded into a Live Set end up in this Live Set's Sounds folder. Live offers a convenient
method for gathering all the les that are referenced by a Live Set in this folder: When you
choose the File menu's Save Set Self-Contained command, Live copies all externally referenced les there. After Live has self-contained the les, there will no longer be references
to samples spread over one or more hard drives. You can back up the Live Set along with
Page 65

5.8. LIVE PACKS 63
its Sounds folder, or send it to collaborators via the Internet, and all les used in the project
will be included.
The Sounds folder for My Live Set is called My Live Set Sounds. It is located next to (in
the same folder as) My Live Set.
5.8 Live Packs
Live's library is broken down into several Live Packs that can be separately downloaded,
installed and uninstalled. A Live Pack is a single le (much like a ZIP le) that expands into
many les upon installation.
Live Packs are available from installation CDs or the Ableton website2. To install a downloaded Live Pack, drag the le into Live, double-click the le, or select Install Live Pack from
the File menu.
A list of all installed Live Packs is kept in the Preferences' Products tab. You can select
individual Live Packs from the list and click the Uninstall button to remove them.
You can, of course, remove, rename, alter and add to the individual les that come with Live
Packs at will, making someone else's library your own.
2
http://www.ableton.com/downloads
Page 66

Chapter 6
Arrangement View
The Arrangement View displays the Arrangement, which contains music laid out along a
song timeline, like a multitrack tape.
A Piece of Music Laid
out in the Arrangement
View.
64
Page 67

6.1. NAVIGATION 65
1
3
4
5
6
2
Ctrl
Alt
Alt
The Arrangement View is a powerful editing tool that easily lets you combine and arrange
musical material of all types: MIDI, loops, sound effects and complete pieces of music.
6.1 Navigation
Live offers several fast methods for zooming and scrolling the Arrangement display:
Navigating the
Arrangement View.
ruler at the top of the Arrangement V iew (you can also drag horizontally to scroll
the display).
2. To zoom in and out around the current selection, use the computer keyboard's +
and - keys. To pan the display, click and drag while holding the
1. To smoothly change the zoom level, click and drag vertically in the beat-time
(PC) /
(Mac) modier.
3. The Arrangement Overview is like a bird's-eye view of your music. It always
shows the complete piece, from start to end. The black rectangular outline repre-
Page 68

6.2. TRANSPORT 66
sents the part of the Arrangement that is currently displayed in the Arrangement
display below. To scroll the display, click within the outline and drag left or right;
to zoom out and in, drag up and down.
4. To change the displayed part of the Arrangement, drag the outline's left and
right edges.
5. To see a specic part of the Arrangement in more detail, click on it in the Overview
and drag downwards to zoom in around that part. Note that you can also drag
horizontally to scroll the display. Using this method, you can zoom and scroll to
focus around any part of the Arrangement with just one mouse motion.
6. To have the Arrangement display follow the song position and scroll automatically, turn on the Follow switch, or use the Follow command from the Options
menu.
6.2 Transport
There are a number of ways to control Live's transport with the computer keyboard and
mouse:
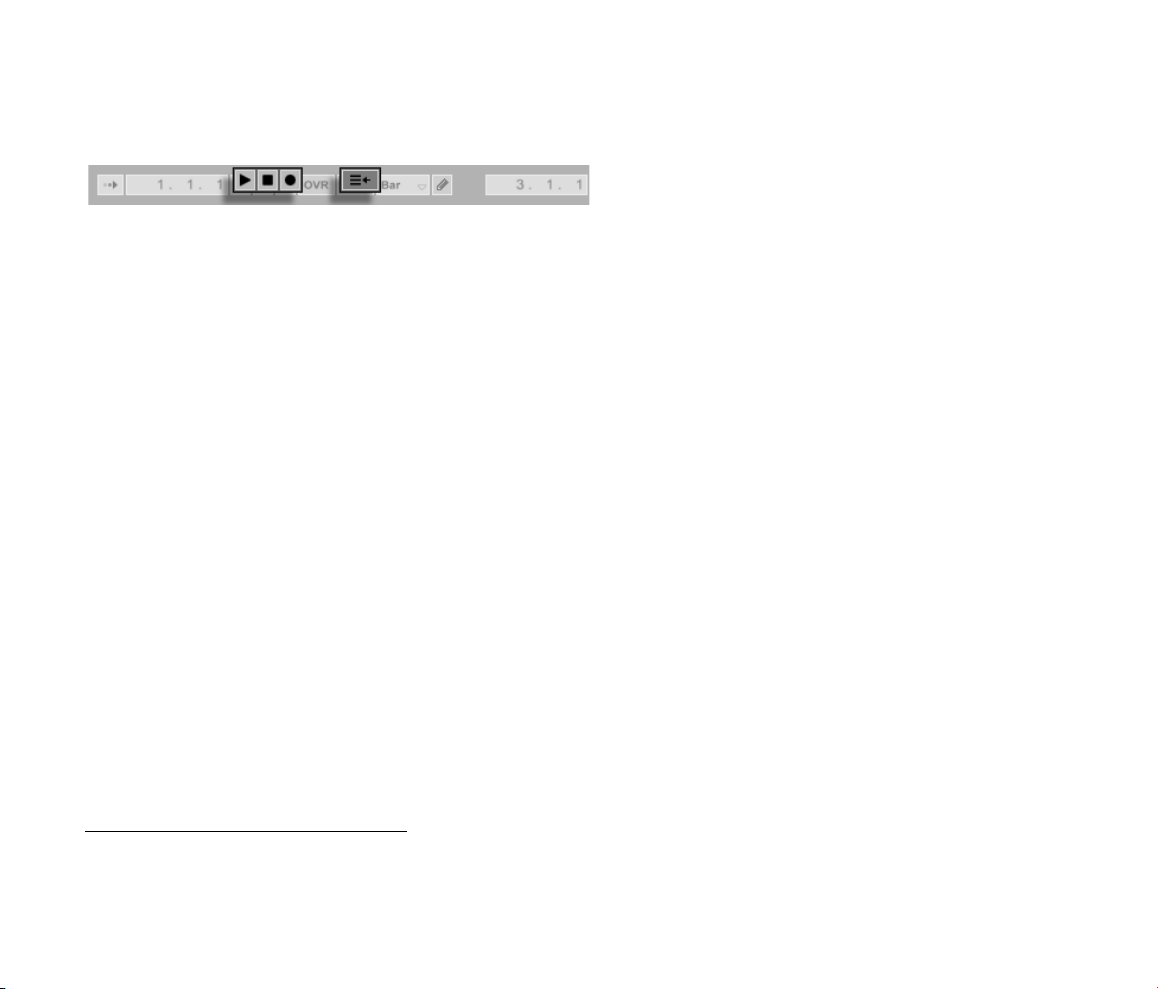
1. You can start Arrangement playback by clicking the Control Bar's Play button,
and stop playback by clicking the Stop button. Arrangement playback can also
be toggled on and off by pressing the keyboard's space bar.
2. You can set the Arrangement playback position by clicking anywhere along the
Arrangement to place the ashing insert marker. Double-clicking the Stop button
The Play and Stop
Buttons in the Control
Bar.
Page 69

6.2. TRANSPORT 67
will return the Arrangement play position to 1.1.1.
To continue playback from the position where it last stopped, rather than from
the insert marker, hold down the modier while pressing the space bar.
3. Clicking in the scrub area above the tracks will make playback jump to that point.
The size of these jumps is quantized according to the Control Bar's Quantization
menu setting. While the mouse is held down over the scrub area, a portion of
the Arrangement the size of the chosen quantization setting will be repeatedly
played. With small quantization settings, or a setting of None, this allows you
to scrub through the music.
Arrangement Playback
Begins from the Insert
Marker.
4. The song position can be adjusted numerically using the Control Bar's Arrangement Position elds.
Scrubbing Arrangement
Playback.
Setting the Play Position
in the Arrangement
Position Fields.
Page 70

6.3. LAUNCHING THE ARRANGEMENT WITH LOCATORS 68
Return
The Arrangement Position elds show the song position in bars-beats-sixteenths.
To change the values:
Click and drag up or down in any of these elds.
Click and type a number, then hit
Click and decrement or increment the value with and .
.
5. Arrangement playback can be started at a particular point in one of your clips
using the scrub area in the Clip View.
6. Several Arrangement playback positions can be set using launchable locators.
Note that any computer keyboard key or MIDI message can be mapped to the transport
controls, as described in the respective chapter.
6.3 Launching the Arrangement with Locators
Using Locators to
Launch Play in the
Arrangement.
Locators can be set at any point in the Arrangement. This can be done in real time during
playback or recording with the Set Locator button, and will be quantized according to the
global quantization value set in the Control Bar. Clicking the Set Locator button when the
Arrangement is not playing will create a locator at the insert marker or selection start. You
Page 71

6.3. LAUNCHING THE ARRANGEMENT WITH LOCATORS 69
Ctrl
R
R
can also create a locator using the context menu in the scrub area above the tracks or via the
Insert menu. Note that the position of a new locator is quantized according to the Control
Bar's Quantization menu setting.
You can recall (jump to) locators by clicking on them, or with the Previous and Next Locator
buttons on either side of the Set button. Locators can also be recalled using MIDI/key
mapping. Note that locator recall is subject to quantization. Double-clicking a locator will
select it and start Arrangement playback from that point.
After jumping to the rst or last locator in the Arrangement, the Previous and Next Locator
buttons will jump to the Arrangement start or end, respectively.
Locators can be moved by clicking and dragging, or with the arrow keys on your computer
keyboard.
The Locator Controls.
To name a locator, select it by clicking its triangular marker, and choose the Rename Edit
menu command (or use the
(PC) /
(Mac) shortcut). Locators can be
removed with your computer's backspace or delete key, the Insert menu, or the Delete
Locator button.
Note that the locator context menu offers a quick way of looping playback between two
locators with its Loop To Next Locator command.
Page 72

6.4. THE ARRANGEMENT LOOP 70
6.4 The Arrangement Loop
For Live to repeatedly play a section of the Arrangement, activate the Arrangement loop by
clicking on the Control Bar's Loop switch.
You can set loop length numerically using the Control Bar elds: The left-hand set of elds
determines the loop start position, while the right-hand set determines loop length.
The Edit menu's Loop Selection command accomplishes all of the above at once: It turns
the Arrangement loop on and sets the Arrangement loop brace to whatever timespan is
selected in the Arrangement.
The Control Bar's Loop
Switch.
The Loop Start Fields
(Left) and the Loop
Length Fields (Right).
The loop brace can be selected with the mouse and manipulated with commands from the
computer keyboard:
and nudge the loop brace to the left/right by the current grid setting.
The Arrangement's Loop
Brace.
Page 73

6.5. MOVING AND RESIZING CLIPS 71
Ctrl
Ctrl
and shift the loop brace left/right in steps the size of its length.
The
(PC) / (Mac) modier used with the arrow left and right keys shortens
or lengthens the loop by the current grid setting.
The
(PC) / (Mac) modier with the arrow up and down keys doubles or
halves the loop length.
You can also drag the Arrangement's loop brace: Dragging the left and right ends sets the
loop start and end points; dragging between the ends moves the loop without changing its
length.
6.5 Moving and Resizing Clips
A piece of audio or MIDI is represented in the Arrangement View by a clip sitting at some
song position in one of Live's tracks.
Moving a Clip.
Dragging a clip moves it to another song position or track.
Changing a Clip's
Length.
Dragging a clip's left or right edge changes the clip's length.
Page 74

6.6. SELECTING CLIPS AND TIME 72
Alt
Alt
6.6 Selecting Clips and Time
With the exception of moving and resizing clips, Arrangement editing in Live is selectionbased: You select something using the mouse, then execute a menu command (e.g., Cut,
Copy, Paste, Duplicate) on the selection. This editing method lends itself to an efcient
division of labor between the two hands: One hand operates the mouse or trackpad, while
the other hand issues the keyboard shortcuts for the menu commands. The menu eventually
is only used as a reference for looking up the keyboard shortcuts.
Here is how selection works:
Clicking a clip selects the clip;
Clicking into the Arrangement background selects a point in time, represented by a
ashing insert mark;
Clicking and dragging selects a timespan.
To access the time within a clip for editing, unfold its track by clicking the triangular
button next to the track name.
Notice that you can adjust the height of the unfolded track by dragging the split line
below the Unfold Track button. Clicking and dragging in the waveform display below
the clip's horizontal strip allows you to select time within the clip. Note that you can
actually unfold all of your tracks at once by holding down the
(PC) /
(Mac) modier when clicking the Unfold Track button.
Adjusting an Unfolded
Track's Height.
Page 75

6.7. USING THE EDITING GRID 73
Ctrl
Ctrl
1
1
Ctrl
2
2
Clicking on the loop brace is a shortcut for executing the Edit menu's Select Loop
command, which selects all material included within the loop.
Holding Shift while clicking extends an existing selection in the same track or across
tracks.
6.7 Using the Editing Grid
To ease editing, the cursor will snap to grid lines that represent the meter subdivisions of
the song tempo. The grid can be set to be either zoom-adaptive or xed.
Clicking the Loop Brace
to Select the Loop for
Editing.
You can set the width of both zoom-adaptive and xed grid lines using the (PC) /
(Mac) context menu available in either the Arrangement View track area or the
Clip View display.
The following shortcuts to Options menu commands allow quickly working with the grid:
Use
(PC) /
(Mac) to narrow the grid, doubling the density of the
grid lines (e.g., from eighth notes to sixteenth notes).
Use
(PC) /
(Mac) to widen the grid, halving the density of the grid
lines (e.g., from eighth notes to quarter notes).
Page 76

6.8. USING THE ...TIME COMMANDS 74
Ctrl
3
3
Ctrl
4
4
Ctrl
5
5
Use
(PC) /
(Mac) to toggle triplets mode; this would, for instance,
change the grid from eighth notes to eighth note triplets.
Use
(PC) /
(Mac) to turn grid snapping on or off. When the grid is
off, the cursor does not snap to meter subdivisions.
Use
(PC) /
(Mac) to toggle xed and adaptive grid modes.
The current spacing between adjacent grid lines is displayed in the lower right corner of the
Arrangement View or Clip View.
6.8 Using the ...Time Commands
Whereas the standard commands like Cut, Copy and Paste only affect the current selection,
their ... Time counterparts act upon all tracks by inserting and deleting time.
Cut Time cuts a selection of time from the Arrangement, thereby moving any audio
or MIDI on either side of the cut area closer together in the timeline. This command
reduces the length of your Arrangement by whatever amount of time you have cut.
Note that the Cut Time command affects all tracks, not only the selected ones.
Paste Time places copied time into the Arrangement, thereby increasing its overall
duration by the length of time you have copied.
A Gap Between Clips
Has Been Deleted by
First Selecting it, Then
Executing the Delete
Time Command.
Page 77

6.9. SPLITTING CLIPS 75
Duplicate Time places a copy of the selected timespan into the Arrangement, thereby
increasing its overall duration by the length of the selection.
Delete Time deletes a selection of time from the Arrangement, thereby moving any
audio or MIDI on either side of the deleted area closer together in the timeline. This
command reduces the length of your Arrangement by the amount of time you have
deleted. Note that the Delete Time command affects all tracks, not only the selected
ones.
Insert Silence inserts as much empty time as is currently selected into the Arrangement,
before the selection.
6.9 Splitting Clips
The Split command can divide a clip or isolate part of it.
To split a clip in two halves,
1. unfold the track;
2. in the waveform or MIDI display, click at the position where you want the clip to
be split;
3. execute the Split command.
To isolate a part of a clip,
1. unfold the track;
2. in the waveform or MIDI display, drag a selection over the part of the clip you
want to isolate;
3. execute the Split command to divide the original clip into three pieces.
Page 78

6.10. CONSOLIDATING CLIPS 76
6.10 Consolidating Clips
The Consolidate command replaces the material in the Arrangement View selection with
one new clip per track. This is very useful for creating structure.
The Result of Splitting a
Clip.
Consolidating Several
Clips Into a New Clip.
Page 79

6.10. CONSOLIDATING CLIPS 77
Suppose you have, by editing or improvising, come up with a layout of clips that sound
good in Arrangement Loop Mode. Selecting that part of the Arrangement, for instance by
using the Edit menu's Select Loop command, and then executing the Consolidate command
creates a new clip that can be treated as a loop. You can now, for instance, drag the clip
edges to create more repetitions. You might also want to drag the new loop via the Session
View selector into a Session View slot for real-time arrangement purposes.
When operating on audio clips, Consolidate actually creates a new sample for every track
in the selection. The new samples are essentially recordings of the time-warping engine's
audio output, prior to processing in the track's effects chain and mixer. Hence, the new
sample incorporates the effects of in-clip attenuation, time-warping and pitch shifting, and
of the respective clip envelopes; however, it does not incorporate the effects. To create a
new sample from the post-effects signal, please use the Render to Disk command.
The new samples can be found in the Sounds folder, a disk location specic to the Live
Set in which you are working. Please see the relevant section of this manual for more
information.
Page 80

Chapter 7
Session View
In Live's Arrangement View, as in all traditional sequencing programs, everything happens
along a xed song timeline. For a number of applications, this is a limiting paradigm:
When playing live, or when DJing, the order of pieces, the length of each piece and
the order of parts within each piece is generally not known in advance.
In the theatre, sound has to react to what happens on stage.
When working along with a piece of music or a lm score, it can be more efcient and
inspirational to start with an improvisation, which is later rened into the nal product.
This is exactly what Live's unique Session View is for.
78
Page 81

7.1. SESSION VIEW CLIPS 79
Return
7.1 Session View Clips
1. Each clip in the Session View has a triangular button at the left edge. Click the
button with the mouse to launch clip playback at any time, or pre-select a
clip by clicking on its name, and launch it using the computer's
can then move on to the neighboring clips using the arrow keys. Please refer
the manual section on clip launch settings for details on how to customize this
behavior.
2. Click on a square Clip Stop button to stop a running clip, either in one of the
track's slots, or in the Track Status eld below the Session grid.
Clips can be controlled remotely with the computer keyboard or a MIDI controller. They can
even be mapped to MIDI note ranges so that they play chromatically.
key. You
The Controls for a
Session View Clip.
Clips can be played at any time and in any order. The layout of clips does not predetermine
their temporal succession; the Session grid offers random access to the clips it contains.
Notice that, even if you stop playback for a Session View clip, the Play button in the Control
Bar will remain highlighted, and the Arrangement Position elds will continue running.
These elds keep a continuous ow of musical time going, so that you can always know your
position in song time during a live performance or while recording into the Arrangement,
regardless of what your individual Session clips are doing.
Page 82

7.2. TRACKS AND SCENES 80
You can always return the Arrangement Position elds to 1.1.1 and stop playback for the
entire Live Set by pressing the Control Bar's Stop button twice.
7.2 Tracks and Scenes
Each vertical column, or track, can play only one clip at a time. It therefore makes sense to
put a set of clips that are supposed to be played alternatively in the same columns: parts of
a song, variations of a drum loop, etc.
The Arrangement
Position Fields and the
Stop Button.
For convenient access to more clips at once, you can resize Session View tracks by clicking
and dragging at the edges of their title bars. Tracks can be narrowed this way so that only
Clip Launch buttons and essential track controls are visibile.
Resized Session View
Tracks.
Page 83

7.2. TRACKS AND SCENES 81
The horizontal rows are called scenes. The Scene Launch buttons are located in the rightmost
column, which represents the Master track. To launch every clip in a row simultaneously,
click on the associated Scene Launch button. This can be very useful in organizing the live
performance of a song with multiple parts.
The scene below a launched scene will automatically be selected as the next to be launched
unless the Select Next Scene on Launch option in the Misc Preferences is set to Off.
This allows you to trigger scenes from top to bottom without having to select them rst.
Computer keys or a MIDI controller can be used to launch scenes and scroll between them.
Scenes can be renamed using the Edit menu's Rename command. One can quickly rename
several scenes by executing the Rename command and using the computer's Tab key to
move from one scene to the next.
Each scene can actually store a tempo setting as part of its name, so that it changes the
project tempo upon launch; this is accomplished by selecting the scene and renaming it
with a viable tempo (e.g., 96 BPM). Any tempo can be used, as long as it is within the
range allowed by Live's Tempo control (20999 BPM).
A Session View Scene.
This Scene Will Change
the Tempo to 96 BPM.
Page 84

7.3. THE TRACK STATUS FIELDS 82
7.3 The Track Status Fields
You can tell a track's status by looking at the Track Status eld just above the active track's
mixer controls:
The pie-chart icon represents a looping Session clip. The number to the right of the circle
is the loop length in beats, and the number at the left represents how many times the loop
has been played since its launch.
The progress-bar icon represents a one-shot (non-looping) Session clip. The value displays
the remaining play time in minutes:seconds.
A Track Playing a
Looping Session Clip...
... A One-shot Session
Clip...
A microphone icon appears in an audio track that is set to monitor its input. A keyboard
icon appears in a MIDI track under these same circumstances.
... Monitoring the
Input...
... Playing the
Arrangement.
Page 85

7.4. SETTING UP THE SESSION VIEW GRID 83
Ctrl
Ctrl
If the track is playing clips from the Arrangement, a miniature display representing the
Arrangement clips being played appears.
7.4 Setting Up the Session View Grid
Clips arrive in the Session View by being imported from the File Browsers or through
recording.
Dropping Multiple Clips
Into the Session View.
If you are dragging multiple clips into the Session View, Live defaults to arrange them
vertically, in one track. Hold down
(PC) / (Mac) prior to dropping them so as
to lay the clips out in one scene.
Clips can be moved around the Session grid by drag-and-drop. To move several clips
at once, select them by using the - or
(PC) / (Mac)-modier before
dragging. You can also click into an empty slot and rubber-band select from there. Scenes
can be reordered by drag-and-drop as well.
Page 86

7.4. SETTING UP THE SESSION VIEW GRID 84
7.4.1 Select on Launch
By default, clicking a Session View clip's Launch button also selects the clip, since you will
typically want the Clip View to show the newly launched clip. However, some power-users
don't want the current focus (e.g., a return track's devices) to disappear just because a clip
has been launched, especially when starting a clip in order to try it with the return track
device settings. Turn off the Select on Launch option from the Misc Preferences if you prefer
the view to remain as is when you launch clips or scenes.
7.4.2 Removing Clip Stop Buttons
You can add and remove Clip Stop buttons from the grid using the Edit menu's Add/Remove
Stop Button command. This is useful for pre-conguring the scene launch behavior: If, for
instance, you don't want scene 3 to affect track 4, remove the scene 3 / track 4 Stop button.
Slots W ithout Clip Stop
Buttons.
7.4.3 Editing Scenes
There are a number of useful commands in the Edit and Insert menus that apply to scenes:
Cut Scenes cuts out scenes with selected slots from the Session View, thereby reducing
the total number of scenes. Please note that the Cut Scenes command affects all tracks,
not only those containing selected slots.
Page 87

7.5. RECORDING SESSIONS INTO THE ARRANGEMENT 85
Paste Scenes works like Paste, but inserts blank scenes before pasting. Live inserts
enough scenes to t the material from the clipboard. The new scenes will be inserted
behind the current selection.
Duplicate Scenes works like Duplicate, but inserts blank scenes before pasting. Live
inserts enough scenes to t the material from the clipboard.
Delete Scenes deletes all scenes with selected slots from the Session View, thereby
reducing the total number of scenes. Please note that the Delete Scenes command
affects all tracks, not only those containing selected slots.
Insert Scene inserts an empty scene below the current selection.
Capture and Insert Scene inserts a new scene below the current selection, places
copies of the clips that are currently running in the new scene and launches the new
scene immediately with no audible interruption. This command is very helpful when
developing materials in the Session View. You can capture an interesting moment as
a new scene and move on, changing clip properties and trying clip combinations.
7.5 Recording Sessions into the Arrangement
Your Session View playing can be recorded into the Arrangement, allowing for an improvisational approach to composing songs and scores.
Page 88

7.5. RECORDING SESSIONS INTO THE ARRANGEMENT 86
When the Record button is on, Live logs all of your actions into the Arrangement:
the clips launched;
changes of those clips' properties;
changes of the mixer and the devices' controls, also known as automation.
To nish recording, press the Record button again, or stop playback.
The Control Bar's Record
Button.
The Arrangement
Selector.
To view the results of your recording, bring up the Arrangement View. As you can see, Live
has copied the clips you launched during recording into the Arrangement, in the appropriate
tracks and the correct song positions. Notice that your recording has not created new audio
data, only clips.
The Session clips and the Arrangement clips in one track are mutually exclusive: Only one
can play at a time. When a Session clip is launched, Live stops playing back the Arrangement
in favor of the Session clip. Clicking a Clip Stop button causes the Arrangement playback
to stop, which produces silence.
Page 89

7.5. RECORDING SESSIONS INTO THE ARRANGEMENT 87
Arrangement playback does not resume until you explicitly tell Live to resume by clicking
the Back to Arrangement button, which lights up to remind you that what you hear differs
from the Arrangement.
To disable all Arrangement clips simultaneously, click on the Stop All Clips button in the
Master Track Status eld. The clips in the Arrangement and in the Session View exist
independently from one another, which makes it easy to improvise into the Arrangement
over and over again until it's right.
Furthermore, you can move clips not only within the Session grid, but also from the Session
View to the Arrangement and vice versa by using Copy and Paste, or by dragging clips over
The Back to
Arrangement Button.
The Stop All Clips
Button.
the
or selectors.
When pasting material from the Arrangement into the Session View, Live attempts to preserve the temporal structure of the clips by laying them out in a matching top-to-bottom
order. Moving through the scenes from the top down, you can reconstruct the original arrangement. This is useful for taking a composed piece of music back to the improvisational
stage.
Page 90

Chapter 8
Clip View
The Clip View is where clip properties can be set and adjusted.
The Clip View is opened by clicking on the Clip Overview or double-clicking a clip in the
Session or Arrangement View.
Clicking the Clip
Overview Opens the
Clip View.
88
Page 91

89
Ctrl
In the Session View, clicking on a Track Status Field opens the Clip View for editing the clip
that is currently running in the track.
The properties of more than one clip can be edited collectively in the Clip View as a multiselection. To create a multi-selection, click and drag to highlight the clips, or select one clip
and use the
(PC) / (Mac) or modiers to add to your selection. The
properties available in the Clip View for a multi-selection depend on the contents of the
clips; generally only properties which the clips have in common are shown.
Clicking a Session View
Track Status Field Opens
the Clip View.
Creating a Clip
Multi-Selection.
Controls such as sliders and knobs behave slightly differently when they are part of a multiselection. If the clips in a multi-selection have differing values for any particular knob or
slider parameter (clip transposition, for example), the range of these values will be displayed
and can be adjusted with the control. Dragging the knob or slider to its absolute maximum
or minimum value will make the clips' settings thereafter identical, adjustable as a single
value.
MIDI clips and audio clips in Live have different sets of properties and, consequently, do
not share the same set of Clip V iew controls. The two types of clips do have the following
in common:
Page 92

The Clip box contains basic clip settings.
The Envelopes box and the Envelope Editor manage the clip's envelopes, which are
used to modulate the effects, mixer, and clip or MIDI controls. Clip envelopes and
their associated Clip View components are covered in detail in a separate manual
chapter.
The Launch box controls clip launch behavior and, as such, only appears for Session
View clips. Setting Session View clip launch properties is covered in detail in a separate
manual chapter.
Audio clips have these additional Clip View controls:
The Sample Display toggles with the Envelope Editor on the right-hand side of the
Clip View, and controls Live's sample-warping capabilities and clip playback settings.
The Sample box contains settings pertaining to how the clip plays its sample and
displays it in the Sample Display.
90
MIDI clips have these additional Clip View controls:
The MIDI Editor toggles with the Envelope Editor on the right-hand side of the Clip
View, and allows editing and creating MIDI notes and velocities.
The Clip View for an
Audio Clip.
Page 93

91
The Notes box contains settings pertaining to how Live plays a MIDI clip and what it
displays in the MIDI Editor.
To make best use of the screen real estate, you can show or hide the Launch, Envelopes,
and Sample or MIDI boxes using the Clip View Box selector in the Clips box. You can also
toggle between the Sample Display/MIDI Editor and the Envelope Editor by clicking in the
title bars of the Sample/Notes box and the Envelopes box, respectively.
The Clip View for a MIDI
Clip.
The Clip View Box
Selector Shows and
Hides Various Clip View
Components.
Page 94

8.1. THE CLIP BOX 92
Ctrl
8.1 The Clip Box
8.1.1 Clip Activator Switch
Using this switch, you can deactivate a clip so that it does not play when launched in the
Session View or during Arrangement playback. Clips can also be activated/deactivated
directly from the Session or Arrangement View with their (PC) /
menus.
(Mac) context
The Clip Box.
8.1.2 Clip Name and Color
The Clip Name eld allows naming the clip. By default, a clip's name matches the name of
the le it references but, in general, the clip name is independent from the le name.
Renaming an audio clip does not rename the referenced sample le. To rename a le, select
it in Live's File Browsers, and then choose the Edit menu's Rename command.
The Clip Color chooser allows choosing a clip color.
Page 95

8.1. THE CLIP BOX 93
8.1.3 Clip Signature
Using the Clip Signature elds, you can specify the signature of an audio clip's sample. This
setting is relevant only for display; it does not affect sample playback.
8.1.4 Groove
The Clip Groove chooser selects the type of groove used for the clip. Swing 8, for
example, applies an 8th-note groove.
The Global Groove control denes the amount of the groove for every clip in the Live Set.
So, how does it work? Imagine a simple one-bar MIDI clip that has a time signature of 4/4.
Our MIDI clip is made up of 8th notes eight of them that play either on or between each
of the four beats. With a Clip Groove setting of Swing 8, the timing of our one-bar clip
becomes a bit like a rubber-band that is pinned down at each beat but exible in between.
The 8th notes that fall between beats can shift slightly forward. With a Global Groove setting
of 50, for example, the notes will wait until 2/3 of the way through the beat to play, where
an 8th-note triplet would normally fall.
The Control Bar's Global
Groove Control.
16th- and 32nd-note swing works similarly, but on a smaller scale: Every other note shifts
forward, toward the nearest 16th- or 32nd-note triplet position.
Returning to our rubber-band analogy, we can see that Swing 8 can actually affect more
than just 8th notes. Actually, any notes that do not lie directly on a beat will be affected
when the rubber-band is stretched including 16th and 32nd notes. By the same token,
Swing 16 (where our rubber-band is anchored to positions just an 8th note apart) can affect
32nd notes.
Page 96

8.1. THE CLIP BOX 94
Groove can be applied to both MIDI clips and audio clips. Applying groove to audio
clips does require that the Warp switch be activated and a Warp Mode other than Re-Pitch
selected. If an audio clip is in Beats Mode, the Transients setting must be greater than or
equal to the Clip Groove chooser's swing setting (e.g., with a Transients setting of 1/16,
Swing 8 and Swing 16 can be used, but not Swing 32).
Because of this feature's dependency on note timing, we recommend that you quantize
MIDI clips prior to applying groove provided you want predictable results. For audio clips,
any swing contained within the original sample can be removed by appropriately setting
Warp Markers prior to applying the articial swing of the Groove setting.
8.1.5 Clip Offset and Nudging
To jump within a playing clip in increments the size of the global quantization period, you
can use the Nudge buttons in the Clip box.
These buttons can also be mapped to keys or MIDI controllers. In MIDI Map mode, a scrub
control will appear between the Nudge buttons and can be assigned to a rotary encoder
wheel for continuous scrubbing.
Using the Nudge
Buttons to Jump
Through a Clip.
Page 97

8.1. THE CLIP BOX 95
With quantization set to values less than one bar, it is easy to offset clip playback from Live's
master clock by launching clips, using the Nudge buttons or scrubbing within the clip.
The Scrub Control in
MIDI Map Mode.
When clip play is offset from global time in this manner, a little dot will illuminate in the
Sample Display or MIDI Editor to display the offset start position.
Clip Offset from Global
Time as Shown in the
Clip's Display.
Page 98

8.2. THE SAMPLE BOX 96
The current offset as indicated by the dot can be made permanent by moving the start
marker to the dot's position - and this is exactly what the Keep button, found just beneath
the Nudge buttons, does. Or, the current offset can be undone using the Revert button.
8.2 The Sample Box
8.2.1 Warp Controls
Using the Keep and
Revert Buttons to
Manage Meter Offset.
The Clip Warp Controls.
Page 99

8.2. THE SAMPLE BOX 97
When the Warp switch is off, Live plays the sample at its original, normal tempo, irrespective of the current Live Set tempo. This is useful for samples that have no inherent rhythmic
structure: percussion hits, atmospheres, sound effects, spoken word and the like. Turn
the Warp switch on to play rhythmically structured samples (such as sample loops, music
recordings, complete music pieces, etc.) in sync with the current song tempo.
To verify this, note that a warped sample's speed follows the tempo as you change the
Control Bar's Tempo control.
The Control Bar's Tempo
Control.
Live offers a number of controls to adjust the time-warping engine for optimal stretching
quality. For accurate warping, Live needs to know the sample's metrical structure. For
properly prepared loops, tempo and duration are calculated automatically; most of the time
this is accurate enough that the sample is immediately ready for use in Live. For other
samples, you may have to provide some hints.
Page 100

8.2. THE SAMPLE BOX 98
8.2.2 Sample Loop/Region and Display
Zooming and Scrolling
Zooming and scrolling in the Sample Display work much like they do in the Arrangement
View. Using the zoom/scroll area in the top half of the waveform, you can click and drag
vertically to smoothly change the zoom level, and horizontally to scroll the display.
The Clip Zoom/Scroll
Area.
The Clip Overview provides additional zoom/scrolling functionality. It always shows the
complete clip, from start to end. The black rectangular outline represents the part of the
The Clip Overview.
 Loading...