


Ableton Reference Manual Version 10
for Windows and Mac
Reference Manual by Dennis DeSantis, Michelle Hughes, Ian Gallagher, Kevin Haywood, Rose
Knudsen, Gerhard Behles, Jakob Rang, Robert Henke, Torsten Slama.
1
Schönhauser Allee 6-7 | 10119 Berlin, Germany
Contact Support: www.ableton.com/support/contact

Copyright 2018 Ableton AG. All rights reserved. Made in Germany.
This manual, as well as the software described in it, is furnished under license and may be used or copied only in accordance with the terms of such license. The content of this manual is furnished for informational use only, is subject to change
without notice, and should not be construed as a commitment by Ableton. Every effort has been made to ensure that the
information in this manual is accurate. Ableton assumes no responsibility or liability for any errors or inaccuracies that may
appear in this book.
Except as permitted by such license, no part of this publication may be reproduced, edited, stored in a retrieval system or
transmitted, in any form or by any means, electronic, mechanical, recording or otherwise, without the prior written permission of Ableton.
Ableton, the Ableton Logo, the Live logo are trademarks of Ableton AG. Apple, Finder, GarageBand, Mac, Macintosh,
macOS, OS X and QuickTime are trademarks of Apple Inc, registered in the U.S. and other countries. Windows is a registered trademark of Microsoft Corporation in the United States and other countries. Intel is a registered trademark of Intel
Corporation or its subsidiaries in the United States and other countries. SONiVOX is the brand name trademark of Sonic
Network, Inc. VST and ASIO are trademarks and software of Steinberg Media Technologies GmbH. ReWire, Recycle and
REX2 are trademarks of Propellerhead Software AB. All other product and company names are trademarks or registered
trademarks of their respective holders.
Content provided by:
2
SONiVOX — www.sonivoxrocks.com
Chocolate Audio — www.chocolateaudio.com
Puremagnetik — www.puremagnetik.com
Cycling ‘74 — www.cycling74.com
SonArte — www.sonarte.ca
e-instruments — www.e-instruments.com
Zero-G — w ww.zero-g.co.uk
Goldbaby – ww w.goldbaby.co.nz
Sample Magic – www.samplemagic.com
Soniccouture – www.soniccouture.com
Loopmasters – w ww.loopmasters.com
Uppercussion – www.uppercussion.com
Physical Modeling technology provided by:
Applied Acoustics Systems — w ww.applied-acoustics.com

Contents
Welcome to Live 21
1.1 The Ableton Team Says: Thank You ……………………………………………………………………21
1.2 What’s New in Live 10? …………………………………………………………………………………21
1.2.1 Device Additions and Improvements ........................................................................21
1.2.2 Capture ...................................................................................................................... 22
1.2.3 Multi-Clip Editing ...................................................................................................... 22
1.2.4 Nested Group Tracks ................................................................................................ 23
1.2.5 Arrangement Editing Improvements ......................................................................... 23
1.2.6 Automation Improvements ........................................................................................ 24
1.2.7 Navigation Improvements ........................................................................................ 24
1.2.8 Mixing Improvements ............................................................................................... 25
1.2.9 Browser Improvements .............................................................................................. 25
1.2.10 Setup Improvements .................................................................................................. 26
1.2.11 Interface Improvements ............................................................................................ 26
1.2.12 File Handling Improvements ..................................................................................... 27
1.2.13 Max for Live Updates ...............................................................................................28
1.2.14 Push Device Visualizations ....................................................................................... 28
1.2.15 Push Note Layouts ..................................................................................................... 28
1.2.16 Push MIDI Clip Mode ............................................................................................... 29
1.2.17 Additional Push Improvements ................................................................................. 29
3
First Steps 31
2.1 Learn About Live ……………………………………………………………………………………………31
2.1.1 Using the Info View and Index ..................................................................................31
2.2 Setting up Preferences ………………………………………………………………………………… 32
2.3 The Main Live Screen …………………………………………………………………………………… 33
Authorizing Live 37
3.1 Copy Protection FAQs ………………………………………………………………………………… 37
3.1.1 Can I Use Live or Other Ableton Products Without a Serial Number? ................. 37
3.1.2 What if I Change My Computer’s Components? ................................................... 38
3.1.3 Can I Authorize Live More than Once?...................................................................38

3.1.4 Can I Play my Set from a Computer That Is Not Authorized?................................ 38
3.1.5 What Do I Do About Problems or Questions Regarding Copy Protection? .........39
Live Concepts 41
4.1 The Browser …………………………………………………………………………………………………41
4.2 Live Sets …………………………………………………………………………………………………… 42
4.3 Arrangement and Session …………………………………………………………………………… 42
4.4 Tracks ………………………………………………………………………………………………………… 43
4.5 Audio and MIDI ………………………………………………………………………………………… 46
4.6 Audio Clips and Samples ……………………………………………………………………………… 46
4.7 MIDI Clips and MIDI Files …………………………………………………………………………… 48
4.8 Devices and the Mixer ………………………………………………………………………………… 49
4.9 Presets and Racks ………………………………………………………………………………………… 52
4.10 Routing ……………………………………………………………………………………………………… 52
4.11 Recording New Clips …………………………………………………………………………………… 53
4.12 Automation Envelopes ………………………………………………………………………………… 54
4.13 Clip Envelopes …………………………………………………………………………………………… 55
4.14 MIDI and Key Remote ………………………………………………………………………………… 56
4.15 Saving and Exporting ………………………………………………………………………………… 57
4
Managing Files and Sets 59
5.1 Working with the Browser …………………………………………………………………………… 59
5.1.1 Understanding the Browser’s Hierarchy .................................................................. 60
5.1.2 User Folders ............................................................................................................... 64
5.1.3 Searching for Files ..................................................................................................... 64
5.2 Sample Files ……………………………………………………………………………………………… 69
5.2.1 The Decoding Cache ................................................................................................ 69
5.2.2 Analysis Files (.asd) ................................................................................................... 70
5.2.3 Exporting Audio and Video .......................................................................................71
5.3 MIDI Files ………………………………………………………………………………………………… 77
5.3.1 Exporting MIDI Files ................................................................................................. 77
5.4 Live Clips …………………………………………………………………………………………………… 77
5.5 Live Sets …………………………………………………………………………………………………… 79
5.5.1 Creating, Opening and Saving Sets ....................................................................... 79
5.5.2 Merging Sets ............................................................................................................. 79
5.5.3 Exporting Session Clips as New Sets .......................................................................81
5.5.4 Template Sets ..............................................................................................................81
5.5.5 Viewing and Changing a Live Set’s File References ............................................... 82
5.6 Live Projects ……………………………………………………………………………………………… 84
5.6.1 Projects and Live Sets ................................................................................................ 84
5.6.2 Projects and Presets ................................................................................................... 87

5.6.3 Managing Files in a Project ...................................................................................... 87
5.7 Locating Missing Files ………………………………………………………………………………… 88
5.7.1 Manual Repair ..........................................................................................................88
5.7.2 Automatic Repair ....................................................................................................... 89
5.8 Collecting External Files ……………………………………………………………………………… 90
5.8.1 Collect Files on Export ...............................................................................................91
5.9 Aggregated Locating and Collecting ……………………………………………………………… 92
5.10 Finding Unused Files …………………………………………………………………………………… 92
5.11 Packing Projects into Packs …………………………………………………………………………… 93
5.12 File Management FAQs ……………………………………………………………………………… 93
5.12.1 How Do I Create a Project? ..................................................................................... 93
5.12.2 How Can I Save Presets Into My Current Project? ................................................. 94
5.12.3 Can I Work On Multiple Versions of a Set? ............................................................ 94
5.12.4 Where Should I Save My Live Sets? ........................................................................ 94
5.12.5 Can I Use My Own Folder Structure Within a Project Folder? .............................. 94
Arrangement View 97
6.1 Navigation ………………………………………………………………………………………………… 97
6.2 Transport …………………………………………………………………………………………………… 99
6.3 Launching the Arrangement with Locators ……………………………………………………… 101
6.4 Time Signature Changes ………………………………………………………………………………102
6.5 The Arrangement Loop ………………………………………………………………………………… 104
6.6 Moving and Resizing Clips ……………………………………………………………………………106
6.7 Audio Clip Fades and Crossfades ………………………………………………………………… 106
6.8 Selecting Clips and Time ……………………………………………………………………………… 109
6.9 Using the Editing Grid ………………………………………………………………………………… 11 0
6.10 Using the ...Time Commands ………………………………………………………………………… 111
6.11 Splitting Clips ……………………………………………………………………………………………… 112
6.12 Consolidating Clips ……………………………………………………………………………………… 113
5
Session View 115
7.1 Session View Clips ……………………………………………………………………………………… 11 5
7.2 Tracks and Scenes ……………………………………………………………………………………… 11 7
7.3 The Track Status Fields ………………………………………………………………………………… 11 9
7.4 Setting Up the Session View Grid …………………………………………………………………… 12 0
7.4.1 Select on Launch ......................................................................................................121
7.4.2 Removing Clip Stop Buttons ....................................................................................12 2
7.4.3 Editing Scenes ..........................................................................................................122
7.5 Recording Sessions into the Arrangement ………………………………………………………… 12 2

Clip View 12 7
8.1 The Clip Box ……………………………………………………………………………………………… 130
8.1.1 Clip Activator Switch ............................................................................................... 130
8.1.2 Clip Name and Color .............................................................................................. 131
8.1.3 Clip Signature ...........................................................................................................131
8.1.4 Clip Groove Chooser ..............................................................................................131
8.1.5 Clip Offset and Nudging .........................................................................................13 2
8.2 The Sample Box ………………………………………………………………………………………… 13 3
8.2.1 Warp Controls ..........................................................................................................13 3
8.2.2 Sample Loop/Region and Display .........................................................................13 4
8.2.3 Clip Pitch and Gain ................................................................................................. 140
8.2.4 Destructive Sample Editing ..................................................................................... 140
8.2.5 Saving Default Clip Settings with the Sample ........................................................14 1
8.2.6 High Quality Interpolation ......................................................................................141
8.2.7 Clip Start and End Fades ........................................................................................ 14 2
8.2.8 Clip RAM Mode ...................................................................................................... 143
8.2.9 Reversing Samples .................................................................................................. 143
8.2.10 Cropping Audio Clips ............................................................................................. 144
8.2.11 Replacing and Editing the Sample ......................................................................... 144
8.3 The Notes Box …………………………………………………………………………………………… 145
8.3.1 Transform Tools ........................................................................................................ 145
8.3.2 Bank and Program Change .................................................................................... 146
8.3.3 MIDI Loop/Region ................................................................................................. 147
8.4 Clip Defaults and Update Rate ……………………………………………………………………… 14 7
6
Audio Clips, Tempo, and Warping 149
9.1 Tempo ……………………………………………………………………………………………………… 14 9
9.1.1 Setting the Tempo .................................................................................................... 14 9
9.1.2 Tapping the Tempo .................................................................................................. 150
9.1.3 Nudging the Tempo .................................................................................................151
9.2 Time-Warping Samples ……………………………………………………………………………… 151
9.2.1 Tempo Master/Slave .............................................................................................. 152
9.2.2 Warp Markers ......................................................................................................... 153
9.2.3 Using Warp Markers .............................................................................................. 155
9.2.4 Quantizing Audio .....................................................................................................161
9.3 Adjusting for Good Stretching Quality …………………………………………………………… 161
9.3.1 Beats Mode ............................................................................................................. 16 2
9.3.2 Tones Mode ............................................................................................................. 163
9.3.3 Texture Mode...........................................................................................................163
9.3.4 Re-Pitch Mode ......................................................................................................... 163
9.3.5 Complex Mode ....................................................................................................... 163
9.3.6 Complex Pro Mode ................................................................................................164

9.3.7 REX Mode ................................................................................................................ 164
Editing MIDI Notes and Velocities 167
10.1 Creating an Empty MIDI Clip ………………………………………………………………………… 16 7
10.2 The MIDI Editor …………………………………………………………………………………………… 168
10.3 MIDI Editor Navigation and Transport …………………………………………………………… 17 0
10.4 Editing MIDI ……………………………………………………………………………………………… 17 2
10.4.1 Non-Destructive Editing .......................................................................................... 17 2
10.4.2 Folding and Looping ............................................................................................... 172
10.4.3 Grid Snapping..........................................................................................................174
10.4.4 Editing Notes ............................................................................................................174
10.4.5 Changing Note Length ............................................................................................176
10.4.6 The ...Time Commands in the MIDI Editor ..............................................................17 6
10.4.7 Quantizing Notes .....................................................................................................176
10.4.8 Editing Velocities ..................................................................................................... 17 7
10.4.9 MIDI Note Stretch ................................................................................................... 180
10.4.10 Cropping MIDI Clips ...............................................................................................181
10.4.11 Deactivating Notes ..................................................................................................181
10.4.12 The Transform Tools ..................................................................................................181
10.5 Multi-Clip Editing ………………………………………………………………………………………… 181
10.5.1 Editing in the Session View ..................................................................................... 18 2
10.5.2 Editing in the Arrangement View ............................................................................ 183
7
Converting Audio to MIDI 18 5
11.1 Slice to New MIDI Track ……………………………………………………………………………… 18 5
11.1.1 Resequencing Slices ................................................................................................ 187
11.1.2 Using Effects on Slices ............................................................................................ 187
11.2 Convert Harmony to New MIDI Track …………………………………………………………… 188
11.3 Convert Melody to New MIDI Track ……………………………………………………………… 188
11.4 Convert Drums to New MIDI Track ………………………………………………………………… 18 9
11.5 Optimizing for Better Conversion Quality………………………………………………………… 18 9
Using Grooves 191
12.1 Groove Pool ……………………………………………………………………………………………… 192
12.1.1 Adjusting Groove Parameters ................................................................................ 19 3
12.1.2 Committing Grooves ............................................................................................... 194
12.2 Editing Grooves ………………………………………………………………………………………… 19 5
12.2.1 Extracting Grooves .................................................................................................. 19 5
12.3 Groove Tips ……………………………………………………………………………………………… 195
12.3.1 Grooving a Single Voice ........................................................................................ 196

12.3.2 Non-Destructive Quantization ............................................................................... 196
12.3.3 Creating Texture With Randomization ................................................................... 196
Launching Clips 19 7
13.1 The Launch Box …………………………………………………………………………………………… 19 7
13.2 Launch Modes …………………………………………………………………………………………… 19 8
13.3 Clip Launch Quantization……………………………………………………………………………… 199
13.4 Velocity ……………………………………………………………………………………………………… 199
13.5 Legato Mode ……………………………………………………………………………………………… 200
13.6 Follow Actions …………………………………………………………………………………………… 201
13.6.1 Looping Parts of a Clip ...........................................................................................202
13.6.2 Creating Cycles .......................................................................................................203
13.6.3 Temporarily Looping Clips ......................................................................................203
13.6.4 Adding Variations in Sync ......................................................................................204
13.6.5 Mixing up Melodies and Beats ..............................................................................204
13.6.6 Creating Nonrepetitive Structures ..........................................................................205
Routing and I/O 207
14.1 Monitoring ………………………………………………………………………………………………… 208
14.2 External Audio In/Out …………………………………………………………………………………209
14.2.1 Mono/Stereo Conversions .....................................................................................21 0
14.3 External MIDI In/Out ………………………………………………………………………………… 21 0
14.3.1 The MIDI Ports List in the Preferences ......................................................................21 0
14.3.2 Playing MIDI With the Computer Keyboard .......................................................... 211
14.3.3 Connecting External Synthesizers ........................................................................... 211
14.3.4 MIDI In/Out Indicators ...........................................................................................212
14.4 ReWire Slave Routing ………………………………………………………………………………… 213
14.5 Resampling ………………………………………………………………………………………………… 214
14.6 Internal Routings ………………………………………………………………………………………… 21 5
14.6.1 Internal Routing Points ..............................................................................................21 6
14.6.2 Making Use of Internal Routing ..............................................................................218
8
Mixing 227
15.1 The Live Mixer …………………………………………………………………………………………… 227
15.1.1 Session Mixer Features ...........................................................................................230
15.2 Audio and MIDI Tracks ………………………………………………………………………………… 231
15.3 Group Tracks ……………………………………………………………………………………………… 232
15.4 Return Tracks and the Master Track ………………………………………………………………… 234
15.5 Using Live’s Crossfader ………………………………………………………………………………… 235
15.6 Soloing and Cueing …………………………………………………………………………………… 238

15.7 Track Delays ………………………………………………………………………………………………240
Recording New Clips 241
16.1 Choosing an Input ……………………………………………………………………………………… 241
16.2 Arming (Record-Enabling) Tracks …………………………………………………………………… 242
16.3 Recording ………………………………………………………………………………………………… 243
16.3.1 Recording Into the Arrangement ............................................................................ 243
16.3.2 Recording Into Session Slots ...................................................................................244
16.3.3 Overdub Recording MIDI Patterns ........................................................................246
16.3.4 MIDI Step Recording .............................................................................................. 247
16.4 Recording in Sync ………………………………………………………………………………………248
16.4.1 Metronome Settings ................................................................................................249
16.5 Recording Quantized MIDI Notes …………………………………………………………………250
16.6 Recording with Count-in ……………………………………………………………………………… 250
16.7 Setting up File Types …………………………………………………………………………………… 251
16.8 Where are the Recorded Samples? ………………………………………………………………… 251
16.9 Using Remote Control for Recording ……………………………………………………………… 252
16.10 Capturing MIDI …………………………………………………………………………………………… 253
16.10.1 Starting a New Live Set .......................................................................................... 254
16.10.2 Adding Material to an Existing Live Set ................................................................254
9
Working with Instruments and Effects 257
17.1 Using the Live Devices ………………………………………………………………………………… 259
17.1.1 Live Device Presets ..................................................................................................262
17.2 Using Plug-Ins …………………………………………………………………………………………… 268
17.2.1 Plug-Ins in the Device View ....................................................................................269
17.3 VST Plug-Ins ……………………………………………………………………………………………… 273
17.3.1 The VST Plug-In Folder ............................................................................................ 273
17.3.2 VST Presets and Banks ............................................................................................ 275
17.4 Audio Units Plug-Ins …………………………………………………………………………………… 276
17.5 Device Delay Compensation ………………………………………………………………………… 277
Instrument, Drum and Effect Racks 279
18.1 An Overview of Racks ………………………………………………………………………………… 280
18.1.1 Signal Flow and Parallel Device Chains ...............................................................280
18.1.2 Macro Controls ....................................................................................................... 281
18.2 Creating Racks …………………………………………………………………………………………… 281
18.3 Looking at Racks ………………………………………………………………………………………… 282
18.4 Chain List ……………………………………………………………………………………………………284
18.4.1 Auto Select ...............................................................................................................285

18.5 Zones ………………………………………………………………………………………………………… 286
18.5.1 Signal Flow through Zones .....................................................................................286
18.5.2 Key Zones ................................................................................................................ 287
18.5.3 Velocity Zones .........................................................................................................288
18.5.4 Chain Select Zones .................................................................................................288
18.6 Drum Racks ………………………………………………………………………………………………… 290
18.6.1 Pad View .................................................................................................................. 292
18.7 Using the Macro Controls …………………………………………………………………………… 294
18.8 Mixing With Racks ……………………………………………………………………………………… 295
18.8.1 Extracting Chains ....................................................................................................296
Automation and Editing Envelopes 299
19.1 Recording Automation in Arrangement View …………………………………………………… 299
19.2 Recording Automation in Session View ……………………………………………………………300
19.2.1 Session Automation Recording Modes .................................................................302
19.3 Deleting Automation ……………………………………………………………………………………302
19.4 Overriding Automation …………………………………………………………………………………302
19.5 Drawing and Editing Automation ……………………………………………………………………303
19.5.1 Drawing Envelopes .................................................................................................305
19.5.2 Editing Breakpoints ..................................................................................................306
19.5.3 Locking Envelopes ...................................................................................................308
19.5.4 Edit Menu Commands ............................................................................................308
19.5.5 Editing the Tempo Automation................................................................................309
10
Clip Envelopes 311
20.1 The Clip Envelope Editor ……………………………………………………………………………… 311
20.2 Audio Clip Envelopes …………………………………………………………………………………… 313
20.2.1 Clip Envelopes are Non-Destructive ......................................................................313
20.2.2 Changing Pitch and Tuning per Note ..................................................................... 313
20.2.3 Muting or Attenuating Notes in a Sample .............................................................314
20.2.4 Scrambling Beats .....................................................................................................315
20.2.5 Using Clips as Templates .........................................................................................31 6
20.3 Mixer and Device Clip Envelopes ………………………………………………………………… 31 6
20.3.1 Modulating Mixer Volumes and Sends ..................................................................31 7
20.3.2 Modulating Pan ........................................................................................................318
20.3.3 Modulating Device Controls ................................................................................... 318
20.4 MIDI Controller Clip Envelopes ……………………………………………………………………… 318
20.5 Unlinking Clip Envelopes From Clips ……………………………………………………………… 31 9
20.5.1 Programming a Fade-Out for a Live Set .................................................................31 9
20.5.2 Creating Long Loops from Short Loops .................................................................320
20.5.3 Imposing Rhythm Patterns onto Samples ................................................................321

20.5.4 Clip Envelopes as LFOs ..........................................................................................322
20.5.5 Warping Linked Envelopes ..................................................................................... 322
Working with Video 323
21.1 Importing Video ………………………………………………………………………………………… 323
21.2 The Appearance of Video in Live …………………………………………………………………… 324
21.2.1 Video Clips in the Arrangement View ....................................................................324
21.2.2 The Video Window .................................................................................................325
21.2.3 Clip View .................................................................................................................325
21.3 Matching Sound to Video …………………………………………………………………………… 326
21.4 Video Trimming Tricks …………………………………………………………………………………… 327
Live Audio Effect Reference 331
22.1 Amp ………………………………………………………………………………………………………… 331
22.1.1 Amp Tips .................................................................................................................. 333
22.2 Auto Filter ………………………………………………………………………………………………… 334
22.3 Auto Pan ……………………………………………………………………………………………………337
22.4 Beat Repeat ……………………………………………………………………………………………… 338
22.5 Cabinet ……………………………………………………………………………………………………… 340
22.5.1 Cabinet Tips ............................................................................................................. 341
22.6 Chorus ……………………………………………………………………………………………………… 342
22.7 Compressor ………………………………………………………………………………………………343
22.7.1 Sidechain Parameters ............................................................................................. 347
22.7.2 Compression Tips .................................................................................................... 348
22.7.3 Upgrading from Legacy Mode .............................................................................. 349
22.8 Corpus ……………………………………………………………………………………………………… 350
22.9 Drum Buss ………………………………………………………………………………………………… 354
22.10 Dynamic Tube …………………………………………………………………………………………… 356
22.11 Echo ………………………………………………………………………………………………………… 357
22.11.1 Echo Tab ..................................................................................................................358
22.11.2 Modulation Tab .......................................................................................................359
22.11.3 Character Tab ..........................................................................................................360
22.11.4 Global Controls ....................................................................................................... 361
22.12 EQ Eight …………………………………………………………………………………………………… 362
22.13 EQ Three ……………………………………………………………………………………………………365
22.14 Erosion ……………………………………………………………………………………………………… 366
22.15 External Audio Effect …………………………………………………………………………………… 367
22.16 Filter Delay …………………………………………………………………………………………………368
22.17 Flanger ……………………………………………………………………………………………………… 370
22.18 Frequency Shifter ………………………………………………………………………………………… 371
22.18.1 Frequency Shifter Tips ............................................................................................. 373
11

22.19 Gate ………………………………………………………………………………………………………… 374
22.20 Glue Compressor ………………………………………………………………………………………… 376
22.20.1 Sidechain Parameters .............................................................................................378
22.21 Grain Delay ……………………………………………………………………………………………… 379
22.22 Limiter ……………………………………………………………………………………………………… 381
22.23 Looper ……………………………………………………………………………………………………… 382
22.23.1 Feedback Routing ....................................................................................................387
22.24 Multiband Dynamics …………………………………………………………………………………… 387
22.24.1 Dynamics Processing Theory ..................................................................................388
22.24.2 Interface and Controls ............................................................................................390
22.24.3 Sidechain Parameters ............................................................................................. 392
22.24.4 Multiband Dynamics Tips ....................................................................................... 392
22.25 Overdrive ………………………………………………………………………………………………… 394
22.26 Pedal ………………………………………………………………………………………………………… 395
22.26.1 Pedal Tips and Tricks ...............................................................................................396
22.27 Phaser ……………………………………………………………………………………………………… 398
22.28 Ping Pong Delay ………………………………………………………………………………………… 399
22.29 Redux ……………………………………………………………………………………………………… 401
22.30 Resonators …………………………………………………………………………………………………402
22.31 Reverb ………………………………………………………………………………………………………403
22.31.1 Input Processing .......................................................................................................403
22.31.2 Early Reflections ......................................................................................................404
22.31.3 Global Settings ........................................................................................................404
22.31.4 Diffusion Network ...................................................................................................405
22.31.5 Output ......................................................................................................................405
22.32 Saturator ……………………………………………………………………………………………………406
22.33 Simple Delay ………………………………………………………………………………………………408
22.34 Spectrum ……………………………………………………………………………………………………409
22.35 Tuner ………………………………………………………………………………………………………… 411
22.36 Utility ………………………………………………………………………………………………………… 413
22.37 Vinyl Distortion …………………………………………………………………………………………… 415
22.38 Vocoder …………………………………………………………………………………………………… 416
22.38.1 Vocoder Tips .............................................................................................................419
12
Live MIDI Effect Reference 421
23.1 Arpeggiator ……………………………………………………………………………………………… 421
23.1.1 Style and Rate Sections ..........................................................................................422
23.1.2 Transposition and Velocity Sections ....................................................................... 424
23.2 Chord ……………………………………………………………………………………………………… 425
23.3 Note Length ……………………………………………………………………………………………… 426
23.4 Pitch ………………………………………………………………………………………………………… 427
23.5 Random …………………………………………………………………………………………………… 428

23.6 Scale ………………………………………………………………………………………………………… 429
23.7 Velocity ………………………………………………………………………………………………………430
Live Instrument Reference 433
24.1 Analog ……………………………………………………………………………………………………… 433
24.1.1 Architecture and Interface ......................................................................................434
24.1.2 Oscillators ................................................................................................................ 435
24.1.3 Noise Generator .....................................................................................................436
24.1.4 Filters ........................................................................................................................437
24.1.5 Amplifiers .................................................................................................................438
24.1.6 Envelopes .................................................................................................................439
24.1.7 LFOs .........................................................................................................................441
24.1.8 Global Parameters ..................................................................................................442
24.2 Collision ……………………………………………………………………………………………………444
24.2.1 Architecture and Interface ......................................................................................444
24.2.2 Excitator Tab ............................................................................................................445
24.2.3 Resonator Tabs ........................................................................................................447
24.2.4 LFO Tab .................................................................................................................... 451
24.2.5 MIDI Tab ..................................................................................................................452
24.2.6 Sound Design Tips ...................................................................................................454
24.3 Electric ………………………………………………………………………………………………………455
24.3.1 Architecture and Interface ......................................................................................456
24.3.2 Mallet Section .........................................................................................................456
24.3.3 Fork Section .............................................................................................................457
24.3.4 Damper Section .......................................................................................................457
24.3.5 Pickup Section .........................................................................................................458
24.3.6 Global Section ........................................................................................................458
24.4 External Instrument ………………………………………………………………………………………459
24.5 Impulse ……………………………………………………………………………………………………… 461
24.5.1 Sample Slots ............................................................................................................ 461
24.5.2 Start, Transpose and Stretch ...................................................................................462
24.5.3 Filter ..........................................................................................................................463
24.5.4 Saturator and Envelope ..........................................................................................463
24.5.5 Pan and Volume ......................................................................................................463
24.5.6 Global Controls .......................................................................................................463
24.5.7 Individual Outputs ...................................................................................................464
24.6 Operator ……………………………………………………………………………………………………464
24.6.1 General Overview ..................................................................................................464
24.6.2 Oscillator Section ....................................................................................................466
24.6.3 LFO Section .............................................................................................................469
24.6.4 Envelopes .................................................................................................................470
24.6.5 Filter Section ............................................................................................................472
13

24.6.6 Global Controls ....................................................................................................... 474
24.6.7 Glide and Spread ................................................................................................... 475
24.6.8 Strategies for Saving CPU Power ..........................................................................475
24.6.9 Finally... .................................................................................................................... 476
24.6.10 The Complete Parameter List...................................................................................476
24.7 Sampler …………………………………………………………………………………………………… 486
24.7.1 Getting Started with Sampler .................................................................................486
24.7.2 Multisampling ..........................................................................................................486
24.7.3 Title Bar Options ......................................................................................................487
24.7.4 Sampler’s Tabs.........................................................................................................489
24.7.5 The Zone Tab ...........................................................................................................489
24.7.6 The Sample Tab .......................................................................................................496
24.7.7 The Pitch/Osc Tab ...................................................................................................503
24.7.8 The Filter/Global Tab .............................................................................................505
24.7.9 The Modulation Tab ................................................................................................508
24.7.10 The MIDI Tab ............................................................................................................ 511
24.7.11 Importing Third-Party Multisamples ........................................................................512
24.8 Simpler ……………………………………………………………………………………………………… 512
24.8.1 Playback Modes ......................................................................................................513
24.8.2 Warp Controls ..........................................................................................................519
24.8.3 Filter .......................................................................................................................... 520
24.8.4 Envelopes ................................................................................................................. 522
24.8.5 LFO ........................................................................................................................... 523
24.8.6 Global Parameters .................................................................................................. 524
24.8.7 Context Menu Options ........................................................................................... 525
24.8.8 Strategies for Saving CPU Power ..........................................................................526
24.9 Tension ……………………………………………………………………………………………………… 527
24.9.1 Architecture and Interface ...................................................................................... 527
24.9.2 String Tab ................................................................................................................. 528
24.9.3 Filter/Global Tab ....................................................................................................535
24.9.4 Sound Design Tips ...................................................................................................538
24.10 Wavetable …………………………………………………………………………………………………539
24.10.1 Wavetable Synthesis ...............................................................................................539
24.10.2 Oscillators ................................................................................................................540
24.10.3 Sub Oscillator .......................................................................................................... 541
24.10.4 Filters ........................................................................................................................ 542
24.10.5 Matrix Tab ................................................................................................................543
24.10.6 Mod Sources Tab ....................................................................................................545
24.10.7 MIDI Tab ..................................................................................................................547
24.10.8 Global and Unison Controls ..................................................................................548
14

Max for Live 551
25.1 Using Max for Live Devices …………………………………………………………………………… 551
25.2 Editing Max for Live Devices …………………………………………………………………………552
25.3 Max Dependencies ……………………………………………………………………………………553
25.4 Learning Max Programming ………………………………………………………………………… 554
Max for Live Devices 555
26.1 Max for Live Instruments ………………………………………………………………………………555
26.1.1 DS Clang .................................................................................................................555
26.1.2 DS Clap ...................................................................................................................556
26.1.3 DS Cymbal ..............................................................................................................557
26.1.4 DS FM ......................................................................................................................558
26.1.5 DS HH ......................................................................................................................559
26.1.6 DS Kick .....................................................................................................................560
26.1.7 DS Sampler .............................................................................................................. 561
26.1.8 DS Snare ..................................................................................................................562
26.1.9 DS Tom .....................................................................................................................563
26.2 Max for Live Audio Effects …………………………………………………………………………… 564
26.2.1 Envelope Follower ...................................................................................................564
26.2.2 LFO ...........................................................................................................................565
26.2.3 Shaper ......................................................................................................................566
26.3 Max for Live MIDI Effects ………………………………………………………………………………567
26.3.1 Envelope ..................................................................................................................567
26.3.2 Expression Control .................................................................................................569
26.3.3 Note Echo ................................................................................................................ 570
15
MIDI and Key Remote Control 571
27.1 MIDI Remote Control …………………………………………………………………………………… 571
27.1.1 Natively Supported Control Surfaces ...................................................................572
27.1.2 Manual Control Surface Setup .............................................................................. 574
27.1.3 Takeover Mode ....................................................................................................... 575
27.2 The Mapping Browser ………………………………………………………………………………… 576
27.2.1 Assigning MIDI Remote Control .............................................................................576
27.2.2 Mapping to MIDI Notes .........................................................................................577
27.2.3 Mapping to Absolute MIDI Controllers .................................................................578
27.2.4 Mapping to Relative MIDI Controllers .................................................................. 578
27.2.5 Computer Keyboard Remote Control .................................................................... 581
Using Push 583
28.1 Setup …………………………………………………………………………………………………………584

28.2 Browsing and Loading Sounds ………………………………………………………………………584
28.3 Playing and Programming Beats ……………………………………………………………………586
28.3.1 Loop Selector ...........................................................................................................586
28.3.2 16 Velocities Mode .................................................................................................588
28.3.3 64-Pad Mode .........................................................................................................588
28.3.4 Loading Individual Drums .......................................................................................589
28.3.5 Step Sequencing Beats ...........................................................................................590
28.3.6 Real-time Recording ................................................................................................592
28.3.7 Fixed Length Recording ..........................................................................................594
28.4 Additional Recording Options ……………………………………………………………………… 596
28.4.1 Recording with Repeat ............................................................................................596
28.4.2 Quantizing ...............................................................................................................597
28.5 Playing Melodies and Harmonies ………………………………………………………………… 598
28.5.1 Playing in Other Keys ..............................................................................................600
28.6 Step Sequencing Melodies and Harmonies ……………………………………………………602
28.6.1 Adjusting the Loop Length.......................................................................................604
28.7 Melodic Sequencer + 32 Notes ……………………………………………………………………606
28.7.1 32 Notes ..................................................................................................................606
28.7.2 Sequencer ................................................................................................................607
28.8 Navigating in Note Mode ……………………………………………………………………………608
28.9 Controlling Live’s Instruments and Effects …………………………………………………………609
28.10 Mixing with Push ………………………………………………………………………………………… 61 0
28.11 Recording Automation ………………………………………………………………………………… 612
28.12 Step Sequencing Automation ………………………………………………………………………… 613
28.12.1 Note-Specific Parameters .......................................................................................613
28.12.2 Per-Step Automation ................................................................................................614
28.13 Controlling Live’s Session View ……………………………………………………………………… 615
28.13.1 Session Overview ....................................................................................................616
28.14 Setting User Preferences ……………………………………………………………………………… 617
28.15 Push Control Reference ………………………………………………………………………………… 620
16
Using Push 2 633
29.1 Setup …………………………………………………………………………………………………………634
29.2 Browsing and Loading Sounds ……………………………………………………………………… 634
29.3 Playing and Programming Beats ……………………………………………………………………638
29.3.1 Loop Selector ..........................................................................................................638
29.3.2 16 Velocities Mode .................................................................................................640
29.3.3 64-Pad Mode .........................................................................................................641
29.3.4 Loading Individual Drums ....................................................................................... 641
29.3.5 Step Sequencing Beats ...........................................................................................645
29.3.6 Real-time Recording ................................................................................................648
29.3.7 Fixed Length Recording ..........................................................................................650

29.4 Additional Recording Options ……………………………………………………………………… 651
29.4.1 Recording with Repeat ............................................................................................ 651
29.4.2 Quantizing ...............................................................................................................652
29.4.3 Arrangement Recording ..........................................................................................653
29.5 Playing Melodies and Harmonies ………………………………………………………………… 654
29.5.1 Playing in Other Keys ..............................................................................................656
29.6 Step Sequencing Melodies and Harmonies ……………………………………………………658
29.6.1 Adjusting the Loop Length.......................................................................................659
29.7 Melodic Sequencer + 32 Notes …………………………………………………………………… 661
29.7.1 32 Notes ..................................................................................................................662
29.7.2 Sequencer ................................................................................................................662
29.8 Working with Samples …………………………………………………………………………………664
29.8.1 Classic Playback Mode ..........................................................................................666
29.8.2 One-Shot Mode ......................................................................................................668
29.8.3 Slicing Mode ...........................................................................................................669
29.9 Navigating in Note Mode …………………………………………………………………………… 672
29.10 Working With Instruments and Effects …………………………………………………………… 673
29.10.1 Adding, Deleting, and Reordering Devices .......................................................... 675
29.10.2 Working with Racks ................................................................................................676
29.11 Track Control And Mixing …………………………………………………………………………… 678
29.11.1 Rack and Group Track Mixing ............................................................................... 681
29.12 Recording Automation …………………………………………………………………………………683
29.13 Step Sequencing Automation ………………………………………………………………………… 684
29.14 Clip Mode …………………………………………………………………………………………………684
29.14.1 Using MIDI Tracks in Clip Mode ...........................................................................686
29.14.2 Real-Time Playing Layouts ......................................................................................687
29.14.3 Sequencing Layouts ................................................................................................687
29.14.4 Note-Specific Parameters ......................................................................................689
29.15 Controlling Live’s Session View ………………………………………………………………………690
29.15.1 Session Overview ...................................................................................................692
29.16 Setup Menu ……………………………………………………………………………………………… 692
29.17 Push 2 Control Reference ……………………………………………………………………………… 695
17
Link, Synchronization, and ReWire 703
30.1 Setting up Link …………………………………………………………………………………………… 703
30.2 Using Link ………………………………………………………………………………………………… 704
30.3 Synchronizing via MIDI………………………………………………………………………………… 706
30.3.1 Synchronizing External MIDI Devices to Live .......................................................706
30.3.2 Synchronizing Live to External MIDI Devices ....................................................... 707
30.3.3 Sync Delay...............................................................................................................708
30.4 Connecting via ReWire ………………………………………………………………………………… 708
30.4.1 Running Live in ReWire Master Mode ...................................................................709

30.4.2 Running Live in ReWire Slave Mode .....................................................................709
30.4.3 More on ReWire ......................................................................................................71 0
Computer Audio Resources and Strategies 711
31.1 Managing the CPU Load ……………………………………………………………………………… 711
31.1.1 CPU Load from Multichannel Audio .......................................................................712
31.1.2 CPU Load from Tracks and Devices ........................................................................712
31.1.3 Track Freeze ..............................................................................................................713
31.2 Managing the Disk Load ……………………………………………………………………………… 71 5
Audio Fact Sheet 717
32.1 Testing and Methodology …………………………………………………………………………… 717
32.2 Neutral Operations ……………………………………………………………………………………… 717
32.2.1 Undithered Rendering ..............................................................................................718
32.2.2 Matching sample rate/no transposition.................................................................719
32.2.3 Unstretched Beats/Tones/Texture/Re-Pitch Warping ..........................................71 9
32.2.4 Summing at Single Mix Points .................................................................................719
32.2.5 Recording external signals (bit depth >/= A/D converter) .................................720
32.2.6 Recording internal sources at 32 bit ...................................................................... 720
32.2.7 Freeze, Flatten ......................................................................................................... 720
32.2.8 Bypassed Effects .......................................................................................................721
32.2.9 Routing ......................................................................................................................721
32.2.10 Splitting Clips ........................................................................................................... 722
32.3 Non-Neutral Operations ……………………………………………………………………………… 722
32.3.1 Playback in Complex and Complex Pro Mode ....................................................722
32.3.2 Sample rate conversion/transposition .................................................................. 723
32.3.3 Volume Automation .................................................................................................723
32.3.4 Dithering ...................................................................................................................723
32.3.5 Recording external signals (bit depth < A/D converter)......................................724
32.3.6 Recording internal sources below 32 bit ............................................................... 724
32.3.7 Consolidate .............................................................................................................724
32.3.8 Clip fades ................................................................................................................. 724
32.3.9 Panning ....................................................................................................................725
32.3.10 Grooves ................................................................................................................... 725
32.4 Tips for Achieving Optimal Sound Quality in Live ……………………………………………… 725
32.5 Summary and Conclusions …………………………………………………………………………… 726
18
MIDI Fact Sheet 727
33.1 Ideal MIDI Behavior …………………………………………………………………………………… 727
33.2 MIDI Timing Problems ………………………………………………………………………………… 728

33.3 Live’s MIDI Solutions …………………………………………………………………………………… 728
33.4 Variables Outside of Live’s Control ………………………………………………………………… 729
33.5 Tips for Achieving Optimal MIDI Performance ………………………………………………… 732
33.6 Summary and Conclusions …………………………………………………………………………… 733
Live Keyboard Shortcuts 735
34.1 Showing and Hiding Views …………………………………………………………………………… 735
34.2 Accessing Menus ………………………………………………………………………………………… 736
34.3 Adjusting Values ………………………………………………………………………………………… 736
34.4 Browsing …………………………………………………………………………………………………… 736
34.5 Transport …………………………………………………………………………………………………… 737
34.6 Editing ……………………………………………………………………………………………………… 737
34.7 Loop Brace and Start/End Markers ……………………………………………………………… 738
34.8 Session View Commands ………………………………………………………………………………73 9
34.9 Arrangement View Commands ……………………………………………………………………… 739
34.10 Commands for Tracks …………………………………………………………………………………… 740
34.11 Commands for Breakpoint Envelopes ……………………………………………………………… 74 1
34.12 Key/MIDI Map Mode and the Computer MIDI Keyboard ………………………………… 74 1
34.13 Zooming, Display and Selections …………………………………………………………………… 741
34.14 Clip View Sample Display …………………………………………………………………………… 74 2
34.15 Clip View MIDI Editor ………………………………………………………………………………… 74 2
34.16 Grid Snapping and Drawing ………………………………………………………………………… 743
34.17 Global Quantization …………………………………………………………………………………… 743
34.18 Working with Sets and the Program ……………………………………………………………… 744
34.19 Working with Plug-Ins and Devices ………………………………………………………………… 744
34.20 Using the Context Menu ……………………………………………………………………………… 744
19
Index 746

20

Chapter 1
Welcome to Live
1.1 The Ableton Team Says: Thank You
Live is the result of musicians wanting a better way to create, produce and perform music using a computer. A great deal of effort has been put into making Live easy and fun to use, yet
at the same time capable of helping you create music with unlimited depth and sophistication.
This effort continues even as you read these lines... in fact, a new, improved Live version might
already be available for download! Please check on our website now1, or choose the Check for
Updates command from the Help menu.
21 Welcome to Live
We hope you enjoy using Live and that it enhances your creative process.
Your Ableton Team.
1.2 What’s New in Live 10?
1.2.1 Device Additions and Improvements
•Wavetable (page 539) is a new dual-oscillator wavetable synthesizer that’s both easy to
program and deeply powerful.
•Echo (page 357) is a new and highly-flexible delay effect with lots of modulation possibilities. It’s capable of a wide range of sounds from classic analog-style delays to modern,
digital approaches.
1 http://www.ableton.com/downloads

•Drum Buss (page 354) is a new effect that brings analog-style character, body, and glue
to drum tracks. Drum Buss combines a range of commonly used drum processing tools into
a single device:
•Pedal (page 395) is a new effect, inspired by three classic guitar distortion pedals. Pedal
is capable of a range of distortion sounds from warm overdrive to aggressive distortion to
heavy and broken fuzz tones.
•Utility’s (page 413) Gain control can now be adjusted from -infinity dB to +35 dB. The
Left/Right Phase buttons now invert the signal at Utility’s input rather than at its output. A
Bass Mono section allows you to convert frequencies below an adjustable point to mono,
with an adjustable crossover control.
•EQ Eight (page 362) can now boost or cut frequencies down to 10 Hz.
1.2.2 Capture
Capture (page 253) introduces a new way of (not) thinking about MIDI recording.
22 Welcome to Live
Now, Live is always listening to MIDI input on armed or input-monitored tracks. Press the Capture button after you’ve played to create a clip containing your music. Live will automatically try
to find the tempo and set appropriate loop boundaries.
With Capture, you never have to worry about losing your experiments and improvisations
because you forgot to start recording. You can always capture what you’ve just played, after
you’ve played it.
1.2.3 Multi-Clip Editing
Up to eight MIDI clips can be viewed simultaneously in the Detail View.
Within the multi-clip view (page 181), clicking a clip’s notes or its loop bar selects this clip for
editing.
If multiple clips of different lengths are selected, the editor will show as many loop iterations as
are necessary for the clips to realign.

1.2.4 Nested Group Tracks
Group Tracks (page 232) can now be created or moved within other Group Tracks. There is
no limit to the number of nested Group Tracks.
1.2.5 Arrangement Editing Improvements
•Holding [CTRL](PC) / [CMD](Mac) while scrolling will zoom to the mouse pointer’s position. Holding [ALT] while scrolling will zoom the amplitude or pitch of the selected tracks.
•All Arrangement clips within a time selection can be moved using the left and right arrow
keys. Hold [ALT](PC) / [CMD](Mac) while scrolling to temporarily toggle the grid on or off.
•[CTRL][Shift](PC) / [Alt][Shift](Mac)-dragging within an Arrangement clip will slide the
material within the clip without moving the clip itself. Hold [ALT](PC) / [CMD](Mac) while
dragging to temporarily toggle the grid on or off.
•Holding [Shift] while dragging the edge of a warped audio clip in the Arrangement will
stretch the audio.
23 Welcome to Live
•Arrangement clips can be moved by dragging the upper half of the clip. Dragging in the
lower half will select time.
•It’s now possible to activate, deactivate, or reverse a selected range of time. If the time
selection includes only a portion of a clip or multiple clips, Live will split the clips as necessary, then perform the action on the split clips.
•Live now plays back MIDI notes in the Arrangement even if playback is started at a position after the beginning of the notes. This behavior can be toggled off or on via the Chase
MIDI Notes command in the Options menu.
•Double-clicking in a MIDI track in the Arrangement will create a new clip. The clip will be
the length of the Arrangement’s grid resolution.
•When editing in the Arrangement or Detail View, Follow is now paused rather than disabled. Follow will resume when scrubbing or restarting playback.
•[CTRL][L](PC) / [CMD][L](Mac] will now toggle the Arrangement loop on or off.
•Audio or MIDI files can be imported via an “Import...” command in the Create menu. The

file will be inserted at the Insert Marker position in the Arrangement View or in the selected
clip slot in the Session View.
•The Lock Envelopes switch (page 308) can be MIDI or key mapped.
1.2.6 Automation Improvements
•Clip fades are now always available directly on the clip if the track is tall enough.
•In the Arrangement, all automation lanes are shown or hidden via the Automation Mode
button or the [A] key. When automation lanes are visible, the content lanes are minimized
to the height of the clip headers.
•It is possible to Split or Consolidate clips in a time selection within an automation lane.
•Introduced fade edge handles in the Arrangement, which allow users to change the duration of a fade in (via the Fade In Start Handle) and fade out (via the Fade Out End Handle)
without affecting the fade peaks. However, a fade edge cannot move beyond the fade
peak. To do this, the clip start/end must be used to increase the size of the clip.
24 Welcome to Live
•Breakpoints now snap to the grid (or to existing breakpoints) when moved horizontally.
•Breakpoint values can now be adjusted vertically without moving the breakpoints in time.
•Automation segments can be moved horizontally.
•It is now possible to create an automation breakpoint by double-clicking anywhere in an
envelope view/automation lane. In the Arrangement, this means that MIDI clips can only
be created by double-clicking in the content lane.
•Automation values are now displayed when hovering over or dragging breakpoints or
automation segments.
•The [Shift] modifier is no longer required for moving automation segments past existing
breakpoints.
1.2.7 Navigation Improvements
•In Arrangement View, Detail View, Simpler and Sampler, holding [CTRL](PC) / [CMD]

(Mac) while scrolling will zoom to the mouse pointer’s position.
•The Detail View now zooms to show the selected time within an Arrangement clip.
•Pressing [Z] will zoom to the time selection in the Arrangement and Detail Views. Press
[Shift][Z] to zoom back out.
•On U.S. keyboards, it is now possible to zoom by pressing [+] without holding [Shift].
•Audio effects can now be dragged to the Master track’s Scene Launch area.
•Dragging clips from existing tracks to the clip/device drop area creates a new track with
those clips, and also the devices from the original tracks.
•Dragging frozen clips and tails to the clip/device drop area in the Arrangement View creates new frozen tracks (which also contain the devices from the original track).
•Holding [Shift] while scrolling will scroll horizontally on both Mac and Windows (this previously only worked on Macs).
25 Welcome to Live
•The Show All Tracks command in the View and context menus in the Arrangement View
minimizes all tracks, allowing you to see as many as possible on your screen.
1.2.8 Mixing Improvements
A number of small improvements make mixing easier:
•A [right-click](PC) / [CTRL-click](Mac) command can switch each track’s Pan control to a
Split Stereo Pan control. In Split Stereo mode, you can adjust the stereo position of the left
and right channels independently.
•Double-clicking on a knob or slider will reset it to its default value.
•Individual Drum Rack pads can now be routed to one of the Drum Rack’s internal return
chains.
1.2.9 Browser Improvements
•A new Collections section (page 60) of the browser allows you to tag browser items

with up to seven colors. Each color can also be given a custom name. Searching or browsing within a Collection will then show only items with that tag applied.
•Uninstalled Packs or Packs with available updates can be installed directly from the browser.
•Group Tracks (including nested Group Tracks) now appear when unfolding Sets in the
browser, and can be dragged into the current Set.
1.2.10 Setup Improvements
•It is now possible to provide custom names for input and output channels via the Input/
Output Config buttons in the Audio preferences These names then appear in all Input/
Output choosers.
•It is now possible to choose between different metronome sounds via the Metronome’s
pull-down and context menus.
26 Welcome to Live
•The Metronome can be set to click at various note divisions via its pull-down and context
menus. The default “Auto” setting follows the time signature’s denominator. Note divisions
that don’t fit into one bar of the current time signature will be disabled.
•When “Enable Only While Recording” is enabled in the Metronome’s pull-down and context menus, the Metronome will only be audible while recording. The “Enable Only While
Recording” setting is not saved and must be enabled every time Live is started.
•The Computer MIDI Keyboard is now off by default, and can be toggled on and off with
the [M] key.
•Context menu items now react when the mouse is released, instead of after the initial
mouse click. This makes it possible to drag away from a selection to cancel triggering an
item, while keeping the context menu open. When hovering over disabled context menu
items, they are no longer highlighted.
1.2.11 Interface Improvements
•Updated the appearance of clips.
•Enabled sample dots on waveforms. When zooming in, it’s easier to see where samples

are on the Beat Time Ruler.
•MIDI notes are now drawn in their clip’s color in the Note Editor.
•Added an Assign Track Color to Clips menu item to the context menu of track headers. The
command applies the track color only to clips in the currently active view (Session or Arrangement).
•Incorporated a new font throughout the interface.
•Live’s dials and sliders now look sharp at any zoom level.
•Introduced a set of five new Themes (page 32) in place of the previously available Live
“Skins”.
•The clip/device drop area is now always displayed in Session View to enable dragging.
•Added Pen Tablet Mode to Live’s Look/Feel Preferences. Pen Tablet Mode allows graphic
tablets and touch screens to control Live. This replaces the “AbsoluteMouseMode” options.
txt entry.
27 Welcome to Live
•Live now supports HiDPI monitors on Windows 10.
1.2.12 File Handling Improvements
•The Undo history is no longer cleared when saving a Live Set.
•The Export Audio/Video dialog now shows toggles for Encode PCM and Encode MP3.
When Encode PCM is on, a lossless audio file is created. In addition to WAV and AIFF,
FLAC and WavPack formats are available for PCM export. When Encode MP3 is on, a
CBR 320 kbps MP3 file is created. It is possible to export PCM and MP3 simultaneously. If
neither toggle is enabled, the Export button will be disabled.
•Saving a Set creates a Backup folder within the Project. This folder contains the 10 most
recently saved versions of the Set.
•Recorded audio files now include a timestamp in the filename.
•Live Sets now load samples faster, which may reducing the loading time of some Sets.

•Large Live Sets can now be closed 5-10 times faster.
Numerous changes for Windows 10:
•Live now supports the Jump List.
•When using Live 9 and 10 in parallel, they no longer ask for admin rights if you start them
interchangeably.
•Owners of both Live 9 and 10 can choose which version of Live to open a Live Set with, by
using the [right-click](PC) / [CTRL-click](Mac) command on that Set and selecting “Open
With”.
•It is now possible to associate .als files with a specific Live version, via “Control Panel” “Apps” - “Default Apps”.
1.2.13 Max for Live Updates
28 Welcome to Live
•Max for Live is now bundled with the Live installation and is loaded whenever Live is
started.
•Max for Live devices can now support multiple audio inputs and outputs, and routing is
available via the Live API.
1.2.14 Push Device Visualizations
•Compressor’s Gain Reduction view and Sidechain controls are now available on Push 2.
•EQ Eight’s filters and spectrum are now visible on Push 2’s display.
•Operator’s envelopes are now displayed graphically on Push 2’s display.
1.2.15 Push Note Layouts
•Melodic Sequencer + 32 Notes is a new note layout on Push 1 (page 606) and Push 2
(page 661) that uses the bottom 32 pads for notes and the top 32 as a step sequencer.
Pressing notes selects them for sequencing. This mode allows for real-time playing and step

sequencing at the same time. Holding Note (Push 1) or Layout (Push 2) temporarily shows
the loop length controls in the fifth row of pads.
•When using the Loop Selector layout in Drum Racks and Simpler’s Slicing Mode, holding
Note (Push 1) or Layout (Push 2) momentarily toggles the 16 Velocities layout.
•When using the 64-pad layout, holding Note (Push 1) or Layout (Push 2) momentarily
shows the loop length controls in the top row of pads.
•Holding Shift while pressing Note (Push 1) or holding Shift while pressing Layout (Push 2)
now locks the alternate layout on. Pressing Note (Push 1) or Layout (Push 2) again returns
to the original layout.
•Layouts are now remembered per track.
•Holding Duplicate and tapping a loop length pad copies the contents of that page and
allows you to paste it to another page by tapping the corresponding loop length pad.
•Holding Delete and tapping a loop length pad deletes the content of that page.
29 Welcome to Live
1.2.16 Push MIDI Clip Mode
•When using MIDI tracks in Clip Mode (page 686), Push 2’s display shows the notes
within the selected MIDI clip.
•MIDI clips can be cropped from Push 2.
1.2.17 Additional Push Improvements
•Control Surfaces, including Push 1 and 2, are now available when Live runs as a ReWire
slave.
•The Repeat button’s state is now remembered for each track.
•Added Split Stereo Pan Mode to Push 1 and 2. When Split Stereo Pan Mode is active
while in Global Mix Mode, the current pan value is displayed but the pan dial is inactive.
In Track Mix Mode, either the pan dial or stereo pan sliders are shown, depending on the
active pan mode.

•It is now possible to convert audio to MIDI from Push 2, via the Convert button.
•The Collections folder for color labels is now a root level entry in the Push 2 browser.
•Nested chains can now be displayed, folded, and unfolded on Push 2.
•On Push 2, holding a track’s selection button arms the track.
30 Welcome to Live

Chapter 2
First Steps
2.1 Learn About Live
Live comes with a set of interactive lessons to take you step by step through the key features of
the program. The lessons are organized in a table of contents, which can be opened directly in
the program via the Help menu. We highly recommend following the lessons. Many users have
told us that the lessons helped them become familiar with the program very quickly.
31 First Steps
We also recommend that you read the Live Concepts chapter (page 41), which encapsulates
everything that Live is and can do, and is therefore a worthwhile read for both beginners and
experienced users. The remaining chapters of this manual serve as in-depth reference for the
material introduced in Live Concepts.
2.1.1 Using the Info View and Index
Live’s Info View tells you the name and function of whatever you place the mouse over. For certain items, you can create your own text and it will appear in this window.
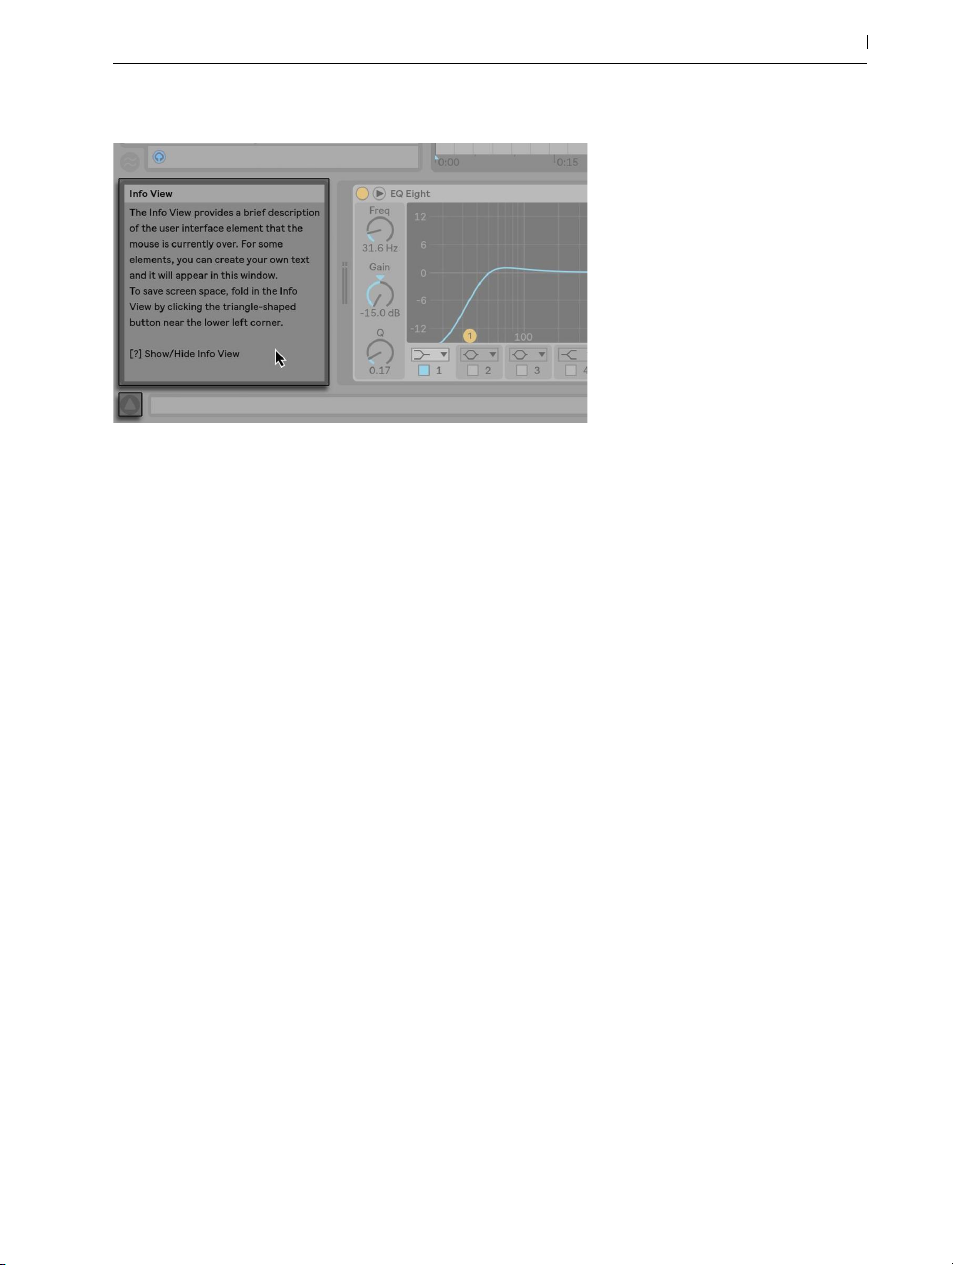
The Info View and its Show/Hide Button.
If you require more information on a specific user interface element or topic, please consult this
reference manual. The index, found at the end of the manual, contains the names of all user interface elements and will lead you to the relevant section.
32 First Steps
2.2 Setting up Preferences
Live’s Preferences window is where you can find various settings that determine how Live looks,
behaves and interfaces with the outside world. This window is accessed from the Preferences
command, which in Windows is available in the Options menu and in OS X is available in the
Live menu. Preferences can also be accessed with the [CTRL][,](PC)/[][,](Mac) shortcut.
Live’s Preferences are distributed over several tabs:
•In the Look/Feel tab, you can modify various settings, including the language used for text
display and the color scheme, or “Theme,“ for the Live user interface. This is also where
you can adjust the size of objects displayed on the screen: the Zoom Display slider allows
you to zoom Live’s screen to any percentage between 50% and 200% of the standard
interface size.
•The Audio Preferences are used to set up Live’s audio connections with the outside world
via an audio interface. Please take the time to follow the program’s built-in “Setting up Audio I/O“ lesson, which will walk you through all the steps required to set up and optimize
the settings for any given system. To access the lesson, use the Help View command from

the Help menu.
•The Link/MIDI Preferences are used to help Live recognize external devices for three separate and distinct purposes:
―Playing MIDI notes. To learn how to route an external device into Live for MIDI input,
or how to send MIDI to an external device, please see the Routing and I/O chapter
(page 210).
―Controlling parts of the interface remotely. This subject is covered in detail in the
MIDI and Key Remote Control chapter (page 571).
―Syncing the program with external devices, either via Ableton Link or via MIDI.
Please see the Link, Synchronization, and ReWire chapter (page 703) for details.
•The File/Folder Preferences pertain to Live’s file management (page 59) and the location of plug-in devices (page 268).
•The Library Preferences allow you to specify a default location for various types of installed files, including Packs and your User Library, as well as whether or not samples and
other files are self-contained when saving Sets (page 91).
33 First Steps
•The Record/Warp/Launch Preferences allow customizing the default state for new Live
Sets (page 79) and their components (page 127), as well as selecting options for
new recordings (page 241).
•The Licenses/Maintenance Preferences are used to manage licensing and installation of
the Live platform (page 37).
2.3 The Main Live Screen
Most of your work in Live happens in the main Live screen. This screen consists of a number of
views, and each view manages a specific aspect of your Live Set, which is the type of document
that you create and work on in Live. If you have multiple monitors (or even one very large monitor), you can open a second window to display all of Live’s views at the same time.
Each one of the selector buttons at the screen borders calls up a specific view; clicking this one,
for instance, opens and closes Live’s browser:

The Browser Selector.
You can run Live in Full Screen Mode by selecting the Full Screen command from the View menu.
Full Screen Mode can also be toggled by pressing [F11](PC) / [CTRL][CMD][F](Mac). On Windows and versions of OS X prior to 10.9, you can leave Full Screen mode by clicking a button
that appears in the lower right corner of the screen.
34 First Steps
Turn Full Screen Off (Windows and OS X 10.8 or older).
When using OS X version 10.9 or higher, Live uses the operating system’s native full screen controls. You can turn Full Screen Mode on by clicking the arrows in the top right corner.
Turn Full Screen On (OS X 10.9 or higher).
When in Full Screen Mode on OS X version 10.9 or higher, Live’s menus will appear when moving your mouse pointer to the top of the screen. You can turn Full Screen Mode off by clicking the
arrows on the right side of the menu bar.
Enabling the Second Window option via [CTRL][Shift][W](PC) / [CMD][Shift][W](Mac) or in the
View menu opens a second window that will display an alternate collection of Live’s views.
If Live’s browser is open, you can adjust the main window’s horizontal split by dragging.
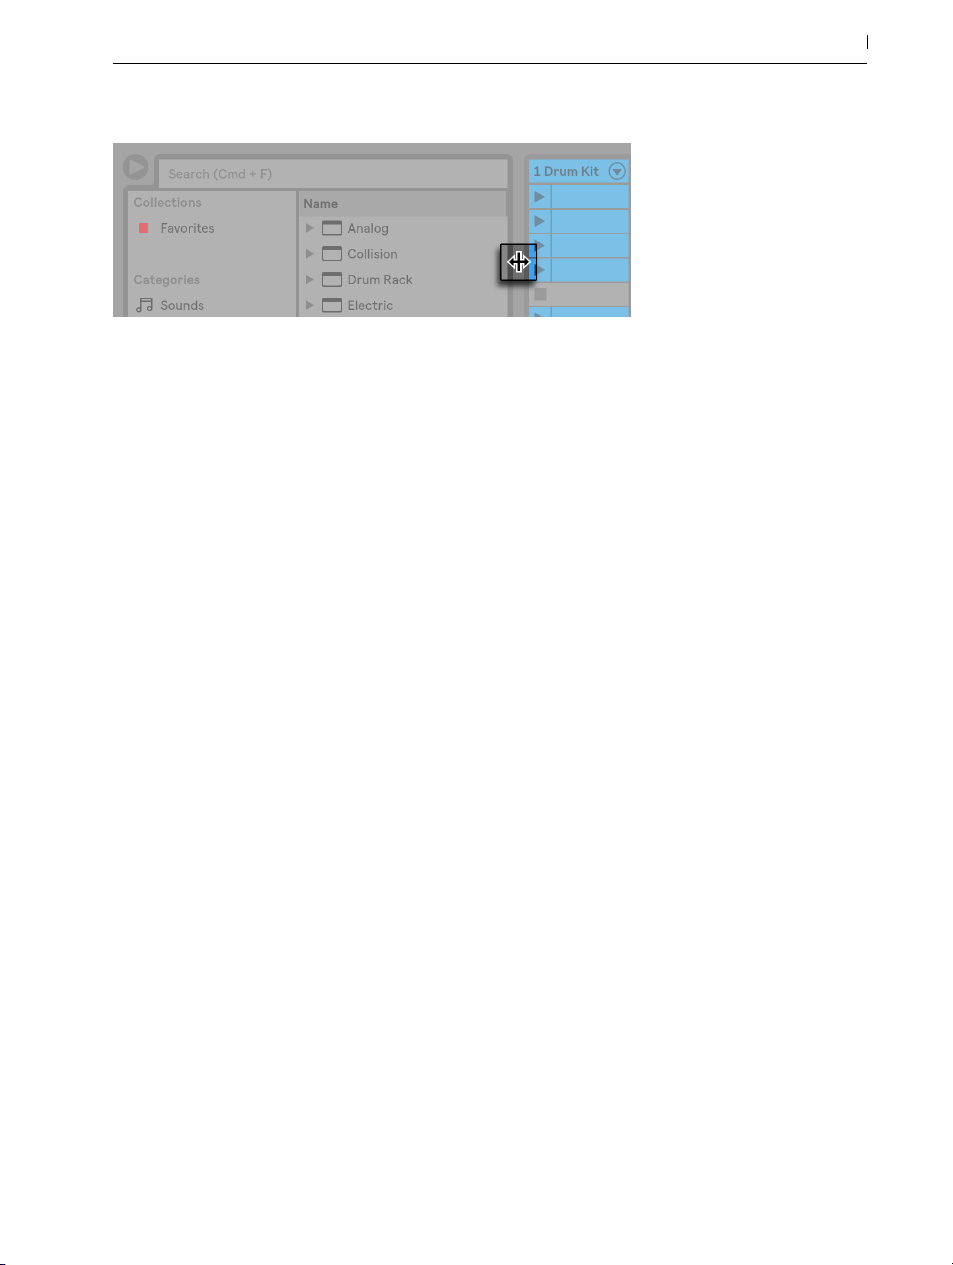
Adjusting the Main Window Split.
35 First Steps

36 First Steps

Chapter 3
Authorizing Live
Live is protected against illegal use by a copy protection scheme. This scheme has been designed to meet the highest security standards while avoiding hassles for our customers. If you
find this procedure to be an inconvenience, please understand that the copy protection secures
your investment: It allows Ableton to provide you with support and to continue developing Live.
Please be aware that the standard Live license grants you the right to use Live on only one com-
puter at a time. You can, however, authorize Live more than once under the legal and technical
conditions described later (page 37).
37 Authorizing Live
The first time you run Live, you will be prompted to complete the authorization process. The software will walk you through the steps.
If the computer that you wish to authorize is connected to the internet, you can authorize immediately by pressing the appropriate button in the dialog box. If you do not have an internet connection, press the “No internet on this computer“ button and follow the instructions.
3.1 Copy Protection FAQs
3.1.1 Can I Use Live or Other Ableton Products Without a Serial Number?
If you do not (yet) own Live or its add-on products, you can still try them out, but saving and
exporting will be disabled.

If trying Live or another product raises your interest in purchasing it, please visit the Ableton webshop2. This site contains information about Ableton’s distributor and dealer network. It also offers
you the opportunity to buy Ableton products online.
3.1.2 What if I Change My Computer’s Components?
If you change your computer components for some reason, Live may indeed ask you to authorize the software another time. Live does not need to be reauthorized when computer peripherals are replaced (audio or MIDI hardware, printers, modems). But you may need to authorize
again if the motherboard, processor or network card is replaced. On some computers, reformatting a hard drive will require a new authorization.
3.1.3 Can I Authorize Live More than Once?
The standard Live license allows you to use Live on only one computer at a time. However, the
Ableton server will provide you with two authorizations in good faith that you will use Live on
only one machine at a time.
38 Authorizing Live
You can therefore run Live on both a studio desktop computer and a tour laptop, but not at the
same time.
Should the Ableton server reject your demand for another authorization, please contact Ableton’s technical support3.
To use Live on more than one computer at a time, you may require a secondary license or a site
license. Ableton offers these licenses at special rates.
3.1.4 Can I Play my Set from a Computer That Is Not Authorized?
Even if Live is not authorized, you can still load and perform a Live Set with no time limitation.
You cannot, however, save or export your work. When you go on tour, consider taking along
your Live USB installer and a backup of the last state of your Live Set(s). In case of an emergency, you can install and run Live on any computer available and play your backup Live Set(s).
2 http://www.ableton.com/shop
3 http://www.ableton.com/help

3.1.5 What Do I Do About Problems or Questions Regarding Copy Protection?
Please visit Ableton’s technical support page.
39 Authorizing Live

40 Authorizing Live

Chapter 4
Live Concepts
This chapter introduces the essential concepts of Live. We advise you to read this chapter early
in your Live career, as a solid understanding of the program’s basic principles will help you fully
exploit Live’s potential for your music-making.
4.1 The Browser
Live’s browser (page 59) is the place where you interact with your library of musical assets:
the core library of sounds that are installed with the program, any additional sounds you’ve
installed via Ableton Packs, presets and samples you’ve saved, your Ableton and third-party
devices, and any folders that you’ve added manually.
41 Live Concepts
Live’s Browser.

4.2 Live Sets
The type of document that you create and work on in Live is called a Live Set (page 79). Live
Sets reside in a Live Project — a folder that collects related materials — and can be opened either through the File menu’s Open command or via Live’s browser.
A Live Set in the Browser.
42 Live Concepts
4.3 Arrangement and Session
The basic musical building blocks of Live are called clips. A clip is a piece of musical material: a
melody, a drum pattern, a bassline or a complete song. Live allows you to record and alter clips,
and to create larger musical structures from them: songs, scores, remixes, DJ sets or stage shows.
A Live Set consists of two environments that can hold clips: The Arrangement is a layout of clips
along a musical timeline; the Session is a real-time-oriented “launching base” for clips. Every
Session clip has its own play button that allows launching the clip at any time and in any order.
Each clip’s behavior upon launch can be precisely specified through a number of settings (page
197 ).
Clips in the Session View (Left) and in the Arrangement View (Right).
The Arrangement is accessed via the Arrangement View (page 97) and the Session via the
Session View (page 115). If you’re using Live in a single window, you can toggle between the

two views using the computer’s [Tab] key or their respective selectors. If you’re using two windows, pressing [Tab] will swap the Session and Arrangement from one window to the other.
Because the two views have distinct applications, they each hold individual collections of clips.
However, it is important to understand that toggling or swapping the views simply changes the
appearance of the Live Set and does not switch modes, alter what you hear or change what is
stored.
The Arrangement and Session View Selectors.
The Arrangement View and the Session View interact in useful ways. One can, for instance, improvise with Session clips and record a log of the improvisation (page 122) into the Arrange-
ment for further refinement. This works because Arrangement and Session are connected via
tracks.
43 Live Concepts
4.4 Tracks
Tracks host clips and also manage the flow of signals, as well as the creation of new clips
through recording, sound synthesis, effects processing and mixing.
A Track in the Arrangement View.
The Session and Arrangement share the same set of tracks. In the Session View, the tracks are
laid out in columns, while in the Arrangement View they are stacked vertically, with time moving
from left to right. A simple rule governs the cohabitation of clips in a track:

A track can only play one clip at a time.
Therefore, one usually puts clips that should play alternatively in the same Session View column,
and spreads out clips that should play together across tracks in rows, or what we call scenes
(page 117).
A Scene in the Session View.
At any one time, a track can be playing either a Session clip or an Arrangement clip, but never
both. So, who wins? When a Session clip is launched, the respective track stops whatever it is
doing to play that clip. In particular, if the track was playing an Arrangement clip, it will stop it in
favor of the Session clip — even as the other tracks continue to play what is in the Arrangement.
The track will not resume Arrangement playback until explicitly told to do so.
44 Live Concepts
This is what the Back to Arrangement button is for, which is found in the Master Track in the Session View and at the top-right of the scrub area in the Arrangement View. This button lights up
to indicate that one or more tracks are currently not playing the Arrangement, but are playing a
clip from the Session instead.

The Back to Arrangement Button in the Session View.
The Back to Arrangement Button in the Arrangement View.
45 Live Concepts
We can click this button to make all tracks go back to playing the Arrangement. Each track in the
Arrangement View also has its own Back to Arrangement button, allowing you to resume Arrangement playback of only certain tracks.
A Single Track’s Back to Arrangement Button.
We can also capture the current state into the Arrangement by activating the Arrangement Record button. Disengaging Record Mode or stopping Live using the Stop button leaves us with an
altered Arrangement.

4.5 Audio and MIDI
Clips represent recorded signals. Live deals with two types of signals: audio and MIDI. In the
digital world, an audio signal is a series of numbers that approximates a continuous signal as
generated by a microphone or delivered to a loudspeaker. A MIDI signal is a sequence of commands, such as “now play a C4 at mezzo piano.“ MIDI is a symbolic representation of musical
material, one that is closer to a written score than to an audio recording. MIDI signals are generated by input devices such as MIDI or USB keyboards
It takes an instrument (page 257) to convert MIDI signals into audio signals that can actually
be heard. Some instruments, such as Live’s Simpler (page 512), are for chromatic playing of
one sound via the keyboard. Other instruments, such as Live’s Impulse (page 461), have a dif-
ferent percussion sound assigned to each keyboard key.
Audio signals are recorded and played back using audio tracks, and MIDI signals are recorded
and played back using MIDI tracks. The two track types have their own corresponding clip
types. Audio clips cannot live on MIDI tracks and vice versa.
4
.
46 Live Concepts
Information about inserting, reordering and deleting audio and MIDI tracks is found here (page
231).
4.6 Audio Clips and Samples
An audio clip contains a reference to a sample (also known as a “sound file“ or “audio file“) or
a compressed sample (such as an MP3 file). The clip tells Live where on the computer’s drives to
find the sample, what part of the sample to play and how to play it.
When a sample is dragged in from Live’s built-in browser, Live automatically creates a clip to
play that sample. Prior to dragging in a sample, one can audition or preview it directly in the
browser; the switch in the browser with the headphone icon activates previewing.
4 For an introduction to MIDI and digital audio, please see http://en.wikipedia.org/wiki/Midi and
http://en.wikipedia.org/wiki/Digital_audio.

Samples Are Dragged in from Live’s Browser.
Live offers many options for playing samples in exciting new ways, allowing you to create an
abundance of new sounds without actually changing the original sample — all the changes are
computed in real time, while the sample is played. The respective settings are made in the Clip
View (page 127), which appears on screen when a clip is double-clicked.
47 Live Concepts
An Audio Clip’s Properties as Displayed in the Clip View.
Many powerful manipulations arise from Live’s warping capabilities (page 151). Warping
means changing the speed of sample playback independently from the pitch so as to match the
song tempo. The tempo can be adjusted on the fly in the Control Bar’s Tempo field.
The Control Bar’s Tempo Field.
The most elementary use of this technique, and one that usually requires no manual setup, is
synchronizing sample loops to the chosen tempo. Live’s Auto-Warp algorithm actually makes it
easy to line up any sample with the song tempo, such as a recording of a drunken jazz band’s

performance. It is also possible to radically change the sonic signature of a sound using extreme
warp settings.
4.7 MIDI Clips and MIDI Files
A MIDI clip contains musical material in the form of MIDI notes and controller envelopes. When
MIDI is imported from a MIDI file (page 77), the data gets incorporated into the Live Set,
and the original file is not referenced thereafter. In Live’s browser, a MIDI file appears with a
special icon, and with the .mid file extension.
48 Live Concepts
MIDI Files Are Dragged in from Live’s Browsers.
As you’d expect, a MIDI clip’s contents can be accessed and edited (page 167) via the Clip
View, for instance to change a melody or “paint“ a drum pattern.
A MIDI Clip’s Properties as Displayed in the Clip View.
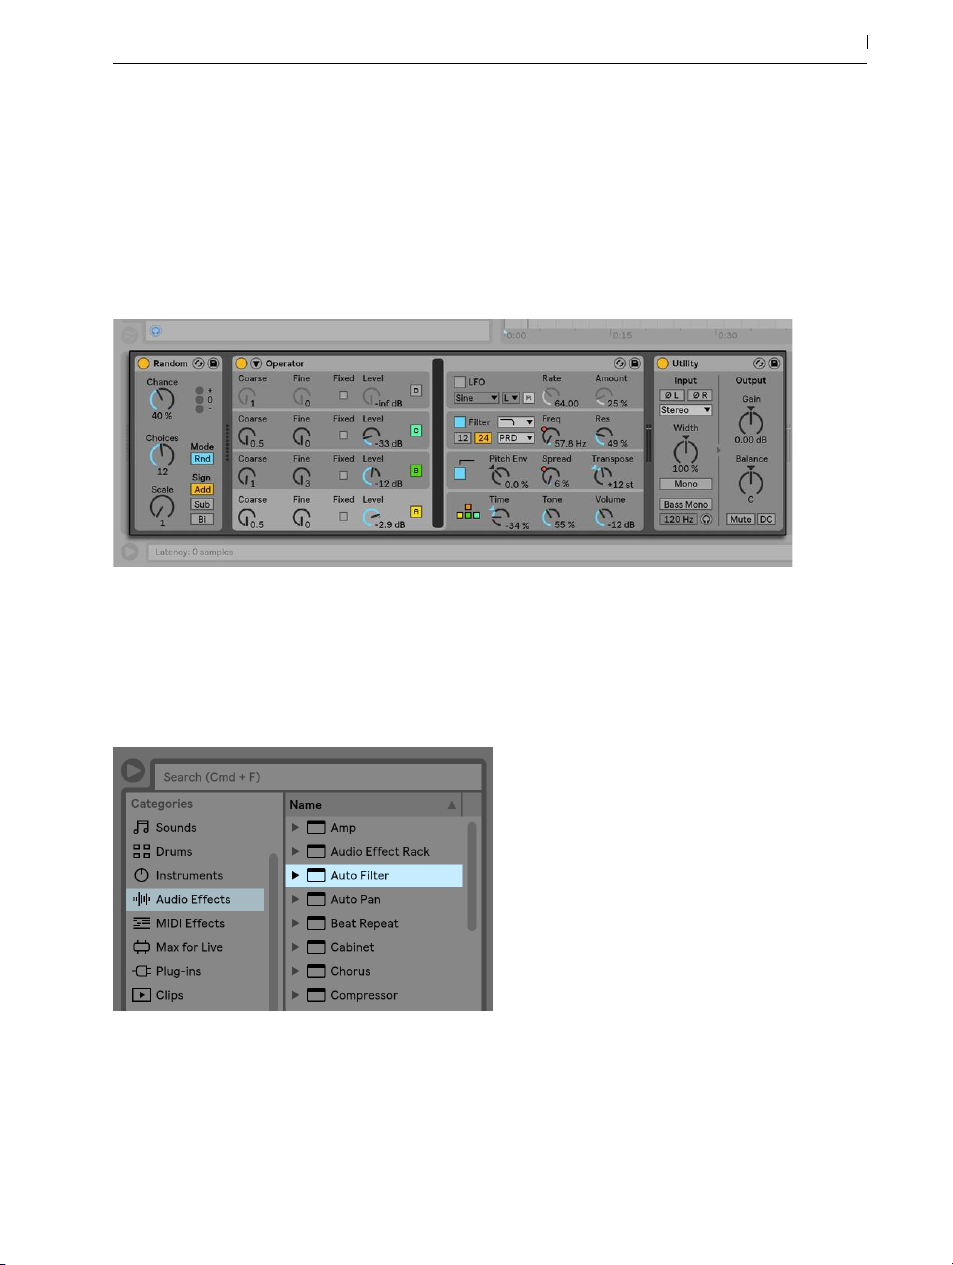
4.8 Devices and the Mixer
A track can have not only clips but also a chain of devices (page 257) for processing signals.
Double-clicking a track’s title bar brings up the Device View, which shows the track’s device
chain.
The Device View Displaying a MIDI Track’s Device Chain.
49 Live Concepts
Live’s built-in audio effects (page 331), MIDI effects (page 421) and instruments (page
433) are available from the browser and can be added to tracks by dragging them from there
into the Device View, or into a Session or Arrangement track.
Live’s Built-in Devices Are Available from the Browser.
You can also use plug-in devices (page 268) in Live. VST and Audio Units (Mac OS X only)
Plug-ins are available from the browser’s Plug-Ins label.
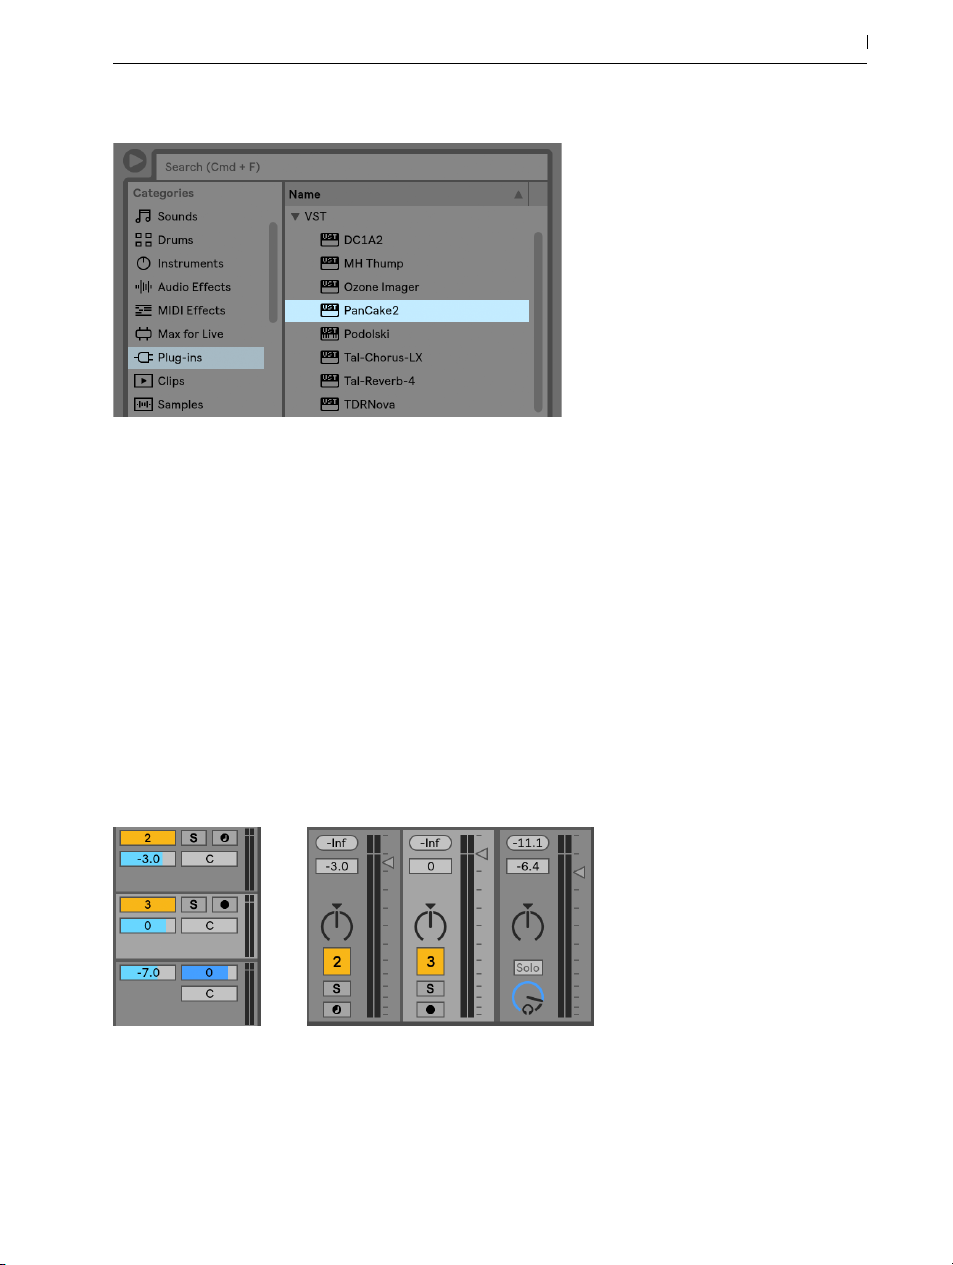
Plug-In Devices Are Available from the Browser’s Plug-Ins Label.
Consider an audio clip playing in an audio track. The audio signal from the clip reaches the leftmost device in the chain. This device processes (changes) the signal and feeds the result into the
next device, and so on. The number of devices per track is theoretically unlimited. In practice, the
computer’s processor speed imposes a limit on the number of devices you can use at the same
time, a topic that deserves separate discussion (page 711). Note that the signal connections
between audio devices are always stereo, but the software’s inputs and outputs can be configured to be mono in the Audio Preferences.
50 Live Concepts
When the signal has passed through the device chain, it ends up in Live’s mixer (page 227). As
the Session and Arrangement share the same set of tracks, they also share the mixer. The mixer
can be shown in both views for convenience. To optimize the screen layout, the individual mixer
sections can be shown or hidden using the View menu’s entries.
The Live Mixer in the Arrangement View (Left) and Session View (Right).
The mixer has controls for volume, pan position and sends, which adjust the contribution each
track makes to the input of any return tracks. Return tracks only host effects, and not clips. Via
their sends, all tracks can feed a part of their signal into a return track and share its effects.

The mixer also includes a crossfader (page 235), which can create smooth transitions between
clips playing on different tracks. Live’s crossfader works like a typical DJ mixer crossfader, except that it allows crossfading not only two but any number of tracks — including the returns.
Live’s Crossfader.
Devices that receive and deliver audio signals are called audio effects. Audio effects are the
only type of device that fit in an audio track or a return track. However, two more types of devices are available for use in MIDI tracks: MIDI effects and instruments.
Consider a MIDI track playing a clip. The MIDI signal from the clip is fed into the track’s device
chain. There, it is first processed by any number of MIDI effects. A MIDI effect receives and
delivers MIDI signals. One example is the Scale effect, which maps the incoming notes onto a
user-defined musical scale. The last MIDI effect in the chain is followed by an instrument. Instruments, for instance Live’s Simpler and Impulse, receive MIDI and deliver audio. Following the
instrument, there can be any number of audio effects — as in an audio track.
51 Live Concepts
A MIDI Effect, an Instrument and an Audio Effect in a MIDI Track.
If a MIDI track has no instrument (and no audio effects), then the track’s output is a plain MIDI
signal, which has to be sent somewhere else to be converted into audio. In this case, the track’s
mix and Send controls disappear from the mixer.
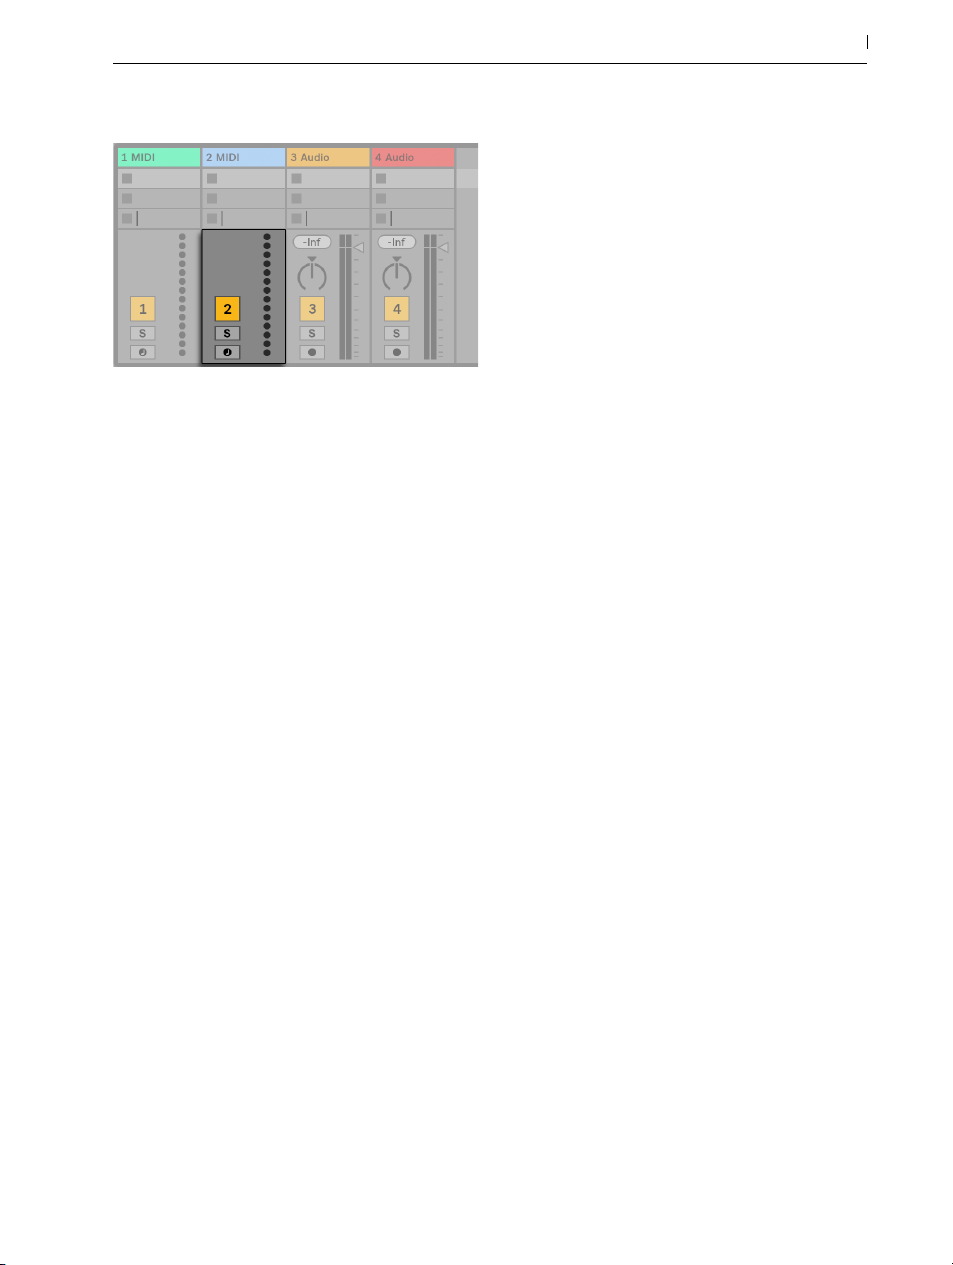
The Mixer for a MIDI Track without an Instrument.
4.9 Presets and Racks
Every Live device can store and retrieve particular sets of parameter values as presets (page
262). As presets are stored independently from Live Sets, new presets become part of your
user library that any project can draw from.
52 Live Concepts
Live’s Instrument, Drum and Effect Racks (page 279) allow saving combinations of devices
and their settings as a single preset. This feature allows for the creation of powerful multi-device
creations and effectively adds all the capabilities of Live’s MIDI and audio effects to the built-in
instruments.
4.10 Routing
As we have seen, all tracks deliver signals, either audio or MIDI. Where do these signals go?
This is set up in the mixer’s In/Out section, which offers, for every track, choosers to select a
signal source and destination. The In/Out section, accessible through the View menu’s In/Out
option, is Live’s “patchbay.“ Its routing options (page 207) enable valuable creative and technical methods such as resampling, submixing, layering of synths, complex effects setups and
more.

Track Routing Is Set up Using the In/Out Section in the Arrangement (Left) or Session View (Right).
Signals from the tracks can be sent to the outside world via the computer’s audio and MIDI interfaces, to other programs that are connected to Live via ReWire (page 708) or to other tracks
or devices within Live. Tracks can also be combined into a Group Track (page 232) which
serves as a submixer for the selected tracks.
Likewise, a track can be set up to receive an input signal to be played through the track’s devices. Again, tracks can receive their input from the outside, from a ReWire program or from
another track or device in Live. The Monitor controls regulate the conditions under which the
input signal is heard through the track.
53 Live Concepts
It is also possible to route signals to external hardware devices from within a track’s device
chain, by using the External Audio Effect (page 367) and External Instrument (page 459)
devices. (Note: these devices are not available in the Lite or Intro Editions.)
4.11 Recording New Clips
Audio tracks and MIDI tracks can record their input signal and thereby create new clips (page
241). Recording is enabled on a track by pressing its Arm button. With multiple tracks se-
lected, pressing any of their Arm buttons will arm all of them. You can also hold down the [CTRL]
(PC)/[CMD] (Mac) modifier when clicking the Arm buttons to arm several tracks at once. If the
Exclusive Arm option is enabled in the Record Preferences, inserting an instrument into a new or
empty MIDI track will automatically arm the track. When the Control Bar’s Arrangement Record
button is on, every armed track records its input signal into the Arrangement. Every take yields a
new clip per track.
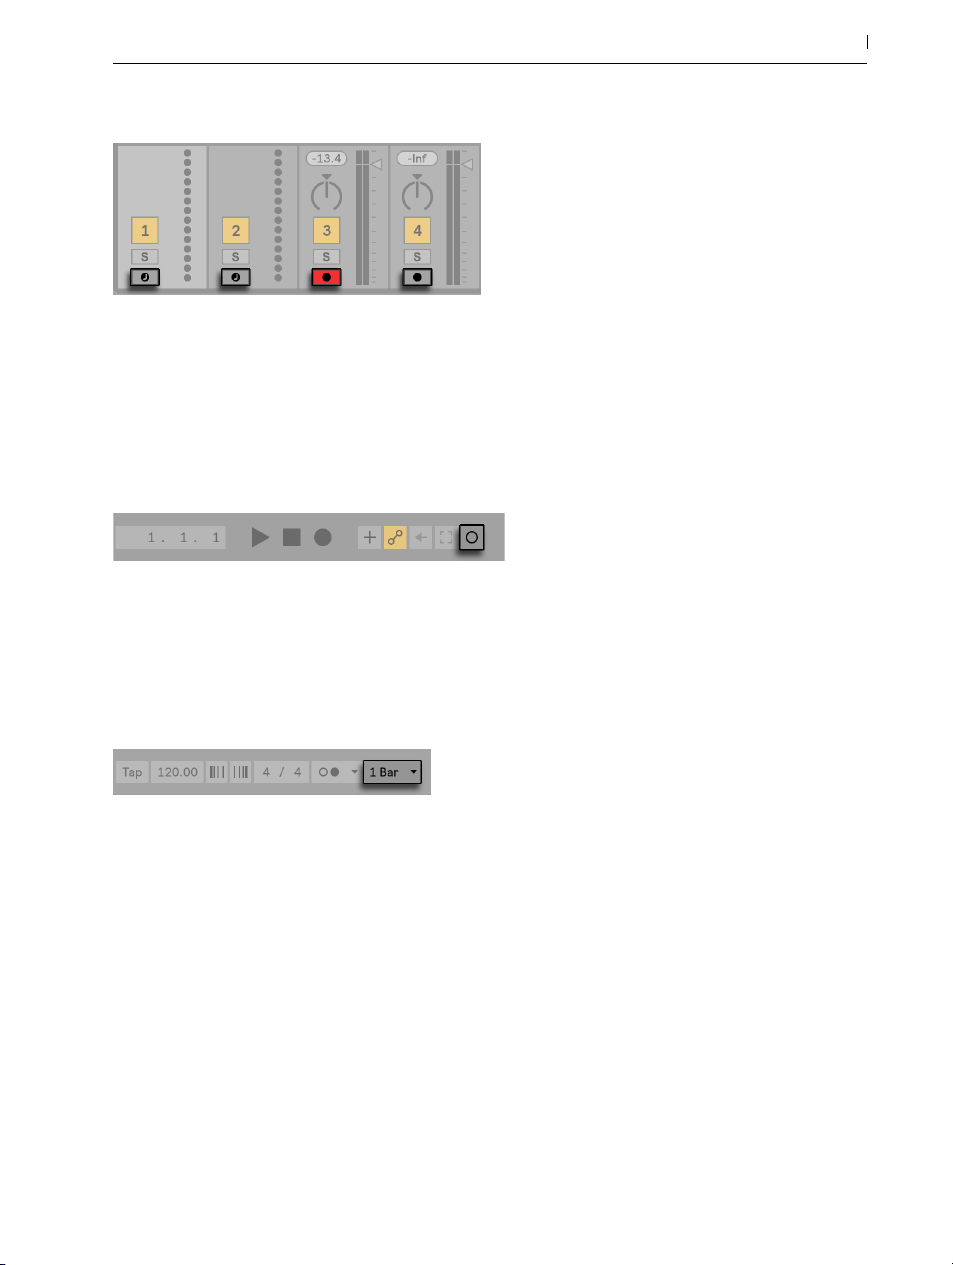
Track Arm Buttons, as They Appear in the Session View.
It is also possible to record into Session View slots on the fly (page 244). This technique is
very useful for the jamming musician, as Session recording does not require stopping the music.
Clicking the Session Record button records a new clip in the selected Session scene in all armed
tracks.
The Control Bar’s Session Record Button.
54 Live Concepts
Clicking the Session Record button again defines the end of the recording and launches the new
clips. As these actions are subject to real-time launch quantization, the resulting clips can be
automatically cut to the beat.
The Control Bar’s Quantization Chooser.
Session recording in conjunction with overdubbing and Record Quantization is the method of
choice for creating drum patterns, which are built up by successively adding notes to the pattern
while it plays in a loop. It only takes a MIDI keyboard (or the computer keyboard) and a MIDI
track with Live’s Impulse percussion instrument to do this (page 461).
4.12 Automation Envelopes
Often, when working with Live’s mixer and effects, you will want the controls’ movements to
become part of the Set. The movement of a control across the Arrangement timeline or Session

clip is called automation (page 299); a control whose value changes over time is automated.
Automation is represented by breakpoint envelopes, which can be drawn, edited and recorded
in real-time.
The Automated Pan Control and its Envelope.
Practically all mixer and effect controls in Live can be automated, even the song tempo. Recording automation is straightforward: all changes of a control that occur while the Control Bar’s
Automation Arm and Arrangement Record buttons are on become automation in the Arrangement View. Automation is recorded to Session View clips if controls are adjusted while recording
with the Automation Arm button enabled.
Changing an automated control’s value while not recording is similar to launching a Session clip
while the Arrangement is playing: It deactivates the control’s automation (in favor of the new
control setting). The control will stop tracking its automation and rest with the new value until the
Re-Enable Automation button is pressed or a Session clip that contains automation is launched.
55 Live Concepts
4.13 Clip Envelopes
Envelopes can be found in both tracks and clips. Clip envelopes (page 311) are used to au-
tomate or modulate device and mixer controls. Audio clips have, in addition, clip envelopes to
influence the clip’s pitch, volume and more; these can be used to change the melody and rhythm
of recorded audio. MIDI clips have additional clip envelopes to represent MIDI controller data.
Clip envelopes can be unlinked from the clip to give them independent loop settings, so that
larger movements (like fade-outs) or smaller gestures (like an arpeggio) can be superimposed
onto the clip’s material.
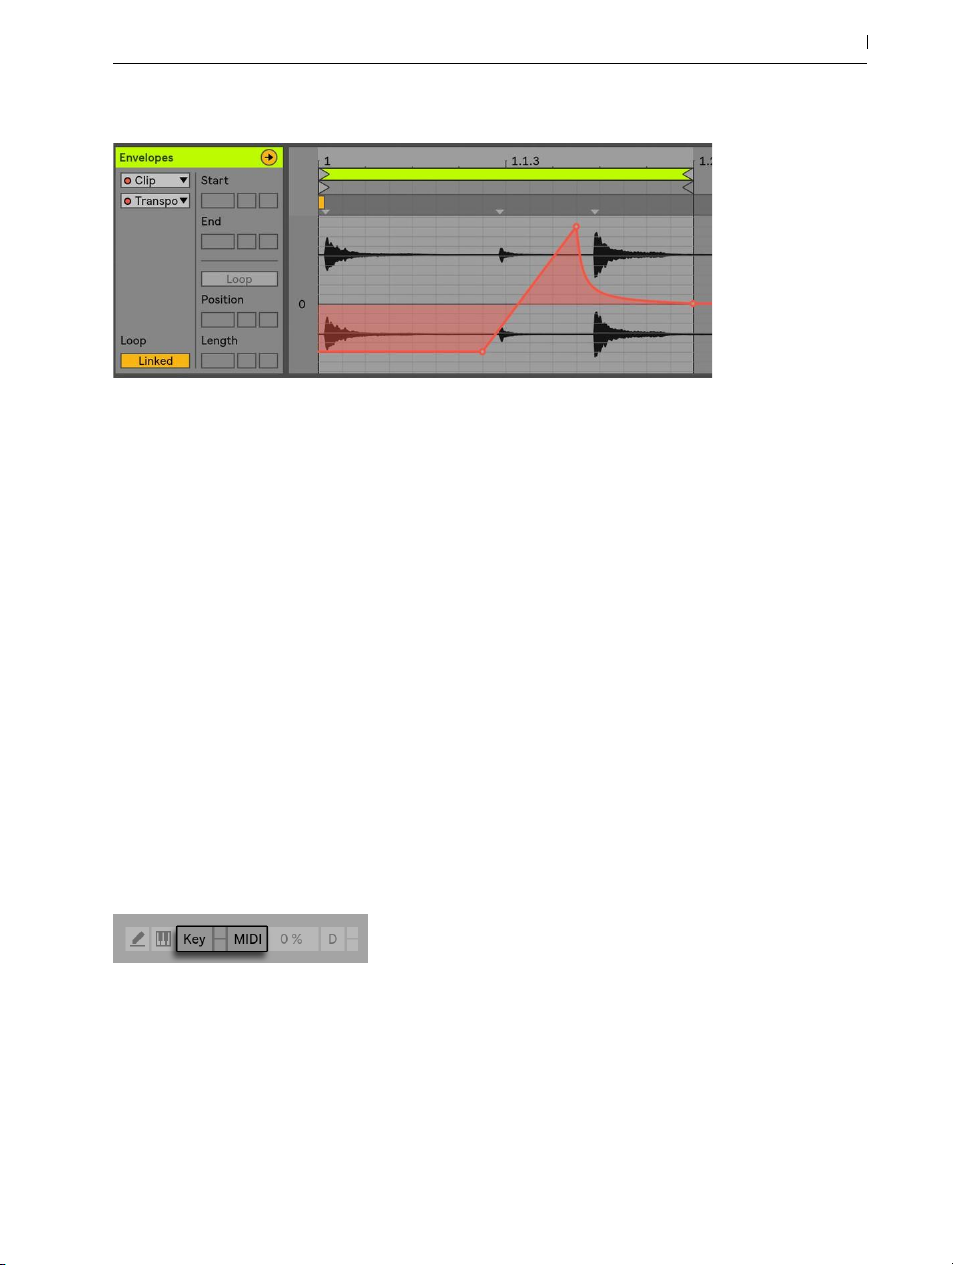
An Envelope for Clip Transposition.
4.14 MIDI and Key Remote
To liberate the musician from the mouse, most of Live’s controls can be “remote-controlled“
via an external MIDI controller. Remote mappings are established in MIDI Map Mode (page
576), which is engaged by pressing the MIDI switch in the Control Bar.
56 Live Concepts
In this mode, you can click on any mixer or effect control, and then assign it to a controller simply by sending the desired MIDI message (for example, by turning a knob on your MIDI control
box). Your assignments take effect immediately after you leave MIDI Map Mode. Session clips
can be mapped to a MIDI key or even a keyboard range for chromatic playing.
MIDI keys and controllers that have been mapped to Live’s controls are not available for recording via MIDI tracks. These messages are filtered out before the incoming MIDI is passed on to
the MIDI tracks.
The Key/MIDI Map Controls.
Session clips, switches, buttons and radio buttons can be mapped to computer keyboard keys as
well. This happens in Key Map Mode (page 581), which works just like MIDI Map Mode.
Live offers, in addition to this general purpose mapping technique, dedicated support for Ableton Push (page 583) and Push 2.
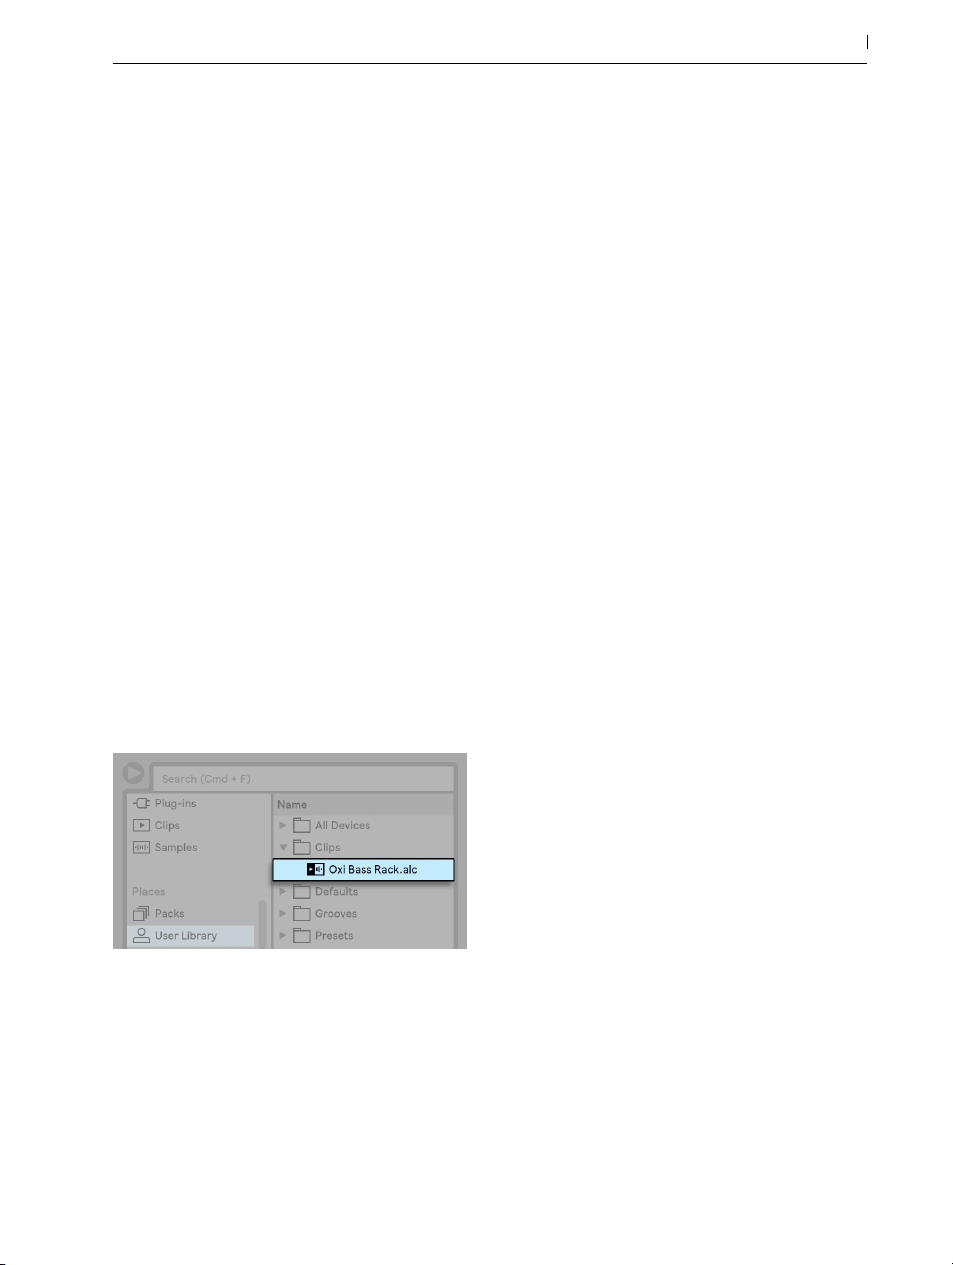
4.15 Saving and Exporting
Saving a Live Set saves everything it contains, including all clips, their positions and settings,
and settings for devices and controls. An audio clip can, however, lose the reference to its corresponding sample if it is moved or deleted from disk. The links between samples and their clips
can be preserved with a special command, Collect and Save (page 90), which makes a
copy of each sample and stores it in a project folder along with the Live Set.
A separate Save button in the Clip View saves a set of default clip settings (page 141) along
with the sample, so that each time the sample is dragged into the program, it will automatically
appear with these settings. This is especially useful if you have made warp settings for a clip and
want to use it in multiple Live Sets.
Exporting audio from Live can be done from both the Session and Arrangement Views. By default, Live will export the audio coming through on the Master output as an audio file of your
specifications via Export Audio/Video (page 71).
Live can also export individual MIDI clips as MIDI files (page 77).
57 Live Concepts
Exporting and saving material for later use in Live can be done very conveniently with the Live
Clip format (page 77). Session View clips can be dragged back out of a Live Set to the
browser, and thereby exported to the disk as Live Clips.
A Live Clip in the Browser.
Live Clips are a very powerful way of storing ideas, as they save not only the clip’s Clip View
settings, but also the corresponding track’s instruments and effects chain. Live Clips in the browser can be previewed and added to any open Live Set just like sample files. In the Live Set, they
restore the original clip’s creative options.
Using Live Clips, you can build your own personalized library of:

•MIDI sequences with matching instruments and effects, e.g., a MIDI drum pattern with the
associated Impulse and effects settings;
•Different regions or loops (page 134) referencing the same source file;
•Variations of a sample loop created by applying Warp Markers (page 151), clip enve-
lopes (page 311) and effects (page 257);
•Ideas that may not fit your current project but could be useful in the future.
58 Live Concepts

Chapter 5
Managing Files and Sets
Various types of files are used in making music with Live, from those containing MIDI (page
77) and audio (page 69), to more program-specific files such as Live Clips (page 77)
and Live Sets (page 79). This chapter will explain everything you need to know about working with each of these file types in Live. However, we should first take a look at Live’s browser,
through which most files arrive in the program.
5.1 Working with the Browser
59 Managing Files and Sets
Live’s browser is the place where you interact with your library of musical assets: the core library
of sounds that are installed with the program, any additional sounds you’ve installed via Ableton
Packs, presets and samples you’ve saved, your Ableton and third-party devices, and any folder
on your hard drive that contains samples, tracks, etc.

60 Managing Files and Sets
The Browser.
The browser display is divided into left and right sections, called the sidebar and the content
pane respectively. To resize the sections, drag the divider line horizontally.
5.1.1 Understanding the Browser’s Hierarchy
Working in the browser involves choosing one of the labels from the Collections, Categories or
Places sections in the sidebar, and then selecting from the items that appear in the content pane.
Collections
The Collections labels each have their own assignable color, which you can use to tag items
(including folders) that appear in the browser’s content pane. These labels (or “tags”) enable
you to quickly organize and access particular browser items (for example, your favorite or mostused items).

You can assign Collections labels via a selected item’s [right-click](PC) / [CTRL-click](Mac) context menu, or by using the number key shortcuts [1] through to [7]. Use [0] to reset color assignments.
Note that Collections labels can also be assigned to multiple browser items within a selection.
Additionally, it is possible to assign a color label to different item “types”. For example, you can
assign the same color label to a drum sound, a MIDI effect, and a plug-in.
Clicking on a Collections label in the sidebar shows all items tagged with that color. Folders that
appear in the Collections labels can be unfolded to show their contents.
61 Managing Files and Sets
The Edit Button in the Browser.
Each label can be renamed via their [right-click](PC) / [CTRL-click](Mac) context menu, or by
pressing [CTRL][R](PC) / [CMD][R](Mac). You can choose which labels are visible in the browser, by clicking the “Edit” button next to the “Collections” header, and checking the “Show/Hide
Label” option.
Editing Collections in the Browser.

To exit Edit Mode, press the “Done” button.
Note that when a hidden unassigned color becomes assigned to a browser item, the Collections
label for that color will be shown in the sidebar automatically. However, visible color labels are
not automatically hidden if all their assignments are removed.
Browser Items and Their Assigned Colors in the Content Pane.
In the content pane, square icons indicate the respective color(s) assigned to each item. Note
that although multiple colors can be assigned to an item, no more than three of those colors will
be shown in the content pane.
62 Managing Files and Sets
Categories
The Categories labels show all items of a given type, regardless of where they are in your
library. Use this section to explore and discover all of the instruments and sounds you have installed. The Categories section is organized as follows:
•Sounds — all of your Instrument Racks (page 279) and instrument presets, organized by
the type of sound they make (rather than by their devices.)
•Drums — all of your drum presets. This includes full drum kits, which are available as Drum
Racks, as well as single drum hits, which are delivered as Instrument Racks.
•Instruments — all of your Instrument Racks, as well as “raw” Live instruments and their presets, organized by device (rather than by the type of sound.)
•Audio Effects — all of your Audio Effect Racks, as well as “raw” Live audio effects devices
and presets.
•MIDI Effects — all of your MIDI Effect Racks, as well as “raw” Live MIDI effects devices

and presets.
•Max for Live — all of your Max for Live (page 551) devices and presets, as well as any
Racks that are built with those devices, organized into Audio Effect, Instrument and MIDI
Effect folders.
•Plug-Ins — your third-party VST and/or Audio Units plug-ins (page 268).
•Clips — all of your Live Clips.
•Samples — all of your raw audio samples.
•All results — this section appears after you’ve typed something into the search field. It
shows search results for every section of the browser in a single list.
Places
The Places labels show the contents of folders on your hard drives. Use this section when you
want to access a particular place, such as a folder you’ve added or an add-on Pack. The actual
contents of the Places section will vary depending on how you’ve configured your library, but
will contain at least the following:
63 Managing Files and Sets
•Packs — all Packs that come pre-installed with Live, as well as any that you’ve installed
yourself. Each Pack appears as a folder in the content pane, which can be unfolded to
reveal that Pack’s contents. Presets, samples, and Live Clips installed by Packs will also appear in the appropriate Categories labels.
•User Library — the User Library is the default location for items you save yourself, including
default presets, grooves, your personalized Racks and device presets, your own samples,
Live Clips, etc. Files that you save to your User Library will also be available in the appropriate Categories labels.
•Current Project — all of the files that are contained in the currently active Project (page
84). If you’re working on a Live Set that you haven’t yet saved, the current Project refers
to a temporary location.
•any folders from any of your hard drives that you’ve added to Live’s Browser.
Moving through the files in Live’s browser can be done with either the mouse or the computer
keyboard:

•Scroll up and down in the Browser with the up and down arrow keys, the mousewheel, or
by clicking and dragging while holding the [CTRL][ALT](PC) / [CMD][ALT](Mac) modifier.
•Close and open folders, or move between the sidebar and content pane with the left and
right arrow keys.
By default, any previously open folders will close when you open a new one, but you can override this behavior by holding [CTRL](PC) / [CMD](Mac) while opening new folders.
5.1.2 User Folders
Live’s browser allows you to work with your creative tools regardless of where they are installed
on your computer. This allows you to, for example, store large sample collections on one or
more external drives, and still use the browser to access their contents - there is no need to keep
them in a single centralized location.
In order to work with your own folders in Live, you must first add them to the browser, either by
dropping them directly into Live from the Explorer (Windows)/Finder (Mac) or by pressing the
Add Folder button in the browser’s sidebar.
64 Managing Files and Sets
After adding a user folder, Live will scan it, which “teaches” the browser about its contents. Following this, it will appear in the Places section of the sidebar.
Note: adding a user folder does not actually move the folder to a new location, but simply
makes it available in Live’s browser. If you reorganize your drives using Explorer (Windows)/
Finder (Mac), Live may not be able to find user folders if they’ve been moved. For example, if
a user folder is contained on an external hard drive, and Live is opened without the drive attached, the user folder will still appear in the browser but will be grayed out. You can attempt to
find it by using the [right-click](PC) / [CTRL-click](Mac) context menu’s Locate Folder command,
or tell Live to “forget” this folder via the Remove from Sidebar command. You can also use this
command to remove folders that aren’t missing, but which you simply don’t want to work with
anymore.
5.1.3 Searching for Files
Live’s browser is equipped with a search field that filters the contents of the selected sidebar label as you type. To search across all locations, press [CTRL][F](PC) / [CMD][F](Mac).

The Browser’s Search Field.
The results will include files that match all search terms, as opposed to any. For example, if
you search for “acoustic bass,“ the search will yield all acoustic bass sounds — not all acoustic
sounds and all bass sounds.
For mouse-free searching, we suggest the following sequence of shortcuts:
1. [CTRL][F](PC) / [CMD][F](Mac) to place a cursor in the search field;
2. Type your search terms;
3. Down arrow key to jump to the search results;
65 Managing Files and Sets
4. Up and down arrow keys to scroll the search results;
5. [ESC] to clear the search field, showing all of the contents of the selected sidebar label.
Previewing Files
Live allows you to preview samples, clips, and instrument presets in the browser before they are
imported into the program. To enable previewing, activate the Preview switch next to the Preview
Tab at the bottom of the browser.

The Preview Switch.
66 Managing Files and Sets
Hint: You can preview files even when the Preview switch is not activated by pressing [Shift][Enter] or the right arrow key.
Click on a file (or use the up and down arrow keys) to select it. Click in the Tab’s scrub area
to make playback jump to that point. (Note that it is not possible to scrub clips that have been
saved with Warp turned off.)
You can select Live Clips in the browser to load them into the Preview Tab.
You can also preview Live’s instrument presets in the Preview Tab. When selected, you’ll hear a
short audio example of the preset, so you can get an idea of how it sounds before loading it.
With the Raw button enabled, files will preview at their original tempo and will not loop. With
Raw disabled, Live will try to preview files in sync with the current Set, so that you can better
judge which samples will work for you. Please note that scrubbing is not possible when Raw is
enabled.
The previewing volume can be adjusted using the mixer’s Preview Volume knob.
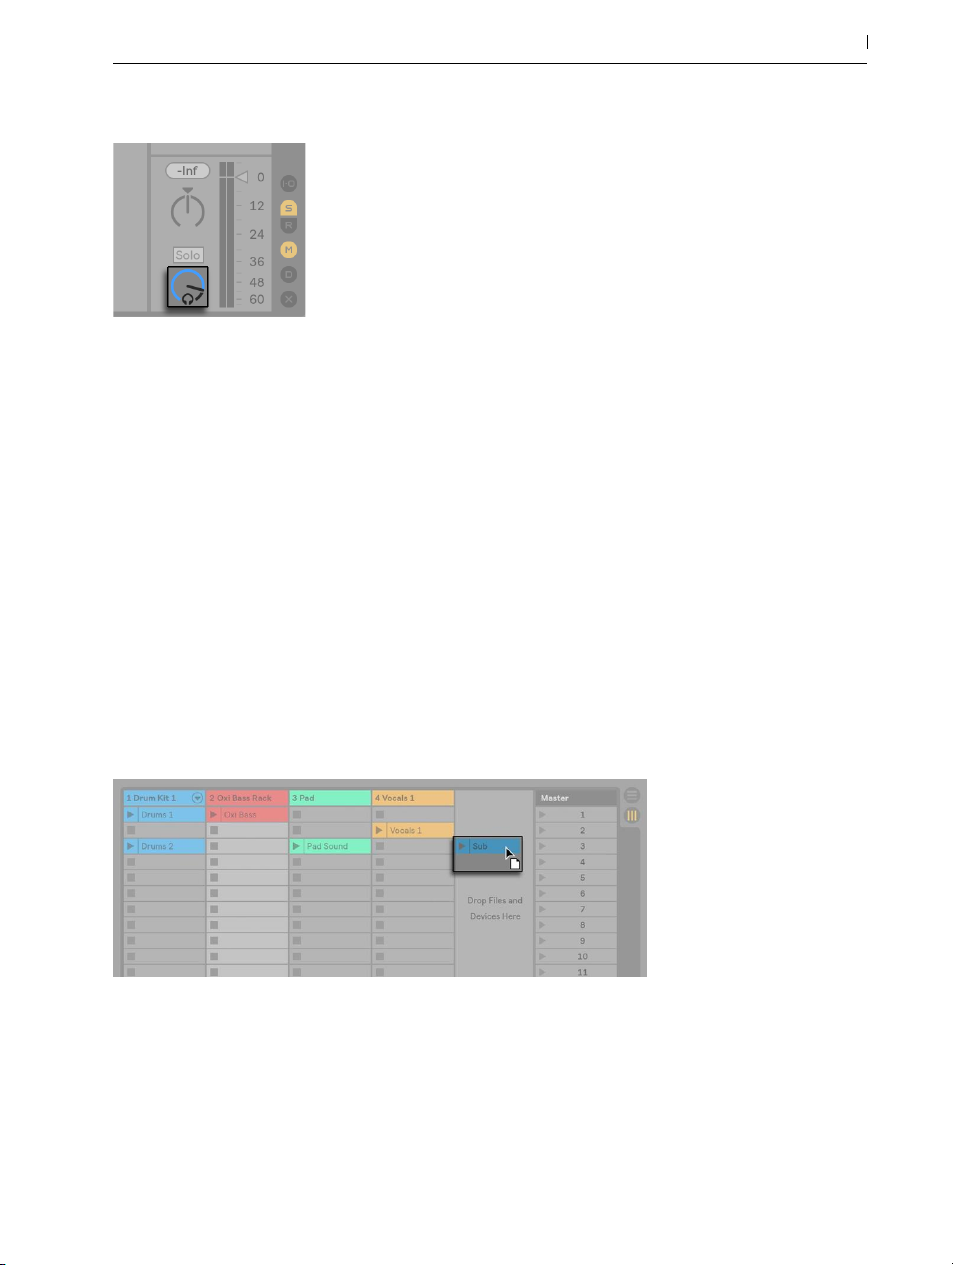
The Preview Volume Knob.
If your audio hardware offers multiple audio outs, you can privately audition, or cue, files via
headphones connected to a separate pair of outs — while the music continues to play. To learn
how to set up Live for cueing, please refer to the relevant section (page 238) of the Mixing
chapter.
Adding Clips from the Browser
There are several ways to add clips to a Live Set:
67 Managing Files and Sets
•Files can be dragged and dropped from the browser into tracks in the Session or Arrangement View. Dragging and dropping material from the browser into the space to the right of
Session View tracks or below Arrangement View tracks will create a new track and place
the new clip(s) there.
Dropping a Clip to Create a New Track.
•In the Session View, double-clicking or pressing [Enter] on a file in the browser will automatically create a new track to the right of the other tracks and load it with the clip.
•Files can be dropped directly into Live from the Explorer (Windows)/Finder (Mac).
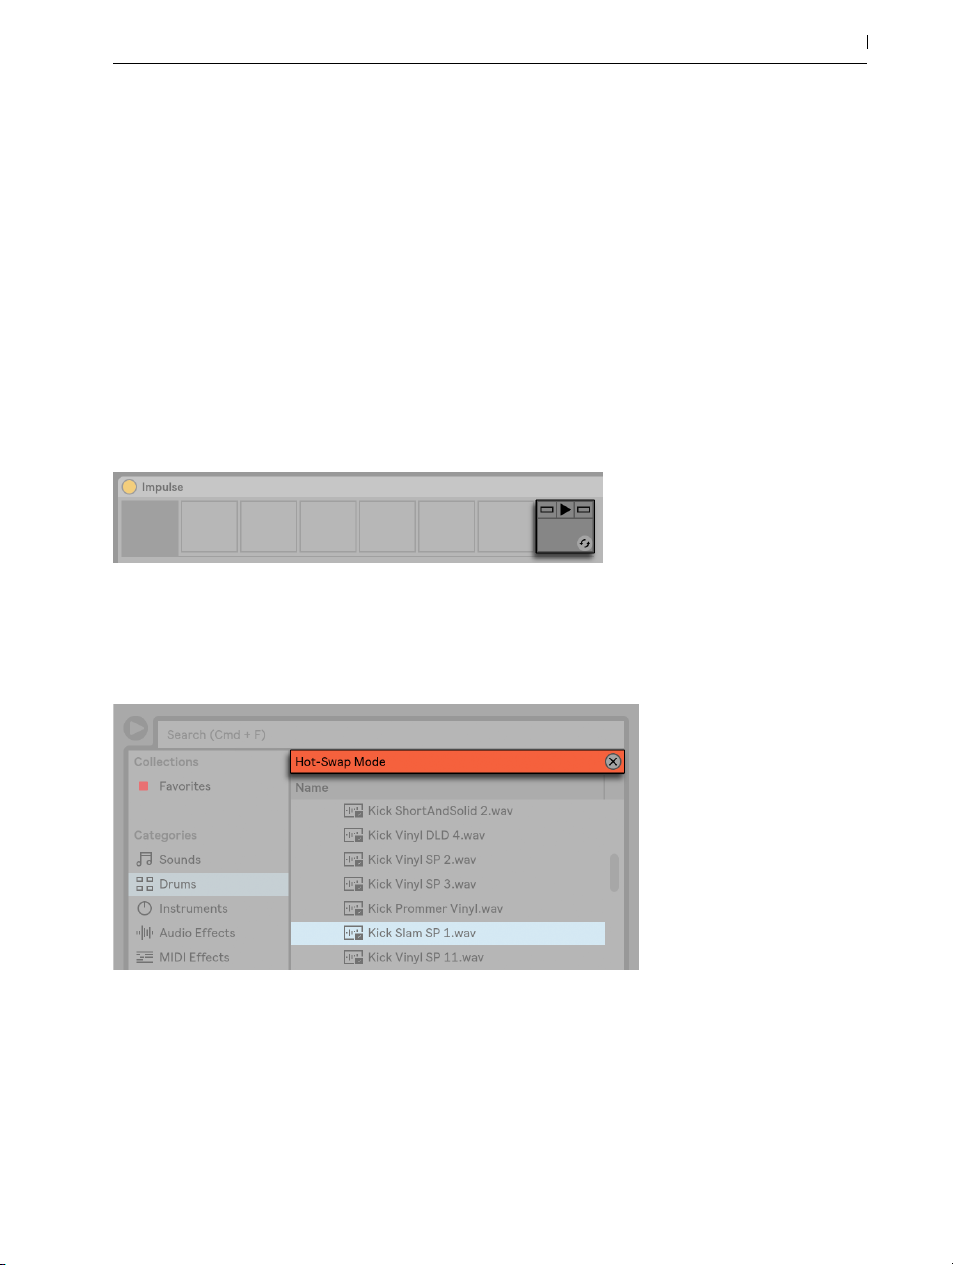
Hot-Swap Mode
In addition to the drag-and-drop method of loading files from the browser, Live offers a HotSwap Mode to reduce your mouse travel. Hot-Swap Mode can be toggled on and off with
the [Q] key, and establishes a temporary link between the browser and, for example, a virtual
instrument. While in Hot-Swap Mode, you can step through samples or presets to audition them
“in place,“ that is, within the instrument. Hot-swapping for presets is covered in the Live Device
Presets section (page 262). Let’s go through an example of hot-swapping samples:
Live’s built-in Impulse instrument features eight sample-player slots that can be filled by dropping
samples into them. Alternatively, we can click the Hot-Swap button that appears as we move the
mouse over a slot.
The Hot-Swap Button in an Impulse Slot.
68 Managing Files and Sets
Clicking the Hot-Swap button or pressing the [Q] key engages Hot-Swap Mode:
The Browser in Hot-Swap Mode.
While in Hot-Swap Mode, pressing the up or down arrow key moves to the next file in the content pane, and pressing [Enter] or double-clicking the file loads it into the Impulse slot (presumably while Impulse is playing incoming MIDI notes). The link between the browser and the instrument will be broken if a different view is selected, or if the [Q] key or the Hot-Swap button is

pressed again. Hot-swapping can also be cancelled with a press of the [ESC] key or by pressing
the close button in the Hot-Swap bar at the top of the browser.
When Hot-Swap Mode is re-entered, the browser will show the location of the currently loaded
sound and pre-select it.
5.2 Sample Files
A sample is a file that contains audio data. Live can play both uncompressed file formats (WAV,
AIF and Sound Designer II for Mac) and compressed file formats (MP3, AAC, Ogg Vorbis, Ogg
FLAC and FLAC). (Please note that not all of these file formats can be played in the Lite Edition.)
A note on using Variable Bit Rate (VBR) files: Please install QuickTime for decoding purposes if
you do not already have it on your system. It can be downloaded from the Apple website5.
As Live plays the samples directly from disk, you can work with a large number of (large)
samples without running into RAM memory limitations. Please note, however, that you may run
into disk throughput problems if your disk is nearly full, and/or (on Windows systems) highly
fragmented. Hard drive rotation speed can also affect disk performance. Refer to the section on
managing the disk load (page 715) for more information.
69 Managing Files and Sets
Live can combine uncompressed mono or stereo samples of any length, sample rate or bit depth
without prior conversion. To play a compressed sample, Live decodes the sample and writes the
result to a temporary, uncompressed sample file. This usually happens quickly enough that you
will be able to play the sample right away, without waiting for the decoding process to finish.
Note: When adding a long sample to a project, Live might tell you that it cannot play the sample
before it has been analyzed. Please see the section on analysis (page 70) for an explanation.
5.2.1 The Decoding Cache
To save computational resources, Live keeps the decoded sample files of compressed samples
in the cache. Maintenance of the cache is normally not required, as Live automatically deletes
older files to make room for those that are new. You can, however, impose limits on the cache
size using the File/Folder Preferences’ Decoding Cache section. The cache will not grow larger
5 http://www.apple.com/quicktime/download

than the Maximum Cache Size setting, and it will always leave the Minimum Free Space on the
hard disk. Pressing the nearby Cleanup button will delete all files not being used by the current
Live Set.
Preferences for the Decoding Cache.
70 Managing Files and Sets
5.2.2 Analysis Files (.asd)
An analysis file is a little file that Live creates when a sample file is brought into the program
for the first time. The analysis file contains data gathered by Live to help optimize the stretching
quality, speed up the waveform display and automatically detect the tempo of long samples
(page 157).
When adding a long sample to a project, Live might tell you that it cannot play the sample before it has been analyzed. This will not happen if the sample has already been analyzed (i.e.,
Live finds an analysis file for this sample), or if the Record/Warp/Launch Preferences’ AutoWarp Long Samples preference (page 151) has been deactivated.
An analysis file can also store default clip settings for the sample:
Clicking the Clip View’s Save button (page 141) will store the current clip’s settings with the
sample’s analysis file. The next time the sample is dragged into Live, it will appear with all its clip
settings intact. This is particularly useful for retaining Warp Marker settings with the sample. Storing default clip settings with the analysis file is different from saving the clip as a Live Clip.
While analysis files are a handy way to store default information about a particular sample’s
settings, keep in mind that you can use different settings for each clip within a Live Set — even if
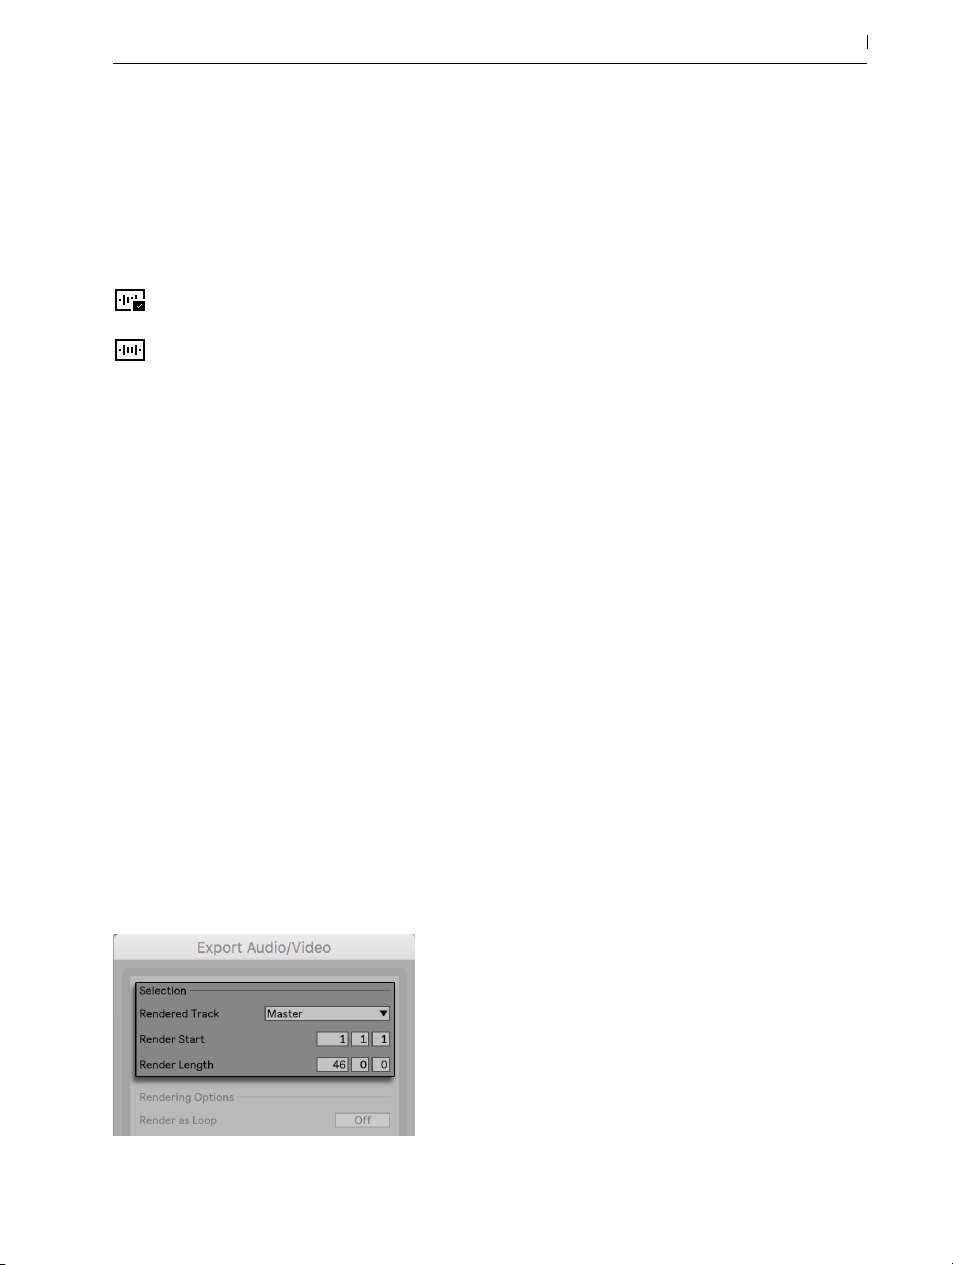
those clips refer to the same sample on disk. But if you drag a new version of the sample into a
Live Set, Live will use the settings stored in the analysis file for the newly created clip.
The analysis file’s name is the same as that of the associated sample, with an added “.asd“ extension. Live puts this analysis file in the same folder as the sample.
Samples that have an .asd file are displayed like this in the browser.
Samples without an .asd file look like this.
The analysis files themselves do not appear in Live’s browser.
Note that you can suppress the creation of .asd files by turning off the Create Analysis Files option in the File/Folder Preferences. All data (except for the default clip settings) can be recreated
by Live if the .asd file is missing, however this will take some time for longer samples.
5.2.3 Exporting Audio and Video
71 Managing Files and Sets
The File menu’s Export Audio/Video command allows you to export Live’s audio output as new
samples. The resulting files can be used to burn an audio CD for listening purposes or a data
CD, which could serve as a backup of your work or be used with other digital audio applications. If your set includes video, you can also use the Export Audio/Video command to export
this to a new video file, which will be created in the same directory as the rendered audio files.
(Note: video export is not available in the Lite and Intro Editions.) You can also upload your exported audio files directly to your SoundCloud account.
Selection Options
The Render Dialog’s Selection Options.
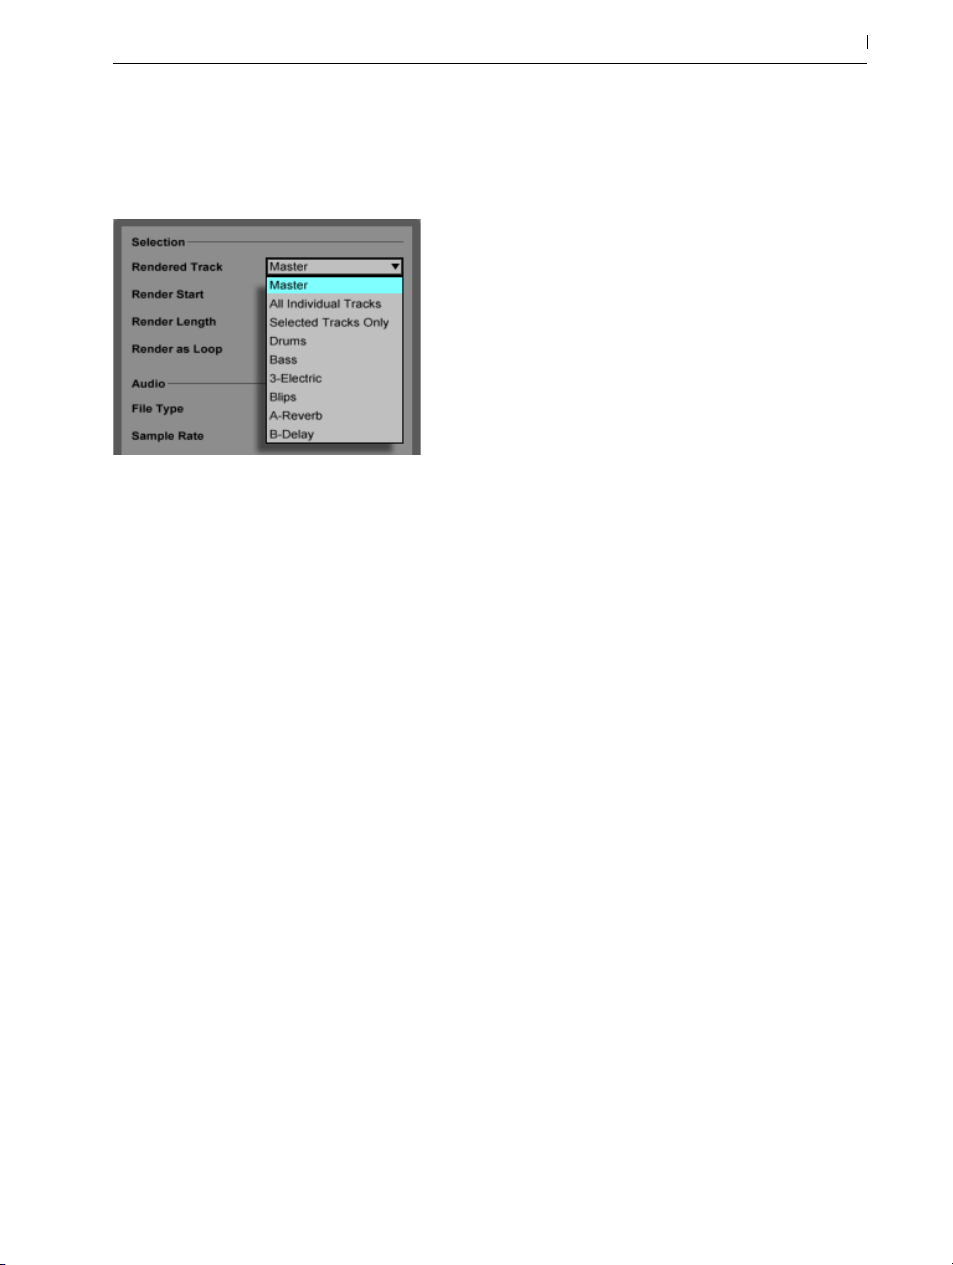
The Export dialog’s Rendered Track chooser offers several options for which audio signal to
render:
The Rendered Track Chooser.
•Master — the post-fader signal at Live’s Master output. If you are monitoring the Master
output, you can be sure that the rendered file will contain exactly what you hear.
72 Managing Files and Sets
•All Individual Tracks — the post-fader signal at the output of each individual track, including return tracks and MIDI tracks with instruments. Live will create a separate sample for
each track. All samples will have the same length, making it easy to align them in other
multitrack programs.
•Selected Tracks Only — this is identical to the All Individual Tracks option, but only renders
tracks that were selected prior to opening the Export dialog.
•(single tracks) — the post-fader signal at the output of the selected track.
The other Selection fields determine the start time and length of the exported material:
•Render Start — sets the position at which rendering will begin.
•Render Length — determines the length of the rendered sample.
•Render as Loop — If this is activated, Live will create a sample that can be used as a loop.
For example, suppose your Live Set uses a delay effect. If Render as Loop is on, Live will
go through the rendering process twice: The first pass will not actually write samples to
disk, but add the specified delay effect. As the second pass starts writing audio to disk, it
will include the delay “tail“ resulting from the first pass.
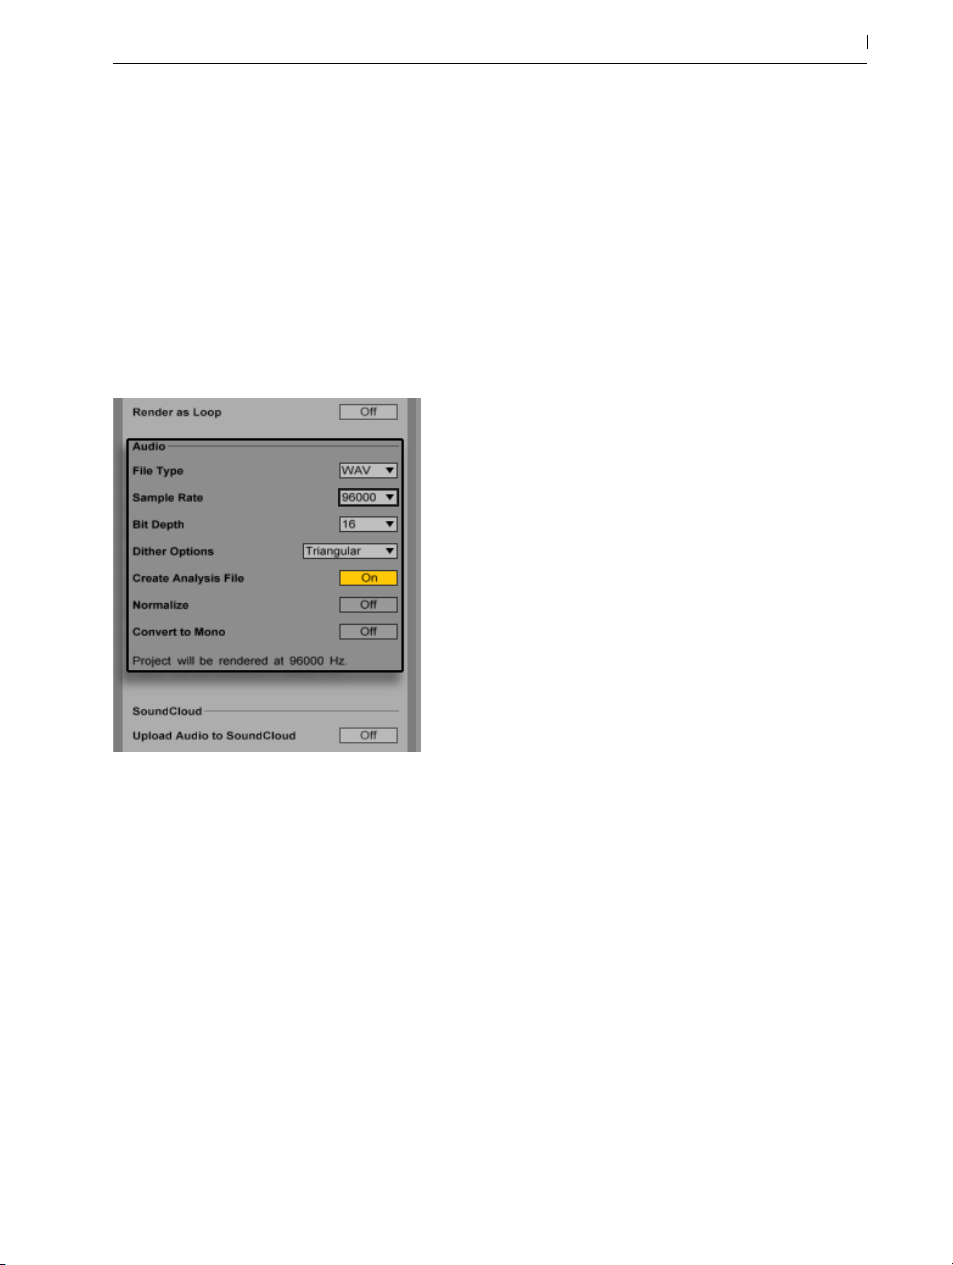
Tip — a fast way to set both the Render Start and Length values is to select a range of time in
the Arrangement View prior to invoking the Export Audio/Video command. But remember — a
rendered audio file contains only what you heard prior to rendering. So, for example, if you’re
playing back some combination of Session View clips and Arrangement material, then that is
what will be captured in your rendered file — regardless of which view is active when you render.
Audio Rendering Options
73 Managing Files and Sets
Audio Rendering Options.
The Export dialog offers several audio rendering options:
•File Type, Sample Rate, Bit Depth — These options specify the type of sample to be created. Note that your choice of sample rate works as follows: if you select a sample rate
equal to or higher than the rate you’re using in your project (as set in the Audio tab of Live’s
Preferences), Live will export in a single step, at the sample rate you’ve chosen in the Export dialog. If you export at a sample rate that is lower than your current project sample
rate, Live will first export at the current project sample rate and then downsample the file in
a second step using a high-quality process. Note that this may take a few moments.
•Dither Options — If you are rendering at a bit depth lower than 32-bit, choose one of the
dither modes. Dithering adds a small amount of noise to rendered audio, but minimizes
artifacts when reducing the bit depth. By default, Triangular is selected, which is the “saf-

est“ mode to use if there is any possibility of doing additional processing on your file.
Rectangular mode introduces an even smaller amount of dither noise, but at the expense of
additional quantization error. The three Pow-r modes offer successively higher amounts of
dithering, but with the noise pushed above the audible range. Note that dithering is a procedure that should only be applied once to any given audio file. If you plan to do further
processing on your rendered file, it’s best to render to 32-bit to avoid the need for dithering
at this stage. In particular, the Pow-r modes should never be used for any material that will
be sent on to a further mastering stage — these are for final output only. (Please note that
the Pow-r modes are not available in the Intro and Lite Editions.)
•Create Analysis File — If this is activated, Live will create an .asd file that contains analysis
information about the rendered sample. If you intend to use the new sample in Live, check
this option.
•Normalize — If this is activated, the sample resulting from the render process will be normalized (i.e., the file will be amplified so that the highest peak attains the maximum available headroom).
•Convert to Mono — If this is activated, Live will create a mono file instead of a stereo file.
74 Managing Files and Sets
•Upload Audio to SoundCloud — If activated, a helper application will launch that will allow you to upload your exported audio file to SoundCloud.
Video Rendering Options
Video Rendering Options.
(Note: video rendering is not available in the Intro and Lite Editions.)

In addition to settings for audio rendering, the Export dialog provides additional options for
rendering video:
•Create Video — If this is activated, a video file will be created in the same directory as
your rendered audio. Note that this option is only enabled if you have video clips in the
Arrangement View. Also, it is not possible to only render a video file — enabling video
rendering will always produce a video in addition to rendered audio.
•Video Encoder — This chooser allows you to select the encoder to use for the video rendering. The choices you have here depend on the encoders you have installed.
•Video Encoder Settings — This button opens the settings window for the selected encoder.
Note that the settings options will vary depending on the encoder you have chosen. Certain encoders have no user-configurable options. In this case, the Edit button will be disabled.
Once you’ve made your selections and clicked Export to begin the rendering process, audio
rendering will begin. After the audio rendering is complete, the video will be rendered. Note
that, depending on the encoder used, video rendering may occur in more than one pass. Live
will display a progress bar that will indicate the status of the process.
75 Managing Files and Sets
Unless you’ve specified a special window size or aspect ratio in the encoder settings, the rendered video file will play back exactly as it appeared during real time playback in Live. The
video file will also contain the rendered audio.
For more information about working with video in Live, see the chapter on video (page 323).
Real-Time Rendering
Normally, rendering happens as an offline process. But if your set contains an External Audio
Effect (page 367) or External Instrument (page 459) that routes to a hardware effects device
or synthesizer, the rendering process is a bit different. In this case, rendering the master output
happens in real time. If you render single tracks, all tracks that don’t route to an external device
anywhere in their signal paths will be rendered offline. Then, any tracks that do access these
devices will be rendered in real time. Live will automatically trace each track’s signal flow and
detect if real-time rendering is necessary. You’ll then be presented with several options when you
start to render:

Waiting for External Devices to Become Silent.
•Skip — By default, Live will wait for ten seconds before starting a real-time render. This
should allow any sound from external devices to fade out, but if you need more time (for
example, if you’re waiting for a long reverb tail), you can increase the wait time by typing
a new number in the number box. On the other hand, if you’re sure that your external devices aren’t making any sound, you can speed the process along by pressing “Skip,“ which
will start the render immediately.
After the render has begun, the dialog changes to show a recording progress bar:
76 Managing Files and Sets
Real-Time Rendering in Progress.
•Auto-Restart on drop-outs — Rendering in real-time requires somewhat more CPU power
than non-real-time rendering, and in some cases drop-outs (small gaps or glitches in the
audio) can occur. Live detects when drop-outs happen, and rendering will start again from
the beginning if the Auto-Restart option is enabled.
•Restart — manually restarts the rendering process.
•Cancel — stops the rendering process and deletes the partially rendered file.
The number of rendering attempts (if there has been more than one) will also be listed in the dialog box. If you find that dropouts and restarts keep happening, you should close other running
applications to allow more processing power for rendering. Please see the chapter on computer
audio resources (page 711) for more tips on improving performance.

5.3 MIDI Files
A MIDI file contains commands that prompt MIDI compatible synthesizers or instruments, such
as Live’s Simpler, to create specific musical output. MIDI files are exported by hardware and
software MIDI sequencers. Importing MIDI files into Live works differently than with samples:
MIDI file data is incorporated into the Live Set, and the resulting MIDI clips lose all reference to
the original file. MIDI files appear with a special icon in the browser.
A MIDI File in the Browser.
77 Managing Files and Sets
You can import MIDI files by using the browser or the Create menu’s Import MIDI File... command. Note that when using the Import MIDI File... command in the Arrangement View, the file
will be inserted at the Insert Marker position. When using the command in the Session View, the
file will be inserted in the currently selected clip slot.
5.3.1 Exporting MIDI Files
Live MIDI clips can be exported as Standard MIDI files. To export a MIDI clip, use the File
menu’s Export MIDI Clip command. This command will open a file-save dialog, allowing you to
choose the location for your new MIDI file.
Exporting a MIDI file is different from saving the clip as a Live Clip.
5.4 Live Clips
Individual audio or MIDI clips can be exported to disk in the Live Clip format for easy retrieval
and reuse in any project. Audio clips only contain references to samples on disk (rather than the

audio data itself), so they are very small, which makes it easy to develop and maintain your own
collection.
To save a clip from the open Live Set to disk, simply drag it to the Places section of the browser
and drop it into the Current Project or any user folder. For audio clips, Live will manage the
copying of the clip’s sample into this new location based on the selection in the Collect Files on
Export chooser (page 91). You can then type in a new name for the clip or confirm the one
suggested by Live with [Enter].
A Live Clip in the Browser.
78 Managing Files and Sets
Live Clips are a great way of storing your ideas for later use or development, as they save not
only the original clip, including all its clip and envelope settings, but also the original track’s devices. In order to recreate a Live Clip’s device chain, either drag it into a track containing no clips
or devices, or drag it into the space in the Session or Arrangement View containing no tracks.
Note that Live Clips that are imported into tracks already containing devices or clips will appear
with their clip settings but not their devices. You could, for instance, drop a bassline Live Clip on
an existing track that drives a bass instrument, rather than creating a new track.
Clips belonging to any Live Sets already on disk are also Live Clips. Please see the section on
merging Sets (page 79) for more on this topic.
Note that storing default clip settings with a sample’s analysis file is different from saving a Live
Clip. The default clip in the .asd file annotates the sample with sensible default values (warp,
gain and pitch settings) so that it will play in a defined way when it is added to a Set. Live Clips,
on the other hand, are stored on disk as separate musical ideas. For example, you could create
a number of variations from the same audio clip by using different warp, pitch, envelope and
effect settings, and store them all as separate Live Clips. In the browser, you could then independently sort and preview these clips, even though they are all referring to the same source
sample.

5.5 Live Sets
The type of document that you create and work on in Live is called a Live Set. Think of this as a
single “song.“ Sets must be saved inside projects, so that Live can keep track of and manage all
of the various components of the Live Set: Live Clips, device presets, any samples used, etc.
5.5.1 Creating, Opening and Saving Sets
Use the File menu’s New Live Set command to create new Live Sets, and the Open Live Set or
Open Recent Set command to open existing ones. In the browser, you can double-click or press
[Enter] on a Live Set to open it.
The File menu’s Save Live Set command saves the current Live Set exactly as it is, including all
clips and settings.
You can use the Save Live Set As command to save the current Live Set under a different name
and/or in a different directory location, or the Save a Copy command to create a copy of the
current Live Set with a new name and/or new directory location.
79 Managing Files and Sets
5.5.2 Merging Sets
Live makes it easy to merge Sets, which can come in handy when combining work from different versions or pieces. To add all tracks (except the return tracks) from one Live Set into another,
drag the Set from the browser into the current Set, and drop it onto any track title bar or into
the drop area next to or below the tracks. The tracks from the dropped Set will be completely
reconstructed, including their clips in the Session and Arrangement View, their devices, and their
automation.
Session View Drop Area for Importing Live Sets.
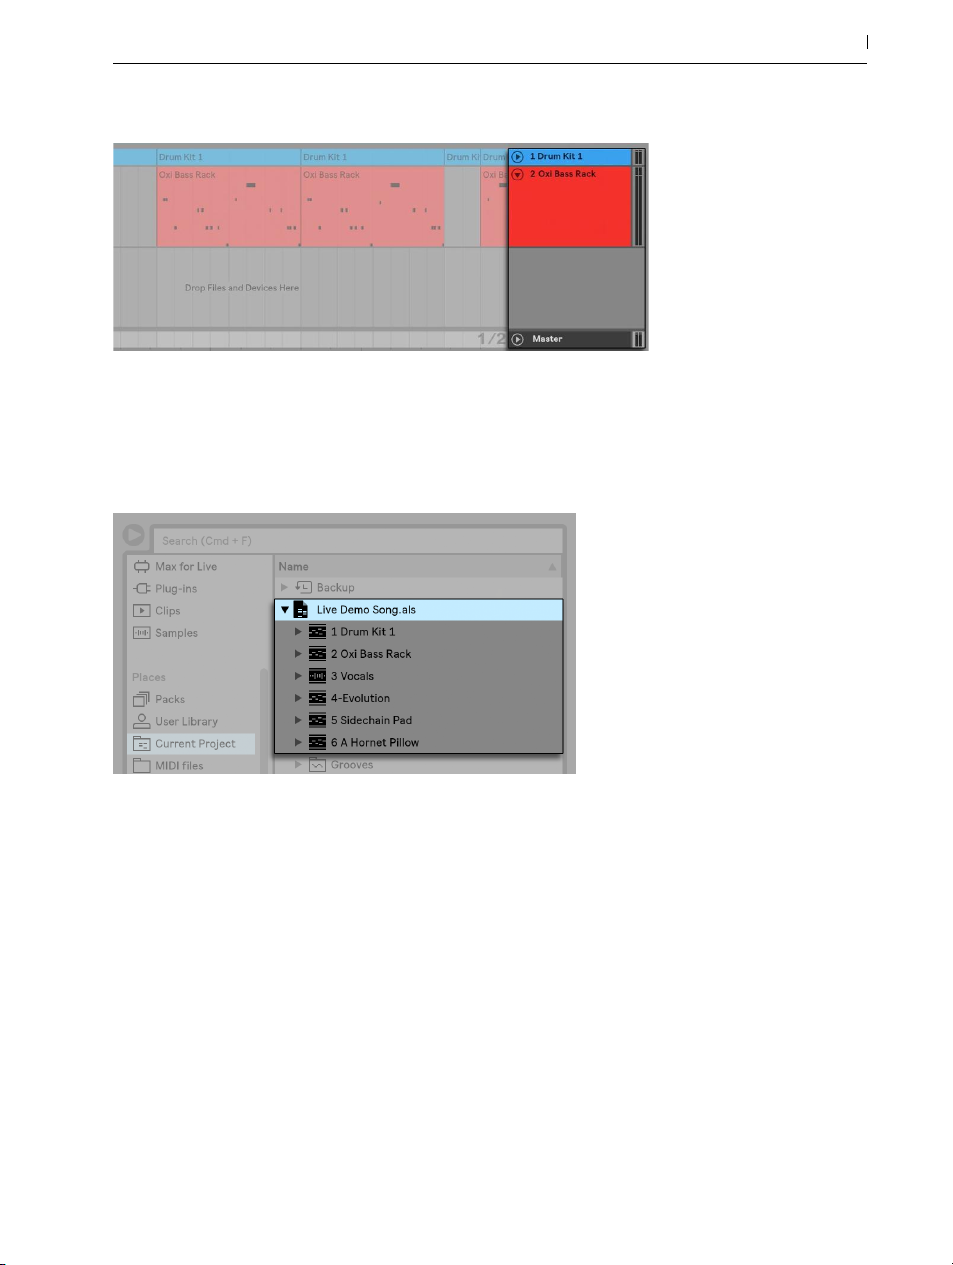
Arrangement View Drop Area for Importing Live Sets.
If you prefer to import individual tracks from a Set, you can unfold the Live Set in the browser just
as if it were a folder.
80 Managing Files and Sets
Unfolding a Set to Reveal its Contents.
You can now drag the individual tracks and drop them as described at the beginning of this
section. Any grooves (page 191) that were saved with your Set are also available as a folder
within the unfolded Set.
You can also drag Group Tracks (page 232) and nested Group Tracks from Live’s browser.
Group Tracks can be expanded in the browser, allowing you to load an individual track from
within.
In addition to unfolding Sets, you can further unfold the tracks within the Sets to access the individual Session View clips that were used on the track:

Revealing the Session View Clips Contained in a Set.
You can browse, preview and import Session View clips from the Set as if they had been stored
as individual Live Clips. This means that any Live Set can serve as a pool of sounds for any other,
suggesting creative reuse and crossover.
81 Managing Files and Sets
5.5.3 Exporting Session Clips as New Sets
You can export a selection of Session View clips as a new Live Set by dragging them to the
browser. To export a Set, first click and drag, or use the [Shift] or [CTRL](PC) / [ALT](Mac) modifiers, to select more than one Session View clip. Then, simply drag and drop the clips into the
Current Project or any user folder, where you can either confirm Live’s suggested name or type in
one of your own.
5.5.4 Template Sets
Use the File/Folder Preferences’ Save Current Set as Default button to save the current Live Set
as the default template. Live will use these settings as the initialized, default state for new Live
Sets. You can use this to pre-configure:
•Your multichannel input/output setup.
•Preset devices, like EQs and Compressors, in every track.
•Computer key mappings (page 581).
•MIDI mappings (page 571).
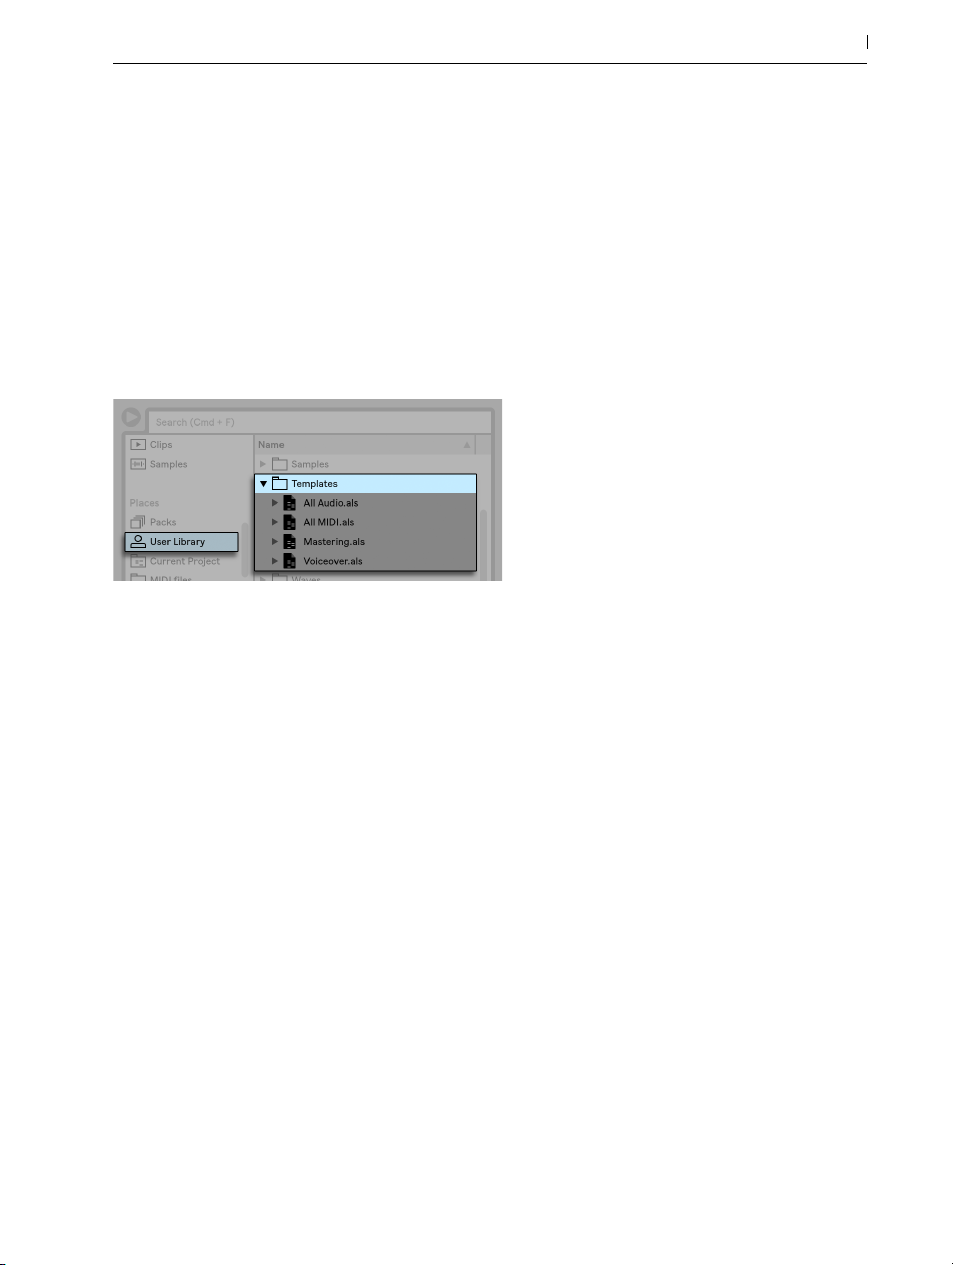
To delete your custom template Set, press the Clear button in the File/Folder Preferences. This
will restore the built-in factory template. You can also temporarily load the built-in factory template by holding [Shift] while selecting New Live Set from the File menu.
In addition to this “master” default template, you can create additional template Sets for different types of projects, each with their own unique configuration of tracks, devices, etc. To do this,
create a folder called “Templates” within your User Library. Any Sets saved to this folder will
then function as templates: they will load with the configuration you saved, but with the name
Untitled.als, ready to be used as a new Set.
Multiple Template Sets in the User Library
82 Managing Files and Sets
5.5.5 Viewing and Changing a Live Set’s File References
To view a list of the files referenced by the current Live Set, choose the Manage Files command
from the File menu, click the Manage Set button, and then click the View Files button. Live will
display one line for each file used by the Live Set. To list all clips or instruments in the Live Set
where the file is actually used, click the triangle to expand the line. Here is what you can do:
•Replace a file — Dragging a file from the browser and dropping it on an entry in the list
makes the Live Set reference the new file instead of the old one. For samples used in audio
clips, Live retains the clip properties; the Warp Markers are kept if the new sample has the
same or a greater length as the old sample and discarded otherwise. Please note that replacing a sample will change all clips in your set that reference this sample.
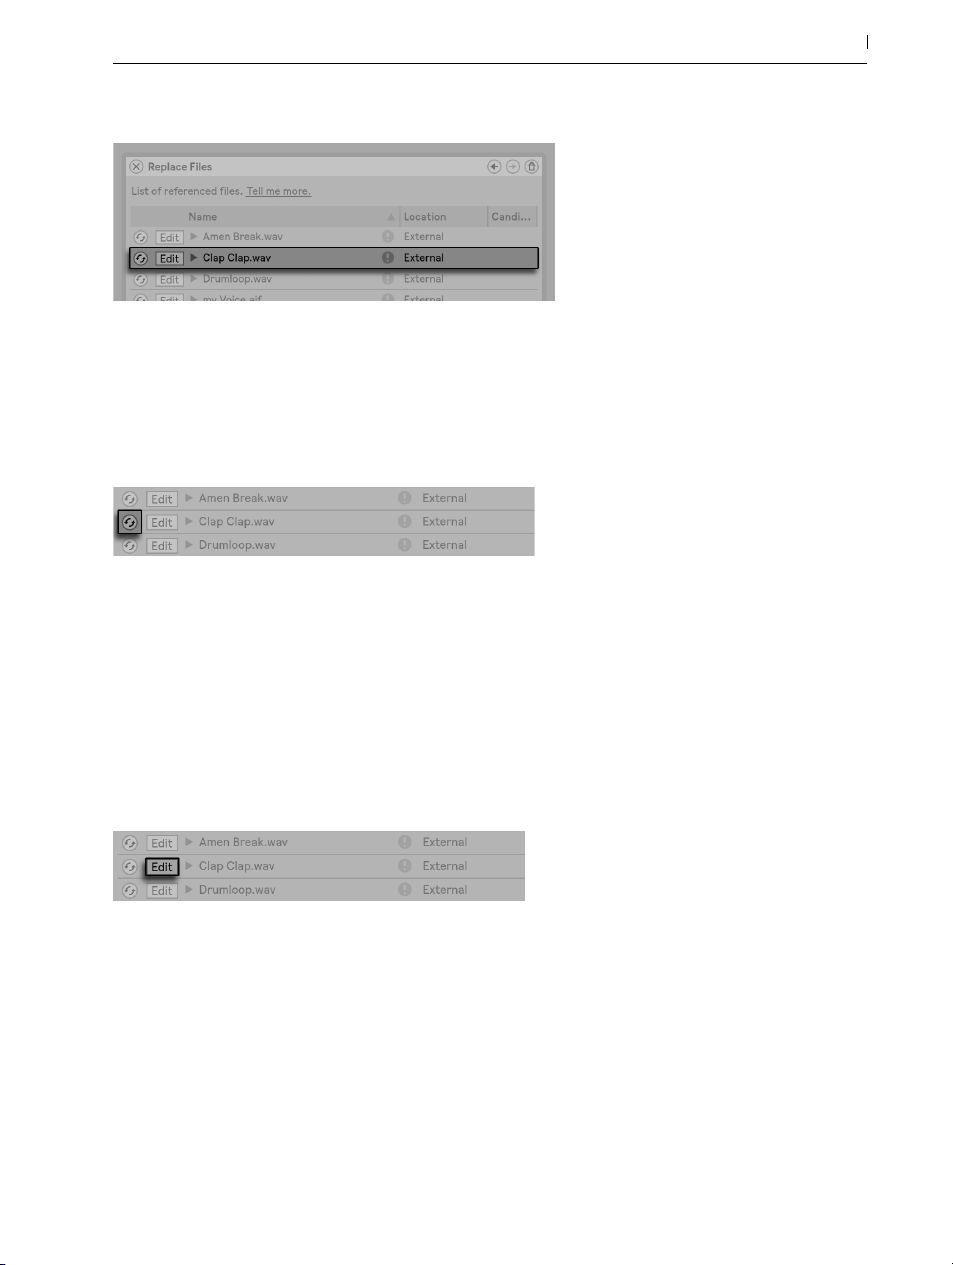
Every Entry in the File Reference List is a Drop Target for Files.
•Hot-swap files — Using the Hot-Swap button at the left-hand side of each entry, you can
quickly browse through alternatives for the file that is currently being referenced. This is like
dragging files here, only quicker.
The File Reference List’s Hot-Swap Button.
83 Managing Files and Sets
•Edit a referenced sample — using an external application (which can be chosen in the
Preferences’ File/Folder tab). Clicking the Edit button will open the referenced sample in
the external application. The sample will remain offline as long as the Edit switch is engaged. For samples used in audio clips, the current set of Warp Markers is retained only if
the sample length remains the same as before. Note that the Edit button is only available
for samples, not for other types of files such as Max for Live devices (page 551).
The File Reference List’s Edit Switch.
•View a file’s location — The Location column states if a file is missing (page 88), or if it
resides in your User Library, a Project or somewhere else (“external“). When unfolded, the
entry shows the specific places in the Set where the file is used.

The File Reference List’s Location Column.
5.6 Live Projects
A Live Project is a folder containing Live-related files that belong together. Consider, for example, work on a piece of music: You start out with an empty Live Set; you record audio and thereby create new sample files; you drag in samples from collections; you save different versions of
the Live Set along the way so that you can go back and compare. Perhaps you also save Live
Clips or device presets that “belong“ to this particular musical piece. The project folder for this
Live Project will maintain all the files related to this piece of music — and Live’s File Manager will
provide the tools you need to manage them (page 87).
84 Managing Files and Sets
5.6.1 Projects and Live Sets
When you save a Live Set under a new name or in a new folder location, Live will create a new
project folder and store the Live Set there — unless you are saving the Live Set into an existing
Live Project. Let’s look at an example to illustrate this process:
We have recorded some audio into a new Live Set. We now save the Live Set under the name
“Tango“ on the Desktop. The Desktop is available in the browser because we have previously
added it as a user folder. Here is the result as displayed by the Live browser:
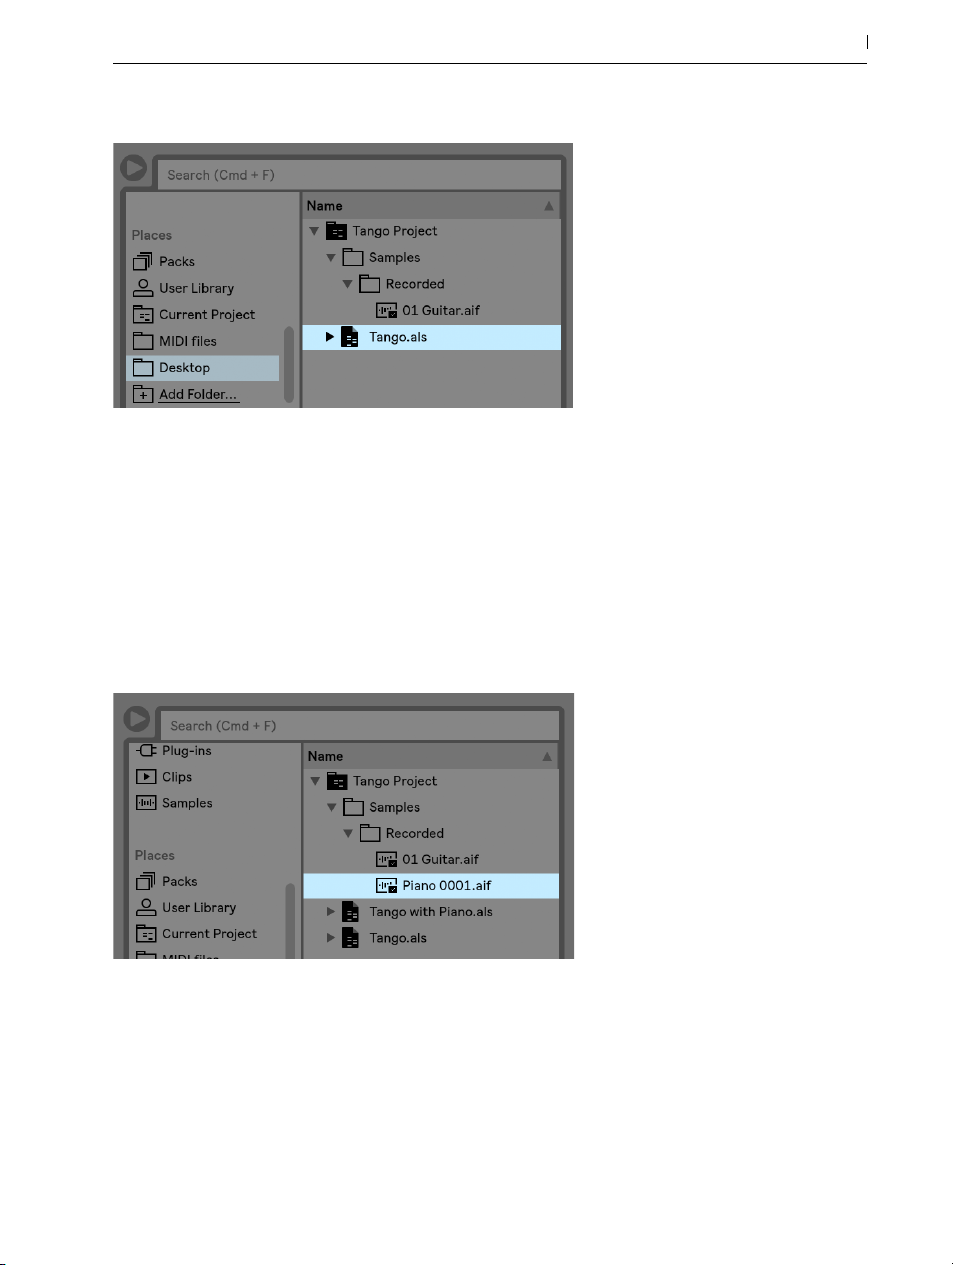
A Live Set and its Recordings in a Live Project Folder.
The project folder (“Tango Project“) contains the Live Set (“Tango.als“) and a Samples folder,
which in turn contains a Recorded folder with two samples in it. Note that the current Project is
also indicated in the title bar of Live’s application window.
Next, we record another track into our Project. We save the modified version of the Live Set under a new name so that we do not lose the previous version. Accepting the Save As command’s
default suggestion, we store the new version of the song in the Tango Project folder.
85 Managing Files and Sets
A Second Version of the Live Set Has Been Added to the Project.
The Tango Project now contains two Live Sets, and its Samples/Recorded folder contains the
samples used by both of them.
And now for something completely different: We choose the File menu’s New Live Set command
and record a samba tune. As this has nothing to do with our tango dabblings, we decide to save
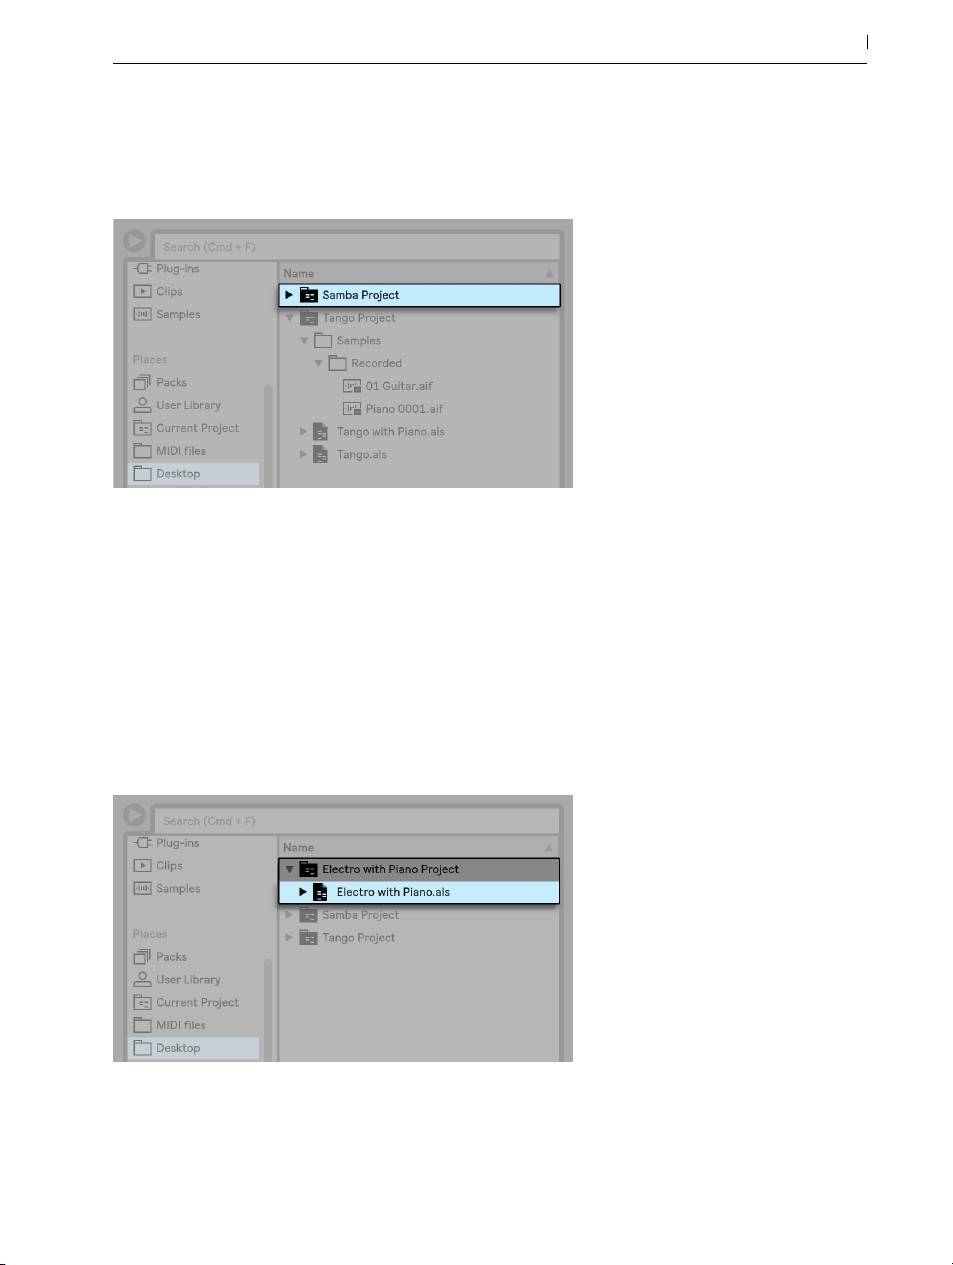
it outside the Tango Project folder, say on the Desktop. Live creates a new project folder named
Samba Project next to Tango Project.
A New Project Was Added Next to Tango Project.
So far we have seen how to create Live Projects and save versions of Live Sets into them. How
do we open a Project? Simply by opening any of its contained Live Sets. Double-clicking “Tango
with Piano.als“ opens that Set and the associated Project — as displayed in Live’s title bar.
86 Managing Files and Sets
Let’s suppose that, in the course of our work on “Tango with Piano.als,“ we get sidetracked: The
piece evolves towards something entirely different, and we feel that it should live in a Project of
its own. So, we “Save As...“ under a new name and in some location outside the current Project,
say the Desktop:
A New Project Was Added by Saving a Live Set Outside its Original Project.

Note that the new project folder has no Samples folder (yet). “Electro with Piano.als“ is still referencing the piano sample from the original Tango Project. There is nothing wrong with this except
for when the Tango Project is moved away or deleted; then “Tango with Piano.als“ will be missing samples. You can prevent this by collecting external files (page 90). Even after the fact,
Live’s tools for searching missing files (page 88) can help solve this problem.
There is actually no need to keep a Project’s Live Set exactly one level below the Project itself.
Within a project folder, you can create any number of sub-folders and move files around to organize them as desired, although you many need to use the File Manager to “teach“ the Project
about the changes you’ve made (page 94).
In general, Live will do what it can to prevent situations such as orphaned (Project-less) Live Sets,
which have the potential of confusing both the user and Live’s file management tools. It cannot,
however, control situations in which Sets or files are moved out of order and become disorganized via the Explorer (Windows)/Finder (Mac).
A note for users of older Live versions: Live does not allow overwriting Live Sets that were created by older major versions to prevent compatibility problems. Instead, you will be requested to
“Save As...“. Doing this will insure that the newly saved Live Sets reside in project folders.
87 Managing Files and Sets
5.6.2 Projects and Presets
By default, new instrument and effect presets are stored in your current Project. At times however, it may make more sense to save a preset to another folder or to your User Library, so that
you can access them from other Projects. You can drag a preset between folders after saving it
(page 264), or simply drag the title bar of the device over a folder in the sidebar, wait for the
content pane to open, and then drop it into the content pane, adding it to the folder.
When saving presets that contain samples to a new location, Live may copy the samples depending on the settings in the Collect Files on Export chooser in the Library Preferences. You can
then type in a new name for the device or confirm the one suggested by Live with [Enter].
5.6.3 Managing Files in a Project
Live’s File Manager offers several convenient tools for managing Projects. Once you’ve opened
a Live Set that is part of the Project you wish to manage, choose the Manage Files command
from the File menu, and then click the Manage Project button. The File Manager will present you
with an overview of the Project’s contents and tools for:
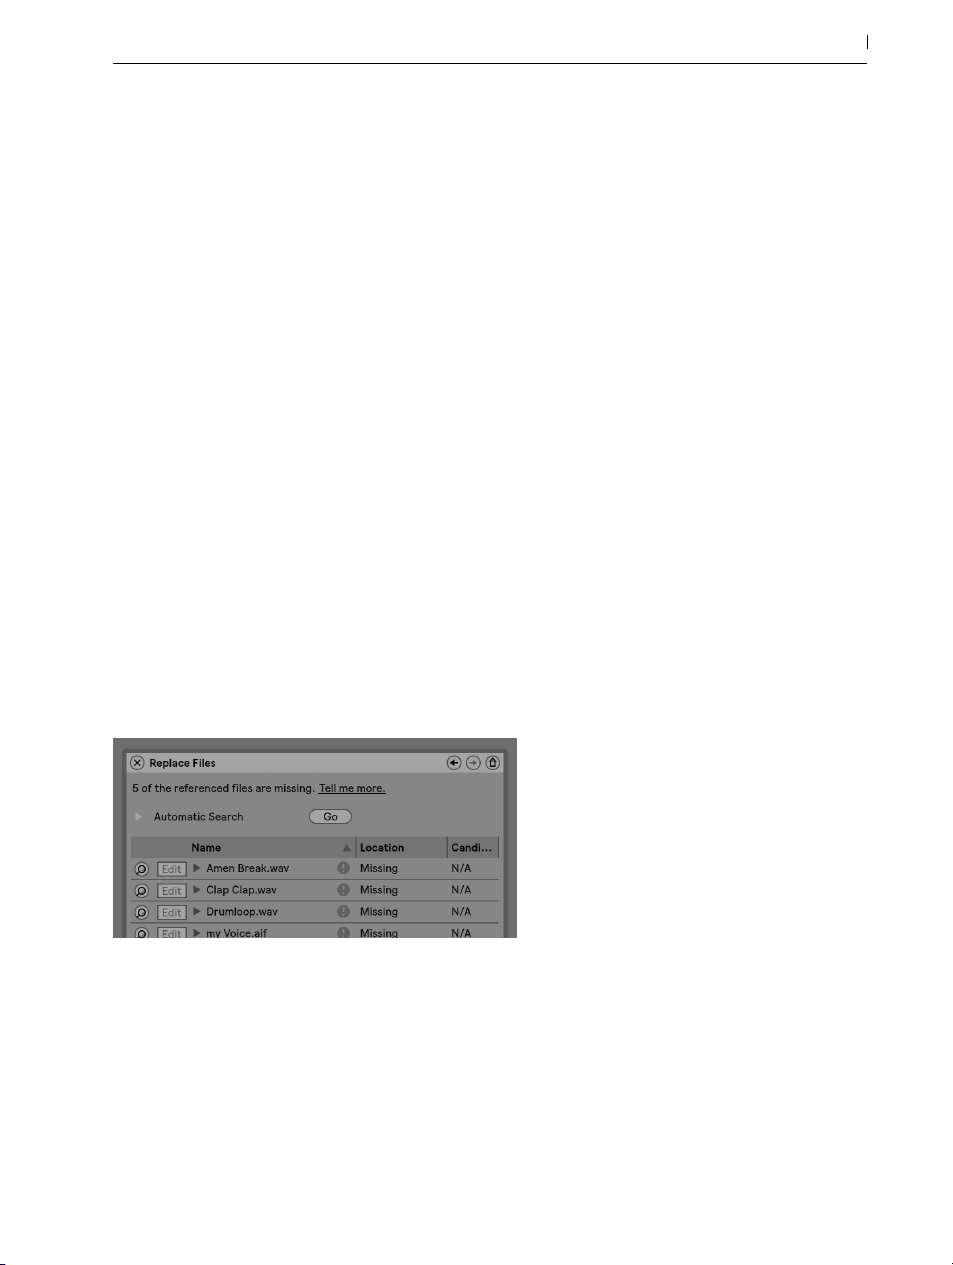
•locating files that the Project is missing;
•collecting external files into the Project (page 90);
•listing unused files in the Project (page 92);
•packing a Project in Pack format (page 93);
5.7 Locating Missing Files
If you load a Live Set, Live Clip or preset that references files which are missing from their referenced locations, Live’s Status Bar (located at the bottom of the main screen) will display a
warning message. Clips and instrument sample slots that reference missing samples will appear
marked “Offline,“ and Live will play silence instead of the missing samples.
Live’s File Manager offers tools for repairing these missing links. Click on the Status Bar message
to access these. (This is actually a shortcut for choosing the Manage Files command from the File
menu, clicking the Manage Set button, and then clicking the Locate button found in the Missing
Files section.) The File Manager will present you with a list of the missing files and associated
controls.
88 Managing Files and Sets
The File Manager’s List of Missing Files.
5.7.1 Manual Repair
To manually fix a broken file reference, locate the missing file in the browser, drag it over to the
File Manager and drop it on the respective line in the list of missing files. Note that Live will not
care if the file you offer is really the file that was missing.
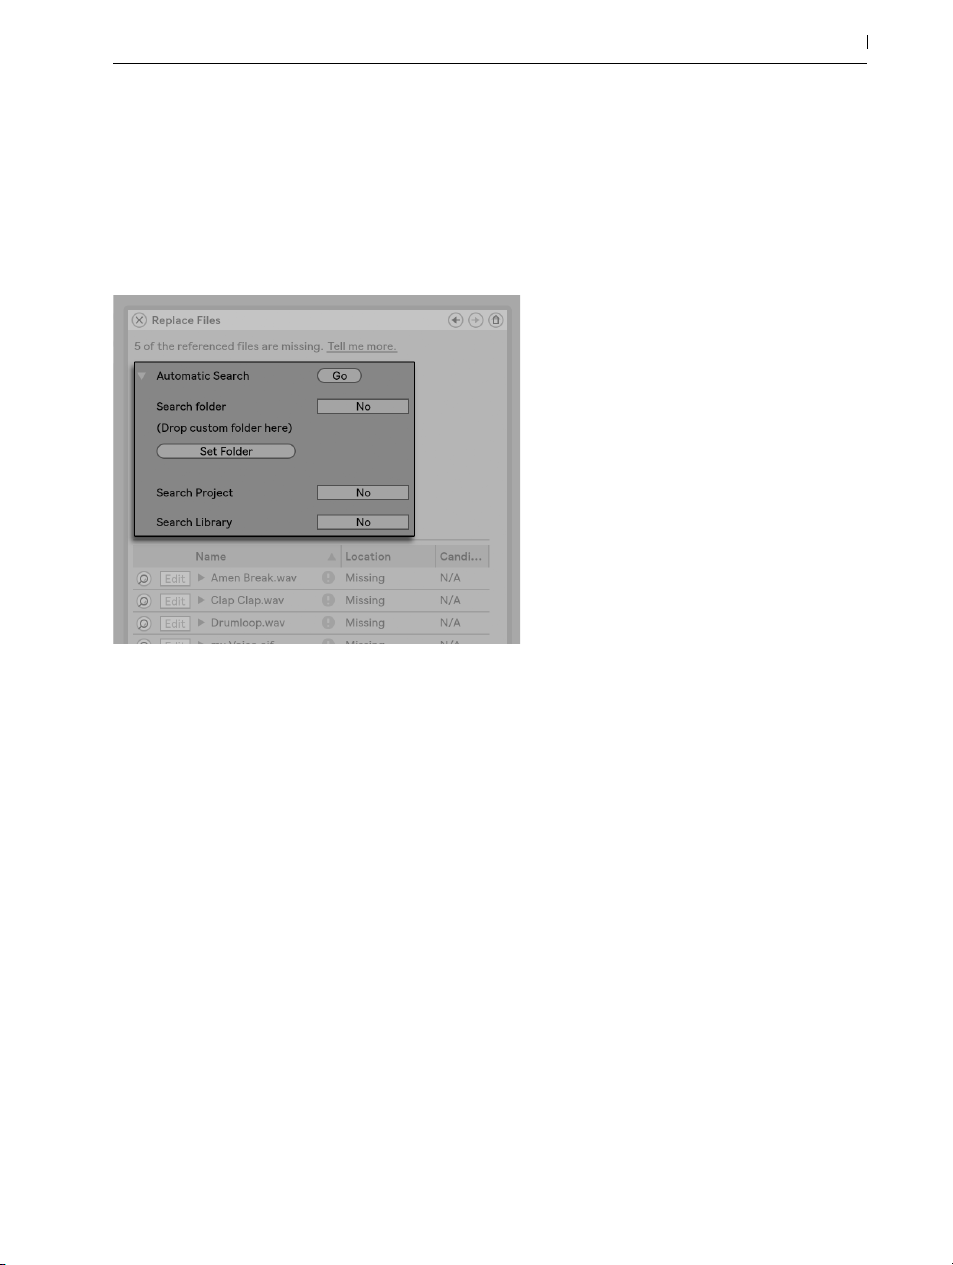
5.7.2 Automatic Repair
Live offers a convenient automatic search function for repairing file references. To send Live on
a search, click the Automatic Search section’s Go button. To reveal detailed options for guiding
the automatic search function, click the neighboring triangular-shaped button.
89 Managing Files and Sets
Automatic Repair Options in the File Manager.
•Search Folder — includes a user-defined folder, as well as any sub-folders, in the search.
To select the folder, click the associated Set Folder button.
•Search Project — includes this Set’s project folder in the search.
•Search Library — includes the Live Library in the search.
For each missing file, the automatic search function may find any number of candidates. Let’s
consider the following cases:
•No candidate found — you can choose another folder and try again, or locate the sample
manually.
•One candidate found — Live accepts the candidate and considers the problem solved.
•Several candidates found — Live requires your assistance: Click the Hot-Swap button (i.e.,
the leftmost item in every line of the list of missing files) to have the browser present the
candidates in Hot-Swap Mode. You can now double-click the candidates in the browser

to load them, as the music plays if you like.
5.8 Collecting External Files
To prevent a Live Set from containing broken file references, Live provides the option of collecting (i.e., copying) them into the Set’s project folder. This is accomplished via the File Manager:
•Choose the Manage Files command from the File menu
•Click the Manage Set button
•Unfold the triangular-shaped fold button in the External Files section.
90 Managing Files and Sets
Options for Collecting External Files.

Separated by location (other Projects, the User Library, installed by factory Packs, and elsewhere — sample collections from external drives, for example), the File Manager provides:
•A file count and the associated disk space used;
•A Show button that will list the files in the browser;
•A Yes/No toggle for engaging or disengaging collection.
Note: Make sure to confirm your choices by clicking the File Manager’s Collect and Save button!
91 Managing Files and Sets
The File Manager’s Collect and Save Button.
The File menu’s Collect All and Save command is a shortcut that collects and saves all external
files referenced by the current Set, including those from Live’s Core Library or other installed
Packs. Note that this can cause a lot of copying, especially if your Live Set uses large multisample collections!
5.8.1 Collect Files on Export
When you save Live Clips, device presets or tracks by dragging them into the Browser, Live manages the copying of associated files based on the selection made in the Collect Files on Export
chooser in the Library Preferences. This chooser provides the following options:
•Always, the default setting, will copy files into the same folder as the clip, preset, or track
without notification.
•When Ask is selected, Live provides a dialog box with options for copying files.

•Never means that files will not be copied when saving.
5.9 Aggregated Locating and Collecting
Instead of having to deal with problems while you are in a creative mode, you might prefer putting aside some dedicated housekeeping time to solve all the problems in one go. Using Live’s
File Manager, you can find missing files and collect external files not only for the current Live Set
but also for:
•The User Library — choose the Manage Files command from the File menu; then click the
Manage User Library button.
•The current Live Project — choose the Manage Files command from the File menu; then
click the Manage Project button.
•Any Live Project — [right-click](PC) / [CTRL-click](Mac) on a Project in the browser’s content pane, and choose the Manage Project option.
92 Managing Files and Sets
•Any selection of Live Sets, Live Clips, Live Presets — [right-click](PC) / [CTRL-click](Mac)
on the respective items in the browser, and choose the Manage Files command.
Remember to click the Collect and Save button at the bottom of the File Manager when you are
finished. Otherwise your changes will be discarded.
5.10 Finding Unused Files
Live’s File Manager can find the unused files in a Project for you. You can then review them and
decide to delete them individually or collectively. When searching for “unused“ files, Live will
inspect each file in a Project folder, checking if it is referenced by any of the Live Sets, Live Clips
or device presets in the Project. If not, the file is regarded as unused — even if other Projects or
programs still use it.
To find the unused files for the currently open Project, choose the Manage Files command from
the File menu, click the Manage Project button, and then click on the triangular-shaped fold button next to “Unused Files“ to access a summary and the Show button. Clicking the Show button

makes the browser list the unused files; there, you can preview samples (page 65) and delete
them if you like.
Note you can also find the unused files from the Library: choose the Manage Files command
from the File menu, then click the Manage Library button, and then see the Unused Files section.
Last but not least, you can find the unused files for all Projects found in a specific folder (and its
sub-folders): [right-click](PC) / [CTRL-click](Mac) on a folder in the browser and choose the
Manage Projects command, then see the Unused Files section. Live inspects each Project individually and labels a file unused even if another Projects in the same folder does use that file. To
prevent losses, you may want to first collect the files into their respective Projects and then purge
the Projects of unused files.
5.11 Packing Projects into Packs
Live’s File Manager provides the option of packing a Live Project in Pack format for convenient
archiving and transfer. To do this, choose the Manage Files command from the File menu, click
the Manage Project button, and then click on the triangular-shaped fold button next to “Packing.“ Click the Create Pack button to bring up a file-select dialog where you can specify the
name and location of a new Pack file. Creating a new Pack from a Project does not affect the
Project. If you want the Project deleted, you can delete it using the browser.
93 Managing Files and Sets
Live employs lossless compression techniques to minimize the file size of Packs. Depending on
the audio materials in a Project, this saves up to 50 percent in file size.
To unpack a Pack (i.e., to restore the original Live Project), double-click the Pack file (.alp), drag
it into the Live main window, or locate it via the File menu’s Install Pack command. Live will then
install the Pack to its default location and it will appear in the Packs label in the browser.
5.12 File Management FAQs
5.12.1 How Do I Create a Project?
A Project is automatically created whenever you save a Live Set, except when you save it into a
preexisting Project.

5.12.2 How Can I Save Presets Into My Current Project?
You can save presets directly to the current project by dragging from the device’s title bar and
dropping into the Current Project label in the browser. You can then use the File Management
tools, collect any referenced samples, etc.
5.12.3 Can I Work On Multiple Versions of a Set?
If you’d like to work on different versions of the same Live Set, save them into the same Project.
This will usually be the Project that was created when you saved the first version of the Live Set. If
a Project contains multiple Live Sets it will only collect one copy of any samples used by the various versions, which can save disk space and help with organization.
5.12.4 Where Should I Save My Live Sets?
You can save Live Sets anywhere you want, but saving to pre-existing Project folders can cause
problems, and should be reserved for special cases. You should only save a Live Set to an existing Project if it is somehow related to the Project — for example, an alternate version of a song
that’s already in the Project.
94 Managing Files and Sets
5.12.5 Can I Use My Own Folder Structure Within a Project Folder?
You can organize your files any way you want within a Project, but you’ll need to use the File
Manager to relink the files that you’ve moved around:
1. In Live’s Browser or via your operating system, reorganize the files and folders within your
Project folder.
2. Navigate to the Project folder in the Browser and choose Manage Project via the [rightclick](PC) / [CTRL-click](Mac) context menu.
3. If you’ve changed the original location of any samples used in the Project, the Missing
Samples section of the File Manager will indicate this. Click the Locate button to search for
the samples.
4. Since you know that your samples are all in the Project folder, unfold Automatic Search.

Then enable the Search Project and Fully Rescan Folders options. Finally, click Go to initiate the search.
5. When searching is complete, click Collect and Save at the bottom of the File Manager to
update the Project.
95 Managing Files and Sets

96 Managing Files and Sets
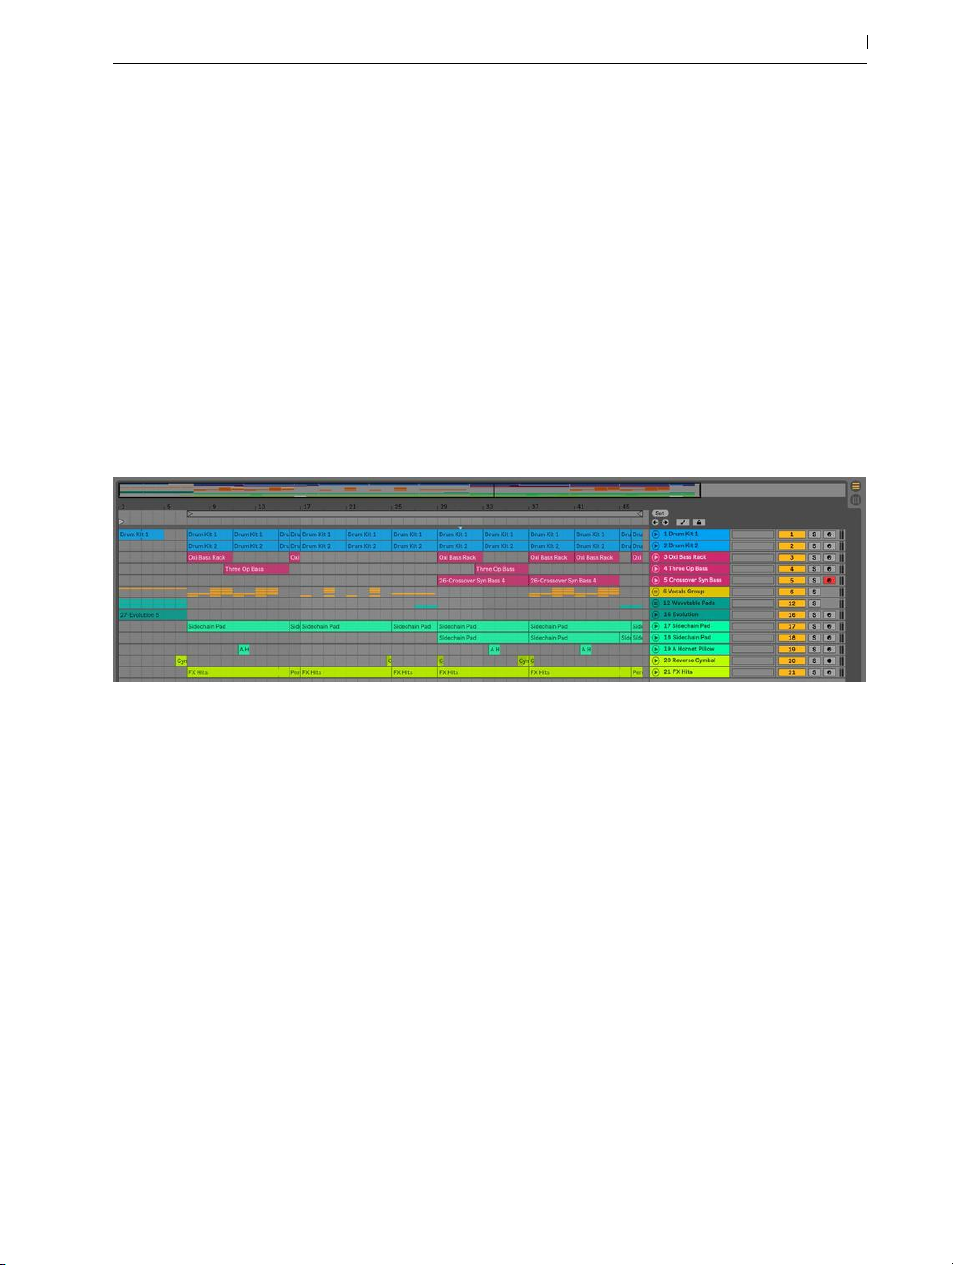
Chapter 6
Arrangement View
The Arrangement View displays the Arrangement, which contains music laid out along a song
timeline, like a multitrack tape.
97 Arrangement View
A Piece of Music in the Arrangement View.
The Arrangement View is a powerful editing tool that easily lets you combine and arrange MIDI,
loops, sound effects, video and complete pieces of music.
6.1 Navigation
Live offers several fast methods for zooming and scrolling the Arrangement display:
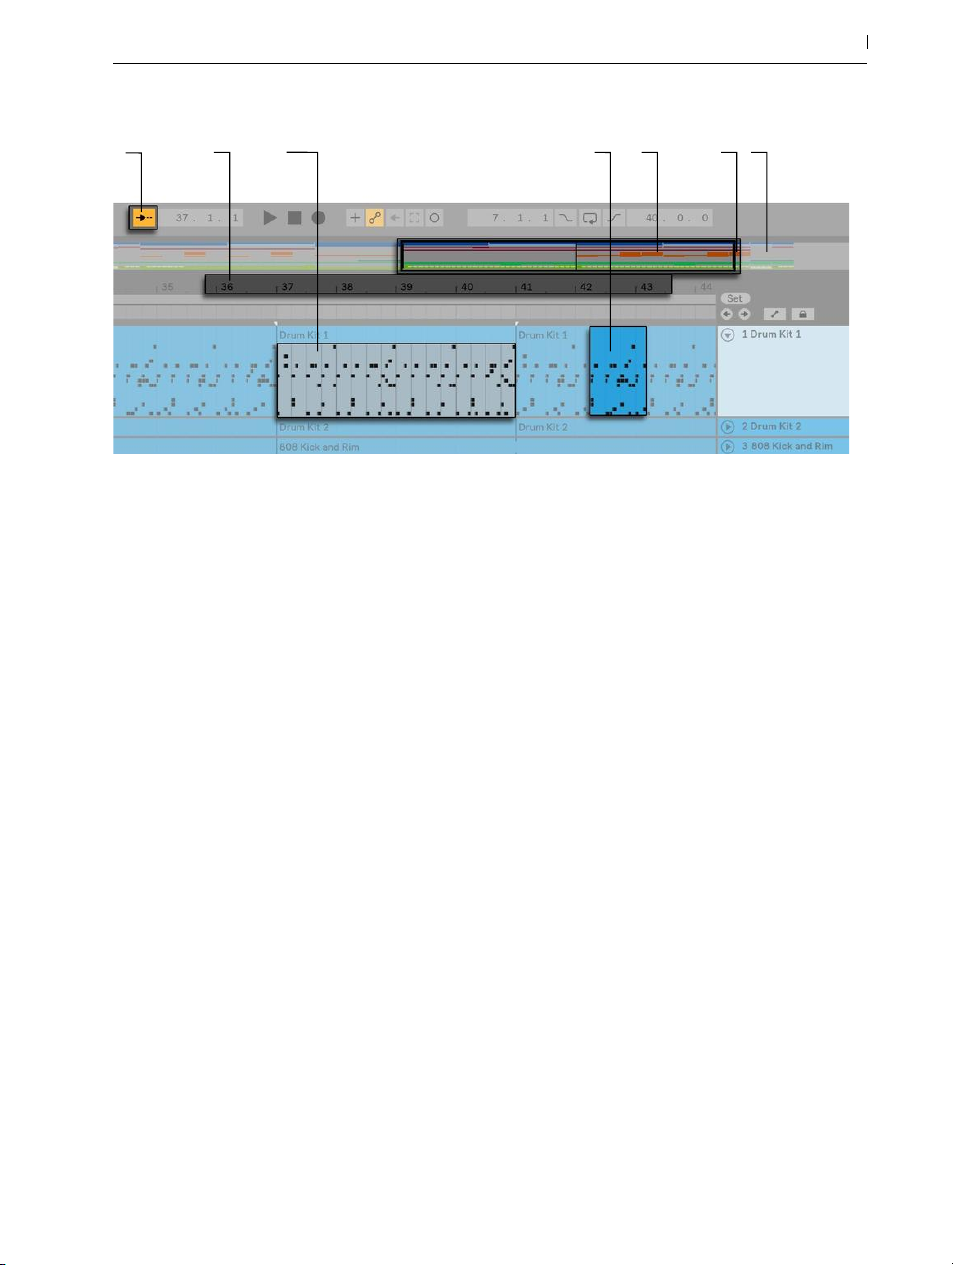
98 Arrangement View
8 1
2-3
4 5 6 7
Navigating the Arrangement View.
1. To smoothly change the zoom level, click and drag vertically in the beat-time ruler at the
top of the Arrangement View (you can also drag horizontally to scroll the display). You can
also
2. To zoom in and out around the current selection progressively, you can use the computer
keyboard’s [+] and [-] keys, or scroll with the mousewheel or trackpad while holding the
[CTRL](PC) / [CMD](Mac) modifier. To “pan“ the display, click and drag while holding the
[CTRL][ALT](PC) / [CMD][ALT](Mac) modifier. Double-clicking in the beat-time ruler also
zooms to the current selection. If nothing is selected, double-clicking the beat-time ruler
zooms out to show the entire Arrangement.
3. To zoom in the current selection completely, press [Z] or use the View menu’s Zoom to Arrangement Time Selection command. (Note that if you select time on a single Arrangement
clip, the Clip View display (page 134) will zoom in on that selected time.) You can revert
back to the previous zoom state by pressing [Shift][Z]. Note that pressing [Shift][Z] another
time will zoom the Arrangement out completely.
4. To vertically zoom a selected track, scroll inside the Track Display Area with the mousewheel or trackpad while holding the [ALT] modifier.
5. The Arrangement Overview is like a “bird’s-eye view“ of your music. It always shows the
complete piece, from start to end. The black rectangular outline represents the part of the
Arrangement that is currently displayed in the Arrangement display below. To scroll the
display, click within the outline and drag left or right; to zoom out and in, drag up and
down.
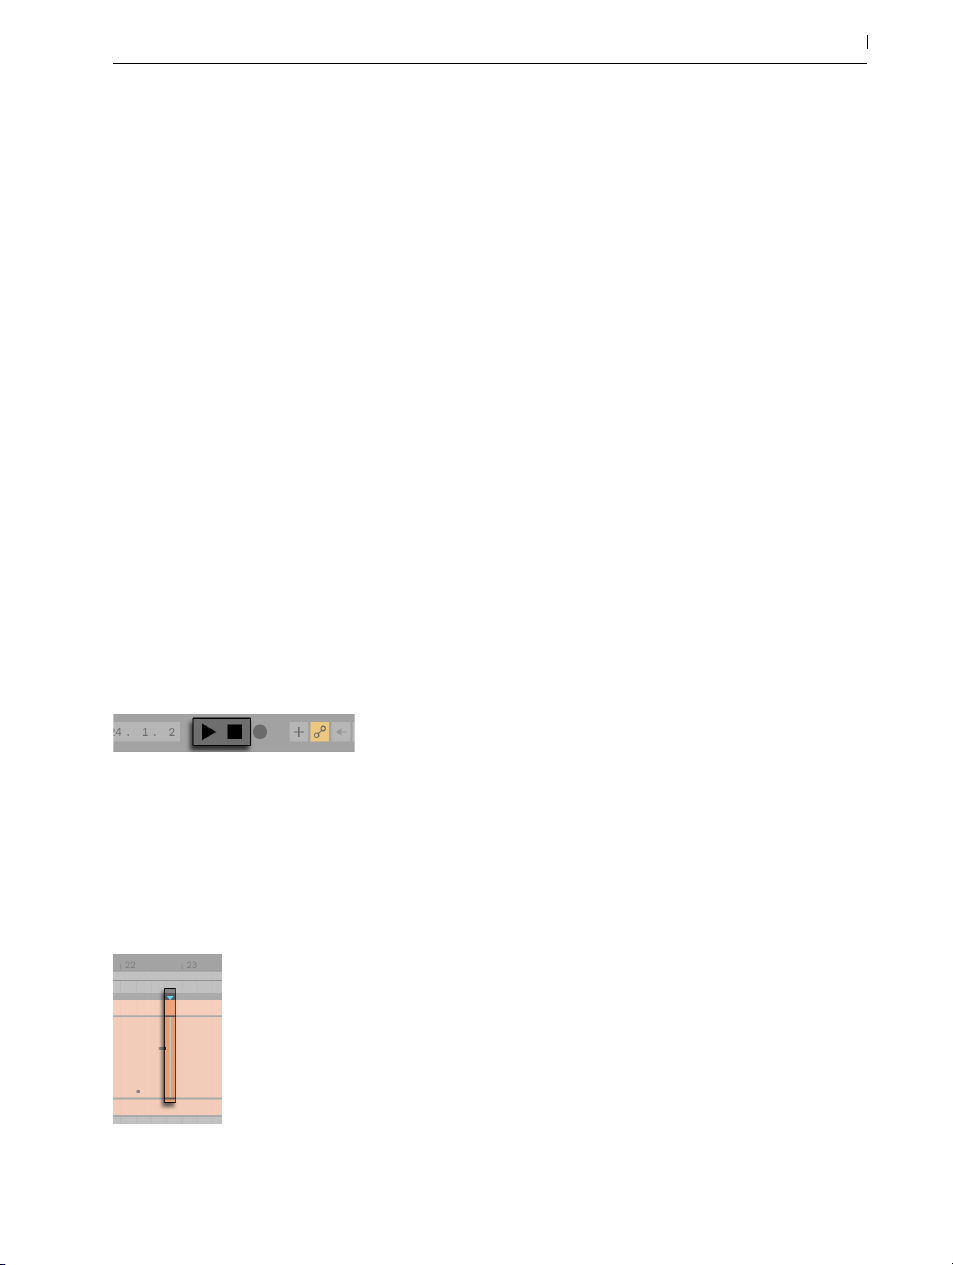
6. To change the displayed part of the Arrangement, drag the outline’s left and right edges.
7. To see a specific part of the Arrangement in more detail, click on it in the Overview and
drag downwards to zoom in around that part. Note that you can also drag horizontally to
scroll the display. Using this method, you can zoom and scroll to focus around any part of
the Arrangement with just one mouse motion.
8. To have the Arrangement display follow the song position and scroll automatically, turn on
the Follow switch, or use the Follow command from the Options menu. Follow will pause if
you make an edit or scroll the view horizontally in the Arrangement. Follow will start again
once you stop or restart playback, or click in the Arrangement or clip scrub area.
6.2 Transport
There are a number of ways to control Live’s transport with the computer keyboard and mouse:
1. You can start Arrangement playback by clicking the Control Bar’s Play button, and stop
playback by clicking the Stop button. Arrangement playback can also be toggled on and
off by pressing the keyboard’s space bar.
99 Arrangement View
The Play and Stop Buttons in the Control Bar.
2. You can set the Arrangement playback position by clicking anywhere along the Arrangement to place the flashing insert marker. You can return the Arrangement play position to
1.1.1 by double-clicking the Stop button or by pressing the Home key (PC) / Function + left
arrow key (Mac).
Arrangement Playback Begins from the Insert Marker.

To continue playback from the position where it last stopped, rather than from the insert
marker, hold down the [Shift] modifier while pressing the space bar.
3. When Permanent Scrub Areas is enabled in Live’s Look/Feel Preferences, clicking in the
scrub area above the tracks will make playback jump to that point. The size of these jumps
is quantized according to the Control Bar’s Quantization menu setting. While the mouse is
held down over the scrub area, a portion of the Arrangement the size of the chosen quantization setting will be repeatedly played. With small quantization settings, or a setting of
“None,“ this allows you to scrub through the music. Activating the Options menu’s Chase
MIDI Notes command allows MIDI notes to play back even if playback begins after the
MIDI note’s start time.
When the Permanent Scrub Areas preference is off, you can still scrub by [Shift]-clicking
anywhere in the scrub area or in the beat time ruler.
100 Arrangement View
Scrubbing Arrangement Playback.
4. The song position can be adjusted numerically using the Control Bar’s Arrangement Position fields.
Setting the Play Position in the Arrangement Position Fields.
The Arrangement Position fields show the song position in bars-beats-sixteenths. To change
the values:
•Click and drag up or down in any of these fields.
•Click and type a number, then hit [Enter].
•Click and decrement or increment the value with the up and down arrow keys .
5. Arrangement playback can be started at a particular point in one of your clips using the
 Loading...