

Page 1

Quick Guide
Table Of Contents
1. Introduction .................................................................................1
2. How to Access ABIT µGuru .......................................................2
3. ABIT EQ.......................................................................................3
3.1 What is ABIT EQ ..........................................................................3
3.2 How to Use ABIT EQ ...................................................................5
3.2.1 Power Supply Voltage .....................................................5
3.2.2 FAN Speed ......................................................................7
3.2.3 Temperature.....................................................................8
3.2.4 Monitor Setting................................................................9
3.2.5 Display Setting ..............................................................11
4. ABIT OC Guru ..........................................................................13
4.1 Turbo Mode .................................................................................13
4.2 F1 Mode.......................................................................................14
5. ABIT FlashMenu .......................................................................16
6. ABIT AudioEQ ..........................................................................18
6.1 Sound Effect ................................................................................19
6.2 S/PDIF .........................................................................................20
6.3 Speaker Configuration.................................................................21
6.4 General ........................................................................................22
7. ABIT FanEQ..............................................................................23
8. ABIT BlackBox..........................................................................25
4200-0394-03 Rev. 2.01 i
Page 2

ABIT µGuru ABIT µGuru
ii ii
Page 3

1. Introduction
ABIT µGuru1 is a fresh Microprocessor developed by ABIT
engineers used only on ABIT motherboards. This processor
combines the current ABIT engineered features into a
user-friendly Windows-based interface, providing users a
perfect environment to maximize PC performance and
stability.
ABIT µGuru family currently includes six categories
1. ABIT EQ
2. ABIT OC Guru
3. ABIT FlashMenu
4. ABIT AudioEQ
5. ABIT FanEQ
6. ABIT BlackBox
Quick Guide
2
:
1
µGuru = micro guru
2
The information in this document is subject to change without notice and does not represent a
commitment on part of the vendor, who assumes no liability or responsibility for any errors that
may appear in this manual.
1
Page 4
ABIT µGuru
2. How to Access ABIT µGuru
You will have to install the driver first by the “Driver &
Utility” CD that came pack with your motherboard. Please
follow its instruction to complete the installation.
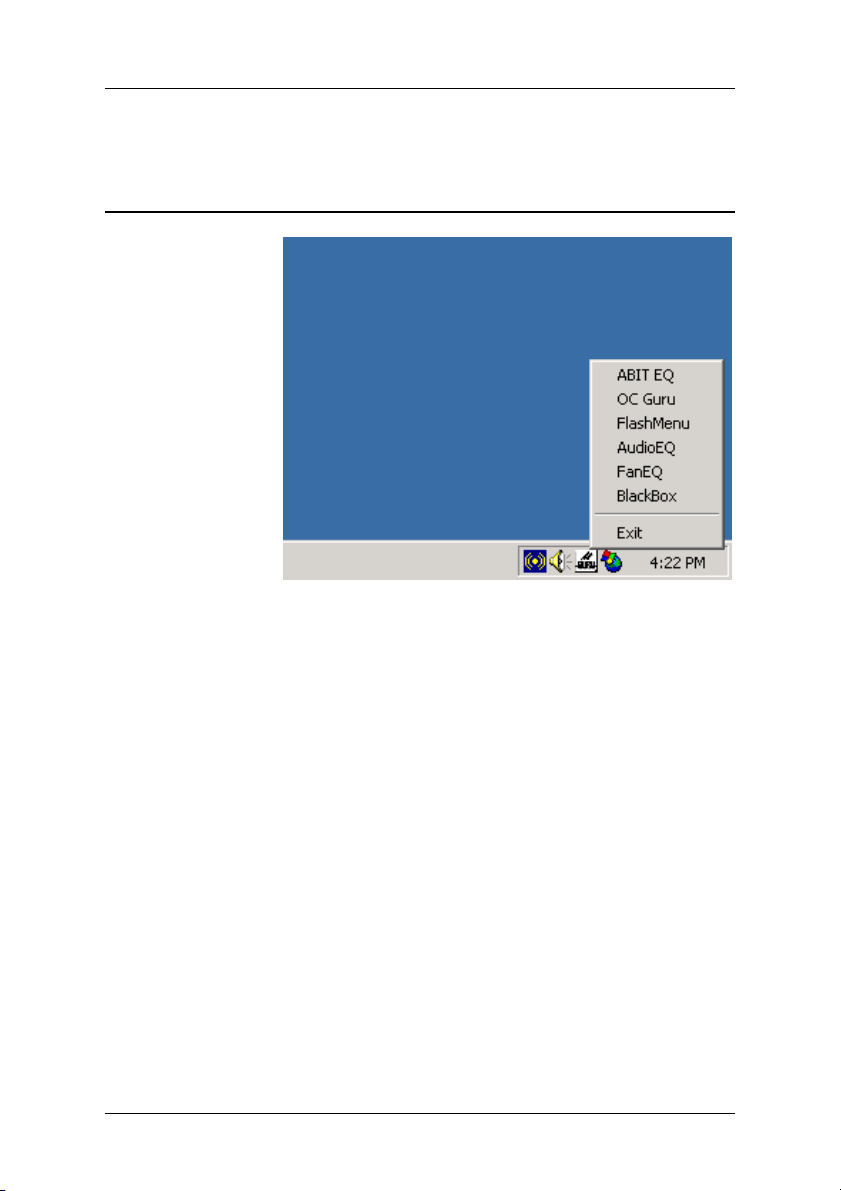
To access the ABIT µGuru, move your mouse to the µGuru
icon located at the status bar, and then right click your mouse.
The µGuru menu spreads up. Move your mouse to one of the
µGuru family members you want, and then left click your
mouse.
2
Page 5
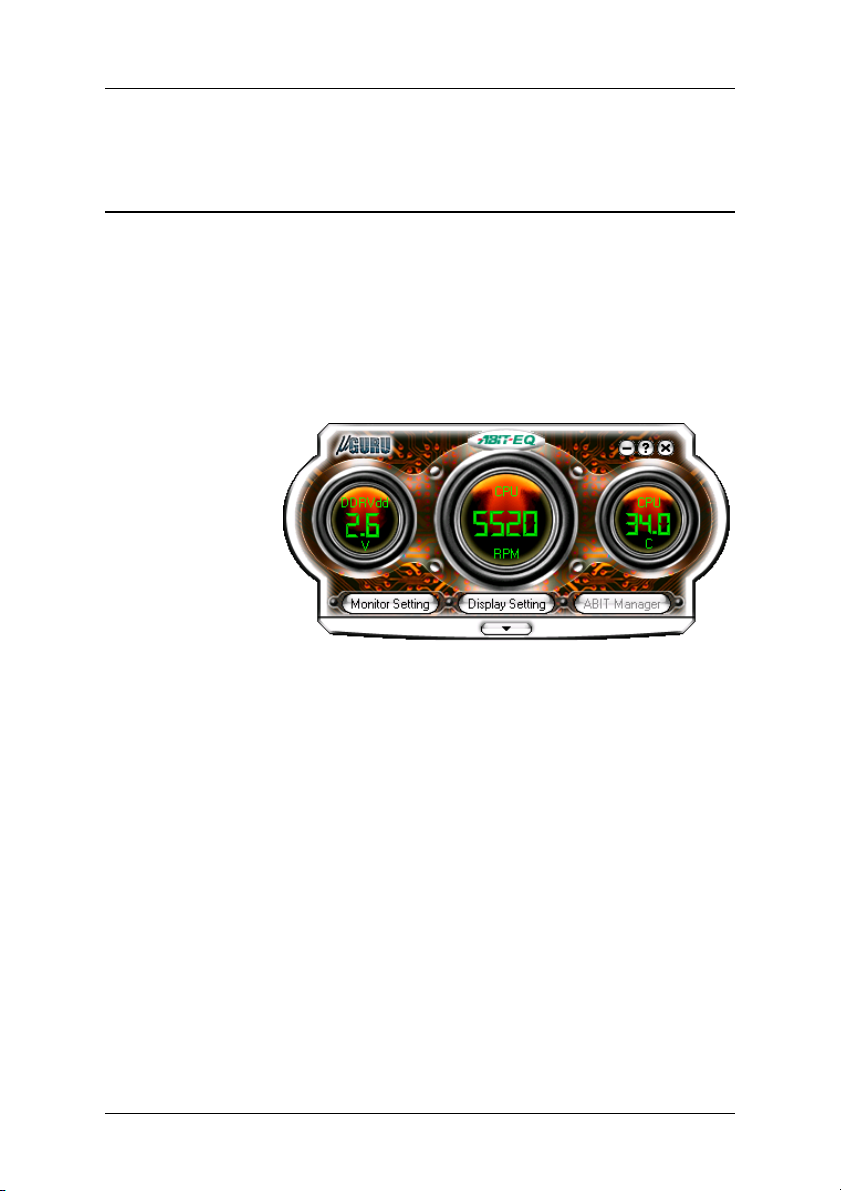
3. ABIT EQ
3.1 What is ABIT EQ
ABIT EQ is a self-diagnostic system for PC based on
motherboards designed and manufactured by ABIT Computer
Corporation. It will protect PC Hardware by monitoring
critical items of Power Supply Voltage, CPU & System Fans
Speed, and CPU & System Temperature.
Quick Guide
• < - > Button:
Click this < - > button on the up-right corner will minimize
the main screen of ABIT EQ to the Windows working bar.
• <?> Button:
Click this <?> button to enter the help menu.
• <X> Button:
Click this <X> button on the up-right corner will exit the
ABIT EQ.
• Monitor Setting:
Click this button to enter the sub-screen of setting the
monitoring values.
3
Page 6

ABIT µGuru
• Display Setting:
Click this button to enter the sub-screen of selecting the
monitoring items.
• Down-pull arrow:
Click this button to pull down a detailed monitoring
sub-screen.
4
Page 7
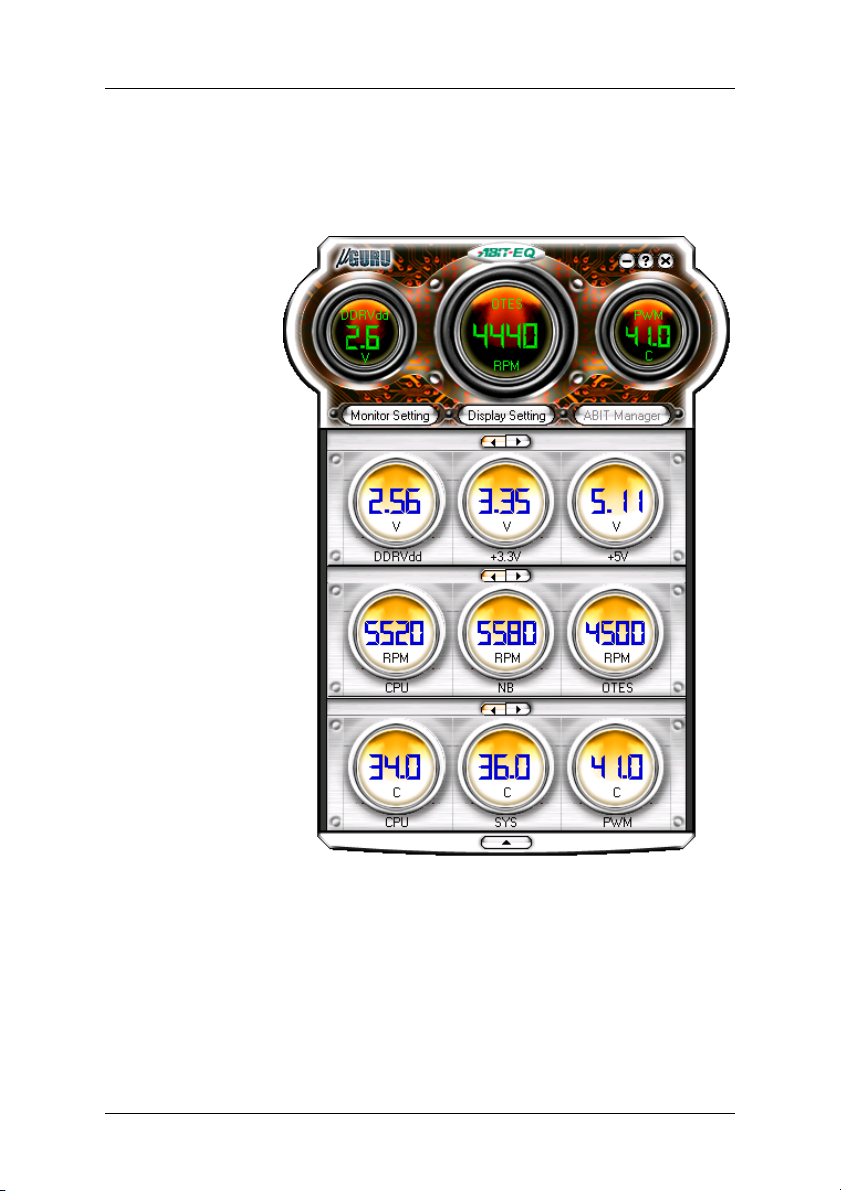
3.2 How to Use ABIT EQ
Quick Guide
3.2.1 Power Supply Voltage
Power Supply usually provides kinds of working voltage for
different devices such as CPU, Chipset, and PCI Bus, etc.
• VCORE:
This column displays the CPU working voltage.
5
Page 8

ABIT µGuru
• +3.3V:
This column displays the working voltage of chipset and
clock generator.
• +5V:
The power supply usually provides +5V for the working
voltage of Most ICs on motherboard. Both ISA bus and PCI
bus are both provided with +5V voltage.
• +12V:
The power supply provides ISA bus several kinds of working
voltage including +5V, +12V, -5V, -12V for different ISA
devices.
• AGPV:
This column displays the working voltage of AGP video
graphics accelerator slot.
• DDRV:
This column displays the working voltage of DDR memory
slot.
• 5VSB:
This column displays the standby voltage when system is in
Suspend Mode.
• VBAT:
This column displays the battery voltage.
Note: These items are for reference only. All the names and
items differ according to each model.
6
Page 9

3.2.2 FAN Speed
• CPU FAN:
• SYS FAN:
Quick Guide
Please check your motherboard to see how many Fan Headers
exist. Usually there will be one CPU Fan, one System Fan,
and/or one Power Fan available, depending on different
motherboard model. When the Fan is not connected or
doesn’t exist, the Fan Speed Column will be indicated by a
black-colored-character “OFF”.
Note: Only the fan with three output pins can be monitored!
The CPU Fan and its heatsink assembly must be installed
directly on the top of CPU to keep it in normal temperature.
When the CPU Fan is running, the Fan Speed Column will
display the number of RPM in blue-colored-character among
the yellow-colored background. If it turns low speed or stops,
the fan speed column will be indicated by RPM in the same
blue-colored-character among the red-colored background.
Note: The CPU may be damaged or operate unstably if the
CPU Fan turns low speed or stops.
The System Fan is usually installed in the chassis to keep the
system chassis in normal temperature.
When the System Fan is running, the Fan Speed Column will
display the number of RPM in blue-colored-character among
the yellow-colored background. If it turns low speed or stops,
the fan speed column will be indicated by RPM in the same
blue-colored-character among the red-colored background.
• NB FAN:
The NB (North Bridge) Fan is usually installed directly on the
top of the North Bridge Chipset to keep it in normal
temperature.
When the NB Fan is running, the Fan Speed Column will
display the number of RPM in blue-colored-character among
the yellow-colored background. If it turns low speed or stops,
the fan speed column will be indicated by RPM in the same
blue-colored-character among the red-colored background.
7
Page 10

ABIT µGuru
3.2.3 Temperature
• SYS Temp:
• CPU Temp:
• PWM Temp:
Note: These items are for reference only. All the names and
items differ according to each model.
Once the CPU/System/PWM temperature exceeds the high
limit set in the “Monitor Setting” menu, the background color
of Temperature Column will turn “Red”. The background
color will turn back to yellow once the temperature gets lower
than the high limit.
The environment (system) temperature can be measured by
an onboard thermal sensor. If the system temperature exceeds
the high limit, the hardware may be damaged or operate
unstably.
The CPU temperature can be measured by an onboard
thermal sensor beneath CPU. If the CPU temperature exceeds
the high limit, the CPU may be damaged or operate unstably.
This device allows the system to monitor the temperature
around the CPU power supplying circuit on motherboard.
Note: These items are for reference only. All the names and
items differ according to each model.
8
Page 11

3.2.4 Monitor Setting
Quick Guide
• Item:
This column lists the monitoring items.
• Value:
This column displays the monitoring value.
• Lo Limit:
This column displays the value of low limit for each item.
• Hi Limit:
This column displays the value of high limit for each item.
Note: Some critical items, such as VCore (CPU voltage),
+3.3V, +5V are recommended NOT to change their default
limit
9
Page 12

ABIT µGuru
• Shutdown:
Check this box to shut down the system 30 (thirty) seconds
after the error detected.
• Load Default:
Click this <Default> button at each item to set its limits to
default value.
Note: Make sure to set all limits to default value after replacing
new CPU to allow the CPU working voltage VCore to be
loaded automatically. To do so, click the <Default Setting>
button and <Apply> button at the bottom of the main screen.
• Voltage Setting:
The blue bar represents the low limit. The red bar represents
the high limit. Use the mouse button to change these low and
high limits by adjusting the color bar.
• Fan Setting:
The value in this column represents the fan speed per minute.
• Temperature Setting:
The value in this column represents the temperature detected.
10
• Centigrade/Fahrenheit:
Check one of these two boxes to select the
temperature-measuring unit.
• Default Setting:
To set all the settings to their default value, click this
<Default Setting> button and then click the <Apply> button
to activate the default settings.
• Apply:
To activate the new settings, click this <Apply> button make
it effective at once.
Page 13

• Cancel:
To cancel the new settings, click this <Cancel> button to exit
the Monitor Setting.
3.2.5 Display Setting
Quick Guide
• Display Item List:
This column lists all the items you may monitor.
• Main Screen:
This column lists the selected monitoring items from
“Display Item List” to display on the “Main Screen”.
• Sub Screen:
This column lists the selected monitoring items from
“Display Item List” to display on the “Sub Screen”.
• Add >>:
Click this button to add the selected items from the column of
<Display Item List> to the main and/or sub screen.
11
Page 14

ABIT µGuru
• Select All:
Click this button to add all the items from the column of
<Display Item List> to the main and/or sub screen.
• Remove:
Click this button to remove the selected items from the
column of the main and/or sub screen.
• Apply:
Click this <Apply> button to make the new settings effective
at once.
• Warning alert by E-Mail:
Check this box if you want the ABIT EQ to send out a
warning message by E-Mail. You may type in the mailing
address in the blank spaces.
• Error Log Recording:
Check this box if you want to record the error log. To view
the error log in text form, you may click the <View Error
Log> button.
12
• Run ABIT EQ when system start up:
Check this box if you want to run the ABIT EQ after starting
the system.
Page 15

4. ABIT OC Guru
ABIT OC Guru is a Windows-based over clocking utility to
automatically and immediately over clocks the external clock
for an extra hit of juice.
All settings adjusted under ABIT OC Guru will be displayed
in real-time, allowing users the most control over their
systems, as well as instant hardware gratification, and save it
into different settings.
ABIT OC Guru utilizes hard ware technique to protect the
act of over clocking failure. Once the system fails by over
clocking, users can reset the system to have it rebooted, and
then the system will be back to its previous optimized setting.
4.1 Turbo Mode
Quick Guide
• Ext. Clock:
Drag and pull this slider bar to adjust the external clock you
need.
13
Page 16

ABIT µGuru
• CPU Info:
• Save:
• Add:
• Remove:
• Apply:
• Exit:
4.2 F1 Mode
Your CPU information will be displayed in this column.
Save the current setting.
Add a new name to do the setting.
Remove the current setting from the name previously
specified.
Apply the new setting.
Exit this program.
14
Page 17

Quick Guide
• Ext. Clock:
Drag and pull this slider bar to adjust the external clock you
need.
• CPU Voltage:
Drag and pull this slider bar to adjust the CPU core voltage
you need.
• AGP Voltage:
Click the down-pull arrow to select the AGP slot voltage you
need.
• DDR Voltage:
Click the down-pull arrow to select the DRAM memory slot
voltage you need.
• Save:
Save the current setting.
• Add:
Add a new name to do the setting.
• Remove:
Remove the current setting from the name previously
specified.
• Apply:
Apply the new setting.
• Exit:
Exit this program.
15
Page 18

ABIT µGuru
5. ABIT FlashMenu
ABIT FlashMenu is the most stable Windows-based BIOS
flash available. No more worries from crashing. With one
click of BIOS updating, ABIT users can flash their BIOS
more easily and in less time.
•
Click this button to toggle this program.
16
•
Click this button to link to ABIT’s Technical Support Web
Site.
• Update From File:
Click this button to update your BIOS by the BIOS file
previously downloaded and stored in your PC.
• Save BIOS:
Click this button to save the current BIOS version run by
your PC.
• One Click LiveUpdate:
Click this button to update your BIOS without any further
prompt.
Page 19

Quick Guide
You must have your system connected to the Web. The
program will find the path to ABIT’s Web Site and do the
BIOS update automatically.
• LiveUpdate Step by Step:
Click this button to update your BIOS step by step.
You must have your system connected to the Web. The
program will find the path to ABIT’s Web Site and prompt
you to do the BIOS update step by step.
• Stop:
Click this button to stop downloading the BIOS.
• Setting:
Click this button to enter the sub-screen of “Advance
Setting”.
• About:
Click this button to bring out the version screen.
17
Page 20

ABIT µGuru
6. ABIT AudioEQ
ABIT AudioEQ uses the Realtek ALC658 Codec, designed
by ABIT for audiophiles, musicians and gamers to bring the
richest, warmest sound to your home PC. Audio EQ offers
high quality 5.1-Channel surround sound of better than 95dB
SNR and supports major game audio technologies including
EAX 1.0/2.0, DirectSound 3D, A3D, HRTF3D, and Sensaura
3D. Users can adjust speaker configuration, equalizer and
sound effects for more control over their audio experience.
ABIT AudioEQ also uses Jack Sensing Technology to
inform users of an inappropriate peripheral connection. No
more confusion among Line-in, Line-out, and Mic-in
selection.
18
There are four main functions in ABIT AudioEQ: (1) Sound
Effect, (2) S/PDIF, (3) Speaker Configuration, and (4)
General.
Page 21

6.1 Sound Effect
There are five pre-determined environmental types of main
Sound Effect shown on user interface.
• Under Water
Quick Guide
•
•
•
•
Auditorium
Bathroom
Sewer Pipe
Arena
You can also select various types of reverbs that simulate
various environments by clicking this button.
19
Page 22

ABIT µGuru
6.2 S/PDIF
This page allows you to control the settings for the Digital
Audio input and output. S/PDIF is the acronym for
industry-wide standard called Sony/Philips Digital Interface.
This is the signal typically labeled “Digital Output” on the
back of a newer generation CD-Player or similar “Digital
Audio” consumer devices.
20
Page 23

6.3 Speaker Configuration
This page allows you to configure the speakers’ output.
• Speakers Type:
Select the correct type of your speakers from “Headphone”,
“2CH Speaker”, “4CH Speaker”, and “6CH Speaker”.
Quick Guide
• Swap Center / Subwoofer Output:
Swap the sound output between Center and Subwoofer
speaker. There is no need to reconnect the wiring between
these two speakers.
• Auto Test:
Click this button to start auto testing of verifying the speakers
connection and orientation.
21
Page 24

ABIT µGuru
6.4 General
This information tab provides detailed information about your
sound system. You can also choose the language of your user
interface here.
22
Page 25

7. ABIT FanEQ
The “ABIT FanEQ” intelligently and automatically adjusts
CPU fan speed according to system load and temperature. It
lowers fan speed when CPU and Chipset temperature is
decreased due to lighter system load, ensuring a quiet
computing environment. Accompanied with the almost
noiseless environment is the eager for more power saving,
performance increasing, and easing off CPU loading.
There are three main categories to do the monitoring: “CPU
Fan”, “NB Fan”, and “OTES Fan”
3
Quick Guide
.
The “CPU FanEQ” controls the speed of the fan connected to
“CPU fan header” according to the reference temperature
measured from the CPU thermal sensor only.
3
These names differ upon different motherboard. The category OTES Fan might be replaced
with SYS Fan or AUX Fan.
23
Page 26

ABIT µGuru
The “NB FanEQ” controls the speed of the fan connected to
“NB fan header” according to the reference temperature
measured among the CPU, SYS, or PWM thermal sensors.
The “OTES FanEQ” controls the speed of the fan connected
to “SYS fan header” or “AUX fan header” according to the
reference temperature measured among the CPU, SYS, or
PWM thermal sensors.
Each monitoring category comes with three pre-determined
“Cool”, “Quiet”, and “Normal” modes to choose. The “Cool”
mode allows a faster fan-speed while as the “Quiet” mode
allows a slower fan-speed than the one set in “Normal” mode.
Besides these pre-determined modes, you can also determine
your own speed-temperature ratio by selecting the “User
Define” mode to adjust the “Low Temperature” and “High
Temperature” range manually.
The fan will run at the slowest speed auto-detected by FanEQ
when the actual temperature measured is lower than the
user-defined low-temperature point. The fan gradually
increases the speed when the actual temperature measured is
gaining higher. The fan finally run at full speed when the
actual temperature measured is higher than the user-defined
high-temperature point.
To disable this FanEQ function in each monitoring categories,
simply check the “Disable FanEQ” box. The fan will run at
its full speed regardless of how the temperature is.
24
Page 27

8. ABIT BlackBox
As the name depicted, ABIT BlackBox acts like the black
box found on aircrafts. When your system crashes, it will
record information pertinent to your system and problem,
such as CPU Type, CPU speed, memory size, and a summary
of devices presented in your PC into a text file. You can then
automatically e-mail ABIT for technical support with this text
file. ABIT will then be able to determine your problem and
will e-mail you back directly with solution.
Quick Guide
There are six pages of documentation you will need to fill in
after entering the ABIT BlackBox: (1) User Info, (2) CPU &
Memory, (3), HDD & PCI Card, (4) USB, (5) MB, and (6)
Software Info.
• Auto Detect:
Besides the manually documentation filling, all the hardware
information can be detected automatically by clicking this
button.
Note: You still have to fill in your problem in the “Symptom
Description” box manually.
25
Page 28

ABIT µGuru
• Send Mail to ABIT:
After finishing the documentation, you can click this button
to send the text file of your problem by e-mail to ABIT for
help.
• Exit:
Click this button to cancel and exit the BlackBox.
26
 Loading...