

Page 1
ABIT R9200SE-DT/R9200SE-T
UUSSEERR’’SS GGUUIIDDEE
1
Page 2

Features & Specifications
Powered by the RADEON
On-board 64/128MB DDR Memory
4 parallel rendering pipelines process up to 1.1 billion pixels per
second
High performance 2nd generation hardware transform & lighting
engine
Advanced vertex shader support for the latest programmable
effects
Full support for DirectX
shaders in hardware
1.4 pixel shaders support up to 22 instructions and up to 6
textures per rendering pass
Vertex Shaders support vertex programs up to 128 instructions
Complete feature set also supported in OpenGL
Programmable Shaders provide enhanced 3D effects in over 100
existing and upcoming game titles
Image quality enhancement features for Direct3D™ and
OpenGL
®
applications
Programmable full-scene anti-aliasing supports 2 to 6 samples
with user selectable performance and quality modes
Advanced anisotropic filtering supports 2 to 16 samples for high
quality texture rendering with minimal performance impact
Lossless Z-Buffer Compression and Fast Z-Buffer Clear reduce
memory bandwidth by up to 25%
FULLSTREAM™ Hardware accelerated de-blocking of Internet
video streams
VIDEO IMMERSION™ II delivers industry-leading DVD playback
Integrated MPEG-2 decode including iDCT and motion
compensation for top quality DVD with lowest CPU usage
Unique Adaptive per-pixel de-interlacing feature combines the
best elements of the "bob" and "add-field" (weave) techniques
YUV to RGB color space conversion
TM
9200 SE Visual Processing Unit
®
8.1 programmable pixel and vertex
®
via extensions
Back-end scaler delivers top quality playback
4-tap horizontal and vertical filtering
Filtered display of images up to 1920 pixels wide
Hardware mirroring for flipping video images in video
conferencing systems
Supports 8-bit alpha blending and video keying for effective
overlay of video and graphics
Dual display to drive two displays simultaneously with
independent resolutions and refresh rates
HYDRAVISION™ software provides complete control over
multi-display configurations with a user-friendly interface
400MHz Dual integrated DACs with 10-bit per channel palette
Integrated DVI-compliant 165MHz TMDS transmitter
Integrated TV-Out support up to 1024x768 resolution
Operating Systems Support
Windows
®
XP/2000/Me
System Requirements
®
Intel
Pentium® 4, AMD® Athlon® or higher with AGP 8X (0.8V),
4X (1.5V) bus
128MB of system memory
Installation software requires CD/DVD ROM drive
Order Information
Model Spec Description
R9200SE-DT 128MB DDR, TV-Out, DVI-I
R9200SE-T 64MB DDR, TV-Out
2
Page 3

Card Installation
This graphics card can only be installed in a motherboard with AGP
slot. Please handle this card with care and make sure to unplug the
power supply of your system before installation.
New Systems:
1. Unplug all power cords of your computer.
2. Remove computer
chassis cover.
3. Locate the AGP slot on
your motherboard.
4. Remove the metal
bracket corresponding to
the AGP slot. Keep the
screw.
5. Align this card to the AGP
slot. Hold the card’s
edges and insert it into
the slot without using
excessive force or
pressing any components
on the card. Make sure it
is firmly and completely
fixed into the slot.
6. Secure this card’s mounting bracket to the back panel of
computer chassis with the screw removed from the metal
bracket.
7. Replace the chassis cover.
Systems with Existing VGA Card:
1. Change the display driver to Standard VGA.
2. Shut down your computer and unplug all power cords.
3. Replace the existing VGA card with this new card.
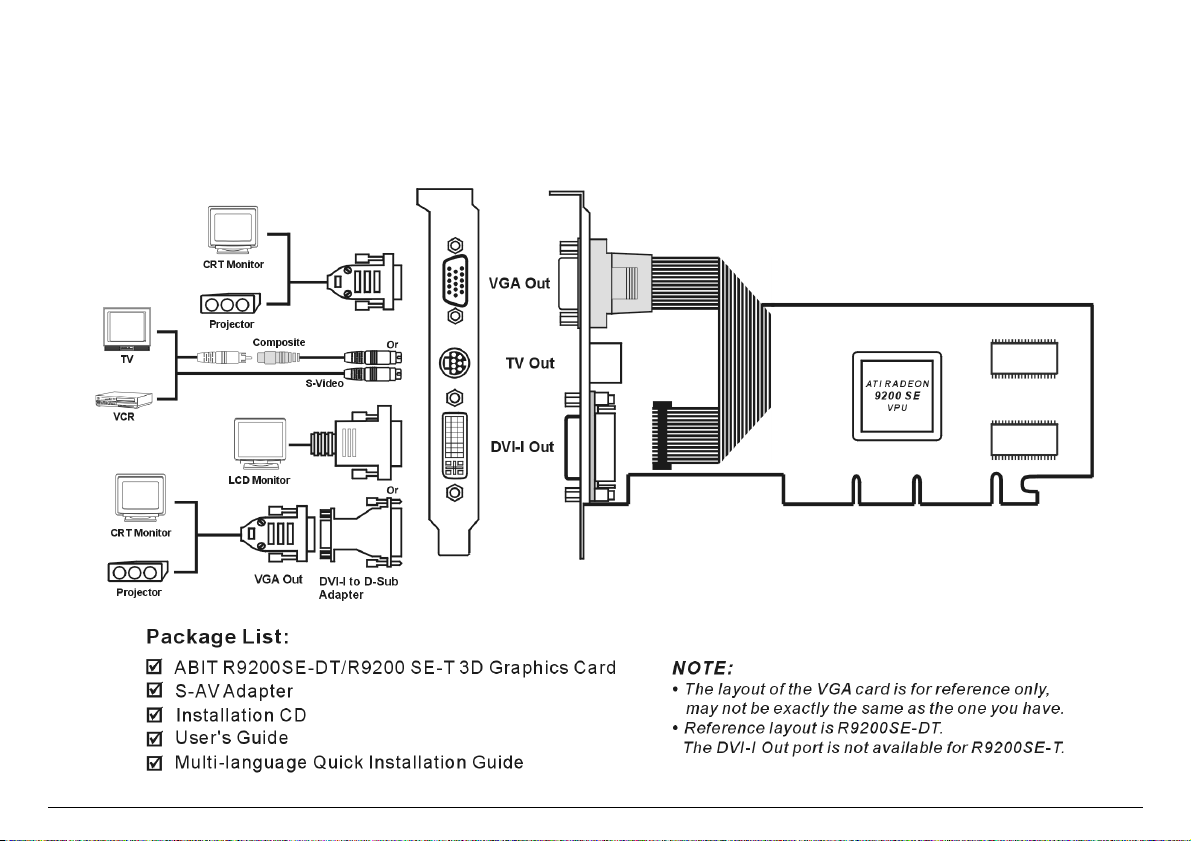
Your graphics card is now installed. Before restarting your computer,
connect PC monitor or other display devices to this card.
Driver Installation
The contents of the Installation CD that came with this card are subject
to change at any time without notice. The latest driver for this board is
also downloadable from our Web site at http://www.abit.com.tw.
The installation procedures and screen shots shown here are based
on Windows XP operating system. For those of other OS, please
follow its on-screen instruction.
Insert the Installation CD into
CD-ROM drive, it should execute
the installation program
automatically. If not, double-click
the execution file at the main
directory of this CD to enter the
installation menu.
1. After entering the installation
menu, move your curser to
[Drivers] tab. Click [ATI
Official CATALYST Drivers].
2. The welcome screen appears,
click “Next>” to start
installation.
3. Click “Yes” to continue.
3
Page 4

4. Select the component you
want to install to enter
further installation.
5. Click “Continue Anyway”.
6. Click “Continue Anyway”.
7. Choose “Yes, I want to
restart my computer now”,
and click “Finish” to
complete setup.
Display Properties
After you have completed the driver installation, the Setup program
adds many specific options to the Windows-based Display Properties.
You can configure the specific display properties of the VGA card to
obtain optimized performance.
®
To use the Display Properties, access the Windows
and then double-click Display to enter, or you may right-click the
Windows
shown below will appear on your screen.
NOTE: The figure shown here is for your reference only. The actual
information would vary by models or by operating systems.
Click Advanced button to open the Properties dialog box for the
video adapter that appears in Display.
®
desktop, click “Properties” “Settings” to enter. The figure
Control Panel
4
 Loading...