

Page 1

G740A/G740B Graphics Accelerator Card
Installation Guide and User’s Manual
Page 2

Page 3

Table of Contents
Chapter 1 Introduction .....................................................................1-1
What’s in the box?..................................................................1-1
The Software and Supporting Documentation..........................1-1
About the G740A/G740B Graphics Accelerator Card..............1-1
Full Hardware Acceleration of Key 3D Features:..................... 1-2
Excellent 2D and Video Performance:.....................................1-2
Layout diagram....................................................................... 1-3
Chapter 2 Installation ....................................................................... 2-1
System Recommendations....................................................... 2-1
Installation Guide.................................................................... 2-1
Chapter 3 Troubleshooting and Support ........................................... 3-1
Troubleshooting Guidelines..................................................... 3-1
Gathering Information ................................................... 3-1
The Symptom Table....................................................... 3-2
The Solution Table......................................................... 3-2
Technical Support................................................................... 3-3
Chapter 4 Technical Information...................................................... 4-1
Display Information ................................................................4-1
DDC Monitor Support.................................................... 4-1
Mechanical / Thermal Specifications....................................... 4-1
Connector Descriptions...........................................................4-2
Part No: MN-126-2B0-61 Rev. 1.10
Page 4

Page 5
Introduction 1-1
Chapter 1 Introduction
What’ s in the box?
Read through this section to familiarize yourself with everything that is
included with the G740A/G740B Graphics Accelerator card.
The Software and Supporting Documentation
The software and drivers needed to properly install and set up the
G740A/G740B Graphics Accelerator Card are on the included CD-ROM, with
help files to assist you in making configuration changes. This user’s manual
will give you detailed instructions on how to install the G740A/G740B
Graphics Accelerator card and software.
About the G740A/G740B Graphics Accelerator Card
• Designed for the Accelerated Graphics Port (AGP) 1.0 Specification
• Optimized for AGP 2x and direct memory execution modes
• 4MB SGRAM/8MB SDRAM local frame buffer memory
• Meets all Microsoft PC’97 hardware design requirements
• Supports major 3D standards: DirectX, OpenGL (under Windows NT*)
The G740A/G740B Graphics Accelerator is AGP done right!
Page 6

1-2 Chapter 1
Full Hardware Acceleration of Key 3D Features:
l 3D setup engine
l Gouraud and flat shading
l Colored specular highlighting
l Texture mip-mapping and bilinear filtering
l Texture map color/chroma-keying
l Texture map perspective correction
l Texture map blending
l 16-bit z-buffering
l Translucency: source alpha blending, per-vertex fogging, alpha and pattern
stippling
l Edge and line antialiasing
l Color dithering
Excellent 2D and Video Performance:
l Supports all standard PC monitor display resolutions up to 1600x1200
l Supports PC monitor (VGA) display vertical refresh rates up to 85Hz non-
interlaced
l MPEG1 video playback
l Supports video capture
l Has headers for Version 1.4 compliant Video Module Interface (VMI) for
connecting optional advanced feature modules (e.g. MPEG module)
Page 7
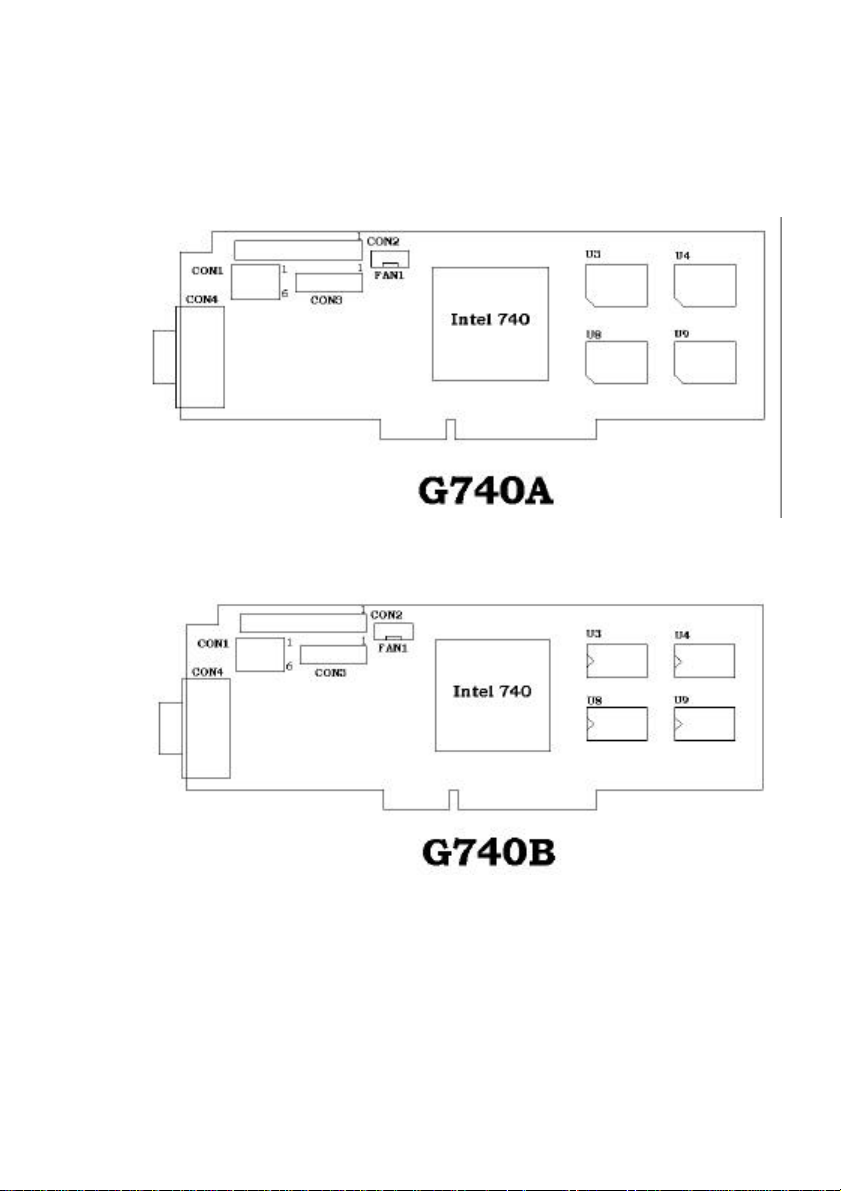
Introduction 1-3
Layout diagram
+ The layouts for the two cards are the same, the different between the G740A
and the G740B is that the G740A uses 4MB(or 8MB)of SGRAM, and the
G740B used 8MB of SDRAM
Page 8

1-4 Chapter 1
Page 9

Installation 2-1
Chapter 2 Installation
System Recommendations
Before attempting to install the G740A/G740B Graphics Accelerator
card into a computer, make sure that there is an available AGP expansion
slot on the (PCI 2.1 compliant) motherboard. Additionally, it is
recommended that your computer meet the following:
l Pentium
l At least 32 MB of SDRAM main/system memory
l DVD license compliant hardware (drive, authentication and
descrambler modules, etc.)
l Microsoft Windows
higher) operating system
l Microsoft
Note: For full and correct operation of the card under Windows
®
II processor-based system
95, Windows 98, or Windows NT 4.0 (or
DirectX* version 5.0 or later
95, you must be using OEM Service Release (OSR) 2.1 or
later. For Windows NT 4.0, you need to have installed
Service Pack (SP) 3.
Installation Guide
This guide will take you through the steps to take in order to properly
install the G740A/G740B Graphics Accelerator card into your computer.
Please note that your computer may differ slightly from the illustrations
and screen shots displayed in this manual.
Page 10

2-2 Chapter 2
Step 1 - Ground yourself.
Warning: Danger to equipment! The G740A/G740B Graphics
Accelerator card and other components in your computer can be
damaged by static discharge.
Before handling any components or opening the computer system cover,
ground yourself by touching the metal back or side panel of your
computer system unit.
Limiting your movements during installation reduces static electricity.
Step 2 - Unplug the computer and remove the
cover.
Warning: Don’t burn yourself! Many components can become hot
enough to cause mild skin burns. Wait at least 15 minutes after turning
off the power before handling any parts.
Shut down the computer and turn off any attached equipment (such as a
monitor or printer).
Unplug the power cord.
Remove the cover.
Step 3 - Remove the current graphics card.
If there is a graphics card currently in the computer, use the following
guidelines to remove it:
Detach any cables which are attached to the current graphics card and
remove the bracket screw locking the card down.
Grasp the card by the edges and pull it straight out of the motherboard
slot. If the card sticks in the slot, rock it gently from end to end to dislodge
it. Remember to save the screw.
Note: If the computer has a graphics chip soldered down on the
motherboard, refer to the manual for the system or motherboard
for information on how to disable it.
Page 11

Installation 2-3
Step 4 - Insert the G740A/G740B Graphics
Accelerator card.
Locate the empty AGP socket on the motherboard and use the following
instructions to insert the G740A/G740B Graphics Accelerator card into
that socket:
Grasp the G740A/G740B Graphics Accelerator card by its edges.
Align it with the empty AGP socket on the motherboard, and gently insert
it into place.
Make sure that the card is pressed evenly and completely into the socket.
Fasten the card with the bracket screw.
Note: Use the figure above to help locate the Accelerated Graphics Port
(AGP) socket on your motherboard. The exact configuration of
the components on your motherboard may differ from the figure.
Look for a single, smaller socket between the set of PCI sockets
and the processor.
Page 12

2-4 Chapter 2
Step 5 - Reconnect all cables & replace the cover.
Plug the cable from your computer monitor into the back of the
G740A/G740A Graphics Accelerator card. Make sure it is securely
fastened.
If you have cables for television input and output, S-video (video camera)
input and output, or a DVD add-on card, reconnect them to the card or via
the provided multi-function cable.
Carefully replace the computer cover and plug the power cord back in.
Step 6 - Start the computer and install the drivers.
Turn the computer on and allow the operating system to start. Microsoft
Windows should auto-detect the presence of the new graphics card and
prompt you to install the display drivers for it.
For Windows 95 & 98:
Insert the driver disc into your CD-ROM drive, and you will see the main
screen as below:
Page 13

Installation 2-5
You should then click the “G740 Driver Install”, and see the screen
below:
You should then click the “Windows 95/98 Driver ”, and see the screen
below:
Page 14

2-6 Chapter 2
Click “Accept”, the screen will show:
When you click “OK”, it will start the driver install action. You will see
the screen open and close many of the windows automatically, after
installing, the screen will show:
Click “Yes” to restart Windows. When you restart Windows, the driver
should work properly for you, you can change the desktop size or
resolution for your working environment as well.
Page 15

Installation 2-7
For Windows NT 4.0:
Windows will prompt you to install the ”Standard PCI Graphics
Adapter (VGA)” drivers. Click Next and Finish to install the standard
drivers, and restart the system when asked.
Right-click on the desktop and select Properties, then click the Display
Type button in the Display Properties window.
In the Adapter tab, click the Change button under ”Adapter Type”.
Click the ”Have Disk” button in the ”Change Display” window
and insert the G740A/G740A Graphics Accelerator card drivers CDROM into the CD-ROM drive of your computer.
The G740A/G740A Graphics Accelerator card display drivers are
located in the *D:\G740_DRV\NT40_DRV directory of the CD-ROM.
Browse to this location and select the display driver *.inf file, then click
OK.
In the Select Device window, select the Intel740 video Accelerator
device and click OK.
Click Apply, then Close to finish the driver installation. Restart the
system if asked.
* D stands for your CD-ROM drive in your computer system, it may
change depending on the devices you have installed in your computer.
Page 16

Page 17

Troubleshooting and Support 3-1
Chapter 3 Troubleshooting and
Support
Troubleshooting Guidelines
Gathering Information
Troubleshooting starts with diagnosis and progresses to solution. Before
diagnosis can begin, you’ll need to collect some information. This is
especially important if you don’t already know the contents of the
computer.
o See if the monitor cable is securely attached to the graphics board.
Loose cables are the most common cause of board problems. If it is
loose, secure it now and see if the graphics card functions with the
computer.
o See if the graphics card is seated correctly in the AGP slot on the
motherboard. If it is not seated correctly, remove the card with the
computer power off and reseat it, making sure the entire connector is
flush inside of the slot.
o Find out what other cards are in the computer. Cards can conflict
with one another, and resolution of these conflicts varies depending
on what boards are present.
o Find out what versions of the G740A/G740B Graphics Accelerator
display drivers and related software such as DirectX are installed in
the computer. You may need to update to the latest drivers by
downloading them from the World Wide Web. Contact your Field
Sales Representative if you do not know how to get the latest
G740A/G740B Graphics Accelerator display drivers.
o Gather some history. Did the graphics card ever work in this
computer? If so, was anything added to the computer just before the
card stopped working? Was the graphics card moved from a different
computer where it was working fine? Is the graphics card new? The
answers to these questions will speed up diagnosis dramatically.
Page 18

3-2 Chapter 3
The Symptom Table
Scan the left column of the table until you find a symptom that your
G740A/G740B Graphics Accelerator graphics card is exhibiting. Note
the corresponding solution codes.
Symptom Solution Codes
The graphics card stopped working when a software
package was added to the computer.
The graphics board stopped working without apparent
cause.
The graphics card stopped working when another
board was added to the computer.
An application stopped functioning since the graphics
card was added.
The computer wouldn’t boot after installing the
graphics card.
The monitor doesn’t display correctly after installing
the graphics board.
1, 5
1
3, 4, 1
5, 6
1, 3, 4, 7
2
The Solution Table
For each solution code associated with your graphics card’s symptom,
look up the code in the Solution Table for the recommended action. You
may need to try several possibilities to fix the problem.
Solution
Code
1 Verify that the monitor cable is attached to the connector on
the back of the graphics card.
2 The G740A/G740B Graphics Accelerator display driver may
be trying to use settings your monitor doesn’t support. This
could happen if a monitor was never selected in the software
and you changed your display resolution to one your monitor
doesn’t support, or if you changed the monitor connected to
your computer without changing it in the software.
3 Some computers may not properly detect the addition or
change of an internal PCI card. On start-up, a computer may
beep differently from normal to indicate this error. Reset your
computer’s CMOS. This is usually done through a switch or
jumper on the motherboard of your computer. Check your
system manual or contact your computer vendor for
instructions on how to do this.
Recommendation
Page 19

Troubleshooting and Support 3-3
Solution
Code
4 Your computer beeps during POST or the graphics card is
detected incorrectly. If another graphics card is plugged into
an expansion slot, remove it. If a graphics chip is built-in to
your computer motherboard, your system may not have
automatically disabled it when you installed your
G740A/G740B Graphics Accelerator card. Check your
system manual for instructions on how to manually disable the
built-in graphics chip.
5 There could be a conflict between the application and the
G740A/G740B Graphics Accelerator card. Make sure that you
have installed the latest available display drivers. Try disabling
Hardware Acceleration in the Advanced Graphics Settings of
the System application in the Windows Control Panel if the
problem is specific to this application.
6 DirectX may not be installed, or an older version of DirectX
may be installed. Most programs that use DirectX install it as
part of their installation, but some do not. Also, some older
programs may install an earlier version of DirectX (overwriting
a later version).
7 The files containing the G740A/G740B Graphics Accelerator
display drivers may have become corrupt. Reinstall the
drivers and try again.
Recommendation
Technical Support
For the latest information or any questions, call your local Field Sales
Representative.
Page 20

3-4 Chapter 3
Page 21

Technical Information 4-1
Technical Information
Display Information
The following tables provide information on the display formats
supported by the G740A/G740B Graphics Accelerator card.
Resolution
(horizontal x
vertical)
320 x 200 4, 8, 16, 24 4, 8 60, 72, 75, 85
320 x 240 4, 8, 16, 24 4, 8 60, 72, 75, 85
512 x 384 4, 8, 16, 24 4, 8 60, 72, 75, 85
640 x 350 4, 8, 16, 24 4, 8 85
640 x 480 4, 8, 16, 24 4, 8 60, 72, 75, 85
800 x 600 41, 8, 16, 24 4, 8 56, 60, 72, 75, 85
1024 x 768 8, 16, 24 4, 8 60, 70, 75, 85
1152 x 864 8, 16 4, 8 75
1280 x 1024 8, 16
1600 x 1200 8 4, 8 60, 75
1. Planar mode only.
2. Interlace support is for 8-bit only.
3. 85 MHz not supported.
Color Depth
(bits per pixel)
3
Memory
Configuration
(MB)
4, 8 60, 75, 85
Vertical Refresh
Rates
(Hz)
DDC Monitor Support
The G740A/G740B Graphics Accelerator card supports the DDC-2B
protocol. DDC monitors send their optimal timing parameters to the
graphics adapter, allowing it to choose the proper refresh rate for each
resolution.
Mechanical / Thermal Specifications
Card dimensions (excluding bracket): 20cm (7.9”) x 5.5cm (2.2”)
Worst-case system environment with default thermal solution: zero
airflow, 55°C internal ambient temperature
Maximum case temperature (T
): 105°C
case
Page 22

4-2 Chapter 4
No.
No.
No.
Red Video Return
11
12
SDA Serial Data
13
Horizontal Sync
14
10
15
SCL Serial Clock
Connector Descriptions
CON4 - 15Pin VGA Connector
Description
1 Red Video 6
2 Green Video 7 Green Video
3 Blue Video 8 Blue Video
4 Monitor ID 2 9 +5V Supply
5 Return
Description
Return
Return
Sync Return
Description
Monitor ID 0
Vertical Sync
VMI Feature Connectors
The bi-directional VMI-compatible connectors are provided to enable a
video module, such as a DVD/MPEG card in a PCI slot, to communicate
video data directly to the G740A/G740B Graphics Accelerator card
instead of through the PCI bus. Ribbon cable connectors are inserted into
the VMI connectors A and B. Further connector information can be
found in the Video Module Interface (VMI) Specification.
 Loading...